Transcripts
1. Class Intro: Why learn logo animation
in the first place? Now, let's say, for example,
you are scrolling through social media and you
see a still image. While you may stop a
second to check the image, if it's an animated image, you will spend more time
on a specific post. And that's when logo
animation comes in handy, it helps retain the
customer's attention a little bit more for brands. Hello, everyone.
My name is Adam. I am professional
motion designer and graphic designer based in Casablanca Morocco with now
seven years experience. And in this class, I will
show you how to make three different logo reveals
in Adobe After effects. So first thing
first, this class is for beginners in
Adobe After effects, and it's perfect for graphic
designers, content creators, or anyone who want to dive into the motion graphics world. We'll start first by doing a simple mask animation
in after effects. Then we'll jump and do a little by little reveal after that. And then finally,
we'll see how we can tweak the camera
movements and after effect so we can add more dynamics to
our logo animation. So for this class, of course, you will need it will
be after effect, and we're also
going to be working with Duik Basal or Dwik Angela. As you may have noticed from all my logo animation classes, I always use Duik Basal
because it's free. And by the end of this class, whatever techniques
you learned here, you can apply them
to your own designs, and you can also
learn how to speak those techniques to make the animation more personal
and unique to you. Now, let's go ahead and
start animating our logo.
2. Class Project: This class projects, we will
do a simple logo reveal. But it's not just going
to be one animation, it's going to be like
three animations and one. So first thing first, you go ahead and you
download Duik Basel. We will need it and make sure that you
have all the files, you can download all the class
projects files from here. And if you have any questions or anything you can ask
me here. All right. And my advice to you here is that if you don't
understand something, just try to rewatch the video again or you can
ask me directly a question, and I will reply to you. And finally, I also
included the final file. I recommend you don't open this one until you
finish the class. Alright, let's get started.
3. Make Animation using Masks: Alright, so in this class, we will start by doing
the first mask reveal, and we'll see how we can
make amazing reveals using only the masks
and the after effects. So once you open after effects, you'll go ahead and new project
now for new composition. And these are the dimensions
I'm working with. You can pretty much work
with any dimensions here. Depends, of course, on what type of animation you'll be making. So for now, I'm working
with these, click Okay. And first thing I like to do is go ahead and add a background. So we'll go ahead and
add a solid background, white color, and
then just lock it. The next thing I want to
do here is go to text. So let's find T, this one. And we'll be using the
Futura bold for this one. Which I find the most
suitable for this animation, and then just type in
Sumo just like this. No caps, just like this. Now, let's go ahead
and center this. In the middle,
let's find a line, then a line in the middle. So if you're working so if you're wondering what
workspace I'm working with, you can find it here, so I'm doing all
panels for this one. Now here's the thing.
For this first layer, we're just going to
keep it as a reference. So what I'm going to
do is just click here, see for opacity. Make
sure you have this on. And now let's decrease the opacity to
something like this. Again, I'm going to
lock this layer. Now with the text
tool sll selected, I'm going to click
here and write down two letters S and U, click away, click again, and N and
O. I'm going to grab those and then just adjust
them to our reference, right? Because we're going to be
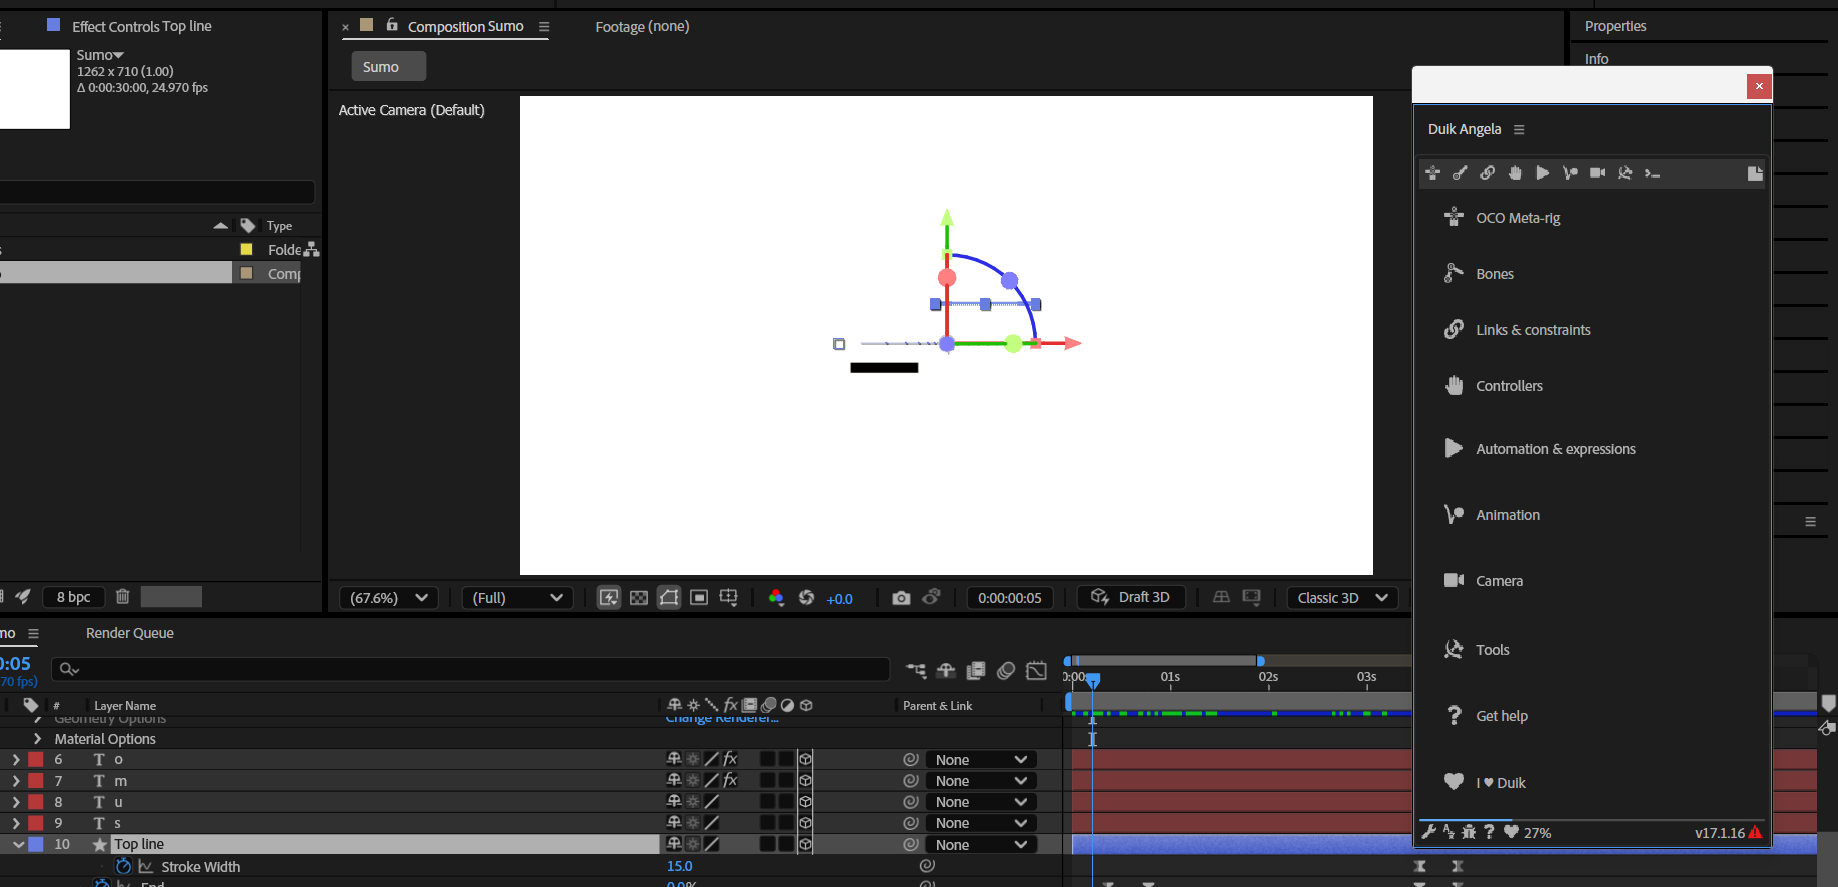
animating them separately. Now, grab the pencol and then I'm going to
add the shape here. So make sure, of
course, no fell, right? Should be here, none. And
stroke we have 30 here. Let's put it around 15. Click here, and then click here. Alright. That's not
a horizontal line. So again, click here,
hold shift, click here. Control command set,
maybe here a little bit. All right, this is better.
Same thing here from the top. I'm going to click
here, hold Shift, click here, just like this. Now if I click on this
layer, shape layer one, I can adjust it using the arrows on my keyboard and
holding shifts. Do something like this.
Same thing for this one. Do something like this. Let's go ahead and rename those
layers real quick, so right click and then rename
So this one line bottom. This one lines up. I'm just adjusting this
one on the bottom, a little bit more
closer to the letters. So now let's start with
our first animation. What we want to do here is
animate the SNU first, right? And we just want
it to appear like it's coming out from this line. And in order to do
that, we're going to have to use masks, right? So with the layer selected, come over here to
rectangle tool, click and drag like this. I'm going to go ahead and
hide the reference for now. Let's go back to SNU. Now here's the
thing. If I go ahead now and just animatee
the position, Transform and then position. The entire thing is moving, even the mask, right? And we don't want to
adjust like this. We don't want the reveal
to be adjusted like this. We want just let it to move
and we want the mask to stay. Now, to do that, instead of changing from here,
transform directly, what we can do is come
over here to animate, click and then add a position
parameter or option. All right, now we
have rectangle, select to one and
we have position. I'm going to add
the keyframe here, Zoom into the timeline. Bring it here around tin frames. So around here and come back to position and then
put it down just like this. Alright, now, only
the letter is moving. If I click on play. You
can see the reveal. Okay? Now, let's make this better by adding easings, right? So for that, we're
going to add F nine. That's better. All right. And we can
make it even better. If we go ahead and
select these keyframes, go to the speed graph. Make sure you have all
these options selected. Now, let's say we
want this animation to start fast and end up slowly. So what I'm going
to do is select this parts of the handles or of the curve and then drag
it to the left like this. Same thing for the parts. So now the animation
will start fast, right the high curve like this
means it's going to start fast and then slow
downs at the end. All right. And this
is way better. Now we're going to go ahead and do same thing for letter M, but this one we want
it from the top. Again, with the layer selected, rectangle tool, masked
letter, animates at position. Add a keyframe, click on. So I just have the keyframes
here and the keyframes here. Move to ten frames in
this time from the top. F nine for easings and same
thing for the speed graph. We want something like this. Then we have it. Now
we have our animation. Next, we want to animate
the lines, right? So the idea is that
we animate the line first and then the typo after. So I'm going to grab these two layers and just
drag them to the right a little bit. For now. Now let's go to line bottom, open the options, and
we go to add trim path. Then let's start with the end. Okay? So it's going to
start with zero like this. Then around ten frames, 100. Okay, same thing we want to
do for this one on the top. So you can copy and paste the keyframes and
you have it here. Do the same thing, select, F nine, speed graph, grab. There we go, and then
adjust the curve like this. All right, so around here, let's bring back
these two layers. All right. And we can even
upset those a little bit. So this one, for example, here, this one here. All right. Now to make
everything disappear. So the animation will start. It will hold here
for 1 second or so. Now around 2 seconds, let's go ahead and add key
frames for the position. Then around tin frames again. Like, make this one go
up and this one go down. Let's play. Okay. Now that the letter
has disappeared, it's time to make the
lines disappear as well. So around here, when it's gone, let's go ahead and add keyframe for the train
path here and here. Ten frames. We're going
to make them disappear. Oops. Is just this. You can see that
it's a bit slow. I want it to be more faster. So they bring it
two frames closer. Okay, and then lets just
the speed graph, as well. So we want something Like this here something. Like this. And to make it more interesting, click on P for the
position parameter. Add keyframes here,
then click on U. Select both and drag. If nine F nine. Let's play the entire
animation now. Now, of course, Control Command
S to save our document. Let's give it a name. Alright, so that's
it for this class. Up next, we'll start with our second phase
of the animation.
4. Animating Letter By Letter and The Text Cursor: This part of the class,
we will see how we can move the cursor
and also make every letter appear individually after the cursor is moving. Pretty much what
we want to create here is a type in effect. But we're going to
do it manually. It's maybe a little bit tedious, but just bear with me. Let's go ahead and just close everything that
we finished with. Lock it like this. I'm going to bring
back the reference. Now, this time,
I'm going to go to the text tool and just
type in each letter individually because we'll be animating every
letter individually. Like away and then Oh. Alright, so let's go ahead
and then just adjust these according
to the reference. Now with M. Now with
O. There we go. And select all of those. I'm just going to
give them a different color, just like this. All right, so we got to go. Again, hide the reference. Now what I want to do
is first and first, just add another line here. Just like this. Then just
adjust it a little bit. Around here. And this time, I'm going to make
this line thicker. C 25, something
like this is fine. So this line is going to
act like a writing line, like the one you get on Excel or note when you
type in something. Then just let's rename it. I'm going to rename it
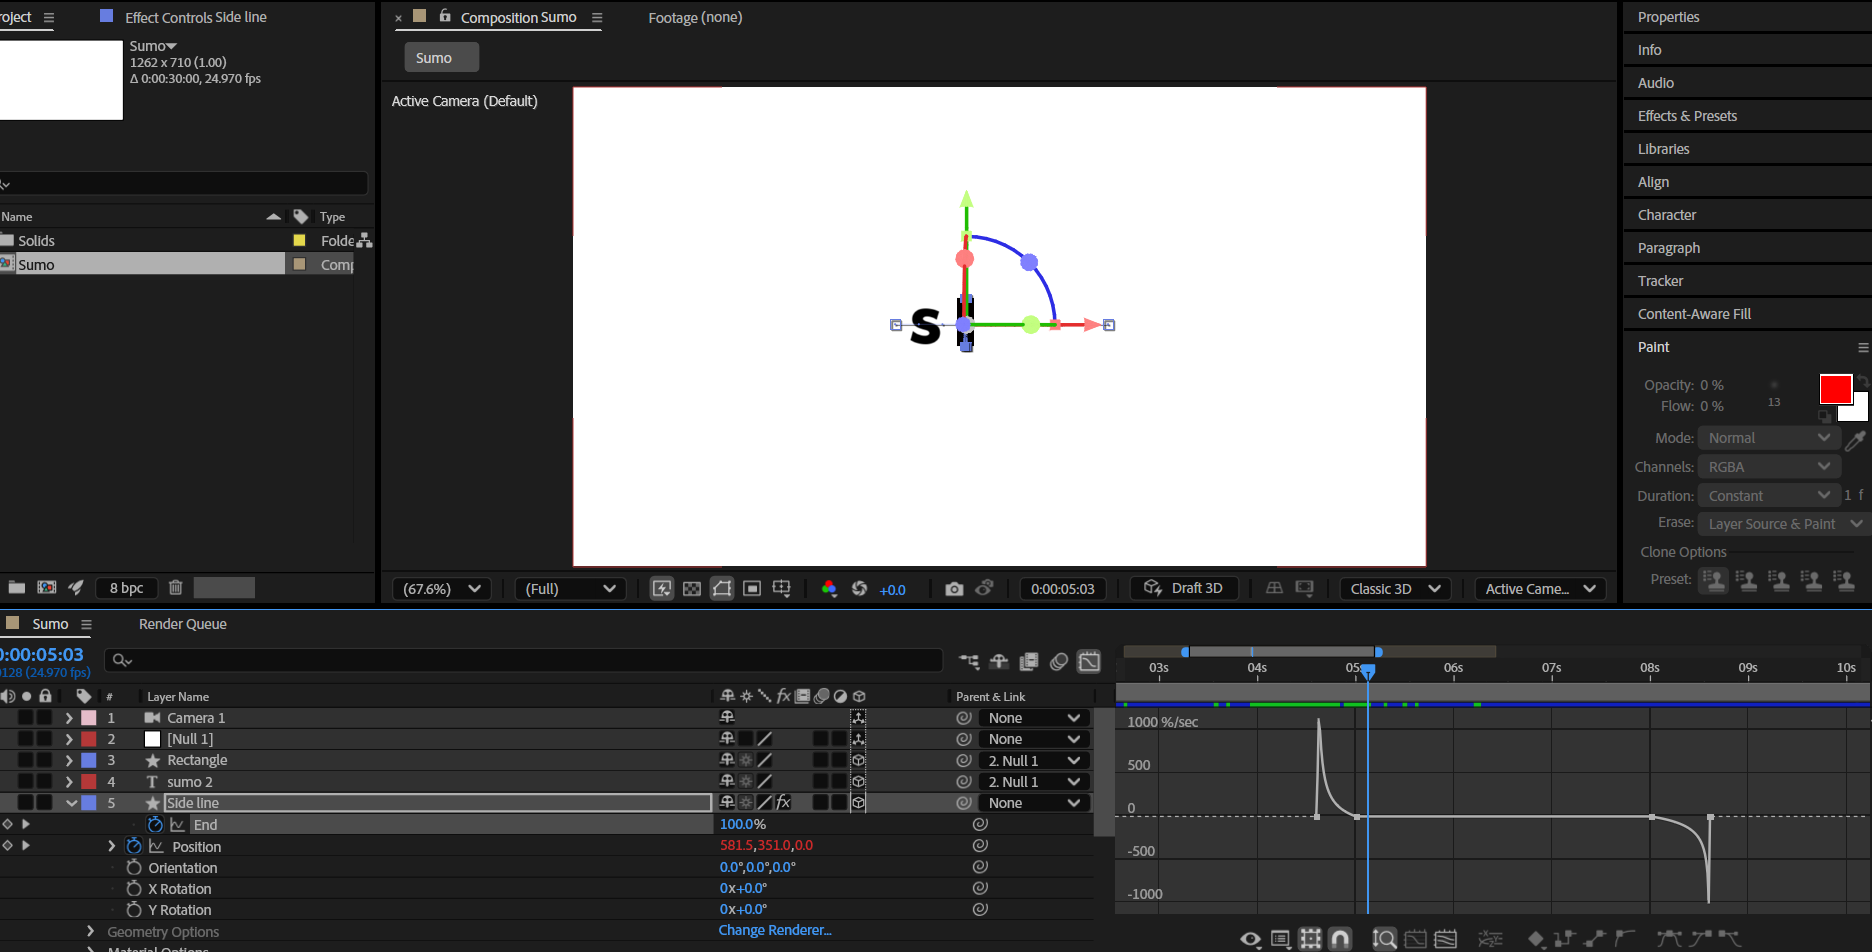
here, rename sideline. Next, I will add trend path. Now let's animate this line, the reveal of the line first. Again, add the keyframe here. Click on here, pen behind, and then just adjust the starting points
of the animation. I want it to be here
from the bottom. Again, I'm going to move
this keyframe around ten frames and then bring this down. Same thing F nine, and same thing with the easings, start fast and slow. I forgot Hi dose. It's hides. No, not you. You Let's increase the distance between the keyframes to
make the animation fast. This looks better. Once the
animation is done here, we're going to go ahead
and animate the position. So P for position
at the keyframe, U. Then I'm going to move
around the eight frames and drag all the way to the right. Around here. And I'm just eyeballing here the distance between
the letters, and I'm trying to do the
same with this line. So I think here is
good somewhere here. Now, this time, instead
of adding the easings, we're going to go ahead and add an expression with
the selection tool, select all Now I'm
going to go to Windows, scroll down Di Angela. Now let's find this icon
looks like play icon, click here, go to key leaner and then
bounce, no simulation. Put this here for now. Again, let's select
these keyframes, click here on follow through, and then check bounce. Let's click on Play. All right, this
is exactly what I want. Now here's the thing. We're going to go
ahead and animate each of these letter
individually, we will be animating, of course, the appearance of these. But before we do that let's
come over here to line top. The animation finishes here. So go to drag all
of these babies. Here. Okay, and we can start animating from here after the
first animation. All right, so around here. Let's start with
S T for opacity, and then make sure the
animation starts either from here or from the side here. All right, so here or here,
I'm going to do it from here. I zoom into the timeline until you can see each
frame individually. Now I'm going to start
moving playhead like this. All right, so from here to here, This should appear.
That rhymes well. From here to here,
it should appear. All right around here, decrease. Then just switch those because it should be
like this instead. Alright see. How long? Who All right. So here. Let's see. Okay, that's cool. Now for the
second one around here, T. Add a key frame around here, add another one and this one. Let's put it zero. There we go. Let's
see how it goes. Mm. Boom. All right now for M, T. Add one here. Let's move the
playhead. Around here. Add another one here.
Let's go back to this one. Let's put zero. Let's see. So in this case, because
this is let's to M, it may be a little bit
difficult to animate. So it just adjust so you can
either adjust the distance between the
transparency parameter here on the M or instead, we can adjust this the position parameter
of the sideline. If I put it here, Okay, this is better. Okay, this is better. And for the last one, once we have the follow through, once the bar is here, or the line is here and it's
coming back, right here, I'm going to animatee the letter O. I'm going to add the key
frame for the position first. Here, I'm going to
drag it here for now and then move this
to the side like this. Then let's make it look
like it's going to hit the M And come
back to its place. It just switch those like this. So what's this one here. So this one is here. It's coming back. It's gonna hit the M and come
back to its place. Whew. Here, just drag
a little bit more. And let's go ahead and find the M. And this time we want
the scale parameter. Add a keyframe here and link. So once it hits here, we'll have something like this. And then let's bring it back
to its original position. Control command S,
control command V the key frame to make it bounce back to its original position. All right, cool. Now, of course, let's just go back to O and
animate the opacity. So it starts with zero. Then around here, it appears. Okay, you And then just add an expression
to both this keyframe right to the position
key frame of the O, same thing, K linear, bounce, no simulation,
follow through, uncheck bounce and same
thing with the scale for the M. Click three dot
of the Kleiner. Bounce, no simulation, follow
through and check bounce. Let's click on play now. Okay, so now since we
added an expression, of course, you can see
some changes in here. That's fine. We can
just change those. All right, so now that
we apply the expression, you can see that the
animation changed, and all we need to do now is just change the distance between the keyframe so we obtain the same animation
that we had earlier. So that's totally normal. So that's totally normal because once you apply expression, it will change the
behavior of the animation, and you just need to
adjust the distance again between the keyframe so you can have the
same behavior again. Now we're going to
go ahead and try different stuff until
we get all we want. I Okay, so now once the O hits the, it will squash. Then do this. Okay, it's too early for this. Let's bring it back here. That we hit the line and
come back to its place. Now, this could be a bit tricky because we added the
bouncing and stuff. So just try to adjust the
position key frames of the O and the M accordingly while you outplaying the
animation like this. Okay? And if you have trouble, you can download the entire
file and check how I did it. All right to have position
here of letter O, couple of frames, we move it. All right. Then we add position
for the scale down here, and then one frame we
squash the letter M, and then two frames, we
put it back to its place. That's, of course, applying
the king or the expression. Now let's go ahead and
just play the animation. All right, looks good. Let's bring back the layers, and let's see what
we have so far. All right this, not this one. All right, so around
here. Mm hmm. M. Let's move this here. Let's play again. All right, this is
for this class. Up next, we'll see
how we can rearrange our camera movement to make the logo animation
a bit more dynamic.
5. Animating the Camera Movements: Now, finally, here,
what we're going to do is see how we can
move the camera any way to make the animation
look a little bit more dynamic and make
it look like it's popping about to pop
out from the screen. Now, we're gonna wait
a little bit for the animation to settle
down once we have this. Then around here, whatever you feel like audience
have seen the logo now, you need to add
another animation. Around here, what
we're going to do is add a keyframe to make
this line disappear. So move a couple of frames
around ten or less. You can always do ten frames, distance between keyframes
and an animation. And then you can either increase
or decrease the distance between a keyframe depending on how fast you want
the animation to be. Put it down. Mm hmm. All right, you want
it to go down fast? Now for the last
piece of animation, once this is gone around here, let's go ahead and add a
rectangle shape this time, make sure nothing is selected. Something like
this. Let's adjust it a little bit to the middle. Okay, we are done now
with the expression so we can put it somewhere here. Let's go to a line. Then just send through this
in the middle like this. Maybe just stroke width. And then let's animate
the stroke width. So rectangle, stroke,
stroke width, add the key frame,
move it a little bit. Around ten frame or so. Then here zero, again, F nine. That was too fast. Let's move. Let's increase the distance between
the key frames. A little bit less, like
two frames or less or one frame. All right. And then now what I want to do is add the last part
of the animation, which is just the
rectangle appearing and then the entire logo
moving to the side. So for that, we're going
to go to layer new. Then we're going to
add a null objects. Now, next thing you want to
do is link all everything, the logo to the null object. So this one is going
to be null one. And this one null one, null one, one, null one. Now we go to null one and
then Pee for position at the keyframe around here, we're going to move it
little bit to the side. Also, we're going
to put S for scale, at the keyframe here, U, then put this one here, and then decrease the scale
of everything a little bit. All right, same thing. Cuts
to click F nine first. Come back to this this. I have to select
both and like this. All right, let's play the
entire animation now. Okay, so around here move this two frames. It happens fast after the
start line disappears. So again, I'm going to move
these couple of frames here. Alright, let's play again. All right. Now, one
more thing we can do here is just add a camera view, so it can follow the logo. Camera, make sure all these
serens are like this, okay. Camera and terns
affect to the layers. So before we do that let's
go ahead and delete this. Make sure this is
all three D layers. Not everything but up till here. Only the things we
want to be affected. Let's go ahead and add
layer a new camera. Okay. Now it's going. Once we have this here, let's go back to
our null objects. So the animation starts here. Let's go to camera here, open this position, transform. We're going to add
the keyframe here. And once this moves like this, we're going to add
Another key frame here and the
orientation as well. Then a couple frames. Alcan Calco V to put
it on its place. U Let's see how it goes. Let's open this camera options. And then let's add the keyframe
for the wire rotation. Once it moves here, let's follow here bit. Then here, just making
sure to keep the logo in the middle of the animation. F nine. Now let's click on play. And do you have it.
That's our animation.
6. Congratulations...: Alright, so now that you finish the animation, don't be shy. Go ahead, share your project.
Let me see how you did. Go ahead and share your
animation on your social media, tag me, ask for my feedback. Make sure you follow
me so you get notification when
I post classes. All right, so thank
you so much for watching and see you
on the next one.
 Adam Chraibi, Designer and animator