Transcripts
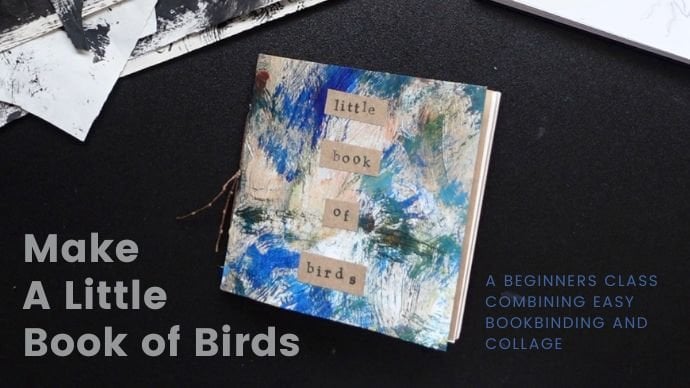
1. Class Description: Hi, I'm Helen and I'm a UK
based artist and crafter. My favorite materials
are recycled, repurposed or found materials. And my favorite ways of working or with collage and assemblage. Today we're going to be
making a mini folded hardback book using collage
and found materials. I believe creativity is
in us all and we can all make wonderful things with
the resources we have. So let's get creative and
make a mini folded Book.
2. Project Description: So today we're going to
make a mini folded book. And I'm going to walk you
through the process of creating the collage that is going to
form the pages of the book. And we're going to use found or scrap paper
to make those pages. We're going to fold and
concertina them together. I'll walk you
through the process of making a hardback book, which you can use those skills for further
bookbinding projects. I look at various
different books that I've created to give you inspiration to as to what you use your little
mini book for. I like to collage or make
found word art out of it. You'll find a PDF of guidelines which talks about
materials you'll need, the equipment you could use, and other helpful information. So I'd love to see
the mini books you create and the uses
that you put them too. So let's get creative and
make a mini folded Book.
3. Equipment And Materials: So these are the things
that you're going to need to make your
mini folding book. We've got scissors. You're going to need scissors. You can just use scissors. I also use a craft knife with
a mat and a metal ruler. You may find useful. They're not essential,
but you need something to cut
your paper with. You're also going
to need some glue. I have PVA glue. I decant into a jar. I apply it with a brush. I have a brush that I
keep for just gluing. And I have a pot that I
can put some water in. To help fold your paper. I have used a pencil to
mark and I've also got a paper folder to make
nice creases on the pages. When you gluing the pages, I've clicked it together
with some paperclips or some sort of
clicks are useful. When you're leaving the glue to dry though you could
easily just put it underneath something heavy to
hold those pages together. And if you haven't got a
paper folder, a lolly stick, or a butter knife
or blunt knife, or even using the
back of a ruler. This one is probably
a little bit sharp, but maybe a wooden
or plastic ruler that would help make nice
creases in your paper. The materials used
in this project are materials that are easily
found within your home. So there's no need to go out
and buy new fancy materials or new Arctic art equipment
or new art materials. I'm using the front
cover from a magazine. The front covers are
a little bit more sturdy than the pages. I've chosen. One that's less glossy. So not your high fashion
magazines, glossy magazine. So something that's got
a little bit more of a dull shine to it, nor high gloss
that works for me. I've got a collection
of papers here. So these are just scripts and scraps that I have
just accumulated. So I went for the neutral
tones in this project. You need not. You could go for
whatever tones you like. So I've just got a piece
of scrap paper here, which is ledger paper. I like the lines and the grid
on here and the numbers. Brown envelope paper, one of my favorite resources as
his brown wrapping paper. I also used, I think I've
actually used it up, so there's not any
scraps of it here. But I also used the paper from a brown paper bag
in this project. Just a little bit of a scrap of paper that I had a
tea or coffee died. I've got some scraps
of graph paper, some old book paper
from charity shop book. That's another piece. And some old some lined paper
from old exercise books. My keys, I don't throw
paper away basically, I keep quite a lot of paper
and hold exercise books. I mean, you can see there's
two different tones in different colors in this. So if the kids have
finished their, their books and there's
pages left in them. Take the page. So there you go. Those are the types of papers that I've used
for this project. So anything that you can lay your hand on
that you think he's an interesting
texture or color that fits your, your project. I love anything that can
be recycled or repurposed.
4. Making The Collage: So we're going to make
the collage paper that I'm going to
make the book out of. And I'm going to
use magazine paper. And I'm going to do a similar
one to this one here. In as much as I'm going to use different tones of
brown and cream. But you could use lots
of different papers. This one's got book papers. This one is in tones of purple. This has got some
flour died paper. So this is with P and needs from the summer I
died some paper. You could use off cuts
of your painted papers. Or you could just use colored
magazine paper as well. I'm going to put
those to one side. So I've got a magazine here and I've gone through one that's not got the very shiny
paper on the front. But it is. I'm going to use
the cover because the inside pages are
a little bit thinner. So I'm just going to tear
the cover off of there and use that to paste onto. Doesn't matter
which side you use because the other side
you're not going to say, I've got a collection
of papers here. So these are book papers. And I've got lined papers from old notebooks and a
bit of ledger paper there. I have got some brown papers. So these are these
are paper bags and some died pay person coffee dyed papers
and brown envelopes, and some brown wrapping paper. I won't use all of these, but it's nice to
have a selection of different tones that
you're going to use. The other thing I've
also got is some scraps of graph papers and
some squared paper. Just add a little
bit of interest. What we need to do is we
need to cover the piece of paper with all sorts of
off cuts of these papers. So as you can see, I've
used straight edges on some of them and
I've torn others. But it doesn't really matter. This one here, I don't know
if you can see this one here. You can just about see the print through the magazine
paper underneath. But that doesn't
matter when it gets folded up into the
concertina book. It's just going to add an extra little bit of
detail and you're not really going to be able to read those words underneath. The thing is, just
have a good play. Decide what you're going
to do and just get going. I think I'm going to do a
piece of this lined paper. The other thing you may
notice is I've torn the edge here and I'm not going to cut
that yet until I've pasted. So when we finished doing
the collage and then I can square that often
and cut that neatly. But I'm not going to
worry about that for now. The glue I'm using today is PVA. You can use any glue
that you're happy using. And I have got pot with
some water and for my, for my brush so it
doesn't get dry. So let's get going. I'm just going to put that on. We've just got to put
one to start off with. And it doesn't matter
where and watch. Now things like this. This is from a paper bag. This has got a nice
textured edge. So I want that to go
on top of something. So I'm not going to
stick that down yet. But I will put some paper
underneath there too. So that, that can, you can, you can see the
texture of the paper. Now, the thing is, I want to see I might
do it that way. I want to see both the torn
edge and the numbers on this. So for this one, I'm going to put
that on here likes. But I'm not going to quite stick it down
underneath there yet because I'm going to put
something else underneath that. So what should we do? Should we put some, Let's
put some book pages. So these are just
books that I've collected in charity shops. And I'm going to
put that on there. You can see my papers
buckling already. That doesn't matter. You can when you
leave it to dry, you can put it onto
something really heavy so that it
dries nice and flat. So don't worry about that. So this now needs
the edge pasting. You can do this with matte
medium if you want to, or any. Any glue that you have. And the information pack, you will find even a recipe for making your own
glow from wheat paste. It doesn't matter
what glue you use. So I'm just going to squeeze
that underneath them. Now the important thing
is you need to paste, paste these pieces
of paper down. Well, not only do you need
the edges, wealth stock, you also need the middles because the latest
stage you are going to trim The you're gonna
be cutting the pages. So you're gonna be cutting
some of where it's been glued. And if there's little
pockets of air, then that's going to show it's not the end
of the world though. You can glue, glue any
bits at any stage. So we're getting somewhere. Like I said, the brown
pieces of paper, the bag pieces of bag I want
to put on towards the end, because they are the
ones with the textures. I actually quite like
that on top there. So some book pages you'll find are more
yellow than others. So you've got a good
tonal quality happening. In my opinion is a good thing. Actually, I'm going
to put that there. Now. You could,
if you wanted to, instead of doing
that with the page, you could glue that
individual pieces of paper. That doesn't matter. Either way will work. Right? What else? Have we got? We've got a
bit of graph paper there. Do we want another
piece over here? I think we could
do, couldn't wait. What am I going to
have underneath it? Should we have some brown paper? We haven't had any
brown paper yet. I think you've just
got to be quite happy to just go with the flow. Just glue and paste
and see what happens. And that's, that's when, that's when exciting
things occur. Now, let's say you had
any envelope paper yet. Slightly different
brown. It looks alright, old, mucky mess at the moment, but don't worry, it
will all come together. You want every part
of the magazine paper underneath to be covered? I might have some air
pockets underneath and the fair dealing with I don't know. I feel a little bit we've got a tiny bit
over here to do so. I liked this brown paper
and the brown paper bags. I'm going to put a
little bit of brown paper bag along that strip, their edge there so I can
see the zigzags happening. And I've got a little piece over here to do this top corner. So I think I might do I'll do some brown paper
bag on there as well. You can see that that has
just lifted a little bit. So some papers are more
fragile than others, but actually the creases and
the crackles and the tears. What's going to make
this piece unique? Also, this piece
here hasn't quite caught and there's a little
bit less same happening. So I'm just going to put a little bit more
glue underneath. There. May be some underneath that same from the
original paper bag. So that's that I'm going
to leave it like that. What I'm going to do
though before I dry is I am going to just quickly trim off some of the excess
paper because we don't need all of that on there and that can just stay with my scraps. But I'm not being careful, not being precious
about it neatly. So all I'm going to do is
put that somewhere nice and flat to dry on and not
on a non-stick surface. We'll have a look
at it again later.
5. Trimming: So I've got my
collaged pieces dried. They've been drying overnight. They are a little bit crinkly, but I don't mind that at all. So what I'm going to do
now is trim them down and start folding and cutting ready to fold them
into the book. I'm going to turn them
over because I've still got the straight
lines of the actual page. And that's going to help me. So I don't want them any
bigger than the actual page. So I'm just going to
trim that one off there. My head isn't going
to get into the way. You can do this. If you've got a guillotine or
something like that, you can use, again, a teen, you can use scissors. You can trim them, however, is best for you. You could even just
leave the edges rough or tear off those extra
surplus bits of it on paper. Right? Now we just
need to decide how big we want our
tone. Let's see. Turn my cutting mat
length way so I can actually fit it
all on to the mat. I'm lining it up. And I'm going to
cut to this line here just to even it
off and get rid of all those torn edges that we
had when we tore the page, the front cover
from the magazine. So that's my square
root of piece of paper.
6. Folding And Cutting: So we've got our neatly
trimmed collaged pieces. I did too yesterday. So I'm not sure which one
I'm going to use about. I am thinking we
will carry on and do the one that I
glued on camera. So the next thing we need
to do is to fold this into 16 equal pieces. Now, because you've got
a layer of glue and different layers of
paper thickness. It will be a little bit tricky, but just gently ease it over. So we're going to fold
it in half first of all, so bring those two
edges together. I'm gonna be using
a paper folder. Just ease it gently
with your thumb. Now, as you can see, I am getting some
cracking on the back, but that doesn't matter. You've got enough
stability in the paper. So we've done our first fold. Now we're going to fold to
the edges, to the middle. And again, just ease
it gently into place. And then that one's gonna be a little
bit of a tricky one. And then crease it
with paper folder. And again, the other side, bringing edge to the middle, easing it gently into place. Keep your juice as
straight as possible. So we've got four sections now, and we're gonna
do it exactly the same in the other direction. Trying to match up your creases where we're at all possible. And gently ease. And crazy. Two more, two more. Last fold to the middle. Line up your other creases. Okay. Tricky to see
on camera, I think. But the second divided now
into six equal pieces. So I'm going to show you on
another piece of paper here. So we've got six equal pieces. We did our fold in the middle, and then we did those two folds there and we folded
it the other way, and that's 16 equal pieces. So the next thing we need
to do is we need to cut and to then be able to
fold the book together. The cuts I'm going to
make our I'm going to cut from that
crease to the edge, this crease to the edge, that crease to the edge. So I'm going to just
show you just by marking it out on here. And this is part of your
supplementary material PDF. Where the cut lines are
you going to be cutting a long way, you've just folded. Now you can do this
with scissors or with a craft knife there. So three cuts. I'm going to stand up for this because I'm
going to be doing it with a craft knife. I find it easier just
to see where my fold is by just folding one and
then to making a dot. So I've got one and then two. And that's my, that's
my starting point. And I can clearly see this one. That's my starting point there. So line up your dot, make sure you can still
bend your crease. And cut line up your dot. Make sure you can still
bend your crease. Go from the dot to the edge. Flip it around and
do exactly the same. So line up your dot and
make sure your ruler is running along that
crease and then cut. So we've got three carts
and we're ready to fold. This is this is already folding
in the right direction. So we are now going
to just work our way around and concertina,
that book together. So backwards and forwards. And keeping it as square and as straight as you possibly can. So those are the first ones done with Constantine,
it along there. So we've got a valley fold here, that one's going to need
to be a mountain fold. So we're going to put
that flight flat. Valleys already happening. I'm going to flip it
over so we can crease. We can crease a
little bit better. And it will kind of work its way around and find its own way. And it will be obvious which way we're going now
this one isn't gonna be, uh, let me see, there's a little bit
of thickness on here. So this one needs a little
bit more encouragement. Just use your bone
folder to keep it nice and square and
straight forward. It's turning around
that way again. Try and keep it as
square as possible. Once I've, once I've done this, I will show you again
which way we have bolded. So I'm gonna open that up again, back into the square rectangle
that we started off with. We started folding from the top left corner and
we zigzag all the way. Get to this corner here and we zigzag because
that's a valley, so we need to make a mountain. Now. We've got a
valley mountain. Valley mountain. That's how you go
all the way along, zigzagging until
you've got a block, you've got your book block here. These are going to be
the pages of a book. But as you can see, there's some little flaps
happening here. We've got a flap there. When a flap there, and
we've got a flap there. So now we're going to
need to glue these together so they
make their pages. So there'll be three glued
pages within your book.
7. Glueing The Pages: So I'm ready to glue
those flaps together now. I'm just going to
get my flu map. So I regularly use the front of art paper books
as a glue Matt, just to protect my cutting mat, I've got the PVA glue again. I've got a pot of
water and I've got some paper towel nearby. You do have to be a little
bit careful that you don't want glue on
the other pages. So I've got another little
piece of watercolor paper, but any, any piece
of scrap paper will do this one we want to do. First of all, we've got our
concertina folding nicely, but this is the flap here that
we need to glue together. So what I'm gonna do
is just put some paper underneath before
I start pasting. Because I don't want any paint. I don't want any glue
on the other pages, if at all possible. I'm just literally
going to glue this all together to try and get
a good, strong fix. I'm going over
that crease there. But I don't want to go over
the edges in the back. Then we're just literally
going to fold that together. And that should hold. I'm just going to get a piece of kitchen paper paper
towel just to make sure any glue
that's oozing out. He's not going onto
the other pages. I've got some I've got some paper clips here
if I can untangle them. Some paperclips
here, which I'm just going to put a couple on to keep those pages together. As they lecture. I think we'll be fine to hold
those together as they dry. So that's the first
one we've done. We've got number two
to do it over here. So again, it's all pinging
around that again, you need to put some
glue in on that piece of on the back of
your collaged piece. Right to the edges. You can go over the crease. It's going to fold
together to glow. And then that is just going
to fold in place like that. Okay. I'm going to just give
that a little bit of a wipe, make sure there's no
excess glue anywhere. None losing out anywhere. And clip it together just
to hold while it's drying. Two down, one to go. And it's this one here. Slightly dry eye
patch on my Mac. Again. You can see just
glue the page there. The flaps that are
going to glue together. As with the rest of the project, you can use whatever
blue you have to hand that you're happy using. I have copious
quantities of PVA, and I'm very happy using PVA. I don't mind getting sticky. Other people may find
it a little bit more, Missy, and they don't like it. It's your personal preference. But you needed a
good strong glue to hold it. There we are. Let's move the blue
mats outbreak. And we've got our little book. So we've got those two
pages holding together, the middle pages
holding together, and these ones over here, these last ones just
holding together. And that's how your
book is going to be. It's going to open like so without the
paperclips obviously. But you can have it whichever
way round you'd like. So you need to have a look at your pages and decide which way up you're
going to have them. At this stage, it doesn't
matter which way they go. And even when you
get the cover on, it doesn't matter
which way they go. If the Declaration on the
cover can be rotated anyway, then that's still fine. You don't need to make that
decision until later on. We're going to leave that to dry and come back and have a
look at making a cover.
8. Cutting The Cover Board: I've got the book block canal and we're ready to
make the cover. So I'm going to have a
look at some cardboard. And I have a box of cardboard pieces which barriers always have a stash
of cardboard. But just wanted to show
you some options here. You could use cereal box
cardboard if you want to. It is quite flimsy, but that's absolutely fine. And if you wanted it
slightly thicker, you could For you could double
that to put two layers of cardboard regularly use the
back of the blocks of paper. So drawing paper, art
paper, anything like that. But this one I'm not going to use because it is quite thick. So it's a good solid
piece of cardboard, but it's too thick for
what I want today. But I have got another one here. So this is the back
of a paper block, artist's sketch pad,
and it is a bit more, it's a bit more flimsy. It's not as flimsy
as the cereal box. Little bit from.
I'm going to use this bigger piece here to
make cover of my book. Now books are hardback. Books are made of three
pieces of cardboard. You want a piece of cardboard
for the front and the back, but you also want a piece
of cardboard for the spine. When you open it out, you can see the three
pieces of cardboard. They're all the same
height as the book. The front and the back
will be the same size. And then this one
is however thick, your book is the spine and
the thickness of the book, the page block inside. So that's what
we're going to do. So I've got my piece, piece of cardboard here. To be economical. I think I'm just going to cut a strip off of the bottom here, but how thick do I want it? I've got my paper
block and I want it a little bit bigger than
the paper and the pages. So I'm probably going to cut it about that thickness,
a little bit bigger. I might just cut inside
that line a little bit. You could measure it. And I've got six point
probably about 76.7 cm, 67 mm or Nearly inch
and three-quarter inch, 2 " and three quarters. Not very good with
my Imperial growing up in the metric
world here in the UK. So that is going to be
the height of my books. I know I can easily cut a strip of cardboard that height
all the way along. I can make the
front and the back covers the spine out of that. So I'm going to line it up
on my cutting mat here and cut a strip of cardboard off
the bottom of this piece. Line your ruler up,
nice and square. And take a few cuts through. Depending on how
sharp your knife is. Just keeping the rule
are nice and straight. Don't move your hand grip on the ruler and just keep doing gentle swipes through until
you, until that divides. Say this is the piece of
cardboard that we're going to use to make the front and
the back cover of our book. I probably don't need that
sticker on the back there, so let's see if
that will peel off. Yeah, pretty much. Okay. So now I need to decide how
big I want the color to be. So as you can see, I'm shade over the
sides of the book. So there's a little bit
of a difference between the page size and the
edge of the cardboard. I think I'm going to want
that all the way round, but it needs to stop
where the fold is. That's the front towards
the back lineup with that. Yeah. I think
that's about right. So my front and back I'm
going to be about that size. So here I'm shade over 5 cm, about 5.2, around about 2 ". Again, I'm going to just
stand up and cut that. So once you've cut one, you can use the other one too, as a guide to make sure
that they're both the same. If you get it wrong,
it doesn't matter. You can just trim it
to the correct size. So that is going to be
my front cover piece. So I need to cut
another one of those. Nine it up. Sure. It's lined up there alongside of it. And as you can see,
I'm not square on my cutting mat here because
I'm using a piece of paper, the piece of cardboard
as the template, not using the cutting
mat as the guide. I've got two pieces ready for the front
and the back cover. I now need to work
out how thick I want. That's fine to be. The piece of cardboard
that runs along there. The central, central,
central piece. I'm gonna do that and I do
need to measure for this. So it's about a centimeter. I obviously need my spine to be the same
height as my book. So I'm going to cut one
of these edges here. These marks on the
cutting mat in metric, so they are 1 cm squares, it's a 1 cm grid. So I can just line up my piece of cardboard
and cut to the grid. This strip will create
the spine to the book. Okay, you put that last
little piece of cardboard in my stash and this
is what's going to be making the book cover. So I've got a front cover
spine and a back cover.
9. Covering The Cover: So the next thing we need to
do is to decorate the cover. So we've got the
cardboard already cut out and now we need to decide
what we're going to use. This is one of my
favorite methods of covering a book and this
is just painted newspaper. This one, as you
can see, you can still see the texts through it. And I think this is probably, this is a book, paper. Pages from book paper. Again, I've got a
newspaper on this one. This one, I've got an
image from a magazine. You can see quite clearly
like that what it is. But when you put it on the front of the cover or the
back of the cover, makes a bit more of
an abstract image. And again with this one, it makes a bit more
of an abstract image. So I have a stash of
papers. I collect. So I keep them all together. And I've used varying
different things to paint on. So I've got some
music papering here. I've got some different
thicknesses of paper, magazine, paper, newspaper,
all sorts of things. And also in the front here, I've got some book Papers. These are from an old book I
picked up in a charity shop. And so they're all in there. I've hadn't had a look through and I'm debating whether to use these papers or to
use the newspaper. And I'm thinking, I like
the gray of the newspaper. I think that would sit quite
nicely with the internal. What I've got here. It's those neutral tones. So I think I'm going to use this section of the newspaper. Don't want too much orange
on there and I don't want too much print showing through, but I think I can get away with just this section down here. So it's this section down here. So I'm going to be pasting
my cardboard front, back and spine onto there. I need to leave enough
fold-over so that you're not seeing the inside of the
the cardboard cover. So you want to have that painted affect all the way through. And also, you may want to
consider putting a strip on the inside so you
don't get this effect happening where he sees the cardboard of the
spine through there. I want a decent amount, probably about a centimeter, maybe a shade over
one-and-a-half centimeters each side to allow a fold-over. Now when I place them together, I am going to put a bit
of a spacer in-between. So I'm going to use my card ward off cut to create
a little bit of a gap, but you want that to
be an IV and gap. So it will all
become clear as I, as I get going, I'm going to put my
gluing mat underneath and start to glue the
front and the back cover. So what I'm gonna do
first of all, it's, I'm not going to
paste the paper. I'm going to paste
the cardboard. Just glue all over one side of your front or back cover. And then I'm going to use my
ruler to help me as well. So I'm gonna put that around
about a centimeter from the edge and press it down. My next one is going
to be the spine. I'm going to put my
little spacer in-between. Okay. So I'm going to now
do the other cover. But the gap that you're
creating at the spine, that's important because
you need to be able to fold your book open and shut and
then take your cardboard out. Okay. This is where I want it to be
quite quick with newspaper because there is a
risk that it can be a bit creased on the other side. So I'm going to flip it over and just press it down nice and firmly with my paper folder. Okey-dokey. Now, I'm going to
just trim off about the same distance all around. And that just gives
me folding space to try and make it a square
and as neat as possible. I'm just eyeballing this. I'm not measuring it. I'm just going to trim a
little bit off of this one. So it's about the same
as the other side. So that's my front
and back cover. I'm going to now put my strip of paper that's going to cover
the spine bit inside. I want to make it the
same height as the book. Much. That's going to
just glue on there. Now what you want
to do is get the edges of that cardboard glued. Because you're meant to nudge piece of paper into those
creases and crevices. Nail that just reinforces those folds and gives a
little bit more stability. So it makes for a stronger
fold on your book. So the next thing we
need to do is we need to fold those edges over. So I'm just going
to trim the edges, not going right to the
corner of the cardboard. I'm giving it a
little bit of a gap. And you'll see how we do
we sort that out in a bit. So I'm just going to gently
trim off those corners. And I'm going to
do my luggage is first and then the short edges. So I'm going to put glue on the cardboard and on the edges of that piece
of card of the cardboard. And then on the paper. So make sure you're well glued. Clean data if you're
cutting mat and then gently fold over until it catches and just gently
encouraged that over again. You can just nudge it into
those creases with your NAOH. Now I don't know whether
you can see there's a bit of a corner
happening here. And that's where you
need to just nip it with your nail and flatten that. That creates that corner over. We're going to do
the same again with the means to do the same
again with the other side. So gluing, making sure
we've got the edge of the cardboard and all of the flap declaim bit
on the cutting mat, on the mat, folded over until it catches
and then just ease it down into those creases and nip your corner to
squash a corner in. I'm going to do the
front and the back now. So again, right into the edge of those pieces of cardboard folded over and this
is where your flaps, when they've had their
corners decreases, corners creased. It makes for a
neater fold and it encloses all of the cardboard. You don't want any piece
of cardboard showing right into the edge
of the cardboard. Go over here for this one, fold it as unfolding. I'm pushing on the
edge of the cardboard and then just ease
those corners over. There. We have it. There's a front and
back cover and I'm just going to leave it under
something heavy to dry. And then we'll attach
the book to the cover.
10. Attaching The Cover: We're nearly there.
We've done our cover. And that's tried nicely, and it's got good
strong folding points. We've bought the book
pages ready to glue in. What you want to do now is
decide which way up your, you want your book to go and which is gonna be the
front and back cover. I've decided I'm
going to keep it this way up because I like this first page and I want
the text to be upside down. So that's the way I'm
going for my book. And I've also decided
that I think I like the white area better for the front cover of my book
is going to go in like this. We need to glue our first page into the front cover and our last page into
the back cover. And that's how it
all fits together. So that's what
we're going to do. Now. I'm going to put some glue
on the inside cover page. Michael it out again. Dry my brush a little bit because I don't
want it too wet. Piece of protective paper inside just to protect
the other pages. And glue that first
back of the first page. Now this is where it gets
a little bit tricky. You've watched a matrix,
you allow some wriggle room for for movement. So we decided we were going
to have it fairly, even. The gap on the top and the back. This is going to be fairly even. So I think that's
fairly square there, but you also do need to
make sure that is going to wrap around and work for
the back cover as well. I'm quite happy with that. This is why you need to have your book block to be nice and square when
you're folding it. It makes it easier
for gluing the cover on glue onto the back
of the back page. And that is going
to fit onto here. I've got some blue on there. Just dab off. Make sure it's nice and square. And that it's going to
fold nicely together. And I'm pretty
pleased with that. That's all worked
out very nicely. So I'm just going to run the paper folder over the
front and the back just to make sure that I've got it
nice and firmly attached. So you can open your book
quite nicely like that. You can also open it
up further like that. You can see there's the paper
that we fitted in-between. So we don't see any blank pieces of cardboard on the spine. There is your folded
mini notebook.
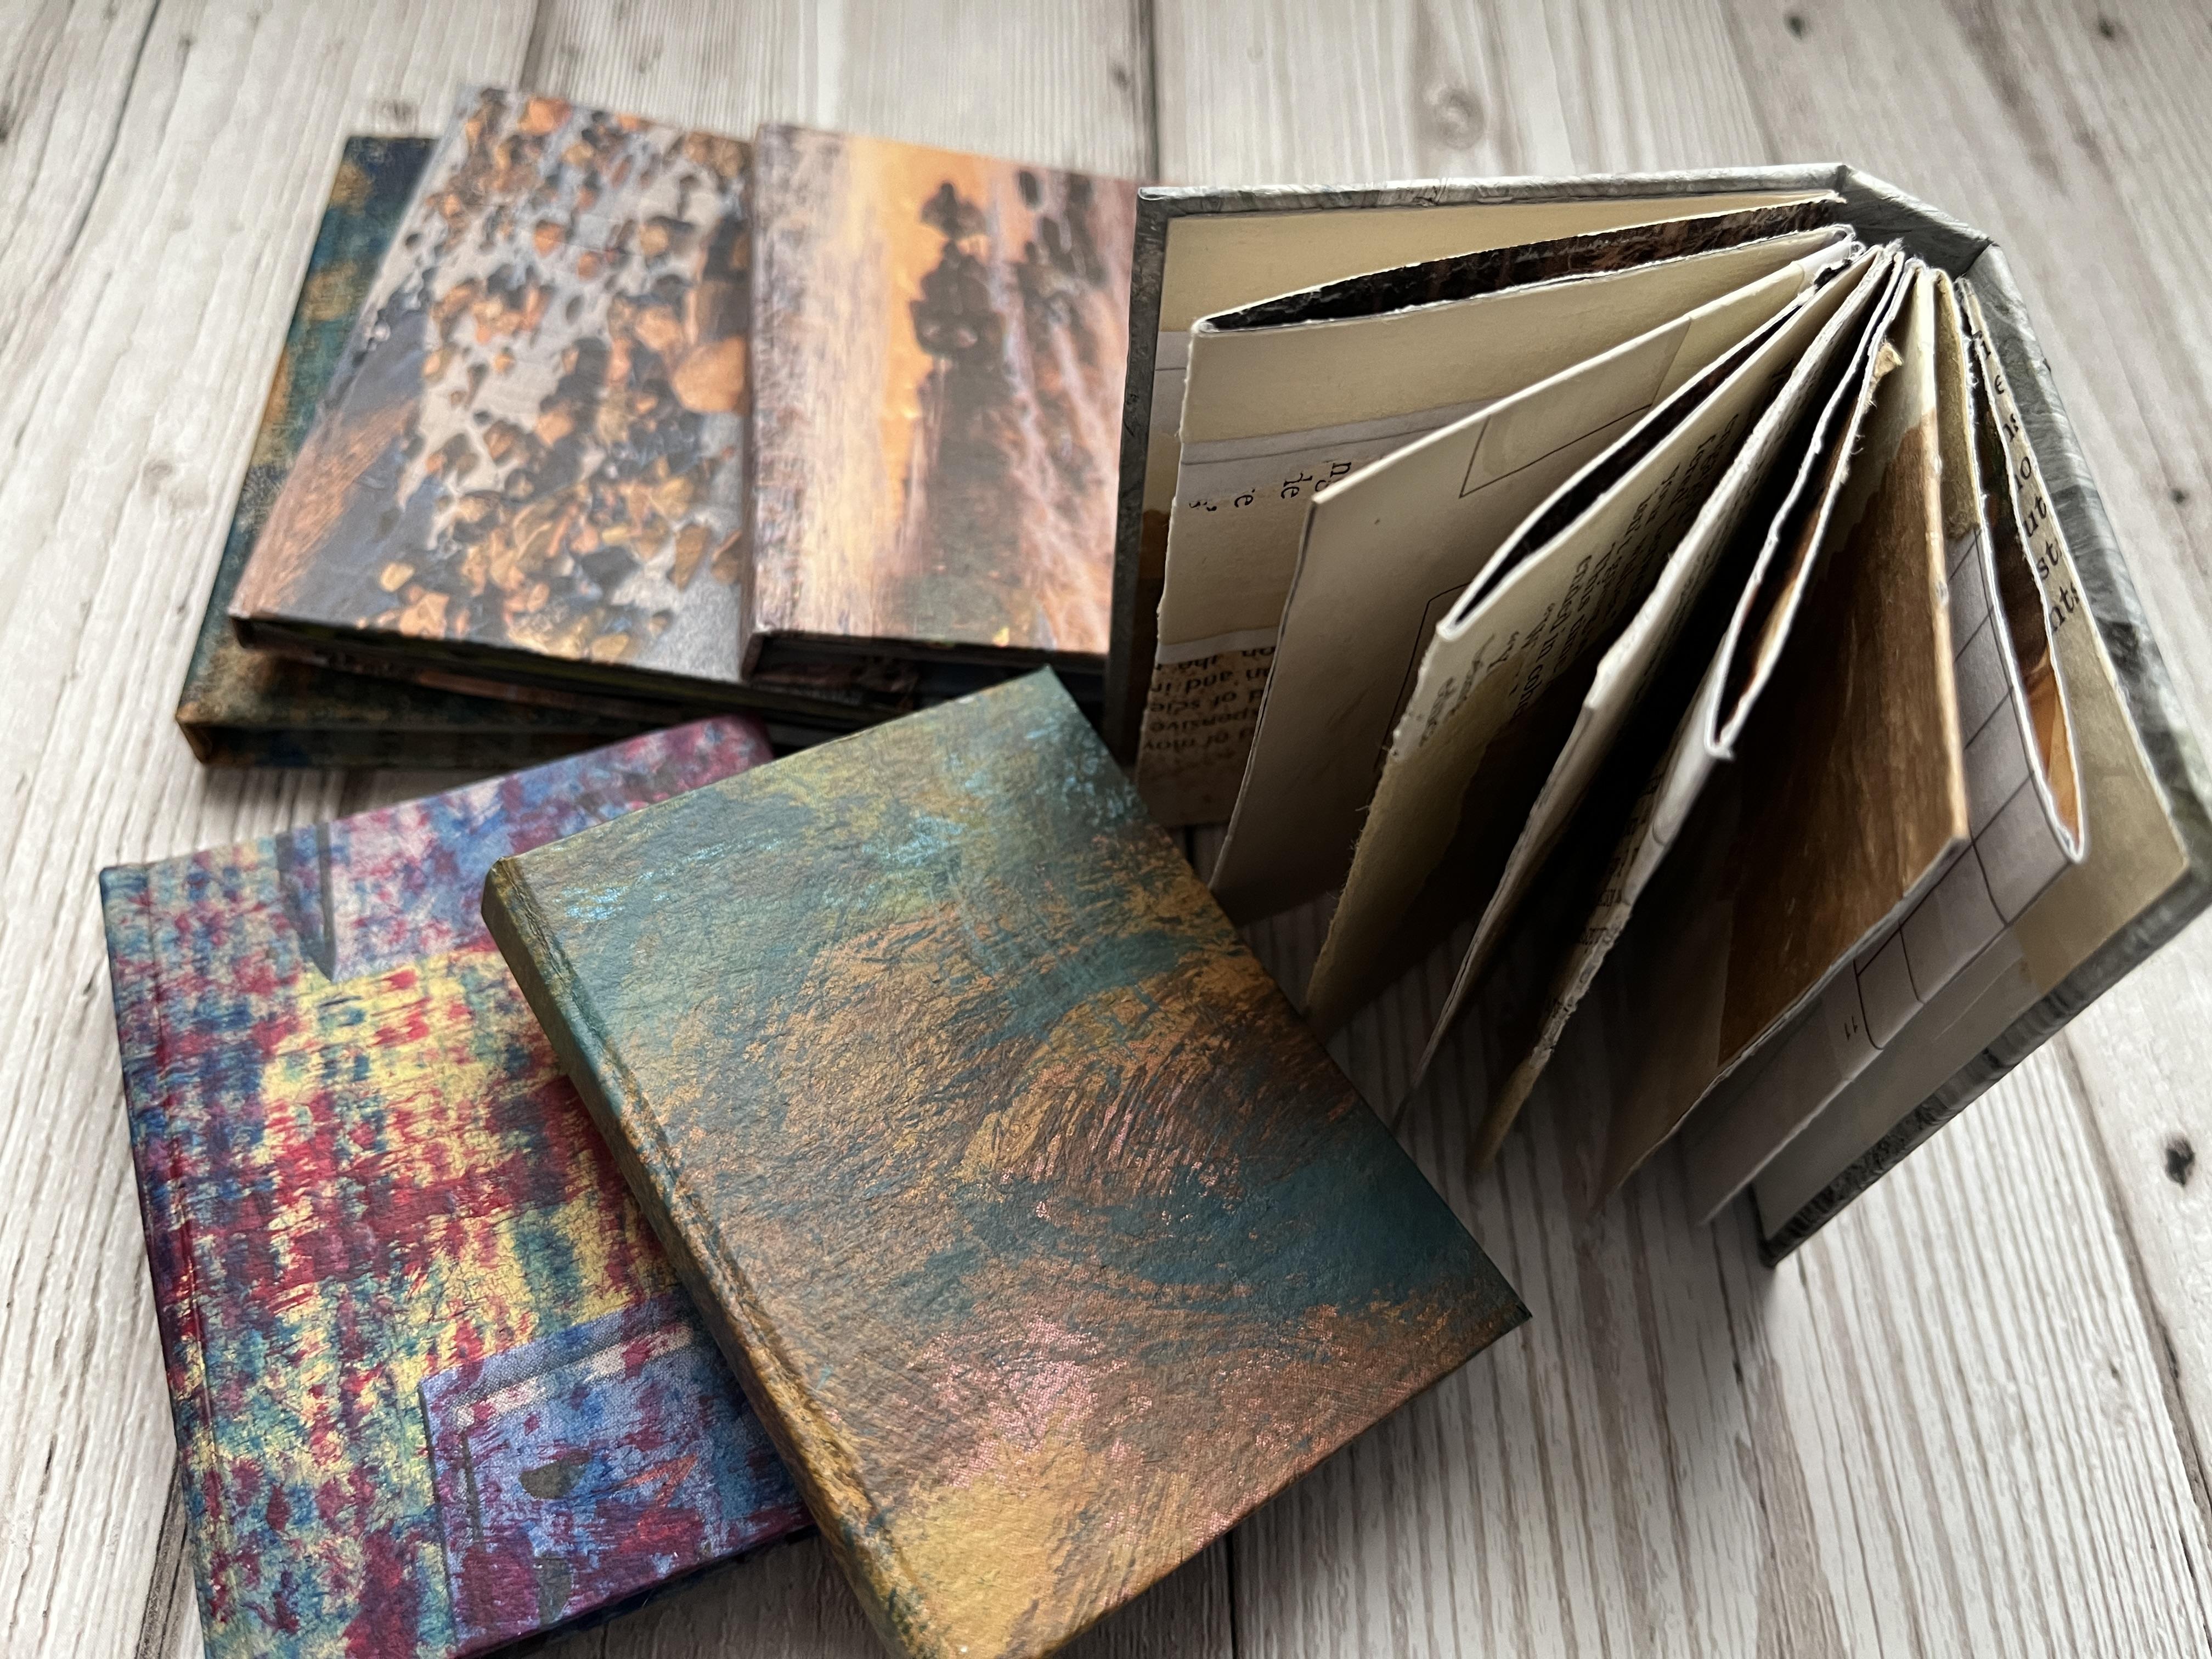
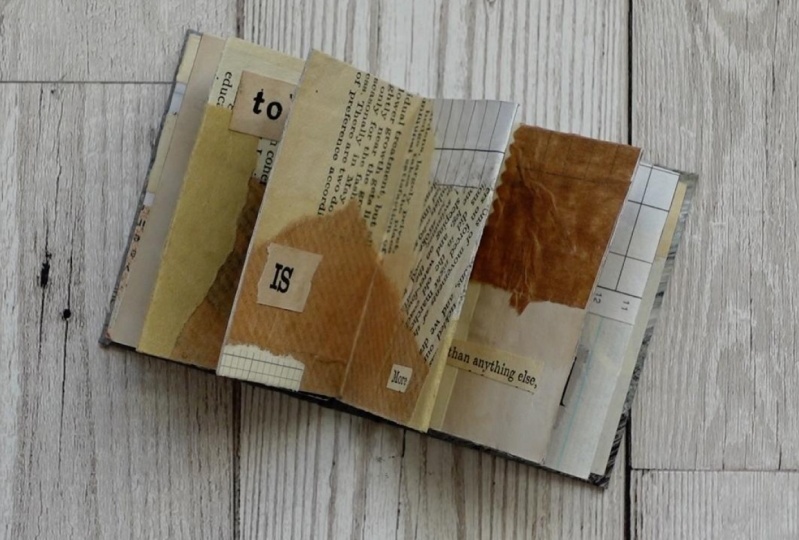
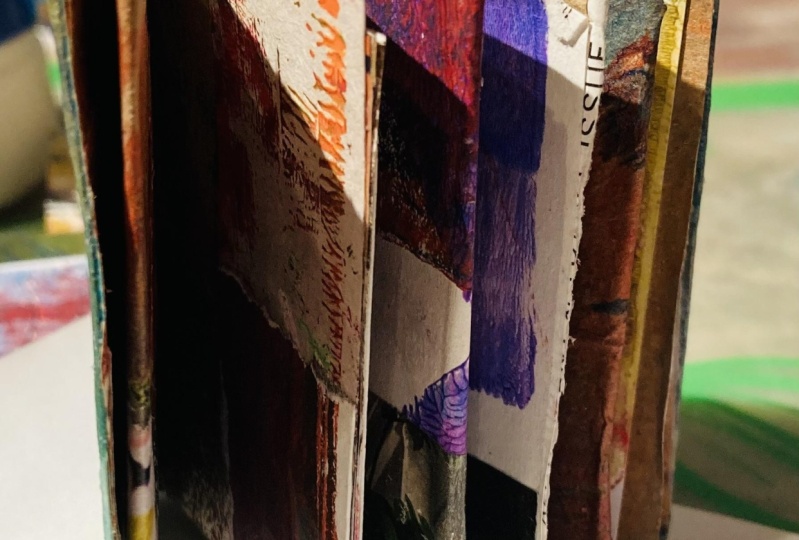
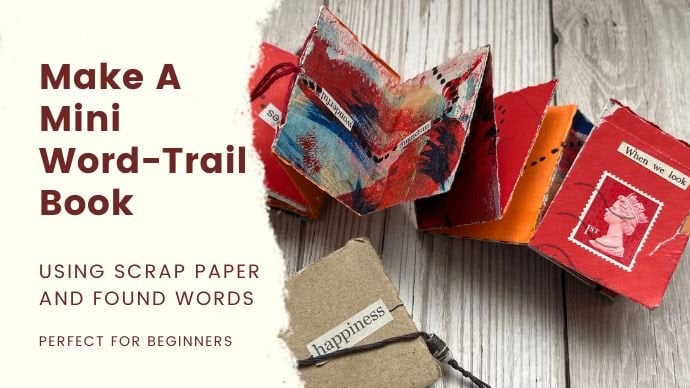
11. Ideas For Using Your Book: So now we've finished
our little book. What do we want to do with it? So I'm a great fan of putting
my initials on books. So I'm going to put my
initials on the back. And I'm probably going to use
found words to make a poem. This is one way to just put a collection of
words that are interesting together and just thread
them through and make a little poem that
goes through the book. And I quite liked doing that sort of
thing because you never really know how it's going to
end and what it's going to, what it's going to say, and
how it's all going to work. So that's quite a fun
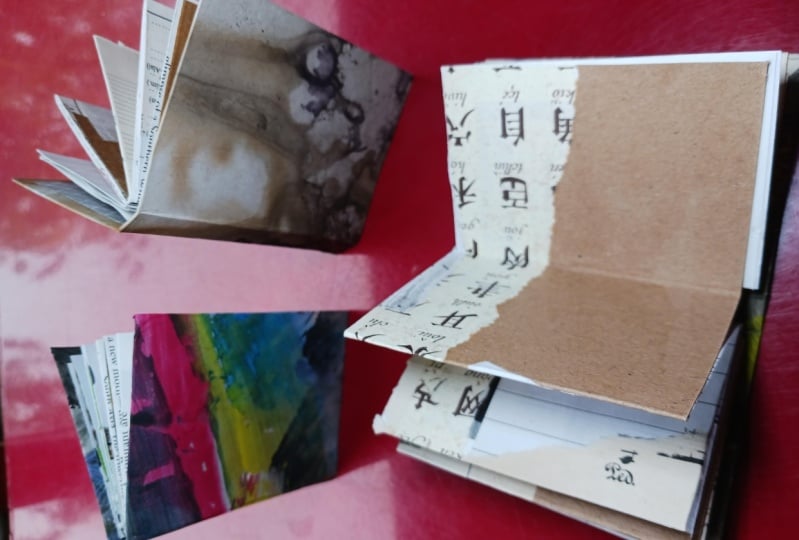
way of using your book. The other, the other books I've got here which you
could do this one. I've just, I've just put
a title on this book. This book was using a piece of paper that I had painted and
pressed leaf patterns on. But when I actually
folded it into the book, I could see tree trunks
and it looked like woods. And so I didn't really want to use collage on top of that. So I have left it as is. And it's just a little book of imaginary scenes
through woodwinds. I've called it
walk in the woods. Again, I've put my
initials on the back. This little book is made
from magazine paper. Inside the pages are made
from magazine paper as well. And I've used it to do what
I call Sharpie doodles. So I've just done some doodle
art in there and covered all the feet image
using the colors underneath and you can't really see what the image
was underneath. So that's, that's
another fun way of making a little book. These ones are same thing
that are all ready to go, but I haven't I haven't
filled the inside with them. This is slightly
different because it says it's a sewn
binding, but again, I've used magazine
pages as the inside. So just images, which I
will then do it all in. But you could use
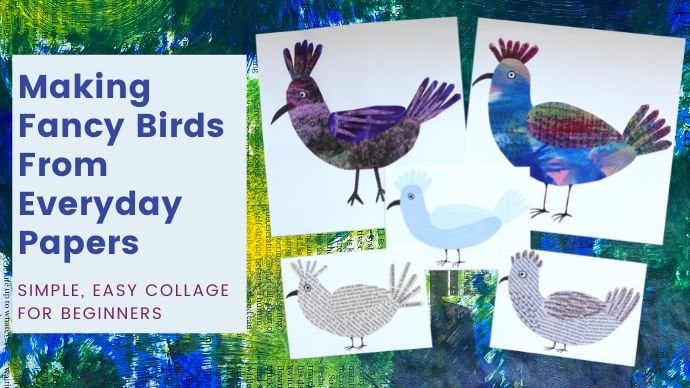
it for collage. And in my, in my other
Skillshare classes, I've got my little books
of birds and you could always use it to put your
collages in as well. So I've got a black
and white version or the colored version. So you can use it for collage. You could put rubber
stamping images on there, you can paint on there. This is your little book to do whatever you want to do with. So I hope this has given
you some ideas to reuse, recycle, and be creative.
12. Conclusion: So how did you get on? I hope you enjoyed getting creative and rediscover the joys of cutting and sticking with scrap paper to make something
unique and wonderful. Please post all of
your pictures in the class gallery for us
all to see and enjoy. And I look forward to
making another project with you again soon.
 Helen H, UK based artist and maker