Transcripts
1. Introduction: Hi, I'm Nadine. Thanks
for joining me today. This lesson is really about
the joy of watercolor of how beautiful the medium is without having to
do very much to it. I'm a really big believer that the best paintings
are those that you've had to touch the least. So it's a pretty quick paint, but we're going
to really rely on letting the water
and the pigment do the work for you and getting in single strokes and sitting
back and not touching. And then also recognizing that just a few really small details can elevate your painting. What we'll do is go through the sketch step by step through the painting. As I
said, it's pretty quick. We get the bulk of the
subject in one hit, which hopefully doesn't
freak you out too much. Hopefully, by the end, you can see that you
don't really need to do much to make an
effective painting. So let's get started.
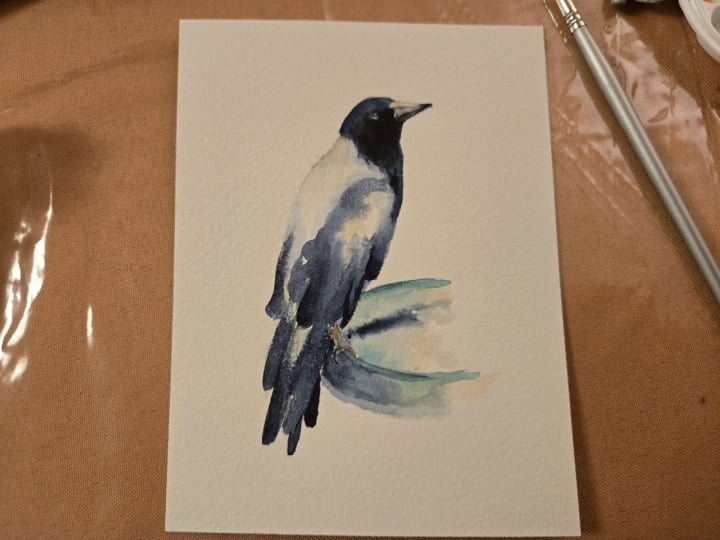
2. Materials: Okay, materials for this lesson. So start off with
the reference photo. This one's mine, so
you can download it directly from the
materials section. I'm painting on 300 gram
arches called pressed paper. I'm painting flat on a board, but I'm not taping it down. You'll need a regular HB
pencil and an eraser, and I'm using three
brushes today. I've got a really big one. You don't absolutely
have to have this. It's my favorite brush, and
it's beautiful to work with. That's what gives
these lovely shapes. But you can make do with a small one if you don't
want to go one of these. Just have a play with the
bigger brushes that you've got and see what
shapes that they form. The details of these are
under the materials. Then I've just got
a little synthetic. It's brand new, so it's
got a really nice point for getting in some
of the details. In terms of paints,
I've got a bunch here. You don't need to use all these, but I like to get a mix of color when I'm using black when I'm painting a
black and white subject. In this one, I've got
these lovely the purple and aqua and those are
Daniel Smith cacao, violet and the turquoise. The main black of the bird
is Daniel Smith indigo. I'm also using a little bit
of transparent brown oxide. You could use burnt sienna. That's just in the eye and a little bit through
the white of the back here and a little
bit of yellow ochre. This one's from Winsor Newton. I don't really like the
Daniel Smith yellow ocher, but you can use Winthrop
Newton or you could use raw sienna for that as well. I've also got a tiny little
highlight in the eye that I've used some white gash. The brand of that
doesn't matter. If you don't have white glass, you could use some titanium
white or China white. Then all you'll need
is your palette. For this one, I reckon a
couple of jars of water are good because you will
get really dirty with the indigo and some
tissue or toilet paper. So we'll get onto the sketch.
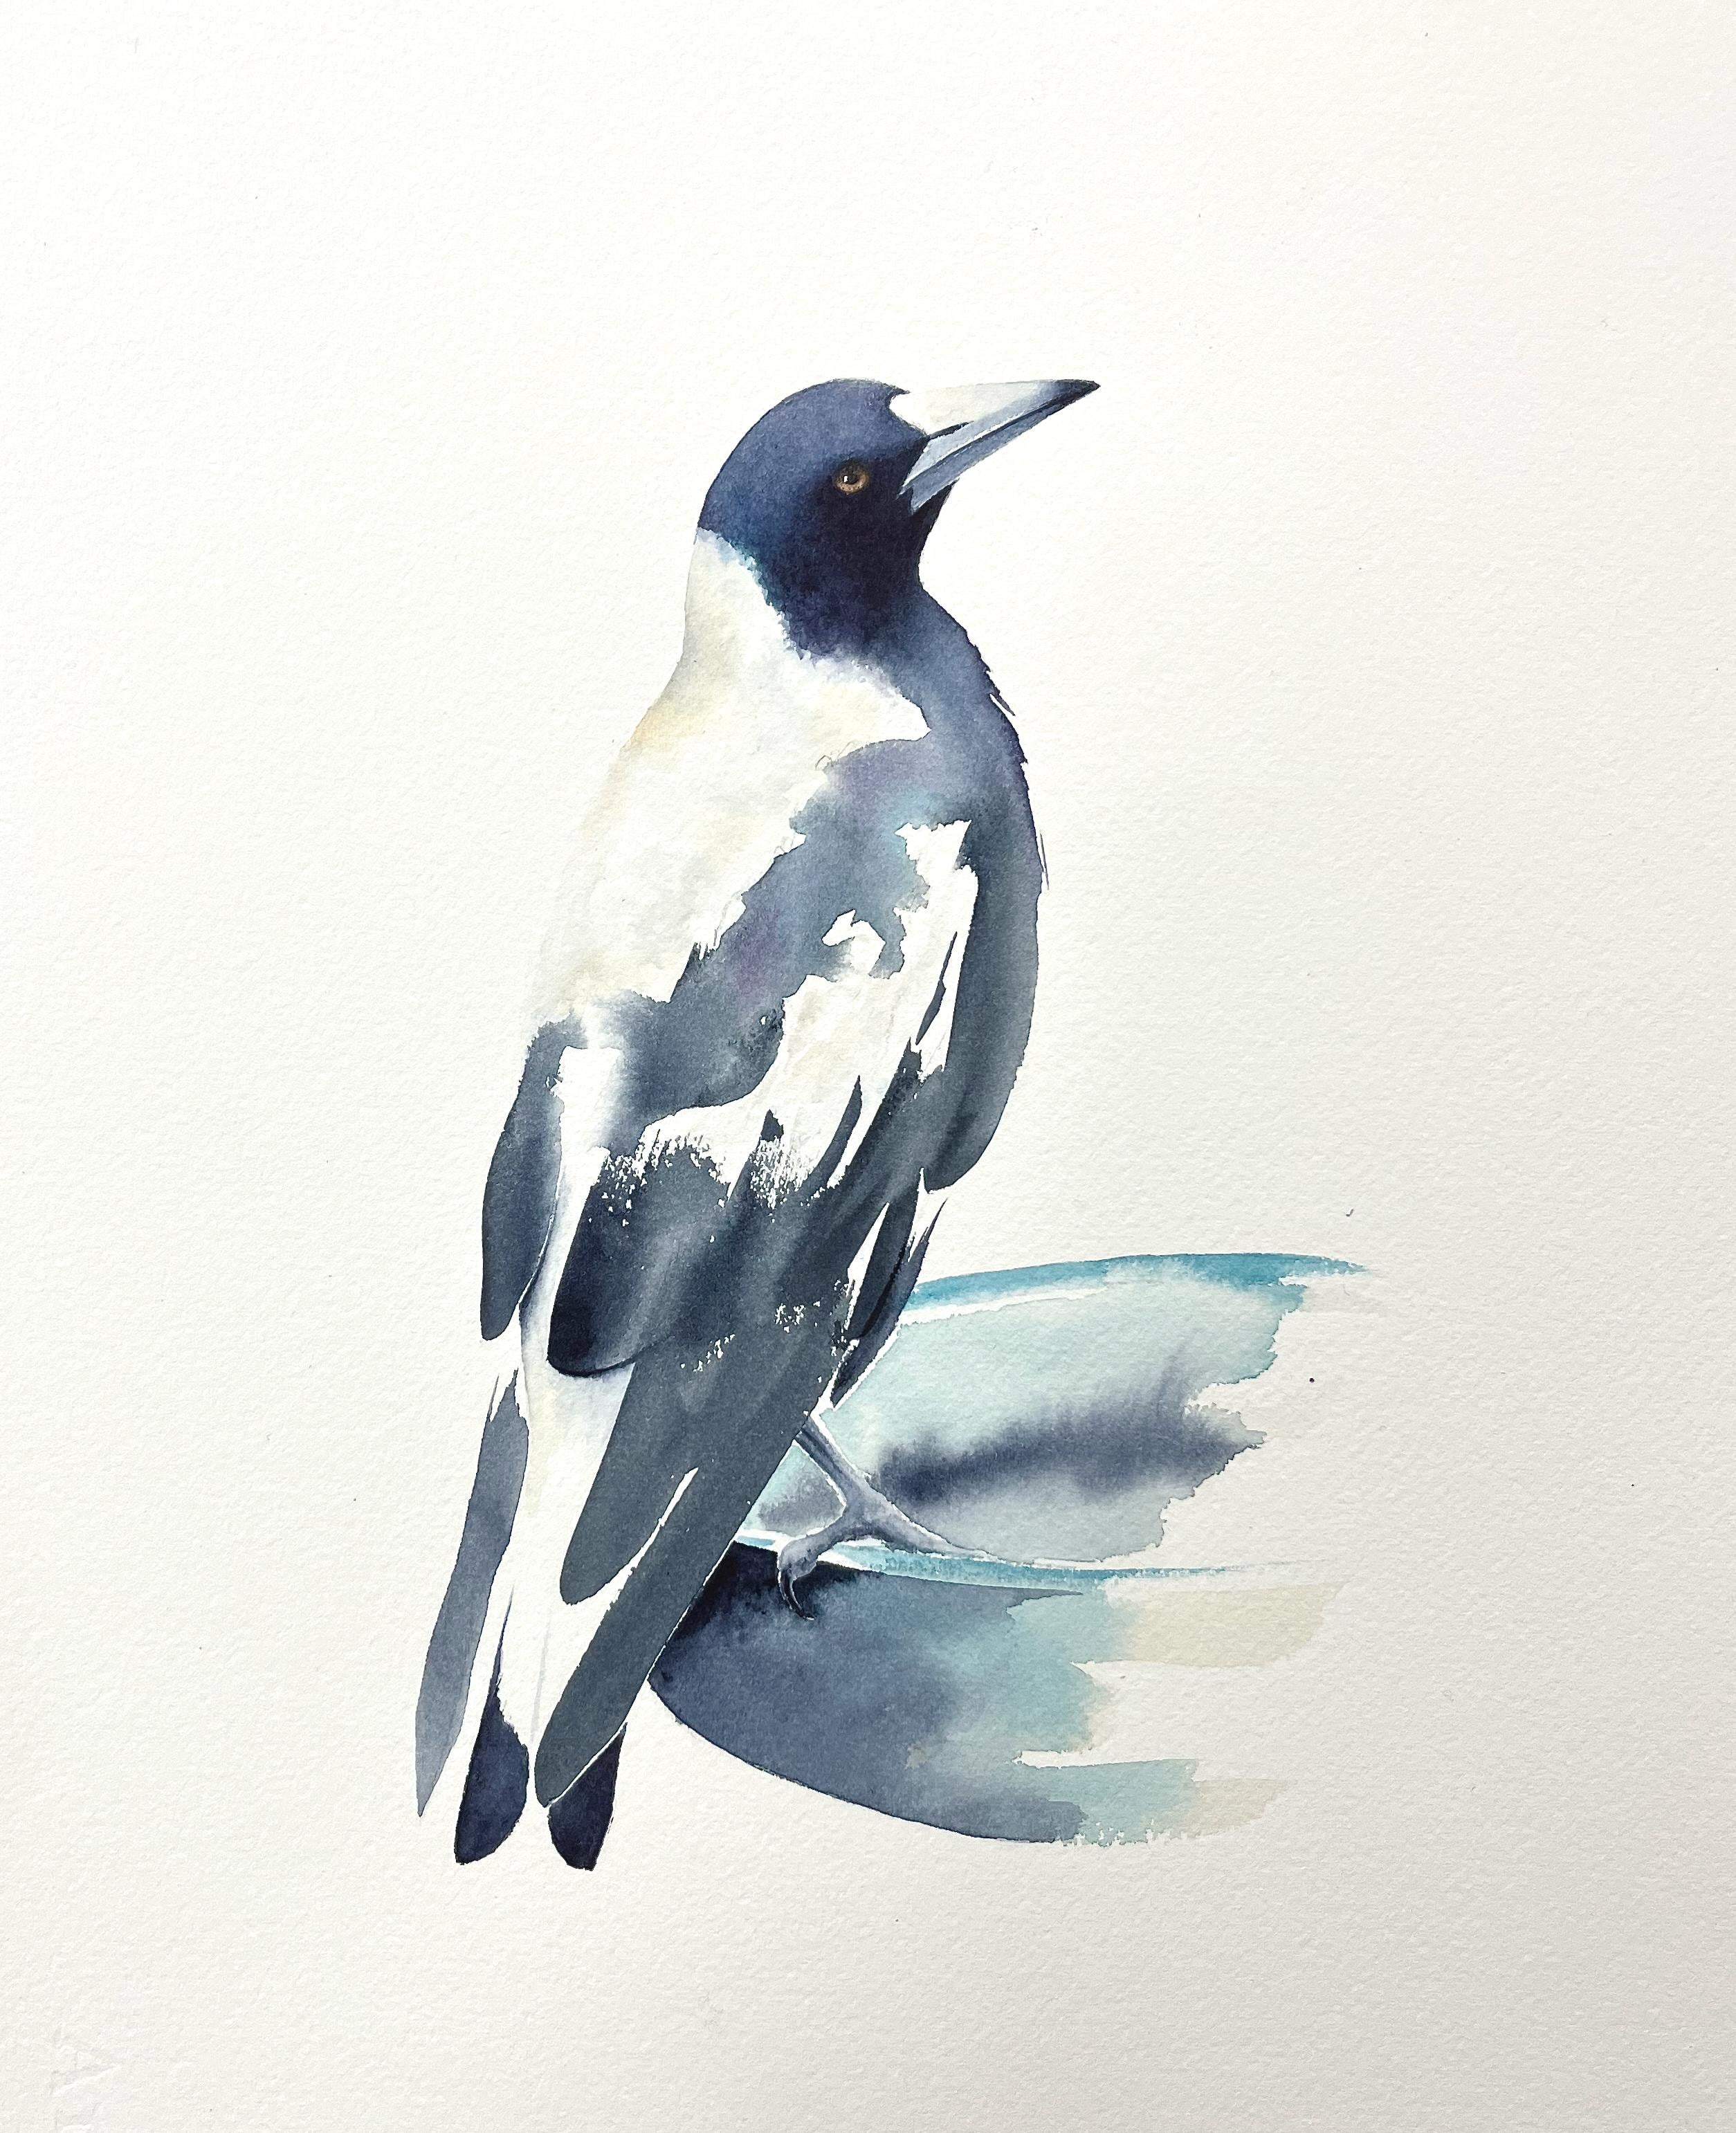
3. Sketching Up: Okay, first off with the sketch. Now, I'm not worrying about
any of the background here. If you want to put it
in, absolutely, you can, I'm just popping in the
bird and a little bit of a hint of the bird bath
that it's standing on. When you go to sketch it
up, don't worry about all these overlying feathers. We're just going to handle those with a single
brush throat. So I don't get too
caught up in the detail. I've just given
myself an indication of where these wing feathers
sort of end and down here. And underneath here, there's a tail feather
underneath this one. So I have kind of
indicated that. Whether that stays in when I
go to paint it, who knows? Have just popped it in lightly. It's a little bit ruffled at
the back of the neck here. I've just tidied that
up just a touch. I've come in a little bit
on the back of the neck. Get the position of
the eye and the beak, and we're pretty
much good to go. If you don't want to
sketch it up yourself, I have also provided a template
that you can download.
4. Starting the Beak and Eye: Okay, so we're going to
start really simply. We're going to start in
the eye and the beak. And I'm using this
little size O brush. It's probably a
little bit small, but it's the only brush
I've got that's brand new, so it has a really nice tip. So I'm going to live with
the frustration of trying to cover a reasonable sized
area with a little brush. Okay. I'll start in the
beak with clean water. I'm going to pop some
water on the top. And also the bottom
and I'm going to try, it doesn't matter if I don't I'm going to try and
leave a little bit of a white line dry paper between the top and the
bottom of the beak, at least in this lower
back part rather. Then I'm going to grab a tiny
bit of really milky yellow acre throw that into the top of the web page and then a
little bit into the bottom. So really faint.
You may not be able to see that particularly well. And then while it's
wet, I'm going to take. I've got a little
bit of so turquoise. Normally, I'd use serlem
probably for this, but I don't want to give
you too many colors. So I'm just taking a
really small amount of my palo turquoise
and just dropping that into the bottom
of the beak and maybe just the lower
half of the top beak. I just want a little
bit of color. In here. And I can strengthen that
up if I need to later. And then before it dries, I take a bit of indigo. I've gotten the well here. I need to squeeze out some more. But I haven't squeezed it out yet because I need
this to be fairly dry. I've got a fair bit
of water in there, and if I put really wet indigo, it's going to run everywhere.
So I don't want that. I just want to in the wet page. Drop a little bit of indigo
into the tip of that beak, and I just want it
to bleed softly in. Now, for me, I have to be
able to get to that tip. I've got to turn
the page around. I can't hack doing
it the other way. So I'm just toeing the page around and
painting in that tip. This is where it's good to have a fine brush because you'll find it's really easy to you
start to put in the tip, and then you're trying
to get it tidy and so you keep pushing and
pushing and pushing, and then you end up with
a really long beak. So a fine brush is
good for that end bit. Now, I'm just cleaning
my brush a bit. I painted my tissue, and I'm just teasing
that down a bit. I'll do it at the top, as well. Again, I'm leaving that
kind of little light between the top and the
bottom bead for now. Now, if this isn't dark enough, again, I can come back
in and restate it. But I just want to
make sure I've got this shape right before I bother going on with the rest of the painting
because it was wrong, there's no point in continuing. Okay, so it will
probably need to go darker, but I've
got the shape right. I've got the start of it, so I'm happy to just let that dry. Yeah. And so then I'm going to go into
just a little oval of. I've got some I think this
is transparent brown. So transparent brown
or burnt sienna. I'm just going to paint
in that shape of the eye. So here I'm going onto dry paper with a milky creamy,
probably creamy. Milky creamy mix. Okay, so that's where I'm
going to leave that to dry and come out for a couple of minutes
before I start the rest. No
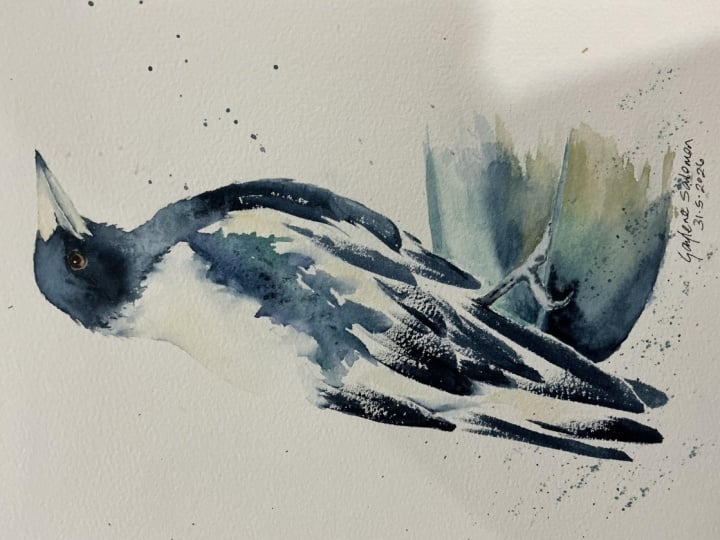
5. Getting the Main Body in One Go: Okay, so I'm completely dry now, and what I want to do is get the main feathers and the
head and the body in one hit. That's why I've got this
sent to intermediate because I don't want
to go step by step. I want you to just hold
your breath and go. I'm going to take
my medium brush. I'm going to wet down kind of the edges of where this
black is here on the body. I'm going to start
along this edge, damp. Then I'm going to come
across the top of the head. Push out my pencil line around the eye underneath the beak v. So I'm just filling
in with water. I'm coming down,
fitting to the chest, just down a little bit. Alright, so if I hold it up, you'll see where I've gone here. Now, the idea is we're going
to paint onto dry paper for the feather tips
and then come into this wet and let the
pigment weak up. I'm going to use indigo, and I'm also going to use I've got some queen violet and a little bit of Tamo turquoise, as well to get a bit
more color in there. I'm going to max up this brush. Then I'm going to switch
to my bigger brush, this one because I can go on the side to get a feather shape. All right now because
I've been talking, this is probably
dried off a bit, so I'm just going to
make sure I wing at I've got enough water in
here, basically. We're going to
leave lots of bits of white paper, and that's fine. I might just pop a bit of water just on the back bit here too. So I'm dry up in here. I'm dry mostly down here, all dry down here. All I'm stalling, I'm talking, so I'm just
going to paint. Alright, so I'm going to start. Where am I going to start? I might start actually
with the bigger brush. So I'm going to start
down the tip of the tail. So I'm going to
take some indigo. I don't want too
much water in here. I've had to put a bit of
water because my wells really dry to actually
pick up the paint. I'm just going to wick off
a bit so I'm not too dry. I'm going to push down
and pull up, push, pull. That's all I'm going to do
come around into that chess. Then I've got these
fatter feathers here. I'm going to put my
brush on the side a bit. And just come up and meat
that water on this side, push down, pull up, and I've got these
longer ones here, but I don't have
to do those yet. I'm going to put
that brush down. Then I'm going to switch
to my smaller brush. Here I'm going to pick up
now wax some into the water, but now I'm also
going to pick up a bit of my purple and a bit of my plot turquoise
and just throw that, didn't get any purple
into the web page. So I'm getting a
mix of colors in here a bit more of my indigo. Now I want to push
all the way out to the edge and I can tidy
up my shapes a little. On the chest here, I'm going to just drag a few flicks out onto the dry paper so that
little ruffled feel. I'm going to turn
my page over Okay. Push out to the edge. I've just dried my brush then on a tissue because I had a
little bit much paint. I have a bit much
water on there. I'm just trying to be careful
to come to my pencil line. Now, as I get into here, where the shapes are
more controlled, I'm now going to switch back
to my really small brush. I'm going to turn it around, I think I can getting here. I'm going to use a pigment
that's already in the page and just tidy up those shapes. I got to have less water
on this brush than in the page or I calls blooms. I'm just going to bring
that around the eye. This is going to need
another layer of dark. I'm a little bit pale,
but I don't want to mess with all of that in there. What I am going to do is
run while it's still wet. I'm just going to
run a touch of water down this little
bit and then just touch to that edge just to see if I can get a
little bit more movement. I don't want to
introduce a whole lot of water here because
the water will push back into the head. I just want a little bit
more stuff happening. Here. Now, before
it's dry, I can see. I'm just going to
make use of the water I've already gotten the page. I'm going to be darker around
this part of the face. I'm just picking up some
more indigo, creamy indigo, less water on my brush
than in my page. I'm just dropping a bit
more pigment in it. It doesn't matter if
you're already dry, if it's already dried on you, you can wait until
it's fully dry and then just wet down again. You don't have to
do this right now, but I can just see
that I've still got some moisture in my page. I'm just washing my hook. I miss my water jar there. I'm just trying to wash
my brush, drying it off, and just softening my
hard edges back in. And then I'm probably at
the point where I need to come out of that and
let that dry before I do my next next layer. So the Ida is we don't want to lose I'm doing it in multiple rounds because
I don't want to lose all the light. I might not keep it
all, but initially, I want the light on
the top of the head. So I'm going to come
out and let that dry before I come in and do
these other feathers.
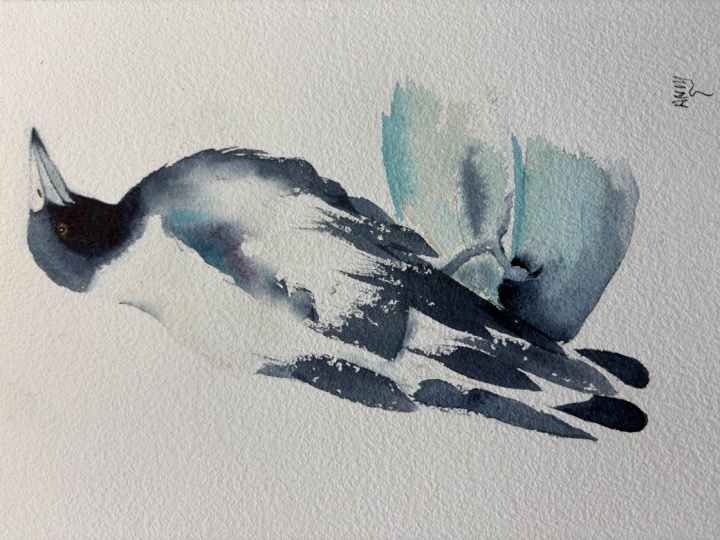
6. Tail Feathers and Foot: Okay. Now I want to put before
I go on feet in the bath, I want to pop this
tail feather in. Normally, I would have done that at the same time as the others, but I didn't want to
give it too much. So I'm going to pop this in and these little
tail feathers here. Because I've let this
dry then go again, I've got a little scrap piece of paper here because
I want to make sure my tone is similar to
what I've already got here. So I'm taking my
medium size brush, picking up a little
bit of Indigo, and I'm just going to
push down and pull up a couple of strokes
there for that one. And then here, I'm
going to pop is the bottom with a tail feather pop my brush and try and
put my brush on the side, and just pull a stroke up, turn my page around, and
then do the other one. I might need to join
this or tidy that up, but I don't want to do
it while it's still wet. So here, I push
down and pull up, turn my page, push down
and at and make it. So I'm trying to avoid
that painting that tip. So I'm just going
to tidy that shape up a little bit because I didn't quite come. High enough. It's just not the
optimal way to do it, but it's a funny
little I haven't given myself much room in there. I'm just going to pop a bit
more pigment on that one. Okay. This is actually it's
going to dry a bit patchy, but that's okay because I
can darken that off later. The reason I did it rather than trying to paint it initially
and fill in the shape, I always find you just
get a nicer shape if you just use the
shape of the brush, a little bit more spontaneous, but I will have to tidy
that up later. Alright. Then what we're going
to do is we're going to move on to this leg. Now for that, I'm going
to use my small brush. I'm just going to
paint with some water. Well, it's a bit
dirty, so dirty water. The shape. They're just damp. Then I'm going to
pick up some Indigo, and I'm going to
paint that chlorine. I'm going to do that. Then
come in and touch the wet. Didn't get enough water in it. I'm just going to
flood this a bit more. I'm just going to drag
a bit of pigment. A couple of lines down. It's darker underneath here. I'm just dropping a
bit more pigment in. I tend to do I don't like painting feet
and when I do do them, I'd rather let the
pigment kind of do its own random thing
than really trying to pay attention to what's
happening there. So I just need a little
bit of variation in tone. I'm just looking to see in my
reference, whether I need. I possibly need to pop
another feather in here. I don't like doing
this after the fact, but I think I probably
need one more. I've got milky creamy Indigo. I'm just going to
not milky enough. I had no water in there,
so that hasn't moved. I think I need a bit more
of a feather in there, and then I'm just
going to tidy up. That shake. You
might not need that. You might have gotten
all the way down, but I just feel like I need to add a bit more
something in there. I need to that dry and
then we're going to put the bed bath in before
we start adding details and shadows
and more depth.
7. Bird Bath and Starting the Detail: Okay. I'm going
to have a look at the actual bird bath now I've flipped in to go
on there, bit of pain. I'm just going to do
some wet and wet here. I might start with some
yellow ochre actually. We'll go onto the dry page with some milky yellow ochre
and some dust and hair. I'm just coming underneath
the rim up to the leg. Then I do the same
thing underneath here. I'm keeping the rim of the
bath dry paper at the moment, coming on Now, I want to I
don't want to put the edge in. I just want to disappear. I'm just dragging a few
strokes out to the right edge. I'm also going to
have to put some in this little space in here. While that's still wet,
I'm going to throw in some pho turquoise. Into that web page and
just let it do its own. Book, I didn't mean to do that. Don't go over your rim. The rim that I so
carefully left. Try not to go over it. All right. In here. So I'm having lots
of problems because my palette has been I haven't
painted for a week or so, and my palette is dusty, and I should have
washed it off before I started painting
because I've got grit. Got all these little
bits of grit in my well, but that's okay. We will roll with that. Okay. I'm coming as close
as I can to the foot. I might just in there. And then I'm going to put
before it's fully dry, I'm going to pop a little bit
of I got some indigo here, just down low for
underneath the bath and maybe maybe I'll just put some to suggest that that's where the water
kind of is as well. I didn't really. A bit too wet. There we go. See what
happens with that. I'm not too bothered about this. Because I just want to give the idea. I'll
come back to that. I'll see what that
does. But before it dries, I am going to drag. Well, actually, it
doesn't matter. You can wait until this
dries, but I am going to drag a rim of some turquoise, some potato turquoise around. And if bits mix in, that's fine. I probably will add
more dark underneath, but I'm going to stay out
of that for the time being. I don't really care
what that does. I might strengthen the
shadow underneath, but what I'm going to do is
I'm going to come up here and work a bit more in the face. A few things I don't like. I've gotten a bit messy. I'm a little bit rough around
the top of the head there. We'll see how that pans out. But I am going to paint
the pupil in for the eye. So just with my little brush
and straight indigo. Okay. So I'll probably
have to close off that little light on the
top. Doesn't make sense. Yeah. Now, I want to darken
off the bottom of the beak. I spent all that time putting the turquoise and all that
kind of stuff in there, but it's too light, so I'm just going to
take milky indigo with my small brush. I'm just going to
darken that off. Probably, I think I
might do the same. I might do a little
bit here as well. I put on a stripe of indigo, and then I'm going to
soften that back in. Then I'm just going to wash
my brush and soften it off. I'm getting a transition. I'm keeping all the light
on the top of that beak. But I've just got a little
bit of a transition. I want to darken the tip here. So really solid indigo
into the tip of that beak. Down. Then I'm going
to wash my brush, dry it on tissue, and just
run my water down there. I've just got a soft join. If you're teasing it,
you dilute it too much, just grab some more pigment
and drop it. Drop it in. Now I want to work
on around here. So I've got to
close up. I've got this little light on the top of the eye,
which doesn't work. I'm going to close that in. And onto dry paper, I'm going to strengthen the
dark around the face here. So I'm really dry here. So I'm just painting
over the top of that first wash
with milky indigo. I think it probably needs to come over the top
of the head there. Wash my brush and
soften that edge in up to this join where
it meets the beak. Can wash my brush and just softening that join
with the damp brush. I still need to be
darker under here, so I'm getting a bit more paint. So darkest underneath the beak here and just around
the bottom of the eye. And then coming over the
top of the chest here. So I'm just going to trap a bit more water
and throw that on. Now, I think it will probably
have to go darker again, but I don't want to muck too much with
that at the moment. I am going to pop a little bit more dark
over the top of the eye. So I want this top third half to be darker than the bottom. So I'm leaving a
flashlight underneath the eye and just
darkening off the top. Okay, now I'm going to need to go one more round
of dark on here, but I need to let it fully
dry before I do that. So I'm gonna come out of
that, let you have a rest. I'll come in and out
a few more details.
8. Fiddly Bits: Okay, so some more
fiddly bits now. I'm going to give it
a little bit more body through the back here. So I'm gonna wet down
through the shoulder, back of the neck and this
little bit in its neck, but little from neck
to shoulder here. I need to throw some
paint in there. I'm going to actually grab a
little bit of yellow ochre, throw that into the web page, and a little bit on the
body there as well. Wash my brush and just
soften that back. I just need a little bit of something because I'm not
doing the background. If you're doing all the leaves, you don't need as much there. Switch my little brush. I
just want a bit of dark. Take a little bit of
indigo and just in there. Just to touch, wet and wet. Don't overdo it. And messy. We're being messy with that. Okay, I knead a little bit of the same thing
through this wing, so I've just with the small brush, chopped
a bit of water on, a little bit of yellow och cause that needs
to talk to that, but then also needs
to talk to this. So same here. Now, here I need to be a
bit careful because this is the back of the tail there. So I'm going to put a bit of
water on throw a little bit of yellow ochre. I want to. I probably I've got pencil lines here that
I probably should have gotten rid of before
I started doing this. Can't really do much
about that now. I'm just going to ignore them, pretend that they're not there. I'm going to put a bit of a
shadow underneath this one. So I've just come onto
that web page where I just went with indigo, and I'm actually putting this feather kind
of on the top here. It's not really like that in
the reference bit behind, but the way that I've painted
it, that's what works. Went on with a little
bit of indigo, now I'm going slightly
stronger indigo. Soften out that edge. Actually, I just as
I'm looking up there, I can see my indigo that I
put up there has disappeared. So I'm just before
it's completely dry. I'm just going to chuck
a little bit more. In. All right. Then I'm going to
look down here and think, how has this worked out? I need to probably put a
shadow underneath this one. So I'm going to again, I probably should have gotten
rid of the pencil line. Wash my brush, soften that edge. And if it dilutes out too much
when you're softening it, I just come back in. And I'm going to just drag
that one just slightly. Into that next feather. So I spend a lot of
time in my work. You know, the bulk of the
painting is really fast. I spend quite a lot of
time on this sort of really small details that I
think actually really help. All right. So I'm going
to do the same thing. I think I'm going to
rub out that tail, that pencil line
that's bugging me. I'm going to have to
give a bit more of an indication of this
where the tail goes. So I think here, although I like that line, I want
to straighten it up. So I'm going to take really
fine bit of indigo and just straighten that out, probably, I know that there's
another join in there. So I'm just going to
suggest those two. I need to strengthen.
This is too light. And then I'm just going
to back fill this tail. You know how it was patchy.
So yours might not be. So you might not
have to do this, but I've just got to put a little washer in
to go over the top. Hopefully, yours was perfect, and you don't need to do that. Okay. And the same then
I need to strengthen. This one, I'm just going to
strengthen to dry paper here. And I don't want too
much of a gap there. I think, actually, it's that little light that's ding here. That bit in. All right. I want to
put the dark in here, but I'm going to first come back up and
strengthen that dark. You know, I said that I
probably needed more dark, so I'm doing exactly
what I did before. And again, yours might
be strong enough. You might need to darken it off. But mine's just a
little bit insipid. Okay. And then I'm also going
to pop in the dark along be straight on to dry
paper and the nostril. So for that, I'm going to
push down and lift off. And I actually think
that the bottom still needs to be darker. So I wash my brush, use the indigo that's in it from that stripe and just darken off the bottom a bit more and
that little bit of a stripe. There and do the same
thing where I'm washing my brush and just
softening that top. Now, I'm also going to pop a little bit of
a dark just over the top where the
feathers meet the beak, just on the top
of the head here. So on to dry paper and then
just softening that back. Okay. Getting close. Now I need a bit
more stuff on here. So when you look
at the reference, there's a bit of patterning, it's a young bird or whichever
whether it's a female. I can't remember. So I'm
just wet the page down, and then I'm just going to
drop in a little bit of milky indigo and just let the pigment do what
it wants to do. And the same just in here. Okay. Now, I need to a
little bit down here, do a little bit of
work down here. I want a bit of a dark underneath the bird
bath here suggest a shadow. I'm just going to paint it with water and then grab some indigo and just chuck
that into the web page. Okay, so I can tidy up
that edge a little bit. I'm just sort of pushing that
shape under just a touch. And I might switch to my smaller brush just to
close the light here. So picking up really
creamy toothpasty pigment and just dropping that in. Chiseling out shape of
that claw a little. I'm just going to
pop touch more here. So although it's not
like the reference, I'm going to just
make it slightly darker here to kind of
work with what I've got. I'm going to pop a little
highlight in the eye. So I'm going to take just
a touch of gouache and just stick that in the
back of the eye there. And then, like I said,
I'm gonna let that drive, rub off the pencil and see if I need to add anything else. So come out of that ten.
9. Don't Forget the Foot!: Okay, it's been
about 10 minutes, and I've realized I forgot about the foot because
I don't like feet. So I'm just going to pop just to push that underneath
a little bit. I'm just going to grab
a little bit of water. I just going to paint
down the top of that leg. And I'm just going
to grab a little bit of indigo and just drop that in because I just want to just sort of sit
that underneath. So I've done a little stripe on either end and a little bit
darker towards the top here. I'm keeping the
light on the top, and maybe a bit darker. You come onto dry paper here
a bit darker under here. And must set up a jet. So not a big deal,
but I think I don't want too much light on that. Okay, now that I've rubbed now
that I've rubbed this out, I probably maybe I'll pop a little bit of the brown
that I used in the eye. So I'm just going to wet down my pencil lines my eye was relying a lot on
the pencil lines here. So now they've gone. I
might just pop a little bit of the transparent
brown or Burnt Sienna. Just a touch, wash my brush. If you do that and
it's too much, you can just grab your tissue
and just back it up a bit, preferably clean tissue, not one that's covered
in indigo, like mine is. But just a little bit. I don't know if I
like that or not. This is a thing that I often come back to the
next day and decide, let's go now a little
bit of indigo as well. Pop it on, must it up a bit. I probably need a little
bit of that down here. I'm always about trying to balance. And, you
know, I do that. And then I feel like I have to back off the white
just to touch. There's a bit of that burns. Okay, I am 100%
starting to fiddle now, so I'm just going
to call that quit, and that's where I'm going to
end putting my brush down.
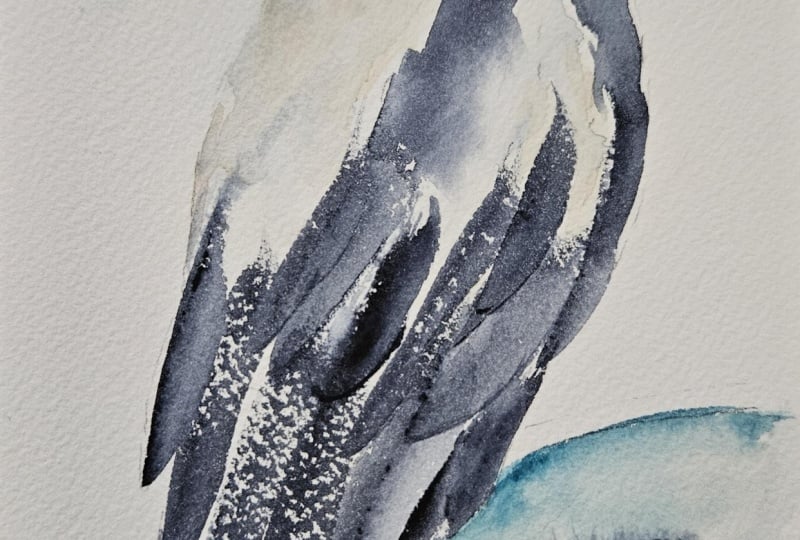
10. A Final Word: Okay, so now that we're done, I'm hoping what you take
away from this is letting the water and pigment
do some work for you. So my favorite bits
on this painting, this feather here,
where I've got this broken stroke and this little flash of light. There was nothing to do with me. It was just there happened
to be water there. When I dragged the
paint brush through, that's what it did. And also these bleeds
here where you get that hint of purple and
aqua through there. And again, that's
just the pigment and paint the pigment,
sorry, and the water. Doing whatever it wants to do. So the bits that you
don't have to force are often the nicest
parts of the painting. And then also paying attention to the really small details like these little shadows that
really lift to work. So if you're happy
with what you've done, take a picture for me
and you can pop it up on the project section
so I can have a look and thanks
for joining me.
 Nadine Dudek, Professional Watercolour Artist