Transcripts
1. Introduction: The Hi, I'm Nadine. I'm
a watercolor artist from Melbourne, Australia. Often when I'm talking to my
students about watercolor, they have this feeling that you've either
got to be really, really loose or you've got to be perfectly detailed and accurate. And I don't really find
that that's the case. For me, I like to find a
happy medium, and certainly, I would encourage students to find the balance
that works for them. So that's what today
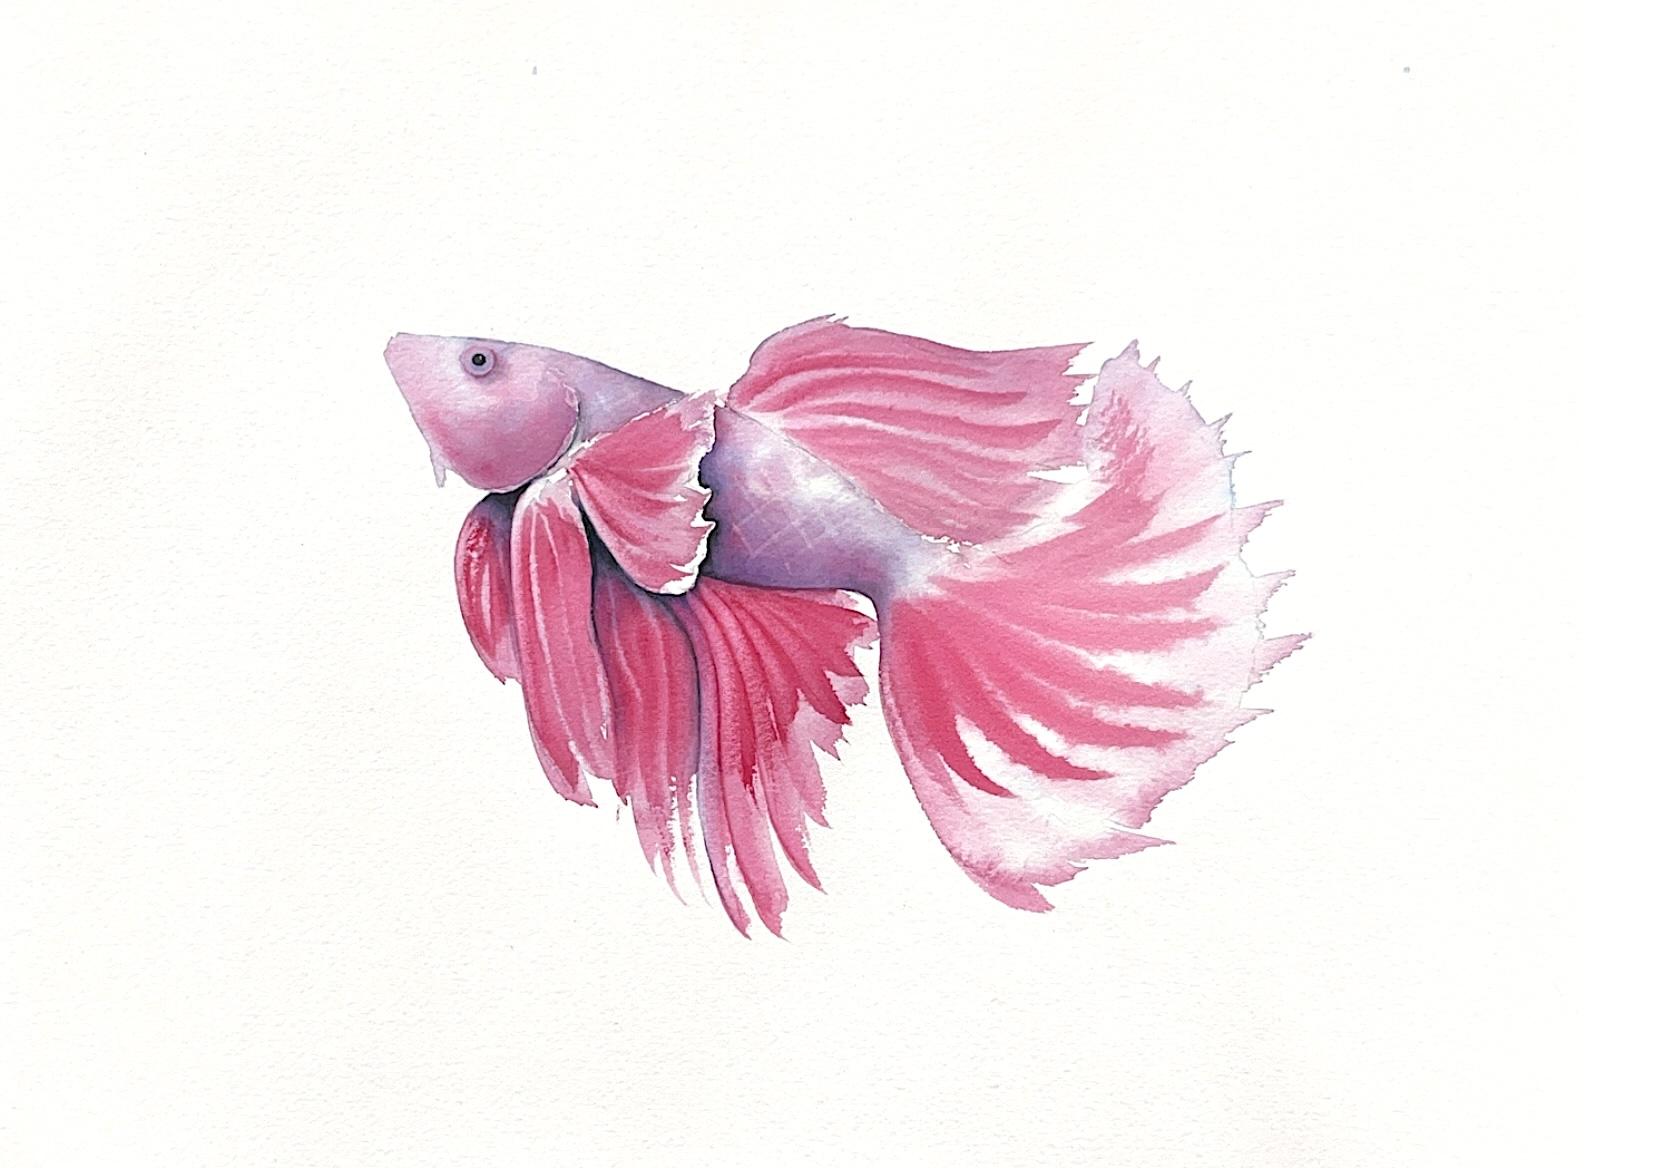
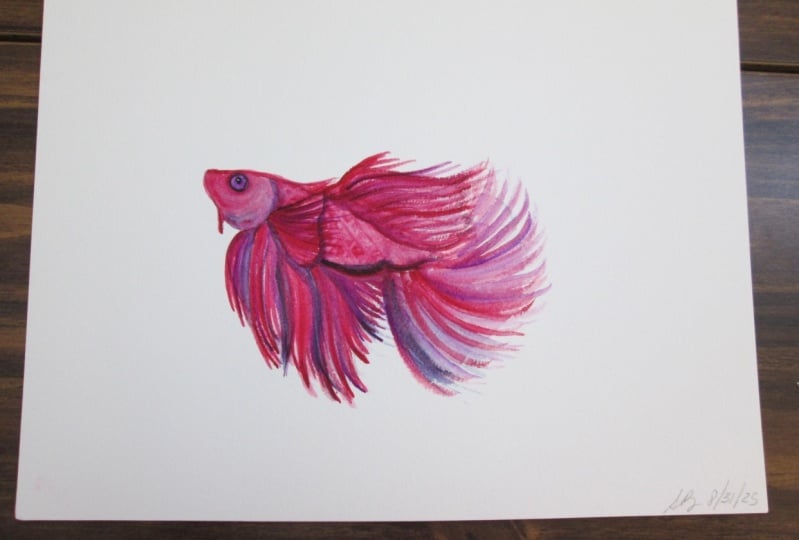
is going to be about. We're doing a fish with
beautiful flowing fins. I had to think about
I always paint wings, so I had to think
about the word then. And that's very
quick wet in wet, really loose wash. And then we're going to spend
the rest of the time layering, adding small details, little bits of dark
to try and get the painting to slowly
emerge off the page. I think that's what I
find quite enjoyable, while I love those loose
strokes, they're so much fun. But working out where
to put the darks, where to focus your attention is really quite an enjoyable
process for me. So we'll go through
the reference photo, doing the sketch, and then step by step through
the painting. And hopefully by the end of it, you've got something
you're happy with, and I need you to be patient
in between each layer. That would be the only
thing I would say before we start is make sure you let
things dry before you push on. So speaking of which
let's get painting.
2. Materials: Okay. Materials
for today's class. I'm using a reference photo
from Pixel Bay and you can get to that image through the link on
the material section. Now, it's a little bit busy because it's got the reflection. In the little sketch video, I go through how
I deal with that. I just tend to take a little
screenshot and remove the background to make it
simpler when I'm sketching. Now, I'm painting on 300 gram
Arches cold press paper. I haven't prestretch. That's why I've got
a little bit of a wobble and I'm not
taping it down. I am painting though on a
board and I'm painting flat. You'll need a regular eraser
and pencil for the sketch. And in terms of paints, I've only got the three here. I'm using some Daniel
Smith turquoise, some Windsor and
Newton permanent rose, and for the really dark dark, so I'm using some
Daniel Smith indigo. You probably don't
even need that. You can probably get
a dark enough dark with these two mixed together, but I tend to fall back on
the indigo quite a bit. I also have used just a tiny spot of
white gash in the eye. You don't need to have that. You can just leave
the paper white. But I tend to paint
through the eye and forget about
the highlight and I'm not got a
steady enough hand, so I do cheat and
use the white gash, or you can use China white
or titanium white for that. Now for the brushes, I'm using ball so I've got these two
big ones to get around. This big one I've used for
the shape of the tail, and then the rest
of the fins I've done with this medium brush. In terms of all
these smaller areas, the little details, I've just got a little synthetic here. This is a size zero, then the only brother brush
I use is a stiff oil brush. This one I use to lift out
some of these highlights. This one is quite an
important one to have and the details of all these
are under the materials. Now, other than
that, you'll need your palette jar of water and some tissues and I think we can move on to the sketch.
3. Sketching Up : Okay, we take a look at
the sketch for this one. So this is the image on
Pixel Bay and obviously, it's quite busy with
the reflection. So it can be quite hard to get your eye in to see what it
is you're actually drawing. So if I've got
something like this, I tend to clean it up a
little bit before I sketch. So I'm using a mac, I imagine there'd be
something similar on a PC. But what I tend to
do is I'll take a screenshot of the area
that I'm interested in, then just remove the background. And I just find that that makes it easier
for me to sketch. Okay. So here's the
actual sketch here. I'm not worrying too
much about the details in the scales or the details
through the fins here. I just want the basic shape. So the outline here of
the edge of the fins, it is important
to get this shape in the tummy here and the back because
we've got this side fin. This line needs to kind of
make sense with this one. This line here needs to
make sense with this one. So they're really
the only two points that I'd pay particular
attention to. Get the position of
the eye and spend a little bit of time getting the position of the mouth right. And I have put
this little bit of a gill on the other side there. That's all we need to
do for the sketch. If you're not comfortable
sketching it up yourself, then I have included a bit of a template for
you that you can download from the
Skillshare site. But I think we're good to paint.
4. First Wash : Okay. I'm going to use
two brushes initially. I've got a really big one
on my medium size brush, and I've got two palettes, but not because you
need two palettes, but because I've got my
fallo turquoise squeezed out on that palette and I've got permanent rows on this one, and so I just want
to use up what I have rather than
squeezing out more. What I'm going to do
initially, I'm going to start with this
medium size brush. I'm going to throw just a touch
of water on a little bit, just around the place, and then I'm going to grab a little bit of my
pho turquoise really watery. I'm going to throw a little
bit of that onto the page, and apparently spray
everywhere else. So I'm keeping a bit of
a gap between the fins. Here I threw a bit
of water on first, which is really
more mental thing just to get yourself started. It's always hard with
a fresh blank page. I'm just throwing a bit on into this one and I'm
keeping dry paper mostly, not completely between
these different shapes. Okay. Keeping it
really nice and light. Now, at the front
of the face here, I want to be careful
of the shape of that nose coming around
the gills there. I don't want to go
outside my pencil lines. I don't care if I've
got gaps on the paper, but I don't want to track
out of that pencil edge. Now, while this is
still actually, no, then I'm going to switch now to my big brush
because here on the tail, my po turquoise, I just want to put my brush on the side and without thinking
of it, get that shape in. I just pushed down and around. Otherwise, I'll overthink it. While that's still wet,
now I'm going to go into my permanent rows with my medium size brush back
to the smaller brush. Now I'm going to come through and drag my brush
through that do turquoise. And lift up at the end. I get these little dry flicks on the end coming through.
Maybe I'll do this one. Doesn't really matter what
order you do these in. You can see I'm not really strictly following
my pencil edge. But I'm after some of
these sort of strokes, and I'm after this the
transition between the blue, the tho turquoise, and the pink. All right, so into the tail, I'm going to start here in the base of sort of the
joint of the tail to the body. And here I'm again, pulling straight through so that I get a few
of those shapes. All now here I've had a lot of water there
and it's pushed back. So I'm just going to
tidy that one up a bit. Then I'm going to
in these scales, where I've got scales now, I'm just going to dab
my brush through in a few spots just to get a
bit of permanent rose on. I want to be a bit careful that my brush is
dry than my page. Now into this fin here, It's all very fast
and into the face. So I'm sitting
next to my heater, so my papers drying
really quickly. They come over that eye. I've stayed out of
the eye mostly for now and tidy up that shape. So this first wash is really
fast and quite messy. I don't really mind
if I've got these. Do I mind that? I'm
just drying my brush. I've got these two big
bits of permanent rose, so I'll just dry
those off a bit. All right. A couple of
things to note here. I can take a breath now because
that was all pretty fast. I can sit here with
my dry brush and tidy up anywhere where
I've had pooling water. Not overly fast, but I can just tidy up anything
that's really bugging me. And I'm going to be able
to see these pencil lines, but I've done those darker
than I normally would so that you can see where the
edges are on my sketch. If I was doing this myself, I'd probably have those
a little bit lighter, backbe off a little bit. So I'd sketch it out and
then maybe just with my razor just before I start painting, rub it
over a little bit. So I don't get these. Those are going to stay there pretty much. All right. So before I'm fully dry, this is a suck it and see thing, test it out and
see what happens. I want to put a few more solid permanent rose
stripes through here. Now, I've got to be careful. When I pick up this paint,
I'm picking up creamy. This paint has actually
been sitting on my palette for a couple
of days, it's pretty dry. I've got to get a little bit of liquid in there to
get it to move. But then I want to make sure
my brush is pretty dry. Then I'm going to
come on and just drag that brush through a few places might
come into this one. I get that much darker stroke, but because I'm still wet, I get a little bit of movement. In this front one,
how does that one go? Oh, I just covered
up a little bit more of the blue than I wanted
to, but that's okay. You can see how dry my brush
is there, and then maybe. I'm just now following
the direction of the fins probably should go when
I look at the reference. Then the one here, Then maybe I'm going to
do a few in the tail. Let's see. It's
pretty warm in here. I'll see if I'm still whether
I can get away with it. All right. Make sure my brush is really nice and less water
on my brush than my page. And it's very much put it
on and see what happens. I probably got a little less So turquoise than I would
like, but that's right. That's where I'm
going to stop for this first wash because
I need to breathe. I can tell that I've been, you know, while I've
been painting it. So I need that to settle in. I'll give it 10 minutes to dry. Then we'll come in and start building up
some of the layers. So come out of that
and let that dry.
5. Starting the Darks: It's been about 10 minutes. I'm not fully dry, but I didn't do this initially
because I didn't want to paint over it and then lose the position of
where it needed to be. But now I'm going to just paint in a little
bit of phalloturquoise. Then I'm going to drop a bit of that perros in. I've
got a bit of a bleed. It's not quite the
right shape yet, but I'll worry about that later. Okay. All right. We've got some other
messiness to go up there, so I'm not too
bothered about that, but I've got the eye in. Now, where am I going to go? I think I'm going to start
in this bit of the body. Go back to my medium size brush. I'm just going to wet down, chisel out a bit decide where
that fin is going to be. I might come in there a bit. I just wet it down, it
might be a bit too wet. I'm just going to track
that water down a bit to where the tail fin
meets the body there. I'm damp, not saturated. I'm going to go back
to my little brush. Initially, I'm going to
pick up a little bit of phalloi turquoise and
just try and work out where I think I want probably that white
edge to belong to that fin, and then maybe a bit
of a permanent row. I'm just picking up
the same colors that I had but just chiseling out, tidying up the
shape that I want. I'm going to grab some water
and just throw it on so that that pigment chases back a bit. Maybe I reckon I'll need more. I think I need a
pinker, I'm going to grab a bit more of
my permanent rose. Thinking that I want a darker underneath that fin,
and then they come out. I'm really saturated now
because I keep throwing on pigment and water
and that's fine. I can see I'm just chiseling
out where I want it. I'm going to grab a
bit more turquoise. I'm not really following
the reference. There is a nice little
shadow under the reference, but I'm making it
easy for myself. And just working with what
I've got in front of me rather than trying to see what
the reference is doing. Now I've gone maybe like
a sat, mix of colors, but I'm going back and forth
by getting a two pink, then, blue, then I'm after
that bit of that purple. I'm now dropping that in to give me the idea of scales without having to
actually paint the scales. I'll stop in that
one for a minute. It's going to tidy
up this edge a bit. All right. Then I'm
going to decide. I'm going to move to this one under here because
I want to stay out. That's a bit messy and wet. I'm going to come into
this one underneath its chin and try and chisel
out now where that one is. Again, I'm using
the same colors. I'm putting on first
a little bit of my lo turquoise with
my small brush, then I'm dropping in a little
bit of permanent rose. I can decide where I think push that fin back where I think
it actually belongs. Although that first
wash was really messy, now I can think a bit more carefully
about what's happening. I'm missing pigment in here. I'll deal with that once
I've dealt with this shape. Okay. So now I'm picking
up, I came on with really toothpasty
that's a bit thick. Petrose and I popped
into so turquoise, but I do want you can see how strong that dark is
with just mixing the two and I've got them at a really thick toothpaste
like consistency. So I keep washing my brush and
I'm just washing my brush, painting my tissue,
and just softening that edge and teasing
the paint to our want. I won't be enough, but
I want to come out, let that settle move
on to the next one. Now I'm thinking
about this one on the PR is quite complicated
on the actual image. I don't want to do complicated. I'm going to pick up a little
bit of my palo turquoise. I'm going to decide that my shape comes
probably in there. It will depend on what you did in that first wash as to
what you're chiseling out. No one's ever going to
have the reference photo next to the painting, so
it really doesn't matter. You can do whatever you like.
I put the pho turquoise in. Now I'm popping in some
more permanent rows. I need that to be darker, grabbing up some
more Palo turquoise. Maybe I'll go some
permanent rose in here. I'm just alternating between the turquoise and the permanent rose to build up my dar. I will go on with
some indigo later, but I don't want to
do that just yet. Then here I have to decide this fin the
way that I painted, this fin here could either sit behind or it could
sit in front of this one. I think I'm going
to push it behind, which is what it actually
is in the reference. That means I'm going to have to take my pho tourquoise
and chisel it out there, take my pink, brush my brush
and just smooth that edge. So that should be starting
to push that fin under. And you have to just bear in
mind when you're doing this, that it will dry lighter. So you can see initially
that looked really dark, but it's really light now. So you have to
trust that it's not going to dry as dark. Is this. Then I haven't reconciled
this shape underneath there, that light will have to go. I'll probably need permanent rose here to match the top of that fin and decide maybe
I'm coming out to there. I'm just now chiseling
out that shape. Grab a bit more permanent rose. So I'm going to step
away for a minute, but before I do, I'm just going to paint in the pupil
fully dry here. So I'm just going to pop
this in with my small brush. Come out, sit on your hands. Because this is fully dry, I'm going to see if some
of that pencil will come out while I'm
sitting and waiting. So let that dry.
6. Shadows and Highlights: Okay. It's been about 15
minutes now and I'm fully dry. I could get off some of
the pencil actually, not all of it, but
it's not too bad. But when I rubbed
off the pencil, one of the thing I can
see straightaway is, I said I needed to be careful
of line between these two. You can see what
I mean here that the back here is lower,
doesn't quite join up, so I need to reconcile
what's happening there, and I'm going to start to add a little bit more shadowing. I stick with my little brush. Initially, I'm going
to take I think a little bit of permanent rose, and I'm just going to tidy up. So that this makes sense. I need this line to
join to that line. I just wash my brush
and soften that back and then maybe drop a bit of a turquoise in there as well. You don't need much to fix it. But even something
small like that can really throw
the painting off, so it is worth paying attention. Now we're going to
come into this part. I might switch to my
medium size brush. I'm fully dry, so I'm
just going to paint down damp, not soaking. Then because I want
some control in here, I'm going to go stick
with my smaller brush. I don't want to get
too carried away. I'm also not looking at the reference particularly
because the lights coming differently on the
reference to the way that I'm directing it here. I'm going to pick up a bit
of my phallo and a bit of my permanent rose. And throw it in that bottom part of the body because I want to
push that body underneath. I want to give some
form to the body. I'm going to bring
that over and tidy up my shake there
to wash my brush, paint my tissue and just soften that so that this
where I'm putting pigment that it disappears into the tail without giving
me any hard lines. I don't want any sharp edges in there. Pick up a bit more. Okay. I'm going to leave it
light up the top here, but I am just going to
tidy up my shape a little. A little bit stronger,
down under here. I'm going to keep my darkest down the bottom all wet and wet. Now I've got that mostly on. I'm going to go back to
my medium size brush just to soften off my edges. I probably I think what I'm
going to do is suggest, I'm nice and wet, I'm
damp around here. I'm now going to
grab a bit of my ph, a bit of my permanent rose, and I'm really going
to strengthen. Around that curve,
tidy that shape up it's working with what
I've got in front of me, not what's on the reference. I'm just strengthening
up that curve in here. I quite like that shape. Then I need to balance. Well, actually, a couple of
things I need to balance. Again, the problem up here, I've got the same thing
happening down here where this curve comes
up a little bit. I probably need to
back that off a bit. I probably needs to shallow out. Because my line here needs to match up where I might imagine it
might come out there. Tiding that shape up. Then I need to do
whatever I've done here. At the moment it doesn't
match this side of the face, so the body doesn't
match the face. I'm gonna stick with
my little brush. I'm going to wet down. Oh, no, I'm going
to go to the knee. I can't get enough. It's too painstaking doing it
with a little brush. So I'm just going
to throw a bit of water around the gill,
behind the gill. I've left a little
bit of white paper where that gill comes up there. I'm not I'm gonna I've got that funny shape where I didn't quite get it right
around the eye. I'm going to bring a
little bit of water there, maybe a little bit in the front. Okay, so damp. Not saturated. Now I'm going to grab a bit of my permanent rose initially. Coming into this gill, I'm just going to throw a bit
of paint on and then behind that eye to get my shape a bit better and
behind the gill here. I want this messiness because I want the pigment to
do the work for me. I don't want to have to sit here and look back carefully at my photo to work out where
everything should be. I'm letting the pigment
do its own thing. And then I'm aware
that I want to get a bit of this
color on this side. My phallo and my
permanent robes. That talks a little
more to that now and maybe I want before I'm dry, a little bit more of it
in there and you can see, well, maybe you can see,
possibly a bit hard to tell. Because I'm getting bleeding and mixing of the
paint on the page, I'm getting all sorts
of little effects in there that give me the idea that there's something going on
without me really having to try very hard for it. Now, while that's drying, I'm looking at this and
I don't really like it. I think although
on the reference, this fin is behind this one, I think I want to bring it out. So what I'm going to
show you how to do so you can change your
mind on these things. So what I want to show you, I'm going to take my hard oil brush, take some clean
tissue. All right. Then I'm going to get my brush, make sure it's
clean, dry it off. I'm going to work my brush
and lift that highlight. I've got to keep washing it, drying it, and pushing
my brush through. You got to press pretty hard. Was it, dry it. What that will do it will change where
that fin is sitting. The most important
thing to remember is to keep cleaning that brush because if you don't
you do that and lift, don't clean it and go back
and try and lift again, you'll just smudge that darker paint, that pigment everywhere. All right. When that's dry, I will come back and strengthen the pink probably in here and soften that dark line, but I need to let
that dry fully. I want to then match do a few more of those so that by itself doesn't
match the rest of the fins. What I'm going to do I'm going to come and do
another one next to it. Then I can move again
to next move over. To be able to do
this, you've got to have had enough
pigment to start with. I can't lift a highlight when if there's hardly any
pigment there. Then I'm going to do
not quite as hard. Just a bit more of
a suggestion coming back into those ones. It's a really fun technique
to have up your sleeve. A couple of other
places I can do it. I might push the light on
the front of these two. So on this one, I would say before you do this, which I possibly should have
said right at the start, is it will depend how
successful this is, will depend on what
paper you're using. So papers lift
better than others. Arches is really good for this. Test it out on a scrap
before you do this and discover that nothing's happening
and you get frustrated. Then I'm going to put
some at the front here. Just a touch. I want
to tidy up here. I'm a bit messy on the front of that one, so I'm
going to use it. To make this nicer. I want to come back
up into the eye, and I'm just going to pop a
little bit more of a wash. I've got some permanent rose. I think I don't have enough. Stuff around here. I'm just strengthening
the wash a bit, just a touch of paint, and then I'm going
to put a little bit of my piloturquoise. Behind. Again, I know I
keep saying this, but it will depend
on what you've got on your page you might
not need to do anything. Now, it's fully dry there. I'm going to do one more
layer of bit of water. And dropping in a bit of my palo and a bit of
my permanent rose, maybe a bit more of
my permanent rose to strengthen up that gill. And before I let you stop
and we do the final touches, I am going to just lift, give a little bit
of a suggestion, strengthen up the idea
of the scales here using the same brush that I
use to lift that highlight. I'm just going to just ever so gently pull out a few
lines, this way first. Don't need much,
doesn't need to go the whole way down
just a little bit, and then the other direction. I've got a little
bit of a curve. And it doesn't have to
go all the way around. Okay. And then a little bit. Just to give you a
little bit of an idea. Okay, I need to come out of
that, let that fully dry. And then we're gonna
come back and just strengthen a couple of darks. Maybe you fix up the shadow
here and then we'll be done.
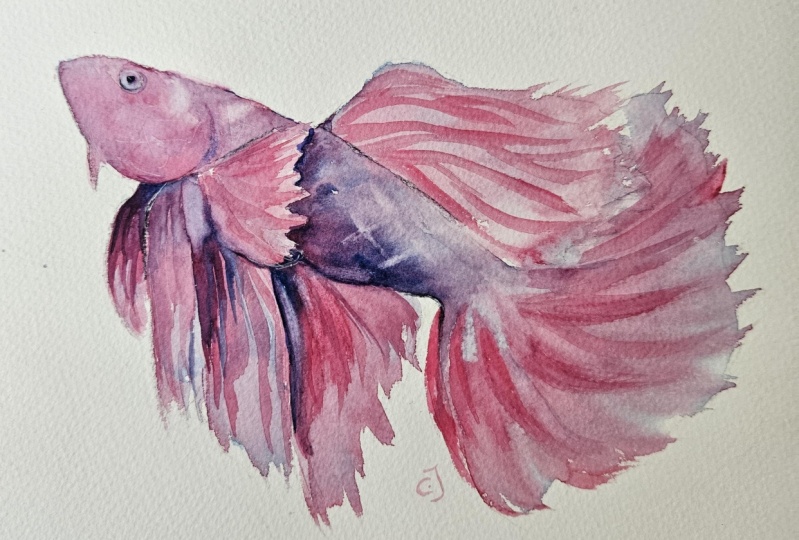
7. Finishing Off: Okay, really, all I'm going
to do now, I'm fully dry. I'm just going to strengthen
up a feudle darts using my little brush onto dry
paper and using some indigo. So I want to tidy up in
here where I lifted. I'm coming onto the dry paper, I paint underneath that fin. Wash my brush and
soften that edge. When you soften that edge back, what you'll find is that you
then dilute the pigment so you need to go on again. So while the page is still wet for me putting
that first bit on, I can just add a bit
more pigment in. I want to soften back in. I think I want to
soften a little bit of my highlight just
underneath the fin there, where I think there's a there'd be a bit more of a cast shadow. I'm just again going
on to dry paper and I'm just backing off that
highlight just there a touch. You get a bit of push
and pull with this. You can add, take off, add, take off without getting
into too much trouble. I'm going to
strengthen I think a little underneath the gill here. So again, straight on to
dry paper with the indigo. I'm make that kind of
talk to that a bit. A bit of indigo on this side, which is only really
slightly darker than the PermtrosePhalo,
turquoise mix. Possibly I need to bring a
suggestion of that indigo. I've painted an notch dry paper and then I'm
just softening that edge just a bit of a
shadow behind the gill were. All right. Then two last things
I'm going to do. I think I'm going to
strengthen a little bit behind this fin. I'm going on to dry paper
with straight indigo there. Then I'm going to wash my brush all about softening that edge, running it on that wet edge
doesn't get any water. And if you dilute the
pigment out too much, just drop a bit more in. I think I want to add a little bit in that
curve that we did as well. Softening this one in. So over the tail here. Yeah, it's a balance
of you want to add some of these really dark darks, but you don't want to lose, I've got lots of nice bleeds and things happening in here, so I don't want to
paint over all of that. But I just want to balance. I'm thinking dark, dark, dark, dark, is
what I'm thinking. It softly, does it? And also, you can remember
that you can keep adding to this if you come
back in a few hours and think, Oh, no,
I need some more. Come back the next day
and you can add more. You don't have to get
it all in first try. And it certainly is good to
walk away and come back. Before you make any
drastic decisions. Then tiny little bit around
the back of the eye here, my indigo paint my tissue so
I've not got too much water. Took my page so I
can see the circle. I didn't leave a highlight in the eye when I
was painting it. I'm just going to pop a touch of glass in the back
of the eye there. I think that's probably. I think that's probably
where I'm going to stop.
8. A Final Word: A couple of things that I want you to take away
from this class. Firstly, I want you to be
really loose and messy in that first wash.
Keep it transparent. Let the water do
the work for you, try and do a lot of wet and wet, but give yourself
some boundaries between the wet and the dry. So leaving spaces between the different shapes
so that everything doesn't just blend in
together all at once. And I find for me that gives me sort of the best of both worlds. Then I need you to
think about layering. So working up those darks
without covering everything in. I want you to see that just
a little bit of dark can make a really big difference
to the end result. So when you get to the end, if you're happy with
what you've done, I'd love it if you'd post a
photo of your painting in the project section on the Skillshare page for
me to have a look at, and I'm always happy to give feedback and
answer questions. So thanks for joining me.
 Nadine Dudek, Professional Watercolour Artist