Transcripts
1. 01 Class Project Overview: Hello and welcome to magical butterfly effects
in Houdini course, my name is, says OK, and I will be your instructor
for this course. First, we will start with
creating the butterfly wings. And then we're going
to use the chops to create wings flapping animation. Then we will use
particle simulation to make particles
from butterfly wings. And we're going to
learn how to color our particles with
the image texture. And then we will create
smoke simulation and use the smoke simulation velocities
to advect our particles. And then we will all
our scene into lobes Solaris for lighting and
shading and for rendering. Mainly we're going
to use the karma XB you to render our
magical effect. And we will finish
our course off by compositing inside
of After Effects. We will learn how we can import our render sequence and
passes in the correct OCI, your color space to
the after-effects. This course is for anyone who is looking to
polish their route, any skilled want to add magical effect
in their portfolio. So without further
ado, let's get to it
2. 02 Setup New Project: Okay, so let's start this project off by first
creating a new project. So go into the
file, new project. Let's name our project
to be magical. Butterfly. And
choose the location where you want to
save your project. I'm going with this c. So you can choose the path
wherever you want in it, except for this project. I'm gonna using this ten
animated butterflies is a free 3D model and
it is from CG trader. Make BY MR. David's. Just download that by pressing this
button. Free download. And it will ask you to wait for 20 s and press the download
button to start download. And it will ask you to
login to your account. If you don't have the
CG Twitter account, you can create your own account by going onto the register and enter your details and registered to create an
SAG Twitter account. And then you will be able
to download this model. So I already
downloaded the model. So let's unzip that. And we're going to
import this model into DNA in the next lesson.
3. 03 Making Butterfly Wings: Alright, now let's
take a look at the files that we
have downloaded. So here are the files that I unzipped animator
butterfly packs. And here we have the
idle animation folder. Let's open that. So here we have the idle
animation of the butterfly. So let's go back. And here we have the single
butterfly falling apart. Let's open that. So here it is, moving its
wings very fast. Let's see. Now we have the Slovenian
butterfly, idle, slow flapping. And here we have the
textures for the butterfly. And here we have the
blender to penetrate folder where we have
these diffuse stored. Let's take a look. We have the Alpha map. And this is the basic
butterfly body that's open. So that is the basic
body of our butterfly. And we have the normal
map and the diffuse map. Okay, so now let's import
this into Houdini. Let's create a geometry node. And now inside here, let's create a file load. Bring up this parameter. And here let's load our
basic butterfly body. So that is the butterfly body. It Games in very huge. So let's scale it down by
creating an image size node. And click on scale to fit. And press F on your keyboard
to frame our geometry. And let's make it
sit onto the floor by going to the justify. Why set this to a minimum? Now sitting on floor, if you middle click
on the geometry, you see we have some attributes. We have CD, mask
and some groups. For our project, we
don't need them, so let's remove these attributes and group by creating an cleans up and check the remove attributes and remove groups and uncheck the removed
to generate perimeters. Ok. Now if you middle click, now you see we don't have
all these attributes. Nice, Good. So now let's import our wins and we're going to create
wings inside of Houdini. So because if you take
a look at these model, you see it's using these simple planes and
using the Alpha map to cut out these planes
to render its wings. So that won't help
in our project. So instead, we will come to
create wings on our own. So let's create them by
using an, a trace up. So the trace out will
lead the Alpha map to trace out the silhouette
of the geometry. So if we take a look
at the textures, you see we have the Alpha map. So we're going to use this
map to trace out the wings. So let's open the parameter for the trace and
the image input. Let's let the alpha opacity. Okay, so here we have the
silhouette of the butterfly. And if we turn on the display, you see we have
very dense point. So let's add a resample node
to filter out these points. So let's change the
length to 0.15, 015. And let's add another
reason to load. This time, change this to 0.01 and change this
to subdivision curves. It will smooth out any
of these jagged edges. Okay? So let's add an a transform
node to transform. Rotate this butterfly onto
the 90 degrees in the X. Okay? So let's add a match size to add this into the center of the x axis because we later, we're going to use
the Middle South to create the mirror
geometry of the wings. So just click on the justify why to minimum to make sure
it sits on the floor, on the x2 max. And now it is perfectly
sitting onto the x-axis. Okay, so now if we want
to use the mirror, you see it is
mirrored correctly. So let's delete that for now. Let's create the UVs
and shade our bins. So let's create an edge UV
project node to create a UVs. Let's create an edge
uv quick shade node to shade our UVs. So here on to the texture map. Let's select our diffuse map. Okay? So here, as you can see, we have some problems. So let's adjust these UVs to fit the diffuse map
properly to our geometry. So let's create a UV
transform node before the UV. Quick shared node. Over here we have created the
UVs by using reject null. So let's add that. Let's set the display
flag to the gooey cookies so we can check the
changes that we're making. So first let's
center the pivot to our geometry by using
the dollar sign C x, dollar sign C, y for the y and dollar sign C for these add
to center out the direct. Okay, so first let's
scale these UVs up or scale down 0.9. Let's translate them in this direction by a
very small amount. Let's move this a little bit. Okay, so these are
the accurate values. Translate set this
to 0.0, 3.0, 0.03. Cited the scale to
0.89, 20.8, 6.0, 0.9, and it is looking good. Okay. So in the next lesson, let's animate these beings
4. 04 Procedural Wings Flapping Animation: Let's animate our wing by adding the wing-flapping
animation. So first, let me pass
the UV shared node. So let's hide these
UVs checkered pattern by clicking on
this UV checkout icon. And here as you can see, we have one big N gone here. So later on we're
going to use the velum to add the flexible
animation into our wind. So we need some geometry in our wings to create
the good animation. So let's create a 3D mesh node. And let's change the
target size to 0.02. And let's increase
the iteration to try and to create the
even out triangles. And let's increase
the smoothing tool, smooth out the triangles. Okay? So let me enable my
UV quick shared node. And let's animate by adding
an, a transform node. And we're going to animate
this rotation z value. Okay? So for the animation, I'm gonna using the
motion effects. So right-click and say
emotional effects. So right now it is currently
cut off the screen. But here I'm choosing the motion effects
and the V at the, this is the very
last option wave. Okay? So here as you can see, we have the wave
patterns generated. So let me close this window. So you can also view the wave
in the motion effects view. So here we are in the jobs. So if we go back, you'll see here we have the
motion effects job network. So let's dive inside. So here it is, bringing up the parameter and using the wave node to
generate the vague. So let's go back
to our scene view. Let me bring up my
labor and let's play. Let's click on the lock icon to check the real-time playback. So let's hit play. So as you can see, we have the wing flapping. So let's increase the
amplitude of our wave. So this one. Let me play that again. So let's change the
amplitude to 30. Let's play that again. Okay, so that is looking good. Let's change the period
to do to create an, a slow moving
flapping animation. And let's change. Our animation ran 220. So this is the frame range
that we are going to use in this project. Okay? So let's go back. So let's add a mirror node
to mirror our geometry. Let's connect to mirror node. And let's add the resistance to create the space for
the butterfly body. So let's increase the distance. Let's change this to 0.07. So that is I think, enough spacing for
the body to fit in. So let's add another match size. Two. Central route the both wings. Okay, so let's change the
justify why to none and Z2 num. We only need the x
to be in the center. Okay, so now it is looking good. Okay. So in the next lesson, let's create the
velum simulation. To create, add the
flexibility to our wings.
5. 05 Simulating Wings In Vellum: Now let's use the velum
to simulate our wings. So for that, let's create our group that will
be fun to animation. So here, as you can see, we have estimated our butterfly. So we need the pin group two
when our basic animation. So before the middle node. So here onto the transform
where we animated our wings. So let me rename my
transform to being. Here. Let's group some points. So let's select the Select
tool or from the primitive. Let's change these two points. And let me select some
points for painting. And maybe let's change the selection mode
to brush selection. Hold on the Shift to add
the points to the groups. Let's select this inner vein that may be responsible
for the wings animation in this in this case. So this point will work
good enough for us. Acme add couple of more. Hit Tab on the viewport. Let's try group to
group the selection. So here as you can see, the group node has been created. So let's rename
this group to pin. And when we have our geometry, we do have these pin groups. Okay? So here as you can see, on the point group, we have 358 points and before
the mirror, we have 179. So after the mirror, we do have these points
into the pin group. Okay. So let me place my
wings to where I want. So let's create an
a transform node after the match size and
moves the veins up a bit. Let's create another
transform load. For this, let's scale our
wings up to buy three units. And let's create
another transform to place livings in our angle. So let's move one
unit up in the y. And let's rotate this
to negative 60 degrees. If we play. This angle is
looking good for me. And now let's create
a vellum constraint. Configure cloth. This one. Here, it
says pin to Animation. Let's select our ingroup
to pin to our animation. Let's add an a vellum
solver and hit play. And here as you can see, our animation has
not been imported. So let's fix that onto the
velum plot constraint. Now let's check the
match animation. Let's play that again. And now as you can see, our animation is important. So what the wings
are very flexible. So let's increase
this bend stiffness. So where it says Bend
and the stiffness. So it's multiplier is the 0.001, which is very small value. So let's increase
this to 100,000. Let's play that again. Okay? I think the flexibility is good. So if he's, if it is
too flexible for you, you can change the
band stiffness to a higher value to create an, a more stiff wings. From my paupers,
100,000 is good. And you can also onto
the green group, you can add more points
to the pin group. So where you're feeling that there animation is
going to solve. So for example, here
on to the group. Let me add more points
to the pin group. To the group, Let's select
this selector icon. And let's add these points
onto the group as well. To create a more
stiff animation. Press Enter to complete
the selection. And let's check that again. Now as you can see, now the animation
is stiff. Okay? So now let's cash-out
our simulation. Let's create an F phi cash node and attach the first input. So that is our geometry. So before I flash out, if I middle click
on this board here, as you can see, we
have lots of points, attributes, and groups
that we don't need. So they will increase out our cache size and we
don't need them anyway. So let's remove them by ad and a clean saw up here
onto the clean. So let's uncheck the removed
to generate primitive. Let's remove the
attributes and groups. And this will also
remove the UVs. So we don't want that. So for the after the star, let's add the heart
sign on the shift six to add this crap
sign and add UV. So it means that delete
everything except UVs. So now, if we were to click, now you see we have
the UV attribute. So we can confirm that by connecting the UV
quick share known. So let me shake this node off. And let's connect after the clean node and
set the display flag. So here as you can
see, we have UVs. Okay? So let me pass this node here
on to the file cache known. And let's set the base name. Suddenly, I'm going
to name these things. Flapping and change
the base folder where you want the
cash to be stored. So let's check here on to
the dollar sign job and onto the same hit Accept
to select the folder. And the name will
be wings flapping. And here we have the version, version set to one. Let's check the load
from trace corruption and saved to disk to
cash out your emission. Alright, so our caches
has been written out to disk and we are loading
the caches from the disk. Okay, So let's shake you quick shade load
and place it here. And let's enable that node
to view it with our shader. So in the next lesson, let's create the
particle simulation to emit particles from our wings
6. 06 Emit Particles From Wings: Now let's create our
particle simulation. So for that, let's create a scatter salt to scatter
some point onto our geometry. So after the file cache, Let's add an S scatter salt
onto the scatter salt. Let's uncheck the legs
iteration. We don't need that. So let's increase the
force total count. Now let's create a pop network. So dive inside here
onto the pop source. Let's uncheck the guide and the emission type we said
to scatter onto surface. So currently we don't
have any surface. So let's change
this to all points because we are using
the points as a source. So here onto the birth, let's decrease the
life expectancy to two and add an a
life variance of one. So let's hit play. Here. As you can see, the
particles are generated but they're not
moving because the, currently there are no forces. So let's create a
pop when force. So we want the wind velocity to be into the negative
z direction. So we're on to the
vane velocity. Let's change the wind
velocity onto the z two negative five. And let's introduce some noise. So let's increase the
noise amplitude to two. Now let's increase
the salt size to 1.5. So let's hit play. So now as you can see, our particles are
moving with the forces. So let me change the particle display options from where it says
display material. So right-click on it. Let's change the particle
display two pixels. So after the path, then, let's add an a Bob drag
to add any drag effect. So let's connect that. So now as you can see, we have some particles stepping problem because our source
is moving very fast. That is why the particle
stepping is happening. So let's fix that. So for that, Let's create an, a trill SOP to create
the in-between frames. So let's connect the
points to the trails up. And the result type where it says Preserve Richard original. Let's change this to
connect as polygons. So now if we hit
Play, as you can see, our trig sub is connecting
these particles as polygons. So let's change the
trail increment to ten. Let's play that again. So as you can see, our trail sub is
struggling to work with. And that is because
these scatter salt does not generating the
consistent points on every frame. So if we take a look
at the point number, so these are very dense, so let me decrease
the point numbers. So harris can see the point count is
changing in every frame. So that is what
confusing the trail. So we need the consistent points to be generated every frame. So for that, let me
hide the point number. Let's create an a time shift
node after the file cache. So time shift here
onto the frame, right-click and let's delete channel to delete the
expression onto the frame. So now we have the steel frame. So let's scatter the points
onto this steel frame. Let me increase the
particle count. Okay, so now we don't
have animation. So we need, we want to stick these particles
to the animation. So for that, we're going to use the attribute intercalate sob. So the attribute interprets
up has two inputs. So one is the
destination geometry. So the destination geometry
is the scatter salt. And the required source
attributes to interplay. So we want the position
attribute to be interpolating. So this will be in
the our second input. So let's set the display flag to the attribute interpellate. So as you can see that actually will interpret soft
throws an error. And that is because the
attribute interpret South needs these two
attributes to work with. So it needs this whole supreme and source supreme UV attribute So here on to the scatter cell
onto the output attribute. Let's enable the brim num
and the UV attribute. So when scattered, scattered the points
onto these geometry. So it will store this
information onto which primitive it is a landing the point and what
is its primitive? Uv position, prim uv position. Okay, So we are enabling that. So let's set the display flag to the attribute intercalate. Now if we hit Play, as you can see, now, all particles are sticking to the geometry and
they are consistent. So now let's connect
the trails up. I want to be
attributed interplay and certainly display
flag to the trail. Now as you can see, our trig sub is working fine. If we enable the point display
there, as you can see, we have these
basically two streams and these lines are
connecting between frames. So let's add an, a scatter sub two
scatter points onto our this new geometry to create anymore filled geometry
to this character, let's increase the
particles count. Okay? So now let's use
this as a source. Set the display flag
to the pop net. So let's go back to
the first frame first. Now, let's set the display flag. So now as you can see, we don't have those weird
particle stepping. Okay. So now let's further improve our source by adding the noise. So after the scatter SOP, let's create an attribute warp. Connect that, and dive inside. Now let's create an a and
T aliased flow noise. So let's connect the
position to the position. And for the flow, we're going to connect
the time as a flow. Let's put the noise to CD. Okay? So now the noise is currently
very low-frequency. So let's increase its frequency. Okay, After the mTLS flow
noise, Let's add an, a fixed range to clamp
some noise values. So source minimum,
let's decrease this to negative two to add
a bit more contrast. Okay? So now let's break up our source by deleting
all these black values. So for that, let's create
an attribute triangle. Let's type in a
simple expression. So we're going to say if C, D capital C lowercase t is
less than a threshold value. So we're going to create an a threshold value
through a slider. So our skeleton as CHF, which means the channel float. So here we will
type the threshold. And let's close the
parentheses for the if. So, if the condition is true, we want to remove points. Move point, and the geometry should be zero and
the port number is large side and a semicolon. And let's click on
the channel Create, to create the channel, let's increase the
threshold value. So here as you can see, we are removing the points
with the black color value. Okay? So let's set the
slider to our liking. And now let's use this as
a source, as our source. And now we have an, a more breakout source. So now let's import
our color attributes. So this color, I want this
color to be onto my particles. So for that, after we
remove some points, Let's create an
attribute from map. So if we middle click
on to this node here, as you can see, we
have these UVs. So the UVs that we have created onto the
original geometry. So these UVs are inherited
with the scatter salt. So as you can see, we do
have UVs on to these points. So which means we can use
the attribute from AB to load out our map
as a CD attribute. So here onto the texture map, Let's select our to our
dollar sign job texture, butterfly texture, and
load our diffuse color. So now we are importing the diffuse color as
an a, C, D attribute. So now when we simulate this CD, attributes will be inherited. Okay? Now as you can see, we are importing the color attribute onto our
particles as well. Okay. So in the next lesson, let's create a smoke simulation
to advect our particles
7. 07 Advect Particles From Volume Velocity: So now let's create the smoke simulation
for particle advection. Before that, let me
fix some values. So here onto the scattered SOP. So let's uncheck the
relaxed iteration. We don't need that. And let's increase the particle
count to nine to five. And here onto the, before the attribute interpolates
up onto this character. So let's change
these force count to 400,000 to create
any more detail source. So now if we take a look. So here as you can see, we have lot more
particles. Okay? So let me organize
my node graph. So here onto the file cache, Let's add another scatters up. To scatter some points. Uncheck the relaxer tuition, increase the force count. And let's break up our source by copying this whole setup
that we have generated, this noise and the
particle removal wrangle. So let's duplicate that. My press and hold and drag
to duplicate these node. And let's connect that, set the display flag. And here as you can see, we have these
particles breakups. And let's create a
spiral source node and change the
particle scale to one and initialize to source smoke. And let's create a velocity. So we're gonna use
the point velocity. So let's connect that
point velocity node. Select the initialization
to set to value. And let's add a velocity into
the negative z-direction. So let's change this
to negative one. And let's lift up a
little bit to 0.3. And onto the noise. Let's add an, a girl
noise and animated. Let's chain the soul size 21.3 and lower the
overall scale to 0.5. Now let's add an a volume
restaurants attribute node. Connect that. And lets rasterize our density and temperature and velocity. Let's check the normalized
by acclaimed coverage. And let's lower the voxel
size to zero points. Simon. We don't need that
much detail smoke. So let's create an viral solver. Connect that. And let's change this to 0.07. And onto the sourcing. We have density to density,
temperature to temperature. We don't have flame. Let's remove that. And the velocity, Let's bump up the velocity two to
less the temperature. And let's set the temperature
method from pool to add. So we are adding
the temperature. So onto the output. We don't need the
temperature or flame or CD. So we only need the
velocity field. So I am still exporting
the density so I can look at the
smoke simulation. So let's hit play. So as you can see, our
smoke is rising up. So let's go on to
the quantity shape. We are on to the buoyancy. Let's change the
buoyancy direction y to zero and
change this to one. So now you go on to the
negative z direction. Let's add some wind. Let's enable the vein. Let's set the wind direction
to negative z direction. So here onto the fields. Let's uncheck the flame
so we don't have flim, flam, so let's uncheck that. So we are on to the
density dissipation. So let's lower the
patient to 0.05 And here onto the shape tab, Let's enable the blends and set the scale to one. Let's check. Okay, so now let's connect this into the second
input of our subnet. So let's dive inside. Here after the bulb when let's add a pop, advect by volume. Connect that. And we'll ask to source
where it says solve. Let's change this to
second contexts, geometry. And the advection type
set this to update velocity and change the
advection method to trace. And let's lower the
velocity scale to 0.8. Okay, let's hit Play. So we have lot more particles so that why our
animation is slow. So let's go back to
the first frame. And after the pop net merge, add an attribute, leads up. So click on the
Delete, non-selective. So because nothing is selected, so every attribute is deleted. So now we don't have
any attributes. So before that we have
23 point attributes. So these will increase our car size and we
don't need them anyway. So let's lead them. And we still have the
one-point groups. So let's add a group delete. To delete that group. And select our group
that we want to delete. And now we don't
have any groups, we only have points. So let's add a color to color. These are particles to black. Now, let's transfer our this
color onto these points. So that is because I don't want my whole articles color to be
the butterfly wings color, but the blue color, I wanted this color to
bleed out a little bit. So let's create an,
a transform node. And let's center out its pivot. So the pivot translate. Let's add dollar sign C, e x on the x. I'll assign CE. Why? I don't put onto the
z dollar sign C, E, Z. Okay. To center out our pre-vet. Okay, so now let's scale down our whole particles
just a little bit. So let's scale down it by 0.9. So now let's add an
attribute transfer. So I want to transfer
the CD attribute from this train to the
attribute transfer. Let's uncheck the primitive. And we only want
the CD attribute to be transferred to
the conditions. Let's zero out the
distance threshold, increase the blend
width to 0.0, 15. Okay, So now as you can see, we have a little bit
color bleeding effect. Okay, So here on to
the transform node. So let's just little bit add a nudge onto the negative
x-direction is 0.05. Clay onto the z. Let's add 0.3. So
basically we have an, a color bleeding effect. So the butterfly color
is on the inside of the particles and
the outside will be completely black particles. Okay? At this point, if you want to crash
out your simulation, this smoke simulation,
you can add an F file cash and cash
that out separately. But I'm going to cash out when I have all
these steps term, okay? So it's all up to
you if you want to catch this separately. So what I'm caching after I have done all
these operations. So if you middle click, now we have the CD
and the p. Okay? So let's add an a phi cash node. Connect that, set the
display flag to file cache. Let's set the name to
be particles, cash. And change the base folder to dollar sign job
and onto the same. And hit Accept. Check the load from disk
and press the saved to disk option to cash out
your particle simulation
8. 08 Settings up Smoke Simulation: Okay, all done. So I have written
out all the caches. So after the file cache
or scraped and no, let's call this
null out particles. Okay, so now let's create a smoke simulation that
we are going to render. So this smoke simulation
that we have created here, this is for the advection. So now we need to create another smoke simulation
for rendering. So let's copy our
whole setup here. Press and hold the
Alt key and drag to duplicate all these nodes. Okay? So for the volume
restaurants attribute, so let me lower down
the voxel size to 0.03. So this is a much
higher risk simulation. So let's create a
viral solver node. So let me bring back my play
bar to the first frame. To the pyro solver. Let's lower the
voxel size to 0.03. And onto the sourcing tends to do density and temperature. Let's set the operation to add. Let's uncheck the
flame velocity. So let's change this to two. And onto the field. Let's uncheck the flame. Now let's check
the spirit field. So for the dissipation, we're going to use the 0.05 for the dissipation onto the ship. So let's zero out the y and set this to one because we want
the smoke to travel in, in the negative side. Okay? So let's enable the disturbance. Also enable the turbulence. Here onto the disturbance. Let's enable the use
control field and the control phase already set to speed and the
range is zero to one. Okay? And let's set
the disturbance to ten and the turbulence
to one, or maybe five. We're going to create
another turbulence node inside of the pyro solver nodes. So let's dive inside
here onto the forces. Let's create another
gas turbulence node. And let's connect that. Let's set its scale to one. So we have one low scale noise and we have one
large scale up here. Okay? So here onto the output. Let's disable the
temperature, flame, velocity and CD we only need
the trends TO attribute. So let's check the convert to VDB and use the 16-bit float. So let's hit play. So right now our smoke
is looking very thick. So let's change that. So here onto the
pyro source node, let's decrease the
particle separation to 0.03 to match our voxel size. Okay, and now let's hit Play. So let me change
my color to black. So just click on this icon
and go into the fire ground. And let's change the
color scheme too dark. Okay, So this is our
smoke simulation. So let's catch that out. So let's create a
file cache known. Connect that. Let's also check
the load from disk and name these two small same. Let's select our dollar
sign job. Same folder. And you'd accept
and press the Save to risk option to
render all these caches
9. 09 Scene Preparation For Rendering: Okay. All done. So I have written out the
smoke simulation cash. Okay, So after the file cache, let's create an unknown. Let's call this
null to out smoke. Set the display, flex the smoke. Now let's fix our
butterfly. Foldy. So it's way up here. So after the clean, so here as you can see, we have the butterfly body. So after the clean, so let's add an colors up to let's color this may be
a gray value, half gray. So let's create
another transform node and set its scale to three to match the
scale of our wins. And let's create
another transform with the same value
for the placement. So we have lifted one unit up and the rotation was
negative 60 degrees. So let's check this
with our main cash. So let's merge this view if
the placement is correct. So let's merge our
wings with the body. So here as you can see, our scale is not matching up. So go into the match size that we have created after
we imported the geometry. So we are onto the target size. So let's lower that
down the target size. Okay? So our scale
is looking good. Maybe let's increase
its scale just a little bit more to 0.25. Okay. So now its
placement is good. Let's check. Okay, so we don't
need this merge node. So after the transform, Let's create another neural. And let's call
this null tool our body. Okay? So here onto the particles. So if we middle click here, as you can see, we
have the CD and the P. So currently we don't have
the B scale attribute. So we need the p scale attribute to set the scale
of our particles. So let's create that. Let's create an
attribute triangle. Let's set the scale to a
lower value, maybe 0.01. We will change it back when we are rendering our particles. Okay, so now let's
import all of these, our geometry particles and
since smoke simulation into Solaris to render
out our final effect. Okay?
10. 10 Import Into LOPs: Okay, so now let's import our scene into Solaris
for rendering. So we have forgot one
null for the wings. So here on to this file cache, where we have simulated
our wings using vellum. So let's create another node. Let's connect that. Let's name this our wins. So that is our wins simulation. So let's go into
the state context. Here into the stage, alerts, create an import node. And here onto the soft path. Let's select the body. And let's rename this to body. And let's duplicate that node. Let's import our OUT wins. So let's call this rings. So duplicate again. And let's import our particles. These two particles. And let's duplicate one more
time to import our smoke. Let's rename this to smoke. So we have the body, we have the beans, and the particles and smoke. So let's merge them together. Select all of these nodes
connected to the merge. Okay? So now we have imported all of our scene
geometry into Solaris. So now let's create
a dome light. So let's merge the
light into our scene. And for the texture. Let's select the
Houdini, pick HDRI, and choose the HDRI Haven
skylight garage. Okay. So if you don't want the light to be seen in the
viewport and just press this eye icon and onto the background and uncheck the display environment
height as background. Okay. So let's increase the
exposure a bit to-to. We'll change that later
when we are rendering. And let's create an, a material library to
assign the materials. Lastly, let's create an, a hormone render up
to render our scene. So let's connect there. So the camera Indra
has two nodes. One, we have the render settings and we have these USD renter up. Okay, so in the next lesson, let's set up our material
and shade our scene
11. 11 Materials And Rendering In Karma XPU: Okay, so now let's create our materials for our
geometry particles and smoke. Into the material library,
Let's dive inside. So it is important
that, you know, if you are using the CPU engine, you can use the principal
shader, this one. So because I'm gonna be
using the karma x q. So which mean is going to
utilize my CPU and GPU. So the karma exp EU does not work with
principal children. So for Karma XP you, you need to create
the material x. So these are the
material x node. So we are going to use the material x surface
shader, standard surface. So let's create that. So let's rename this to party. And let's duplicate that. And this one will be for our wings and another
for the particles. So let's rename
this to particles. And for the smoke, we're gonna using the SBU
viral previous shader. So this shader will be
used to render our smoke. Okay, so let's go
back to the stage. So on to the material library. Let's click on the
autofill material too. Fill all the material
into the proper slot. So for assigning,
let's check the assigned to geometry
and for the geometry. So let me change my
desktop to the Solaris. So now we have the access
to the scene graph tree. So let me hide my parameter window and
let me hide the shelf. So here we have the
same graph tree. So here onto the
material library and assigned to geometry. So we're going to find the body. So here we have the mesh. So let's use that. So now we are using the body. You can use the
body node as well. Okay? So for the wings, Let's let the wings
and drag it into the assigned to geometry
slot for the particles. Let's select the particles
and drag it to here. And for the SBU pyro preview, we're going to use the small. So let's do that. So now we have assign our materials to all of our geometry,
particles and smoke. Okay, so let me hide
the scene graph tree. We don't need that. So let's bring up our display option again and onto the background. Nurse disable the environment
light as background. Let's disable this
light guide as well by clicking this enable
or disable light guide. Okay, so let me change
the view to dark. And let me hide the grid. Okay, so let's set the display flag onto the
karma render setting here, Let's change this to SBU engine and alerts here onto
the perspective. Let's change this to karma
to render out our scene. Okay, so let's change some different frame
where we go into the 50. Okay? As you can see, the current
my x value is very fast. So first, let me focus
on the material. So let me disable
all of these node. So let's bypass them. So now currently we are only
focusing on to the party. Okay, so now let's dive
inside the material library. And here we have
the body material. So let's bump up the
diffuse roughness. We don't want the shiny
surface for our body. And let's change its
color to a darker value. So going into the specular, and let's lower
the specular down. And let's increase the
specular roughness to 0.8 So now we have the rough
surface for our body. Okay, So let's
change this to 0.5. And now let's enable the wings. So let's go into the
material library. And for the wings, Let's load out our
diffuse texture. So by using the material
ECS image known. So here onto the image, let's hear on to the file name. Let's select our dollar
sign job into the texture. And here we have the diffuse. So let's select that. Let's connect these
two base color. Okay? So now as you can see, we have imported
our diffuse color. So now the surface
is very shiny. So here onto the wings, go into the specular
and let's zero out the specular so we don't
want any reflection. So let's change back to
normal to see our changes. So now as you can
see now we don't have any reflective surface. And maybe let's change
the base to 0.8. Okay, so after the
material ECS image node, let's lay down and a
material x range node. And let's connect that. And here onto the Gamma. Let's lower the
Gamma down to maybe 0.45 and outlaw to negative 0.4. Okay, so It's now
looking a bit dark. But when we increase the
dome light exposure. So let's increase the
exposure to four. So go into the material
library again. So let's use the same
image for the emission. So we want the glow effect, swear on to the emission color. Let's connect that. So go into the wings material. Into the emission. Let's enable the emission by
setting the mission to one. So now as you can see, our butterfly is looking good. Okay, So now for the articles, so let me change this
to Houdini g, l. And let me disable
the body and wings. And for the particles,
let's enable that. So go inside the
material library where we created the
particle material. So here, let's import our CD and use the CD attribute
as a base color. So for that, we are going to use the USD ClinVar reader here
onto the brim worried. So the variable name does CD will be changed to
display color in Solaris. So in Solaris the CD is
called the display color. So let's type display and the color have
the capital C bar. Let's connect this
to our base color. And the signature is the vector. Okay, here onto the
particles and the specular. Let's increase it. Roughness to 0.8. And let's change our renderer to grammar to view
our particles. Okay, So here as you can see, now we are rendering our CD
attribute as a coloring. Okay? So the particles scale
is maybe too small, so let's increase that. So let me disable the
renderer to Houdini G, L. So let's go back onto
the object to the geometry. So we set it RPE scale. So let me rename this to scale. Let's change our scale to a
higher value, may be 0.05. And now let's see the stage. And let's change
this to caramel. Okay, Now the particle
scale is looking good. So let's dive inside
and let's use our same CD attribute into
our emission as well. So here on to the
emission color. Let's plug that onto the particles material
going into the emission. Let's enable emission by
setting emission 0-1. Okay, so now we have the Emission going on
in our particles. Let me change back
to Houdini GL, and now let's set up
our smoke material. So go into the karma
viral preview. And let me disable my particles
and enable the smoke. And let's change the renderer to karma to see our current smoke. Okay, So let's dive inside the
material library and let's change the density scale to tend to create nMOS,
thicker smoke. Let's increase the shadow, tends to turn as well. Okay, so now we do
have some shadows. So let's make our smoke
color to our darker value. Okay, So this smoke is, smoke color is looking good. Maybe let's increase
the density a bit more. Let's change this to 15. Okay, now let's view
everything together. So let's enable all
our geometries. Let's change this to karma. So now let's rotate
our dome light. So let's go into the transform
and onto the Y rotation. Let's rotate this
into 180 degrees. Okay? Now let's create another
light into our scene. So let me bring up my shelf
and let's press and hold the Control key and
click on the area light to create the light
from the current view. Okay. So let me uncheck this lock
icon to disable the log. Let's change this to caramel
to see the light effect. So maybe let's increase
the intensity to three. And also let's increase
the exposure to ten. Okay. So here onto the light. So let me disconnect. It's wire. So let's connected hair
after their dome light. So here onto the
karma intersecting. Let's lower the portray
sample to maybe 91, maybe less lower even
further by 64 fast preview. So let's change back to normal. Okay? So the area light
is a bit harsh. So let's set this
very says no cam. Let's look through light, area light, and let's
lock the light. So let's place it a
little bit more in angle. So let's uncheck the lock icon. And now let's create a
camera for our scene. So for that, let me choose
a view that I like. And press and hold the
Control key and click on the camera icon to create
the camera onto that view. So let's unlock the camera. So let's make this
bigger and bigger and let's hide the shelf
on the camera. Let's merge it with our scene. Okay. So let's go into the
karma render setting. Swear on to the resolution. Let's change this
to HDTV Trinity. And here onto the image output. And the AOVs. Let's enable the light and emission and the
combined emission AOV. So we need the
emission it will be for later in the compositing
to add a glow effect. So let's select the
karma to render. Okay, you can check your
movie by clicking on this, viewing the output option. So let's click that. So here we have the
combined option AOV, so combined emission. So let's like that. So here as you can see, we have the emission AOV. So this Avi we're going to use later in the compositing to
add and add glow effect. Okay, so let's change back to see for the color beauty pass. Okay. So let me change back
to Houdini G, L. Okay, so at this point, you can pretty much play
around with the camera and all the lights to set
up at your liking. So when you are done, go into the USD
anaerobe and here onto the render up inside the
buret surrender Chrome Frame. Let's change this to render
specific frame range. So it will be one to 120. Okay? So here onto the karma render setting where it
says Output picture. So let's select that dollar
sign job into the render. So let's call this
one to be butterfly. Taught. Dollar sign F and G XOR to write out the
XOR sequence, hit Accept. So here onto the
USDA render setting, precedent it to disk option to render out all your
sequence to taste. Okay?
12. 12 Compositing In After Effects: Okay. All done. So the render has been finished. So these are the rendered
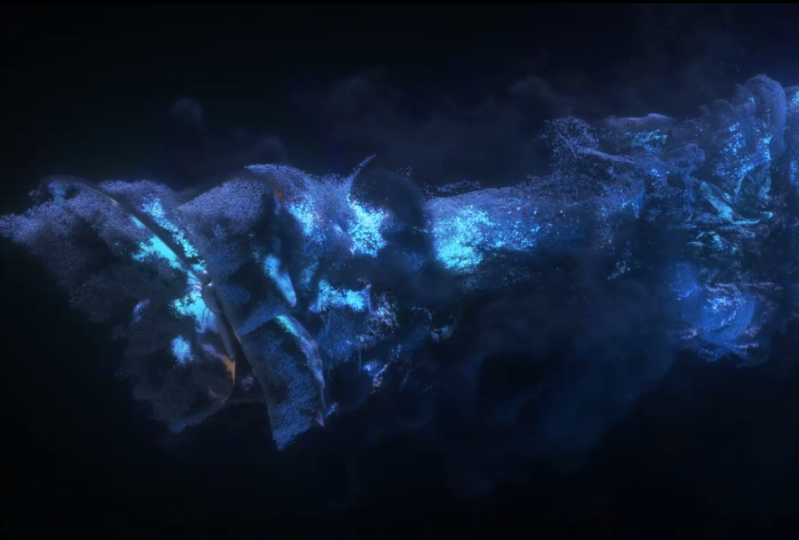
straight from Houdini. So the particles and smoke
are looking very good. So now let's composite
them into After Effects. Here, into the after-effects, I already imported
the image sequence. So when you are
importing your sequence, go to the interpret
footage main chain, the frames per second, 30-24, because these are the
frame rate that we're using when we are rendering
our short in Houdini. And also in the
color management. Check the preserve RGB to
disable the color management. Okay, because we
are using the aces. So for the essays to work correctly inside
the After Effects, you need the plug-in. So this is the plug-in open
color IO for After Effects. So download that, press the green button
to download for Windows. And if you are on Mac, press the math button
to download it for Mac. I'm also going to be using the
plugin from video copilot. So it's a free plugin. So let's scroll down where
it says free plugins. Let's download the
color vibrance. Press the download to
download that, unzip that, and place it inside the
after-effects Plugin Library. Now we have the butterfly. Let's create a new comp. So these are the sequence. So right now they are looking
very dark because they are using their knowledge using
the correct color space. So let's correct that by
adding an open color IO. So let's add there. So here onto the open
color io input space, Let's change this to
aces and essays CG. And for the output space, these two output and
choose the output sRGB. So now the aftereffects is
using the correct color space. So let's add a
curves adjustment. So let's adjust the curves to create an S curve shape. Now, let's import
the emission paths. So I rendered the emission
paths separately. So here I have emission bars, so let's import that. So for the emission, let's copy our same open color. I use headings. So select the plugin control C to
copy and onto the emission. Press Control V to paste. And now we're using the correct color space for
the emission paths as well. So let's add the mission bars
blending mode to screen. And let's add an, a VC color vibrance to
add color to our glow. So let's change this to blue. And now let's add an, a CC vector blur. So what CC vector blur will do? So if I disable my
butterfly sequence. Okay, so let's
enable the amount. Increase this to five. Okay, So it will create a
more organic looking shapes. Okay, Now let's add a glow
to add the glow effect. And let's increase
the glow radius 200. Let's increase the
glow intensity to create any more intense glow. And let's enable our
main butterfly sequence to view it together. Okay. So these are the, pretty much the settings
that are used for the glow. I'm using the deep blue. So it is from plugins
and everything. So Deep Blue is a paid plug-in. So I use there to
add the glow effect. Okay, So now let's render out our sequence by going to composition pre-render. Here, Let's select the format
that you want to render. You can use the JPEG sequence
or the PNG sequence. Hit Okay, and press Render to render out your
composter sequence
 Shahzad Ahmad, Houdini FX Artist