Transcripts
1. Introduction: This class is about lost and
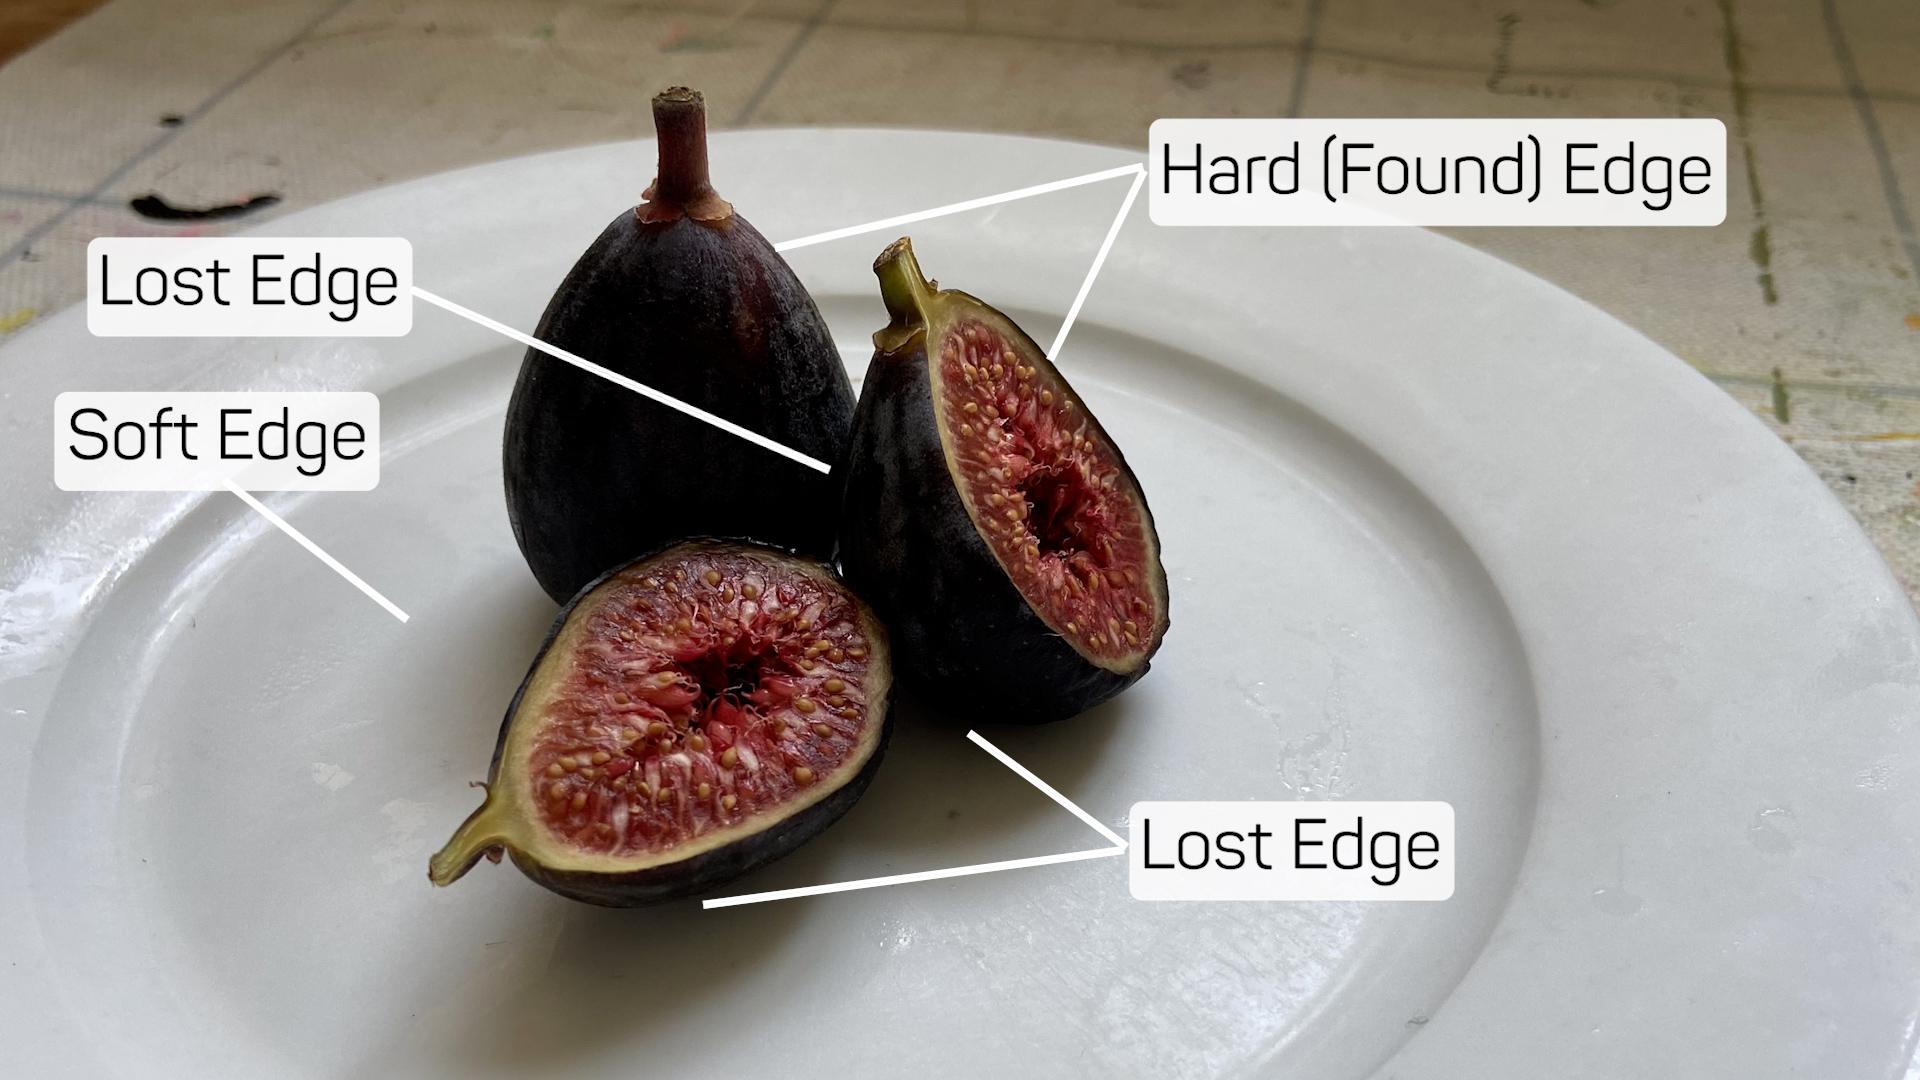
found edges in watercolor. There are four types of
watercolor edges, hard edges, also known as found
edges, soft edges. Lost edges and broken edges. We are going to look
at why edges are important and how to paint them. Then we are going to
practice lost and found edges by
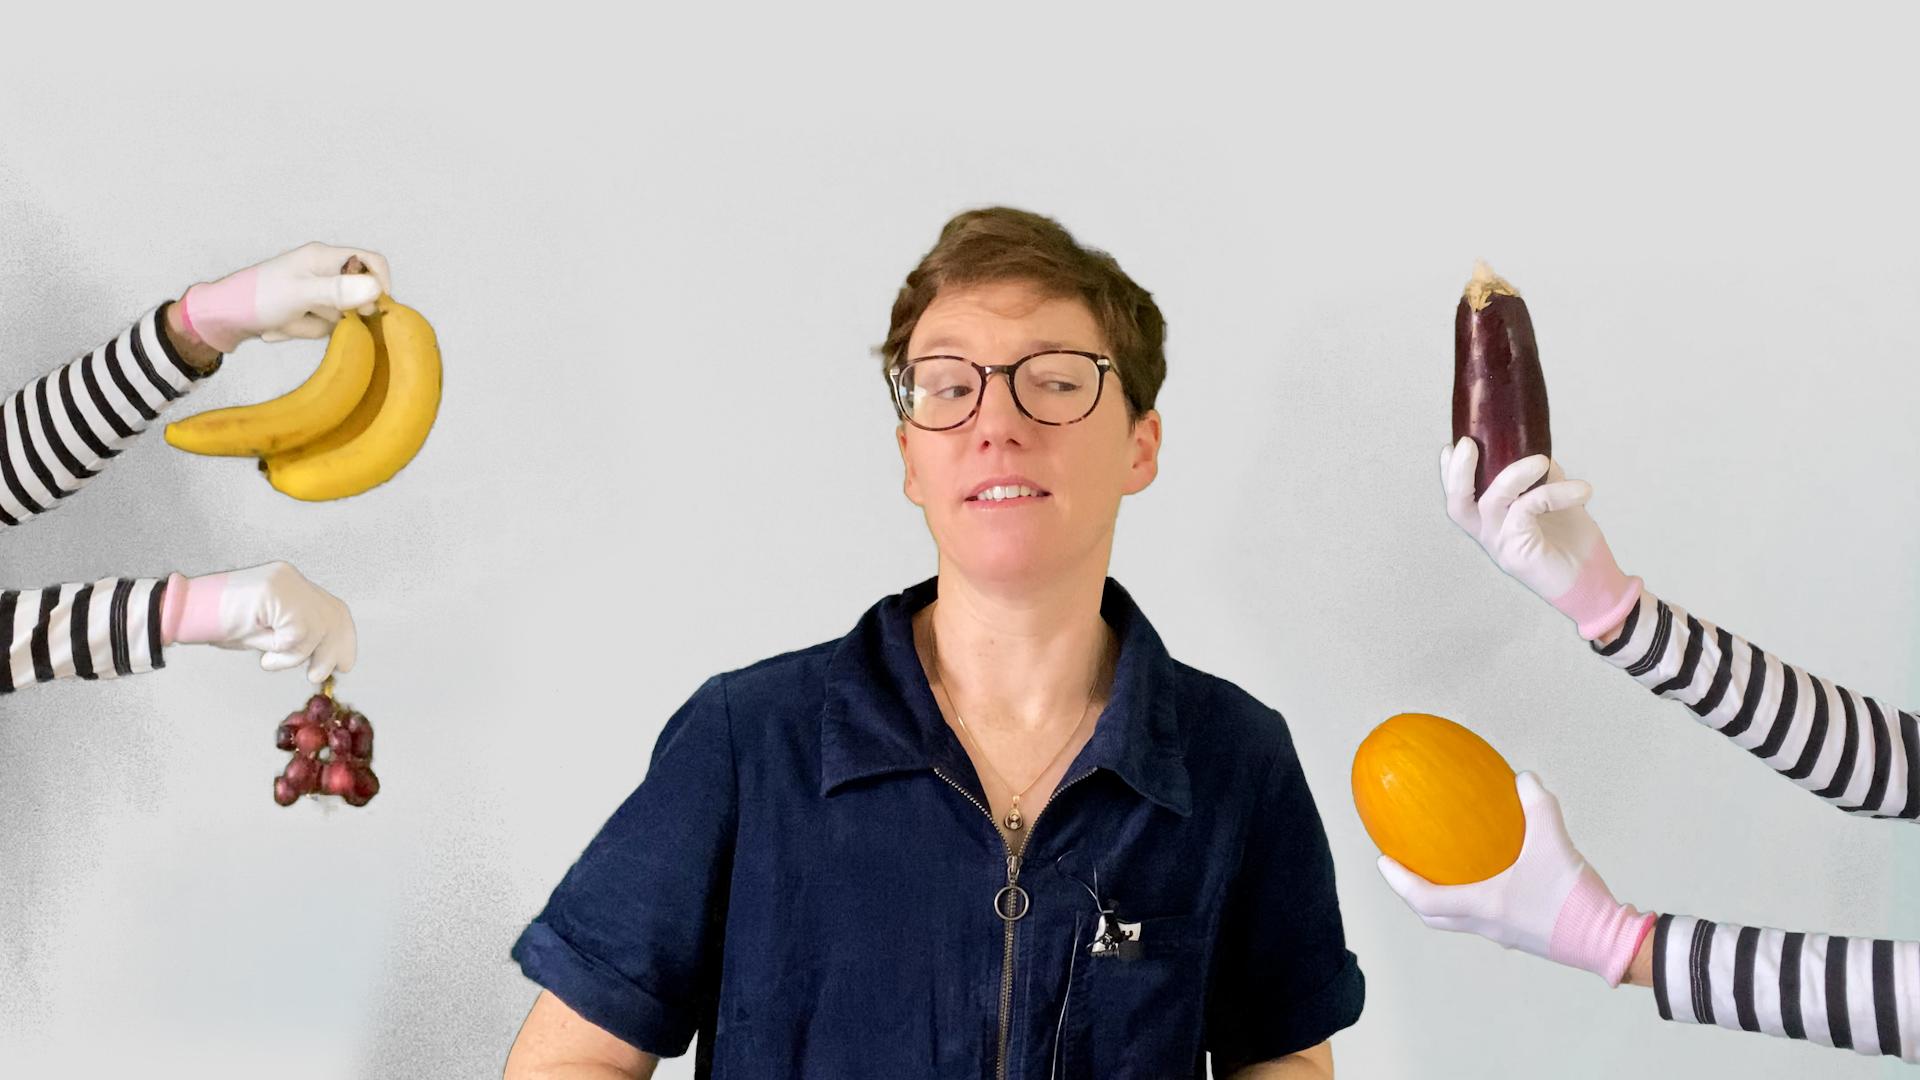
painting some edges. This is edges with edges. Hello. I'm Catherine Jennifer. I'm an artist, art educator, and top teacher on Skillshare. Not sure who that
was. In this class, we're going to focus on two of the most important aspects
of watercolor painting, edges and tonal value. We're going to do simple
paintings of vegetables, making sure to include
lost and found edges. And we're going to
combine this with a focus on mastering
tonal value. I'm going to show
you specific brush and palette techniques
so that you can achieve a full range of tone in your paintings
from light to dark. So grab your things.
All you need is some black watercolor
paint and your fiber day. Thank you.
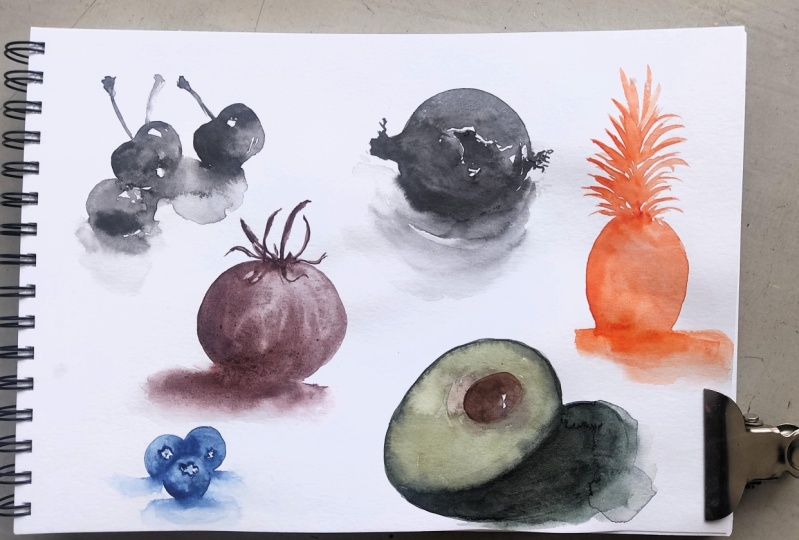
2. Project: Project is to paint
a vegetable of your choice using only
black watercolor paint, and to make sure you include
lost and found edges. If you don't have
black, you can mix a black using colors that
you've already got. I'll show you how to do this. Once you've done your painting, take a quick photo and upload it into the
class Project Gallery.
3. Materials: You'll need black
watercolor paint, or if you don't have
black, you can mix a black using the colors
you've already got. You'll need a nice big brush
and also a smaller brush. And then the main thing is try
to use good quality paper. 100% cotton paper will
give you the best results. So gather your stuff
and let's get started.
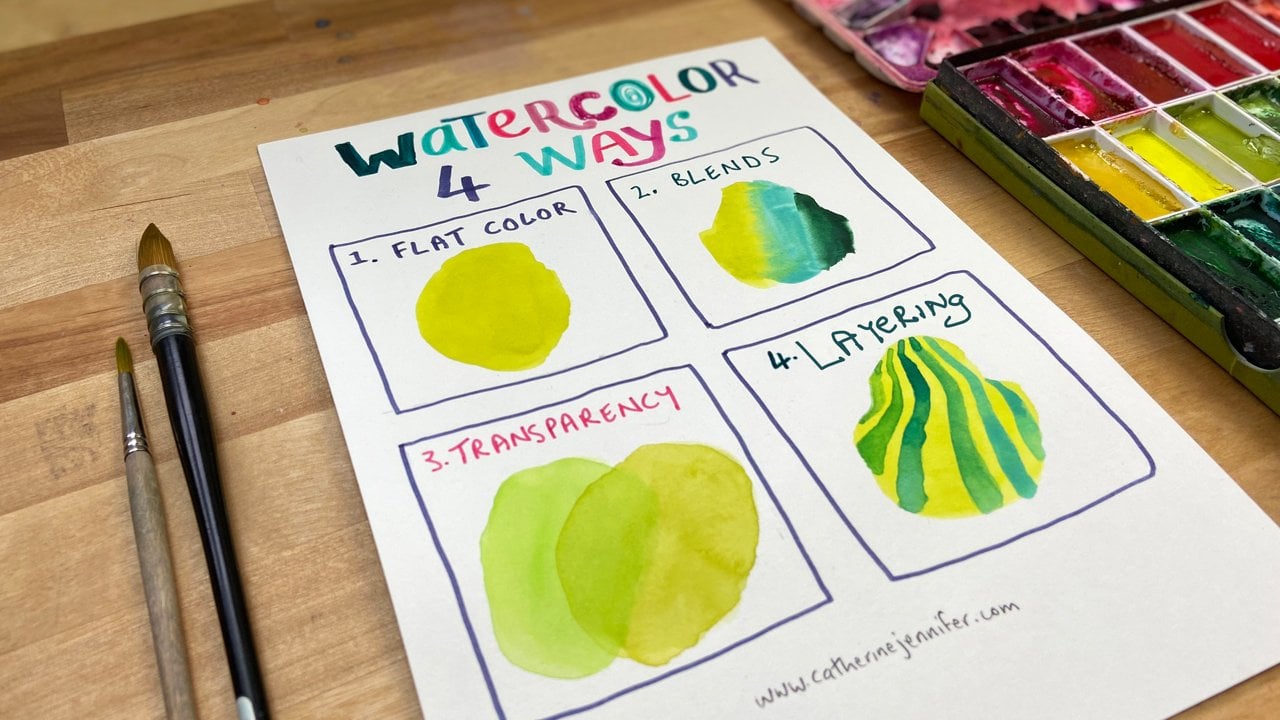
4. Edges Explained: First of all, let's look at how we create the different
types of edges. So let's look at how
to create hard edges. A hard edge, also called a found edge is the
easiest one to make, and it's created by using
wet paint on dry paper. Just like that. A soft edge is created
by painting wet on wet. So to create a soft edge, you will typically
wet your paper, like I'm doing here
with clean water. The key to a soft edge is
letting the water soak into the paper a little bit so that you've got
a sheen on your paper. You don't want a swimming
pool sitting on top, but you also don't
want it to be too dry, in which case you won't get a soft edge. The
paint won't travel. And then the third and
important thing is you need to have the right amount of
liquid in your brush, but you don't want
it to be too wet. So I've picked it up here. I'm tapping it off
there onto my tissue, and I will paint a wet line. And I will get a soft edge. A lost edge is created either through
tone or through color. So if I'm going to do a quick painting of
these strawberries, just to demonstrate
the lost edge. If I put the first
strawberry in here, and then if I join
the next strawberry onto this strawberry, going to leave the leaves
as the white of the paper. By joining these two
strawberries over here, I have lost the edge
between the two of them. You can also have fun using
lost edges for shadows. So if I'm going to create the shadow
underneath the strawberry, I can come in with a
lighter tone of paint, control my water, and I can lose that hard edge underneath the
strawberry into my shadow. You'll see this in action in the demonstration of the
vegetables that I paint. Come in with a lighter
shade of paint and lose that edge underneath. And then the final type
of edge is a broken edge. And this is created using
a dry brush effect. So you load your
brush with paint, and then you take out as much of the excess water as you can. And sometimes it can also
help to open your bristles. And you get this
dry brush effect. If you don't want to
open the bristles by hand, you can still get it. You can see bits of the
paper coming through. It works best if you keep
your brush flat to the paper. So not upright. And there you have
a broken edge.
5. Rescuing a Soft Edge: Now, just going back to
soft edges for a moment. I want to show you two
ways you can rescue a soft edge if it hasn't softened as
much as you wanted to. So I'm just putting some
clean water on my page. Want it to be nice
and evenly covered. Okay. So my page is wet, but it's drying very quickly. And if I make my mark there, that one's working quite well and giving me a
lovely soft edge. I'm gonna wait a few moments for the paper to dry even more
because I want you to see what happens if I get the timing wrong and then
how to rescue it. Okay, so I can see
that my paper is now pretty dry and also everything here on my palette is pretty
dry and thirsty. So if I make a mark here, it's getting a soft edge there, but it's not getting as much of a soft edge there as
I was wanting it to. And then if I make
another mark there, as you can see, my edge
isn't soft at all. So the first thing I can do if I wanted a soft edge
and I'm not getting it is I take a clean
brush, clean water. And I call this
approaching by stealth. So starting away from the
edge that I want to soften, I'm coming in with
my clean water. The place where I
first go in with my brush is the place where
the most water will come off. And then I can control
how much water I'm dragging upwards towards the edge that I want to soften. And then I just touch that edge and the
softening will happen. If you get a bit jumping
off there, just like I did, then you can dry off
your brush and just pick it up and wipe it
off on your tissue. So that's the first method
approaching by stealth, and that's my preferred method because I have more
control over the water. However, you can also try and bring it that
way with water. Now, some people say
don't do this because all you're doing is moving
your hard edge that way. However, sometimes it works, sometimes it doesn't I've
got clean water on my brush, and I'm carefully controlling
how much I've got in there. And then if I start in the edge I want to
soften and I bring it out, I can soften that edge. Now, I find this method not as successful as that method generally, because
as you can see, it was harder to control, and although I took longer, so it had dried a bit more, there's still that
hard edge there, and then there's a
hard edge there. And as I said, some people say that if you do it this way, all you're doing is taking
your hard edge and moving it making it bigger. You have to have a
lot more control to get it to work
with this method. And you can see how
these have dried. This one was definitely more
successful than that one. Then the second thing
you can do if you make an edge that you wanted to
be soft and it's not soft, let's say I was hoping
that would be a soft edge. As you can take a clean brush, wet it, but not too wet, and you can just tickle
the edge to soften it. Okay? Clean it,
control the amount of wetness and tickle
that soft edge. It works best if you use a
harder, more bristly brush. This is more of an
acrylic or gouache brush. I'll show you again
on this side. Just tickling that edge. So those are two things
you can do to rescue your soft edges if they
weren't soft enough.
6. How Artists Use Edges: Now we know what
the different kinds of edges are and
how to make them. But let's look at how
artists use them. Lost and found edges are very useful in
landscape painting, such as in this example
by William Turner. Basically, edges that
are softened or lost edges are used to add
atmosphere and depth. They often allow forms to
disappear into the background, and edges that are hardened
or are found edges are used for focal points and to bring objects forward
in the painting. Here's another example of
a really beautiful use of lost and found edges
by John Singer Sargent. He simplified the details of the buildings and
used soft edges in this section to almost get
rid of the windows and get rid of any details that he didn't actually want
the viewer to focus on. And it creates a
beautiful sense of flow in this part
of the painting. And then he's created found edges here with the
bridge by actually painting the sky around the
bridge and leaving some of the paper showing through at the top
of the bridge. That's a beautiful
example of a found edge. Then here in the foreground
with these gondolas, he's used not only
hard or found edges, but also a strong contrast of tone from the very
light lights to the very dark darks to draw the viewers attention to
that part of the painting. There's also a really
beautiful found edge just on the edge of this building where the light meets the dark shadow. So your eye gets drawn in to
that point in the distance. And then here is a
beautiful softness of colors and forms all
fading into each other. Here's an example
of a still life painting that has very
interesting edge control. The peaches in the front
have these hard edges, these found edges here, as well as a strong
contrast of tone, the dark shadow and
the light peach. And the bowl, as well, has very hard edges, particularly at the bottom. And here in these complicated
folds of the fabric, the artist has used soft edges and gradations of tone,
as well as texture, which kind of blur into
each other and help the viewer to focus their
attention on the peaches. And then here's a final example of flowers painted
by the same artist. And this is another beautiful
example of edge control. We've got hard or found edges on this leaf and on
some of these stems. Over here, we've got a
beautiful example of found edges where the artist has painted around
these white petals, allowing the white of the
paper to show through. This is a beautiful
way of creating white petals on white paper. Then up here, we've got a
beautiful example of soft edges as the colors gently fade
out into the white paper, and then even further out, we've got lost edges
where the forms of the leaves are lost into
the white of the paper. And all of this edge control combines to not only create a sense of movement
in this painting, but to focus the viewer's eye on this central part
of the painting.
7. How To Mix Black: It's always better to mix your own black than to use
black straight from the tube. And if you don't have black straight from the
tube, then this will, I'm just going to show
you a quick method on how to create a
good dark color. So there's various different
ways you can do it. The first way is you mix your primary colors,
red y own blue. A second way is you mix
complimentary colors, which is actually just the same. It's just that instead
of mixing red, yellow and blue, you're
mixing red and green, but green consists
of yellow and blue. So it's just two different
ways of saying the same thing. And the third way is to mix your earth tones
with some darks. And the classic one is burnt sienna and French ultramarine. So I'll just whiz through
that very quickly. The secret with mixing your primary colors is getting the relative portions
of each color, right. So you're going to need more of the yellow than
you'll need of the red. And that's because red is
much stronger than yellow. So over here, I've got a
handsome yellow light, a parle red light, and an ultramarine blue. These are core water colors, and I'll just get
those out the way. If I take some of the yellow, and I add a little
bit of the red, but not as much and
then some of the blue, I end up with basically
a brown, okay. So to get it to be more black, I need to add more of the blue, more of the red,
less of the yellow. And mixing a good dark
just comes with practice of adjusting each color until you've achieved the
kind of dark you want. You can get a dark
that's more red in tone or a dark that's
more blue in tone. So it's a great way to control if you want a cool dark or
if you want a warm dark, you just adjust the relative
proportions of each thing. So here, I've got a
lovely dark, actually. It's not too cold, it's not
too warm. It's just right. If I'm going to mix
my complimentares, red and green, let's say you
don't have a tube of yellow, but you do have a tube of
red and a tube of green. Then I'll use that same
red, the pearl red light. But let's say I've got
Thalo green, blue shade. I'll just pop a bit over there. If I take some of
that red, Okay. And I mix in some of that green. Now, this green is very strong. So what I've got here is much
more of a green dark color. So I'm going back to my
red, adding that in. If I put too much red in, it's going to lean
towards brown. So back to my green
just adjusting, adjusting until I have
the kind of dark I want. I'm going to put that over here. Beautiful. And it's very
similar to that one, actually. Likewise, if I have
blue and orange, um, so if I take my
ultramarine blue, it's always best to mix colors with a darker blue
rather than a lighter blue. You'll have more success
with a French ultramarine, if you're mixing
colors than you will with a cerulan blue. A Cerulean blue will give
you lighter shades so you won't get to this lovely dark
color with a cerulan blue. So blue and orange. So I've got altamarin blue. And if I use this, it's a permanent yellow orange. And I'll put that there.
When you're mixing a color, always start with your lighter
color onto your palette, and then bring in
your darker color. It's just a better
way of doing it. So I've got my orange there. I've got my blue hair. And usually you'll get
quite a browny color. So this is one of my least favorite ways
of mixing a dark. But just to
demonstrate blue plus orange gives me
that kind of dark. And then if I mix
yellow and purple, purple is basically red
and blue mixed together. But just to illustrate this point about
mixing complimentares, if I take some yellow, and I add some purple, this is a KuratakiPurple. I'm just going to control
the wetness with my tissue. I can see it there.
And I mix that in. Okay that's gone brown, and that is often what you get when you mix complimentares. So you have more
control when you mix your three primaries than if you go for the two
complimentaries option. So I've basically
got a brown here. If I take a different purple, slightly darker one,
and mix that in, now I've basically got purple. I'm going to go back to my
yellow and put that in. And you can see how it goes
back to brown quite a lot. So this complimentary method involves quite a
lot of tweaking. This is the purple,
makes it in there. And you have to be quite disciplined to get to
the dark that you want. So you can see here it's
more of a purply dark. Then there's the
third way to mix a good dark is to mix an
earth tone with a dark color. The classic way is burnt
sienna and French ultramarine. Now, I don't have burnt sienna. I've got raw sienna, and I've got
rinacridon gold deep. So I'll take a little
bit of my raw sienna. Raw sienna is
basically just a bit lighter than burnt sienna. And if I mix in a bit of
my cacrodon gold deep, it will be closer
to Burnsena Okay. And then if I mix those two
with my French ultramarine, which was up here you can
see I'm getting a nice dark. I need a bit more of that French ultramarine.
Mix it in there. And you basically
just tweak the colors you've got until you get
a dark that you want. So a little bit more blue, a little bit more brown.
Let's have a look. And what happens
with that is that when you do your
actual painting, you'll get the different tones sort of separating out
and coming through, and you'll end up with a much
more interesting painting. So there you can see, it's almost a bit more
brown than black here, but when you are
painting with it, it will basically if you layer it up, it
will look like a dark. And then I've just written here various colors plus indigo and various colors plus Panes
gray because you can take, you know, a combination
of your reds and your yellow and your blue. And then if it's not
quite the dark you want, mix in a bit of indigo or mix in a bit of Payne's
gray and just keep working and tweaking
it until you've got a dark color that
you're happy with.
8. How To Control Tonal Values: So now we know about edges, let's take a look at how
to control tone or value. The secret is that, no matter how light or dark your tone is, the amount of water in your
brush needs to stay the same. What changes is the
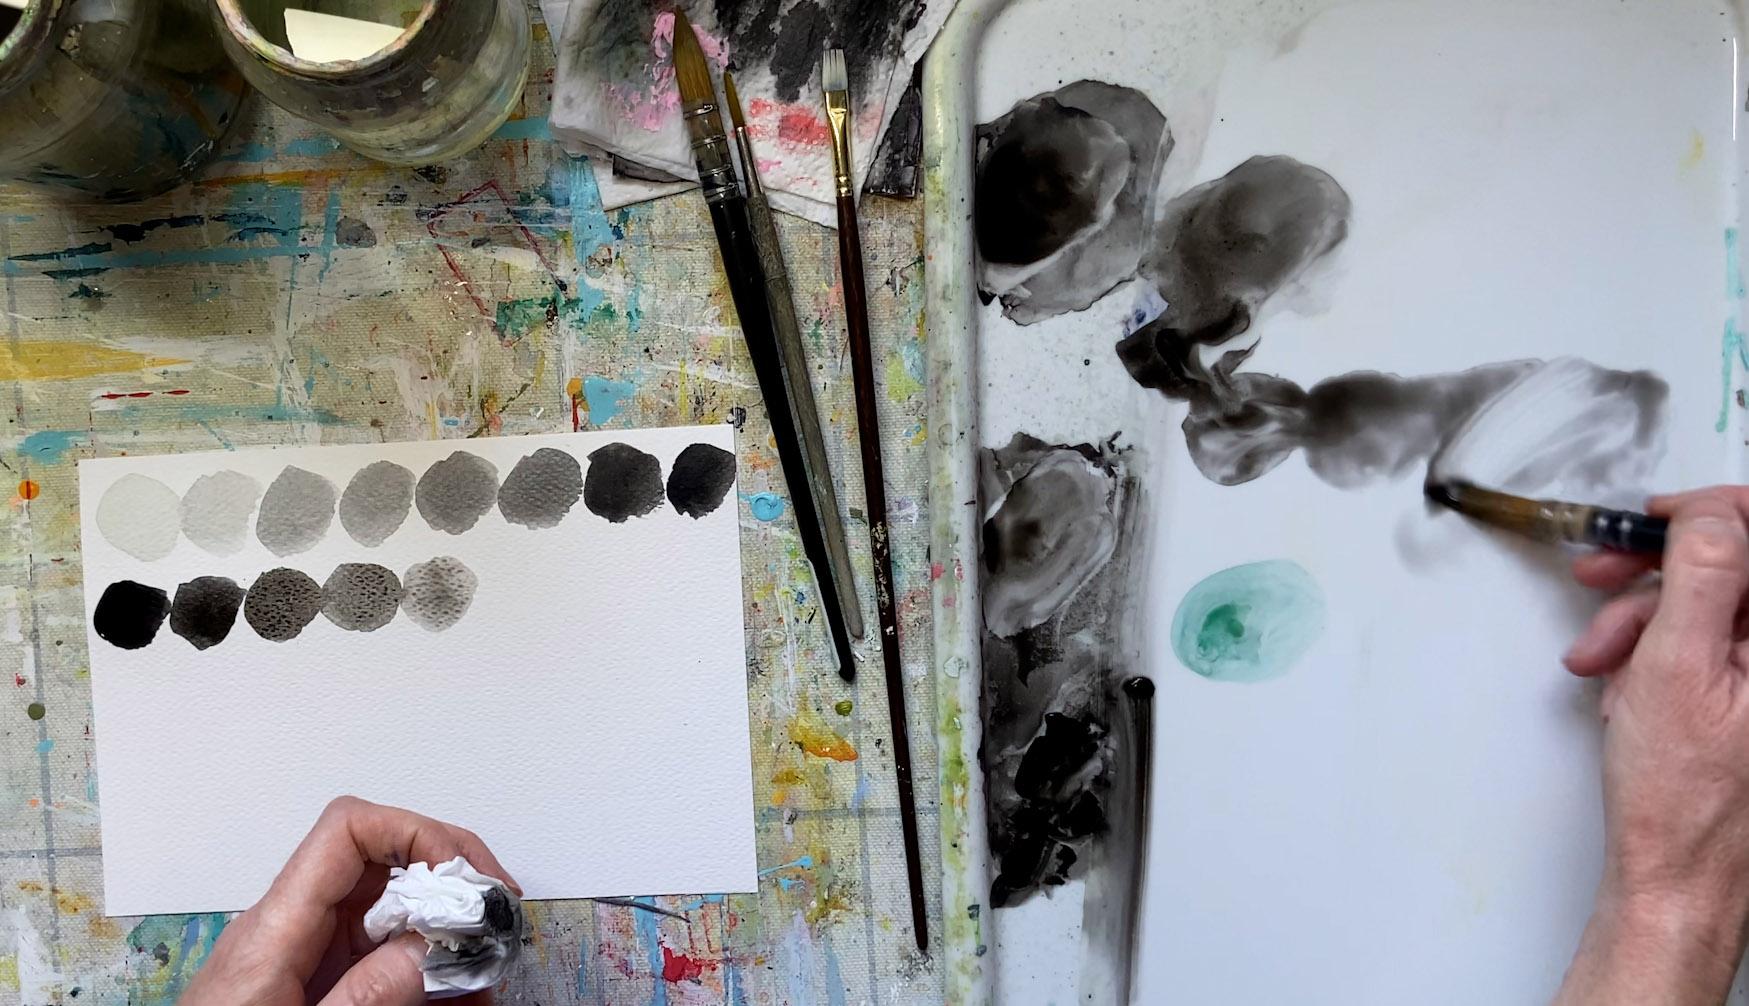
amount of pigment. So I'm going to make a series of blobs along here
from light to dark. So if I start with
my light pigment, now you can see here I've got a little round patch of water
and a tiny bit of pigment, and there I've got a
beautiful light tone. Okay. I'm going to darken
that up slightly. I'm going to control
the amount of liquid by using my tissue. And I just want to go a
little bit darker each time, taking a bit more pigment, adding it in, control the
liquid, get a bit darker. Take a bit more liquid pigment, sorry, add it in. Control the wetness,
a little bit darker. This is a very good thing to
do as a warm up exercise. And it's really
important that you have this discipline
of getting things right on your palette and in your brush before you
go onto your paper. Okay? So I suggest you do this as a practice before you start
painting your vegetables. You can see there,
it's getting darker. And then one last one where I want to go
really, really dark. And for the darkest dark, it's almost pure pigment. Okay? So that's a great exercise to do working from
light to dark. Now, slightly more tricky is to go from dark to light.
So I'll show you that. So starting with almost
pure pigment, dark. Now we've got to reduce
the amount of pigment. So I'm going to wash off I'm gonna bring
my water in a bit. So I'm going to wash
that pigment off. Well, first, I'm
just going to start from the heavy pigment, okay? So pure pigment over there. Now, I'm going to wash
off some of that, tap on the edge, make a new
pile here on my palate. Now, the important thing is
to control how wet that is. If it's too wet, I'll just
tap on my tissue here. Make another swatch, and
it's a tiny bit less dark. Now I'm going to
do the same thing. Wh a bit off in the water, tap on the edge, make a pull. Now, the difference between
those is quite marked. So I'm going to take a
bit of that pigment, put it in this poll. And I can feel that
this is very wet. So I'm going to control that wetness and make my little dot. That's quite a big difference
between those two. Let's go back in, adjust it, control the wetness, put a
bit more pigment on there. That's better. Take a
bit of the pigment out. Make a new pile. Can you see how the amount of water
is not changing? It's still the same
amount of water, but I'm adjusting in each time the amount of
pigment to make it less. Now, here I can feel, let's see, is that right? Yes, a little bit less. Take a bit out. Make a new pile. Take some pigment from here. That's too dark. Take a bit out. Make a new pile.
That looks better. Yes. And you just
keep doing that until you have got a whole row of dots going gradually lighter. And as I said, the
key thing is to keep the water the same and change
the amount of pigment. Okay? That's the secret. The final one, I've almost got no pigment there
just a bit of water. There we go. So light to dark
or dark to light. Have a go at that as a
kind of warm up exercise. It's really important you have that palette discipline
and you maintain the correct fluidity of
the water in the brush before you actually make any mark on your
actual painting. The other thing to know is that when you are first
loading up your brush, make sure you do a lot of work
on the palette like this. So you want to get the paint really soaked
up into your brush. All the way to the ferrule of the brush because then you've got lots to work with
on your actual painting. Don't just have the bottom tip of your brush covered in paint. You need to work it on your palette until it's fully loaded and
at the same time, control the amount of water that's in there by
using your tissue. You'll see how I do that when I paint the actual vegetables.
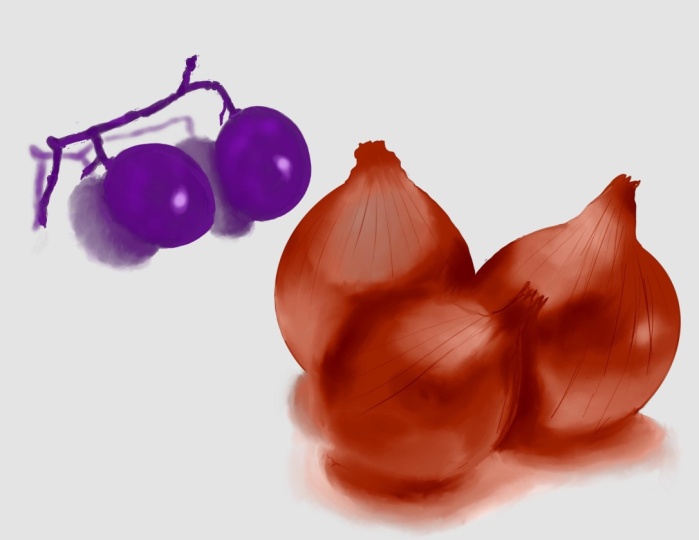
9. Painting a Red Onion: So now we know what lost and found edges are and
how to make them, and we know how to
control our tonal value. So let's dive in and
paint a vegetable. For the first
vegetable, I'm going to paint this
beautiful red onion. I've already painted these
cherries, and as you can see, they've got hard or
found edges at the top. They've got lost edges where these two cherries join,
that's a lost edge. And where the cherry
joins the shadow over here and over here,
those are lost edges. And then they've got a
soft edge over here, where the shadow
kind of peters out onto the page.
That's a soft edge. So I'm going to paint
in the basic shape of the onion with hard
edges at the top. I'm going to work quickly, and I'm going to leave white
gaps on the paper where the skin of the onion overlaps
the underneath layer. Now, for this lost edge, I'm going to start
with water down here and I'm going to do
more water than I need. So I'm going to cover
more area than I actually want the shadow to take up. Okay. And as I come
towards the onion, I'm going to bring
the water up and then I'm just going to
touch the bottom of the red onion with the water. And as you can see,
that flows out. And into that shadow
in a lovely wet, loose kind of way. I don't want it to touch
any more up than that, so I'm going to stop it there. And now I'm thinking
about my values. So first, we think about edges, then we think about values. The shadow's got almost two
rings in it, two tones. If you squint your
eyes, then you can see where the
shadows are darker. And there's a darker bit there. And then towards the
end of the shadow, there's another dark bit there. And then there's a stark there. And I'm just going
to do it as loose as that and leave it to flow
a bit into the water. Then there's a little bit of the shadow coming out
here with a found edge. With my smaller brush, I'm going to come in
and just paint a few of these little interesting pieces and bits that are
trailing off it. It doesn't have to
be exactly accurate. And a few of these
top bits up here. And now, again, I'm returning to my big brush and I'm
thinking about my values. So I want to go for
my darkest darks. So if I squint my eyes, it's very dark here, and I'm just dropping
in some deep dark black and letting it
flow on the paper. And then it's also
quite dark here. So let me come in and
darken these tones. And again, at the
bottom of this onion, if I bring it down and round, the paper is all
still nice and wet, so that watercolor will
move into that shadow. I'm going to wait a moment
to see what happens with that before I make
any other moves. I can see here a hard edge
is forming a found edge, and I'd like to soften that. So if I clean my brush, and then if I approach that edge from outside
with my water, come creeping up to it, approaching it by stealth and just creeping up and
just gently touching it, and then it will soften
that edge a little bit. One thing I want to do is a
little bit of lifting here because this has got very solid and there's actually
light on that. So I'm going to clean my brush. I'm going to dry it. And now
I'm going to just come in and lift a little bit
of the paint out. Can you see it softens
there and clean it off again, dry and lift. And it just allows you to
take out anywhere that you had excessive amounts of
paint that you didn't want. This is forming quite
a hard edge there, so I'm going to clean my brush, take out most of the water. So my brush is damp but clean, and I'm going to do
the final technique for softening an edge, which is just while
it's still wet, just creeping up to it, and gently tickling it and
pulling it this way. Can you see how we've
softened that hard line? I'm going to wait and see how
that looks once it's dry. So it's dry now, and I'm actually quite happy
with how this came out. It's got some found
edges over here, which are hard edges created
by wet paint on dry paper. And then it's got
these lost edges here, where the shadow
and the bottom of the onion has merged together. And it's also got soft
edge in here where the shadow has merged and softened but not
lost completely. So it's got a hard edge,
which is a found edge, a lost edge, and a soft
edge, tick tick, tick. And then looking at the values, it's got a full range of tone from the light of the
paper through mid tones, one, two, three, four tones, and right through to
a very dense black. So that, in my eyes, is what I set out to achieve. So I'm happy with that.
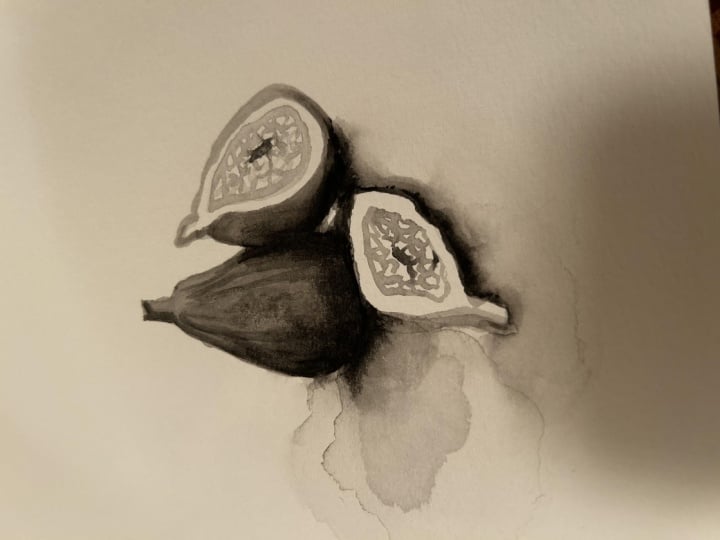
10. Painting Figs: For my next painting,
I'm going to do a very quick painting of
these beautiful figs. I'm going to have lost
edges where the figs join, and I'm going to have found edges on the edges of
the figs themselves, and then I'm going to lose the edges where the
figs join the shadows. I'm also going to have
a soft edge where the shadow peters
out on the plate. So I'm just going to start with a medium tone on the side fig. That. Then here where they join, I'm going straight
in to the next one and the third one
will come out there. I want to cover my area quickly, so I'm getting my
pen Brush and sin close down onto my paper. Notice that I didn't draw an
outline first of the fig. Well, apart from that outline. But in terms of the
shape of the fig, I'm going straight in to
try and get the shape of the whole fig in as one tone. And then this front
one will come here. It doesn't have to
be a perfect shape. I love a good wonky fig. Now, here's a shadow underneath. So I'm going to merge that
shadow into that fig. There's a tiny sliver
of light in there. So I'll leave that visible. Okay. I'm going to
bring this shadow down around and lose this
bottom edge into the shadow. And then squinting my eyes, I can see that the shadow goes a bit more that way
with a lighter shade. So I'm going to just
pull it out a bit. And then I want this
to become a lost edge. So I'm going to start out
here with some clean water. And that water was not clean. I'm gonna take my clean brush. Start out here and remember what I said about
approaching by stealth. So coming up towards
that edge that I want to lose and just touching it. Okay. Like that. Okay, now I'm just
checking my values. I want to just bring this down a bit that because it's
quite dark there, and it's quite dark there, and it's dark there. And then I'm going to
pull up some of this dark in stripes because it's
got sort of stripes. Like that. I do love a fig. Figs are great to paint. Squinting my eyes again to get the values controlling
those cauliflowers that were threatening to form. Lovely. And then under here, I deepen this out a bit. Like that. And then I want to lose the sedge
into the shadow. And the shadow goes around
the side a little bit, and then it kind of disappears
so same thing as before, approach by stealth from
here and just gently touch into that shadow. Lovely. And in the middle of this fig, if I squint my eyes,
it's kind of a mid tone. So just gonna pop it
in as a mid tone. It has got a little
flecks of white, so just gonna leave a few gaps where the
little seeds are. It doesn't have to be accurate, but it'll add a little bit of sparkle to our fig and
everybody needs sparkle. And then the same for the middle And then the middle bit
here goes a bit darker. Darken that up. And
the same thing there. Beautiful. I just
want to revisit this shadow and just adjust the tones and those
edges slightly. There's shadow here, the
shape is a bit funny, so I'm going to just
take another look, bring it around a
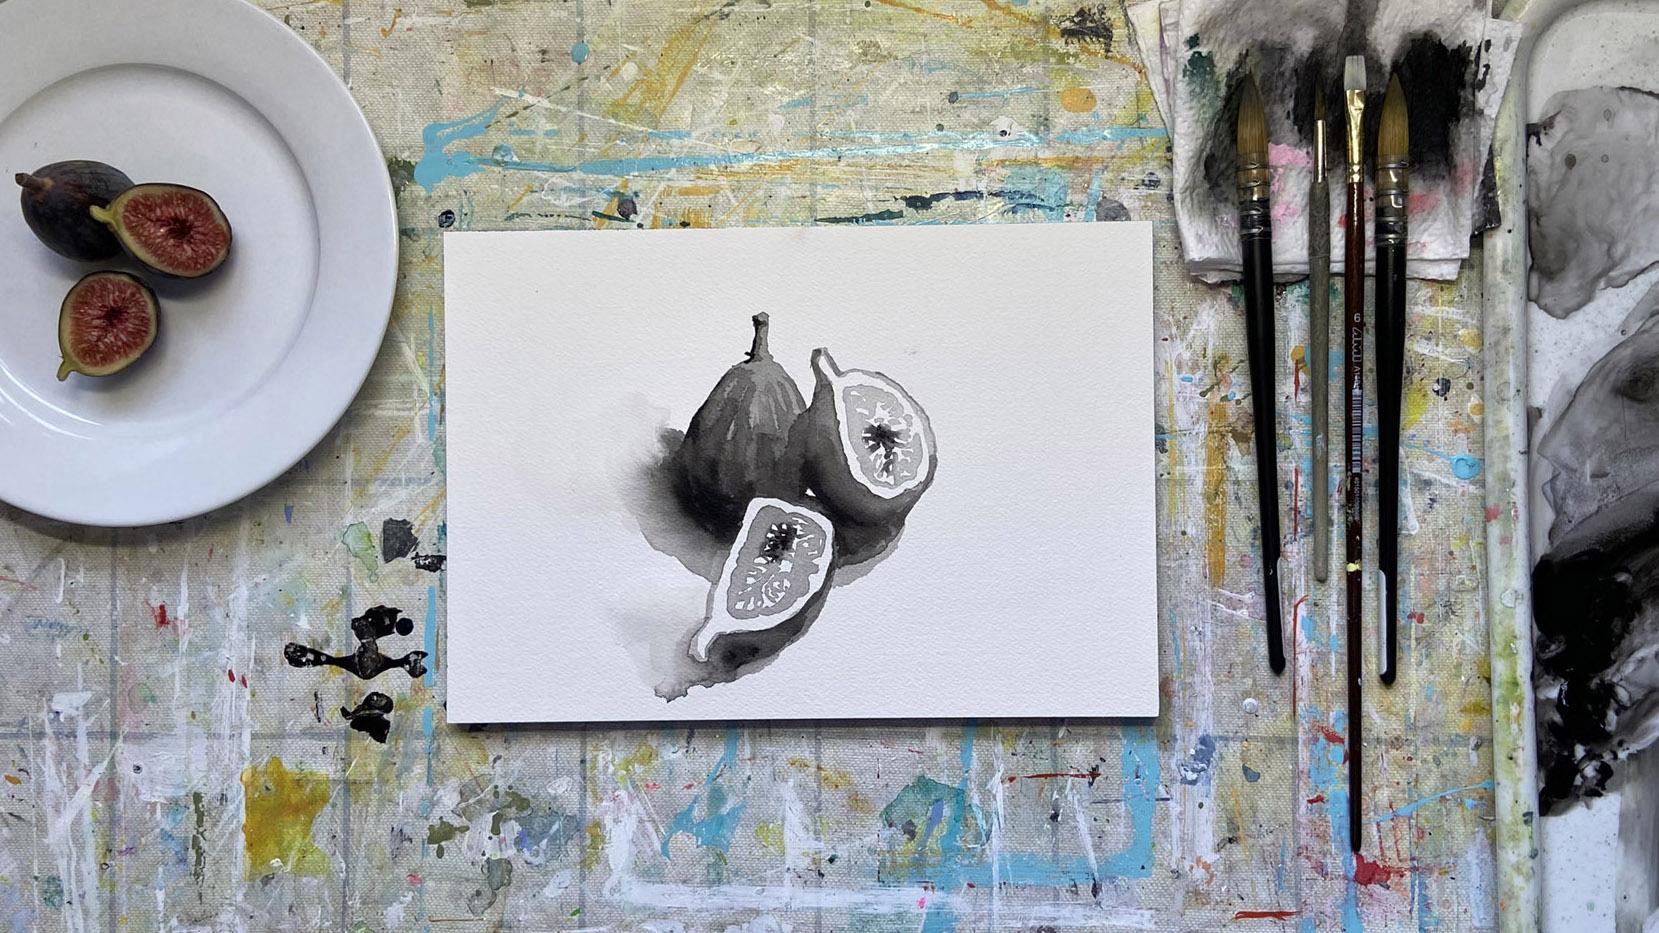
bit, like that. And then we have a simple, quick painting of figs, focusing on lost and found
edges and tonal value. I had to rush out and fetch
the children at that point. So while I was out,
this has dried, and as often as the
case with watercolor, it has dried lighter
than I was hoping, and it doesn't have
the deep dark darks that I wanted to have. So I'm just going
to come back in and darken some of those
really dark areas. This has to be done quite
carefully because now that it's dry, it's more tricky. So first, I'm wetting the
areas that I want to darken. And it's important to
control this wetness, just as you would if you
were painting a first layer. I like the beautiful blend
I got on this shadow. So I hope I can get
the same thing again. And to do that, I'm just
coming in with clean water. Like that. Okay. And now I'm going to
bring in my dark tones. It doesn't need a lot. Just like that. And then I'm just softening the edges that dark tone there. Evening out the
shadow a little bit. And then here where I want
the shadow to disappear. I'm going to approach
from far away, approach Batalth and just
touch into that pigment. And let it flow on the
paper. There we go. I'm going to wait till that
dries and see how that looks. So here's a before
and after picture, and I think that by
darkening our dark tones, it has definitely
made a difference to the success of the value
contrast in the painting. It's now got a full range of
value from light to dark. And I'm happy with the lost and found edges
that I've created. So I hope you found
that interesting, and now it's time to celebrate.
11. Conclusion: So now you've got
the edge on edges. We looked at four
different types of edges, how to make them, and
how artists use them. And we looked at brush and
palette techniques to master tonal value so that
our paintings can contain a full range of
tone from light to dark. And then we painted some wedge, making sure to include
a full range of tone plus lost and found edges. If you haven't
already done this, please take a quick photo of your painting and upload it into the class
project gallery. It encourages others
to have a go, and you can add even
more goodness by liking and commenting on
other students projects. If you would like to, you
can share your work on Instagram using the
hashtag Bedges with edges. If you enjoyed
this class, I'd be really grateful if you
could leave a review. And if you'd like to connect
with me on Instagram, I am at Catherine Jennifer Designs and the
same on Facebook. You can also find me
on YouTube search for at Catherine
Jennifer Designs. And if you want
even more goodness, join my newsletter
via my website, which is catherine jennifer.com. Until next time, I hope you have a great time practicing
edges with edges. You know the rules. No pudding until you've eaten
all your getables. Thank you.
12. Outtakes: Intro T one. This class is about lost and
found edges in watercolor. There are four types of edges. Look.
 Catherine Jennifer, Artist, Art Educator, Designer