Transcripts
1. Introduction Quick and Easy Loose Floral Exercises: Hello, there. My name
is Kelly Chasse. Welcome to Lose floral painting. We're going to be doing some quick and easy
practice techniques to guide you into painting
loose florals. I'm an artist with over
15 years of experience, and my work has traveled
all over the world. But my passion is helping those
that really want to learn how to paint or just want to have some fun with watercolor. In this class, I
wanted to dive into the world of loose
expressive florals with you. This is going to be perfect
for both beginners and experienced artists
that are just looking to loosen up a little
bit in their style. Over the years, I have struggled
with painting florals, and I've learned some really
simple and fun techniques I think that will help you
build your confidence and help with the flow with your
watercolor practice pieces. Whether you're
getting started with lose florals or you just want to explore some new exercises to add to your creative routine, I think this class is
going to be for you. Together, we're going to explore how to create some beautiful, loose floral shapes
really without that pressure of perfectionism. We've got some
practice exercises in here like gestural strokes, some blind contour drawing, and we're going to be doing
just some quick florals. So you can combine these
techniques to help you design some unique floral cards or make some projects
like bookmarks, things like that
with this technique. And I think by the
end of this class, you're going to have a set
of practical skills that you can use any time to help you loosen up
your painting style. So grab your brushes, your watercolors, and
let's get started.
2. Materials: Hello and welcome to the course. Let's talk about
materials really quick. Now, I'm not big in buying tons of supplies that you don't
need or will never use. But if you are a
creative person, an artist, that's I don't know
why I'm even saying this. Because I know we still buy things because
we want to try it. You're just beginning
watercolors, don't go out and buy a bunch of stuff. Use the basic stuff. If you decide later on, you want to try some
new tools or you're feeling comfortable
and maybe the tools that you're currently using. This brush, it's a little oval wash brush, Robert Simmons, and my little cotton kit with a little detail brush that comes with a cotton
kit from Windsor Newton. It's like a $25 kit. I mean, that's really all
you need to get started. So don't feel like you have to get all of these materials. I did that for five years when
I first started painting. That's all I used
was two brushes basically and the
little watercolor kit. Don't feel like you have to
go out and buy tons of stuff. However, I will
share with you some of my very favorites and things that I've been
using for florals. If you want to do some different things
because I'm using some different materials
for this course. But if you want to try
those different things, feel free to do it. If you don't have them, you
can incorporate other things. Taking a look at a few
things that we've got here. The basic thing you're going to want is two cups of water, one for clean, one for dirty
or something like this. I have my little brush tub. So I can actually lean my
brushes in here if I want to. I've got one side for clean, one side for dirty,
for watercolor paper. If you are again new and you want to do something
inexpensively, the Strathmore watercolor
cards are wonderful. You get 100 cards. They come with envelopes. I just cut them in half. This is what they look like. I just cut that seam
right down the middle and I've got two perfectly
good five by seven. Again, great size for practice, and also it fits a standard
eight by ten mat or frame. So if you and you
want to frame it up? You could frame it in a standard eight by ten matt and frame, and again, this is the five by seven if it's
perfectly in there. If you wanted to do
something smaller, you could get a smaller frame. Get a little five by seven mat with a four
by six opening and do something like that
with a smaller little five by seven frame.
It works with both. I'm going to be using some watercolor paper,
some larger sizes. If you want to get a little
bit bigger, you can do that. This is a full sheet, which is normally a 22 by 30, and I just basically fold it in half, fold
it in half again, and I get a couple of really good size
paintings this way. This is 140 pound C
press arches paper, F arches, if you say
it, the correct way. For paints, I'm
going to be using mostly in this course,
the Rosa Gallery. I had this little kit
for the longest time. It's got some beautiful
colors in here for florals. You can see it's nice and messy. One, two, three, four,
five, six, 889 to 11, 12, right? 444 12 paints. All the basics you
need, your cools and your warm yellows, red, and two blues, two browns, two greens. I mean, you don't need
anything else, even the white. You can use the
white in the kit. If you are using other kids, you just want to
make sure you don't add a lot of water
to your white. This white happens
to be very opaque and it works really well, but it still shows up. So white and some kids
don't show up really well, even if you're using
it as thick paint. I do use doct
Martin's bleed proof white or also guash
for the white. If you need to find something
that's a little bit more. Opaque and it's going to show up in your watercolor paintings. I also just bought
this lovely kit. Thanks to my patrons. This is the Rosa
Gallery botanical Kit. Again, it's messy.
I've been using it, and you have, I think
it's 28 colors. Well, this one really
has everything. You can mix a lot of those
colors by using this kit. You don't have to go out
and buy a really large kit, but this is a great kit. Again, very vibrant. But use whatever you have
for watercolors. Just find some of your colors. We're going to play around with colors anyway so you can see what colors that you like
with your particular kit. Again, don't feel like
you have to go out and buy something
special for that. But these are wonderful. I really like these paints. Then this is the b Doc
Martin's bleed proof white. Again, this is great.
It's very opaque. It will really pop and
stand out on your paper. Even if you've overworked
your painting a little bit, I've used this to lighten it
up or give some splatters. So this is a great
thing to have. If you don't have that, you
can get whitewash in a tube. It's very similar to this. I used to always use
Windsor Newton whitewash, but this is my go to. I really like it because
it's got the cap, it doesn't dry out and it's already a little
bit of a liquid, so I don't have to add
much for water to it, so it just works really easy. This has been my new thing that I've been really enjoying. Also be using a black sharpie. We're going to be doing this with some one line
drawing and we're also going to be
adding some details for our cards with a sharpie. I like the fine
tip only because I can get a lot more smaller
details with that, but if you've got a larger
sharpie, that's okay. Again. Options. Then you could also use colored
pencils, Dirwin pencils. We're going to do a little
bit of that in there, but again, not necessary
for the course. For brushes, I'm using a little bit more fun brushes
this time in this course. I love my dagger brush. This is one of my
very favorite ones. I've done a couple
of videos on that. This is the quarter inch. This is one of my go to ones. If you haven't tried
a dagger brush, I highly recommend
it's super fun. It does take some
practice, but it's fun. And then we have the
number two, a wash brush. Again, this one holds
a lot of water, and it does come to a
nice tip when it's wet. But again, it holds a lot of
water and it's very soft, so you can do a lot of
pushing, smushing, pulling. You're again, we're
going to kind of practice with our brushes and whatever you have for brush, you're just going to get
comfortable with it. I also can get a
little confusing. This is a number two, depending on who makes your brushes, the wash brushes usually are
size a little bit different. Then we also have, I
don't use this one much, but square brushes. Flat brush. I call it square, but it's a flat wash.
3. Exercises we will cover: Today, we're going
to practice more. We're going to loosen up
and we're going to work on our hand eye
coordination skills. Are you ready for this? These skills are going to
help you with your brushwork. They're going to help loosen up. They're also going to teach you various ways that
you can loosen up, as well as this really
helps you develop your own unique style
because you can see how your brain works. Fun. First we're going to do is some gesture drawing and we are going to do something
that looks like a flower, we're going to look at flowers. We're going to just maybe think about how we see
them in our heads. Maybe not necessarily
how they are, but how we see them. We're going to do
this with paint. We're going to actually
paint in little shapes, and we're going to practice
our floral shapes, and you can use any
colors that you'd like. For the next lesson, we're going to do some blind drawing. Line contour drawing. You can either
blindfold yourself, you can close your eyes and
we're going to attempt to draw something without actually looking at it or
looking at our paper. This is so much fun. It's very challenging, but fun. That's going to really help you with your hand eye coordination. It's also going to give
you that spontaneity for your brush strokes, even though we'll be using a pencil or a pen for this one. It's also going to help you
embrace your natural rhythm. Again, how you see
or interpret things. For the next lesson, we're
going to do a one line drawn. That is similar in the respect that you're going to
have your spontaneity, but you're going to be able
to see what you're doing. The only trick is,
it's one line. We're going to do
one continuous line, so it's going to
get messy and it's so good for us because especially if you're
perfectionist and you want everything every line perfect. It's going to really
help you loosen up. With the loose florals,
that is one of the big key things that you
need to take away from this. We want to lose control, we want to play more, and we want to just enjoy the experience rather than
being really controlled. One thing I want you
to keep in mind while you're doing this. You
want to work quickly. You want to be decisive. You don't want to go back
in and constantly rework things while you're trying to do this looser version
or looser style. You want to make sure
that you're going to take breaks, step away. And you want to practice these things over
and over again. Just doing something one time is not going to give you the
results that you want. You're going to need to
work on these things over and over to develop your skills because you can't expect
working with something for 15 minutes to practice
practice practice. One other thing I wanted to
talk about is experiment with your different materials
or your different brushes, maybe even different paper. Different paints, different
amounts of water. Really experiment.
Use this whole day to experiment with
different things. Again, don't worry
about the outcome. We are just practicing at this. All of these lessons
together today are really going to help
you open your eyes, help you with your
hand eye coordination, as I said, and just
loosen you up. If you're ready,
let's get started.
4. Gesture Exercise : Uh The first thing
we're going to do here is just
do some exercises for practicing some
gestural painting. We're going to do some
blind contour drawing, and then some continuous
line drawing. Let's start out
with some gestures. What I want you
to do is just set yourself a timer for a
short period of time, maybe like 5 minutes. I want you to start creating some gestural shapes of flowers and focus on
capturing just that shape, the overall shape and the
movement of the flowers, really loosely and very
expressive brush strokes. A fun thing to try is maybe
some different types of brushes or different size
brushes while you do that. I'm going to go ahead and
just set a timer here. I might try all four of these brushes just to
see the difference, and we're going to set a
quick five minute timer and see how this goes. I'm going to start
with my large brushes the number four,
and it's a nice, big fluffy brush, and I'm going to just add some water
to my paints here. Let's just do some nice
purple. Get nice and wet. I'd like to start lighter
when I'm doing this. 5 minutes, starting now. Okay. Here we go. We're going to do some
short brush strokes, rolling things around. Again, just getting that
loose shape blob per se, add a little water to it. Bring that out. That's
a pretty little shape. Again, big flower, big brush. Let's try using a
nice oval wash brush. Remember, I'm just
getting the shape down. This is very loose, just seeing how these
brushes are going to work. Creating some blobby shapes. We can turn those into
something, maybe. That's oval. Let's try a square. Now, I haven't even tried this. Let's go ahead and
get this one a shot. See what we can get for
again for a nice loose. Now I'm using doing a scrubbing motion with
this one. That's cute. It's almost like a
little Johnny jump up. Maybe a little
twist. I don't know. I could have some edges
along the bottom. If I want. It's go a little darker or
maybe a different color. That gives a nice edge. Again, very loose.
That's the square. I have practiced quite
a bit with this one. This is my little dagger brush. Let me grab a little
bit more paint. Again, this one is
my favorite one. This one really makes me be super loose
with my paintings. You can see I've got a lot
of jagged edges on this one. If I add a little water to it. Again, this is what
I practice with. This is what I'm going to
feel most comfortable with. But you can see this
one had a lot of water. I've got some little
drying on the edges here. This one actually was pretty fun having the square
brush with that. Those are very loose
interpretations. Let's go ahead with another one. Again, you can see
I'm just doing a little scribbly motion. I don't know if I can
do that same shape. You'll find some brushes are more conducive
to a certain shape. This definitely is a
little bit more rounded. I love that twirl shape
that I can get with that. Again, very loose. Practice a bunch of these shapes and see what
you're going to get with it. I would continue maybe
with some smaller ones. Go back again to my
little brush here. Let's get with the bigger one. My yellow is somewhat dirty. You can see I've got some
of that purple in there. But again, we're
practicing, it's okay. Try this one again,
the oval wash. Now, this was a brush that I used for my first five
years of painting. This one I find it a little
bit harder to be loose with. I can try to get
those little petals, maybe more conducive
to something a little bit more like this shape. I would like star shape
or little branches. A try different
shapes with these. See what is going
to happen with it. This is all part of the thon. I could probably do a nice, a nice little star shape with just using the flat
part of this brush. This could be maybe more of a shape that you would
get for hydrangia. Again, you're getting a
different shapes with this. I think this would be good too for for more of a rose
shape. Look at that. In adding a little bit of water
to that to lighten it up. Again, Practice and play
for a good 5 minutes. My timer is just about up. You can see that that
was pretty quick. Can you even go
back in maybe and add some centers to these
or some other petals. Again, I'm just
playing at this point. It's okay. Don't feel like you have to have
everything perfect. This is where you're
going to see. That you will start to loosen up a little bit because it
doesn't really matter. And just play again,
loose, no pressure. 5 minutes is up. I
went quick, didn't it? You could fill these
pages a couple of times. That's what I want
you to do. This is going to get you loose. This is great practice for you to explore and see what your
brushes are going to do. See what your paints
are going to do, no details with this whatsoever.
5. Blind Contour Exercise: For this next exercise, we're just going to
You can use a pencil, a marker, whatever you have. Let's go. Actually I'm going to go
with something a little bit larger so you can see
a little bit better. I've got my black Sharpie. I'm just going to show
you how you can do some blind con drawing
for your flowers, and you can go ahead and fils in with color if
you want to again, a very loose way of doing it. You're going to
draw the outline of a flower without
looking at your paper. You can either use a blindfold, you can close your eyes. Whatever you need
to do is cheat. This exercise is going
to really help you develop your hand and
eye coordination, and it's going to encourage more intuitive marking or
mark making for your flowers. You can either look at something if you want to look at a flower, or you can just look
at the screen and have some different
flowers up on your screen, or you can just go by memory. I'm going to go by memory. I'm going to just
do a few daisies. I'm going to close my eyes. I'm on my paper, feel
around for the paper, and I'm just going to
do a little daisy. I know it has a
center What did I do? Well, that's pretty
good. My center is a little off and that's okay. Let's Let's try I'm going
to make this one up. I don't know what
this is going to be. This is just going to
be some little petals. I don't know. It's not really a dahlia, but maybe it's got
somewhat of a center. I'm not looking at stem. Leaf. Let's see how I did. Oh. But I mean how cute is that in a really messy way if you
were to fill this in and paint and do a bunch of
these different shapes everywhere. Let's
try another one. I'm going to go over here to the center of off
center of the paper. Let's see. I'm thinking. I'm just trying to
picture a flower. Let's attempt an iris. I can remember. I had some rises blooming
in the back yard. I know I've got I've got two maybe a third
one in the middle, like this bearded thing. I don't know if this is
going to look right or not. Hey, not bad. I was a
little off from my leaf. But that doesn't look too bad. It's a scary looking ris. But again, gestural drawing can be very freeing, very fun, and it gives you that real
looseness to your paintings. Go ahead and just
try some flowers. I, a tulip would be really easy. Let's just do a tulip over here. I'm going to start with
thats a bulbs shape? Let's just do one that's opened. I don't know. That's
a point there. I don't know if this is
going to work, but again, we've got that loose leaf shape. My leaf shape was not
good. Bring that back in. But again, look, you can go from that and then look at it and see how close you are to this tulip I could
begin to fill it in. If I'm painting this, you're not going to see most of
these lines anyway. Again, it gives you
that real loose feel as you're doing
some of your work. Then if you want to
go back through, you can go back through. Now this isn't watercolor paper, but just to give you an idea again because we're practicing. I want to add just a
little color to this. I can fill some of this in. Just again, very loose. That one's iris, so
let's make that purple. A little purple shape. Again, loose. You don't have
to fill it in real heavily. A daisies white. Let's just do a little bit of a little bit
of yellow, maybe. It's dirty yellow because I
still have some purple in there. A little yellow. Then for our tulip. I had white tulips
is what I've had and I had some a white
and a pink ones. Let's just do go a little pink. G a little green in here. Again, it's a d. That's all. Again, just loose be another
little one over here. You could fill some of those in. You could get really
colorful with that. You could go with a couple of different shades
in there if you want. It's all about being loose, being fun, and just having
a good time with it. I almost to see this
as maybe a black eyed. Maybe a little.in the middle. Of, I could fix that
dot because it was really a offered there
when I drew it in. But again, super fun to do, go ahead and just
fill up your sheet. Again, practicing,
just being loose and do some blind drawing and see what little shapes
you can come up with. You can fix them if you want to. Add a little bit more to them. I did a color on this one. You can just really
have fun with it. Use a pencil, use a watercolor
pencil if you want. Anything that you have, again, just to practice and give yourself some exercises on
how to really loosen up.
6. One Line Drawing Exercise: Okay. So we've gone to the
blind contour drawing. Let's do a continuous
line drawing. This one is even
more challenging. We're just going to take
one line where you draw that contour of a flower shape
and one continuous line. This is about lifting
your pencil, your marker, your watercolor paper, I
mean, watercolor pencil. Or if you want to just
do it with a brush, you can actually do one
continuous line with a brush and watercolors. This exercise is going to
encourage you to be really loose and fluid and uninterrupted with
your brush strokes. Again, we are doing
this loosely. Let's see if we can do this
one we can actually look, but you're just going to do one continuous drawing, one line. I'm going to do a rose. I've got my rose shape. Again, I'm working within that foundation of
one continuous line. We have a rose shape there. Let's try maybe a upright
one or a rose bud. Again, same line. We, cute. I could probably could have continued
on that a little bit more. Let's do one more. And a nice little fold in there. You see that as a little rose? You can do, like the
whole petal there. Let's try that. I mean,
the whole leaf shape. So we've got one continues. Again, remember we're loose. We don't care what
this looks like, but it's off, it's okay. Little bud, come back
up on that same line. Maybe another pedal here. Maybe we bring
another butt up here. Down another again. Again, I'm just going
one continuous line. I'm going to get that shape and this one is a little
off right here, but again, that's all right. We've got a nice little
bouquet that's really loose in there. Let's try another one. Again, with a pedal shape. It's okay. A little
off, gain down. Little petal. That's
not what I want to say. I want to say a leaf. Let's try and see if we
can get one over here. I don't know if that
is really much of a rose shape, but
that's all right. Come back down. Remember,
it's all about that practice. It's okay if it's not correct. Look at that. How cute is that? Again, one line practice, you could try your daisies. Again, that shape. B. Still going with that one line. I'm
doing this quickly. We could even get
the center in there. When I here. You could follow
those lines back down too. But you're still doing
that one continuous shape. Again, how cute is that? It's again, very,
very loose floral, a little bit different loose
floral than painting it in, but it's another
way to practice. Again, you can take
your one line drawings and you can fill those
in with color as well. Practice those,
have fun with it. I hope that these exercises really help you practice
that loosening up and being a little
bit more quick with your gestural shapes and
focus on capturing again, just the overall movement of a flower with that
really loose look. Don't get too bogged
down in the details. It doesn't have to be perfect. Do these over and over again. Go back, watch this
again, try it again. Try different size markers,
different size pencils. You could do it with
colored pencils again. You could do it with
different colored markers. You can do it anything. You can even grab a
calligraphy pen if you want and try it with that. So just have fun with it. That's the key,
get loose with it.
7. Key Watercolor Techniques to practice: The first technique
we want to talk about is wet on wet technique. This involves just applying wet paint to a wet
surface and it's going to allow the colors to blend and bled together more organically. We're going to start by wetting our paper with a clean brush. I'm using a number
eight round Kolinski, and sometimes when you're
using those bigger brushes, it just helps us become a little bit looser with
some of our paintings. Use what you have.
I'm going to tap off some of the
bit excess water. Remember that the paints are going to flow
wherever your water is. We've got our nice
little tulp here. Let's just do a a shape of a little petal. It's
really hard to see. I'm going to add just
a tint color to that. I can't even I hold it up. I can see that. See that where it's
glistening a little bit. I'm going to go ahead and just put just a little
bit of color in here so you can see this a little bit better.
Hopefully you can see that. We've got the wet in here. We've got some clean water. Then we're going to go ahead and add a little bit
of color to this. What it's going to do is
going to create a very soft. Let's do some vibrant pink pes. Beautiful magenta color. As you have wet that surface, you're going to paint
directly into this and see how you get
that nice burst of color and that nice diffused
look or softer edges. That's going to really
create some of our best, best expressive looks
for our watercolors. You can see how if I come up to the edge here
where this is dry, I'm going to get a
nice curst edge. You can see on this side,
it's very, very loose. This is where it's wet, this
is where it's a little dry. I can tip and tilt. And it just makes a
beautiful soft petal. Look at that, isn't
that gorgeous. Maybe on the edge here,
we've got a nice sharp edge. Again, where it's wet, we
have a nice soft edge. Soft edges and hard
edges are going to be a big portion of your
loose florals as well. Now this really comes into effect when you're
working with paintings that have lots of layers in
them or paintings that can be a little bit more
tight because you can see I've got a nice
tight sharp edge on it, and some places are
going to want that, some places we're not
going to want that. Another technique you
can do is a wet on to dry and contrary to the
wet and to wet technique, the wet on dry technique
is going to involve implying paint onto
a dry surface. This technique allows for more
control over the placement and really the
intensity that you're going to use for paint, but it can still be used to achieve those lose effects too. To paint loosely wet on dry, we're going to apply a
bold gestural stroke, loaded brush here, and
we're going to let the paint flow and mingle
onto the dry paper. We're going to avoid overworking this
paint because it can really result in
stiff, more unnatural. Look. Very loaded brush
with a lot of color. We'll just try this other shape. Again, if we want it to be
a little bit more loose. But you can see we've
got wet paint in here. I'm not going over that a bunch. You can see where some
of the paint might be a little heavier, a
little thicker. You can do a little
push and pull here if we wanted to add
another color to this. Again, tip and tilt. This is a great way
to mix a few colors. You can see where it's
drying a little bit here and I don't want to
go back into this area. I want to just let the paints
dry naturally like that. This part was first
wet onto dry. The paper being dry, the paints being wet. Was this was just clear water, and you can see where you get a lot more softer technique. This is a much brighter pigment. This is a much lighter pigment. We can make that a
little bit darker, but it's going to be lighter wherever that clean water was. The third technique, we're
going to look at dry brushing. This is going to involve using a brush with very water,
very little paint. We're going to create
some texture in detail on the surface
of the paper. And to paint loosely
with dry brush, you're going to load just your brush with
a small amount of paint and lightly drag
it across the dry paper. I'm going to sop up
most of that water. This is a pretty dry
brush at this point. We're going to put just a
little bit of paint on here. I'm going to try to
do a pedal form, lightly drag that paint
across the paper. Let's do a little bit more. It's going to
create those broken regular marks on our paper. What that's going to do is add some visual interest
to your artwork. You want to use the dry
brushing technique sparingly. In that way, it'll trait
that more spontaneous. You don't want to overwork this. I use this technique a
lot with my water colors for painting like water, sparkle on water, any texture that I might
need in something. You could do this
maybe in the leaves. You can still do
it in the petals, but you don't want to overdo
the dry brush technique. The key to all of these is to really just try
to work loosely. I'm going to add
again clean water, a little bit of color
to it so you can see it with a nice shape. You see how quickly,
I popped it in there, go in with some color. Again, this is clean water. Well, it's supposed to be clean, water, dropping in, look at
the burst that that creates. You can see I'm not going
to overwork that too much. I'm just going to let the
paints do their thing. Maybe create another
petal over here. This one I've already
got color in. This is the wet on dry. Again, if I want to pop in a little bit more
color into this one. I can do that. You can see
where I can move this. I want to feather
this into this petal. This is going to bleed up into this one because
it's wet as well. You've got to be really careful, but that one didn't have
a whole lot of water. You can see it's barely
moving there it is. If I lean this up a little bit, you can see it's grabbing
some of that paint. You're going to
want to practice. Practice how much
water you're using, how much pigment you're using, and just start creating
some of these little shapes and petal shape that you want. Remember, your brush
is going to have different amounts of water depending on if it's
a natural hair brush. You can see how fast
this is drying today. If it's a natural hair brush, depending on the
size of your brush. If you have a
really large brush, it's going to hold more water. You really need to practice with your materials,
your supplies. You can see this one
here is still wet. You can see you have a little
bit of gloss on there. You don't have to always
go quite so dark. Let's just do another petal
here, maybe two petals. These are meeting together. And let's drop in that
water, wet into wet. You can see it's going
to both petals now. Maybe I have a darker
value under here. And this is just rising
up. Look at that. You can really have
a lot of fun with this, practice and play. Try to work quickly, B
decisive with you do. Trust your instincts
with this and let the paint guide your brush. You don't want
perfection in this. We're trying to avoid
striving for that perfection. You want to take
breaks, step back, assess your work as you're
working on each petal. Experiment. Maybe
with some tools as just a glass dip pen, and you could practice trying to add a little
texture in here. You can see that this
petal on the tulip has got a little bit of a
darker value in here, so I can create some texture
in that wet and to wet. Let's try this one. This one has started to dry a little bit. Again, test it out. I can get some texture in here where this is still wet. This is dry. We can add a little on this one. When you're following
the shape of the pedal and make sure that
your lines are following that contour as well. Some of these are quite dry. If you can create shape by
just using something like a pen or calligraphy
pen, play around. There's all kinds
of little tools you can even use a pencil. You can use the back
of your paintbrush sometimes and you can get
some texture that way. It's really fun to experiment. L et's see here if I can do
a little dry brush here. Again, some little
texture. We can go ahead. I'm going to dry this
really quick and let's just do a little dry
brush on this one. I'm all dry. I'm going to Grab a bit of this red maybe
not the best color combo, but again, trying out things, you never know what
you're going to get. You might like it, you
might not. Going to tap off any excess because
I want that dry brush on here and I'm just going
to create a little texture. That looks like one
of those tulips, maybe that hasn't
even opened yet. A nice closed. Let's put
a little stem on there. Oops. Again, that's dry brush. Look at that. I don't have
a lot of water on there. Me a little bit more water.
We have a little tulip. Maybe we have another one
coming up here or this could be a a leaf. Practice some of that. That is wet and to wet. Let's add another darker
value in here. Look at that. Again, you can get
more colors in there and just have fun
experiment with it. Let's do another
green on this one. Maybe you can add
a little yellow to it. Drop it in there. Again, let it mix. This one is looking at dark. Let's throw some
yellow in there. Again, just practicing
and playing. I actually like to do blues and browns with a lot of mine. That was really blue.
I'm not picking up much of that browns
on the side there. Let's get a little
bit more of that. Putting a little bit
of blue in here. Again, just being
super loose with it and experimenting with some
of the colors as well. You can still do their
dry brush in here. You can still do some a
little bit of textures. Practice your wet into wet, practice your wet on dry techniques and your
dry brushing techniques. Just get comfortable with that. We're going to be
using that in some of the flowers that we'll be
doing later on in the class.
8. Watercolor Pencil - Rapid Petal Play : To dive into some quick exercise
again within 5 minutes, and I practiced on these flowers that my son
gave me for my birthday. So we're going to capture
the shapes and the essence of these blooms in
a rapid drawing. And this exercise is
all about loosening up, letting go of your
perfectionism. I'm going to drive
that into our heads. So grab either your sketchbook, watercolor pencils,
and watercolor paper, and we are going to do a fleeting capture of these
in a very swift manner. And then I'm going to fill some of them in with some color. Little bouquet here of
just sordid flowers. I'm not sure. What
they're called. My son picked these up for
my birthday, is that sweet? You can see there's a lot of
different shapes to these. The challenge on some of them
are on their way out too. The challenge is to try
to draw some of these. Again, within a five
minute time frame and see how many you
can create within that short period of time.
That was a fun little one. I'm going to use for this
one some colored pencils. We've got some really
interesting shapes in the leaves for this one. I'm going to actually take that one stem off.
Oh, no. Look at that. I've already got
something on there. Maybe having the flowers facing different directions to
challenge yourself as well. Let's just start off. Again. Give another sheet, Ho. We've got this direction and this direction or
this direction. I mean, you can have it
in different directions just to practice. So I'm going to grab.
I've got a purple. I guess that's kind of a
purple with a yellow center. I'm going to start
my time Alexa. Set five minute time.
We've started 5 minutes. I'm going to practice
these little shapes. This one is upright. We've got some green here. I'm just going to do
all in the purple. We've got this one. I start off with this
round shape here, and it's almost like an oval. These are coming up. They're
going to be shorter. As we come ad, these are
going to get longer. Again, it's about practicing it, It's okay if it's not correct. Let's try it again. Again,
I'm getting looser. Some of that greenery in here. And Let's try it now
without using that shape. I know they're shorter here
and then this is getting longer here because
it's at an angle. We've got some petals
coming inward on that one. I go a little bit
better on that one. Let's try it again. Again, this is that fan shape. This is the back side of it. There's your fan, and you're
just going to fill that in with those petals
with that shape. I got a leaf on that one. Continuing, let's try that
those petals in the center. I know we've got
some petals outward. That's pretty good. Let's turn. Let's see if I hold it my hand upright. What can I get now? Instead of it being outward, the center is here and these are going to be almost equal
as I come around this one. I even have some petals
facing inward a bit on that. I got the center on that one. And that is not a
perfect center. Cute Even can do
the back side of it. What's that look like? I have the petals now going down and they're sh over here. There's that stem.
Again, probably be better if I have
some green in there. But you can see the difference being out and up versus down. Let's turn this one this way. Let's challenges. I can barely see
that little circle. Let bring this over
here a little bit more. You can see there's a
half circle in there. You're not seeing most of that. You are seeing
these petals here, and these coming up and around. That one's a little
bit harder, isn't it? Stems coming that way. It's really interesting if you find that it's a
little easier to do your little circle to get that shape in there
a little bit better, feel free to use that. Again, I don't have much here because this is the part
that's coming down. That is a pretty good
challenge on that one. This one really is pretty
much the same thing except for it's more
closed in the inside, and that one is white. I did that one and
might do that one with a nice light green. That's the time.
That's the 5 minutes just practicing those. Let's try as two
another 5 minutes down here and practice. Maybe this one just because it's a little bit different shape. F.
9. Progressive Sketching Exercise: It would be fun to do
something like this one too, and that one is completely
closed up. What about. Again, that would be
really the same thing. Except for, you would
have everything going upright and then you've got that little bell shape
going on with that one. I would have had time
if I didn't do so many of those. I should
have cleaned that. Let's do a five minute
timer for this one. Alexa, five minute timer. We have some really cool
leaf patterns with this one. I've got this round shape. There's one tucked in behind. There's one here. This is the underneath.
There's one over here. We've got our stem. Stem there. This one is coming
out like this. We've got the main stem. These are I don't know,
little spikes again. These are all coming
up and inward. This one is coming off to
the side a little bit. This one is curling around. Shorter here on the edge, and then getting a
little longer here. I also wanted to do a little
shape of those leaves. Then we have one coming
out here on the stem. These are funky shaped leaves. It's a weird one, huh? Let's bring it. It's
not really that pretty if I look at it
straight up and down. Let's turn it hard
to do, isn't it? Let's go back to this one. I'm going to draw this way. Again, we've got 5
minutes just playing. I'm going to move this
over a little bit more. Again, we've got this
little shape here, which is that little
bell shape and the stem, little tiny leaf there. Then we have car
petals coming out. Some of those you can't even see because these are in
front of it, right? I tucked in there
on the back side. We've got this one
that's folded over. Again, you just want
that lose shape. This pedal is big up
in the front there. Really loose shape.
Let's see this one. Oops. Let's try to go
this way with this one. Maybe go upright. I want to put it here so we
can do it this way. Again, you don't really
see much of that center.'s switch to a yellow, yellow one that way we
can just fill it in. It actually is green
here. That green shape. Then we have again,
almost this bell or an oval oval shape. That's hard to see with
the yellow, isn't it? We've got this bolus
shape in the center. Then are a little bit smaller. We get a little bit bigger. And you have some
that are coming right forward here, which
you can't really see. Some of those are
hidden in the back. Let's just pretend
we had a stem still. This has a similar leaf to the other one
that we had done. That's not quite right,
but that's okay. Again, we're filling it in. It's all right. Let's turn it this way so we can
see it looking at us. K. I don't see any of the green, so I'm just going to
go with the yellow, the yellow is hard to see. But we have this
gathering in the center. Then we have again,
our an shape. We've got some hidden
ones in there. These have multiple layers. We have our outer petal. And then we would
have our inner petal. But again, we're trying to
be still somewhat loose, when we're drawing these,
you're going to be a little tighter than if you are
going to be painting them. 5 minutes is up again. Let's just go ahead
and fill these in. Playing on that loose mode, I'm just going to add
some water to this, and that is pretty
much it because we have the ink pencils on here, so you can see when you
add water to those, it just activates them. Again, we can keep it pretty
loose just by doing this, leaving in some white space. Going to get some
of this green going here. Filling that in. You see as you go
over and if you continue to work
some of those lines, you can meet them a little bit, but again, we are practicing. These are going to be green. This is supposed to be
white. That's okay. And just filling in
those shapes and you can see how the shapes
just right out. Look at that. A n g, a shape. You don't have to stay
within the lines. And very loose. We've got some darks and some
lights in there. Let's go back up to
these purple ones. Now that did have
a yellow center. And we do have some green. We can just do the
edges of these. Again. Remember, fill
in those cute that is. Let's see if we can
get some of this covered or our little circle. I could go in with a little
bit more darker pigment if I want to cover some of
that up with my watercolor. I can get a little loose. You can see I go some nice
little edges on that, want a nice little burst. It's really fun to mix and
match and play with these. Let's got a green in here. That's a dark, but that's. This was supposed to be
white. But that's all. T. You can see how
just creating some of those little shapes really
make it nice and loose for you without having
too much pressure, let's go ahead and fill this in. Let me add a little
yellow to those. Keeping it nice and loose. You can see I'm just not being really defined on all of
those individual petals. Keeping it nice and loose. Let's go with a little
bit yellow in here. That was kind of green,
wasn't it? This was upright. So to get the green in
there. Little stems. Really yellow on this one. Again, we can take some
darker values if we want. This was more of a
purple, wasn't it? A pinky purple shade
that we had there. If I want to deepen that
a little bit, I can. Again, you get a little bit
of that dark and light. You get some of those
colors that are pk. You've got those lighter values
in there, darker values. And again, it's a great
way to loosen up. These were kind of curled at
towards me, weren't they? Okay. So again,
just a really quick way to practice. Some of these. Practice. Again, whatever
you have for flowers, try to get the shape down
by drawing it in first. Then you can always do
the colored pencils, or you could do watercolor
pencils, intense pencils. Whatever you have on hand, you can just use regular pencil and just do a light wash
first with watercolors. There's a lot of different
options for that. But the key is is just to practice those shapes
and turn the flowers in different directions
and practice how how to create those flowers in
different ways so that we can incorporate that into our paintings and
get a little bit more a little bit more variety, so everything is going
in the same direction.
10. Thoughts about painting loose florals: Want to talk about the benefits of being able to paint loosely. Embracing a loose paint style
offers numerous benefits, both creatively and emotionally for us artists of all levels. In this segment, we're
just going to explore some advantages of
paint loosely and how it really fosters
some artistic growth and personal fulfillment. So the first thing I
want to talk about is that creative freedom
and expression. Painting loosely allows
you to break free of constraints and let you
embrace a more intuitive, spontaneous approach
to your work. And by relinquishing control, which was really hard for me to do and embracing
that imperfection, these artists can really tap into that creativity
more freely, and it results in artworks that feel more authentic
and more expressive. And loose paintings really encourage those
bold brush strokes, squiggly lines and movements, which can lead to some
really dynamic looks in your florals. And you can see some of these, they start out basically
as little blobs of color, and by layering them,
they come to life. It's just the best
thing and so much fun. That regard, artistic
experimentation and discovery is what I found while I was painting
these loose flowers, going from trying to
do something very realistic to doing
this loose style really provided a ground for experimentation
and discovery for me. And I think as artists, I think we should encourage each other to explore
those new techniques. We are always learning. We're always trying new mediums, and I think we need to do
that without fear of failure or judgment because in order to get better at anything,
we need to fail at it. So in spirit of experimentation and
growth and innovation, I'm going to push you
outside your comfort zone, and I want you to
expand your horizons, and we're going to do this
through trial and error. This painting here was one
of my very first ones, and I thought I would share
it with you just so you could see where I started
in this journey. And I really was able to develop my own unique style with this
and really share my voice. And I encourage you
to do the same thing. I encourage you to really
just explore and go into this with just like that
childlike wide eyed look when you're creating stuff, try not to as
you're painting it, just look like a flower, because we all need to start somewhere, and we all need to grow and experiment and
fail along the way. Emotional release, hinting loosely can also be deeply therapeutic
experience. Channeling those emotions,
and those experiences onto your paper really gives us that release and just gives us solos in the act of creating something
from nothing. Any act of painting becomes a form really of
self expression, and it can be in a very emotional
process allowing you to connect with some of your innermost
thoughts and feelings, and in a sense, painting loosely just becomes
not a creative endeavor, but it also is a
way for you to form a real personal exploration
and have a lot of growth. L et's talk about
personal insights. As an artist who has embraced
the loose painting style, I can attest that this was transformative in allowing me that freedom and spontaneity. I've always been a very detailed
artist with watercolors. I learned from my mom.
She is self taught. And before, I really painted along
with her with watercolors. I did acrylics a long
long time ago and oils. And I look back at
some of my older work, and I just find it so emotional. It was a lot of bold strokes, and I was not doing
detailed work whatsoever. So I kind of discovered myself again using
these techniques, and I gained a deeper understanding of
myself as an artist. So the process of paying
loosely has brought me really so much
joy and fulfillment, and it just reminded me
of the inherent beauty of that imperfection
and the freedom that you've got from letting
go of your expectations.
11. Practice and Spontaneity : So we have done a little
bit of practicing. We've tried to loosen up. We've done some
exercises that hopefully have released some of that extra pressure that
we put on ourselves. And now we're just going to
just practice some shapes. We're going to let go of that perfection while
we're doing this, and we're just going to play. So let's just let's unpack this a little bit as we paint along. The first thing I want to talk
to you about is embracing confidence and just
trusting your intuition. Trusting your instincts, painting some of
these crazy colors, taking risks, and
experimenting with new styles, new techniques, and really allowing yourself
to be creative and just flourish without any fear or judgment as
you're doing this. So I started out with this one. I put in a couple of lines. I'm using the brush sideways, using some clean water, and just spreading
things around. Now, I'm not sure at the beginning if this even looks like a flower,
but you know what? It's amazing how it
starts to develop. Especially if you think
about it so much. I say that all the time,
but it's really part of it. If you're like, I'm
not really sure, then just move on
to another one. I was unsure about
that when I had one of those petals is really large. I'm going with a
different color and I'm just making some lines, making some marks, and
I'm taking those marks, and I'm just spreading them
out using some clean water. I'm seeing what
it's going to do, seeing where the paint is
going to move and making these very random shaped petals because petals are
not always perfect. As they spread out like this, they really fan out and make
these really organic shapes. You want to practice
that spontaneity and let go of that
perfectionism. You want to allow
that paint to really just know freely on the paper. Focus on capturing more of
the essence of your subject, your flowers with more loose and just more gestural
brush strokes, and it doesn't have
to be perfect. You're just going with
the flow on this, when embracing the
unpredictability of what they're
doing on the paper. You are going to have blobs and those blobs will turn into
flowers before your eyes. So this one again, again, practicing some other colors. I added a little
bit of orange to the yellow to see what
that was going to do, going in with the pinks. This is, I think this is
the magenta magenta rose. Again, I'm just practicing that shape and they're not all going to be going
the same direction. You might find that when
you first start that everything is going in
the same direction, and you want to start to realize that I need to change the
shape of these flowers. It can't be all
going the same way. Play with your brush strokes, play with the colors, spread things out, see what
it's going to do. You can see I'm using a a
mid size brush for this one. I'm using large paper. I'm not using my smaller
Strathmore watercolor cards. This is actually
arches paper and it's a large 11 by 14 sheet. So some of these are
a little bit larger, some are going to be smaller. Here I'm practicing a row shape. I'm giving myself
a lot of space. I'm going to do some layering. I don't care if I
go over on top of these if I mess up the colors. It's okay. The
shape of the rose. I'm just again playing
with that shape. Leaving some white
space in there. It's basically an oval shape, and I've got those little
lines reaching out, going darker in the middle. The white areas look
like the top of the flower or where the light
is going to be hitting it. Again, I notice I'm still leaning everything towards
the left at this point. I didn't notice it while I was painting it. I
will tell you that. It's more like when
I look back at it, and I noticed that everything was going
the same direction. I think halfway through, I did start as I'm filling
in some of the white space, I start to realize it. Here I'm changing up that
shape a little bit more. This one is not quite leaning to the left as
much as the other ones. I'm going to lift
a little bit here, just taking some clean water and lifting up some
of that paint. Again, I don't want
everything dark. I want some lights and
some darks in there. If you're using the same color, we had practiced a little
bit of that wet in to wet, we practice a bit of
that wet and to dry. I'm doing a little of that here, spreading some of that out even with some of the paint that
I've already laid down, just adding a little water to
it and spreading that out. Again, I want to hit
those darker areas for the center of those flowers. Not sure what type of flower they are and it doesn't matter. You're going to
experiment and explore. You want to push
those boundaries, try some new techniques, try new mediums, try new styles. You're going to embrace
that exploration and discovery knowing that
each one that you do is going to bring you
a little closer to finding that perfect
spot for you. I'm trying some other
colors again, orange. Orange with pink, a
little bit of blue. We'll try it in this one too. As you grab your
paper, try it out. Look at that beautiful
bloom that this one has. This one doesn't have as
much. That one was more wet. This one was more
dry. You can see that different things will happen depending on how
wet, how dry it is. I've got some dry brush here
that I can see happening. Go back and forth on that. I can clean it up a little bit. But again, a little
bit of it looks neat. It looks interesting. It
changes it up a little bit. I'm going to continue
to move this along. I'm still making
those rose shapes, and adding just some lines
and some shapes in there. Once I have that shape in there, you can add some water to
it and just blend that out. Now you do want a brush will
hold a little bit of water. You don't want to work
with a really tiny brush. You want to have something
that's got a nice belly on it. We can really spread
some of that pain out. This one I'm going. This is just the top of that
flower on the other side, so I don't want to go
really big on that one. We're only seeing a portion
of that for that direction. We need a little bit more
darker values again. Let's have a little
darker to here. A some shadow areas. Til playing with
color, you can see, I'm like, let's try
this. Let's try that. There is no wrong. Granted, you don't want
to turn it to mud, you want to try to keep
away from the brown. That experiment. Let's see what you
like. Mak notes, even. The key to this is really just letting go of
that perfectionism. You want to embrace it
as part of the beauty of your art and if you have
mistakes along the way, that is great because you need those mistakes to
learn and you need to look at them as opportunities
for learning and growth. I can't say it
enough embrace that spontaneity of what
watercolor actually is. I'm going to play a
little bit more here and share the live portion
of this with you so you can see how I
am thinking through this and how I'm just
really having a good time. Playing with it. Say
loose, stay flexible. You want to have a
plan for your artwork, but you want to really
remain open to the spot. I have a plan for this one. I know I'm going to
make them into card, again, I wasn't really worried. I can cut and paste what I
want out of this painting, so you can always utilize it, even if you're using
it as practice. You're just going
to allow that pain to evolve really organically. You really can respond
to the flow of the pain, maybe the energy of the moment, and just be willing to change directions and try
new techniques and practice and if inspiration
strikes, just go with it. Keep painting. The only way you're going to get
there is by practice and persistence and
recognize that Mastering this loose painting style really is going to take you
time and lots of practice. So feel free to do a
few of these papers. Now, you can choose any size
watercolor paper you want. If you want to start smaller,
feel free to do that. But the big ones are really fun because you can cut them up, and we're going to do that
for the final project. But go through this
a couple of times, practice it, watch us again, and just kind of practice your own little style
for your florals, find out what you like, find out the colors you like, and
the shapes that you like.
12. Color Fun Mixing on the paper: So I did want to
share this with you. This was actually one of the very first
paintings that I did, and I did record it live. And I thought that, you know, I would just share this with you because I decided to make
some cards out of this one, and it was all part
of my process, my, you know,
learning the shapes, learning color, seeing what things are going to do together. So for this one, I'm doing a row shape here, and I've seen little S curves or C curves that people
have done for roses. But it's just about leaving
a little bit of space. I have this one
turned more oval, and I'm trying it in a couple
of different places here. I'm just skipping around. I'm just leaving
some white space, and then I'm going
to go in and add a few darker values in there. So you can see the first rows
that I had done that with, I put in some nice
blues in there. And I'm not thinking about the
composition at this point. I am just practicing
different shaped flowers. And some of these
I'm going into, while they're still wet,
like this one here, I'm going to go in with a
little bit darker value again, just to make it pop because
it's going to be very flat. If you don't add some darker
values to these florals, it's just going to be too soft, and you're not going to get that dimension in your flowers. And even though they're loose, by adding darker values to them, it just again, makes
some pop off the page. So this one again,
is it all blue. I've got a few darker
blues in there, but now I'm adding a little
bit of purple to that. And this is still
wet. So you can see how everything's
kind of moving. It's actually not purple. It's more of a I think that's a yellow ochre or
gold quacal gold. That's what that one was. So
I mean, I'm mixing color, what's quinacal gold going to do over this beautiful blue? You know, I'm thinking I'm going to get some
type of green, right? Because you've got
golds and blues. You're going to make
some type of green, and it was a very dark shade. So it's just about experimenting and playing with the colors. Without any pressure. That's
the great thing about this. I just want you to take the
time to explore shapes. And if the flower is not
perfect, that's okay. You are learning at this point. Let's add a few leaves in here. So I've got a little bit
of that quinacinon gold and a little bit
of brown in there. If you don't have Quin
gold, you could use, you could get a yellow Ochre, add a little blue to it,
add a little brown to it. Again, experiment with those
different colored greens. I find that the best type of green are the ones
that you mix yourself. So if you're just grabbing
regular sap green, it's going to again look
a little bit more flat. By adding some browns or
some blues to those colors, you're going to get
a much richer tone and a much prettier
more interesting color. So you can see the
sap green over here and the right that I had done. It didn't have much other colors in there. Here's another one. So even if you put
that in there, I'm going to add a little
bit of brown to that. Just a couple of little
taps. Playing with a color. What's that going to do? We've
got some nice dark green. I don't often rinse my brush. You'll notice I'm just
scooping up the green, scooping up the blues, yellows. It doesn't matter. It's just
know about playing around. And this is how you're going
to learn about your colors, what they're going to do, what you like, what
you don't like. So I'm adding a a little
bit darker value here. So I've got some lights
and some darks going on. And that's the key is
where there's light, there's dark, where there's
dark, there's light, and having that mixture is what's going to
make your paintings look so much more pretty. R prettier. So I'm kind of pausing
here and like, Okay, where do I have another spot
that I can place a flower. I'm starting to fill up a lot of that white space at this point. So I may have to
layer some more. Again, I'm not worried about
composition at this point. I am just practicing
the flowers, trying to figure out what I
can do, where I can put it. So I did let that dry
and took a break, took a step back here. And then I'm going
to go back in and we're going to play
around a little bit more. This is pretty, but
it's very basic. There's no structure
to this at all. This is a bunch of flowers. You can see this one
is very, very light. I want to pop in a
little bit darker color. Again, I'm just there's
no particular shape. I'm making some little marks angular marks
facing outwards. If you're looking at a petal, it might be bent over. It could be you know, reaching for the sunlight. It could be in any direction. So you're just going to
pop in a little bit of clean water against those
little marks that you've made, and it makes this
beautiful bloom. So you get that
darker in the center. And because you're
adding water to it, it's going to get
lighter usually at the tips or in the center there. So I'm going back in again. I'm trying to play
around with the colors. I want to see what these things are going to do
with one another. Now you'll notice here, I'm adding paint or water to something that
has already dried, so we're going to get a
nice layer with this one. Keep in mind, if your
paints are always wet, you can tend to get
a little muddied. So if you find it that's happening with
some of your flowers, go ahead and dry them
and then go back over and do what I'm doing now by adding the
color on top of it. You can still get
those beautiful tones, but they just don't
all turn to mud. You can see I can actually blend out some of that nice soft
pink around this one, making some more
transparent petals. The lighter they are, the
more transparent it looks. Going in with a little
bit darker yellow here. And then I go, Okay, well, what's the yellow going
to look like in this one? What will the yellow
look like in this one? Most center flowers either have a really dark center or a very light center with
some little dots in there. So again, I'm experimenting
with the dots and little marks like
little stamens in there. And you can see
already, it's starting to look a bit more cohesive. I've got more color
going on here, more depth going on here. I'm going to do a
little bit more on this one. I like the yellow. It's nice and bright, and it
works with a little bit of gouache or a little
bit of bleed proof white to really pop out
some of those centers. If I feel it needs just a
little bit of brightness. So this is a really
light flower, so let's add a little
dark to that one. My be a little dark to this one. So I get a nice shadow in here. Again, I'm not thinking about every little mark or
stroke that I'm making. This is more intuitive. I, going to do? What's that going
to do? Let's add a little this. Add
a little of that. Put it here. And this is part of
part of that learning. And again, guess what? It's just a practice piece. We're just learning how
to make the shapes. We're learning how to mi
some colors that we like. So there is no
pressure with this. You can play if
they're not perfect. I've said this before.
It's all right. D. You can see I had a little
bit too much color in there. I just tapped off
a little bit of that excess. I didn't
want it to drip. And again I'm making
some little marks. Having fun with it. Let's add a little
darker into the petal. I'm pushing that outward. It looks like that petal is bending. This one's lifting up. You can see they
just come to life. They get more and
more darker values and lighter values, more color, and they start to pop and look more realistic
or more three D. I don't like the
center of that one. That was still wet. I'm
just going to tap that, lift it out, and I'm going
to try something different. Tap off a little Xs. I'm going to let that
dry a little bit. I've got some orange
in here, too. I like the orange. I want to see what
that's going to do. I had to start popping
it in here and there. Maybe even at that
orange in the row shape. Now, try to blend that one. You can see that that's already
dry, so that didn't work. Timing this is important, so I'm just going to add
some more orange to it, and now I can take that
and move that down. We need a little bit more
water there. There we go. I did dry this and now
I'm going to go back in and just try to fill in
some more of that white space. Now normally, you want
to make sure that you've got plenty of white
space in your paintings, and if you're planning
something out, that's much easier to do. When you are doing
things more intuitive, you're not really sure where your white
space is going to be, but just always keep that
in the back of your mind. You do want a little bit of
that white space to pop out. You don't want to
cover up everything, especially with your florals, you want to be able to
have some space in there, especially for this one,
we're going to cut it out. So we're going to make
some cards out of this. And having a little bit
of white space in there. We'll really make those
colors pop a little bit more. So I'm going to tuck
them in here here and there and continue to play. So I just started with this one, so I know I need to add, again, some other darker colors to that because it's very flat.
13. Adding Details and Layers: I'm going to go on
with some pink. I really like that pink
look. I think better. Pink and Peaches, oranges, I don't know if we
can doctor this one up and save it. Let's say. A little better. I
will make that blue around it some more green. The yellow one, I
think I need to balance that one
out a little bit. Let's put a yellow one up here. In the corn. Maybe we
need another one here. So one is looking
a little green. This one looks a off as well. Before I do that, let's
go with some red in this one and a touch of it. And soften it. I'm going to switch now to some green
or browns maybe some blues. Create a few more flowers
or What do you call them? Ps. That's not what
you call them. Leaves. Blue. A little too transparent. There you go. Okay. Some of those I
definitely don't like. I need more curve,
more looseness. I was too tight. I think I
don't know where that one is. I so probably have a flower
in there somewhere. It's a. A. I'm just like randomly popping
in the leaves everywhere. Again a little overboard. We'll see what we can do
to doctor it up a bit. What to do with this one.
Let's go a bit blue green. I trying to capture that
a little everywhere. Little dry brush, maybe. I don't know. So stems, smaller leaves, that's what it needs. You can see where this one
is not a quick quick one. Again, it's a little bit
bigger painting, co. I've definitely over a of it. Let's try another one here. So I'll do it too. Too dark. Let's see what a
little light will do to that. A play time. All right, do something. Which may again make it a
little bit more cohesive. Then I'm going to do a
little bit of peat splatter. And maybe a little
white splitter. All right. Let's try it and
make some final decisions.
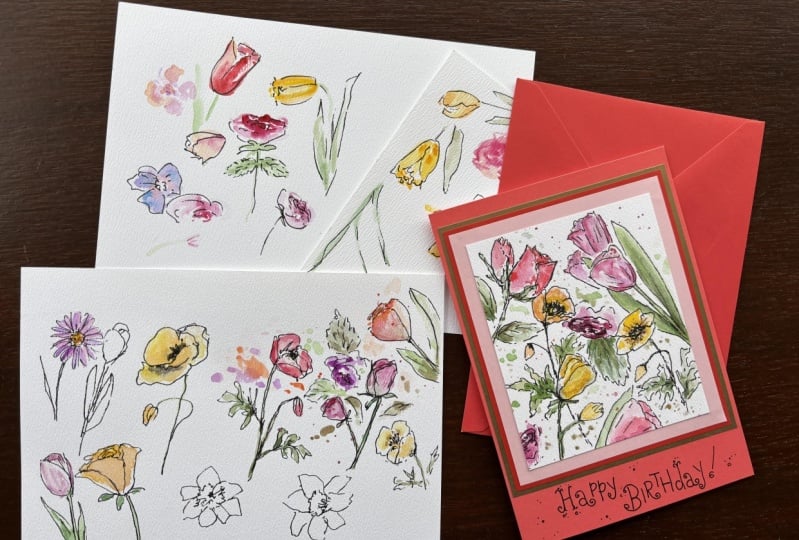
14. Project: Creating A Card from a practice pieces: Now it's time to turn my practice pieces into something
fun and more practical. I just finished creating this beautiful card using
some of my practice pieces, and I'd love to see what
you would come up with. For your project, I'm going
to have you take one of your favorite full
oral practice pieces and transform it into
something special, a card, small framed artwork, any creative project you like. And don't be afraid to
experiment and make it your own. There's a lot of those I.
They're very still transparent, but a couple of them
that I used the guash. You can see where
it got more opaque. So you lose that
translucent quality here, this one as well. I mean not bad, but these are so much
prettier when you can see the paper through them a few of the other
ones. A little muddy. This one, it was a
great experiment. I tried lots of
different colors. I can see what colors I
probably would work with, which I really like
the peach colors, and maybe reds together
along with the green, the green, blue, rusty color. Some of these are
a little too dark. Some of them a
little too muddied. Again, learn by experimenting, but all in all, not bad. I think I could
always crop some of these paintings too or crop some of the
flowers that I like. Great one for cutting out maybe
for adding to some cards. Let's just take a look at some of the areas
like I like this. I think that's. That's p. I
might leave that one out. I would probably
leave these out. But that's not bad. I I cropped it maybe right here, so I've got some of that
light transparency. This one's not too bad. Maybe here. There's still a lot of possibilities
with this one. Let's go ahead and
pull a tape off. I think I'm going to
actually cut this one up and we will make some
cards with this. The cards that I'm
going to be using are the Strathmore
watercolor card. Pull that one in half, and
now we need to pick out a couple little areas
that I would like to try. I don't want to cut
it up too badly. I might be able to get a
couple of different ones. I know what I don't
like is this one, but if I can cut that off the edge of something
that might work. Let's just go ahead and cut
it right down the middle. I want to cut it
down the middle, cut it down the middle this way. I can do the card upright and do a little
square. Let's do it that way. I want to cut it
right about here. I don't need to do too
much. Look at that. I like that one. Let's
go a little bit more. Those can be done. L at home, I have my ruler for
the decled edge. I love the decled edge look, but I think I'm going
to do is just crop. So I don't have the
outer edge of that. And I think that's going to
fit in there really well. Another thing I
could do. I don't have the deckled edge
but I can fold it. Goodness. That's a pretty one. Back and forth, and
then I can spare it. That way, I can get that raw
edge on there if I want it. That's really pretty.
Look at that. Also it could leave
you some space to w right around the
edges if you want. Always thinking. That's obviously a
little large for that. This way, I'm not even
sure how this flower goes. I painted it this way. Let's
go ahead and trim that out. I think that's going
to fit like that. If I do it, right about here. Come down a little
closer for you. And again, a little
back and forth. That's why it doesn't
have to be perfect. I tear it sly. Didn't get the edge really well. I can see where it is. Coming in closer. There so nice loess. Let's go ahead and tear it here. This is 140 pound press, so it's really easy to tear. This way it doesn't
have to be perfect either. The edge don't match up. Decisions. If I do that, I have to cut
off a little bit of this. Let's do that. I feel
like you like that. Okay. That's what I'm
going to go with. And room down the bottom or I can write some
encouraging words. I'm just using double sided
sticky tape for this. A little in the middle.
I'm going to peel it off. That's really challenging
to figure out, isn't it? I think I'm going
to go this way. Okay. Decisions made. I'm thinking of some
positive words. Let's see here. Okay. I just traced it in here. I use I'm horrible at writing, so I just used my little
ruler and did a pencil, some funky little letters. Because I am not
the best writer, and I'm just going to go
ahead and trace those. I'm going to speed this up
just a little bit for you. I just want you to know you don't have to be
the best writer. I did this large, small, funky little way
that I was writing, and then I just added
some little thoughts to the top of it,
spread the words out. It doesn't have to be perfect, like I said, I'm a great writer. This was really fun for me
just to get messy and loose. That's cute. Let's see. I feel like I need
something around the edges. I don't know what. I'm
not much of a crafter. I might be able to tell that. But this is cute. Let's see. I feel like I need
to I don't know. I start pen and ink,
I have a tendency to do a little more. I don't know why that is, but I feel like it ties it in
together a little bit more. Whether it does or
not? I don't know. Let me try not to
go overboard with it because that's usually
where it gets me. That's just a little. Needs it. That wants it, but it's got it. Way. Cute way to do just a
little card with some of the excess scraps of tests or things that
you don't care for. That's a good way
to repurpose it, and I'll be sending this
out to somebody, I'm sure.
15. Conclusion: So, I had a lot of fun with
this larger piece that I did. And again, as a whole, it wasn't the perfect painting. But when you're
trying, you know, for the first time, some of
these loose watercolors, it's just about playing. So that's what I want you to
do. Don't worry about it. For your project, we
are going to have you create a set of
inspirational el cards. From the paintings that
you've done today. So you're going to transform
that practice exercise or exercises into
a beautiful set of personalized floral cards. This project allows you to apply those loose floral
techniques learned in the course while really getting to unleash
your creativity in the designing of some
unique inspirational cards. Start by practicing the loose floral techniques
from the course, including the tural shapes, maybe even the blind
contour drawing, and the quick five
minute florals. Grab some of your
own flowers that you might have in your house or in your garden and
practice those. So you're going to select then your favorite florals from all of these practice sessions. Just pick a few of
your favorites, maybe the shape or
the composition that you liked in certain areas
of your practice sessions. And then you're going
to design your cards. You're going to use
your chosen florals to design a set of cards. I like to use the five by seven, the watercolor cards
from Strathmore. Feel free to experiment with layouts, add
inspirational phrases. Let your floral designs just kind of shine
as the focal point. And then I want you to finalize and share your
cards once they're complete. You're going to
upload them here in the project gallery and include just a brief note on the techniques that you used and what you thought about it, and maybe even how
you came up with your personalized
designs or wording. And if you're not a card
person and you just want to make a piece of art
and you want to matt it, don't feel like you have
to make a card with this. You can still do the same
thing without turning it into a card great to frame up
and hang on your wall. Maybe you have some type of support message or just some positive messages
that you can hang up, something cute for
maybe a nursery. Or for someone's birthday, you know, it could be anything. So don't limit yourself
to just the cards. I just want to see
what you come up with. I'm so excited to see what
you guys make and create. So thank you so much for joining me in this little project, and I am excited to see yours. And if you are interested
in painting more florals, I would love to have you
join my membership over at www.kellychassisfineart.com, where we do monthly challenges. We have live paint parties, and we are just having a lot
of fun painting flowers, and we would love to have you.
 Kellie Chasse, Artist + Entrepreneur + Educator