Transcripts
1. Introduction: Welcome back,
everyone. For those of you that do not know
me, my name is Paul. I have been a Skillshare
teacher for seven years. Now, I teach watercolor painting as well as digital
painting in Procreate. Today, our focus is on a
loose watercolor painting, a follow up to our loose
watercolor painting series that we started
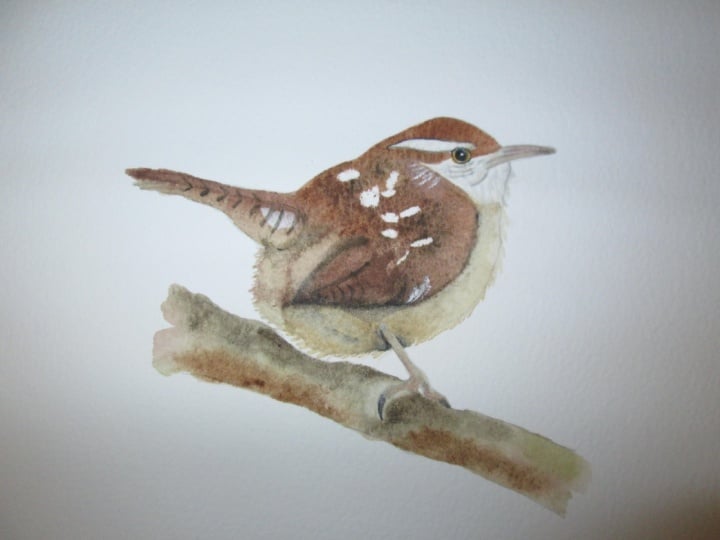
first with a flower, then moved on to a hummingbird, and today we're
doing a rendering. Get it? It's a ren render the class is broken up into
very easy to follow chapters. We start off very simple
with the bottom of the bird, then we move on to
the top of the bird, putting the darker browns on. Then we dive into making
the eye and the beak, and then we add the final
details, some feet, some branch, and walla you got a rendering
all said and done. It's not hard and looks
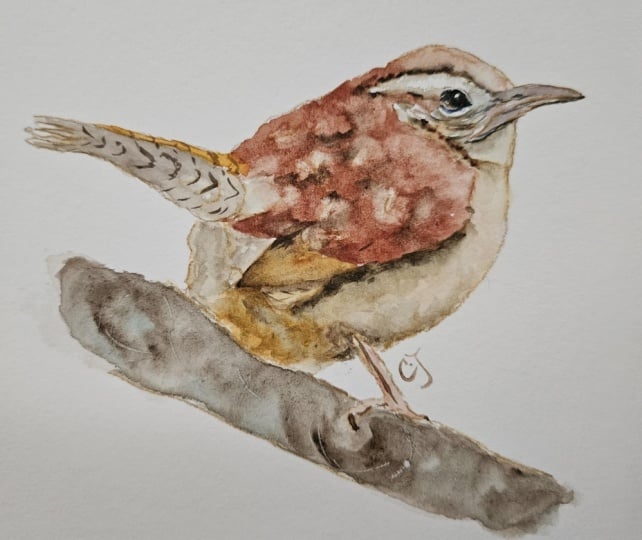
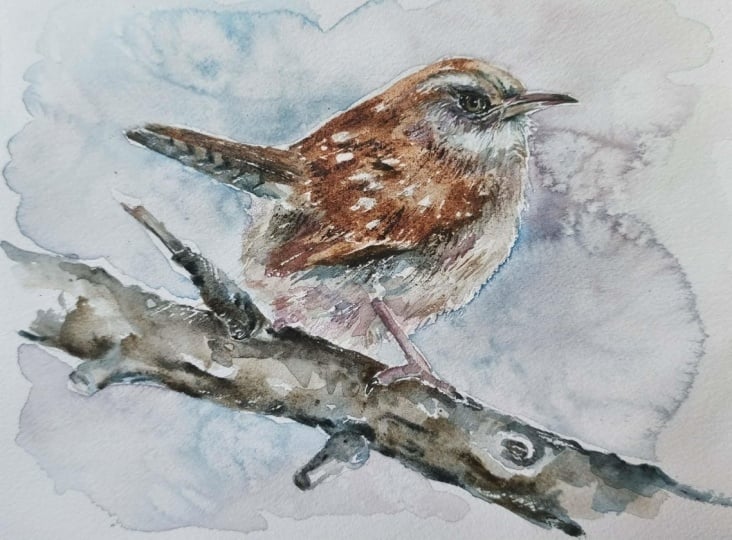
complicated, but it's really not. As with all my other classes, I've included a reference
photo that I painted from a high resolution version of
this painting right here, and an outline that you
can use to draw this out, so you don't have to
draw it yourself. You don't need to
know how to draw. Of course, if you want
to draw it, you can. That's up to you. This class is intended for all levels because all levels have done the other classes. There's no reason why
they can't do this one. It does use some more
advanced techniques, but if you've watched
those other classes, you should be fine
to do this one. If you haven't go watch them. When you're done,
you're painting, make sure you posted
in the projects and resources section so that I can give you positive feedback, and you can help inspire other people to want
to paint this as well. If you get a chance, make
sure to leave a review. Let me know what
you like, what you don't like. Let me
know what you think. I hope you enjoy this class as much as I enjoyed making it. Thank you, and I will see
you on the other side.
2. Materials: Okay, let's take a
look at our materials. First step, we've
got my favorite squirrel hair mob
brush by DaVinci. Then I've got my liner brush. I use this for very
fine detail areas where I'm gonna pull
the feathers out, and I've got a mixture here of synthetic brushes that I use
mostly for just applying, like, heavy amounts
of pigment, you know, for brushing and
pulling back the paint, like, pushing against the hairs. You don't want to use
a natural hair brush for that because it
would destroy the brush. Um, I've also got my little white wax crayon
here. It's got to be wax. And why what we're
doing with this is we're using it kind of
like a masking fluid. We're just masking
out the areas. The paint won't stick
to the white wax, so we're just going to
color these in and fill these in with white wax crayon. You could use masking
fluid if you like, or you can just
paint around them, or you can paint over them
and not have any white areas. Whatever you prefer is fine, it's your painting.
You be in charge. We're drawing, I use my
fabricastle water soluble pencil. It's great for well, water solubing the lines
away when you're painting. Let's take a look at the
palette that we're going to use today, our colors here. So my regular palette sits
here on my desk all the time. First off, we've got our
hansa yellow medium. We've got raw sienna, we've got burnt umber, burnt sienna, quinacridone gold, and ultramarine
blue, and indigo. Those are the main colors
that we will be using today.
3. Laying down the first wash: Okay, so we're gonna
mix some paint to get started raw sienna
and raw umber. We're gonna mix that
with lots of water. So what I'm doing is I'm mixing some more saturated pigment
with less water at the top, and then on the
bottom of my palette, I'm putting in more water and less pigment just so I have different variations
to work with. Once we have our
brush all loaded up, we're going to start
applying the paint. We're gonna ry and keep remember that on the right
side of the chest, it's a lot lighter
than the dark side, so we're going to try
and put less pigment on the right side and more on the left side where
the darker areas are. Take a special note of how
much water is on here. You can see the puddles here. And I'm going to
go back and forth between my palette
and the paper, keeping my brush as
wet as possible, and I'm trying to also
at the same time, get the darker pigments
on the darker side. I'm going to darken things
up a little bit here, adding in more raw sienna. You can see where
it's more saturated, and this is where the shadow
areas will be as well. Okay, now it's time to
grab some burnt umber, and we're going to add some
of that into the mix here. I'm just starting off
underneath the neck here where that little
shadow line is there. I'm going to make
it a bit darker by adding in some ultramarine blue. So that makes a nice
dark gray, burnt umber, and burnt sienna generally
is what you would use, but I'm kind of
mixing in all three here that's the colors
I have in front of me. The goal is to make a dark gray. If you really wanted to
go super black here, you could add in
a bit of magenta or a dark green or
something like that. But for now, we're just
going to use we've got burnt sienna and
ultramarine blue, for the most part here
with a Daba burnt umber because it was
left over on the brush. And now we're going to apply this using a number
two brush here, synthetic brush just in
case you're wondering, and we're putting it underneath where the
darkest area is. If we look at our subject there, we can clearly see that
it's not dark enough. We're going to have to come back and do another pass on it. But for now, this
is the base layer, and main goal here is to have these colors
blend together. Notice how the paint underneath the yellow color is still wet, so these paints are
bleeding in together. It's going to make
a nice gradation, letting the water do the work. You're gonna notice
that I go back and forth between
brushes a fair bit. I don't want you to
think that this is overly premeditated outside of, okay, big area, big brush, small area, small brush. So here I'm using my
rigor to flick out some of the feathers and
little fine bits here. Sometimes I overdo this, but I see it and
I like to do it. I don't know why I
end up overdoing it. Now I'm back to the
squirrel hair mob brush to lift out some of the
lighter areas because, remember, we have the light area on
the chest on the right, and then the dark on the left. So I'm just going back, and I've got a dry brush here, and you can see how
it keeps its shape. But I'm just using that to
lift out some of the pigment. I'm just going to
finish off here in the rest of the I'm gonna
call it the yellow area, the pale area
underneath the bird. And we're going
to mix in some of the shadow areas a bit more. Once we get this on here, we're going to put
in some of the dark shadow mix that we had, which remember was ultramarine blue and burnt sienna or burnt umber,
whatever you prefer. Now I'm going to
dry off my brush and get a more saturated
version of this, more pigment, less water. We'll add in a few
flecks here and there to show some variation
in the feathers, but try not to overdo it. We don't want to
overwork our painting. We'll let this bit dry end, we will come back for
the next section.
4. Painting the back of the Wren: Okay, let's take a look at
how our painting dried. Looks pretty good.
We got lots of variation in here,
nice and loose. The dark area could
be darker, for sure. We knew that going
in, but that's okay. We'll fix it up later. Okay, now we're gonna load up my trusty squirrel
hair brush here with lots of water and lots
of burnt sienna pigment. We're gonna keep the
area to the right lighter and the area
to the left darker, as that's the way
the bird looks. And keep in mind, I'm not putting this on in any
particular fashion. I'm just being careful near the top to try and keep
the shape of the bird. I don't want to make a mistake. This once this paint is on, it's not going anywhere, and it's gonna make a big
mess if I try to fix it. And again, here
down at the bottom, near the chest, I'm doing
the same thing again, just being careful
not to go over top. You'll notice these little
white areas where we put the wax on the paint is not sticking. Those
are working well. I'm being careful to make sure my brush is loaded with lots of water and lots of
pigment helping to keep this painting loose. As you can see here, we've got lots of pigment piled
up in the back here. Now I want to lift this area. What I'm trying
to do is simulate the feathers coming over
top of the brown area. Each stroke I've got, I'm wiping it off. You can
see there on my hand. I should be using a
cloth, which I'll do now. What I'm doing is it
gives the impression. You can see it right
there where it looks like this is coming back. We want these feathers to flick over top of
the back part there. It takes a little
bit of practice, and this is where a really good durable watercolor
paper comes in handy. And again, make sure you're using a synthetic
brush for this. You don't want to wreck
a real hair brush here. And do be careful not
to overwork this. This, like anything is one of those things that
you can do too much. You can go from
stops it from being a loose painting to an
overworked painting very easily. So be selective.
Remember this is representative of the bird. It's not supposed to be a
photographic image of the bird. We're just going to flick
some of these areas out. I'm using my rigor brush. To be quite honest, you could
use any brush for this. You don't have to have
these lines here. We're just kind of breaking up the solid line of the
end of the pigment here. You could use water in here. You could use a normal brush. Remember, this is your painting. Just keep it loose now I'm going to take
some clean water, and I'm just dabbing
in some clean water. What this is doing is it's pushing the pigments
out in the paint, like little grains of sand
in a puddle of water. It makes the disperse
away. I pushes them out. And this, again, we're just
getting some variation in here to show where
the light areas are. So it's just not these dark, harsh lines like that. Again, it really helps to keep it loose up here in the front. This is where you can see in the reference image
where it's much lighter. We're going to do
the lifting again. And again, remember this
is your synthetic brush, not a real hair brush. And this, again, is where good watercolor paper
comes in handy. Now we're going to mix
up a nice dark here, a more saturated version. We're going to use burnt
umber and ultramarine blue. We're gonna keep it more on the brown side because
it is a brown bird. If it was a cooler
shadow or a cooler area, we'd just keep it more
on the blue side. Now I've got my number
two brush here, and I'm just dabbing
this in along the top. Keep in mind, our
paint is still wet. This allows it to bleed up. The brown is bleeding up,
like our shadow area there is bleeding up into the wet
paint. Works very well. Though you do want
to make sure you're applying this when
the paint is wet, you also want to make sure
that you're not rushing this. You're getting the right
colors and the right areas. The dark's where the dark should go, the lights where
the light should go. Here, I'm just putting
in some dark areas to show where the
dark feathers are. I did this painting about five times in preparation
for this class. Sometimes I left them in,
sometimes I took them out, or sorry, sometimes I applied them and sometimes
I left them out. Um, you can do
whatever you like. I personally prefer it
without them there. It's just there in
the reference photo, and I didn't want you wondering
why I didn't put them in. But in hindsight, I would
have left them out again. I'm not crazy about them
in here, but that's okay. It's your painting. You can
apply whatever you like. Just keep the variation
nice and loose. That's what we're going for
here. You can see my paint is starting to dry because this isn't spreading as much as I would like it to. We can go back and forth, adding in some more richer pigments, some clean water, just
breaking that up, giving the kind of light
and dark areas there. Here we're putting
in some clean water. And before we overwork this, we're going to stop
and let this dry, and we will move on to
our next section once it.
5. Painting the tail and wing: Let's take a look
at how our painting dried. We're looking good here. We've got lots of variation. We don't have the
same amount of dark that we have in our
reference photo. I could have put more
in, but I learned in previous paintings
that I didn't really like how it looked.
So I left it out. If you want to put
more in, you can, but for the most part, I really
like how this worked out. Now we're going to move on to the other lighter
burnt sienna areas here in this bottom feather
and in the top of the tail. We're going to start by mixing
up some quinacridone gold. It's just a little bit lighter
than the burnt sienna, and we're going to put it on
this bottom feather here, and then we will apply it
again at the top of the tail. Don't put too much
thought onto this. It's a base layer for now. Just make sure you
have enough water. We want to be able to add in
a bit of dark in a second. Now we're gonna grab some
of that dark mixture that we mixed up and put
it in here on the bottom. Where it's just a
little bit darker, just to give it some
variation representing some of those lines that we're not gonna really put
into this painting. We're gonna keep it
simple and loose. Using a smaller brush here,
number four, I think it is, I have to keep coming
back to my palette and loading it up with paint. Now we're gonna take some
of that quinacridone gold and slide it right
along the top here. Now we're gonna take a bit
more saturated version of the same quinacridone gold and just align it along
the bottom here.
6. Painting the face: Be a good time to
take a quick look at our reference picture
before we dive into the face because that's pretty much the most
important part of the bird. It's what connects
us with the bird, the eye, and the
face, and whatnot. And let's just walk through what we're
going to be doing here. So the first thing I want you to notice is this
area under here, we'll call it the white area. It's very tempting to make this paper white and
just leave it white or, you know, if you
wanted to keep it, which you can. There's
nothing wrong with that. But there's a lot of
subtle shadows under here, and they're subtle
or not, you know? This area here is a bit darker. This area here is pretty much the same value or a little
bit brighter than down here. But let's take a look and
see, is it actually white? So I'm going to
draw a little box here and I'm going to
fill it with white. And now we can see how
not white that is. Like, this is actual
white over here. Look at how not white that is. Okay? Let's just
get rid of that. So what we're gonna do is we're
going to start by wetting this area up in here where
we've got pigment already. And let that bleed
into the white area there just to sort of define that kind of tonal value, right? We want to establish how
dark we want to make this. Once we put these colors on, if you put it on
too dark, it's very hard to make it not dark. So we want to get
that right. So let's just be we'll be
careful about that. We're going to start
by wetting this area up in here, where we've
got some pigment, letting it bleed up
in there, making, you know, some of
these lines and marks. And we look at this. Essentially, what we have
here is we've got lines, we'll call them, even though
they're not really lines, but we can call them that
for now, underneath here. And then they are shadow areas. So they've got, like, a gradual shadow that
goes underneath. That's exactly
what goes on here, here, here, pretty
much everywhere. You've got these gradual shadows that appear from underneath, right? They're layered on top. So that's what we're
trying to achieve here in our painting. Now, let's get started on
that lovely little face. We've got some gray
areas underneath, and it's not a solid
white. It's an off white. So we need a very
subtle light color. I'm just going to add lots
of water to my brush here, and I've got pretty much the right color
on there already. Before we put that color on, as I said, we're going
to wet this dark area, this pigment that we've
already got there and bleed it into this white area here now we can push
some of that around and establish that color that
we're going to have here. Now we're going to take some of that dark color we mixed up, and we're going to
start putting some of these shadow areas on. Once we get those
on, we can add in some clean water and
blend them down. Now we can repeat that
process up here underneath the eye where we've got some of those kind of half semicircles. Well, my brush is wet. I can't help but poke and prod, and I just want to flick back some of this white area here, doing that feather thing again, making it showing it so that it looks like it's overlapping
the brown underneath. Do this at your own discretion. If you don't feel like doing
this, you can leave it out. It's fine. I'm gonna drop in a couple more
little details here, and then we'll move on
to the next section.
7. Starting the eye, beak and adding shadows: Let's take a look at how
our painting dried here. We've got lots of variation. We've got we missed our
shadow area down here. We're gonna have to fix that. Yeah, everything's
coming along nicely. The feathers are pushing back. I could have pushed those
back a little bit further, I think, but we
can get it later. Now, we need to mix up
some paint for the beak. It's kind of like a
ready purply gray color. And this right here
should work fairly well. We'll just keep it
nice and diluted. We can always layer
on top of it, but we can't make it lighter. So let's apply a nice
even layer base layer here of that gray color. We'll call it a ready
gray or purply gray. We're just going to apply
that on a nice even wash. Now, there is a little bit
of a magenta tinge in there, so I'm going to add
in some quinacridone magenta into our mix here. We're keeping the same dilution, the same nice loose. I think we're just gonna bleed it into our
paint there just to give it a bit more
of that ready colour. And now moving onto our eye, we're gonna grab some of
that quinacridone gold. There's a tiny little brown
streak in the bottom there, and we want that
to show through. But we want it to be soft.
We don't want it to be, like, here's a brown
line, here's a dark line. So we're just going to
do an underpainting of quinacridone gold
on the entire eye. Don't worry about the
little white speck. We'll put that lighter
in with guash. I'll just fill in a nice
even wash on there. While we're waiting
for that to dry, I'm just gonna mark out the
shadow area here, like, where that shadow starts and stops on the back of the tail, and then mix up a nice shadow
color to put in there. Where the color, we basically just got a diluted burnt sienna. Now, that went on a
little bit light, so I'm just going to darken
it up with some burnt umber. And we'll use the same color just to fill in some
of these areas here, like where we're
meeting the back. There's a lot of detail
on the back here, and we could really go to town, and we could paint every little
line, every little thing. But remember, we're trying
to keep this loose. This is one of
those tricky areas where we want to keep it loose, we want it to look real, but we also don't want to get
bogged down in details. So I'm just applying lots of water and pigment
here to blend it in. And while we've got
these colors handy, let's fill in this little
area here where we made a boo boo and didn't draw
the wing right. That's okay. We also have to put
some more shadow underneath the shadow is
going on the wrong angle. So we're gonna get that next. And now, because that's
wet paint under there, I'm gonna try and use as
little bit water as possible, just keep the highly
saturated gray in there and try to
blend it in together. You can see that wing is
starting to take shape.
8. Painting the eye and face details: Okay, we're zoomed in,
nice and close now, and we're going to get
started on the eye. So what I've got on
my brush here is some pure indigo with
not a lot of water. I want to be able
to control this. And what I'm doing here is I'm going to start
and go around and just outline the outside
edge of that eye. If we look close, we can see that we've got this little
ridge that goes around, kind of surrounding
like a little lip that goes around the eyeball. And so that's just kind of what I'm trying to outline right now. I'm going to make it a little
wider than it should be. The reason for this
is that I can bring the inside of the eye out
towards it gradually. It's easier to do
this than it is to try and, you
know, fix it later. Now, there's a little
area there where the brown is that I went over. We're gonna fix that
later with some wash, so don't worry about that if your paint was a little
too loose in that area. The brush I'm using
here is a zero brush, and it's just you can use any small brush to do this that you can
control the detail on. Now what we're going
to do is we're going to come in and we're going to isolate that little bit of brown area that you
see in the eye there. It's a tiny little strip. It's very, very faded. But we're going to
isolate that now. You can see mine's
obviously a lot bigger. But again, just like
as we did the outline, you can always make it smaller, but it's hard to make it bigger. And now we'll just
fill in the area that isn't that
little brown area. No, I'm just going to
strengthen that outside line around the eye where we made
that little ridge before. No, I'm just continuing to nudge the dark area down and closer
over top of the brown area, as you can see in
the reference photo, it's very subtle, very slight, but I don't want to go
too far, so I'm just bringing it down a
little bit at a time. And I'm going to
strengthen the areas that are around it here and bring the line up towards the beak and fill in
some of those areas. Now, working from the
inside of the eye outwards, I'm going to shrink that little
ridge area that we made. So you can see here
I'm pushing up the inside of the eye over
top of that little rig. I tend to bounce around
a little bit and jump around from different
areas to different areas. Well, I have paint on my brush. Depending on how much paint or how much pigment I
am, I might think, Oh, I'm going to
use this leftover paint in this area over here. In this case, I'm just
putting in some of these little lines and
ridges around the eye. I'm trying to decide what I want to define and what I
want to leave out. I want just enough detail to show what the eye looks like, but I don't
want to overdo it. Now, I've got a
lot of dry pigment in here with that indigo. And what I'm doing
now is I'm just taking a very dry brush, and I'm just rubbing that down. I'm just kind of shading like I would with a pencil over top of that brown area to
bring it more in line with how it actually looks
in the reference photo. Now, I'm gonna take some
of that browny grey color that we made earlier, and I'm gonna fill in
this little section here between the
eye and the beak. I'm putting in more
saturated pigment, and then I'm gonna
pull it down with water to spread it out
and make it blend. That pretty much
wraps up our eye. Now we're going to move
on over to the beak. We're gonna start
by adding in some of these dark pigments again. We've just got
indigo again here, highly saturated, nothing
to show on the palette. And then we're going
to bleed some of this in to fill in, like, the value there, like
the darker value, it's clearly darker on
the reference photo than it is on our painting. So we'll put in the dark areas, and we're gonna bleed
some of those in. And then we're going to mix in a little bit of magenta into that browny gray color just to give it that pinky
color that's in the beak. I'm doing my best here. I'm going to try and
leave a white area there where there's a little bit of a highlight on the beak. Mine's not bang on
exactly where it is, but, you know, it does its job. I'm going to add
a little bit more three dimensional shape here, so I'm just going to darken up the bottom of the beak here. Again, I'm just going
back and forth and changing up how much water I have and how much
pigment I have. So here I've got
more pigment now, and I'm making a darker shadow
over top of the bottom. I go back and forth
and see, okay, are my values dark enough?
In this case, they were not. So I'm looking at the dark here under the beak compared to
what I have in the eye. They should be pretty much the same when you look at
the reference photos. Seeing the dark in
the eye, the circle, and then the dark
underneath the beak. Those are the same values.
So we want those to be the same or else it's
gonna look a little funny. And while I've got that paint. I'm just going to
hit the bottom here underneath that shadow area
and match it, as well. So again, you can see all
those three points there are pretty much the same
value these dark areas there, which is, in this case, I'm using just pure
saturated indigo. Then I can take some clean
water and just pull it down. This gives us that
nice gradation. Now, we're still using
that same gray brown color that we've been using all along. We're just going to use a more saturated
version of it now, and we're gonna put this
shadow area underneath the tail here where the top of the tails blocking
the light from coming in. I'm just gonna put
on a nice even wash. Well, I must confess here. I forgot to push the
painting back up. And so I cut off part of the bottom of the foot
here that I'm painting. We're just using some
coronacrodon magenta mixed in with the brown color to give it a muddy pink look. Don't worry when it
goes down below here. We're just filling in the entire foot area with the same color, a nice even wash. Then we're going to go back to our brown color there, our brown gray. We got a more saturated version, and we're gonna put in
some of these Chevrons. Well, not sure what
else to call them. So I'm calling them Chevrons. I'm sure the bird won't white. And while we're at
it, we'll add some more down to this
wing area here, some of these finer details. This is just saturated pigment, not a lot of water so
that we can control it. Think of it as a
final top layer. And just as I did with the feet, I did not move the painting back up when I started
on the branch here. But rest assured,
it's very simple. We've just got some
clean water here, and then we're going to
dab in some of the brown, some of the yellow,
some of the pinks. We're just going
to mix in some of the colors here, and you
can see what I'm doing. I'm just dabbing them
into water, essentially. So my water was a little
dirty, that's fine. It's okay because the
branch is a branch, right? It's a stick. We're just
generally just we don't want a lot of detail here because
it's not an area of focus. We've got lots of
water, lots of pigment, keeping this area very loose.
9. Adding the final details and wrap up: Okay, let's see how our
painting has dried here. We can now see the whole foot and the whole branch,
as you can see, it's exactly as I said, pretty
much the same that we saw. The top is all
through the bottom, and the foot is just
one big pink area. Now we're going to put some detail in the
leg and the foot by mixing in some pink
with our brown gray color. Looking at a reference photo, we can see there is a
bit darker at the top, and then there's
kind of like a line right down the middle
of the leg there, and then some shadow areas
and a few little details. Because I'm using a
small brush here, I have to keep going back to the palette to pick
up more paint. I'll just follow along with the reference photo and we'll put the shadows where the shadows are and the details
where the details are. Just keep in mind. We
want to keep it loose. I'm being minimal with
what details I put in. I want to make
sure it looks like a foot, but I don't
want to overdo it. Now we can use that
same shadow collar again to put the top Chevrons, whatever you want to call,
these little lines up here on the top of the tail
feather now that it's dry. Then last but not least, I'm gonna drop in a
little bit of guash to put that highlight in the
eye where it really pops. You'll see a jump
bam. There it goes. Now, a bird, I'm gonna fill
in that little spot on the side I said
back there that I would where I had
brown, and we're done. In this class as much
as I enjoyed making it. Please remember to put your
finished painting up in the projects and
resources section so that I can
critique it for you. It also helps
inspire other people to try their hand at
the painting, as well. Please, if you get a
chance, leave a review. Let me know what you
liked about this class. Is there anything I
could do differently? The format is a
little bit different. I decided to try and swing it more like my YouTube
channel videos, which there are very
few of, I know, but people seem to like them, so I thought I'd try that
here and see how it goes. Let me know what
you think. I look forward to seeing you soon. Bye bye.
 Paul Cheney, Teaching watercolour and digital painting