Transcripts
1. Introduction: Hello, everyone. Welcome
to the painting class. My name is Shiba. I'm an artist, YouTuber, and a
passionate watercolist. In today's session,
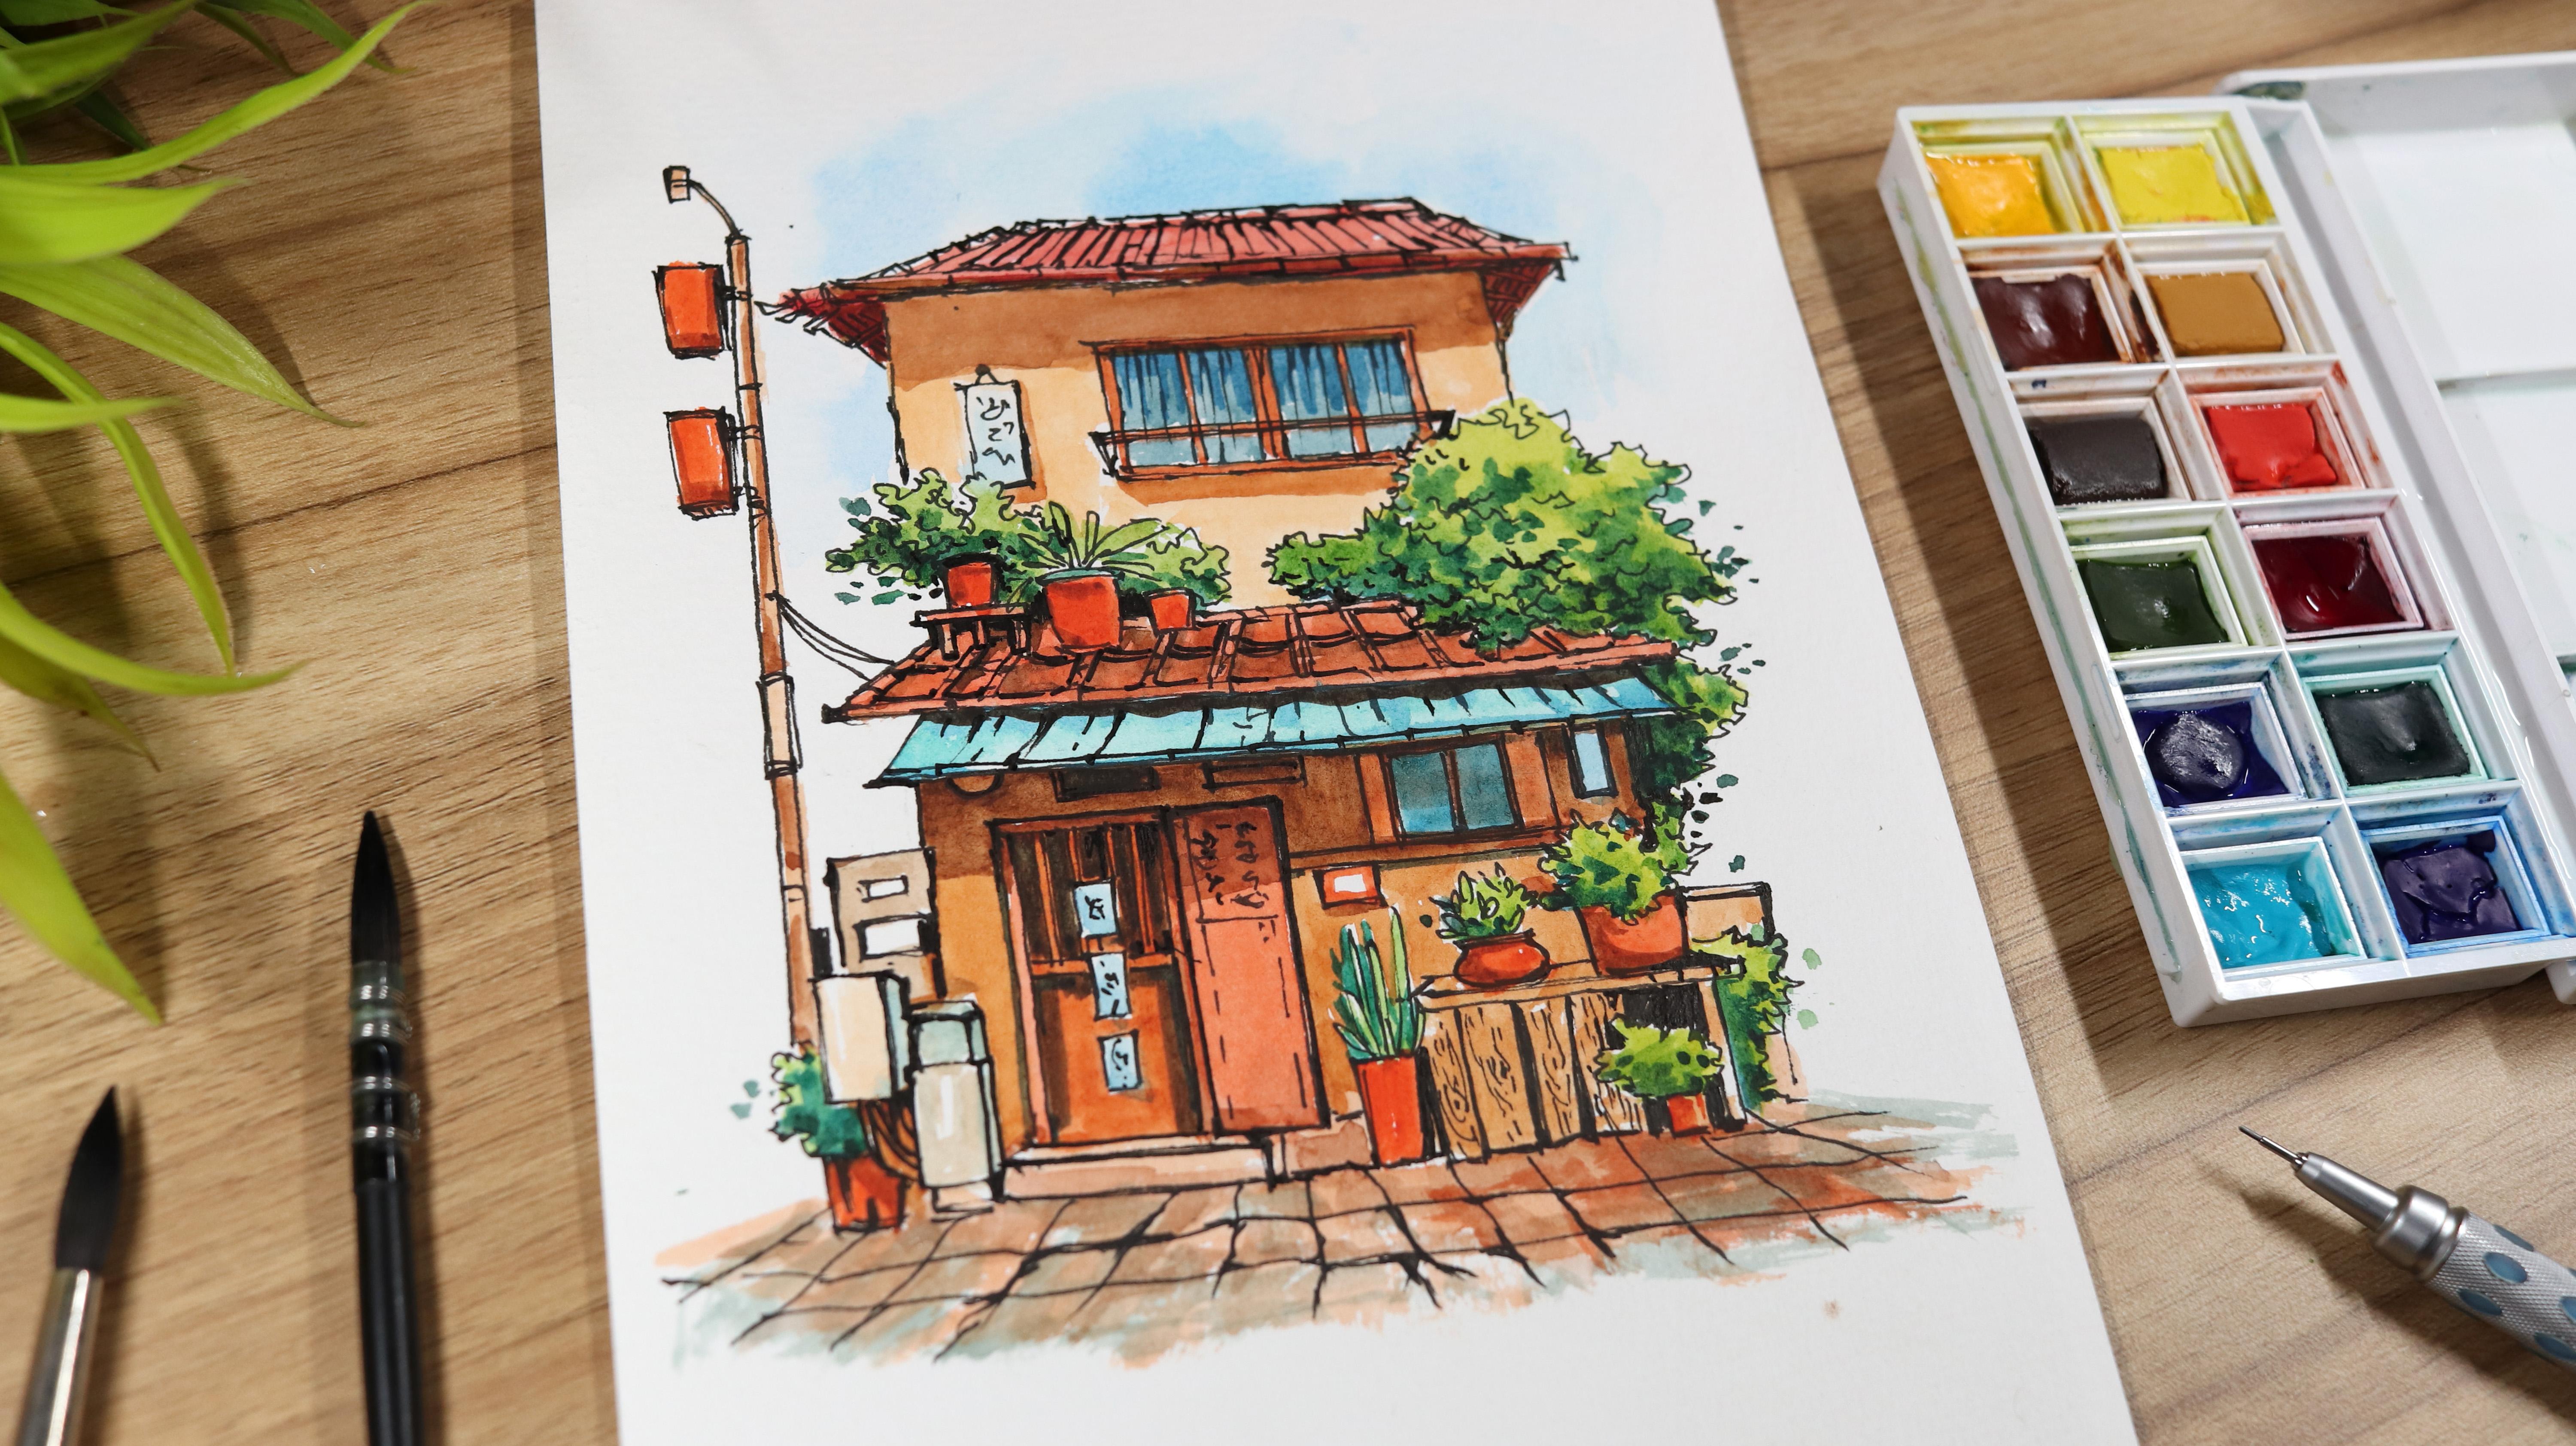
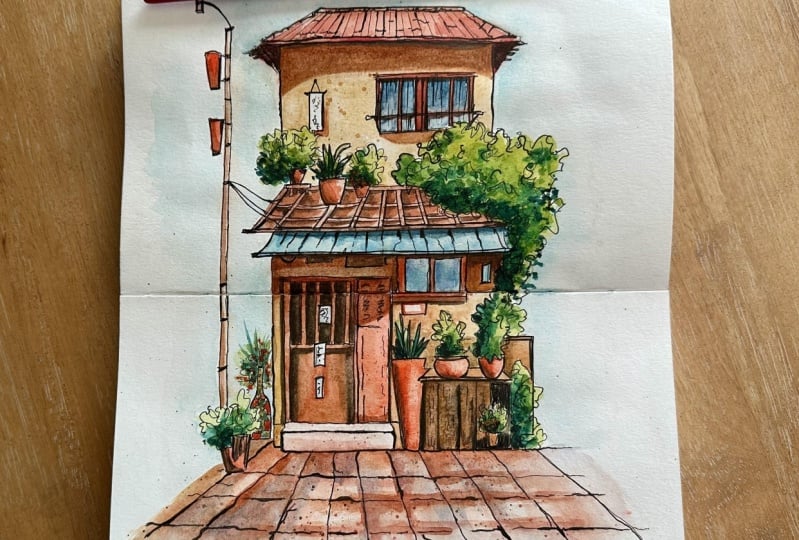
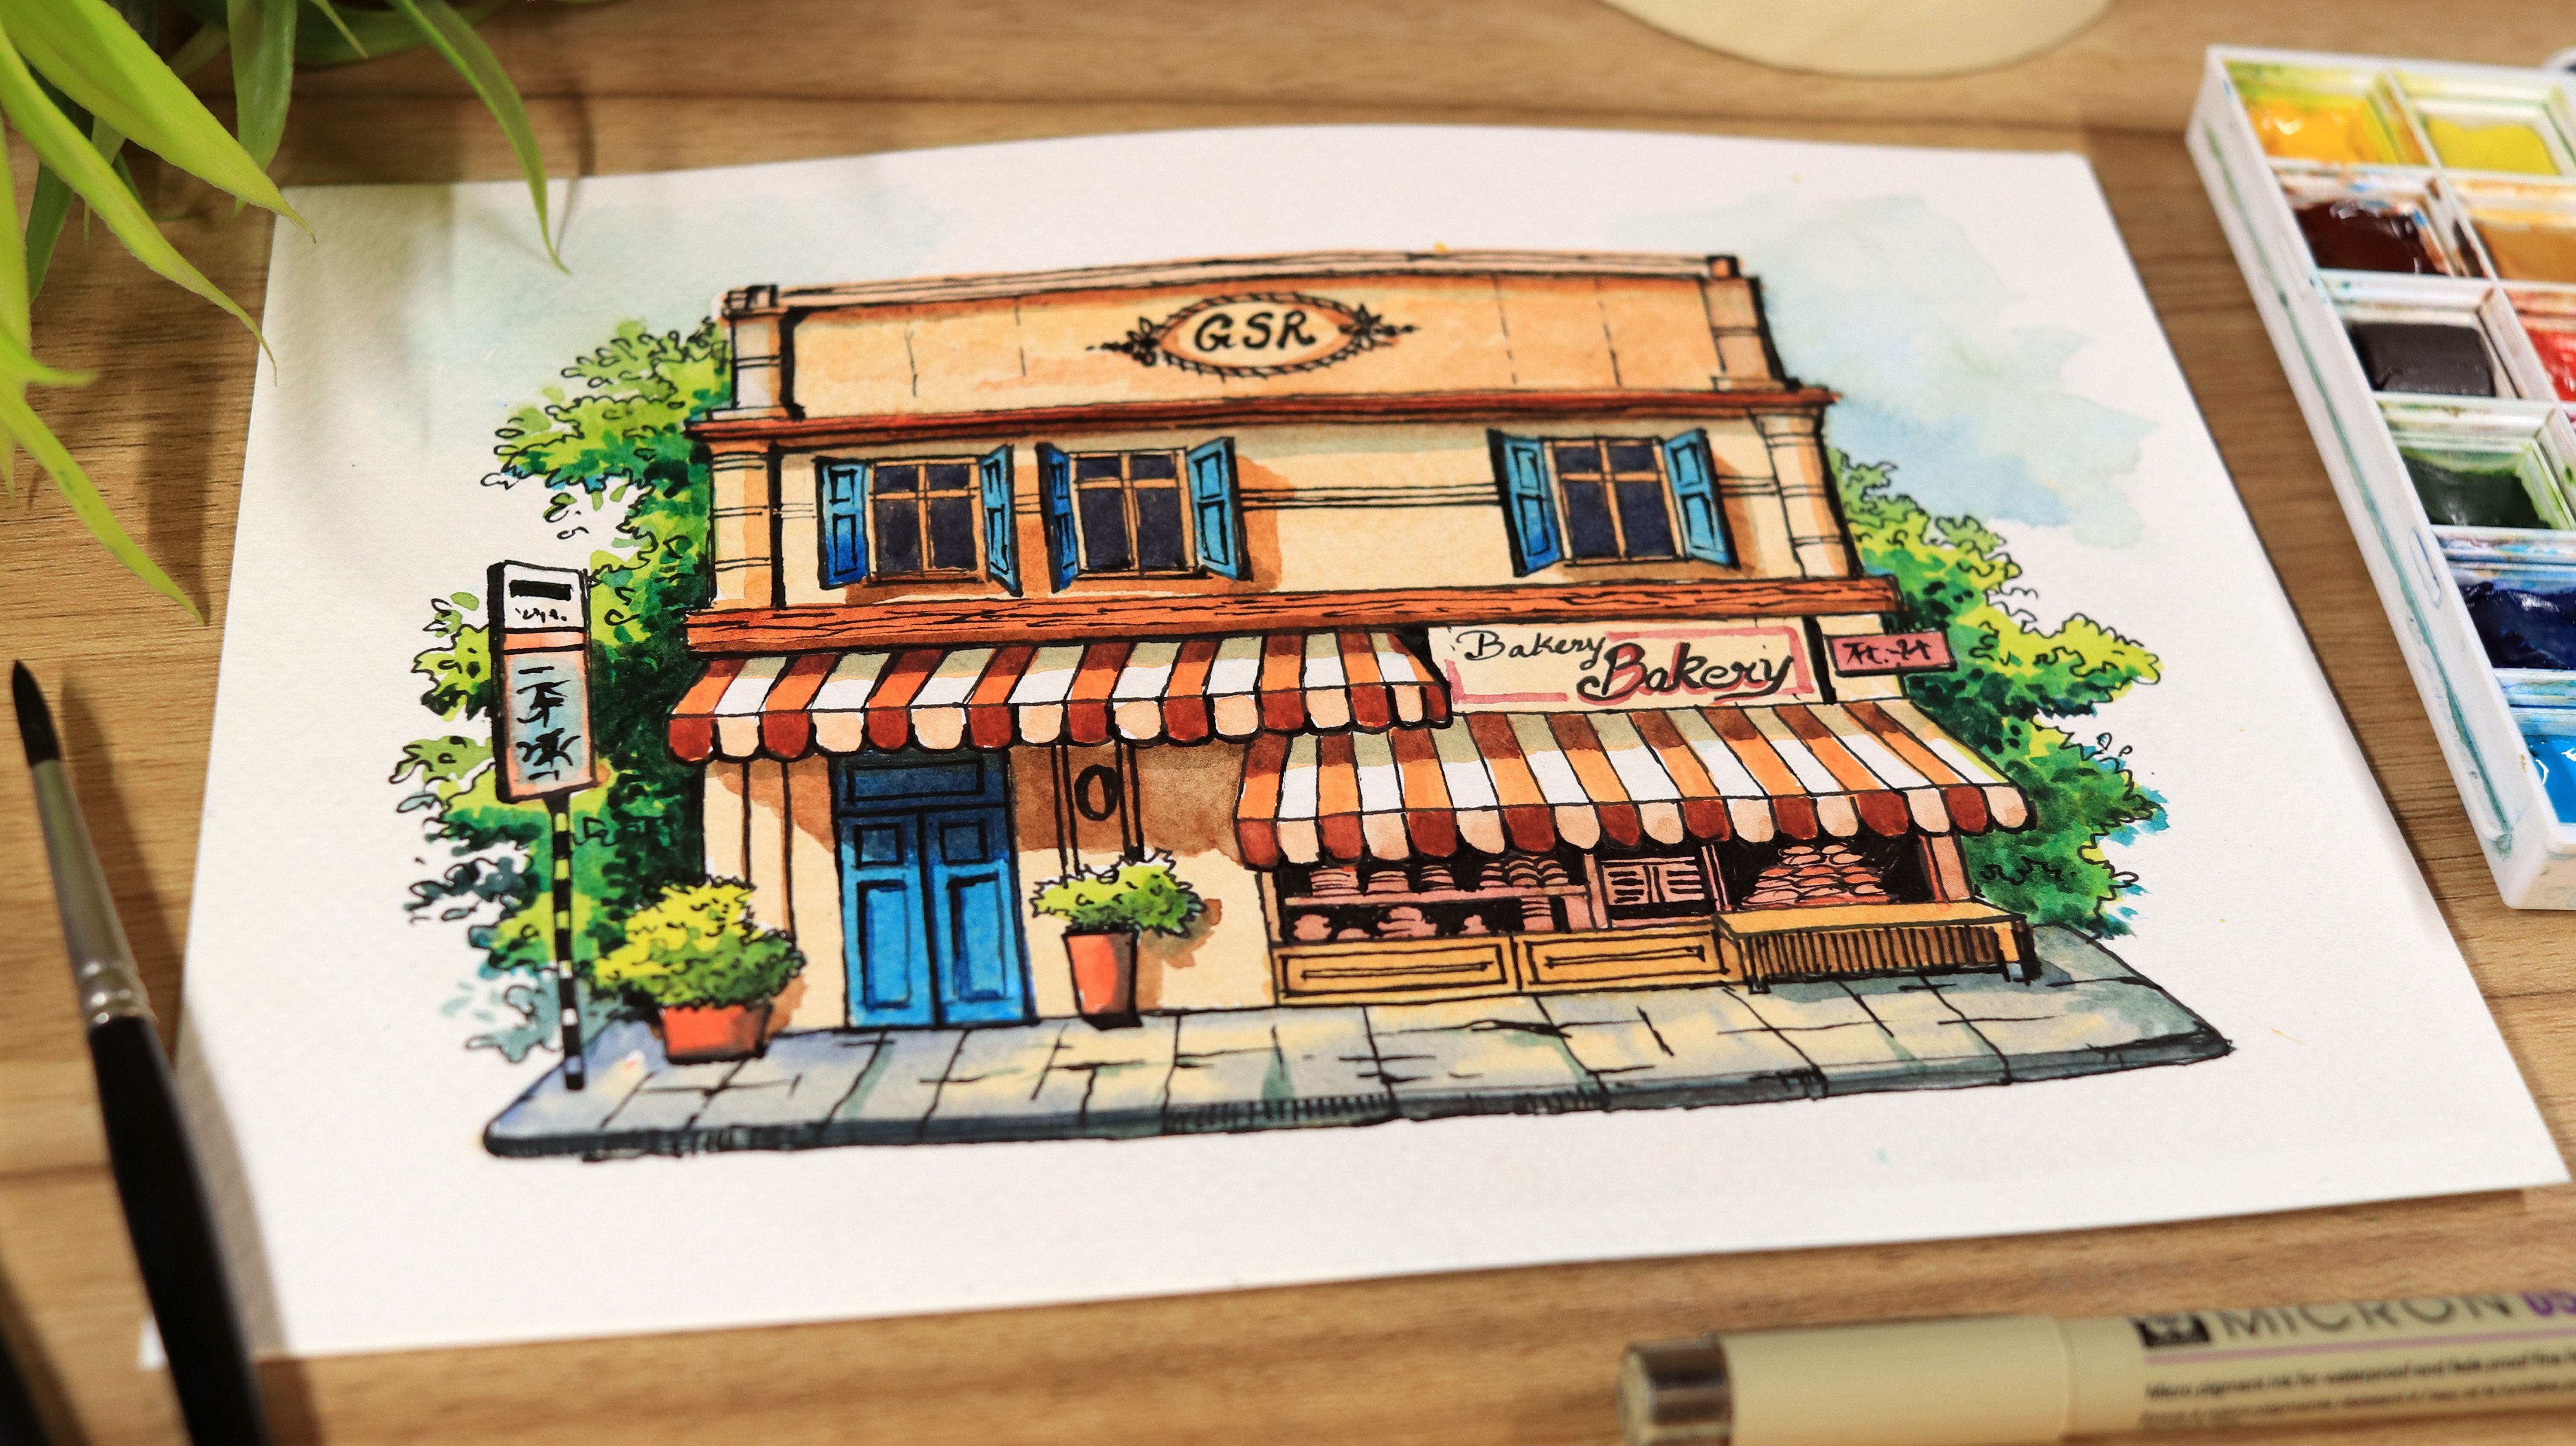
we will be creating a beautiful urban landscape
using watercolor and ink. In this class, I will walk
you through all the materials that you will need to create
this stunning landscape. I will also explain the
watercolor techniques in detail and provide step by step instructions so
that you are well acquainted with both the
materials and the process. I'm excited to guide you through the process and share
my techniques with you. By the end of this class,
you will know exactly what colours to use at each
stage of the painting. I have a deep passion
for watercolor, particularly for painting
rural landscapes, seascapes, birds,
animals, and much more. I strive to keep my painting
vibrant, rich in color, and full of life,
which you will find today in my watercolor
painting class. Now, this class is
big enough friendly. So even if you are new
to this watercolor, you will able to create
this beautiful painting by the end of this class. No need to worry.
I have made sure to explain every steps clearly throughout the painting process to enhance your
watercolor knowledge. I'm so happy that you
have chosen this class, and I'm very excited to
share my passion with you. Now let's jump into
the next section where we will take a look at the materials we
will need to create this beautiful painting,
and I see you there.
2. Materials Required: Hey, everyone. Welcome back. In this part, we are diving into the materials you
will need to bring this watercolor painting to life. Let's start
with the paper. I'm using a Kenson
watercolor paper, 300 GSM cold pressed. These comes in pre cut out
sheets of A five size, which makes them super convenient
and easy to work with. Moving on to the watercolors, I'm using a Windsor and
Newton watercolor set, which comes in 12
vibrant sheets. It's a big enough friendly set, but has the potential
and capability of creating realistic
and detailed artwork. I've also added
an extra sheet to the set that is
cobalt turquoise, which I'm using in
place of white. Now, this particular sheet
is from white knights. That's all for the colors. Now let's talk
about the brushes. Here I'm using Senylo
brushes for this painting. A few of them are the mob
brushes for broader strokes, and the rest are round brushes, great for detailing and control. Of course, you don't need exact same
brushes to get started. Feel free to use any brushes
you have in your hand. The pen sketch, I'm using a Shakura micron
pen, which is 05. This pen is
absolutely beautiful, the flows smoothly
without any bleeding, so it's super easy to use
and perfect for bigness. For the rough sketch,
I will be using a mechanical pencil from Pentl. It has 0.7 MM lead, which gives just
the right balance between precision and softness. And to clean up any
extra pencil marks, I will be using a
kneaded eraser. To tape down my paper, I'm using a half
inch masking tape, but if you don't have a
masking tape on hand, you can use a washi
tape as well. Watercolor painting isn't
possible without water, right? So I have got a tub of water to clean and rinse my brushes, and to speed things up
between the layers, I'm using a hair dryer
to dry my painting. I'm also keeping a cotton
cloth handy to wipe off any excess paint from
the brushes whenever needed. It helps keep things
neat and controlled. So, friends, that is
all about the materials I will be using for
this painting class. Now let's move on to
the next part where we will start with the basic
sketch of the painting.
3. Let's Start Sketching: Hello, everyone, and welcome to the first part of this
painting process. In this section, I will be drawing the sketch
of the painting, just a simple
outline to guide us before we dive into
the painting itself. Before we start
painting, let's apply masking tape on all the
four edges of the paper. I'm using a half
inch masking tape, but if you prefer
a broader border, you can use a 1 " tape as well. For the sketching,
I will be using a mechanical pencil
with 0.7 MM lid. It's important to create
a basic framework first. This helps us to plan the
composition before we move on to the pen and start making
those permanent strokes. Here I've just sketched out some basic squares
and rectangles. This is just a rough outline
to guide the pen sketch. It helps us figure
out the placement of each element without
making too many mistakes. As you can see, I have kept the sketch very
light on the paper. I have outlined the
window, the roof shade, and also placed the pots, just enough to
guide the pen work without making the pencil
lines too distracting. Now, let's refine the sketch and make it a little
more accurate. I have already added
the larger sheps. Now it's time to add some
smaller details like those plastic roof
sheets you often see on the shop fronts
and also cleaning up the lines to make them
straighter and more precise. Here I'm working on
the basic framework of the house nestled among
the surrounding trees. I'm also starting to add
key elements like the door, the shop counter, the hooding, and the advertising signboard, all the little details that
bring the scene to life. If we talk about the shop, it's actually a plant shop, something you will start
to notice as I gradually add more pots and greenery
to the composition. The scene will
slowly come to life with all those little
natural details. As for the sketch, it's pretty much ready to move
onto the pen drawing. But before that, let's add a few more details like
some window openings and add few electric
boxes just to complete the basic structure
before we start inking. Let's add a few more
boxes and shape around the shop to build up
the structure a bit more. I'm also refining the sketch
with a few extra lines just to make everything
cleaner before we move on to the pen and
start final inking. Now that we have finished
the basic pencil sketch. Now let's move on
to the pen work. For this, I'm using
a Shakura pen, which is 05 perfect for
adding those sharp, precise lines to bring
the sketch to life. Here I'm starting by adding some small details to the roof, specifically creating
those broken lines that divide the roof
into smaller section. Now, these lines will help give the roof some texture
and structure. Now I'm adding some
vertical lines following the basic
perspective of the scene. Now, they start straight, but as the perspective shifts, they begin to lean and incline, creating that natural
depth and dimension. Now, let's quickly add
a few more details. I'm sketching in
some roof sheets on both the right and left side. The pen strokes are
intentionally a bit random, which helps give the sketch a more natural and organic feel. As you can see, I'm moving slowly and steadily
down the sketch, and now I'm drawing
the sliding window, taking my time to get those clean straight lines just right. Now, let's add a few more
details to the windows. I'm drawing the bars and
also adding a curtain beside the glass to give it
some depth and character. So these little touches really help bring
the scene to life. Now, let's add some
signboard and a few potted plants to
decorate the shop. So these small details
add a lot of charm and also helps tell the story
of that particular space. You can get creative
here and add a variety of plants
to these spots, as you can see on the screen. So there is no
limit to the shape and styles you can explore with So I've also added a small tool
beneath one of the pot for a bit
of extra detail. And here's a quick tip, vary the size of the
pot as you draw them. So mixing up their heights and shape adds more interest and make the composition feel more natural and
virtually appealing. Now, let's draw the tree line covering some part of the roof and start adding some finer
details to the roof shade. I'm sketching in some
small elements like tiles, making sure that all
the part work together to create a cohesive
and detailed scene. For some of the lines,
I'm making them slightly thicker to emphasize the
main structure of the scene. Then I'm adding a final line that follows up the
perspective of the painting. So this helps create depth and guides the viewers eyes
through the composition. You can see that the sketch is really starting to
take shape now. So next, let's add another
set of plastic sheets, like the one we often see
in front of the shops. So they are there to protect the items from
direct sunlight and they also add a nice layer of
detail to the store front. Now, let's draw the
meter boxes and a few other small utility
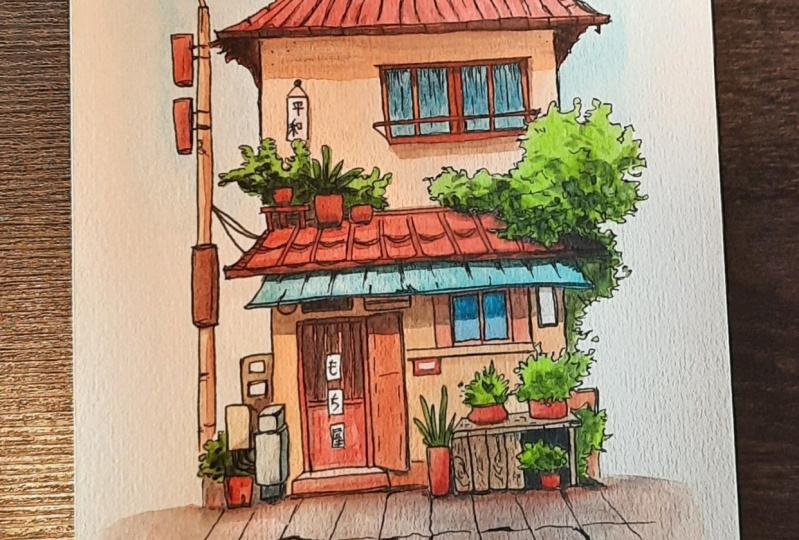
boxes around the shop. For this part, I have
taken inspiration from the kind of street side
shops we often see in Japan where little details like these add charm and
realism to the scene. I've also added a few pipe running underneath
the electric boxes, and to keep things balanced, I'm placing a couple of more potted plants
around the scene. So these little
details help fill out the space and add more
life to the composition. Now I'm adding electric
poles by drawing straight vertical lines
to create its structure. Next, I will add some
accessories to the pool, like things like
small electric boxes and advertising holdings, just like we often
see in front of shops to make the scene
feel more authentic. You can see how quickly we
have added the electric poles. It's all about keeping the lines simple and focus on
the key details. Now, let's go ahead and draw a door along with the
gate in front of it. I'm also adding
some fine details like small sign
board on the gate. So little touches
like this really help and add personality and
realism to the scene. Now, let's add some
words to the scene. These are just random shapes and strokes I'm using to
represent the words. But they don't have
to be perfect, just enough to give the look
and feel of the signage. Here I'm sketching a snake plant with its tall upright leaves. It adds a nice
touch of greenery. I'm also drawing a shelf to hold a few more plants and bring some structure
to the display. You can see how these
small touches really help make the painting look
more beautiful and lively. So feel free to add your
own creativity into this, whether it's a new element in detail or a personal touches. Try to make it of your own. Now, let's add some
dark bold lines to separate the wooden planks, so this helps define
each one clearly. I'm also adding a bit
of texture to give the woods a more natural
and rustic effect. Now I'm adding a bit
of more greenery to the pots just to make the scene
feel more lush and alive. I'm also sketching
in a few vents and windows to add more structure
and details to the shop. Let's go ahead and define the window a bit
more clearly and add a few extra pen marks to strengthen and define
the overall structure. So these subtle details really help tie
everything together. You can see I've added
a wooden design here to capture the natural pattern
of the wooden planks. So the subtle texture
give the surface a more realistic
and organic feel. Uh So we have completed the sketch by adding
all these small details. Now, let's move on to
drawing the floor. As you can see, I've used the same ShakuraPen 05
for the entire sketch. Here I have drawn
small square tiles to create the flooring
outside the shop. I'm also adding a
few pen marks to suggest cracks and gaps
between the tiles. Now, little
imperfections like this make the scene feel more
realistic and lived in et's add a few more lines to finish off with the sketch. Here I'm also adding some
extra lines to suggest the tree leaves and to make
the leaves look more denser, feel free to lay in a
few more extra strokes. So, friends, this is
all for this part. In the next session, we will begin with a painting process where we will start
bringing the scene to life with color, and
I see you there.
4. Let's Start Watercolor: Hello, everyone. Welcome to the second part of
this painting process. In this segment, I will be applying the first layer
using watercolors. Here I'm using a
needed eraser to remove any extra
lines from the paper. Once you have erased your sketch lightly using a needed eraser, take a moment to look at it
and see how it comes along. If you feel any part
needs improvement, you can go ahead and make adjustment using your
pencil or a pen. Let's begin the painting. For this, I'm using a mob brush, specifically a size
three by zero brush. Here I'm starting by painting
the background first. To create a soft blend, try to wet the area before
applying any paint. To apply the sky colors
to the background, I'm using a cobalt turquoise. Once we apply this paint, it will create a
light tone as a base. After that, to slightly
darken the sky, I will be using
ultramarine blue as well. Once I've applied
the blue color, I will be using a bit of
clean water on the brush to soften the edges and
gently blend it out. So this will help the colors feed smoothly into the paper. Now, let's paint the roof. For this, I'm using cadmium red mixed with a touch
of crimson red. As you can see, the color
tone is nicely balanced, not too dark and not too light. And I'm applying a
very dilute form to maintain the transparency. Whenever you feel a slightly
darker shade is needed, like the areas which is not
exposed to the sunlight, such as under the roof, you can add a little bit
more pigment there. So we have already
worked on the roof. Now let's focus on the walls. For this, I've chosen
yellow ochre and mixed a little bit of cadmium red to achieve a subtle
reddish tone. I'm applying it a
very dilute form to keep the transparency, especially for working
on the shadow areas. I'm using the same more brush
throughout this process. Now, let's focus on painting the shadow areas formed
by the roof on the wall. For this, I'm using
yellow ochre with cadmium red and a bit of intense blue to
create a darker tone. It is important to
ensure that the layer is completely dry before we
start applying the paint. We don't want our shadows
to bleed into the edges. For sharp clean lines, the layer beneath
needs to be dry. Now, let's paint
the window headers. For this, I'm using
a thin round brush from sanela so this
is a synthetic brush. For the paints, I'm
using a mixture of cadmium red mixed with a
touch of burnt sienna, which is brown to
create a darker tone. I'm applying this as
a dilute mixture to the window headers for
a more subtle effect. As you can see, this
mixture is quite saturated. The reason is that I want to add more vibrant
colors to the sketch. My focus isn't on
making hyper realistic, but rather on giving it a
more impressionistic feel. Now, let's clean the palette
before mixing any new color. Here I'm using a
damp brush to lift any leftover paints and then rinsing it in
a tub of water. So we have finished painting
the window headers. Now let's paint the curtains that are visible through
the window glass. For this, I'm using a mix of intense blue and cobalt
blue with a touch of cadmium red added in to give
it a slight warm effect. Once you are done with this,
we will make the mixture dark by adding more
intense blue to it. Using this darker mixture, we will paint the
shadows of the curtain. And you can see I'm still using the same brush for this step. While painting the curtains, it's important to
pay attention to the direction of
your brush strokes. Use mostly vertical strokes along with a few
horizontal strokes. So this will help
create folds and lines that gives the curtain
a more realistic look. Now let's paint some
more tree leaves. For this, I'm using
the mix of sap green and cadmium yellow. Now, this combination
creates a warm green tone, which will serve as a base
layer for these tree leaves. Now I'm switching to a mob
brush so that I can cover larger areas more effectively without leaving too many
visible brush strokes. Now let's move on to painting the other plants and
leaves on the right side. For this, I'm using
the same colour mix that is cadmium
yellow and sap green. If you did like to add more
variation to the tree leaves, you can also use a little bit
of viridian green as well. Now, let's add a touch
of rident green to sabgreen mixture to create more darker leaves and
define the shadow areas. Let's quickly paint the rest of the tree leaves and plants. And as this is the first layer, I am painting it quite light, and this is important
because as we move forward, we will gradually build up
the darkness and depth. So make sure to keep your
initial layers light. And this is really important to keep in mind while painting. Et's paint a few more plants and tree leaves using
the same mixture of cadmium yellow,
and sap green. For the darker sheds, you can add a touch of viridian
green to the mix. So we have almost
done with the green. Now let's mix some cadmium red with crimson
red for the roof, which will be our initial wash. While painting the roof, try
to use more crimson red in the area where you plan to
add darker tones later on. So we will be adding
shadows in the next step, but for now, you can make
those areas a little dark. I'm also adding a
bit of water to dilute the color and
reduce the pigment, especially for the areas
where more sunlight falls. Do Do Now, let's apply yellow ochre
to cover the wall areas. We have finished painting
the roof in red. Now let's paint the tarp outside the shop,
which will be in blue. For this, I'm using
a cobalt turquoise. Here you can see I'm starting by applying a light
wash of this color. Then in the areas
where the shadow falls or where we want to
emphasize the shadows, we will mix a little bit
of ultramarine blue with cobalt turquoise and then
apply in those areas. It's time to clean our brush
and prepare a new mixture. We will use a burn
sienna that is brown, mixed with yellow ochre to
create a warm earthy tone. Now, this warm
earthy tone will be used to paint the walls of
the shop, as you can see. Now, the mixture is quite dilute and because
of the yellow color, it gives the shop a
warm inviting feel. While painting the
wall, make sure to pay attention to where the paint
should and shouldn't go. For example, avoid painting
in those areas where plants are or where you have planned to add windows or any other
details in different color. You can leave those
spaces blank. The mix I'm using
is yellow ochre, combined with burn
sienna, that is brown. While painting, take
your time, don't rush. Carefully observe which
areas you need to leave out, like any signboard or small paper hanging
outside of the shop. Now, let's paint the door. For this, I'm using cadmium
red and applying it straight without mixing it with any other color
to keep it bright. For the do header, I'm
using a mix of burnt sienna and cadmium red to give
it a slight darker tone. When painting, make sure to
avoid areas where paper or any other objects are hanging on the door as I'm
painting around them. Here I'm using a dark
mix of burn sienna and cadmium red to
create a deep tone. I'm applying this with a
same thin round brush. I'm carefully painting around the areas where signboard
are hanging on the door, leaving some smaller sections unpainted to maintain
their presence. Now, let's use the wash of intense blue and
cobalt turquoise to paint the glass window. Now, let's paint the meter
boxes and electric boxes. For this, I'm using a mix of yellow ocher and burn sienna. To paint the shadows, I'm adding a little bit of
blue to the mixture. In some areas, you can also
mix blue directly with yellow and brown colors to create variation and add
depth to the colors. Let's add this warm
yellow tone to the electric pole in the
background, as you can see. I'm using a very
light wash for this. For the sign board, I'm applying
a bright wash of cadmium red directly without mixing it with any other color
to make it stand out. Now, let's add some
more burnt sienna to the cadmium red to
create a warm tone. I'm using this mixture
as a base layer for the ground area
in front of the shop, and also I'm adding a
little bit of cadmium red directly to paint a
few of the plant pots. And with that, our first
layer is complete. I hope you enjoyed this part
of the painting process. In the next part, we will
dive deeper and start adding details to really
make the painting stand out and I see you there.
5. Painting the Shadows: Hello, everyone. Welcome to the third part of this
painting process. In this segment, I will be
working on these shadows, adding second layer
of watercolor. Let's start by
painting the pots and other elements that
requires cadmium red. We will apply this color to all the relevant
areas in this step. If you want a brighter and more saturated effect from
the cadmium red, try to use less water and
apply the color more directly. So this will give you a
bold, vibrant finish. Now, let's create
a darker mixture by combining intense blue, also known as halo blue
with burned sienna. Now, this mixture
results in a rich, deep tone that is
quite close to black. I'm applying this dark
tone made by the mixing of burn sienna and halo blue underneath the roof to
show the shadow areas. Now, these parts
appears much darker since they are not receiving
the direct sunlight. Let's use this thin
round brush to paint the shadows in
the narrow areas, as you can see on the screen. I'm also using this brush to add shadows underneath
the window headers. Here I'm using the same
mix of intense blue, also known as halo blue
combined with burned Sienna. For the shadow cast
by the window above, I'm using a mix of cadmium red and burned sienna to give
a slight former tone. Let's add a few more shadows. Now, let's paint some darker
tone leaves by mixing sap green with a bit of intense
blue to deepen the color. If you did like
to add variation, you can also adjust
the mix to slightly change the tone of the green
by adding variant green. While painting the shadows, we will keep our brush
strokes a bit loose and natural following the
directions of the light. For example, if you are adding shadows at the base
of the tree leaves, it means that the sunlight is
coming directly from above. So it's important to
observe the light source and adjust the direction of
your shadows accordingly. As you can see in some areas, I'm spreading the paint
a bit more freely. So this helps me cover
larger sections quickly without needing to apply small detailed
brushstrokes everywhere. Similarly, when you
need to apply a tone, like for larger shadow areas, you can do it in one go just like the way I'm doing it here. Let's quickly mix some
more sap green with intense blue to get
a darker shade and apply this to the
remaining tree leaves and smaller potted plants to cover
those areas effectively. So if you want to have a more
darker and denser effect, simply increase the amount of intense blue in your mixture. Now let's quickly
clean the brush and prepare a dark brown color. For this, I'm mixing cadmium
red with burn sienna that is brown and also adding
a little bit of intense blue to add a cool
dark tone to the brown. This dark mix is perfect
for defining the edges between the tiles of the roof helping to create
sharp clean lines. So if you did like, you can also experiment by mixing cadmium red with burn Siena in some areas and then
blend them together. So this will help in enhancing the shape of the
roof and its tiles, especially in the
shadowed section. Et's mix some more colors
to create a darker tone. For this, I'm using intense blue and mixing it with cadmium red. The ratio is weighted more
towards intense blue, which gives the color
a slight bluish hue. We will apply this to the area between the roof
and the blue tarp. This will create a dark
shadow in that space, adding depth and contrast. For the shadows falling
on the shop wall, I'm using a mix of
cadmium red and Bnciena. I will be applying this with a fine round brush to ensure
precision and detail. Now, let's add the reflection on the window using a
light wash of blue. For the header of the window, I'm using a wash of cadmium red. Now, let's switch brushes to
mix another set of colors. I'm mixing a darker tone to paint the shadows on the door. For this, I'm using
cadmium red mixed with burned sienna and adding
a touch of intense blue. You can see that I'm using a pre mixed color that was originally a mix
of intense blue. So if you don't have
it on the palette, you can easily achieve it by
combining these two colors. Now let's mix some burn
sienna with intense blue. As you can see, this
color is quite dark, almost close to black. I'm using it to paint small
vertical lines to create a groove between the door and the reflection
of the shop inside. Whenever you are painting small
details or fine elements, it's important to pay attention, as these small parts plays a crucial role in the
overall painting. Any mistakes here can prevent the details from
showing up properly, and all the hard work you have put into the earlier
layers can be lost. So move forward carefully
observe closely. And since the color is dark, make sure you apply
it slowly and gently. Similarly, let's carefully paint the other small objects
in the painting. We are using the same mixture of cadmium red and intense blue. Gradually, you will notice that the painting starts
to take shape and looks better as we add
these details step by step. As you can see,
cadmium red plays a very significant
role in this painting. It is the key color
throughout as we have used it in almost
every tone applied. For example, you can see on
the screen that I'm using cadmium red even in the shadows of the plant
pots I'm working on. So if you want to make
the shadows darker, you can use a mix of cadmium
red with burn Sienna. But if you want to make
it even further darker, you can use a touch of
intense blue to the mixture. Now it's time to start refining our painting
step by step. First, let's quickly
rinse our brush, and then we will take a
bit of viridian green and apply it to the darker
areas to add some depth. Similarly, we will use a
bit of brown and apply it to the small areas where
we have missed earlier. This will help us to
complete and bring the painting together with
more clarity and detail. Now let's take some thalo blue to create the
ultimate dark tones. I'm applying this at the
base of the plastic tarp to paint the appliances and
add depth to the area. Let's add a few strokes of this paint to the door as well. This will enhance
the depth and help tie the darker tones
across the composition. You can see I'm adding these small dark tones
to add further details. Now, let's mix some cadmium red with intense blue to
create a darker sheet. We will use this
color to enhance the shadow we have
already added. By applying this deeper tone, we will increase the overall
depth in the painting. It will make the artwork look even more beautiful because when shadows become richer and
perspective becomes clearer, we can easily identify
which elements are closer and which
are farther away. Sometimes when we apply a new layer of paint
over an existing one, especially in that
previous layer if it is thin and has
too much of water, it starts to lift
off or peel off. So to avoid this,
we can increase the amount of pigment
concentration or saturation of your paint. So this will make the new
layer thicker and more stable, helping it to sit
properly on the top of previous one without disturbing. Now, let's darken some
of the tree leaves. For this, I'm using a mix of intense blue combined
with viridiant green. I've added a touch of
cadmium red as well. As you can see, this
resulting tone is quite dark, so we will apply this to the deeper shadow areas
of the tree leaves, places where the sunlight isn't reaching to add more depth
and contrast in the painting. These small touches,
like the dark tones and subtle details are really adding beauty to the
painting, as you can see. Now let's work on the
shadows of electric pole. For that, I'm using a
light wash of cadmium red. Similarly, to create
a darker tone for the orange sine board, you can use a mixture of cadmium
red with a bit of brown. This will help us to add depth and definition to
both the elements. Now to paint these
white sign boards, you can add a slight
touch of blue. Now don't leave them completely white because even
the white objects, they have certain
shadows and colors to. Now, let's add shadows to the
floor in front of the shop. For this, I'm using a wash of cadmium red mixed
with crimson red. As you can see, I'm painting small boxes like sheaps
with darker edges to give the effect
that they are all interconnected and
casting subtle shadows. So, friends, we have almost come to an end of this
painting session. So before we wrap up, let's apply a light wash of cadmium red in some of the
areas to enhance the color. I will also add a touch of dark blue to the floor
to create a cool effect, giving it a bit of contrast. After all, the floor
can't be entirely orange, so adding some blue
will help balance the warmth and give a more
realistic feel to the floor. Let's now move to the next part where we will remove
the masking tape and share our final thoughts on the piece, and I see you there.
6. Final Thoughts: Hello, everyone. Welcome to the last part of
this painting class. I hope you have enjoyed
this painting process of creating this
beautiful piece. And before we wrap
up, let's quickly remove the masking tape
and reveal our painting. While pulling the masking tape, try to pull it outward so that you don't end up
tearing your paper. Don't forget to share
your final thoughts on this watercolor
urban sketching class. If you have any
doubts or queries, feel free to ask me in
the discussion tab. I will be more than
happy to help you. So this painting was indeed quite enjoyable for me as well, especially since it is the
first time I came with a class where I have used both the pen and
watercolor together. I really hope you
have enjoyed it, too. So keep painting, and I assume the next class till then
take care and stabilized.
 Shiba Basan, Art influencer and Content Creator