Transcripts
1. Introduction: Hi, I'm Jake. I, I motion Zion for me
creating this effect. We will greet rate. Now in this class, I'll show you how you can create a logo animation templates inspired by logos of
popular streaming services. I'll show you
techniques to create a logo disintegration effect and to make it appear
back on the stream. What is cool about
this technique is that you don't need to
have any knowledge of Adobe After Effects
has also you don't even need to have an
external plugins. All you need to have is any version of Adobe
After Effects, even trial version
will work too. Share with you all
tips and tricks which you need to know to
create seamless transitions, ingredient, logos or texts
from simple particles. I'll show you a cool
tricks in making this effect in such a way
that you'll be able to place any logo or texts and your project will apply the effect on top of
it automatically. I'll start with basics and gradually we will get to
more complex techniques. I think it's the best way
to learn the software while gradient interesting
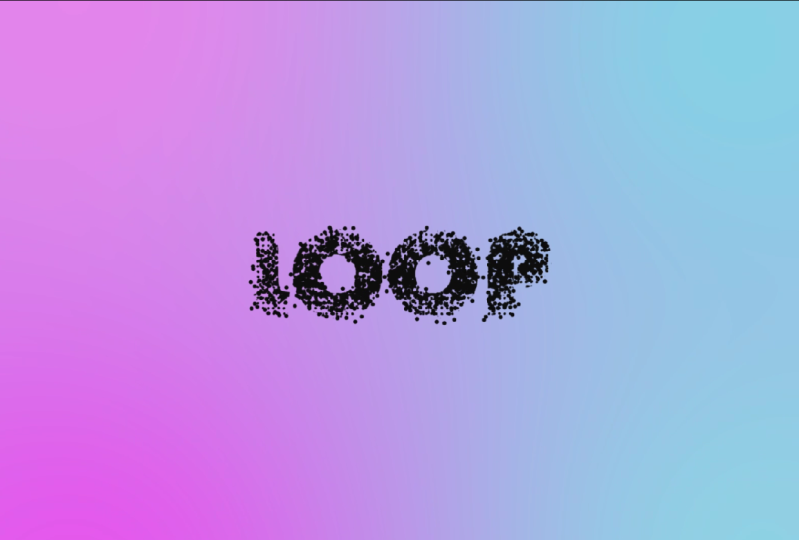
effects for fun. And to complete this class, our goal is to create these
texts, animation effect. I'll be happy to see
it in my class as also your result after
following all the steps. So let's get started.
2. Creating Background: So I'm using Adobe
After Effects 2021, but you can use any version
of Adobe After Effects. It will work fine. As you can see, I'm also
using standard layout, so you can click here. And your panels should
be similar to mine. If you for some reason
cannot see some of the panels which you
can see on my screen. You can always refer
to them by their name. For example, character. You can enable it
from here, window, character, and pretty much any panel you can
enable it from here. So before we are going to
create this logo animation, I want to show you the parts
from which it contains. So it would be easier
to understand that all complex things are
made from simple parts. So in our case, we can
see, first of all, that I created this background, which we are going
to create great now. Then we are going to create
this flesh using lens flare. And we will use the text
itself to exploit like this. And over the course
of this video, it will fade away. Next step will be to create
these small particles which will come together into
our logo just like this. And then we will
duplicate it bunch of times, make some changes. We will create our main logo appearing from nothing
just like this. Then we are going to
apply this last layer, which basically will fade
down the original logo. And if we will have time, I'm going to quickly show
you how you can make this animation of operation
of the text below. And basically, this
is all the text. As you can see, it's
all connected to the scale, which will animate, which will go from big
text to something smaller. And basically with
all of these parts, we are going to create
this logo right here. So let's start with
our background. So to create our
background, we need, first of all, to create
a new composition. We can click here or here on this little icon to
create new composition. Let's click on it. Polish D will be great. Basically, width should be
an 1820 and height ten AD. Let's call it logo animation. 30 frames per second and
about seven seconds. And click Okay, so
degrade our background. We want to use Layer, New solid. We can use black layer. Here you can just click on this icon to be able
to change the color. And in our case, I
want to use black one. And it should be the same
size as our composition. If it's not, you can
just click on here, Make Comp Size, and let's call it background
or BG and click. Okay. So we've created our first solid and now we can apply
some effects on it. This we want to go to
effects and presets. And if you cannot
see this panel here, you can go to Window
and enable it. From here, Effects and Presets. And let's type the
name of the effect, which is a four color gradient. So let's leftmost ligand it, hold and drag to our
solid and drop it. So you can see we have
these four colors from which we can
create our gradient. In my case, I've used
something more like a bluish colors deeper blown by clicking on each of these icons, you can change the colors
of each of these points. So let's create kinda
similar gradient, which I had in my
original example. Basically I'm going with
this pinkish dark colors. And then you can
just simply click on these little dots to move the
colors wherever you want. So let's move this
out of the way. So we would have just little
hints on this pink color. You can type here and
effects and presets curves. Leftmost click on it and drag it on top of this
background layer. With this kind of S-curve, we can add more contrast. If you like. Click on reset. If you didn't like your changes, and try to manipulate
in other ways. So in this case, you can get
a bit different kinds of colors or just simply play around with these colors to get the gradient which you like. Okay, so now we've
created our background. In the next video, I'm going
to show you how you can create this flare effect, which we have here
at the beginning. See you next video.
3. Creating Flare: Okay, so now let's create
this flare at the beginning, because as you can see, this
effect starts from black. Then we have this
flash of light, and then all of these particles, which we are going to
create in the next video. So let's start with
our flash of light. Before of creating
this flash of light, we can animate our background. To animate our background, I want to use this ellipse tool. To be able to choose
this ellipse tool, you want to left mouse
click on this icon hold, and then will drop
down this menu. And here you can choose this
ellipse tool if you choose your background layer and left mouse double-click on
this ellipse tool. It will create
this ellipse mask. This is basically
exactly what we want. What we can do is to open this mask and change this
expansion to little smaller. Then just feather. And now we can animate
our background. We want it to start really
small so we cannot see it. And then really big, we
can animate it by scale. So if you're going
to choose your layer and press S on keyboard, you are going to see your scale. So first of all, I want
to move this play head to maybe 18 frames and create
a keyframe for scale. So what is key-frame? Basically, keyframe
is a point in time, we should remember is the
value of southern property. So in our case, this keyframe remembers this point in time, which is 18 frame. It remembers the value of
100 of the property scale. So for example, if I am going to move this play
head to beginning, and we'll change
this value to 0, which basically will shrink
all of our image to 0. It will automatically
create another keyframe. So now we have this
moment in time, this keyframe, which remember
is that this value of 0. And we have here another keyframe which
remembers this 100%. And basically now
After Effects will try to connect these two points, it will go from 0 to 100. So if I'm going to
move this play head, just look at here at this value. And you can see that it
changes from 0 to 100. And basically this
is how animation works inside of
Adobe After Effects. You just created
these keyframes. And then after Effects is
trying to connect these values. So basically now it's
going from 0 to 100. I also want to remove this
feather on the edges. And trauma of this
feather on the edges, we can just simply
press M on keyboard. Just make sure to select your solid press M on keyboard to see your mask and close it
and open here at mask. Do you see the feather and expansion which we
already changed? So basically we want to create a animation for these
properties as well. So to create our animation, we know that we need
to click here on this stopwatch here as well. And then more few
frames further. And to remove this further, we can just set it to
0, just like this. And the mask expansion
we can just increase. So it will cover
all of our screen. On my keys, 311 covers
all the screen. And now if we will select our salad and press
U on keyboard, you can see that we have all of our keyframes of animation. First of all, it
starts with scale. It scales up. And then it's expanded just like this and covers
all of our screen, which is exactly what we want. But we can always change the
position of these keyframes. So for example, if
I'm going to drag it like this, this feather one, you can see that feather is
going out much more smoother. Now, if you want to abbreviate
this in full speed, what you need to do is to change this work area by
clicking on this edge. Left mouse click and hold
and drag it to the left, just like this, and
press 0 or numbered. And now we can see
this animation. So this is basically
our animation. If you want to have
it a lot faster, we can just move these keyframes one-by-one to shrink
this space between them. Or just simply select all of these keyframes and hold
alt key on a keyboard. As you can see, I'm
holding Alt and just choose the last
keyframe which you have. Leftmost. Click on it,
hold and drag to the left. As you can see. Now we can just shrink all of these keyframes accordingly. So if I'm going
to shrink it like this and release it,
embrace 0 numbered. You can see that this
animation is a lot faster. So this is how you can speed up this animation if you need. And the same way, you can
just hold Alt, left mouse, click on less keyframe, spread it apart, and
press 0 numbered. And as you can see, if you
are spreading your keyframes, you'll get much
slower animation. In our case, we want
fast animation. So I'm going to press
Control Z to undo this. Or you can just simply
go to Edit Undo. And you can basically undo every step we should
make an After Effects. So don't be afraid to push
buttons and click on Icons because basically you can
reverse pretty much everything. Just make sure to
save your project. You can go to File, Save As, and save it
wherever you want. Okay, so now we
have this animation of operation of our background. But we also want to have
some flash of light. And to create this
flash of light, we can go to layer new solid. Let's call it flair. Because of this
effect we will use and make sure that
its color is black. Just click here and choose
black color and click. Okay. So now let's apply
lens flare effect. Let's go to effects and
presets and type here lens flare and choose
it left mouse, click on it, hold and
drag on this flare solid. So as you can see,
we have this kind of generic flare if we will change this position
to the center, just like this or anarchies, I know that I have full HD
composition and center will be exactly the middle, 960 by 540. Here in length type, we have three choices. You can pretty much choose
any of these lens types. But in my case, I want to use this 105 millimeter prime lens, which gives this kind of flair. So first of all, I want
to have a lot brighter. So let's change
brightness to 115. And also I want to use
some curve effect. It will allow us change the color and add a
bit more contrast. So for example, if I'm going to draw the course
something like this, you can see that we have
a lot more contrast and a bit of color. So something like this
curve should work fine. As you can see, we have nice bright spot with
the red and blue colors, which resembles our background, which is perfect for our effect. Now I want to animate our scale. So basically we can
just select this flare, press S on keyboard
to see our scale. And let's make it a bit smaller. And interesting thing that
you can click on this icon here and change the
value and x and y axis. Basically, this first value is X axis and second
value is y-axis. If I'm going to change
just first value, you can see that I am stretching horizontally and vertically. Basically it allows me to make this not so perfect sphere. For example, first
value I want to set to 102nd value 225. I want to have this kind of
wider look of this flesh. And as you can see, we
still have these borders. And to see this flash of light
on top of our backgrounds, we just need to change
this mode to screen. If you cannot see these modes, you just need to click here
on toggle switches and modes to be able to see them
and change to screen. Now as you can see, it
blends with our background. Now, let's animate the scale. Here at the beginning, I
want to create a keyframe. And then here later, just about also 18 frames. I want to make it a lot bigger, maybe like 1 thousand
in both dimensions. So it will cover
all of our screen. As you can see, it goes from this wider kinds of
plants to this spherical. And this is how we can
get this blinding light. We can also add motion blur
just by clicking here and then go to toggle switches enabled on this layer right
here by clicking here. Now as you can see
what this motion blur, we have this more nice look. And finally, we want to make this flesh transparent
by the end. So for this, we want to select our flare and press T on
keyboard to see our opacity. So about here at the beginning, we can create a keyframe on fifth frame and set to maybe 75. So it will be not so bright and few frames before we
can set it to 100. So here at the beginning, it will be really bright
than not so bright. And finally, hear about at 18 frames, we want set it to 0. So basically what we've got, this flash of light which covers our screen and blends
with our background. We can also cut this layer so we will see what exactly
this animation appears. And just by moving this layer to the left or to the right, we can time it with
our background. Now let's press 0 numpad
to see our preview. And as you remember, you can just press U on keyboard to see all
of these keyframes. You can always select all
of these keyframes and hold alt key on keyboard and
spread these keyframes apart. If you want this animation
to be a bit slower. So let's press 0 numbers. And this is basically
how we can get this first flash of light. And by the way, you can
always press T on keyboard and adjust this opacity. If you want it to be brighter, you can just move this
middle keyframe and control the brightness,
the beginning. Okay, it looks good. And the next video, I'm going to show you how you can create these particles from which
our text will appear. See you next video.
4. Creating Particles with No Plugins: So now let's create
our logo and our case, we want to create
a new composition just by clicking here on
create new composition. Let's call it text or logo. Because in the future
you can just drop your texts or logo
in this composition. And it will automatically change and create all
of the animation which we are going to create
right now on top of your texts for logo. So let's click. Okay. And my case, I don't
have any logo, so I'm going to
use a simple text. So to create a simple text, we just want to use this
horizontal type tool. Just left mouse click on it, and then leftmost click, hold and drag to create
this kind of box, which you can type your text. I'm going to type Mini, just like I've typed in preview. Now we can just select
the selection tool and make some
changes to our text. We can make it a lot bigger.
It's just like this. I'm going to use
Montserrat font, which is free and
available on the web. But you can use pretty much any font and it will work fine. I can just shrink this leading
to make it look nicer. And with this align tool, I can just make it. So it will appear on the middle of our screen
to see this Align panel. You can just go to Window
and enable it from here. Now let's go back to
our main composition, which is logo animation. Now we can just drag
this text logo, which we just created into this logo animation
and drop it here, just left mouse click
hold and drag it here. Now as you can see,
we already have our logo and this
basic animation, which also looks not that bad. But we want to create it
much more interesting. So first of all, I want to
apply some size animation, integrate a size animation. I want to create a
new null object. So let's go to Layer
New Null Object. With this null object, we
can create some animation and then link these
layers to this animation. It's really handy
because you can create just one animation
on this null object. And you don't have to create a scale animation on each layer which we
are about to create. So this is basically why I created this animation
on the scale. And then a link all of
these layers to the scale. So it will scale all at once. So let's create exactly that. We can just select
this null object and press S on keyboard. By the end, about
the six seconds. As you can see, I'm exactly
on the sixth second. I can create a scale keyframe. Just select your null object and press S to see the scale. And click on the stopwatch
to create a keyframe. And about here, at two seconds, I want to make it the
scale a lot bigger. So first of all, I want to just link these texts
logo to this null. So to link it, you can just
select this text logo. And with this pick whip, just left mouse click and
link it to this null object. You can see now it's
linked to null one, which is this one. You can also press Return or Enter on
keyboard to rename it, and let's call it scale. So we would know that this
is an animation of scale. And now we can just make
the scale a lot bigger. Let's go with 155. Now as you can see, we have the scale animation
of it scaling down. You can go even further than 100 and scale it even
less, maybe to 88. And now we have this animation
of slowly scaling down. We can make this animation a bit more interesting
just by selecting these both keyframes
and clicking here you see in
the graph editor. So now if I'm going
to select the scale, you can see these bulk
keyframes which we just weird. And by selecting one of
them, you just take this. And by clicking on this
handle, leftmost click, hold, and drag to the left and
up to this baseline, which lays up orange once you
touch it, just like this. And if you will drag to the
left just about like this. And from this side
also to the right, you'll get this kind of arc. And this arc means that it
will start really slow. Then here it will be faster
than slower till the end. So if I'm going to exit this graph editor and
press 0 or numpad. You can see the splash. Then it starts slow, faster and then
slower till the end. And it looks much nicer with
this kind of animation. So now we have this basic
animation of our text. Now let's create some
particles from this text. For this, I want to use an
effect called CC ball action. So let's type it here, CC ball. And you can see this
effect leftmost click and drag on top
of this text logo. And as you can see, it's graded this kind of volts
on top of our text, which is exactly what we want. But we want to
have a lot of them because if you are going
to change this scatter, you can see it flies everywhere. And we have this nice particles. But at this point, it's too
large of the particles. And to change that, we can go to grid spacing and
change it to one. And now as you can see, we
have a lot of small particles, which already looks
a lot better. So now let's animate this property of
laying out particles. Here at the beginning
of this layer. I want to set it to minus eight. And basically if
we're going to solo this layer just by selecting
it and clicking here, we will see only this layer. And it's really handy to
see what we are working on. If I'm going to set to
0, nothing happens. Then if I'm going to
set to minus eight, we already have some
distortion in our text. And let's create a keyframe. So basically we want to start with this little distortion
at the beginning. To see this keyframe, you just need to
select this layer and press U on keyboard. And now we see this keyframe. And later about here, we want to spread it a lot more. So let's just change
this value to minus, maybe minus 525. It's spread this out a lot more. And if I'm going to move
with this play head, you can see this animation. Let's also press 0 number
to see what we have. It looks pretty good. But as you can see, it's linear motion. And to make it a lot
faster at the beginning. So it will resemble
this flash of light. Really fast. We want to adjust
these keyframes. Let's select this keyframe
and go to graph editor. And also hold this
sandal left mouse click and hold and drag it to the
left, to this baseline. So it will light up orange. And basically it
will start really fast and slow it
down at the end. Let's exit this graph editor. And now we have this
really nice motion at the start of explosion. And then it's scaling down. Because we have this
scale animation which we've created
a few minutes ago. Okay, so let's press 0
number to see what we got. We have this explosion. And then let's go to the center. This momentum, we
want to make them disappear because we are going to use another instance of this layer with the
smaller particles. So we will get this text, but it will be a lot
more pronounced. So let's create another
animation basically about here. We can just click on this ball
size to create a keyframe. You can click on this stopwatch, then select this layer
and press U on keyboard twice to see this keyframe
which we just created. And a bit later about here, where this scale
animation is going back, we can just change
this bolt size to 0. Basically now we have this
animation of disappearing. We can also select this
keyframe and press F9. So this animation will
also fade slowly. And by the way, if you
are going to zoom in into this picture by
using wheel on the mouse, you can see that each ball
has this faded edges. And to make this
entire one color, you can just apply an
effect called fill. So let's drag it on top. As you can see, we can change to any color we should like. In my case, I just want to use simple white color and click. Okay, so now we've created this really nice explosion
of the particles, really nice and
smooth disappearing. We can apply some
more effects to make it even more interesting. And next effects which
we are going to play to make this effect
even more interesting, I'm going to show you
in the next video. See you next video.
5. Adjusting the Look of Particles: Let's apply some
more effects to make this look even more interesting. Let's go to effects
and presets and type effect called Optics
Compensation. Drag it on top of
this text logo. If you want to
change this value, you can see that we are reading this kind of effect of
distortion on the edges. But if I'm going to click on this checkbox, just click here. You can see that is
the sorts inward. So we have this
really cool effect. Basically with this effect will amplify this effect
of laying out particles about on 1 second
and maybe 18 frames, we can create a keyframe, and let's make it a
round number like 115. And about here,
three seconds and ten frames where it's
about to disappear, we can set this
amount back to 0. So basically this effect
will allow us to add this little something of animation before it
will scale down. We can press U on keyboard to see these two keyframes
which we just created. And we can select both
of them and press F9. So it will start slower than faster and slower at the end. And as you can see, it's still starts really fast
here at the beginning. If I'm going to press 0 or not, but you can see that it's aggressively starts
at the beginning. So we want to change
this keyframe so it will start
affecting a bit slower. Select this keyframe, go to graph editor and
drag it to the left. So in this case, it will start really slow. And then it will blend with our scale effect we've
created on this null object. So let's press 0 number
to see how it looks. Now as you can see, it blends seamlessly with this effect. We are given a bit more
depth to our effect. Next step, which I want to add is effect called CC
Radial fast blur. So let's go to effects
and presets and type here is CC Radial Fast Blur. Select it and drag it on
top of this text logo. As you can see, it adds something looking
like a motion blur. And the reason why we are using this CC Radial best blur
instead of motion blur, because motion blur
doesn't really work on this CC ball action. As you can see, it
doesn't add anything. But we can simulate
this effect of motion blur with this
CCA radial fast blur. And it would look like this
motion is a lot faster. Here at the beginning
of this layer, we can set this amount to 100, which is basically a lot, and it will help us to blend better with
this flash of light. So let's select this text
logo and create a keyframe. And later hero to
about two seconds. Here we want to change the
CC Radial face blur to 0. Basically we have this a
lot of blur and then it will transform into these
particles and disappear. Once again, we want to select this text logo and press
U on the keyboard. Press U one more time to
see all of these keyframes. And here's our CC Radial
Fessler and our animation. Once again, we want to select this last keyframe and press F9. This motion blur will
fade. A bit smoother. You can also go to this graph
editor and a bit adjusted. So we have a lot of blur, and then it slowly fades away and blends with
this animation. So now as you can see, we have really interesting effect
here at the beginning, which blends with
our last flare. And we can also enable
this background. And as you can see, we have this really nice
effect at the start. So I'm going to solo this layer. So we are going to continue
working on this one. Finally, I want to
add two more effects. First one is VR
chromatic aberration. This one, Let's
left mouse click, hold and drag on top of
this text logo effect. And as you can see, it creates this really nice and interesting
colors in our particles. We can change some properties here to get the colors
which you like. We can basically
shift the channels. You can play around
with these colors and get the colors
which you like best. I just showing the exactly
the same colors which I've used in my preview and
use curves effect. With this curious effect, we can bring up some of the
particles which we lost. So if I'm going
to change this to Alpha mode and bring
up this alpha curve. You can see that our
particles becomes visible. Now we can see our
particles a lot better. Let's un-solo this layer
and see what we've got. We can even press 0
number to see it. And by the way, you can change
this resolution to full to see all the particles
and the entire look, which will be after render. Okay, so now we
have this really a nice beginning of our effect. Next video, I'm going
to show you how we can apply these a lot
of small particles, which basically will form
our text here by the hand. And exactly this I'm
going to show in the next video. See
you in the next video.
6. Forming Text Out Of Particles: So now let's create
smaller particles which fly inside and create our logo. Basically, we can use
even this same layer. We can just select it and press Control D to duplicate it. As you can see, I've duplicate this layer and just move it. So about here at 1
second intend brain, we can set our duplicated layer. This time we don't need
any optic compensation. We don't mean CC
Radial face blur. And we don't even need this VR chromatic aberrations
as well as curves. Just select all of
them and delete them. Basically, all we need is
CC ball action effect, which we already have
and fill effect. It will be entirely white. At this point, we can just
reset this bowl CC action, delete this keyframe, and this keyframe which
we already created. So now we can just scatter
this effect once again. But this time not so much. Maybe 255 will work. Well. Then we want to change the bowl size so it
will be a lot smaller. Something like 26
should work fine. As you can see,
we've created this really, really small particles. And let's create a
keyframe to this scatter. Because here later in this
video about on fifth frame, we want this scatter
to go back to 0. Now, if we are going
to scroll this video, we can also solo only this
layer which will duplicate it. We can see how this
forms into our logo, which is exactly what we want. But once again, we can just
select this layer and press U on the keyboard to see these
keyframes of the scatter, which creates our logo. We can select this keyframe
and go to graph editor. And once again, make it a
lot slower towards the end, and maybe a slow here at
the beginning as well. So something like this
curve should work. Nice. So let's press 0 number
to see how it looks. It looks pretty cool. But one problem which
we have is that it appears too fast, just click and appeared, and it doesn't disappear. So we can just press T on the keyboard to animate
here at the beginning. We can just create a
keyframe and move it. And create another keyframe
by changing this value to 0. So basically we've created two keyframes here at
the beginning with the 0, here with 100. So basically it's appearing on our screen and then
Forums into our logo. And hereby D and we
want it to disappear. And the easiest way to
create these keyframes, we can just simply select them. Press Control C, Control
V to paste here. And basically right mouse
click on one of the keyframes, key frame assistant,
time-reverse keyframes, which basically swap
these keyframes. So now it starts with
100 and goes to 0. And basically why we want
to make them disappear. Because as you can see, it's still has these
dots between them. And it doesn't look
really like our logo. And to fix this,
we can just simply select our text, duplicate it, duplicate it, just
press Control D, and then just delete
these effects. So now we have our
original logo. And as you can see, we
still have this kind of dots which will disappear. And I'm going to press T on keyboard on this
duplicate later, which already has
the same properties. We can just simply once again time-reverse
these keyframes, which basically means
that this layer below will disappear and this
on top will appear. These keyframes we can just delete and we can even cut
this layer to this moment. So now those disappears
and this appears, we can start this process
even sooner, just like this. And later in this class, I'm going to show you how to hide this kind of transition. But main transition into
appearing into our logo. We already have.
Now as you can see, basically we are trying to
apply as many effects as we can to just hide all of
these transition points. Okay, so now we have this
really cool effect and we can un-solo this to
see all of this together. So we have this explosion then fades in these
smaller particles. They are starting to form
this kind of our logo. And now basically we can
just select this text logo. By the way, we can just
rename our layers so we would know what each
of these layers does. So first one is more
like explosion. So let's call it explosion selected embrace
reader on keyboard. And let's call it explosion. Then this one, we are going
to name it small particles. And this one, let's
call it fade in logo. So now we have this
kind of transition. But it doesn't look like
these particles can form these kind of solid logo. And to make it more believable, we want to duplicate this layer. Just select it and press
Control D to duplicate it and move it a bit further. So we'd have pores part
of these small particles, then second part of
this small particles. So it will form more
and more of them. And we can even duplicate
one more time and move it. So we would have this first 1, second, 1, third 1. And now it looks
a lot more dense. And this fading animation with our text logo looks a
bit more believable. As you can see you. Next video, I want to show you this final transition point. Basically, with this
final transition point, we are making sure that this transition becomes
a lot more seamless. So it will look more like this. Forums into solid
logo right here. And exactly this I'm
going to show you in the next video. See
you in the next video.
7. Seamless Transition: So let's create this
final point which will blend these small particles
into our solid logo. This time we can just
duplicate this fate in logo. We can expand it, as
you will remember here. If I'm going to
press T on keyboard, we have this opacity, basically animation of fade in. So I just want to delete
these keyframes of opacity. Basically we can just click
here and it will delete all of the keyframes and
set this to 100 per cent. So now we have just our logo
inside of our composition. And now what we
can do is to apply an effect called roughen edges. It's really powerful
and interesting effect which we want to apply here
on this fate in the logo. We can also rename
it as roughen edges. So we would now, this layer has this kind of
roughen edges effect. Now let's solo only this layer, so we will see what
we are working on. And as you can see by changing this border of
roughen edges effect, we can make this
fading animation. And then my case,
I don't want it to animate from the
center just like this. I just want to keep this structure of the text
and then animate it in. To keep the structure
of the text, we can just change
this edge type to cut. As you can see. Now we have just really
nice structure of the text and this roughen edges
effect works with them. Those edges, which is
exactly what we want. Second thing which I want to address is to change the
sharpness of these edges. Because as you can
see, it's fades in. And I don't want
these faded edges. So I can change this
edge sharpness to ten. Then by changing this scale, we can make these kind
of small parts from which it will appear here. Or you can just play around with your value and see what
works best on your image. My case, maybe something
like 15 will work fine. And finally, we just want to
animate this border effect. First of all, we want to
set it to higher value. So let's find the value
where it's about to appear. In my case, it's about 480. Here at the beginning, I want to create a keyframe for 480. Then about here where
it will appear, I'm going to set it to 0. So basically, we have
this animation where it will start slowly
appear on our screen, which looks pretty cool. We can also press U on
the keyboard to see this keyframe and go
to graph editor and just drag by this handle to make this animation fade in slowly. And let's spread
these keyframes. So this fading
animation BLS slower. Okay, next step which I want to apply is optics compensation, which we already
applied earlier. And as you remember, it gives a bit more depth
to our animation. So if we're going to click on this reverse lens distortion, we can reverse just like this. So basically about here where
we can see our particles, I want to set it
to something like 135, create a keyframe. And by the end of
this animation, we can change it to 0. And as you can see, we add in this more of this distortion. Let's press U on keyboard to see this Fall of
these keyframes. We can even spread it
apart if you want. But what we really want, start really slow
at the beginning, press F9 and go to
Graph Editor slowly. And here, Let's move
this keyframe apart. So it would be a lot slower. Just play around
with the position of these keyframes to see
what works best for you. Let's also press is 0
number to see how it looks. And as you can see with
this decomposition, we are adding more kind of interesting animation to
the edges of our logo, which looks pretty nice. One less detail which I want
to add is you can see, now, if you are going
to look at this, you can see that it doesn't
really have life in it. And if we are going to bring
back these small particles, you can see that they
have a lot of movement. So it doesn't blend too good. And to change that, we want to add on this roughen
edges effect, effect called
turbulence displays. So let's type here and effects in presets turbulent displays. Left mouse click and drag it on top of this roughen edges. First of all, we can change the amount of this
effect working. So basically here
at the beginning, we want to start with like 100. So we would have a
lot of distortion. We can change the size. So this distortion
will be a lot smaller, maybe something like
nine or even four. We are going to animate
this evolution. And as you can see,
the smaller the size, the smaller the movement
between these parts will be. And to get this effect working, we just need to animate
this evolution. We can hold alt key on keyboard. As you can see, I'm holding Alt and left mouse click
on this evolution. And here it allows us
to type expression. Basically we can just
type here, time, multiply 150, and
click anywhere. It will allow us to animate it. So now it's big value is
you're going to type here as faster this animation will
be inside of this effect. So let's make sure to solo this layer so we will
see how it looks. And if you pay close
attention here, you can see that it's
moving inside of this word. And now it more resembles
like it has some life in it. You can go, even with 250, you'll get even more
movement inside of our logo. And basically, this fall will help us blend with
these particles. So this movement
of particles will resemble inside of
our logo as well. And finally, what do we
want to do is to animate this amount so it will not
distort our final product. So here at the start we can just set a keyframe for amount. And about here, by the end, we can just change it to 0. So we will get a
bit crispier edge. And then when this layer
will start appearing on top, we'll feed them into our logo. And by the way, when this
fader and logo will appear, we want this rough and
edges to disappear also. So let's press T on keyboard, create a keyframe a bit
later. Let's set it to 0. So it will also disappear and make sure that these small
particles by holding Shift and select all
of them and press T to make sure that all of these
particles will disappear. Also, we are moving only
this opacity animation. So all of this will disappear and this video
and the logo will appear. So this is basically the idea. We can just spread
this animation a bit, select these keyframes, and press F9 of opacity of each layer and move it further. So it will blend nicely. And this animation
will start sooner. So now as you can see,
it blends a lot better. Okay, so now let's close all
of these layers and let's un-solo all of these layers
to see our final result. Let's press 0 number
to see how it looks. Feel free to follow me
here on Skillshare. I have a lot of glasses on VFX. I upload new classes each week, as well as fundamentals of
Adobe After Effects on texts, animation, logo animation, and even complexity effects,
I recommend you do. Why should this VFX class, which takes all it
wealth minutes and you'll get really powerful
results at the end. Just follow me here
on Skillshare. I post-operative base
classes every week. And maybe let me quickly
show you how you can create this tagline below. Basically you can just
duplicate this text logo, open it, change the text or any other words which
you want to use. Let's set it to the middle. And basically let's go to a logo animation
and drop it here. We want to press S on
keyboard to make it smaller, so it will be the same size as our logo animation,
something like this. Finally, we want to
connect it with the scale. And what is cool
about this skill that now we can just select it, press P to Z position and move it on top to recenter
our animation. Now basically we can
just make sure that this second line
will appear later. So we can just press
T on keyboard, create a keyframe
for 100 per cent. About here is 0 per
cent at the start. And we can go to effects and presets and apply Gaussian blur. Let's set Gaussian
blur to about 50. Create a keyframe.
Select this layer, press U on the keyboard. Set it here at the beginning. Here we'll, it's appearing, Well, let's set it to 0. Let's select both
of these keyframes. Press F9, so it will slowly
appear on our screen. So this is basically
how you can create this tagline to your animation. And what is cool about
this effect that you can always change this text. So any other word. And it will still have all of this animation
just like this. So this is basically how
we can create templates. And also here, you can change to any other color and get
this entire new look. Thank you for
watching and I hope to see you in my next class.
 M Jake, Lets Create VFX & Cool Stuff Together