Lilac Simplicity: Creating Complex Watercolor Beauty with Ease | Natalia Nikitiuk | Skillshare

Playback Speed


1.0x


  • 0.5x
  • 0.75x
  • 1x (Normal)
  • 1.25x
  • 1.5x
  • 1.75x
  • 2x

Lilac Simplicity: Creating Complex Watercolor Beauty with Ease

teacher avatar Natalia Nikitiuk, Capturing Life's Beauty

Watch this class and thousands more

Get unlimited access to every class
Taught by industry leaders & working professionals
Topics include illustration, design, photography, and more

Watch this class and thousands more

Get unlimited access to every class
Taught by industry leaders & working professionals
Topics include illustration, design, photography, and more

Lessons in This Class

    • 1.

      Intro

      0:43

    • 2.

      Materials

      2:34

    • 3.

      Pencil drawing

      1:54

    • 4.

      Color choosing

      2:07

    • 5.

      Watercolor drawing

      18:28

    • 6.

      Adding details with a liner

      6:31

    • 7.

      Conclusion

      0:33

  • --
  • Beginner level
  • Intermediate level
  • Advanced level
  • All levels

Community Generated

The level is determined by a majority opinion of students who have reviewed this class. The teacher's recommendation is shown until at least 5 student responses are collected.

55

Students

1

Project

About This Class

About This Class

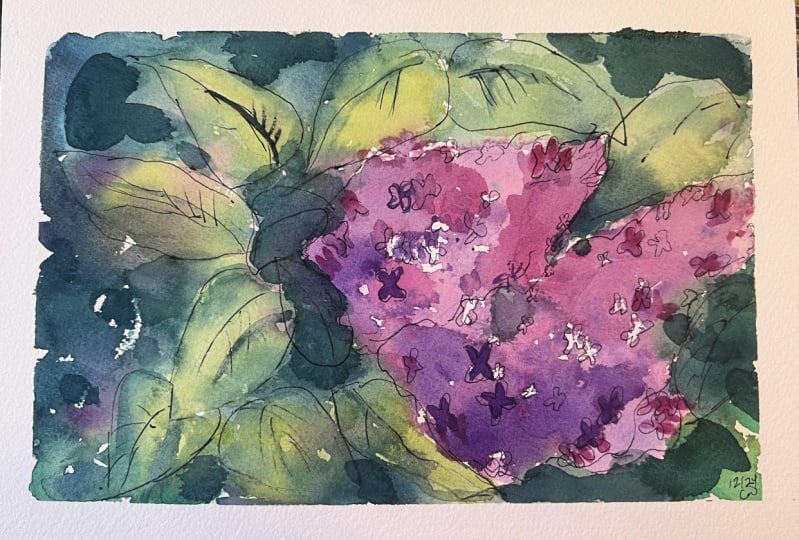
Welcome to this beginner-friendly watercolor class where we’ll transform a seemingly complex lilac sketch into an easy and enjoyable masterpiece. In just 30 minutes, you’ll learn how to create beautiful lilac flowers with a few simple techniques. This class is perfect for those looking to explore watercolors, improve their floral painting skills, or simply enjoy a quick creative session.

What You’ll Learn:

  • Layering Techniques: Build depth and texture for realistic lilac blooms.
  • Simple Brushstrokes: Discover how to create delicate floral shapes with minimal effort.
  • Color Harmony: Blend vibrant shades only 4 colors to bring your artwork to life.
  • Details Made Easy: Add finishing touches to your painting with subtle highlights and shadows.

Why You Should Take This Class:

Even if you’re new to watercolors, this class will show you how to simplify a complex subject like lilac flowers. You’ll walk away with not just a painting but also a better understanding of how to approach floral sketches with confidence.

Who This Class Is For:

This class is perfect for beginners and intermediate artists who want to create a quick, vibrant floral painting. Whether you’re an experienced painter looking for inspiration or a complete beginner, you’ll find this class accessible and rewarding.

Let’s make something beautiful together in just half an hour—join the class and paint your own lilac masterpiece!

The result:
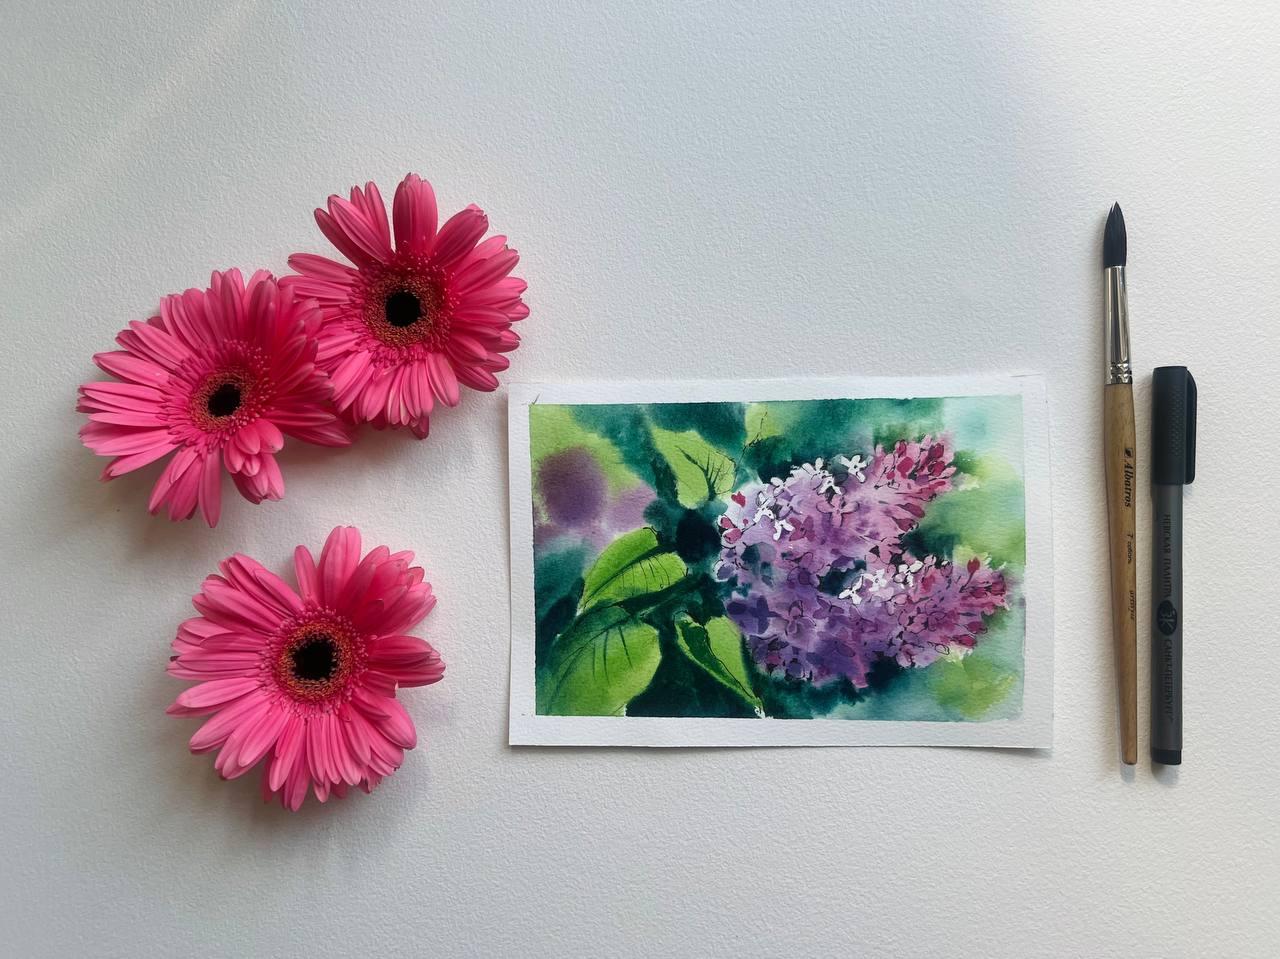
The reference:
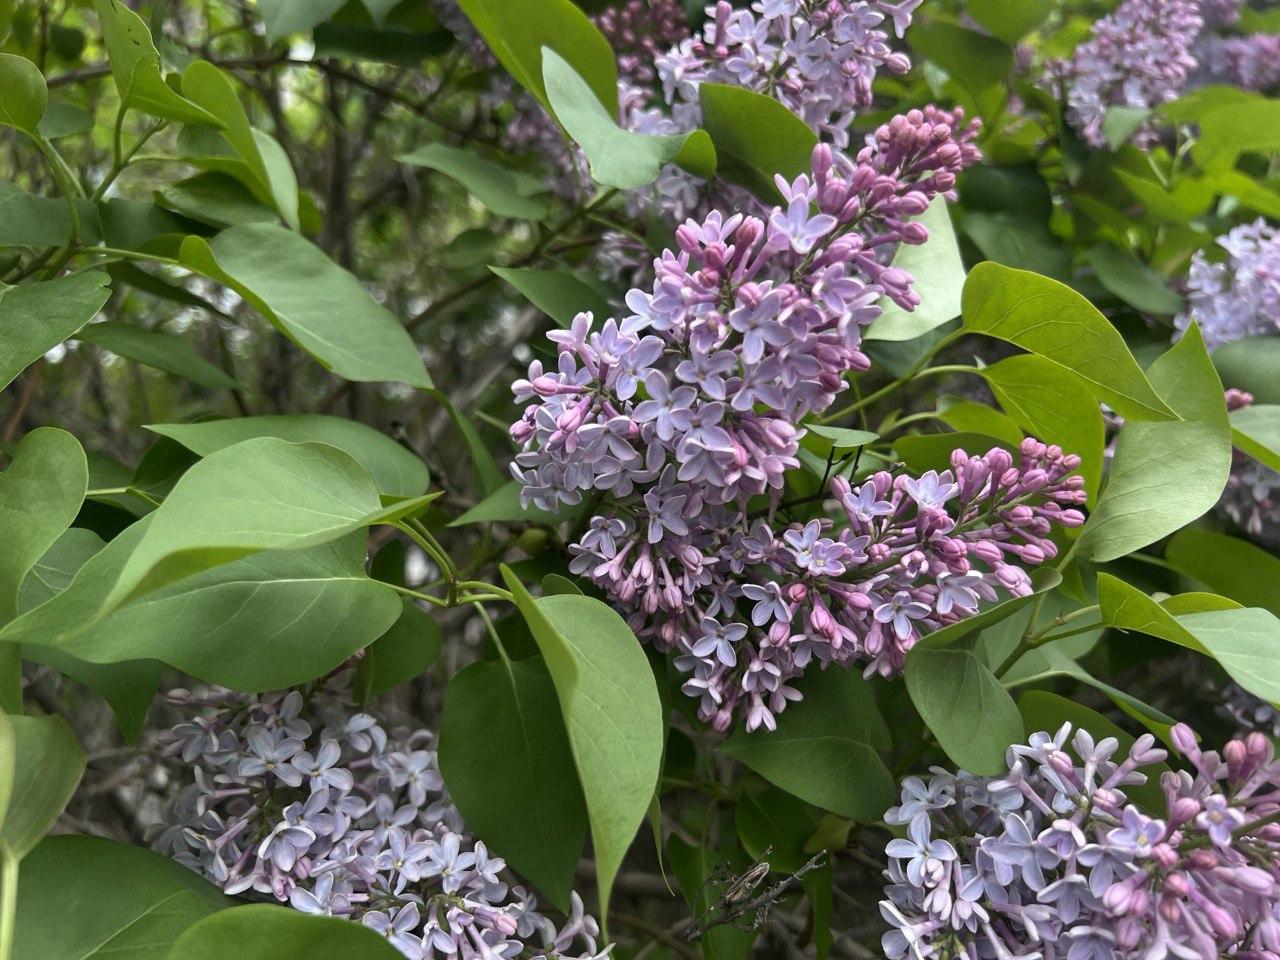
Other my lessons of the flowers series:

Blooming with Watercolors: Peony Roses Made Simple

Blooming Pansies: A Quick Watercolor Sketch

Watercolor Magic: Paint Peonies in 20 Minutes

Meet Your Teacher

Teacher Profile Image

Natalia Nikitiuk

Capturing Life's Beauty

Teacher

Hello there! I am a passionate watercolour artist, and I'm here to share the magic of this versatile medium with you. Contrary to popular belief, watercolour is easier than it seems, and I truly believe that everyone has the potential to create beautiful art.

My love for watercolour is deeply rooted in the joy of capturing life's most memorable moments in my ever-present sketchbook. Alongside these cherished sketches, I also take great pleasure in creating full-size watercolour paintings that bring vibrancy and depth to the canvas.

As a mother, I've discovered the delight of sharing my passion for watercolour with my daughter. It's not only a wonderful way to bond with children, but also a creative outlet that nurtures their artistic growth.

Let me guide you on this... See full profile

Level: All Levels

Class Ratings

Expectations Met?
    Exceeded!
  • 0%
  • Yes
  • 0%
  • Somewhat
  • 0%
  • Not really
  • 0%

Why Join Skillshare?

Take award-winning Skillshare Original Classes

Each class has short lessons, hands-on projects

Your membership supports Skillshare teachers

Learn From Anywhere

Take classes on the go with the Skillshare app. Stream or download to watch on the plane, the subway, or wherever you learn best.

Transcripts

1. Intro: Hello, everyone. My name is Natalie. I'm a watercolor artist, sketcher, and drawing instructor. I'm excited to welcome you to my class and share my knowledge with you. I have prepared a series of lessons dedicated to drawing flowers, where I discuss different approaches and focus on capturing scenes without unnecessary details. And today we will draw lc. I'll show you how easy and enjoyable it can be to draw this seemingly complex flower. Let's get started and have fun, paint it, eat together. 2. Materials: Now, I'll show you how to easily depict such a complex flower using my favorite technique, a combination of watercolor and liner. This is actually my favorite approach to painting where we combine the lightness of watercolor with the detail of liner. Let's begin by discussing the materials we'll need today. We'll use watercolor paper. I'm using 300 GSM, Bauhun but for this type of sketch, paper with a density starting from 200 GSM will work. I seek paper to make the drawing look like a postcard. Next, we'll need a board and masking tape. Or you can draw in a sketchbook. I secure the paper so that is tightly fixed and comfortable to work on. If you're using a sketchbook, you can secure the sheet as well for easier handling. What else will we need? A pencil, an editor razor, and a liner. The most versatile size is 0.3 millimetres. It's suitable for nearly any task. We'll also need two brushes. A soft medium sized brush, and a smaller one with firm bristles. One is synthetic and the other is squirrel hair. The most important feature of a brush is a sharp tip, as it allows you to do a lot. In fact, you could even complete the entire work with just one good brush. But having this combination is always handy and convenient. Next, we need pins, a palette, or a dish for mixing colors, tissues, container of water. And the hair dryer. If you want to speed up, dry the sheet without waiting too long. 3. Pencil drawing: Now let's get started. The first scene we need is preliminary sketch. We'll choose the main subjects. As you can see here, we have two panicles. They should be different sizes to avoid competing with each other. Let's roughly sketch the areas where they will be placed one larger and one smaller. This means the lilac will be situated in this region. Avoid placing them in the center as it makes the composition less appealing. Shift them slightly. Let's add some leaves. I'll alter them a bit. As artists were a little like magicians, we can change things. Here we'll have a leaf and they'll slightly tone it for better visibility. Underneath, let's place another large leaf extending to the center. We can draw another here. I won't draw leaves in this direction because our main branch is here, and it's better to have the leaves radiating from it to make the drawing clearer. I also suggest adding a small violet spot here for an interesting contrast. We want meticulously sketch out the flowers themselves. That will be done with a brush or detailed with a liner as we go. Now, such sketch with arrangement of elements is enough. 4. Color choosing: Now, I'd like to start by selecting colors. I love working with a limited palette to ensure the artwork looks cohesive and nothing stands out. This creates harmony. That's why before starting, I usually test the colors they use. Let me show you as well. For the lilacs, I'll use two colors pink, camine, and violet. I'll mix them and vary the situation. Some areas will have more violet and others more pink. If you look closely, the flowers themselves differentiate. Next, let's move to green. I'll use two greens, a light one may green, a very pleasant summery color that's bright in its pure form, but can be muted. And emerald for the darker areas, emerald is included in almost every set, so not everyone uses it because it's very vivid and not suitable for every purpose. However, if you dit a bit of red in our case pink, it will mute the color, making it less intense and better suited for our work. You can also add Vallet to use in shadows. So these are the colors we'll use. I love how they complement each other and look together. 5. Watercolor drawing: Before we begin, I want to draw attention to the light areas. Some of the flowers will be white as if light is falling on them. We will leave these areas unpainted. When we wet the paper, the lilac area will remain dry. Let me explain how to do it. With a large brush, carefully wet the paper. I would in the Lilac area. Pay special attention to the edges of the paper as they dry out faster. And let's start with the flowers. I use a mix of pink and purple in the intensity. I don't take too much pain so that the lilac remains light. I gently sketch the flowers, leaving white spaces for the light. The buds on the edges are not open and they are more pink while the central opened flowers are lighter. The purple color should be diluted with water so that it is not too bright. This will serve as a base layer. Here and there you can suggest flowers, leaving white caps. Look closely at the flowers and carefully go around the shape of several buds with a brush. You can smoothly blur the paint in some places. So that are not a lot of clear boundaries. It's the same here. Show the bads. A few pieces are enough. No need to draw too many. Let To create texture, you can lightly splat a paint to imitate flowers just like this. And while the paper is still wet at dark areas, Thus, you can avoid everything looking similar. Let's leave the lilac for now and move on to the leaves. We mute the light green shade with pink or dark green, so it's not too bright. We begin with the lightest areas, adding soft traditions. You can also make a lighteri here and here. And again, don't avoid it. Make the background light and blurry. Here, I want to add a purple spot as I planned. Then we introduce daka shades, mix in green with pink and purple to make them look natural. I really like this muted shade. Place dog spots between the leaves. We need it, soften the traditions, so there are no sharp bodas. In these as, I will leave more light to emphasize the lighting. This leaf is located under the second one. So I will darken it on one side. For the darkest shadows, I mix green with purple muted with pink. I use the shades to define the deepest shadows between the leaves and on the leaves themselves. It's important to pay attention to the edges. They should be racked to convey the natural shape. Then put some spots in the middle. Add some shadows to the top. P. Blur the edges where needed. But you don't need to go around the flowers in a circle everywhere with a same duck color. Leave some places untouched or highlight the buds with a light color in some places. Pay attention that at the edges, the buds resemble small spheres, and it's important to preserve their shape. By going around the correct shape of the flower, you will seem to push it forward. But don't make the flowers identical. Let them vary a bit. In the final stage, I take a fan brush for detailing. Here you can outline a leaf, dug in the background behind it. And then the leaf will come to the foreground Et's define the contour here. One side can have a sharper edge while the other side can be blurred. So the drawing doesn't have uniformity. Now let's move on to the most exciting part. We'll likely define the lilac flowers. As I mentioned, the closed buds are noticeable at the edges. I suggest painting a few such buds in dark, saturated colors as the ends of the buds have more bright pink. Don't play them evenly or symmetrically. Let the rhythm be lively and natural. If you want, you can repeat specific butts. I'll draw them on a stem. But avoid over detailing. Now we will add just tell you tell specificity and move on to the liner. Sketching is a wonderful genre because it can be completed at any moment. Even at this stage, it's clear that we are looking at lilac. After this, it's up to you. You can delve into more detail or stop here. This is what I love about sketching. The opportunity to draw quickly, capturing the moment. And Watercolor sketchon is especially interesting for its lightness, lack of strict boundaries, and the possibilities for experimentation. Now I'm bringing out the individual buds. Usually, a lilac flower consists of four petals and the center. You should depict a few such buds. You can also add green color. Choose a specific flower to try and repeat its contours. This will immediately give the sketch more expressiveness. Soften the edges so they don't stand out too much and don't catch the eye. Don't forget that you don't need to do the same way from all sides. You can change the color, leave some pots undefined, and highlight the center with a different hue. It will still be clear that it's lilac. You can't mistake it for anything else. This part of the work is especially meditative. It's so important to enjoy not only the result, but the process itself. And the less you attach yourself to the final outcome, the better it turns out For example, I don't outline each petal, but it's already clear that we are painting lilacs. I think I need to draw the edge with the color. You can also define some flowers. Just add pin to the brush, and use st pin to draw the flowers. Let one be lighter. The other darker. This will create a sense of volume. If you need to lighten some areas, you can do so with soft brush strokes. One more flower at the upper branch. Remove some colour from the center of the flower. Additionally, you can add thin branches along the edges. They support the flowers. Draw one more flower here, and we can finish with the watercolur. If the edges are to uniform, you can slightly change them. I will make the composition more interesting. This pod is slightly lacking in shadows, so I will add a couple of dog bots. Now we are done with the watercolor. Let the shed dry, and we will add details with the liner. 6. Adding details with a liner: Once the sheet is dry, we can add some variety. Let's start with the leaves. At first, wind the veins. Make them different. Don't copy them exactly from one leaf to another to keep the look lively. But For example, you can outline the edge of the upper leaf. But I want outline the second leaf completely to maintain the lightness. For the next leaf, I will only define the stem now let's move on to the flowers. With liner, carefully accentuate the flowers, petals and stems that hold the flowers. If some lands turned out uneven, you can smooth them out with a liner and pay attention to the buds. Let them be both light and dark. It will look more interesting. Some areas can be completely filled in to emphasize the shadow or form. This will add depth and expressiveness. You can also redraw the shape of the flowers where the watercolor didn't define them clearly enough. The key is to do it lightly and naturally. Fill in some areas to enhance the accents. But don't get carried away with overworking the details. Remember, this is a sketch. It's unfinished quality that makes it interesting. Such light strokes will give it more recognizability. It's important to emphasize the centers of the petals, places where they begin. This will give the flowers a recognizable shape. A bit more detail. I want to accentuate the lower part of the flowers. When you show them from different angles, this will immediately reveal the flower shape and make it appear more three dimensional. This process can be time consuming, but it's important to know when to stop, so you don't end up detailing everything to the smallest detail. What's attractive about sketches is always the lightness and the unfinished quality. Now our lilac is ready. We spent about half an hour on this work. You can do it faster or on the other hand, dive deeper into the details. It all depends on your preferences. I like this intermediate version where there is a bit of unfinished quality, but enough detail. 7. Conclusion: Thank you for joining me in this lesson. I hope that you found it interesting and enjoyable to create these beautiful flowers. Remember to paint with joy and share your lovely lilac artworks. There are more lessons in this seria dedicated to drawing flowers. I've included links in the description. Be sure to check them out. Happy painting and see you in the next lessons.