Transcripts
1. Into: Hello. My name is Natalie, and welcome to this fun and
creative watercolor class. Today we will be
painting a set of colorful and playful hot
themed illustrations. That are perfect for
Valentine's Day cards. These simple designs
are perfect for beginners and
seasoned artists like providing the perfect
opportunity to explore vibrant colors,
textures and buttons. So grab your watercolor set, and let's create something
special together.
2. Materials: I want to show you the materials we will use for today's lesson. We need watercolor paints
and sick watercolor paper. You will also need tip and
a board to fix the paper. If you're drawing
in a sketchbook, you don't need the board. You will need two brushes, one bigger, and one smaller. I have a big soft squal brush and a smaller synthetic one. You will also need it
a eraser and a pencil. A liner is also helpful, and the best size
is 0.3 millimeters. Don't forget some tissues
and a cup of water. If you want, you can use a hair dryer to dry
the paper faster. So let's start.
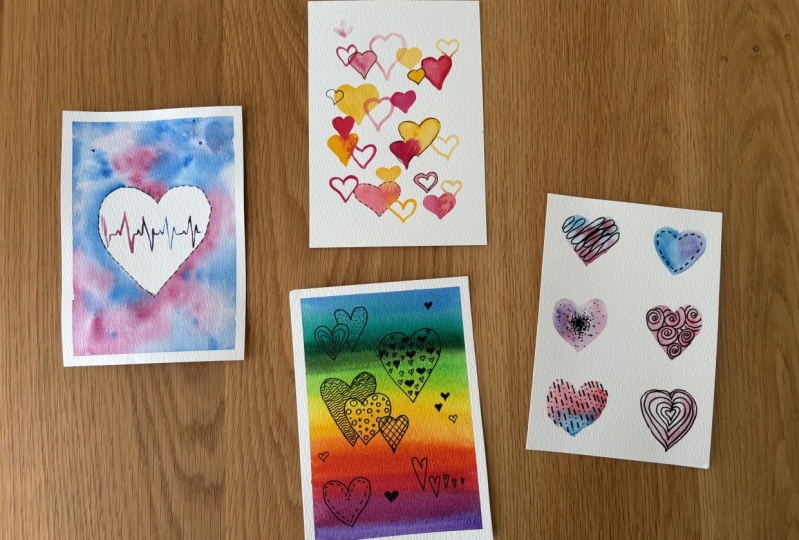
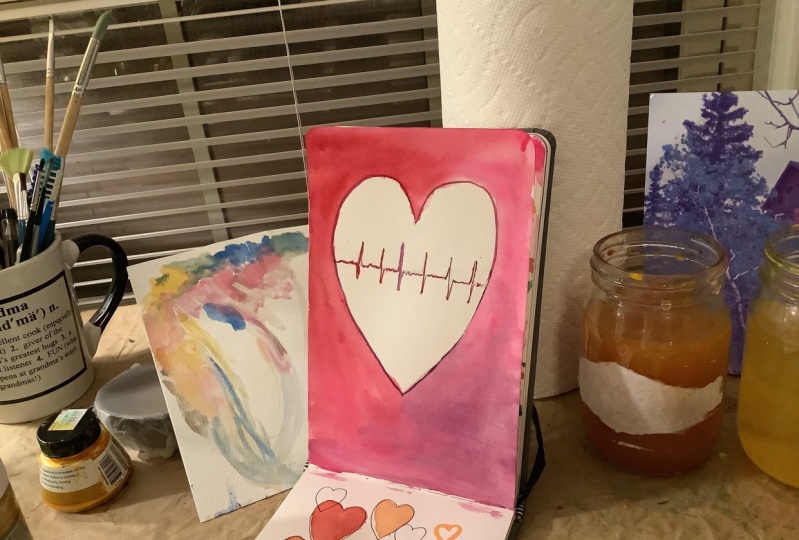
3. Lesson 1: Galaxy Heartbeat: First, let's tap the paper
to the board to secure it. Now we'll move on to
the pencil sketch. The first design
will be very simple. First, we need to draw a hat
in the center of the paper. I suggest placing it
slightly about the middle. Draw it in the shape you like. For example, a more
elongated one. Erase any extra
lines right away. Inside the hot, I want
to draw a hot bit line. First, draw a straight
line where it will go. You can choose a specific item or look up examples online. Let's do something like this. First, a high spike, then a lower one. It's important that the toe line doesn't hit the exact
center of the page. If something doesn't look right, you can adjust it like I did by lowering
the line slightly. Makes a lower part shorter, so the design looks
more interesting. All the lines should end
at about the same level, and the top ones to. I want to make it a little
narrower and shorter here. The pencil sketches ready. Now we'll move on
to the watercolor. We'll paint the background
around the hot. Carefully leave in the
hotbed line untouched. You can outline the contour with clean water first
to make it easier. Now, choose your colors. A you like. I'll
use bright pink. Purple pink. And after that, I will add turquoise. Start filling in the space around the hat. Okay. Good. Okay. You can tell the paper in
different directions. So the paint flows and plants. Check if any colors are missing
and add them if needed. Let the paint create
beautiful streaks. Let the watercolor draw itself, and if there are a puddle at
the edges, just remove them. You can remove it
with that dry rot. You can also use a
smaller brush to outline the hot contour and adjusted
remove excess moisture. If you are worried about touching wet paint
with your hand, rotate the paper and walk
from the other side. Now, let's start adding
patterns with the sin brush. I'll begin with turquoise since the background
ends with that color. Either dry the pipa or it
until the pipa is slightly absorbed if you're worried about smudging and carefully
begin to draw. No. Carefully creates smooth
transitions between colors. If you go outside the lines, you can fix it to
the clean brush. Lita will add sharp
details with the liner. So don't worry about
precision now. And Make sure to blend the colors for
a more tistic look. I want to use turquoise
color once again. I'll finish with the same color. I add purple pink
colour in between. The watercolor pot is now done. The paint is starting to set, and you can sprinkle some water to create
interesting textures. If you do this on dry paper, the spots won't appear. So you need to wait
until the paper is not wet but not
completely dry either. If you prefer, you can
skip the splatters. The background will still
look colorful and beautiful. For extra detail, use a brush to make some spots more visible. For example, a dry
brush can lift paint from certain areas to
create light spots. I think that's enough. Now I'll use a hair dryer
to dry the background. You can leave it as is all read details with a liner if
you want sharper lines. You can outline the
inside of the hot Let the lines extend
beyond the watercolor in some places to make the
design feel more dynamic. But it's up to you. If you want, you can make the drawing meter and
focus on precision. The first cut is now finished. Carefully remove the tape. To make it easier, you can warm the tape
with a hair dryer. Here is a cut we created. If you like, you can add a small method or
write who's from. Use this idea to create
your own designs.
4. Lesson 2: Warm Heart Collage: For this cut, I tape the paper
lightly with masking tape. The tape is mostly needed
to keep the painting within the boundaries and prevent
it from going no the edges. It also helps secure the paper so it doesn't
move while we work. Now, let's start painting
directly with what color. All three colors, pink,
turquoise and yellow. We'll paint hats of
different sizes. Use enough water, so the colons blend
beautifully. Let's begin. For smaller hearts, you
can use a small brush, and for larger ones, use a bigger brush. Okay. Now we'll use yellow color and I'll paint a hot
that connects to others. I like what the lovely
gradients are created. At the top, you can
paint an outline of a hot without feeling
in the center. I add a small hot using a
mix of yellow and pink. Well, the paint is still wet. You can adjust the
edges if needed. For example, by adding
shading to one side, Okay. Let's continue. In the center, I want to
plant a big yellow hut. Here will be the hard that
connects out the elements. But not all hearts
need to be connected. But these ones will
be painted together. Moving down. Below. I'll paint a more flattened hut. Okay. And next to it, a smaller hot in
the same colour. In this project, follow your hot and paint what
feels right to you. Actually, I wanted to
add turquoise color, but now I understood that
it will be superfluous. This colour scheme is already
beautiful and sufficient. This hot is of another shape. I want to add this
another color. And let's connect them with
such a beautiful pink colour. I want to tell you
one more time. You should follow your heart and paint what you
want to paint. It will definitely turn out
beautiful and uniquely. I'll add one more hot
on the right side. And a small delicate
one on the left. And we can stop here. We've created an interesting
hot pattern. Let's dry it. Look, how beautiful and
interesting it already looks. I especially like the
watercolor gradients. You can leave the cut as it is. It already looks
complete and lovely. But if you'd like, you can add either random details or
precise lines with the liner. Now I'll try to make that just nettle where the
watercolor is uneven. With a liner, I wanted some
tidiness and sharp teeth. For example, I'll
outline some hot. If any hot turned out uneven, you can fix it slightly. You can also draw
a few hots with just the liner
without watercolor. Let's draw several of them. In some hots, you can
add patterns inside, such as a few lines
following the shape of the hot instead
of a full outline. I want to connect to hots
by outlining them together. And for one, I let line
on the inner contour. And the last one. You can
outline all the hots, do as you prefer. I think I'll just
finish with this hot and leave it as it is. And now let's carefully
remove the tape. Another sweet and lovely
Valentine's card is ready. Paint your own, choose
the colors you like best and create unique patterns. If it's difficult for you, start with pencil sketches. If you feel confident, paint directly with watercolor. The most important thing is to create and share
your results. I'd love to see what
you come up with.
5. Lesson 3: Rainbow Hearts with Patterns: Let's start making the next cut. For this one, we will create a beautiful watercolor
background, and the rest of the work
will be done with a liner. First, let's choose the colors. I want to create
a smooth gradient from top to bottom,
starting with purple. You can tilt the paper
slightly to let the pint flow. Okay. The next color will be orange. You can choose your
own favorite colors and the combinations. Then I let lemon yellow. And we have such a
rainbow like tradition. Okay. And let's finish it with blue. You can use just a few colors. The ingle is to create a
beautiful watercolor vase. Now we'll draw the background
to speed up the process, and then we'll start
drawing with the liner. The paper is dry, solid drawn hots of different sizes and
shapes in random pattern. We will fill them with
various patterns. You can start with later hots. I'll draw one big hot. And another small one here. Gradually, we will fill
the space with hearts. Some of them will
be more rounded. And others I don't get it. A few hearts will stand alone, not connected to others. And that's all. If needed, you can add more later. Now let's get creative and
come up with unique patterns. Fill the hearts with
interesting lines. For example, you
can draw circles inside or create a
weighted design. This is a com meditative
process that helps you relax. Let's draw more elongated lines. And the last element
of design in this hut Add missing
lines if it's necessary. And outline the
conto if you want. And let's go for
the next large hot. I want to fill it
with smaller hots. Some fully shaded,
others just outlined. First, I'll draw
the shaded hots, then add the outlines. This is just one example of
how you can fill the space. Feel free to create
your own designs. Et's draw a few small hots to make the composition denser. Last one's here. F another hot, I'll fit it with
hot shaped lines. The last one. Then we'll create a spotted heart with
circles of different sides, some large, and some small. Circles can be partial
or overlap with others. You can make the hot intersect or have one hot
dominate the design. It's up to you. Start with larger elements and then fill in the gaps
with smaller details. For contrast, let's
make some hot darker. For example, one hot can be stripes with alternating
sk and sin lines. And carefully outline
neighboring elements to keep them intact. This one is ready. Another hot will have
small dots or shot lines. The next hot can be
filled with tiny spots. And let this one be filled, for example, with curved lines. One hot I want outline more clearly to make it stand
out on the dark background. Inside, I can draw circles or rolls and fill the space
between them with the liner. For the finishing touch, add light stripe
with thin lines. Now the cut is almost ready. I'll add one small hot
and fill it with black. And the last small
black hot here. I think it's done.
Carefully remove the tap and to avoid
damaging the edges, you can wp the tip
slightly with warm air, and it will come off easily. Here is another bright
and interesting card. Each of you will create a unique and one of a kind design. Share your results, and let's move on to
the next product.
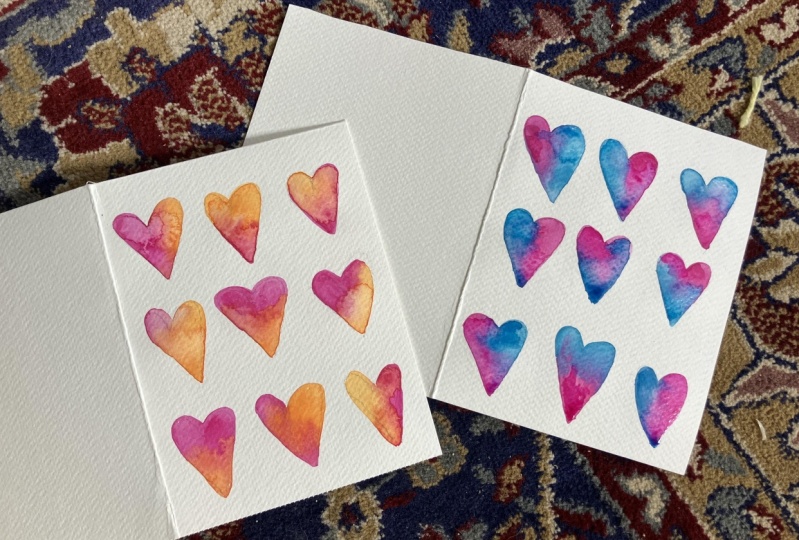
6. Lesson 4: extured Watercolor Hearts: So this cut, it will be enough to tear the paper into pieces. We won't use too much
water or soak the paper. So this is just to keep it in place and make
it easier to work. Now we need to draw nine hots. Let's start by making the central points where
the hearts will be placed. This will help us
space them evenly. Let's roughly outline the
lines of the allocation. It will be easier to draw. Each line will be this long. First to the central hut. It would be closer to
the center of the paper. Don't worry is the
lines a little uneven. This is a sketch, so it
doesn't have to be perfect. Use light soft lines, so you can easily adjust
or trace over them later. Some hats can be narrow, others wide or you can make
them all the same size. The main thing is to
outline the shapes. Thomson like this. Don't make the lines too dark. As we will cover them
with watercolor letter. If there are extra lines, erase them before
starting to paint. Correct the form a bit. And let's make them
not so bright. Now, let's choose the colors. I like a mix of pink,
turquoise and lilac. I'll create soft traditions without using very dark shades. If the paint goes
outside the lines, you can make the hot
slightly bigger to just for a more artistic look, add blue to one side. And pink to the other. You can also add water to
create beautiful soft patterns. Carefully filling
it hot with colour. Okay. If you prefer, you can skip the blending, but I think it makes a cut
more colorful and interesting. For example, I'll
start the top hot with pink and blend it
into turquoise. This creates a nice effect
where one color pushes the other giving it a
dynamic look. Correct. Correct. Okay. Look one more time, how one color pushes the other. Like one is more stronger. Add a little water if needed to help the colours
blend naturally. Let's wait a bit. Once all the hats are
painted, let them dry. You can use a hair dryer
to speed up the process, but make sure there is no excess water acid
can smudge the paint. If you see puddles, blot them gently with a tissue. After the paint has dried, take liner and start
adding patterns. Start with the first hot. Tracee the edge slightly, and make the line
sicker if you like. The second hat will have
dots placed randomly inside. Use your creativity here
to design the patterns, but try not to put heavy dark patterns too
close to each other. This will keep the
composition balanced. For the next hat, I'll
use a lanar pattern. Start with larger details and
then fill in smaller ones. Here will be a dense pattern
of small black hats. Another hat will have horizontal stripes that won't distrat too much from
the colorful background. Carefully draw the upper part. Yeah, I fill the space
with small circles. So we have a mix of dotted
and linear patterns. The next hat will be filled with circles of different sizes. Leave some space between them and fill the gaps with liner. And now it's time
to fill these gaps. This will create
a textured look, walk slowly and
enjoy the process. You can come up with your
own variations of patterns, adding even more
creativity to the process. Let's fill this hot with small
lines of different sides. For the last hat, I
let a linear design. The lines don't
need to be perfect. This will give the cat a
charming hand drawn feel. And that's it. The cut is ready. It turned out bright,
colorful and unique. Feel free to use your
favorite colors, lines and patterns
to make it your own. The most important thing
is to enjoy the process. Your mood and creativity will shine through the final result. Happy painting. I can't
wait to see your work.
7. Conclusion: Thank you for joining me in
this watercour adventure. I hope you enjoyed creating these hot warming designs
as much as I did. Whether you use MS
Valentine's cards gifts or simply for practice. I'd love to see your work. Feel free to share it
in the project gallery. Remember, art is
all about having fun and expressing
yourself until next time, keep painting and
spreading love.
 Natalia Nikitiuk, Capturing Life's Beauty