Transcripts
1. Intro: [MUSIC] Hey guys, my name is [inaudible] and I'm a full-time
one-line Illustrator. I actually studied
linguistics and education, but used art as my outlet for
as long as I can remember. At some point I realized that both passions could co-exist. Here I am, teaching
you how to do what I love and how to turn it
into your full-time job. In my art, I play around with different brush
types depending on what results I need to achieve. Some have a rough texture, others are smooth and sensible to how much
pressure is applied. In this class, I will be
using the app Procreate, which has an advanced feature called Brush Studio
that lets you create incredible
digital brushes with relatively no effort. This feature is
user-friendly and creates so much room for creativity
and personalization. We're going to get started
with the Procreate brushes that come with the app that are ready
for one line art. Then we will get into the
Brush Studio to identify which brush features are key in this art style and
how to edit them. Finally, we will be creating our own Procreate one
line brush parting from a brush that's
already in the app. This two-level project approach we will take in this class, makes the class suitable for both beginners and intermediate. Hopefully, by the
end of this class, you'll come out with not only better one-line
illustrations, but also with a new
skill set which is creating and editing your
very own Procreate brushes. Thanks for joining my class
and let's get right to it.
2. Brush course project: For the first part of
our class project, we will produce three similar
one line illustrations with different
brushes in order to learn how to control
them and how they work. In this stage, we will
look at the brushes I use the most that are already
part of the procreate app. For the second part of
this class project, we will dive into
Procreate brush studio in order to break
down the features of each of those three
original procreate brushes and what makes them
good for one line art. After that, we will edit and personalize appropriate brush in order to make it our own. The project is divided this way, so both beginners and intermediates can take advantage of this class to the fullest. Before you get started
with the class, make sure you have
the app procreate with the latest update
which is Procreate 5.2 Download the image
we will be working with from the class materials
and let's get started.
3. Ready Made Brushes: [MUSIC] The app Procreate comes with hundreds of awesome brushes for
different purposes. These brushes are so
close to reality that it is a true joy to use them
for the art that we create. Since the time I got
the app back in 2018, there are three of these brushes that I just can't get enough of. These three brushes are my go-to whenever I'm not
feeling particularly creative or have to
tackle a drawing that is proving to be a little more difficult to achieve
than others. For the most part, these brushes are good for
one line art as they are. This means that all you have to do is pick it up
and get drawing. I will be walking you
through what I use these brushes for and how to best use them when you have
not yet personalized them. Because when you use
them as they are, there are a few
quirks I had to get used to as I drew with
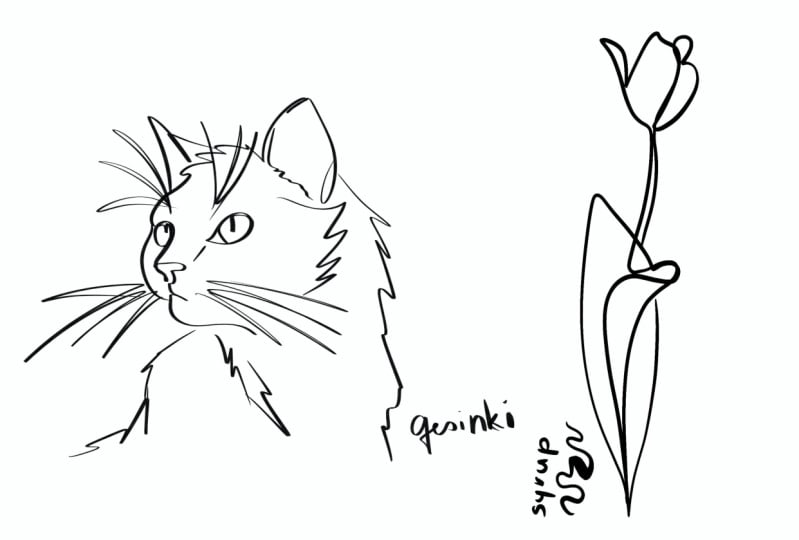
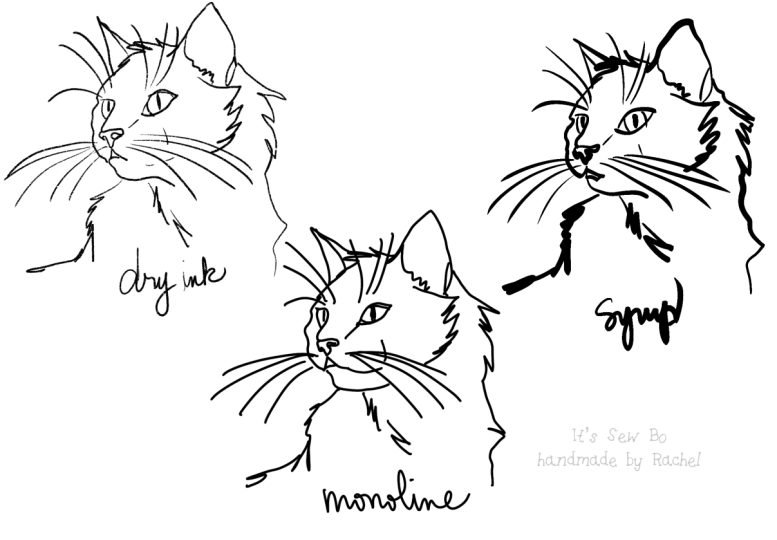
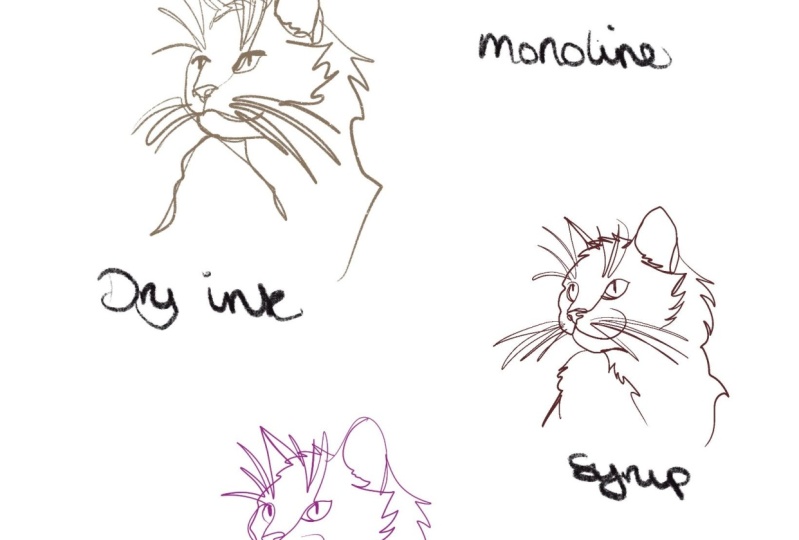
them more and more. Let's start with the first one. It's called dry ink. [MUSIC]
4. Dry Ink: The first brush I want to show
you is the dry ink brush. You can find it by looking
into the inking brush set. I love the rough feeling
this brush gives me, it's great when I want my
drawing to look less polished, or I'm drawing something
that is meant to be rough like one line of a statue. I also like it
because it looks like a chalk or a blunt pencil. Let's try using it in
a drawing together. Okay, guy., in order
to get started, open up a new Canvas
on Procreate. I'm doing 8,196 pixels
by 6,144 pixels. Just open it, click
on Actions, Add, Insert a photo, and let's
insert our cat reference photo. Let's make it this big. Sorry, I put a spot there. Take your reference photo layer, lower the opacity,
and make a new layer. Choose your dry ink brush. Basically just start drawing
with your dry ink brush. If you notice, look how
nice this parts look. It's really rough. It even looks like
pixelated brush. It makes the cat
look, in my opinion, a little bit even meaner than he should be
because it's so rough. We have our first
cat. That's it. Let's toggle the visibility
over example layer, our reference
layer. Here you go. Look at the richness
in that brush. It's so grainy. What do you think
about this brush? Let me know in the
discussion section below. Now, we're moving on to our
second brush, monoline.
5. Monoline: [MUSIC] I use monoline every time I need something to look
very put together. It is a brush that stays
the same width and opacity regardless
of how much pressure you put into the iPad screen. I think monoline
is a great brush for getting started
with one line because it is not too sensitive and it gives a
polished, clean result. You can find it by going to the Calligraphy brush set and
then tapping on Monoline. Monoline was my
first brush love; my logo is actually
made with it. Let's try our cat
one-line drawing with it. In order to start your
monoline brush testing, I want you to move the
reference photo layer to the right just so
that you can use it. Make another layer for that and change your
brush to monoline. The same here, I'm going to
make it a little bit bigger. I'm just going to look
how smooth this brush is, it is really smooth. Compared with the other brush, it's just a pleasure,
is really smooth. If you guys can notice
the line is much richer, there is no spots. Look at the difference here; there is just no spots
in-between these two. You can see how clean this
looks in comparison to this. That felt much more
smooth, less messy. Let's move on to our
next and third brush, which is serum.
6. Syrup: [MUSIC] This brush is my
absolute favorite. If one could marry a
brush, I'd marry this one. Matter of fact, I already did. [LAUGHTER] There is not a
one-line drawing that I do these days that I don't try with the syrup brush first. Like every good love story, this brush was not
easy to master. It is incredibly
sensitive to pressure and the iPad screen being glass, I had to do a lot of
practicing before I could build my own personal style on the base of this very brush. The syrup brush has a
dramatic flair to it. When drawing a line, if you press hard, the brushstroke widens
and becomes thick really quickly and if you draw lightly then the line can be
as thin as a hair strand. I absolutely love it. To find it, all you have to do is go to the inking brush set, and there you'll find syrup. Let's take this brush
for a spin. Shall we? The last one we're
going to do is syrup, just untoggle the visibility
of your reference image. Move it to the side. I'm going to just
move the monoline cat a bit this way so
that I can have more space and I'm
going to leave the cat reference on the
furthermost side on the right. I'm just going to
make a new layer so that I can make my drawing. I'm going to zoom
out, zoom in here. [MUSIC] All right, so as you can see, I love this brush. I really do. Look, I just couldn't stop to say anything
because when I use it, I just feel like I'm in
a flow of consciousness. Look how beautiful this
brushes when you press down, when you use pressure, the line thickens, and then when you
lift up pressure, the line can become
as thin as nothing. I'm going to just show you here. So no pressure,
lots of pressure. No pressure, lots of
pressure, no pressure. It's just really interesting
to me how this brush takes pressure so nicely. Yes, here are our three cats. I'm just going to make
this one's tiny bit smaller so that we
can compare them. If you notice, the dry ink cat is really rough, it's thicker, the line is even, but it is really grainy. Whereas the monoline
drawing is pretty clean. The line doesn't have
any spots on it. I'm zooming in a
lot and you can see the jagged edges because
of the pixilation, but the inside of the
line is pretty solid. Then here, it is pretty solid
as well but then you get that beautiful weaning and thickening and thinning of the line when you
work with pressure. These are my top three. They're really similar
if you see them from afar but they are different, aren't they? There you go. Look how different they all are, how they are unique
in their own way. I'd love to see
how you use them, so please share your
projects with me below. I'm also very interested
in hearing from you guys how it felt to use them in the
discussion section. Now, onto personalizing
these brushes so they work the best way possible
for your hand and style.
7. Brush studio: [MUSIC] Brush Studio is Procreate
section for altering, personalizing and creating
brushes for the app. The app gives you free
reign in there so that you can make their default brushes like the one we
just played with, more personalized or even create your own
brushes from scratch. I want to quickly show you
around before we get into personalizing the brushes in the second part of
this class project. Enter the Brush
Studio by tapping twice in any of the
Procreate brushes. There are three main areas in
the Brush Studio interface. The first one is the leftmost column that has
all the brush attributes. For one line art, the attributes I work
with the most are, stabilization, taper,
and properties. The second column is properties. These are the amounts you can alter within those attributes. Here's where you will
do the actual changing. The third and widest column
is a drawing pad for testing. Quick erasing tip
in the drawing pad. Just motion side-to-side with
three fingers like this. Whenever a brush does
not suit me perfectly, there are three
attributes I always look into and tweaking
them a little usually solves the issue that is causing that particular brush to fill a little off for me. Up next are my go-to attributes, how to treat them,
and what they do.
8. Streamline: [MUSIC] After years, and
years of practice, I use it less and less but it was definitely
a game changer for me when my stroke was
not as stable as it is now. This attribute is ideal for people whose line
looks very shaky, stabilization smooths out
strokes as you draw them, this makes hand-drawn lines straighter than they
would naturally be. Streamline assists in smoothing out any wobbles or
shakes in your line, streamline is
particularly important for inking, and calligraphy. I took all the amounts of this
other properties to zero, to none in this brush, just let you see what
my line would look like without these
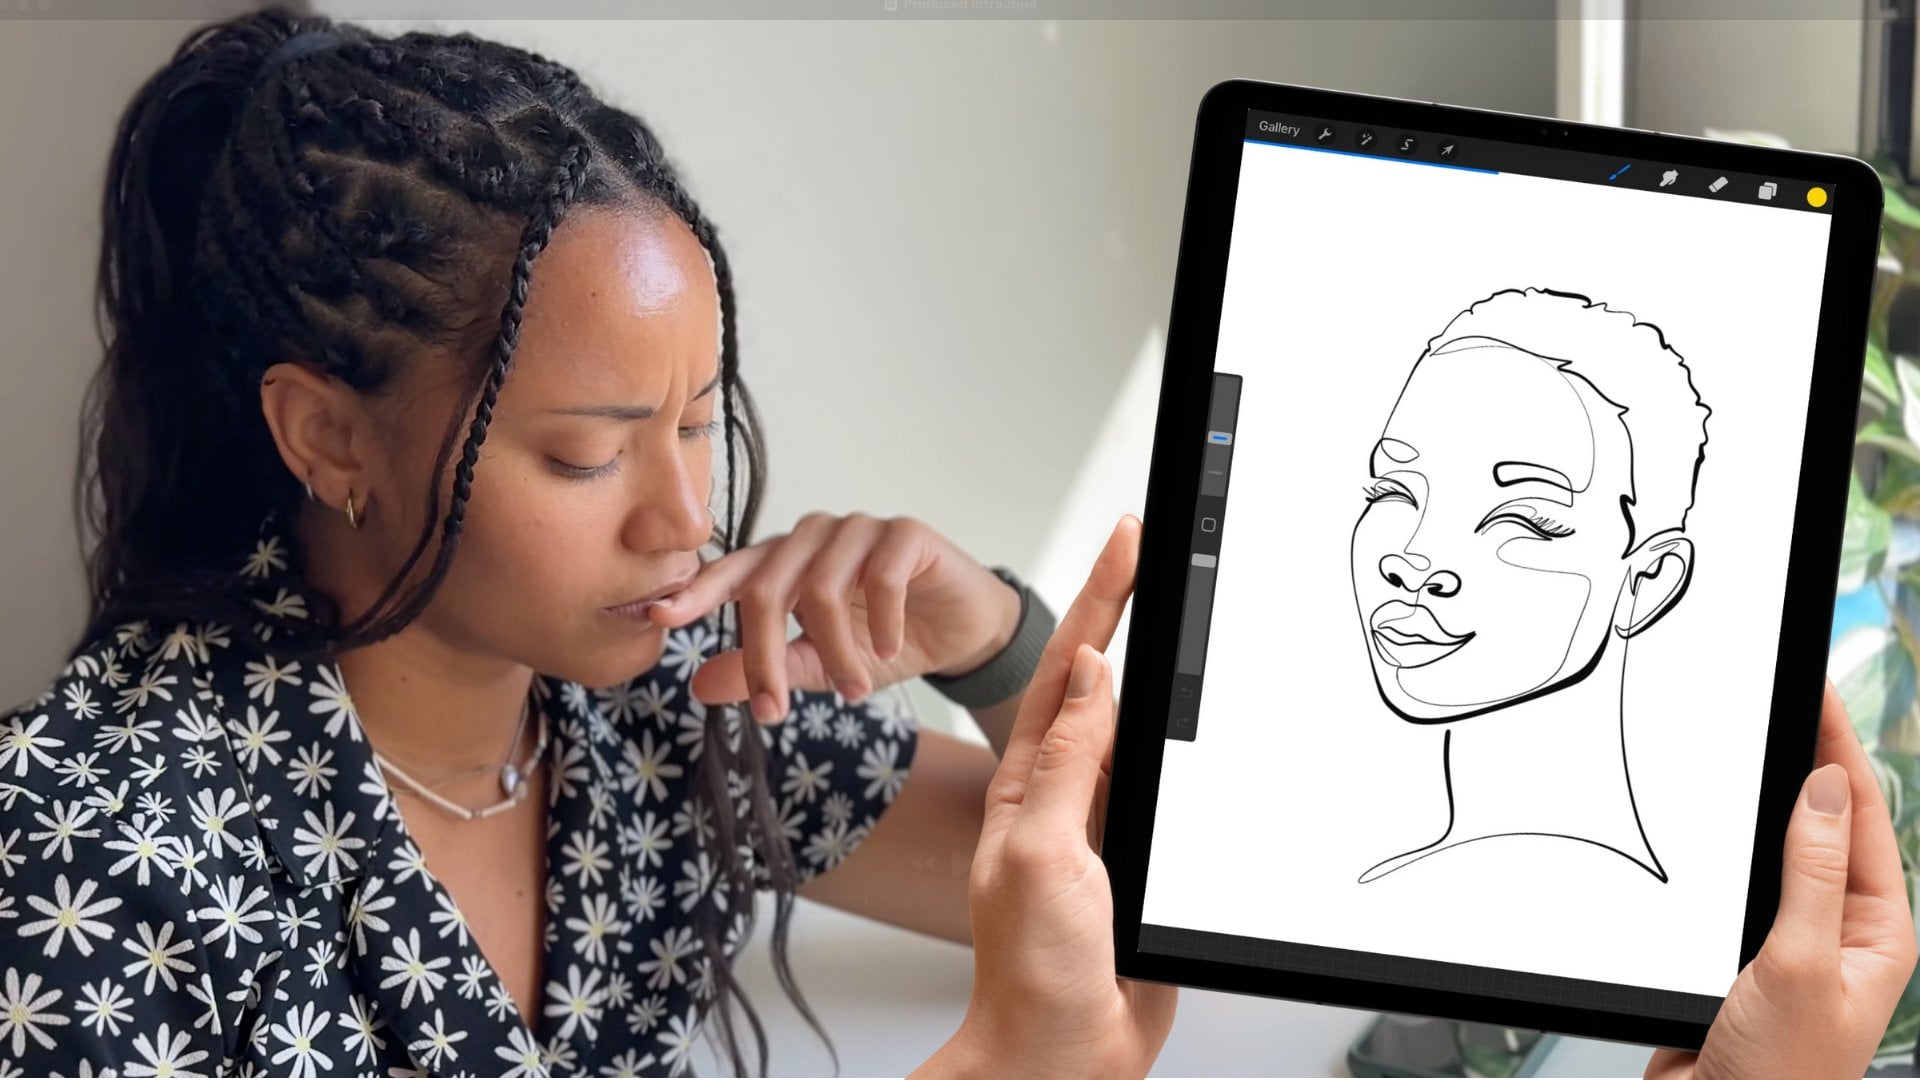
brush features. If I take a one line drawing, just a quick one line
drawing of a face, this is just a
drawing of a face. You can see that the
line is really wobbly. I'm going to do that
again, very wobbly. I'm going to make an i
so that you'll see it in a better line. You can see all the
wobble in this line. You can see how my hands shakes. If I change the amount
of streamlining, it would look
completely different. Look at this, the line just
looks a little bit smoother. If I do it more, it looks even more smooth. It just really [NOISE] takes all the detail of that jitteriness and it just makes it disappear,
which I love. Most of my drawings, most of my brushes are, I would say 50 percent
of streamlining. If you have an
extremely jittery hand, I recommend you also give
it some stabilization. Stabilization will make
your lines straight. You see, it even
becomes almost less. Even if you make a curve, it will become quite straight.
9. Tapper: [MUSIC] Tapper, taper. [LAUGHTER] I use this one when I want a brushless pattern, but the points are very blunt and not suited
for my one line art. These attributes helps turn any appropriate brush
with a pattern you like into a more of a
one-line out friendly brush. The tapper adjusts your
brushes' thickness and opacity at the
beginning and at the end of your stroke and it helps give your brush a natural
tapered appearance. I really like this brush. I really like the marker brush, but it is still very round when it comes to the beginning
and the end of the stroke. It's almost the same size still
as the size of the brush. What I'm going to do
is that I'm going to change that pressure taper, I'm going to link
the tape so that they're at the same size. Now the tip should be much more tapered out. Look at that. If I go like this, you can see that it begins
really thin and then it gets wider as I have
it towards the end. If I do this, it actually also ends thinner. It starts with a thin tip, which is what I like for
one-line art because I like to begin my line and then
just go thicker into it. There's a big difference, look. There's a big difference if I do my one-line art
that looks like this. Sorry. There's a
big difference if I do this whereas if
I have a blunt end, see, it actually
just changed there. I don't have to redraw it. You can see this changes the way your line
starts and ends.
10. Brush Behavior: [MUSIC] If you have not noticed yet, I am just trying to make every brush behave like
my beloved syrup brush. Therefore, the last attribute I often change is the
way my brush behaves. The brush behavior section
is within properties. It changes size and opacity
boundaries on your brush. These settings control the
upper and lower limits of the size and the opacity sliders on
the Procreate sidebar. When it comes to the brush
behavior, I just go here. Let's say I want my
brush to just be bigger. The original monoline
brush is not very big. If I want to make a big drawing, I'm not going to
be able to do so. I'm going to just go to it. I'm going to go to properties. I'm going to go to
maximum brush size here. If you see here, the biggest my brush can
be is 23 percent. If I have the brush
at maximum here it's still going
to be super tiny. I mean, it's going
to be very small. That's the biggest it can be. But if I go here and
I go to monoline, and I change my size
to maximum size. Then that means that I can edit the size of it and the maximum size now
is a thick black line. I can make it much bigger and make a
one-line art with it. This feature allows me to just decide how big
I want my brush to be. The nice thing about
this is though, that if you go to about this
brush here at the bottom, and you want to go back
to that original brush just because you
made a mistake and you want to go back
to the way it was, you can just click on
"Reset all settings" and it's going to bring
it back to where it was.
11. Saving a brush you make or edit: [MUSIC] If you want to edit
a Procreate brush or make your own
brush from scratch. This is the way to save it. If you want to edit one
of the Procreate brushes, you just take a Procreate
brush like we did before. Let's take, for
example, monoline. You have to swipe to
the left and duplicate. Once you duplicate it, you get the copy with
a number on the side. Monoline becomes Monoline
1 if it's your copy, and that one you
can edit and save as your own brush
with your changes. This is great when you want to make your own
brush for selling. We're going to go to properties. We're going to make this brush big like we did in
the last video. Then if you want to save
it and make it your own, you go to about this brush and now it's
going to be different. You see, you're going to have
the chance to rename it. I'm going to rename mine. A big round brush for example. Say it was made by me. I'm going to put my name in here and you can make a
signature if you want to, but you do not have to. This information is
going to travel with your brush wherever it goes. It's going to show up to anyone who uses it
when they purchase it. You have to make sure
that you do create a new reset point so that the new reset point is it returns to the point
which you originally made it. You create the new reset
point, you name it, you put your name
under it so that it shows that you're the creator
and you click "Done." Now it shows you see
big brown brush. Now you drag it. If you want to place it in another category where
you can find it better, I have my favorites
and my brushes, so I'm going to put it in
my brush, this category. You have to linger on
top of it for a bit so that it opens up. This one opened up. Now you're going to drag it
without letting it go. Put in there. As you can see, I can now use it. I'm going to make a new layer
so that I can show you. Now, it's the new
brush you've created.
12. Personalization: [MUSIC] Now, onto personalization. You can alter and personalize any of the default
Procreate brushes. I recommend that you
do because it is like adjusting a chair and mirrors
in a car that you drive. It makes a huge difference. In order to start editing, choose the brush you
want to personalize, make a copy, and
tap on it twice. For this part of the project, I would like you to choose a brush to edit and play around with all the features that
you are curious about. You do not have to limit
yourself to the ones that I use. Do what works best for you. Make sure you rename
your brush after personalization so that you
can find it easily later. When you do so, please draw the cat we did
at the beginning with the brush you just created and share it for me to see in
the project section below.
13. Conclusion: [MUSIC] Whenever you have
some time to play around with the Brush Studio, let your imagination run free. The Procreate website has
really cool tutorials on how each attribute affects
the way of brush behaves. Getting creative with
your brushes will give that extra kick of uniqueness to your work that makes
good art standout. Making your own brushes is also a great way to make some
extra income as an artist. Many known artists sell
their personalized brushes, and with those brushes, their years of expertise on what works for their
specific style of art. I hope to see you
soon again in any other of my classes
here. Bye-bye.
 Attabeira German, One-Line Illustrator