Transcripts
1. 01 Class introduction: Hello everyone and welcome to the second class in the Level Up series. It will be a logical continuation from the first-class and ease your way into the next one. Oh, one will get you better at the craft drawing. I hope the class will be fun and helpful resource. So let's see what this class, an entire series is all about. Leveling up skills and challenging. And they lose a lot of hard work to make it more manageable for you. I divide all the materials into six classes going from easiest to hardest. And the point is to gradually turn on the heat with each new class to a new level of drawing. And right now we're at class number 2. With that set, you can watch this class as a standalone project and be just fine, but you'll get the most of it if combined with all other classes. Now, what happens in this class? Here, we'll introduce two new topics. Talk about why should you draw this and see how this class relates to the previous one? From there, we'll strengthen our drawing Foundation with additional three principles. And next, create class project and give you some tips on how to finish your assignment. Finally, remember, you'll get most of this class, but actually participating. And that is by trying. So pick up the pencil and let's start. I'm really interested and excited to see what you come up with and what will you think about this class in general? So once again, let's start drawing.
2. 02 class topics: Hello once again, and thank you for joining the second class. I hope you find it useful and dress like in the previous one. We'll start off with subjects that are easier to draw, learn some joint principles, and then move on to another one that is just a little bit harder. I'll try to take you step-by-step approach to drawing. Keep you moving forward. And most importantly, help you not get into frustration if something goes wrong in your drawing. Just don't panic. It's okay. That kind of stuff happens to everyone. And remember, if you're really struggling with a certain problem, just send me a message and I'll try to answer as soon as I can. With that way. Let's see what our subject matters for this class. And most importantly, why. We have skulls for first exercise, and bugs and insects for the second. Since I'm left-handed, I started filling the right page, so it wasn't so much the rest of the drawing. And you should also think about that. While you're working in your sketch books. Like you can see, there will be two exercises in this class. And here's why. The more work than the pair, as you cannot expect to progress without an effort and this place to that. But also, you might find yourself drawing stuff that you do not normally to oil to know I do not like so touching between these two, release some of that stress. You can switch between scholars and buds as long as you feel at least one page of each. Now. And let's go to our subject for this batch and see why are they easier to draw than some other subjects. And actually say why we have big D subjects or dislike. Main reason similar to the first-class is because they are organic and the lines describe them can be rather imprecise. There are no straight lines, no 90 degrees and so on. You can even make respected mistakes, but they won't be that obvious. With that in mind, not everything when you're cloning must be exactly where it should be and we can still get away with a good drawing. It doesn't matter that crack is wider than the reference. Use that spike is larger than it should be. What is important is to get a better understanding of principles that will elevate your work and the exercises that will make you achieve this. So for this class, we'll go over the example summit, talking about three principles that have prepared for you today. Go over our class project, See More demos of me drawing additional explanations, quick overview or what is expected from your end. Finally, you can drop. Debt is most important parts of the class. So please, if you want to improve, you must practice, practice, practice and then of course, do some more practice.
3. 03 principles of drawing: three principles are from the mental, so drive to be discussing today will be shapes well, you and shaking. It is a concept that should be very, very familiar to all of us. Yes, we started to draw a brother even esque. It's something like this. In other words, the era that something takes up is a shape to get better at drawing. You want to develop the ability to simplify a shape. Getting distracted by details too early can be very harmful, so it is always better toe work from bigger to smaller, then simplifying. Think about geometric shapes, circles, oval squares, rectangles, triangles, diamonds and so on. These are simple shapes, as opposed to complex organic shapes. For example, this complex shape can be simplified in the first stage of drawing, and then the details can be found at later stages. If we take a closer look, you will see that all the bigger or smaller parts actually made of really basic shape. Growing is light and you can see through the shape to go lap. That is also important because drawing this way helps you better understand what it is that you're seeing. For this reason, there is no better way of drawing them from life where you can go closer to object that you're drawing seed from the other side. It beats drawing from for us in every way. So whenever you can draw from life still, for this exercise, you can use reference images. And if you can find them from different angles, even better as this will give you a better understanding when drawing from life is just not an option I created a Pinterest board did can help you with this part of the class, and you can find the link in the product section of this class you confined in the on the note in time. I know this video, and I hope that will be helpful when we talk about shapes I have. I feel I have to say that you should try to find both positive and negative shapes your reference image or life drawing subject and use it for advantage. If you're not sure, positive shapes are all off these shapes that make your object or objects. Negative shapes are those that surround them, and they can be equally important. See if you can find them on destroy. Yes, this is one, and this is another one. Oclock metaphor can be also used used and be useful as well. In this example, you can draw a virtual line that connects these two joints and track. If it is at the same angle on the reference image or a real life object or other way around , take a pencil in hand, see what tangle it is and then check it to drawing. If this angle on the references showing one o'clock, then it should be the same when you're trying and so on. This is connected to measuring object drawing, and I think we should learn that very early on in a drawing journey. But I think it is always good to have a reminder once in a while. So let's just do that and remind yourselves about that. It's best if you can find one area off your object to matter everything else against, for example, in destroying, we can see that we can use the head of the Mantis to measure dress toe the body. This worst measurement is the length from the top of the head to the tip of the mouth, holding your pencil straight out in front of you. Line up the end of your pencil with head of the mentis and mark. Will you thumbed the ending point off debt measurement people of the month keeping assemble it is. You can move your arm slightly to continue down the length of the body, visually noting each additional segment result of these measurements you consumed image. When you draw this mentis, you mark the length of the head on paper, then copy that length accordingly. That will be the space in which you can draw the length of your object. Also, do this horizontally. Draw these observations As you know, Tim. There is no need to write them down on a separate piece of paper. Just start drawing. Remember, that's only pencil and the lines that you make on the paper. You can always go back, and he raised them and drew them again. It's all about eyeballing and making that connections in your brain that will help your drawing process. Learn to trust your step is what you're trying to achieve here, like accepts in my first less off the Siri's value represents throughout the tone off lightness or darkness over color or but say, in other words, how one color is light or dark. There is an infinite amount of values, but most artists like to think of them like a scale going from 1 to 9. For example, it is easier that way. And when someone tells you, make that shape one with a darker you'll know roughly how much one value is also are drawing. Mediums do not have the ability to represent scale veils that I that our eyes can capture, and that can be a challenge to a comet. They have to translate values that you see into something that are drawing medium can achieve. Do not, I repeat, do not try to represent every new ones of tone that you see with your eyes on your drawing . Try toe work in the limited value range and go from there often times. It is best to simplify. Look at your object on then try toe, determine two or three values. Fill your biggest shapes with those values and their progress from there and at other waiters and in Richard Dry. While we have the subject and matter off values, it is important toe. Say a thing or two about color because although we are while working with pencils and charcoal were working in grayscale, I think that there is there a few things that we should also much or about the way to put it. The only element called it we lose is value. So in drawing, you don't need color to show form that toe feel. And I think it's wise to practice join without color. Since that one last ball, you have to juggle as you're learning. Once you get hangover values, then you can add colors and go to town with it. A summit. Still, I don't want to make it seem like color is unimportant. It is cars beautiful, and quite often that is what catches the yours. I, it could set off on emotional response to an artwork that grayscale join sometimes could not. But as an artist, you must understand that if you don't get the values right, the last of the color won't look right. Those focus on accuracy or values, and that will allow you better, better understand and represent colors for today's exercise. Think of virus off light and shadow in terms off a couple of values ranging from like this to darkest. And once we have for simple distribution off the violence across trying, you can add other details and other values to enrich your drawing. No Semedo this process in the down part of this last, and I hope that with your goals will be helpful for you. Shedding is fairly obvious, but it's also very, very important. And I hope by now you have a pretty good knowledge about it about this topic. So I won't go too much deep about it in this last year. More about fundamental, so shady and you can check here on in my other class cold shading objects and figure drawing a class that is mainly for beginning artists. In this class, we'll go over the basics of shading. But just to have a good base to expend our story from their shading is about to light. As much is, it's about the shadow it shows. Direction of the light reveals the quality of the surfaces stepped, the light shines upon. If it's glossy, Dexter bubbly surface and stuff like that, for example, and maybe most importantly, tells us if the shadow that we draw is cast shadow or part toe the form shadow. Let's take a look at this joint and see how it explains all that I just set in the example . This is the angle off the light, and it comes from this direction. So it's basically from top slightly going towards the viewer, and we can determine that based upon the form with the cast shadow. These are formed shadows, and these are the cast. Shadows form. Shadows are on the opposite side of the light source, and if the object is soft and round, that's how shallow will be. Same applies if the situation is opposite. Think about that. When you draw use lines to describe the form that you'll join. Show us how the object turns. What material it is made off shows planes off the top cast shadow is what we usually think off when it comes to shadows, something is blocking the light, and that is the shallow cast. Shadow is usually dark, erred in the form shadow, and we'll talk. Why's it when we come to the refracted light? For now, let's stay with cash. It has ah, quite sharp defined edge but doesn't have the same untested throat. The further cast shadow is from the objects that it's casting, the lighter it gets unless defined. It's just become. These shadows are in the shadow area off your drawing, where you can find another one as well as light. Let's check that up. This one here is a question shadow and can be found, as you can see in the deepest crevices off your object, where even not reflected light can get saved them for the darks. Parts were dry, I just mentioned reflected light. It's like that bounces off objects in the environment. It is reflected backed in the shadow. That is also why shadows were really bleak, completely black. And also why usually, I think usually form shadows will be lighter than the cast shadow. So in the shallow area we have form shadow. It was reflected light, and there on the floor we confined casts shadow as well. A seclusion shadow. Remember one thing about shadow area off your dry. Like this light on the shadow air must be darker than the shadow area on the light side. I think that is very important. So I repeated once again lightest light in the shadow area off your object must be darker than the shadow area on the light side off your object before moving on to light area. I think it's important to mention determinate. No, not that one. Oh, no, no, that one. Not that one is. Well, this one. It's the edge. Were formed transitions from light to shadow or any other words space on your object where the planes start face away from the light, moving on to light zone. Immediately after Terminator is half tone these airplanes off the form that are partially hit by the direct light as the pain as the planes get closer and closer facing the light, they will get lighter, of course, and the point with foreign points directly at the light is called central light. But that that is not to be confused with highlight. Highlight is something different, a reflection off the light source. Look at it this way. The centre light will be facing the light source. The highlight, however, will need to be at a point where the light can bounce off the surface of your object and reached the viewer's eye. When it comes to shading, you can't go further if you don't have a good grasp on those things, and you'll get that by, of course, practice, practice, practice and practice. So what's more, most important thing is that lightest light. The shadow area must be darker than the shadowy area off the light side and the other way around. Finally, with all this in mind, there are many ways of shading. But hatching and cross hatching are at the core, off initiating and way those reveals a lot. It shows. If you were in a hurry, I just wanted to finish the job he chose. If you understand the form also, it can show your character, your patients or energy. So as soon as you realize this, look at your own work. With quit cry, you'll improve your work tremendously to achieve this For the class exercise, try not to smudge, drawing both intentionally or intentionally. That means don't or very rarely use much to, such as these fingers, issues and stuff like that were quietly and build your shadows layer upon layer. Squint your eyes, find light and shadow areas off your object. And when you made the construction drawing shade very lightly, the complete shadow area off your drawing, then it's going to rise again. Compare draw again and go stages in your shading. Followed the forms off your object by making the lines in that same direction, then crosshatch, using the lines at a 90 degree angle from the previous ones, like a set. Do it like you can also try. I do associate making circular motions, number eights or simply dots. Whatever you choose, think about light and our cares off your object. And, if you like, make the background darker and see how you're drawing would look like that. To do that, remember to start drawing with lighter touch and higher pencil as you progressed, drawing you softer pencils and harder pressure. So these are three most important principles of drawing the two discussed in this class, and we'll continue to work on this principle every step of the way. As we progressed this less or every other future class, I think that were important, and I hope you're quick to. In fact, we will start with the very next video when we'll give you finally structure for your drawing and talk more about your project. So stay tuned and let's go there
4. 04 class project: In the previous video, we talked about the three drink principles, and now it's timeto talk about your project. But before that, let's have a quick reminder. You are here because you like, try or a little hope you do. And if you do like drawing, you'll probably like to draw almost everything. Okay, maybe you probably have some topics that you prefer to others, but you understand what I mean. You love drawing. And like I said earlier, if you like drying, you'll probably love to draw everything that comes your way. Still, there is a trick that I have to use when I come to that part of the drawing or that subject that they're not my favorite. For one, you can pretend you're nail share on adventure, give herself a role and have fun with it. For example, for this particular exercise, imagine that biologists hired you for drawing skills to help him her out on a probably studying insects from South America for the presentation project needs certain numbers of drawing to go along with photos, graphics and national aggravation. AIDS. So you're part of this project would be to provide those joints, and you can be a specific as you want with this, it can be just an idea to push it through the exercise. Or you could fully immerse yourself into this role. Do anything that can help you to go through this exercise is having problems. Just think about it. Then maybe often. Just also remember, take your time. Be patient with you, Brooke. Because most cases good results come with time. Not with Pete. Don't compare yourself with anyone else for that matter. You are your own boss. And if it takes your day toe due to finish something interested something that you will feel proud about and that you learn something from it though, yes, take that day, enjoy the process and have found them drawing. So based on all that we talked about, make 4 to 6 drawings off skulls and insects best, even if you can do, is going to try and draw from real life. But you can also use reference images. Find them on your own. All yours. The ones that I prepared for you on my pinschers Sport link isn't project section of the class or here in the note on the timeline on this video
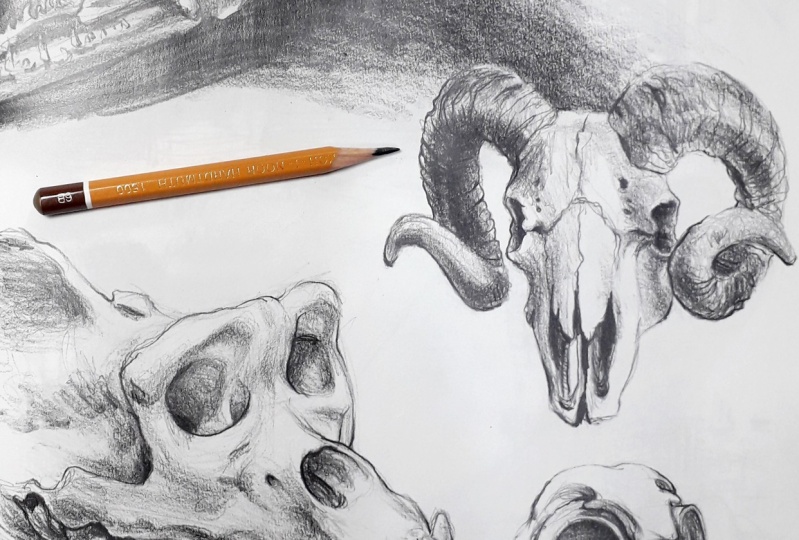
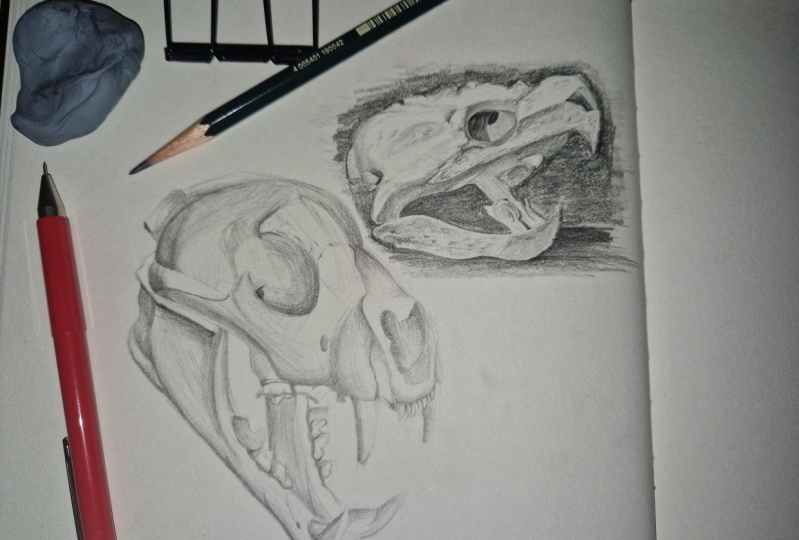
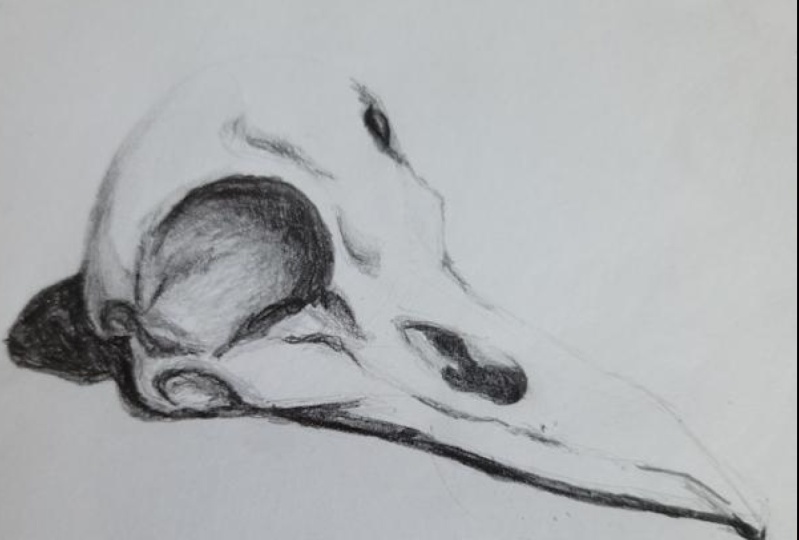
5. 05 demonstration on how to draw animal skulls: hello and welcome to do demonstration part of this video. I hope these demonstrations will reinforce their years that we talked about in the theoretical part of this class. So let's get started, shall we? In this video, you'll see me draw two skulls and this is the 1st 1 Like I said in my previous videos, we'll go with lighter touch and harder pencil at the start, making overall shapes first. So we have established drawing that we can feel, let's say confidence in going into shading and values and stuff like that. So, like you see here I started shadows, but only after I've completed the entire rough borough construction joint. After I've done that, I could see here all right, adding, I'm adding the first layer off shadow. We, of course, like said self touch. All the shapes are in their place, and now I'm working with just a few values and determining all other smaller, smaller shapes and details, slowly adding, like I said, layer upon layer and you'll see me here start adding a second layer, and that will be with a bit off the softer pencil and a bit hard touch. I'm using the reference image from the Pinterest sported are created and that can let the recommend for us well. Or you can use some reference image off your own. It would be perfect if you would have some object that you can draw from real life. But if you don't like, said earlier, you can use reference images. Here is the second layer off shadows. I'm still using the full pressure and adding some conclusion shadows that we discussed earlier in the Paris class and the further determining the shape it's on this drawing is almost done. And this is the third pass, with even softer pencil and a little bit off kneaded eraser toe cleanup fuel. Things like I said, use. We raised our sparingly and I think that would be a good exercise. No, but that's done. Let's see. Second dry. We're seeing this joy in previous part the class. So it's the same principle. I start with basic shapes, little measuring like you saw for a second, adding Oh, the major parts of the drawing and not worrying at all about details day. These details will come later on. At the very start. I think it's very important to find all the shapes that don't need it. And now that, um, pretty satisfied with all rolled position off all the elements. I go a little bit further into details, but like you mentioned, I mentioning that all the time. Sorry from boring at this. But I think it's important to go light and with each additional step in each additional line, you can push it further at the beginning. Draw light here couldn't see me drawing teeth. They are smaller details, and I'm comfortable doing that now because I have the overall shape and I have what toe compared with and see the mentions size because I have all other elements in there. Will it be seclusion and some further details? I'm still working with that pencil, and I'm just very the the pressure like you see there I raised a few things. It's normal if I make a mistake off sees that something is not working to go in and quickly make adjustment. Now I'm going into shady. I see going some clothes and shadows. Like I said, no shadows will be in the creases where the light will take the least amount of newly hardest to get so those details on those places will be, let's say, the least lit casts shadow on the floor. I could have done a better job, but I was trying toe puts in fairly quick time. This is second layer off, adding shadows and amusing, softer pencil. It's well like a cent in the previous of drawing all about players and doing it slowly and after a while after drawing, you'll have similar process or that will be your process. But it's all old becomes similar, and you have a routine when it comes to drawing that will. Routing sometimes can be a bad thing, but in this case it will give you confidence to draw what ever you like. Some deeper shadows, always looking at the reference image. And if you see me at the moment toe stop or something where that means, I'm looking at reference and comparing the stuff that I draw with the reference image. Always like I said, when you drawing these big shadow's shadow areas like squint your eyes and see the big masses on your reference and then compared to your drawing as well that that will give you a better understanding. Where are you in your drawing process and which area needs more attention or work. Let's say this is basically a way major decisions are done. And now I'm just enjoying the shading and adding some cross hatching, hatching toe further established, trying This part is easier and let's say less stressful because all the decision making have already been made. And now it's just a matter of listen to music and drawing the drawing and just getting at it. This is the last, I think, layer where, um, watching the reference and adding additional what this part two joint can last as long as you wish, because you can push it, how ever further you wish. So all depends on your taste and how to go about trying. So this is basically for this video and let's talk about a new drawing and see you in the next with you.
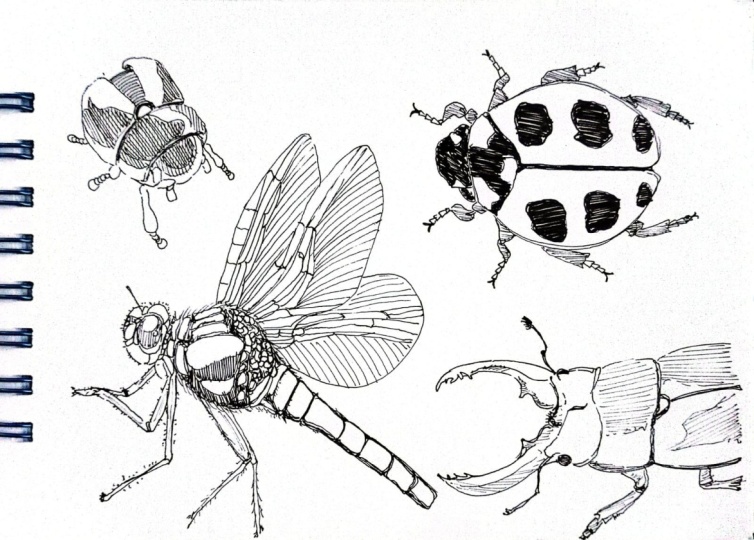
6. 06 drawing insects: This is trying demonstration, too. And like, you see, I made a mistake while filming, uh, when I was starting to draw this, I forgot to press record button at the beginning, so we don't have the construction part of this video. But here, here is the continuation. It's basically the same as with the previous one. You watch your reference image than you try toe make overall big shapes and stuff like that . So it's not nothing unusual and that you haven't seen before. And right now I'm making me in tennis and you can see the way I'm measuring and comparing how long they will be, what will be the curvature and how many parts of this antenna will be there and stuff like that. That's also where relevant you see here, almost comparing that point with other elements of drawing and based on that, decide how long there and where will they end. So that is, I think, very useful when you're starting and you don't know how long and where to place certain elements how long certain parts will be on, and no, not knowing how long they will be to compare them with other elements that you already doing that you're certain about right now? I didn't another leg, forties creature. And it's also like I said, How about the antenna? It's all about repositioning and measuring and seeing, eyeballing, seeing which part is connected to the other and how they're connected. What, how they are related to each other and that helps. We're very much when it comes, toe the construction, and that is the main part. And they were very important. Part of Enjoy is to have a good establishing drawing and that everything is in its place. After that, you will feel probably a lot more confident about the entire drawing. It will see and look like everything is in its right place. No destroying will be much linear than the previous one. We'll use much thicker lines for the entire thing, and I wanted to show you different, another way off, shading, drawing, making lines so you can see that you don't have to be obliged to do it in one way. Just enjoy the process of trying, have fun with it and make your own drawings. That is the most important part, and how you do it then depends on the way you feel at the moment. Yeah, certain job or client stuff on that require something else that this different matter. But if you know the basics, you'll have no problem. We're working in any way, shape or form magic. Other details like to see ones are thicker, but it all comes down toe stuff that I talked about earlier in previous videos about following homes, making big shapes. Start then going into details later on and make little connected art work. And like you see here, I'm going on patrol the antennas for details. Body off this grasshopper, I think, and adding where there details like it's a day earlier. It all comes back later at the later stages, and you see me shading using circular motions of discussed that in the previous sweeter. What type of shading that you'll do depends on the texture that you want to achieve when you're drawing and texture that you see on your subject. So think about that. It doesn't have to be always same way off. Shading told depends. I think, on the situation that you're at and at the specific drawing that you're making, so you could feel like that drawing needs a different type of shading or that it conveyed if it from that type of work, then do it. It's important that you oh, where off all that and you can select the one that you think that it's important right now . OK, in another antenna and further adding details on the Lexx, this is like so second, I don't know layer off, I think shapes and shading and amusing Very I think soft pencil for this part because you see blinds very dark. Like I said, I tried toe do a different type of drawing for this example so you can see that you'll have to be oh state and will be Have you still think that you have toe do a certain way? The all depends on what you want to cheap with your joint. Also with this softer pencil, I'm also using harder pressure so the lines are much thick. No, I'm working on that thing that this grasshopper creature in sixties sitting on and off course the antennas this is slowly getting toe the earth and like you see, I'm using the other piece of paper toe protect drawing and not this much it with my fingers in my hand so that this were important. And after you're done with drawing, remember toe fixate or to use something toe that will make your drawing stick to the paper . So that's basically it. I hope you enjoyed this demo on this class, and I hope you'll find it to you in the next part of this less.
7. 07 class overview: Congratulations on finishing the class number two in this level of series, at least watching the video material that is now to complete the work and prepare yourself for the next class. It is time to make your own project. If you need to refresh on what to do, go back and re-watch the video title, press project and we get busy drawing. Then when you're ready, share your work in the project section. As I will be more than happy to take a look at it and give you feedback if that is what you would like. Also, you can check out my Skillshare and see some other drawing classes. I hope you find them useful. And if you do, please consider leaving a review or following me as it would, Westley helped me grow this channel and make more content from people like you and me. This is it for this class. So take care, Have a great day drawing. And remember, in the next class, we'll go over all the principles. Again. We've been in this class and we'll talk about a new one and go over to additional exercises. So they just have fun and see you there. Bye.
 Milan Glozić, Painter, illustrator, Designer