Transcripts
1. Class introduction: Welcome to level up class number 3. If you feel comfortable with drawing skills, you can watch this class is a stand alone project, but I really think you can get most of it in combination with the class one and class number two. Also, if you have watched the previous classes, I hope you'll find them useful and that you are now ready for step further with this. Let's see more details of what this class, an entire series is all about. Leveling up skills can be challenging and you lose a lot of hard work to make it more manageable for you. I divide it all the material and to six classes going from easiest to hardest. And the point is to gradually turn on the heat with each new class and to let, to a new level drawing. Right now we are at class number 3. With that said, you can watch this class as a standalone project and that would be just fine. But you'll get mostly by combining it with other classes. Now, what happens in this class? Here, we'll introduce two new drawing Topics. Talk about why should you draw this and see how this class relates to the previous one? From there, we'll strengthen our drawing foundationally to new principles. And finally, great class project. While giving you some tips on how to finish your assignment member, you'll get most of this class by actively participate. So draw, drop, drop. So pick up the pencil and let's start. I'm really interested in fact it to see what you come up with and what will you think about this class in general? So once again, let's start drawing.
2. All about our drawing exercises: Hello once again, and thanks for joining the class and hope you find it useful. So without any further delay, let's jump right into it for the first exercise. And we have animals, animals that we don't see every day. So try based on your location to find examples of animals that are from faraway places. You can deal with the textures of their bodies. Think about how to draw feathers, scales for, and so on. As always, I'll be here to guide you or help you by showing my examples. See what I did wrong or correctly. That would be a good start for the first exercise and all old architecture. For the second thing about castle exteriors, all dilapidated buildings, staircases, old building materials, and such. Like in the previous exercise, most of us don't go around castles on a daily basis. And also their shapes. Although with most, mostly straight lines have a lot of irregularities that you can explore without worrying too much if you got it perfectly. One other thing is that these buildings have a lot of shapes in different sizes. And your job will be to compare these and see how it all relates to one another and translate it to your drawing. Since I'm left-handed, I will start filling the right page so that I won't smudge the rest of the drawing. So think about that as well. When you're trying to do your work in sketchbooks. Like you see, there will be two exercises in this class and here is why. The more work done, the better. As you cannot expect progress without an effort and displaced that. But also, you might find yourself drawing stuff that you don't normally do or that you don't like. So trading between these two can relate to some, can release some of that stress. You can switch between animals and old architecture just as long as you feel at least one page of each. Still, there is another reason why I chose the subjects for our third class. Like I said earlier, this class, this entire series is all about getting your drawing skills. And in this class, we'll talk about two principles, and those are edges and respect. So these subjects, I think, go very well along with those subjects and can help me explain you the best possible way that I can. First, we will have an overview of these two principles. Go over our class project and then see how some demos me drawing with additional explanations. This should get you ready for the work. And finally, you can draw that is the most important part of the class, please. If you want to improve, you must practice, practice and of course, practice.
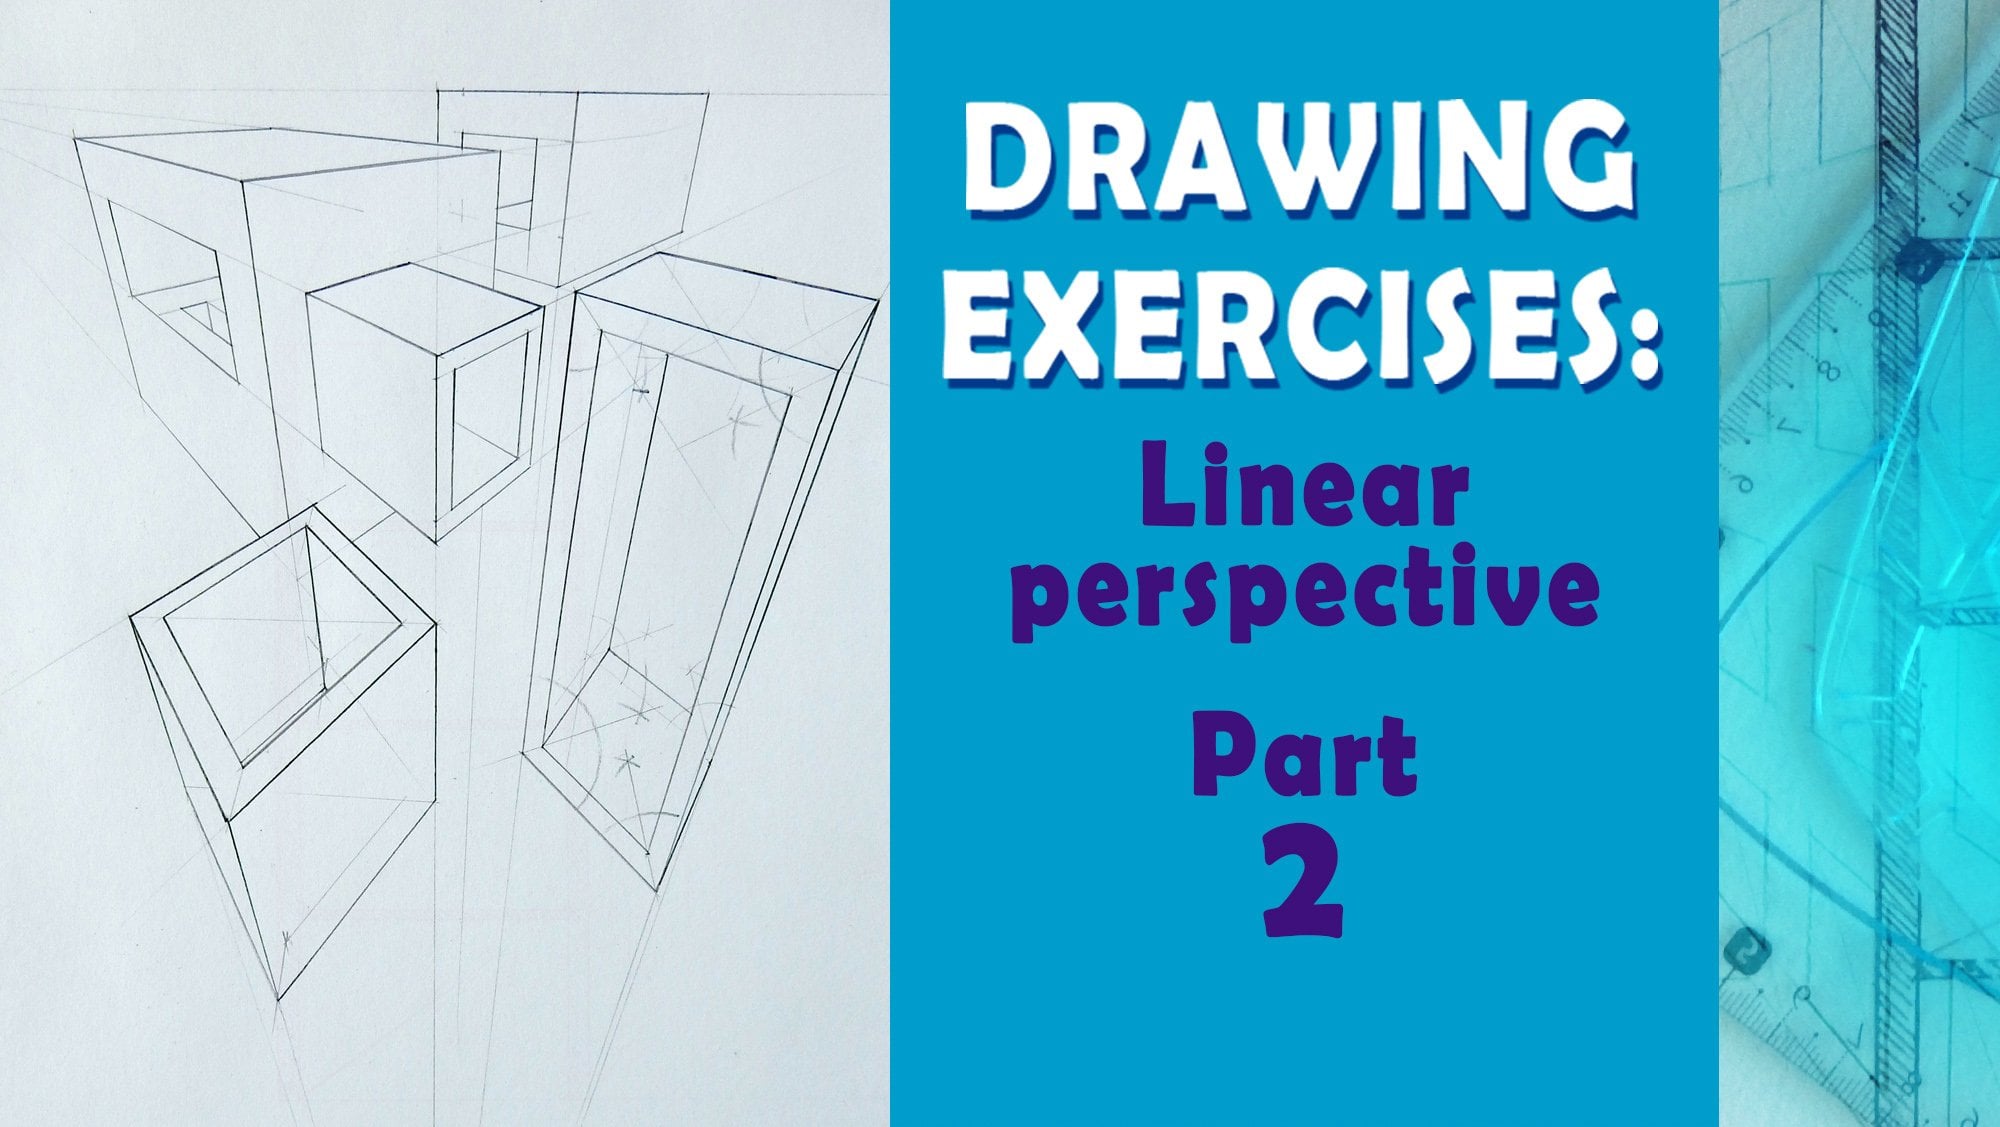
3. Drawing principles: two principles off drying it will talk about today, are and just and perspective. I just describe the shape often object in a very straightforward way, and they tell us a lot about an object done right. It can clear. Tell your if the object is round. Does it help sharp soft edges? What this directional delight describe form shadows and tell us if the shadow is actually cast cheddar? And finally, I just can't describe the transition to into planes of the shape Types of edges range from shopped freely soft within an infinite amount in between. But to simplify its use in drawing, you've come up with four types of which sharp, firm, soft and lost. Which ones you'll use depends on what you want to it with it and what types of objects are you drawing? So let's start a sharp edge is very sudden transition between two shapes or planes. It's sharp, like a razor blade. There is no transition. It's suddenly changes. A fromage is almost hard, but it has a very small gradation to it. You can use them for corners that have a bevel or some wellness on a figure. Your hypocrisy from shadows own joints, for example. A soft touch is a very smooth transition between two shapes or a shape in the background, and with them you will see a longer gradation. So for examples, soft touches are like used clouds or white cotton flowers. A lost such is one that is so soft that you can see it anymore. It's frequently use in areas where volumes off two forms are close together, and really soft edge would merge the two forms to get. So take a look at subject that you drive for subjects. Squint your eyes a little bit so you can lose most of the details and see what kind of interest are left and use them in your work. When you meet your construction drawing and you're ready to go into shading, it is a perfect time to repeat squinting eyes to double check your first findings and by using the shading, achieve the desired effect if you need fresher changing. I talked more about it in the previous class of this, Siri's or take a look at completely separate class that is all about changing. Like I said earlier, this is not the short place, so use anything that can help you and make great early poured in your drawing skills. If you like, you can check that out and come back later. So in case you do that, I leave a mark off the timeline off. This video's when you do come back, you have a much easier toe timeto find out where you left off on were to continue with this class. Cool. On the other hand, if you're ready, let's move on to the second principle for this class and at this perspective in this class will ease you in the topic of perspective. L build on that in the upcoming classes. Just like with any other principal this talked about, and this one will have a specific place Where will talk the most? Well, we'll talk the most about it still like ripples in the pond that gradually become bigger with each new class, there will be something new at, and your skill become brothers. Perspective is a word that strikes fear into hearts off beginning artists, but it isn't as bad as you think. By now, you've probably done drawing off railroad tracks going back into traditions or maybe offense supposed going on the road. If you ever done drawing like either of these, then you really know something about respect. Heroes que shirt. I have no class is going in depth on perspective, and I hope you already have a good knowledge off basics parts to get to the point of the day. Stocks. Let's have a short recap off kinds of perspective that are most important for drawings, starting with linear perspective. With linear perspective, our focus should be on one and two point perspective, Since the these will be like 95% of your drinks remaining 55% goes 2345 million more perspective, but they won't affect your work much unless you're in architect and off. All those perspectives will consider Onley three point perspective and in the next class will also discuss aerial perspective. But for now, let's get back to linear. The simplest one is the 1st 1 point perspective. Basically, all of thumb is that objects that are closer to us appear bigger, while objects that are further away look smaller. Like all in your perspective, there are a few concepts we need to discuss the horizon line and the Vanishing point. The cries in line is basically of yours, I level and in a lot off paintings and drawings where the land and sky meet. The vanishing point is all is goingto be somewhere on your highlighted like, well, almost always, but we'll discuss that a little bit later. This is the point where everything gets a tiny that we can no longer see it. It's also critical point drawing, because it's where all your directional lines will converge. Now let's talk a little bit about the both of these concepts. So for Horizons line, we can say that it can be anywhere in your drawing as long as it's horizontal. Otherwise, it wouldn't be Horizon's horizon line. When establishing your horizon, I think about where you want. If you're to be in your work, the horizon line is always going to be at your eye level. So if you are top really tall, building, your eye level is also really talk. If you lay on the ground, your eye level is low. It's always helpful to keep in mind how our bodies relate to what we see, and that will also effect on the perspective off your drawing with two point perspective. Now we have one site often object coin towards one mention point and the other side towards the other Wenshan Point. Instead of bringing the viewer into the scene like we had the situation with one point perspective in this case, we get in effect off the closest subject popping out towards of your we controls to play up or play down this effect with the degree off Nangle, for example, with this staircase lines closest us really jump forward. It is very difficult not to look there. What's sick is is like screaming just toe. Pay attention on it. So you decide if that is what you want. Is it about staircase or the whole interior? You can play down this effect by flattening the perspective a bit very different, in fact, and something that many don't even consider as they start putting their perspective. Be careful with this because all these decisions could have an important law row in out of your reach. Your work. Remember when it told you that the vanishing points were always almost always on the present? In three point perspective to vanishing. Points are along the horizon, like in two point perspective, but the third dimension point is located above the Horizon line or below the horizon line, the impending on the area. You want to drop the three vanishing points. Make up a triangle with of your center off vision roughly in the middle and all your lines received toward these vanishing points. How much time will you abusing? Three point perspective depends entirely new, but in most cases you need just one and two point perspective. So I recommend getting better at these two first and then move to three or more points perspective. So, based on the stock and your previous knowledge or perspective, the point of today's exercise with all architecture is about to use dramatic shapes and objects such cubes. Another entangle objects to simplify the perspective construction and to learn to trust your eyes in the process. You need to train your eyes to find the vanishing points, but not feel overwhelmed by the process. Little mistakes are allowed, but if you got majority of lines correctly, the drawing will look fine. Remember. That is why we decided for this exercise to go with older detector, since in most cases it is not something that we look at on every day basis. There is an element off unknown with enough of elements to exercise. Drawing perspective in the down part. This class, you'll see me work on the drawings with additional commenters, and I hope it will choir for anything that I might have missed here. Now, these are two principles off drawing and will continue to work with them. Every step of the way, in fact, will start with where next video. We're give final instructions about your work and talk more about class project, so see you there.
4. Before you start drawing: that was a lot of talking. But now that it's over, we can go quickly about what is the goal of this class? A quick reminder and after that comes really fun part, at least for me, and that is for drawing. So what exactly should we remember? What what is the essential from the previous videos? Let's take care of. We're not doing Oneto one cup, though, go super realistic. Try to get everything that the paper Justice D's in your reference or on the subject that is in front of you. Goal is to relax around your wrist to get in the drawing zone to, say, use it just to describe the form. And like we said earlier, there are four of them sharp from soft and lost. He wasn wisely to achieve the look that you want scanned the object that you should draw in search for simple geometric shapes that will make your perspective construction easier. Learn to trust your eyes and Rex Final blow, and it's very important is to gain confidence and is connected. Put the last one, and that is, of course, to have hunt when you're drawing. You are here because they love drunk. And if you like drawing, you're basically love to draw anything that comes in your way. Okay, baby, Maybe you have your favorite subject. I know I do, but you should be able to draw whatever comes away. Still, that may become problems sometimes. But don't worry. Even those situations have. So in next tip, I'll try to help you. When you come across that situation, you have to draw something that you don't normally do. Or you maybe don't like doing so. Here it is. For one, you can pretend you're an illustrator on adventure yourself role and have fun with it. For this particular exercise, for example, you can imagine that you're a detective for supernatural charities with some good drawing skills. Right now, you're exploited, for example, haunted castle and these drawings, but will be observational status. You can be as specific as you want, but it it can be just an idea to push through the exercise. Or you can fully immerse yourself into the road. So, like, for example, imagine yourself some kind of ah long detective fur like coat and maybe having a trusted sidekick carrying of equipment. So you are there sitting down, making sketch drawings in your sketchbook and so on. Do anything that will help you go through the exercise. So just think about it. Also remember, taken time, be patient with your work because most cases good results come. We time not with Pete. Don't compare yourself with anyone else for that matter. You are your own boss. And if it takes your day toe due to finish something interested something that you will feel proud about and that you learn something from it? Well, yes. I think that day Enjoy the process and have fun time drawing. So based on all that talked about, do, for example 3 to 4 drawings for each exercise. Best thing that you can do so is to go into nature and drove from real life. But you can also use Russian force. Find them on your own, or use the ones that I prepared for you in on my Pinterest sport Link is in the procession of this class or here on in the note on the timeline off the city. Next, we'll have demonstration part of this class and you see me draw examples from the class project and I can only encourage you to those same so suit there
5. Drawing demonstration: Welcome to the first demo, this class. And as you can see, I'm drawing a lizard on the previous examples and previous videos. This is a spirit drawing, so you don't have to waste too much time on it. But if you want to take a closer look at what I'm doing, you can off course played this video at the lower speed and is, if you can see I'm starting with the basics, using the shapes for the eyes, eye socket and all other parts of the body. This lizard just with take your pencils using very faint clients. This is stable typically, how go about off my drawings? And as you can see, it's important to first start with bigger shapes and then that is over. Then you can go toe at details and other smaller parts that objected to join. Just go. At least that's what I'm doing. I'm going from bigger to smaller and then applying some shading and other stuff. This example. There is no much not much perspective that I decided to go for this one toe. So some examples off the edges that shown in this drawing, and you also see me adding textures toe this lizard and the way I'm making approaching that stuff can. How to go about that line and line making because new often time have to deal feathers, scales, stuff. It's important. Think how to approach this subject, how to go about it. In this case, I decided toe go that to make that these shapes individually and like you see here I'm laying the first rough. Let's say that layer of scales on top of which I'll further establish other lines, areas of interest and stuff like that and you concede it. No, I'm adding further lines and edges and see how I can show more life into this character. This animal think that I'm drawing so we have old different edges that I'm losing. Have soft and hard edges toe show how the surface of this object is and how it all comes together. Different lines are used for different parts of this, and then, using toe toe, emphasize the the surface off this being, and to add where is light? Where is the shadow on how each plane off the body of this insect, This animal Sorry it's connected to the other one also, how toe showed folds of the skin. It's very specific case, and that's why I think it's very useful for you to see how we can go about it. What is most important to think is that I tried when I'm drawing that similar way. When I'm painting east to go in layers across the entire figure or whatever that you're drawing, don't concentrate just on one area drawing and then we move to the other. At least that would be my suggestion. But try to go in layers over the entire subject that you're drawing. That way you will have it more cohesive and you're drawing. Look organic. So you say. And like you see here you can use nearly razor toe race some parts that are not necessary and show some depth. Basically, I'm using one pencil, and in this case it's I think will be basically finishes drying. Hope you like it and see you in the next one will talk more about perspective
6. Drawing exteriors and interiors: No, we are at the start, second Emma for another drawing that's basically also about 44 5 minutes. And it's the castle that you already seen in the previous videos. So, like a date like some Ito in previous drawing start with big shapes. That same thing I'm going on doing right now just looking more about perspective and finding. I'm going. Where should all the vanishing points B and based on that, make the choice have to go about respect? In this case? I'm using images I put on my Pinterest sport and, like you see, because I'm using the photograph for this work. The angles are a little bit strange because that's how the camera saw it. But because I wanted to exercise based, that father tried to replicate debt as well on my drive and like you see me here, I'm adding other elements. Just like previous case, I'm using the light touch, and as a building these shapes, I'm adding smaller details but still leaving all the smaller details for the later part off work. For now, I'm just trying to get all the shapes, bigger shapes into their places, and they will later be used references a move on to add other details, this woman going shading and like you see this in this case, tours of the Christ line is lower and we see more off. The shapes that were drawing are above the horizon lines. I think that about that drawing because that will dictate what parts of the buildings are shown. So basically, if we have elements drying it above the Iraq crisis line, then we should see the lower parts of these shapes and Weisslers. No, and the stage used penciled it softer for harder pressure and at those details more and give doing tired, drawing more deaths. My previous classes amusing baseline after I'm fairly certain, what are old elements? And Howard, they placed how they connect to each other. Also, think about the line how thick your line is. First drink tried to use thicker lines for the objects that closer and thinner lines for the objects that further away from you. Since this entire objectors castle is saying the distance, basically your lines will be they feel the same way we have. If we would have some objects in the background farther away from the camera case, you're that those lines should be softer and no so pronounced. In this case, they have both cases that we can use different terrorists and see how to use perspective. Can I try? There is all come together on their very important commission. In this case, you haven't touched much foreground because the main focus for this exercise course is the best on that would be basically it for this exercise in the next one will great still case And since it's basically the same as before, the same rules apply I decided to make the most important things. And in this case, I wanted to show you how I created this staircase here. I made the first word decline. Nobody didn't have connected that docked with start staircase and continued upwards until I got to the upper part railing from there. Made another vertical. Aren't going down divided that line in half connected that Dr Regatta. No previous article. I'm true, not vertical line. Then I would be to the process for the next and so on until get it is the same thing. If you would like to make ground look like Beatrice eats into space, just draw another horizontal line. 1st 1 make construction lines or lines going, going through one of segments, and that way you'll know where to place other horizontal line, making the floor more three dimensional. After we don't know that, we can focus our attention toe spiral staircase and here, making start for that center line staircase will people around and then the out of parts that staircase spiral. And it is the part very interesting to figure out how to make this shape and how further you should push it stuff like that. After that, you can start adding parts and stops for dicks, sparks tactics. And again, you know, like you can see all the objects that are below the horizon line. We should see their upper fights and for objects that above the horizon line, we should see the Barton parts off. These idiots, like you can see that clearly on this staircase that is very important when you're drawing and you're doing with perspective is toe. Think about horizon, line the vanishing points and see how our day off connected to a drawing and think about is that object below or beneath the horizon, like that's very important in my opinion. So after we finished that thing just pulling the sketches with pencil, I decided to go with it until the markers and had Andrew dinked are drawing and make the entire drawing with these pants. Like I said earlier, this is one of the materials that will be using in this class, so there's nothing much special about it. But it also gives another way of drawing and like see me here using thinner ones. Just add some depth toe, the spaces stepped. You see that was useful and shadows. And like you see, it doesn't have to be just pencil. You can use any other material to have at your disposal. But even if you're drawing shadows, think about where is son or light sources and think about how to protect that shadow on the objects that are around. So always think about horizon line, vanishing points and art objects above or below that horizon. So basically it's like Seymour dictators slowed down the video for Finished that and start your own drugs. I hope you find this glass USO and seeing the next
7. Class overview: Congratulations, you did it. This is the last video of the class. If you have any questions or doubt, feel free to let me know. Send me a message and I'll try to answer as soon as I can. Because now this is the time to start working on these drawings and filling up that sketch book of yours. And if you want more before the second class series, check out my profile on Skillshare and see some other classes I have there on the topic of drawing. I hope you find it useful as well. And if you do, please consider leaving the review or following me as it would greatly helped me grow this channel and make more quantitative people like you. And this is set for this class. So take care, Have a great day drawing. And remember, in the next class, we'll go over all the principles. Again. We've been over in this class and we'll talk about a new one and go over to additional exercises. So they said, have fun and see you there. Bye.
 Milan Glozić, Painter, illustrator, Designer