Transcripts
1. Introduction: In this class, I'll be teaching you how to create imaginative, colorful, expressive,
abstract landscapes. These abstract landscapes
are created purely from your imagination and don't
rely on reference photos. They are created
through lots of layers of acrylic paint and
some mixed media, such as pencil or oil pastel. And it's a great way to really explore your own creativity and to create artwork that has restrictions
and no limitations. This is a great class for
artists of all levels, whether you're just
beginning or you've been painting for a
while and you want to attempt something a bit
more imaginative and abstract. You can use really
simple materials. You don't need to have
expensive paints or canvases. And this is a really great no pressure exercise
as well because you can continue to
layer as many colors as you like until you are
happy with your landscape. I'll take you through
three complete demonstration of how to
use these techniques. And I'm really looking forward to joining you in the class.
2. Preparation and Materials: This is a really fast
and fun technique that you can use to create really expressive and
messy landscapes that are tend more towards the
abstract side of things. You can do this on paper or
you can do it on Canvas. It's totally up to you. I'm using some watercolor paper is a smooth surface paper. Again, the surface is
totally up to you. But what we need to
do is tape it down. I don't wet my paper or stretch
it or anything like that. Before I use it, you
just tape it down at the table so that it doesn't
move around too much. You could just use normal
masking tape to do this. Make a bit of space here. So you can see we're
just trying to take down a little border around
the edge of the paper. So this says is true
for two purposes. One, that it does
hold the paper down and keeps everything in
place while you're painting. And it also creates a nice clean border around
the edge of your artwork, which gives it a bit more of a finished look to it
when you remove the test. So we're just going to
take around or Legends. Okay, measure them off a bit like this. So Latin secure on the table. So the other thing
you're going to need is a selection of colors. It really doesn't matter
what colors just choose. A limited selection of maybe three or four
different colors that you like and
that appeal to you. I am using midnight blue, which is quite a dark blue. I've got a little premixed
pink here that I like. Also have some
Australian sienna, which is a really nice orange. I have some blue. This is a sort of a
cool colored blue. And I have another
orangey pink color and I have some white. Honestly, it really doesn't matter the colors that you use. I want you to just not overthinking it and
just choose some colors that you are attracted to
or that you are drawn to. Because this is all about
expressing and having fun and just playing
around with materials. It doesn't really
matter what you use, okay, so just grab what
you have available. You also going to need
a couple of brushes. I have a couple of
round brushes here. You could also use a flat brush. Again, just grabbed materials
that you already have handy and that you already
have in your art space. But make sure there's
a variety of brushes. So some big ones and
some small ones, because you want to have
some fun making marks. Once you have everything
set up ready to go, you can move on to
the next stage.
3. Putting down a base coat: Now we are going to be painting in a really intuitive way. So intuitive means that you
just follow your heart, follow your expression, and just create compositions and
things that feel good. So the first thing that we're
gonna do is just blood down some colors in a random order. Sorry, I just got like a
medium-sized brush here. And I'm just going to start
with maybe some of the blue. And I'm just going to scribble
down patches of color. So maybe I'll add
a bit of white to that blue and spread that around mixing
on the paper a lot. Don't worry about whether the
colors are mixed perfectly. We're just having fun
blocking down some color. I'm going to add a bit
of darkness in here. Now, you just say how I'm not blending all these
colors together. You can see how there's
quite a sharp edge and I'm creating
these blobby shapes. You don't want
everything to be super blended because that's going
to make it really boring. You want to have a
really expressive, vibrant pattern or abstract art that looks like it's
got movement to it. If everything is smoothed
out and blended too much, you're not going to have that expression that
we're looking for. So if you're not used to
painting in such an expressive, loose way, it might take you
a little bit of practice. But for example, what
I see a lot of people do when I'm teaching in person, which I do quite often, is that they'll get
something like this and then now start blending everything together and making
it really smooth. And so all the
brushstrokes are blended. And there's really neat
transitions between the colors. So this sort of blended look, this is not what
we're looking for. We're not looking for
this nice blended look. We're looking for really
defined patches of color. If you find that your
piece of paper is starting to look really
blended and smooth, then maybe you need to dry off your paper and start
adding colors on again in a more
loose kind of way. So to fix this up, for example, I can just come in
with some white. And to be really abrupt
with that color, I can come back in with
some of the orange and be really abrupt adding
in that color and not joining up any of the blobs in a
really smooth manner. We want it to be very,
very expressive. If you don't want your colors to smoosh together too much, you can wash your brush
in between layers. For example, I'm
moving to the pink is sort of semi pink color. Now, I don't want it to blend with too much of the
balloon that's on my brush. So I'm going to rinse out the brush first before
I come back in. We just sort of apricot color. I can mix a bit of orange
into this to change it, and I can also mix some
white into it as well. The other thing I want you
to try and think about is make different
shapes, different blobs. Don't make everything
the same size. You don't want a patch of blobs that are all in a really
patterning kind of shape. You want it to be haphazard,
random, loose, expressive. You don't want it
to be repetitive. So we're trying to get
a bit of a surface happening that has a
lot of interests in it. So you can see as well how far I'm supporting
my brush back. If you find that you're
being a little bit too fussy or to stick with it, hold your brush a bit further back and just push
the paint around. The color is getting
a little bit muddy. So again, if you find that
your colors are getting a bit muddy on the piece
of paper, come back, wash your brush, come back with some fresh color instead of
whatever was on your brush. I want the whole page filled so every little corner
really haphazard. You don't have to use
every single color that you have at this stage, but you want to add a few
different variations of color. So there's some
darks and lights. Something like that. Sorry. If I just pick my camera
up a little bit so he can see it a bit closer. I'm not a big glaring
because it's wet. But can you see how really loose these shapes are?
Nothing is blended. They're very brushstroke. Saving this very
strong brushstrokes. This is what we're looking for. If your piece of paper is too smooth and all the colors
are blended in perfectly, It's gonna be really hard to
build up onto these layers. So make sure that
your piece of paper, it looks something like this. And then we're going
to completely dry this and then move
on to the next step.
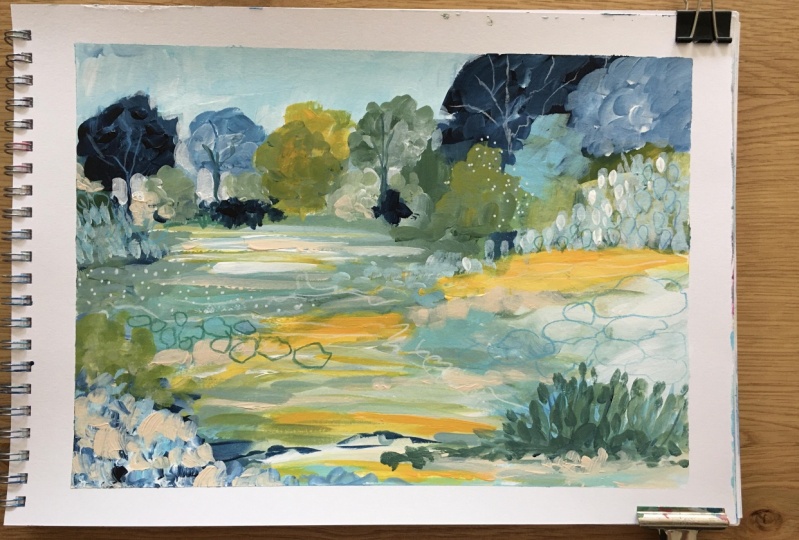
4. Building up interest: So this is what your piece of paper or canvas should
look like at this stage. And this is what
I'm considering, the underpainting to
these abstract landscape. So what we're gonna
do now is start to build up areas of color and interest to create some more visual
patterns and textures. So the first thing
that we want to do is work out where our
horizon is going to be. Sorry, this is going to
be a sort of landscape, ish, inspired abstract art. So any landscape really needs to have a horizon
line of some kind. So we're going to do that first. I'm just going to
wash out my brush. Make sure it's nice and clean. So a couple of rules of
landscape painting is going to help us when we're pulling together these
abstract landscape. One of the rules being
that generally speaking, the sky is one of the
lightest elements in a landscape painting. So in order to define the sky
in our abstract painting, we're going to create
a lighter area. That's going to be our sky area. So I'm going to go
into the white that I have and create a
really light value. Might add a little bit
of the blue in here. And I'm going to mix up a
really light value color. And I'm going to use
this light value color to block in some areas
that are gonna be sky. Now, what I can also do
is use this to create some negative shapes
to indicate where trees might be or where
some bushes might be. Up in this area here, I can use the blogs that
I've already created randomly to help dictate
where things are gonna go. So for example, this
really dark blob here, and this dark blob here. This could be trees, because trees tend to
be dark in landscapes. So I can use those to
dark blobs as trees by blocking in sky around them. So maybe our horizon starts
about here by blocking a really light sky
area up in here. And maybe around
this tree as well. Just get a little
bit more paint. Now, I can go over this sky
color a few times later on. But for now we're just
using it to block in with some sky. So you can see that now created these negative
shapes that could be interpreted as trees or bushes. So now that I have this here, I can start to work my way down, adding in some areas
of interest and color to emphasize
certain areas. So these trees, for example, we can make them really stand out trees by making them darker. If I come in with
the midnight blue, which is my darkest
color that I have here. I can go over some
of these shapes. Again, really loosely
see how I'm not making them look like generic trees. I'm just blocking in
some darker shapes. Okay. Maybe I can add some
dark and standing heat to this sort of way of painting. You really have to
just play around with values and
playing the contrast. So you can see how I've added
in some really dark shapes. Now, these dark shapes contrast really nicely
with the light shapes. Okay, so now that I've
added some dark shapes in, I'm going to come in and
do some light shapes. So maybe like a nice
lighter blue color. Again, don't overthink
color choices. Just play around and do
what feels good to you. This is supposed to be a fun, expressive, relaxing project. It's not meant to look
like anything spectacular. It's just meant to be fun. So use your instincts to play around with the
color placement. So for example, I
put some blue and so maybe I can come back
in with some of these salmon pink cut around the
shapes that I have here. With the salmon pink. I can even maybe add
some white to it. And lighten that
up a little bit. Just to add a different value. Really loosely going in
saying that there is blobby, weird shapes that
we started with. So continuing on, we've
really loose shapes. So I've got a lot of the similar sort of
colors at the moment. Somebody into that, some
of the orange that I have. Just to maybe add another
variation of color, see how bright that is
compared to everything else. It might add a few
orange bushes around. I can also add a bit
of white to that to lighten it up a bit. And I can even add a
little blue to it. If we want to make more
of a greenish color, I can add the yellowy orange
and the blue together. Then we might have a bit more
of a green to work with. Okay, not intense. So I can add some
of that in. See how things are moving around
my paper as well. I'm not just keeping
everything in one spot. I'm moving this paint around and I'm moving
this color around because he's not
mix up some color and I use it in just one spot, it's going to look
really out of place. So again, using your
brush really far away. This way you have
a little bit less control over what you're doing. Maybe I'll add a bit
of a larger area of a colossal might. Wind up this greenish
color on there. I can even maybe come in with
some more stronger bowler. I might have to wash
my brush a little bit. These two little different now. Okay. So now I'm going to change my brush because
you don't want to do everything with
the same brush. So I'm going to come up with a slightly smaller brush now. So this is like a round brush. A size six, I think it is. If you've watched any
of my other videos, you'll know that
I'm not very good at giving instructions on
note which brushes I'm using. My deep into some of
these lighter pink now. And use this brush just to
add in some different shapes. You can blend and mix a
lot on the paper as well. And I'm just going to have moving that some of this paint around with a different brush. You can lighten up
some of these areas. And what beginning a bit
wet at this stage actually. So I think we'll give this
a bit of a dry first. But hopefully you can see,
I'll just zoom in a bit. Can you see how, again, the shapes that I'm creating, a very textured
nothing is blended. All the brushstrokes that
I'm having that I've added. Still very visible. But it creates a
really interesting, vibrant texture to the art work. So this is what we're
trying to achieve here. So if you're finding that all of your marks are blending
into each other too much. You may have a bit too
much water in your paint. Your pipe might not
be thick enough. So maybe try working
with a bit of a thicker consistency paint. And it should really feel like smooth and battery when
you're painting with it. So I'm going to drive
this off now and then we can come
back and work again. You continue to work too
much on wet paint like this. It's a can get a bit
muddy so we're just gonna let it dry
and then we'll come back with some more layers.
5. Adding layers and contrast: Alright, so I paint is now dry. So we're going to
add some more lines. You can continue
painting and adding as many layers as you feel necessary until you are
happy with the painting. But to start with, I'm
going to go back to the sky area and add in another layer of color, maybe a little bit more opaque, sorry to cut out a little bit
of that initial background, I'm going to make it
a little bit thicker. Hey, let's go around. It doesn't matter if
areas sort of blending or get a bit messy. This is a good
excuse to just play. I find that when you
paint in this technique, it's really important to let go of perfection or let go of any particular idea or a direction that you want
your artwork to go in. It's much easier to paint
like this if you just play and don't expect it to look like
anything in the end. That can be a really
hard thing to do, but it is something that
once you've mastered, will really help you to create more authentic and
expressive art works, because you will no longer
worrying about the end result. Just adding in some
more blue because I feel like a lot of
the colors that are in here at the moment
are very similar. Sorry, just getting
it, add a bit of blue. Now I'm going to start
thinking a little bit about some focal points are some areas of interests that I
want to emphasize. So for example, I really liked this tree shape here
that I've created. But I feel like there's not quite enough contrast
between these two colors. So I want to emphasize
this a little bit more. So I'm going to emphasize it
by increasing the contrast. So that means that
I'm going to make the value that's behind
it much lighter. So I'm going to
come in with again, some of the lips. Right now. Let's have fun with it. Who cares? They come in with
some white paint and a little bit of
that same orange, but I'm going to make sure that the ratio of white is much higher so that the color
is a much lighter color, a little bit more vibrant. And we go and I'm
going to use this. And again, the fill in the
area behind this tree. We've a much brighter value. So you can see that
now I've done that. This tree now stands out even more than it
did a minute ago. I can do that in
other places as well. Like for example, I can add in maybe some brighter
and lighter bushes up around here as well. A little bit of blue change the value of some of
these bushes around here. It's just going to clean the brush off because
I want you to go back to slightly different colors. I'm going to add some of
these orange to some of these pink and add that in as well. In some areas. Maybe add some white to it. Sometimes it's
really fun to squint your eyes while you're
painting as well. So by squinting your eyes, what you're going to do is
see the shapes that you're painting as just blocks of
color without any detail. And by doing that, you can
sometimes pick out areas of interests or areas that require something else in them. So I'm gonna go back to
the darker color now. I've washed my brush
because that's like okay, so I might go back to this dark, increase the darkness
in some of these areas. That'd be the shutter
down here as well. What we're gonna do now
that we're sort of, you can see now that
I've kind of getting a landscape or abstract
landscape happening here, now, we've got a horizon, we've got some trees. It could be a focal point, is all these patches of color
and pattern happening here. And so I want to
emphasize some of these colors and patterns here by adding some smaller marks
and some more details. So I'm going to again draw this off and we're going to come
back and add some detail.
6. Finishing Details: Okay, so we're back to a
nice dry surface again. And so what we're gonna
do now is start to add some marks and some
interesting things onto some of these
areas to again, just add another layer
of interest and detail. So you can do this with paint, you can do it with
pencils, crayons. So what I've got here is
I have some current arch. These other Nero color too. I'm sorry, these are
water-soluble crayons. These work really well
on top of acrylic paint. Sorry, you can blend them
back out again and you can paint back on
top of them again because they're not oil
pastels, they are water-based. So you can use
something like this, or you can use pencils,
paint, whatever you like. But what I'm gonna do is I'm
going to pick a few colors that compliment what
we already have here. Maybe it's the Arctic
Council got a purple of Lewin barker going to
pop these to the side. What I'm gonna do with these. So I might get just
one more darker color. Come to sorry, a motorbike
just been pasta. I guess I've got like a just
a darker blue here as well. So I've got a couple of
colors that, as you can see, I hold them up
against his painting that fit in with the color scheme that I've got going here. What I can do with these
is add some details. For example, I might
add in some marks to indicate maybe some more trees that are happening
up on this horizon. You want all of your marks to be very loose and
expressive as well, because we're keeping
with this whole theme. And you don't want anything that looks too realistic coming in at this stage because
it won't really suit the rest of the artwork. So you want to still
keep your marks and you're drawing or whatever
it is you choose to do. Very loose and expressive still. Maybe there's a
little tree coming out from this guy as well. Let's see what else we can do. We can add in some marks that indicate maybe some
grasses down here. Maybe I can add it. You can use these to
really add in some areas of interest and pops
of color as well, because these are quite bright. And when you push really hard, they do work very
similar to oil pastels. So you kinda get the
same sort of look. However, I just put
some marks down here. I'll zoom in and show you what happens when
I add water to it. So these are some of the marks that I've just added in here. And as I said, because
these are water-soluble, if I get my paintbrush
clear off some paint, y, then come over. I can use the paint too. If I wanted to. I can completely erase
what I've just done. Or I can just blend it out and add some different
textures to it. So that's why these
are really good. And then you can come
back over and draw again. Sorry, that's why the nail
colors are very good. But again, you could still
do these details and all these different textures and things with just
normal pencil as well. It doesn't need to be crayon. But I just wanted to
demonstrate that. I'm just going to use these to bring out some areas
of interests and pattern. For example, I can maybe add
in some marks like this. You can also add
little spot patterns. Important thing here is to not overwork it or add in too much. That's gonna be distracting for what you already have here. Because again, we're
trying to create an abstract artwork or
semi abstract artwork. Obviously it is representational
of a landscape. But we don't want it to have a huge amount
of detail happening. Because then that's going
to really distract from the abstract kind of feeling
that we are going for. You can also add it
as I was saying, you can also use pink brushes. So if, for example, if I come back to this
brush that I had before and say I want to
create a bit more interests. Maybe in this area. I can use my brush
to add some pattern. Okay, so I'm, I'm just
blending the paint down with this brush which makes a really nice caught up teardrop shape. If I get a smaller brush, I can do more smaller details. I have a small flat brush here. So you can just continue
to build up your artwork and take it as far as you want to a garden,
you don't have to. You can completely paint over everything that
you've just done. Or you can reserve areas
that you really like. You can cover up areas
that you don't like that. So there's something
that you're not happy with or color you're
not happy with. Just go in and cover it again. Play around and
continue to build and build and build
until you are happy. We that the artwork
that you have. Sir, I find the lines
that I just put in here, for example, a little
bit distracting. So I'm just going to go back
with some of that really pale yellow and block it out. Back to what it was before. Add summit. This brought us
to the orange color down. Like that. I'm just
going to continue to build and build and build. Once your artwork has reached a stage where you're
happy with x, you can take off the tape. If you find that your tape
starts to tear your paper, what you can do is just
get your hairdryer, run the hairdryer
for a moment over the tape and that will loosen
up the glue on the tape. And so it will come up a lot easier without any
looping or tearing. So that's a little tip if you find that your paper rips a bit. And here is my finished piece. You can see how the tape creates a really nice border and finishing sort of
edge to the art work. This is what I have here. So you can now see that it
has elements of a landscape, but it's still very abstract. A lot of the paint
is not very blended, but there's a lot of nice color and interesting
pattern happening. The little touches that I've
added him with the crayon, a subtle, but they do add to that landscape field
of this artwork. And Credit Suisse not
aligned with the interests. Okay, sorry, Let's
do another one. I'm going to start
again. We have some different
colors and I'm gonna do the whole process
all over again.
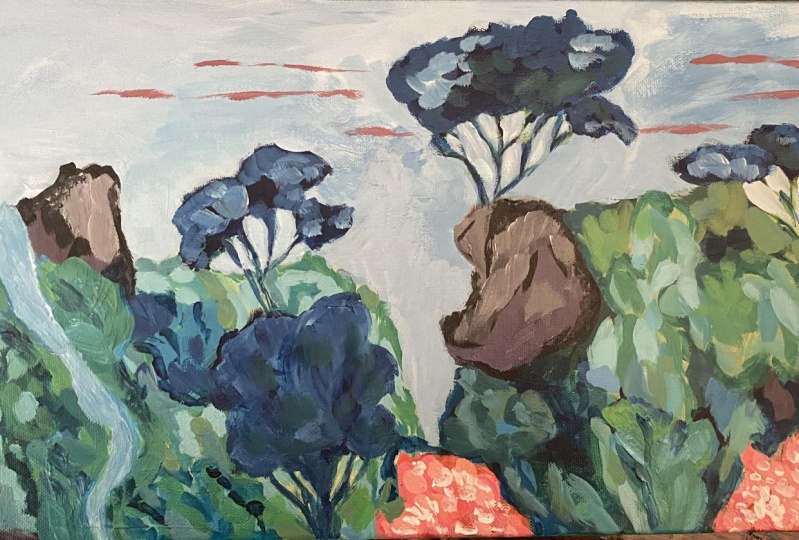
7. Timelapse Demo 1 - Useing your imagination: I'm going to do another painting using the same technique. This time I do have a
canvas board instead of paper just to mix
things up a little bit. I've also changed up my colors. I still have the
same midnight blue, but I now have a yellow, pink, and a lighter blue,
as well as my white and the same lighter pink. And I'm just going
to approach this in exactly the same way that
I did the previous one. I will probably speed it up a little bit because
you don't need to. He may describe what's
happening again. But just know that the
technique I'm using for this is exactly the same
as the previous artwork. While this video is
playing and you're watching the paint work, I wanted to talk a
little bit about why it's important to use your imagination and not just rely on reference
photos all the time, especially if you're
wanting to create artworks that are more abstract or more loose and
expressive and unique looking, you really need to focus on using it and embracing
your imagination. Working on, on location, or looking for photos or
doing workshops is fine, and seeking mentors is fine. But at some point you do
have to turn into your, yourself and you need to allow that creative individual
voice to spread its wings. And the best way of doing
that is to approach a artwork in a way that has no boundaries
and limitations. So I don't have a particular image in my mind when I'm
creating art like this, I don't have a final idea
that I'm trying to achieve. I am just letting the
paint tell me what to do. So when I add color and
globes and textures of paint, I allow those choices to then
dictate where I go next. So for example, I might look up to the darker
areas of the painting and decides that they are going
to be trees, for example. And so I woke up where
I've randomly put those dark areas and I start to elaborate those
and build up on those. So this sort of technique
of working with your imagination does
involve a lot of trust and a little
confidence in yourself. And you need to accept the fact that you will probably make a lot of really ugly
paintings to begin with. But once you get over
that feeling of having to create something that
is finished perfect, it does open up the opportunity to explore ideas and explore techniques and see where your own personal
creativity will take you. And I think that's a really important thing when it comes to not only your skills as an artist and your ability
to create as an artist, but also as art as a form
of therapy and mindfulness. And just allowing yourself
to create for the sake of creating is a really important
thing to learn how to do. And it's really fun as well. And it does take a lot of
the pressure off you to create something that
can be hung on a wall. Not every piece of art
has to be display worthy. No, no one else has to
see what you're saying. The American missile
social media driven world, we are in our economy encouraged
to share, share, share. But if you're not
feeling confident in your work and you're
just producing things for the fun of it. Don't feel the need that
you have to share it with people until you are happy
to share it with people. Sorry. Yes, I think that's
a really important thing to remember as well. I also strongly believe
that imagination is something that can
improve through practice. And you can. Practice creating things
from imagination. There's this idea out there, all this misconception
that we have to wait for that strike of inspiration to hit us in the head
or to magically appear. And if we don't catch
that immediately, then we won't produce
anything interesting. But really that's not
really how it works. I find that the work of actually creating something in
the process of creating something triggers that
moment of inspiration. So the more you experiment and play around with
materials and techniques, the more likely it is that the inspiration
is going to hit you. Instead of sitting there just
staring at a blank canvas, just start making
something and laying down just basic shapes and
colors and patterns. From doing that,
you actually give you imagination
the opportunity to start working and to start building on something and
reacting to something. I often say my classes
that, you know, if you're worried about
making a mistake, just let that idea of
it being a mistake go. Put something down. And once you have something
in front of you to react to, then you can decide, okay, what do I need to add
to these to improve it, or what is overwhelming or what is not working
compositionally. But if you don't take
that step and you don't add something
to your artwork, then you can't
react to anything. And so you're not going to
then push yourself forward. Sorry. That's why I
find that it's really important for just just
getting there and do it, and just have fun with it. And try not to overthink the actual finished part
of the whole process. The next thing that I wanted
to quickly talk about as well is the use of color and how color can
impact what you're creating. You'll notice that the color
choices that I've made for this particular example a vastly different to the ones that I
had in the previous example. The colors that I was using
originally created a lot of really muted neutral tones. It was actually a
contrasting color palette in the previous artwork. So I was using
oranges and blues. So if you think
about a color wheel, anything that's
opposite itself on the color wheel is its
contrast in color. So when mixed together, they create a lot of
really nice neutrals and they do work really nicely
together as a combination. Whereas the colors
that I'm using in this particular painting, It's a bit more of a, let's say a primary palette of colors. So I have a yellow, a pink, and a blue, which is a
basic primary combination. And sorrow because I
have those three colors, it means that I can mix a lot of different varieties of colors. And I'm not just working
with muted tones, I'm working with a
lot more brighter values and brighter colors. So when thinking about color, it's really important to think about the value and
intensity of those colors. And you want to make
sure that you have a really nice variety of values. You can interpret colors
in any way you like. As long as you think
of them more as the value than the
color which I sorry, I don't think I'm
explaining that very well. The value is more
important than color. That's what I'm trying to say. The value is relating to the darkness and lightness
of a particular color. And it's really
important to have a strong mix of values
in your artwork, even an abstract
artwork like this, it still needs to have good
values and interesting values within the painting
for it to look balanced and for it
to look harmonious. Um, if all of your values
are too light, for example, you'll be lacking contrast and
it will be really hard for the viewer to work out where it is they're
supposed to look. Also, if your values
are all too dark, the painting and the Albert
can appear quite dull and flat and have a lot less, again, interest in
the actual painting. And it will make it difficult for the person viewing
the painting to focus on what it is they're looking for and
where to rest their eyes. So it's really important to have a good variation of
colors and values. So you can see that I've got some really dark areas in those trees and I've also
got some light areas. And so because of that, I can explore different colors. As long as the values of their colors are
quite different. But you also need
to think a little bit about mark making. So for example, you can say that I'm just literally
dipping my finger in the paint and creating dots
and marks to create patterns. But I'm making sure that when I mix that color
that's going on top, the value change is significant
enough for me to be able to see it if you
don't have a value change. So if you're layering
paint on top of itself and you don't
change the value enough, then it's just
going to disappear. And everything
that you're doing, it's not going to
make an impact. So those dots and
marks that I've just added in on top of this
particular artwork. You'll notice that the value of the color that I used is a lot lighter than
what was underneath. So it shows up. That works
the same with darkness. If you want to add
something dark and needs to be
significantly darker. This is something that
acrylic paint is known for in that it does dry darker than what it is
when it goes on wet. So it can sometimes take
a bit of practice to get an understanding
of values and color. So I do recommend this is again
another good projects for that kind of practice
layering colors, but I do recommend that
you allow yourself time to learn how to mix colors properly and to mix
colors nice and cleanly. It's again, just something that's just taken
out with practice. And it will be a lot
easier the more you do it. However, working with
a limited palette, such as this, for example, where you only have a
very small selection of colors to choose from. It's going to make
it a lot easier for you to just concentrate
on painting and creating because you're not overwhelmed with too many
choices in regards to color. You'll notice a lot
of my projects that I have on Skillshare, we work with limited
palettes quite a lot. And even when I'm creating my
own artworks in my studio, I do make sure that I limit my palette and I
limit my choices. This particular painting
has more colors available than to me than
the other paintings do, but it's still a
limited palette. So it's still limited
to, I'm really, I'm using that the
yellow, the pink, blue, and a little bit of that darker color,
and that's it. So we've got four
colors and watt. That's the limited
palette that I'm using in the previous video. I had blues and
peachy orange colors, but it was still a
fairly limited palette. I didn't have the greens
and purples and pinks and yellows to add
in there as well. I was just working
with limited colors. Sorry, that's limiting
those choices that you have is
going to force you to use what you have and learn how to work with
value rather than color, which he's going to
help you again to use your imagination and free up your creativity
a little bit more.
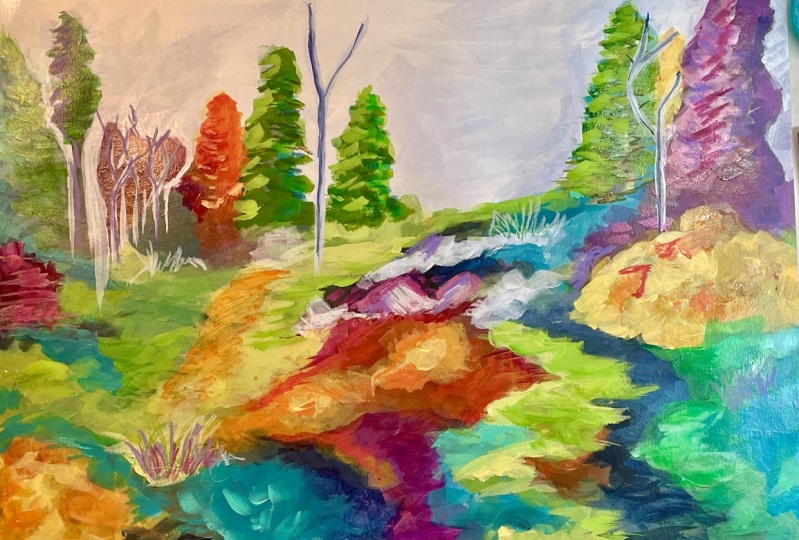
8. Timelapse Demo 2- Brushwork and mark making: While you're watching
this demonstration, which for reference, I'm using the same color
palette that I had in the first step-by-step
demonstration. So that's why the colors kinda look the same
as the first one. So while you're watching this, I just wanted to talk a little
bit about brushwork and mark-making and how practicing that different brushwork and
different brush strokes and mark-making can really help you to develop your style and
develop your confidence. So when we're talking
about brush and mock working and where you apply the paint
to the surface. It's a really personal
thing and it's something that is as
unique as handwriting. Just like your handwriting is totally different
to my handwriting. The way you apply paint
to the surface is totally different
to the way that I apply Pie paint
to the surface. And this is something
that you can learn. You can learn certain
brush techniques, such as being quite smooth and blending colors
really easily. Sort of dry brushing
and layering colors. You can also learn how to be
really loose and expressive. But it does take practice and it does take a lot
of confidence. The paint application
is not usually the first thing you think about when you look
at a painting, you might be attracted
to these subjects, the colors, maybe the
looseness or the tightness. And yet the application, it says so much about the mood and the intent of the oddest. And so you really read the
surface of the painting, like I said, in the same way
that you read handwriting. So when you're looking
at someone's handwriting that seems really rushed and Missy and frenetic that you
get the feeling that whatever was the person who
was in the mood of being quite rushed when
they were writing that. When you say handwriting that is very neat and controlled, then you may have a feeling that this person was
taking their time and being very with
what they're writing. And it's the same
when you're painting. If you want to have
an artwork that has a lot of energy in it and a lot of movement
and freedom and expression, then you need to
work quite quickly. If you are painting really
slow, lazy brushstrokes, you're not going to have the same energy to that
painting as you would if you were painting really quickly and just
laying down colors. I tend to paint really quick, which is why I have a lot of energy and most
of my paintings. So if you want to have energy, you need to accept the
fact that you may have to work a lot quicker than what
you're used to working. Different brushes are
also going to help create different brushstrokes
and marks and textures. So experiment with
the large brushes, small brushes, brushes that
have long stiff bristles, soft brushes, different types
because you might find that you are a lot looser and
find it a lot easier to express yourself when you're using a brush of a certain kind. You might find it
harder to express yourself when you're using
a different kind of brush. Work around that by just trying
a few different brushes. I prefer to use brushes with
quite long handles on them. And I also prefer them
to be not too soft. I do have a combination of sort of harder
bristle brushes. The brush I'm using
at the moment, It's a bit more of a
harder bristle brush. It's technically, I think
an oil painting brush. But I do also use quite
soft flat acrylic brushes. I really like the way that
they apply paint as well. That you can use really
thin brushes as well to add a different texture and the different mark
to your artwork. It is always recommended
that you don't just use one brush for
the whole painting. You should really
change it around and think about the
way you're applying the paint as well in regards to the variety of
your brushstrokes, something that I see a lot of beginner artists do in
my classes is that they will reproduce the same mark on their artwork
over and over again. And there will be a very repetitious
kind of looking back, whether it's just
a line or a dot or cross hatching kind of look. But all of the shapes
that they make with their brush look the same. And as a result of
the painting has a sort of repetitive and
confusing kind of look to it. So you need to focus on making
sure that you are varying the size and the shape
of the marks that you're creating and make
some larger marks, some smaller marks, and changing up your
brush will help this. But you also need to
really concentrate a beat on what you're doing
and remind yourself, even when you're in that
fantastic zone of painting, you need to remind yourself to change up what you're doing. Step back and look at
what you've done so far and analyze the
marks that you're making with your brush and
see if they are too similar. And maybe try another
layer of paint using a different brush and changing the way that
you apply the paint. But it's, it really is a
very individual thing. And the more you paint, the better you will understand the application of the painting, how it affects the artwork. So if you think
about, for example, a Van Gough artwork, he would create a lot of
really small lines of color. And the movement of
those lines would then create movement
within the painting. He didn't blend any of
these colors at all. Everything was very just a
mark of color on top of color. And when you step back
from that artwork, everything sort of
blending together. Where then if you
think, for example, about more traditional
Renaissance paintings, they would build up their
paintings with a lot of really smooth layers of
paint and scumbling of color to create a much more
realistic changing values and real realistic skin tones. Sorry, that's just to do
with the application of the paint and how they've
approached the application. And so studying the Old Masters in that way and having a look at how artists that you admire and artists that you're
drawn to their work, how do they actually
apply that paint? Are they making really bold,
big sweeping movements? Are they making really tight, fine mocks and movements
with their brushes? By analyzing the work that you like and the work that you
would like to produce. That you can then work out how they're applying
the paint and then practice doing that yourself. But brushwork and mark-making, it's a very individual thing. And sometimes you just
need to accept that. The way you apply
paint is the way you are going to apply pack does it's like it's a
way of getting it to know your style
as well as having, having a look at how
you approach art and how you approach
applying paint. And it does take a lot
of practice to get to a point where you are confident
enough to just let go. I know that when people
are watching me paint, they are often surprised
at how quickly I paint. This video is sped up. So I don't paint
quite this fast, but I do paint quite quickly. This painting here,
it only took me about half an hour to complete. And often people will think, oh gosh, I could never
do that in that time. However, I have pushed myself after many
years of painting to work quickly and to get really loose with
my art deliberately. I've done that and
I've worked on that. And as a result,
I can now create an artwork like this in a
very short amount of time. However, it has
taken me quite a few years to get to that point. So don't expect yourself to
just be able to jump into it. I have a lot of understanding
of color and composition. I can do this, this kind
of work really quickly, but it is really important
to you do practice. That's the most, most
important thing I can say. So I hope that you
enjoyed this little demo, and I hope you've enjoyed
this workshop as well. I'm really excited to
see what you produce. And I hope that it has been
really helpful to you and it has given you some
inspiration to just get out there and create something
out of your imagination. And I look forward to seeing
you in some other workshops.
 Clair Bremner, Professional Artist