Transcripts
1. What's in This Classs?: Welcome to my stick
figure drawing class. We are here to give your
drawing skills a boost. My name is Thomas, and as usual, I have a great relaxing activity for you for the next hour or so. If you are an absolute beginner
drawing, that's great. I'm here to make you believe
that you can learn to draw simple but expressive human
figures in a very short time. If you are not a beginner, but you like to improve some
of the basic drawing skills, you are also good to
go with this class. We'll be drawing plenty of simple aestic figures in all kinds of
different body poses. We'll be drawing static pauses, learning to express
emotional states. And draw human
figures in action. During these exercises, you will learn how to make simplification
in your sketches. Being economical
with your pencil or ink strokes is crucial when
you illustrate human figures. You will also
develop your ability to sense of space and learn several techniques that make your two dfigures more
like three dimensional. You will learn about the
proportion of the human body, its balance and dynamics, all kinds of fun stuff,
drawing essentials. I'll be using an A four
size sketchbook paper. This is similar to
the US letter size, but you can also use the
cheapest regular office paper. Mostly, I'll be using an inexpensive black ink so you can better see
what I'm drawing. But feel free to use a
graphite pencil or a pen, whatever you have at hand. Now, I hope you are excited to dive into my entertaining
figure drawing session. You see that what you
will learn and practice here won't just help
you with stick figures, but your overall drawing
skills will improve. I'll see you in the first video.
2. Warming Up: I'm glad that you decided to
take this drawing session. It's time to do some
warm up exercise. In case you have some
negative beliefs about your drawing capabilities, please put them aside now. Try to be in the moment, draw exactly what I'm drawing, and you will see everything
will be just fine. Now, if you can draw a
stick figure like this, you'll be able to
do so much more. Let's improve our little
stick figure step by step. Let's draw the same thing. But this time, I'm taking
the shoulder a bit shorter and drawing
two arms like this. You got it? I'm marking
the change with a red ink. Now let's take it further. The upper body is the same. But this time, we are drawing
the lower body like this. A horizontal line represents the hip and we have the
legs in vertical position. Very good. In the next step, we are leaving a gap between
the head and the body. The middle part is the same. And this time, I'm representing some joints with red circles. You know, a joint
is the point where two or more bones connect in the body to allow for rotation. We are also dividing the limbs, the parts like this. So we have the knees,
the ankles on the legs, Similarly, the elbows and the wrists on the arms. These rotation points are also called landmarks
on a figure. By using these landmarks, placing them at
the right places, we'll be able to draw very
expressive human figures. This is a very simplified
anatomy of the human body, but it will be perfectly
enough for our purposes. The key term when we draw
human figures is proportion. In other words, how the
different parts compare to each other without going into too
much details by the book, the height of the adult body is about seven or
eight heads tall. But the problem with
this approach is that it forces you to
use a fixed size head. As an artist, you don't
want limitations. We like flexibility
when we sketch. For example, with this size, the math doesn't add up. Still, this figure
looks pretty good. So I suggest to forget the book. Instead, let's focus on the overall impression
of the figure. Actually, it's enough to place the hip somewhere in the
middle of your figure. And if you notice the tip of the hand is somewhere
at the mid thigh. You Pay attention to
these two things, and proportionally, you will get a good enough human figure. All right. Now we can also illustrate the torso with a
simple rectangle like this. We don't have to
mark the joints, but it's good to be
mindful where we place them because they will define
the gesture of our figure. In this case, he has
a neutral body pose. When you illustrate a figure
like this, primarily, you want to pay attention
to the placement of the shoulders and the hip. In this neutral pose, they are both horizontal and aligned to the
center of the body. By the way, we'll be using
this kind of figure in our drawing exercises
because it's simple enough, but still we can express a
lot with it, as you will see. But I'd like to show you some
more complex ways to draw figures so you know
what other options you can choose from
according to your liking. We can illustrate the torso
with a rounded shape like this and you can
show the joints too. By placing the landmarks
on the right like this, we can get another
gesture for our figure. Now we can split the
torso into two parts, approaching the real anatomy
of the human body further. Sometimes this can be
useful if you want to express more
sophisticated body poses. If you prefer block shapes, you can illustrate
figures like this. You can also mix two different
approaches by illustrating the shoulder with a simple line and the pelvis with
an oval shape. Another popular approach
is the potato body. But You can also add a bit more detail like adding a bit of
volume to the feet, as well as to the hands. Now let's see a quick and looser presentation
of the human figure. This time, I'm drawing
a vertical and the horizontal center line on the head showing
its orientation. You can also add some
cross contour lines to the torso and some volume to the limbs,
something like that. One of the reasons you want to practice drawing these
figures is that you will have the skill to draw more expressive and more
realistic human figures. Because when you draw
a figure in quotes, even if it's hidden, the
underlying structure will affect the final outcome. Once you master drawing
these simple figures, it will only take a
few further steps to draw an eye
catching character. You just need to learn
how to draw a cute face. At the hairstyle. And put some draws
to the figure. As we have our warmup
exercise done, we can start drawing
different body poses. I'll see you in the next video.
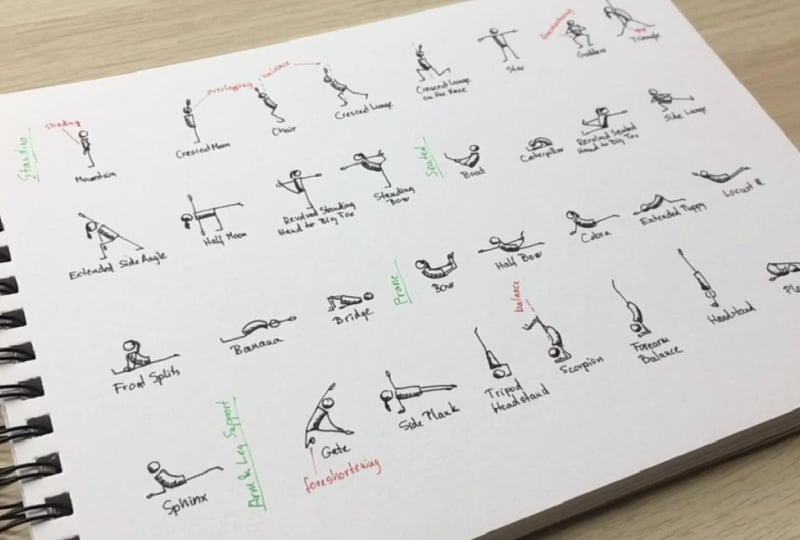
3. Static Figure Poses: All right. Let's start off by drawing
some static poses. Drawing something static is always simpler than
including motion. So let's look into this first. Actually, yoga poses are
perfect for the purpose. So we'll be drawing yoga
poses in four lines. Eight poses in each row. A side note. I'm
not a yoga expert, so please be forgiving
if a pause is not perfectly illustrated or
its name is not correct. Keep in mind that the point here is not to teach
yoga in any ways, but to develop your
drawing skills. Okay, as I mentioned, we'll be using this kind of
simple figure illustration. I'm also adding the
name of the pose as a labor for those of you
who are interested in yoga. Let me also add some
shadows to the figure with just a few pen strokes in diagonal direction by using the technique called hatching. By the way, adding shadows to your subject is also
called shading. This is one of the
tricks that you can use to add some
three dimensionality to your otherwise two difigure I'll show you some
more in a minute. Similar pose, but it
hands in the air. Notice that there
is an overlap here, which also conveys the illusion
of depth to the viewer. Now, let's bend torso like this. And the knee as well. I static poses, it's important to show that
your figure is in balance. I mark the center of
gravity with a dashed line. It's roughly in the middle, so the figure seems
stable to the viewer. A similar position. But one of the
legs reaches back. This position also seems stable. Now, let's lower the body. And one of the knees
touches the ground. Another stable position. A position in front you. The figure bends her knee. And notice what happens
here with her thigh. It seems shorter than normal. This shows to the viewer that the legs are in a
diagonal orientation. So they don't point
directly to the side, but towards the viewer
to some extent. This is called foreshortening. It's another tool in the hand of the artist to illustrate
depth on a drawing. This comes from the fact that length shortens by distance. The knees are closer to
the viewer than the hip, so the thigh shortens
on the paper compared to the figure in star position
right next to this one. Now here, notice that I left a little gap just to illustrate
the overlapping better. A simple but effective way to show layers on your drawings. I'm also adding a hairline and a ponytail to show the
orientation of the head. So our figure is
looking upwards. Very good. These
were standing poses. Let's draw some more. With the gap, I'm marking that the
arm is behind the leg. And the face is
pointing upwards. With this exercise,
you are practicing to transform the simple
building blocks of drawing. These simple building
blocks are the line, the circle, and the rectangle. We rotate them, bend them, squeeze them, and so on. This is a fundamental
drawing skill that will pay off whatever you
draw or paint in the future. I find it impressive how
many different poses we can do with our body,
at least in theory. For me, the last two would
definitely be a challenge. Good. Now let's throw
some sitting poses. You probably notice that when I'm drawing
these shadow shapes, I'm assuming that the
light is coming from the top left or
from the top right. Consequently, the surfaces that face the opposite direction, usually downwards towards
the ground, will be dark. I'm drawing the
hair only if I need to if the orientation of the
face is important to show. In illustration, using
the least amount of information is
priority sometimes. Actually, it's a challenge to simplify your subjects
to the extreme, but it can be very useful because it takes
less time to draw and it takes less time
for the viewer to process the information
you want to convey. I feel like it can
be more challenging sometimes than drawing
something realistic. Simplification is
key in art anyway. Unless you are going after
hyperrealistic illustrations, it's important to know how
to simplify and how to add details to only those spaces where you want some focus on. Notice how the tiny details like the angle where this food
pointing to has importance. It's pointing
upwards, which tells the viewer that muscles in the back of this
leg are stretched.
4. Sitting, Lying & Other Poses: By drawing simple figures like this also helps you improve
the sense of space. You won't even notice and your two D drawings
turn into three D. In a side view like this, you can draw only one leg, or you can draw the other
one with some gaps. Feel free to add details
to the feet like this. Details can make your
figure more exciting, or it can serve a purpose like maintaining
a certain style. These are artistic decisions. If you think that
something looks cool, feel free to use it. Let's keep on drawing
some more pauses. By the way, these
poses can really help to strengthen the
muscles in your back. If you regularly have back
pain or lower back pain, you might want to
check some exercises from professional trainers. Finally, let's see some
yoga poses with arm and leg support. Uh huh. This figure shows
the perfect example of foreshortening
here on the left. The lower leg is pretty short, which means it's
pointing backwards. Nonetheless, the sporting arm here is a bit shorter
than it should. There shouldn't be
any shortening here, but that's okay.
We are practicing. You need to be forgiving
with yourself. You have to keep your desire after perfection under control. Making some mistakes is part
of the learning process. If you can accept that, you will develop faster with
less frustration. With these poses, we have to pay special attention to balance because our brain
knows that it's really hard to stay stable
in a pose like this. So we have to arrange the
body parts carefully. The center of gravity
is important here. Now, let's see a
handstand position. And the last one Wonderful. I hope you enjoy drawing these simple
aesthetic body poses. Honestly, I believe in volumes when we are talking
about drawing exercises, drawing one or two
poses may be fun, but we don't teach you much
or develop you in any ways. But by drawing this
amount of figures, the skills will sink, and we don't stop here. In the next lesson,
you will learn to express all kinds of
emotional states. See you in the next video.
5. Expressing Emotions: Welcome back. In this lesson, we'll be looking into
how we can express certain emotions with our
simple stick figures. I hope you will enjoy it. We'll be drawing
again in four rows. This time, six
figures in each row. Let's draw a neutral
body pose first. Something like this. This time, I'll be
using a mid gray marker to draw the shadows just
for the sake of variety. Now, let's draw a man waiting. One of the knees
is slightly bent, and one of the arms
is on the hip. Very simple. Now, let's draw a figure making
small talk on the phone. Cross legs. The palm is at the ear. Something like this. This one is scratching his head. Otherwise, his body posture
is in a neutral state. He might be saying, I don't
remember. He's in doubt. With slightly bent knees. And both hands to the head. This figure is telling
I forgot that. But Now, he is standing in a very
strong minded position. This is a power pose. Legs are spread,
hands on the hip. He definitely seems confident. We can also draw this man
inside view like this. Notice the arm that is further away from the
viewer is smaller. Remember the term
foreshortening. This is also called compression. Objects that are further
away from us seem smaller. They are compressed, just to learn some
drawing essentials. Let's not forget the center of gravity in a pause like this. In order to convey confidence, it has to be stable
or in balance. Now let's illustrate
sadness in different ways. Okay. We are drawing a hunched posture with
slightly bent knees. Sorry for the typo. Watch this curve that
the body follows. This is called the gesture line. It forms a C curve. It's one of the typical
curves in drawing. We can also exaggerate the expression with
this arm position. This figure might be crying. We can show the same
person sitting at a table. Or he can be in a
kneeling position. Or he can sit on the ground
right next to a wall. Five different body postures expressing similar
emotional states. Now, let's show a man sitting on a bench thinking
about the old times. One hand is sporting. One hand is in his lap. His head is slightly
tilted forward. And here comes the
bench he's sitting on.
6. Thinking, Anger & Happiness: Now let's draw a man thinking in a squatting position. Something like this. And with a different
arm posture. Actually, I wanted his pum
at the top of his head. This man is listening
in a lying position. This man is D dreaming. How about some interaction
between two people? This parent is angry
with her child. This man is just
losing his mind. In the last row, let's see some positive
emotional states. Let's draw a man that
unexpectedly meets an old friend. Slightly bent knees, the center of gravity
slightly behind, arms spread. That's true, a man that
expresses his gratitude to God. Now, let's show a man
singing in a microphone. You can always add some extra to your drawing like
these music notes. Watch the gesture line here, which comes from the angle that the shoulders
and the hip make. Now, let's start off by drawing the so called line
of action first, then the figure itself. This term is connected
to gesture line. The line of action defines the primary direction
of a pause. It serves as a base
for the gesture. The line of action is
basically the core. It defines the flow while the gesture is a
fluid sketch that may include the
limbs and the head capturing the essence of
a movement or posture. I'm placing the head and we can draw the body
and the leg in one row. This body posture
conveys happiness. By changing the curve, we can make our body
pose more dramatic. I'm also bending the
knees like this. And a similar one
with straight legs. Awesome. We have
added some extra to our figures by expressing
different emotional states. I hope you are also having fun. In the next lesson,
we are going to draw an eventful composition with
lots of figures in action. See you in the next video.
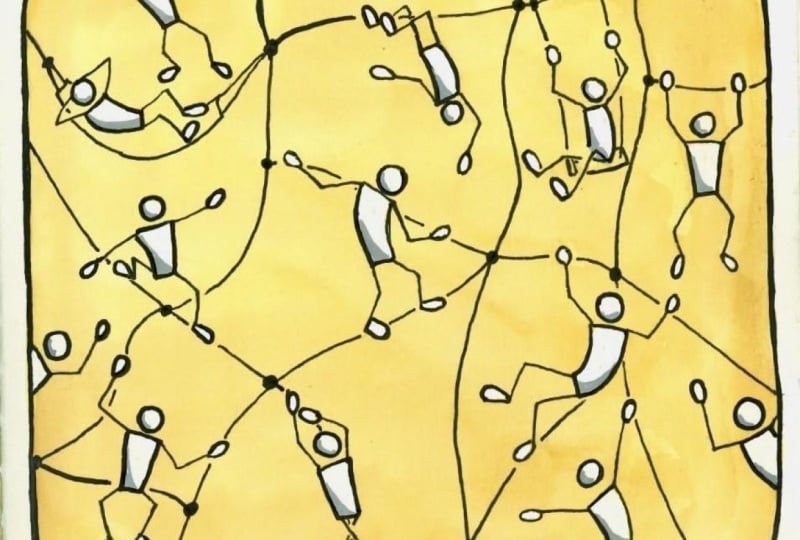
7. Figures in Action: Welcome back. In this lesson, we are going to
populate our paper with all kinds of tiny
figures in action. You can also look at
this drawing session as a creative exercise. By the end of this lesson, hopefully you will have
the skills to create your own unique collection
of figures in action. As a first step, let's
draw a cube with a pencil. I'm placing it somewhere here
in the middle of my paper. Try to draw something
similar in terms of placement, size,
and orientation. H our first figure will be climbing up on a rope
on this side of the cube. His feet is against
wall like this. Good. Now, let's throw a figure that's just reaching
the top on this edge. Let's say there are
some indentations on the wall to help him. Let's throw another
guy reaching the top, but this time, on the
other side of the cube. So we have a different
viewing angle for a similar body pause. It will look
something like this. O. Now, let's show a group of people
who are collecting some smaller cubes and trying
to build a kind of stairs. I'm placing the first
cube over here. And this guy will be pushing the cube by pressing his
back against the side. I'm marking that the cube
is sliding that way. Now, let's throw a
figure who is so strong that he's carrying
a cube on his back. The strongly bend front knee shows that the cube is heavy. Very good. This
cube is pulled by a guy. Something like this. Note that the shape
of my cube is far from perfect,
but that's okay. We are just sketching
and the gesture of our figures is more important than precision
in the details. Now let's show a figure
who is pushing a cube. We can mark this way that there is significant
tension at his back. Awesome. Before we move on, let me remove some unnecessary
pencil marks. Now, let's throw a guy who
decided to stay out of work. He's just watching
at the corner. Now, let's draw a figure who is sitting on the edge
of a hole at the top.
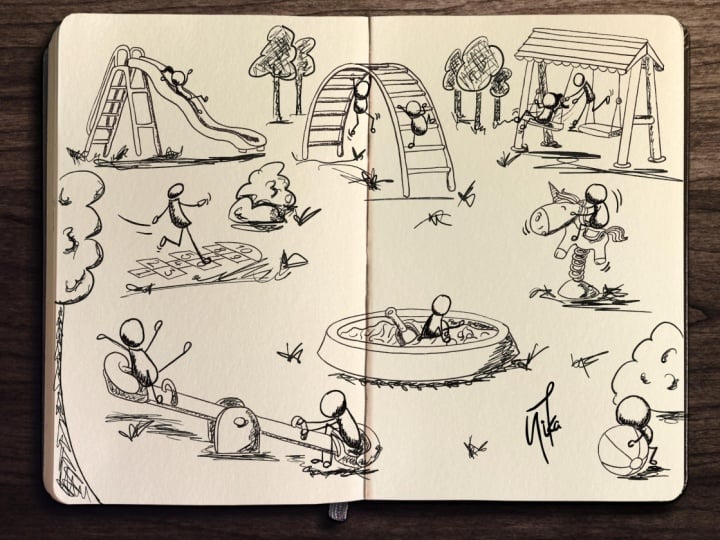
8. Playing, Jumping & Climbing: Now let's construct
a simple swing on this side of the cube. This guy seems to enjoy playing. If the structure
is already here, let's show a guy who
is leaning his back against the wall. M. I guess we can erase the
remaining pensier marks. Let's throw another guy who is spinning on the vertical
pole of the swing. Like so. Now let's draw another cube with pencil first somewhere
here at the back. I'm trying to be
consistent with the edges, so both cubes follow
the same perspective. Et's draw a guy who's running, preparing for a jump. Let's say that this other guy has already kicked off
from the platform. M and this one is already in the air
halfway to the other cube. Hopefully he will make it. Oh, Let's finalize the
edges of the cube. What else? Let's throw
a hole on the side. And the guy who is
climbing a ladder, something like this. Let's show another guy who is
climbing a ball. A totally different
body posture. The interesting
detail of this pose, how his legs wrap
around the pole. Watch which part
overlaps the other. Let's erase the pencil marks.
9. Off-Balance: And let's draw another
cube on the right. It's further away from us, so it will be a bit smaller
than the one in the front. Remember the term compression. That's what's happening
here by the distance. And let's connect
the two cubes with a rope because we'll be
drawing a tight rope walker. Well, my rope is not that tight, but hopefully this
little guy won't fall. I'm intentionally drawing the figure slightly off balance, leaning slightly to the right, creating some doubt
in the viewer. You know what? Let's
throw a stair on the top. And the window on this side. This guy is leaning
out the window. And offering his
hand to someone. To this guy, who is
trying to catch. Now let's throw another guy sitting on this
edge of the cube. He is watching something that
is happening down there. What's happening? It seems that the top surface
is slippery over here. The guys already
falling from the roof. Okay. He's in great danger. We don't want anyone to get
hurt, so let's save him. Let's drew some guys who are holding a rubber
mat or something. Three guys are
holding this stuff. Mm. Okay. Thanks to our lifesavers, no one will have
serious injuries here. All right. I hope you
enjoy this practice. I encourage you to create
your own action scene, placing about 20 figures
in different body poses. I strongly believe by now that you have the skills to
draw these figures, and it would also be a great creative exercise to
stimulate your brain cells. I can't wait to
see your drawing, so don't forget to upload it in the project section
right below the video.
10. Final Thoughts: If you got to the end of this class, I'm
really proud of you. I hope you enjoyed the lessons and your drawing skills
developed a lot. I always like to ask my students, how are
you feeling now? Do you feel succeeded, learned something new,
enjoyed what you were doing? Your feedback in the
form of a review or rating would be really
valuable for me. And if you like my
teaching style, I definitely have some
more classes for you. Make sure you check them
on my profile page. I hope you had a
good time with me. See you in another drawing
or painting session.
 Tamas Benko, Drawing & Painting Classes