Transcripts
1. Introduction: Hi friends, thanks for joining the class. My name is Siobhan. I'm an artist instructor and a content
creator on YouTube. This is my seventh
class on Skillshare. And I'm very excited to share a very beautiful
painting with you-all. Today's painting classes for
the intermediate artists. But this doesn't mean that the business cannot
give it a try. They can definitely do. All you need is patient and must have tried a few paintings
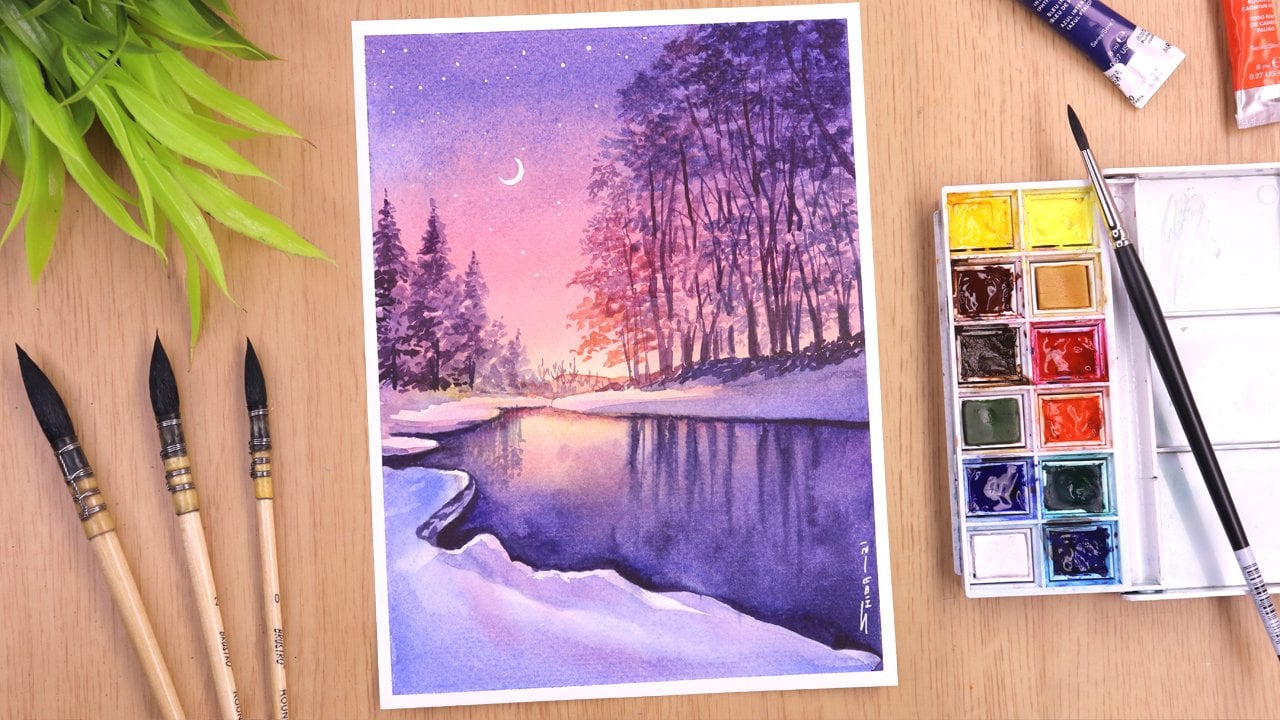
like this before. In today's painting class, I will be painting an
autumn forest landscape with trees and dear
in watercolor. So before giving it a try, just watch the painting first. I hope this will
give you an idea on how to proceed with
such subjects. I'm very excited to
share all the steps that helped me in making
this beautiful painting. I will give you
some step-by-step guide and walk you through my materials so that you can
even try and follow along. So without wasting time,
let's get started.
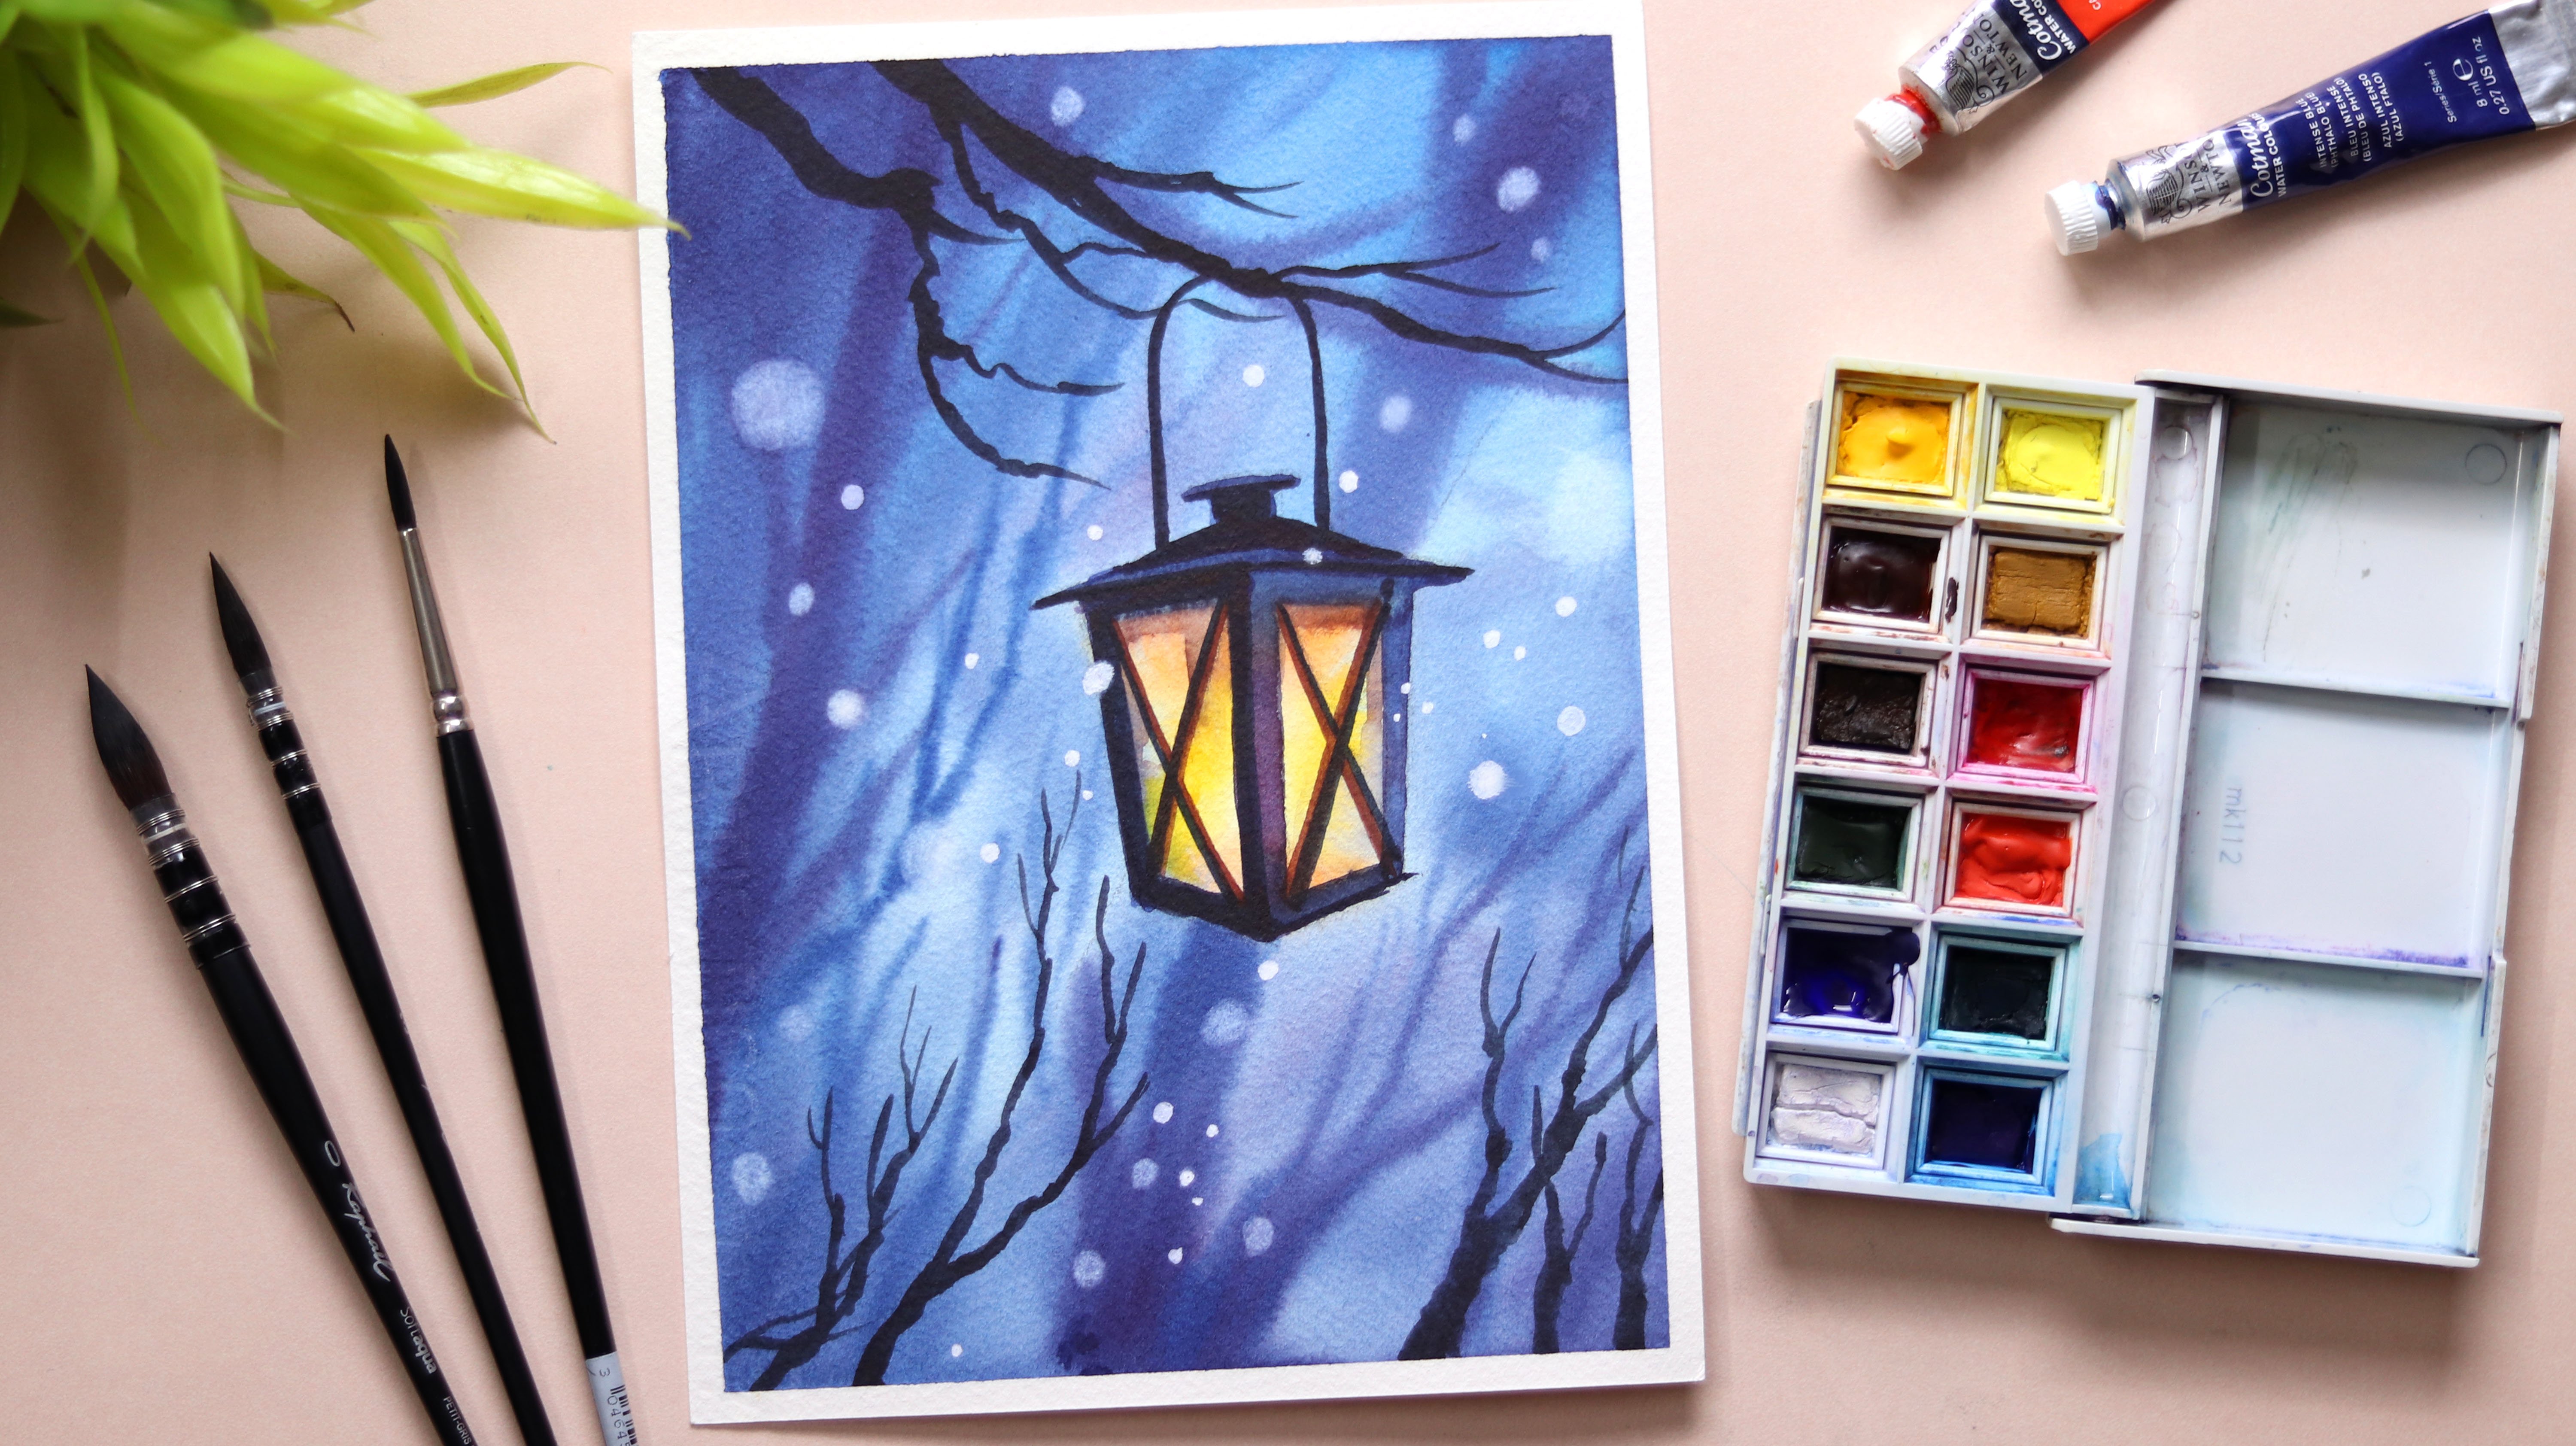
2. Art Materials Required for the Painting: Hello everyone, Welcome back. In this part we will be
discussing the materials required to draw this
beautiful painting of an autumn forest. These other materials I
will be using to draw this painting for the people. I'm using Fabriano artistic
or watercolor paper. This paper is 300
GSM and 100% cotton. This paper is quite
good because it can easily withstand two to
three layers of order. For the colors I'm using Winsor
and Newton Cotman series. These are student
grade watercolors. This palette includes scholars
such as lemon yellow, cadmium yellow or yellow ocher, cadmium red and crimson red, burnt sienna, burnt umber, and ultramarine blue, intense
blue, and turquoise blue. I have removed the
white color from this palette as I
don't use white in my paintings and replaced it with the quiz blue
from White Nights. I'm using a half-inch masking tape to tape
down my people. It helps to get clear boundaries at the end of the painting and also keeps the paper street
by avoiding battling. I used to depths of water, one to clean the brush and the other one as
a mixing medium. For drawing the basic sketch, I will be using a kneaded
eraser and a pencil. Here I'm using an HB pencil
to draw the light sketches. I often use kneaded
eraser for my paintings because it can easily be
molded into a required shape. And also it doesn't leave
behind any eraser crumbs. For the brushes I'm
using to mop brushes from Sinaloa Raffles
soft Aqua number 4.01 liner brush from Sinaloa soft Aqua
precision number four, round brush from Sinaloa
raffle soft Aqua number 12. The size, thickness,
and the number of the brush may vary
from brand to brand. So you can use any brush
you are comfortable with. Just check ones that you get a sharp point on the
brush once you make it wet because it helps in getting sharp lines even from
the thick brushes. And also try to keep a
cloth or paper towel or tissue to make
the brushes dry, as well as to remove any
extra paint from the brushes. So friends, we have covered all the materials that we will be using for this painting. So let's move on to our next part where we will be drawing this sketch and starting with the first layer
of watercolor. And I hope to see you there.
3. Basic Sketch and Working on First Layer of Watercolor: Hello everyone, Welcome back. In this part we will
be discussing about the sketch and the first
layer of watercolor. Let's quickly apply
the masking tape on all the four
corners of the paper. This is a half-inch
masking tape. So while applying
the masking tape, I will try to keep half portion
stuck on the people and the other half will keep the people firmly
connected to the board. I have completed applying the
masking tape to the people. Now it's time to
draw the sketch. For the sketch, I'm
using an HB pencil. You can use any pencil you have. But don't use a darker pencil
because it creates marks on the people and it becomes very hard to erase
them afterwards. I'm starting with drink a straight horizontal
lines somewhere in the middle of the
people, as you can see. And then I will add a half
conical oval to draw the leak. You don't need to
be that perfect while drawing the
half conical oval, because we knew that in real-world the shapes
are not that defined. So we can create them as
little irregular in shape. Let's quickly draw the tree. I am drawing only one tree
on the left and the other. I will be drawing with
the bean statically. So friends, we are
done with the sketch. Now it's time to make it
light before I apply pins. As you can see, I'm using a kneaded eraser to
make my sketch layer. You can give you a kneaded
eraser, the required shape. And then we will
slowly dab it on to the people to pick any
extra lead on the paper. Let's start with the
pins for the brush. I'm using a mop
brush number zero. I will be painting
the background first with yellow color. So, but before
applying the color, I will be applying water to all the required areas
to make the paper wet. Here I'm applying good
amount of water because it helps the people to remain wet for a longer period of time. And at the same time it gives us more time to play
with the colors. Let's start with the
colors. For the colors. I'm using the tone of yellow for this IF mix lemon yellow with cadmium yellow and
then applying it. I have left some of the
area white in the middle to show the gluing back late
coming from the sun. Now I'm blending it with the
white portion in the middle. But keep in mind, we will do this step when the
paper is still wet. Now I'm adding a touch of burnt sienna mixture of lemon
yellow and cadmium yellow, which we have already
applied on the paper. So we will mix the paint at the edges the same V
we did for the yellow. So friends, we are done
with the background. It's time to draw the land. So let's apply water to
all the required areas. Before applying the colors. I will use the same
mixture of burnt sienna mixed with cadmium
yellow and lemon yellow. Now I'm increasing the quantity of burnt sienna in the mixture. And you can see that the land is looking a little bit
darker in color. As we move down the painting, I will be increasing
the contrast as well as the saturation. Because the portion
which is close to us, we will try to make
it darker in color. Let's pin the reflection
on the water for this, I'm using the same wash
off, cadmium yellow. Let's complete the front
portion of the land for this, I'm using burnt sienna statically and add some of
the areas I will be using. The mixture of burnt sienna
mixed with intense blue. Burnt sienna is the brown
color which I'm using. So I have already
said like I have two frowns on my palette. One is the burnt sienna and the other darker version
is the burnt umber. Let's use the same mixture
of intense blue mix, burnt sienna to add few details at some of the portion where
the paper is still wet. Now I'm adding intense blue in dilute form to draw the
reflection of the water. You can see that the blue
color and gotten mixed with the yellow color because the color was active
at the edges. Now I'm using water to pick the colors from the people
using a damp brush. Every time you
pick up the color, try to make it a
try using a cloth. Don't make your brush
completely re tried to keep it a little damp so that it has the ability to hold and pull
the color from the people. Let's add a few details using the same mixture of burnt
sienna mixed with intense blue. You can see that the pupil
is not completely dry. It is somewhat 90 per cent re at some of the portion, I'm using intense blue
more to show darker areas. You can just increase
the quantity of intense blue and burnt
sienna and then apply. But try to keep the colors
a little saturated. Water issue will
be something 5050. So friends, we have completed painting the first
layer and the sketch. Now it's time to move on to our next part where we will
be painting the trees. And I hope to see you there.
4. Painting Trees and Ground: Hello everyone, Welcome back. In this part, we
will be painting the trees and adding the
second layer to the land. For painting the trees, I'm using the mixture of burnt sienna mixed
with cadmium yellow. You can see well painting, I'm applying the colors
in a very dilute form. The trees which are
at the distance. We will try to draw them a little dilute and add the
middle portion of the tree. We will try to keep the
colors a little desaturated. In the middle
portion of the tree, we will be applying
the water to create transition and to show that reflection coming
from the background. After painting the tree, I'm applying a little drop of
water in the middle so that the water moves the paint outward and creates a
beautiful transition. You can also take the
help of brush to pick the extra paint from
the center of the tree. Let's quickly paint a
few more trees using the same process and
C mixture of color. For painting this tree, I'm using the mixture of burnt sienna mixed
with intense blue. But we will try to keep the
amount of burnt sienna more. As we move down the tree, I will try to add
a little touch of intense blue to show the base
of the tree a little dark. So we'll use the same process
for other trees as well. Let's quickly paint this
tree using the same process. I will use the same
mixture of burnt sienna mixed with intense blue
for these three as well. To paint this tree, I'm using the same mixture of intense
blue mixed with burnt sienna. But this time we will be increasing the
saturation of the color. For this, we will be taking the help of more color pigments. At the base of the tree. I will be adding a little bit of more intense blue to make the tree darker and to show that this portion of
the tree is in shadow, I'm also adding a little
bit of intense blue at the upper portion of the tree
and also add the branches. Even for these trees, I will be using the
same mixture of intense blue mixed
with burnt sienna. You can increase
the thickness of the tree trunks according
to the requirement. At some other portion you can show the three trends
are little pig. And at some of the portions
you can make them ten. This will make
your painting look more interesting and
appealing to the eye. Let's pin the ground in detail. You can see I'm using
a very dilute mixture of burnt sienna mixed
with intense blue. And as we move away
from the center, we will be increasing
the amount of saturation by adding
more and more color. In this case, we
will be increasing the amount of burnt
sienna and intense blue. Now I'm adding a little bit of more burnt sienna and intense blue to
increase the contrast. You can see that this
mixture is quite dark, which will add good amount
of contrast to the painting. Let's add more intense blue
to make the color darker. You can see that the skull
is much closer to the black. Let's quickly cover the land
using the same mixture. So you can see that the color is looking a little
bit green in color. It's because we have added blue and when it gets mixed
with burnt sienna, it gives such effects. Let's add more intense blue to the burnt sienna and then we will apply it onto the paper. So for instance, we have
completed painting the land. Let's quickly add one more tree. But before that, we will make the painting try
using a hairdryer. Now I am using a damp brush
to mix the color which is at the background to create
a beautiful, dreamy fit. Basically I'm blending
it with water. Let's paint one more tree. For this, I'm using
the same mixture of burnt sienna mixed with a
little bit of intense blue. Slowly, I will add
more intense blue to draw the shadows at the
base of the tree trunk. Now adding a few details on
the tree to add shadows. So friends, this is all about this part I hope you've enjoyed. In the next part, I will be sketching the deer
and painting it. And I hope to see you there.
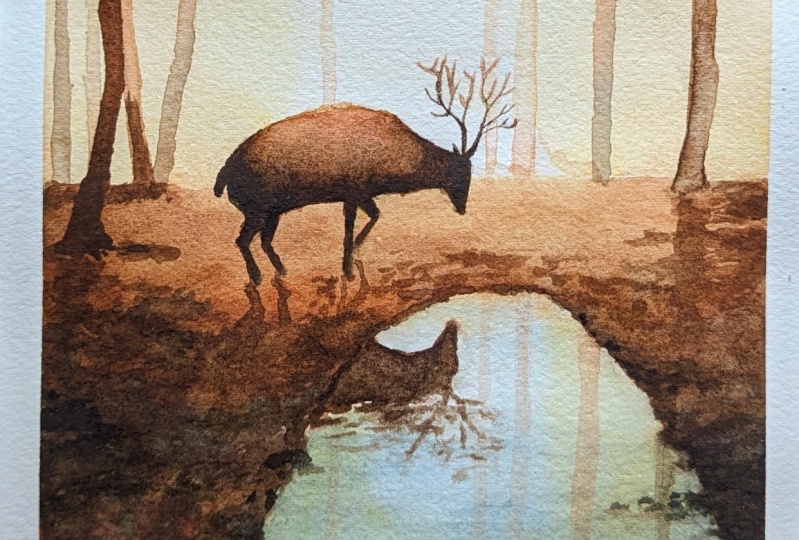
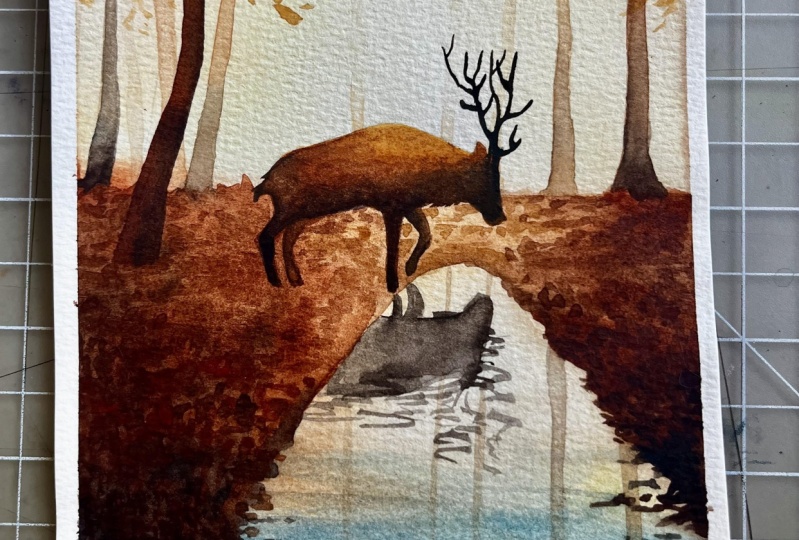
5. Painting Deer: Hello everyone, welcome back. In this part, I will be sketching the deer
and painting it. Also. I will try
to please the deer in the middle of the
painting so as to create a centralized focus
for sketching the deer. I'm using a mechanical
pencil with an HB lead. So here I'm trying to
draw the deer freehand. If you want, you can
just practice ones on a blank paper and then you
can perform this activity. So first I will try to create
the shape of the body, which consist of ownership
and circular shifts. And then I will try
to connect them. You can see I'm working very
slow and at the same thing, trying to create a
very light sketch. Otherwise the pencil would
create dark marks on the people and it becomes
very hard to erase them. You can see I'm just creating the outer basic
shape of the body. Once it gets completed, we will make it light
using a kneaded eraser. Now, I'm using a kneaded eraser
to make my sketch light. Before I start with the beans. The brush, I'm using a round brush number food
from sin eyelid soft at one. The color I'm using is a
mixture of burnt sienna mixed with cadmium yellow and a
little bit of cadmium red. Here I'm starting
applying the color from the upper
portion of the deal. This will be the light areas. So I am starting
with a light wash merely consist of cadmium
yellow in the mixture. As we move down the body, I will be increasing the
amount of burnt sienna, which is the brown
in the mixture. You can see how beautifully the colors are getting
mixed with each other. It's only because the
colors are still active. Now let's add intense blue to the mixture to make
the mixture darker. This will help in
adding the shadows. A small tip to keep
in mind is that as we will move away
from the center, we will try to make
things darker in color. Let's remove the color to make the area light
using a damp brush. And every time you
pick the color, tried to wash your brush. For the face of the deer. I'm using the same mixture of burnt sienna mixed
with intense blue. Let's quickly add the
legs of the DEA using the same mixture of intense
blue mixed with burnt sienna. So looking at the painting, you can see that the
deal is in motion. Probably when we
dropping things, It's better to add characters
in motion and not steal. This will help you in adding
beauty to your painting. Let's add a little
bit of more intense blue mixed with burnt
sienna to draw the shadows. You can see that the deal
is slowly getting sheep. Now I'm using a mixture
of cadmium yellow mixed with burnt sienna to blend
the colors with the shadow. The face of the year as
well as for the lower legs. I'm using the same mixture with more of intense blue in it. Let's use a thin liner brush to draw the hands of the deal. I'm using a liner
brush number four. You can use any liner
brush you have. Just check once that it has a sharp tip so that it becomes easy for you
to draw the lines. You can see I'm painting
the hands quite slowly because at
this point of time, if any mistake happens, it becomes very difficult
to recover it back. As they move up while
drawing the hands. I'm trying to make them
little thinner because at the edges that wants tends to look a little thinner
than the base. Let's add a few more details. So friends, we have
come to an end of this painting session
where we have drawn the Deere successfully adding the details such as shadows. Now it's time to move on to
our next part where I will be drawing the shadows and
reflection in the water. And I hope to see you there.
6. Painting Shadows and Reflections: Hello everyone, Welcome back. In this part we will be drawing the reflection and the
shadows in the deal. Here I'm using a round
brush number eight from Sennelier soft
Aqua Raffles series. A color which I'm
using is a mixture of burnt sienna mixed
with intense blue. Fullest. I'm trying to create the basic shape
of the ears head. After that, we will make it
dark using a darker shades. You can see I'm drawing
the mirror image of the deals head to show that
reflection in the water. Let's quickly add the
reflection of the deers Hans. For this, I'm using
the same mixture of intense blue mixed
with burnt sienna. You can see I'm painting
the shadow quite slow and interconnecting them with straight horizontal lines. The shadow of the deer said, is looking a little
bit light in color. So in order to increase the
contrast and saturation, I'm adding a little bit of more intense blue
to the mixture. So let's clean the
palette before we mix other colors for
the water of the lake. Let's add another layer of color to add contrast
to the lake. Before applying the color, I'm making the area wet so that the colors
can easily flow. And it also helps in creating
beautiful color gradations. Now let's add colors for this, I'm using the same mixture of intense blue mixed
with burnt sienna. But this same, the amount
of intense blue will be more as we're
painting the water. As you can see on
the painting that I've applied the pin to the area where I feel that the water was not good enough to
blend the colors. So I'm applying the water
again and trying to blend it. Let's add a few more
brushstrokes of intense blue. I'm adding these colors when
the paper is still wet. Now I'm picking some
of the color using a damp brush because
I don't want to make the reflection stand
out in the painting. I want to make them
look a little faded. Let's add a little bit
of more burnt sienna to the intense blue to
make the color look dark. And then I'm applying
it onto the people. Here. I'm following
the same rule that the things
which are close to us tends to look more defined with high
contrast and saturation. Let's try the painting using a hairdryer before they proceed
with the further steps. Let's mix burnt sienna with
intense blue for the shadows. As you can see, I've
started painting the shadow of the deal using
the same mixture. While painting the shadows, we will try to keep in mind the basic autonomy of the deal. We will try to create a mirror
image of it on the ground. Keeping perspective in mind. I'm using the same color
to draw the texture on the ground to show some
small pebbles and stones, which we usually
see in the jungles. You can definitely change the color tones using
more of intense blue or less of intense blue to
bring variety to your shadows. Let's add some more
texture to show the shadows of the
leaves and tree trunks. Now I'm adding a mixture of intense blue and burnt sienna
to draw darker shadows. Let's draw a few more
shadows on the left. And the brush which I'm using
is a mop brush number zero. I'm also adding a few texture on the water to show dry leaves, dust, and broken branches. This will actually increase
the beauty of the painting. Now let's paint
some reflections of the tree trunk on the
water of the leak. Further reflection of the
tree trunk on the water. I'm using a very dilute
layer of burnt sienna. For the trees on the right, I'm using a very dilute mixture of burnt sienna mixed
with intense blue. So we'll painting
the reflections. Keep one thing in mind that we need to
draw reflections as a mirror images and making them correctly will
give your painting a sense of realistic lists. Let's add a few more strokes of intense blue to draw the leaves, but try to keep this
layer a little dilute. Let's add a touch
of burnt sienna on the left to paint the
details on the ground. Now let's clean the palette. It's time to draw
some autumn leaves on the ground as well
as on the water. For this, I'm mixing
cadmium red and we'll apply it directly on
the required areas. Friends, this is all about this part I hope
you have enjoyed. In the next part,
I will be painting the reflections and
shadows in the deal. And I hope to see you there.
7. Adding Detail to Shadows and Reflections: Hello friends, welcome back. In this part, we will be adding the details to shadows
and reflection. Here I'm using the mixture of cadmium red mixing burnt
sienna to increase the saturation as this portion of the deal was looking
less saturated. So I'm taking the
help of intense blue to add the shadow to
the body of the deal. Let's add a little
bit of more intense blue to the fees of the
deer and on the legs. Again, I'm using the
same intense blue at the lower portion of the body to add the contrast to make
the EDL look more dark. Adding a little touch
of burnt sienna, which is the brown, and
then we will blend it. Also. I'm blending
some of the areas and the dark so that the
blending looks even. Let's add some details
to the ground. For this, I'm using
the same mixture of intense blue mixed
with burnt sienna. I'm applying this darker
color only at the corners. And on those portions
which are close to us and away from
the glowing center. Looking at the
painting, I feel that the lake water is
looking less saturated. So I will be adding a
layer of color to it. For this, I'm using
the same mixture of intense blue mixed
with burnt sienna. But the amount of intense
blue will be more. As we move up the painting, we will try to make the colors dilute by taking
the help of water. You can see I'm pushing
the colors a little bit up using my brush to create a
beautiful gradation of color. The brush which I'm using
is a mop brush number zero. And as we move up, we will increase the amount of water and use less
paint with it. Here I'm using a clean water so that I don't
lose the brightness of the reflection and don't
make my colors look muddy. You can increase the contrast of the land using the
same mixture of intense blue mixed with burnt sienna to make the
land look more dark. Let's add texture
to the land using the same mixture of intense
blue mixed with burnt sienna. So friends, we have come to an end of this
painting session where we have added the details to
the shadows and reflections. Now it's time to move
on to our next part, where I will be drawing
the autumn tree leaves. And I hope
to see you there.
8. Painting Autumn Tree Leaves: Hello friends, welcome back. In this part, we will be
drawing the autumn tree leaves. Let's start with the paint. Here. I'm using a cadmium red for the leaves
in dilute form. You can see that the color is
looking a little bit duller because of the intense blue
color present on the palette. You can apply the
color directly, or you can take the
help of lighter colors, such as cadmium yellow
or dark colors like burnt sienna and intense blue to bring variation
in your tree leaves. I'm also taking the
help of water to make the colors dilute
and less saturated. While drawing the leaves, I'm trying to play with
the variety of shifts. You can see I've started drawing the leaves with
some bigger ships. And at the edges, I am
making them smaller in size to show the
growth of new leaves. Let's use some more cadmium
red to draw the leaves. To draw the light color leaves, you can mix cadmium yellow with cadmium red and then apply. Now let's use a
mixture of cadmium red and intense blue to
draw darker leaves. I will use the same mixture
of cadmium red mixed with intense blue for all the leaves
which are in the shadow. To draw the darkest leaves, I will be using the intense
blue more in the mixture. So friends, we have come to an end of this painting session. In the next part,
I will be removing the masking tape and
revealing the painting. And I hope to see you there.
9. Final Thoughts: Hi everyone, Welcome back. Finally, we have come to an
end of this painting class. It seemed to reveal a
painting that clean borders. But before that, let's make the painting completely
re using a hairdryer. Once it is done, we will
remove the masking tape. While removing the masking tape. Try to remove it slowly and pull the masking tape outwards so that it does not
see other people. I hope you have enjoyed
the painting class and would definitely
give it a try. Don't forget to
share your paintings in the project gallery. I would definitely love to see your creations and we'll try to help you in case
it is required. If you have any questions you can ask me in the
discussion tab, I will be more than
happy to answer you. You can even join me
on Instagram or you can visit my YouTube
channel, drove it Sheba. And don't forget to follow me on Skillshare for upcoming classes. And lastly, Be safe, stay blessed, and
enjoy painting. And I see you in the next class.
 Shiba Basan, Art influencer and Content Creator