Transcripts
1. Course Introduction: Hey, everybody, And welcome to this very exciting cause for how to edit your own videos using Adobe Premiere Pro. Hopefully without getting bored out off your mind. Now, video editing doesn't have to be difficult. There's no need to panic in this course. I want to take you through everything you need to know to create and edit your own videos from start to finish, no matter whether you into blogging, game casting, travel, cooking or wedding videography or putting together your own movie projects. Now my name is Toby s. And for probably around about the last 10 years or so, I've been teaching visual effects film making. In three D online. I run the surface studio YouTube channel, which is probably the main outlet for my slightly different type of two titles. In this structured course, I want to show you how you can very easily put together your very own video projects from start to finish using Adobe Premiere Pro, which is one of the industry leading video editing tools. By the end of this course, you will know how to use Premiere Pro to create your own projects, how to input your media files used the essential editing tools to create your own video edits. And then how to export those edits into actual video files that you can then share with your friends, family or random strangers all over the Internet. You will learn how to work with video and audio transitions and effects, how to lay our video and audio material, how to have key friends and animations and helped add text titles and graphics to spice up your final video. Finally, you will get to practice your skills by putting together a video. Edit yourself, either by using the provided course materials. Or you can dive straight into the deep end and use any video footage set you may already have. If you have any questions along the way, you get stuck or you just want to share your thoughts or feedback at any point in time. Do you get in contact with me on here off via social media? I'm always really happy to help out now. Want to make sure that you get the most out of this course, but now I feel like I've offered on forever. Let's jump right into the course
2. What is Adobe Premiere Pro?: before we get into it. Let's quickly talk about what Adobe Premiere Pro is and what it is not. Premiere Pro is an industry leading an L E would stands for non linear editing system. Can N. L E is a software program that allows you to combine all sorts of recorded video and audio material into a cohesive video edit in a non destructive, nonlinear way. Adobe Premiere Pro is used all over the world to create anything from YouTube videos to Hollywood movies. It makes it really easy to import and manage all of your videos, your images. He music, his sound effects. Pick all the pieces that you want, a deranged them in a sequential manner to put together a final video edit. It allows you to lay our video audio clips on top of each other to create picture and picture effects, then different visual elements together or at sound effects and music to your videos. It comes with a lot of in the video and audio transition, tons of effects and lots of tools for creating text and titles and include friends and animations or color correcting and color grading your footage, topics that will dive in another deeper throughout this course. Now, While Premiere Pro is a great tool for video editing, it is important to understand that it is not the best tool. If you want to get into motion graphics and visual effects for that sort of work, that will be after effects provides a much more powerful than the much more suitable to set . Also, if you are looking to get more into audio engineering and creating your own music, I would recommend check out some of the other tools, such as Adobe Audition or potentially an actual d a W a digital audio workstation. Instead, all of that Seto Adobe Crimea Pro is a great way to put together anything from blocks to professional wedding we used to Hollywood movies. Now it's finally time to get a hand, stirred the fire Premiere pro and learn how to use this powerful video editing tool
3. Creating a New Project: Let's finally get our hands dirty and launch Premiere Pro. Depending on the version of Premier Pro that you're using, you start up screen might look slightly different for me. It's a shows me a list off my recently open projects. I can jump straight back into it, but for now, let's just click this away. And before you can do anything in Premiere Pro, you first need to create a new project. For that. Let's come up into the main menu. So, like file new and let's Elect to create a new project. First, let's give our project a name, and this is also going to be the name off the file that is going to be saved on your hard drive. Let's just call this my first project, and then it's to find a location on our hard drive. Where we want this file to be saved was going to navigate to the folder here for this premiere pro training course where I want to save this file, select this folder and then we need to define the project settings. Now you won't find anything about resolution or frame rates here. That happens when we create sequences which are the containers for actual video files here . All we have to select is the render we want to use for Premier Pro. Right now. This is set to the Mercury playback engine. Which does? He was. GPU Acceleration in brackets here says cuter because I haven't NVIDIA graphics card. If you have an 80 a graphics card, this might say open CL, which is kind of the open source version off Cuba. So I recommend Do select an option that has GPU acceleration if you have a dedicated graphics card, otherwise you can fall back to software only. But this will render just on your CPU so it will be slower. So to select either cuter or open C l. And then let's simply hit okay, after just a second Premier Pro will open up our new project, and this is the default interface for Premier Pro that we will probably was spending a whole lot of time staring at. But without project now created, let's have a more in depth look at the premiere pro interface in the next lesson
4. The Premiere Pro Interface: now the interface for Adobe Premiere Pro might seem a little bit daunting when you first encounter it. But don't worry, it's all not that complicated. Also don't stress if you in the face doesn't look exactly the same. The look and feel of the layout off this interface has changed over the years, but all of the features that we're going to be using throughout this course should be available in Adobe Premiere Pro Ever since Sisi was released in 2013 the only exception to that are the title and textiles that have changed in C C 2017. But I'll touch on that a little further. Down the line. The interface for Premier Pro is made up of a number off different customizable panels. All of them have thes thick, dark lines. In between. You can click on them and drag in and out to resize your panels in any way that you want. You can also actually click on the titles for any off these panels and drag them around and you can reposition them. So, for example, I could move the timeline up into here are can drag it and attach it to the siding and relay out your interface in any way that you want. You can also right click on the title off a lot of these panels and select to undock that panel, and that's going to give you a floating window so you can, you know, move bits and pieces around or moving off to another screen. If you have, you can also close the pounds that you don't need. It's also a little excess next to those panels to close them more quickly. Now, if you've lost a panel that we're going to be touching on throughout this course, you can always come up into window and down here at the bottom, you will find a list of all of the panels that are available in Adobe Premiere Pro. So, for example, I've closed the timeline panel. I could just select the timeline panel here, and that brings my timeline panel back. Another gotcha for beginners off premier pros also that sometimes some panels are hidden behind others. So right here on the left inside, I've got a project panel which will touch on in just a minute and over on the right off that there's actually more panel CIA there's a media browser and you can see that by this little double arrow that's being indicated he If you click on that, you can actually see there's two panels nested right here. Secrets, which between them. And if you added more panels into that for self, we dragged the timeline into that as well. Now, under this arrow, I would have the project panel, the media browser and the time that so again, you may not see all of them on your interface. Now, if you can't find a Penhall or you've messed everything up and you just want to return to where you started, you can always come up into window workspaces over on the right hand side. You can actually select a number of different work spaces for editing. Working with the facts were graphics or going through your libraries off learning or working with all your down at the bottom. You have a really handy function called reset to safety layout, and if you so like that, it's got to reset the interface to way you started. Now we almost ready to get into actually editing some video. But first we do need to talk about setting a premiere pro and adjusting some of the preferences. Just so. It's a little bit easier working with Premiere Pro, and we're going to do that in the next lesson.
5. Setting Initial Preferences: Now, before we start creating sequences and getting into the editing part off this course, it's quickly come up into the preferences. Make sure were properly configured, come up into the main menu. Under it, you'll find preferences. Let's come into general now. There's tons of options in here that you can dig through. We're only going to be touching on just a few. The 1st 1 on the general. You'll find an option for its start up. You can actually decide what happens when you start a premier profess you can show home, or you can open up your most recent project automatically. I usually like to keep it at your home because in the later versions of Premiere Pro, that gives me a list of my previous projects. Anyways, the more important settings when you're first starting out is probably order safe. He can actually enable automatically saving your project, and that is highly recommended because if you're working on a heavy edit, premiere pro mind sometimes crash or there's issues with your computer, so you probably want to set this to maybe safe every five minutes automatically. And how many past versions to retain? I was going to leave this on 20. So the most amount of work I'm ever going to lose is five minutes worth off work, and they'll be 20 old versions safe. This historically reckon, Go back to the next thing I recommend you have. Look at issue Media Cage as he import files into Premiere Pro when you start working with them and editing them, Premier Pro will start right and case files, little temporary preview files and peak files and other supporting data on your hard drive to make Premiere Pro faster. Those ones were all be written to the media case file locations to make sure you've configured this one to something sensible. Otherwise, this will this point to some user slash temper. It'll be folder now. If you find Premiere Pro is getting a bit slow or your hard drive is starting to fill up with these temp fast, you can always click delete this flashy occasion. There's no harm in this. It just means Premier Pro might have to rebuild it. But this is a good thing to try out. If you having any issues. Previ in files or Premiere pro starting to go a little bit, laddie Finally, let's quickly jump into the memory preferences, and in here you can define how much memory or how much RAM is accessible to Premier Pro. Now I have 64 gigabytes installed on my machine, and that is slightly ridiculous amount. But I do a lot of visual effects. Working last three D work that does require a lot of RAM forward with Premiere Pro. I would recommend 16 gigabytes off ramp just told the rest of your system has enough to work with. But eight gigabytes should be fine as long as you're not working with large four K files or anything like that. Now you have to define how much RAM to reserve for other applications. So Premiere Pro will use everything except what you leave now. I would recommend setting this to eight if you have 16 gigabytes of RAM. If you have eight gigabytes of Ram, I would probably set that to Forrester that Premiere Pro has a decent amount of RAM to work with, and other applications have enough left over also down at the bottom optimized rendering for if you have this option again, only available in later versions of Premiere Pro make sure that this is set to performance rather than memory. It'll simply make Premiere Pro go faster. Now there's tons like tons of other options in here, I'd recommend is Go through these, see which ones make sense and tweak them to your liking. You can also read up on them on the Adobe Help site. But let's just finish this often, actually get to the editing. And for that, let's talk about importing media into your project in the next lesson.
6. Importing Media: Now let's finally talk about how we can get all of our media files, our videos, our images, our music and our sound effects into Premiere Pro, so we can actually start editing our first project. The panel that is going to be most important to that is the project panel, which by default I could see on the bottom left here. I'm going to make this panel a little bit bigger as well. Now there are quite a number of different ways to import media. The most obvious one is to come up into the main menu like file import. This is going to pop open a file browser dialogue, and then you can never get to the folder on your hard drive where you have all of your media files stored. I'm going to go into the course Materials folder, and you will be able to download all of the's fires as part of the course to follow along. But if you do have your own videos recorded already are highly encourage you to use those instead would likely be much more fun, much more personal and for the purpose off the course, it doesn't really matter what video image, music or sound effect files you're using under jackalope lets us import this bunny stare. You also just select a whole bunch of them and simply hit open. That's going to import all of those files directly into your project. All of those video files are now available in the project panel. In click through them, you can select them. You can hold down shift and collectors like the range of them, or hold on control or command on the Mac to select multiple farts individually. Now I'm going to select all of my fans with control or command and a and then hit delete on my keyboard to remove these files from a project Now that won't delete the files from a hard drive, it just removed them from the project. Another way to import fired into the product is simply to double click into some empty space in the project folder. Again, that's going to pop up the same dialogue and in here come in. Maybe in tow, iPhone and importance Korean barbecue file Again, it's going to get imported into my project and extend of able in my project panel again. I'm going to drag click. Select that and hit delete. To delete that, let's talk about probably the easiest way to get your father into Adobe. Premiere Pro. Simply open up a file down a lock. I've got one here already navigated to the course materials, and you can now simply select folders or the whole group of Fuller's drag and drop them directly into the project panel. Let go and Premier Pro will import them into your project folder already organized into the fullest that they were in. So this makes it really easy. If you've pre sorted and pre named your fastest draft that whole thing into your project and everything will get important. Now do note that while Premiere Pro does support a very large number off audio and video material, there's some file times Premier Produce doesn't recognize. I've got an amazing underscore landscapes underscore 00 dot or pee or was up far here. If I try to drop that into the project, Premier Pro is actually going to say I cannot import that file. I don't know what that is. My file format is not supported Now, if that is a video file from your camera or your mobile phone and premier pro complaints to make sure that you can play that far back on your computer. If not, maybe you're missing a Kodak like quick time that you need to install first, so Premiere Pro can actually understand it. Now. It is also possible that the files are corrupted. So he has got a Sony is that that extends to outdoor short dot MP for I know this isn't is bad file. If I drag and drop that into Premiere Pro Premiere Pro Again will give me a failure, saying something like the Filers unsupported compression type. Or there's something else wrong with the file to make sure you can play the far back on your computer. And then you should be able to drag and drop that into your product panel to import it into Premiere Pro. Now, in a project panel, Premiere Pro has imported all of our far into their separate folders. They're called bins in Premiere Pro, and you can restructure things in here swell. So down here at the bottom off the Project pound, you'll find a number off different wagons. There's one a little folder Aiken saying you been if you click that it's going to create a new folder, and you can call this whatever you want to. Maybe I'm going to call this for which you actually just drag and drop fallers around here . So let's select these four folders and drop them into the footage. Been the Ends kind of makes it bit nicer and easier. You can move things out and renamed them in any way that you want, simply by clicking on the name and then just giving it in your name at the bottom off the project panel. Right now we're in list view. You can also go in tow. I can view, and while this doesn't help us much, But if you double click onto the footage, fall down and maybe let's double click onto jackalope, you'll actually get little previews. Little thumbnails here that preview those files, and you can also this whole team out over the mccaf scrub right and left a kind of scrapped through these clips very quickly. It just makes it easier to see what the files are that you have imported into your project . Down at the bottom, you've got a little slide as well. She could kind of make these images bigger or smaller, and if you find you have very little space in this panel, remember, you can just right click onto this name been jackalope and select toe undock that's going toe undocked. This been, but he's still half the project folder with your footage been, and the project indignados resize this and move this off to another screen, and you can then select and use your footage from this separate window here. That's us closest again. Come back to the project panel and maybe let's return there to list you. Now It's totally up to you. How you want to manage these folders are usually, once I'm in a specific one. I like to pop it open. Just it's a bit easier to select the files, but in my project panel, I like to keep everything nice and clean in this list view. Also, if you're looking for a specific filed as a search function up at the top years, if I search for Bunny, that's going to filter down everything I have in my project pound toe, only the files that have bunny in the name, so there are just too bunny stare and jackalope money, and we'll get to those ones in just a little bit. But it just makes it a bit easier if you have a large amount of footage important into your project, assuming that everything is properly named to just find what you're looking for. But now that we've imported all of this footage into our project, let's look at sequences and how to create an actual video edit in the next lesson.
7. Creating Sequences: Now that we've imported all of the media into a project, we to create a sequence a sequence is kind of a container for our media files were will actually do with the editing than arranging everything the way we want to and the sequences what will be exporting into a final video file? There are multiple ways to create a sequence you can simply come up into file new and then select to create a new sequence to short cut key. For that is control or command and end. If the bottom off the project panel, you'll also find that this little new item I can. If you click on that, you'll also be able to create a whole bunch of different types off files with the new project. The top one is a sequence, so let's simply select to create a new sequence. And Premier Pro is going to pop up the new sequence Dialogue Now first off at the bottom here, we have to give our sequence the name. Let's call this fun my first edit, and then in the top here you'll find a very large amount of different presets for the settings that you want to use for your sequence. Now, the most important settings for your sequence that we need to find is the frame science, which is the width and height off the final video that we're going to export as well as the pixel aspect ratio that you'll see in brackets. Here s one. And the pixel aspect ratio actually just refers to the fact that not all pixels are created equal. Not all pixels are square. Some cameras actually record video informant, where the pictures are a little bit more elongated. So you may have a pixel aspect ratio that is not 1 to 1, but that's usually more for older cameras. Most modern DSLR zor muralist cameras, even the mobile phone shoots at a square pixel aspect ratio. So that's usually going to be one. Then we need to define the frame rate. How many frames per second you want to have now? A lot of handheld cameras and mobile phones should at 30 frames per second, movies and cinema and TV generally used 24 or 23.976 frames per second. So depending on the field that you want your final video to have you may want to pick one of the other, and then you also need to define your sample rate, which is the quality off the output audio. Most of the times you will be fined a season 48,000 hertz, which is what most cameras and audio recorders will record in any way. Now, as he select all these presets here on the left side, you'll see some off. These settings change that when I'm going to pick is under digital SLR 10. 80 p, which is 10 80 vertical pixels. So that's a resolution off 1920 by 10 80. I want to select this first preset DSLR 10 80 p at 24 frames per second. No one right inside. You can see what those settings are. You can also come up into the settings here at the top and customize them yourself. So in he'll find things like the frame rate to use, as well as the frame size of the width and height off your open video, the pixel aspect ratio again. Most of the time, you could just leave that on one and not worry about it. If you video end up being squished or stretched, you may have to change the pixel aspect ratio, and then you need to check out what the pixel aspect ratio off the video files are that you've recorded with your camera. Further down the sample rate for the audio. I'm going to leave on 48,000 hertz. And then there's a few more settings down here that we don't need to worry about. For now, the one final thing that I want to point your attention to is in the tracks tap. Now every sequence is actually going to contain multiple video and multiple audio tracks so that you can lay our videos on top of each other. Or you can lay out or your top of each other so you can have someone talking. But under that you have music and maybe some sound effects. And same with the video, you may have a general video. You may have a little picture and picture like a small square off yourself, talking over a game play video or something like that, or you may have text layers and other things. So he going to find how many video tracks you want to buy the fault that is three as well as how many audio tracks you want and you can actually give your audio tracks names. Here, you could call one voice over one music and one sound effect. You can add other audio tracks to it, but we re able to do that later on anyway. So let's simply hit OK to actually create our first sequence. And here in the product panel, you will now find a sequence called My First Edit. You will also note that the timeline itself now says my first edit and this is the time nine for this particular sequence. This is now the timeline where we'll be able to add all of our media farts, our music. Our images are video arranged him and edit them, and this sequence, we can then export into a video file. If for whatever reason you've close to your sequence, you can see right now we're back on the timeline that there's nothing selected here or you have multiple sequences in the same project, and there's nothing stopping you from creating as many sequences as you want within the same project. You could simply double click onto that sequence in your project panel that's going to open that up again, and then you're ready to do your editing. Finally, if you're unhappy with the settings that you chose for you sequence and by the way, if you have over, the sequence there should be blended in. So this is 1920 by 10 80 pixel aspect ratio, off one at 24 frames per second. With 48,000 hertz or your settings, you can right click on the sequence. Come up into sequence settings, and then you can change those settings again so you can tweet your sequence even after the fact. So don't worry about it. But now that we've created the sequence, let's actually start adding some media into the sequence and start getting into the actual editing work flow in the next lesson.
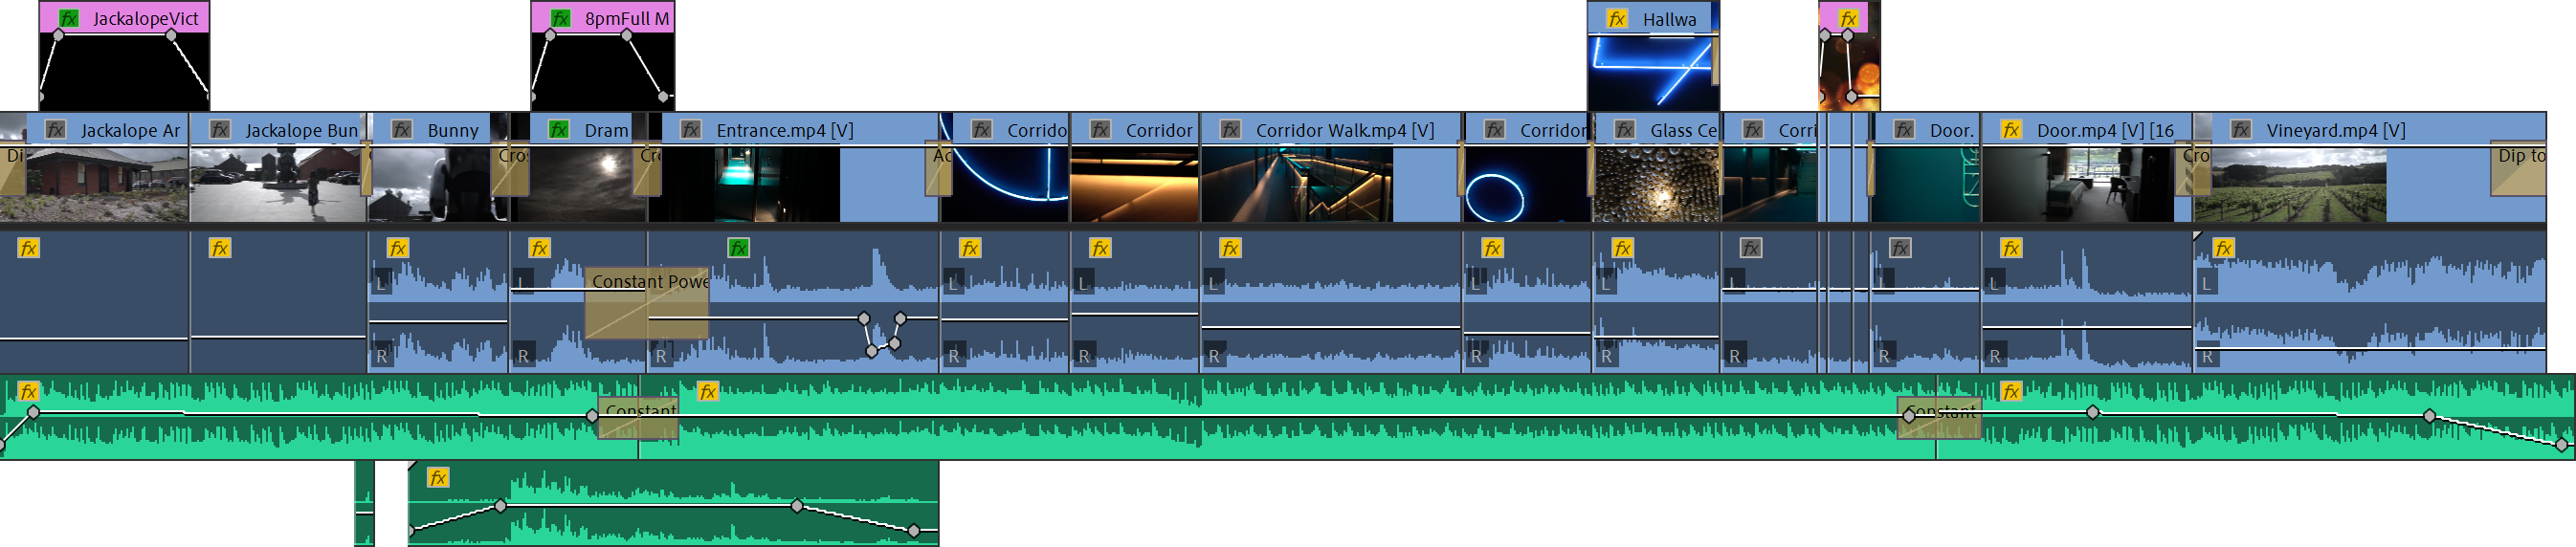
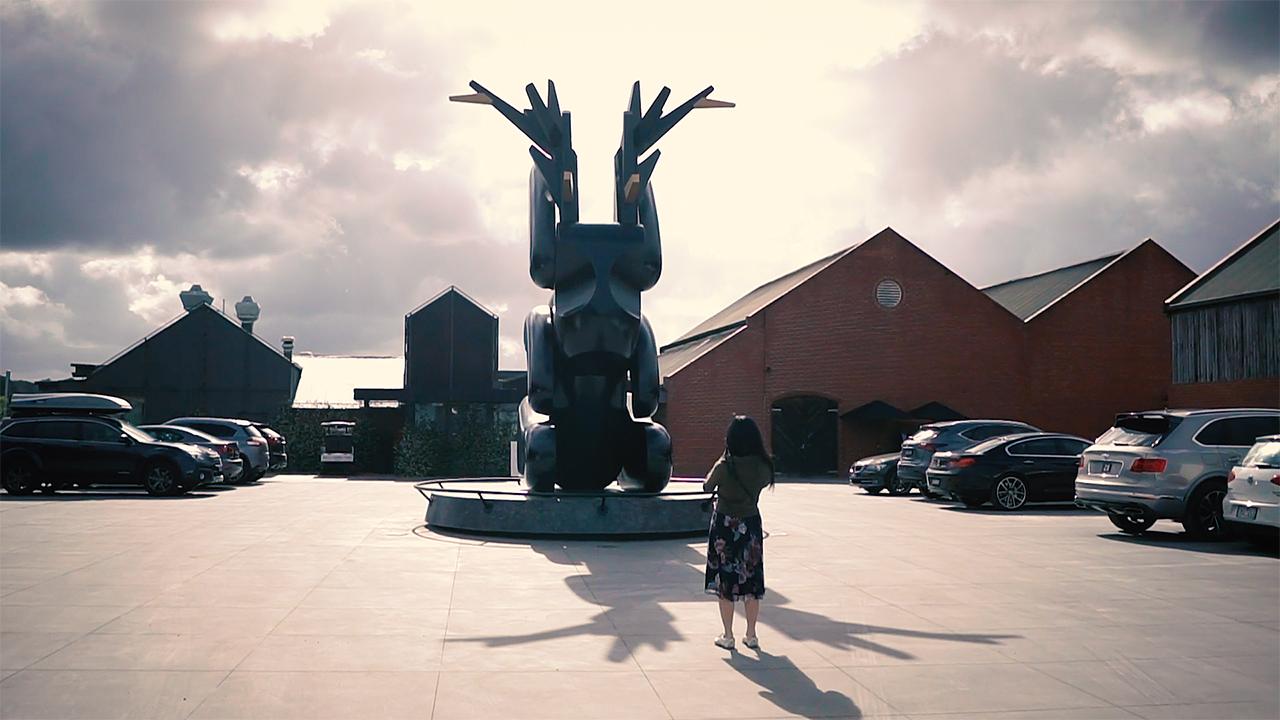
8. Adding Media to The Timeline: we've created our first sequence. We've got all of our media imported into our project. Let's finally get this boat on the water and start editing now in my project panel, I'm going to switch this over toe I can view because I actually want to see what I'm selecting. Let's double click into footage and double click into jackalope. And by the way, if you're wondering why this is called jackalope, down here in Australia and near Melbourne is a very, very modern hotel called jackalope. Their mascot is kind of a combination off a jack rabbit and an antelope, A check, a lope kind of preacher. Me and my wife stayed at that hotel a little while ago on The clips in this folder are from that particular trip. So that's why it's called jackalope again. If this is a little bit too small, I can actually right click onto this header. He had been jackalope and select toe undocked. That panel that is going to pop this up as a little window second, just make this a little bit bigger variety on the side. Now there's some tools on the left side of the timeline. We will look at those ones in a later lesson. So for now we can discover that happen. Just make this we know a little bit bigger, just gives us a little bit more overview over the clips that we have to work with. And in order to pull any media from your project panel or any off your bins onto your timeline, let's click on this chord a ceiling dot mp for and drag that into the sequence and you should see to lay us one represents the video track off this clip that we're dragging in, and the one at the bottom represents the audio track. Now, as a move up and down, I'm going to change where I'm going to place this audio and video material right now. This is going to be dropped on video, Track one and audio track one. If I drag this up, that will be Video Track two and audio track to video to three and audio three and again, this is useful for layering. Audio and video on top of each other will deal with all of that later. Let's just drop it on video Trade one End Audio Track One has this click on it to select it , and we've now added our first clip into our sequence. Just the super quick side. Note. If at the point of dragging and dropping a clip from your project panel onto your timeline , you get this pop up here from Premier Pro, wanting you off a clip mismatch. That's his premiere pro trying to be helpful because it says that the clip that you've dropped from your project panel onto your time nine doesn't match the sequence settings in terms off his resolution, its frame rate, the pixel aspect ratio or the audio assemble rate in Premiere Pro is now offering. Well, do you want to change the sequence settings to match the properties off the clip you dropped on? What you want to keep the existing settings that you've set up when he created the sequence . Now, if you're not quite sure you just editing through some family footage or gameplay videos or anything like that, you might want to just choose to change sequence settings. He guaranteed that that clip that you've dropping into matches exactly onto the sequence. If you're falling along with all of the footage provided for this course, and we've already created and set up our sequence their way we wanted it to. You can simply click on, keep existing settings, and you can just continue on with the course. But now back to the main meal. Now the program monitor or the preview monitor at the top still just shows black because it only shows. But it's underneath. That timeline indicated here this blue cursor. Now you can click at the top of this Curzon start grabbing it and scrubbing three Project. And the moment this crazy goes over your clip, you'll see what's in there, and you'll also hear the all you for that. Now it's a little bit small, but you can easily zoom in on the time that simply by holding down old or option on the Mac and scrolling up on your mouse wheel. So you going to zoom in. You can also scroll down to zoom back out. You can also use this little slider, he at the bottom to move left and fried and kind of take these little circles into zoom in and out. Now, in order to move forward and backwards without holding down any key to scroll up or down on the mouse wheel to navigate around and again. You can just move this slider around, if that's what you want to do. Now, these layers here, this audio track and this video track that quite narrow and you can actually click on these horizontal bus and drag this up, same with the audience. Distract that down to make those clips a little bit bigger, and you can now see you that the video track actually gives a little preview off the first frame off this clip, and you can also see the audio away fall off the actual audio that place as part of this clip. Now, in order to play back your timeline, make sure the timeline is selected. So I got this little blue highlight. You just click into it, press space and press space again to stop it. So space is start and stop playback. And underneath the program monitor, you'll also find playback controls and same thing. You just click on play and click on Stop to stop the playback. Let's zoom back out a little bit, and now you can make all of the's tracks here, bigger or smaller, to your heart's content. You can also hold down, shift and scroll up or down on the mouse. Well, to do that, just a little bit more easily and again over on the right. Inside, you'll find this little slider here that you can use to do the same thing. There's no right or wrong. Just do this anyway you want. You can also set up keyboard shortcuts for zooming in and out and moving around. It will just make your life a whole lot easier. Let's zoom out a little bit, but holding up all options, scrolling down on the mouse wheel. Let's grab another clip. Maybe we'll grab this dramatic moon dot mp four clip again drag and drop that into the sequence. And again, it's got two clips, a video in an audio track that's this place, this right at the end, and that's got through Now. There's nothing between these two clips as actual just again. But the moment we over that dark moon, you can see that he and I actually got a bit of dark borders on the scientist because is framing the size off. This video doesn't quite match the size off our sequence, and we'll deal with that. A little bit later, let's zoom back in. And now you can simply take this dramatic moon clip and just drag this over to the left inside and snap it to the end off the first clip so that transitions from one directly into the other remove this back over to the right inside. You can also, at any point in time, right click into any gaps in your sequence and select to ripple delete that is going to delete the gap and move all clips that follow it in words are gonna snap them over to the left hand side. And that's really useful if you have a whole bunch of clips after this one, and you just want kind of collapse those gaps just right. Click them. So, for example, he at the beginning that's right. Click at the start. Select a ripple delete. It's going to delete that gap and all of the clips that came after that over to the left inside. So now it's nicely snapped to the left inside. By the way, if you clips, don't snap properly to each other. Make sure you have snapping, enabled up here, the top of the time, Landers is a little magnet Aiken or S sister shortcut key to make sure you enable snapping . If that doesn't happen, that's the reason why. Also, what might happen is that when you drag a clip from your project window into the sequence, you may only get the video track are only the audio track, even though there is both audio and video on that clip, That can happen if in your time nine here, you've got targeting enabled for video and audio, you're telling Premiere Pro, bringing both the video and the audio track. If I click on this, a one here, just disable targeting for the audio track and I now grab this dramatic moon clip and attracted into my sequence. You'll notice I only have two video track. I don't have the audio track, and that's because targeting isn't enabled. So let's click that again. Select this dramatic moon click press delete to delete that. So just it's just one of those gotchas in Premiere Pro. Now let's look at how we can start to arrange these clips, move them around to trim them in and out, and start getting into the very basics of editing. In the next lesson
9. Starting Your First Edit: Now let's zoom in a little bit and do some really, really basic editing in Premiere Pro. You can click on the end or the start off any clip. You could see the arrow change to the left here or trim to the right, and you can then click and drag in the direction to trim the beginning or click contracted from the end off a cliff. And that allows you to essentially cut the pieces out that you don't want so that you can actually create a proper edit and you know, to stumping every single clip that you've ever recorded on the same sequence. Again, let's delete those gaps by right clicking and selecting Ripple, Delete and reportedly so now we've got a little bit off a shorter edit and just a quick our transition between those two clips. Now let's say I wanted to insert a new clip at the beginning here. I've changed my mind. I want to start my video with a different clip. You can click and drag to box, select all of those clips, click and drag them over to the right inside to make a gap. And let's grab, for example, the entrance and before dragon drop that into our sequence and well, it's It's actually a little bit long. And if I let this go now, it's actually going to override thes two clips because while I place that right on top, that's control or command and see two under that, let's grab this entrance and before again drag that into the sequence to the very beginning and let's hold on control or command. You can see these arrows here indicating over to the right inside, and that means inside this clip and push everything to the right hand side. So let's let go. That looks like the same thing happened, but let's zoom out a little bit and our clips are still there. They just got pushed over to the right and site. Let's select this entrance and before delete to delete it, right click. Let's delete this gap again. Let's do that again. Let's grab this entrance and before drag it into our sequence at the very beginning on video, track and audio track one. Hold on control or commands to incident, Let go and that now incident this entrance and before, at the very beginning again. It's a very long clip, so we may want to click on the answer. Just pull that to the left to trim it in again, right. Click into the Gap and Ripple delete, and we've just created a really simple edit. Now, with any clips on your timeline, you can actually select them. That's select this one here. The ceiling clip press conference command and see to copy It has moved to a new location, so we're not overriding anything. Press contra or command and V to insert that clip and so you can duplicate them very easily . Control, command and X will cut it and again control or command and V to paste it in. You can also select this clip control on X to cut it. Let's come to the beginning and let's press control shift and V or command shift envy to insert that clip and push everything out. Let's do that and that now incident the clip again. Control and shift or command and shift and V toe incidently and push everything to the right inside. So again, there's lots, lots of ways to move your clips around and shrimp them in, and we're going to look at a whole bunch off. Those would be further down the line. Now that's just something slightly different. Zoom in. Let's right click on this clip. This is not a gap, but this is right. Click on this clip and in here you will also find a ripple delete option that will delete this clip and move everything into collapse. That gap. So let's do that. We've not delete the clip at the beginning. Moved everything over to the left inside on back to about a minute ago. Now let's do one more thing. Let's grab this vinyard dot mp four clip that's dragging into our sequence. But let's not override anything. And also don't push anything around it instead of drag this up to place the video on video Layer two and the audio on audio layer to that's conferred a little bit, and at this point here you'll see that we will swap to this vineyard clip because the vineyard clip is on top off all the other videos. So this will show because everything gets rendered top down the audio. You will hear both off the audio from the original entrance clip and the one from the Vineyard let me extend this layer just a little bit, make it a little bit bigger. So the view covers up everything that's underneath it. And thes old use will play together over on the left, inside, on every video tracking you'll find an eye, Aiken, that allows you to toggle the visibility off this track. If I turn this off for the vineyard. This layer here, anything that sits on this track is no longer visible. So we're going to see the entrance and before, underneath it Let's under that you could see the vineyard again and at the bottom. Here I have m and s switches. For all of my only attracts em means to mute. Don't play that only back s means to solo. So this will only play back this track and mute all of the other ones. So if, for example, I have a lot of audio tracks, I just want to listen to this fun. I could solo this layer and now I will only hear the video. Now that is very noisy. That's unsold. That and solo only the entrance. So I'm just swapping between those two audio clips. And for that we've created our very first edit. In the next lesson, let's look at a really easy way to deal with very long video clips where you may only want to add small snippets or small pieces off those clips onto your timeline.
10. The Source Monitor: Let's assume for a moment that you've recorded a really long video clip. Maybe you put your camera on a tripod at the beach or you were recording your cousin Donnie's wedding and all you really want. Is those two minutes off violence being spoken? Or that one snippet whether swarm off Siegel's was flying by the camera. Now, in the course materials, the probably longest clip is this corridor walk MP for Let's zoom out off our time down a little bit again, beholding down old option and scrolling down on the Mass. We'll let the drag and drop this clip onto the timeline, and it's pretty chunky now. It's not two hours long. Otherwise, this file would be humongous to download, but it is pretty long. And, let's say, out of this clip, I only really wanted a small snippet Now, rather than just dropping it onto my time nine trying to find the points that I wanted, trimming it in instant, lead it from the timeline again, and let's use the source monitor to pre select the pieces that we want and only dropped those pieces onto our timeline in order to do that, what I'm going to do is I'm going to re dock this been right here. And for that remember, you can just click on to the title and then you can kind of snapped that back in place. And I'm actually going to places right back here in my project panel, right in the center. Let go. It's going to snap it back in place. They're just That's kind of out of the way. So now, rather than dragging and dropping from the project panel onto the time nine, I'm going to double click the clip in my project panels. That's DoubleClick under this corridor. Walk dot MP, for That's going to pop open this clip in what's called the source Monitor. The songs monitor is essentially a preview monitor. Let me just make the panel just a little bit bigger. And this is a full video player, and down here, you've got playback controls. You've also got a little timeline indicate on you cannot scrapped through this and find the start point off this section off this clip that you actually want. So let's say we want to start right here just before I'm passing these railings for that staircase. I can now set an in point to say This is where I want to start. You can do that below there. Some controls here, over on the left side, mark in and mark out. Shortcut keys for that as I and own Premiere Pro has tons of shortcut keys highly recommend you get use of them that make editing so much easier. So let's click Mark in. That's going to set a marker down here, and you can see the rest of this Clippers highlighted. So I've selected from here everything forward, but I don't want the rest of the clip. Only one small section so lets us come forward. Or, you know you can play through this as well. If you wanted to, it's going to scrap because of it faster. Just until I pass those railings. Let's say I only want this section here. I can now set the out point and click on, Mark out our press on your keyboard to mark the out point and have not only got this small section highlighted, and now the cool thing is, I can click directly into the source monitor and drag it across into my timeline and drop it off and this small snippet here, this clip that I've dropped onto my timeline is only the clip that I've highlighted in my source monitor. So now only get the snip it off this clip where I'm starting right in front off this stairwell, right until I pass it. So I didn't need to drop the entire clip on my time. I can really just select snippet that I actually want. The cool thing is, I can now extract other clips. Let's say at the end here there's kind of like a short section. I'm kind of going, you know, just parallel to these railings here. I kind of like that as well. So again, I could mark this as in and out. But I can also drag these end markets around if I wanted to you. But I find that's a little bit less precise. So I preferred us marking this as my in point and coming forward to maybe around about their Let's mark this SD out point and the end, click and drag directly from the source monitor onto my sequence. Let that go in different. I'll play this back, I know have extracted two pieces out of this longer clip and only drop those selected snippets onto my timeline. Let's zoom out a little bit now. Sometimes he may only want to get the pieces off video only the sound from a certain clip at the bottom. Off the sauce monitors, you'll find two icons. They're very handy on the left side. This I can say drag video only on the right side. There's one that says Drag Audio Only if I click on the drag video only and drag from there on to my timeline, you can see now I only have the video less selected. I can drop that in, and that is only the video part off this skylighted section from the source monitor. I can do the same with the audio, so I can only drag the audio onto my timeline, and they're only going to get the audience, snip it off that clip. The sauce monitor is a really handy tool, especially if you work with long video. Fans are highly recommend that you make use of it, but now, in the next lesson, let's actually start exploring some of these editing tools over the left inside and let's start it, actually putting together our proper first edit
11. Basic Editing Tools: Now let's not exploring some of the tools that we have available in Premiere Pro to probably put together an actual video edit. For that, I'm first going to delete everything on our time now and then. You neither click and box select. Everything are, you know, with having clicked into the timer control command and a to select everything hit delete on your keyboard to flush everything. Let's come to the beginning off the sequence. Zoom in just a little bit and let's try to put together an actual small edits. Now again, if you're using your own footage, just do whatever feels right. And obviously you don't have to follow along exactly with what I do. I really just want to show you how to do things. And then what you do with that knowledge is totally up to you. Now let's just come down in our jackalope folder and I miss you. Go to start my video art with this jackalope arrived, which is like a panning shot over the hotel and then my wife just walking toe what's the car back? And to grab this and drag and drop that into the timeline. And yes, I could go via the source monitor, But I know a lot of these clips are pretty short already because I cut them to size for the purpose off this course. So we don't need to worry about too much of that. Let's scrap through this and just temporarily, I magic commute these audio tracks down here. Just because I don't want to interfere with the recording of this to trial will turn their back on once we start dealing with audio. So this is just a small clip panning across from the car park at a jackalope, and at the very end here, you could see the cameras kind of dropping down, so I don't want that. So let's come back a little bit trim in the end for that, let's come to the beginning. Zoom in a little bit and again. I don't need the clip to be quite that long, so maybe I'll start from round about there again. Let's take the beginning off the clip, trim that him right click that gap and hit rippled elites and, well, that work. So now we have our first trip, but there's other ways to do this, and there's ways to do that much more easily. But let's leave the first clip in place. Zoom out a little bit. Let's grab his jackalope Bonnie clip, drag and drop that onto the tunnel and snap it to the end off the 1st 1 So we're cutting across from this clip to that one and again, I wanted to start a little bit later, maybe here, when my wife is already approaching the Jack Bunny rabbit crossed with an antelope, and in the end, I could pull the beginning in and then delete the gap and do the same for the end. But let's start using some of the other tools we have in our toolbox now. Right now, we're on the selection tool that you can select with V as well, so you can click and select the eclipse on your timeline. Let's ignore a few of the other ones and come to the razor tool, which you can select with C. Let's select this one, and this allows you to cut your video clips up in any way that you want. You could empty click on the clip, and that's going to create a cut and edit through both of the video and audio track for that clip, I can place as many counts as I want to across all of my clips. Then I can return to the selection tool either by selecting it from our toolbox or by pressing V, and then I can start selecting all of the individual clips. Let's undo most of that with control or command and see, because I don't want to chop it up quite that fine. I really just want to cut in the beginning. So press see, to return to the razor to click on the Tomlin indicate. And again, with snapping enabled, you'll notice that this will snap to that point. Click Press Veto returned selection tools like the first trip, and that's pressing delete to delete that one right click and rippled elites. So that's the lead to the beginning. Let's come to the end and again, maybe we don't need quite that much off the clip towards the end of this wanna, just as my wife stops in front off the jackalope creature. So maybe right about there, proceed for the razor tool click V for the selection tool like that clip press delete to delete that and now we have the second clip on our timeline. Let's continue this on. And there's a lot to be said about video editing, not only from a technical but also from a storytelling point of view. I won't go into too much details. If you're interested in that, let me know I could make a course on that as well. Instead, let's grab this bunny stare clip from our jackalope. Been so it's kind of pretending you, my wife looking up at that bunny accounts, staring up at this weird creature. So let's grab this bunny stare, clip, drag and drop it into our timeline. You know, really tell. It's a bit of a longer clip. Snap it to the very end. Let's scrub through and again, it's a bit slow. Maybe I want to start where it's panning up towards the face off that creature. So maybe right about here and now, I could again just delete the beginning, kind of cut it up or no, scroll this in and then delete the gap. But there's actually much easier way to do that, and it's called the Ripple Edit Tool. Now you will find the ripple attitude over on the left insiders, usually the 3rd 1 down, but you may have to look for it. Also, I do know that a lot of these tools have a little triangle arrow at the bottom, right inside that need taken, click and hold, and it will reveal other tools underneath it that you can swap out those things like a rolling edit, or it stretched, too, and we'll get to some of these later. But now make sure you've got the Ripple edit tool selected to shortcut key. For that is be, Let's select the beginning off this clip, as we did before and dragged it in over to the right hand side. And if I now let go, What that did is that essentially, because it ripple edits it pulled that clip in, but it automatically ripple deleted that gap four. So we didn't have to do that manually. So at the end, we're now cutting across to this clip here and again. We can probably end that clip a little bit, alley, but because I want to demonstrate how this ripple editor works, let's return to the selection tool. Let's grab the clip that I want after this head fading in and want to grab this dramatic moon clip. And as a set, just grab any clip that you want. It doesn't really matter. I'm just kind of trying to put together something off a story with this edit. Let's grab this dramatic moon and drop that after the bunny stand against snapped that to the end and if and I want to trim in this clip, but there's other clips after it again, I can pull this in and then ripple. Delete the gap, but it does become tedious. So again, let's return to our ripple edit tool. Again. I recommend pressing B to get used to the shortcut keys for ripple Edit nets. Select the end of the clip and pulled it in towards the left. That's going to trim the end off that clip and bring all of the clips that follow it to the left because it automatically and rebuild deleted that cap. Now the clip after that is this dramatic moon clip, and again, I don't want some of that camera movement. I can't want to get justice part here, where it's nice and still so go to come into the beginning and again with the ripple attitude selected. Take the beginning of that and pulled it over to the right inside to trim that in Come over to the right inside. And if you on the last clip, it doesn't matter whether you've got the selection of the rip. Elated to selected Laissus trim that in. So we're not cutting from this head into this dramatic moon, and now we could deal with these black bottles later. But let's just do that really, really quickly. Just, you know, you might have pulled in some footage that has borders. So at this point, let's return to the selection to make sure this dramatic moon clip is selected. And now find the effects control panel on your interface. For me, that is, over here on the top, left inside again. If you can't find this panel window effect controls and make sure that is selected and it should, in newer versions of Premiere Pro, ultimately puppet forward. Now there's a ton here that we don't need to deal with the main properties in this effects control panel, and this will change depending on what you have selected. If you have nothing selected, that panel will be empty, so it shows you the properties and the effects that are on these video clips. And again, we're going to get into that a bit later. I just want to zoom in on this clip so I can get rid of these black borders on the outside for that. In the Effects Controls panel, every video clip has a motion property, and under that you'll find positions, scale, rotation anchors and flickering and opacity for dealing with transparency, which again will do later all I want to do at this point, I want to select the scale, click and drag to the right to scale this clip up, and that's going to make it a little bit bigger. Now we're going toe cut off a little bit at the top and at the bottom, but we're going to essentially fill the frame with that. You can also click and drag in your viewer, assuming that you have the scale selected to scale that into a kind of getting rid off those black borders just because they're going to be annoying and you might be in the same situation. So now we're cutting from the bunny over to the moon and everything looks nice and clean. Now let's zoom in a little bit on this cut between the bunny rabbit and this dramatic moon . And let's say I wanted to this bunny rabbit to be in shot just a little bit longer. Now I can come back to marvel at a tool with B. I can select the end of this clip and extend that towards the right hand side. Let go, and that's going to extend the clip and push all the other clips out because again it kind of pushed it and then ripple. That changed through to the end of the edit, and it's really nice and easy to extend that clip. But again, let's undo that. And let's say I actually wanted to keep the bunny in a little bit longer, but then also equally cut into the beginning off this clip to make it a little bit shorter . Now, besides the Ripple edit tool, there's also a rolling edit tool, and let's select the rolling at it tool or on your keyboard as a shortcut for that. And this tool will only work where two clips are touching each other and there's a little bit of extra on either side. So the dramatic move trimmed in a bit of the beginning at their bunny. We've trimmed in a little bit at the end. You can now with the rolling Edit tool, click on an edit on a cut line between two clips. Click that, and I can drag this cut line around so I can actually move this cut line towards the end. Now let go. And what that did that essentially moved where this cut happens? So the cat now happens a little bit later for the bunny stay clip, but a little bit early for this dramatic moose. I'm really just moving the cut line around without actually moving the clips. Now the cool thing is that up here and the viewer, you can actually see the last frame off. The previous clips of This is the end frame with his bunny steak lawful end as well as the first frame for this dramatic room where the dramatic mood clip will start so you can come off, get a good feeling for how you're transitioning from one clip into the other. So maybe when the bunny head is right about them is going to let go, and it's kind of an easy way to just clips when you want to make sure that the end of one clip matches nicely under the beginning off the next, let's zoom out a little bit Prez v to return to the selection tool. And let's just say this bunny move is looking up at the bunny and say, I'm finding that a little bit too slow. I actually want to make this clip a bit faster and probably pro gives you a really easy way to make your videos faster or slower in any way that you want. For that, we're going to use the rate stretch tool and get in the tube on the left, inside, underneath the Ribble and rolling edit. You should find the raid stretch to press are on the keyboard as a short cut for that. And with that, if I now select the end off this bunny, stay clip and bring that over to the left hand side. What? This is going to do it? This is essentially compressing the content, so it's now going to play back the same clip. Same start, same ends in less time So for now, let go now I would want to lead the gap. I'll have to ripple. Delete that. But if I'm not rewinds and play this back, the movement is much faster. Let's zoom in a little bit more and you'll see a percentage up here on the clip name 212.73%. So this clip place back at more than twice its original speed. Let's bring that in even more. Zoom in this now place back at 325% off the speed. If we play this back, you can see that movement has gotten a whole lot quicker. Similarly, we can slow down clips by making them longer. Let's under that with control or command and see twice. Let's say I want to slow down this dramatic moon clip with the rate stretch tool still selective. Let's click on the end of this clip and extend it. Pull it out and again you can see 28.8%. So this clip now place back at about 1/4 off its time and five per space. This now is a whole lot slower, so have slowed down my footage that's Press V to return to the selection tool that is right . Click onto this dramatic moon dot MP four clip and in this giant pop up menu that you get, you'll also find an option for speed slash duration. If you select that, you get this little pop up and it's telling you exactly I'm playing this clip back at 28.79%. You can set this back to 100. If you want to have this clip playback at the original speed, you can also reverse the speed streak and playback clips in reverse. You can try to maintain the audio pitch because speeding a clip up will make the audio higher and slowing a clip down will make the audio lower so the frequencies change unless you unable to maintain the audio pitch. You can also select to ripple, edit and shift the clips, so that s your slowing things down or pushing them out to make them longer. The clips that follow it will either be pushed away or pulled in so you don't get any gaps , and then this is option for time interpretation. Now, if you making a video clip slower unless it has a very high frame rate to support proper slow motion. It'll start looking a bit study because it Premiere Pro might have to repeat some frames to make that clip longer. Now how Premiere Pro extends a video clip and blends between those frames when it has to start duplicating them depends on the time interpellation. By the fourth, it'll use frame sampling. You can also do frame blending, which will carve fade from one frame into the next S. You make your clip slower and longer, or you can use something called optical flow. This is a little bit slower to rent. A premiere Pro will try to be a bit smarter and turn this into nicer looking smooth, slow motion, if you will. So usually I prefer going with optical flow. If I'm making clips lower, that's it. Okay, but again, because of back 200% here, you're not going to see the effect. So maybe let's press are again. Take this clip and pull it out towards the right hand side, and if we play this back, you can see it is now nice. Slow motion playing back at about 29.81% off its original speed. Let's zoom out a little bit and come back to the beginning V and cook somewhere. Just un select all of our clips and need the selection tool. You'll find two tools called Track Select Ford and tracks like Backward and these ones are really useful. When you have a very large edit. Let's select the track Select forward tool. And if I now click anywhere to my timeline, what this does this will essentially select everything in my timeline from this point forward. So everything after the point I'm clicking will get selected. That makes it very easy to kind of push everything from a certain point forward because now that I've got it all selected, if I come back to my selection tool and drag it to the right, all of those selected clips will get moved. If I select the track, select backward tool or shift in A that'll do the obstacles, like everything on the left hand side off, where I'm clicking and again it will do that for the entire edit. Very useful to select everything before a certain point, but let's press a to return to the track Select Forward option. Click right here over our gaps were selecting everything after that V to return to the selection to announce. Track that back to the left again. You could also just right click and triple delete that gap. It'll do the same thing, then, underneath that we have our rate. Stretch ripple, edit rolling Edit the razor to we talked about. Then there's a slip and slide tool. Now these knows a bit about technical. I'm not going to go into depth on these ones right now, but you can look them up. They're actually quite useful, but there are a little bit more complicated than there's a pen tool, a rectangle tool and an ellipse to for reading shapes. On top of few videos, there's a hand and a zoom toe, so if you don't like using your mouse much or Yuki, but you can actually to select the hand tool and drag around your time. Nine. You could also just select the zoom tool to zoom in and out off specific parts within your timeline. Not a big fan of using these. They do feel a little bit clunky, much prefer using keyboard and mouse for that, and then in Premiere Pro since Sisi 2017. There's a type tool that allows you to create text and tons on your videos, and we'll touch on these a little bit later in the course. The last thing I want to touch on very quickly. If we return to our razor to you may have noticed that you're going to cut both the video and the audio that belong together. At the same time, however, you can actually separate the two. In order to do that, return to the selection tool right click onto the clip, and they'll be an option toe unlinked. This will handling the video and the audio, so now you can select them individually. If you return to the razor tool, you can now also kathem independent off one another, and this allows you to do some really clever things where video might already be starting. While the audio off the previous clip is already playing or the audio off, the next clip can already be heard. While the current clips still keeps playing, she can create some really interesting edits. With happen is gives you a lot of freedom. Let's undo all of that. If you accidentally unlinked something, you can also join them back together by selecting both of them, right. Clicking and selecting to link again linked those two clips back together. Now I don't like that this dramatic moon clip is very, very long. So let's press see to select our razor tools. Got to trim off the ends. Select that and just leave that out. And you can now continue this process to add more video files, images, music, sound effects, anything into your timeline and arrange them in any way that you want to complete your first edit. Once that's done, you probably want to export your timeline into an actual video file, and we'll get to that in a moment. But before we get to that, let's check out some of the features and some of the settings for the program monitor within Premiere Pro to make it easy to preview your sequence as he do, you work in the next lesson
12. The Program Monitor: as you go through editing most of the time, you are going to be staring at the program on into in Premiere Pro to preview edit, playback, everything. Make sure everything looks the way you wanted to. Now the program monitor actually has a number of different options. One of them helps, especially if you're playback isn't quite smooth. Like you computer struggles a little bit to play everything back in real time. Down at the bottom, you should find a drop down box, which defines the playback resolution. Right now that's set to full, so Premiere Pro will play back the clip at full resolution. You can also turn this to half or even 1/4. Let's make playback ahold of quick about asset place back. You may notice that this is a little bit from pixelated, but it's usually enough to get a good feeling for you at it, especially if you computer dust struggle to play it back at full resolution. I'm going to switch this back to full. You can also click on this little wrench I can hear, and that will prop up a whole bunch more options that you have available in the program monitor. Now it here. You'll also find the option for playback resolution, half quarter or full. You'll also have an option for your post resolution right now that is set. If all you want to set the post resolution to less than full again, it can just help with performance. Now if you want to zoom in on your video. Unfortunately, you can't do that just with your mouse wheel. The bottom left. You'll find a little zoom level. We know right now that's set to fit. You could just change that over to maybe 200%. So you're going to zoom in a little bit on your footage, or maybe even 400% to really get an intense look at that bunny right there. Obviously, you're not going to see the entire clip as you're playing this back here, only going to see this snippet that you zoomed in on. But in this change, the zoom level back to fit and you backed away started. Now, a few other useful options underneath that these range settings are the safe margins. This will overlay two boxes onto your video, and it's more relevant if you're making videos that might be played back on different devices like TV, mobile phones, desktop computers. The other one is called the Action Safe Box, and the other one is called the Title Safe Box. And it is recommended that if you have text in your video and you want to make sure that that text can be read, no matter which device you be, is being played back on, make sure title school within this title safe area, the outer one is actual safe. So anything that you want to make sure people will be able to perceive should go into that box. The outer edge might end up getting trimmed off if you have a TV, the aspect ratio is a little bit different, or maybe on your mobile device on the Web, depending on how it's being played back. But it's just good to know that there there, let's click into this range again and disabled safe margins. The other thing that I personally think is quite useful, a swell, especially when I'm trying to figure out how to align elements in my screen, our rulers, you can enable them under the wrench. You could just say show rulers here that's going to pop in rulers at the top and on the left inside and now by the fault don't seem to be doing much. But you can actually click on these rulers and dragged into the program monitor to create these guides. So now I can place this vertical line to make sure that I don't know that roof is straight . Or maybe I want to make sure that my horizon is straight. I can click on this rule at the top. Drag this down and yeah, that looks about right. I could rotate the video just a tiny bit if I really wanted to. But again, it is really useful for, you know, if you place Taxi one, make sure that's aligned with some of the other elements. It's just nice to know that there can be really useful tools. Let's click on the wrench again. That's clear. Our guides click on the wrench again and also going to hide the rulers itself. Just so we're back to the normal program on it. And now, in the next lesson, let's look at how we can export our sequence into an actual video father. We can then watch share with friends or family up show to the entire world by uploading it to the Internet
13. Exporting Your Video: once you're happy with you, edit. We need to export our sequence into an actual video file that we can then share with other people or upload to the Internet. Now let me un mute my tracks right here is sure to do that, because otherwise, if your tracks a muted and export video, there will be no sound. Now, in order to tell Premiere Pro, which parts off a sequence you want to export, you need to define your in and out points. Now our video is round about 23 seconds long. You can see that on the time indicator up in the top left inside for our play head position , and I want to export everything from the beginning up until the very end. So let's come to the very beginning. That's right. Click onto this. Play head at the top off the Tomlin indicator and select to mark in, and this is similar to what we did with a source monitor. We need to tell it. Which part of the sequence are we actually interested in? Let's say mark in and again. It's going to select from that point, everything forward. But if I zoom out well, that's going to export a whole lot of other stuff after our clip. So there would be a whole lot of black at the end if we exported this. So let's zoom in at the end of our clip, come over to the left inside. Let's snap the timeline closer to the end, and you can hold on shift and drag this timeline Caza kind of snap in between those edit points. I'm going to snap it to the end that zoom in a little bit, right click under this, play it and select to mark out. By the way, you can also press I and old to do that just doesn't indicate that the shortcut keys for that year let's like to mark out. And if I now come back to the beginning, this whole section is now marked as my in and out area. And if I export this sequence, that's the part of the sequence that will get exported into a video file. Once you've to find the in and out points for his sequence, come up into file export and here at the very top you want to select to export media, there's a whole lot of other options. Another four months you can export in, but only export media will turn into an actual video file, so select to export media. And then it's going to pop open the export dialog on the left hand side. You have a preview Reno in a highly recommend with the time not down here the bottom scrapped three project and make sure that this is actually the clip that you expect to be export. And that looks fine to me. And then over on the right hand side, we need to find our export settings now. There's a lot like a lot in here, and we're not going to go through all of it. But let's touch on the main points that you need to configure properly to export your first video project. The first thing is the format, and this will determine the file ending off your file Now there are lots of options in here most of the time. If you want to share with friends, so you just want to upload it to YouTube or Vimeo or Facebook. Hate to 64 is a good option. There are lots of different video contest to choose from in here like image sequences and a V. I was an UN compressed format. The fancy houses will be very big, but again, everything comes down to a bit of a trade off between Do you want in sequence off images? Do you want a video file? And then for that video file? How much quality do you want versus how big do you want that far to be? Hates to 64 is a very popular video. Kodak. The files will turn into dot mp four file. So let's select that. And then underneath that you can select a preset. Now, this preset defines the resolution, but also the quality off that final exported video. You can set up your own presets. I've got a bunch off them here for surface studio specifically, but I would recommend, if you're just starting out, select the one that makes the most sense for you. So, for example, let's say I want to export it to YouTube and I wanted to be a 10 80 p video, like in 1920 by 10 80 full HD video options down here at the bottom, you can't see it, but if I selected, you'll see this is now set to YouTube 10 80 p full hey HT. And once you've modified all of the settings down in here, you can actually save this off as your own custom preset. Next, let's define an output name. You can simply click onto this output name and find a location as well as a name for this file where you want to save your video to. So let's save it down here in my Renda folder as my first. Yet it's safe now. Do you make sure you have both export video and export audio enabled? Otherwise? Well, it's either going to be a black video or a silent movie. And then down here in the summer, it is check that this makes sense, so we're going to export a file. Court Mice first editor dot mp for at 10 80 piece in 1920 by 10 80. A pixel aspect ratio off 1 23.976 frames per second. Now the bit rate will talk about in just a little bit on. We're going to export this with 48 kilohertz in stereo. Now, a little further down, we now find a whole bunch of different settings for effects video audio, multiplex captions where we want to publish it to. You can actually publish directly to Facebook from here. Personally, I've never really used these. I just turned this into a video file in and just uploaded myself. Now the most important settings are probably under video. First off you with that height. Now, this will by default be the find by our sequence, but you can override them here. If you wanted to export your video in a smaller former to keep the foul smaller, I'm just going to leave it in 1920 by 10 80 which we defined in our sequence again frame rate you could override thes. If you unchecked the default, you can actually just you know, you can literally, over all of these settings again here. I'm going to leave all of the's ones at default Encoding settings. Don't worry too much about that. That has to do with how the media is then going to be compressed and pushed into this format. This MP four file at the end, it's gets very technical in here. You can ignore almost all of them. The biggest lever you have to control. The quality off output file is the bit rate. So go into the bit rate settings, and down here you will be able to define a target beat rate in megabits per second. The higher you make this number, the more quality will get retained in the final video, but also the larger that file is going to get now. Premiere Pro actually tries to estimate the fire size off what you're going to get out of this. So right now it sets at 186 megabytes. If I bring down the bit rate to, let's say, 10 it now says my files very going to be about 31 megabytes in size. And this does comes down to lift off preference a little bit. Playing around personally I usually set it to around 30 30 is generally pretty good, but it depends on the type off clips he used. Like whether used, you know, pixel clip, art graphics or just more organic looking footage, you may have to tweak this a little bit. Generally, if you start around 20 to 34 the bid right, you should be fine. There's a couple of advanced settings. But again, don't worry too much about those the main ones in the video settings. Here's the bit rate, which determines the quality as well as the size off the final output file. And then you with and hide make sure their resolution is exactly what you expecting it to be. And then now you can cue it, which pushes it into Adobe media and code out. But again that be totally different. Course. Don't worry about that. Simply hit export. And that's going to export your sequence into an actual video. Far one said some Let's come into our render folder. And here's my file. My first editor dot MP for ended up being about 70 megabytes in size for about 25 seconds off video, and now he can simply play this file back and check out your final video project. Now what? This should be enough to get you started in the next section. I do want to cover a few more advanced topics, like adding transitions and effects and layering videos and all you're talking these other to really round out in hands and spice up you edit to create a much more compelling and much more exciting final video
14. Adding Video Transitions: now we already have a very exciting at it here. But let's spice this up a little bit. And at some transitions between the individual clips, as you can see, all of the cuts or edits as they are called between our clips at a straight cutters jumps from one camp to the next. But Premiere Pro actually contains a large sum of different video transitions that you can apply to transition a little bit nicer from one clip into the next. All of those video transitions you will find in the effects panel again. If you can't see this panel come into window and make sure you enable the effects panel, let's just make this one a little bit bigger. And in the effects panel, he will find all the effects, audio transitions, video effects and video transitions. Let's open up the video transitions and what types of traditions you have in here might differ a little bit, depending on what you have installed a new machine as well as the version off Premiere Pro . Let's just coming to the dissolved folder and let's pick This crossed is off to fade very gently from the face off the jackalope over into this scene off the moon because it does feel a little bit abrupt. In order to add its position to any cut in your timeline, simply click on it in the effects panel and drag it onto that cat. Let's let go and let me zoom in a little bit. So right here. We have now added this cross dissolve between these two clips, and if you scrap over this, you can see that this actually fades from one clip into the next. Now, this transition right now is actually very short. If you double click on it, you get a little dialogue to define the transition duration. Right now, That's just said to eight frames, which is very, very short. Let's set this to 24 which, because our sequences 24 frames per second, will be a full second hit. Okay, and you can see that the transition has gotten a little bit longer. You can actually also selected the edges off this transition and drag out to make it longer or drag in to make it shorter. So there's different ways of defining the length off these traditions. Let's zoom out a little bit wind Let's play this back cool, and we've added our first video transition. Let's at a difference. Transition I don't want to do is maybe between this shot here off my wife looking, added the jackalope creature to this close up shot off the bunny face, where zooms in on the bunny here and then zooms back out on the bunny face again in the video transitions within the effects panel that's come down. And that's afford a presume. Let's expand this and there's a cross zoom in here and again. If you don't have these particular transition effects is grab any off the ones that you haven't tried them out. A lot of them are actually pretty cool. Let's grab this drag and drop it onto the count. Between these two clips, go to double click on it to swell and again, the set that to 24. The default for my transition is set to eight frames a second. Nothing by the fold. For you. It might be 12 or 24 but equals change degeneration to anything that you want. Let's hit okay and let's play this back cool. That's not too bad. I actually think that's a bit too long. So let's double click on this transition again, going to delete that zero out of the and set this to 12 frames, which will be half a second. So the transition will be a little bit more snappy. Let's come back. Let's play this back. Yeah, cool. I think that just looks a little bit more normal. Now let's come to the very beginning. Let's say we want to fade this video in so it doesn't to start with a full frame for that again. In the dissolved Fuller, he'll find a dip to black or dipped a white as grab this and let's drop this at the beginning off the first clip. So I'm not actually dropping it on the transition between two clips, but at the very start off a clip and that works a small it essentially to start out with nothing and then applies the transition and then fades into this clip so it's going to fade in from black. Good to make this a little bit longer, maybe go with 24 because we're just starting the video. There's kind of a soft transition into our video. Let's remind to play this back cool, and we've now added some transitions to make our edit a little bit more interesting. Now do note that if you move clips away from each other that have a transition between so right here, for example, if asked to move these clips away over to the right inside, that transition is going to vanish. I'm going to lose that transition because those two clips are no longer connected. That's under that with control or commodity and the other thing you could do with transitions. With a transition selected in the Effects Controls panel, you'll often see a number of different options where you can actually configure and customize these transitions. Now the options you will see here depend on what transition you have applied on what transition you have selected in your timeline. But just be aware that there are additional controls, an additional options for quite a few of these transitions, and then you can just applied them. Play with them, try them out, and it would spice up your edit. Now, if he just getting into film making in general, don't apply transitions to everything just for the sake of it, do them where they make sense. For example, here, this fate of black answers kind of introducing the user gently into a story. This bunny hop is kind of changing from the perspective off someone outside, essentially to the viewpoint of my wife looking up at the bunny. So this transition kind of makes a little bit more sense also because the clip off the bunny and the clip off the dark Muna come they don't quite match, so wanted to fade from one into the other. Net applies a change off scenery or a change of time. But again, it's totally up to you what you want to do with your video editing. What type of transitions you want. Apply. Just be aware that it can easily be overdone. The other thing you can do as well to spice up your credit is actually apply video effects to the video clips on your timeline. Let's talk about that in the next lesson.
15. Adding Video Effects: we do. Traditions are short term effects that only occur on the counts between two clips to blend from one to the other. But Premiere Pro also includes a number of video effects that you can apply to the actual clips on your timeline to permanently alter the way they look. You will find these be effects again in the effects panel, this time under video effects. Let's expand that, and now I have a bunch off plug ins installed, so I have a lot more foolish than you might find on your machine. But there will be some very basic ones for color correction distorting layers or generating different effects. So with this dramatic moon clip selected, commit, assume in a little bit, let's open up the color correction folder and in here maybe let's apply a brightness and contrast effect. Now there's two ways to apply effectively either drag and drop them from the effects panel directly onto the clip or let's not do that for now, with the clip selected simply, double click the effect in the effects panel that is also going to apply the effect you'll see this little FX I can hear turned green so that means there's one or more effects applied on this clip. You can see the bunny Stay here over on the left inside. It does not have that green eyewitnesses great out, so this one does not have any effects. But we've applied a brightness and contrast effect to this clip. However, nothing really changed. And that's because we haven't actually adjusted the effects settings, the effects settings for any effect that you have applied to you. Clip similar to the settings for a transition can be found in the effects controls panel. So with the dramatic moon clip selected come up into the effect controls panel now in here , we've already talked about the motion capacity will touch on a little bit later. Let's come down it in here. You'll actually find all and any effects that you have applied to this clip. Right now we have a bright as a contrast effect. You and that effect has two settings a brightness and a contrast value. You can either type something in here, so maybe aren't this clip to be a little darker? Someone to type minus 10 and immediately you can see that my clip got DACA you can click on this little FX. I came here to disable or enable this effect. You can. Also, instead of typing in a valley, you can actually just click, hold and dragged towards the right or the left to kind of increase or decrease the value. Maybe I'll give it a little of contrast, maybe 10 or so. It's just going to make this whole shot look a whole lot more dramatic. But maybe also one Adelaide of color. So let's apply another effect in the effects panel on the color correction. Let's grab this color balance effect. Grab that and drag and drop it onto the dramatic move. Now you may see that the top off your timeline has gone red. That means that Premiere Pro needs to actually do some processing to process any effects that are planned to this clip. So this may not render out in real time anymore. Maybe just a little bit slow until you actually export the video and then it'll just play fine. It's just while playing this back on your timeline. This indicates as a bit of processing for Premiere Pro to do now with the clip selected Let's come back into the effect controls and under the bright as a contrast effect, we will now also find a color balance effect, and this allows you to change the red, green and blue that you can see in the dark mitt or bright areas off your footage. Let's just say I want the darks, the dark areas off my footage to be but my blues. I'm going to increase the shadow blue balance by clicking on it and dragging it over to the right and side a little bit. I'm going to lower the red again, click on it and pull to the left. And obviously do whatever you want for these effects. Apply any effects that you want. I'm really just trying to show you the concept, and what do you do with them again? It's totally up to you. Let's bring a little of green into the highlights. It's just increased the screen value here a little bit, and suddenly we've got this really dramatic looking shot. Let's disable the color balance and disabled the brightest in contrast effect. So that's where we started. Apply brightness and contrast and apply the color balance, and we've essentially transformed the look and feel off this clip now, within every effect, you will find an ellipse, a rectangle and a pen tool. These once allow you to define where on your footage. Those effects are present, so let's select under the color balance. Let's select this ellipse here, click on it, and that's going to add an elliptical mask into your program monitor that defines where this color balance effect is now going to occur. You can grab these corner points and bring them out or in to essentially control where any off these effects are applied. And this works for all effects that you may apply to UKIP now masks. We get in a little bit later. Just know that they have a mosque path, which is to shape off the mask itself. You can animate that control that even track it to your video or some fancy stuff you could do. The more important things is the mask feather, which is the harshness off the edge. So if you bring up this mask for their here, what's going to happen is you can see that the effect kind of fades in, so it doesn't just harshly cut off at the masks Etch account leads in the Libyan Isar. You can control the opacity, how opaque that mask and therefore this particular color bounds effect. ISS. Let's just leave it at 100 you could bring up or down the mask expansions, which pushes the radius off this mask out of increased the mask expansion, you can see that the size off the mask and therefore the area off this effect increases decreased that as well. And you can play around with these in order to delete a mask again, just selected. Press a delete on your keyboard that will remove the mask, and the color balance effect is now applied onto the entirety off the clip again. Other controls he will find for your facts is this little revert. I can let's just reset all of the's para meters to the default value and will lose our currently applied color balance effect on the left side of all of these properties. You'll also find a stopwatch on this allows you to add key frames and animation to these properties, but we will get into that in a later lesson. Now, the last thing I want to cover our master clip effects. Let's zoom out a little bit. Come back to this bunny and let's apply an effect to this bunny, too stylized up the way this clip looks now, this is going to be a little tribute, but just follow long. It's really just an example in the effects panel. Come into the generate tap. Open this up and in here you can actually generate a whole bunch of different patterns and shapes or lightning effects lens flares, a whole bunch of cool stuff. Now I'm going to grab this four colored radiant drag and drop that onto my bunny stare. And that's essentially going to fill this layer with a Grady in made from four colors in my Effect controls panel. With that clip selected. If you come down a little bit into the settings for the four colored radiant, you can determine where these points are positions. You can actually click and drag them directly in the program monitors Well, so you're gonna define custom grade and even give them custom colors. You can also blend it with the original, but what I want to do is I want to change my blending mode for this four college radiant from numb over to scream So this four color grading kind of gets blended on top off this bunny. Now this clip is called Money Stare. Imagine this is a really long clip and somewhere else, and you edit your using a part off that clip. Let's zoom out a little bit. Grab this bunny Stoeckley. Begin from our Project folder drag and drop that into our timeline. And if you preview this, this clip does not have any effects. Apply to it, and sure enough, in the effects controls, there is no four colored radiant in here. However, sometimes you may want to apply, in effect to the actual underlying clip, so that no matter which snippet or which copy off that clip you're using on your timeline, the same effects will be applied. And that's where master clip effects of really useful. Let's come back to this first bunny stare clip that has this colorful rainbow Grady in Over it come into the effect controls selected this four colored radiant and press control or command and X to cut it out. Now, in this effects controls panel, you will see two taps. There's actually a master stop on the stair and then my first edit Stop on the stair. Right now we've got the 2nd 1 selected, which is only representing this particular clip in this timeline. So it's just this instance off the clip. It doesn't refer to the 2nd 1 however, if I change my tap you over into Master Bunny stare and now click into this and press Contra or command and V to paste my four color grading into here. The effect is immediately back on this particular clip, but the effect is not associated with this clip. It's associated with this piece of footage in my project panel you can even see in my project panel. This effect is now applied, and if I scrap over the second copy off this clip, that clip also has this effect. But if you select the clip coming to the effect controls and select the my first edit star Bonnie stare in here, the four color grading is in applied because it sits under the master clip effects in here . And this is where I can now control this effect for any copy, any instance any. Snip it off this clip from a project that I'm using anywhere on my timeline. Now let's delete this bunny stare clip again. Come back a little bit. And on this money clip, let's come into the master clip effects in the effects controls panel. Let me just delete this four color grading here. It's just a little bit too tribute, but I just wanted to show us an example. Now, besides video effects and video transitions, there'll be Premiere Pro also contains audio effects and audio transitions. And let's have a quick look at how you can use them in the next lesson.
16. Adding Audio Transitions & Effects: Let's talk about how to add audio transitions and audio effects to your project, but first just make things a little bit easier to see. I'm going to come up in my timeline and right click onto this highlighted area, this in out area and selected clear in and out. That's just going to remove that highlight and make it a little bit easier to see. Now let's come into the project panel and let's pick another clip to drop onto our timeline . The one I want to drop is this entrance dot MP. For now, it is a little bit off a longer clip, so let's double clicked toe. Open it up in the source monitor. Let's come back and find a point where we want to start. It's got a whole bunch of random camera Shagan beginning, so I really want this clip to start just as I'm walking in through the door into the Jackalope Hotel. Let's mark the important let's come forward until I'm just about to turn a corner and let's press oh to mark the Al Ponte again. Keyboard shortcuts are your friends. Let's click and drag from the sauce monitor onto our timeline and let's place this clip at the very end. Make sure that none off your audio tracks are muted. And let's just play back that transition between this dramatic moon and our entrance. Don't MP four now, both visually and from the sound, you can see that on the subway for years. Well, that is quite a jump. Now we can smooth over the video transition by coming into the effects panel and under the video transition Onda, dissolve, weaken, grab the crust is off and drop that onto that transition. Double click the transition, and I'm going to make that 24 frames long or one second. Let's remind a little bit. Play this back now. Visually, that works. But the sound still jumps. Unfortunately, Premiere Pro, just like it has video transitions. It also has audio transitions. Let's pop this open in here. You'll only find one folder called Cross Fate, and there's three different types of CrossFit. You don't need to worry about the details. Let's simply grab the constant power cross for a transition. Grab that Drac. That's and you won't be able to drop that onto a video track because this is an audio transition However, you can now drop that on a cat between audio clips. So let's drop that right here, similar to a video transition looks the same way. You can double click it to define the length, so this is one second long. Or you can grab the sights and pull that. I'm gonna make it a little bit longer to slowly fade from the first to the second sound. And I don't mind if you hear the sound off the entrance clip while you're still looking at this dramatic moon, it's actually kind of a nice transition. Let's remind and play this back, and that works so much better you can click onto the audience position and again in the Effect controls panel. You might find some additional options for that or you transition. Just like with the video ones. Letters have different options that you can play with press delete to delete it once you have it selected. But let's undo that because actually do want it so control or command and see to restore that, let's zoom out a little bit and now let's close the audio transitions, and that's have a look at some of the audio effects works exactly the same way as the video effects. Except these ones are all for your audio clips, and there's a lot of really useful ones in here. Now, if I play back this clip, there's quite a lot of rumbling from the wind on the microphone. Fortunately, under the audio effects, you'll find a category for noise reduction and restoration, and there's a whole bunch of effects in here to repair bad audio. Now it won't perfectly fix things, but let's take this D hama drag and drop it onto our or you clip again. If I zoom in a little bit, you can see that little FX Eigen being highlighted in purple right there to tell you hate. There's now on all the effect on this audio clip, and with that clip selected in the effect controls, if I come down a little bit under the audio category, I now find my D Hama effect. Now most of these audio effects actually do have quite a few paramedics, and if I click edit, they do pop up pretty technical interfaces for how some of these audio effects work. Because most all the effects by nature are actually quite intricate and quiet technical, but don't worry too much about that. Let's us close this one out. Let's rewind and play this back. Now let's remind just a little bit. Come back into the audio effect that's press this little FX Aiken next to the D Hama to disable it. You can listen without the diorama. It is quite noisy. Let's enable the diorama now. It's not perfect, but it's a whole lot better. I'm not going to go through all of the different effects. And here there's a ton to explore and play with and try out just for fun, though. Let's pop open the modulation folder. Let's grab the flames, your or the effect and drop that onto our clip as well. So now in the Effect controls panel under audio, we have our d hama, and we also have this flame jer right here in this stranger lets us press, edit and bring up a slightly scary interface. Ignore most of the pyramid has just come to the very bottom way you can mix the dry signal . The original sound with the wet signaled the modified sound going to bring this up to maybe 80 to 90% because I just want to show you what this effect does That's close, that out. Reminds and play the spec. Can you hear this Really spaced out sound That is the flames effect. But as I said, just just play around with some of these. There's some really cool stuff in here. For now. I'm going to come back into my effects controls. Scroll down. I'm going to remove the flame, Jer, because I don't really want it to D Hama. I'm going to leave in just because it did have a lot of noise without that effect on Finally, you might ask Well, what if I just want to make some sound softer? For example, here at the end, this is loud Spike and play this back. Whoa! That's actually just the door falling close behind me. It's very, very loud. Now the easiest way. Let me just make this track a little bigger. Every audio clip has this horizontal white line. Now, if this layer is very small, he may not see that line. But if you make this track big enough, you can see this horizontal line. This is the volume level off this audio clip. It actually says Right there. Volume is set at zero decibels. We're just just level. You can click and drag this line down to reduce the audio volume for the scripts I could say Maybe make this 10 decibels softer or for one that I can make this really loud, 10 or 12 decibel louder. But this one's a bit loud already. So let's drop this to minus 10 decibels. Let's play this back, and that is a whole lot softer. Also on the right hand side. Off the timeline, he will usually find the audio meters, and they'll actually indicate how loud your audio place back. Let's right place back, and you want to avoid this hitting the very top. So if I make this clip really, really loud, let's just increase this to 15 decibels extra and then I'll play this back, Mo. See how it hit the right here. Your audio. If you exported this into a video file, you already would be clipping and would get distorted because it's too loud. So we want to avoid this clipping here, so let's bring this back down to maybe minus 10 and you can actually click on these red indicators here to clear them out. So reset, um, and then you could play the spec again and check whether that's OK now. Yep, that looks a whole lot better, but that's really all there is to applying Audie traditions and audio effects. Now you may have noticed that besides audio tracks, the view tracks also have this wide line here at the top. This controls the opacity or the transparency off that layer, and it comes really useful when you start to lay our videos and we're going to talk about layering videos as well as layering on your tracks in the next lesson.
17. Layering Videos & Audio Tracks: now. So far, we've only worked with a single video and a single audio track. However, within our sequence, we actually have three video and three all your tracks, meaning we can lay our videos on top of each other. And we can also layout or new clips on top of each other. If you make the video track a little bit bigger, you should see that each video clip has this horizontal line. This represents the capacity or the opaqueness off this layer. Right now, this is 100% opaque, so you can't see through it. But you can just like you could. With the audio levels on the audio clips, you can click on this opacity line and drag it down to lower the capacity to maybe 50%. Now it looks like the clip just got darker. But that's because this is the only video. There's nothing underneath it, so making this more transparent just makes it see through, and what's underneath it is just black. So let's bring this back up to 100% and let's lay or something else on top off this one over on the left, inside and again, feel free to grab any clip that you want. I'm going to grab this glass ceiling dot and before dragged into my sequence. But what I'm going to do is I don't want it at the end. I actually wanted on top off my entrance, and it's also got an audio track, which is going to be on audio track to actually going to drop it at the very beginning here . But on video track to and all your track, too. Let's let go. If I run and play this back, well, that is a little bit chaotic, so I'm actually going to trim this clip in here, pull it to the very beginning, and let's trim the interest of it. Kind of sits exactly over this entrance dot and before and if you scrap through this well, we can't actually see the interest that and before, because the glass ceiling layers on top of everything below that is hidden. Let's just make the timeline a little bit bigger and expand this V to lay up. And there's that horizontal line. Let's assume in a little bit let's drag this horizontal line on this glass ceiling down to maybe 50% so now the glass ceiling is 50%. See through, and you can see the entrance clip underneath. Let's remind and play this back, and that's a pretty trippy effect. Let's selected the glass ceiling God and before and come up into the effect controls. Under the video category, you will find an option for capacity, and this is exactly what we're controlling. With that wide line, you could see the capacity is set to 57.1%. If I lower that to, let's say, 30 you can see that this horizontal line has moved down my clippers a little bit more. See through the A pass ity of this clip is now 30%. Also, just for the time being, let me just meet my audio tracks again because I don't want to interfere with the recording off this course. Let's rewind just a little bit and, in effect, controls within the capacity category. Under opacity, you'll find a blend mode, and this determines how this video that sits on top of the entrance are glass ceiling is blended onto that video layer below. If you pop this open, there's actually quite a lot of different options, and here, each of them will look slightly different. Right now. It's set to normal, so it's just looks normal. But because our past, these 30% it's 70% see through. But let's just come down. Let's, for example, choose linear dodge or additive that will blend this layer on top very, very differently. So the style looks quite different. Let's pop this open again. And maybe let's Jews overlay again a very, very different effect. Now I won't go through the technical detail off all of these different options. But just know that there are different ways to layer videos on top of each other, both managing the opacity like how see through L. A is, but also how it's being blended onto the video layer below. But now let's has come up set this back to normal, and let's set the capacity up to 100% so we can't actually see through it now. Sometimes, especially if you're doing gaming videos, for example, he may want just at a little insert off yourself a second clip that just sits in the corner for that. Rather than managing the opacity, he may want to manage the motion. The positions Scale invitation off that clip. Right now, the clip is at 100% size. It takes up the entire screen and therefore blocks everything that sits underneath it. However, you can change the scale so you can either click and drag or you can enter a number on this scale. Let's just bring that down to maybe, let's say, about 45 you can now adjust the position by clicking and dragging here in the effect controls. But you can actually alter this. Click onto the layer itself. Avoid clicking on the center that just moves the anchor point. Click on the layer in your program monitor, and then you can move it. Let's say over to the left inside, you can also click and drag on the corners to scale it in. Or if you go out a little bit, you can rotate it a swell kind of place your video layer wherever you want to. And this could be really great for this blending and clips of people talking or yourself if you're doing it to tar Laura, Gaming clip or anything like that. So let's remind and play that back cool. We now have this layer blended on top of our entrance. Lets reset everything we changed in the motion properties for this layer. And for that, make sure the clip is still selected on your timeline. Come into the effect controls, and next to the motion section over on the right hand side, you'll find this reset effect button. Let's click that that's going to reset everything under motions, so we're back to where we started, but I still want to see the entrance through it. However, rather than making the top on smaller, more see through a blending it differently, I can also use masks under the opacity category. You'll find three tools and lips mask to a four point polygon mask as well as a pen tool. Now, if you click any off these, this will allow you to draw a mask on Yulia within the problem. Monitor to define where this layer is visible, for example, let's click onto this Ellipse mosque button. This is going to add an elliptical mask onto your passivity, and you can now in the program monitor, click and drag this around. You can click the corners and drag this out. You could also scale it out a little bit, and we know essentially defining a mask where that layer is visible. If you come into the mask properties that has a mask path, you can actually track that. We're not going to get into that. It's also got a mask feather, and if you bring up the feather amount, that's going to make the edges softer, so it's kind of blending the outer edges off that mask. It's also got a mask expansion that you can push that out or pull that Maskin, depending on your preferences. And you can actually add multiple masks if you re select the capacity. And let's add another must, like the four point PolyGram. This is going to add a second mask onto this layer, which again you can now modify and do whatever you want with. So you have full control off aware your layer is visible in order to delete any off the masks in your fact controls under capacity to select the mask and hit delete on your keyboard. That's going to delete that mask and to know that even if you layer has masks, you can still change the opacity overall. Or you can change the blend mode to anything that you want. So you have full control over how video layers up blended together, and there's no limit to how many you can lay on top of each other. Let's grab this hallway, revealed MP for drag and drop that into the time that I'm going to drop that onto video. Layer three and audio Layer Three Proceeds is Select the Razor Tool. I'm going to trim off that end V for the selection tools like that piece and deleted. You can go to mute the audio track for that. So there's now yet another layer. Let's select this one, and you can either play with your pastie to lower that a little bit all. Let's change the blend mode tune at and let's rewind and play that back. Now that is getting pretty tribute, but this is just meant as an example to show you what you can do in Premiere Pro. Now, if you want to lay out even more video tracks or even more audio tracks on top of each other, you can simply add more tracks for that. Simply right click either onto the video or the audio tracks and select to either at a single track or at tracks dot, dot dot and then you can define how many video and how many audio tracks you want to add on . They'll extend your timeline, and you can add as many as you need. Let's cancel that, because I actually think we have plenty. Now. Let's say I want to leave these video layers over late because I kind of like that effect. It's It's a bit trippy, but it kind of works, but I want to get rid of these additional audio tracks that we have here at the bottom. I really just want the audio track from the entrance clips. So I need to unlinked this audio in this video layer, and for that I can right click onto that layer and select two unlinked. That's not going to separate my video and the audio layers, and I can delete just the audio that's like the one at the bottom right click select toe unlinked. By the way, it's control or command and l to link or link. It's going to lead that audio track as well. Let's zoom out and that's this and a bit of music into this whole thing. Let's come back to the footage been Let's go into the YouTube Audio Library folder And these are just sound clips and music fans that have download from the YouTube or the library. It's a free resource. You can get a whole bunch of cool stuff from there, so check that out and go crazy. I'm going to grab this blue McCord dot mp four, grab it, drag and drop it into my sequence. And that's a pretty long audio file. As a set, it's a piece of music. I'm going to drop this on audio layer to because I want to leave my original audio. That comes with the actual clip that after call it Let's drop that in. Also, go to a mute all of my layers on. Let's just play this back from the dramatic move forward. Now that is actually pretty cool. It immediately adds a whole new vibe to the entire video addict. Just subtle music into your videos will really spice up your projects, is going to expand this layer a little bit and go to make their music a little bit softer. It's a little bit too loud for me. So let's just drop this by maybe eight or so decibel. That's rewind, play, Inspect one more time. Cool. That works really well. Now, besides music, the original sound clips that came with your video, you can also drop sound effects onto the additional audio track. So let's, for example, grab this distant thunder sound effect. Drag and drop that onto audio track number three, and there's a little bit off thunder happening here. Maybe I'll start this. You can see that on the audio away. Form us well, really nicely. This is where the thunder happens. So let's maybe have that happen during this traumatic Muna. I'm going to lower the volume already a little bit again. I'm kind of keeping an eye on this audio meter here. Make sure that that doesn't clip, so let's rewind and play this back. That is pretty cool. Now, if you have a keen eye, you may have noticed that there's a glass ceiling as well as this hallway compass pop in there, saying with this audio, here is no fading in or fading out happening here. And yes, you can at video transitions to these clips to fade them in an audio transitions to these old effects to fade the minister well. But there's a much easier way to animate video opacity, audio volume or any off the effect para meters off the effects that we've applied to our video audio clips, and we're going to talk about how to do that in the next lesson.
18. Keyframes and Animations: right now in our video as we transition from this dramatic moon to the entrance clip. If I play this back, you'll see the glass ceiling in the hallway reveal this kind of pop in looks a little bit ugly. Let's just check this out now it it just doesn't look very nice right now. An easy way to fix this would be to come up into the video transitions under the dissolved transitions. Pick a crust is off drag and drop that on the beginning off this hallway. Review and drag and drop that onto the beginning Off this glass ceiling clip. Let's zoom in a little bit. I want to just make these a little bit longer, and now if I play this back, it feels a whole organizer. It's a lot softer, these video clips and are being transitioned in so they're fading in. However, there's a much easier way to do that. Just using key frames. Let's select these cross dissolves, delete so like the other one and delete. And there's actually a really easy way to at key friends and animation to the capacity line that you can see on your timeline. The trick to that is, hold down control or command on your keyboard and click onto that line. That's going to add a blue dot, which indicates a key frame. You may also notice in the effect controls under the A pass ity property capacity now has its stopwatch. I can enable That's blue. And that's this little blue diamond here, which indicates that key frame. So this key frame just says that at this point at the point off this key frame, the capacity is going to be 100%. Now let's come forward a little bit to the beginning off this clip and let's at another key frame, and you could do that either by control or command, clicking onto this wide line right here. This creates another key frame, and now you can click and drag that key frame down to say, What do you want the A pass iti to be? At this point in time, you can also move the key frame right or left to kind of shift the timing off things. So we're saying right at the beginning have a key frame, whether you passed 0% so the layers invisible and then slowly and gradually increase the capacity until you hit this key frame when the capacity is 100 so the layers full of visible. So now, if I play this back, you can see the layer fading in, not facing a little bit quick so I can select that key from here. Click and hold and drag that over to the right inside, some slowing down, the fading in off these lights in the hallway. Reveal clip. Let's do the same for the glass ceiling. Let's come to where we wanted fully faded in. So maybe around about here, that's contra or command. Click onto that wide line. Let's come to the very beginning. You can see the glass ceiling right here, but I want that to be invisible at this point in time. So again I could control or command click onto this wide line. But what I can also do with this layer selected in the effect controls under the capacity Let's come down a little bit now. The a pass it, he has the blue stopwatch I can enable, saying there are key frames on this property. That means that the moment I changed his value, Premiere Pro Bowler automatic, creating new key friend because it knows this property is now animated. So if I change this a pass ity here, let's say I changed it to 0% Premier Pro. It's a little bit hard to see has placed a new key frame right there. I could see the Montanan, he as well, which indicates that at this point in time, the capacity is zero. Let's zoom out relying a bit and play this back, and that works really nice. The cool thing is that you can very easily at as many key friends as you want to fully control how things animate and fade in and out, both for video as well as for audio, because thes key frames also work for the lines on the audio track. So, for example, if I wanted the music to start fading in just as we're fading into this entrance clip, I could place a key frame right here. Maybe just after the transition is fully completed, that's come back a little bit. Let's place a new key frame and drag that down to minus infinity, so there won't be any audio here. Let's run and play this back and Now you have this music gently failing in. The great thing is that this is also really useful. If you have really loud spikes and audio, for example, here, let's say this door slam that we have right here. I'm gonna make this layer a little bit bigger. If I play this back, let's say I still find that's a bit annoying me so I can actually control or command click before and after the spike. Let's create two key frames on the inside of that. Let's drag this line in the middle down so essentially animating the volume to drop down and kind of cut out this spike. And this is really useful if you have no people screaming suddenly or just some noises in the video that you want just kind of get rid off, you can simply create key friends to cut those pieces off. Audio out. Let's remind to play this back and you'll notice that that slamming off the doors just gone . Now I highly recommend always having a little bit of a fade in and a little bit of a fade out and do this gently. Otherwise it might become noticeable just if it's a bit too abrupt, but is fading things in and out and just adding key friends to the A passage. The audio volume is super easy now. The cool thing is, and I don't know whether you've noticed this. A lot of properties in Premiere Pro Half that little stopwatch, Aiken, under the effect controls motion properties, positions, scale rotation, anchor points, flickering capacity volumes. The channel like the balance where you hear the sound left or right, a lot of things in Premiere Pro Half this Stop what I can and they can all be animated now the way to animate them. If you're not talking about the capacity or the audio volume, which are represented by these horizontal lines on your time, that is a little bit different. But it's still actually pretty easy. Let's come to the beginning here, and let's say that this glass ceiling what's coming in a little bit? This glass ceiling here I wanted to have moving in from the left to the right. I don't want it to just be static, so what I can do is with this layer selected in the effect controls on the motion, let's enable to stop parts for the position, and I could simply click on it to say I want to animate this position. Property Premiere Pro will immediately create a key frame that you can see right here. Now, you won't see anything in the timeline because the position property isn't represented by horizontal line. But this key frame right here you can also zoom in just using this little scroll, but at the bottom. Now, this key frame editor isn't the greatest thing in Premiere Pro, but it kind of does its job. So we now have a key frame on the position here, and I can now change the position. At this point. In times, let's say I'm going to move this over to the left inside. You can see this moving already in the program monitors going to track this over to the left and then let's come forward a little bit. Maybe here, I'm gonna push the position to the right and again it's going to create a new key friend says, Keep pushing us to the right. You could see the layer coming in there. Let's place it right. That and I'm going to come back a little bit you can see I've added animation. I'm now essentially making this glass ceiling. They're moving from the left to the right. You can move the key friends around. You can add as many key terms as you want, and this will work for all effect perimeters of, like distortion, effects, glows, sound effects, anything you want just at key frames and animate those properties in any way that you want . And this really unlocks a massive amount of control and freedom and really designing the video exactly the way that you want to. Now let's remove the animation on this position property, and for that, simply click on that stopwatch Aiken again, that's going to remove all of the key friends. But Premiere Pro With usually warn you, this action will delete all existing key frames. Do you want to continue because we're going to lose those two key friends that we've already created? That's to say, Okay, key frames are gone, the position property is no longer animated, and I'm also going to click onto this reset para media button to reset the position toe where What's so the glasses backward? Waas. I kind of like that. It's his faith in any way. Now you should have almost everything that you need to put together a pretty professional video project from start to finish. But one thing we haven't talked about yet is how to add text entitles to your videos, and let's get into that in the next lesson.
19. Adding Text & Titles: Let's talk about how you can add text entitles to your videos. Now again, I'm going to mute all off my audio tracks, and that's a that right here when we're fading into this trippy entrance hole overlay video . We really want to tell people that this is the Jackalope Hotel. We want a piece of text to kind of say, Jackalope Hotel may be coming from the left, and maybe we'll add some other elements as well. Or maybe you want have credits or title or time stamp appear if you doing of longer something like that. Now, since Premier Pro Sisi 2017 the April released, there's a new type tool available, and you can find that in YouTube A at the very bottom, less a type tool. And if you click and hold as also a vertical time tools. So that's the way to create text and titles and add them to your videos in Premiere Pro Sisi 2017 and above. If you're using an older version of Premier Pro, you can actually find the titles under the new item. Aiken In here, you won't find them anymore. There'll be an option for you, saying Title if you still want to create them in newer versions of Premiere Pro, you can actually come on to file new and select to create a legacy title. It opens up a window where you can define text and at other elements, and it becomes a video layer that you can just add onto your video. I won't go into too much detail on that. I'm going to assume that you are on at least TC 2017 or buff, so let's come down it. Our timeline. Let's select the type tool and let simply click into our program monitor, maybe down here at the bottom, where I want my text to appear. That's this click and let's just start typing. I want to say Jackalope Hotel Now it's a little bit hard to see. Let's reposition it for that in the time line. That's come back to the selection to let's click onto this text in the program monitor, and I can move it around. Let this drag it to the bottom left year, and you may have noticed that on the timeline, Premiere Pro has created a new element. A graphic layer. This one contains shapes as well as any other text that I might add. And if I add more text right now, if I re select my type, too, and at another piece off text, that's re select the selection tool unless distract that maybe over on the right inside, both of those text elements sit in the same graphic layer. If my cursor is in an area where the is no graphic layer and I used to type tool to type something, you'll notice that Premiere Pro Bowl. Add a new graphic layer because it needs a graphic layer to hold my text elements. Let's just go back to the selection tool. Let's just delete this one. He and come back to our 1st 1 We can see it right here, and you can just click on these texts and move them around in any way that you want now in the Effect controls panel. With that graphic elements selective, you will find a graphic section in here. You will find any text elements you've edit as well as any shapes you've added with the pen rectangular ellipse till here not going to go into that, but you can just add colorful shapes onto these graphic layers as well. Let's come back to the selection tool back to the effect controls. And in here you have the two text pieces that we've added into this graphic element. Let's expand this jackalope hotel text element and in here you actually now have all of the options for customizing that piece of text that's has changed to fund over to Tahoma Regular again. Just pick whatever you want to. You could make it bold. You can change the size may well make it a little bit smaller. You change the paragraph ing the tracking, the turning a whole bunch of other options now and the appearance. You can change the color. The film. I'm happy for this to be white, but it does get a little bit hard to see on the brighter background. You can give it a stroke so I could enable the stroke click on the color, maybe make this black, and then just give it a little off the stroke. If I wanted that to stand out a little bit more. Not a big fan off that those, let's disable that. Let's enable the background. Let's just absolute off a background to it I'm going to change that to Black as well. We'll just make it a little bit less transparently and just kind of adds that a little bit off dark background. I'm going to expand it a swell to, so it's a bit easier to see. That kind of makes that text elements stand out a little bit nicer against the background. Now we've lost all of the settings. That's because I accidentally un selected that graphic element to make sure you have it selected. Otherwise, he will not see all of the options. Let's has come down and then this option to transform so you can move these elements around down here. You can scale them, rotate them or, you know, change the opacity. And again, all of the's property have stopwatches, so you can animate them in anywhere that you want. If you want to remove any off these text elements, you can either select them directly in the program monitor and hit delete. You can also select them in this graphic element. Maybe I'll just delete this. VICTORIA, Australia For now, that's just it. Deletes two Flash that So I just have this jackalope hotel piece of text here. And if you want to align this, let's say I wanted to places right in the middle. No, not not 100% sure the alignment controls for anything within these graphic elements actually sitting under the essentials graphic panel. So again, if you can't see that window, essential graphics. So with that panel expanded again, there's a whole bunch off different options here. All of the settings you have in the graphic element as well are replicated. So the fund to Kern in the paragraph in the color you can customize all of that in here, and this Panelist well, has alignment controls. So with this text elements select it, I can say, aligned as vertically aligned this horizontally or maybe on a snap it to the left side. So all of the options for lining things and rotating it very easily it's all in the essentials. Graphic panel under the edit tap. Make sure you know them. Browse, browse for something totally different for dynamic titles. I won't go into that in this particular course to make sure you in the edit tap for central graphics. You can then select the element and you can align it right in the center. And again, you have similar controls in the Effect controls panel under the taps for the specific elements, which one you want to use totally up to you. Let me distract that over again in the left hand side down here. Let's expand this video layer just a little bit, and you may have noticed this actually added additional layers sa ad those graphic elements because he needed to make some space for them. So now I actually have five video tracks I can also, if I don't want Mike Ashley, right, click any of thes video tracks and say delete so it deletes them. So I don't have any superfluous once floating about. Let's assume in a little bit. And this graphic element works just like any other video or image lay on your timeline. It has a capacity that you can change by modifying or animating this horizontal wide line, and as a blend mode, it has all of the other usual properties, so we can now animate the position property to have this text element come in from the left , and that's why right back out. But you can actually also do this pop in pop out effect with a reader transition and just for keeping it simple. That's coming. The effects video transitions come into slide in here you have a push transition. So let's just drag and drop that onto the beginning off this title. So that's going to push that title from the left into the video. Maybe a little bit further. We're going to at that transition to get it out to sponsor. Let's track this push transition onto the end off this layer that's got foot. And yes, it's pushing us out. It's pushing it out in the wrong direction. So let's select that transition come up into the effect controls. And remember, a lot of these transitions actually have quite a few different options. What I want to do is on enable reverse here so that the push off goes to the left. So it kind of comes in from the left and pops back out from the left. Now I do want this to started just after this has all faded in, so it'll fade everything in, and maybe at this point, I want the layer to start now because the graphic element itself is static you can make this as long or as short as you want to. Just make sure that if you have set some key frames, they will move along with the changes he making to this clip. I'm just going to have the title popping at that point and into what's the end. It'll just pop out before the end of that clip. Let's zoom out a little bit. Come back a mute the audio and let's display this back dolls call that looks pretty good, and you can freely use the type tool as well as the vertical type tool, as well as thes shaped tools that you find under the pen tool. So there's a rectangle tulips toe toe at shapes and text elements onto these graphic layers and use the miss titles, overlays, indicators, off time, off day or location or anything you need for you. Gameplay, vlogging, family wedding videos, this super customizable that really flexible, and they should give you everything you need to add any sort of text and titles to spice up your videos. Now, one final thing I want to touch on how to better manage the volume and output off all of the's audio tracks for the final video. And for that, let's talk about the audio track mixer in the next lesson.
20. Working with Audio: Let's once again talk about audio and let's talk about how you can control the audio volume for entire tracts. Let's expand the audio track one. And by the way, other than dragging on it or shift mouse wheeling up, you can also double click on this track to expand it. What's with the video layers as well? Just double take again to collapsed. Um, that zoom in a little bit and this keep here at the end. We have played with the audio, edit some key frames as well, to have cut out this slam sound for the door. But what if we now wanted to make all of these clips Everything on audio track one, All of the sounds that came with our original video a little bit softer. Now we could go through the timeline and drafty volume for every single clip down, but that will bring you a little bit too close to insanity, especially if you have a lot of edits on your timeline. Let's undo those changes again, and let's instead adjust the audio volume for this entire audio track. For that, we're going to use the audio track mixer. You can enable the audio track mixer. If you come into window and there should be an option for audio track mixer, let's bring this up. And this audio track mixer represents the audio tracks you have near currently selected sequence. So with my first edit open in our timeline, we have three audio tracks or you one or you two and audio three, representing audio track 12 and three. In our timeline, the names even match up, and that's not a coincidence. You can actually rename thes audio tracks, either by right clicking on them and selecting to rename. Maybe let's call this one original hit. Enter, and you'll also see that name update in the audio track mixer. Because these controls here on the left inside refer to all your track one, which is now renamed to original. Let's call audio track to Music because in our timeline on audio track to we've placed the music and on Audio Track three, we have some sound effects like that Rolling Thunder sold. Let's rename this track to S F X or sound effects. Let's click out off that box in the final expanses, less there now called original music and sound effects So let's make the time that a little bit smaller. So the audio track mixer is a little bit bigger and in the audio track makes up every audio track in your timeline has a bunch of additional controls. At the top. You'll find a pan wheel these controls. Whether the sound comes out of your left or the right speakers, you can kind of pan the music left or right. Then there's mute solo and record switches. Mutant Solar We talked about record might be for another course, and then underneath that you have a master fader for this track. These controls the audio volume for the entire tracts of For all clips that sit on this original audio track. This is the slide effort. If I bring that down to minus 20 decibels now, this entire only attract all sound clips that are on this audio track. One reduced fine minus 20 decibels. Let's play this back, and you can hardly hear the sound from the original audio clips. Let's rewind a little bit. Come back into the audio track mix on. Let's bring up this original sounds back to zero. You cannot to double click onto this fatal handle and it'll snap it back to zero. Let's bring the music down to maybe minus 15 or so And again, let's play this back now. The music is a whole lot softer, and the great thing is, we didn't have to fiddle with the audience for any off the individual clips. We just controlled the audience for the entire track. That makes it super easy. If you have a whole bunch of all your files or sound effects and you think that the music is too soft or maybe the sound effects are too loud, you could simply just the audio volume for the entire track and all of the key frames that we've added like this hiding off the door. Slam sound will still be applied, but on top of that, you also have the adjustment from the audio track mixer. If you want to make your entire video louder or softer in the audio track mixer, you will also find a master fader, and this is the volume adjusted that will get applied to all of your audio tracks combined . So all of the's on your tracks audio track 123 and however many you have end up flowing into this master channel and in here you can then lower the volume for you entire video or bring it up if it's a little bit too soft now, finally, let's talk about something just a little bit more intricate. Note that on this audio clip here, we've adjusted the volume down. We've added some key frames at the bottom. Off the audio track, you'll find a number of controls. You find two errors which indicate to go to next key frame and go to previous key frame. You can click on these andl jumped the timeline indicator to the next key frame on that clip so you can simply jump between the key frames right now. I can't go back any further because there are normal key frames on this track. This little diamond I can hear indicates whether you are currently on a key frame. It's blue because right now the time an indicator actually sits on this particular key frame. If I scrap that off a little bit, this indicator will go white. But again, if I jump between, the key frames will go back to blue as long as this time an indicator is directly on a key frame now over to the left. Inside, you'll find this little diamond with a drop down, and if you click on that, you can control what this horizontal white line represents. Right now. It represents the clip key friends, the audio for that particular clip. But you can actually change that to represent the track key frames for the volume or the mute switch or you consented to represent the balance. Let's come into the track e frames and select volume. And now this horizontal bar here represents the volume as set by this master key Fada. If I bring this master key fader for all your track one down to maybe minus tan, you'll see this white line jumped down because I've adjusted that volume. But bring it back up, it'll jump back up. Now you will notice that this horizontal line extends way past any clips because of represents the audio volume for this entire track and not for a specific clip. And the great thing is, once again, you can add key frames on this exactly the same way you did before. Simply hold on control or command and click to create a key frame. Let's come back a little bit and create one here swelling. Let's bring this down. So now we're animating the audio volume for the entire track. This is totally independent off the clip so I could move these key frames independent off any cuts between my clips because again they just represent the volume for the entire track , not for a specific clip. The cool thing is that zoom out just a little bit. Have a look at the audio track mixer on this Master fader here for all your track one. Let's scrap back a little bit and you'll see that fatal come down because we've animated it . So the movement of this fatal follows the animation that we've drawn in here onto our volume line for this audio track. Let's run and display this back. You can see the fate of creeping up right there. Cool. So now you have full control over the volume off a specific audio clip as well as to you over or D volume for that track, let's come back into the show Key frames option. Click on that on. Let's bring that to the track panel and select balance. Now this controls whether you Audie comes from the left or the right speaker, and that can sometimes be cool if he had an audio effect for something that happens on the left side of the screen and you panic to the left side so it feels like it's coming from the left side, so really useful or kind of panning. Music left and writers to create all sorts off trippy effects again works the same way you contract this up or down to control the panning, and they'll get reflected in the audio track mixer. You can add key frames to this line and do anything you want. And keep in mind that the balance, as well as the animations for the balance the track key frames for volume or for muting the entire track as well as to clip key frames would have already added. They all work together. They just give you different levels of granularity to control the audio for your video, and with that, I hope you now have a solid understanding off how to get add it layer composite videos, titles, images, other media onto your time. Nine. How to add music. Sound effects, control the volume and then finally exported video into a final video file, and you can share with friends, family or the rest of the world via the Internet.
21. Course Project - Create Your Own Edit: and now it's your chance to practice down with the course farts. Or if you've got some videos that you recorded with your phone, a video camera or stuff you got online. Grab all of that. Used that to put together your first edit. Try to apply most of the things that we've gone through in this course, because it helps solidify them in your mind. You can also get a lot of really great free. Resource is online from the YouTube audio library pixel start comfrey sound up, or there's a whole bunch of great resource. I'm going to drop some things down into the course notes, so be sure to check them out. There's lots of places online where you can find additional materials, sound effects, music and stock footage that you can incorporate into your final edit. Once you put together your first edit from start to finish your exported your video, the whole thing will become a whole lot easier every single time you do, and you get more skilled at it. Your pick up new tips and tricks you'll figure out refuges the premiere Pro house and over time, the more you do it, the more enjoyable and the easier video editing will become. I'm just putting a really simple edit together here, and this is in no ways the way to do it. You could take the same footage and turn it all black and white. Turned it. I get horror video, edit or, you know, make it like a music video. There's all sorts of cool stuff you can do. Experiment play around and just have some fun with it. Now, before I let you go, let me quickly take you through. This simple edit took me around March 20 minutes to put together. I'm starting out with some shots here from the outside off the Jackalope Hotel. The comforters introduced to the cattle of the location are mainly using the outside shots here. Then, by this tradition over this dark moon, I'm transition to the inside of the whole talent, also changing up the music. I'm fading to a different music track. Then I got a whole bunch of clips from the inside of the hotel. A lot of lights, a lot of transitions. Where am using additive dissolves? What kind of blends those two clips together with the bright parts floating on top. I've got a few places where have composited additional video, top of each other just to create some more trippy effects? Because it kind of felt in line with the vibe off that particular hotel. Other things. He would have sped up some camera swipes and four relayed some additional. Stop. Put it on top of it just to kind off. Give the little bit more style. And finally of using this clip off a door being opened into a room where again it's bright outside and that then again, softly traditions into the outside world and the vineyards behind the jackalope Hotel off also swapped the music back out to the music that I started. So it's kind of like a little story of the outside inside and then back into the out of the hotel. Now it really is nothing fancy in the highly encourage. You do just experiment. Play around with this, try different things, different techniques, different stars. You see what works for you. Finally, Yes, I do believe I'm over using that word a little bit. Let me play back my simple edit here just to give you a little bit of an idea and maybe even a little bit of inspiration as to what's possible to put together with the files included in the course materials. In order to make that nice, a big I'm actually going to hover my mouse over the program monitor and press Tilda on my keyboard to maximize that windows. The program monitor is nice and big, and let's play back the final edit.
22. Thank You: And with that, we've reached the end of this course. I really hope you know what the right and learn something useful along the way. If you have a moment out, greatly appreciate it. If you could leave me some feedback, let me know whether you liked or disliked the cost. Even some comments, thoughts, feedback, anything at all. Leave it down here. Just hit me up on social media. I was really keen to get some feedback. It helps me make better training courses and better trained better for all of you. Also, if you feel I miss something or there some advanced stuff that you would love to learn, let me know. Down below. I'm really keen to create more courses motor Charles, Much training to trial and put it out for all of you. But with all of that I hope you know this cause And I hope you feel comfortable enough to create your own videos now with Adobe Premiere Pro. So thank you very much for coming on this right with me. And until next time I will see you later.
 Surfaced Studio, Level Up Your Videos