Transcripts
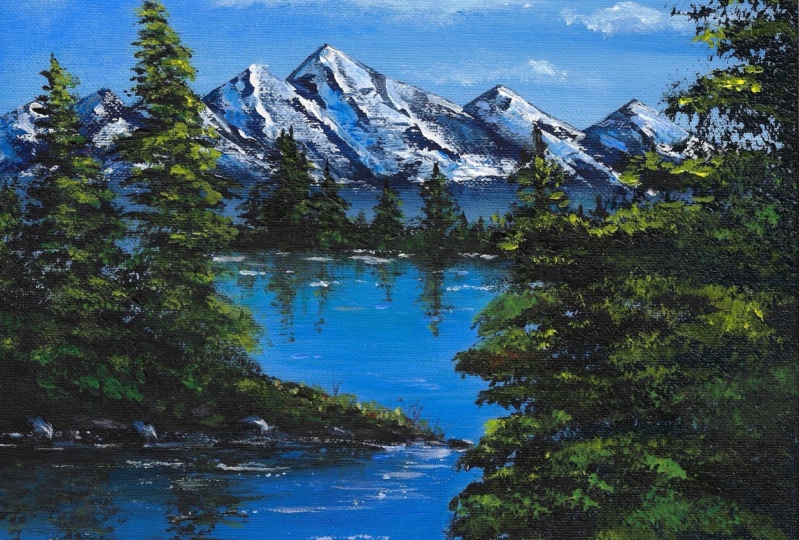
1. The Introduction: Well, my name's Jason quit, and today we're talking about acrylic landscapes and specifically how to paint them. But let's not jump ahead before we do that. Let's touch on a few things that we're gonna learn in this class today. First, we're gonna start with the materials, basically what things we're gonna need for this class on. And keep in mind, there are a ton of different options. We'll touch on a few different things. But we're basically going to go over just the things that we need specifically for this class here. And I recommend that. Watch that first figure out, if you can sort of cheat what we're doing or maybe go out, get a few of these things before you jump into the rest of the class from there will jump into the steps that it's gonna take to build in acrylic landscape. We'll go over how to paint sky water, clouds, mountains, land trees, shading and reflection from there will jump into a paint along of sorts, where in that I will help you put all of those tools together to build your first acrylic landscape. Now, listen, this is gonna be a pretty simple class, but parts of it can feel a bit overwhelming from moment to moment. So I want you to take your time. These are videos designed to be paused and worked at at your own pace. Don't rush. I'm gonna move much faster than most people will. I want to try to get through these so I don't waste any time. But when you're doing this, you have all the time you need. So please be loose. Just relax. Don't take it too seriously. This is just for fun. But you want to learn something along the way, and I want to give that to you. Just remember that there's no making mistakes. Anything can be adjusted. So throughout this class again, just have some fun with that being said, we're going to jump in. But before we do that, I've gotta grab all the material. So I'm gonna do that. You hang tight, I'm gonna roll the intro, and I'll be right back
2. Lesson 1: The Materials: I really enjoyed that interest anyway. Welcome back. And you know what? Thank you for spending a few minutes of your day with me. I really appreciate that. So let's not waste any of it. We're gonna jump right into this class. The first thing that we need to talk about is materials. Now, clearly, there are tons of materials we can use to make this painting. But for this class, we're gonna narrow it down and use very specific things. Now, if you look down here, I've pre prepped my surface area with just a couple of things just to save a little bit of time. First we have our canvas and we have our palate paper. Now, we're gonna touch on that in just a second. But these are part of the materials that we're gonna need, at least for this painting. But you don't need all of them. This canvas here is a 16 by 20 campus. We're gonna do most of the tutorial on this thing specifically just to catch the surface area. And this here is just a simple piece of palate paper. Now, with that being said, I suppose the campus is a perfect place to start with which materials we're gonna need for this painting. Now, do you need specifically a canvas for the tutorial part of this class? No, not really. But when we get into the actual painting, the project of it, you're gonna need a campus now, Like I said before, I do recommend this 16 by 24 this painting. You can get these at a local art store, something like Michael's or Blick. For pretty cheap. You can get a stack of five of these for under $20 which is a great value now, obviously, while learning the steps, you clearly don't need to learn them on a canvas. You could pretty much work at your own pace on anything you want, So why don't I give you a few options on what exactly you can use on a little bit cheaper than just practicing on campus? First, let's start with a little bit of mixed media paper. Now I intermix media paper because it's incredibly resilient, very, very resilient, and the pages here very, very tough like that. We want him to be substantial, You know, throughout this tutorial, we may or may not use a few sheets of it just to show you. All right, so let's take that out of the way. Are there other options off course there? So what's next? She did canvass board. Now Candace board is probably, in my opinion, the best thing you could practice on. It's a bit more substantial than, say, a mixed media paper or even the canvas itself, because in this board it has teeth like the canvas. But it's much, much cheaper, and you can take these down so they don't move around, which is a lot of times what I do. If I'm practicing something, I'll usually just tape it down. So let's get that out of the way. Well, now we know what to paint on. So now we need something to paint with. What is that gonna be Brushes Now? There are so many options of Russia's, it's quite frankly, pretty overwhelming, so we're gonna really narrow it down and use very specific once for this painting. But that does not mean that you only have these options to do the steps that we're gonna do , and I encourage you to eventually bison cheaper brushes and practice with different types. So for today. In order, we're going to use a synthetic mega brush are two inch natural bristle. Brush our one inch natural bristle brush, a synthetic last brush, a natural bristle fan brush. For good measure. Let's throw in our synthetic bright brush, a synthetic round brush and a palette knife. Now, with this steps of these, when I'm teaching how to do it, before we jump into the painting, I might switch around with brushes just to show you a few different options. But for the painting portion of this class itself, those of the brushes that we're going to use all right, so for right now, let's get those out of weight. It was extremely unnecessarily anyway, so we get those out of the way. Now we know what we're gonna paint on. We know what we're gonna paint with. So let's look at some of the other things that are a bit of a necessity when it comes to painting. All right, we touched on this earlier, but down here I have a piece of palette paper. So what exactly is palette paper? Well, that's exactly what it sounds like. It's a piece of paper. It's a very waxy piece of paper. We're gonna touch on that second, actually. But this piece of palate papers very waxy for a purpose. It helps the paint sort of slide across very nicely. Now there are a number of options you can use for this, and and that's kind of a good thing right here. We have a piece of palate paper. There are actual pallets themselves, and alternatively, one of the things that I really enjoy using any really work in a pinch is actual wax paper . Something goodbye. It's a dollar store or something like that. They work really well, sir. Back to the paper. So again, it's just a nice little shoot. Waxy palette. Paper is what we're going to use today, But again, you don't have to also to with the sheet, you'll notice that I taped it on the four sides. That's really just to keep it down. I don't like to use it in the book itself. It comes in like a booklet, like a big book with depending on the size, I usually just like to rip it out of tape it down. It's much more stable that way. Feel free to use it any way you want. They even make ones with holes in them so you could hold him paint like that. I'm more of a fan of keeping it down than I am of actually holding it. It's just a preference. Choose whatever works easy for you. Okay, so we got all that. Now let's talk a little bit about paint for this painting. Specifically, we're going to use a bit of a mixture between soft body acrylics and hard body acrylics. Now what's the difference? Well, glad you asked now with acrylics, and this is a bit opposite from oil paintings. But eight thicker paint in acrylics will stick very nicely to a thinner pain. We'll see that in the painting and sort of the steps as we go through. Now. Can you use just one either hard body or soft body? You can. I wouldn't recommend it, especially for this type of painting, like a landscape with mountains and trees and things we want. Highlights and shadows toe happen organically, and the best way to do that is to layer paints, cause that's what acrylics are good for their. They're known for their layering effects, so we might as well. Use them with these pains, you can get them relatively cheap. But the soft bodies are always much cheaper than that hard or heavy body painted. You kind of go either way. Now with soft bodies, I'll usually get, like, 1/2 gallon on and use something like this like a little, uh, squeeze bottle. Get these. Unlike Amazon or something. Super, Super cheap. And then for the Hardbodies, I'll get, like, a smaller tube something like this, because I won't use as much of it, especially in a painting like this. So we've got our hard body and are soft bodied for today. Okay, So is that all we need to start? Technically, Yes. But you want to get yourself a few What I like to refer to as extras. So what exactly are those? Pretty simple. You need a container to put some water, and you're gonna need some water, obviously, to clean your brushes off. Now with that container, feel free to use whatever you want. I like to buy things in bulk. Is I don't like to do a lot of cleaning, so I need stuff that I could just toss like this palette paper. These cups, everything that I have for the most part is disposable. Now that isn't exactly cost effective. You could buy things that prolong the life of themselves, a glass jar or cup you could buy instead of, let's say, paper towels, which I use. You can buy things like disposable rags or even just towels. You could do wash him later. It was a perfect options, thes air simply what I use for myself, because I like to just toss everything when I'm done. And these are things that I recommend and that will use today. Now, if you know anything about painting or if you've painted before, you might notice that we're void of one thing and that's an easel. Feel free to get yourself one for the class itself. We're gonna use it when we get into the project porch in the painting portion. But there is absolutely nothing wrong with just simply taping your canvases or you're mixed media paper. Anything like that. I think you're practicing on. Put it on a table you can get yourself. There are so many options. You give yourself a little tabletop easel, you get yourself standing easel, you can go all out and get yourself a giant would want. Doesn't matter. It is the one thing that we will use that we absolutely don't need to paint. Okay, so those were the materials that were going to use for this class today. So now that we have them, why don't we jump into prime ing the canvas?
3. Lesson 2: Priming the Canvas: okay, Prime in the campus. What exactly does that mean? Now, if you've ever been to an art store, you would have possibly seen a giant roll of canvas. But it's very dark. It's a very tan color, But most of the time the canvases that you see are like this where they're very, very white. Now those are what are referred to as pre primed canvases. Now, pre primed canvases such as this one have a film on it that's called a Jess. Oh, but we're not gonna actually use a Jessel today because we're using a pre prime canvas. You might be asking yourself if the campus is already pre prime. What's good question? So prime ing the canvas before you paint gives you the ability to sort of manipulate the colors that you lay on. Top of it were essentially cheating. What would be referred to in oil painting as a wet on wet acrylics drive very, very fast. Their properties are incredibly quick drying, and we don't want them to dry out before we get to the parts we need to get to Now. Sometimes you'll see people use things like spray bottles and, uh, airbrush is just to keep the pain away. But we don't want to do that. We want to work a little quickly. Make sure that we know how the paints work before we jump into playing around with how to manipulate their properties. Now, you might be saying to yourself, Well, hang on, Jesse Way didn't go over that. You're right. We did it. And there's an actual point to that. So, Jess Oh, can be a bit expensive. And when you're beginning the painting process, we want to try to keep us much of the budget low while we're practicing or learning different steps before we get into actually using those air intricate things that will weighing down the road. So with Jess Oh, we're gonna cheat it a little bit, Especially with this class. We're gonna make sure we know how to practice prime a canvas before we start buying things . They're a bit more expensive and unnecessary. OK, so what are we gonna use? Well, I'm gonna grab just a bit of titanium white. We don't need a lot of that. We want a very thin layer. Put that down here. It's go right here and we don't need a lot of it. Okay, so we've got that there. Now, I'm gonna grab my mega brush when we're talking about prime ing the canvas. I like to use a synthetic brush. They clean a bit easier. And the way that the synthetic brush pushes into the teeth of the canvas, you get a little bit more coverage out of it. Natural bristle brushes are a bit harder, a bit more course in there. A lot more tough to clean eso when it comes to just prime a canvas. I like to put a nice thin layer with a synthetic brush. Okay, So for the sake of this, I'm gonna put this water here for just a second right here in case I spill. Don't really want to spill on this. We don't want to get water underneath are acrylic paint. We do that. We're gonna under bind the paint. And I know that seems a bit counterintuitive because we're gonna put water on the campus itself. But you can undermine the paint to thin it out when it comes to acrylics. About 20%. So if you didn't know paint, acrylic paint specifically is made of two things pigment and binder, which is basically the color and what makes it stick to the canvas when it dries. So that's what we're gonna do here on this canvas is we're going to basically put titanium white and under bind it slightly with a coat off water directly underneath. Right. So take a little bit of this water. Take that. Going to put a nice thin layer. Very easy. Nice thin layer does off their right. Nice. I'm wiping that off. Nice, thin layer. Cover it. It doesn't really matter exactly how you cover it with water. Specifically, we just want a nice even coat through. And how do you know it's even? Well when you're applying the water. If you look into it with a little bit of lights, right, the light shining from the ceiling, Whatever. If you see a bubble, you really want balance that out, you wanna wipe that away So smooth agency, then how I'm just kind of going for not really putting too much effort into it. I just want full coverage. Keep in mind to when you're doing this. The design of a canvas is very bouncy in the middle of it. But the outsides, the rim or the frame, if you will, is so hard that sometimes you get these lines right. See that? Now we want to make sure that when we do that, we kind of go over the edges, especially when crime just there. Remember, only about 20% don't want under buying this too much, because then we're not gonna get the effects that now, in the event that you feel like you may have added a little too much water and always grab that little paper towel and very, very lightly, lightly pulling some of the water off. And there's only if you feel like you had a little too much can always pull just a little bit. All right, we got the water. Now let's go back. We're gonna put a little bit of painted this cup out of the way, and with this paint, we want a nice glob of it as we sort of spread it onto the canvas. So really dip in there. You see how much paint that is? Look at that. That's a lot as we're doing this. It's a nice, smooth coat. All right. You can go up and down laughter, right? Doesn't really matter. No, I don't know if you could see this on the edge here. I have a little bit of the Candace sort of tort off, which is a good thing, because that helps me with the ability to see if I've got a nice thin layer. Very subtle. Very nice. I'm not pressing to our. Doesn't exactly seem if I filled it in like this, that's fine, too. I just want a nice coverage. Nice coverage. Smooth. Now, just to make sure that you've got it right and that's it, that is prime in the campus. That super easy. Simple, quick. No real worries about now. The important part here is to make sure that this doesn't drive so immediately after prime in your campus, you have to jump into laying the background of your painting and whatever that background. So we're gonna actually not waste any time. We're gonna do that now by painting sky in the water
4. Lesson 3: Sky and Water: Okay, So for this step of the class, we're going to use our two inch brush. Now, I already went ahead just to save a little bit of time and put some blue paint on our palate. This is a soft bodied pain. We're gonna be using soft body and I'll let you know between the steps which, whether we're gonna be using soft body or hard body. But with this you want to take that two inch brush you want lightly apply some blue paint, right that very lightly apply some blue. Now the white on your canvas is going to react to this blue and create a nice sky blue by muting the color. And when we do this, we want to do these little crisscross strokes like this, as I do, that starts to run across the canvas. And as I work my way down, then begins to lightly loosen the paint, create this Scott, lose just kind of wiping that in these crisscross drugs. We want to take this down. Maybe about half way, Chris from strokes. Now, when you're done, take this brush just very lightly. Go back and forth just to soften it up to get a bit more smoky. That kind of creates a little bit of misty clouds in the background. Very organically, very organically. Okay, now. So let's work on our water. We're gonna grab a little bit. Just gonna grab a little bit more blue back now with water. What we want to do is start at the end of the canvas pulling toward this side, or I should say toward the middle of the canvas something like this, and make this little flick on the A little flip me. And as we work our way up, we want to get closer and closer to be friends with the canvas. Yeah, this little flip creates this bit of a comet trail here. Now, in the event that while you're doing this, maybe sometimes you're just so or your prime can dry out a little bit as you're doing this right? You see this little bit of chalky, very textured areas that might be something you don't want. So if that happens to you what you can do, just grab just a bit of soft bodied white Bryant. See that? Not a lot. And just cool that in. It'll help for a smooth transition. A bit more here. Not a ton. We don't need it. Yeah, They want to keep this straight water as it sits. Still go straight across. Even the waves go straight across. So if you were to take it and turn it this way, we look like the painter Waters trying to run off the canvas. We don't want to do that, so make sure that you keep these straight like that. Well, we don't like that. You want to keep it straight across as we do it nice and smooth as we go. And then when you're done with that, lightly pull it across. Just tickly that nice light area. We want some water here. Be nice and bright. It's where the sun or the light source will be coming from again if you want it moving it out. Force again. He went down with a bottle here once again. Very light. She's little flicks. Little flexes. We go yuks it in caller. No. Now, when you're looking at it, sometimes you could see it might get a bit dried out. They didn't put enough underneath it. And if you want to smooth the area out especially in the middle again. We want to add some white, but we want to be very, very cautious about how much we pull through. So when you do it in the event you want to do that, grab some white, start at the bottom, but very, very lightly. We see how aggressive that becomes. We don't want to aggressive because we don't want him around out. Exactly what that nice light sources now playing around with the too much is going to dry it out. So don't spend too much time in one area late in. Let it go. I didn't That's it. So that's basically the sky in the water. There's no riel trouble with its A few strokes. Top a few swifts at the bottom. You're good to go. Okay, so let's take that brush. We're gonna put it to the side for a minute. Now, with natural bristle brushes, you don't exactly especially big ones like that want to clean them right away? One leave a little bit of that paint on there for now. And the reason is because if you dip the natural bristle brush shinto water, they hold water. Retain it much longer than synthetic, so it's really difficult to pull that water out so they remain wet. Just trust Mantis. You don't want those brushes to be soaking wet when you use him again. That being said now that we have our sky in our water, why don't we enter in some clouds?
5. Lesson 4: Clouds: now, Clearly, there aren't a number of ways we can do clouds, but for this painting, specifically, when we get into the actual painting portion of this project, we're going to use our Wantage for us for it. So that's how I'm gonna teach you first. And then I'll show you a little few tricks here in their toe. Sort of use whatever you have. So again, we've got our one inch brush we're gonna do, has put just a bit white with just a pinch walk. I see that. Not a ton of it. What we're going to do is we're going to use the corner only off this brush. And when we do this, we're going to lay the corner very lightly onto the canvas. Do these little strokes like this is a little circles circles. As we go, we'll use the paper. It's in their works its way. There, some over here. I really wouldn't just brush it and make it nice and smoking right Like this with Russian up a little, just to make it a bit smokier. Here is their rights. Johnson plans now with clowns. They typically at the bottom, do this little thing where they sort of straightened out. See that? Maybe there's, uh, Scrabble. Maybe years. Maybe there's another one, right? Maybe there's one that comes this way. Carry. You want that smoky you wanted to free a little comes this week just to give it a bit. That's pretty simple, right? And if you want those to be a little bit more smoking, just sort of tap it a little, Put another one. Let's go one more just so you could see a little bit of white paint. Oh, gosh, I don't know. Let's do one that doesn't exactly have a flat surface off a ball this but the thing about clouds is at the edges. They really almost always dissipate. They don't exactly stay perfect, right? So even if we were to not make it an exact flat surface, he always kind of just think through, look, sort of blend them into the sky. Now, with that, I'm gonna show you away. So we've got our clouds in there. They're perfect the way they are, but we want to pull them out a little bit because the way that clouds work is there not two dimensional? Obviously. So there's parts of the clouds, there are much brighter and parts of the clouds that are much lighter. Or, I should say, darker, darker parts of the clowns that have. We'll do it this way. There are parts of the clouds that have light and parts of the closet shadow. So the parts that have light obviously a little bit we're gonna continue using this. That's fine. You can continue using with all that white on there for what we're going to do is we're gonna enter in now a little bit hard body paint. Take this hard body paint just lightly. Very little bit. Do not need a lot here. You see that? Look at the comparison between how much we've used. Okay. So again, take my one inch brush. I'm going to lightly just the corner again with my one inch brush just with the corner when it add in just a little bit of that paint. Like I said, before a hard body paint will stick to a soft body. Very nice thing you'll see just in a second. I see that as I likely apply. Thank you. Here. All right. I'm gonna take the other corner. Right. I've got the hard body in one. I'm gonna take the other corner. Loosen that up a little bit towards the edges. Just so circles here and there just to give us bit more depths where you want, Right? Maybe there's something here. Maybe there's another little bit here. Years here, Right? Take that corner and just loosen up the edges a little. Here, Chief. Three very, very over here, wherever you want. It doesn't really matter. We're just We just kind of play here. Gosh, I here. Maybe. You know what? Here. What? We do this. Do this. This is a good way to sort of distinguished. Maybe there's one in the front, and maybe there's one of the back. Layer it on top. You can't really build these with Onley. Ah, hard body paint or only a soft body. The way to get that is to sort of mix the two. Or you'd have to wait for it to dry completely and then layer on some soft or hard body paint on top of it. But we're trying to be efficient here. So again. And if you wanted us without, just helps without the edges that now just leave that one right in the front. Excellent. Okay, now that we have our clouds, we know exactly where those air going to live. Why don't we now move on to mountains?
6. Lesson 5: Mountains (part 1): there's a lesson that I learned a long time ago. That painting isn't about easy for heart. It's about simple for complex. The more steps that something takes, the more difficult or the the higher the difficulty level becomes to do that one thing and make it feel a bit more natural. With that being said, mountains are one of those things that are a bit more complex than they need to be. Technically speaking. So that's what we're gonna learn. Mountains on a canvas like this are gonna happen in a bunch of different sections. We're going to start with base color off the mountain. Then we're going to start with lending and into the background, and then we're gonna finish off by adding shadows and highlights. One of the things that you have to do is pick a color for this one. We're going to go a bit deeper into the darker, blue ish purple color for our base reach over here. I'm gonna grab a little bit of red, put that right next to is a blue. We don't need a lot of it now. What I'm also gonna do is I'm gonna throw a little bit of black, just in the very top corner here. To say that I don't have a lot don't need a lot, either. Black goes a really long way. It's an incredibly overwhelming color. So be very subtle with the black or the darker colors in general, but with the black specifically, if you need to use it, be very, very subtle with So we've got our black and are red. Let's make a bit of a background code for this one. I'm going to use my synthetic flat brush now. This one thing that you should learn about brushes is each company has a different set of numbers for their brushes. This one is Ah, you tricked. This is, I believe, a to 39 flat brush. So if you wanted to follow along and get that, But I would say for this painting, despite what you use, you want it to be about an inch tall, which is usually the size of a flat brush and maybe about on 3/4 of an inch. Applied now doesn't need to be exactly those measurements off course not, but generally speaking, that's what. Now that we know that, let's make a bit of a color. So we're gonna grab some blue, pull it over here just right to that little section of blue that we already have. I'm gonna grab just a very little bit of red that almost turns it into, like a deep plum color. Now, with the background color of this, we wanted to be a little bit of grayish. We don't want it to be exactly purple. So we're going to add just a pinch, right? See that on the corner there. Very little bit of black. Just a pension that's really gonna keep it up with the other. Just a bit of that soft body white. We get this greyish purple color. It's a good color. We want to use both sides of that. When you look when you use both sides of this, it really takes that and sharpens it up a little. Right now sharp, that is. We want that that's gonna be important for making these mountains. With this flat brush, you can use the angle of the brush, right? See, that's very sharp like that. We can use the angle of the brush to create the sides of the mountain very easily. show you here. So let's take a mountain. Maybe we'll start one foot tall. One just kind of lives right here. You see the angle of the brush here as I keep that angle. I'm just going to go like this, all right? I never really changed the angle. Go back this way. Cut like that for a little bit more pain. Tears that's dry. You can do it on the side like this, but you don't get as much of that natural feel. It's going like this. Just kind of want to keep the angle of the brush, Make a little bit more paint here. Black, white. Pull that blue in there. A decent amount here. And for this, it's OK, especially in the background here for it to not be as consistent of a color. We're OK with that. Actually makes it feel a bit more organic. Okay, so what? This got a decent amount on their pull in, right? Fan it out a little. I'm just lightly pulling it across. We just want to make sure that we mind our edges. Keep those colors. Now with this. Let's go. Clearly, we're not gonna do just one little mountain leave. We want a mountain range so you can kind of ladies in front or in back of each other indiscriminately. And we could figure out where they live later. So maybe there's one that lives here, like this one guy here more. Here you go back and forth, all right, make a little bit here a little bit there. See that? More like a core. I like that. It's really pretty. Okay. All right, Maybe there's another one here. Front to back. Not sure exactly what. Everyone's a little bit lower here. Small, small lunge across here like that. I'm just evening it out with the edge of the brush. Create a nice edge. When the mountain comes to a peak. It's not a point. It's a peak. So we wanted to be a bit loose at the top. Not exactly perfect right now with this, when you're filling it in, Sure, it's nice and full. We don't want to leave much of that behind. I don't see how there's some chalky areas, writes chunky stuff. We don't want to do that. We don't want to leave a lot of so what I'm gonna do is I'm just going to take this color, pull it together more. You can always keep making more experience, even if it's darker. You worry too much about the exact color I see that really care about that. I just want to get this filled in So it's nice and full. You know exactly where these mountains live, what this want to get a nice sharp edge. So if you need to go across the edges with sharp point of that brush again, we don't want to leave it to drop. So we want to make it kind of quick here as we do it all right now, that is clearly a bit of an aggressive transition, so we don't want the transition be that aggressive. Use a bit of soft bodied white paint, just the very bottom. And as you do that, you'll notice that it's true blends and takes that mom's pushes it into push something here . Very subtle, very light. Don't worry about their color. Like I said, don't worry about that color underneath, specifically being exactly consistent all the way through. After I see that as they pressed very lightly, it sort of pools that color into blue. You can go back and forth now just to sort of blend that bottom part, indiscriminately laying this on
7. Lesson 5: Mountains (Part 2): but a wife. You want it even it out a little bit. The one thing we don't want to do is leave chunks like this. We want to smooth it out. Very nice. Light on pressing. Very, very light. Very light. Very moving. Sideways really matter. Exactly. Sometimes we could hear that sound right. That's okay. Sometimes that crunchy we can hear it sometimes. And that's okay. But most of the time, we don't want to hear that uglies we don't want Guess that killing this. I think I I think I think it's ugly. But I know exactly what that means for these brushes later on. You don't really want that are so I believe that's good. We've got a nice, foggy, smoky area at the bottom. That's good there. All right, so we're gonna put that brushing aside for a second. And with this here, we want to pull out our highlights and shadows. So for that, we're gonna use our palette knife with a palette knife. Remember earlier how I said and we showed you what? The clouds, how a soft body and a hard body kind of work in tandem. That's what we're gonna do here. we're gonna use a bit more of that hard body white paint. I'm gonna take that white paint on the show You how to use this so we can create a bit of a mountain field. All right, if you take that hard body painting, pull it onto the brush very lightly. I'm sorry. The palate. All right. See that? That's a big lobby. We don't want to do that. So we want to even it out, push a little bit. Right? Get all of that off of there. We're gonna do is we're gonna take it. I've got, like, this, like this that's gonna create a bit of a role on the edge instead, off on the side of it. Now, we want to do here because we want a very politely see I'm barely holding. Barely barely holding. Okay, Now I want to lay this so the edge of the palette knife is against the edge of the mountain . I'm going to very, very lightly. This is very lightly press on. My mountain pulled down, and that sort of pulls it creates a bit off snow on the top. It's even it out. Roll that in right. You're gonna cut here, Cut across the ready that it's a nice cut across using the angle of the palette knife. Um, okay, so we know that one is now in the front. Let's let's put this one knew this one kind of lives like this. Maybe it kind of goes like this down the mountain range more your flattened out. Do this sort of preserve it a little, Flatten it out, flatten it out, take a little bit and see how much is still on there. Flatten it out. Cut across. Roll on. There. You shouldn't. Nice little role. Uh, cash. Let's put this one's will go. Very, very subtle. Very simple on this light on pressing. Maybe this one would kind of lives in the backgrounds weekend. Get, uh, no. Got it across like this. See that? See that? Still on. There is not a lot of using very, very little. Maybe it goes back a little bit like this somewhere over here, it's very, very subtle ground more users. Horrible light. Kind of hits it. A little light kind of just shines across the small. So now that we have our highlights, we got to create a bit of a shadow. Now, with this, we can loosen this up a little bit. Not too much. We don't wanna again, sort of under bind the paint. So what I'm gonna do is grab a bit of that soft body, pull it into the hard body just to have a little bit of shadow to that color mix. It enters a good way to mix paint all right, through push it down through down. Good mixing technique with these palette lives. Actually, palette knife is the best way to mix paint when it comes to hard body. But soft body doesn't exactly matter, but with hard body, it's a bit tougher. So palette knife is definitely a way to go if you want to mix those colors together and conserve it, because if you try to mix it together with brush, you're gonna get a lot inside of that brush. All right, so across that little role inside and then these little areas here, we just kind of want to push in just a little bit here and there. Maybe there's some over here, very light across here. Here's him, like I'm pressing here. Oh, gosh. Just wherever the mountain lives Want to add just a bit? Highlights. Promise, Right. Got a little bit of roll on there, adding it. And now with this, the one thing that you don't want to do. And this is why I feel it's so important to say this again is pressed lightly because if you do press hard, you're gonna run into a situation like this. Watch If I press hard and I do that, I'm gonna get too much of a smooth edge, way too much of a smooth edge. And you're not gonna get that snow feel alright? And if you do that pretty simple, we take a little bit of that other edge of the brush and just kind of pull it up a little bit, right, And we can sort of go back. Just pull the rest of it. Now, the one thing that you can do is wipe this off. The one thing that you can do after you get that in just to smooth out the transition a bit more is grab. Um, you're so we used our We use our flat synthetic brush. Now we want to use our right. This one is a bit tougher It's got a bit more of a spring on, right? If you see that's got a bit more of a spring as I pulled through. And we want that when it comes to sort of pulling the bottom of this together, it's hard. Body paints are gonna move differently than the soft body, so clean, dry brush. We don't have to put any water, grab it and just light pull the bottom. Just pushing in. Is that ugly sound again? I don't like it. I don't like scrubbing with these brushes very lightly. You can if you want to. You don't have to just a bit of a suggestion. And thats so that area that we might have. If you press too hard, you want to blend it in a little bit. Even though we don't like that sound, it is an all time just to pull it together just a little. So now we have our mountain. We've blended it in slightly at the bottom, so feels a bit more smoky or foggy. We put our highlights in her shadows, and that concludes mountains, which is, I mean, there are a lot of steps. It becomes a bit more complex. But it's simple in its idea. All right, now that we have that, let's move on. We know how to make our mountains. Let's move on to our land.
8. Lesson 6: Land: Okay, So when we talk about land, what we're really talking about is just especially in this painting is the things that just kind of live outside of the water. So we don't have to spend too much time on this, but we do need to be very specific in the way that we do it. So we're going to do first is we're gonna add a little bit of yellow because we need to make a bit of a green color. Now, with this yellow here, we can go simply just some soft body paint, because we just want to make the base color like we did with the mountains. So again, I'm gonna grab my one inch brush. All right again. Natural bristle. These natural bristles have a nice spring to them, right? That nice little spring to blue, like black, is a very overwhelming color. So the parts to make green are not equal here. So what we need to do first is grab just a pinch of see that I don't have a today. I don't have a Pull it over here to the yellow and you'll notice a soon as I pull that in. It's gonna make free. And we want this green to be much darker underneath. But with this if we try to make it. But if we try to add black to it, let's say it's going to be a bit too muddy. A little bit of that black. If I put it here on this side to fit too much of an army green color, we don't really want that. So we want to add more blue to deepen it up. If we wanted to be a bit darker, See that now we've got a bit more of a bluish media forest. Green color. Now, for the sake of this tutorial, you can add a little bit of black if you want. It won't hurt. Just don't overwhelm it. We want to be nice and sharp on the edge of their seat. Sharp. That is right. Nice, sharp. Now, when we're adding this, let's start. Um, start here. We do this, we want that sharp edge and we want to lightly tap with this natural brush. Now, as we do this, we want to make sure so when land grows under the water and pops up, it creates this thing where the water in the land. They're not like this, right? They kind of flow into each other like this. So the land just sort of makes this sort of on ramps situation where it's sort of flows out . So when we're building this land, we need to make sure that when we do it, it comes to a point at the end. So when we fill it in later, it's deeper or thicker on the edges, off the canvas, right, thinner as it works its way over. Maybe there's maybe even comes up like this, right works its way that we don't know wherever it lives, wherever it lives. You're painting. You figure out where you want not here to dictate what looks good to you. Only here to help you through the steps. Remember that as we go through this now, after we put that land in there while the paint is still wet and this is important, I want to take this very lightly. Pull down to create a bit of a water effects or ah, reflection underneath. Thanks very lightly pulling down. It's a bit of an effect, like there's don't push too hard when you do this cause you're gonna push the paints together. We want to create that little bit of reflection as it works its way down. See that? Okay, so let's do another one. Now we know what land far in the back looks like. It's very in descript. Now, what happens if we want to pull it a little bit close? Well, we have to sort of change the idea up off how we add this in from the ground a little bit more blue here, pull that in. So I still doubt that dark area. Now, this happens with mountains to in this painting, but more specifically, it's gonna happen with the land. The So, the way that silhouettes work is the closer something gets to you. Or I should say, the farther away it gets from a point of light that darker it becomes. So whenever you're looking at something, the farther away they are, the brighter they are. As things get closer to our I like catches it and creates a silhouette. I find it so with this, these air gonna be a bit later, but it here, we're gonna make this one just a pinch darker. Now the land in the front. Let's say that this land kind of cuts across this. We want to create a little bit of perspective. So we're gonna take this, and we're going to basically smash this and see how it creates these nice little grassy areas. Mr. Lives like this, but it still has to sort of fade off a little bit. Thanks. Yeah, for tapping. Don't worry too much. Exactly about the bottom just yet. Because remember, we're gonna pull Creates that those natural bristles. See if I push it in, See how the edge creates that little grassy area. Do you like? That kind of fades away. We'll grab a little bit. One of the pain sharp in that job pulled out. Okay, A nice little reflection. Water brushes up like that. Sure, why not, Huh? Pulls down now. It's always when the land is higher, the reflection is lower. Just keep that in mind. You don't want the reflection to be exactly the same distance all the way across Creates a bit more of a realistic perspective. All right, so I'm gonna put this to the senate for just a second. Now, I understand that paint is expensive. it really is expensive for me. It's too expensive for everybody. And if you're going between hard bodied and soft bodied, you're gonna be spending a lot. So that is why if you look, this is all of the paint that we're going to use and that's what's referred to as a limited palate. And you really don't need any more than this to create a painting such as this. The reason being is because all of those primary colors will make any color you want. You just have to figure out a little bit of how to put them together. But for this one to stick a little bit of yellow paint to our landmass here, we're going to grab some hard bites. Give me just a second. We're gonna put it right in here. We'll put it on the canvas. We'll put it on the palate. Right. All right, so I've got that put right next to it, just like a little heavy bodied or hard body paint. Now, with this, when it comes to these, we don't exactly need to grab a palette knife. We're not gonna put it in that way. We're gonna remain using are one inch brush. You didn't even have to clean it off. To be honest, don't have to worry about that. So we're gonna grab a little bit of that hard body politic. This and that paint that's already on there is going to interact with that yellow right, and we want to just lightly, just very lightly tapping. And it creates just a bit of light reflection. Gideon Water. I don't know why I'm whispering a little bit into the water, right? And it's just those little light taps just with the edge of brush darker you want. See that if you want. That's now. When we do it to the top portion, it's gonna be a bit different. And remember, as things get closer, they get a little bit darker. So even if you were to take put a little bit of blue into that, want that highlight to be just a page darker? Okay, with this, really afraid that Russia, as I do that tap round, it just creates a bit of a grassy field pull down just to get that watery effect. Lives like that happen. We don't have to overwhelm it. We don't want to lose the darkness or the color underneath. That's what's creating our shadow. So we're not filling it in. We're tapping it around randomly to make sure that we get enough coverage. That's all. So, basic taps. We're all good there. Put that rush to the side. Now that we have our land, we need something to put on it. Which brings us to trees.
9. Lesson 7: Trees: It's a little fun fact about me. I have zero idea how many trees there are in the world, and I know there's a bunch of. So because of that, we're only gonna stick to a couple. We're gonna do some evergreen PSA pines. Things like that in this pain will make it very, very simple. And to do that, we are going to use our natural bristle fan brush. I have two of them going here, and the reason I have two of them going because we're going toe want to different sizes for this. We want the ones that are going to work in the background. We want the ones that are going to work in the foreground. We are going to start, however, with our a smaller one again, same concept here. We are going to use the darker color, so we want to pull in some of that blue, grab some of that yellow, pulling it onto both sides. The idea here is the same that even a get out. Now I'm gonna show you here first before we jump into these small ones. But with this fan brush, it's very easy to use, but incredibly specific and how it's done. So with these, we want to figure out where the top of our true lives first. So we want to create just a bit of ah, just a little tap tap, good to go. And with that, we're going to take that brush, and we're going to put it on it's side for a second. All right, Like this. And as I start to tap down, going to begin to tap a little bit harder and start to fan that brush out as I do Russia. No, as I do that, I'm gonna get it straight. And I'm just going to a little back and forth. It's not something. Now, with these ones in the background, they're gonna act. They're gonna act a little bit different. So with these, we're gonna start with our edge. Maybe there's one tall guy right here, right? And then we don't want to fan the brush out all the way. It's very so so there. A lot of play around back there was very big. Maybe there's a little ways one right here. I'm just right. There are all different sizes. No tree is exactly the same. You know, trees perfectly straight. No tree has the same kind of these. Have you ever seen that? It's only because you're lying. So with this, when we do that, we want just give this little tapped making different sizes. That's according like different sizes. Different shapes that's important some summer tall. Some are short. Maybe there's one really big one. It's been there for a really long time. Super old like the wise one. Maybe right next to it, there's one. Just start going a few years after that. One. Like that. Way in the background. Don't really need to exactly worry about. Even grab just a bit more of that yellow. It's tempting hunger. Tap that yellow in there a little bit just to create that little highlight. Okay, so now we have our background trees. Let's create some foreground trees. Put this brush to the side. We're gonna go back. Grab are bigger. One again. Same start. We're gonna grab that yellow that blue. Let's make it a little bit darker. Remember, closer. It's darker. I want this to be a very, very dark. Much as they become closer, they get bigger write things that are closer are much bigger than much wider things like that. So let's start this one. Same concept. By the way, start this one. We will start right here. We got our tap. That's where it's gonna is gonna live. Now, Right now, with this, we want to start a little bit over to the side. I don't wanna be too close because I want to drown out. Our idea rides on be half the tree, right? So I got tapped there and we started the top, tapping a little bit back and forth and band that out. Yes, I like that. The there's smaller one right here. Even if that paint kind of pokes through a little bit, that's underneath. That's perfectly fine. Maybe there's one more lives right here. We're gonna put this one in the final show. Just that's it. Super easy. Tap little few taps here and there, and you're ready to go. All right. So let's put a bit of highlighting next brush. This will take most of this yellow paint that I have left. If you need to feel free to grab a little bit more, always go a little bit at a time, don't put too much on the palate. We want maintain the longevity of that. And what do I mean by that? I'm not I don't only mean we don't want to waste it. What I mean is, the less you put on the okay, So acrylics, like I said in the beginning, dry out very quickly. So if you put a large clump of it on your painting for 23 hours, that's gonna try out, you're gonna need to start again. So what we want to do is make sure that we don't create that film. I only had a little bit. You could always put more on there, but you can't always take a lot of weight. All right, so we're gonna grab a little bit more of that yellow, basically. Just get over right now. What did I mean earlier? About putting in the front in the back? This by adding highlight or shading, we can determine exactly which one lives in the front. Which one was in the back? I'll show you what I mean. So if I tap here and I sort of pushed that in like this, right, I can make it live like that right now that one was in the front. I take that I pull that other one in like this. I'm just tap it in. And now this one. That's right. Studies you can even put you want gravel White just to very little bit. Don't Don't do a lot of this, even if you wanted to tap just a bit of highlights here is there just to distinguish, pushes, catches a little bit of some light somewhere. Who knows? Maybe it's reflecting off the water and pushing into the tree. We don't know. OK, so that is our trees. Very simple, very subtle, right? But I feel like with this painting, we can learn a little bit more by pulling perspective. And we don't necessarily want to make the same exact trees every time. So we're gonna change up the idea here a little bit. We're gonna go back for just a moment to our one inch. Actually, you know what? Let's use our two inch brush. We're gonna put make this guy really big, so I'm gonna take that two inch brush and I'm gonna pull in some of this color. Really use a lot of it here. See, that's gonna be very, very close to us. We're gonna have some fun with it. What makes a Now we're time. Now it's time to make some real choices here. All right, so I'm gonna put that in, okay? And let's, um Let's just go for it. Ready with this? We want to make it. So it's nice and big, so just begin. It was right here. Does now. I see. I'm just kind of tapping it out. Nice big holding treat. Just tapping it in. I might even need to add a little bit more blue here. It kind of cuts across this way. So, you know, I'm just doing the different trees, and I'm tapping and I'm pushing, but it's pushing forward so that it's not pushing like this. This All right, let's grab a little bit more blue. Here, push this right here. I don't need a lot more. Second. All right. Grab a little more blue, pulling some of that yellow. You know what? It's gotta have something live on. So it's pushing land here like this. Tap tap, tap, tap, tap, tap, tap, tap, tap, tap, tap room. Lives like that. See how I'm pushing against it. It creates its own highlight as it works through. Even if you have a booth, that's where lives now, right? I like it. I think it looks good. See, we've pushed in some of this. We've created a little bit of land that lives on right. Make it nice and sharp at the edge. The winning a little bit of highlight. Let's try it out. We're gonna need some more yellow that So let's grab. I don't want very little bit. See that? Not very much. And if you want, you don't have to do this. I like where this is at, but I'm gonna add just a little bit, Steve. Kind of see, I even added a little bit soft body. With this, you don't have to do too much. That was a lot of fun. All right, so that's treaties. Pretty simple, right? And actually don't know if you've noticed, but I snuck in another little lesson there. We did some shading while we did that right, So it was sort of a dual lesson trees and shading at the same time, right? So basically we started with our darker color. That's our shade. And we added in a lighter color at some highlight to really make that pop. And the fact that I snuck it in, you may not have noticed is as simple as shading is. So with that said, What's next? Well, in this, we should put just a bit of reflection.
10. Lesson 8: Reflection: Okay, so the concept of reflection is very simple in its execution. To do that, we're going to switch now back to our smaller, bright brush. That's what this one is called a bright brush. And you'll notice that with this bright brush gets very sharp on the edge, and it's designed to spread a very small amount of paint very boldly across the canvas. It does it by making very sharp edges, very hard lines, and that's how we're gonna build this reflection. So with this, we're going to take a little bit of soft bodied white. Don't need hard about it here, soft bodied white. And what we're gonna do is put start in the background here. We're gonna lay it, laughed this and we're going to very lightly press. I'm gonna do this motion like this were what kind of trembles a little bit. I worked my way through. Let's go here. Let's do it here, Right? You want to cut that? So it's not on the edge of the reflection, but here. So, for example, you see, I'm just sort of shaking it are trembling, it not paying much mind to exactly how, By doing that sort of pushed that idea off this here into the background. Reflections very and creating the idea of perspective. That's very so. It's just some waves on the water so that very, very easy Very, very subtle Berries. Okay, so that's reflection. It's very simple. Lay it in. Let it go. Don't spend too much time on If you look just sort of no real rhyme or reason to wear panel . It's just as long as it pushes against our landmass here. Just plays around in the back on spec, dances in the water. We like that. Okay, now we've learned crime in the campus. Who learned sky? We learned water we learned clouds, mountains, trees, land reflection all of that. So let's use it. But before we do that, I just want to show you this is why, very specifically, I use pallets. It's so easy to just take fold up. Get going. Okay. Now, if you're ready, I'm gonna finish cleaning up on a reset. You're gonna change. I don't get painted. I wear this for you. Do you like it? I hope you. Because I like shirt. I thought it was formal. Anyway, I'm gonna finish cleaning up reset change, and then we're gonna paint together. So in the meantime, one grab yourself something to drink. Something to eat. Take a little break. Come back, restart the video campaign together. We'll see in just a second.
11. Lesson 9: Paint Along (Part 1): So let's see where we started. So I've already pre primed the canvas. So I basically took what would essentially be the equivalent of acrylic, you know, sort of wet on wet style where I put a little bit of water and a little bit of white paint just to help smooth these colors out a little bit. All right, so what we're gonna do is we're gonna start with the sky and we're gonna work our way down . Right? So we're gonna begin with sky and grab more kind of bounce around a little bit. All right, So what we're gonna do first is we're going to start are two inch brush. See that? Two inches right there. Okay. Now, because it's already primed. We don't really need a lot of paint here. All right, so what I'm gonna do, I'm just gonna dab just a very little bit of paint on the brush. You see that very little bit here? A little bit. I'm gonna start here at the top who will serve the left corner if you're lefty, right? Sort of the left hand corner if you want. Or the right hand corner. I'm gonna start either one doesn't really matter. But I'm going to start here in the left side corner. Okay, So what we're gonna do is we're to start here, and we're gonna begin with these little crisscross strokes like this. Get underneath easel here, just like this. And as I started to work my way down, you're gonna notice that it's going to get much thinner as I go See that, right? That liquid white. So this is really pushing together with that blue. Nice, even sky. Nice. Very light. Very even skies crisscross strokes there. Right, I'm gonna come down to about It's in the middle of the campus. Now, when I got this, see on these little brush strokes in here, I don't want those in there. So what I'm gonna do is I'm gonna even these out by lightly pulling brush across the tennis . See that lightly pulling. I don't really want to leave this too much. Just manipulated slightly here. Very light air. I really want to do much to That's really beautiful. Thanks. I know you said the same thing, and if you didn't, I said it, so whatever. All right, so now that we have our sky what we wanted. Just want to get begin pulling on water through and up the canvas. All right, now, this is really simple. Now there's two tricks to doing this, right? You can grab just a little bit more blue paint again. Not a lot to see that a lot, Very little bit. Okay, What we're gonna do is gonna take it from the edge. Pull this just like that. Now, if you did what I did and you added a little bit of water and you added a little bit of white paint. What's gonna happen sometimes is that depending on how much you add, it might dry out a little bit. All right. So as you're adding, if it does seem to dry out slightly, all you do is grab just a very little bit of white that very little bit. And what you can do is you could take that blue and begin pulling it up. Now, what I want to do is I'm gonna leave a little space in the middle here. I don't want to pull too much a little bit more blue here bottom just so we can pull some more up now as you're doing this. Keep in mind that the way that the light will reflect is different each time, so it won't necessarily be even. So as you pull it across. Don't me get one line all the way through. What you could do is as you're pulling it, just do it a different links. Here's the trick. We do not want to pull these together. We don't want them to meet. That's important that they don't meet. All right. You want to leave some space in just a second again. Take that. Use that white. If you don't have enough to help pull that color. See that? It's very simple years. Okay, now, because we don't want this to be too dark. You can do is as we grab about White start to help pull it, Harry, like Harry, wear nice lightness to come. White. Here's Yeah, like that's that. I'm gonna leave it. Okay. So now what we want to do is essentially with acrylics. What we need to do is let it dry a little bit before we start putting our forwards. So the way that critics will work is there kind of known for the layering effect So what will happen is you can kind of build a painting from back to front, layering it together. It's why known for that. So what we're gonna do now is we've got are essentially blocked out. What we've called color blocking, right? We've got our sky, We've got our water. What we're gonna do is we're gonna add some clouds, and I'm gonna do this with my one inch brush. My one inch brush. Now, what we're gonna do is very simple idea. We're gonna take someone we're gonna use the corner, the brush, just the corner. You see that rush? What I do is I'm gonna start here and pick a spot. Really? Anywhere is comfortable. Doesn't really matter. And I'm gonna start with these little circular motions like this. All right? I kind of wanted to be fluffy. Kind of left it up a little bit like I want to bring it down. I wanted to sort of lean together, so it doesn't create just a solid white. All right. See how some of that is white? Some of that isn't. That's what we want. Push that together, right? Just 1/4. Let's throw another one. That's the little circular motions. Just like it's like there's one here does now, right? What kind of fade away Dissipate, right. That's clouds. Do they Don't all stay in one spot if they move across the sky. Dissipate. Scott. That's kind of what we're with. We're here. Look around. Play around in your sky night some parts of the whiter, some parts of darker itself around this way, this way. Yeah, well, I like that. Looks good to me, So I'm gonna leave it all right. Now, here's the thing with these brushes. So there's two types of Russia's that we're gonna be using today. We're gonna be using synthetic. We're gonna be using natural now what I'm using here, this two inch brush in this one, it's perfect. Use these air natural personal brushes. So when you essentially use acrylics, you want to wash him off right away. But with natural bristled when those get wet, they take an exceptionally long time to dry, like four ever. Okay, so if you take this and you dip it, you try to pull it out. That's going to stay really wet. You're not Use it. So with natural bristles, what I do is I just take it and I wipe it off. I usually do it on, like, a paper towel. And just to kind of get enough of that paint off just to get enough of that paint out, I just wipe it off and then I'll move on cause I got a couple of these brushes going with me, so it's a little bit easier for So sometimes when you're working with acrylics, if you're gonna do that, you might want to either have a couple of them or work with all synthetic Would you could pretty much get the same effect. I'm just trying to do it a little bit faster. Okay, Now that we have that, why don't we begin building? We're gonna put our mountain right in the middle here and with the Mount were gonna work it in two ways. All right, so first we have to Just like we've been with the background kind of collar block where that's gonna live first. All right. And we're gonna do that. I'm gonna grab my synthetic brush, right with the synthetic rush. What you want to do is you want to give it a little bit of water inside of it. Not too much. You want to try it out? You want to really shake those bristles? Make him really nice and sharp. See that? And then by doing that, what you're doing is helping the brush keep its angle, and that's gonna be important. Especially things mountains. All right. So, uh, why don't we make this sort of a darkish blue color? That's what we'll start with. So I'm simply going to grab some blue, grab a little bit of black market. It may be a little bit of white Mary. All right, So what I'm gonna do is also pick a spot wherever you feel comfortable. Right? But what we want to do is make sure that don't change the angle brush. Right? So if I start like this, swooping down second, don't take it. Move it up from that. I mean, that was there. Yeah. Why on this I don't make them all even remember, they're not pyramids. The mountain so way that they work is the shape of them. There's each time slow here, right here. Just maybe this just right now. Here's the trick. When you do this, we want to fill these it now, as you film, it doesn't really matter how you do it. A little bit more paint here. Filling it in isn't the important part. However you fill it in is just fine, right? If you want to look like this here, if you want to fill it, just this. How long do you mind the edges? You want to keep those consistent Longs? Do that, Pull it through. It doesn't really matter. How you doing? Sure, why? Just a second? Because after we do that, what we want to do now is because we're using a soft body to mix of soft body and card body , right? But right now we're using a soft body paint. What you can do is after you get that in there, it's manipulate that to pull it in any directions. So that's kind of what we're doing here. Fill it in anyways. Cop doesn't what we wanted to after we fill it, make it a nice swing direction. So he's kind of pull this way here. This one couple's this way, something. All right now, with these mountains, we weren't really be foggy towards, so the way to do that It's with this still in the brush. We don't want to clean off the brush, gonna grab some. And as I start to push that in the bottom, it's really gonna fall that up to see that. Nice talking. Now, don't go too far into the mountain and come back down. You really pull that in with you? We'll do that. So what we want Teoh. Just make it nice and smoky here. Almost like a little bit of fog. Just kind of writing the bottom There. This little fog, Right? As you move it through, press very lightly. Very lightly. Pull it up. Great. A nice fall right through here. Grab some of that. A look back here. I smoke. I don't what you said at home. I know what you know what I agree with you, Ana. Not angry about that. Remember? We want to mind the direction. Mind the direction off your mouth. All right. So as you pull it through, it's very nice. And song. Yes, it's I don't really worry too much about this part because we're gonna really cover that up with a lot of stuff. Just nice is all right now with these synthetic brushes like I'm staying. You really want. All right, so I'll usually take it, wash it off, make it really nice and dry. Reshape it again. That's important. Take it. Wipe it off. Reshape it again. Okay. All right. Let's put some shadow and some highlighted here now with these mountains. Like I said earlier, we're using a combination of soft body and hard body paint. So what I'm gonna do here is I'm gonna pull some of that highlight forward by using a hard body, white paint, and I'm gonna use my knife to do that. Okay? This is really simple. What we wanted to hear with the knife is you kind of want to get role of it. So what I'll do is I'll take that and I'll flatten it out with this nice, flat areas Latin at all. And then what I'll do is I'll wipe it off, caught the knife, So I get a nice So as I cut the knife, have a nice I'll show you. It's like, pull that through. I cut across and I'll get a good role of paint. Not sure you can see that. There. Roll paint, right? Take it. smooth it out. Cut it across. Nice roll paint. Sure. Right here. You see that? Nice. All right. So the important part here with the mountain is you want to be very loose. All right. Very loose and very light. Do not press heart. Press hard. He's gonna smash it into the mountain. We don't want to do that. All right. You also want to start with the angle. Seems here to start with the angle as I start to work my way down. Just gonna pull across like that. Very light the area. Others. Others here. Nature Flatten it out. Nice role. This one lives in front here, right? We do not want to press. Hard to see. That was very, very light. We're just gonna kind of play with these mountains. Yeah, he rolled paint training. What? I like it. It's pretty. All right. It's here somewhere. Really? We want to put it right here. Comes out. Right. So what, you want to make sure that you never do is if you do pressed, you are don't really want to smash it into the canvas. So if you do just take it even it out. I see that even it out just doesn't smash into the pain. Because if it smashes into the other paint, you're gonna pull all those colors together. One sounded color on top of the other colors. All right, now, with this, we need a nice highlight on the other side. But you don't really want to fill it completely. You want some of that sunshine to be in different spots, so I'm gonna take a little bit of blue, mix it in with that white. Not very much. Almost like a little light. Now, as I use that light blue, I'm not taking soft body part taking the hard body paint, letting it just kind of sit alright in some of those spots, hold just some, right. You make it move in another direction. Years I never saw her here Was over here somewhere. That short, right? Right here. Sure. Why not write c Super simple, Easiest
12. Lesson 9: Paint Along (Part 2): Yeah, real commitment. I was kind of more, but they live. All right, So what? This kind of bearing, right? We have our mountain. We have our sky. We have all this water where I'm doing anything with. So what we're going to do is we're gonna add some trees to it. Now, what do when I add these trees is I'm gonna start again from the back, working my way forward, so we need to start one way far back. All right, So what I'm gonna do is I'm gonna grab my one inch brush. I'm gonna grab this, and I'm gonna take some of my green using a sap green today. Take some of my sap green. All right? I want a pretty dark and that should Sam Green should cover a dark area. Now, what I want to do here is I want to get both sides off the brush so it creates a nice, sharp edge. See that reason I see? I see. That's really sharp. What I'm gonna do is I'm gonna begin to tap tap somewhere around the base of those mountains. That's why I said earlier. Don't worry about and I'm gonna do is Take this town now, as you tap, you're gonna notice that this is a little drunk like that. Sounds some of my favorite parts of this, right, Right. And all we do is tap tap with that wanted to brush. Move it around, right? You don't have to be straight across right. But what it does have to do is at some point it has to end. So because it has to end to create perspective, what we wanna do is make it a little bit thicker toward the end of the campus. And as it works its way through, gonna make it thinner, almost just kind of fades away. Now, with this, this is water. So the bottom of this land is gonna reflect. So as you get that in, all we're gonna do is we're gonna simply pull down this. Yeah, pulling. Now, there's two ways to do this. If you Sometimes people feel a little bit more comfortable doing it with natural bristle brush. And then other times people feel more comfortable with the synthetic brush. Tell you neither of those ideas are show you. Why. So if I wanted to, I can grab my synthetic brush again, using a natural bristle here. But if I grab that paints, I could pull down. When I do that, I take that color pulled out difference here is it's more of a flick, right? With this natural bristle brush I'm gonna pull down, But with this, I'm gonna flick down. You see that nice little flick downward? What? You need paint on the brush for this? You're not pulling any existing paint. You're essentially adding more pain as you flick downward. It's really that simple, though, as I flick downward with a natural with a synthetic bristle Or I will hold down a natural person brush just like just like Okay. All right. Um, must put another structure. Mommy will go here, all right. And again, we're simply just all right. Maybe this one kind of lives this way. This way. Maybe it cuts back, works its weakness. Trump, Like don't know why I'm making that noise. Just feels right. Deal with it. If you're paying along with me, do it at home too. Trust me. Just like that. Now, again, as you're tapping this in, right, moving around, stay all in one direction. That hold on, pulling down just on the edge. Now remember to as you work your way towards the end, that's gonna be longer, right. That Cole is gonna be longer here than it is over here, towards the end. Much, much longer. Sorry, I like that. So what we want to do now is let's sort of fill this with some things. Now, what we can do, like my brush off here. What we can do is let's have some trees now with trees. I'm gonna use fan brushes are very easy, and very they're They're almost effortless when it comes to making trees because they have a very specific way of doing. Show you how so again, with our base color, what's that green color? Well, we're gonna do is make me put, uh, there's one that lives right here. Right. So I get a little tap. Just so I've got one little section there. I'm gonna take the corner rush now the town like this. And then as I worked my way down kind of fan that out. Uh, I mean, no one left right there. Take that corner of the brush. Just kind of moving back and forth, just like this. Now, the trick here is don't make it really wide at the bottom, right? We want to keep it relatively thin because its not a christmas tree. You didn't have to put little lights on. It's, uh, here. No, wherever you feel comfortable. So you were pain. All right. I'm not here to dictate what looks good to you. Only here to help you through the steps. All right, Um, like that. We'll leave that for a second. When I want to do now, I want to fill this area. Let's put put another guy right. We're girl, right? Not gender specific trees. We don't know with your family. You know what were to make a family. All right, so let's put one right there. You know what? Move over. No. So we're just gonna tap. And now with the bigger trees as you move down, you want a fan that brush out to make it straight? See, that I came from appear in our little right As I did it. I handed out just doing Let's make this one taller right now. Essentially, when you make trees, some of them can be taller. Like this one might be a little bit taller than this one. And this one, or what you're doing is essentially created perspective. What I mean by that just because it's bigger doesn't mean that it is actually bigger. Could just mean that it's closer perspective. Something like that. Oh, I was pretty, like, really good looking tree. Okay. I want this off here. See, now what we have is essentially, we have a good color going, but we need some highlights, right? There's some light somewhere. Know that Want put forward. So that's what we're gonna do right now. I'm gonna take a different brush. I don't want I want really muddy that one up. One of the things. I'm gonna take a lighter color of this. So I'm gonna grab a little bit of yellow a little bit of blue just to make a nice green color. All right. See that nice green color. Now, the way that you should do this is the reason I'm using a mix of heavy body soft body is because soft body paint stick nicely to a heavy body paint. All right, Now, if you wanted to break, that's why I used a soft body underneath and heavy body, but I don't want to break. I wanted to stick. All right. I'm sure you what? I mean, here. Now, with this, I don't really want that full body or that everybody paint to pull forward. So amused, that soft body. And I'm just gonna town, like, taps. Everyone essentially just eating grass while whispering. It's really weird really whispering for a second. Whatever. Whatever. Don't judge me, all right? When you take the highlight on the tree Now, here's the trick. New highlight tree. I don't want to put it all the way through. Just one tap, some of it. Hi. I do not want to put it all the way through. Just one tap some areas, All right. Just some areas. So it really sort of pulls it forward. That's all we're doing. Scram, Right. It's not fully all the way through. And keep in mind perspective here matters because this one is gonna be in the front. So I started with this one on the end because I know that this one here, right in the front front, process over. All right, let's pull something down here. We'll just have a nice water reflection for starters. That's good. Keep in mind to remember during reflection that we want some of that in the war, but it is distorted, so we don't need a lot of is distorted. Keep that in mind. Here is part of the reason that I left my other brush with that paint on it because I just want a town When I wanted to. Just one town, some of that in just decreed that darkness that's in the water. Okay. Same thing here. I want to do here, actually. Let's go down first on this one. Pull it down. Right? Remember, it's distorted. All right, So it doesn't have to be perfect. Does not have to be perfect. Someone's answer grass here. Very simple. Very subtle. A little grassy area, Just some green and some blue mixed together. Soft body crazy. We want that darkness to kind of poke through a little bit. That's important. I remember. Hold down. Get that reflection in the water. Now, come up here a little bit. Make the sound, don't you? It helps. Yeah. Okay. Like, were there perfect. All right, you know what? Let's, um I feel like we need a bigger tree. I feel that way Be something on the side here just to kind of cover it up a little bit. All right, So what we're gonna do is let's make a big guy. I'm gonna take my two inch brush for this and a little bit more green here because I think we're gonna make this. We're make this trip pretty big. So again, pull it together for Old Side to see that pulling it together on both sides. You see that? It's really nice. And shirt, um, let's start. We'll start here in the corner, and the way that we want to do this is we just want to tap, tap, tap, tap around. Right? Right. That's the way trees move. Come forward, Come forward a little bit. There's no real wrong way to do this. We're just just kind of moving it around. Really? What a night. Where am I? All right. Let's as we're doing this much poll. You know what? Let's give this a little bit of land landless here, too. Right off the side. Here has now. Hey. All right, get a little loopy here. All right? Tap in there like that. No, this needs like it needs another. Another tree here to take our green again. Immediate lives. Oh, bigger than I want to be. But hey, trees. A bigger centuries cuts behind here a little bit sideways lives off the side. There perfect aren't. Now we want to do is let's add a little highlight to that tree Right there I will go. Same color. But here what we want to do is so has things air farther away. They retain their color. But as they get closer, what happens is is they sort of, um they get darker, right? The silhouette effect happens and that's kind of what we're doing. We're gonna give this the silhouette effect, right? I'll start here with this back tree. All right, we'll tap it. And so it's a little bit darker, that one I work. What I should say is what we have been doing a little bit darker. That's a silhouette effect. Let's grab a white our you know, what do you use were to use a different synthetic are different natural bristle brush here to make these sort of eso With this, I want these two really pop. It's a different type of tree, so Those leaves are a little bit different. So I'm gonna take my synthetic my natural bristle brush natural bristle And I'm gonna tap it toe fray The bristles of the brush You see that? Nice and afraid. All right, nice and afraid And I'm just gonna start. Let's make a little later. A little later. See that? Just tapping it. Tap with Caffrey. Those risks do it. Different tree number. Different tree Friends of these taps are gonna be different as well, right? You don't have a tap too hard here. Pretty light, Too much pressure. We're not attacking the tree. Just tap it to give it a little bit of tap tap, tap room. Some of you know what that means. Some of you don't. That's fine, right? Let's, uh, let's go here a little that way won't make these a little bit different. These are kind of pushing. So that's people a little bit of red, too. That's pretty like that. A little bit of red to it. Me and almost a orange color. Like it's almost just some bushes. That kind just lay here. That's pretty Okay. I like that. You know, we need reflection. Oh, so with the reflection. What we need to do is sometimes you could do it with a knife if you're using a hard body paint. But I find it much easier to use a soft body paint to make reflection when I use is a bright this name of the brush he right brush for making the reflections in the water. And this is a synthetic brush. So using software right back here, Maybe it kind of cuts like this, right? We're gonna use a little bit of most shaking brush across, right? Let it pull some of that color through. It's that we want that. All right, let's get a little bit of a darker color down here. Grab a little bit around, I think. All right. One A little bit of sort of land, I should say. Both the kind of flows into the water here. A little bit of black with it. Darken it up. Right. So I'm using here. I'm gonna use a, uh, burnt sienna color here. Right. And with this, I'm gonna keep the angle of Russian. I'm just kind of pull it right. There's just a little bit of land there. I was there right. It's just to create. She lives off somewhere. That way. Just so we know kind of where to start again with this synthetic brush, it's important that you clean it off. So when you do put this reflection in here, it doesn't pull too much color through you. See that? Just a little motion. Just like that. We're here. Yeah, I like that. You know what? I think we're done. All right, So that's a mountain scape today. Thank you for joining me if you paint along. How did you do? Let me know. Um, otherwise I'll see you next time.
13. In Conclusion: So apparently, at some point throughout that class, I had a little paint on my face and hopefully it was toward the end so you could have taken me a bit. Seriously, it's really tough to take somebody seriously, have a giant of paint on their face, which is fine. Anyhoo, I hope you enjoyed that class today. I know I had a lot of fun and I hope you did as well. But now it's time for you to go off on your own doing acrylic landscape. Use the tools that we've learned today. I don't know. Put something new in there, make some birds or something like that. Something fun. But whatever that is to you, I'd love to see it. So please share your projects with me. And I want to see what you guys can create. With that, I'm gonna sign off. I had a great day and I hope you did too. I'll see in the next one piece
 Jason Kwidd, Just a guy making videos about Art!