Transcripts
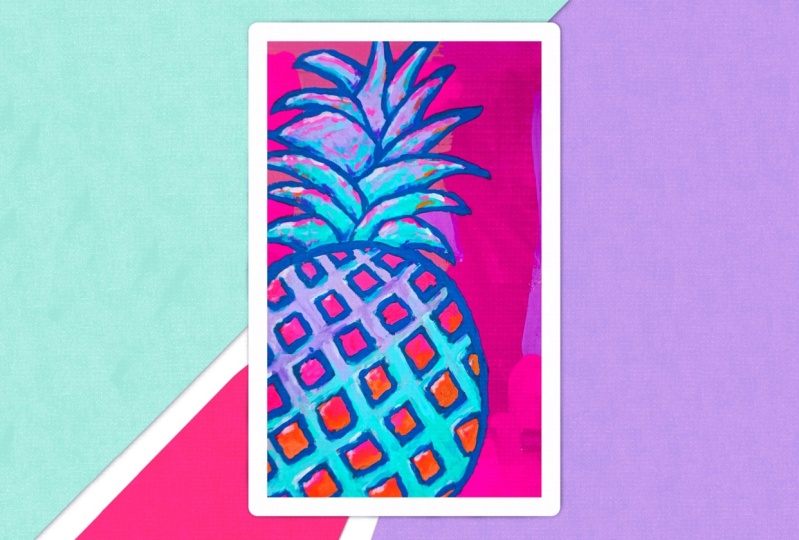
1. Pineapple Introduction: Hey, artist friends, it's L. Today I'm gonna show you how I paint a colorful pineapple. I'm going to be using an eight by 10 canvas. You'll also need some sort of palate amusing palette paper. Today I'm gonna use just a regular pencil to sketch my pineapple on my canvas. I have some clean water, paintbrushes and some paper towels, and I also have a bunch of really bright colored acrylic page. I'm going to list all of the supplies and paint colors that I'm using below the video.
2. Sketch Your Pineapple: to start off. I'm going to sketch my design onto my canvas. I know that I want my pineapple to sit off center, so I'm gonna break my canvas down into thirds. Roughly. This helps me to visualize what I'm trying to dio. And I want my pineapple to sit mostly on this part of the canvas and my crown to be up here on this top 1/3. So the fruit part is going to be about 2/3 and the crown about 1/3. I'm just gonna sketch this out very simply if you need to Google what a pineapple looks like sometimes that's helpful for this sketching part here. This does not have to be exact at all. Maybe that will go off the side a little bit. And we can fill this in a little bit more as we start to paint. And so for the fruit, I'm gonna make just very simple diamond shapes, I guess sort of triangles along the bottom, a little space in between. Once we start painting, you won't even see the pencil lines anymore. And I'm just going to repeat this all the way to the top, - and that's pretty much it. Now that I have my basic shape, I'm going to go ahead and set up my paint palette.
3. Outline Your Pineapple: for this first step, I'm going to start with my darkest color, which today on using Prussian blue And I'm simply going to outline all of my pencil marks. So I'm gonna take a brush. That's fairly then this one should do. Went it a little bit. And I'm going to go over all of my pencil marks. - I like to outline with a dark color because it will add some depth and shadows to your painting. You could use any color you wanted. A dark green would look nice. Even a dark purple, maybe a violet. I'm going to be using a lot of lighter colors and my painting as well. So I like the contrast of very dark color and a light color. I'm trying to put this on fairly thin because I don't want to add any more colors until this layer is completely dry. Or else that dark blue is gonna bleed into all of my lighter pinks and yellows, which I don't want. - This is just a rough outline. We can go over these marks again later. Teoh sort of tighten everything up. Okay, I'm gonna wait several minutes. It might even put this in front of a fan for a little bit because I wanted to be completely dry before I continue in the next step, we're going to block all of this in with our colors. We're going to make this outline just a little bit thicker there, and we're gonna let this dry now.
4. Color Blocking: for the next step. All we're going to do is put on a single layer of paint. We're just gonna block everything out. So I'm gonna fill in Ah, the crown with some different blues and greens And I'm gonna decide what colors to use down here in the fruit part I'm gonna start with my blues and greens I'll work on the crown a little bit First some turquoise and some light blue And then I'll add some green It's okay if you go over the lines to You can see that I'm just filling in pieces of each leaf Like maybe half or so Because I want them to be mixed a little bit mixed blue and green Add a little bit of lighter blue We'll be adding some green as well I'm gonna carry these colors down into my fruit I want to do sort of a greedy int color blue to green So I'm gonna put a little bit of my turquoise down here in between the diamonds inside the diamonds is where I'm gonna put my pinks and yellows and orange Some starting off down here with some turquoise that I'm gonna movinto light blue and then in just some green and sort of a yellowish green up at the top . You don't have to do that if you don't want to. You could stick with all one color or just used to basic colors have been wiped off my brush and get some of this lighter blue. It's okay if you go over the lines of the dark blue a little bit, but just trying not to get your color inside your diamonds unless you're gonna wait for this to dry first, which I'm not. So I'm going to be a little bit more careful any time. I have too much paint on my brush. I wanted to switch to a similar color. I don't even wet the brush. I just wait it off on a paper towel. I find that to be a little bit easier. So from going back and forth between light blue and turquoise, they just wiped the paint on the paper towel. Hey, I'm gonna move into a green color. I like this light olive green. - I'm gonna mix a teeny bit of turquoise and with the screen to kind of give me a different shade . You can see that this one was a little bit more yellow. And this one's a little but more green Now, just for some variation, it could have too much blue and not enough green. So I'm going to go over some of these light blue ones there. I'm gonna put some of these colors here up into the crown as well. And then I'm going to switch to my pinks and yellows. You can see I'm going over the lines here. I want to fill this in a little bit better than the way I had it outlined. That's the great thing about acrylic paint is you can correct your mistakes as you go along . You just wait for the layer to dry, and then you can paint right over it. A. And I'm gonna use some cave me and yellow So magenta and some pink late portrait pink. And I'm gonna mix the magenta and the yellow in a couple of minutes and it'll make a nice orange color. So these three colors are going to be in my fruit. I'm going to use a clean brush cause I'm switching colors here and I'm going to start with my light pink and I'm gonna fill in. Some of my diamonds down in this area can pick whatever color you want. Anything that goes good with turquoise or whatever color you chose. Take a look at the color wheel and kind of figure out a nice palate, and I'm going to switch to my yellow. Then you can see the yellow is kind of translucent. It's not really covering those pencil marks that we made earlier, but I'm not worried about that right now because this is just our first layer. And as we go along and add layers that will get covered up, that's some of my green and there. But that's okay. I don't think it ruins anything. And so, as I was saying, you could mix a nice orange by putting a little bit of magenta into your cave medium yellow . If you want it a little bit darker, you can add more magenta. And if you wanted to make a peach color, you could add some pink or white into that, and I like that orange a little bit better. They might make some weight into that later on for my highlights. Right now, I'm gonna keep it kind of dark. Wipe that off. And for the rest of my diamonds, I am going to use Magenta. Hey, and for my negative space in here, I'm going to use a neutral color. Um, I'm not gonna mix anything myself right now. I have this color called Lake Fog, which is kind of, ah, between a beige in a gray. And I think I'm going to use this, and I'm going to very roughly just start to put some color on the outside. If I wait till the end, I'm gonna have to put layer after layer after layer. So I definitely want to cover some of these pencil marks to get started tables . Kind of shaky. I think I need a better table for this. And I'm not being exact just yet because I might want to reshape some of this just blocking everything in for right now, putting down a base coat on my canvas so that everything is pretty much covered. Okay, I'm gonna let this dry for a few minutes, and then I'm going to go in and start adding some details and some highlights.
5. Highlights and Details: Now that this is mostly dry, I want to add some details. I'm going to start toe layer on top of already, uh, what we've done already. I think I was looking at the crown a little bit, and I think I want to make it a little bit bigger. So I'm gonna do that with my dark blue. I just want this side to come out a little bit more. Maybe I used a little too much water about. That's okay. And I like that a little bit better. And I think I want some to come up like this. All right. We can still leave that one there. Some coming down. Just everything's not going in the same direction and will make these some of these a little bit bigger. Then maybe have one coming up like this. They're already like that better. This is why I love to work in acrylics. Because once you're layers dry, you can just paint right over it and add whatever details you want. Okay, so I'm gonna move. When I let that dry a little bit, I'm gonna move down to my fruit area and I'm going to add a layer on top of what I've already done. But I'm also gonna mix in a little bit of white paint with some of this to start adding some highlights. So the second coat of paint and the white is really what's going to start to bring our painting together. You didn't use this aqua color yet. I'm gonna incorporate this already. Got some blue there, and I'm going to get started with just these colors and anywhere that I didn't fill in, that I can see some of the canvas poking through. I'm just going to go over those areas, and I forgot to add white to my palette. So if I mix a little bit of turquoise and with this white and then go over that a little, you can see how we start to get a few little highlights. You could also do it with the light blue over the turquoise. If you don't want white highlights, you could do light blue highlights. And if you do too many, just let it dry and go back in with the turquoise, wipe off my brush and go up to my light blue here when it ad my second layer and then mix and some white at this point to if you wanted to change some of the color, maybe you don't like the screen. This is the time now where you can go over it with a different color or mixed the two colors, right? That's a little too much for me. So I'm gonna just go over it again with the blue. And don't worry about covering up the dark blue in our final steps of final details. We're going to go over that dark blue again there. I like that. You could even do your highlights with a smaller brush if you want wrong color and gonna put a little bit of aqua on that just for some variation probably can't really see it, but in person might add some nice details. Also, my I'm gonna fix up this dark blue line in a little bit, but you also might want to add some details to the side just to kind of give it a little bit more definition. Marie animals, they're going to take my great paint and just kind of clean that up a little bit in a few minutes. Okay. When a white some brush here and move on toe adding more details. And I made that, um, darker green color earlier by mixing a little turquoise and with my olive greens, I'm gonna do that again. It's a little dark, so I'm gonna put a tiny bit of white into that. You like that color a lot. You know, lighten it up for my highlights. - That might be a little too light. So it grabs more of this light, all of green. They're much better. And then just kind of look at it. What needs to be lightened up? Do we have enough highlights? Do you want to mix anything? I think I want him mix up a little bit of light blue for some of these highlights. America will move up to my crown now, And I'm just gonna start to layer wherever I had some green. I mean, adds more green. I'm gonna use different shades to bring some of that aqua up into my crown. I'm painting between the lines over the lines. We're going to go back in with the blue anyway. Turquoise. I think this needs to be lightened up a little bit, take blue and mix it with worry for some highlights. - I'm just trying to add when I think it might need that to come down a little bit more cinnamon a switch colors now. And I'm going to add my second layer onto my fruit. I've got some paint still on my palette. I'm going to use the same colors. Think I'm gonna do the same type of highlighting here with, uh, white. I just want to darken up some of these colors, right with my second layer, and then I'll add the highlights with the white. So I'm gonna put a little bit more right on my palette, pick up a little bit of white on my brush, and I'm not gonna fill in the whole thing. I'm just gonna make some marks on top of the pink, maybe like half the diamonds you could do like two little triangles for highlights. You could do three sides on one of them or two of them. If you want to change it up, we just want a little bit of variation in each of the little diamonds. If you wanted, you could put a little bit of yellow into your pink and make it kind of a peachy color, and then I do the same with my yellow, and I can still see some of my pencil marks through this yellow. You could put your highlights right on those pencil marks and you won't see them anymore. You could add some pink into your highlights. I like to blend all of my colors and you can see that I'm totally being messy. And that's okay if you want Teoh, which I know that I want to. I'm going to go back in with my dark blue and outline a few of thes triangles again just so that they stand out a little more You don't have to do with all of tha. Mu could do it with just a few if you wanted darken up this magenta. Sorry about shaky table and then I'm gonna make some of that orange again with my yellow and magenta. It's kind of dark. Can add a little white to lighten it up. Too much paint on my brush. I think that's a great orange color. Orange right out of the tube can be really too bright sometimes. So finding a nice bright yellow and, um, agenda to mix, we'll give you a nice orange color. Better than what you can get out of any tube gonna do some kind of pink highlights on my orange peach highlights. You can even makes a little magenta on and then do your lighter ones, whatever you like. Pretty happy with the way this fruit part is coming out right now on and gonna lighten up this magenta for my highlights. Here, you can see I just go over them a few times until I'm happy with, um, just take a peek and see if you like everything. If not, fix it. Okay? I think that's good for my fruit. I was going to define this a little bit more, and I think I don't have enough highlights and details in my crown, so I'm gonna go back to that. We find one of my brushes here that already has some green on it clean. That went off a little. And I'm gonna add some messy details. I definitely need some highlights. Right. So I'm gonna lighten things up with my white, You know, I think a couple of pops of yellow in the crown will look good. Not too much, but it'll help Teoh make this more cohesive. Okay, I think I'm gonna let this dry and look at it for a few minutes and see what details I'm missing and see what I need to add before I start to clean all of this up and finish up my negative space.
6. Finishing Touches: Okay, so I let everything dry, and I've been looking at my pineapple. And so for my final details here, I'm going to fix what I don't like. So I'm gonna try to reshape this crown a little bit. And I also just want to add in some details to the, um, the bottom part of my painting here. I want to go over some of these dark blue lines and just dark and them a little bit. First, I'm gonna work on my crown. One of kind of reshaped some of these a little. I want this one here, the big one to be sort of in the background, so I'm gonna paint on top of it a little bit. And I want some of these going more in an upward direction than how I had, um, same thing on this side instead of this one growing out, I wanted to go up a little bit more. Some of the paint right on top of that have won going up this right here, I'm gonna paint some of that beige paint over to reshape the outline, and then I'm gonna go back in and, um, add some more highlights. So I think I'm gonna leave this year for a minute, and I think I'm going to take a little bit of that gray. It's too dry Lake Fog, it's called. I'm probably gonna have to go over this a few times because it's so dark, but gonna make this part of my background and just really give that a better shape there. That did blend a little bit with my blue, but I'll just go over it again in a little while. Well, I have the gray out. I can also work on this line here a little bit, and I might fix this line over here a little bit as well. Who's to shape up my pineapple a little bit better? All right, that needs to dry. I'm gonna let that go and then go back here to my blue. While that's drying up a bit and with a smaller brush, I'm just going to go over my dark blue. This will really give more definition, and it'll add some shadows and depth. I don't have to go over every single line. If you don't want Teoh, just do a few kind of step back and look at it and see if you want to keep going. - I like that better than how it looks down here. So I'm gonna do it. Teoh. Most of my diamonds. - I think I have most of thumb done. Good. Okay. So I'm pretty happy with this bottom part of my pineapple. I think my top part just needs a little bit more work. So I'm going Teoh paint in some of those dark blue lines that I made, and I'm gonna add some highlights and make some, I guess, just different lines for details and see how that works. So I have some aqua I'm gonna do. You use a little bit more light blue on, and I'm going to get a clean brush for this. This one should be good. I'm going to start with my light blue. But I just want to define some of these, uh, new parts of the crown that I'm in to make it look like they're going in the new direction that I want them and to go in, pick up some white highlights like this aqua color in here. So I'm gonna add a little bit more of that mix in a little white with the aqua, and I think I could use a little bit more of my, um, all of green. And here I'm already liking this much better. Just trying to figure out where I could use a little bit more green. Maybe right there. Okay, that's coming together a lot better now, a little white for some highlights. - And really, I'm just trying toe fill it in, I guess. And make sure that everything looks like it's going in the direction that I want it to go in. So when you look at a pineapple, a lot of the top, the crown kind of stands up. Um, but I do have some coming off the sides a little larger just to sort of balance out canvas . Hey, and I think I think I'm happier with this now, and all I'm gonna have left to do is touch up my negative space. A couple of, uh, little white lines here will give you some nice highlights in a couple of little marks in the middle. Going like that will add some nice detail. Okay, I'm calling this one Done. You know me. I always say that when I keep painting I'm going to say this is done and I'm going to for my final step, I'm going to finish up this negative space here.
7. Negative Space: okay to finish up like, a little bit bigger of a brush to do the bigger area. And I'm going to use a smaller brush if I need to. Teoh go in between the areas of the crown up there. So if we hadn't put this color on earlier, you'd probably need a few coats of it. But I'm just gonna do one coat now because it seems to be covering everything up the way that I want it to. This would also be cute. Maybe if you put some stripes in the background Oh, or maybe some other pattern you can play around with that you could do a pineapple that has fewer colors in the pineapple and had some colored stripes in the background. That would be cute. Or you could put your this on really thick and add some nice texture. I am. And I'm just going to use a point to your brush here to get in a little bit closer. Okay? I am calling this one. Done
8. Sign and Varnish: I hope you're happy with your colorful pineapple painting. Once you're painting is completely dry, you consign the back of the canvas with a marker. I also recommend that you varnish your painting to preserve the colors. I use this aerosol Matt varnish a lot. I use it outside because it is an aerosol. It does have a strong smell, but the smell will go away once it's dry. If you want to be notified every time I post a new skill share class, you can click on the follow button right above the video and you'll be notified every time I publish a class. And if you created your own pineapple painting after watching this class, I would absolutely love to see it click on the projects tab below the video and upload a photo of what you created. Thanks for following along with me today.
 Elle Byers, Artist and Teacher