Transcripts
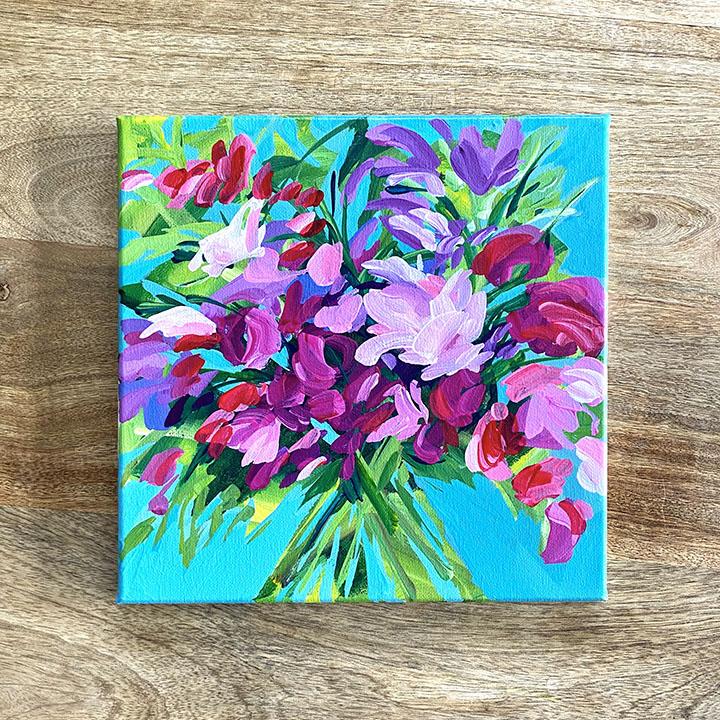
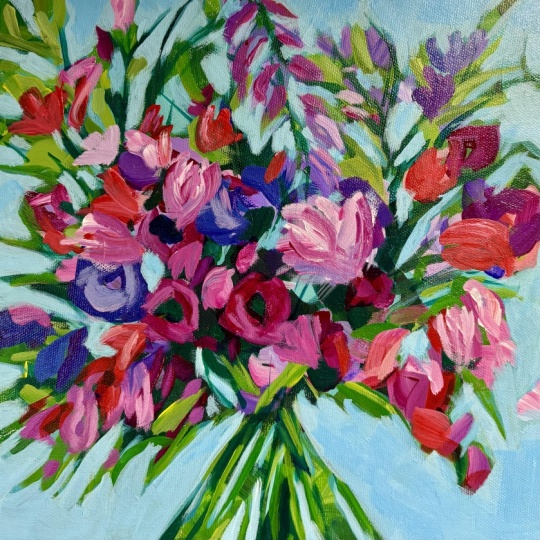
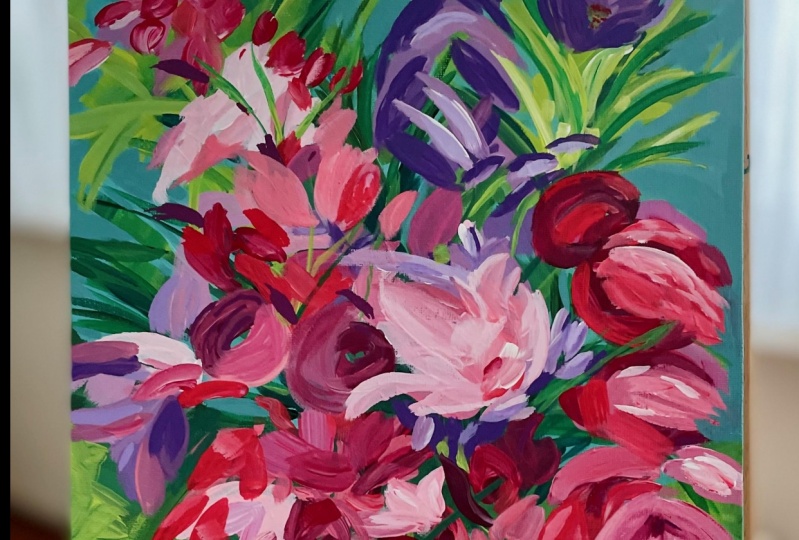
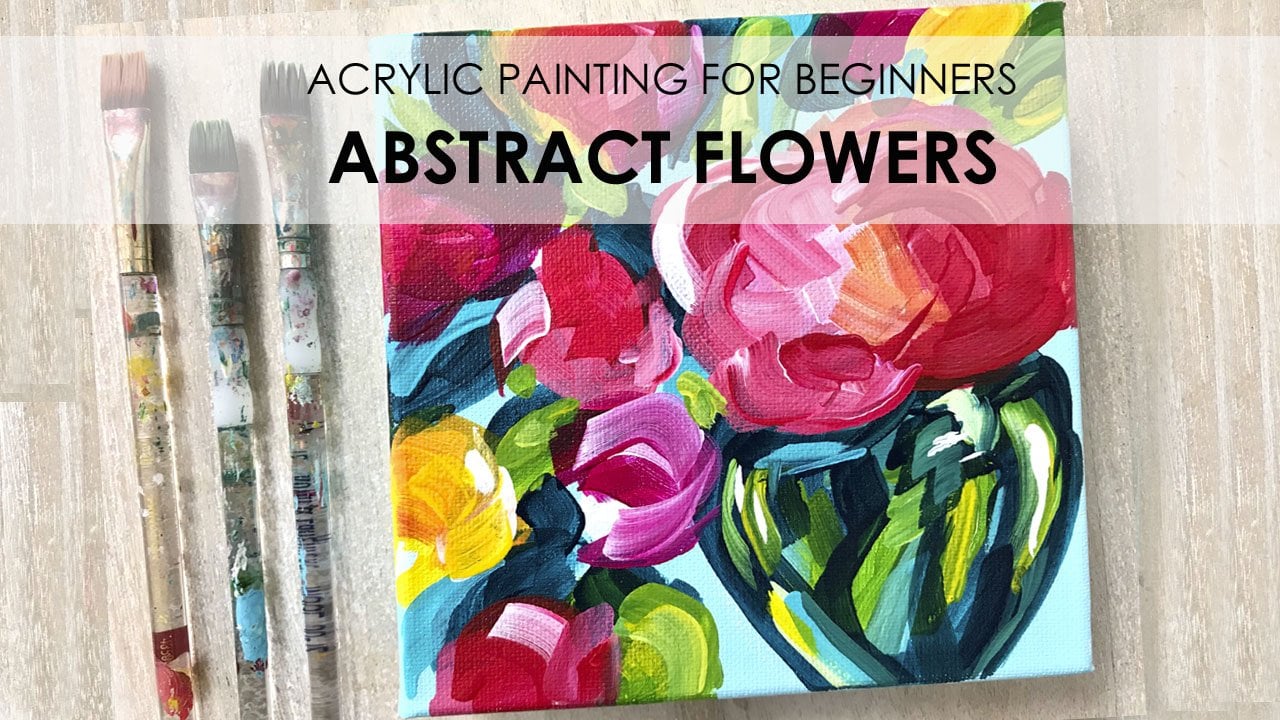
1. Introduction & Materials: Hi everyone, I'm Mel buyers. Welcome to my painting class. In this class I'm going to teach you how I painted this loose floral bouquet with acrylic paint. We're going to start off by mixing some green and blue hues to create an abstract painting. Then we'll sketch our composition with a piece of chalk and start to fill in the negative space. After that, I'll show you how I add in more layers and details to build up my paint. And gradually, I used a 10 by 10 inch canvas and flat paint brushes for this painting. For paints, I'm using golden fluid acrylics, but I encourage you to use whatever paint in materials you already have on hand. You don't need the exact same page or brushes I'm using to achieve a similar result. I have listed all of the exact paint colors and supplies that I used for this class under the video in the about section, I also attached a copy of my completed painting below the video. So feel free to use that as a reference for your own painting. For your class project, I would love to see your interpretation of a loose floral bouquet. You can click on the Projects and Resources tab located below the video to upload a photo of your painting. If you have any questions about this class or any of my other classes, you can click on the Discussions tab below the video and post your question there. Also, if you'd like to be notified every time I post a new Skillshare class, you can click the follow button next to my name and you'll get an email notification every time a new class is published. All right, let's get started on our floral bouquet.
2. Create an Abstract Background: I am going to start off by making a green and yellow abstract painting. I'm using turquoise for my cool blue and cobalt blue for my warm blue. I also have some Hansa yellow. And I'm adding some weight. I think I'll add a little bit of burnt sienna just so I can dark in. Some of my greens, make them really dark. So I'm mixing my burnt sienna and my turquoise base, a little bit of yellow to make a really dark green. I'm going to put my darkest values. We're in the middle of the canvas where I want to create a sense of depth in between my flowers. And as I work, I'll lighten the values a little bit. Just trying to cover the canvas with a variety of dark values. I don't want one solid color in the background because that will read this kind of flat. I'm going to add a little more yellow and white. Let's say move to the outer ends of the canvas. Still going for a variety. It's okay to leave your background streaky. That'll just add detail on the end. At this stage, I think the more variety the better. So don't be afraid to grab a bunch of colors and mix a whole bunch of greens. And just make sure the whole canvas is covered so that you don't have to go back at the end and try to cover up all these little spots that you didn't get the first time around. I'm going to have just some darker values kinda shooting out in different directions. I think I'm going to go over this dark middle one more time because I wanted to be really dark. I'm just going to rinse my brush a bit, get some of the lighter color off. I'm going to use a little more turquoise. Quite as dark as I wanted. There we go, that's better. So the turquoise and burnt sienna. So the main part of my flowers are going to be in here and then I'm going to have some stems going off in all different directions. A little more yellow and white. And I'm just kind of crisscross everything. And some of this, these bits of details will show through in the end. All right, I'm going to let this dry for a couple of minutes so that I can start to carve out the shape of my bouquet.
3. Sketch Your Composition: You could do this next part, freehand. Just go in with your paintbrush or take something marker, pencil to sketch your composition. I'm using a piece of chalk, just regular chalk. This is going to be the stems of my bouquet. And then I'm going to draw out the stems that are coming off the bouquet so that I can paint around them a little bit better. If I were to just kind of guess, I would probably get a totally different composition. In both ways. It's totally fine. Whatever you're comfortable with. Sometimes I do it free hand. If I were doing it freehand, I would probably want to work on my easel so that I could step back a lot to see what I was doing a little bit better. So I'm going to put some negative space in here. I'll have a couple of branches crisscrossing in this area. Purple flowers. And then I'm going to mix a darker gray color using my turquoise and my burnt sienna and white. And I'm going to start to carve this out a little bit. Kind of reveal the shape of the outer part of the bouquet. So this is kinda like a blue-gray. The more burnt sienna you put in, the more it'll push it a little bit more towards the gray. I'm going to need a lot more paint than that. I'm going to start to just come in around some of these shapes that I made pretty loosely. So I want to leave a good amount of the green showing. But I do want to have this gray wall in the background showing through. I'm not worried about mixing the exact same gray for each part. Because I kind of like when there's a bit of a gradient, This does not have to be exact at all. So if you've never done this before and it feels a little strange, that's okay. It's normal to to kinda be a little unsure of it. At this point, I would say less is more. If you're feeling unsure, you can always come back in and add more background color later on. Then, even if you don't like what you did here, you could do another layer of green on top and start again. So pretty forgiving method of painting. Because you can make everything really abstract. I'm going to leave a little bit more of the green showing on this side. And it'll put it in a couple of spots where you can see the wall in the background. And again, you can always paint over these later. I'm going to put a little bit of space in between some of the stems. All right, I think that's a good start. I am going to mix up some purples and pinks and start to layer on my flowers.
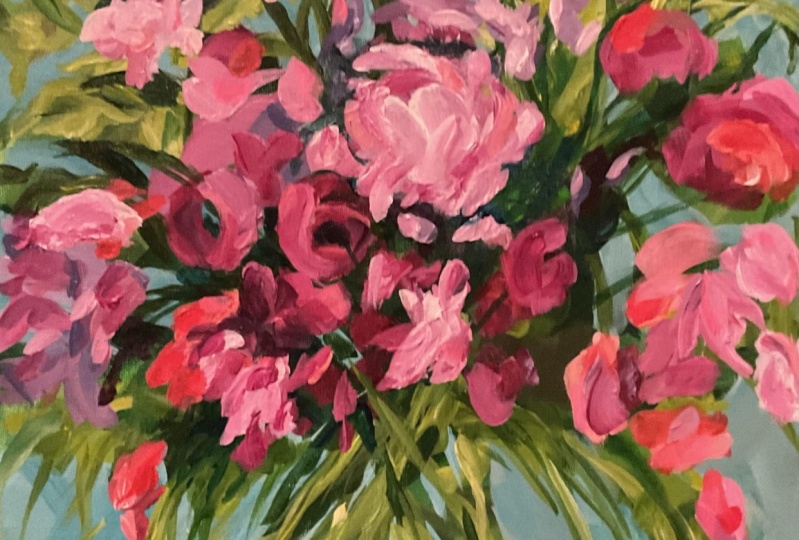
4. First Flower Layer: I'm going to remove the chalk lines. You can just use a little bit of water and reveal the shape that you created. If you're not happy with the shape. If you did too much of the background, you can go back in with some yellow and blue and add some more of the background color. And then go back in with the negative space again. If you think you didn't do enough of the background color, I would just hold off for now and add more later with a second pass of the background color. I'm going to just use the clean side of my palette paper here. I'm gonna start with quinacridone, magenta and some white. I'm also going to use a little quinacridone, red. So these are both cool red colors. And I have some turquoise here in case I want to go a little bit more towards the purple. I'm gonna put a little bit of white into my magenta. And I'm just going to start to mark the areas where I want some of my magenta flowers to be. I'm going to slowly build the flowers. I'm not going to put them all in at once. It's easy to overdo it if you start to paint fully formed flowers. So just think about putting in some partial marks. You can always paint over these later. And you don't have to paint circles. Remember that? You want your flowers to stay pretty loose. You can just make some, just some abstract marks. I'm going to put a little bit of turquoise in here, just a tiny bit. And a little bit of white. And push that a little bit more towards the purple. And I'm going to lighten it up so it's a lighter value than the magenta that I had just put down. And even though I'm not making any flowers, real flowers, they're just abstract marks. Your eye should read them as flowers because of this green background shapes that we already created. So you don't even really have to have anything that is a completely formed flower and order for them to be believable flowers, which is wiped my brush on my paper towel. And I'm gonna go back and with a little bit more magenta. And I think I'll switch to a new brush. I'm going to use my red seems style brush number 4, flat. And a little bit of weight. This is pretty dark going on the greens, a pretty translucent color. Some seeing a lot of the green coming through. I'm going to add more white and it'll help with the opacity. And I'm getting some nice rail vibrant pink florals here. And what I'm going to start to do as I go along is just layer over these marks with darker and the lighter values. And that'll help my flowers to be a little bit more dimensional. I'm going to go back to the purple. And I think this is a good start for the flowers. I'm going to add some details onto the greenery and let my flowers dry before I layer them any further.
5. Layer the Greens: Using that same brush, I just rinsed it off a little bit. And I'm going to mix up some different greens. I have some turquoise and burnt sienna here, still. Going to add in a little bit of yellow. And I'm going to add some more dark details. More in the middle here. Just some smaller lines going in different directions. Don't be afraid to overlap an areas that you already put down some paint. If you want to have some stems. Just kinda use the tip of your brush. And I'm mixing a little of that purple just to kind of D saturate my color a little bit. It's more variety. A little bit of white. So I can mix a lighter green. And I'm just adding in some lighter details. And I'll do the same over here. I think I want more yellow. Just kind of pressing my brush down and letting the shape happen organically. And then in the middle I'm going to go just a little bit darker, just so I have some nice variety. And I think I'll do some lighter highlights down here on some of these stems. I'm going to bring this down a little further just so I don't have a lot of empty space. And I'll probably reshape a little bit with my negative space ones I redo that color or not redo it, but add another layer onto it. All right, So I do think that I have enough greenery now. Going to do a little bit more turquoise and the middle because, just because I think the turquoise will look nice with the purples and pinks. All right, I think that's enough. I feel like I'm overdoing it. And I put a couple of stems overlapping on some of these flowers just so everything looks like it's all mixed together. And I'm going to let this dry for a couple of minutes and clean my brushes. And then I'm going to do another layer on my flowers.
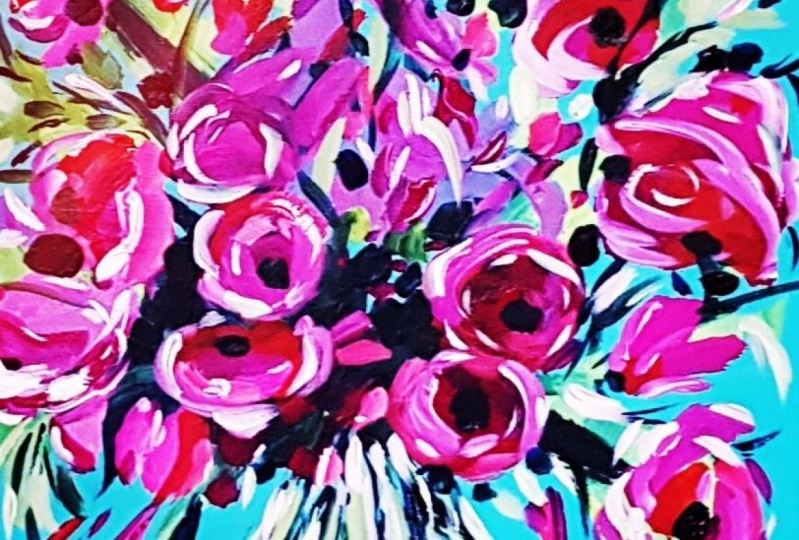
6. Add Details to the Flowers: I'm going to grab a new piece of pallet paper because I don't want any of my greens. And with my purple and pink, I want nice pure bright colors. And so I'm going to add my quinacridone red and my quinacridone magenta. Back to my palette. I'm going to start to layer over next to on top of some of the colors that I already put down. I wanted to do it in a slightly different value. So if it's a dark mark, I want to put either a medium or light mark on top. And that will help to give my flowers dimension. So cover over a little of what you did, but not the whole thing leaves some of the under layers showing through. And I'm still just making loose abstract marks will lighten up this value with a lot more white. I'm trying to vary my brushstroke so that every flower doesn't look exactly the same. And I want a nice amount of contrast. So I'm going to really lighten some of these up. Let's make a really light value, magenta. And then I'm going to mix in a little bit of red to change the hue. Because I don't want everything to all be exactly the same color. So some nice reds here. I'm gonna do a little bit more red. Really liking the way the bright red looks with the magenta. Then don't want to overdo it. So I really want those pops. So Fred to stand out. Just going to wait my brush a little on my paper to how can some of the write-off. So I can mix a lighter pink. I don't really like this flower here. So I'm going to layer over it a little. Maybe even with some purple. I think it just needs some more color. A little washed out. And I'm going to do one, turquoise. Turquoise place. Whenever down magenta. It's a beautiful dark purple. Maybe I can use a little of this. I'm going to lighten the value with some weight and I'm going to find those purple marks that I already made and start to layer over those. So I can get a little bit more variety, create a little more dimension. Think some of the purple needs to be lightened up a bit. Layering rate next to it. Next to the darker purple. Get some of those highlights. I'm just trying to work this flower a little bit, so it's a little bit more of a focal point. You don't want everything to be the exact size, same size, shape. So I think that one I'll be a little bit more prominent and a little bit lighter. And I'm going to leave it. I don't want to overwork it. And then just add a few lighter highlights. And I think the last thing I'm going to do, I think I'm pretty happy with my flowers. If you're not happy with your flowers, try adding a little more variation and color and value. If everything is the same value you're painting is going to look pretty flat. You wanna make sure you have some variety in your value highlights and shadows. And I'm just touching up the reds. And I'll let this dry for a couple of minutes. And then I'm going to go over that background one more time.
7. Final Details: I just want to clean up some of the Hs. You may or may not have to do this. If you are happy with the way your painting is right now, it might be finished. I'm going to just mix up a similar color. I want to just clean up this part a little bit. Not worried about the color matching exactly. Sometimes I think it looks better when there is a bit of a gradient in the background. That's probably a little bit too light. Much better. I think the stems look okay, so I'm not going to really touch the stems. I'm going to ship this thing a little bit more and to leave. I'm leaving some of that original underpainting showing. Think it just adds a little bit more detail. I hope you enjoyed the class. If you have any questions about this or any of my other classes, there is a discussion tab where you can post a question and I'll be sure to get back to you. And under the video and the projects and resources tab, you can click Create, Project, and upload a photo of your painting. I would love to see it. I also have all of the supplies and pink colors that I used in the About section below the video. And if you want to be notified every time I post a new class, just click the follow button over by my name and you'll get an email every time I post a new Skillshare class. Already feel like I'm going to stir it to overwork it. So I'm going to stop here. Thanks for watching.
 Elle Byers, Artist and Teacher