Transcripts
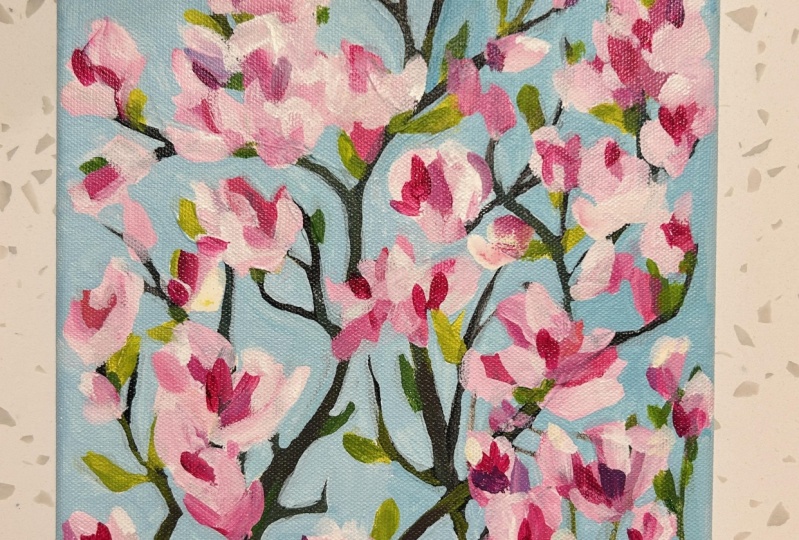
1. Introduction: Hey everyone, My name is L. In this class I'm going to teach you how I painted this little magnolia tree on a six by eight inch canvas. You will need some acrylic paint palette to mix your paint colors, some small paint brushes, and some water and paper towels for cleanup. I will list all of the paint colors and supplies that I used for this class. In the projects and resources tab located below the video. For your class project, I would love to see a picture of your magnolia tree painting. You can take a photo and upload it to the projects and resources tab below the video by clicking Create project. All right, let's get started.
2. Paint the Branches: I'm going to start my magnolia tree by painting some dark branches. And I think I'm going to start with my Payne's gray branches should be more organic and shape. They're not perfectly straight lines. I'm going to have one branch go up over the top and also vary the thickness. They get a little bit thinner as you go up. They've got one small one here. Really trying to just simplify the image that I'm looking at. There are so many branches. I'm just going to paint the really the main ones. And there's lots of little stems coming off all of them as well. Don't worry if you paint too many, you can always go over them with the background color. When we go into clean things up. So be the last one that I do. I don't want my painting to be overwhelmed with branches. I do want them to overlap. So you don't want everything just sitting side by side. And then I'm gonna go in and add some more color to this so it's not just flat and dark. I do see a lot of green on some of the branches. So that's my Hansa yellow. And I'm also going to add some turquoise. I'm going to use the same brush. I just wiped it on my paper towel. And I'll put a little of that Payne's gray in here, just to take that neon glow out of the green. If you mixed turquoise and Hansa yellow together, it is super vibrant. One to lighten it up so I get some nice contrast on the branches here. I don't want too much paint on my brush. And I'm painting in where some of the branches seemed to be sitting in the light. They look a little bit yellow. And then also some of them have some little leaves and buds coming off of them. Gonna do a little later, Payne's gray as well. And just get some variety in my colors. I'm going to paint. I'm a good number of these yellow buds because the flowers are mostly pink and white. And I would like to have a lot more color in my painting. And I'm not really using the reference photo for this. I'm just trying to put these little buds everywhere. And I'll probably paint some of them out with my background color. And a little bit later, if I think I have too many. Great, I think this is a good start. I can always add in more. It's going to add some yellow branches. And I think I'm going to put a branch over here. I want to leave this a little more open. I'll have a little bit more. My branches over here. Tone that down a little bit. Usually medial put some of this color and as well, the more varieties of better. I think that's a personal opinion. Alright, I am going to let this dry. And then I'm going to paint my flowers.
3. Add the Flowers: If you zoom in close on your Magnolia reference photo, you'll see that the flowers are sort of a purply pink in the middle and more toward the bottom, and then also just a regular vibrant pink. So I'm going to do a little of both because, you know, I like variety. I have a flat brush. I think this is a size three. I got paint over the size so I can't see it. A little filbert brush would look would work well too. So that was too much blue. I need to get this to lean a little more purple. I'm going to start out with just small pops of color. And then put more white and pink on top of this layer. And a lot of them are overlapping and you can't tell where one ends and one begins. So it's okay if you get them real close together. I'm also going to try not to have them all be the exact same color and shape, which is hard because they are mostly the same color, but I'm going to try to have some with a little more purple in them and then others with a little bit more red. Red, but pink might push the colors a little further than what I see in the photo. If I feel like the painting needs a little more color, can always add in more greens, more yellows. And so that's subtle, but it's definitely a different color. And not just using the tip of my brush, I'm also using the flat side a little to get some different shapes going on here. Can even put some pink in with the purple ones if you want to. So I just wiped my brush on my paper towel and I'm going to pick up some white so that I can get a little bit later of a color to go around the sides and the top of a lot of my flowers here. But I don't want it to be pure white. I want it to have a little hint of color. I'm not overly worried about the shape of the flower. I want them to be a little abstract. Your eye will still read them as flowers. Even if they're not the exact correct shape. And I want to get a little bit of that purple and here. And remember a lot of them are so overlapped that you can't really see where one ends and one begins. So there's a big cluster here. I think that's fine. I'm just going to put a little white down here. I'm gonna go in with my sky Next and fill in all these little spaces. I didn't put blue down first because I knew it would impact the color of my whites and pinks that I was putting down. Plus I like to use the background color to clean up the edges of things. So if I make something too big or it's too neat, I cut into it with my with my background color and clean things up. All right. I'm going to let these dry. I'm gonna go over everything on here again at least one more time plus my background color. But before I do the background, I want everything dry so that it's not smudging with my flowers.
4. Paint the Negative Space: I'm going to now take a small flat brush, filbert or whenever I have over here. And I'm going to mix a sky color, I think I'll use this little filbert is a size 2. And that's my turquoise paint. I'm going to use a turquoise and white because I like the way that contrasts with the pinks and purples that I have in my painting. As part of the process might take a little time. I'm not being overly careful. I don't mind if I cut into my flowers and my branches a little bit. I'm being mildly cautious. And if you went too crazy, too big with some of your flowers or your branches, this is a good way to push them back. You can paint right over them and sort of reshape anything that you consider a mistake. I like this because it also helps to make my branches not to street looking like the jagged edge. And don't forget we are or you can go over the branches and the flowers one more time. Which I will definitely do, but you might not think it's necessary. And so if you take too much away, you can add it back in with your next layer. I'm all about going back and forth with my layers. I think you get a better sense of depth and dimension. When you're adding a variety, variety of colors and values to the painting. Like kinda just cut right in here. It just makes that tree branch a little more organic in shape. If you have little white spots, don't worry, you can always put some more green or pink or something on top of it. So you don't have to worry about every little tiny spot of white. I think this is a good start. And definitely want to let the canvas dry for a few minutes before I add any more green or pinks, so that it doesn't smear in with my background color.
5. Layer the Flowers: Just rinsed that same brush I was using the filbert size 2. And I have a little red here on my palette, still going to push it a little purple. And I'm gonna make my colors and my flowers a little more vibrant. So I'm not going to cover every single area of pink. And I'm going to layer on top. So I'm leaving some of what I already put down and then adding a little more color kind of next to it, kind of on top of it. The flowers seemed to point up toward the sky. So that's what I'm thinking. As I'm putting more paint on. And I won't do it on every single one. Thinks some pops of color will be, just make it stand out a little more. And you can add in new flowers too. So if you feel like you have an area that's a little bear or you maybe put a little too much of your blue paint. You can just go over those areas. We're going to start to change the value of this a little by adding in a little white and lighten it up. Start to get a little more variation. I think I need more white paint. I try to have this lean a little more purple and then go over some of these purple areas. And a little bit more. And I'll lighten it up a little bit. I'm adding more flowers down on this side. I want, I kinda like the cluster of flowers up there. And I wanted to work in a cluster down here. And then leave this little bear and a white my brush on my paper towel and mix some lighter pinks and purples now and just sort of repeat process. So the weight is around the tops and a little bit on the sides kinda goes around the darker colors. So that's what I'm going to try to do here. And the cheeks just layer, layer, layer. My favorite thing to do. Just a little bit more white. And then I'm going to take a break for a minute. Let my eyes sort of refresh. And then I'll touch up my branches and my sky and then I might possibly be finished. Right? I can feel myself kind of overdoing it. So I'm going to take a short break and then come back and see what I need to do for my final details.
6. Add the Leaves: I'm going to go back in with my yellows and blues and touch up the branches. Turquoise. And I'm also going to add a little bit more of my Payne's gray. That's my turquoise. And put my Payne's gray over here. Probably could use some more white. I want to bump up these yellowy greens just to make things pop a little more. And I'm also going to go over my background color one more time. And it was the wrong color. I wanted to use turquoise. I'm going to get more of a vibrant green in here, a warm green. So I'm adding a lot of yellow and a little bit of white. Having a few pumps that are a little more highlighted, I think is going to make everything really just stand out a little more. I'm also going to put a little bit of green at the base of some of the flowers. And do you want to vary my greens so I don't want everything exactly the same. Can fix some of the branches or add in a couple more if you want. Some of the branches and the reference photo I was looking at earlier overlap some of the flowers. So you could do that too just to make it look like the flowers are mixed in with the tree and not just sitting on top of the tree. If you don't mix the greens and in, with your flowers, in your paintings, no matter what type of floral painting you're doing, it can look like the flowers are just floating on top of the painting. And I'm just going to wait my brush and grab some of this darker Payne's gray and have nice contrast in here between darks and lights will help everything pop. And a little more too. I'm kinda just standing back a little. And I'm just putting a little green wherever I think the painting could use it. I'm going to actually use a little bit more yellow and get some really fun bright spots. And yellows pretty translucent. So it's hard to get it to really stand out, mixing it in with a little bit of white just to make it a bit more opaque. I don't want to overdo it. I think that's pretty good. I am going to touch up the sky and then just add a few highlights to my flowers. And then I'll be finished with my magnolia tree.
7. Touch up the Background and Sides: All right, layer, layer, layer. I'm gonna go over the sky one more time with my turquoise and white. And then just a few highlights. Now be finished. I'm going to go in a little more carefully. And I might not even touch up every single spot anywhere that it looks like it needs it. Definitely over here, I didn't do a good job covering the first time. You might not need to do this if you covered it. Well, in the beginning, some of these spots in the middle, I should have been a little more careful on your own. I think that looks a little better. A little more coverage. And also, I'm going to just paint my sides pretty quick here. I'm gonna do them all just the flat turquoise would be cute if you had a thicker canvas to have the magnolia leaves coming over to the side and takes a little extra patients though to carry the painting over like that. I just have to be careful putting it down. And then the last step is going to be just to add some white highlights to really contrast with my dark colors.
8. Highlights and Final Details: And then just gonna put down some pure white. Just a little. I'm going to take a clean brush so I don't get any other colors mixed in here. I want to just paint in some highlights. I love seeing your class projects. So if you do paint a magnolia tree, I would love to see it. You can upload a photo of your painting to the projects and resources tab located below the video. I believe if you're using the app, the projects and resources tab, might not. It's either not there or it's somewhere else. But if you're on a computer or if you're using a browser, on a tablet or phone, you should see a tab that says Projects and Resources. I will also, in the About section below the video, I will add my finished painting and I will add the reference photo that I'm using. So feel free to use those as a reference for your own painting. You can really find any reference photo of magnolia trees. I just used the photo as a loose reference. I don't think you'll find that my painting really looks anything like the reference photo. I think that's good. And could keep touching this up forever. And I think I'm going to say this one is finished. I hope you enjoyed this painting tutorial. Thanks for watching.
 Elle Byers, Artist and Teacher