Transcripts
1. Intro: I love drawing people. I think they are
fascinating and I want to share my love of
drawing people with all of you. A lot of my students over
the years have told me that the hardest thing for them
to draw is the human form, whether it's a
portrait or full body. But we're just a
collection of shapes, just like anything else. If you can draw a tree,
you can draw a person. I want to show you some of the tricks and
techniques that I've learned over the years to make it a bit less intimidating, some of the lessons
we'll be focused on portraiture and how to capture
the elements of the face. And we'll also do a
lot of drawings at the full figure from a lot of
different angles and poses, so you can get comfortable
with that too. The key to learning to draw anything is consistent practice. So that's why I've
broken this up into a series of short lessons, each videos about 10 min long. And don't worry if you
don't have any experience because this class is
perfect for beginners, I'm going to start at
the very basic level and then build from there, sharpen your pencils,
get some paper. And let's go.
2. Lesson 1: Learning Proportions - Face: I am very much a people person. I love people I always have, and I really love drawing
and painting them. I've also been teaching
art a long time. And I know that human subjects can be
challenging for a lot of people, especially when you're
first starting out, I wanted to teach a
class where I could share with you some
of the things that I've learned over the years
and hopefully make it a little less scary
and a lot more fun. So are you ready to
get started today? We're gonna be
focusing on learning the proportions of the face. So sharpen your pencils.
Get some paper. And let's go. Alright, here's our model
for today's drawing. I chose this one because they
are looking straight at us. We'll be able to see where all of the features are placed. Start talking a little about proportions and how you might
approach drawing a face. And then as we go through
these classes will start working with models who are facing in
different directions. So grab a pencil, I'm using a to-be pencil. You can use whatever
you have handy. Don't worry about having
the same exact thing as me. The B is the softer lead. The other option you'll
see sometimes is an H. So those are the
harder lead pencils. And that just means that
if the lead is harder, it makes it a little
bit of a lighter mark. The softer lead comes off
more easily onto the paper, so they tend to be a bit darker. So that's what I'm using. So you'll be able to
see what I'm doing. And let's jump right in. I'm going to draw just a simple
oval shape to start with. Now this person's
face obviously is a little bit more
nuanced than that. But it's always good
to start a drawing. Just looking at
simple, basic shapes. And then you can go
back and adjust, add all the details. So I've got my, my egg shape on here. And you can see that
I draw very loose and light at first and I draw a lot of kind
of scratchy lines. I find that helps
me to keep from getting too caught up
in details right away. If I keep it very
loose and light, It's also easy to erase
if I make a mistake. And then as I start refining
things and get more confident that everything is
where it's supposed to be. Then you'll see me pressing a
little bit harder and maybe doing a little bit
cleaner line work. Now our faces are in
general, pretty symmetrical. That's not to say where exactly
the same on both sides. I know I have a
slightly crooked nose and if you look at people, you'll notice
different interesting characteristics like that. In general, you can draw a line down the
middle of the face. That's called the
line of symmetry. And that gives you a
good starting point for placing the features, since there will be two eyes and the nose is roughly the same on both sides
and so as the mouth. So we've got our oval and
our line of symmetry so far. See this isn't scary.
You can do it. I hope nobody was too scared
about getting started today. I know sometimes doing a new thing can be a
little intimidating. There's this
expectation you think you have to do it perfectly. That is not anything we
are worried about here. We just want you to have
fun and learn some stuff. So now we're going to draw
guidelines for where to place the eyes, nose, and mouth. As a general rule, you will hear people say
that the eyes go about halfway between the top
of the head and the chin. And that's a good, that's
a good general rule. But just like all rules, they're kinda made to be broken. So you can start with that idea, but then look at the
reference and just see for yourself if that holds up. In this case, the model is
actually looking, tilting, tilting the head up
just a little bit. And so that shifts the
placement of everything. So instead of the eyes being
right dead in the middle, they're gonna scooch
up just a little bit. So I want you to find
the midway point first of that line of symmetry. So it's about right here. And then just come up
here from that line. And because the
model is looking up, when we draw this guideline, it's going to have a slight
curve to it like this. So go ahead and draw that. E.g. if the model were to
have been looking down, you would draw a curved
line the other way. And you'll see why in a minute, why we have to do that curve. Whatever type of line that
you draw for the eyes, you'll do the exact same curve. Or if it's a perfectly
straight line, if the model is really
looking straight on at us, then that might be
a straight line. Or if they're looking down and it will be curved this way. But whatever, whatever
you do for this line, all of the other
guidelines that we draw will follow suit
and have that same, that same curve to it. So we're going to come down, I would say, find the halfway point between
here and here, right here. And I'm just going to come
up a little bit from that. Maybe about the same
distance we did there. We're just estimating. I'm just looking
at the reference, kinda getting a sense of
where the nose might be. And then I'm going to
draw another guideline right here for that. So right now we've got this, this guideline for the eyes, this guideline for the nose. See you can do this. I mean, it doesn't look
exactly like a person yet, but we're on our way. Alright, now, we are
going to come down, find about the
halfway point between here and the chin,
which is here. And I'm going to scoot up
just a little bit again. The reason I'm doing that
upward scoot is because the model is looking up. And so that makes
everything just shift a little bit upwards from
where they might be. Otherwise, you could you could draw the lines all the
way across if you want to. I just tend to do that for the eyes because they
are the farthest. And then I'll do a
smaller line for the nose and a little bit
longer line for the mouth. All right, That's a great start. Now, we have about 3 min
left for this video. So I wanted to just show
you how you can start placing some features
using these guidelines. We're not going to get a
fully finished drawing today. We're just kinda thinking about the general placement of things. You're welcome to continue
the drawing though after the video on your own and see how far you can get with it. So I'm gonna begin by drawing. It's, the reason why
it was important to have that curved line is because we place the corners of the eyes right on that line. That tells us where
the eye goes. So you're going to
come out a little ways from the center. And you're going to
start right here. And just draw the
shape that you see. And try to keep, keep your eye moving
back and forth between your paper and the screen to look at
the model and just draw the shape of the
eye that you see. You can kinda follow
along if you want to draw it the way I'm drawing it, Like that. Okay? Now you want to have
the same distance from that center line
on the other side. So what I like to do is
use my pencil to measure. So you can put the point
of the pencil here and use your thumb to capture that distance and
then slide it over, make it a little dot. And that's how you know how
far over to put that i, and then I'm gonna do
the same thing here. I'm going to measure this. I pinpointed the
pencil at one end, thumb at the other. Scooch over, make a dot. And that's how you
can make sure that the two eyes are the same size. Okay, go ahead and sketch
this one in now again, making sure that the each
corner lands on your guideline. Okay. Go ahead and draw a little
circle now inside there. The other side, you might have to tweak them a little bit. If they don't look,
if they don't match. If you draw one circle and it looks smaller
than the other one, where it looks like it's not in the same position
as the other one. Sometimes takes a little
tweaking when you're drawing eyes to make sure that they match up the way
they're supposed to. And it's can draw a
little curved line up above the eye to
represent the eyelid. And let's really quickly
sketch in nose and mouth. So I'm going to draw kind
of a V-shape right here, meeting at the middle and
landing right on this line. Then we're going to
draw a little circle on each side to represent
the nostril. And then go ahead and draw another curved
line on each side. Like this. Don't worry if your drawing doesn't look exactly like mine. Don't worry if your
drawing doesn't look exactly like the model. This is just for practice. Right? Now coming down to the mouth, I'm drawing the inside
top line first. So this is the line that the
bottom of the upper lip, if that makes sense. And so each end
of that will land right on your guideline and then her mouth is slightly open, so I'm going to draw that next. See how you can use that
line of symmetry to help you place things where
they're supposed to go. So now I'm gonna
come up a ways here. Do another V-shape like this. Extend the mouth a
little bit on each side. A good rule of thumb is
that the ends of the mount, the corners of the
mouth usually align around the center of the eye. So you can even draw a line down or just kinda like look to, you can even lay your pencil to use that for a straight edge. And then I'm going to
draw the bottom lip. This top lip. Since we came this far, let's go ahead and
do some eyebrows. I know we're going a
little over our time, but hey, it's our first-class. Let's get to know each
other a little bit here. Not going to Rusty out
the door on day one. All right. Then if I were continuing
this, which I guess I am, I would go back now and reshape
that oval that I started with and try and draw more of
the true shapes that I see. So everything that you kinda put down first in your drawing, It's really just a
guide to help you start placing things
and you can go back and keep adjusting until you get it exactly
how you want it to be. Being an artist does not mean that everything that you
draw as perfect right away. We always have to tweak. See if it kinda the
top of the head. This little angle. Here. It's when you can start really
seeing these angles and the more subtle shapes that it starts to feel like the specific person
that you're drawing. Just very quickly. I'm going to draw some ears. They always can look to see
where things are aligned. So the year is a little
bit below the eye, the top of the ear, and then the bottom is a
little bit above the mouth. A little hard to see here
because of those earrings, but that's about where her, his land come over here. There's a lot more we could do with this drawing, like I said, but I'm going to stop it here
after I finished this year. I encourage you to keep going. If you feel so inspired though, see how far you can take it now that you've got
the basics down, this is really actually
where the fun part begins. We can go back and start drawing the
eyelashes and all the, all the little things that
make it look like that person. So I hope this
first-class has given you a good understanding of how you can start mapping out
the facial features. And we'll continue with this in future classes and get
a lot more in depth. See you did it. I knew you could. Congratulations on making it
through your first lesson. In lesson two. We're gonna be learning about the proportions of
drawing the full figure. So get ready and
I'll see you then. Bye-bye.
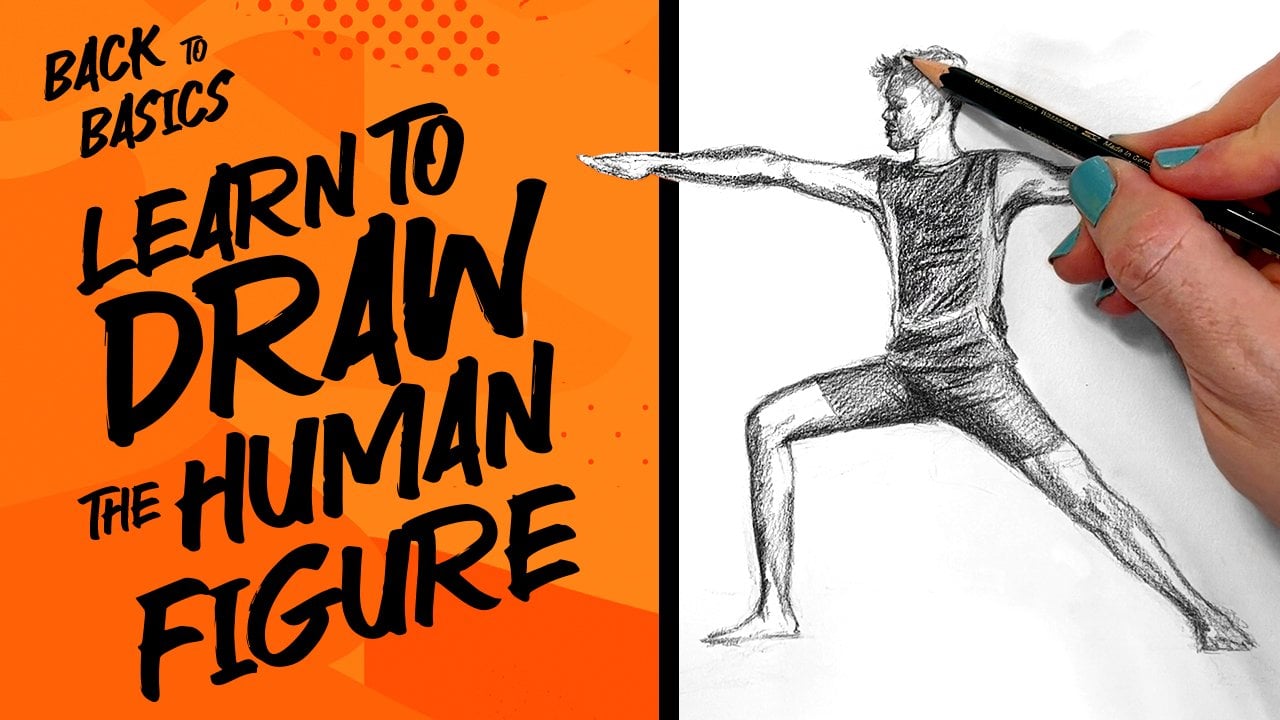
3. Lesson 2: Learning Proportions - Full Figure: We are going to
be learning about the proportions of the
full figure today. So sharpen your pencils, get some paper, and let's go. Today we're zooming out
and drawing the full body. And just like yesterday,
I'm gonna be showing you some simple steps for
how to approach that. So to begin with, I like to draw a line
to represent the spine, I guess, of the person or the
central axis of their body. In this case, the model is, I'm standing pretty straight. So that line will
be straight two, if the person is
leaning one way or the other or doing some
sort of more complex pose, then that line might change. So it's a good way to
just kinda start it, kinda anchor the
figure on your paper, figure out what their
overall position of the body is doing. Then there are three simple
shapes that I like to use when I'm helping
people understand how to start figure drawing. And that is an
oval for the head, just like what we used yesterday when we
did the portrait. So up here at the
top of the line, I'm going to draw that. And you can see how in
this case the model is tilting his head a little
bit this direction. So when you draw that oval, give it a little bit
of a, of a lean. Not much. This is a way you
can start to think about how the body is
positioned, what it's doing. You'll see me grab this. Sometimes this is called
a kneaded eraser. There. Come in very handy. I like them a lot
because you can shape them and get in and erase
whatever you need to. Again, not as not essential. You can use any kind
of eraser you want. Alright, the next shape that
I use for figure drawing is a triangle shape for the torso. So I'll use this. This model is again standing
pretty, pretty straight on. That line for the top of the triangle will
be straight across because not one shoulder isn't higher than the
other in this pose. And then you're going
to draw the third point of the triangle will
be right on the line. Like that. This is a good time for me to point out that
everything that I'm showing you here is just
simply my way of doing this. There are no right or wrong
ways to do anything in art. So as we go through
and we start doing some more gesture drawings
and figure drawings, you might find that you don't
like these shapes at all. You might want to do it
a totally different way. And I want to encourage
you to explore that and try and see
what works best for you. Now I'm drawing a third shape, which is a rectangle
for the pelvis. Like that. Sometimes when you
do figure drawing, if it's a really quick
gesture drawing, which is when you're
just trying to get the essence of deposed, you might not get
much farther than just a few simple shapes. So it's good to have this, something like this in your
back pocket that you can use. Alright, so now I'm going to
draw the legs and I'm using, you can see how his legs and he's got a
little bit of, uh, his legs are a little bit apart, kind of a wider stance here. So I'm drawing
rectangles for the legs. I'm doing down to the knee. So right here. Then another rectangle and then they don't have to
be perfect rectangles. You can see how I'm kinda
tapering them a little bit so that they get narrower
as they go down. This rectangle is a very similar in length to the one below it. The same on this side. Like that. And then I'm just going to draw this little wedge shape are
also kind of like a triangle. For now. For the foot. You don't want to get caught
up on little details, trying to make everything
look perfect right away. You just wanted to
get the basics down. Because once you do that, then you can check
your proportions. And that's what I'm going
to show you how to do. But let's get him
some arms first. So coming out of the
end of this triangle. Elbows usually come
about at the waist, it a little bit above, in this case, like that. Then the second rectangle, because of the
position of his arms, will come in towards
the middle here. And then you could just do
an oval or a circle, square, whatever you wanna
do to represent the hands like that. Okay? Now this doesn't look
exactly like a person, but you can see it's on its way. And this is the point where
I checked my proportions. So if you've ever seen an
artist when they're at work, holding up their pencil, maybe closing one
eye or holding up a paintbrush and doing this, they're
checking proportions. And so what I'd like
you to do right now is hold up your pencil like this. Straight up and down. They're pointing
towards the screen that you're watching
the video on. And I want you to align
the point of the pencil. I'll use my drawing
as an example here, but you're actually
going to be holding it up to the photo of the model. I don't want you to
align it so that the tip of the pencil is at
the top of the model's head. And then slide your finger or your thumb down to
the models chin. So you're capturing
the size of his head. So now I'm going to do that. I'm kinda off-camera,
but I'm doing it to the photo of
the model as well. I've captured the
measurement of his head. And then I'm going to
slide my finger down or my hand down so that I can count how many heads the model is, two different
increments of the body. So I'm gonna do this
right now to the model. I've got the measurement
of his head. And then I'm counting down
to see how many heads high he is from the top
of his head to his feet. So you do that as well. And we'll see if we
get the same number. Three for almost eight is what I got. It helps if you close one eye. It also you want to
make sure that you keep your arm at a
steady distance. If it moves back and forth, it's going to change things. So I got almost eight
heads high for this model. So now I'm going to capture
that same measurement, but on my drawing. So I want you to
do that as well. And then count down
and see if you're drawing has the same results. So 1234567. So I made him a little short. This is why you
want to start with simple shapes because
it's easier to adjust. So right now I
have is feed here. I'm going to move
them down here. I wish I could lie and tell you that I did that on purpose. But this is just
how drawing works. I think a lot of people have an expectation that
when you draw, it has to be perfect right away. So in this case, it looks to me like I made his legs
a little too short. So that's the part that
I'm going to adjust. If you aren't sure. You can also count down and see how many heads does it
take to get to the waist? How many heads does it
take to get to the knees? And that can help you sort out those proportion issues too. But I'm just eyeballing it and
I can kinda see from doing that that I had his
legs a little bit too short. So you just fix it? Well, I think so many
times when people are first starting out withdrawing, they get freaked out
because they think, oh my gosh, it has to
be perfect right away. If I mess up, I must be terrible at this and then
they just want to give up. But nobody draws everything
perfectly right away. You just have to get something
down on the paper so that you can start to
check those proportions. And then at that point, that's when you can
fix it and make it perfect or your
version of perfect, whatever that might be. Alright, So now if
you had more time, you could go back
on top of this and continue making the
drawing more detailed, more realistic, less geometric. So I see that there's
really more of a kind of a slope to the shoulder
that does this. So you build on top of
that basic, you know, the basic geometric
shapes and flush them out to make your
drawing more realistic. Now I'm not going to do all
of that right now because we are at the end of
our time for today. But I encourage you if
you want to keep going, to try that, see if
you can take your, your simple geometric
drawing and add more detail. And as you do that, then you can erase away some of those preliminary shapes because they've served their purpose and you don't need
those anymore. You did it. Congratulations, you've
completed two clauses. Now you know about
drawing faces and bodies. We're going to dig
into this so much deeper soon in our next lesson, we are going to be doing
some gesture drawing. I can't wait, it's one
of my favorite things. I'll see you then. Bye bye.
4. Lesson 3: Gestures - Full Figure: Welcome back. I'm
excited to see you. I'm excited to keep
drawing with you. Today is one of my very
favorite things to do. We are going to be
doing gesture drawing. So sharpen your pencils, get some paper and let's go. A gesture drawing is a quick sketch where you're
not going for the details, but you're trying to capture
the essence of the pose. So today we are going to do three, three-minute
gesture drawings. Your help to draw really fast, which is a great thing
because it helps you to stay sorted out
of your own head. So here's our first model. I'm going to set the timer right now and we're going to
just start drawing. You can think about
the basic shapes that I showed you yesterday, or use whatever
technique you want. I'll probably try a
few different things here so you can see how
I might approach it. But really, the goal of
this is to not think. Just draw you ready, set, go. I'm gonna do a line
for the spine again, like I talked about yesterday. And I will go ahead for
this first one and draw the same basic shapes that I
was showing you yesterday. So the oval, in this
case a triangle. If you look at the
angle of the shoulders, they kinda tilt
upwards this way. It comes down and meets here. And then you see that the pelvis is actually
angling this direction. So just by drawing those
same basic shapes, but paying attention to
the position of the model. You can see how that gives you more of a sense of how
that model is moving. In this case, we have
about 2 min left. Not to stress you out, just letting you
know that you do have to draw it quickly. And that's actually
a really good thing. Alright. Get that leg shape in. There. Might be angling up a little more
than what I have. Just. It's usually a good
idea when you're doing quick gesture drawings to try not to erase if you draw
a line that you don't like, just draw another line, make it a little darker, fix it, don't worry about it. You can see how I'm holding
my pencil far back. That's one of my
tricks that I use to help me to keep
from getting too, too tight, too detailed. Alright, so we've got legs, arms coming in now and we have about a minute and a half
to go on this drawing. I'll give you time
updates again, not to stress you out, but just so you kind
of pace yourself. Remember, we're just going
for the essence here. This isn't about getting all the details are
making it perfect. If it looks remotely like a human who is doing the position that
you see this person doing, then consider that a win. Okay, So now I'm gonna
go in and just draw a few details to start to make this feel a little bit
more like this model. Shoulders. I have about 30 s to go. Not even worrying
about details of like clothing or fees or
anything like that. Just just get the overall pose. You can see how I'm
going right on top of my previous lines and just making them a
little bit darker, a little bit more refined. Alright, and time is
up. So there's mine. Take a look at yours,
see how you did. If you like it, that's awesome. If not, who cares?
Time for another one? Are you ready? Alright, let's do it. All right, here's the model. Let me reset my timer
for 3 min and go. Alright, so I'm gonna
do that line again. He's leaning forward
a little bit. So it kinda goes like that. His head though is a
little bit straighter. Like this. Little bit of
an angle to the shoulders, the one that's closer to us. It looks a little bit higher. Close off that triangle. Going to angle the pelvis a little bit because he's seated. Like that. You've got one leg
comes up here down. So it's the same shapes. But you can see how
they look different depending on the
direction and how the, how they're kinda overlapping the other parts of the body. We have 2 min left for the swim. If you don't get the
whole pose, That's okay. I'll gesture. Drawing can certainly
be just one part. Now we see this leg comes
out a little bit farther. This one is a little
bit foreshortened. It's coming toward
us so it might look shorter than the other leg. It isn't actually shorter. It just appears that way
because it's coming toward us. This leg comes down. Another foot, It's
kind of a wedge shape. Alright, then out
of this shoulder, we have one arm that
comes down like this. Over a lot of overlap
in this pose. One trick that I like
to use is to look at the shapes of the
negative spaces. And the negative space is
just the background or the space around the subject. So like this little
triangle right here. And then there's another shape right here that you can use as the basis for knowing
where to place this arm. If you draw the negative space, is the positive space that actually the model
will start to show up. That's one trick that a
lot of artists use and it helps you make sure you're getting things
where they belong. Alright, and I'm just gonna
do ovals for the hands because we don't have time for much more than that really. And I'm gonna go over
a few of my lines. We have about 30 s to go. See how much you can
get done in that time. Neck, flesh out, some details. All right. Time's up for that
one. How did you do? Let me reset my timer again. Turn the page. Time for one more. Are you ready? All right, Let's do it. Here. You see is starting the
timer now 3 min and go. This time. Instead of doing the
shapes that I showed you, I'm going to just jump
right in and kinda start drawing and do a little bit more of a scribbly
kind of approach, which is another way that I
like to do these sometimes. So you try out whatever
works for you. Sometimes I think
the scribbly, loose, sketchy approach like
this really helps me because I can just
feel it out as I go, I guess is how I
would describe it. I like I feel like when
I'm drawing a person, it's about trying to not
just show how they look, but kinda capture their, their energy a little bit. And so I like a lot of movement, a lot of scribbly lines
and that kind of thing. Every artist is different. Some artists love very
geometric shapes. Some artists love
really curved lines. I'd encourage you
to just experiment, see what feels right to you. It's all about just
whatever helps you to get the thing down on the paper. In your own way. There's no right or wrong. In art. When you're doing
gesture drawings, it can be fun to try drawing the figure
at different sizes. I'm doing all of mine
consistently because they have to fit them on the camera. Wouldn't help you much if I was drawing way out here and you couldn't see
what I was doing. But when I'm, when I'm
doing gesture drawings, a lot of times I
really love drawing on large sheets of paper and using charcoal or something where
I can kinda get it down. Be more expressive, I
guess with my marks. So if you're, if you're drawing small and that doesn't
feel right to you. Try drawing bigger. Try something different. There's always different ways of mixing it up to see
what works best for you. Looking at the negative shape, we have about 50 s left. By the way, I was not being a good timekeeper
for this when I was getting a little
too wrapped up in my drawing, I apologize. I love getting to draw
along with all of you. This is really fun. I hope you're enjoying it too. I hope you're not stressing out. I hope you're not thinking, Oh my gosh, this
doesn't look perfect. I must not be good at this because you're not
supposed to be perfect. I always learned the
most from drawings that I don't love or drawings that I think look
terrible actually. Because when you stop and
analyze it and try and figure out what,
what doesn't work. That's the learning
opportunity there. Alright, so there's
my third one. And just in time
because time's up. Alright, you did it. Congratulations. I hope you enjoyed
that class and I'll be back tomorrow
for lesson four, where we're going to
be learning about the planes of the face. And if you have no
idea what I'm talking about, you'll find out soon. See you then. Bye bye.
5. Lesson 4: Planes of the Face: Today we're going to be learning
about how to break down the face into planes or shapes is another
way to think of it. So sharpen your pencils,
get some paper. And let's go. Here's our model for today. We're back to portraits again. And this time I'm showing you a technique that is all about breaking down the face into different planes are
different shapes. But let's start off
with our oval again. And the model is
kinda looking up. There's a slight lean, so I'm going to draw the oval, leaning this way
just a little bit. And then behind the oval, I'm going to draw a
circle like this. You can draw it all
the way around. That might help you to
make a little more sense. Because what we're
doing is we're thinking now about the
overall shape of the skull. The oval is more of a
representation of the face. The circle gives us
the back of the head. It's still just
using simple shapes to represent what we're seeing, but it gives us a
little bit more of a three-dimensional feeling. And then coming out
from here is where we see the neck. Okay? So now we're still going to use that technique that I showed
you on the first day, which is drawing the
line of symmetry, figuring out where the eyes, nose, and mouth go. So in this case, because
the model is turned, that line of symmetry
is going to be all the way over here. And it's going to
curve a little bit because the face is round. It's not a flat, It's not like a, like
a flat piece of paper. It's got a curve to it. And because it's proving in a three-dimensional space
going to the right, that curved line will
curve to the right also. Alright, now the eyes, we're gonna go halfway point, little bit up because this model is also looking
up like our first model. And if you follow the, if you were to draw a
line from the corner of the eye on the right
to the I on the left. You'll see that this guideline for the i kinda
angles up a little bit like that and then would curve like this to
wrap around the head. See if you can get that that guideline on
close to where I have mine. Then we're going to come down about halfway and then
I'm gonna go up a smudge because it looks to
me to be about where his nose there and then when it come
down again a little ways and do the
guideline for the mouth. Okay, Now this is
where I'm going to change it a little
bit from what I did on the first day
because you're ready now. You're ready to
get more complex. When I draw faces, I like to think about, almost like imagining that
I'm sculpting the face. So thinking about it in
a three-dimensional way. So to begin with, instead of drawing
the eyes right away, what I'm gonna do is actually draw what I would
imagine to be the shape, the models eye socket. So the top of the eye socket is about where you see the eyebrow. And then it comes over to here, down way below that line. And over like that. Now the I on this side
appears smaller, doesn't it? That's not because it is
smaller, but because that's, that's a perspective thing
that I is turned away from us, or that's a whole side of the face is turned away from us. And so everything
that is farther away from us gets smaller. That's how any, anything
in perspective works. If you're drawing
a street scene, if you're drawing a landscape, or if you're drawing a person, everything gets smaller
as it gets farther away. Alright, so now I'm going
to continue from there to sculpt the face using
very geometric lines. And you'll see what I'm
doing here as I go along. So I'm going to build
out the nose next. It's got a little bit of a
interesting shape to his nose. So let me adjust that is
not such a straight line, a little bit more of an angle to it and it comes out of here. A good way to think
about this when I'm teaching this technique, I often will call it. The soccer ball approach. If you picture a soccer ball, it's a sphere, but
it's made up of all the little geometric shapes. That's kinda how we're
building this face. We're just connecting
geometric shapes. It's like we're building him
out of Legos or something. The shapes that you see, the shapes that you choose are allowed to be
different from mine. I know I say this a lot, but there's no right
or wrong way here. It's just about
how your brain can kinda take apart what you're
seeing and then recreated. The key to this technique is
using very geometric lines. And just thinking about how all of these different
sections connect. The way that you can
tell where there is a plane shift when
you're looking at a, at a model is because you'll notice there's a shift
in the lighting. So you see how right here, e.g. there's a plane, there's that
little shadow like this. This comes over that which is building out that
face one plane at a time. I think it's a really
fun technique. Because even though it looks
kinda strange at first, you can see that you
immediately can start to see a little bit more dimension
than if you were to just draw the oval and do an eyes, nose, and mouth on top of that. In this case, you're
really getting to see kind of how the, the volume, the dimensionality
of that, of that model. And then you go back
and do the details, the eyes, the nose, the mouth. And they'll feel more
believable because you've taken the time to create
a structure for them. So sometimes when
you do just the, you know, the oval and
draw the features on top, the person can end up looking a little bit like a peanut egg, which is not what you want. So this is a really good way to just break it down
a little bit more. See that dark shadow
here on his head that tells you there's
a big plane shifts. This can also be really
helpful if you do paintings or if you're planning on
adding color, doing shading. Because if you take
the time to figure out where all of these
different planes are, then when you go to shaded or painted or whatever it
is that you're doing, you have a good sense of
where all of those shadows need to go to make it
look more realistic. Now we have about a minute left. So I want to show you once you get to a point where you feel like you've got the, the essential shapes down. Then you can go back in and start refining it
and adding details. So one of the first things
that I'll do is now go inside the eye socket and drawn. I come over here and do this one. Then I can see I
need to bring in this side of his
face a little bit. It's okay to tweak your
drawings as you go. It does not have to be
perfect right away. You can use your eraser and lift up the lines a little bit. But you want to keep it, make it so you can still see them. And then go back
right on top and do the more curved true
lines that you see. So you're kinda
taking that robotic, more structural drawing,
but that you started with, then flushing it out
and making it feel more realistic and also adjusting
it as you go as needed, that it feels believable
and in proportion. I'm like I need to widen
this here a little bit. Here we go. I feel bad that I didn't get
to give him his hair. Got some nice here. Okay. We'll do some quick here. I know we're out of time, but just can't leave them
like that feels wrong. You can definitely keep
going with this drawing. Maybe even try doing some shaving if you feel
like it looked for where you see those shadows and
start bringing them out? All right. I'm going to stop there
since we're out of time. But like I said, feel
free to keep going. See how far you can
take this drawing. Great job everyone You made it. I hope you enjoyed that lesson. Be sure to share your artwork. I want to see in
our next lesson, we are going to be doing
contour drawings of the body. I'll see you then. Bye-bye.
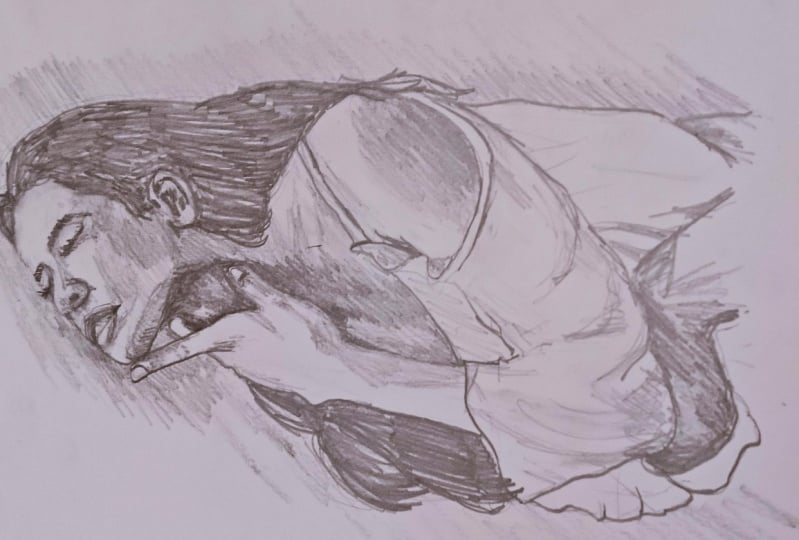
6. Lesson 5: Contour Drawings - Full Figure: Today we're going to be
contour drawing the figure. So sharpen your pencils,
get some paper. And let's go. Today we're doing contour
line drawings of the figure. That is another way of doing a gesture drawing in a
contour line drawing though you're looking a
little bit more at the outlines and
also interior lines. But when you start the drawing from the beginning of the
drawing until the end, the goal is to never lift
your pencil off the paper. So everything is connected. Everything is kind of one
big long continuous line. If you want to get from
one area to another, you have to find a way they're navigating through
the body with lines. So it's tends to be a
bit more expressive, maybe a little more stylized. Just really have fun with it. This is not about perfection. This is about looking
at the model and trying to capture what
you see in a new way. So we'll have 3 min
for each one of these. Let me get my pencil ready. I'm going to start the
timer, and let's go. Alright. I'm going to start, I'm going to start
up here at the top. And I'm just kinda
looking at the edge. But I'll break through. Sometimes. You end
up with, I think, a little bit more
expressive lines, a little bit more playful. We're definitely not
going for realism here. This is about responding to what you see in front of you and just kinda
having fun with it. See how I'm kinda
doing the face, but I'm also just everything
has to remain connected. Every line has to
merge with the neck. So I'm just kinda going
from one part to the next. Usually with contour,
drawings were less concerned about measuring and proportion because what you can't
stop to do that stuff. So it doesn't really matter. It's more about
just the direction of all the different shapes, the way the lines interact. And if the portion if the proportions aren't
perfect, that's okay. Like look at mine, look
at that wacky arm. That's okay though. That's what a contour drawing
is supposed to look like. In some ways, I
think when you allow yourself to be a little
bit looser with your work, it actually can free you up and your drawings become
more interesting. We have about a minute left. Wacky hand. You can just change the lines by drawing another line darker. You can even try doing a
blind contour drawing, which is where you don't look at your paper the whole time
that you do the drawing. You just look at the model. Then when you finish, you look at your paper
and see how you did. I'm not going to be
doing that myself today, but feel free if you want to try that on one of these poses. It's a very fun way to draw. Okay. Time's up for him. How do you do? Now? Obviously, mine is
a little wacky. The hands look kinda crazy. There's some very
expressive line work. That's okay, that's
what this is all about. Ready to try another one? Alright, let's do it. She is. Alright, another 3 min. Ready and go. Just have fun with it. I think. So easy to put a
lot of pressure on yourself when you're
drawing a human. Because you really want it
to look like that person. Gosh, especially if you're
drawing somebody that, you know, pressure is really on, then thankfully, probably don't know these folks that
we're drawing today, so they will never know. I won't tell them. And once again, I'm holding
my pencil really far back so that I'm not
tempted to try to overly. Control these drawings. I really want to allow
myself to be expressive and to have more expressive
lines, expressive marks. Less controlled, the better. You're doing a more
detailed drawing and more technical and you
really want to be precise, then you can hold your
pencil closer to the tip. You have a little more
control that way. It's interesting just navigating around the drawing when
you are drawing this way because you have to figure out how to
get your pencil from one point to the next
without lifting it up. I like that little hand. It's not highly detailed, but it captures
the essence of it. I think that's
really what a good gesture drawing is all about. Just capturing the
essence of what you see in your own way. Okay, We have about
a minute left. Might end up retracing
your steps a little. That's a good. I have about 15 s left. Let's see if I can
make it back up here. All right. Here we go. Time is up. One more. Alright. Ready? Wonder what he's pointing out? Ready, set and go 3 min. Now, you see me. I keep starting at the head, but you can start at
any point in the body, wherever, whatever speaks to
you, wherever you may be, feel the most comfortable, that that would
be a great reason to start in a certain area. There's no, No, no right or wrong way to
start one of these. Really just looking
at the shapes. Try not to think too much of it as a person
really just look at shapes and the folds increases in the clothing can
actually be really helpful. Especially when you're doing
a contour drawing like this, because you can use those to get from one point to the
next inside the body. But also the way that the fabric is folding
increasing is really telling us a lot about what the body is actually doing
underneath the clothing. The way that it's twisting, turning the movement
of the body. So I would encourage you, when you're doing
these contour drawings to include some of those folds and wrinkles that
can be very, very helpful. Remember, we're not
going for perfect. You see mine, none of
mine have been perfect. Which is trying to capture something about the
essence of the pose. That's it. I get my
way back down here. Okay, there we go. Got lost in that
shirt for a minute. We have about 1 min left. Always a scramble
at the last minute. You're also always welcome to choose to just draw a
certain part of the body. If you don't want to
draw the whole thing, you could just do
the upper body, you could just do the legs, whatever, whatever you want. Sometimes it can be
really interesting to crop the figure and not, not draw the whole thing. 20 s to go. See if I can make it. Oh, he's got a wacky me here. Let's see if I can fix that. So I'm just going to redraw the line where
actually want it. Like here. Here we go. Okay. Time is up. Wasn't that fun? I had a blast, I hope you did to you. In our next lesson, we are going to be
focusing on drawing eyes. I'll see you then. Bye bye.
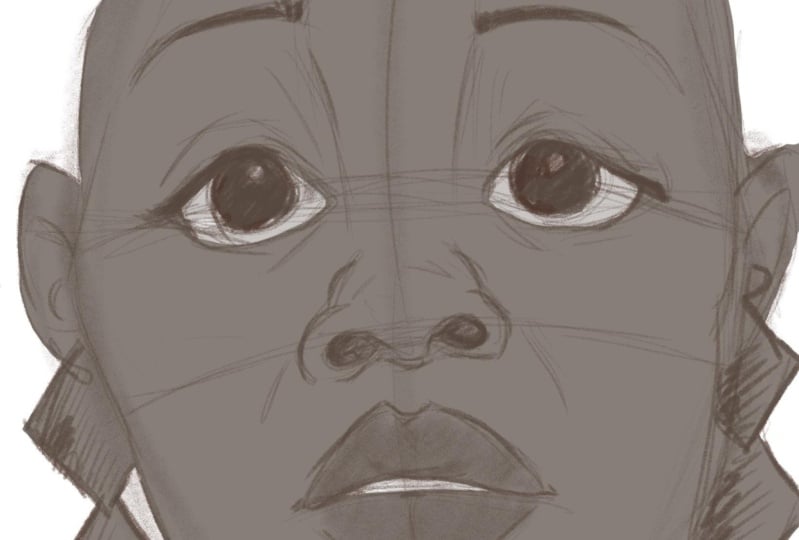
7. Lesson 6: Studies - Eyes: Today we are going to be focusing on one of
my favorite things. I think I save that every time. Everything's my favorite. But today's favorite is the
I sharpen your pencils, get some paper. And let's go. Today is all about the I. So let's jump right
in and get started. I like to start with
just like always kind of a very loose sketch to get
the basic shapes down. And then we'll go into detail. You see I'm drawing very light, kinda like I'm doing
a gesture drawing makes it very easy to adjust. If anything isn't
looking quite right. Just go for the big,
simple shapes first. I think eyes are so important
when you're drawing people. Especially if you're
doing a portrait, it's usually the first place
that the viewer will go. We're just naturally
drawn to looking at, I'm looking into people's eyes. It's how we, how we read. The person has how we
first try to gauge their emotions or how they're reacting to what we're saying. We'd just that human connection looking into somebody's eyes. So if you're going to spend a little extra time on one part, that would be a good place to do is when you draw the eye, I find it very helpful
to think about how that eye is sitting
inside of the face. How it, how the
skin is overlapping above and below to
create the eyelid. The actual eye
itself is a sphere. We're just seeing one
little sliver of it, but it's really a big
round ball in there. And when we do a little shading, hopefully we'll have a
little time where we can do some shading that, that really comes into play. You don't want your eye to
look flat when you shade it. You want to look at the reference right
now you can see how it gets a little darker over
here in the corners. And also it's a little darker up here where the eyelid
is overlapping. All of that is helping us to
see that the eye is round. It can be a little scary
to put shading and the white of the eye. But if you look at the
reference, there's very little. That's actually pure white. It's, there's a lot of
different values and that will, that all makes the eye
look more realistic. Alright, so I'm
drawing very roughly sketching in some
eyelashes right now. Paying attention to the
direction that I see them going. Try not to just draw what you
think eyelashes look like. You've got a beautiful model
right here in front of you. So really look at the direction that
things are moving in. Draw what you see,
not what you know. It's an old saying. Every artist has heard it. I'm sure you've probably
heard it from me before. But it is very true. Alright, I'm gonna draw eyebrow. Okay? And now that we've got
the basics on there, we have oui, good. We still have quite
a bit of time. I'm not even going to have
to like keep you on today. Let's go in and do some
shading now and make this, I really look realistic. If you need longer to
get your drawing down, go ahead and pause the
video until you're, until you get it to this point. Now what I'm going
to do is start right here in the middle and just sketch in some of
those reflections that I see. That's always an interesting
thing about drawing an i2 because they do reflect the environment looks
like this window or a door or something in front
of this particular model. So you get a little bit more of a sense of what's happening around them just by what you see being reflected in the eye. And now I'm going to
start doing some shading. So I'm going to start right
around the edge here. That's where I see in
this particular model. It looks the darkest, and then it just comes in and in various shapes and patterns. So I'm going to go
dark around the edge. And also just sort of
use that opportunity to clean up my
circle a little bit. See you look at that. I
drew a perfect circle. No one has to know. Well, except for all of
you watching the video, that there were about
five or six other lines. They're going dark
all the way around. And then pulling it in. You don't have to replicate
the pattern exactly. It's a very intricate, fascinating
combination of shapes and patterns that
happen in there. I mean, you certainly
could really do a very detailed
technical rendering of that if you are inclined, but probably not in 10 min. So I'm just going to roughly
estimate some of that stuff. Now I'm just using one
pencil for everything. I'm using my pencil. If you're somebody that likes to use the range of pencils, you can always switch, get a harder lead for when
you wanna do lighter values, like how I'm going in now
in doing this inner part, where I want it to be
a little bit wider so that the darker pattern
contrast it a bit. If you're just using
one pencil like I am, you just vary the amount of
pressure that you put on it. So like now I'm going
back in to do this part. Press a little harder,
make it dark again. You can always go
back in and erase out highlights too if you
haven't gone too dark. I'm kinda working around the highlights so I don't
have to do that too much. But I might take
my little kneaded eraser and come in and just make a few other little
patterns, shapes. You can kind of shape
this however you want to get into the spaces. Okay? Now I'm gonna go
along the top here. Darken that. I really
want to get to. Showing the shading on
the white of the eye. So let me go ahead and do a
little bit more of that now. You see how since we've
added the dark in the center of everything
else looks super light. Because value is one of those things that's
very relative. Dumb. You cheat, you change the
value of one thing in your drawing and then it
really changes everything. So you might have to
backtrack and darken or adjust the amount of
contrast in different areas. Once you've established
your darkest point. A little bit of shading
right around here, just kinda softens that edge. Now I'm going to make
this dark crease. You don't want it to feel
too much like a line. If you're going for, if you're
going for realism anyway, if you're going for realism, the less lines the better because you don't
really see outlines. When you're looking at something that's
three-dimensional, what you see are shadows. So I'm going to
just pull that line down and then also pull it up. Because looking at
that reference, you can kinda see how the
shadow goes both ways there. And then I'm going to do
is darken the eyelashes. Can I do a little bit of
shading down here as well? I think doing a little
bit of shading around the eye just definitely
helps to make it feel like it's sitting
inside of the skin. You don't want it to feel
like it's bulging out. We were gonna do a
little shading here. And then we'll do these lashes. And let's just darken that eyebrow smooth shading and over here, completed. Now as with most
of these drawings that I've been doing in here, I could spend a lot
longer on this. And if you are in the zone and enjoying
working on this one, I would encourage you to keep going until you feel
like you're done. But minds at a good
stopping point here, everything's sort of at
least had the same degree of shading and feels
pretty well worked out. So I'm going to call
this one finished. Like I said, you keep going. If you wanted to. I could spend a lot of time working on eyes. I think they are
just fascinating. Icu. Good job, everyone. Hope you enjoyed that lesson tomorrow we're going
to continue with this close-up idea and we'll be practicing noses and mouths. So I'll see you then
Have a great day. Bye bye.
8. Lesson 7: Studies - Nose and Lips: Today we are going
to be focusing on drawing noses and mouths. So sharpen your pencils, get some paper, and let's go. Okay, today you're
getting a two for one special were drawing
nose and lips. So let's dive right
in and get started. Now, as I often do with faces, I'm going to begin
with that line of symmetry that I
talked about earlier, where it just kinda helps you line everything up on the face. I'm curving it a
little bit because I can tell that this person is look is positioned in
a three-quarter view. And then I'm gonna go ahead and draw a little guideline
here for the nose, it looks like it's angled just slightly dipping
down on the right. Then I'll come down to about where it looks
like that mouth goes. We can always adjust if needed, but that feels about right. I think that'll work. Now. I'm just going to start
lightly sketching in the shapes that I see. So I'm going to start
with the nose and notice how the nostril on the
left appears bigger. The nostril on the right. It's not because this
person has a unusual knows. It's just because
of perspective. That's the that's what happens when a part of the face
is facing away from us. That everything on that
side, in this case, everything on the right
side, looks smaller. See how I'm using that line
of symmetry though to make sure that that's where the center of the nose
goes and that's all. That will also be where the
center of the mouth will go. I'm going to draw
this little flap over here on this side. Kinda comes under like this. And over here you can see I, just like when I was drawing
the planes of the face, I definitely tend to start in a more with more geometric lines. And I like to
sometimes just lightly sketch in where I see some of the shadows because that
tells me that there's a plain shift at
that at that area. That's why it goes
from light to shadow because the nose is angling
in a different direction. So any of those
interior lines you can sketch while you're
going, it just helps you. It makes it easier to
when it is time to add shading or other details. Alright, so those are, those are good
start for our nose. Now I'm gonna come
down, I think I'm made that line a little too low. I'm going to scooch
it up, just a smidge. And then I like to start
right in the middle. And I'm drawing the line in-between the upper
and lower lip. There's usually a little bit of a curved shape right here. And then it tends to kinda
come down on each side. And then depending on their
expression, in this case, it kinda curves back up again. Down, up, over. Alright, so there's
that center line. Now, we can just build the lower lip and the
upper lip out from there. Usually it doesn't go all
the way to the far corner. You can see in the photo, the lip actually kinda begins just a little
bit inset like this. Then same thing on this side. The edges aren't super defined. So you might not want to have a real dark hard
edge or hard line, kinda keep it a little softer. In this case, if the
person had really defined lips or maybe it was wearing
lipstick or lip liner, then that would change that. But this case,
it's more natural. Okay, back down. And just in a little
bit like that. Alright, now I'm going
to also go ahead and draw this little teardrop shaped kinda divot that it's between the
nose and the mouth. And draw a couple of
the little laugh lines, smile lines over here. And maybe a little hint
of where the chin starts whenever I'm drawing
close-ups of facial features like this,
just like with the eyes. I like to just think
a little bit about what's going on around them. Now I'm gonna go in and erase. Guidelines don't
need those anymore. And we have a little
bit of time left. So I'm going to do some shading. I like to start by
trying to just lay in where I see the biggest
chunks of dark and shadows. So I definitely see
strong shadow here. All the way down. Just kinda fades out. It looks like there's
a light source that's coming from
this direction. So that's why everything on
the left is little darker, or in some cases a lot darker. See how drawing those lines of the planes really helped me. Now that I'm shading, I'm going to go real dark
in here in the nostril and continue this shadow. It looks like it
comes all the way over to about the center. Gets a little tighter, they're a little smaller. Alright, then we
have shadow up here. Dark shadow for this nostril. And it's also a bit of shading
right here on this part to me that a little
too wide. There we go. Not going super detailed. I'm just looking
for the big areas with the most contrast for now. If there's time, come back
and fine tune it even more. Take that on up. Now this whole left side here of the skin in-between
the nose and mouth is a little bit more
in shadow because it's facing away from
that light source. And then it gets a little
darker inside of this divot. See how just doing
that little bit. It really adds a lot of
dimension to the face. Without a lot of effort. It's my favorite kind. Okay, Now onto the lips. So it's really dark over here. It actually fades
up into the skin. And then a lot of shadow
on that upper lip. That tends to be the case
if the lighting is coming from up above because of
the angle of that lip, that will be usually more in
shadow than the lower lip. Is chris. Different if the
light was coming from below or if it was some kind of unusual lighting situation, that might not be the case. But in general, you
always want to just look at your reference
though that's the, that's the go-to. You can know all the
rules there are. Reference might not
follow any of them, so just always keep looking. Alright, so now it's kind
of a medium value here. Going to curve this up a
little more. Here we go. And then there's a lot of
little texture lines here. And then in-between
them is where there's some highlights hitting the lip side over
here on the left, more in shadow a little bit later down here. But closing off
those highlights, I might come back to it a
little darker value here. This is just playing. You just get it in
there and play. That's, that's my favorite
thing about drawing. Just noodle away
until it looks good. And don't be afraid to erase if something doesn't feel right. Those are the best learning
opportunities really, when you look at a
drawing and you think, Wow, something is
not right here. That doesn't mean you
should quit and give up. That's the time to
really step back, study it, compare it
to the reference, and see if you can
figure out what's wrong. Sometimes just literally taking two steps back away
from your paper will give you the space and
the perspective that you need to notice issues. You can also try flipping
your drawing upside down. That's a really good way to spot something wrong because it just disorients you enough to be able to see
it with fresh eyes, looking at it in a mirror
as another good trick, I use that one a lot. I'm stealing a little bit of shading here under the mouth. Again to just help
place it in context, make it feel a little
more dimensional. Okay, now, I want to keep going, but I've already been at it for 10 min and we are at a good
I'm at a good stopping point. You feel free to carry on. If you are having
fun with this one. And try practicing some more
noses and mouths and eyes and anything else that
you find challenging. It can really be helpful to just isolate that
thing, draw it big, and study how it's
made up of a lot of famous artists did a lot of studies of just
parts of the piece, parts of the face,
parts of the figure, whatever it was they were
painting before they would actually do the real,
the real thing. Alright, I said I was
stopping. And I will. So there's mine. Awesome job, everyone. Tomorrow in less than eight, we're going to be drawing hands. See you then. Bye bye.
9. Lesson 8: Studies - Hands: Today we're going to
be drawing hands. So sharpen your pencils,
get some paper. And let's go. Alright, here's the hand
we're going to draw today. Let's get started by
focusing on simple, basic shapes like always, I know I'm a broken
record sometimes. But that really is
the best way to approach just about
anything you need to draw. So I'm doing sort of a rectangular shape for the
main section of the hand. Well, I don't know if you'd
call this really a rectangle. Started out that way, but I'm giving it a little bit
more definition than that. So kinda having a taper
toward the wrist like this. Really, I want to
encourage you to draw whatever shapes you see. There's no one way
to do any of this, but this is the shape
that I am starting with. Like that. Then let's draw the fingers coming
off of this top part. And I think this is probably the best recommendation I can
make for you when drawing hands is to think about the
structure of those fingers. A lot of times people
will just draw, draw the fingers without
thinking about the shape of the structure of why they
bend the way they do. And the fingers can
end up looking very, very undefined, like little
sausage links or something. So we don't want that. So the way to avoid it is to kind of draw each
section of the finger, making it a little bit
more geometric at first. So that's just going right to that first bend,
the first digit. And then the next one. Here. The finger gets skinnier
as it goes toward the tip. Alright, the last one here. See that wasn't so hard. And then it kinda comes
down a little bit in here. Then let's draw that thumb. Cv. Just break anything
down into shapes. It's suddenly a lot less scary. So we're gonna go right
to that first bend. That's the first digit. And then also, I'm looking at the shape of the negative space. I know that's something
we've talked about before. Right up here and down. I shorten this finger just
a little. There we go. All right. There we have the first
finger and thumb. Now in this case,
the other fingers are kinda tucked behind, but we still want to think about them and think about
their position. Get the knuckles in. So we have one here that they're on a downward
angle you see from here down. And it helps to draw a little guidelines for
yourself like that. The first 1 s, one, third one comes down kind of angles over toward the wrist than the
arm is at an angle, kind of goes to the left. Bring that over a smidge, little bump and back. Alright, now we just have one more finger to draw
and that's where we see this little piece of the middle finger sticking
through ray here. And then it bends, comes down. It really does
help whatever part of the body you might
be struggling with to just take the time to sort of isolate it and
draw it by itself. Everybody says hands
are so difficult, but look how quickly we've
gotten this sketched out. See, you did it. You can do it. And now we have some time
left to really refine it, and I love that. So let's take advantage of that. I'm going to go through
now and just sort of follow this finger
all the way around the perimeter and try to
capture a little bit more of the subtle shapes
that I see there. So we start off our eyes, I start off more geometric. That doesn't mean you have to. And then I go back and refine it and really try to draw
the two shapes that I see. A lot easier to do that
it makes it a lot, lot more comfortable if
you've taken the time to do that loose sketch
first because then, you know that things are roughly where they're supposed to be. And so you can go a
little bit deeper into detail with the
confidence that you don't, you're not going to have
to erase it and redraw it a bunch of different times to get it in the right spot. I'm just rounding things
out where they need to be. This was not an
easy hand to dry, could have picked one that was doing a much simpler position. But I figure you're on
you're on less than eight, you're ready for a challenge. I don't have to keep it
interesting for myself here too. Okay. Like I said, I was
drawing this finger and then I went everywhere
except that finger. It sounds like me. Let's continue. Then it comes here. Okay. And I think
I need to make it just a little bit smaller. A little bit about fingernail, you can see I'm going to
go ahead and draw that. Erase some of these extra lines that I don't need anymore. Okay, Let's come up here and
get this one worked out. So this comes up over like that. Raise some of these lines. Let's get that
thumbnail, sketch it in. Now it'd be a shame with all the beautiful waiting
in this picture not to do at least a little bit of shading and this drawing. So let's jump in and
do some of their, I like to focus on where I see the most contrast
between light and dark. So I'm going to follow right along where the highlight is, this highlight that is
right on the right side. We can tell by
looking at this that there's a light source
that's coming from the right from the right from the back because it's not it's not lighting up a
whole lot of the hand. It's really just getting
along the edges. I'm just doing a quick sheet here just to get a
little bit of value. And I think that can add so
much dimension to a drawing. Just makes those, those
lines kinda come to life. So it's worth taking the time
to do a little bit of air. Okay, here we go. And now you can never say that you can't draw
hands because look, you just did one. And hands are great because
you can just keep practicing. Obviously, you can use
your own hand as a model. Or you can find
plenty of references online of hands in
different positions. And just study them. Look at the shapes,
don't be intimidated. You can, you can do it. And especially when you're
drawing them as a part of a larger image that
shows more of the body. You can take what you've
learned from this and not feel so intimidated or not feel like you have
to avoid that part anymore. It's just a
collection of shapes, just like anything else. Just emphasizing some
are my shadows a little. I know I need to stop because I think we're at our time limit. I don't want to stop having too much fun and you
don't have to stop. You can keep right on going. But here's mine. Yeah, you did it. Let
me give you a hand. I can't help being cheesy. I hope you enjoyed that lesson tomorrow we are
going to be drawing the face from the front.
Have a great day. Bye bye.
10. Lesson 9: Drawing Practice - Face from the Front: Today we are going to be drawing
the face from the front. So sharpen your pencils,
get some paper. And let's go. Okay, here's our
model for today. We are doing another
face from the front. But this time because you've had a little bit more practice now, we will go a little
bit more in depth. So let's get started. To begin with. We see
there's a little bit of a lean to the left. I'm going to draw my line
of symmetry right here. And then kinda just get
the overall head shape, the big oval to start with. And then, then we will
refine it, of course. Okay. Now this model is
looking pretty, pretty straight on at us
in terms of eye level. So that guideline for
the eyes really is going to be about halfway between the top of the
head and the chin. That's something that can
throw people off a little bit because you expect
it to be higher, but you have to take
into account that the hairline is
actually going to be, you know, probably about here. Of course, if it was
a drawing of me, it would be about here. But we're not going there. Alright, then knows is about halfway my little above halfway between eyes and
chin. Just a smidge. And same with the mouth. About halfway, but a little. Kinda just want to
look at the model and estimate the best you can. Wear those things go. Now I'm using the approach
that I shared with you in the planes
of the face lesson. I want to start by just
kind of like lightly sketching some
structural shapes. I'm not doing the
eyes right away. I am thinking more
about eye sockets. I'm thinking about if I was sculpting this face out of clay, what are the shapes
I would need? And you can see I'm keeping
my lines very loose, very light at first just to
get everything in position. And I'm looking at where I
see shadows on the face. And that helps me to figure out where those
different planes are, where there's planar
shifts in the face are. This is something that does take a little bit of practice to understand the using the
whole soccer ball method. So what I like to
call it anyway, I don't know that I've ever
heard anybody else call it. But doing the planes of the
face really does help you to create a much more
three-dimensional looking image. Alright, so that's
the basic setup. See is a line right with the top of this eye sockets
are where the eyebrow is, and then the bottom of it's
just a little above the nose. We see we do see more of
this year than this one. So that tells us that
there is actually a little bit of a turn
to the phase after all, the left side is turned just ever so
slightly away from us. And that's why we see
lots of that ear. Also means we're going to see a little bit less on this side of the face and a little
bit more over here. Okay? So I've got the basic
structural elements, I've got the basic planes
sort of late in here. I need to make a few tweaks, but overall it
looks pretty good. Alright, now I'm going
to start with the eyes. I'm going to come
right here inside of the eye socket and just do a real light sketch for where
I think that I need to go. Keeping it nice and
loose it first here. I have a tendency to want
to draw eyes too big. So I have to kinda just watch
that and adjust as needed. The more that you draw, the more you are
going to learn what your own tendencies are. And then you can sort
of take the steps to correct them if you want to, or you can just
embrace it and thought that'd be a part of
your style to you. Every artist is allowed
to do whatever they want. It's, it's good to learn
how to draw realistically. But you don't have
to stay there. You can learn the
rules and break them. Can find your own unique style. That's a great thing. When I paint. That's really when I get
very abstract with figures. I do a lot of painting with
the palette knife and just let crazy colors and shapes kinda takeover really
have fun with it. So I encourage you
to allow yourself to be expressive to everything doesn't
have to be realistic. Okay, sketching in the
eyebrows here on top of that shape where I
had the eye sockets. Now I'm going to just
start refining everything, starting with the
edge of the face. I'm going to figure out
where the hairline goes. He's got some grid here. We've got to get that in there. Not jealous at all. Maybe a Louisville. You can see I'm still being
very loosened, sketchy at this stage. I don't like to commit to quickly must have
commitment issues. But that way you just feel
a lot freer to adjust. Know that's the biggest thing. Can't be afraid to tweak and can keep tweaking
and keep refining until you're drawing
feels right to you. If something feels
wrong, it probably is. So don't let that
intimidate you. Stop and analyze it. Figured out why, what isn't
working about that part? Because if you can
recognize that there's a problem, that's,
that's wonderful. That's the, that's the
biggest most important step. But you have to follow
up with fixing it. I'm just going back
over top of my lines. Adding more detail, refining. It's very sparkly. Eyes. Gotta get those in there. Okay, let's get his mouth raising it just a little
bit as I did this, I think he I think I made
it just a little TOO. Looking at to see where the
corners of the mouth kind of align with the
center of his eye. Right down from there. You remember how we
did the lips when we worked on the close-up of that. But that little
divot in the middle should fall right on
the line of symmetry. Lower lip in there. Just going to very loosely
kinda suggest his beard. What I wanna do too, if we have time, is just get a little bit of
the shading on his face. That's going just like,
just like with some of the other recent drawings
we've been doing that to stop that enhances it so much. It's when it really
goes from feeling like a two-dimensional line drawing
to three-dimensional form. Let's see if we can get
a little bit of time for the beard too high. There we go. Give you a little beard trim. I'm just going to very
quickly see it in the here. And then kinda just do some, some lines on top too, show the movement of the hair. You don't have to
draw every strand of hair when you draw here. That's a, that's a mistake. I see a lot of beginning artists make you want to draw
every single hair, but that can make it
look very stringy. Not usually the
look people want, It's better, less is more. And you want to think about, instead of each
individual strand, you want to think
about sort of showing different sections or
different clumps of hair, I guess would be the
way to describe it. Look for the plane
shifts in the HER2, you can see where it
gets darker in shadow. And you can even use your Kneaded eraser to pull out some highlights where
the light is hitting. But we don't want to
make him look like he's got blonde tips. Okay, so now let's do a little bit of
shading on his face. This is the part that
just makes it in. If you've drawn some of those lines for the
planar structure, then it makes it really
easy because you've given yourself the outline of some of those shadow
shapes already. Upper lips, a little darker, more in shadow here. Under the nerves. I'm just going for
the big shadows. We don't have time to do
a lot of detail here. Will you do? If you, if you want,
you can keep going. And I encourage you to,
this is a great pose. This is a great,
great drawing to practice on and really
study that face and see just how far
you can take it. And especially applying
some of what we have learned by
focusing on the eyes, nose, and mouth and
those recent lesson. See if you can put it all
together now in this one. Okay. And just because
I don't want him to be a floating head, I'm going to take a
minute here and just draw a little hint of shoulder. Sometimes in a
drawing like this, when you have limited time, you can just really focus
in on certain details, especially around
the eyes are good, good place to emphasize. And then just let
things start to, start to fade away as they move. They can just kinda
dissolve until wine, everything doesn't have
to be fully rendered. Soften that mouth a little bit. Little shading on
that lower lip. Shading over here. You can tell I
don't want to start because I'm having fun. But I promised you 10 min, I'm going to try and stay as
close to that as possible. All right. I'm stopping and stepping away
from the drawing in 1 min. Okay. Done. Great job, everyone. Tomorrow we are going to
be drawing the face again, but from a three-quarter view, you'll see how
everything changes. So have a great day
and I'll see you then. Bye bye.
11. Lesson 10: Drawing Practice - ¾ View Face: Today we are drawing
the face again, but from three-quarter view, and that's going to change
everything up a little bit. So get ready, sharpen your
pencils, get some paper. Let's go. Here's our model for it today. And we are looking at a
three-quarter view this time, which means the model is turned a little bit
in one direction. So to start with, like always with port threats, I'm going to do that line of symmetry down the
middle of the face. And it's going to curve
this direction because of the way that the model is
turned. Kind of like that. And roughly draw the head shape, which is going to
be much closer to the line of symmetry
on the right side. We'll see a lot more over here, actually quite a bit more. I'm gonna do that what I
did previously where I draw kind of a circular shape to represent the
back of the head, the skull area, and then more
of an oval for the face. Okay. Now, let me do really look to see
now before I draw it, look at the eyes and
see if you can figure out the direction that
that line needs to go. When I look at it, first of all, I see is she's pretty much
looking straight on at us. But there's just the slightest
bit of an upward tilt, a little bit of a
curve like this. You see that? It's just has to do with the
way her head is positioned. It really is worth taking the time to study that
face and figure it out. If you can't tell by
eyeballing it at first, it's okay to print
out your references, put a piece of tracing paper
over them and just draw these guidelines so that
you can understand how the, how the structure
of the face works. I encourage you to try that. Because if you do
that a few times, then you'll really start
to get it and you'll be able to recognize it more. If you have the ability
to do any digital work, that's another way to do it. You can bring the bring your photo reference into
whatever program you use. I use Photoshop a lot myself. And then you can just
draw right on top of it to figure out
where the shapes go. Okay? Now let's draw the
eye socket shapes. This I is closer to us. We see more of it. That means we see more
of that eye socket. On this side. It's facing away. So we see lives like that. Then I'm going to just
start building the nose. I always, I always kinda use
words like that when I'm drawing in this way
because it is like, like you're building
in essence it really, the flat paper opens up in a way and you can just really start to envision that
three-dimensional form. For me anyway, that's
what makes it really fun. We go from drawing on
something that's flat. And then all of a
sudden it just feels like you're seeing that person
right there on your paper. I love that. Never gets old. I've done so many drawings
and paintings of people. And I just love it. I just think it's so exciting, something so fascinating
about people. I love, I love drawing
and painting them and I love really trying to capture not just
what they look like, but kinda little sense
of who I think they are. Alright, now we're going
to come down to the mouth. This time. She has slightly open mouth. So we don't just get to draw
one line in the middle. And if you look, there's that line of
symmetry down the middle, you have that little
teardrop shapes. So you know that that's where the upper lips gonna
go, the center of it. Then we do not see very much of this side of the lip
compared to this side. And that's because
of the perspective. So let me draw this over
here and she's smiling. So that curves up and then down. So this area is the
inside of her mouth. And then we'll work
outward from there to do the upper and lower lip. So we've got upper lip here. Just a little bit of it. Lower lip here. Tried to choose photos
where you'll get a variety of different kinds
of drawing experiences here. I think that's
always a good thing. So we haven't done an
open mouth like this yet. But just like with anything, you just look for the shapes. Don't get too caught
up in thinking about, you know, what it is or
what's, what's happening. Just where you see. Alright. Now I'm gonna come
in and do the eyes. See on the right side that I actually partially
hidden by the nose, which is not necessarily
what you would expect if you were just drawing
it from your imagination. So that's where, that's where references come in really handy. They keep kinda keep us from drawing what
we think we know. Focus on what we're
actually seeing. Then I noticed that the edge
of her face is right here. By that, I so I'm gonna go
ahead and draw that in. That'll just helped me
to start to shape that. Let's come back here. Get the pupil and iris late in. Okay, Good. Get that little reflection. Okay, now, let's just get the eyelid into
some Laius is here. Okay, we'll come back
and do more detail, but let's get the other IN to make sure that
everything looks right. So we've got here's the
the side of the nose. Then there's the shadow area. Eye socket starts here. Corner of the eye about here, I would say comes up, makes sure that both sides
land on that guideline. That's why we drew
it, after all, got to take advantage
of that thing. That looks pretty good. Pay attention to where
the pupil and iris are. You see the in this case it's all the way over on the left. That's why she really has
that sense of looking at us. Okay. We're getting there. Okay, Now I'm gonna do
that little eyelid. You don't see much of it. This is a little
line right up above, Little smile line
underneath her eye. And then let's go ahead
and do the eyebrows. Pay attention to
the shape of them in the direction
that they're going. That adds a lot to
the expression. Eyebrows are very expressive. They can be anyway. Okay, now let's go on and
kinda refund some things and get the rest of her face
worked out the face shape. So the forehead
comes up to here. Kinda angles in a little bit. You see a little bit
of hair comes down. We have this fabric
that's sort of sweeps down right beside the eyebrow. And then it comes up like that. Let's figure out the
layers of this fabric. Now we have the
gold fabric first. This comes about here. Comes over, up like that. Then this comes down. And over. So right around the nose
is where the fabric tucks. Then this other piece
that comes down starts to form the chin. And you see how I
like to approach different areas from both sides. So I got, you know, about
this far down here and now I want to make sure that everything over
here is lining up. So kind of bouncing
around really helps me kind of get things placed where
they're supposed to be. It also just works very well
for my ADD personality. I bounce around all the time. That's my MO in life. Let's come down. Eight that chin over. Connect into this a line here. And now let me draw it in. I'm going to erase
my guidelines. And then I want to draw
just a hint of the teeth. Teeth or something. You don't want to
go overboard with a vacant start to really
take over a drawing. So sometimes I'll just draw like a little hint of the shape, that little triangular shape
that you see from the gums. Then I'll come and draw
the bottoms of the teeth. I won't even connect
each one up. I'll just kinda let people make that connection themselves. It's better to not
over-emphasize the teeth in your
drawing. I think. Unless you want to
go for that Look, I always find if I if I
emphasize the teeth too much, it ends up looking like that boy who was on the cover
of Mad Magazine, that big, big grid. So if that's the vibe you want, then by all means go for it. Otherwise, this is probably
a good approach for teeth. Less is more even. That might be a
little to emphasize. So you can just take
your eraser and dab. I'm not going to have
time to shade her in like we did with
the one yesterday. But you feel free to do that with yours if you would like. Instead, I'm just going
to make this one a more refined line drawing. So I'm just going to take
a couple extra minutes here to go over
some of the lines, especially giving
more of a sense of darkness around her eyes. Just got beautiful eyes. So I want to emphasize that
even in a line drawing, you can create a
sense of emphasis. Emphasis. You can also
create even a sense of the volume just by making some lines darker
and others lighter. That can suggest where shadows are if you don't actually get to
drop it on shaded in. Loved keep working on
this and I probably will, but we are at the
end of our time. So I'm going to wrap this up. You keep on going though, if you are in the zone, I never want to enter her up. An artist in the zone. Hope you enjoyed this. I certainly did awesome work. You did it. I hope you're
putting all of these drawings on your refrigerator
or somewhere. Tomorrow we're
going to be drawing the whole body again
and we'll spend the whole class time on one post so that you can
get a little more detailed. Have a great day and
I'll see you then. Bye-bye.
12. Lesson 11: Drawing Practice - Full Figure Pose #1: I can't believe we're
already at less than 11. It seems like we just started. I hope you're having a
blast in this class. I'm certainly loving
getting to spend this time being creative
with all of you. Today we're going to spend
the whole 10 min drawing one full body pose so
you can get a little bit more detailed than
you've been able to in our gesture drawings and contour drawings to
sharpen your pencils. Get some paper, and let's go. Alright, I've got a great
pose for you today. I couldn't do it myself, but I found a photo
of someone doing it. So let's jump in
and get started. I'm going to do the kinda the
line for the spine first. And this is a really good
one for that because it starts off and I've angled like this and then twists in the middle head about here. Right. Actually lower it just a
smudge because I don't want to run out of room
for the hands. Which is actually a
good point to bring up. Sometimes when you're in the
middle of a figure drawing, you do run out of room. You might have to take the arms or the legs
right off the page if you didn't account for that from the start
and that's okay. It's much better to do that than to squished the figure
and into the frame. Make their proportions all
wacky so that they fit. I've seen so many
drawings like that when they're figures
approaching the edge and you just kinda
like want to shorten things or make it, make them fit somehow.
So don't do that. I'm looking at that negative
space above the head, keeping it very loose here. First, you can see I'm kinda using some
of the shapes that I, that I shared with
you earlier on, that triangular
shape for the torso. But I'm also adapting those
shapes now at this point, you don't need to be
quite so rigid about it. If you started out
that way, maybe, maybe allow the shapes to
become a little bit looser now, a little more like what
you're actually seeing. If you're ready for that. If not, just keep doing the
triangles and rectangles. But I tend to like to round
them out a little bit more and actually really look at the shapes
that I'm seeing. Then I'll come back and give him close and I'm in a minute. Let's get the essentials on here first. Okay. This knee comes out
or the leg comes out sort of towards the top of that pelvis
area is really stretching. So that's something that you might not want to draw
naturally or might feel wrong, but just draw the
shapes that you see. Look at the negative space here. Draw the, draw the shape
of the negative space. And I know I've said
this before too, but it really does
help me to try to approach a drawing like
it's a quick gesture drawings. So even though we have 10
min to do this one piece, I've already gotten the
basics of the pose down, and we're just a few minutes in, so that leaves a lot
more time to refine it. To check proportions. You can measure his head
and count down and make sure everything is landing
where it's supposed to. And then you have all
this time to do details, which is what I'm
going to do now. I'm gonna go back into my
drawing and start refining it. Starting with the head. I'm not doing details, but I am going to provide a
little bit more information. So get the hair shape
in there if you want. You doing all the
facial features. But I'm just kinda doing some of the main shapes that I see just where I see
the most contrast. So kinda like the eye socket. It's a lot of shadow there. So I'm going to draw
that this whole side of his face is a bit in
shadows and G there. Then just work my way down. It's a lot of great folds increases in the fabric
on this one that really help understand what
the body's doing. Some kind of drawing
those two as I go. I wonder how long he
had to hold this. I've posed for some
figure drawing classes. It's not easy. Of course I never
posed like this. My poses are usually means
is like laying there. You get with to get that other sleeve and there can be kinda looser
with your lines if you want. This is a good one to try. You know, being more expressive, you could even do
contour line drawing or whatever you want. I'm not drawing the
hands in detail, but I'm just again, kinda like with the face, just picking up on some
of the main shapes that are that helped to define
what we're looking at. You can go as
detailed as you want. We provide you with the photos. In addition to having
them here on the screen. If you go to the page
where we have the lesson, you can see the photos, you can zoom in, you can download them and
zoom in on certain areas. So if you really wanted to do a more detailed drawing of
this, you absolutely could. Okay, now I'm gonna get some of those creases and
folds on his genes. This is a fun one.
I like drawing dancers because you get some
really interesting poses, lot of movement and
contortion of the body. It's really fun challenge. It makes you look at
it more as shapes. I think when somebody
is in a pose, that's not necessarily
what you would consider a normal
pose or casual pose, but they're more doing something
more extreme like this. I think it's easier
to get out of your own way or get
out of your head. Stop thinking of it
so much as a body. Just draw the shapes. We didn't do a lesson
focusing just on feed. But take everything you've
learned from the hand lesson. It applies to beat to
start get the big sheep. Then focus on toes. And really look at structure With a minute to spare. So I'm gonna do a
little shading. I loved the shadows on this. There's some great shadows. That definitely helps. Give the figure more volume. I hope you're enjoying this. If so, you're in
luck because we are doing another one tomorrow. So get ready. Can't get enough practice
doing figures Studies. I really think they are one of the most valuable things
if you really want to learn how to draw, practice drawing the figure. Alright. I think that's going
to do it for mine. You keep going as
long as you want. Yes. Great job, everyone. Woohoo, you did it. I'm your biggest cheerleader
tomorrow we are going to be doing the same thing
we did today actually, but a different pose,
different model. I think it's great to spend
some time really drawing the full figure and
seeing how it looks with different models
in different positions. So have a great day. And I'll see you then. Bye-bye.
13. Lesson 12: Drawing Practice - Full Figure Pose #2: Today we are drawing
the full figure again. We'll be spending the whole
class time on one pose, but it's a different pose. Then yesterday's, sharpen
your pencils, get some paper. And let's go. Here's
our model for today. Let's jump right in. We're going to spend the
whole 10 min working on this one just like
we did yesterday. I'm going to start with my
usual line for the spine. Little bit of a slant to it. Head up here. I'm sure you probably know that where the head
goes back now. Let's see a little bit of
an angle to the shoulders. Comes back like this. Sort of doing a modified
version of the triangle, oval square thing that
I showed you earlier. This time I'm doing shapes
that are a little bit closer to what I'm
actually seeing. So if you feel comfortable
doing that, Go right ahead. If not stick with the more simple geometric
shapes to start with. Or if you have another way
you like to do it, do that. All right. Leg over here. You can see just like usual, I'm starting very
loose and sketchy, pretending that I
only have a couple of minutes to get this down. And then I'll come
back and refine it. Very low commitment
level at this point, if something is off, it's easy to fix. Trying to look at
how the elements on one side of the body
relate to the other. Always check the alignment of things that can really help. Especially in a more
complex pose like this, where you do have
a lot of overlap. The arms and legs. Just using very rough
sketchy shapes for now. Always want to check the sheep
of the negative space too. That's telling me
I was looking at this little opening right here. I think I had her arm going
out just a little too far. So remember to
draw the shapes of the negative spaces there. Now, that helps me know where
to put that arm like this. And then that also tells
me that I might have this knee out as mids too far to correct one thing and then it kinda
opens the floodgates. But it is a really
good way to check. All right, there
that feels better. That really is
what this phase is for putting something down
on the paper so you have the ability to compare and just make it exactly how
it's supposed to be. All right, here's our other arm. That's looking pretty good. I think I'm ready to start doing some more refined line work now and we still have
about 6 min left, so we're doing good. If you're not quite here
yet, you keep going. Get your shapes working, make sure that the
proportions feel right. Then go on to the next step. For me, the next step is just using a little bit
cleaner lines. Paying more attention to
some of the subtle things. Going to just kinda
imply a face, not gonna get too
detailed with it. A little suggestion of eyes. Knows if there's time and always come back and
refine that further. But at least if not, at least there's
something on there. Now, what does keep on
working our way down? The neck? Some hair in there. Hold on a second. I have to adjust an I. It's looking a little wacky. There we go. Alright. Good enough for now. Alright. Onto this arm. When I go through
and do the second, second pass over things, that's when I'm really
looking for where I see any curves are subtle things that I didn't pick up
on the first time. That's when it really
starts to come to life. I think you get the essence down first in your quick gesture. Drawing in essence is really
fun and important too. But then if you do
have time for detail, that's when it becomes
extra light gouache. That combination can't really
do one without the other. You can have really
great details. But if you don't
have a good sense of the overall than they might not really come together
in the way that you want. Drawing is especially figure
drawing is this constant. Stepping back to look
at the big picture, check how everything
is relating. And then kind of going in and really focusing on the details that you want to
bring out to you. How are your drawings come in? Are you having fun? This
is a challenging one, so if you're struggling a
little, don't feel bad. Just take your time. Look at it and see what
doesn't feel right. See if you can fix it. I can't emphasize enough how important it is
to constantly be. Looking up at the reference and then looking back
down at your paper. That's really how
you spot mistakes. See even in this stage, I'm still being pretty loose. I'm not going super
detailed yet. It's just a matter of steps, steps toward the tail. You can kinda gauge it by the amount of time
that you have if it's a timed thing like this. And that way you're
always sort of bringing everything up to the same level. And then if there's more time, you can go even further
with the detail. But if not, it will still hold together and work as a drawing. Not going to go super
detailed on the shoes. I could spend the whole 10
min just drawing this shoe, but I wanted to say a
lot going on there. Got her on there pretty good. Now I'm just going to go back
and use the minute or so that we have left to refine
it a little further. Grab a sharp or pencil here. Might even do a little shading. That'll help get some of
those different planes of the body working together to make the model feel
more dimensional. You can tell the light's
coming from the right side, especially when you
look at the face. It's very illuminated on that side and more
shadow on the left. It's always good to think
about light source, even if you're not cheating, even if you're just
doing a line drawing, you can still create a sense of the light source just by
using heavier lines where the shadow in lighter lines
in the highlight areas. To make it for a beautiful line drawing when you
approach it that way. And it really will
create a sense of the lighting without
doing any shading at all. Just about out of time here. Just wrap up these
hands a little better. I always tell when someone's
trying to avoid hands, but everything else will be
really detailed and then the hands will be kinda
just like little bubbles. So I always try to take a minute and refund
the hands of good. I do think they're
pretty important. There we go. I hope you enjoyed that. Keep practicing to, you can
keep working on this one. You can look up other
models online in different poses or recruit
your friends to pose for you. That's always a good thing. I make all my friends
do that for me, for various projects when I need a reference for something. Okay. I said I was stopping, so I guess I should. All the awesome work I
hope you enjoyed that. Tomorrow's lesson
will be all about shading in capturing light. I'll see you then. Bye bye.
14. Lesson 13: Shading and Capturing Light: I'm excited that you're
still drawing with us. I hope you're enjoying
this class so, so much today we are going to be learning all about shading
and capturing light. So sharpen your pencils, get some paper, and let's go. Today's all about capturing
light and shading. So I chose a reference that has a really dramatic light source
coming in from the left. And we're going to sketch this portrait as
quickly as we can. So we have a little
bit more time left over to do
some shading on it. So to start with, I'm going to draw the
line of symmetry, which is going to be
sort of arcane to the left because the model
is turned that direction. Get a rough head shape on there. Okay? It's a little bit of
an angle to the eyes. You can see a little
bit lower on the right. And so that means all the other guidelines will follow suit. Now I'm going to,
I'm going to use my soccer ball approach here. I like calling it
that it's so weird. But by what I mean is drawing
the planes of the face. I'm drawing the eye
sockets right now. Since we're focusing
on shading today, It's great to start
off just thinking about the planar structure of the face because then you'll be in a better position
to do the shading. The planes are all defined by where we see shifts
in light and shadows. So this will really
help that process. I'm just been a very loose, very geometric way, drawing
the shapes of the face. That wherever I see a shift
going from light to dark, I'm, I'm sketching that
in lightly right now. Then we'll refine
this in it as we go. Just like always. Have to get something
done first. So you can see how it looks. I hope if anything would
come away from this class, feeling a little more empowered to just start off your
sketches and your drawings in a loose way and not let go of some of the
tension that I see a lot of people kind of holding onto when they're doing
a drawing summit, you feel this pressure
that it has to be perfect. And when you draw something
that is imperfect, you get all stressed out. And this actually makes it
just so much more freeing, so much more fun if you can just kinda let your pencil
glide along very loosely without,
without that stress. Okay, so now I've
got the basics. I'm not going to do the hand. I think that's going
to take too long. I want to get to shading here. So let me quickly
sketch in eyes. Remember the corners go right on that guideline that we drew. He's kind of looking up, you can see the the placement of the pupil and iris is on the
upper part of the eye there. And then we'll come over here, the sides farther away from us. So this I is going to be
a little bit smaller. I'll always think
about perspective. That in looking pretty good, we don't see a lot of
detail on this side. And for as far as
eyebrow and all kind of blends into the shadow. And that's a really good example of draw what you see,
not what you know. If you don't see the eyebrow,
you don't need to draw it. Just focus on the shapes
and lines that you do see. Over here. We see
a bit more of it. So I'll go ahead
and sketch that in. And then let me refine
the shape a little. My goal is to spend
about half the class getting the drawing down
and the other half shading, we have about 30. So 30 more seconds
of drawing here. If you need longer
to get your drawing worked out before you
go on to shading. Feel free to pause
it when I start drawing and keep going yourself. And then whenever you're ready to rejoin
and start shading, then just press play again. Can just shut me write up. Slow down, Paul, I'm
not ready for that. One advantage to
doing video classes. Alright, that looks pretty good. We really don't see
much detail in the ear either because it's
all in shadow. So that is enough information for us to start
doing some shading. So now what I like to do. Start by just laying
in some general value. Wherever I see the darkest
tones, we already have. White. The white of the paper
creates the highlight. So I like to jump right
to the opposite of that. And land where I see shadow. Now you can see how the hairline just kinda
goes right into the shadow on that dark side of the face that's facing away
from the light source. So I'm just kinda
with my pencil on its side very loosely. Weighing in all of the shadows. I'm not going as dark
yet as I see it. I kinda like to build
up the shadows as I go. So I'm going to
take everything to this middle value first. And then we can push it as far as time allows
with the drawing, even if you don't go
as dark as you see it. As long as everything
else is working within that value structure
that you're creating, then it will be believable and
it will capture the light. So in other words, you don't, you can work with something that's called a
compressed value scale. In this case, right
now, in my drawing, we're only seeing
the values from the lightest end to
about the middle. And you can do
beautiful drawings only using the values in that range. But of course it makes
it more dramatic if you push the values farther. So we'll keep going. But see how just getting that little bit of
value on there. Already, we get a sense of how the light is
hitting the figure. Now the other thing I wanted
to be sharing point out to you when you are doing a drawing and you
really want it to feel realistic and you want it to
have believable lighting. The best way to accomplish that is to not rely
on outlines for anything because
the outline makes it feel more like a drawing, which is a drawing. So that's okay. But if you
want it to be more realistic, you want to get
rid of those lines by turning them into shading. So look to see where
is the darkest value. Whenever you have a
line in your drawing, is it to the left, in this case in the background? Or is it on the face? And so in this case, the background on the left
side is definitely darker because that's where that's the side of the face that
the light is hitting. So I'm just going to
lay a bit of value back in here and that
will make that side of the face really pop out and feel like the
light is hitting it. You see that? Alright,
now I want to jump in to the eyes here. That's where I'm
gonna start laying a little bit darker value. I might even jump up to a. What is the six B pencil that'll give me a
little bit darker. Without much effort. Fan of air, little shading and I got a little darker up
here pushing those values. Now, Let's get this. I leave that leave space
for our little highlight. Don't be afraid to put
value on the whites of the i2 because it's not white. It's in shadow. That actually helps tell the lighting story too
late effects, everything. Little bit more
weight value here. Alright, I'm going to
start going darker now and my shadow darker here. Working with value and
thinking about light and shadow just involves a lot of pushing and pulling with you. When you adjust the
value of one area, it kinda shifts everything. So you have to just kind
of keep looking and seeing where you need to go next to make everything
feel balanced. And I would encourage
you squint your eyes a lot because that will help
you to see the big picture. So look at your reference
in squint your eyes. You see how all the
detail kinda disappears. And you just focus on the big
sections of light and dark. It's, it's easy to
get so wrapped up in the details that you lose
sight of the big picture. So that's a trick that
I use a lot to help me. Kinda just make sure
that everything is working together
the way it should. And that's really what the
values in your drawings do. They work together to create that sense of lading
that we wanted? I believe I am out of time here. As always, keep going with
this drawing if you want. Go as detailed or as
loose as you would like. But you can see how even just in our 10-minute time period, by being very selective
about how I approached it, we've pretty much
managed to really mimic the value structure
of that photo. And with even more work, you can take this
and make it into a very realistic drawing
if you wanted to, by continuing to go on top and add details and refine things. But this is a good
stopping point. For me. Awesome job, you did it. The next lesson is
actually a two parter. It's going to stretch out
over the final two classes. And so we'll be spending a
little bit longer working on proportions and drawing
the figure tomorrow. And then in the final lesson, we'll be adding a lot more
detail and rendering. Have a great day, and I'll
see you then. Bye bye.
15. Lesson 14: 2-Part Drawing - Focus on Proportion: Today's the first part of a two-part lesson where
we'll be drawing the figure. In today's class, we'll be focusing on just getting
the drawing right, getting the proportions
worked out, all of that good stuff. And then tomorrow we'll get
into a lot more detail. So sharpen your pencils, get some paper. And let's go. This is going to be a two
parter we are spending today focusing on just getting the
drawing down for this model. And then be sure to hang on
to the drawing because then tomorrow we're going
to continue with shading and rendering and
making it look realistic. I wanted to end this
series by a really letting you focus and do a bit
of a longer drawing. So let's get started. I'm going to do my usual Can
I get the line of the body, the angle of the head, keeping it very loose. This is not a, this
is not a full figure. Obviously this is we're only
seeing from the waist up, will get to go a little
bit more detailed. Definitely use what we
have learned about hands. All the, all the
facial features, eyes, well the eyes are
closed but still get to draw, draw them. They're still there. And nose and mouth and shading. We're just going to put
everything together. I would also encourage
you to really use this as an opportunity
to explore. As far as drawing styles go. What you want your, what you want your
drawing to look like. Do you want it to be
more line oriented? Do you want it to be more
realistically shaded? Do you want it to be
stylized in some way? I've been approaching
everything from a somewhat realistic angle. But that's just one way
you could do anything. You could take a
cartoony approach, you could take a very
illustration approach and stylize the figure.
Have fun with it. Still starting very loosened, sketchy though like
I like I always do. Getting that handshape in there. Just focusing on shapes. Constantly looking to see how one shape relates to the next. Don't get intimidated by thinking about what
it is you're drawing. Just focus on the shapes. You can do this. It's no different than any of our other drawings we've done. Shoulder and that
looks about right. I'm saving the facial details
for last because I want to get the rest of the body
on there and makes sure where that the head
size feels right. You could do, you could do the measuring trick if you want. Measure the head count down, see how many heads high. It's always a good thing to do. A lot of nice overlap here with the little bit of
the arm that we see, the lower arm at the bottom. Okay. That's looking
pretty good. How's yours coming? I'm sure it is coming along beautifully. Alright, let's see thumbs here, jaw line here, here. Here. Here. It's tricky to place for me in this one because of the way
her head is turned, it ends up being a little bit lower then where you
would expect it. Definitely a case of
draw what you see, not what you know. It's always helpful
to remember that. Especially when you're drawing
something where they're unusual angles like this one. Right? The line of symmetry
for the face is very much over on the left side. She's not quite in profile, but she's headed that way. We've got the line for the
eyes right about here. Knows. Now. Looks about right, maybe a little lower on the list there. Let's get this face on here. So eye socket, that's
how I'm doing it. You can go right for drilling
the features if you want. I like to do my planar
structure thing. I think every artist
started just develops their own way into a drawing. This is definitely what's
evolved for me out of the years that I spent doing portraits and
figurative work, I've tried a lot of
different techniques. I keep coming back
to this method of just really focusing on the shapes and the
structure and thinking about if I was making
a sculpture of this, how would I do that? That helps me a lot, which is ironic because
I'm terrible at sculpting. But I can do imaginary
sculpting on paper. Refining that side of the face. I think the line for the eyes
needs to be a smidge lower. There we go. Because I was just looking
at where that left eye, how we just see like
the littlest bit of it peeking out from
behind the nose. So I know it's got
to land right there. So the other one will too. All right. That
looks about right. Then use the eye
socket to kinda know where the eyebrow goes. Okay, let's get the
sign of that phase-in. See what I mean. You
can draw anything. If you just break it
down into shapes, It's really pretty incredible. Did you think you'd be able
to draw something like this? Maybe you did, I don't know. But if you're surprised, just know that
that means you can draw anything you put
your mind to you. So even though this
video series is coming to a close pretty
soon after tomorrow, which makes me sad
because I've really enjoyed hanging out with all
of you doing these drawings. But even though the
video series when you're drawing life should not. I hope that you've
done this enough now that it has become a habit. And I would encourage
you to continue that habit of being
an enabler here. Keep practicing, find something interesting and try to draw a little bit every
day if you can. Because it really does. You'll see so much
improvement in your drawings the more that
you continue to practice. I'm sure that you've seen
quite a bit already just in the short time we've
been doing these lessons. And if you continue
to see even more, hey, just refining
this hand a bit. When I get the drawing
worked out really well. So that tomorrow we can focus, spend the whole time
playing with shading. There's some beautiful
shadows in this picture. And I think that's going to
be a really nice way to end this class by making a drawing that is a
bit more detailed. Take everything that you've learned and put
it into practice. Pay attention to all those
little subtle nuances. Let's see how we see a little
bit about finger right here on the other side
that's up against her neck. Did you see that? And don't want to
forget her hair. And it comes back down. Again. Erase any of those initial guidelines
that you don't need anymore. Of course, as always, if you need more time, take as much time
as you need to get the drawing to where
it feels good. Then you'll be all set for
tomorrow when we shade it in. I like to kinda lightly
sketch some of the shadow shapes that I see too, that just makes it
a little easier when it is time
to start shading. Okay. I'm feeling good
about this drawing. I hope you are too. If you need longer, like I said, keep going. And then we'll come back
tomorrow and finish this up for a final drawing
together in this class. So excited to see
how this turns out. Great job everyone. Now hang on to this drawing
because we are going to continue working on it tomorrow. Alright, have a great day, everyone and I'll see
you next time. Bye-bye.
16. Lesson 15: 2-Part Drawing - Final Rendering: I cannot believe this
is our final class that has gone by way too
quickly for my taste. But the good thing is
you can always re-watch them if you want to come back
and hang out with me again. And we'll be doing a lot more
classes like this to you. In today's class we're
gonna be continuing the drawing that we
started yesterday. So sharpen your pencils,
get yesterday's drawing. And let's go. Alright, here she is. Again, recognize this. Here's our drawing that we
started from yesterday. Every, all the
line work is done. So we get to spend this
whole class just shading. I'm super-excited. So I'm going to begin
like I did on the, when we were doing the portrait, focusing on light and shadow by just kinda very gently
filling in all of the shadow areas so I can look at some value
laid onto my paper here. Here filled in. I like to start loose like this should come as no surprise, that's how I kinda
do everything. But even when it
comes to shading, I don't want to I
don't like to go too detailed to quickly. I like to just gradually
build everything up. Which is interesting
because in general I'm a pretty impatient person. Like things to happen
now and quick. But this is just the easiest
way I've found to be able to really wrap
my head around what I'm seeing and what I'm drawing. These shadows on the, on the shadow side of her
face are very helpful at creating the dimension. Making her look like a
three-dimensional form. So I really want to
pay attention to the shaping of those
that's going to be very important in making it feel like her shading here on the lips, under the chin. Up here. Okay. Now I'm going to bring
the shadow on down. This. There's pretty strong
shadow beside that hand. Here is strong shadow
on her shoulder. So I'm just scanning
the whole reference and wherever I see dark shadows, that's kinda where I'm jumping
for this initial phase. Down here. This arm is pretty much
in shadow completely. Then it gets a little
lighter shadow here. Okay? So we have the
basics laid out now. And I'm not drawing that
whole complicated background, but I'm just going to put a
little bit of shading out here and that will make the
highlight part standout. I like to do this
pretty early on if I know I'm putting a little bit of value in the background, I'll go ahead and do that
at this first stage of shading and that way I can use that and see how it
affects everything. It just sort of
have that in mind. As I'm working on the
rest of the piece, I'm going to bring that
all the way around because I'm going to
use that same shadow to help make her clothing on along her back here
kinda stand out to you. Okay. Alright, so now
it's time to go a little bit more detailed and I want to start by
making her eyes really pop. There's a shadow underneath this I that's really prominent. And just kinda refining some of the shapes and
details that I see. This time I'm using the point of the pencil instead of the side, so I can be more precise. I'm looking to see now also
inside of the shadows, there are some shifts, areas where it gets
a little darker, a little wider, making it
fade to light more gradually. Come right around. Her mouth. Here is a little bit
of a curved shadow that tells us a little bit about the structure
of her face too. There's darkness under the
lip, faint shadow here. So this is now the
time to really start looking at some of
those subtle things that make her feel
very, very believable. Okay, and then it
gets extra dark here. You see how starting
a little bit softer with the shadow allows you to go back and push the
dark areas where you need to, but you're not locked into them. You can just build
it up where you need it and then leave the lighter
value where you need them. Okay, there's little
shadow on this finger. Shadow on this finger. I can't believe this is
our last video already. Where did these 15 days go? I have really enjoyed getting to spend this time
drawing with all of you. I hope that you have to. I hope you've
learned some stuff. And mostly I just hope that you feel
confident to keep going. I truly, truly believe
that everyone can draw. Everyone can be an artist. It's not some magical thing that you have to be born with. It's just a skill that you
develop with practice. If it's something
that you enjoy, then you'll be more likely to continue practicing
and get better at it. I always say, I can teach
anybody to be an artist, but I can't teach
you how to love it. That's the part that you
have to contribute or have. I guess that maybe
is the part that people are born with or is a part of your personality or something if this
really speaks to you, even if the results aren't
always exactly what you want. If you enjoy the process, then that's something
to pay attention to you and to keep going. You can learn the skill. Just takes time and practice. If you enjoy the process,
that's what counts. We get a little to
focus sometimes on the end product and forget that the creative process
is the important thing. And I know I have definitely
enjoyed the process of making all of these
drawings with you. I hope you've enjoyed it to you. I'll be doing a lot more
classes like this too. So if you enjoyed this one, keep your eyes peeled for more. How about lot of
things in the works? So you'll never be
able to get rid of me. One thing that I wanted to
mention about value two is that you really have to think about the
relativity of the value. So I see how I just shaded. I added some darker values to this year because initially
I had left it light, because it does look light
compared to what's around it. However, it's not
as light as this. So you, even though something
might appear lighter than what
it's next to you, it doesn't mean that
it jumps all the way to the lightest end
of the value scale. It's really about
trying to look to see what is the true value of weight of what
you're looking at. Looking good, How are
your drawings coming? I want to see I hope
you'll post them or share them with them so
I can check them out. I think it's only for here
you've got to see all of mine doing a little bit less detail as I move away from the
face because I want this to be the focal point area. And so you can allow
the details to feed become a little more impressionistic as
you move away from, from that, if you would like. I do that a lot in my drawings. I think it's a nice way to help people know what to look at. Actually go a little darker with the shadow
here in the background. That's also going to make
her face pop a little more. Who your IRA to their friends. Well, we have just about coming to the end of
this little creative journey. You don't want to forget the
most important step of all. When you make a masterpiece,
you have to sign it.
17. Closing Thoughts: Great job everyone. You did it. You made it all the way to
the end of our 15 day class. I'm so proud of you. I really hope that
you had a blast and I hope that you
continue drawing. If you do something
consistently for 15 days, that's long enough for it to
start to feel like a habit. And I think this is a habit
that you should continue. Have a great day everyone, and I hope to see you
again really soon. Bye-bye.
 Paul Richmond, Everyone is an artist.