Transcripts
1. Lesson 1: Introduction: My name is back the watcher, and I'm an artist. And amateur status in animal during this class is basically going to be about how do we draw the head of a horse in different angles? And how do we understand the basics of a horse's head? Because horses are very interesting element, basically mustering horses and help you quickly minimum. So we shall begin with understanding exactly what happens under your skin. Was to say you can know exactly what religion is and what should be done. Whenever we look at the question of what happens only if the skin is contributions to what we do a buffer string to make it less nucleophilic. So I'll take you to the basics just to show you how I use what's happened on the skin, secretes something very reasonably attractive. Well, we'll need like kinda kin selection tool just to show you the basics, how to polish them, and how to indulge in compounding, which otherwise have fun. You can also take me to a very little activity that happens. But when you look at the product really grow much of Magellan compound projected you exactly what goes on, how we use the little details of the gets. Frankly, just to make sure that we capture very realistic appearance of the demonstrations on preference by imagination. And we have Bulgarian motion. So motion loss of maggots, color tonight, just that we can see basic stuff like how do we begin? So we shall move on. New potential reaches, where outside his window, size of 100 and II of the horse. And how I put all this together and secure myself some things was not the reference is possible. And we showed that the very same thing for hints, where I'll take you through exactly what to look for. Hundreds of years the horse are all comes together. It must have resulted in the class whenever we see that even from any kind of reference image. And then you can angles. So we shall move on. And then I'm showing my approach to model. And if an animal, well, because the goal here is to understand what we need for a low, mid-range variable and simplifying and between facial expressions rather than an interesting difference engine and hopefully lighthearted achieve the arbitrary tones as well. Then we shall put it all together and draw the head of a horse with an arrows. And I'll show you my simple interpretation. And by simple approach to an end was by putting all the different fields together in one diagram. By looking at the reference inside and then bring it all together. And we shall go ahead and then I'll show you exactly what I would pay attention to the liver and drying facial expression mechanism and simply adds one to tell you that as a balance, now take into my oxygen and listen and correlate the side I can show you what you can achieve. You understand exactly what happens. Mostly. They're not so worried with the facial inches overnight. I will try to exaggerate its own. And we make this and looking forward to seeing you there.
2. Lesson 2: Drawing Materials : It comes to drawing materials. You do not have to get to launch. All you need to do is get something that you are comfortable with. I think something like pencils, charcoal, ink, pen, colored pencils. And if you are using other mediums like paints, may use anything that you are comfortable it as long as you can draw with it and it's easy and cheap, we need to access. I don't think there is a problem. So explore every possibility with the materials that you have. Because this is a fundamental cause. And when it comes to paper, you can use any kind of paper that you are comfortable with. You can use Chaco paper. We can use what kind of paper? You can use print. You can get your sketch book that you can use any kind of paper. Because eventually, what matters is what you put on the paper and not the material that you're using. Because if the technique is not good enough, then you can blend the paper. So we use any kind of paper that should comfortable with. Because eventually it's going to be what we put in the paper that matters. So if it's cheap for you to access and it's comfortable enough, we need to use them. I don't see why not? However, I do recommend you check out sketch books by a company called Stillman and been. They make amazing sketch books. Their sketchbooks have very high GSM, which means that you can use mixed media on their sketchbooks. You can use watercolor, you can use oils, this sketch books. You can use, gosh, you can use anything that you want. You can even use ink in this sketch books, which makes them even more amazing because they are Paypal, is really good, really strong, and it's worth it. So if you get a chance you can go pass by, you ought store and take your pick. And they come in different ranges and different GSM and different designs. So this everything for everyone to check the March, forget the chance. However, I will be using Procreate on the iPad such that you can have a liquor Watson doing. So if you want to work digitally, you can also use the stem or you can do it traditionally.
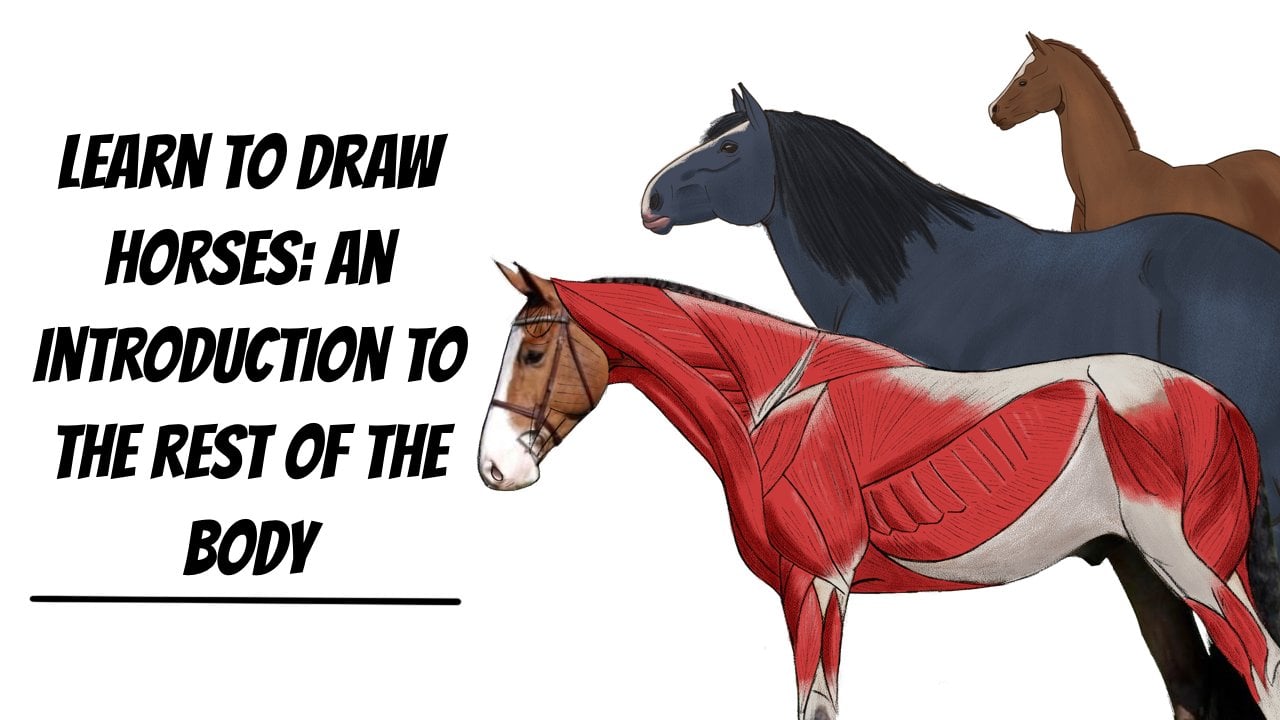
3. Lesson 3: Anatomy Of Profile View: So in this video we are going to be going through the muscles of the head of a horse, just such you can understand what goes on under your skin. And when we apply the skin is much easier for you to exactly what's happening. But the goal is weighted, simply know what is going on. And the skill civil Watson drain right here. We're going to go through this a bit quickly, but the goal is for it is simply what goes on underneath the skin. So what I'm doing here is I'm drawing the masseter muscle, which is the most significant Muslim on the head of a horse. And so it's the Muslims they usually is for chewing. It's attached to a very sharp Kendall. Let's just below the knee, the eye socket. So it's very interesting muscle but the core has free to just know that masseter muscle actually really contested landmark in the ozone levels. So as you can see at the back, I tried to put the ear using a coin that we shall also be looking at the needs of women living on the video. But if you look at Watson trying to achieve the undistorted pitch, which if you what's exactly it wasn't? I mean, if it's true, how does all that come together to give us what we look at a horse? So when you see at the muzzle area and the shorter put, what the market possibly look like. A heart-wrenching is a very generic approach such that we get the basic perspective when called on. So you can tell it's actually not what we see on the reference image on the left, but I'm just trying to get you to see a very basic approach and their basic understanding. So as you can see, there is a sudden and dense, as we can see in the nozzle area. That's just where the loud noise closer and at the bottom of the head, you can really tell that there's not really much that goes on, especially very small amount of skin that covers up the hill. So when we are drawing, I usually like to do it's with the planes Call. It's important that you identify the purines are the eyes are usually make them treatments for the top two plots for the button. So as you can see, it's very similar process. I had seven in this image that we tried to draw on the right, sir, accommodating. And I'm trying to just put them a bit of a highlight just that you can see come out of the image. But you can see Juliet since we're in the middle of the eye socket. And it has eyelid, just like you can see in humans. It's solid, lightweight indicated islet and see exactly how well it can demonstrate them. But you can really see here milligram quickly just to show you exactly what always look up for a level we are joining the handler whose most importantly, you remember that head of a horse is made up of significant muscles that we can use landmarks just to help us exactly how to do it. For example, if you look at the masseter muscle, this muscle, it does help us when we change locations that I should go and try to locate where the neck she began from. So as you can tell, on the left of the left you can see the reference image and the right you can see here we're doing and that's always nice way to see how these two relate together. That's exactly what we're looking at and how that helps us. So you can see yes, in the image. And the stranger refined the joint and indicates exactly are we going to deal with the loss shelf and show you now the muscle that are going to be placed into a kind of shadow that we've seen just between the nostril and the masseter muscle survey several muscles that we do not need to know the most part, it's really nice to know exactly what's going on because they do attached to the skull and also attach underneath the masseter muscle, as well as on separate masseter muscle. So if you look at the way, the way several veins travel along the head of the host, usually chug along the maximum muscle and all searchable, undoing these particular muscles of your drawing. So just so you can, just for your own information, one of these muscles here is called a coelom sermon, so you don't need to remember the name. But the goal here is just for you to know exactly what's going on. Why it is when t's, because you're going to realize that muscles in general just simply help us understand how shadows on the head agreeing to be dealt with and how we should handle the shadow just to give us the very best results. For this particular, during this which I'll be doing. So as you can see, I'm going to draw that particular muscle that goes underneath the masseter muscle. And underneath that is actually in layer five. Practitioner B indicates in life, simply whatever digital densify is, visually several remotely, what you're going to be seeing significantly affecting who we are. We render the head of the horse. So these muscles right here are very interested in also, we shall not be named and the face value. Do you remember Patagonia's which simply tells that a sub as much of that country, Moscow, that goes all the way through to the masseter muscle. And there's another muscle that goes above the maximum Muslim but comes from the mobile area. So this is how they do make these muscles help the muscle moves in certain areas and certain directions. That's why we'll availability of very interesting facial expressions being done by horses and how I do of course drain, but because of your passion should be structured. And how these can help us actually get very interesting shapes out of the most complex. My courses. So you can see under strain to clean that up, either bits of color just change, it gets three-dimensional. Look at the muscle for the goal here is simply fridge, etc. These are actually the only muscles when I'm trying to deal with forces. So what do I do about that? What I'm going to do it into the Muslim going to identify it, how I'm going to do one is actually what's going to affect harder for oxygen to look like when I do apply skin above it. So we're going to be looking at my approach to life. But in the Shange returned the jury Europe here in that the centric chain to change some different areas. But simply the goal is reached. Once we are doing. Simply just a way for you to understand how simple that says and how he shall furnish Schrodinger. Because if you know that the most significant muscle on the head of the horse is the masseter muscle. Like a newsletter, the landmark, altitude, the nostril, the muscle and the masseter muscle. There are several muscles and Gertrude, and this is how these muscles are back to where we are going to be during skin on top of it. And rendering skin to show shadows, show planned changes. I'm sure dimensionalities and easy information out. Go ahead and simply make the necessary changes that need to be led. And excellent, I do have very interesting image. So these are the major muscles. And the goal was simply know that muscle ABC and D is what helps us. So I do not want to get into the names of the muscles because that's as much for fundamental class. And there's lots of biology class Patagonia is freaking Central. See that is the muscle of minutes later. And you again to just see how these muscles go to shape up what the head shall look like. For the neck muscles, we shall look at those in another course, that Shelby detail and how to draw the rest of the body of the host. And in the course of talking to you about how can we actually understand the rationale of body and how we can use that too. Selection to where we shall be very different angles and different areas. So we shall look at that in a later class. But for this, we are just going to simply focus on what we are looking at here. So we're just going to brush off those initial language so much detail. And the leg muscles, particularly that goes in another lesson. Right now we're just focusing. Head muscles. Are the muscles help us shape the entire head of the horse and how that's going to help. So moving on. As you can see here, I'm just going to kill lots up and collapse. But the goal was to simply see that these are the different muscles that go on the head. And this is how we're going to deal with them. So I'm simply adding a bit and veins because actually the veins also help with the direction in which might be introducing the highlights integrated be affecting the whole body, no portion of the horse. So the different directions in animals of lights and how it should connect on the surface of the horse's head are affected by the blood vessels in the skin. So interestingly, via our solution nucleotide. So I'm simply adding a bit of Helena. That's to get that picture come through the way we should look at them. So with the mother of children is very ductile compared to the rest of the body. You can see in my reference image here, it's actually dark on the limits of the brain. So simply we introduced connected to the Docker, you and as you can tell, I had to just pick on a different layer, then do everything on top of life. But we're going to have to look at the rest of the things that is so transparently at the bottom and just that we can see exactly how all this comes together. So as you can see on the shelf later module, the darker and the colossal, less than half that comes on the surface that did not prevent larva hatches up to make the lab no direct visible by making the lab others of the mat. And just so we can now see exactly how again to be affecting what about so as you can tell the shadows, muscles where the muscles are, solids, we can actually have a very close to reality, can approach for Cayman kinda of appearance of inspection process. So as you can see here, the muscles have helped us identify where acceleration, no blood vessels that can looks at visual shadow. So it's always nice for us in the surgical really see the images cavity can acquire era. And I do like what I'm seeing. So simply we are looking at the way that muscles can enter. And that's exactly what's happening. While our great to deal with different light atom in different angles. But the goal here is simply for you to understand exactly what goes on on the head and how the muscles underneath help us shape the rest. That even when you're using structural shapes, break down different dimensions in different angle is a head of a horse. It's very easy to estimate exactly what's going on. So as you can see with the colors and the strength to make sure that what we're seeing, something reasonably close enough to the allergen can get it. But the goal here is to communicate to you how, what's happening underneath the skin into helpless. When we are looking at what happens. Skin, how color relates to the rest of the body. So as you see illustrated, go back and forth with the muscles and the skin just to make sure that everything is saying is working together. It's a very decent image. But the goal here is to make you see what I'm saying. And if you can see it, there really are Phoenicians example. So as you can see, even on the blood vessels did tried to apply verbatim. I might just show how the highlights you do come through because of the blood vessels and evil shadow you can see. Now under strategy, find the image, get the point across more clearly. But the goal here is to simply show you that we have lots of money movements in but less than paying so much attention to organism because we are not doing anatomy needs. So it was real money, multiple points, heads. It's important for us to move closer to a 100 scale, such that when we apply the skin, we know how to Claire on the color and Carter Jan license shadow. See how we can actually get us on the very decent image. So right now, if you appreciate the fact that the shadows and we have indicated and because of our understanding of the muscles, it's around the room. And because of this, it's much easier for us to light and shadow. Light, darkness and highlight everything is put together and have a very nice image.
4. Lesson 4: Anatomy Of Front View: So when we come to the front view of the head of the host, interestingly, I use the symmetry tool in Procreate to bring this out, just like we can save ourselves a lot of time. Patagonia's SRE, how much? Ben, anything detention until the process, vitamins and nutrients. Because most of these muscles come from a profile view parts, if you look at the frontal belly of the muscle going on. But the goal here is to simply show you exactly what we're going to be achieving and how that's going to help us. But if you look at that area just around the year, discipline public, just above the head of the horse, as far we have what they call the temporalis muscle. But if you look at animals like horses, there's no moisture causes alarm muscle. But if we look at cats, That's actually one of the most powerful muscle. Eventually look at junks like rules. That muscle unit powerful. But for now, in animals like horses that Lamaze causally the temporalis muscle, but instead more solutes around the head. You're going to realize that you don't pay so much attention to muscle when you look at the funky because as more skin coming because of all the fact underneath because muscles. But if you look at the profiles you prefer B has lots of majority. But as you can see from the front, what's emerged show you these are the eyes coming just indict socket. That is the island. They do come in the center of the eye socket just having enough space between the top and bottom. Then we do have an agent the bottom of the eye socket. That's the very principle when we look at things like the mass numbers of ability. But the goal here is for you to see that there's really not much of Muslim puzzle. But it's also a way to identify, know that because there's barely any marks or what new landmarks tonight used to identify why the packing on doing, for example, she see what I'm doing right here. That is actually because of the massive amounts of each line, or it's the muscle that comes and comes under the head and gives a certain kind of curvy shapes. And so when we come and look at the way the muscle Kansan also has a very interesting shape. Is bailing much muscle. Same. But just like the seller profile you earlier, we have a kind of Akami, frankly, just where we have the nozzle coming through. And that also contributes to the way we begin to see in those are the most venture firm altogether in the wisdom teeth are going to charity. So even the most visually doing our part to the other primary way, moving to the front view of the horse's head because there's more bold walking in his muscles being used. So prevented. So much detail here. Let's dive right into it and see if it's at kinda work to our advantage. And we can use. So just like we saw earlier, the masses were helping them screen is kinda intense in color. And these kinds of light and shadow patterns watch and you look at the frankly there's barely any evacuating on. So specifically being left to interpretation of representation means division. So you can see in the short-run, the parents into the guitar came perspective. And that's exactly what unchanged we do the show to bring it out in lithium little bit different. And try to bring up that Kim three-dimensionality. Because of particular course that we have chosen pecs than what we're seeing here. So put simply, we're not going to be doing so much glutenin, anything more than just a way lightened shadow. That's the handler was on the front view because there's not much, most of it goes on. But the goal is simple just to show you to look at the front view of the much mostly goes on. But it's also really interesting for us to understand. We'll look at the cows and the size of the heading levels. It's because of the Muslim Muslim Wilson, the temporalis muscle here doesn't do so much and we don't pay so much attention to it. But even a few months of the pollutants that come from the noise of a back-ends masseter muscle or the back edge of the head. There is not much then helping them to the front view. But it's also interesting Western really. Remember they are actually that and you're going to be seeing different horses in different ways. The MPF realizes those muscles actually visible. And some concepts, for example, feel, look at ancient horses. Horses that are used in places like Saudi Arabia. Usually those kinda courses have been being series of learned from the pointy parts for this kind of other horses or events. Events. For example, if you look at wholesome and draft horses, but skeletal muscle is very rare to see from the front.
5. Lesson 5: Drawing Facial Features : When it comes to drawing horse facial features, I usually like to break them down into shapes because that way it's easier for me to come down to the detail and down to Color and all those things. So when I'm drawing the host is, I usually, actually, I always draw cylinders first because that way it's easier for me to pay attention to three-dimensionality that walk in too much for it. Because, I mean, they follow a kind of roundness that's sending this provide. And so when I draw the cylinders, it's easier for me to use what I like to call subtraction and addition where necessary. Because it's subtraction, what you're doing is you are removing what you do not want. An addition you are ADI what you want. So the cylinder is a kind of boundaries that helped me know that I need to keep my shapes within this. And so all I have to do is remove the size of a dinner at once and keep this as a tyrant. And I do that using lines and angles to pay attention to detail. And so that way it's easier for me. And there's you can see one side or is a bit bigger. So I shrunk it down a bit. And so I put it all together and I get wonderful air. And when I came to this reference, web is a facing different directions. Same thing I began with. The cylinder is because that way it's easier for me to actually draw the ease and get a roundness without walk is so for the roundness because I mean, if you begin without, Is it true not for you to actually get roundness clearly, at least at one try when you begin a setting that is much easier for you to do that even when the E is facing in different directions. And if you look at the three-quarter view in this reference, you can tell that we can see the side for the E beta, the phone to the a. And same way we begin with the cylinders because that way we can achieve three-dimensionality easier without walking so hot for it. One of the OG to remember is when we begin with three-dimensional shapes and we just subtract them, we can actually achieve three-dimensional HE sooner then beginning with lines and angles. So what happens is I tried to do that. I began with the cylinders and then subtract them by using lines and angles within the cylinder is to draw out the shape that I want. That way it's easier for me to actually get something closer to reality than beginning with lions alone. And as you can see in this video, we are doing the very same thing. And we are trying to draw that is from the cylinders. And we are, one would say, get to three-dimensionality from the cylinders and ultramodern lines. And as you can see in this one goal was very happy that one ear is facing far away from the other. And we have the front view and the profile view. And so Festival, we begin a lot cylinders. And these cylinders help us know how exactly we are going to put the shapes and addition and subtraction as I call it. And see, if you see him, you drew outside the boundaries of the cylinder is that's what a cool addition because I'm saying. My cylinder is a ship, it's element. But the shape to tell Wundt is a bit outside the center of that. So I need to add boundaries. And if it's inside and try to subtract the edge of the cylinder to maintain that shape that we went argument ascend into action now something closer to reality. But when we move to the eyes, now, when you are drawing the eyes of 0 was, you need to pay attention to shapes. For big shapes, to smear the shapes. As you do that, it's easier for you to auction integral or not. That's true and to reality. And as you can see in this one, when we have a close-up, what we're trying to achieve is the eye of the horse. And what we're doing is we're beginning from bigger shapes. Paying attention to angle changes, paying attention to line relationships. Because if you know how the lining every lecture that we're going there, and if you know how the angle of that light Fx the angle of another light, it's much easier for each oxygen central line that pays attention to what is closer to reality that way usual the eye. And it looks actually more realistic. Then drawing it just got to know it. And so we pay attention to 9's angles, shapes. Same thing that applies here. Just like I told you in the beginning, that I or the horse has ridge and the skeleton and that has to be sure when you're looking at the eye from areas like this, the front view. And it's really important that you put the IBEC with a protrusion that way it's more more realistic than putting. It's a bit flat like a chicken xy that's closer to a face of the head than other animals like the host. So what happens is you can see how it began with the big shapes. And now I'm going down to the smaller shapes. That way it's easier for me to respond to the way angles are changing, to the way in lines are responding to each other. The relationship between lines, angles, and shapes is very important. And if you have been foyer from the beginning, you can actually tell that that's what we have been focusing on. Same thing applies to this one. And we look at the eye from the side view, which we call the profile view. There's not much to pay attention to here. All you have to know is the lines, angles, and the shapes. Just like you can see. I'm beginning with angle relationships. Then the shapes go down a bit. And so I pay attention to the way each one points to the other. That way it's easier for me to get more realistic then when we come to the muscle, I like to use squares or cubes depends on the direction and the angle in which the horse is facing. But in this one, as you can see, it's actually facing us. And so I tried to get the horse's muzzle with this cuboid in the right angle. I asked him defy the nose into a number six. That way it's easier for me to auction. It gets it. Now paying too much attention to detail. And so when I do that psychology, we have this thing called subtraction and addition. And so as I'm cutting it into the queue, I'm trying to get the right angle to see a relationship between the lines. Transplant attention to that, and make sure that I do not derive from the idea of actually capturing something closer to reality. And so just like a set, angles are important, the way line gelato each other and the wave shapes are put together. Ease what's good to give us realism at the end. And so when it comes to something like this one, well, we can see the top of the head and the side of the head. I begin with a cuboid. Because when I drew the Q point, just like I said, we benefit from a three-dimensionality we have walked for. So I, so I have done this when I drew the cuboid. It's easier for me to achieve three-dimensionality without doing too much work or an activity is fun or through the lines. And then boom, when I remove the cuboid, tuck in and looks like the nose, the mouth, the tongue of those. And so that's exactly what we're doing it. If you look at something that goes outside of the cuboid, that's what I like to call edition. If you look at something that's inside the cuboid. So it's, I like to call subtraction. Because just like sculptors, what we're doing is we're trying to use shapes to develop form. And so we're going to add and remove items. Eventually, we shall get what we're looking for. And in the profile view, very simple. We can only see one side of the head. And so we're going to use this shape, four-sided shape. That isn't the same angle has bad. And we're going to just cut through, use the lines that we need to get the shapes that we're making poor. And eventually we're going to have ourselves something close to reality. And just like I said, it loads and we simplify to number 6. And we'd like that communicators is something like this one where had the horses so excited. We can set the teeth and all that. We still begin with a simple shape, a four-sided shape, because that way it's easier for us to make sure that the muscle comes out the way we need it because it's a front view. We will obviously in the top and the top will not be affecting. Do I redraw the muzzle? And that's why we're getting this. And so as you can see, we are paying attention to the way the lines affect each other. And just like you see, I split this one into two halves. So that's equity tell 1.5 is where the teeth begin from and the other half is where the mouth actually ends. And so the tongue comes out a bit longer. I'm just like that.
6. Lesson 6: Putting It All Together - Head Sketches : In this video, we are going to look at putting everything together to draw a force heads. Now, in this one, I've split the head into three pots. And I'm using a three-dimensional shape, a cuboid. And as you can tell, I did it fast on the reference and then call the other side. I did the very same thing. It's important for you to realize that a broken it down into three parts. Identified landmarks where the eyes are going to be. An amazing cylinders to identify the ease. And just like that spandrel the limb and they look perfectly. And so for the second picture, as you can tell, the head is looking down towards us. And so we need to pay attention to the tilt. And as we draw a three-dimensional shape, we need to also be in respect of our perspective. And just as simple as that, identify the landmarks placed at things where they ought to be and there we are. And for the front view, as you can tell, I'm breaking it down into smaller shapes. They're different lines. That's amazing. Guidelines. And I'm placing them here just so the tech until where each feature should be and how each features gains have helped me identify other features and then putting all this together that to help me know exactly how to put everything together using my subtraction and addition technique to make sure that when I remove the lines, I can actually see an actual horse head. Now, as you can see, I'm drawing on the reference and I get back to drew on the other side. And all this is just for me to know what's in putting where I'm putting it in half each of this effect, the other, to make sure that I'm actually getting a good picture in the end. And as you can tell and put in the hair, Then I'm doing is in our cylinder just as we had been done before, because this helps us actually benefit from three-dimensionality that we worked so hard to achieve. And just moving on is that you can see the eyes inputs in light. And then the jaw is a bit on the other side and they wouldn't come to the muscle. You can tell that a museum holes that in some kind of number 6. But when it comes to the mouth, there's not much of a moth that you can see. And so we just put a few lines to just identify that and remove the guidelines. You can see it's the head of the horse. Now moving on to this one is very surprised horse, I'm using another kind of cuboid, but not this one. I'm paying attention to how the eyes line up to each other from both sides. And have that also lines up to the muzzle aids and hand-wringing on the reference and drain on the other side just so that you can tell that each of these is affecting the other to help us actually identify what the final shape is going to be electron. So the cylinders always help when it comes to drawing the B's. And so just like that, you can see that I'm putting the lines where they ought to be. And as I draw the reference, I come back to join this other side. And simply as that, identify what needs to be identified. And keeping the details that I need to keep a museum or a subtraction and addition approach. You can see that I'm making changes to the cuboid because this is not set in stone. This is simply a guideline to help you identify what you owe to put in the right place. Sorry. Okay. And the other okay. Okay.
7. Lesson 7: Drawing Demo - A Happy Horse In Color: So this happy horse, as you can see, this is the one that we drew way back in the video where we're putting everything together to draw the heads of the horses. And so in this one or no, I want you to have a look at sends. As you can see, the way that I'm actually going to further through this video is I'm just going to make this drawing from the other video a bit cleaner. After which I'm just going to use colors that I see a closer to reality than not, are closer to the reference. Now, Eulerian to do is do not pay so much attention detail. Because if you pay so much attention to detail, then that's a problem. Because the more detail you pay attention to and the closer you get to reference you, there's a sense of art. And that's really what we want to achieve. Plus paying too much attention to detail makes it even harder for you to actually get to painting them. And so what happens here is all I'm doing is just drawing the lines to make it a bit more polished, make it look a bit cleaner. And you can draw along with me. If you did the painting you again together, we can pull it out. So if you're working digitally and just make it a bit cleaner and forth through with me as I explore this journey of vSim color, burn the horse's head. Now, only need to know is a really important thing when it comes to drawing things like dramatic facial expressions like this is the colors are going to use. I'm not exactly what you're seeing in the reference per se, but they are just colors that look appropriate. Colors that are going to communicate what you're looking at without actually paying attention to reference directly. Because the mean is just going to make it a lot harder for you when you're drawing this. But what I can say is if you have the right brushes and if you are patient enough, you can get that. And as you can see, what I'm trying to do here is put more details where they should. They make them look a bit more realistic. Make things look a bit closer to the reference as possible. As I pay attention to the details that needs to be applied, know where the shadows are going to be placed. And that's why I'm actually shading in some areas because the shadows in those areas. And just like that, it's actually helping me communicate three-dimensionality of it. And if you can tell, we're getting closer to the reference with every stroke, with every mach end. Just like that. You're actually going to get there. As you can see, I'm just simply make him the right marks and our places, designing it up to make it look close enough to reality as possible. Making sure that I'm Mark where the shadows are, making sure that everything looks blue, it's uncomfortable and clean because eventually we are going to make sure that we're aware of plain tequila on another lab because we do not apply color on the map of the land joint, we have planned color on a layer below the line joy. That we can know where to give marks of a callous. And lots of fact are the marks that we're, when we're blending. It's even easier when we remove the line drawing and remain with the final painting. It's actually does look amazing. You can call it through a glue and draw together, or you can just watch it was I drew, but enjoy the rest of the video. As you see me explore several strategies and different ways to actually get this close enough to reference as possible. Hello. So okay. Hello. So okay. Hi. Thank you. Okay. Okay. The Roman Catholic Church. Okay. Hello. Hello.
8. Lesson 8: Drawing Demo - Horsa Lisa: Now, when it comes to drawing hosts that Lisa is I like to call. I begin with our cuboid because all I'm trying to do here, it's complete exaggeration. You know the features, you know how to use them. This is a three-quarter view. How do you make it look like a pretty fascinating, simple. You make sure that you adjust the features to respond to the angulation leaking out. And they fish expression you're trying to communicate. And then use simply make a beat. Cartoon towns here in that. And just like you can see, that's exactly what they've done. Their lips are pouting. The eyes, just like how Unix-like you can see one eye and you can see the edge of the other. Make the IRB has come out of it. And then just like that you have yourself a head of a horse that's pouting, which looks like a lady. And there's nothing else to house and back. And so I make a few changes, shrink down what you submit shrinked normal, I'm trying to say here is when you understand the head in a host, you can exaggerate it and you can change the way you want. You can do all kinds of characters where you want to do it. And at this point, allow me to enjoy this satisfying video of me during host Elisa. And if you have any questions, feel free to DM me. We'll talk about that later. Hi. Right. Hi. Hello. Hello. Okay. Okay. The weather. Hi. Hi. Okay. So to say hello. Hello. Okay. Right. Okay. Okay. Okay.
9. Lesson 9: Closing Thoughts: I wanted to say thank you so much for joining me on this journey to Joe horse heads. And by law, you have noticed that horses are not that hard to do actual. They are beautiful creatures with beautiful facial expressions and amazing attitudes. Unless you can tell passively. Anyways, I were to thank you so much for joining me this far. And I do believe that you can now draw horses regardless of the facial expression, regardless of the angle. And if you do not feel comfortable, you can always come back and watch the videos or DM me on Instagram and we can chat and see how to help each other. And I thank you so much for joining Emily's far, I do believe that's a field of Congress for you can do art like this. Or even better. You can use your own technique and cooperate anything from anywhere and put it all together to do art beautiful as these are actually seeing here. Or even better, I do believe that all it takes is determination and focus and you'll get there. So once again, thank you for joining me. See you in the next one. Cheers.
 Ken School Of Design, Digital Art