Transcripts
1. Lesson1: Introduction: Hi everyone. My name is Michael and I'll be your instructor for this class on how to draw horses. So mesial start by looking at the head of a horse. I'll do a bit of a recap on that and just talk about the different features and different method to draw the head and the finger look out for and how to put all these together. Whenever we are trying to draw the hand of a host, will go ahead to look at how to render that. And I'll be taking you through it that I always look out for. And just a few major themes to always pay attention to whenever you are trying to render horses. And that will then lead us into anatomy. And we'll go ahead and draw the muscles. And the host will be driven one muscle to time, just the major superficial muscles. And there is no rush. I believe this is because we are going to define everything that comes after that. Best on the understanding of the location of these muscles, have to make it into muscles. We shall go ahead and draw the front feet. And now we shall be using a beat and the non-literary I'm from the previous video, just to define what the front feet possibly look like. And we shall be doing a few front feet using different poses. And I'll be showing you why, uh, we used. And that's me in the beginning and how we can implement that very basic understanding of the different features and different muscles we looked at earlier to the host and how we can use all that just to help us understand how best to draw the horses and what always look out for. So doing a beta that will then go ahead and look at a few dynamic angles like this one. Now, the front feet inactivity look like and what oh, it look off for just if you want to render them quite well in a very believable kind of way. And that will then lead us into looking at the Blackfeet, which I'll be simplifying using different methods. And I'll know CBs and the very same understanding of anatomy just so we can understand exactly what's going on there and how to represent that. And we'll put all that together and draw this particular horse in action. And now the breaking down for you, just a few things that I believe can be of much help. Whenever we're drawing. Then we'll go ahead and render that. And we'll then the kids, something different, which is these horses, the draft horses, these very powerful machine candidate will be able to horses. And then we'll finish that by looking at Falls, which is young horses. And we'll see how those are constructed and what makes them different from the other would show horses. And if that sounds Lexend be interested in. See you on the other side.
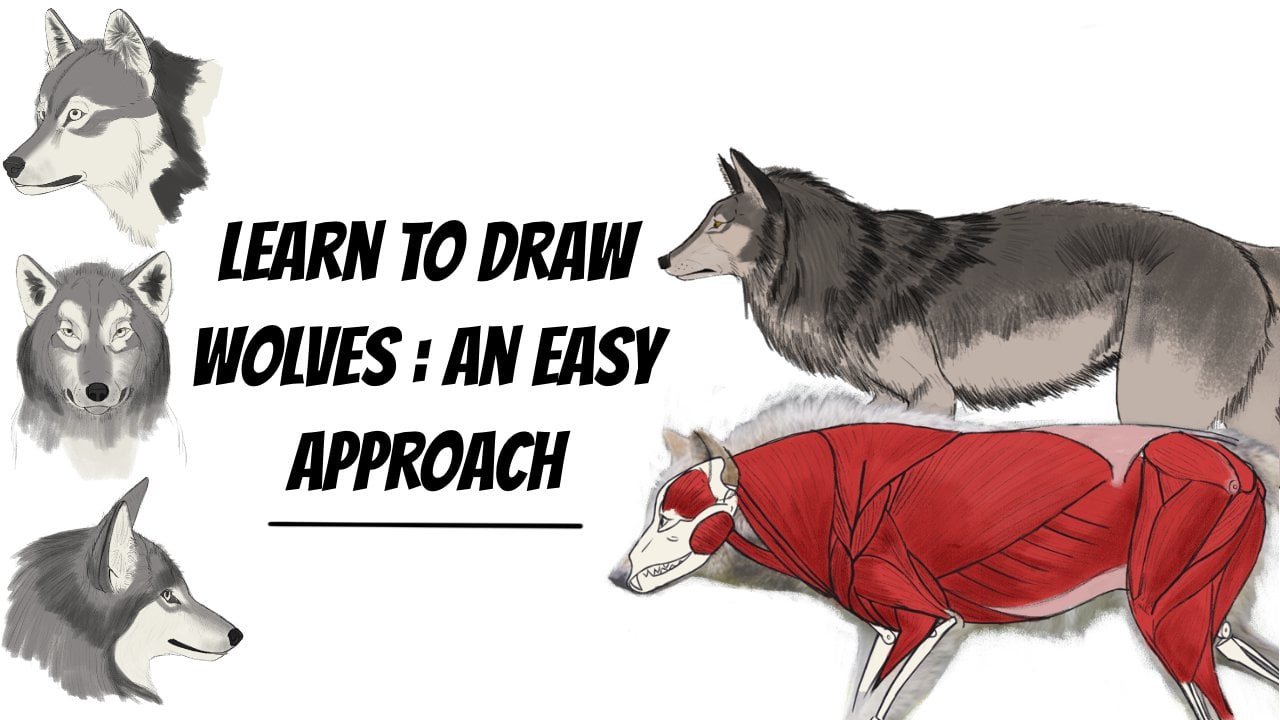
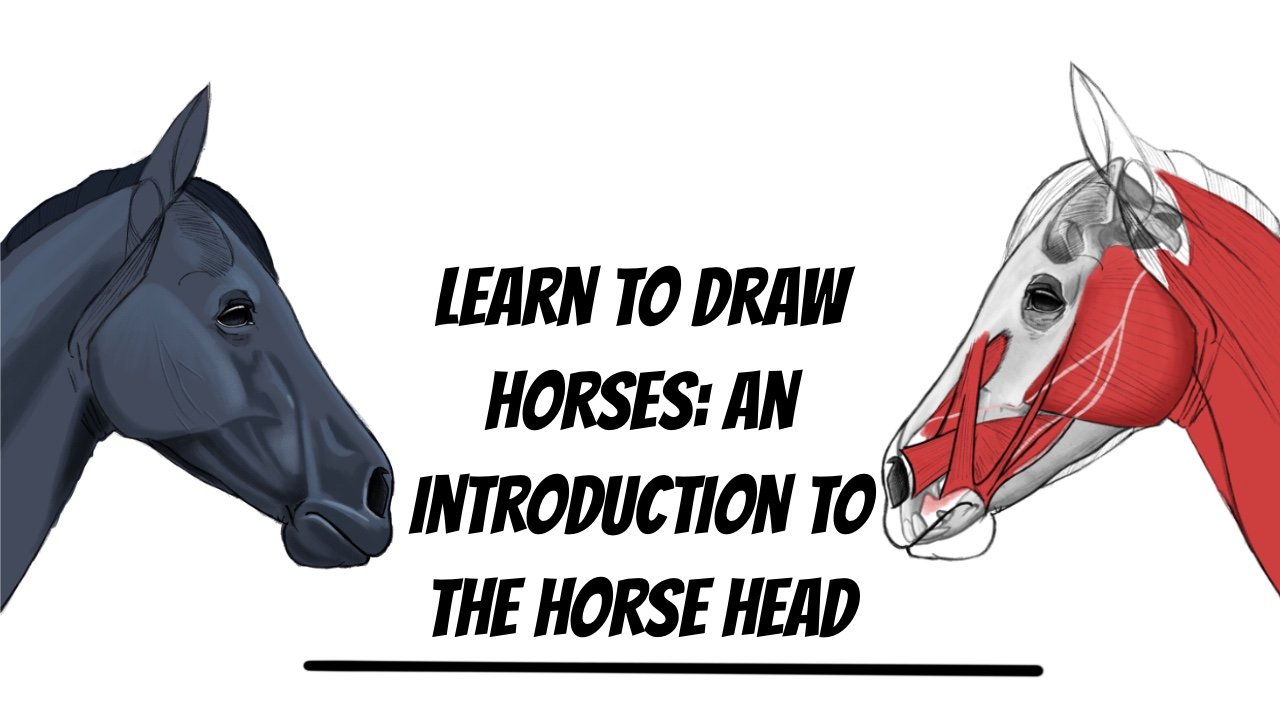
2. Lesson 2: Head Recap: So in this video, we are going to be looking at the horse's head and I'll be recovering from the previous content we went through why? Looking at the horse's head in the course, we did the horse's head. So generally what I can say about the head is when we look at the profile view, that's where a lot of work is happening. Especially when you look at the major muscles of the profile view, such as the masseter muscle that we're looking at right now. It is one of the most significant landmarks on the head of a horse. And it's actually really useful when we are drawing the head from the profile view. So it was nice of you just to remember where the muscles are and whether begin from and how they contribute to Austria in the head completely. So the profile view does have the most activity is compared to the rest of the V's. And it's also important to wash just to make sure that we remember the most significant landmarks in a profile view and how to use these. For example, we will look at the masseter muscle. You see where it ends on which starts from. So it's nice if you remember where that is and how we can use this to our advantage whenever we're drawing the horse's head from different angles. And if we look at how to draw the eye, it's always going to be several planes being included, having the three planes at the top and two planes at the bottom. So it's always nice advice just to make sure we identify that under the horse's head that way, when you get a more realistic effect. And it's even better whenever we are joined. To always identify that and always include that whenever we are looking at the IO hose and when you look at the muscle, when we look at the nostrils, It's a very interesting kind of shape that looks like a number six. So it's a nice vastus to show that as well. So I'm just going to go through a couple of things that just can help us understand a basic interpretation of what exactly we can do whenever we're looking at the head. But if you want to get to be more detail, you can go check out that class where we looked at the head in detail. Because now this one is going to be specifically about the rest of the body. And we're only paying too much attention to the head. So moving on, you can really tell that I'm trying to leverage and the muscles underneath the skin to identify exactly what the rest of the head should look like. So as you can see here, the several muscles that we have indicated just right there around the head. And these are the muscles that are between the I and the nostril. And they collect the muscle to the skull. And all of this is just supposed to help in the movement of the muscle to carry out activities like mastication, or just simply to make expressions or mix sound. So all these muscles are just really useful for us to identify because when we are trying to shed and apply Karla, we shall be applying kinda best and the effect these muscles have on the rest of the skin. So it's always nice vastus to know where these muscles are exactly. So I'm just going to go ahead and indicate these muscles. As you can see here. These are significant muscles that we need to just keep in mind and use whenever that time comes for shading and a playing card on the rest of the body. So this obliged to whichever medium is, and now you do not have to always draw the muscles. But a basic understanding of these muscles is important. Because even if we look at our reference image and our left, you can actually tell that these muscles are that. And you can really see that we're trying to use these muscles just to make sure that we have a very realistic effect on the catalog the skin, and how the rest of the body will look like. So for example, if we look at the reference image and our left and you see between the muscle and the masseter muscle, you can really tell that there's a sense of shadow being caused by the muscles just right there. So it's always nice just to make sure we know exactly what's causing this shadow. Such that even when we go ahead to draw the rest of the body and draw the rest of the head. We exactly carry an understanding of how muscles affect light and how light responds to movement and change. And plains, especially when it's called by muscles. So as you can see here, that's exactly what I'm trying to explain. And with the rest of the head, you can really tell that this is exactly what's been going on. Now Jim, just going to go ahead and clean that up and then add a bit more detail to the muscles. And we can now move on to look at more detail, especially when it comes to coloring the rest of the head. But only know. It's always nice if you just to make sure you carry an understanding of the muscles that are underneath and how to use these muscles to get a more realistic effect. For example, you can really tell that we have in our neck muscles coming in just right there underneath the ear. And it's just nice of us to pay attention to that as well. So you can really see this. I'm trying to clean up all this. And I do like what this looks like because now you can actually get a really decent impression of the mouth of a horse, the head of a horse coming together. And basically just a real interpretation of what the head of the horse will look like. Now, the profile view in the three-quarter view, you do have a lot of activity as compared to all the other views. But we're going to go through only the profile, the profile view. And the front view for this one. So as you can see, I'm trying to apply a little bit of blood vessels that because even the blood vessels to play a very significant role when it comes to the shading and the realistic effect when you are trying to look at the head. So now we're trying to color in the muscle because now at this point is where yes, you actually start to see the head come together more realistically and the muscles do play a big role. Now, fluted gets a very decent representation of the body. I'm going to go ahead and just apply Carlo and the head. And then as you can see now just trying to clean up the edges and refine the lines. And now we can have the musculature applied. And we can now see how we can use that to make a very decentered presentation of the rest of the head. So I've just made it a more lighter and then have a predator on the layer above it, which now I can use to see what's underneath. And now I can influence the coloring best in that analogy can tell, been turned supply base of shadow just where the muscles are. Just to give us that very realistic impression of exactly what happened whenever we're looking at this kind of color and how we can use that to make sure that we get a very realistic impression of the reference image. And as you can tell everything speaking, it's well itself together quite well. And That's exactly what we're trying to focus on and achieve. Surge streams, apply bits of highlight and make everything as decent as we can possibly make it. And this is just a very generic interpretation of what the head should look like. Because you can really tell this is very far from our reference. But the goal here is for you to just see what the possibilities are and how to leverage them as possibilities to get a very decent representation of the reference. And if you want to get a bit more detail, you can always check out that class where we looked at the head of the horse. And you can find a bit more detail and how exactly we go about each particular view, and even how to manipulate facial expressions when it comes to horses. And here you can really see that some turn to refine the colors, clean up the edges and gets a very decent representation of the reference. And that's exactly what's going on. But you can really see how the muscle understanding gives us a very realistic representation of what we see underneath and how we can use this to leverage on exactly how to give her a very decent representation of the reference. Now when you look at this particular view, the front view, there's not much that goes on in the front view because most of what you're seeing is actually bone. So when it comes to the front view, what we tried to focus on is how exactly can we represent what we're seeing without giving us a very complicated time? So you see here me doing is unrestrained. Go ahead and apply the eyes as you can tell. And we intend to put the, is an amazing a symmetry drawing assist because not much changes if you look at the front view and as you can see just underneath the either, swear we have the masseter muscles that we saw earlier. And most of what you see at the front tree is actually a bone. So when we go so much into detail on how to draw that, but you can really tell that if you pay attention to what the rest of the water looked at, the rest of the head looks like. You can get yourself a very decent representation of the head. And important to remember is the fact that when you are drawing the head from the front view, the most important asset that you actually have is an understanding of karma. And without saying, I will see you in the next video.
3. Lesson 3: Muscles of the Horse: So we're going to go ahead and look at the major muscles of a host. The reason we were looking at these muscles is because they are very useful muscles in understanding how to draw the host. And you realize that when we are looking at the different parts of the horse's body. So now we're going to look at the major muscles. And as you can see industry in two points, a simple indication of the masseter muscle, like we saw earlier. It's a very powerful muscle they use for chewing. So it's always nice if you consider including that one. So as you can tell, I'm just going to give a very decent indication about muscle that. And we'll just get into the biggest stuff. For example, now we're going to be looking at the neck muscles and the muscle we're actually trying to draw right now is once the coal, the brachiocephalic is muscle. It's a very powerful neck muscle that helps in the movement of the head. Now, the muscle here, this brachial muscle, it's very important that we look at it because now when we are drawing the, the muscles and we're looking at the head and different angles. For example, if you look at the pectoralis muscle and the pectoralis muscle and this one work. It's very interesting when you see, for example, fun to use of the horse or when you drain the host and perspective. These are the kinda muscles that's again to help. So it's always most of us to pay attention to those. And now, when you go ahead and see that just right below the brachiocephalic as muscle is where we find the Anterior pectoralis. Now, we'll be looking at that later, but I'm just going to go ahead and kinda here in the brachial muscle just for shorts, brachial muscle year. Right below it, just right under the neck is where we have the 10 or cephalic as muscle. I'm going to share with you labeled shot with this. So you can always go through and compare with me and see where we all whenever we are drawing. But it's a very interesting muscles. You didn't have to remember all the names. But what I'm trying to say here is, is a muscles that, again, to help us draw it much easily. Because if there's something that observation can't offer, then an understanding of anatomy always helps to fill in those gaps. And that's the reason why we study in that's me. Because observation can only go as much and go as far. But then anatomy can take an extra step to define for you what observation can't offer. So that's exactly why we do the things we do. So this muscle that you see here right just below the brachial muscle, as I said earlier, is what we call the stone ossify like as muscle and just write that of Coumadin. And now right above them, which insurance to indicate that is what we call the trapezius muscle. Now this is a very powerful back muscle that's I usually use when drawing different horses, even actually animals that are in general. In this kind of pause, usually the trapezius muscle is very useful mostly in helping us define those. And it's a very powerful muscle that controls the back and neck, connects the two and makes walk a whole lot easier for this. We also have the trapezius muscle, No back, and it connects to our neck as well. So comparative anatomy is also very useful. We can always look at that later time, but for now, take you through the basic muscles. So this here is the trapezius muscle. And it's very helpful and very useful when we're looking at the movement of the neck. And we were looking at different animals. Looking at these muscles just helps us define planes much easily. And right between the trapezius muscle and the brachial muscle is where we have the serratus, which is that muscle right between the brachial and the trapezius. Then above it that we have the splenius muscle, which connects right to the back of the head. And just write below that, as you can see as indicating now is where we have several muscles. Actually, we have the deltoids below the trapezius muscles. In red below that is where we have the triceps, which is the two separations that you have seen me indicator web there. And as you see in just a plain lines to indicate the direction of the fiber of the muscles. Not that is where we have the trapezius. Triceps. Yes. So that's why we have the tricep muscles and it's always nice to just put those there. So right above the triceps though we have a deltoids. So we're just like that and growing their head to indicate those. And let me just color that in just to get us off the surface as well. Now the reason why I'm living in those several spaces between the muscles is because something bad that we call facial nerve. The facial is like a white sheet of fiber or tissue that just helps with connecting muscles to bones and muscles, the muscles. So it is very useful thing. So you can actually see gets right through the triceps just that it's in the delta is and the triceps. And it's something very important to indicate. Now, going to go ahead and we're going to just look at what happens right below the triceps and I'll just write that. But a lot of the triceps where we have the flexors and extensors. Now these are going to be very useful muscles when we are drawing the feet of the horse. So we usually use this just to define. Fractions and the angles that we are choosing and the directions. For example, if you look at the front view of a horse's feet, always be very careful when your brain that because now observation can get you only as much and it can get only as far. But now we know that the extensors and flexors are what control the feet, then we can get to much more representational dagger of the feet. So it's always really nice to pay attention to those. So that's where we have the flexors and extensors. Just write that. Very interesting things to pay attention to. They also have a couple of facial indications, wretch around back. So as you can see, just right next to the triceps, base, something that to indicate as well. And that's always nice of us to pay attention to that because this is something very nice. I mean, anyone that knows anatomy knowledge that they cannot stop studying anatomy because there's that sense of excitement and the bragging rights that come with knowing stuff. So just moving on here, I wanted to show you the pectoralis muscles, not from the front. These pectoralis muscles come all the way to the box. So it's always nice to Western indicate those. But now we're just wanted to show you these muscles here from here, just so that you can tell what exactly goes on the front, not the picture I listen. A pectoralis look like. And just on this side you see those muscles I was telling you about earlier that that's where we have the bronchial muscles coming all the way. But coming back to this, let's just go ahead and indicate what the posterior pectoralis look like because they stretch all the way to the back, try below that. And then we can have these other muscles come through. Now that muscle we're going to draw just that is what we call the latissimus dorsi, the beak of back muscle. The reason why we call it bigger back muscle is it's actually the largest muscle in many mammals actually it's even the largest muscle, no body as humans. So it covers the rest of the back. Very interesting muscle to look at. So it's also a very decent landmark when we're drawing any animal that actually walks on four legs. And just read below the latissimus is where we have the intercostal muscles just right above the ribs and indicating that it's also really useful. Because now this is more than just an indication of the muscles you'll note. This is a landmark that you can actually use. One observation has failed to help you achieve what you're trying to express, even when you're trying to draw from imagination. These are the kinda stuff that you can always look ought to achieve and use. And that's why we study anatomy such that you can get to go beyond what we're seeing actually produce a lot more than what we're seeing. Which is very interesting. Any kind of drawing them as they're formed by anatomy is just a very pleasant thing to look at. And you do not need to remember all the names. What is important is you know, where these muscles are located. Because if you are able to locate those muscles, then just trust me, it's a whole lot easier for you to draw. And you can always come back and reflect on these diagrams in this charts and see how to compare every different feature and how to use every different feature to achieve each particular detail that you went into achieve. But as you can really see here, I'm going to shrink to apply the lines just at the intercostal muscles, just to show the direction of the muscles. And the fiber just around that and indicates everything just to make them look decent. But I do like what I'm seeing. This is actually showing that we're heading into the right direction. Which is a really good thing. Considering the kind of detail that we want to pay attention to when we're drawing the rest of the body of the host. And yeah, I do like what I'm seeing. Now. When we just get right above the intercostals, we have the pelvis, of course. And right around that is where they sever details The pay attention to. But we shall get to those when the time comes. Let me just go ahead and finish the refinements of these lines to surround the intercostals, then we shall get into detail with the rest. But it's always nice if you just to indicate the direction of these Muslim because it just gives you an understanding of exactly what's going on. I mean, you feel like you know what you're doing. Which is I realize for links, let us go ahead and add a bit of kinda that. But let us, and most muscle, now we have obese aphasia that comes through as well. And that facial run the latissimus heads all the way to the back of the trapezius, which is something we didn't nice to indicate as well, will come in and do that. So as you can see, I'm just colored in the posterior pectoralis. The muscles we see at the intercausal and then the letters and those muscles. Now I think we can go ahead and play a bit more detail at the back where we have more muscles to look at. Now the muscles of the back actually help us when we're doing the horse, when it's an action as well, in that kind of angle. So just around that, like I said, on the pelvis, we have more facial coming through. The phase shift from that comes all the way to the latissimus dorsi. Then it comes all the way down to the abdomen where we have B calories. Well, we have the intercostal muscles. And then it can also go all the way to the trapezius muscle, like I said. So indicating all of this is very useful. And that's exactly what you see us doing right now. We're just trying to indicate those muscles and the fascia that's comes back. So facially just like us, Theta is just a thin sheet that covers muscles connect muscles are the muscles connects bones, muscles. So it's just a very decent tissue to remember, but is that, but when we're using a beats aphasia in our drawings, just really good to know that it's that. But humans also have facial, so it's common everywhere. And as you can see here, just how to go ahead and refine the coronas that because I'm just trying to make sure that the facial pilot does not affect the color of the horse and it doesn't confuse you when you're seeing it. So maybe it's a refinement went into works that I do my quartz everything looks like as we continue because now I want to make sure that I establish a simple understanding of the most secure mature of the host, such that when we explore the rest of the features and the rest of the videos, you know that this has been informed by an understanding of anatomy and a decent interpretation of observation that we employ represent what you see. Then if you just went to new observation. And that's amines meant to amplify, watchful eyes can see. And it's just very interesting tool to have in your toolbox as an artist. That's why we study anatomy. Plus it's exciting and interesting. You mean if you study anatomy of horses and study anatomy of any other animal, you will not stop studying anatomy. For some reason you'll end up studying human anatomy. Unless you get into human anatomy, you will never stop having fun. And that's only just an exciting topic. If you ever get the chance, you should consider that as something to pay attention to. And because we have a lifetime together, we can always or the anatomical understanding of different animals and we can have fun like that. But coming back to the drawing, you can really see that the facial has covered up the rest of the top. Just write that as we saved. It has a Beta of contribution to the literature and Westlaw psi. And they do Like what that looks like. And just above the trapezius muscles they as well. And you can really see that I'm trying to apply a bit of shadow to the other muscles just to give them a beats of dimensionality and perspective. Which is a very good thing. I mean, it's nice invested. Just have a bit of shadow there with the muscles. At best. So as you can see around the triceps are on the muscles, we see the intercostal. So it's just a very good thing to have in general. So as you can see, I'm trying to imply that that and it's a good thing and I'm quite happy with what we have done so far. And if you can remember the names of the muscles, that's amazing. If you cannot do foil, all we need is for you to remember where these muscles are located. Because if you know where the muscles are located, then it's much easier if we go ahead and improvable It muscles and go ahead and add all the details that need to be added. Which is very interesting because now when we add all the detail, then walk becomes a whole lot easier for us when we are establishing this in their drawings. For example, when we are drawing draft horses, we shall no, no. What exactly is amplified and what do we manipulate? And moving on, if we look at the back muscles that we're joined, just what that food. We have, the superficial gluteal muscles. Then right next to them is where you see the semitendinosus, then the biceps. Now, interestingly, they have biceps at the back. So those are the biceps, femoris. Biceps. We just pure meaning it's more than one bicep. And that's why we have biceps. And so I'm just going to go ahead and indicate those. And you're going to realize there's going to be very powerful contributors to the way we shall be drawing the back of the horse's feet and horses in action. Basically, there are some horses where Visa more significant than in others. So it's always nice if you just know what you're looking at. For example, in draft horses, you can really tell them with secular child the horse, which is a very cool to look at. And it's going to go ahead and refine those which are lined with fibers just until the direction of the muscle. And just make everything that could be more professional basic. And as you can see, I'm really happy with where this is headed. And it looks decent. So that's a very good thing. Let's just go ahead and clean that up a bit and a bit more over to Sharon that. So that's why we have the tensor fascia latae, the Ts, the TFL as they call them. We also have the TFL, which is right next to argue to your muscles or to warn the hip. So it's very interesting thing to look at as well. When, when you were understand anatomy of humans and anatomy of animals, you realize that we have the same muscles but in different cases, which is really cool. So you can see him skin to go ahead and kinda Latin. And you have a labeled image of this muscles in the resources section. So you can go ahead and just explore that and look at it as redraw these. And you can get yourself a horse image. I'll also provide this particular image. And if you want to trace along, then that's cool. If you're lucky to make your own tracing even better. Because I mean, it's just really exciting to know that you know, the muscles underneath the skin, such that when we come and apply the rest of the skin, you know exactly what you're doing and how all of this contributes to stack. We see it in the head. Demonstrations I layer. The reason why we know muscles is because muscles, the way we shared and apply color. Because now con law is just a contributor to a defining what is underneath. And so if you know exactly how the muscles forward and it's much easier for you to explain how to color the rest and how to render the rest of it. And as you can see that we have the flexors and extensors also drawn in. And the rest of it is just going to be facial. And like we said earlier. So we're just going to go ahead and refine that. And then just put a bit of Canada that makes sense in the flexors. Go ahead and add a bit more lines just to define the fiber directions and basically the general interpretation of what the muscle aches like to make it a bit more professional and closer to reality or more believable, as we like to call it. It just basically like what I'm seeing. And this is what it looks like when we apply shadows and multiply and another layer. With going back to this, we realized that I'm just trying to improve everything that I'm seeing. And Adobe to facial, they're now getting a kind of aphasia is a bit tricky because Felicia is not white, but then it looks a bit quite so. English representation of just to get you to understand exactly what's going on there. So it's going to be a couple of turns, but eventually you get the point. We're trying to represent facial. And we shall be adding a bit of shadow there just to make it look like it's facial. But a shadow in order to give it a sense of dimension. So it will take a couple of tunes, but eventually you'll get, You get the point 1, 0 wanted you to do is understand exactly what's going on here. And if you know exactly what's going on here, then you can apply this in the several drawings we shall be seeing in the next videos. Because we're going to pay a lot of attention to are playing what we have learnt here during the rest. And that is going to be more interesting because now if you know that you are applying your knowledge of anatomy to actual drawings, it's much easier for you to remember what you have been involved in and what you have been drawing. And in general, I do like what this looks like. And I'm hoping you can get yourself an art piece or a horse or any kind of representation of horses. And also do an anatomy tracing over it just to get to remember these muscles and how to use them. And I think we can leave it at this.
4. Lesson 4: Front Feet: The feet from the front view, what's I always start to focus on is exactly how the muscles relate to how we can really represent what we're seeing. Soon as you can see from our reference image and I left, we're looking at a very dynamic angle, having the head tilted downward. We have the feet folded, and then we have a very decent representation actually do macro emptying. So here we're trying to manipulate exactly what the muscles are going to be doing underneath the skin and how we can actually play around with these just to make sure that what ends up coming out of what we're drawing is actually a very decent representation of the reference and something close enough to reality. So as you can see here, we have a very good impression of what the extensors and the tensors look like on this foot that we see right closer to the front. And then when you look at the foot and the other side, you can really see that the same muscles, the extensors and the fluxes actually apparent as well. So awesome. Trying to do here is just make sure that a leveraging the understanding of what these distances look like and look at how these muscles can also be used just to give us a very decent representation of what we're seeing. But the goal is just to make sure that we understand that when we look at the muscles that we saw earlier, that can actually help us get a very accurate representation of what we're seeing in the reference best and network and actually get ourselves close enough to the reference as possible. And also gets a very decent representation of what we're trying to achieve. For example, if you look at the distance between the folded foot closer to us at the front, and then the distance between the hoof of the second foot and that point, you really tell that there's a center relationship that is important for us to establish and in an inch to ensure that we actually get a very decent representation of that as well whenever we're looking at this kind of poses. So it's always nice to vouchers to make sure that we compare length, compare distances, and use that to our advantage just to make sure that we get a very decent representation of the reference. And as you can tell, we are getting close enough to that. And after several trials, we can actually see that something decent is coming out of what we tried from the very beginning. So you can really tell it some trend to just apply a few marks, the edges that represent what the reference looks like. And just to represent exactly what we're seeing there. And general and do like what that looks like. So just after that, it gets into another lab and just try the very same thing. Just cleaning up the lines and cleaning up the edges. Just to ensure that we can actually see something decent. And we can actually clean up what we saw earlier as a rough sketch. So the most important thing to identify here is the triceps actually did help us get a very decent shape of the arm there. And then the extensors and flexors also helped us contribute to getting very fair presentation of how that stretches out before it folds. So I'm just going to go ahead and apply bits of Canada. And then, and so it's nice just to identify the kind of highlights that contribute to getting a very decent representation of the reference. Even after applying the kinda that you actually have some interviewees in, it's very basic color just to give you an impression we exactly to focus on. And exactly how that can help you get a very decent illustration of a reference. So now this is where we apply a bit of Canada in shadow just to make sure that we know exactly how we are trying to represent what we're seeing. So even if you look at the shadows that we're seeing in the reference image, is actually being caused by the way the muscles of folding and how the muscles are relaxing and contracting. So just getting a basic understanding of which muscles are contracting and relaxing, really do realize that it helps you get a much more realistic effect when you are looking at the feet. And General. Soon as you can see here, we've actually come far enough to actually say that this is a very decent representation of what we're seeing in the reference. And we're just going to go ahead and clean that up a bit more color in the right places, refine the lines and just move ahead there as well. And as you can see, I'm just cleaning up there with a bit more Cannon who's coming back up. And in January you can already see that the fetal coming together because of our basic understanding. Even if you look away, the pectoralis muscles are just right there next to the head, just in front of us. Can really tell that that kind of volume of muscle also helps us when we're looking at where to put the head and how exactly to may call this a bit realistic. So with a bit more highlight, you can really tell that that came out quite well. And now when we look at this particular on, this is a very decent representation of what a trot would look like. And now this one, you can really tell it the muscles that are coming into play are the pectoralis muscles, the triceps. Then we have the extensors and flexors. So it's always nice if we just don't know exactly how to manipulate whichever muscles that you're going to be playing with. And you're going to be involved with yours to make sure that whatever you come up with is something you are comfortable with. So as you can see here, I just made sure that when it comes to the triceps, the flexors and extensors, we get ourselves a very decent representation of what that could look like. And now when you see me play around with the pectoralis muscle right there and assurance to make sure I get that very decent beginning of what the second foot would look like. Then we can now include its own extensors and flexors, just wipe that. And then we can just have that foot come out quite well. So it's very important to us just to make sure that we are clear exactly what we're looking for and how we can play around with these just to get us a very decent representation of the reference image and get us close enough to what we're looking for. And this is something decent enough. I can agree. So after looking at that, then we can now go ahead and clean up the lines like we did earlier, refine the edges. And then we can just come back and play around with it and gets us something cool enough to keep and apply color to just to give us very decent representation of a reference image. But in general, what I'm trying to say here is, the more you understand the candidates that come into play, the more you understand the muscles that are involved in flexion. And the more you pay attention to lines and angles, the easier it's going to be for you to draw these because it's all about knowing what's going on. And the more you know what's going on, the easier it is for you to draw what's going on. And that way you get closer to exactly what you want to achieve. So as you can see here, the lines of come close enough. And now we can go ahead and apply bit of color there just to make sure that we get that off the surface and just give it a very digital presentation. Now, Canada is a bit of a topic for another time. But what's amazing this California, just for you to get a very basic interpretation of exactly what to look out for and just to make sure that you understand what we're talking about. But when it comes to kinda horses have all sorts of condos and all sorts of patents, which I find very amazing. So moving on here and can really see this interest turn to apply the shadows where they should be and the strength to make sure that all the pieces itself together to give us a very decent representation of what's going on with the muscles as well. And as you can tell, what we have, right, That is something close enough to the reference. And that's exactly what like what we are focusing on achieving believable as we can get it as much as we can look forward to getting. So we should not fret and show it. I'm happy with I'm seeing. And it's coming together quite well. And it's at this point that we consider just refining the edges and looking at where highlight should be applied. Just to get that to pop a bit more. But with this, it's actually gets enclosed. So just applying a bit more highlight, just in a few areas, just to see what that could possibly look like. And in general, I'm happy with I'm seeing. And now this gives a very basic understanding of why it's important to look out for the muscles. And when we come to this one, well, this is a very interesting shape. So it's a very interesting angle as well. So when you joined this angle, what I tried to begin with is a particular triangle like this one. Just to give us an impression of exactly what's going on at the front. Then we can go ahead and apply the pectoralis muscles like we saw earlier. And then we can bring in the triceps one-foot and the triceps of another foot. And then we can get ourselves a very decent representation. So as you can see after playing the triceps that you went ahead to apply the extensor muscles. Just write that as well. So it's just very nice of us to make sure that we identify that. And now when we come to supply the rest of the foot, realize that it's much easier because of the foreshortening and our impression of the muscle that we use that and just the lines that we use basically, when you break this down into a couple of muscles and a couple of shapes. And you know exactly what's going on. If find it a whole lot easier for you to achieve what is seeing. And that's exactly what we've been given there. And then when we come to the other fluids again, we cannot see very much activity of the triceps, but at least we can see the extensors and the flexor muscles playing the other foot. So it's always nice versus to make sure that we come in and take advantage of what we've seen as well. And use that to our advantage to make sure that we get a very decent representation in the reference image. And as you can tell, that's exactly what I'm doing, will shrink to come in with that particular movement of the muscles. And my knowledge of what's going on. And just applying it to what, some scene. And then during the rest of the foot just because of that. And you can agree that this is actually come together quite well and is exactly what we use whenever we are drawing the horse from, let's say, a front view or from a three-quarter view. It's always nice if we just to begin with that particular Diamond kind of shape, that triangle ledges competent the edges. It just helps you identify exactly the orientation we're looking at. An unmixed walk, a whole lot easier for you. And as you can tell here, everything has come together quite well. And we have ourselves a decent representation to the reference image. At this point that we know decided to go ahead and clean up the edges and refine the lines that we want to keep. And those are Wieden not want we can leave out. But at this very point, we now just go ahead and clean this up, make it a bit clearer. Gets it to be a bit, a bit much realistic, or get it closer to what we want to see or what we are seeing. And just as we clean up the lines, you can really see that the muscles that we talked about earlier that comes from the pectoralis or the way through the neck to the head. Also vary significantly visible in this particular was. So it's always massively just to make sure that we identify all these details and play with them just to make us have a very decentered presentation of what we've seen. And as you can see here, we have cleaned up the lines and everything looks good. Now we can apply color just to get that off the surface and make it pop a bit. But you can really tell that with what we're doing now, we are getting ourselves closer to what a horse should look like. And we are actually using our knowledge of the muscles to actually play around with this and manipulated into making sure that we have a very decent representation of the reference image and a very accurate image of that. And in general, I'm really happy. Watch them seem just going ahead to play around with what the shadow should look like. And in general, just trying to make this look decent. So we won't be going into too much detail as to how to shed. But what I'm trying to say here is whenever you look at the muscles and whenever you look at the horses, it's always nice if you just don't know exactly what's going on. Because that way to be a whole lot easier for you to illustrate that. And the closer you get to that, then the easier it is for you to draw horses. And that's exactly what I'm trying to promote right here. Susie can see industrial to go ahead and apply a bit of a lighter shade, some sort of highlight in the right places just to get that off the ground as well. And just to make you see exactly what's going on a bit more. But in general, I'm happy what I'm seeing. And that's exactly what we're trying to achieve that and that's it. See you in the next video.
5. Lesson 5: Hind Feet: So when it comes to the hind view of the feet, It's a nice heavy just to also learn now to represent this Peston. Several shapes and several muscles. And so an understanding of exactly what the muscles do is also very important. So this one, I'm just going to make sure that the space between the features a bit smaller. And I'm just going to make all this come through quite decently. So as you can tell it, the back we looked at the biceps, I layer. And so it's always nice if you Justin exactly where those are. And then you can also see that the extensors of the back feet also coming into play just to help us write that. And when you look at where the tailors, which can short-term out of it. But if you look at what the other food does when it comes together, very interestingly, you can really tell that all these muscles that we have been looking at actually very clear here and actually can help us with this, this line. It's actually a very decent smooth line coming all the way from the top. So it's always nice if you just remember that because it makes a whole lot easier. So as you can see here, we are leveraging our understanding of the muscles as well. Because it just makes walk a whole lot easier for us even when we're trained to define what this does look like. So as you can see him return to compare lengths as well, because that also helps. And now when we come to the other side and also just trying to make sure that all of that comes together quite well as well. But you can really see that by leveraging on our knowledge of what the muscles look like, things actually a piece of themselves together quite well. And you can see where the extensors begin from this router. We have the cartilage coming in from the edge and then come to connection that you see. Now, what I'm doing here is just leveraging on my knowledge of what the anatomy looks like to define for me what I'm not seeing because, well, we can see the Taylor's cover that area. But with this basic representation, it looks like it's not so by the representation. But yeah, it is quite decent. Soon as you can see that. And the stranger formula does when it comes all the way to the bottom. But everything is presenting itself together quite well. And this is also because of our understanding of the anatomy. So we cannot escape knowing what muscles are doing underneath the skin. Because that is just supposed to help us draw things a whole lot easier in general. So as you can see, I'm just going to refine the lines because I forget hours a bit of a bit, but you can really tell it. Even with all this going on, everything is just coming together to give us basic understanding of what the horse's back feet look like. And that's exactly what we're trying to focus on. If we can get something close enough, then we are better than not wear. And that's exactly what I'm trying to represent. And in general, I do like what that looks like. And if you can see, we can now go ahead and just clean up the lines. And basically you can really tell that our knowledge of the muscles underneath is one of the tools that we're leveraging to make sure that what we're drawing is close enough to the reference and realistic enough for us to be comfortable with. And that's exactly what we want to focus on for this one. And as you can see it, so it nice advisors to indicate those muscles and just to understand where they are and how they flex, and how they fold and all that stuff. Because now when we are shading, It's the muscle activity that's going to help us represent exactly what the reference looks like. Which makes it very important to us to exactly Korean understanding of what's going on. And be very careful with that because now if we do that very carelessly, then we are going to be doing something else completely. But if we carefully formed through and what we're seeing, then we are going to get ourselves very decentered presentation at the reference, which is by all means what we're trying to focus on for this one. And in general, you can also look at this particular shape. I do like using most of the time. It just helps you also fit the feet within very decent shape. And then now it's much easier for you just to pull through and cut through the shape. And all of a sudden you have a substance very good looking back feet. But it's always massively also to carry an understanding of the muscles because even using these shapes, it comes with a knowledge of the muscles that you're playing with. So which means go ahead and apply bits of Canada and just refine the edges is defined by the dark areas are where the light areas are, come up with a bit of shadow there. And basically just represent what we're seeing decently enough for us to carry an understanding of exactly what to look out for, but never return back feet. But what I'm trying to say here is always be very careful when you're playing with this kind of representations. Because if you do not pay attention to the muscles that you are seeing in the reference. Then at least know a few things about the muscles enough for you to represent what we're seeing in the reference without particularly representing what is actually in the reference image. For example, you can really tell that the biceps in the reference image, a bailee that, but I've actually indicated them in my join here because well, I know they're there and they can help me actually get a very fair representation of what I'm seeing. And so that's exactly why apply them. And as we apply a bit of highlight, you can really tell that all this is piecing itself together quite well. And that's exactly what we're trying to achieve that and only known actually happy with how far this has come. Hopefully you are seeing exactly what I'm thinking about whenever I'm drawing these particular feet. But in general, this is exactly what had been turned to focus on for this particular area, just trying to make sure that everything pieces itself together quite well. And our knowledge of the muscles exactly is what we're trying to focus on for this particular experience. And we remove onto another image. Now this one, we are having these muscles actually folding quite significantly. And as they contract and relax, you can really see them come out through the surface. And so with this particular representation, we have ourselves and expenses as well. And then we have the biceps femoris coming out, very, very defined. And we have a beat to the gluteus muscles also being represented that. So we are going to go ahead and just play with what we've seen. Then you can also see the other foot coming in as well. And we're going to go head and representatives as clearly as well there. But you can really tell that wasn't trying to focus on for this particular one is very basic representation of what we've seen is very important. And in forming that with a knowledge of anatomy is even better. Because that way you get a whole lot less work to do. And even if you get it wrong in the few places, you are at a believable level. And the more believable your artwork is, the better it is. And that's exactly what we're trying to focus on for this one. So as you can see that I'm just refining the lines and cleaning up the edges just to make sure that what I'm seeing is at least close enough to the reference because you can really tell that the foot on the other side, the one that's in shadow, is actually a bit more defined and where the foot folds is not where the footfall on the front. So telling us vouchers to remember these edges, remember these landmarks. And it takes several tries just to get that point. Soon as you can see that I'm just going to play around with it until I'm fine with it. And that's going to take a few terms. But basically what I'm trying to say here is, you realize that our knowledge of anatomy is exactly why we dream to get all these things come together a whole lot easier for us. And the more anatomy, you know, then the easier it gets for you to represent all this stuff. And that's exactly what we want to communicate. That as you get to grow in your knowledge of the muscles at gone. And as you get to understand exactly what happens and what causes exactly what happens in these different areas. It's much easier for you to manipulate what you see. And that way you can get yourself a very decentered presentation in the reference image. And you can actually develop outlook that you are proud to look at. And with that said, you can really tell that we have come far enough to go ahead and apply bits of color in those areas just to get them off a surface. But most importantly, just to make sure that you can actually carry an understanding of exactly what you see and be comfortable with exactly that. So we're going to go ahead and apply a bit of shadow in the marketplaces just to define the form. And you can actually see that just like we've been saying from the very beginning. And knowledge of the muscles helps you represent light much better because it's the fold is flexing and extending of the muscles. Or the contracting the muscles and relaxing the muscles that actually gives birth to the way light affects the surface of the host. And the knowledge of exactly what's going on underneath actually helps us get more closely. So as you can see that we have actually cut ourselves close enough to what we see. And in general, we cannot see that it's fairly close. And now we can go ahead and apply a bit of highlight and my places. And also I have a shape that's also think is important to master consider whenever we also drink this particular views as well. So basically, if you have a cuboid, you can filter, draw horses in whichever angle you're looking at. So always think about that as well. And I'll see you in the next video.
6. Lesson 6: Drawing Demo: So in this video, we are going to go ahead and put together everything we have been looking up from the star. And we're going to get a very basic representation of what the body of the horse should look like. And as you can see at this point, is where you can tell it and trying to apply the front foot just right where we have the triceps. And paying attention to the knowledge of the muscles that we had earlier, as I will not stop telling you, is very important because that way it helps us get a very, very believable representation of what the body should look like as well. So as you can see, the Blackfeet and knowledge are the muscles right there is also helpful because it helps us fold the feet better. And that's exactly what you see me doing right there. And as you can tell with the feeds and trying to get a very dynamic angle. And so, so it's nice just to make sure that we know exactly how the body faults as well. So with the feet, you can really see that I'm trying to move the body certain direction. And now we can also apply the other foot just to get us to see that this is a lot of flying horse, but it's a hostage jumping. So you can tell that we're getting everything fairly believable. So it's always nice advice is to make sure that we are seeing something close enough to the reference. And regardless of there being no reference for this one. I just wanted you to see exactly what I would do if I wanted to get a very close representation of a believable horse. And so as you can tell with this one and join the head, you see how we begin with the masseter muscles are. And then we can just move through with a couple of lines, just represent what the rest of the head looks like. And in general, you can really tell it, It's piecing itself together quite well. And just like that, you can tell that that must be head of a horse and indicating either we have a muzzle with the nostril. Is there a couple of, is can make a few changes to the rest of the hand. But in general, you can really tell that, well, this is close enough to the reference. That's fairly better than not. Though. I'm sorry, you cannot see the reference for this one. I'll provide a reference in the resources section for you to compare. And as you can really see here, what I'm doing is just putting in what the other food should look like and making a few changes here and there, just to make sure that we are seeing is quite believable. So several reference images we used for this particular drawing. But as you can see here, the major shapes to always look out for are what the front fiddly like, what the abdomen looks like, the backfield looked like. So always find a way to break this down into these three shapes. Because if you are able to do this, then trust me, it's much easier for you all the way. And so I'm just going to go ahead and refine the lines. But you can really tell that it's just connecting three shapes together. And then you get yourself the whole body of the horse. And a knowledge of the muscles is important. And so visitors takeaway points to always pay attention to and always consider. So we're just going to go ahead and clean it up. Very interesting thing to losses. If you are looking at several horses, is they have something at the back of their feet, especially the front feet, which they call a chestnut kind of white area right there. Which is very peculiar. But while they do have it, usually you will be seeing it in so many horses very distinctly, but it's always nice to look at whenever you are observing horses for awhile. You'll actually see it that it's also a very nice landmark whenever you drink feet. So always pay attention to such details if ever you get the chance to see horses close up. And you can really see that trend to make sure that they're understanding of what the obliques look like also helps us that. And as we refine the lines, it's just very nice of you to make sure that you know these muscles are you playing with? Because that's going to help you a great deal whenever you are drawing. And that's exactly what we want to focus on for this one. And knowledge of the muscles is going to be a very powerful asset. And that's exactly why it took you through all the anatomy. So you don't need to remember the names, but at least you need to know exactly what muscles you are going to be messing with and where these muscles are. And that way to be very easy for you. Because what we're trying to do is return the set ourselves apart from basic parsing, who knows how to draw, returned to consider ourselves as people who will know exactly what we're doing and how to draw it. That way we are close enough to getting a more realistic representation of that as compared to someone who only uses observation. And that's exactly what we understand the anatomy, such that we can go beyond the spaces of observation to a much more realistic impression best and understanding. And so you can really tell that it's this kind of informed view of drawing that makes us get more realistic results is compared to people who use simply observation. So you can see here and returned to apply a bit of Canada. And with the hair and you like how it was folding. And we're just going to go ahead and play with it just completely like that. But very nice of us is the fact that we have put everything together quite well, best on our knowledge of anatomy and just a few features and those three shapes that I looked at earlier, always remember that whenever we're drawing the rest of the body, I'll be giving you these particular images in PSD file formats as well, just for you to manipulate if you ever get the chance to do so. So you can really see that we are coming together with all this quite well. And I do like exactly what I'm seeing. Now. Interestingly, as you can tell here, we are going to be going ahead and play with the shadows as well. But now this can be best and imagination. All this can be best and realism, if you are, let's say using reference. But what I'm trying to say here is because we know what the muscles do whenever they are underneath the skin. It's much easier for us. Represent the livable shadows, unbelievable highlights. And that's exactly why it's important to estimate exactly what musculature is doing underneath skin. And I'm sorry, from stress so much but well, so unfair that you remember. And yeah. Like what this is going and I do like what I'm seeing one. And we're going to go ahead and play around with these lights and shadows on this highlight. And just make sure that whatever comes out of all this is a believable representation of a horse and action. And I chose this dynamic pose because, well, dynamism is just a very exciting form of representation because it gives you that kind of action. And it also gives you a very fair presentation of what activity, let's say the muscles are doing, all the specific features are doing. So that's exactly why I like using dynamic representation. Bit of activity is always important. Just represent whatever you are trying to achieve in art. So even if you look at my other kind of artwork, a moisture to look for center of action, sense of dynamism, a kind of activity. It is the form of excitement that counted seeing action as competitors having standing horse in a field. That is fine, That really well, it's okay, but well, I think you can always do more. So I just consider myself the personnel should always do more. So I just stretch out and choose activity, dynamism, sense of excitement, a sense of movement. It's always nice if we just have a central movement in the artwork. So just fine, dynamic poses are really a fair representation of that. So that's exactly why we have this one here. But as you can see now we turn to apply a beetle highlight in a few areas just to get that off the surface as well. Just to see how that can possibly come through. And it's coming together quite well, as you can tell, we are having a very believable representation of what that could possibly look like. And that's very important. Because the closer we have a believable representation, then the easier it is for someone to recognize this as a horse. And the safer it is for us because well, no one ever said the reference image January. And that's a good thing as well. So as you can see here, and the shown to clean water apply bits of highlight. And yeah, basically, that's exactly what we need to be looking at right now. How exactly can we just represent this very decently? And I'd be like what that looks like. And we're just going to go ahead and play with that in different areas where the messages are. And yeah, I do like what that looks like. You see, we're getting closer to what we want to achieve. And that's always a very nice place to be. So yeah, this is itself together quite well. And that's a very good thing because that way you actually tell it our lineage of the muscles and our basic breakdown of these into shapes is actually paying off. And that's a very nice feeling. So hopefully we have shared something that can help you draw forces altogether. And in the next video, we shall be looking at is a very interesting breed of horses. Hopefully you can see the difference and you can actually see how we can manipulate all the different things to give us a very basic interpretation of what reality should be reflecting. So I do like what that is. I'm just going to go ahead and play with the bits of highlight as well. And with that, say, I will see you in the next video.
7. Lesson 7: Draft Horses: So in this video we are going to be drawing draft horses. And I'll be saying a bit about those particular type of horses now, draft horses are like the muscular kind of horses, the big horses, the huge ones. So this is the kind of horse where you find everything is exaggerated. The feet are exaggerated, the head is a bit bigger. The body is just full of muscle. It's just, it's one of those heavyweight champions in the household. So the draft horses are the big ones. The muscle is just amazingly huge. So they are really high horses, the big horses and one big representation. So always remember, when you look in a jump horses for example, is the fact that these horses have a kind of bulk. Actually they are bulky whenever you look at the muscles, they actually the bigger ones. If you have a heavyweight kinda horses that are used for work, a lot more than you can compare to other horses. For example, if we look at other horses, they're basically is for sport, but draft horses, they are actually the walk and the horses. If you look at Animal Farm, one of our friends, there was actually a draft horse. So if you have ever watched a movie, you can realize that he was actually way bigger than the other horses. So it's always nice if you just to do a bit of research and explore what jump horses look like. But you'll be amazed at how big these horses are and how much they can do with how much they had been given. We have such big muscles. And so basically when it comes to drink draft horses, we're going to go ahead and play with what we saw earlier. Now we're going to go ahead and manipulate that. For example, if you remember from the understanding of the masses we saw earlier, we saw that that's where the triceps, that's where the fluxes are. But now when we come to draft horses, we are simply going to go ahead and just magnify all that, just make it all bigger. And we shall have ourselves a draft horse. And so they usually have a lot of hair on their necks, which is also very nice feature defining Jack horses. And also when you look at the muscle, it's a bit curved as compared to being, let's say, just as compared to the way you find other horses. So this is just very different distinction that she found a job. Horses, surcharge. Nice if we just click off with that. And you realize that it's actually really cool if you're actually Satan in reality, for example. But Jeff horses are not common to many areas. They actually common in Europe and the States in Asia. But if you come to Africa, well, draft horses are not much of a site. So that's also something to consider. If you come into Africa, you'll be seeing a lot more of the other kind of breed horses. But draft horses are common to the West and the East as well. But Kevin, back to this, you can actually see that after that rough sketch and restrained to find the lines here and clean up the edges and move on with the rest of the head. But, and you can actually appreciate the fact that we have come close enough to what a draft horse should look like. Because what I'm trying to do here is I'm trying to piece together things that I'm seeing in other reference images, trying to piece together all these things just to give you a very basic representation of what a draft horse should look like. And now from that particular basic representation, then it's much easier for us to know exactly how far to go and how far not to go. And then how to put all this together to give us the very basic representation of, let's say the references we're using or just what we trying to achieve. Because if we look at the three-step writing process, something I learned from Jeff Watts, very fantastic artist should know at Atelier in Los Angeles, he says that whenever you're drawing, always look for the three-step process. What you are seeing, which you want to see, and what you wish you. So, so always look at that. So if we look at why you're seeing that reference as you have Watching know, for example, or what you wanted to see, what you know. So we looked at the anatomy, we saw the musculature. So we know that draft horses are magnifiers of that particular basic representation of the muscles. And now what we want to see is all of these put together in an image, and that's exactly what we're doing here. So always remember that three-step driven process. It's just going to help you whenever you're doing any other subject matter. So always look at what you are seeing. If you have reference images, what, you know, if you have studied a bit of anatomy or unit, the basic principles are, you know, how to break down things into shapes. All it's kinda details. And now what do you want to see? Then you put all this together to give you what you would possibly want to achieve. Now that's where you define your own style. That's where you play around with your own caricature. You know, just trying to define and develop your own approach to drawing whichever subject matter you want to focus on. So we are just here to give you the tools and then you are to play with them. However you want to get yourself the results that you possibly want to achieve. And I'd find that very useful. And the thicker it's only fair that share that with you. And you can find a helping you in whichever field you want to focus on. But coming back to draft horses, I'm just trying to refine the lines and clean up the edges on the highlight of what the edges should look like and what thing you should always remember if you drink draft horses is the fact that they have such beautiful amounts of hair. The tail here is amazing. The neck hair is amazing. It's just, it's fantastic when we look at them. And it's also very exaggerated as well. So you can imagine how much of it there is. You can actually find reference images where people have actually plates at the head of the draft horses. Just really beautiful to look at. And as you can tell here, it will come back to the drawing. They have such magnificent amounts of hair on their feet as well. So they actually look very decorated system amazing. What Jeff horses look like. They look so amazing for the kind of walk that they do. Then again, smartness doesn't have conditions anyway. It doesn't matter how you look. What matters is what you do by Jeff horses take that seriously. So what we're doing here is we're just going to go ahead and clean up that apply bit of Canada. And the goal of this is just for you to get the very basic representation of what a draft horse looks like. It's in no means the very best way to call up, but just a fair presentation of basically what the draft horses look like. And the good thing is we have a whole lifetime together, so we shall always be joining stuff. We shall be going into deeper understanding of exactly what the different breeds of draft horses are. You know, we should always be exploring all this stuff. So all this is just a continuation, it's a continuous process. And I'm looking forward to seeing you in the future as we explore every individual breed or every individual dynamism in the horse world as possible. When we're defining activity, when we are paying attention to, let's say, different forms of composition. For example, if we look at horses and action like when there is polo going on or when there is host competitions coming on. You know, whenever we look at this kind of dynamic activities, how does the rest of the body of the host respond? And how do we put all those together? Based on our knowledge of, let's say human anatomy because of the partners right on the horse. And then the anatomy of the horse because of the horse itself. So we shall be exploring all these different kinds of stuff in the future. And if that sounds like something you're interested in, look forward to seeing you there. But for now, we're going to go ahead and finish this Dreamforce in particular. And another thing to always remember is whenever you look at draft horses, their mouth does have a very different color, is compared to the rest of the head or the rest of the body. So it's always very nice. Iwi just always see that it's not very common. But whenever you find them, you actually notice it. So it's also very nice features to pay attention to that as well. And when you look at how we are progressing are here, may actually really happy with all that. And now I can just go ahead and apply a beam. Al-qaeda in Iraq places love with a bit of highlight where it needs to be put. But you can actually really see here that we have been given a very basic representation of what to look out for in general. But one thing we know now is draft horses, a huge muscular horses. Always find a way to just represent that my secular nature of the draft horse. It's just a very cool distinction. For example, if we look at the abdomen of a draft horse, well, it's shorter but wider, more aggressive, it's much thicker. It's just all these big things with big words but together. And I'll be sharing this material with you in PSD file and procreate file. That way it's much easier for you to manipulate it how you want. For example, if you were to turn this into a centaur, or if you want to turn this into Pegasus, will have all the skill of interesting stuff. So I'll be sharing that with you as well. And you can go ahead to play with it as you see fit. But I'm just going to go ahead and apply bit of color to the hair. We have enough fit. And what shape is called hair, but well, they're hairy so we can go with that. But I'm just going to go ahead and play that quite well. And always consider the fact that there's going to be several kind of variations within the hair as well. So it's always nice if you just to consider how to play with the light and candelas. And you realize that it's going to be very different colors of hair in different draft horses. So it's just about what do you want to represent and how exactly would you be comfortable presenting it? And that's simply what we'll be looking for whenever we are representing those kind of details. But in general, I'm actually happy what this looks like. And I'm just going to go ahead and clean up that and play around with the hair we are seeing on the neck. Just to give us a believable representation of what the draft horse should look like. And by no means is this exhaustive. This is going to be very many variations whenever you make a chart, horses of different kinds from different places. But it's always nice if you just list the bare minimum of how to represent these, such that when you start seeing variations, you can adapt. It is variations and you can play around with them and manipulate them to actually satisfy what you are trying to accomplish. That's a very important thing to consider. If you want to achieve a very believable look in whatever you're drawing. So I'm just going to have these different colored hair. But this is just because, well, I just wanted to represent this a bit better. But usually you find that the hair or the feet and the tail is the same as the hair in the neck. But here we have very different representation, which is, which is okay, because now we are not trying to achieve a reference. We are just trying to achieve a basic understanding of what draft horses looked like. That was you carry an understanding of what job horses look like. It's much easier for you to now respond to the reference images that you are presented with. Or it's much easier for you to just draw draft horses from imagination. Or basically it's just much easier for you to understand how draft horses work. And that's exactly what you see me doing here. And return to play around with different colors just to see what matches better and how easy it is for us represent all these things if put together. But basically, you can tell that my mission here, simply to give you a basic understanding of the difference between draft horses and every other kind of horse. And how we can use this to achieve a very realistic representation of draft horses, for example. And you can really tell that we have come close enough to what a draft horse should look like. And I'm happy with this. Basically, it's a believable presentation. And with that said, I will see you in the next video.
8. Lesson 8: Foals (Young Horses): So with this video, we are going to be looking at a foal or a baby horse. You can choose what to call it. But what I'm trying to say here is when it comes to drawing younger horses, you realize that everything we looked at earlier is much smaller, much shorter in some areas. And then it's just much tinier. So it's always nice just to make sure that we try to accommodate that. Because if you look at the draft horse we looked at earlier, we realized that the features are much bigger, they are more exaggerated, they are much thicker. But when you come to baby horses, well, the features are much smaller and they are just shorter in general, except for the feet, which are quite long here, as you can tell. But one nice thing to always consider is just like we saw earlier, is because we know the muscles and what's going on underneath the skin. That we can give ourselves a very believable representation of what we are seeing in the reference. And a very nice thing to consider is for example, if we look at where the Neizha just putting cylinders, they're just helps you get a very believable representation as well. And as you can see just right there, whether pectoralis begins from as where we have our foot beginning from n. In general, we are representing this very believably and I'm proud of what I'm seeing. And that's exactly what we need to be doing even with whichever subject matter we choose to look at in the feature. But in general, I'm just trying to make sure that my knowledge of the muscles also comes into play here and helps me achieve a very believable representation at the reference image. And a very fair interpretation of just my knowledge of what draft horses and real horses and younger horses can look like. It's because of our knowledge in all these fields that manipulating this particular reference is much easier to do. And as you can see here, I'm very happy where we're going with this. And though the reference isn't very useful with during the hooves, We shall fill those in best in our understanding of what basic hoof should look like. But in general, everything is piecing itself together quite well with this rough sketch. And we shall be going ahead to refine the head and refine the rest of the body later. But as you can see here and returned to basically represent what I'm seeing. And basically just approach this from a professional perspective. How best can represent what we're seeing best and let say what we are trying to achieve. So the three-step drawing process comes in again. What are you seeing? That's one. What do you know? We know that when you look at other horses like the draft horses, these are the different features. We know that when you look at the musculature, VCs, how you manipulated then had a third step is, what do you want to see? Now we put together what we know and what we are seen to create what we want to see. And as you can see here, a very interesting thing that I've done is I've been playing a head away, playing with the trapezius muscle, just want then the neck. Just to define exactly what the fold that in action look like and what the neck should actually be doing in general. And thanks to that trapezius muscle, well, I'm actually happy what I'm seeing. And you can really see how the neck muscles come in just whiter. And basically can really tell that. I usually use this musculature understanding just to help me make things a bit more easier to manipulate, just to test my accuracy as well. And honestly, I'm also disappointed. So we can just go ahead and refine the head puts a female features. You can really, you can really see that the masseter muscle there is a bit small. But moving on can really tell that we are right on track with cleaning everything up. And we have been given a very believable presentation, the reference. So the three-step writing process did come in quite handy as well. And now we can go ahead and clean up the edges, clean up the lines, and basically just represent the reference. Be better just to make sure that we are close enough. So what we want to achieve and we are better off that way. So as you can tell them the strength to go ahead and clean that up, gets everything to look believable. And generally just make sure that everything is close enough to the reference image. And that's a very good place to be. So you can really tell us which in turn to focus on my deck. And I'm just going to go ahead and clean up those edges the right way. And very happy won't see. So one very interesting thing to consider is the fact that this whole anatomy thing that I've been stressing from the very beginning. Well, at first you find it's intimidating, but for me keep digging and just, just look at how fascinating this whole anatomy thing is. For example, when you look at the muscles in humans, and you look at the muscles in, let's say herbivores. And you look at the muscles and let's say cannibals and you look at the muscles in reptiles, you do realize that even if we are different, we are very much the same. And this hole anatomy thing becomes even more exciting. For example, when you look at the masseter muscle on, let's say cats, it's very small. But if we look at, let's say horses, it's really huge. If we look at humans. Well, luckily, we have been blessed with a balance of the best of both sides. So it's just very interesting to see how all these dynamics plane and how all these walks around. So eventually if you do not like anatomy and you just dig a bit into it, you'll be very happy what you end up discovering. And if you're going to be with me for awhile, we again to Andrea, be to that in the different subject matter we shall be doing. So. I look forward to seeing you in the feature as we do that. So here you see of charts to go ahead and apply bit kind of that. And as we clean up right there, we're just going to go ahead and play with that and refine the edges. Just a very basic achievement to return to consider here is we want to make sure that everything just pieces itself together quite well. And we want to make sure that whatever we adjoin is close enough to the reference and coherence with our understanding of let say anatomy. So it's just all about knowing what we're trying to represent, where we want to represent it that way, and exactly how all this comes together. And as you can tell, I'm very happy where this is going. And this is actually close enough to the reference. And you can really see that our knowledge of anatomy has paid off. And that's a very good thing to realize. And we're going to go ahead and just keep applying condo in workplaces. Just keep playing around with it. And eventually we shall end up with very little presentation in the reference image. But so it's nice investors to consider all these details and play around with them. Just to make sure that we actually end up with something we are proud of. And interestingly, you can tell that this is actually getting closer to the reference. So you can really see that. One thing. Actually, if you realize, if you look at different subject matter and the young of every different, let's say animals like humans, like horses, but like cats, you realize that the young actually have the elements of cuteness. And that element of cuteness is exaggerated when you look at, let's say animation. And the reason why this is very common is because when you're young, everything is shorter and everything is smaller. And it's just a very basic human instincts have considering small things as cute things. And we need look at animated movies. You realize that they take that and notch higher, exaggerated but smallness and all that cuteness. And that's exactly why we actually find younger things in smaller things to have that much cuteness. And that's just a very interesting thing to consider. And as you can see, I'm just trying to play around with the color variations just to make sure that we have a very basic representation of the reference. But in general, what had been turned to focus on here is for you to just understand exactly what we look at when we are drawing falls or baby horses, you can choose what to call it. But in general, that's exactly what's always focused on. And just that's the basic representation of what the photos look like and how to draw them. So you will not be doing so many folds unless it's something important in the field of OT, the chief chosen. But just find it fair enough for you just to understand exactly how to draw falls. Because well, everybody likes themselves a fair share of cuteness anyway. So just moving on, you can really see that everything is pitched itself together quite well there. So you can really see that I will turn to puts everything together actually not the edges and apply bits are the tiny areas the hand. And with that said, I will see you in the next video.
9. Lesson 9: Conclusion: So I'd like to thank you so much for commonly followed me. And I'd like to thank you so much for gaining an interest in drawing losses. And hopefully you have seen the difference between horses and other animals. And hopefully I have shared with you a few details on how best to report this landscape of during horses and just how to basically represent clauses in a very easy way. And with the knowledge of that and a few things in the manipulated features that you have seen. Hopefully, you can actually represent horses in different environments under different conditions and different angles. At least. I do hope that you have gained the feel of just the little details of how best to do that. And I want to thank you so much for coming this far with me. And with that said, I'll see you next time.
 Ken School Of Design, Digital Art