Transcripts
1. Class Overview: Hi. My name is Jonathan Niaki,
designer and illustrator. And in this course,
I'm going to help you develop the habit of drawing
in just 10 minutes a day. Have you ever wanted to draw but felt overwhelmed or
didn't know where to start or maybe you struggled to make time for creativity
in your busy day? Well, this class is
designed just for you. In this course, I'll show
you how to develop a simple, sustainable habit of
sketching every day, even if you only have
10 minutes or less. You don't need fancy supplies
or prior experience, just a sketchbook
and something to draw with and a
willingness to have fun. We'll start with
quick warm ups to loosen up and get your
creative juices flowing. Then I'll guide you through daily drawing prompts
that are fun, easy, and designed to
fit into your day, whether you're at
home on a break or just winding down at night. The end of this
class, you'll have a seven day sketchbook
filled up with your own creative work
and most importantly, the creative confidence
to keep drawing every day and never
run out of ideas. Come on, grab your sketchbook
and let's get started.
2. Drawing Materials : Hi, welcome to class, and congratulations
on getting started. Before we jump into drawing, let's talk about what
you'll need to get started. Good news, it's super simple. All you need is a sketchbook, even loose paper, a pencil, pen, and a little bit
of time each day. Although you're welcome to add additional
supplies like markers, colored pencils, or even
a digital drawing tablet like an iPad or a Wackam tablet. We'll also need
drawing references. So if you have books
or magazines or just your Internet connection
to surf the web for images, we'll need some images to
reference in our drawing. Now, find a nice spot
in your day where you can fit 10 minutes
just for yourself, a morning coffee, a lunch break, or even before bed to unwind. Make it a special
sketching time. Remember, this isn't about
creating a masterpiece. It's about building a habit. Let go of the pressure to
make things perfect and focus on showing up and
enjoying the drawing process. Better yet, if you can
dedicate an area of your home for sketching and
keep it organized and tidy, this will increase your
likelihood of being creative and enjoying
the process of drawing.
3. Drawing Basics: In today's lesson, we're
going to talk about drawing fundamentals and
how to use them to warm up. These fundamentals will get you loose and ready to draw and will help you create
fun illustrations and drawings just like this. Learning the skill
of drawing can be a really overwhelming
task, but today, we're going to break
down the basics, so you can get started
today and start having fun. First things first, how
do you hold your pencil? A lot of people
hold their pencil really close to the
end of the pencil, but you really want to
hold it back farther. This will give you a
little more loose drawings and will keep you from trying to draw too
many details too soon. So, use your shoulder. We're going to draw
some ellipses, and I want you to
use your shoulder and keep your wrist
relatively still. This will keep your
arm nice and loose, and we'll get you some
nice smooth lines. And then I'll also show
you kind of it's a little more detailed when you use the pencil a
little bit closer. But at first, with these
warm up exercises, and even during some
of our drawings, you want to keep your pencil you want to hold
your pencil a little bit farther towards the
end, just to keep it loose. So go ahead and
go ahead and grab your pencil and just try drawing some nice
loose circles and, you know, keep your wrist a little bit tighter and
don't move it as much. Just with your shoulder, practice drawing some
of these circles because drawing these
circles seems silly now, but you're actually going to use those circles in your
drawing practice. Go ahead and fill up
the page with circles and just warm up a little bit. Next, we're going to
practice some linework. Again, try and keep
your shoulder loose and go slow and don't press
too hard on the paper. Just move your shoulder, back and forth,
and this will get you some nice straighter lines. Just practice making
some nice lines, and this will improve your hand eye coordination and
get you ready for drawing. Another way you can
warm up is just by practicing some
different mark making. And one of my favorite
ways to actually draw it is by using hatches. So these little lines are
called cross hatches. And you can use this to build up value or to create
a finished drawing, and just go ahead and
make some hatches, make some straight
hatches, curved. And you'll notice when
you start drawing and using these hatches
to create contours, this will help you kind of
warm up for building up value and loosen up your hand and the hatches really give
your drawing a nice texture. So if you like to add some of the texture
to your drawings, can be another great way to add that add
value and texture. Next, I want you to create
a mini value scale. So this will kind of give you a good idea when you're
doing your drawing on how to create a scale of value where
it's the darkest area, the lightest values,
and the mid range, this will give your drawings
a more finished look. Practicing your value scale is really going to help you in your drawing because
all the nice drawings, no matter how well it's drawn, if the drawing has a nice value scale,
meaning a highlight, a midton and a dark tone, like a shadow, those three, if you just have
just three of those, you're going to have
a nice drawing. So I want you to kind
of think about that in your drawing and make sure
that you have a mid tone, a dark tone, and a light tone. You can also build up value
or create a range of value in your drawings by using cross hatching or any mark
making for that matter. But first, in the value scale, you just want to create
your darkest dark and lighten up and then lighten it and lighten
it with less pressure. And you can create value
a variety of ways. You could just keep the white of the paper there to create your highlights and leave
the other areas filled in, but you want to
create a range of value to create a nice drawing. Go ahead and practice
that and, you know, create those before your drawing that will help you kind of identify your ranges and create a nice well
rounded drawing. Now, let's combine
line and shape. Keep your arm and
shoulder loose. Use your shoulder to draw nice, flowy lines and just keep
it very light and loose. Try and incorporate flow into these drawings and value
and vary your line weight. So you can see it gets
a little darker in some areas and lighter
in some areas. And use your shoulder to draw these and just draw
any kind of shape that you want to just loosen
up and get a nice form. You can practice this and
fill up the whole page. Next, I want you to go ahead and practice some line variation. This is one of my
favorite ways to add depth and character to my
drawings, and, you know, you can really be creative
with the line work, and it really tells
a story, also, if it's a jagged line
or a smooth line. Or just a wavy line. That line can tell a
very interesting story. So think about what your
line is communicating, how much pressure you're
putting in your line, you know, how long the line is, if it's rigid or if it's smooth and combine
those techniques. So you can create
forms with your lines, and you can use the texture or the character of
the line to create shapes and just just
fill up the whole page. Put some energy into your drawings and your linework and create different shapes. And are they geometric? Are they circular? You know, are they know what kind
of shapes can you create? Like, go ahead and
just draw some shapes, put some energy into them, and enjoy the process. Just kind of lose
yourself into it, kind of relax and let go and see what kind of
shapes you can create. And eventually we'll be
able to combine shapes to break down different drawings into shapes and simple shapes. And that way, we can draw more complex items or
objects or people or places. But this is all the
foundation of creating a nice drawing is adding
in some nice line quality, which makes a nice shape
and then combining shapes to create other things
that you're drawing. But this can also be
a nice way to warm up for your first drawing
and get in the flow, get some nice hand eye
coordination, warm up, loosen up and enjoy the process. And believe me, warming up
is important because there's been times where I draw very well and other times where
I don't draw very well, and that can kind of
smooth the transition if you're just getting started and get excited about drawing. It can be discouraging to draw something and not really turn
out the way that you hoped. But if you get started and start drawing and warm
yourself up a little bit and get used to moving your
shoulder and your arm, and you're less likely
to fail at your drawing, although I don't think
there's such thing as failing at your drawing. Sometimes it turns out nice
and sometimes it doesn't. And this can be a nice way to just get ready for
that and definitely give yourself some credit
and be kind to yourself in the drawing
process because it's very easy to get overwhelmed or feel like
you're not very good. And it's better to take a childlike approach to
drawing and just enjoy it. Do your best. And if it doesn't turn out
the way you hoped, well, you can do another one. But one good tip is to
just take your time.
4. Applying Basic Techniques: Today is a mini
sketchbook challenge. And today, we're gonna draw a cup with some pens
in it or if you have anything else on your desk around you that you can
use for an easy drawing. So go ahead and grab
your pen, your paper, and your reference,
and let's get started. We're also going to learn some basic terminology
that's gonna help you create a better sketch and can help you
understand your sketch. So whatever you're drawing
today, look around, find something
that you can draw, and that is relatively
simple in shape. And I'm just going
to go ahead and start with a nice llips, stay loose and try to
draw lightly so you can get a nice shape going and then press down harder to
make that shape permanent. But we're using some of the same techniques that
we did in the last lesson. Draw on llips, nice smooth line. Use your shoulder to
draw a knot your wrist. And then once you have a
nice shape that you like, you can go back and make it a little bit darker and you're also welcome to use whatever
material or medium, if you want to use a
marker or pen or pencil, colored pencil, you're
welcome to do that, as well. But just take your time here. Don't rush the drawing. Really try and study
what you're drawing. And a lot of times we like
to draw what we think an object looks like and
not actually what it is. And a lot of drawing is just
learning to see differently. And sometimes people will actually put their
drawings upside down or whatever
the reference is. If it's an image, they'll
turn an image upside down. So it kind of turns
your brain off to how the object should look and you kind of helps you train your eye on just drawing exactly what you see. And so I think that's a lot of drawing well is
actually drawing what you see and not so much how you
think something should look, because we all have an idea
of how something should look, a house or a bike or whatever
it is that you're drawing. And we're going to make this a relatively quick drawing today. We're not going to spend
too much time on it, but I want you to
take your time. So you can begin to see how some of those early
exercises that we did are showing up in
our basic sketch here. So you just have a few straight
lines and some ellipses, and you can really break down your drawing into basic shapes, and you really should do that. Find the basic shapes first and then go in and add your detail. And you may add in some value. In this particular instance, the light is coming from the top right
corner of the page. And another thing that's
really going to make your drawing stand
out is your light. Really understanding where
the light is coming and where the light is hitting
your reference and really drawing those shadows and lighter areas that will
give your drawing a much, much more finished look. Even if you're not
a skilled artist, if you understand how light works in your drawing and how it looks when it's on
your reference, you'll have a nice drawing. But also, if you are
drawing from an image, it's really good to draw an image that has
if your reference has a dramatic lighting from left to right
or right to left, it's going to help you draw that reference much
better versus having, like an overhead lighting
where there's really not too much difference in terms
of light on your reference. And that's really going to give the illusion of three dimension. So you can see I've added in
some lines or some hatches to give the appearance that light is coming
from the top right, and you can see I left it blank on the
right side to show light. And then we have a nice
cast shadow from our cup. Another ellipse, really. So I'm just gonna fill this
area in because it's actually even darker here on this side where the
cup meets the table. And you can see this
isn't a perfect drawing. We're just doing a
quick sketch here, and I really want to show you just a few more fundamentals that will help you get started. There are a ton of things
to learn about drawing, and it's easy to get
caught up in that. And you really only need a few things you
only need to understand a few things to get started and to enjoy the drawing
process and, uh really get something
going that you're proud of. So if you're drawing a cup or if you're drawing
something else, I just want you to think about light and how light
is hitting it. Even if the light isn't actually
there in your reference, try and artificially add it. So we have our shadow there, and I This is our value scale. We created a value scale
from dark to light, and I'm just going to
draw in another color to further illustrate the value
scale within our drawing. So you have a good idea of how we're using that value
scale in an actual drawing. We have a little light
bulb for our light. And you can see by just
putting two ellipses together, you can get the basic shape
of a cup and really you can draw anything with just basic shapes and adding
those shapes together. Yeah, so we're really this is kind of an exercise to put
together what we've learned. And then after this, we can begin our seven
day drawing challenge. See you then.
5. Day 1 Sketching: Okay. Welcome to Day
one, Lines and shape. We're going to draw something using only lines
and basic shapes to develop a sketch and also learn a few
things along the way. And I'm going to
want you to find a vehicle or something of interest that you'd
like to draw today. If you'd like to follow
along with me today, I'm going to be using
a Volkswagen van. And you can find this image
in the class resources. So you can see that
in a bigger image. And so the first thing
we're going to do today is, we're just going to lay in
some really light lines and keep the shapes
really basic. Use your shoulder and just
lay in the main shape. So the main shape
here is a rectangle, and the top of it kind of
bubbles up a little bit. But we want to just kind of
map things out very lightly and get the overall shape in and kind of if
we can help it, get the dimensions, right. So I'm just going to go ahead
and kind of mark out and mark out where the windows are and see where the
window lines up. The first window lines up with
the end of the first tire. And so just kind of mapping things out to see
where everything is. And that way, you can kind of ghost your pencil across
the paper and get a nice idea of where
you're going to lay in your harder
lines for the drawing. And I'm making adjustments
as I go in this drawing. So that's why it's
really good to make really light lines,
draw very lightly. So once you've figured out your dimensions and your shapes, you can really
start to go in with a heavier line weight and get those permanent
lines in there. But you can see I've adjusted the length and the
height of the drawing, and I'm able to do that
by drawing lightly. So really take your
time with this. I actually did this drawing
in about 55 minutes, but I've condensed this
down to about 10 minutes. So take as long or as short
of time as you'd like. I find myself
getting lost in it, but, you know, to
stay consistent, I just give myself 10 minutes. I'm going to draw for
10 minutes today, and you'll find some days you'll draw for an
hour or longer, and some days you'll draw
for just 10 minutes. But the key is to stay consistent and develop
a creative habit. Okay, so we have
some more serious, permanent lines here, and I'm really paying attention to
all the shapes, the circles, the squares, making sure things are lined up
and really paying attention to the contours of
the van and the silhouette. But I've gone in, and I'm actually going
to start adding in some more details to the van and creating
more permanent lines. It's totally up to
you how many details you want to add
into your drawing. You can keep it very basic
on one end of the spectrum, or you can add a ton of details and draw
everything that you see. For beginner's sake, it's
probably best to kind of simplify things if you can
and not draw everything. But if you have the time, it's very fun to draw
everything that you see and add in
those small details because that can
really add some depth and interest to your drawing. One of the things too here is one of the things I wish
I'd done in this drawing is actually just
keep the tires very simple because in this drawing, I've really overcomplicated
the drawing of the tires. So in your drawing,
maybe you can do a much better job than I did and actually draw a nice simple tire rather than overcomplicating
the tire itself. So as you can see, my tires
progressively got worse, and I think you can
probably do a better job, but I think the important note here is to be kind to yourself. Sometimes our drawings don't turn out like we want them to, and we mess up and
we make mistakes. But the important thing to note here is that
sometimes we make mistakes, and it's just a piece of paper, and we can start over and
try it again another day. I actually went ahead and spent some time drawing tires after
this because I felt, Dang, I felt like I really
messed up this drawing, and so I'm going to spend some
time learning how to draw tires because I think the rest of the drawing
was successful, but the tires and I
really spent a lot of time trying to make
the tires nice. So be kind to yourself. It's just drawing
and learn to enjoy. So now I'm just going back through and adding
in some more detail, adding some variation in line weight and cross hatching and just
adding some texture to the drawing and
really paying attention to the band and what the
reference looks like. Just creating a little
bit more value. And this image doesn't really
have a great light source. It's more of, like, a diffused overhead
light from the sun. But in this example, you can see a little
bit of value change. Obviously, the bus is blue, and it's a little bit darker
on this side of the bus. So filling in the
areas where the light doesn't quite reach and adding in a little bit more
pressure on my pencil. As you can see my
pencil is getting a little bit short here. I need a pencil extender. But going in and filling out the lines where the
rest of the drawing has been a little bit too
light and needed to add in a little bit more pressure on
the silhouette of the van. Just adding in some more
crosshatching here. Creating a little bit more value and texture to the drawing. And there's the bus. It's not quite the way I
wanted it to turn out, but we made some
mistakes along the way, but we got in some good reps, and this was a decent little
sketch of our Volkswagen. And this is you could leave it, you're drawing where it is, or you can continue to
add more texture or find areas where
there's a darker value. I notice on the bus,
there is an area where the bus is a little bit
darker on the edges here. And so I'm just building up the darker value here
with some cross hatching. I'm really running out
of pencil right now. But yeah, you're
always welcome to try different materials in
this drawing challenge or any of the
drawing challenges. So I don't feel limited to what materials or
supplies you have. So again, just going over lines and changing the
line quality and continuing to add a little
bit more pressure to some of the lines and adding in some
details and more value, just looking for
areas where you can push and pull the dark
and light values. I noticed it was just
a little bit darker right under the roof of the van. So continuing to
add that in there. And I'm taking a look at these wheels that just
got all messed up. I know it's hard to I
think the van the rest of the van was actually kind
of neat, but darn wheels. So I'm just going
to go in, again, adding in more details, areas where I think
I missed things, and you're welcome to
leave areas out or, you know, a details
out or add them in. It is totally up to you. But you can see, you know, there is a little bit of
shadow underneath the van, so I'm going to go ahead
and add that in there, too. And, you know, you
don't have to make your drawing exactly
like your reference. It's really up to you to have the creative liberty to put things in there
or leave them out. And again, you could spend a
lot of time just building up value in your sketch and darker
areas and lighter areas. And you could push your
drawing really far in terms of value,
darks lights, midtones. But that's all for today, and we'll see you tomorrow. Or you're welcome to draw
again and do another sketch.
6. Day 2 Sketching: Hey, welcome back. It's day two, and we're gonna be
drawing portraits. And I know it's very complicated
and there's anatomy, and there's all these things
that you need to know. But we're just gonna
jump right in. And we're gonna have some fun, and we're not going to take
ourselves too seriously. We're gonna jump in
and have some fun. And I'm going to
show you how to make your drawing look cool and stylized and look like
you know what you're doing, and like you've been
drawing for some time. We're gonna make something
that's exciting and fun, and I hope you guys enjoy. Okay, let's go ahead
and get started. First thing we're going to do
is draw a box, a rectangle. It doesn't matter what color, as long as it's a lighter
color, you can use a pencil, a marker, just so we can go
over this with a black pen. You just want to get rid of
that white piece of paper, the daunting white
piece of paper, and just have some fun. And I'm going to show
you how to create a really cool, stylized portrait. And once you can
go ahead and pause the video and sketch
out your box, and break out your marker. And you can use
your own reference, or you can use a reference
that I've started with here, and just go ahead and
start on the nose. And I really want
you guys to pay attention to the shapes. We've all seen a nose, and we kind of have a preconceived idea of what a nose should
look like in a face, and I just want you to focus
on shapes, abstract shapes. And even if you feel like, Oh, this is not what a
nose should look like, draw those shapes
and look for shapes, geometric shapes that is going
to help you draw better. I am going to speed up my
drawing process a little bit, just so I can keep these
lessons to 10 minutes or less, and you're welcome to pause
the video at any time, but I I wanted to just
kind of speed these up so they're not a 45
minute drawing class. And that's probably about what I spent on this
drawing in particular. And you're welcome to
spend that amount of time, too or just do a
ten minute sketch. And it really comes down to how much detail you want
to add into your drawing because you can really simplify
the drawings and really get the essence and the likeness by just
basic shapes and lines. And it's really up
to you how long you'd like to sketch for. But in this, as you can see, I'm just working out some
basic shapes and drawing out some of the cross hatching
as I go along, as well. And you can see left
side of his face is well lit and the right
side is a little bit darker, and so you're going to see that come through
in the drawing. And I really want you to get expressive with your
linework and don't worry about making the drawing perfect or anything like that. I just want you to draw
and draw what you see. And you can see this, you know, things aren't proportionate and things aren't lined
up perfectly, and the glasses are
a little bit off, but that gives the drawing
some character and really makes it something unique and something that
you have drawn, and dare I say, stylized. What's most important is drawing something and
having fun in the process, making some art and not
getting too bogged down with the details or is
something symmetric? Is it, you know, actually the right proportions
and is the anatomy right? I want you to just
get in there and have some fun and complete the drawing and decide
afterwards if you'd like to, you know, clean it up a little bit or what to work
on your next drawing. But I want you to just
complete the drawing, and it's really going to
give it a finished look when we add our shadows, our midtones, and
our highlights. And don't be afraid
to get in there and really add in the shadows
with the cross hatching. I know it's daunting
sometimes too. You know, you don't want
to mess up the drawing, but just get in there
and give it a shot. You know, you might
surprise yourself and you are taking a little bit
of a risk by doing this, and we're not using
a pencil beforehand, and we're just jumping right in. This will help you build up your confidence in
your linework and we'll help you train
your eye to make confident pen marks on the page. Another fun thing
about this is we've already gotten rid of the
white space on the page, and now we can just
gives us the, I guess, permission to make mistakes and just have fun and get in
there and work on things. Sometimes people will do
a drawing and, you know, they're so careful and
they don't want to mess things up and you can really learn a lot about drawing by making mistakes
and getting in there and getting your
hands dirty and just trying things and kind of tailoring your drawing
to what you think it needs. And especially when we
add our highlights in, you're really going
to be excited because that really, I think, gives the drawing
a finished feel and makes it look a
little bit more finished. But don't be afraid to make
mistakes and learn from them. And, you know, you can take your time or
you can do this quick. I I think that taking your time is a
really great strategy. If you have 45 minutes or
an hour to really study this subject and get
the proportions, right, have at it. There's a lot of videos
out there to help you study the
proportions and anatomy, but this class is really
not focused on that. I think we can all look
at a photo and make out basic shapes for our drawing and get the general idea across. And I think anyone can draw. It's just a matter of, you know, are you willing to draw
shapes that you see or draw things that
you think you see? Because there's a
big difference. But you also have the
artistic liberty to draw a picture and morph it and
change it as you see fit. So in this video or
in this reference, you don't really see too much
of highlight on the eyes. It's just a tad
bit, but later on, I really add a nice
highlight to the eyes, and that gives it a
more polished look. Again, even if you don't
have years of experience drawing and you nail
the dark value, a midtone value in
a highlight value, that is going to
give your drawing a finished look even if you're
not that good at drawing. And that's what
this is all about. This is about having fun
and drawing something that you're proud of and
is exciting to you. Heck, this would even look
really cool and artsy if you cut it out and framed it and put some
matting around it. You know, there's tons
of art out there that is really basic lines or sketches or abstract how cool would it be to hang up some
of your own artwork and sketches and have it matted and framed and be able to look
at that and feel something, you know, say, I made that, and I think it looks cool. And I'm proud of that. So you
can see I'm going in here and adding in some highlights with a white colored pencil. If you have a gel pen, you can use like gel pen. I'm actually going to use both. But if you don't, then you can go back in with
a marker and just darken the areas of the drawing
that are darkest, and that's going to push the highlighted
areas out farther. So you can see
just going through and you can kind of
you can see where the highlights are and where they are in the reference
and how I'm just kind of floating them over the
top of the drawing of what's already
there and getting expressive with my
linework and cross hatching and just going back in, you know, touching areas
up and moving around the drawing and
creating movement and, you know, going back in there
with that marker and just, you know, you can go in
there with a darker color. You can use the same color. I happen to use the same color. But you're welcome to, you know, create your own drawing
and create your own depth. But pushing the darkest value and the highlighted
value is really going to make your
drawing come together. And so don't be afraid
to push those shadows. I know it's kind of
scary to just go in and draw all over
what you've done so far. But even filling in the
background here is going to push those values and create an interesting and
dynamic portrait. And I also want to
remind you again to take your time and
be kind to yourself. Even if you don't
like how the drawing is turning out, just finish it. You might surprise yourself. And that's it. This is
our finished artwork. We have our darkest value, lightest value, midtone,
and our cross hatching. I think it's cool enough
to hang up and frame. I am super excited to
see what you guys draw. Congrats on completing day two of our sketchbook challenge. I will see you guys
tomorrow, Day three.
7. Day 3 Mini-Landscape: Welcome to Day
three. Today we're going to be doing
a tiny landscape, and I hope you guys
enjoy this one. We'll just need a pen,
paper, markers, pencil. Doesn't matter what
materials you're using, but let's go ahead
and get started. We're going to go
ahead and fill in the background and just
kind of color block this from the get go. And I feel free to
use my reference. Feel free to use
your own reference. But if you'd like
to follow along, we're going to be using
this image as our example. So we're going to go
ahead and just make a square or rectangle, and we're going to
block in the colors for the sky and the road. And we are not taking
ourselves too seriously. We just want to get
in there and have some fun and put some
color down and get messy and this is going to turn into
something kind of interesting and cool. This is a little bit more of
a difficult scene to draw, and it was a little bit
intimidating to start, but we're gonna have
fun and draw it anyway. To be honest, I almost
quit because I thought, Man, this drawing kind of sucks, and it didn't really turn out
the way I hoped it would. But I kept going and persevered, and it ended up turning
out pretty cool. So that is my lesson
for you today. If your drawing is not
going the way you hoped, then just keep going and
going and finish the drawing, and you never know. I might turn out into something
that you really like. So we have three areas here. We have the road, the
tree, and the sky, and we're just going to put in the general colors
for those areas, and eventually we'll
build up value later on. But try not to get
too detailed here. We're just blocking
in some colors. So go ahead and get started with your pen, your black pen, and just start laying in some of the foundational lines for the tree here and the road and try and just
take your time here. Really focus on just making
these abstract shapes and doing your best to interpret just general shapes on the tree. And what's really going
to give the drawing a really nice finished look
is creating a range of value. I know we keep
talking about that, but it really gives
the drawing substance, and it really gives your
audience or your viewer a real sense of depth and gives the drawing
a finished look. And so we're going to focus
on that by, you know, using some of our cross
hatching and kind of creating a nice kind of tree here. And just go ahead and get
those lines in there, and we'll go ahead and
get started on the car next and just have
fun. Be loose. You know, try not to
take this too seriously, have fun and use some
different colors. In terms of color, we
want to make sure that we're using a darker value
when we add in our color. So if you're using a green or
the blue for the road area, just make sure that it is a darker value when
you add it in there. And just pay attention to the shapes here and
draw what you see. And you can just take
your time here and slow down and create the
geometric shapes that we're drawing here. Because if you look at this,
you can really break down the drawing into
squares and circles, and it really doesn't need to be more
complicated than that. Pay attention to where
the shadows are. If an area is completely
black, like a silhouette. You'll notice that when I
draw in these headrests, they are completely
black in the image. So, the more areas where you
can create depth like that, the better off your
drawing will be. And it's just really cool
that we just dropped in blocks of color in here and just started
to draw over it. I think it's a fun
and interesting way to get a stylized illustration. I'm just going to grab this and put a border
around it to give it a nice frame and add in this little
bush here on the right. Make sure we use some of the same greens that
we use on other tree. And just give it
some nice style. I'm gonna add in
even some clouds. And I know my clouds
aren't really that great, but if you have a colored
pencil or that white gel pen, that can help create
some more white areas. I try and draw this little
lamp post here, too. So this is about a 45
minute drawing for me, so Feel free to draw quickly
or not draw quickly. Slow down. But you don't have
to draw all the details. If you only have 10 minutes, you can do a ten minute sketch. But I really enjoyed
drawing this, and I took my time, and I could have done it longer, but as you can see, I'm going to go ahead and
just drop in some more blue. And don't be afraid to put in the blue in the shadow areas. Just get in there,
get your hands dirty, and wherever you see a shadow, just drop it in. This is going to give your
drawing so much more depth, don't be afraid to put in those shadows
and push the shadows. I even went in with
the Sharpie and added even more depth to
the drawing here. And I wasn't really crazy about the area with the road
where the road ended, so I just extended it. And you can do that, too. You can make mistakes and
fix them. No big deal. Just adding in some texture here and go to add in
this parking sign, which I think added an interesting element
to the drawing and kind of gave it a
little bit more context to where it is and what it is. And I thought that
was interesting. So, feel free to add elements or exclude elements from
your drawing and have fun. And I'm just gonna add in
these extra shadows here, too. Push the tree shadows
a little bit more. And that is our
sketch for today. We have a nice little finished drawing
with a full range of value and some nice linework and it's very fun and stylized. And I think this one
turned out really cool. So I'll see you guys next time. And bye for now.
8. Day 4 Perspective: Hi, and welcome today Four. Today, we are going to be drawing in perspective
and learning one and two point perspective,
mainly drawing boxes. So let's go ahead
and get started. The first thing we're going
to do is put a.in the middle, and we are going to learn
one point perspective. This is our one point.
And all of our lines are going to start to
diverge to this line, except for a few of the
lines they're going to be completely vertically straight and
completely horizontal. So one way you can learn to do this is by
creating three lines that make a Y either upside down
or a street on Y. And so I'm going to
highlight the Y. It's kind of a big Y, but that's a Y from this perspective here
below the horizon line. And this is going to
give you a good idea of just a starting
point on how to draw a box from perspective. And so you can just
start by drawing a box like this and then
connect each area. And this is going to
determine the length, each point of the
box to the center. The rest of the
lines will follow. So your vertical lines will follow the first vertical
line you made on the box, and same with the
horizontal line. But I just want to illustrate that if you're going
to start your box, you can use this upside down Y, and that Y can be either
upside down or regular. So let's go ahead and
draw another box. Assignment is going to be
above the horizon line. And again, we just
want to make sure all those lines are
nice and straight and following that line.
I'm sorry, that dot. And as you can see, you can really get some
nice boxes in perspective. And I even draw just, like, an X on any side of the box to kind of further
illustrate that it's a box. And this is the upside down
Y. I know it's a strange Y. But you can see with the
green marker or not marker, pencil, that's a Y. And so by drawing boxes all pointing
towards the one point, you get a really cool
three dimensional box. And so this is just
a great exercise to do to learn one
point perspective, and you can make a ton
of boxes doing this. So go ahead and just
fill up your page with your one point perspective
boxes and just do a ton of them and really get the hang of it, practice,
practice, practice. So now that we've got the one point perspective down
and you've practiced that, we're going to go ahead and
learn two point perspective. So we'll make two dots on
each side of the page and try and make them flat
like I've not done here. And once you've got
your dots here, those are going to be our two points that we're
going to draw from. So go ahead and make
your three lines. And once you have those, you can line up that first
line with this side, this dot. And then from here, you can begin to see where
the box is taking shape. But yeah, create those lines, and then from the other side, we're going to draw those lines pointing towards that
other perspective line. So you can begin to see
the box come together, and the bottom part of the box
really comes together just by making the lines go to
the perspective points. And there you have a box
from above the horizon line, and we'll do some more boxes
from different angles. But you really want to start
with that first line and connect to each of the dots on both sides
instead of just one. Two point perspective. So let's just go ahead
and get started here. Just make one line and
kind of connect that line, the top and bottom
line to the right, and we'll do it to the left. And you can just pick how
long your box is going to be by making a vertical line
within those two sides. So we're gonna pick
here and here. And then you just want to run the parallel lines to the point, just like we've done
on the other side, just make sure
that it's going to the point and do that
on the other side, and then you have your box drawn from below
the horizon line. And so as you can see, it's pretty simple, but it
can be confusing sometimes. So go ahead and draw
a ton of boxes, get a bunch of practice in, and this will help you start seeing shapes in perspective, and will really level
up your drawing skills. So let's just go ahead and recap what we've
learned today. If you're having any
difficulty with this, just start with your one line, make lines going to
each of your points. And from those lines,
the vertical lines, I want you to draw your lines leading towards
your vanishing points. And I'm just going to further illustrate the
upside down y here. And if we did it below the
below the horizon line, we'll have an
upside down y here. But just start with one line and connect it left and right
to each vanishing point, and you should be
able to get there. I'm going to show you a little
bit more distorted version of this one you don't see
much of the box here, but just play around with it. You'll get the hang
of it by practicing. And I hope you guys
enjoyed this lesson, and I know it's going to level up your drawing
skills in your sketchbook. And in the next lesson, we'll talk about how to use this vanishing points to draw
something in perspective. So stick around and check
out the next lesson, and I'll see you
guys there. Bye.
9. Day 5 Sketching: Hi there, and
welcome to day five. Today, we're going to draw
a Vespa in perspective. So go ahead and
grab your supplies today, pencil, pen, marker, whatever you have today, I'm going to be using
colored pencils and markers and pens together. So, let's go ahead
and get started. The first thing
we're going to do is we're going to start off by drawing a box in perspective. And we are using two point perspective to
draw our vespa today. So I have two dots that you can barely see on each
side of the page, and I am just going to start
with one line in the middle. And I am also going to
end my box right here. And I'm going to get a
reference of our VSPa and everything that
we draw is going to be in perspective and
be based off of this box. We've definitely skewed the
perspective on this vespa. It's definitely not as dramatic
as I've drawn in the box, but I think it makes
it a more dynamic and interesting drawing by distorting the
perspective a little bit. So now that we have
our box drawn, and we used our vanishing
points to draw our box, we're just going to plug
in and start to map out some of the front
part of the vespa. So you can really see
by following the box, it really gives us a structure
to follow and really gives the drawing a three
dimensional look and feel. So Go ahead and start
sketching in each area. And remember to follow
that perspective grid. A lines that are going in that direction we want
to make sure that we're they're heading in that vanishing
point to the right. So, we got our wheel in there, and we're just drawing in what we see here
and keeping everything in nice geometric shapes and
keeping our lines light, and we can correct
them if needed. But try and draw with nice and straight, circular,
rectangular lines. And everything, like I said, is going into the right
vanishing point. And that's going to
give our drawing a three dimensional feel. But by having this, we'll have a nice three
dimensional drawing. And so this drawing
really is made up of basic shapes that
follow our perspective. So go ahead and
keep everything in alignment with that box
and our vanishing point. And you'll end up
with a nice drawing. I'm just drawing
in those details on the back of the VSPa. And as you can see, not everything is exactly as it is from the
reference, and that's okay. You can pick and
choose what you want. Or if you just made a mistake. So, this isn't the best
reference for a light source. So we're going to kind
of do our best to create our own light source, and we're just going
to assume that the light source is coming
from the left side, the left corner, even
though this is more of like a well lit reference here where light is there's not
too much areas for shadow, but we're going to
just work on creating our own shadow and
pretend that the light the majority of the light is
coming from the left corner. And so what I've done here
is just taken a marker and gone in and filled
in the shadow areas. And we will go in and
fill in darker areas, and we're going to add in our own line weight
here with a pen. So this is totally a stylistic
approach to our drawing, and that's what I've chosen
to do for our class today. So you're welcome to leave
your drawing as it is, or if you'd like to add in some more details with your fine liner, you
can do that, too. I think this just gives it a little bit more character
and a fun, illustrated style. And also, I feel
like it creates a more finished to
look because there was some areas of the
drawing that I think kind of just needed a little bit
more reference or more work. And I forgot to add those
kickstans in there, too. So we're going to add those kickstans in there
and a little bit of shadow and keep going. So I'm going to go in here and just keep pushing
the drawing further. So I've got a darker color green that I'm going to go in
and fill in the areas where there's very little
light. And you can do that. That's just going to continue to further the
illusion of depth and, you know, push your
shadows farther back. So that's going to help
your drawing even more. The adding in those
nice details. And, again, I want
to remind you guys, your drawing doesn't look like mine or you're not
happy with it, just continue to
go and finish it. You may surprise yourself, be kind to yourself, and
keep practicing. Having fun. That's what's most important. Well, I'll see you guys on the next video.
Thanks for watching.
10. Day 6 Sketching: Okay, welcome to Day six. We are going to be
drawing a cool dog. And this is going to
be a fun drawing. This is going to be a little bit shorter drawing for me
in terms of real time. But I'm going to
break it down for you and make this a fun and
interesting drawing for you. And we're going to apply
some of the ideas about perspective that we learned
in our previous class. So let's go ahead
and get started. We are going to start with
a one point perspective, and I'm just going
to put a light dot there and show you where
we're going to get started. And I want you to think about
this dog's head as a box, a three dimensional box, and that is going
to help us build the illustration in a
three dimensional way and give it real structure. So we have our main box here, and I'm going to build on
the main box because he has a muzzle that kind of protrudes
from the main box's head. So I want you to
think about it in basic shapes and really think about the
shapes that you see. So the muzzle protrudes
from the main square, and we're just going to block in the main shapes here at first, and that will give us a
really solid foundation. So look for basic shapes. Keep your lines relatively geometric at this point
until we really get everything mapped out and
figured out where things are in conjunction to other objects
or items on our reference. The other thing I want
you to think about, too, that I haven't mentioned
before is in terms of drawing references and
ideas on what to draw, I think one of the main things that can be really
helpful in finding a good reference or something
that you actually want to draw is to keep a slipe file. And a slip file could just be a pintrasbard or a folder on
your computer or phone or notes where you just save
photographs of artwork or references or artists artwork
that really inspires you. And so when you're
looking for inspiration, you can go and find artwork and inspiration and items
and things to draw. Another thing you can
pay attention to do is when you look at
well, first of all, you can make a list of your favorite artists
and then go through their artwork and
figure out what is it that inspires you
about their artwork. And what are the
subjects that they draw? So make note of this.
What are the subjects that they draw and what are
the mediums that they use? And that will give
you a good indication about the kind of art that you enjoy or drawings
that you enjoy. And it's going to help you
figure out what to draw, which, in my opinion, I think is one of
the hardest things. So for me, I find
that I like a lot of animals and nature
and, you know, people drawings and kind of, you know, science
fiction style, artwork. And so it's really interesting. You wouldn't really think of that as stuff that you like to draw or that
you're interested in. And so it's very eye opening. So next time you're looking
for something to draw, use that example and that exercise to get to know yourself and the kind
of art that you like, and you might surprise yourself. I also want to take a moment to remind you to take your time. I know some of the areas
of the course are sped up, but that is just for the
time sake of the course. And I want you guys to take your time during
the drawing session and really relax and enjoy
the process of drawing. I really think that
drawing and art is just an incredible way to
unwind, relax, distress. And there's been
studies that have shown how effective
art and drawing can be for reducing anxiety or
stress or things like that. So drawing is really much, much more important
than you might realize. And it's especially
a really fun hobby and a way to spend
your free time. And the better you get, the more fun it gets. And it seems like it's an ever evolving
process that you get to continually improve and enjoy and explore different
mediums and subjects. And so it just
seems like a never ending hobby that you can continue to
improve on and enjoy. So I certainly enjoy it, and I think it's just a great way to
spend your free time. So you can see things are
staying still pretty geometric. I haven't I haven't
really veered away from the geometric
shapes too much here. I am using the cross
hatching technique with the art and
this illustration. And I have to speed this up
a little bit because I spent about 40 minutes
on this drawing, maybe 30 or 40 minutes, but I want you to really pay
attention to the shapes that you see and stay within those, really pay attention to
what the shapes look like, and the different negative, positive and negative
shapes and areas. So the positive shapes are
the most obvious shapes. Like, the sunglasses are
a very obvious shape. But the space around
the sunglasses and the space in between
the sunglasses and the nose is a negative shape. So it's really shapes that make up the drawing
and paying attention to the relationships of
those shapes near other shapes will also give
you a much better drawing. So look for shapes and pay attention really pay
attention to your reference. It's easy to just
kind of forget about your reference and
just kind of say, Okay, I've got enough here. I think I got it, you
know, figured out. But really pay attention
to the nuances and your reference and areas
that are, you know, changing shape or, you know, this nose and how it wraps around the face and
the muzzle kind of wraps around the lip or
wraps around the muzzle. And think about
the shadows here, you know, their subtlety. But those subtlety changes in light really make
a great drawing, so pay attention to those. And you'll end up with
a nice fun drawing. So this is pretty much it. This is the end of
our drawing today. I did go over and add in some darker
lines on the outside, the silhouette of
the drawing and some cross hatching
for some texture. But this is pretty much it. And I hope you guys enjoyed. And I will see you tomorrow for our final day together and
our sketchbook drawing class. Thank you, and I will see
you in the next lesson. Bye.
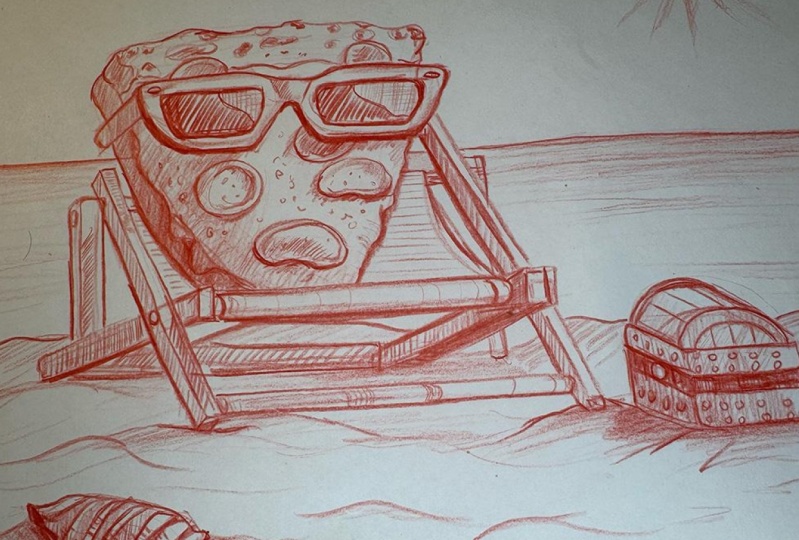
11. Day 7 Sketching: Hi, and welcome to Day seven. Today we're going to be drawing a cool slice of pizza on the
beach. Let's get started. So before we get started, I want to talk a
little bit about how I got my reference
for today's drawing. Sometimes you just don't
know what to draw, and I find that Chat
GPT is actually a really good resource for drawing something extremely
creative and original. And so I typed in combine two random objects
and make it funny, something along those lines. And I had to adjust the
prompt a couple of times, but I eventually got this cool slice of
pizza on the beach. And so I'm going to let you
guys use the same reference, but you're welcome to create your own prompt and Chat GPT, and combine two or more
interesting random objects. Okay, so first things first
like previous drawings, we want to get in a
very, very light sketch, and we want to think a little
bit about perspective and how we're going to get a nice structure laid in
for our drawing here. So, if you want to
make a vanishing point to the left here, you can, but we're just going to
eyeball it the best we can and try and keep your
lines nice and straight, very light, and we
can go in and make those lines darker
once we've figured out where our shapes. And I'm just going to lightly ghost in lines here
with some basic shapes. We have this chair is primarily rectangles in
a one point perspective. So go ahead and get
those light lines in, and if you make some
mistakes, that's okay. Just do your best
to take your time. I spent about 45 minutes
on this drawing, so this certainly was sped up
for you guys' convenience. But for you, if
you have the time, if you have more
than 10 minutes, then spend as much
time as you like. So I've got my pizza in here, and I'm just again, thinking about structure
in three dimensional form. And you can kind of
think of the pizza as a big rectangle or a triangle. And you can see how we we're
using the same lines for the rectangle to give it that three dimensional shape that it's going to the
left vanishing point. And I want you guys to really focus on
giving your drawing a nice structure because
it's going to give it a little bit more realism and structure that will
make it really pop. Next, we want to add some value to the areas, the darker areas, the shadow areas, and really pay attention
to your value scale. So some areas are going
to be completely black. Other areas are going
to be like a mid tone, and other areas will be a
light tone or highlight. So keep that in mind, and that's going to bring a
lot of depth to your drawing. Another thing you'll
notice about this section is once I drew in the
bottom part of the chair, in the reference,
you actually can't see the bottom part of
the chair like this. So my horizon line is much, I guess, higher
in the reference. And so you can see the bottom of the
chair in the drawing. And that was a mistake,
but that's okay. We can make mistakes, and it's not about making
a perfect drawing. It's about having fun and
building consistency. And, you know, I think, even though the perspective
was off a little bit here, still turned out to be
a nice little drawing. So don't be too hard on
yourself if you make a mistake. Next, I've decided to add
in our little seashell, and I think this can
just add a little bit of interest to your drawing
and a little detail. Other areas, we've I've added
in some humps for the sand to give the appearance that the drawing or the
chairs sitting in sand. And I did very lightly draw a
horizon line for the ocean. The other thing
is, try to follow the contours of the
object that you're drawing so you can
really get a sense of its shape and three
dimensionality. And I think I could have spent more time on
this little sea show, and I didn't quite draw
it exactly as it is, but I think it's okay. And I'm actually gonna draw I'm probably going to
have to widen my view here, but I'm actually gonna draw a
cool little treasure chest. And the reference here kind
of has a treasure chest. It doesn't really look
like a treasure chest. And I probably could have
modified the reference in Chachi PT to actually put a better treasure chest. Maybe I'll do that next time. But I just went ahead and
imagined my own treasure chest. Anyway, we are making some
progress here, and again, going in and, you know, pushing more of the shadow areas and really paying attention to where the areas of the
drawing get darker and lighter. And I really like some of the shadows and highlights
that are in the sunglasses. You can really get
a nice feel for the drawing with creating
hard shadows like that. And I really want you
to focus on light and shadow and texture
for the top of the pizza. You can really get
some nice textures in there with some lines and shapes abstract shapes
that give that illusion. So let's go ahead and add
in our treasure chest. I know it's not pictured here, but we are going to make
our own treasure chest. And I'm going to just add in some little lines here
and circles to kind of create the rivets
that you would see on a treasure chest and make
sure I fill in the values. So this side is kind of darker than the other side because our light
is coming in from the top right and I'm
just going to add in our horizon line with a little bit more
lines here and weight. I want to give that
illusion that there is some sand here. So I think our drawing here is coming pretty
close to an end, and I'm gonna go ahead
and just just add in some darker lines in areas
where I think I could increase the value
and take your time. I think this part of the
drawing is definitely one of my favorite parts of the drawing because everything
is already in place, and you can just continue to
further refine your drawing. It's kind of like putting
the finishing touches on your artwork. So edding in your final
details or pushing and pulling value and shadow
and your shapes here. And so take your time
during this portion of the sketch to really
capture your reference. Take your time. I think that's something I constantly
have to remind myself and my sketches is to
slow down, to be patient. I think a lot of times we want instant
gratification on what we're drawing and so we
kind of rush the drawing. But a lot of times that actually has the opposite effect because when you
rush the drawing, you lose out on some
of the, you know, surprises and values and shapes
and three dimensionality. You really lose out on
creating a nice drawing. I find the drawings
that I enjoy most are ones where I took my time. And so it's very obvious to
me when I rush a drawing, and then once I've
rushed a drawing, it's so much more noticeable
and you're less proud, and then you end up not enjoying
the end result as much. So but it's still a constant
reminder that I have to do. I have to remind myself that
I have to take my time. And you can see I drew the sun, and I did not turn out well. Arguably, I probably rushed it, and I just wanted to be
done with the drawing. So I would leave out this on next time if I did
this drawing again. So you're welcome to continue
drawing or finish up your drawing or maybe find a better reference for a sun because I totally
messed this up. I think I would have been better off with just drawing
a circle 'cause I have this weird star
thing out in the sky now. So today's Day seven, thank you for drawing with me, and I will see you in
the next lesson. Bye.
12. Common Challenges: Hey, guys. Welcome back. Today, we're just
going to touch on some really common challenges
that you may have come across or things that you may encounter on your
next day drawing. And this class is
really about building the habit of drawing daily and for a short
period of time. We can really focus on
building consistency. Let's talk about some
challenges that you might face. What if I don't
feel like drawing? Start small, even with just a few lines of
sketching something and even remind yourself about consistency and not
so much perfection. I think one of the main problems that I face is what do I draw? And so I touched on this
before, but, number one, I want you to find
inspiration from other artists that you might have some favorite artists
who you really like, but I want you to pay
attention to the art that they create and what
subjects they draw. I also want you to focus on
the mediums that they use. Is it black and
white, pen and ink, markers and crayons?
Is it paint? That's really going to help
you figure out what kind of art to create
and write it down. What are the subjects? What is the materials and mediums
that they're using? So that is one way to
overcome your creative block. What if I make a
mistake in sketching? There's no mistakes in
sketching, only opportunities. So um, turn a straight line
into something creative or what I talk a lot about is really just continuing
to finish the drawing. Sometimes we want to give up or we want to throw
away the artwork when we've made a mistake and we think this drawing
sucks, I ruined it. But a lot of times, if you
just finish the drawing, you can look past the mistake and have a finished piece of
art that you really enjoy. A lot of times, sometimes I'll draw something and
I'll feel like, man, I really do not like this, this drawing, but I finish it
and I still don't like it. Then next day I look at it
in my sketchbook and I Gosh, I was really hard on
myself because this is a really cool sketch or drawing. So keep going and finish
your drawing always. I don't have time.
I'm short on time. Uh, sketch while you're waiting for your coffee
to brew in the morning. Sketch while you're watching a commercial or you're
waiting for a bus. If you're short on time, just take your sketchbook everywhere. Take your sketchbook, to school, to work to practice,
whatever you're doing, take your sketchbook
and even if you have 10 minutes or 5 minutes
to sketch something that you see in your
daily life or walk, take that sketchbook
everywhere with you because that sketchbook is going to allow you to capture something if it captures
your creativity. But it's always
such a great thing because you never know, you might be waiting
in line for coffee and you could sit down and
sketch for a few minutes, all those sketches compound
and equal to be uh, you know, a daily
creative practice. So if time is an issue, take your sketchbook everywhere
and use the few minutes. Instead of scrolling
on your phone, which I think we're
all guilty of doing, sketch in your sketchbook, anything, anything that
you see, odd shapes, odd references, people, things, um, and just don't make excuses. Even 5 minutes would
do. Even 2 minutes. Sketch, draw anything,
raw smiley face. The key is to keep it
light and flexible. You're building a habit you're building a habit, not a chore. Also, if you're having trouble
figuring out what to draw, try different materials
for different mediums. If you've never
used pens to draw or pencils, use markers, use watercolor, draw on the back of a napkin on
a piece of cardboard, draw on something new, and also keep that swipe file. Of just a collection of
things that inspire you, whether it's other artists or pictures or references
to draw or things. Always keep that file either on your phone or your computer,
I keep it on both, or you can use Pints to keep a nice swipe file,
which is really handy. That's my main swipe
file is Pints. Use Pinters to keep a file of all your references
and inspiring art. That's all for today. I'll see you guys in the
next lesson. Bye.
13. Review: Hi there, and congratulations on making it this
far in the course. Today, we're going to just do a recap on the things
that we've learned and also celebrate completing
this course to this point. Let's go ahead and get started. So, remember, we went over and talked about
line quality and different weight and
rigidity and smoothness. We also talked about ellipses and practicing different shapes. We talked about cross
hatching and value, and so how these different design or
illustration techniques can give your illustration
or sketch life. And so these are just some
basic basic knowledge of drawing that kind of gives us a little bit of a
foundation to our sketches. We also broke down
value, shadows, cross hatching in a tiny sketch, and also a little study
on light and form. This was really our first
sketch we did together, which was our Volkswagen van and breaking down our
basic shapes together. This was a sketch
I did on my own, and some notes I took and some more sketches
I did on my own, just to play around. But next was really our first little
portrait that we did together and kind of going through the
process of using a darker background and
pen and creating value. And then our first
little landscape using markers and pen. And then, of course, you know, practicing our boxes, which you could pretty
much draw anything inside of a box and use
that for its structure. But we really dive into first one point perspective and two point perspective and how to use those
in our drawings, which was really great. And then we did our sketch using one point perspective
for our little vespa. There was a failed
drawing I did. It was very complicated. And, of course, our cool dog
sketch that we did together. It was probably one
of my favorite. And but this was
definitely my favorite. I love pizza, and I think this just was a
cool, fun drawing. Um, so I'm really excited
to see you guys' drawings, and I'm excited to see you guys post your seven day
sketchbook journal. And that's all. Congrats
on making this far. Please post your sketchbook
in the class. Bye for now.
14. Final Thoughts: Congratulations on completing
daily sketchbook habits. You've taken a huge step in creating a personal
creative habit, and I'm super excited
for you guys. So now that you're
finished, I want you to take the
final step and take photographs of
your illustrations and your sketches,
if you'd like. And upload them to
the class projects. That is going to be
really cool to see your guys' sketches and share with other students and see what everyone
else has created. If not, that is okay too. You do not have to share
what's in your sketchbook. But I think this is a
really fun opportunity to see how other people
approach the drawings, the different
materials and styles. I think it would make for a
really interesting discussion and I'd love to see
your guys' work. Congratulations
again on completing the course to keep this creative habit I
really would love for you guys to keep this time that you've
scheduled to yourself to draw and continue to draw and continue to
develop this habit. You made it for the
first seven days and I think it would
be amazing for you guys to continue
to develop your skill and enjoy the process
of daily sketching. If you ever feel stuck, I want you guys
to look at a list of a prompt list
for drawing ideas. Again, you can use
your favorite artist and write down
what do they draw? What are the subjects
that they draw? What are the materials
that they use and use a swipe file to stay
inspired to create? This is really going to help you develop your creative habit, stay inspired to draw, and just keep that file on hand. Whenever you're feeling
uninspired or stuck, you know what to draw
and know what to do. If you are looking for other
ideas on what to draw, you can also just draw what's around you and really
pay attention to your surroundings and find
curiosity wherever you are. Thank you guys so much
for joining this class. It means so much to me. I love to create art and I'm super excited to see what you
guys create in this class. If you enjoyed it, please leave a review and check out
our other classes. See you guys, and
I can't wait to see what you create. Bye.
 Jonathan Nawrocki, Designer+Illustrator