Transcripts
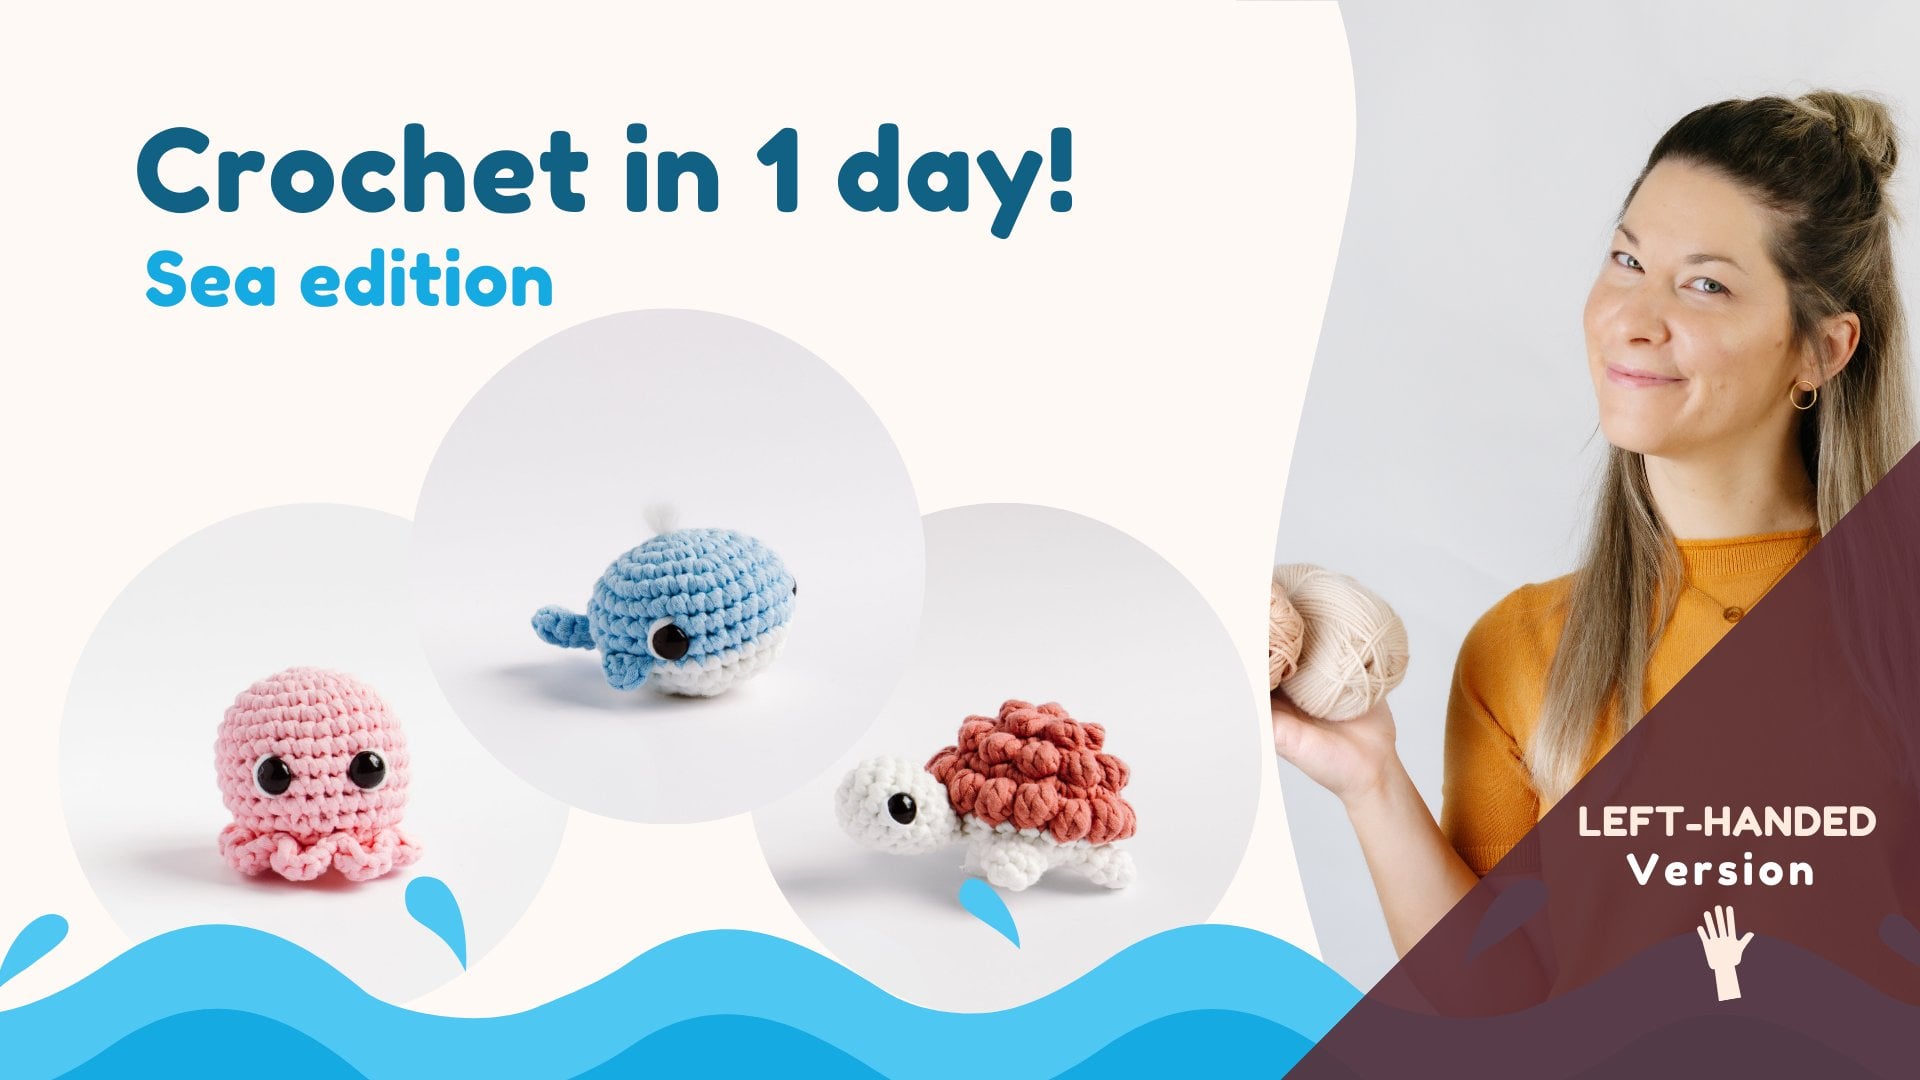
1. Crochet In One Day: Sea Edition Preview: Learn how to crochet
cute animals from zero thanks to this
progressive course. Hi. My name is Emily Baldock, a French Canadian designer
behind Crochet Millis Bran, and I'm so happy to present you the Sea Edition Aigurmy class. You will learn
everything you need to know to be able to
hold a hook and create these creatures of the sea whether you're
right or left handed. In one day, you'll be able to crochet something
really cute. At the end, you'll have
enough practice to navigate into the world
of crocheted Aigurmis. If you'd like to have the
material to follow this course, I put the link of my crochet
kits below. Let's start now.
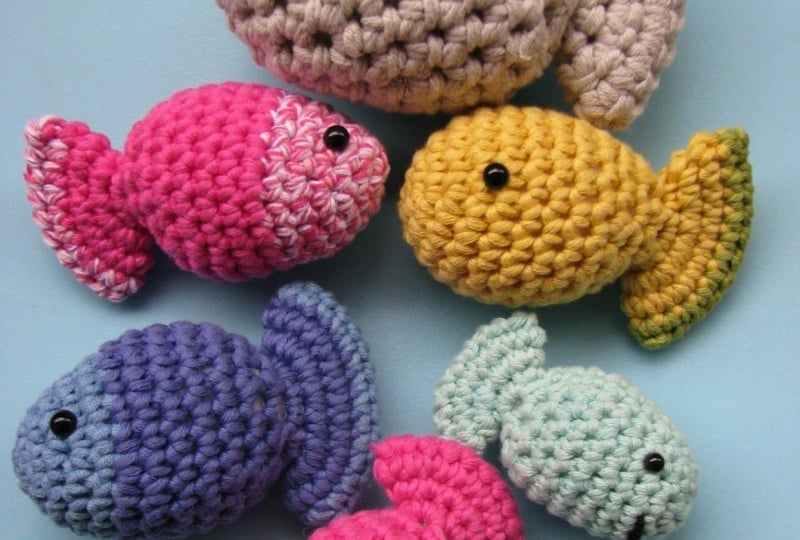
2. Projects Intro: In this course, you'll be able to create three
animals of the sea, from the easiest one
to the complex one. Each little creature will
integrate new techniques. I can't wait to see
your creations. Don't forget to share them with me in the project gallery below. Let's now start with the
materials and techniques.
3. Materials & Techniques: If you don't have
the exact materials I use for these
tutorials, no worries. You can take any yarn you want. To be able to create
the little octopus, you will need about 25
grams of pink bulky yarn. I use the cotton tube style one, but you can take any
orsidwight or bulky yarn in the color of your choice. You will need a 3.5
millimeter hook, scissors, a yarn needle, stitch
markers, polyester stuffing, safety eyes, but be aware to not use them
if there's a chance that a child under
3-years-old can play with it as
well as your dog. So I included an alternative
with black yarn. And finally, you will need
a little bit of white yarn. With the first
project, the octopus, you will learn how
to hold the hook and the yarn and how to
crochet in the round. For the whale, it will
be the same material except you will need
blue and white yarn. You will learn how to
start with a magic ring, how to change colors
and sew parts together. Finally, for the turtle, you will need a kind
of terracotta color, bulk yarn, and white yarn. Again, you can take the
color of your choice. By making the last
project, the turtle, you will learn how to do
bubble stitch to add texture, the nos technique, and you will learn how to add
parts while crushing. Let's now start with the basics.
4. Crochet Basics: Welcome to your first
crochet tutorial. This is where you will learn how to hold the hook and yarn and how to crochet the round
to create a little animal. Remove the paper that
surrounds the small skein of yarn included in the kit and
find the beginning thread. You will start by
making a slip nut. It's similar to a regular nut only you won't pass the end of the thread through the loop. The slipnt should come undone easily by
pulling on the thread. I'll show you another
way to do it. Now, you will insert your
hook into the loop and you can tighten the nut around
it, but not too much. Your hook must be able to
slide well into the loop. Your left hand will come to control the
tension of the urn. You can pass it like this. You open your hand, you wrap the urn around
your little finger, passing through the inside, and then you turn
your hand over and you are going to bring
it to your index finger. And with your thumb and
your middle finger, you are going to hold the
little nut that you made. It will work this way. The index finger will always be in the air to
control your tension. I will show you a second time. You will see after
about 15 minutes this movement will
become very natural. Once you are well positioned, you can hold your
hook in two ways. There is the knife way
or the pencil way. You can test both methods to find out which one you are
most comfortable with. We will now make our
first chain stitch. With the head of the
hook facing you, you will pass the
hook under the yarn, so you make a
movement towards you. You will try to hook the
thread on the head of the hook and you bring it back towards the loop
to pass it through. Your index finger
will help you control the tension so as not
to tighten the loop. You can make a small rotation
movement of the head of the hook downwards so that
it can enter the loop well, and then you twist your hook upwards so that the
yarn doesn't escape. You've made your
first chain stitch. We're going to
make a second one. Throughout the project,
try to keep a good length between your index finger and what you are doing to
control the tension. You pass the hook
under the yarn and bring it back to the loop by rotating the hook
head downwards. You have now made two chains. We would be ready to
start the first round. But if you would like to
practice more holding the yarn, the hook, and having
good tension, feel free to continue
to make chains. When you are ready to
move on to the next step, simply undo the chain until you have two chains remaining
under your hook. Are you ready? Let's
start the first round. The basic stitch
you are going to use is called the
single crochet. I will show you how to do it. Hold the loop that is on your hook with your
right index finger, and you will enter it in the first chain
stitch that you made. You enter the small strand
at the top of the chain. You will then come and get the yarn while still
passing the hook under it. You will pull it
through the chain. Turn your hook up and replace your fingers to see the two loops that are
formed on your hook. You're going to pick
up your yarn again. This movement is
called a yarn over, and you're going to pull through the two loops that
are on your hook. And you've just made your
first single crochet. Well done. We're going to place a marker on this single crochet
that will help you to count your stitches
and rounds correctly. The stitches always
form a sort of small braid composed
of two loops on top. You can place your
marker in these. If you had removed your hook, you can put it back and pull on the yarn to tighten
the loop around it. We will continue round one by making five more single crochet in the same chain stitch in the same space where you
made your first one. So you see the little
hole that it makes. You will put your hook inside. You make a yarn over, you pass through the chain. You replace your fingers to have the two loops clearly visible and not too
tight on your hook. You make another yarn over
and pull through both loops. You have now two single crochet. You can make four more
always in the same space, always in the chain stitch
from the beginning. There will be a total of six
single crochet in round one. A If you happen to miss your single crochet, there is nothing simpler
than to undo by pulling on the thread and you replace the hook in the loop of
the previous stitch. You have now completed
your six single crochet. You see that they all form
a small bread on top. It's easy to count. Your first being
where is your marker. The first round as
well as the second one are those that require
the most patience, given that we are working
in a very restricted space. So don't be discouraged. It will become more enjoyable
as the project progresses. For round two,
we're going to work on each of the stitches
we made in round one. We're going to start in the
one where the marker is. So you can remove it, but
remember where to go. And we're going to insert
our hook into the two loops of the small brid that the single crochet
forms like this. You yarn over, you pass through the stitch by
the two loops where you went. You yarn over and you pull through the two
loops on your hook. You just made the first
single crochet of round two. You can place your marker on it. And since we want to
make our round bigger, we're going to make increases
in each of the stitches. It's very simple.
We're going to make two single crochet in each of
the stitches of round one. You're going to re enter
the stitch you went to and you make another
single crochet. You've just made an increase, that is two single crochet in the stitch of
the previous round. We will continue in
this way, all around. You will make two single crochet
in each of the stitches, always entering into both
loops of the stitch. You made one single crochet. We're going to make
a second one in the same space in
the same stitch. Crochet is very mathematical. We started round one with six single crochet,
now we double. So you should have a total of 12 single crochet in round two. You can count if you made 12
single crochet in round two, counting the small braids. You can also pull on the thread from the beginning
to close your circle. This side is the right
side of the project. And here is the wrong side where the thread from
the beginning goes over. The stitches are much less
defined on this side. Now let's move on
to round three. This time, we're going to
increase every other time. You can remove your marker, and you're going to make two single crochet in
the next stitch, which happens to be the first single crochet
of round two. So we make an increase with two single crochet
in the same stitch. You can put your marker back
on the first one you made. And this time, since we
increase every other time, you will only make one single
crochet in the next ditch. This is where you need a
little more concentration to remember when to
make the increases. Then you make two single crochet in the next ditch and increase. One single crochet
in the next one. And you continue
this way all around. You make two single crochet
in the next stitch, followed by one single crochet in the next one, and you repeat. In crochet, we will always make increases proportionally
extended on the round. As a general rule, we will always increase
by the same number of stitches in each round
until the desired size. So you will have a total of 18 single crochet
in round three. You should end your round
with one single crochet. Again, count if
you have correctly made 18 single crochet
in your third round. You will notice that the
project tends to turn the wrong way the further
you go in the round. You can correct
this situation by forcing it to go the
right way like this. Always keep in mind that
we have to crochet from the outside to the
inside of our project. So what is visible should be
the right side like this. The tutorial to learn the
basics is now finished. I'll be waiting for you in the next video to
continue your project.
5. Little Octopus - Part 1: On round four, we will once again make
proportional increases. So we will increase once
out of three times. You can start by
making an increase, that is two single crochet
in the next stitch. Place your marker on
the first one you made. Then you will make
a single crochet in the next two stitches. Two single crochet in the
next stitch and increase. Followed by one single crochet
in the next two stitches. And you continue
this way all around. You will have a total of 24
single crochet in round four. You can pause the video. We met at the end of the round. As I told you in
the previous video, your project has a tendency
to turn to the wrong side. So just pop it to the outside always crochet from the
outside to the inside, the right side being
clearly visible. Count if you have 24 single
crochet and run four. For round five, we will increase by six single crochet
proportionally. You will make an
increase followed by one single crochet in the next three stitches
and you repeat six times. Don't forget to put
your marker back on the first single
crochet of the round. You continue by making one single crochet in
the next three stitches. And you repeat. Two single
crochet in the next stitch, followed by a single crochet
in the next three stitches, all around for a total of 30 single crochet in round five. We join again at the
end of the round. Count if you have
30 single crochet. So far, your little octopus
should look like this. We're going to count
the rounds together. We see the first one who makes the small
circle in the middle. Then you see the lines that the single crochet stitches
form in each round. If you ever forgot to put your stitch marker and
you're really lost, here's how to find the
first stitch of each round. You can see that we're
working in a spiral. The first single crochet of
round two is right here. So the first single crochet of round three will be on this one. Since we made an increase, it will be the one
furthest to the right. And you follow with
your eyes like this. The first single
crochet of each round that is on the first
of the previous round. And it's very normal to have difficulty seeing all
that at the beginning. I will come with
time. That's why it's important to
use a stitch marker, so you don't have
to think about it. We have now finished
the increase rounds. We will now continue
in simple rounds to form the head of our octopus. The next five rounds
will be all identical. You will make a single crochet in each of the
following stitches. You should have 30 single
crochet in each round. Remember to always put your stitch marker back on the first single
crochet of a round. We need at the end
of the tenth round. We're going to count
them together. The octopus should
now look like this. The good side visible
on the outside. We're going to count the
number of rounds together. You should have made ten so far. The first in the center
here, the second, third, fourth, five, six, seven, eight, nine, and ten. We're now going to start making decreases to start to
close the octopus' head. Here's how to do an
invisible decrease. You'll see either
the abbreviation deck like decrease
or SC two together. We're going to make two
single crochet become one. You will insert your hook into the front loop only of the
two following stitches. The front loop being
the one closest to you. You will then yarn over, pass through these two loops. Yarn over and pull
through two loops. You made a single crochet over two stitches of
the previous round, which makes a decrease. And you can reinstall your
marker on this stitch, you are going to make
a single crochet in the next three stitches. Pay attention not
to enter the stitch that is already taken,
but the next one. A decrease in the
next two stitches. So you enter the front loops
of these two stitches. You yarn over, you pass
through the loops, yarn over, pull through two loops, and you single crochet into
the next three stitches. You repeat this all around
six times in total, which will give you
24 single crochet at the end of round 11. We need at the end of the round. You can count to see if you
have 24 single crochet made, and you will see that your little octopus is
starting to form. If you choose to put safety ice, this will be the time to
do it. I'll show you how. You can start by removing the hook and bring
the ice closer. Even if it says safety eyes, it's strongly discouraged
to use them if you plan on giving away or leaving your creation around children
under the age of three. There is a choking
azard if they come off. I've provided you
black thread if you would like to embroider
the eyes instead. This will be done at the
very end of the project. And I put the video of this
alternative on this page. We will place the eyes between the eighth
and ninth round. Put the first eye between
two stitches this way. Place the second one
so that there are about four stitches
separting them. All you have to do is block them using the
small plastic tips. Make sure to push well so
that they can't come out. So it's important to be sure to put them in the right place. You can check to
see if it's solid. We will continue with round 12.
6. Little Octopus - Part 2: We will now decrease
every other time. So a decrease followed by a single crochet
in the next ditch. And you repeat this all around, which will give you a total of 16 single crochet in round 12. Place your marker on the
stitch you just made. And you make a single
crochet and the next stitch. When you make the decreases, you can pay special
attention to tighten your stitch well so that
it doesn't make a big gap. Now completed the last
round of the octopus' head. We're going to crochet
its tentacles. You are now used to crocheting the basic stitch,
the single crochet. I'm going to teach
you other techniques. We're going to crochet several
stitches in the same one. To help you to find your way, you can place the
stitch marker on the back loop of
the next stitch. The back loop being the
one furthest from you, the one that is inside. We will crochet into the front
loop of the next stitch. You will start by making
a single crochet inside. Then you will make
a double crochet. This is another basic stitch. I'll show you how to do it. You're going to first yarn over before entering
the same stitch. So you're entering
the same front loop where you made your
single crochet. And like the single crochet, you do a yarn over, you pass through the stitch. The difference is here you
are going to do a yarno. You pull through two
loops only on your hook, and you do a last yarno and you pull through the two loops
that remain on your hook. This is the double crochet. It's a stitch that is higher
than the single crochet. You're going to
make a second one. You yarn over before entering
into the same stitch, yarn over, you pass
through the stitch. Yarn over, you pull
through two loops. Yarn over, you pull through the last two
loops on your hook. You are going to make two more still in the front loop
of the same stitch. This is what will form the little tentacle
of the octopus. The major difference between the double crochet and
the single crochet is its height and the
fact that you have to yarn over before
entering the stitch. We have one more step of yarning over and
entering two loops. So you have one more to
do in the same stitch. It should look like this. Here we see our single crochet and our four double
crochet that we just made. And we're going to
give the shape of a half circle by finishing
with a single crochet, once again in the same stitch. Congratulations. You've made
your first little tentacle. I hope it wasn't too difficult. In the front loop
of the next stitch, you're going to learn
a new one again. It's the slip stitch. So you enter the
stitch, you yarn over, and you pass through the stitch as well as
the loop on your hook. The slip stitch is often used as a finishing
or joining stitch. It should look like this so far. Now we're going to make
our second tentacle. Basically, you are going to repeat the same
thing all around. You're going to make a tentacle followed by a slip stitch. Always in the front loop
of the following stitches. So the tentacle is made
up of a single crochet, followed by four double crochet. And you finish with
a single crochet, always in the same stitch. You can tighten the
yarn after making your single crochet to properly
close your half circle. The double crochet
are much easier to see when counting,
given their length. And you make a slip stitch in the front loop
of the next ditch. I'll let you continue
like this all around, knowing that each tentacle is composed of a single crochet, four double crochet,
and a single crochet, followed by a slip stitch
in the next ditch. We meet at the end of the round And your last slip stitch
should be right here. This stitch just before
the first tentacle. Now count if you have made eight Round 14, we will work on the loops
that we left behind. So the back loops of round 12. We will start where
your marker is. You will make a single
crochet in each of the following
stitches in each of the loops of the
following 16 stitches. You can replace your marker. And you continue by making a single crochet in
each small loop. You will see that the loop
where the tentacles are is very difficult to see given that the stitch
is very stretched. So it is really the strand
that passes in the middle. You can hide the
beginning thread into the octopus if
it's in your way. The last little loops
are not easy to see. If you are not sure, just
count how many stitches you have made and go
into any strand you see. That's the advantage of crochet. Nothing really shows as long as you have the
right number of stitches. You only have one round
left and you're finished. Just before you do it,
we're going to fill our little octopus with
polyester stuffing. You can go with small amounts at a time so that the
stuffing is even. Ideally, the octopus
should be well stuffed, firm, but not too much. You shouldn't see the
stuffing sticking out through the small holes
between the stitches. You can add some
just until you're satisfied that it has
a nice round head.
7. Little Octopus - Part 3: You can put the hook
back in the loop. We will now make our last round. You will make eight decreases, so eight times two
single crochet together by taking the front
loops of the stitches. It takes a little more dexterity because the stuffing is there. But you can use your
middle finger of your left hand to remove
it from your path, so as not to catch small
fibers with your hook. Since the space is getting
smaller and smaller, it's a little harder to
see where to put the hook. But this is your last step. You're going to be very proud
of yourself afterwards. And to finish your
project in style, you can make a slip stitch
in the next stitch by taking both loops. And that's it. You can take out the hook, cut the yarn, and
secure your work. You just pull until the
yarn comes out of the loop. To close our last round, you will take your yarn needle and bring the end thread inside. You will then enter the
needle into the front loop of the next stitch from the
outside to the inside. And you will enter
in the same way into all the front loops
of the following stitches, always turning around and entering from the
outside to the inside. At the end, you will
pull on the thread, and you will see
that it closes all by itself in a nice finish. And you put your needle
right in the center. You bring it out at the base of the head between two stitches, and you pull to close a
small hole at the end. To secure the thread,
it's very simple. You will turn
around two stitches by entering between each
of them in this way. And you return to
the center to bring out the thread anywhere
to cut it after. There is just one little
step to make it even cuter. You will take the
white thread in your kit and pass it
through the needle. Enter anywhere on the top of the head to come out
just above one eye. You will then enter
between two stitches just under the eye. You will go directly above the second eye and pull the thread to create a small white reflection
at the end of the eye. Do the same thing
with the second one and join the thread from the
end to the beginning one. Your octopus is
now irresistible. You can hide the
white yarn by making a double nut that you will
tuck inside with your needle and cut off the excess. And that's it. Bravo. You have made your
first Koschei animo. I hope you enjoyed
the experience and that you are proud
of your little creation.
8. Little Whale - Part 1: Welcome to the second level of the Sea Edition Cachekit where you will make
this little whale. In addition to practicing the basic knowledge
you already have, you will learn how to start your project with a magic ring, how to change colors, and how to sew parts together. With the blue color and
your 3.5 millimeter hook, you can start by either doing the technique
learned in level one by making two chains and crochet round one in
the first one you made. Or I show you here how
to make a magic ring, which is super practical to
start a project in the round. You will wrap the yarn
twice around the hook. You will hold the loops with your right index finger and place your yarn on your
left hand for tension. You will hold the small circle formed with your middle
finger and your thumb, and you will simply
come and grab your yarn while passing
it through the ring, and you will make
a chain stitch. We will work round
one in this circle. You will see we have
much more space. It's easier to do. You're going to make six single
crochet in the ring. You can pull on the thread at the beginning to close
your magic ring. You can count if you
have six single crochet. And we're going
to continue round two on the first single
crochet you made. You will make an increase two single crochet
in this stitch. Always entering both loops. You can place your
stitch marker on the first single
crochet of round two. You can then make
another single crochet in the same stitch to
create your increase. And you continue. You make
two single crochet in each of the following stitches for a total of 12 single
crochet in round two. You notice that I
changed the way of writing the round
compared to level one. I wrote the abbreviation
for increase instead of telling you to make two single crochet in each
of the next stitches, just so you get used to the different ways
of reading patterns. At the end of Round two, make sure that you have 12
single crochet made. For round three, we will
increase every other time. You will make two single
crochet in the next ditch. You can replace your
marker on the first one. And it will be followed by one single crochet
in the next ditch. You repeat all around two single crochet
in the next ditch, one single crochet
in the next one, and increase one single crochet for a total of 18
stitches in round three. I'll let you continue. We will meet at the
end of the round. Count if you have 18 stitches
made in round three. For the next round,
you will make an increase followed by a single crochet in
the next two stitches. Don't forget to put
the marker back each time on the first
single crochet of the round. After making an increase, you make one single crochet
in the next two stitches and you repeat all around two single crochet in the
next stitch increase, followed by two single crochet. This, which means
a single crochet in each of the
next two stitches. I'll let you continue.
We'll meet up at the end. You should have 24 single
crochet in round four. Round five will be the
last increase round. You will make an
increase followed by one single crochet in
the next three stitches. And you repeat this
instruction six times for a total of
30 single crochet. I'll let you continue. We'll meet at the
end of the round. You should have 30
single crochet. And as I explained
to you in level one, when you crochet the round, the project has a
tendency to roll inward. So just turn it over to always
crochet from the outside, which is the right side of
the project to the inside. The next three rounds
will be identical. You will make one single crochet in each of the next 30 stitches. We need at the end
of Round eight. If you ever forgot to
replace your marker, here is how to count the round. You have the first one in
the center, the second one. Third one which
starts right here, fourth, fifth, six,
seven, and eight. Remember that the first
single crochet of a round is always on the first single crochet of
the previous one. For round nine, we will change color to work with
the white yarn. So you can remove your hook and to the last single
crochet that you made. You will do it again only
before doing the last step, which is this one, you will add the white yarn. We always join the new color at the last step of the stitch that precedes the color change. Reposition the yarn
on your left hand, and we continue with this color. Make sure that the thread from the beginning is well inside, and we continue
with the new round, which will once again
be a simple one. You will make a single crochet
in the next 30 stitches. After having made your
first single crochet, you can take the
opportunity to secure the two strands of
color that are inside. You can cut the blue yarn. We won't need it for now and make a double not
with the two threads. And we continue. You will make a single crochet in each
of the following stitches. We are now ready to start
the decrease round.
9. Little Whale - Part 2: We are now ready to
start the decrease round to close the
head of our wheel. We will use the invisible
decrease technique. You insert your hook in the front loop of the
two next stitches, and you make your
single crochet. Replace your marker
on this stitch. And you will make
a single crochet in the next three stitches. And you repeat all around a decrease followed by
three single crochet. You will have a total of
24 stitches for round ten. We need at the end of the round. It should look like this.
We will start round 11. We will decrease
proportionally around again. This time, you will make a decrease followed by
one single crochet in the next two stitches
and you repeat six times for a total
of 18 single crochet. We need at the end of the round. It's now time to put
the eyes on the well, pull on the thread, and take out your hook and bring
both eyes close. Even if it's called safety eyes, it is strongly advised not
to use them if you plan on giving or leaving your creation around children under
the age of three. There is a choking
hazard if they come off. I have put black
thread in the bag if you would like to embroider
the eyes instead. This will be done at the
very end of the project, and I put the video of this
alternative on this page. Locate the back of the well, where is the color change. And from there, you will count ten white
stitches to the right. Keep your eyes on it
or put a small marker, and you will enter
one of the eyes, one round above the
white single crochet. So the eyes will be between rounds seven
and eight of the whale. And it really doesn't
matter if the eye is on touched before or
after the one I told you, as long as visually you're
happy with how it looks. You can secure the eye by inserting the
plastic tip into it. And to make sure
that both eyes are equal on one side and the other from the back of the well, we're going to count again
just to be sure from the white single
crochet stitches to the left of the
color junction. This time, you are going
to count 11 stitches. And just above the 11th
between round seven and eight, you will place the second eye. If we compare our well 2:00, the two eyes should
be at ten and 2:00. There should be eight
single crochet stitches visible between both eyes. If you are satisfied with
the result that it gives, you can secure the second I. We will continue with round 12. This time we will decrease
every other time. So a decrease, a single crochet, six times for a total of 12
single crochet in round 12. And the very last round will be simple one single crochet
in the next 12 stitches. For a nice finish, you can remove the marker and make a slip stitch
on the next stitch. And that's it. You
can cut the urn, leaving a good length and pull on the hook
to secure the urn. You can now stuff
your little wel. Go with small amounts at a time and fill it
so that it is firm, but you can't see the stuffing
between the stitches. When you're satisfied, you
can close the last round. Put the thread into your
yarn needle and here is a different method than
the one learned in level one, where we finished our last
round with decreases. In this case, here's
how to close a circle. You enter from the outside to the inside in the next stitch and you exit through the other one from the inside
to the outside, you continue like
that all around, always entering both
loops of the stitch. You could also just enter this
way to make it go faster. And you pull the thread
tight to close the opening, and you insert your
needle right in the center to bring it out
anywhere in the white section. Pull to tighten the
center even more and secure the thread around two stitches back
and forth like this. And bring your needle out on top of the well in the
center of round one. You can cut the yarn leaving a small length of about an inch. We will now crochet the
other parts of the well.
10. Little Whale - Part 3: You will take the blue
yarn for the fins and start with a magic ring or
the technique of your choice. And you will make three
single crochet in the ring. And that's it. You can pull on the thread from the beginning
to close your circle. And cut the thread
leaving a good length because we are going to sew
the fin onto the whale. Pull on your hook to secure the thread and
make a second one. You can put them aside. The tail will be
made in two parts. You can start with
the blue color either by a magic ring or the
method of your choice. You're going to make
six single crochet in the ring for round one. Pull on the thread at the
beginning to close your ring, and we will work on the
first single crochet of round one, which
is right here. You're going to make two single crochet in the next ditch. Then you're going to make two double crochet
in the next ditch. I remind you how it's done. You make a yarn over before
entering the next ditch. Yarn over, you pull
through the stitch. Yarn over, you pull
through two loops. And a yarn over, you pull through the last
two loops on your hook. This is a double
crochet and you are going to make a second
one in the same stitch. Even if it is an increase, I did not write the abbreviation
in the instructions since we use several types of stitches in this specific case. You will once again make two double crochet
in the next stitch. You will make two single
crochet in the next one. One single crochet
in the next stitch. And finally, a slip
stitch in the last one. Remove the hook, cut the
iron, and secure it. I will show you another method to secure the iron
instead of pulling on it. You could tuck it into the loop, which gives an even
stronger finish. You have the choice between both options and all
your crochet projects. You can make a second one. I'll put the instructions here. We're now going to assemble all the small parts on the well. We're going to start
with the tail. We're going to sew
it to the back of the well to hide
our color junction. I'll let you watch the video
to know how to sew them. There is no exact science as long as it is on the right side, very solid and that is
visually beautiful. Everything will be on the thread from the beginning
to the sewing thread. And we saw the second
part next to hits left. And bring out the thread in a different place than the
others because otherwise, it's very difficult to get
inside the whale later. With the thread from the
beginning of this part, you'll be able to stick the two ends of the tail
together like this. And you join this thread
to the sewing thread. You can make double
nuts that you will then hide in the well
with the needle. We will now sew the
small fins on each side. Here you have the
right side of the fin, and on the other side,
it is the wrong one. On the right side, you can
clearly see the small braids. This will be the side that
will be placed upwards. Put the thread
from the beginning into the needle and enter it right here between
the collar junction and two stitches behind the eye. By entering the
beginning thread, it will help you stabilize the fin so that you can sew
it with the end thread. And you will sew in the
two stitches that are on each side of where you
entered the beginning thread. Mm hmm. It should look like this. You can secure and
hide the threads. Now we will sew the second fin. Again, you enter the
middle thread between the color junction at about
two stitches behind the eye. Make sure to sew the fin well, the right side upwards. And you join the two threads, you secure them and hide them. Now, there is just
one step left. It's to embroid
with white thread around the eyes to make
your well even cuter. You can start by inserting
the needle where the white thread sticks
out at the top of the well and bring it out above an eye
between two stitches. Put your needle under the eye and bring it out just
above the other eye. Make the white thread go around the other
side of the eye. And do the same with this one. Bring your needle
all the way out to come to join the
thread to the others. Cut these threads so that they stick out about
three centimeter. What we're going to do is going to unpredle our thread because inside there are
very soft fibers that will create a little
fountain on the wheel. It takes a little dexterity,
but you'll get there. The important thing is to
remove the thread skin. So you can give a
little snip with scissors on the side
and just tear it. And you remove what
surrounded the thread, and you repeat with
all the strength. At the end, you can
tuck what's sticking out into the whale and even it out with your
scissors. That's it. You finish the little whale. You can be very
proud of yourself.
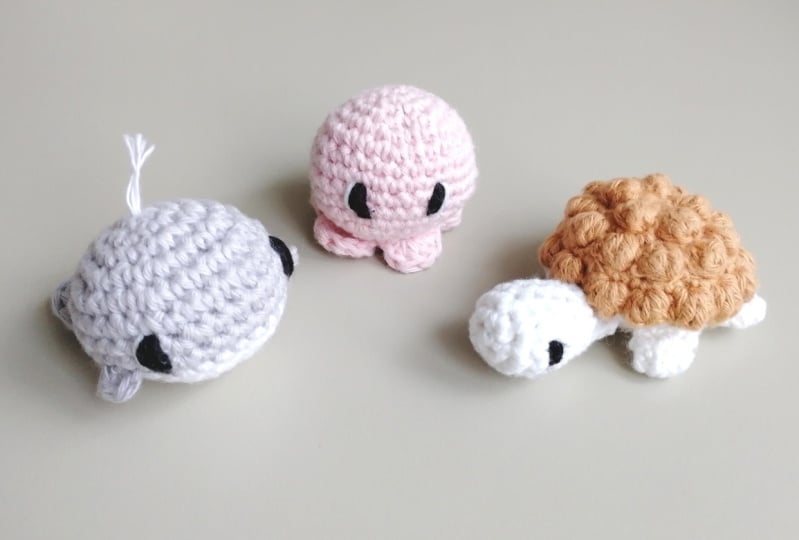
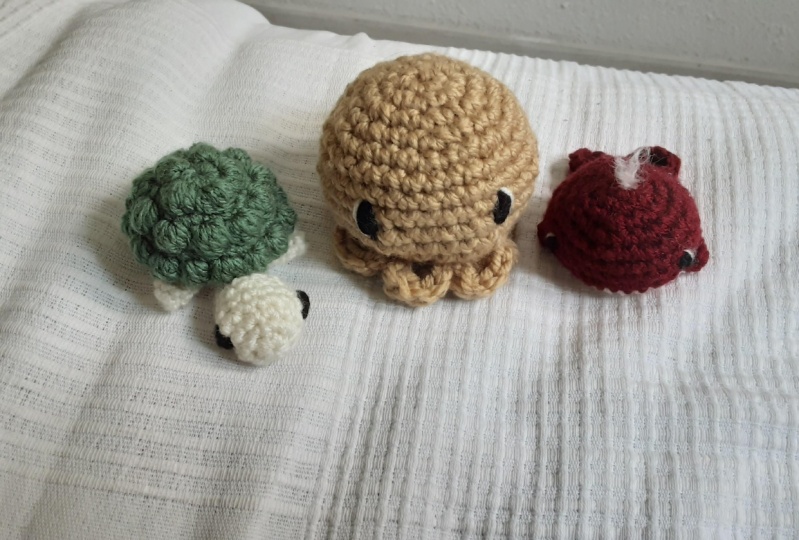
11. Little Turtle - Part 1: Welcome to the third
and final level of the C edition crochet kit. This time, you will
crochet a pretty turtle. You will learn how to make
stitches that have texture. I will also introduce you
to the nos technique that allows you to integrate the different parts of the
turtle while crocheting. Let's get started. Since we're going to
join the small parts of the turtle while crocheting its body, we'll start with this. We'll make the turtle's
head with the white color. You can start by
making a magic ring or the other technique
learned in Level one, and you'll make six single
crochet in the circle. Since you are a little
more used to it, I will put the video
on fast forward. You can press pause and we will meet at the
end of Round one. Count to see if you have six
single crochet in round one. Round two, you will
make six increases. So two single crochet in each of the six
stitches of round one. Don't forget to
place your marker on each first stitch
of the round. Once again, the video is
going to be in fast motion. We'll meet at the
end of round two. You should have 12 single
crochet in round two. Round three, we're going
to make an increase, followed by three
single crochet. So two single crochet in the
next stitch. One increase. You can replace the marker, followed by one single crochet in the next three stitches. You repeat three
times for a total of 15 single crochet
in round three. Don't forget to
pop the circle on the right side so that it is
visible from the outside. Always crochet from the
outside to the inside. Round four and five
will be simple round. You will make a single crochet in each of the
following stitches. 15 single crochet per
round for two rounds. You can pause the video, we meet at the end
of Round five. So it should look like this with the right side
visible on the outside. We're going to count
the round together. Here we have the first one, the little circle, second one, third, fourth, and fifth. Round six, we're
going to start making decreases to start closing
the turtle's head. So you're going to
make a decrease. Just a little reminder to
make invisible decreases, you enter the front loop
of the next two stitches, and you make your
single crochet, place your marker on it, and you will continue by
making three single crochet. So one single crochet in
the next three stitches. And you repeat all
this three times. That will give you a total of 12 single crochet in round six. If you choose to put
in the safety eyes, now it is the time to do it. Even though it has
the word safe, it is strongly discouraged
to use them if you plan to give or leave your creation around children
under 3-years-old. There is a risk of
suffocation if they come off. I have provided you
with black thread. If you would like to
embroider the eye instead, it will be done at the
very end of the project. I put the video of this
alternative on this page. Well, come to place
the eyes between round four and five on each
side of the head. The first one is
here, the second, the third, fourth, and fifth. I suggest you place the
first I about here. This is below your last
decrease made in Round six. But again, it really doesn't matter if you go
a little bit off. You will be able to place the second eye
opposite the first, again, between round
four and five. When you are satisfied
with the result, you can secure them
with the plastic tips. Check to see if they are solid. We will continue with
the seventh round. You will make a single
crochet in each of the following stitches
for a total of 12. Round eight, a
decrease followed by two single crochet and
repeat three times. You're going to have a total of nine single crochet
in round eight. And we're now onto
the last round. But just before that, we're going to put stuffing
in the head. When you're satisfied,
you can put your hook back in the loop and finish with the last round, which will be to make a decrease followed by one
single crochet in the next ditch and
you repeat all around for a total of
six single crochet. Use your middle finger to push the stuffing away so you
don't get caught in it. And for a nicer finish, make a slip stitch into the
next stitch. And that's it. You can remove the
hook, cut the yarn, and secure it and
put the head aside. We will crochet the fins
with the same white yarn. You will make six single
crochet in a magic ring. And round two and three
will be the same. You will make one single crochet in each of the
following stitches. So six single crochet
in each round. You'll notice that I didn't use a stitch marker because
the space is tight, and it will just be on your way. So just a little tip, count to six twice. You'll see you're going to start crocheting from the inside out, the opposite of
what I recommend. This is very normal given
that it's very tight. So towards the end, you will turn the film to
the other side like this. And you finish with a slip
stitch and the next stitch. You have finished
the first film. You have three more to do. So you can pause the video and start the same pattern
three more times. You can leave your four
little fins aside.
12. Little Turtle - Part 2: You are ready to
start a turtle shell. With the terra
cotta colored yarn, you will start by making ten single crochet
in the magic ring. Pull on the thread
at the beginning to tighten the circle. It will be a little
harder since there are many more stitches and can't to be sure that you have
made ten single crochet. Now I'm going to show you how
to do the special stitch, the one that gives texture. It's called the bubble stitch, which is made up of four
double crochet put together. So I'm going to show
you how to do it. You yarn over, you
enter the next stitch, that is the first
stitch of round one. You yarn over, you go
through the stitch. Yarn over, you pull through two loops, and you stop there. You will start again, yarn over, you enter the same stitch. Yarn over, you go
through the stitch. Yarn over, you pull
through two loops only. You do another yarn over, you enter the same stitch. Yarn over, go
through the stitch, yarn over, pull
through two loops. And we do it one last time. Yarn over, go again
in the same stitch. Yarn over through the stitch, yarn over two loops. And this time, the
final movement, you will make a
yarn over and pull through all the loops
that are on your hook. This is the bubble stitch. And to form the bump we want, in the next stitch, you're going to make a single crochet. Use your middle finger to pop your bubble
stitch outwards. We really want it to stand out. So your single crochet
that is right after the bubble stitch can really be tightened more than usual. You can place your marker on the bubble stitch
that you just made. You will see that
the small braid is really on the top,
but directed inward. And we will continue. We're going to do another bubble stitch in the next stitch. You yarn over, you enter
the stitch, yarn over, you go through the
stitch, yarn over, two loops, and you
repeat three more times. And the last step,
you make a yarn over and you pull through
the five loops that are on your hook and you make a single crochet in the next stitch while
forcing the bubble stitch to come out towards the outside and pull on your thread to
tighten everything up. You will continue like this. You're going to make a
bubble stitch followed by a single crochet and
repeat all the way around. You'll have a total
of ten stitches in round two and five will
be bubble stitches. And your last
single crochet will be right before your
first bubble stitch, and you can pull on
the beginning thread to tighten your round one. And we'll continue
with round three. You will make ten increases. So two single crochet in each of the following stitches for a total of 20 single
crochet in round three. You'll see the loops
of bubble stitch are actually facing inward. So just tilt the project
toward you to see it better. Place your stitch marker back on your first stitch
and continue all around by making
two single crochet in each of the next stitches. It should look like
a small crown. We will continue
with round four. Similar to round two, you will alternate
between a bubble stitch and a single crochet in all
the following stitches. Just a reminder, bubble stitch is made of four double
crochet put together. O. Remember to make your
single crochet tighter than usual to make your
bubble stitch stand out. Place your marker on your
first stitch right here and continue all the way
around. I'll let you go. You can pause the video
and continue with a bubble stitch followed
by a single crochet, which will give you a
total of 20 stitches, including ten bubble stitches. And you finish the
last stitch of round four with a
single crochet. You should have ten bubble
stitches in this round. The next round, the fifth one, you're going to increase
every other time ten times. So two single crochet
in the next ditch. Place your marker
on the first one, and you're going to make one single crochet in
the next ditch. You repeat that all around and
increase a single crochet. You will have a total of 30 single crochet
for round five. Round six will be the last
round with bubble stitches. You repeat the same thing
as the previous round. You're going to make
a bubble stitch followed by a single
crochet all around. You can pause the video,
we'll meet at the end. You've now completed the top of the turtle's little shell. We are going to
change the color. You can undo your
last single crochet. Weedo the first step, which is to enter the stitch, yarn over, go
through the stitch. You stop there, go get your white yarn and you pass it through the two
loops on your hook. We are ready to start
the next round. You will make an
invisible decrease by taking the front loop
of the next two stitches. Take the opportunity to secure the two colored threads
by making a double nut. Place your marker. You will then make a single crochet in
the next three stitches. And you repeat all around a decrease three single crochet. You will have a total of 24
single crochet in this round. We are now at the interesting
part of the project. We will come to integrate all the parts that we
have done previously, plus at one while crocheting.
13. Little Turtle - Part 3: We'll start by crocheting
the turtle tail. You'll make a slip stitch in the front loop of
the next stitch. You'll then make four chains. Make a single crochet in the
second chain from your hook. You'll then make a half double
crochet in the next chain. I'll show you how to do it. Similar to the double crochet, you're going to yarn over
before entering the stitch. You yarn over, you go
through the stitch. Yarn over, and this time, you go through the three
loops that are on your hook, and you make another
one in the next chain. You yarn over, you
enter the chain, yarn over, pass
through this stitch, yarn over, pull through the three loops that
are on your hook. And we will attach this part in the same front loop of the previous round where you made your first
slick stitch. You will then make
a single crochet in the next stitch,
taking both loops. Bring closer one of the fins. We will now integrate it
into the body of the turtle. The fin contains six stitches. We will flatten this one and enter our hook through
two stitches at a time. Place your yarn for the
tension on your left hand. Take the small fin with your right hand and
insert your hook into it, through the two
stitches at the end, and insert your hook into the next stitch of
the turtle's body. And you're going to
make a yarn over, you go through the stitches of the body as well as the
stitches of the fin, and you make your
single crochet. You will then insert
your hook through the next two stitches from
edge to edge of the fin. And you will enter the
next stitch of the body, and you make your single crochet through all these stitches. Enter the fin threads
to the inside and insert your hook through
the last two stitches. And enter the next stitch of the turtle's body and you
make your single crochet. This is how you integrate
parts while crocheting. It seems complicated,
but it gives a beautiful result and no
threads to weave in later. We'll continue. You're going to make a single crochet in
the next two stitches. We will now integrate the second film on
three single crochet. Continue by making a single
crochet in the next stitch. Be careful not to enter
a stitch already taken. We will now integrate
the turtle's head. Make sure that the
eyes are really on the sides of the head and
not at the top and bottom. That's the only
thing you have to pay attention to
when you're going to attach it to the body with the same technique as the fins. Your little head is
now well attached. Check if the eyes are
in the right place. Otherwise, you
could just undo and maybe start over on a different
stitch from the head. So we'll continue. You're going to make a single crochet in the next stitch and integrate the third fin for
the next three stitches. Make a single crochet in
the next two stitches. And integrate the fourth fin on the three stitches
of the turtle's body. Congratulations. You have assembled all the
parts together. All you have to do is make a single crochet
in the next ditch, and you're done
with round eight. You can put all the threads
into the turtle's shell. Check if each of the
parts is well attached, and if you ever see that
it makes a small hole, you can simply take one
of the many threads at your disposal to come and
close it with your needle. I'll show you how to do
it if that's your case. Et's continue with
the following round, which will be very easy to compare to the one we just made. We will start by making a single crochet in
the next two stitches. The first stitch
being the back loop that we left from round seven. You really take the strength that it is in the
middle of the tail. You can place your marker and make a single crochet
in the next stitch. It's the one immediately after
the tail, so right here. You will then make a decrease. And you repeat all around two
single crochet, a decrease. You will have a total of
18 stitches in this round. And you will finish the
round with a decrease. Round ten, we will
decrease every other time. You will start with
a single crochet in the next sig follow it by
a decrease, all around. You're going to have a total of 12 single crochet in the round. You can pause the video. We need at the end of the round. We are finally at the final
round where you will make a single crochet in each of the following stitches
for a total of 12. Then for nice finish, make a slip stitch
in the next ditch. We will now be able
to stuff our turtle. You can cut the yarn and secure it and fill the little
abdomen with stuffing. Once you're happy, you can close the end with
your yarn needle, the same way we did with the we. You go in from the
outside to the inside, and you go out in the next
ditch to the outside. And at the end, you
pull to close it all and put your needle in the center to bring it out
anywhere in the white area. Secure the thread by turning
around two stitches. Your little turtle
is almost finished, and all that's missing is the embroidery step for a little white reflection
under the eyes. You can enter on the
top of the head, and it will come
out behind the eye, and you put your
needle in front of it to make a small
reflection under it. And you do the same
thing on the other side. With the remaining thread, you could attach the head to the shell so that
it all upwards. And you join the thread from the end to the beginning that you can then secure and
hide in the turtle's head. And there you have it. I hope you are very proud of yourself.
14. Alternative: Embroider The Eyes: Since the safety ice can be dangerous for
children under three, here are the steps to follow to embroider the
eyes with thread. The same technique can be
reproduced with any animal. You can insert the black thread into your yarn needle and you will include the two rounds mentioned where the
eyes were to be placed. In the case of the
little octopus, I told you to put the eye
between round eight and nine. So with your black thread, you surround these two rounds. You can pass the
thread four times. Then you can put the
needle back in and go make the second eye at the same place where I
mentioned it in the tutorial. You can then join the two
threads to hide them. Make a double knot and
tuck the threads in. And you can add the
white reflection to the outer sides of the eyes. Make a double net
and hide the thread. Your little creation is now
very safe for children.
15. Final Words: You know what? You are
no longer a beginner. You can venture into
this wonderful world of little crocheted creatures. Maybe you've heard
about their name. These little crocheted
animals come from the Japanese technique
called Amigurmy. And this is the
technique you have practiced during
these three levels. The possibility of creation
in crochet is endless. If you'd like to discover other techniques
from this fiber art, I offer several online courses as well as modern patterns that you will find on my website at crochet.com or On Skillshare. See you soon. But
 Emilie Bolduc, Crochetmilie - Modern Crochet