Transcripts
1. Introduction & What You’ll Learn: Hey everyone, welcome
to my Skillshare class. My name is Vinita. I'm an illustrator and pattern designer
based in Singapore. And in this class I'm
going to show you how I create my embroidery stitch
brushes in procreate. In this class, we'll be
creating five stitch brushes. We will start by
creating a shape. For each brush. I will be showing you
step-by-step all the settings you need to turn these
shapes into brushes. There's also a lesson showing more quick and simple examples. These brushes can be
used for creating beautiful prints for
surface pattern designs. I have bonus lessons
showing you how I am creating my prints
with these brushes. These brushes can
also be sewn on online platforms
like marketplace or even your own websites. By the end of this class, you will have a lot of tips
and tricks on how to create your own custom brushes and a whole library of
embroidery stitch brushes. Thank you for taking this class.
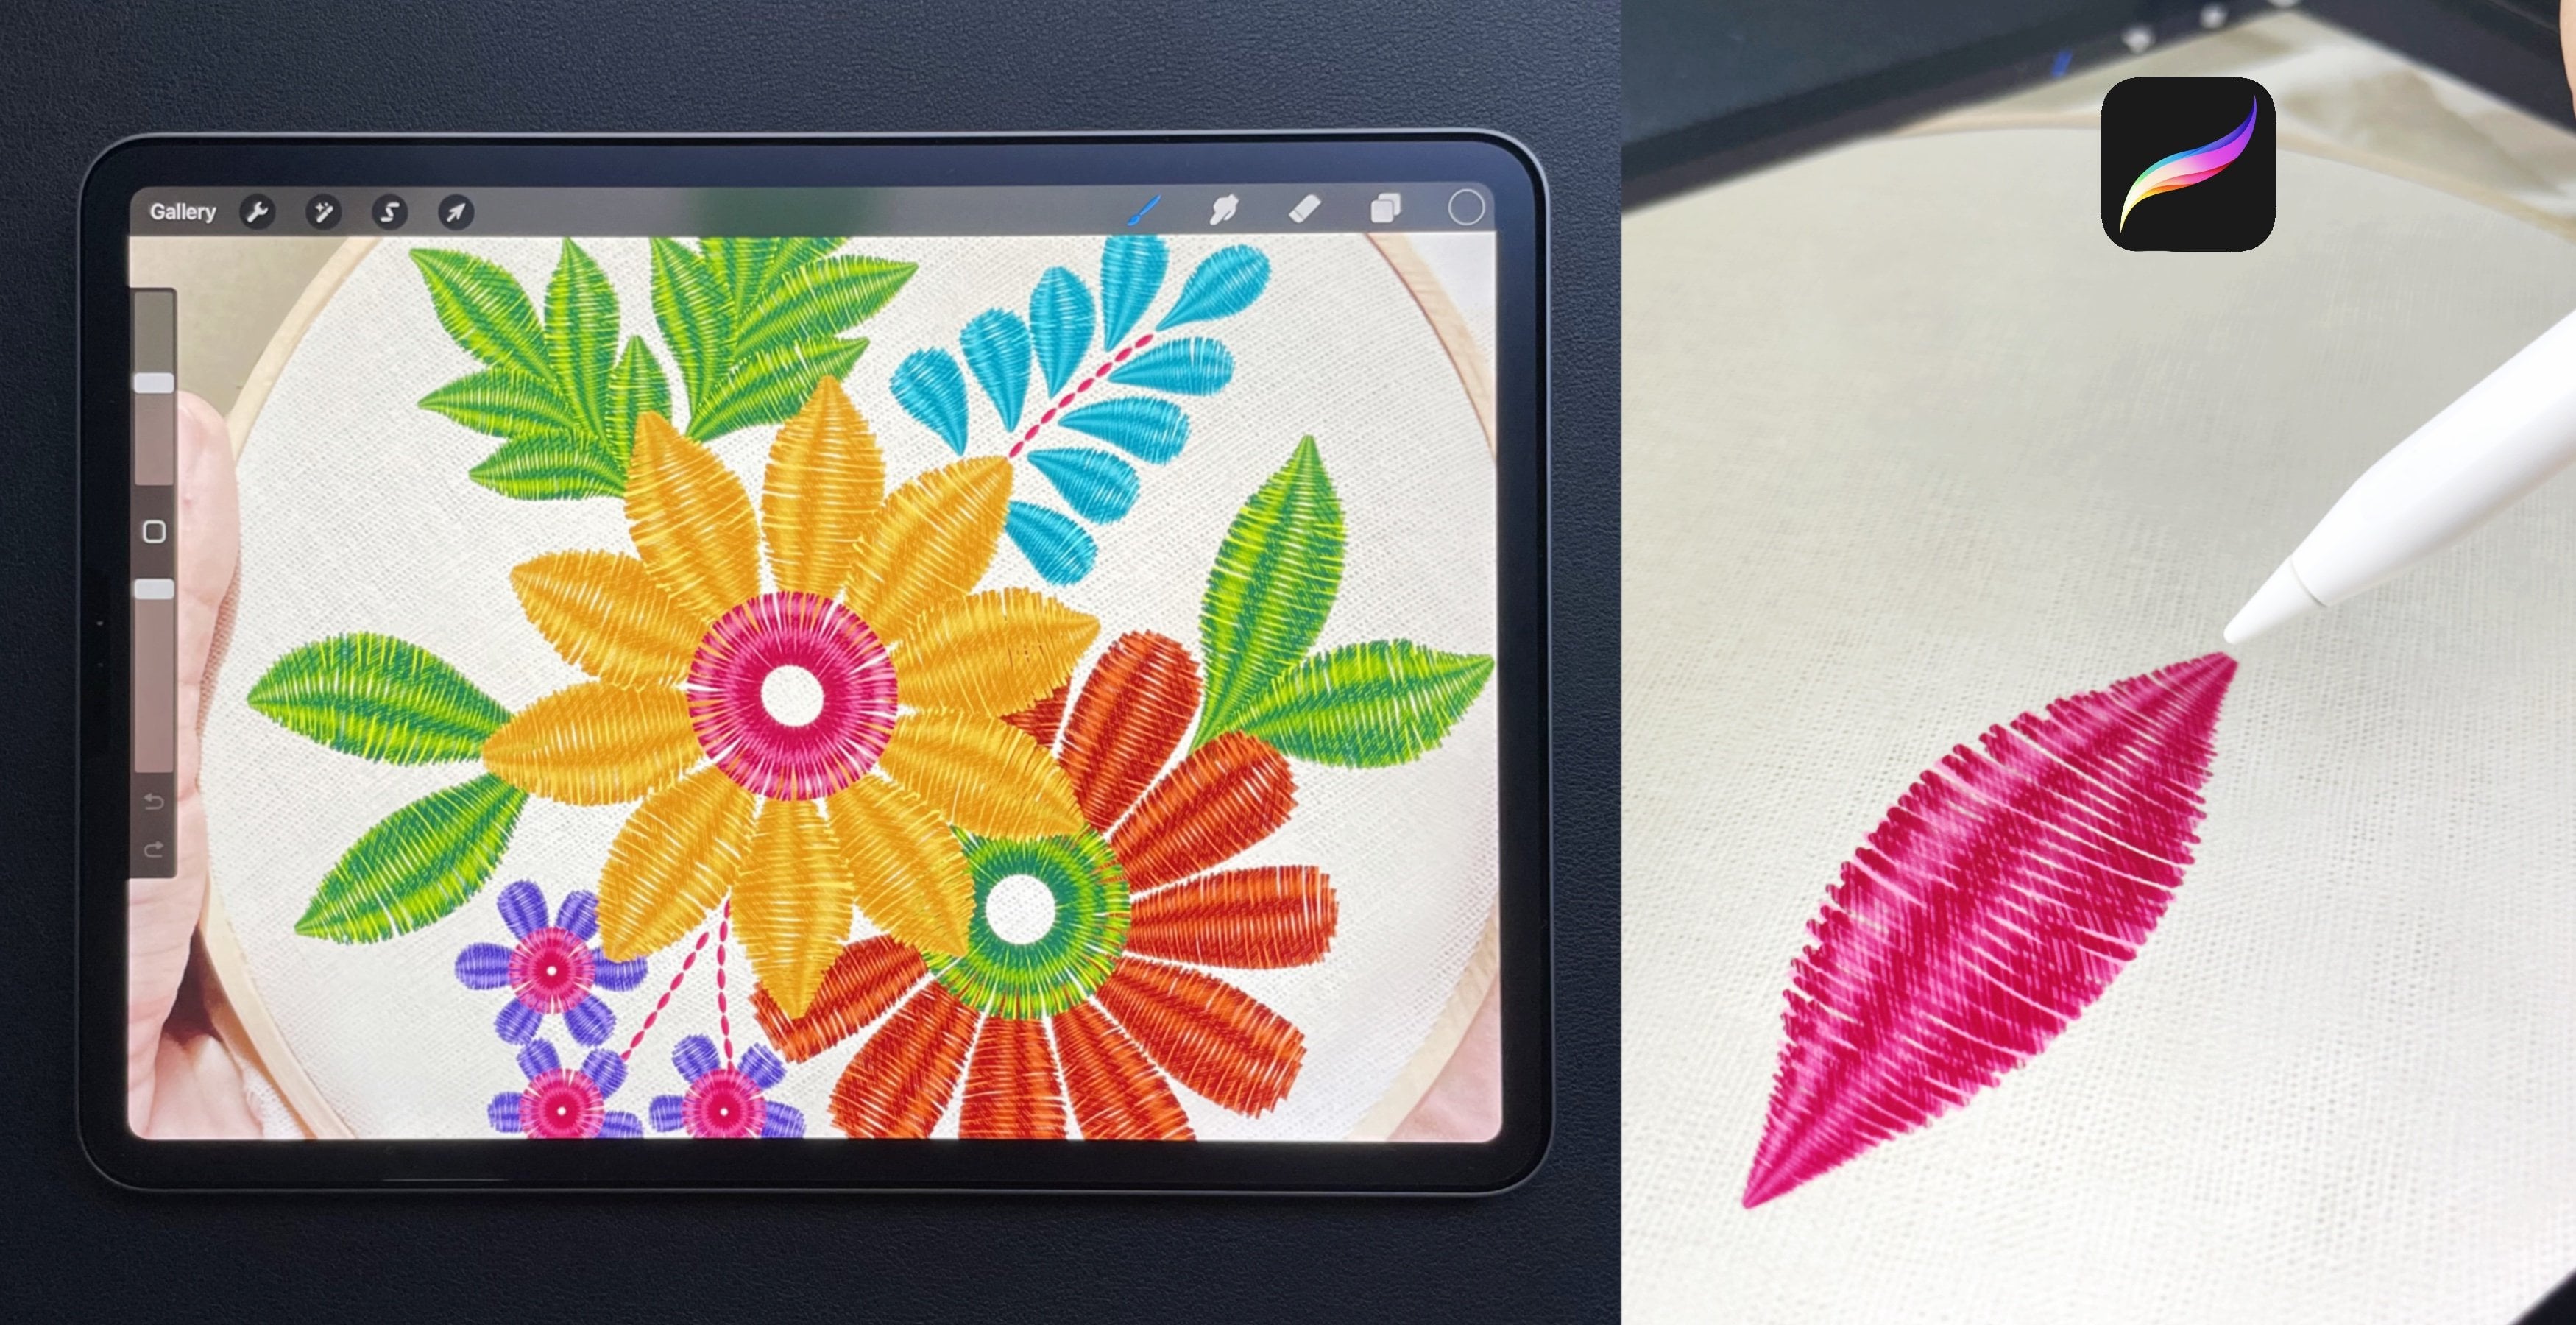
2. Running Stitch Brush: Let's start with our
first embroidery brush that's running stitch. If you're new to Procreate. When you open the app. This is how the
library looks like. These are my illustration
stacked together. Now our first step will be
to create a new canvas. For that, I'll tap
on the plus sign. Again. On the plus sign, I'll keep my canvas
size as 3 thousand by 3 thousand pixel width
300 DPI and tap Create. Next, we'll switch on
our drawing guide. For that, I'll go
to actions canvas. That on drawing guide. Below that, on Edit
Drawing Guide. This bill switch on
our drawing guide. Here, I'll tap on Symmetry, option, horizontal and tap Done. Next, I'll select a black color. Make sure you're black
is completely black. The transparency of your brush will depend on the
color you choose. I just have one layer. I'll go to Brushes. Here under inking, I will
select studio pen brush. I'll draw a horizontal
oval shape here. It doesn't have to be perfect. That will give a more
hand-drawn effect to the brush. Now this step is optional. I will add highlight to
this shape and I'll show you the brush with the highlight and
without the highlight. It depends on your style. You can even skip this step. Next I'll go to Layers, tap on the layer and
tap Drawing Assist, and tap on alpha lock. Next I'll select a white color. Go to brushes and
the airbrushing. I'll select the soft brush, and I'll just add this slide
highlight at the bottom. Now moving on to creating
our brush with this shape. For that go-to action, tap on, Add, Copy Canvas. Go to the Brush Library. Here. Our first step will be to
create our brush folder. For that, I'll tap
on this plus sign. And I will rename this
folder as stitches. You can rename it with
any name of your choice. Now to create a new brush, I will tap on this plus sign. This will open a section with all the settings to
create a new brush. Now here my first step
is to go to Shape. Tap on Edit, Import Based. This will paste our shape that
we copied from the Canvas. Next step with two fingers on this image that will invert
the image and tap Done. Next step is under the same
section under rotation. I'll move this to extreme right. For next steps, scroll down. Under tilt roundness. I'll keep that to Max. Next, I'll tap on Apple Pencil. Here. I'll keep my opacity to 0%. This will help our brush
to be a 100% opaque. Now for the next step, I'll move to sure dab on orient to screen
next under stroke, but we will adjust our spacing. Here. You can experiment with different space
between the stitches. Next, I'll go to properties. Here you can adjust the
size of your brush. Here there are two options, that is maximum size
and minimum size. Your brush size will
be between these two, maximum and minimum
size percentage. Now to rename this brush, I'll go to About
this brush section. You can rename your brush here. I will rename this brush
as running stitch. You can even add your name and your signature under this name. Now, tap Done. Now let's try this brush. I will hide this layer. I didn't new layer. I'll select any bright color. And this is how the brush looks. There's another setting
that I would like to talk about is how the brush
looks in your life. And the properties. There's option called
use stamp preview. If I switch on that option, this is how the stitch looks. If you don't need the
stamp preview option, I'll switch off that option. You can adjust the size
here. And the preview. If I reduce the size, this is how the brush looks. And if I increase the size, the brush will also look bigger. Now the best part is
you don't have to repeat all the settings
for each brush. Let's move on to
the second brush and see what changes
you will need.
3. Fern Stitch Brush: Let's move on to our second
Brush, font, stitch brush. Now for this brush, we will not be
repeating a lot of settings we did for
our first brush. We will be using our first
brush as our base brush. This will be a shortcut and it will save a lot of
our time and efforts. Now, our first step
is to go to layers, and I'll duplicate
our first layer. Hide my first layer, select my second layer. And when you select, you will get this
option called snapping. Make sure you're snapping
and magnetics is on. This selection will help
you with the guidelines while you're moving your
illustration around the canvas. I will make this oval smaller
and place it in the center. You will see these
yellow golden line when it is exactly
in the center. Next, go to layers and
duplicate our second layer. I will rotate this shape around 45-degree and move it
to right top corner. Next, again,
duplicate this layer. Select this layer
and flip vertical. Now, drag it down
to right corner. You can follow the guideline and align it with our
previous shape. Now, our next step
is to go to action. Add, tap on Copy Canvas. Next, go to Brush Library. And I'll duplicate
our previous brush. That is the running
stitch brush, dab on duplicate brush, tap on Shape, Edit,
Import, Paste. This will paste our shape that
we copied from the canvas. We don't need to tap into
finger on this image. When we duplicate
our previous brush. We don't need to do all the settings we did
for the first time. The only setting that we need to adjust here is undisturbed, but that is the spacing. And also under About
this brush section, we need to this brush. Let's try out this brush
with a bright color. Some more examples of similar brushes that
you can try out. Now, moving on to
our third brush, That's the blanket stitch.
4. Blanket Stitch Brush: Let's move on to
our third brush, that's blanket stitch brush. If you are directly
coming to this lesson, make sure you follow the
running stitch brush first as all the settings
are done on the first brush. And we are using that as a base for all the
other brushes. Now for the blanket
stitch brush, my first step is to
create the shape. I'll duplicate our first layer, that's the running stitch layer, and hide this layer. I'll select this shape. Make sure under snapping your magnetic and
snapping is on. Select free form. And I will just make it a little longer and move it
to the top of the. Next I'll duplicate this layer. Select the shape and rotate
it to make it vertical. Move it to the right side of the canvas to form this shape. You can erase the god knows, if it isn't overlapping for you. Next step is to go to
action and copy canvas. Next you can go to
the Brush Library, duplicate our previous brush. That's the feather stitch brush. Tap on the brush to
open the settings. Go to Shape, Edit,
Import, Paste. This will paste our she'd
be copied from the canvas. That done. The only setting we need to adjust is under stroke, but that's the spacing. You can experiment with the spacing between
the stitches here. Next to rename brush, I'll tap on about this brush and you
can rename the stitch here and tap Done. Now, let's try out this
brush with the bright color. Now let's move on to our
fourth stitch brush.
5. Chevron Stitch Brush: Our fourth brush
is Chevron stitch. If you are directly
coming to this brush, makes sure you follow our first stitch brush
that's running stitch. We have done all our setting
on our first brush and using that as our base brush
to create new brushes. Now our first step
is to go to layers, and I'll duplicate our
horizontal oval shape. I'll pull this layer on
top and hide this layer. I'll select this shape. And a free form option. Make this thinner and smaller. Make sure you're snapping is on. So when we're moving this, you can move it
exactly in the center. This golden line will guide
you for the exact center. Next, I'll duplicate
the vertical oval shape that we used for
our blanket stitch. On hide this layer. I'll make this shape in
the center and also tends to rotate the shape to around 45 degree and
place it in the center. Next, I'll duplicate this layer. Flip horizontal and drag
it to the right side. I'll select both of these slant Laos and place it in the center. I'll select all the layers and
shifted on the upper side. Next, I'll duplicate our
smaller horizontal layer and move it to left
bottom corner. There's not enough space here. So I'll select all
the layers and shifted towards the right side. Make sure the
vertical line falls in the center of this
horizontal line. Now, our next step
is to go to action, add and Copy Canvas. Once you copied the
shape on the Canvas, you can go to the Brush Library. I'll duplicate our
blanket stitch brush. Go to Shape, Edit,
input and paste. This will paste your shape
from the Canvas and tap Done. To try a brush and clear
this preview section, you can go to drawing pad. Clear the drawing pad. You can also adjust
the size here. And now you can dry your
brush in empty space. Next I'll go to Stroke Path and you can adjust
your space here. Under About this brush section, you can rename your brush. Let's try out this
brush on the canvas. Now moving on to our fifth
brush, that's lazy daisy.
6. Lazy Daisy Stitch: Our fifth brush is
lazy daisy stitch. My first step is
to go to actions. Canvas, tap on drawing
guide, edit drawing guide, tap on Symmetry, option, quadrant, and tap Done. Next, I'll select a black color. Go to the brush library. Under inking, I'll select
my studio pen brush, add a new layer, and I'll
start drawing a flower. If the symmetry is not working, you have to go
back to the layer, tap on the layer and tap Drawing Assist in
one of the square. I'm going to draw a petal for the flower, the black color. Next I'll go to the layers, tap on the layer and tap Alpha Lock under
the brush library. I'll go to airbrushing
and select my soft brush. Select a white color and add highlight to
one of the petal. Next I'll go to layers. I didn't new layer. Go to the
brush library under inking, I'll select my studio pen
brush, select black color. Make sure that
drawing assist option is activated on your new layer. I will draw a tiny stitch shape in the center of this petty. Fill it with the black color. We are done with our shape here. Next I'll go to action. Add, Copy Canvas, tap
on the Brush Library. Duplicate our chevron
stitch brush, tap on the brush, go to shape. It didn't import and paste. This will paste our
shape here and tap Done. Now the only setting
we need to adjust is under stroke, but a spacing. You can adjust the shape
between the two. Here. Next, under About this brush, I'll rename the brush and tap Done. Let's try out this brush. In my next class, I have few more example
of stitch brushes.
7. More Examples: Let's see some more
example of stitch brushes. I'll tap on the Brush Library, go to running stitch brush. And I'll duplicate this brush. I will be showing you a
few settings that will change this brush into
an absolutely new one. I'll tap on the duplicate brush. Here. I'll go to Shape. Scroll down. Here you can see this big circle with three tiny circle on it. I will hold one of
the tiny circle. And when you move, you can see the change
happening to the right side. Next I'll go to Stroke Path
and reduce the space between these stitches and tap Done. Now, when you compare
it with your first one, you can see the change here. It's a very slight
change and it can be a variation to your
basic running stitch. Next is, again, another variation
to your running stitch. I moved this oval tiny
shape on the top. I'll make it a little thinner. Duplicate this shape and
I will pull it down. Copy Canvas. Go to brushes. Again. I'll duplicate our
running stitch brush. Go to shape and paste
the shape and the shape. I'll scroll down. Again. I'll move this tiny circle
and align them together. Just my shape. And here we have a
double running stitch. Next I'll rotate our shape
and make it a little longer antenna with the
free form selection. And I place it in the center. Copy canvas. Duplicate our stitch. Tap on the brush, go to shape. It didn't input and
paste that down. Under shape. You can see this
option called Scatter. Scatter your shape Li, which will help you with a more hand-drawn effect
next under stroke. But you can experiment
with the spacing to this stitch will be
very helpful when you need a patchwork effect. Next, I'll rotate this
shape around 45-degree. Move it towards left. Duplicate this shape. And flip it horizontally
and move it towards right. To form this criss-cross effect. I will go to action. Copy canvas. Go to the brushes, duplicate one of your brush. Tap on the brush. Shape here, and tap Done here. All you need to do
is experiment with your spacing and a
herringbone stitch is ready. Now for the next brush, I will be working on a
horizontal symmetry. For this, you need to switch
on your drawing guide. And I will draw a
loop like a flower, fill it with the same color and add highlight in the center. Duplicate a brush under shape, you can paste your shape here. Tap Done. This is a very good variation
for your phone stitch.
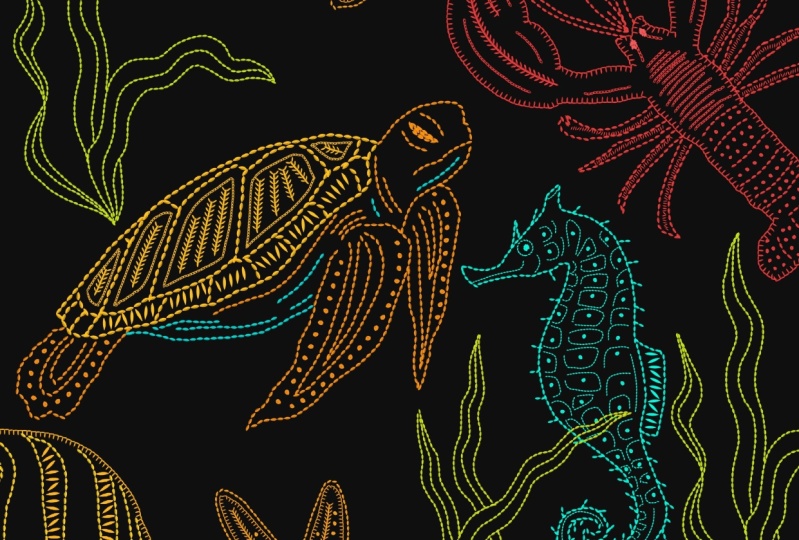
8. Sea Animals Pattern With Stitch Brushes: Animals. Have my sketches ready here. It's on just one layer. I'll add a new layer. Start with the lobster first. Select a bright color. I'm going to select
a nice bright red. Select your stitch brush. I've done these elements
into a seamless pattern. I hope you enjoyed my process. Let's move on to
the second print.
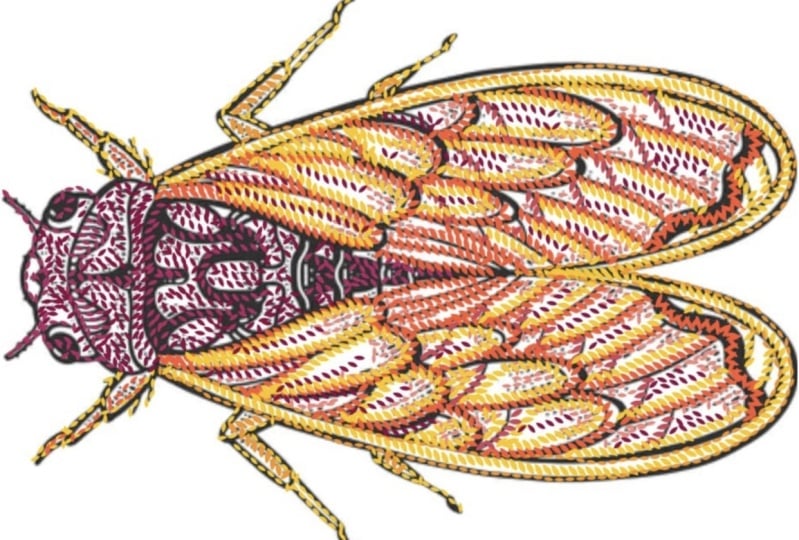
9. Insects Pattern With Stitch Brushes: Insects. I will reduce the
opacity of my sketch layer. I've switched on drawing
assist for all my layers. Select a gold yellow color. Select a brush from
stitch library, and start illustrating my
elements for my pattern here.
10. Project & More Examples: For your class project, you can create any stitch
brush of your choice. Once you're done creating
your favorite stitch brushes, you can even create
an artwork or element using this
stitch brushes. There are plenty of
examples of the brushes. You can choose your
favorite brush and post in the project section.
 Vinita Upadhya, Illustrator & Pattern Designer