Transcripts
1. Intro: Do you know what the most popular front end
interview question is? It, can you build a counter? Today? We're going to walk
through everything you need to know to build your
own project using React, including how to
build this counter so you can ace your
next job interview. Hi, my name's Zoe. I'm a software engineer
and former professor who loves educating others
on how to learn to code. I've created tons of websites
and web apps using React, CSS, HTML, and other technology. By the end of this course, you'll be able to do this for yourself. Let's get started.
2. Course Project: Class project. The project for this
class is to build a fully functioning counter
using react for this. You'll need access
to a computer and a code editor like
visual studio code. You should also have
some understanding of Java script as well
as HTML and CSS. I'll leave links
to any assets and resources you'll need in the project and
resources tab below.
3. Why React?: Why React? React
was developed at Facebook and released
to the public in 2013. It was initially created
in order to handle inefficient page reloads
and updates that at the time required
the entire Dom or document object model to be
repainted With each update, React, fix this issue by creating what they
called the virtual Do, a representation of
the Dom in memory. This allowed React to only
update those aspects or components of the Dom that changed rather than
the whole page, resulting in better performance. React has been a game changer in the web development space and is still one of the most
popular libraries out there. Due to its use of components, developers are now able to write modular code much more easily, which allows them to develop much more efficiently
and effectively. Other popular frameworks which are often compared to react, include View and Angular.
4. Components: Components. Components are re, usable pieces of
code that react, leverages in order to
maintain its modularity. Think of them as
the building blocks that developers use
to create apps. A component is a
self contained, re, usable piece of code that encapsulate its own functionality,
state, and structure. These components can be
thought of as a combination of HTML and Javascript or JS, which is used in react. Each component can
have its own state, which represents data that
can change over time, and a set of properties
or props that allow parent components to pass down data to
their children. Just like HTML has elements
within other elements, React has components
within other components. These internal components are considered the children
of the outer components.
5. Props & State: Props and state. To really understand and use
react to its fullest, we need to talk about
state and properties. Or as they're called props. Let's look at a basic component. These components are really at their base, just functions. They may take arguments, they may modify variables, and they may return a value. Simply speaking, we can think of props as the arguments
that are passed to our function when
it's called state as the local variables that only exist within
our given component. We'll expand on this
definition later, but it's important to
understand how it works first.
6. Create React App: Create react app. There are several ways
to set up a react app. In this course, we'll go
over the most popular. The original way to
set up a react app was by using create
react app, or CRA. Since React is a library and not a fully
functional framework, in order for it to work fully, it needs several other
pieces like build tools. Create React app was also developed by Facebook
in order to remove a lot of this
complexity and turn it into a simple but
powerful command. By using create react app, you'll save yourself
hours of headache when trying to start up a new react project
for the first time. To run create react
app, simply enter px, create react app, followed by the name of your app into
the terminal and hit enter. After a few minutes,
you'll be all ready to go. You can run the command for
yourself in your terminal if you'd like to see what
create react app looks like. We'll be using it
in our project. Using create react app is fine for a small project
like this counter. However, I'd caution you
against using it to build anything larger as it's no
longer being maintained.
7. Bootstrap: Bootstrap. Bootstrap is one of the most popular CSS frameworks for developing
responsive websites. It's free to use open
source and is especially good at building mobile
first web pages react. Bootstrap is based off of
HTML, CSS, and Javascript. And actually provides a set of pre design components,
templates, and styles that allow developers to build
and iterate quickly. It's also designed to
work across browsers, which is great for
ensuring that your app displays correctly
for all audiences. We'll be using
React Bootstrap to speed up our development
process today.
8. React Setup: All right, so now that we understand a little
bit more about react, let's go ahead and build
out our very own counter. As I mentioned, this is
a really important thing to understand how to build, as it's one of those things
you're going to be asked in a few job interviews
and if you decide to go and pursue the career
of front end developer. So let's jump into it.
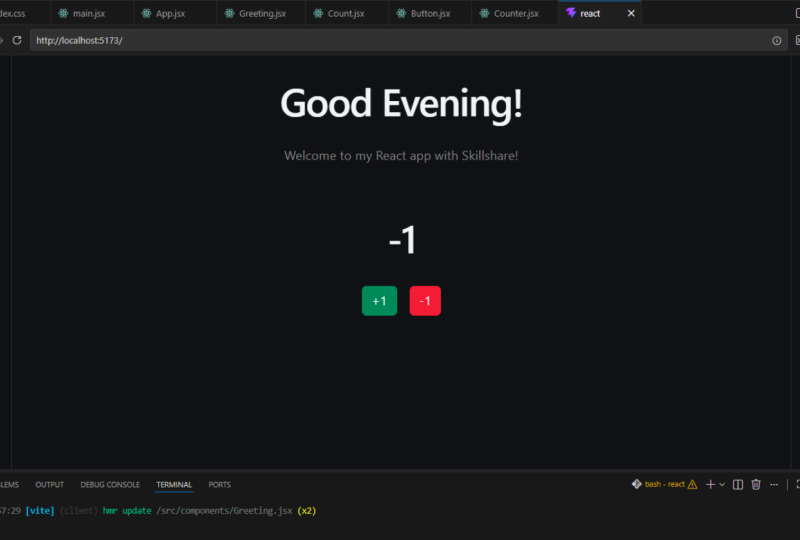
So right here you can see what finished
counter could look like. There are not a
lot of styles and designs, but it's fairly simple. But in terms of the
logic, it's functional. What they'd be looking for you to do is create
something that displays a number and then
allows you to add to it. So you can add one or you
could subtract one from it. Pretty simple, but let's go into how we can
actually build this. If we hop over to
visual studio code, the first thing we're
going to want to do is to create a react app. As I mentioned before,
we can use create react app for this project
since it's so small. But in the future
we'll talk about using solutions such as. Next, we're going to
go ahead and start our Create React
app, PX createapp. And then we're going
to name it Counter. That's going to take a couple
of minutes to get started. Let's hop back into it once
it's finished building. Now that our create react app has finally built the folder, let's go ahead and
start working with it. I'll change directory
into the folder. And there we go,
we have it open. All right, so let's go
ahead and open this out and see what kind of files and folders
we're working with. So on the left hand side here, you'll see that we
have a bunch of different folders that
have basically been created for us as a result of
using the Create React app. As I mentioned before, React is a library and
not a framework. So it does require several
other build tools to be installed with it in order
for it to work properly. So if we take a look
at the Read me, this will tell us a little bit more about how to
work with create, react app, what
things we can do, what commands we can run. If you've ever worked with
NPM or note in the past, you should be familiar with
some of these commands. If not, let's briefly
you should be familiar with if you've ever worked with Node or
NPM in the past, you should be familiar with
some of these commands. Let's walk through
the ones that create react app offers for us. So we have NPM Start which will run the app
in development mode at local host 3,000 Local host 3,000 is the location of
choice for running the app. This is just based
on a configuration that was set by the
create react team. Then you have another
command called NPM test. This allows you to run
tests on your react app, and we'll take a look at
those tests in a second. We also have a production bill that will create a
production optimized build. We have eject, which I haven't
personally used too much, and then we have just a little bit more
about what react is, how it was built, how to use it properly,
things like that. So I encourage you to
read through this. Read me if you haven't
read through it before it has a little bit of information there
that might be useful. As I mentioned though, create react app is not currently being maintained
into the future. So it may or may not be up to date information by the
time you watch this video. All right, so now let's take
a look at the package Json. So again, if you've worked
with NPM before or Jason, you might be familiar, at least, with the format and
understand that this is sort of one of those
necessary files when you're building
out a project. So the package dot Json file contains various
different elements that will help us identify our project and understand
which versions we're working with of the different dependencies that
we've installed. So at the top we have the
name of our package counter. We can always change
this, if we don't like it, we have
our own version, so just our first version
whether or not it's private. And then the
dependencies that we have that are already installed. So we have the testing library, we have react, react, et cetera. Now we have our scripts.
The scripts that we were just going over
in the read me file. Um, so basically what
they've done here is created a script
that's NPM start. But what NPM start really
runs is react scripts start. So it's a bit of a shortening of a longer command just for our
convenience as developers. We then have some ES
link configurations. Es link comes pre installed
with create react app. We have a list of the browsers that we want to work with in production and also in development. That's
pretty much it. The package Jason is not very elaborate in
create react app. There's a few key things
that we need to work with. But it will grow depending on the size of your project that
you're working on. And as we install new things. Speaking of installing new
things while we're here, let's go ahead and
install, react, Bootstrap, and see how
it updates our packages. Going back down to
the terminal here, we'll type in NPM install. And we're going to
install two packages. One is react bootstrap, and the other one is
just bootstrap itself. These two packages together
will allow us to work with the full Bootstrap functionality that is available
to us in react. We'll just sit here and
wait for that to install. I believe there's one more
line of code we need, So let me go ahead and grab that from Bootstraps
Documentation. If we go to Bootstrap React
and we click Getting Started, we also want to import, yeah, see down here where it
says style sheets and CSS. We want to import this
in one of our files. As we go down, I'm
going to copy this. And then when we get to that file I'll make
sure to import it. All right, heading back
to our package A Jason. You'll see here that two
things have changed. So we've installed in
our under dependencies, we have bootstrap, which
has been installed. And react bootstrap. So those are the two that we've just asked to be installed. We've just, you know, made
the request at NPM and they've installed us
for it correctly. As you can see on
the bottom here, there are also several
vulnerabilities. This is due to, again, the project not
being maintained. But as I mentioned, it's one of the easiest ways if you're just trying to get started with
react and learn how to use it. Create react app is
really a sort of straightforward way to
learn how to use react. There's a very, I
would say there's a lower learning
curve to some of the other options that
are currently available. All right, so let's go ahead and we'll take a look at
the other files here. So we have a Git ignore. So if you worked
with Git before, you'll know that Git is
a version control system that allows you to save
your files and save different versions of your
files in case you ever need to revert or go back to an earlier version of a
file you're working with. But in our Git ignore, we'll see all the
files in the folders that we basically
have pre defined to not commit when we are pushing our code
potentially Github, so our node modules folder here. And that's because node modules is a very large folder that includes a lot of data from various dependencies
that if we were to push, if we were to add to our Github would sort of bulk
it and bloat it out. So we don't really
want to push that. That's something that
can be installed based on the package
on Jason versions every every time we clone our file again or
somebody else clones our work. We also have some
other pieces including the coverage in the
build folders and some miscellaneous
files as well. All right, let's hop
into the good stuff. So we have two folders here, we have public and
we have source. So public is where all of
our sort of like images and things that are currently
being shown on our app, our living right at the moment. As well as our index
dot HTML file. And then we have our source, that which has a whole bunch of other files in it as well. So let's dive into these two. And what we can do to
actually really get a good idea of how these two
work is by starting our app. So remember I mentioned in
the package dotson foul, there was a script
called NPM Start. Let's go ahead and run that in the terminal and see
what it brings up. So we'll type NPM Start. We'll hit Enter and
give us a second. Start the development server. And right, good,
we're good to go. We have this
spinning react icon. And then it says Edit Source
Apps and safe to load. And then learn React that
links to the S documentation. Awesome. So at least we know
that our app is working. So let's go back to our files and now see where all
this stuff is living. And what we're going
to do, we're going to leave this terminal window open just so that our app keeps running in the background. So if we go to our
public folder, typically in HTML, all of our information is
stored in the HTML file. So when we open this, this
was a regular HTML project, we would expect to find
all of that information, all that stuff we just
saw there in this file. However, when we look
here, it's not there. We have our head
element here and a lot of meta data here. Things
that we can change. We can change the name
and the content here. However, if we scroll
down to the body, you'll notice that all
of that information that we just had in our
browser is not available. You'll see that in the body
there are just two elements. The no script, which
tells people who don't have Java Script enabled that they need it
to run this up. And then there's a singular
div that is empty, which is really interesting. Where's our project
actually coming from? Then if we have a div
that is completely empty, it doesn't really make sense because if we go
back to the page, we see that we have all
of this information. I mean we have text and we have a spinning icon and
we have a link. Obviously, this has to
be living somewhere. Right, well, if we
go back to our div, let's take a look at it closely. We see that it has
the ID of root. So that means that maybe
somewhere along the way that is targeted and that
root means something, right? So if you watched
the previous video I have on Java script,
you'll understand that. You'll probably remember
that. You'll probably remember that there's a method
called get element by ID. So let's hop over to our index dot JS file over on the left here.
And take a look at that. So looking in our
index dot JS file, we have a whole
bunch of imports. So we are now in the
Javascript world, right? We've sort of transitioned from HTML into fully Javascript. And when we see, but it's not quite Javascript as
we're like used to it, I mean, you see we
have these kind of like div element
like structures. So let's kind of go down line by line and see
what everything is. So we've imported
react from React. Again, working with NPM. We installed that
package called React, that library called React, and we've now imported the
instance of react from it. We have import react, import index CSS, which
is just the CSS file. Import app, which is
another file down here. And then import
report web vitals. Where I want to
really start to pay attention to is on line
seven here where it says constant root equals
react dom dot create route. Then within this create route, it says document dot get
element by ID route. Obviously, something is going on here where we're getting
that root element, we're getting that
div and now we're creating some sort of route
based on that element. So we've done this here, we've created a
route on the react, and we've created this
variable route, right? Then we say root render. And within that now we're
rendering react in strict mode. And then within that we're rendering this app,
this app thing. Now, based on what
we read before, app was just a Javascript file. But both of these are in these weird like element
type structure, right? So that's this JSX thing
we were talking about. This Javascript sort of
mashed up with HTML, which allows us to write
HTML within Javascript. So let's go ahead
and dive into apps. Apps looks like a fairly
normal Javascript file, but it does have that JS HTML and Javascript
combination going on. Now as you can see, it's just a regular
function called app, and it returns
this HTML element. It's really a master
bright there. What this is, is
actually a component. Those things that we were
talking about before. Components that have
their own display and their logic and everything contained app right here
for us is that component. Now if we go through
line by line, we'll see that it imports
a logo from logo dog, but that logo from dot logo, dot Sg, which is in the
same source folder. It imports apps, which
is that style file. And then it creates this
function called app, and then at the
bottom, it exports it. And then in that index
JS file, it imports it. Right? In apps, we return a div with a whole bunch of elements
in it, inside it. So it has a div with a
classamepphadermagelogoitcedemagelogoI'm. Thinking that's that React logo that we were talking
about before. And then we have that
line of code we saw. We have that line
of text, we saw. It says it, source slash app
dogs and save to reload. And then at the bottom
here, it says Learn, react. Now if we go back over here, this is exactly what we have. We have our logo, we have edit, source apps to sit and save to reload. And we
have learned, react. So we finally found the place where all of this information
has been living, right? So understanding react
a little bit more. And understanding the structure, we have this larger
index dot JS file, which actually holds all
of our information, right? It basically is where
everything sort of piles into. But then within index, we have app apps, which is where the information, the logic that we're
actually going to display really lives. And now, before I
forget who as we're in index dogs in order for
our react bootstrap to run, if you remember, we have
to make sure that at the top of the file we
import the bootstrap. Cool. We should be
good to go now. All right, so now
that we kind of understand the structure of
our app a little bit better, let's go ahead and
work with apps, and let's start to build
out our components.
9. Building a Counter: This is an older style of
component that we're going to transform into what we call an arrow
function component. Arrow function components are just a more
syntactically clean way to write and build components. This is not strictly
necessary to do, but I'm going to do it because
it's a good practice to be able to know how to do this and to show
you how to do this. If we go ahead, we're going
to actually change this. So it says constant app
equals equals arrow, and then we're just
going to hit Safe. All right, And we've
just transformed it into an arrow
function component. Awesome. We're a
little bit more modern already then when we
look at our app here. When we look at source apps, we really don't need much
of this or any of it. To be honest, what we're
going to be building, the counter is really just a singular page
with a few elements. We can get rid of most of this. I think one thing that
we can do right here is just clear out everything
that's in app right here. We'll keep the overall di, for app, but we'll clear out everything that we're not
using and we'll save it. All right, and so now
we have our empty app, and if you see we just
have a plain white page, which is exactly how
we want to start. If you were starting a new
create react app project, these are the steps that I'd
recommend you take, right? You get your project,
you clean it up, you install the
packages you need, and then you go ahead and
start working with it. All right, so moving
forward now there are a few other best
practices we want to employ when
working with React. So first things first, within our source folder, we're going to create another
folder called Components. Now the reason we've
created this component is because especially when you're working on larger projects, the number of smaller files we'll start to pile
up really quickly. And it could become
very unwieldy if they are just all sitting
in your source folder. And it's not the best idea to have them all
just everywhere. It becomes very difficult to debug and define what
you're looking for. Best practice is to make separate folders based on which features
you're working on, which functionality
you're working on, just to keep things clean and simple within our
components folder. Now let's go ahead and build out some of the other components that we're going to be needing. If I write, click and
create a new file, we know that we're
building a counter. So let's start by
creating one that says counter counter Jsx enter. Awesome, We've created
our first JSX file. Now the next thing
we're going to want to do is to create our
counter component. Now there are two
ways you can do this. There are sort of like autocomplete ways
that we can do this, or there are manual
ways we can do this. So if you do have the
extension installed, you can type in R, A FCE, which is S seven
snippets, the ES seven, and react snippets is the extension you want to install if you do
want to work with this. And what this will do
is actually just build out this component for us. So we're going to hit Enter so we can see what
it looks like. Then we'll go ahead and
build it out manually. So if we hit Enter,
you'll see that it actually does all the
heavy lifting for us. It imports, react for us. It creates an element
called counter. It returns a bracketed
element with a Dave already. And it says counter and
exports it for us already. This is a really awesome way
to do everything manually. We're going to use this one to do everything without having
to type it out manually. Getting rid of that.
If we're going to do it ourselves again, we just impact from react. And then we would go ahead
and create a counter counter. Also, another thing about
react components is that the first letter of the component must
always be capitalized. That's just part of the
syntax that's required. Cons counter equals
our function, and then we're going to return
a div that says counter. All right, and that's
all we have right now. And then we're also going
to export default counter. All right, so there we
go. We're good to go. We have our counter, we have our counter
component created and, you know, it's good to go, but if we check our page, it's not going to
show up, right? Because nobody knows
the counter exists. Right now, the counter
is just living in its own components folder, in its own little file, and it's not doing anything. So in order for other
people to know it exists, we need to import
it to which file? Our app file, because the app file is a file that
is currently displayed. So let's go back up to app and then we are going
to import counter. And a really cool
thing is that we can also auto import VS code has some intelligence in it and so if we type in with the. The open angle bracket and then the name
of the component, it'll actually prompt us to just import it from
our components holder. So it's really
convenient if we have to import a few different
components or, you know, without
having to import it and then bring
it into the file. It's just a really
quick, intelligent way of working with it. And the final thing we want
to remember now is that if our counter or our component
does not have any children, we want to close it
off immediately. We want it to be a
self closing element, so like this, tops like that. Perfect. So, but what does having
children look like? Right, as you can see right now, Counter is an app that does
not have any children, but if we wanted it to be an
app that took in children, we could always put it just like a regular HTML element and then add the
children within it. Right. And it would
work just the same. So that's this funky
combination of Java script and HTML inaction. Awesome, so let's get rid
of the second counter. We don't actually
need it, and let's start working on our app from
within our counter files. We're kind of done
with apps for now. We don't need our index ML at the moment unless we want to change some of the metadata. We're just going to
focus on counters. All right, so we
have our counter. We have a div, and all
it says is counter. And if we look on
our page right here, we'll see that it
does say counter, so we know we've hooked
it up correctly. Now if we go back to our page, we have to think about what
the elements that were in that initial design were, right? We had that number, we had a red button
in a green button, or a plus and a minus, but they don't have to be red and green. So we want to make sure that we build out all of those
elements, right? All right, so let's go ahead
and start building that out. So within this div
I want to create, let's do, let's make it
an H one for the number. So we're going to start at
zero and just save that. And then below that we're going to create the two buttons. And instead of doing it manually
or styling it manually, we can actually use
React Bootstrap to style them a little
bit more dynamically. We'll use the button
from React Bootstrap. As you can see, it also gives
us the intelligence and asks us to auto import it.
We'll add that button. We can use what is called a variant React bootstrap
gives us an option, a property called variance. With those variants, we can
actually just use a name, like a property that
has been predefined, much like attributes on HTML, and give it some
specific stylings. As a result, there are two variants we're going to
want to work with today. One is called Success.
We'll close that out. And then this will be
our plus one button. And then the other
one is going to be, I believe it's danger, but yeah, we're going to take our button, copy it, paste it. We're going, I think
it's called danger. We'll type in that second one and change this to minus one. So let's take a look
at our page and see if it worked great. We're like 90% of the way
there with the design already. So we have our green
button, which is plus one, and our red button, which is minus one.
So good to go. But one more thing that
I do want to fix up a little bit is just
where this is displayed. Because right now it's really high on the top of the page. Not really ideal for
viewing properly. So we do want to just kind of push it down on the
page just to tat. So the way we're going
to do this again, is just fixing up
our stylings, right? So if we go to our
counter element here, we can actually
add some margin to the top of it just to give ourselves a
little bit more room. So we can either create a CSS file to add
all our stylings to, or we could use inline CSS. Now, inline CSS is something that basically
is what it says. It allows us to literally write the styles
in the same line. It allows us to literally
write the styles in the same line as our HTML, which I think is pretty cool. You might have used it
once or twice before in your HTML before, but it's much more common
practice when you're working with a React because everything is much more compartmentalized. So if we wanted to add our
style in here to our Div, we just type STYLE style. And then we would use
two curly brackets in order to use the dynamic
ness of the inline styling. So we'd want to add some margin. Let's just give it an all
around margin of four Ram. And save that, if
we go back here, great, we have a
little bit more root. I'm going to add a
little bit more spacing maybe to the right of
our green button here. And so let's do, let's add that same style property
and we'll do margin, right. Again, another really interesting
thing about react, right? In HTML you would type
in margin, right? But because we're
working with Javascript, we actually want
to use camel case. The, there'll be no hyphens when we're typing
our CSS and JX. We'll do margin, right? And then we'll type again in a string what our
margin should be. I'll save that.
Perfect. All right, and we have a
little space there. And then let's just add a
little space below the header. And we should be good. So we'll do the same thing one more time. Style, equal margin, bottom. And then we'll put two ramp. We check there, I think we're pretty good to
go with the styling. We could always do
a lot more with it, but typically in an interview, they're not going to ask
you too much more in terms of styling
past this point. So let's jump into the
logic and start working on actually making this
a functional counter. Alright, so the next thing
that we're going to want to do now that we finish with
our basic stylings, is start to work on
our actual logic, our displaying of logic
and things like that. So if you remember, we
have this zero, right? And when we hit the plus
button and the minus button, we want something to happen. Now, if we remember
from our Java script, we require like an
onclick function or, you know, something to be
passed in that onclick function in order for something
to actually run, right? So let's go ahead and start to implement that in a react way. So as I mentioned before, react has this thing
called state, right? So state is literally the given status of
anything that's going on. The given state of what is
happening within a component. So there's a way to
actually interact with the state that we will use
specifically with react. The concept of state is a
little bit abstract at first, but it'll become a lot more
concrete as we work with it. So the first thing I
want to do, right, instead of having this
number being zero, we want to be a little
bit more dynamic, right? So I'm going to
create a variable called count equals zero. So let's start by
replacing this with count, right? Nice and simple. Nothing too crazy so far. And so if we check here,
count has remained zero. Good, tick up. But now that we've changed count
to be a variable, we can now work with it a little bit more
dynamically, right? So as I mentioned, we want to use this
thing called state. React also has this thing
called hooks, right? Hooks were introduced to react a few years ago in order to make using state within
an element much easier. Prior to this, state
couldn't really be used in an element in the way
that we're using it today. So what we want
to do in order to use state is to
actually import a hook. And what a hook is is really
just a simple component. That's what hook is, is really just another function
that's sort of extracted away and we're just importing its functionality in
order to work with it. All right, so let's import
used state from react. Great, so now we
have used state, we're going to modify
the way that we're working with the
variable count, right? And I know you're thinking
well, couldn't we just call a function and do it on click
and et cetera, et cetera. There's a better way to
do it with the react when we're using state there is
the actual variable itself. Then there's a set, something
called a setter that allows us to set the
value of that variable. Now the way that
we can initialize this is through a bit
of specific syntax. We wrap our actual variable
in square brackets, that is our initialized variable and then we put a
common next to it. And then the typical
convention of the way we write this is putting set in front of the name
of the variable. If our variable name is count, we'll use set count in order
for that to be our setter. And then we'll bring in
use state when it comes to the act, initialized
number itself. We'll type and use state and wrap this in that function call. So now you see that
our set count has changed to an actual
function itself. It will be used to
help us set the state. It hooks into that U state hook and allows us to enable
that functionality. And then we have our U state working and
doing its magic there. So you'll see that set
count is underlined still because we actually
have not used it yet. But we'll use it
in just a second. And if we check back
on our page here, we'll see nothing has
changed so far because the initialized value
has not changed, right? We've kept our zero there and it's working
perfectly fine. Now what we want to
do is use this setter in order for us to update the value of the
count dynamically, right? Every time we press the plus one button or the
minus one button, we want that zero to
increase or decrease. Right? So the way we're going to do this is using an
onclick function. It's going to be
a really simple, straightforward
onclick function that will take us 2
seconds to implement. So if we go to our button, right as we know, buttons
have click functionality. So we'll type in our on click and because it
Javascript again, camel case equals
curly brackets. And then we're going
to call our Set count. So we're going to use our parentheses and we
will call set count. And we're going to pass
into the parentheses of set count the value we
want it to be now, because we have the
initial variable of count. Whatever counts value
is is the state, right? So count is that piece of
state, whatever its value is, whether it's a one or 100 or 10,000 that is the
current state. So we can actually use that in our addition
function here. So we're going to take
the value of count, whatever it is at the time, and we're just going
to add one to it. So really straightforward. We're just going to type
in within set count, we're going to take count
and then plus one and save. And that's our whole
function that is going to allow us to add
one to our count. So if we try it out
and we go and hit plus one, we can see
that it's working. So we can just add, add, add, and our
whole thing is set up. Really building a counter
is not that difficult. It's just more
about understanding the logic and the tools
and the steps behind it. If we go back here, we can
actually just copy this, move it to our second button and change the count
to subtract one. We're still referring to
that same count variable, but when somebody
clicks the minus one, we want it to subtract one. Right? So really
straightforward. If we go over here, subtract, subtract that button
is now working and we have our whole
counter set up, nice and easy. Cool. This is a really sort
of first level way of setting up the counter. Right? Your interviewer might ask you to set up the
counter in this way. Initially this might
be a version one. But if you've ever done a tech interview or if you haven't yet, sometimes what
interviewers ask you to do is after you do the
version one of something, they'll ask you to iterate on it and create
a second version. So let's hop into a possible
iteration of this element. So we'll talk about
children of elements, how he pass props, how state gets passed,
and things like that. So let's hop into the
next version, two.
10. Refining the Counter: All right, so now that we have our version
one completely set, let's build this version two. So in version two, what your
interviewer might ask you, what somebody might ask you
to do in a second version of this is actually separate this out into
different components. Because one of the
beautiful things about react is that it allows you to be really modular with the things
that you're working with. And you don't have to
have everything sort of nested in one super
long HTML file, right? You can actually break things down into smaller components. As we saw with passing
counter to app, we can actually just access things as if they're
all in one big file, but keeping them
separate and neat. So let's break down a little bit more about
how we could do this. One thing that we could actually break out is the
button section, right? The actual trigger
of the component. If we wanted to go ahead
and create a new file here, we could call it
buttons and hit Enter. And if I was to. So what I
want to do with button now is just abstract that logic into its own component and
just have that live there. So what we're going
to do here is we're, we're going to create our
button component first of all, then we are going to take
the button information from counters and just
copy it into the. And we're only going to copy one and I'll show you
why in a second. We'll paste it in here. We need to re import
this over here. And this is just re
importing button from Maria Bootstrap to make
sure it still works. Then the next thing, button equals button has already been declared. We need
to change the name. We're going to call this, we're going to call this
custom button. It'll change to custom button. Yeah, so that's another important thing
that you've probably run into in job script before making sure that your
variables are unique. All right, great. You'll notice that we're getting an error with the
set count here. We'll work on that
in just 1 second. Accommodate out for now so it doesn't give us a build error. All right, cool. Good to go. So what we want to do with our custom button
now is we want to basically create it
in a way that's a little bit more modular, right? So it can be either a success
button or a danger button. It could be on the left or
it can be on the right. It could be a plus or a minus. So we want to implement
it in a way that we don't have to use it just
for the one button use case. We want to implement it in
a way that if we had a plus and a minus and a
multiplication button and you all of these
other options, we could do that
with our button. So the way that we're
going to do this is by passing it props
or properties, right? So these are things that
we're going to pass from the parent component
of Counter into the button component
that will help identify what this specific
button is meant to do. So let me show you how
we're going to do that. So the first thing
we're going to do is pass in these properties. So there are two ways to
grab the props, right? So we could, could
basically pass props like, I don't know, the variant and the number
or whatever, right? Yeah, so we can either
pass the props in like this and then grab them, you know, through our props. Right. This is a valid
way of passing them, but it involves a lot of additional syntax that will kind of make a code look
a little bit money. What we want to do instead is actually wrap these
in a curly bracket, and then we can just access
these variables directly. So I can just go constant, I don't need to now initialize a variant, a variant variable. I can actually just access
variant directly in the code. So instead of passing
success here, I'm now going to pass
the word variant, the variable, right? And so let's go and
hook this all up. So you can see what
I'm talking about if we pass the variable
variant here and we go back to counter and
we comment these two out so we can see that
it's not working anymore. Right, we're going
to actually import, we're going to take
this import out here and we're going to
import our button, our custom button from
the local component. Import button from not
from Maria Bootstrap, but from slash button. So import custom button from. All right, and we're
going to then use it. Here we go to pass is
create a custom button. Right now it's just a
random blue button. I can even comment this out. So we'll comment everything out except for the variant so we can make sure we're
doing a good test. It's random button number,
nothing there in it. What we can then do now is actually pass in our properties. We'll go variant equals
and we'll type in success because our first one was success, our
second one was danger. Now the variant button is green. We know that by passing in our property from counter
to custom button in a. Property in the
property of variant and then calling it bring it and then accessing it in custom button and
using it as a variant, it just pipes it right through. Right? We're just
drilling the prop down from counter to button. So we can do this, so we can do this with any property that we want to
work with, right? So if we wanted to then do
the same thing with style, right, If we had specific
style requests we'd want it. We do margin, right? One Ram, right? And if we go back to
button now instead of number, we'll import style. We can do style equals style. Actually we don't
need the double, we just need one style, right? And again, we can't really tell, but you can see it a
little bit off center. We'll have that margin, right? All right, so this is a really quick way we could start to use properties in a really
dynamic way, right? So that if we create
a second button, now we already have two
buttons to work with. And we didn't have to do a
whole lot of work, right? We didn't have to go ahead and write the variant
and write the style. And this and that, we
just had to write in a, we just had to update a couple
of simple fields, right? So this one we're going to
change the variant to danger, and we're going to remove
the style element here. Now we should have a
green and a red button. Perfect. Going really well. Now the other couple of
things that we want to include are the plus
one and the minus one, as well as the onclick function. Right, What we want to do for this to all work
properly is two things. We want to pass whatever whatever the number is
within the custom button, and then we also want to
pass in the function itself. So if we actually change this from to not be a self
closing element and we, as we talked about before, we're going to have it be just a regular element that
takes children. We'll put in plus one
in the first one. And if we go over to Button now, we want to access
something called Children. There's a special
property called children. Yeah, there's a special
property called Children that allows us to access
anything that is nested within a react element. What we'll just
do here is within our button will access instead of where we
just had the plus one, we're actually going
to change that to say children. And save it. Then if we look here,
react has figured out that because the plus one was a child of our
custom button here, we wanted to be a child of the custom button there as well. Now that we've
indicated that we want to use a child
there, the children, all the children now will live within the custom button
element. That makes sense. So we've just taken
the plus one here, taking it to the button here, pass it as children, which is a special prop. And then passed it
to our page itself. Let's do it one more time, but with our minus one. So we're going to
change this here, make it a non self closing element, just
a regular element. And we're going to do minus one. We're going to save that then don't change
anything there, just go back to our page and
there it is. It's working. So we're just passing in
children like we would with HTML but with our buttons. All right, last thing
we need to add is our on click functionality, right? This one's a bit more, this one's a little
bit different. What we're going to do
here is two things. We can write the on
click just as we had it before and pass
in our set count, count equals count plus one. And then that would work
once we add our click. Then once we add our on click
here and click on click. So whatever you pass in the
click and take that out, that works, there we go. We're adding one
every single time. So that's one way to do it. Another way we can do it is to completely abstract away the
logic into the component. Which might be beneficial here is create a function
called add one. We'll do add one equals set
count to be count plus one. All right, so we've
just abstracted that logic into the
top of the counter. All right, so now that we've created this add one function, we can just write it in here. We can just write add one. Then our click will
actually just add. Oops. Then our click will actually just add one when we need it to. Awesome. The next thing we
can do here is abstract away this subtract one so it's a little cleaner in our
actual code at the bottom. So we'll subtract one, we'll do set count minus one. We'll save that. And
then we'll take this, subtract one and pass it as an on click in our function here. If we've done, and if we've done everything
correct, it should just work. So let's take a look.
Subtract one. Awesome. It's working just as we
expected we can get. So we can get rid of this
extra text here. Save that. And we've now added another layer to our
components, right? So what we've done is we've
passed in these variants, we've passed in the styles, and we've passed in these
on clicks to the button. The button now dynamically
calls the child. The button now dynamically
calls the variant the style and the
click as necessary. And passes in the
correct child based on what we've passed
through. It pretty cool. So this is a way of working with properties from a
parent component, so the counter component
to a child component, which is the button component. So that's just one way
of working with it. So we're going to
practice one last time, but we're going to do it
with the count component. So this is pretty
simple actually. A bit more simple than
the button itself. We're going to create a new
file and call it counts. And we're going to
do the same thing and create a count component. What we're going to use,
this count component is just what we're
using the h one for. We're going to import count
and we're going to pass in, instead of using it as a child, we're actually going to
just going to pass it in as a property. We're going to pass in count. And then we're going
to abstract away all this styling from our
component right here. So let's get rid of
that. And we'll save. And if we go back to counts, we want to now access all
those properties, right? So doing the same thing
that we did in button, we're going to use our curly
brackets here and we're going to access the
value of count. We're going to save that. And if you remember, clearly, we actually had an H
one instead of a div here for our actual displaying
of the count itself. And the cool thing
about JSX is that it doesn't really matter what
the outer component is. It could be a button, it could be, it really
doesn't matter. It could be something
called a fragment even, which is where you
actually just have these empty brackets that
don't have any value to them. What we're going to do is actually use that H one instead. So we're going to type an H
one, we're going to save it, and then we're just going to
access the value of count. And if you remember, we also had a little bit of
siling going on, so we're just going
to copied it, we're just going to
paste it back in here. And now if we've done
everything correctly, it should look exactly
the same, right? We have our account and it's
working just as expected. Again, this was really
straightforward in terms of just passing from count. We passed the value of count into the component named count, access the value of
count and displaying it. So hopefully, this
helps you a little bit understand the flow
of how JS works, how react works, how
props are passed, how the parent, child
relationship works. And again, the reason for doing this is just to make things
a little bit cleaner. Something we could even do in the button component to clean it up a little bit is display the variant
dynamically, right? Instead of explicitly writing out the variant here
in the counter file, which kind of just takes
up a lot of space and it's something additional
for us to remember to change every time we
have to change something. It'd be great if
all of our styles just kind of lived in
the button components. Let's see if we
can do that here. What we're going to do
is actually go into our button component and instead of accessing
this variable variant, what we're going to do is base it off of what the child is. So we're going to ask
this question here. So if children E
equals plus one, so this is our ad
component, right? And if you remember, our ad
component is going to be on the left hand side and
it's going to be green. We want our variant to be, we'll ask it and
we're going to want our variant to be success. And if you remember,
this is using something called
ternary operators, which we went over in
Javascript, right? So we're asking condition
a question here. So evaluate this expression. If it's true, result in
this first argument here. If it's false, however,
result in the second one, which in our case is danger. And so if we've done
this correctly, so that variant is no
longer being used, it should just still display the correct colors
of the buttons. So if we look here, yep, it still colors, same colors, and it's working
just as expected. Awesome. So again,
what we did here, right, We just use
a ternary operator. We took the value of children, which is either going to
be plus one or minus one. And we asked the question, so if the child is plus one, if that's true, we
want it to display the success color,
the success variant. If it's false, we
want it to display the danger bearing,
which you know is red. And because we did this, we no longer need this
variant prop to be drilled. Which actually allows us to clean up our code
just a little bit. Right here, makes sense. We're going to use
this one more time just to get the idea of it. So again, here in custom button, you see that we
have style on one and no style on the other. What we can do again in button is display this
based on variant. And we're only doing it this
way just because we know that our counter is not going
to change that much, right? We have a plus one
and we have a minus one and it's not going
to change that much. If it's going to change
a lot in the future, we might not want to
do it in this way. But as it's sort of
a limited scope, it makes sense for our use case. All right, so we're going
to take our style and we want to add a margin,
right, of one around. I'm going to copy that.
And I'm going to remove it from this outer
counter component. Right? So we've already
cleaned this up a lot. You know, we have,
we really just have like three lines
here and you can see sort of the value of abstracting
away a little bit of the styling displaying
into a different component, when you see how much cleaner that the parent component gets. Right. And as you can see, because we've taken it out, the margin right, does not work. It's not there. Which is totally fine because you're
going to add it back in. So let's go back to button. All right, so, and
then we're going to remove the style
from up here, because we're not going
to need it again. Save that. Remove that
there, and save that. Alright, now what we're going
to do with style here is slightly different because we're only modifying one element. We're going to check for it
in a slightly different way. So we're going to type
in margin, right? And then within margin, right? Now we're going to
ask that question. If children equals
equals plus one, we want margin,
right, to be two. N else we want margin, right, to be zero. We're
going to save that. There we have it. We've now
added our margin, right, based on whether or not the
child is the add one or not. And so this is just
a really easy way to clean up our
counter component, our parent component,
and just keep all the styles
living in one area. Right. We can still
see that we have the logic that's being
handled within counter. But counter well is now that like logical component
that contains all of the state the function
calls that then get passed to the display components of count and custom buttons. So react components are also created to have
ideally a single use. So they're displaying or
they're working on logic, but they're not doing
both necessarily. And so that is one of the
reasons that you might be asked to do this in an interview or in a potential job scenario.
11. Testing: All right, so the
final thing we want to work on today is testing. Testing is another interesting
element with React. As you saw before when we were looking at our package dot json, there were these things
that we're install called testing libraries, right? These are testing
libraries that we have access to that we can then use specific calls from in order to actually ensure that our
app is working correctly. So if we check out app tests. So right now it's failing
because we've actually removed part of what
used to be in the app. Right. It was
checking to see if, well, let's go through
this line by line. Within this test, we
import two things. Render and screen from
testing library react. We also import app from app. Now what we then we call
this thing called test. We're running a test. The test renders a learn react link. It renders app and then
it finds a link element. It accesses the screen and
then it calls get by text. It calls this method
called get by text that allows us to find
the words react. And you'll see that it's actually written
really interestingly. Here you'll notice that it's not written as a typical string. If you remember we
kind of touched on red X at some point,
regular expressions. You know this is reg in the way that this is
writing it in a way that allows us to
search for these words regardless of whether
or not they're capitalized or common letters. So you write a slash,
you write your phrase, you write another slash, and then you write an I right after. So that's just a little fun fact that you might be able
to use internets. And then the way
the test works is that the final step is
always the assertion, so what are we trying to make sure is working, is
happening, et cetera. So we expect that
the link element, which is this variable we created here, is
in the document. So we expect the link element
to be in the document. Again, as I said before, this is failing right
now because we've removed this link element
from the document. But we can actually fix
this test and make it look for something else that
is in the document, right? So because we know that our header is always going
to be in the document, we can use this link
element where we can use the same format to check to
see if our header is present. So let's go ahead and change the link element to be count. And we'll do screen, but we'll erase this bit. We'll do screen get by. We want to get it by the role. And Get By Role allows us to basically find things based
on the role they have. So if it's a button, if it's a text, if it's a label. We can use these different
roles in order to identify the actual
elements themselves. Luckily enough, we only have
one heading on this page, so we can use get
by role heading. We can use that there we expect the count to
be in the document. As you can see,
when we saved it, it already ran correctly because we're asserting
for the correct things. One more test we could do. We could do this exact same
test, let's rewrite it. But we can check for the plus
button for instance, right? We can do renders. Um, and we'll also
want to change this renders heading
just to be correct. The second test we want to
do is Renders Plus Button. And then we can
just create, oops, create the test and we'll
render app And you know, the interesting thing
which we might not even have thought about is the reason this is running
right is because all of these components
live within app. Because app contains counter and contains count
and contains button. It doesn't matter
where we're calling the test at because it
can see all of them. So just another interesting
thing to think about. And then we want to write
constant, what was it? Plus button equals
screen, get by roll. But now the interesting
thing is we don't actually we have two buttons. We have plus button
and the minus. But do we do get by roll
button and then pass? What do we pass into
the second part? Can we pass in plus one? That's potentially
one way to do it. Again, as you see, it
doesn't actually work. We are finding now multiple elements with the roll button. We can't just like say, oh yeah, we'll figure
out what it is. We need to probably give
some sort of option here. So we need to ask
like, all right, we want to find the button, but then there's
another property called name that allows us to specifically find the button that has whatever that name is. Right? So here's how
I fix the issue. We've done screen,
we've done get by roll, we've searched for
the roll button, and then we want the
button with the name of plus one to be the button that
we're looking for. Right? So that is how we
access the plus button. I'll show you
another method to do this and we can look
for the minus button. So ducts plus
button equals that. Then we want to make sure
that it is in the document. We'll say that, there we go, so we know that it's
actually working correctly. All right, so now
we're going to write one more test and
we're just going to check for the
subtract button. Test renders subtract button. We'll write our test. We'll do render of the app, that subtract button equal
screen instead of get by role. Now we're going to
use get by text. So we're going to do get by text and then it's
going to be minus one. We're going to save
that. Then we're going to store assertion. Expect the subtract button
to be in the document. We call that. If we've done it
right, our tests pass. There are two ways to
actually look for an element. I mean, there are
more than two ways, but the two ways that
we're looking at right now are using get by role
and using get by text. Now surprisingly enough,
even though get by text is the more terse
of the two options, get by role is actually
preferred because get by role, you can kind of, you
can be a little bit more sure that you're getting
exactly what you want. Say we had a heading with
the writing minus one. This screen dot get by text would actually get both
of those elements and trigger an error because get by text is literally just
looking for the text. Get by roll, on the other hand, is a little bit more nuanced, a little bit more specified
by getting by the role of button as well as the
name or another option, we can be sure or at least
with a higher level of confidence that
we're getting the correct element that
we're looking for.
12. Conclusion: Conclusion, we talked
about a lot in this video from the origins of React to building out
your own counter. I'd love to see how you decided to implement
your counter. So please leave a link to your
code or the hosted site in the Projects and
Resources tab so that I can see all of the hard
work that you've done. I do read every comment and every review and look at
every project submission. So if you do have any questions, please feel free to
leave a comment in the review section below or
to reach out to me directly. Check out my profile page for more information about that. If you'd like to learn
more about coding, check out the other videos I also have on my profile page. I also have videos on HTML and CSS available on my Youtube
channel and my website. If you're interested in
learning those, well, check them out and I'll
see in the next one.
 Zoë Davidson, Software Engineer & Cinematographer