Transcripts
1. Intro: Javascript, let's talk
about JavaScript. Unlike HTML and CSS, which are markup and
style sheet Languages, respectively, JavaScript
is a programming language similar to Python,
Java and others. What JavaScript allows
us to do is introduce logic into our currently
static or unchanging websites. For instance, if you had a form that allowed a user to
sign up for your website, wouldn't it be great if
once they signed in, they were greeted by their name instead of being given
a generic hello. This is something
that JavaScript will enable us to do. High. Zoe Davidson, a software engineer and
university professor. Let's dive into the
ins and outs of JavaScript and programming
languages in general
2. Class Project: We're going to take this little form that
we've created here, and we're actually going to
use it to give our users our response when they
submit their information
3. Programming Languages: Programming languages. So as we've discussed already, JavaScript is a scripting
language that allows you to introduce logic and
functionality to your webpages. But how does it do this? As we've also mentioned, JavaScript is a
programming language. There are several
things that most, if not all programming
languages have in common. Just like other types of
computer-based Languages, programming languages are
in their simplest forms, just ways for us to
talk to the computer. Javascript in particular,
allows us as programmers interact with the Web through the DOM or the
document object model. The DOM is a
programming interface for web documents and acts as a representation of that page so that it can be
interacted with, updated and modified based on
user input and interaction. Javascript in particular is the language that we use
to interact with the DOM. And 98% of all websites use JavaScript on
the client side, programming languages also all have their own unique syntax. Just like in other languages
such as English and French, there is syntax which defines and explains
the ways in which words come together to form sentences,
paragraphs, etcetera. Programming languages
in the same way, each have their own syntax to determine what constitutes
a complete line of code. For instance, just like in
grammar class at school, will spend a fair amount of
time learning and discussing syntax so that we can ensure that we're speaking
the language correctly. After all, think about how important commas are
in the English language. You might have heard of
other programming languages such as Python, C, Ruby, java, and others. Depending on what type of applications you're
looking to build, one of these programming
languages might be better suited for
the task than others. Programming languages all have their own unique use
case and purpose. The goal of this course
is to learn how to interact with and build
applications for the web. The best programming language
we can learn is JavaScript. There are bunch of
other things that all programming languages
have in common, including variables, control structures,
and data structures. We'll get into each of
those in good time. So now that you know a
little bit more about what JavaScript is and how it
relates to web development. Let's start writing it
4. Setup: There are two places where
JavaScript can be written in HTML files or in its own
dedicated JavaScript file. If we want to write
JavaScript it an HTML file, it's as simple as adding the script tag to the head
section of the document. This script tag is reserved
for any scripting languages, which are Languages you can
execute commands width, and this is where our JavaScript could theoretically live. Anything you write between
these tags will be compiled and interpreted
as JavaScript. Well, this is fine for a
really small applications. This might get a bit
complicated once we start to build more and more
complex Web sites. In this case, we can utilize the second place
that JavaScript can be written in its own file and just utilize a script
tag as a reference, will make a separate
JavaScript file, App.js and connect the two. As you mentioned,
there are two places that JavaScript can
be written within a script element
on the HTML page between two script tags
or in its own file. If we were to write it
within the HTML file, we would write it like this. We create our script
tag in the head, and then we'd write
our JavaScript. So we write like console.log, Hello, World, save it. And then if we went
over to our webpage, we'd see in the console
we've logged HelloWorld. Now this is not a bad idea when you're doing
much smaller projects, but as you can see,
it's not necessarily a practical thing to do. If you have multiple components
and multiple layers. You can imagine
that your HTML file would start to get quite long. As a good rule of practice, a good idea to keep in your head is you really
don't want files that are more than 100 lines
long unless it's a particularly complex component that needs all the logic
to be all together. Ideally, you want to
break up things into pieces and integrate
them as you need. To this end, you want to put your JavaScript in
a separate file. So let's get rid of this. And that's actually go ahead
and create a new file, and we'll call it app.js. Because JavaScript is
a scripting language, the script element allows us to connect things that are scripts. So we can do script
and then we can do just like we did
with the style sheet, dot slash and select app.js and have our
closed script tag. Alright, there we go. Good to go. Alright, I script
tag is now connected
5. Writing JavaScript: Writing JavaScript. Now that we know
where JavaScript is used and how it
theoretically works, it's time to learn how to write. If you're new to
programming JavaScript, we'll take a bit longer to
learn than HTML and CSS. And that's completely normal. It's because not only are you learning another
new language, but you're learning a
programming language and some of the core concepts
behind programming in general. But don't worry, if you
stick with it soon, it will be just as easy
as any other language. First, let's hop into
that empty app.js file. Alright, so let's test out our link to make
sure it's working. So let's do a console.log
and we'll type in hello world and save it and
we see it on a console. Awesome. You're already
writing JavaScript. Now, what did you just do there? You simply instructed
the console, which is that window within your Chrome tab to
log or display, which you put within
those two brackets. Console.log is an essential
method that even advanced software engineers use
as it's a great way to figure out where you might have made a mistake
in your code. A process that's
known as debugging. For now though, we don't need that code, so let's
comment it out. To comment something out. In JavaScript, you hold down
the Command button and you press the forward slash and it will actually
just commented out. So commenting out means that you have no
use for that code. It's not actively
running anymore. You can always uncommon to and bring it back
into your page. But you don't necessarily need comments are another
great way to just leave more human-friendly
notes to other developers. So you could say this is a comment and just
let people know what you're trying to
do their work could say this is a test console dot log. So you can let people
know like Hey, this console log is unimportant. Comments are really great. I
think more people should put more comments in there code
so that other developers, when they're working
together, they can understand why someone
has made a simple choice. You don't want to put too
many lines with a comment, but just like one short line, a quick snippet just to say, Hey, this is what I
did this, why did it? I think it's a really
great practice.
6. Variables: Variables in computer science, data is anything that is
meaningful to the computer. Javascript provides eight different datatypes
which are undefined, null, boolean, string, number, object, big, Int, and symbol. In this course, we're going to focus on only the first six, since as a new engineer, you'll rarely come
across the last to these datatypes help a computer understand
what it can and cannot do with
a piece of data. For instance, 12 can either be a number type
or a string type. If it's a number type to
computer treats it as such. And it can be used
in all types of mathematical operations like
addition and subtraction. For instance, if it's a
string, on the other hand, it will be treated like
a line of characters, much like a sentence or
other group of letters. Strings are groups of
characters used to store basic lines of data
that are not numbers. Strings always have quotes
while numbers do not, and are also always numbers. Not only does every piece
of data need a type, but they also need a
place to store them so that they can be accessed
over and over again. It would be a
terrible experience if you typed in a bunch of information into a webpage and it just disappeared
once you left the page. This is where variables
come into play. Variables act as the
storage locations for each particular value. You may have come across
variables such as X and Y and your
high-school math classes. Programming Variables
follow the same concept. They are a representation of
the data that we're storing. The only difference
is with JavaScript, these variables
can be any one of the eight types that we mentioned at the
start of this lesson. For instance, if we were
coding up a website with a form that asks the users
for their firstName. We'd store that data they
gave us in a variable. Let's mark it up as an example
to better understand it. Alright, so I've gone
ahead and created the folder called learn JS. I'm going to create a new file. I'm going to call it app.js. Let's go ahead and talk about different parts of JavaScript
and how they work. So, as we just talked about, Variables are way for us to
store data within JavaScript. So for instance,
if we had a form of a website with a form that
asked users for their name. We'd probably want to have some way to get
that information. So let's whip up a quick HTML file and let's create that
form that we can use. Alright, so in this form, it's gonna be kinda similar to other form with a
few key differences. So I'm going to create
an input of type, text number. And we will place that as age, will have that be perfect. So this is a really simple
form that will just take, that we'll ask the user
for their first name, their last name, their age open. You should have a submit button. So input type equals button. And we'll just focus button. And we will say Submit. Let's connect our
app.js to our HTML, as we did before
with a script tag. And source will be
dot slash app.js. Close that out, save that, and we should be good to go. So if we go back to local, localhost 50, 50, you
know, I think it's this. Third is, alright, we have, are really, really basic Form. Alright, so we have our first
name or last name or age, and our submit button. So we wanna go ahead and fill out these pieces
of data, right? Let's say you want a new user to come to your site and to
fill out this information. Um, you'll say like John
Brown and his age 45, right? And he'll submit
this information. Cool. However, nothing happens when
you submit the information. The information
doesn't go anywhere. What we wanna do is now save this information in a variable
so at least we can use it. So if we go and inspect
here, checkout our console, one thing we can do is actually have this information
be sent to a variable. So when the user presses submit, we can have our Form,
send the data somewhere. What we're gonna do here
is create a variable. So there are two
types of variables. There are constant variables and there are variables
that can change, known as let variables,
constant variables, once you assign it a value, the value cannot change. Let variables, on the
other hand, can change. So we want to decide
which type of variable we want to
use for the situation. Personally, I'd recommend using a lead variable because we
don't actually know the, the value of the variable before the user
submits their data. We can do let user
and just have it be that that has now created the variable user is
not set to anything. It doesn't mean
anything just yet, but eventually we can
assign a value to it. It's good practice to initialize
a variable with a value, but this is not required. When you don't initialize
a variable with a value, it gets the default
value of undefined. The third data type will discuss All undefined means
is that it has yet to be defined
as to what it is. Therefore, the variable
does not yet exist. This doesn't mean that it
has a value of nothing, however, that is the
datatype of null. Null and undefined are two
very similar datatypes, but with subtle differences, you can assign a
variable to the value of null and it will still exist. This is like telling
the computer that you have a box in your storage unit, but you know that it's empty. If you assign that same variable to the value of undefined, you are now telling
your computer that the box doesn't actually exist. Know, is intentionally nothing while undefined doesn't exist. If we did want to create a
constant value of variable, we can do CONST user and
then we can give it, we could, well, let's call this. You can't, you also can't have variables on the
exact same name. So we can call
this constant age. And then we could set it to a specific number or a string. So we can set it to that, or we can set it to 45, right? Whatever, whatever we
want to set it to, we use the equals to actually
assign a variable a value. So unlike in math, we're like equals I1
plus one, equals two. It's not a mathematical
operator in this sense, is actually an assignment. An assignment operator, the
equal sign will talk about. We'll talk a little later
about the other ways we can use equals to actually
mean this equals that. But for now what we
need to know is that the single singular equal
sign is the assignment. So age is 45. We can think about it like that. As I've put the value here, it's a good idea to initialize
a variable with a value. So we can actually do let user equals these empty
quotation marks. Quotation marks, or the
way to identify a string. If you put it, let equals, let user equals quotation
marks is just telling the computer that this is probably gonna be
a string value, um, later down the line, we can actually
mandate that it is a string or it is a
number or whatever it is. But that's something we
can do with TypeScript. But what if we didn't
initialize this value, right? Like, what if we
just had it as that, What value do you
think it would have? We've talked about the
different datatypes, so there's string number, but it probably wouldn't be either of those if we
don't give it a type, well, if you're ever
unsure about something, we can simply console log it. So if we go console dot log, user will see that the user
is actually undefined. And if you remember,
undefined means that something does not exist. Null means it's essentially
zero because it's undefined. I'm, it means that it
does not yet exist. Once we assign it a value, it will then exist. On the other hand, if
we console log age, we should get 45. And that is what
we've assigned it to. Another cool thing we can do is we can console log the type of a specific variable and it will actually
give us the type. So in this case, the type of age is a number because it is we've
assigned a number to it. You can also, as we've
talked about before, use, we can talk, we can assign a variable a value of null, right? So CONST, nothing. We could set it to
null and save that. And then if we were
to Console.log nothing, we should get know. As you see here, we've
got null in the console. So we've specifically told
the computer that it is null, it's nothing, it's
not meant to be read. One thing to really
remember though, especially in computer science and with Variables, is spelling. With JavaScript, It's
actually possible to have two different types to different variables
of the same spelling. So I could actually
do CONST, age. I can do age with lowercase. I could do age with uppercase. And that's not gonna
give me an error. However, down the road, if I ever misspell
where I use age, like if I console dot log uppercase age
instead of lowercase age, I might get the wrong age. So it's best practice to not do this and to actually just use one form of spelling and capitalization for
your Variables. Speaking of spelling and
capitalization in JavaScript, we actually use a special method of capitalisation
called camelCase. Camelcase is where you
have the first letter. The first letter of the
first word is lowercase, and the first letter every word following
that is uppercase. So CamelCase, it's
kinda like a camel. So when you do need to create
more than one variable, you can always use camelCase or maybe you want to be a
little bit more descriptive. So you could say CONST, user last name equals
brown. And there you go. That is how you'd write
that with camel case, you just user is lowercase, last is capitalize, and
name is also capitalize. Alright, so let's
dive in a little bit further to see what else we
can do with variables, right? So we have our user lastName. Let's create a user
firstName of John. Let's assume this is
what the user has inputted into our Form And then we want to like
put together a sentence, maybe want to greet our user
when they click Submit, we want to say like
hi John Brown. So there are different
ways that we can go about doing this. But one interesting
thing that we can do with variables is
actually concatenate them. So we can put
different variables together to create a sentence or some other string that is meaningful or useful
to us or to our users. So do use concatenation, what you would simply
do, and you'd say, you probably saved this in
another variable, something. So you could say
CONST, greeting. And then you would take
not the actual users name, but the variable that represents their name and put them
together in a sentence. So we could say, hi. And then we use
the plus symbol to basically symbolize what we want these two things to
be added together. Now like in math, but like
connected, high user, user, firstName and lastName. Then could even end it with an exclamation mark because we are excited to speak
to this person. And so we have our greeting. Greeting equals hi plus
whatever the username is, plus whatever the last name is. And you know what? For good practice, let
me put a little space in here just to make sure that
it is formatted correctly. Alright, let's go ahead and console log
greeting and see what we get. There we go. Hi John Brown, syllabus.
It's very excited. Let's take away that first one. It says, Hi John Brown. And so that is basically
how concatenation works. You can take strings,
you can take variables and you can
connect them together to create sending that are
meaningful to people or other meaningful
use is like that. Another interesting thing that
you can do with variables, specifically with strings, is find out how many
letters are in them. Because strings are really
just a set of letters, is the list of letters. They actually fall technically under another datatype as well, which is an array, which we'll talk about a little bit later. But one of the methods
that is available or the features that
you get as a result of using arrays is that you
can tell how long they are. So if I wanted to see how many letters are in
the string greeting, I can basically do console.log breeding and then I'll
put a dot after it to specify that there's a method on this variable that
I want to access. Dot basically is like a way
to get inside something. So if I have like a box and I know that there's
a fork in there. I might press like Box
dot fork to get the fork inside the box will do
greeting dot length. And because length is a
property that's on greeting, it should tell us how many
characters are in greeting. So let's go ahead and
console log that. 14. I mean, if you
calculate it, It's like HI space J0 H BR OWN, and then there's another space. And the final exclamation
mark, that's 14. So it tells us exactly how
long a string is or an array. So it's a really
cool property to access if you ever need to
know the length of something, which will be more
useful as we work with larger and
larger sets of data
7. Arrays: Arrays say we want to store multiple names together so that we could access
them all later. In this case, we'd use another
datatype called an array. An array is created by encapsulating the individual
pieces of data within it using square
brackets and using commas to separate
each piece of data. You can have any number
of elements in an array, but it's a good idea
to only use them when you have more than one
piece of data to store. Arrays can even
hold other arrays. They can hold data of any type. Let's try adding an
array to our page. Alright, so another
interesting fact about Coding Languages
and in general, is that most Coding Languages don't actually start
counting at one. They start counting at zero. This is called
zero-based indexing, and it's just the way that we've learned how
to count in code. You'll find a lot
of Languages do this in JavaScript
is one of them. It'll take some getting used to, but I'm sure you can do it. Alright, so we can use
zero-based indexing though, to really help us get at the inner workings of
different pieces of data, like arrays and strings. So if we take this greeting
element right here, we take this greeting,
the screening string. We can actually use
zero-based indexing to get at a specific
letter in greeting. What we'll do is we'll use something called
bracket notation. So there are two types
of new notation. There is bracket notation
and dot notation. In fact, you've already
used dot notation by using the greeting
dot length property. Basically what the dot
notation says is like, Hey, I know you have this thing and there's something
within that thing. There's like, if my name is Zoe, the dot notation might be like, Hey, I want to get Zoe is, Zoe is LastName or you
know, it's always age. These are the things you
might dot notation on me if I was a JavaScript object. But in terms of
what we have here, we have a greeting
which is a string of letters, a sentence. And we could access actually just one letter within that sentence
if we want it to. This can be really
useful when you have maybe a list of data,
lists of names. And you just want to
get the firstname or the last name off that list
or something like that. But we can practice it
using our greeting string. The kiva dot notation to is that you have to know the
name of the property. So if you're looking for the age of whatever
your object is, you need to know
that the age exists. Otherwise it will
return undefined. If I say greeting dot balloon, it should return
undefined because there's no balloon property on green. However, if we do
bracket notation, we can access these
first characters or less characters or
whatever the case may be. So I bring all this up
with zero-based index can, because we're going to put two square brackets next
to the word greeting. Then within those
square brackets, we're going to indicate which character we want to access. And if it's the first character, we're not going to put one. We're going to put zero because
we start counting at zero as we turn to greeting will put zero and then we'll save it. And we should get a capital H. Let's see what we get.
Awesome capital H. That's how we know
that it's working. We're getting that first letter. If we do one will get the I, if we do to will get, we should get that space, which would look like nothing. But it actually is a little, so there's little space there. And then we can do all that
all the way to the end. Now, if we want to get the last letter of
the greeting string, one thing that we can do is
actually access the length, then do the length minus one. So we could do greeting, we could do greeting, and then we can do within this bracket will
do greeting again, dot length minus one. So with zero-based indexing, you always need to
subtract one from whatever the number of amounts is to access that last
element, right? So if you have like 12344 pieces of poor elements and
you know that you're, you're, you're a string is
for four characters long. In the length there'll be four, but when you count, it
will actually be 0123. So the reason we subtract one
is to access that last one. If we subtract,
if we put in for, it'll actually try and access something
that doesn't exist. So we want to make sure
that we subtract one when we're looking for the last
element and a string, we'll do greeting dot
length minus one. And that'll actually that will be the index that we're
looking to access. So this will basically
compute into a number, the correct number of the index. So if greeting ever
changes length, maybe John changes
his name to Stephen. And now greeting is no
longer 14 characters. It's maybe 17. Instead of hard-coding 14 as this greeting,
greeting number or 13. If we do the math already, we can just say, hey, whatever the length of gradient, no matter what the
person's name is, we just want to get length and the last character
isn't an exclamation mark. Is it a period, whatever it is. If we click Save, we should, should get an exclamation mark. There we go, right
here on the console. Exclamation mark. Alright, so we've
been introduced to the concept of Arrays. These pieces, these sets of data where we can hold multiple
variables together, multiple strings together, maybe multiple pieces of
information together. This is awesome. This is a much easier way to bring all of our
data into one piece. So what we can do
now is actually use these arrays
to our advantage. So rather than
having we have age, we have used or firstname, use your last name and greeting. We can actually hold
this all in an array We can say CONST, user, first user, first user. And rather than having
all of this separately, we can say first user equals. Or we can say, instead of, well, let's
get rid of this user here. And we can say CONST user because arrays are
actually mutable. So how we said that you cannot
mutate, mutate a constant. You can actually change
arrays regardless of whether they're declared with constant CONST or with lead. Which is really interesting
thing about them. So if we wanted to create a string that
represents our user, we could create the array with our square brackets
and then we can say the user is
user's first name. We'll do the users
app's user lastname. And then we'll do the user
will do the age, that is R. Now our user array. That array should have all the information
about our user. So if I console.log user, I should get all of
this information, yeah, separated by commas. So we have John Brown with 45. So this is really cool. There's a way for us to keep all our by data like together, like to organize our
data doesn't have to kinda just be
all over the place. It's much easier way to
put things together. So as we were talking
about before, just like with strings, we can access different, different numbers within
our array, right? So say we had a whole bunch
of different users, right? So say we had user1 firstName, and we had, we had
another user, right? So say we had, I'll change this
to use or one age. And I'll change these
two to user to Const, user to age equals three. Alright? So we now have two users. We have user one
and user to end. This is a great place
to use comments, so we can just use R1. We can just be really specific as to what we're talking about and make things look a little
bit less cluttered user to great. So say we have these
two users write and say we wanted to store just the firstName of
both of these users. We could do CONST user first names equals user1 firstName, and user to first-name, right? That would be an array that held both of their first names.
Which is pretty cool. We have that going for us. Now say we wanted to
access just the first, firstName of that array. So the first users FirstName, we could actually access
it using bracket notation. So we could do console.log
via console.log it. And we could say user
first name bracket zero. And that should give us our first user's first
name, which is John. We've done it
correctly. We've gotten the first user's first name. So this is a really
useful way like when maybe we want
to just call it the first person who has arrived to the party
shrunk to the site. We want to say, Hey John, and we want to
welcome them. First. We can iterate through them until we get to
the end of the list. Because that's a really
cool feature about Arrays. You're going to hold
all this data together and access them using
bracket notation. But say you don't necessarily know the index of what
you're looking for, right? Say that you know
that like, you know, John had the party,
but you don't know if he's the first one, the last one, the middle one. I need to find the name. Well, there's actually
another method. So just like we had
the length method, there's the find method
which we can use on an array in order to find a particular piece of
data we're looking for, we can take user first name. Should we use first names, user first names, names. And we can call dot, fine. And we can see here we're
with our documentation. There's actually a little bit
of information about this. So it is a method for arrays of strings to find a
particular string. And then it basically
tells you how to write it. These can be a little
bit confusing, so let's see if we can
look it up on MTN. So let's go back to MTN
and we'll look up find. Alright, array dot
prototype dot, Fine, Cool. So the find method returns the first element in
the provided array. That side of that satisfies the providing
testing function. If no value satisfies the testing function,
undefined is returned. Pretty simple. So we take whatever our array
array is, they've saved it, the answer in a variable here, so found, and then we just
call it on the array. So array dot want array1 dot find whatever the element is. If the element is
greater than ten. And then they should
find, they should get, I guess it gets the first
the first one that is found. That's pretty cool. So let's see if we can find so
we take whatever. So basically this, what
is happening here is it's taking element by element. It's going through the
list and trying to find the first one that
meets the criteria. So it's take, is
looking for an element. If that element is
greater than ten, it will save that answer
and give it back TO say, Hey, we found the answer. So let's see if we can
do the same thing. We'll do constant pound equals and it doesn't have
to be found at, be to anything but constant
usernames, dot find. We are going to look for a name If the name equals, equals jot. As we've talked about before, there are two types
of equalss, right? There is the single equals, double equals, and
the triple equals. This is a situation where we would use the double
equals to say, Hey, I want this to match that. So if name equals John, if name is John, then I want you to find
it and return it to me. So if we console.log found, we should get John. So we've got John, but what
if John wasn't in the list? What if it was Harry? Save that will get undefined, just like the function
said we would. Now what if we wanted to find something a little
bit more interesting? What if we wanted
to find a name? Find a name where name, the name is greater
than, let's say five. They're both named John,
we should change that. So let's change this one to
Stephen, as we mentioned. So if the length of the name is greater than five,
it should return the name. So it should not return John, it should return Steven. Let's see. Awesome. So
we've gotten Steven back. You can kinda see how these different methods start to add up and work together to
create what we need to find. This is the basics
of computer science. You're starting to work with algorithms that are existing
within the computer already. So you're well on your way
to really learn JavaScript. And again, you might
be wondering how I know all of these different
data types and methods. It's not because I
have the memorize. As you can see, we literally
just Google and look up everything that we need that we don't really have
on top of our head. So I used the length method
without too much struggle. That's because it's
something that I've used a bunch but fine is something
I haven't used as much. So I looked it up to
make sure that I have the right implementation of it. And I wasn't just trying to implement it off the top
of my head and I was doing the wrong thing and
getting errors because it was just a silly mistake
in my implementation. Before we wrap up
talking about arrays, Let's go over a few more of these essential type of methods that we
might want to use. One more Coding map
basically iterates over a, an array and returns the results including
that iteration. So it's usually meant to
do something to the array. So if I use it first
names dot map, I want to take the name and I want to
concatenate the name, maybe name plus sun will name
them Johnson and Stevenson. And I want it to return the map. So let's change this to mapped. In theory, I should
get Johnson and Stevenson when I mapped them. So let's see. We now have an array with
Johnson and Stevenson. So you can IMAP over individual items in the
array and make changes. So then using map, next one, let's talk about for each, for each is really
similar to map, except for one key difference. It actually doesn't, it
doesn't return anything. So how we were able to
save map in a function, in a variable and
console log that we don't actually return
anything with for each. So it's meant to change like
the actual thing itself. So if I wanted to change
John's firstName, or if I want it to maybe
create a new array, maybe I created an empty array. So conc, empty array. And it had nothing in it. As you remember I said before
that arrays are mutable. That means you can add
and take away things from them even after they've been
created with a constant. So say I wanted to add things, add names to this empty array. So maybe I took user
first names and I instead of math I for
each, I did a for each. So for each name, I won't save it to
a variable this time we'll just use it as it is. We're going to, for each name, we are going to use a
method called push. We're going to take
our empty array and we're going to push, we're going to push the name. So that means we're literally
just taking that name. We're pushing it into the array. So there should be
a Johnson or there should be at John and a
Steven in our empty array. Let's set that up and let's
console.log empty array. In fact, let's console.log
empty array twice. That's console.log
it before and after. So we should see just
empty square brackets, brackets and then we should
see John and Stephen. Perfect exactly what we got. Empty brackets and
jaundice even so we know it's actually being called
is actually working. Great. Let's check out another method. Slice. Alright, so when
you're working with slice, you can basically decide which section of the array
that you'd like to work with. This is really interesting
to do when you're actually working with
names, for instance. So if I took Const, sliced, if I'm creating a
variable called sliced, and I took User Two's firstName. And I then did a slice on it. Where I started at maybe the second letter and I
ended at the fourth letter, I should get a slice
of Stevens name. And if I console dot log sliced I get tip, which is the middle of the Stevens name between characters wanted for. That is how you would,
you'd slice like. That's it for me. That's what the best way
of using slice is on a string or something
like that where I just need a subset of it. Alright, the next method we're going to checkout is splice. Splice is very
similar to Splice, but it actually changes
the array itself. So I call splice on an array. It will bring me
back a new array. It will, it will change that
array from the beginning, splice it a little bit
different to slice will take, we're gonna do actually
we're going to call splice on user first names. So what we're gonna
do is we're going to put it with a start number. So we'll start
maybe at index one, which is user to first names. Then we are going to, we're gonna we're
gonna delete one. We're going to delete
Justice Stevens name, and then we're going
to add in a new name and we're going to
add in Harry's name. So let's save that and then let's console.log
user first name. Sorry. So what that should have
done is taken this, modified it, and return it as a mutated array. Let's
see if it did it. Awesome. So now we have 0 and let's
get rid of this console.log. Awesome. So now we have John and Harriet instead of
John and Steven. So that's how we you'd
spliced basically the splice something out and
put something new in there. But you don't have to put
something new and you can really just take it
out and leave it up. Alright, so the next
one we're going to take a look at is shift. Shift is another method
that also mutates an array. When you call shift on an array, it actually removes
the first element. Now you can either save
that first element or you can return the mutated
array. The choice is yours. Let's take a look at
how we'd use this on our user first names array. We could call a user
first names dot shift. And we don't need to
pass any parameters. We'll just call it like that. So if we console user, User dot first name, we should just get who should
just get Stevens name? So yeah, there is just seep. But if we console.log this, we should really just get
the, get John's name. John, there we go. So it depends on depends on what thing
you're trying to get. Are you trying to
get the firstname? We're trying to get
the whole list without the for the first element, or you're trying to
get the whole list without the first element. Which one of these two ways
you'll access this data, but the choice is yours again, the last one we're
going to checkout for today is unshift. So as we mentioned, unshift adds elements to the
beginning of an array. So say we have your first name, but what add a new name to
the front of the array. We'll do user first
names, dot unshift. And we'll add in Harry, Harry's name right there. If we console.log
user firstName, again, we should get the array
with the new name at it. And there we go, harry,
John, and Steven. And there we have it. Those are several of
the essential methods as you can use on
arrays that I'm sure you'll find useful as you go through your
JavaScript journey.
8. Functions: Functions, I want till now, we've been doing everything fairly manually. I mean, sure. The computer is doing
the bulk of the work, but there's a way to make
things even easier for us, rather than repeating ourselves
over and over again when we're organizing our data or asking the computer for data, we can use something
called a function. A function is a reusable
piece of code that allows us to access the same logic over and over again
without rewriting it. Functions can also
be named that we can access them anywhere in
our file or our program. Let's refactor our code to make a few basic functions to
make our lives easier. Alright, so the next thing
that we're going to want to talk about is functions. I just mentioned before. Functions allow us to stop
doing everything manually and really take advantage
of the fact that we are doing computer
programming. And we can allow the computer to do a lot of this work for us. So let's take a look at how
we would write a function. So in our app.js file, the way that we
would actually start to write a function,
there are two ways, but the more common way to
do it now is using a Const, just like we saw before, to initialize the
name of the function. So if we were going
to name a function, let's just call it, for
instance, my function. And then instead
of doing it equals and putting in just
the value here, we would actually put equals and then the parentheses and
another equals and an arrow. This is actually called
arrow function syntax. And it's a particular type
of way of writing functions, but it's one of
the most succinct. So it's, it's been
very commonly adopted. After our arrow. After our arrow, we actually use the curly braces and that is it. That is how you write basic
format for a function. But what is a function do? It takes a piece of logic and basically
implements it for us. So in my function, we could just give it
something really simple to do, like console.log. And then as we saw
before, Hello World. So each time this function is called, it will console.log. It will log to the
console HelloWorld. But how do we actually
get this to run? Well, when you have a function, you can't just like write
the function and then expect it to be called,
expected to run. You actually have to call it. So to call a function
is really simple. All you do is type
in the name of the function as you've
seen us do before, and put the
parentheses behind it. And once you save it,
it'll call the function. So if we hop over to our browser and check
out the console, we will see it said
helloworld once again. Functions are pretty
cool to work with. You can imagine the level of complexity you can put within these functions and
have them called over and over again for any
number of problems. So there are really great
thing to work with. Another thing you want to be
aware of is that functions can take arguments just like
how I mentioned before, the console dot log is
a type of function. Helloworld is
actually an argument that is taken in by console.log. So just in our function here, we could actually change
this up a little bit. We could give, we
could make this. We can make this a function that actually prints to the console. We can create our own console.log
if you want it to do. So let's say we call this
our own console log. Alright, and this is
just for practice. You wouldn't actually
do this in real life, but you'd say you give it your own console log and then you would name a
type of parameter. You can do this really
simply just call it R1, R1, or R2, depending on how
many arguments you have. But really you could name
it anything you want. So you could just say value. And then instead of putting
in hardcoding console, hardcode, hard-coding into
the console log HelloWorld. We can actually just pass the prop of value and
use that instead. So now whatever I typed in as a parameter into our own
console log function, when I call it, it will
print that to the console. If I said, Hi everyone. Instead of hello world, when I go back to the console, it will actually
print out Hi everyone instead of HelloWorld or value. All types of functions can take parameters as
long as they have been given that capability and something to do
with that parameter, which is another really awesome
part of functions, right? We can use this in
a number of ways. We can also return a value from a function and then save
that value in a variable. That variable can then be
used just like any other. This is a really useful
way to get data. If your function doesn't
have a return statement, it will return undefined. You might use these sorts of functions to update a
variable outside of itself without
needing the data to be returned directly
by the function. We can also return a value
from a function and then just save that value
to a new variable. So for instance, if we had, say, we wanted to get the sum of a bunch
of numbers, right? So how about we do
CONST, sum equals. And then some will take, and it'll take three arguments. It'll take R1, Argh It'll take numb one because
we're going to take numbers. I'm to its best
to be descriptive when you're doing parameters, just see people who come
back and use your function, know what you meant
for them to put in it. So we'll do an m1, m2 and m3. And then some will
actually just return num1 plus num2
plus number three. So that's it. It just takes three numbers and some of them up altogether. But what we can do it actually, rather than just calling this
function, we can concepts. We can create a, we can create
a variable called result, and then we can
save the results of this function in that
variable results. So we can do some
of numbers 12.3. And then if we console log the answer that we
console log result, it should add up to six. So let's take a look. If you see right here, it has
added up to six and we have six or in six is the sum of
our function right here. So this, this is also a really useful way if
you're just like calling something and you want to save that result and then maybe
use it in another place. This is a great way
to have that as well. Sometimes you may
just want to know if a function is working or not. You don't necessarily need a particular value
returned from it. In this case, we'd use another
datatype called a Boolean. Booleans are a special
datatype that can only have one of two
values, true or false. These words are not written in quotes and are
simply meant to be used as indicators as to whether or not something
was successful. For instance, if
you want to know whether or not your
function ran as intended, you can return true
in the case that it worked and false in the
case that it didn't. Sometimes though, you
just want to know whether or not a function
is working or not. Maybe you just want
to know whether or not a particular aspect of your app is working and you want this function to run
if it is working, or you want this function to return true if it's working or return false if it's not. This is where we'll get
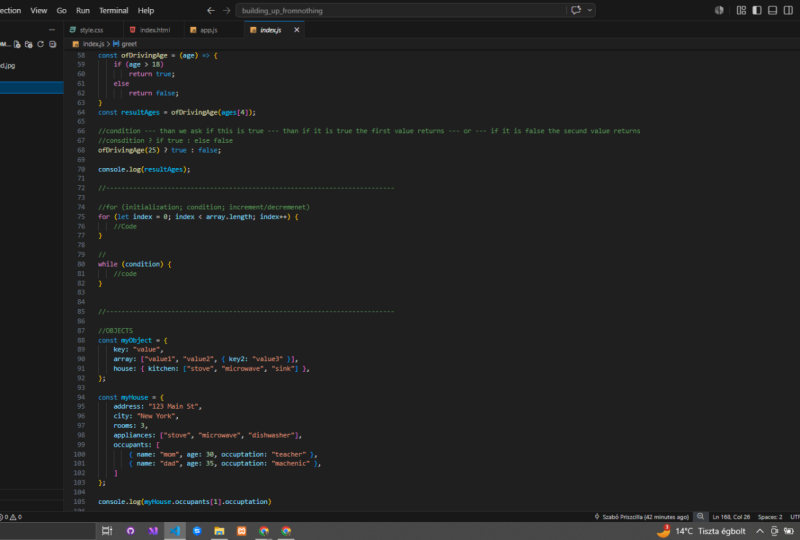
into those Booleans. Let's use if statements
to help us figure out whether someone is or
is not up driving age. So let's get a list of ages. Let's get an array of ages. And we'll do, let's
see, 12 for 2,557.70. And so we want to get the returned number
of ages that are, of, that are over 16, right? Um, so we can actually create a function in order to filter this
out for us, right? So let's do cost of driving age. That's what we'll
call our function. And we will basically will. Now we'll write
our if statement. The if statement
structure goes like this. You write if, then this
is your conditions. So if if the, let's see, will take in an age, if age
is greater than 16, 16. We want the function
to return true. Else we want the function
to return false, right? If we save result. If we save result
in a variable we call of driving age with ages. And we'll use the first or the number and index one and then we'll
console.log result. Let's see. Let's see what we get. So if age is over 16, return true, else return false. False. So that is correct because age, the agent index one
is actually four, which is not above 16. But if we change it to index
of four, for instance, it will return true
because that is a note, so that is age 70. So this is another really
interesting way that we can use this and we could probably implemented in some sort
of drivers check, right? So rather than us taking
an array of ages, we could gather the age may
be from a website where it's asking people whether or
not there of driving age, if you're like asking if
somebody wants to buy a car. So check to see if
there are driving age. You can use something like this in practical
applications as well. Ternary operators, there
are more concise ways to write if else statements using something called
a ternary operator. A ternary operator is just
shorthand notation for it. If else statements which can condense it into a
single line of code. Let's take a look at how an
example of this could be. How you'd write this is you just say you would just
give your value. So you'd say this. So of driving ages, age for ages for you'd say. And we could even just pass
a number to be honest, if we pass it like 25. And then we'd say
if this is true, if this is true, we
want it to return true. Else we want it to return false. And that is how we
would write that, how this works is the first
piece is our condition. Whatever the comparison
we're trying to make or the situation we're
trying to determine. The first and then we'll
ask, is this true? So is, is whatever we
said here, is it true? If it is true, then it will actually bring
up this first value, right? If it's true, this will be the result or those colons
here, it will return. False, is false. If it's true, it will
return this first Condition or false,
will be the result, as we've already discussed, unlike in math, equals is
the assignment operator, not the equality operator. The equality operator
is quite similar. It's just a duplicated
version, two equal signs. You can use the
equality operator to determine whether or not one
thing is equal to another. The result of a comparison using the equality operator will
always return a Boolean, either true if the comparison is valid or false if it isn't. Let's take a look at a
couple of examples of this. We console.log. One equals equals one. We'll see that basically
it will return true. But then if we did one
equals equals two, it should be false
as we expected. This is because one
does not necessarily, well, this is because 1.2 are
different numbers, right? But 1.1 are the same. But when we do one equals, equals one the string, we would think that
it will return false, but actually returns true. Now that last one
is interesting. Why did the number one
match the string one? That's because the double
equals equality operator isn't what you'd call strict. It will let pieces
of data that can be converted to one
another return true. However, if you wanted to
be certain that only the data of the same
type return true, you could use its big brother, the strict equality
operator, three equal signs. Let's give it a try. Now if we wanted to
compare whether or not the number one was actually
equal to the string one. We want to be sure, like know the numbers from the string. We'd use three equal signs,
the strict equality. And we see here that when we run that it's actually giving us the result of
false because one, the number is not
equal to the string, but we have to use
the strict equality, That's the triple equal sign
in order to get that result, there are many different types of operators and JavaScript. Let's look through a few more of them and see how they work. Exclamation equals is
a comparison operator that is used to test whether
two values are not equal. It compares two values
and returns true if they are not equal and false
if they are equal. This is used to test whether one value is less than or
equal to another value. It returns true if the first value is
less than or equal to the second value and false if the first value is greater
than the second value. Just like in math, you
can also use just the, the less than design to compare whether or not the first
value is less than the second value without the equal sign greater
than N equals. This is used to test
whether one value is greater than or
equal to another value. Returns true if the first value is greater than or equal to the second value and false if the first value is less
than the second value. Again, just like in math, you just use the
greater than symbol to compare if the first
value is greater than the second by omitting the
equal sign double end. This is the logical
AND operator. It's used to test whether
two conditions are both true and it returns true if both conditions are
true and false. If either condition is false, this is a logical OR operator. It's used to test
whether at least one of two conditions is
true and it returns true if at least one
of the conditions is true and false if both
conditions are false. For-loops. For-loop is a type of
control flow statement, much like an if else statement. The difference with
for-loops, however, is that they will, as the name implies, loop over and over again until a specific condition is reached for a certain
amount of time. The basic syntax for
a for-loop is for initialization condition and
then increment or decrement, and then whatever
code you want to run. Let's try these out and see how they are
used in practice. As we've mentioned, the
for-loop is a type of control flow statement, right? So it basically allows us to
iterate over something for a certain number of iterations until it reaches
the given number. So how we'd write this
is we type in four. We'd say for whatever
number would initializer. There's an initializer like for, let's say I equals zero. We would run this, this, this, this for-loop until
I equals a given numbers. So let's say we'd run it until I is greater than ten
or is less than ten. We'd run that until, until it reaches that
condition will run this loop. And then every time we
run the loop, every, on, every iteration of the loop, we're going to
actually add one to it so that we actually get
to the end of our loop. If we didn't have this
actual iteration, it would just run forever
and that would ended, that would result in
an infinite loop. So for each time I runs, we're gonna do I plus plus, which is basically saying
that I will be I plus itself, I plus I plus one. So whatever I is at the
time, add one to it. And so as we run this function, we're then just going to
console log whatever I is. So we'll console log I and then we'll see how many times I get. I shows up. I think this
should actually be yeah, I less than ten. So as long as I is less
than ten will run it. And then once I is
ten or greater than, then it'll stop running. Once we see that, it's, once we see that we'll
see it's run and given us the numbers
zero through nine. Alright, awesome. While loops. Now that you've
got the hang of for-loops, let's talk about while loops. These are really similar to for-loops in the sense
that they continue to loop over and over again until a specific
condition is met. Where they differ, however, is that they only
have the condition, so they execute while
that condition is true. While loops are a little
tricky because at some point you have to be sure that that
condition will be false. Otherwise, they'll
result in what's called an infinite loop, which
isn't a good thing. This can crash your browser because your code will
never stop running. Scope. One of the most important
topics to understand and JavaScript now
that we started to talk about Functions is scope. And I'm not talking
about the mouthwash. Scope refers to how accessible are visible, various Variables, Functions and other
pieces of data are in your code during runtime. There are two types of scope in JavaScript, global and local. Global scope is any variable, function or object that
is fine outside of a function and can be accessed by any code in the program. Local scope, on the other
hand, is any variable, function or object that has been defined within a function and therefore is only accessible within the
confines of that function. Let's take a look at how
this works in practice. To show basically
how this works, let's create one that says
global VAR, global variable. I'm to say I'm a Global. And then we'll have one that will create a
function and then we'll will nest a local
variable within it. So to give it, give you an idea of what this really
looks like in practice. So we'll create a variable
called local bar, and it'll say I'm local. And from that point will return, just return
the function. So when we attempt to
Console.log local VAR, if we tried to console log outside of the function,
like will do here, console log leucovorin will see that we're actually
not able to access it. It says reference area, local bar is not defined. And that's because the
console cannot see it, right? The rest of the code
does not know that local exist because it's
trapped inside that function. However, if we try and log
it within the function, you'll notice that it
just kinda lit up as we did that it'll actually, it will actually add once
we call the function, of course, it'll actually
console log local Barnes. It says I'm local. That's because this
variable is basically trapped within the
function itself. But you'll see that
if we do this with the global variable, regardless, if we console log it outside
the, outside the function, or we console log inside the function because
it's a global variable, it's accessible in both places.
9. Objects: Objects. An object is a collection
of key value pairs that can represent a
real-world object or a complex data structure. Objects are one of
the fundamental building blocks of JavaScript. They actually encompass most
of all the other data types, from simple data
structures like arrays to strings and more
complex ones like classes, functions, and even
other objects. An object can be created using the object literal notation, which uses curly braces. The keys in an object
are always strings, but the values can be of any data-type, including
other Objects. Let's write a few objects to see an example of
how this all works. So objects are one of the
best parts about JavaScript. Basically all I'm JavaScript
is built upon these objects. And just like in real life, objects can be anything. Let's take a look at how we
actually write our objects. So if you want to go ahead and create our first
object constant, my object, and you write the name of it just like you'd write the
name of a variable. But instead, you put an equal sign and then you
put those squiggly braces. And that's how you know
that it's an object. Then within an object, I've said you can put
pretty much anything. But the way we
structure our data within objects is we have a key, which is basically
the identifier, and then a value that
corresponds to that key, which is basically
the value of it. This is known as
a key value pair. They work in pairs
because of the key is the identifier and the
value is the actual value. We can access the value of
the key by accessing the key. So the way to do this would be, remember we talked about
dot notation before. We can use dot notation in order to access the
value of the key. So the way that we do
this actually is to console log my
object with dot key, and then we would be able to access whatever the value is. So console log my
object dot key and then the results
should be value. So that's how you access values on objects within JavaScript, however you can do. And then if you console
log the object itself, it'll actually give
you the entire thing, the key, and the value
within those curly braces. However, you can do more than just really simple
key value objects. Objects can actually
contain other objects, as we said, they can contain
arrays, it contains strings. They can basic contain data of any type. The key
can be anything. It doesn't have to
be the word key. It could be like Apple, it
could be any word at all. So you can also, as I said, I had
objects within objects. And it really, that
object can be your house. You can do anything you can
say house and you could talk about maybe the
different appliances that you have that
in your house, in your kitchen, maybe
have a stove and a microwave and I don't know, like not an oven. You can have stove microwave
and maybe have your stove, your microwave and
you're sick, right? That is a list. That is your house, that is a room in your
house, the kitchen. And then that is a list of the appliances in
the kitchen, right? Or lists of the objects in the kitchen sink as
long an appliance. But let's take this idea and let's go a
little bit further. Let's create an object
called my house. And let's start to fill
it out and see how we can have far we can really
go with these objects. So let's go ahead and give
my house and address. Maybe we live, add one
to three main street. And then let's go ahead
and give it a city. Maybe we live in New York. Then let's go ahead
and we'll give it. What else should we give it? Let's give it some rooms, maybe a certain number of rooms. We live in New York,
maybe only a three rooms. It's a pretty small
house that we live in. Then let's also give it, let's give it some appliances. Write this fall on this trend. Let's give it a list of, a list of appliances. So we have, let's
see what other. So again, we have a microwave. What else? We have a stove, we have a microwave, and we have dishwasher this time change
down from the same. Great. Let's see what else could do. Let's do occupants, Let's
do less than number of occupants that we have
in our residents. So let's go ahead and list out. But let's use a list of objects. So instead of using
just a singular object, let's do a list of objects. So let's create the first one. Will have, give it a
name. We'll say mom, she's going to be let's say
it's going to be 29 again. And let's give her
the occupation of, Let's get this
baker and teacher. And so there we go.
We have the occupant. First occupants name
is mom, ages 29, and occupation of the
occupant is a teacher. Awesome. So as I was saying,
we can't just like if we're going to have
more than one occupant, we need to have it
in a list format. So let's go ahead and put in within those square brackets, which indicates that
it's a list or an array. And then let's create
our second occupant. So let's go ahead
and fill this in, will make it name it dad, age 35, software engineer. And we'll move through
that really quickly. Then we can now go ahead and access the properties
of this object, right? We can access the
nested properties. We can console log your house, my house, and then we can
console log the occupant. And as you see, it actually pre fills it in right here, which
is pretty cool. That's a pretty cool
JavaScript feature. Vs Code feature, I should say, where once you have
an object, it autos. It's like a
intellisense, I believe, but it tells you which properties exist on that
Objects. Pretty cool. So you can access
only real property. So we'll go to the occupants and then within occupants
because it's a list, remember we're
lists, we can't just like dot notation into a list. We have to use indexes. Let's take the occupant at the first index will
access the dad, and then we will name
the dads occupation. So we will go to the first index and then
we will access occupation. And oh, here's an interesting, we gotta reference error here. That's because JavaScript is a little bit different
from TypeScript, which will work on and
in a later lesson. But JavaScript does not necessarily call an
error when something is of the oven incorrect type or an incorrect value
within the code itself, it'll call it once you've
tried to run that code, it's not ideal for larger
applications because then you'll just get a lot
of errors when you're writing the code and you won't
know where they came from. But if you catch the error
before you run the code, when you just try
and save it, It's, I think it's a lot more useful. So right here, the reason we
got that error is because in array values one and
value two are not actual. They're not keys and they're
not actually strings. So they're like there's no, there's no variable name value one or two while you
writing it like this. So we just need
to do is actually turn those into strings. Once we've turned
those into strings, all we need to do
is run it again. And as you can see here, we were able to access our
dads occupation. So my house or
occupants accessing the the occupant in index
number one's occupation, software engineer,
That's our dads. Occupations, works pretty
well like you can imagine how useful this could be in
a scenario where you actually like maybe
have a user object, like maybe you're building like a Facebook type of
website and you have a user and they have
an e-mail address, they have a password, they have friends,
they have pictures, they have all these
different pieces of data that are
associated with them. You, you might want to
store them in an object and just like name the object or give the object
like a user ID, could give them an ID within the object and basically
store all of this complex data within
this larger dataset and keep it uniform
amongst your users. So that if you had a site
with like 500 users, you pulled up their
profile page, you can access the
data in a uniform way. That's another great
thing about objects. It allows you to
access data in a really, really uniform way. And you don't necessarily
have to worry about if a piece of
data doesn't exist, then you can have it
return a specific value. But nine out of ten times as
assuming the data exists, it will then just return that value and
you'll be good to go
10. Basic Form: Alright, so now
that we've finished learning all about JavaScript, let's put it into
practice using some of the elements that
we've created before. First things first,
we're going to take this little form that
we've created here, and we're actually
going to use it to give our users our response
when they submit their information in our index HTML file, as we've
talked about before. Wouldn't it be really
cool if when our users go ahead and submit
their first name, their last name, and their age. Maybe they were given some sort of personalized greeting, right? So instead of high user or
just high, maybe it's Hi John. Hi Stephen. Hi Harry. So let's go ahead and add in that particular
functionality. But we're gonna do here is going to create a little P tag. And we're gonna, we're
gonna give it an ID. So remember how we talked
about IDs and how they can be used to target elements
specifically using CSS. They're also really useful when you're working
with JavaScript. So one thing we can
use IDs here for is to actually target
a specific element. So we're going to
use the ID parameter here and give this P
tag an ID of greeting. And that is what
we're going to work with when we're
creating our users. We're also going to go ahead and give this firstName input. We're also going to give
that an IV of first-name, just so that we know which which input that we need
to target the value from. So in order for this
to all workout, we're getting to write
a JavaScript function that gets called when the
submit button is pressed. So let's create an
onclick function. So concepts onclick,
let's call it on Submit. Submit. We want to, we want to basically get the information
that is in that, that first input, we want to
get the value of that input. So how will do this is
by targeting the window, which is the larger object that contains all the
information on the page. So we're going to
target the window. As we also talked
about, we could do this using the document. Because as we said, JavaScript works with the
Document Object Model. You can either use
window or document and type in window dot get. Actually let's use document. Let's do document dot
get element by ID, which is a method
available on the document. And we're going to pass
in that ID that we gave the first input called first name. We're
going to save that. And let's just console
log the result of that. And let's see, let's return just whatever that is,
right, so onsubmit, we are going to return that
and we're this console.log loops will just console
dot log On Submit. I just want to see what
happens when we call that. The last thing we're
going to actually have to do here is call it from the actual HTML file itself because we
need to connect the two. So as we have our input
type button here, we are going to give it
an onclick attribute. And what that attribute
is is gonna be just connection to our
JavaScript functions. So the ultimate function
we're going to sit on, we're going to actually just
change it to on Submit. Alright, so let's actually
returned document, get out. We didn't talk at the values. Let's do document dot, get element by ID dot value because we want the
actual value of that. Alright, let's actually
do something here. Let's say Const firstname. And we'll, we'll set
that to this value. So take this and
I'll put that there. And so now firstName
is the value. We're going to return firstName, but before we return it, we're actually going to
console.log it as well. First. Alright, and let's save that. So when we type in John and
we click Submit, There we go. It's working. We're
getting john, when we hit the Submit button. Perfect, That's exactly
how we intended. So now that we have this
variable that we can work with, what we need to now do is
make use of it, right? So can we save this to
a particular variable? Of course we can, as we've
talked about before, we can save the result of
a function to a variable. Alright, so we, How are
firstname variable here? What else do we wanna do? What we want to return this particular name in a greeting of sort
to our user, right? So what we're gonna
do here is actually take the value of
first-name, serena. Take the results
of this and we're actually going to put it
in a greeting function. So let's create a
greeting as a function. And we are going to say that the greeting
function should return. Or you know what
greeting will be. A side effect function. What it's gonna do is it's
going to target the document, gonna get a different
element by ID. Remember we gave
that P tag an ID. I can bring it over here on
the side so you can see them. So we gave this P tag
an ID of greetings. So we're gonna get element
by ID of ID of greeting. Then there's this other property in this called innerHTML. So you've targeted an element, now you want to put something
inside its inner HTML. So we want to then target
the dot inner HTML. And we want to
essentially put in the user's name into
that, into that sentence. So we're going to say, if our greeting is just
gonna be pretty simple. So we're going to say hi, hi. And then plus the name of
whatever the person is. Plus, we will take in a parameter for this
function called user. Then we will pass that to the little function
that we have here. So when greeting is called, it's going to take the, is going to go to the document, get the element with
the idea of greeting. So that's our P tag here. It's gonna get the inner HTML, which is this little space right between the P tags right here. And it's going to insert this high plus the
name of the user. Pretty simple. So let's move this
function that's hoisted up over above the
submit function here. Because another important thing to know about JavaScript is that sometimes functions cannot be accessed until
they're created. So if I were to, if I were to call greeting, if I were to say greeting,
in this function, I might get an
error that it has, it's being used before
it's been created. Sometimes it causes error,
sometimes it doesn't, but it's best
practice to just put them in the order that
you're using them. So let's create greeting. And then let us take the first name value and we're going to pass
that into greetings. We're going to pass
firstname into greeting. And that is going to be, that is gonna be our function actually need to
do is to add it. So we need to, instead
of calling it, we need to add it
will take inner HTML. And we're going to use plus and equals to
have an equals this. So if we do this again, it should work. We hit Submit. There we go. We have hi John. It's
not quite formatted, right, but let's
we can fix that. Perfect. So let's take a look
at what we did here. We targeted the document. We got the element
by the ID greeting, which is this P tag. We targeted its inner HTML and we use this
plus an equal sign. So we're adding something to it. And we added hi plus
the name of the user. Pretty simple, right? And then to like a nice friendly
greeting that we can do, this is just one way we can take advantage of
all the things that we've done with our
JavaScript so far. Super simple little
function to do. But just a really
cool example of how we can actually work with the values of we've been given. As you can imagine, we
could set this up to do different things like we take their last name,
we take their age. We could say, Hey, you
are of driving age, Go get your license or
something like that, or whatever whatever response you want to get them
based on their age. As you can see, this could be used in a variety
of different ways.
11. Advanced Form: Let's take a look now at
our previous project, our HTML and CSS project, and see how we can add
some JavaScript to them. So as you remember, we have
our website right here. And basically what we wanna do now is probably add
a little bit of interactive interactivity
to it using JavaScript now that we're
JavaScript professionals. So if you remember, there
was this little image here called active states. And so it actually gives
us a whole bunch of different active state they'd like us to add to the
actual form itself. So as you can see, a lot of this is basically
telling the user that something cannot be empty when they've
clicked Submit. So there's also a bit of an
e-mail validator right here. So let's go ahead and try and implement
some of these things. Let's do it like this. If the user tries to submit
and the value is null, we want to return
some error message. So let's see what
this could look like. Let's say we can target, we can use the inner
HTML function, the inner HTML property
that we just talked about, as well as the ID is to really get at what we're
trying to achieve here. So let's see. If you also notice the, the colors around the
edge are red here. So we probably want
to do something with the CSS and the stylet. So that's a couple of
things that we want to do. So let's add an
onsubmit onclick. Let's add an onsubmit function. And it's brown right now because we haven't
actually made it. So let's make that on Submit. Great. Basic function. And on-click, I've spelled
it wrong here as well. They're real onclick. Do an onsubmit. Awesome. Alright, so in
this onsubmit function, we want to basically
target all of the values of the of the input. So there are a couple of
different ways we can do this. We could get them by, let's get them, let's do it really a bit more
manually for now, let's do ID FirstName. Let's do id of LastName. And let's do ID of e-mail color. Probably want to do something different with some
of them as well. And then this one
last week, oh yes, we'll do an id of password. Alright? So we have our four
pieces of input with IDs. So what we wanna do now is we want to get all of
those elements by ID. And we can do that within the onsubmit function
or outside of it. So if we wanted to just
create these variables here, we could go firstname. Awesome. So we now we've
targeted all of those elements. So onsubmit, we'll
then want to say if, if input dot value equals, equals not equals, equals null, then we want to will take that, that will take that input and we will give
it a class name. So it's called class list. Dot add will add, will add in the,
will call it error. Let's do one more thing here. We'll add a style called error. Error. And it'll change the border
to one pixel, one pixel. Solid red. That's what we'll do for now. So if empty, it'll
add this red border. Let's see if that works. Cannot read properties
of null reading value. Okay, so it's giving us an error here because there is no
value for each of them. Alright, so after
some digging around, I figured out what
the problem was. What we really needed to do
is move all of these elements within the function
because basically they don't exist, outside. They don't exist
you, there's nothing there for the function
to actually grab. So by putting them
inside the function, we stop treating that,
triggering that air. So what we basically
wanna do is this. We want to grab the element add, check to see if the value
equals this empty string. If it does equal
that empty string, then we want to take
that element to get into his class list
and then add error. As you remember, we
added a classical error at the bottom here, that's going to give the border, it's going to change the
border to be one pixel, solid border instead
of dotted or dashed, and make it a red border. So in theory, if we've
done this correctly, when we click on first-name not value
is going to add that. It's going to add that class of error and it's gonna be red. So let's click on it and then we have it, it's
working properly. It's telling us that, hey,
there's an error here. Awesome. So what we now want to do is I bet in for all of them. So let's go ahead and quickly add in all
those other options. So we've basically
taken all the inputs. We've created an array so we can iterate over it
much more quickly. And then we've said
for each input, if the input value is nothing, we want to add the
classes error. That's all we did that it
created that air for us. Alright, there you go. We've seen how we can use
JavaScript to actually interact with this form
on a very basic level, I'd encourage you to take
this all the way and to add in the little
exclamation marks and to add in the little
placeholder texts as well to see how far you can
really go with this project
 Zoë Davidson, Software Engineer & Cinematographer