Transcripts
1. Intro: Have you ever heard
of one of the most popular front end libraries
in the world, React? Today, we're going to walk
through everything you need to know to build your own
project using React. Including how to
build this to do app. Hi, my name's Zoe. I'm a software engineer
and former professor who loves educating others on how
to get started with coding. I've created tons of websites and web apps using React CSS, HTML, and other technology. By the end of this course, you'll be able to do this for yourself. Let's get started.
2. Course Project: Class project. The project for this class is to build a
fully functioning to do app. For this, you'll need access to a computer and a code editor
like visual studio code. You should also have
some understanding of java script or type script
as well as HTML and CSS. To spin up our app,
we're going to be using a framework called Next
S, which uses React. We'll also be using material is for some basic
styling and components. A leap links to any assets and resources you'll need in the
project and resources tab.
3. Why React?: Why react? If you're already
familiar with react, you can skip ahead to
the tutorial lessons. But in the next few lessons, we're going to be going over what problem React
was created to solve, how it's used, and
how to run it. React was developed at Facebook and released to the
public in 2013. It was initially created
in order to handle inefficient page reloads
and updates that at the time required
the entire Dom or the document object
model to be repainted. With each update, React, fix this issue by creating what they
called the virtual Dom, a representation of
the Dom in memory. This allowed React to only
update those aspects or components of the Dom that changed rather than
the whole page, resulting in better performance. React has been a game changer in the web development
space and it is still one of the most
popular libraries out there. Due to its use of components, developers are now able to write modular code
much more easily, which allows them to develop more efficiently
and effectively. Other popular frameworks
which are often compared to react include
View and Angular.
4. Components: Components. Components are
reusable pieces of code that react leverages in order
to maintain its modularity. Think of them as
the building blocks that developers use
to create apps. A component is a self contained, reusable piece of
code that encapulates its own functionality,
state, and structure. These components can be
thought of as a combination of HTML and Javascript or JSX, which is used in React. Each component can
have its own state, which represents data that
can change over time, and a set of properties
or props that allow parent components to pass
down data to their children. Just like HTML has elements
within other elements react, has components within
other components. These internal components are considered the children
of the outer components.
5. Props & State: Props and state. To really understand and use
react to its fullest, we need to talk about
state and properties. Or as they're called, props. Let's take a look at
a basin component. These components are really
just at their base functions. They may take arguments, they may modify variables, and they may return a value. But simply speaking, we
can think of props as the arguments that are passed through our function
when it's called, and state as the local variables that only exist within
our given component. We'll expand on this
definition later, but it's important to
understand how it works first.
6. Create React App: Create react app. There are several ways to set
up a react app. In this course, we'll go over
two of the most popular. The original way to
set up a react app was by using CRA or
create react app. Create react app was also developed at Facebook
in order to remove a lot of this
complexity and turn it into a simple but
powerful command. By using create react app, you'll save yourself hours
of headache when trying to set up a new react
app for the first time. To run, create react app. Simply enter px,
create react app, followed by the name of your app into the terminal and hit enter. After a few minutes,
you'll be all ready to go. You can run the command for
yourself in your terminal if you'd like to see what
create react app looks like. However, I'd caution
you against using it to build your project as it's
no longer being maintained. Instead, suggest
using frameworks or tools such as Next S or Vet. We'll be using next S
to build our to do.
7. TypeScript: Typescript. Instead of using Javascript for our to do app, we'll be using typescript. Typescript is actually just
a superset of Javascript. What that means is
that it is built off of and ultimately compiles
down to Javascript. But it has some
additional features that Javascript doesn't give
us out of the box. Typescript allows us to use static instead of
dynamic typing, Catch a lot more errors
when writing our code, as opposed to at run time. It automatically
develops a level of documentation
for your project. It's a bit different
from Javascript, but we'll go through it together step by step throughout
our tutorial. If you can write Javascript, I'm sure you can
write Typescript.
8. Next.js: Next S in the years that have passed since create react
app was first introduced, many frameworks have been
built and developed off of it. A very popular framework
today is Next JS. Next GS provides a lot of out of the box optimizations such as servicide rendering
routing and improved SEO. And as such, is a favorite
of front end developers. We'll be using it
in our projects, so let's dive in
and get started.
9. Styling the App: All right, so let's get started. So the first thing we're
going to want to do is install the package
that we're using. We're actually going to use
this template here that allows us to create an app
that has next S Material, UI and type script all
put together at once. If you were to sort of install
this manually one by one, starting with next JS
and then install it, material I and type script, it would take a little
bit longer to configure. So we're just using
this template as a shortcut to save us
some time on the tutor. So what I'm going to do here
in order to utilize this, and I'll leave the link
to this particular Github repository down down in the projects and
resources tab below. So I'm just going to go
over to the right side here where the green button is. I'm just going to copy
the URL for the project. And then I'm going
to go into the development folder
and I'm going to clone it into a folder that
I'm going to call to do. So we'll do that
and then awesome. So it's created, let me hop
over to my to do folder now. Documents, develop it and to do. And then we're going to
open that up in VS code. All right, awesome.
Now everything is in VS code, we
should be good to go. Now what we're going
to do is use NPM to install the packages
that we're working with. Because although we have
our package on Json, which we've talked about before, it has all of these
packages that need to still be installed
in order for us to use it. So let's go ahead and
get that started. So I'm going to start by
opening up a new terminal. And you'll see that it's already initialized as a Git repository. That's a feature of using
next S. It allows us to basically get all
that stuff that we would have to do one by one, basically done for us. We go ahead and
we're going to type NPM I for install and
let that install. And as you'll see up
in the top left here, a folder called node
modules has just popped up. And this is basically the result of installing all
of these packages. It's all the information that the project is going
to need to work. So you'll see that we have
installed node modules there, a couple errors
there, but we're not going to worry about there. And then we're going
to go ahead and run NPM start to start our project. We're getting a
little error there. Oh, you know what, we do
need to run NPM, run dev. That's what it is.
All right, sorry, start endeavor. Two
different commands. So we'll go over on the right here and if we've done
things correctly, the local host 3,000 as
said in our terminal, we should be able to
yeah, get started. So we have our next
S up and spinning. We're using material Y and
we're using type script. So we're going to basically
just start developing and building our to do app so we can focus on the
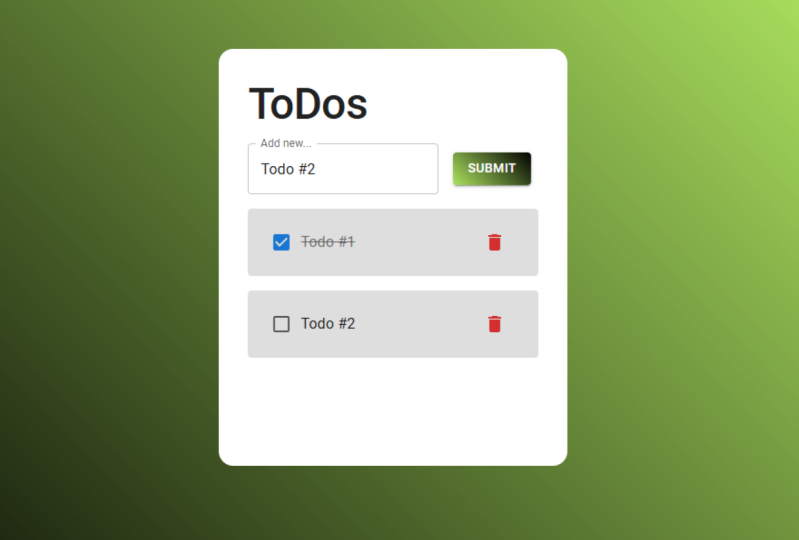
things that matter. All right, so the to do app that we're going
to be building, if you just Google
one, you know, you basically want
to create something, you know, with any
given to do app. You want to create
something that has sort of like a list of tasks. You know, some way
to check off what you're doing and some way to
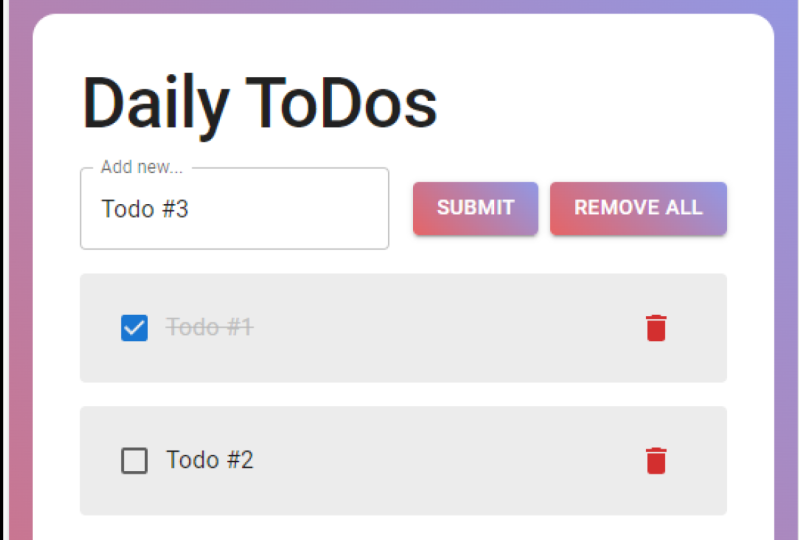
delete what you're doing. One that I've created in the past that we're actually
going to model this after is this to
do app right here. So this is what
we're striving for. We want to do app that
when we add in to Do, we can add it to the list. You know, just by hitting
Submitter, hitting Enter, we can check it
off and, you know, maybe have some styling
associated with that. We can delete it
if we'd like to. And then if we add
it to do and we refresh the page, we
want it to stay right. We don't want it to
disappear because we want to be able to use this
to do app as sort of like our personal to do app
for as long as we want to. So there are a couple
of things we're gonna have to do to get
it working like that. But we'll use this to do app as a reference in case we do
need help in the future. Right now we have
this app though. This next S starter kits. Let's go ahead and get
rid of everything that we don't need to use hopping over into into our
VS code project. Here I'm going to go into pages. The way that next S works is
that it actually structures your app in terms
of pages Because we're at the home
page of the app, we'll just be modifying this index file as we
talked about before. We have JSX, which is Javascript mixed
with Javascript XML. This is S, which is just the typescript version of the same thing as
I mentioned before. If you're not familiar
with Typescript, it's very, very
similar to Javascript. They are basically
the same thing. Typescript is just
Javascript with types, and we'll get into that as
we work on our project. So first thing we want to do is clear out
all of this in the middle. So we're going to just
clear out everything from Maine down to footer
and get rid of that. We just want a blank
slate and we're going to change the title
here to do great. So as you'll see on the right,
we have nothing going on, so we know that
we've done our job correctly. We cleared it out. I'm also going to get
rid of the styles here, just so that we
can really, really start from a blank slate. All right, so let's take a look at our app again.
What do we want to do? Well, I think we're going to
be, we're going to need to create several different
components here. So we're going to need to
have this sort of like larger component that
hosts the background. Maybe you can just add the
background to the body, but then we'll have
this container here that really holds
the actual to do itself. But we seem to have a header
here that we could name it. Art to do list or whatever, but it's just called to
do for the time being. And then we have this
input that is linked to submit and the actual
to do themselves. So there are a few components
we want to create. Think about creating
here. Let's get started by styling up
the background first. I think what we've done
here is a linear gradient. So I think that's what
I'm probably going to do for our projects as well. What I'm going to do to
grab that is I'm going to look up the semantics
for linear gradient. And yes, this is
what I want to do. I want to grab it as
a background color or basically just make
it the background. So I'm going to head
back to the app and then let's try it on our div
here and see if it works. If it covers the whole page, so it's going to be
linear gradient and we just have to wrap this quote. This is inline CSS if you
haven't used it before. Basically, this is
allowing us to write our CSS within the
actual element itself. So we just need to make
sure that wraps around. Yeah. Oh, you know, sorry, I put the quote
on the wrong side. There you go. Cool. So let's take a look at what
that's given us. Mm hm. Oh, and let's add some texture so we can see that we're working on the
right file. All right. To do awesome. So this is
giving us a linear gradient, it's just not covering
the whole page. So one more step I'm going
to add to this page. Basically, I want the page to take up the entire visible page. So there's a property called
view height that you can actually use to take
100% of the view, the height of the view
that you're using. So we'll set the height to 100 VH with stands
for view height. And we're going to save
that. And there we go. We have our page taking
up the background, or at least for our home page, taking up the entire
page. That's great. One more feature that
I'm going to add to this linear gradient
styling here is a turn. So I'm going to
add a 0.125 turn. And that's just going to turn the line where the
gradient is right now. It's kind of across the
page. It's just going to turn it slip, so we're
going to save that. Great. And these are just a
little bit of an extra flare. Cool. So we're done with
styling that for the moment. Let's move on to
creating our components. So I want to create
a new folder here, and I'm going to
call it components. As I mentioned in my
previous lessons, something I like to
do when I'm creating a react project is create a
components folder so that I can kind of categorize and build all of my components
in the existing folders. I find that it makes things
a lot easier for me. It just depends on what
app you're working with and how you'd like to
structure your project. So within the component folder, I'm going to create a new
file and I'm going to call this file to do
container because this is going to be that
big white container that we saw in the
other, in the example. So I'm going to hit
Enter and then using, I believe it's me,
it's an auto complete, I'm going to use R AFC and it's going to automatically create a functional component. So there we go, we have a functional component
called to do container. What I'm going to
do now, hopping back over to that main page, I'm just going to
replace our little text here that says to Do
and replace that with our Do container component
which as you see it actually auto imports because of some of the extensions
we have installed. And I'm just going to say that if you have more questions
about extensions, just leave a comment
down below and I can recommend a bunch if you need
help with stuff like this. So hopping over to, you'll see on the right here that to do container is now actually
present in the, in the app. So, you know, we're
working pretty well. So the next thing
we want to do is actually we want to style, we want our to do
container to be in the center of the page, right?
We want it to be there. So in order to do that, I think the easiest way to do
that would be to set our page to be a flex box because this is going to be the
only thing on our page. We can kind of allow
it to be a flex box with minimal worry that it's going to affect anything else. So in our page, what I'm going to do here is
set the display, do flix and then I'm going to justify the content to
be center and save that. As you'll see, the container has already bounced itself
over to the center, so it's already
centered on the page. Next thing I'm going
to want to do now is actually style the
container itself. And I'm going to add some inline styling to that to kind of get it to where we want it to be. Using some inline style. On the dive right here,
I'm going to go to style and then I'm going to set a margin top of let's
say five M for now, just to push it down off of the top of the
page a little bit. Then the next thing I want to do now is set a background color. Background color. We're just going to
set it to white, which is FF and
save that, great. So we have our to do container, but as you can see
it's going like all the way to the
bottom of the page. We don't necessarily want that. So what I'm going to
actually do is set a max height height and then that'll just keep
it nice and contained. We can make this
bigger if we want to. We can make it more responsive, or we can make it scrollable. All of these sort of things
like that are nice to have, but we'll worry about that
as we get down the line. Right now, we just want
to get this sort of MVP, the minimum viable product
that we're working with here. All right, a couple more things that I'm looking at here is that we don't want our to do is to be really squished to the
edge of the container. So we probably want to
add some padding in. So I go here and I
add some padding. Let's just add two ram of
padding all the way around. Great. Looking pretty good. Then final thing here,
we're going to add a border radius to just
curve those corners. So you're going to
type in border radius and then I'm going to set it to, and save that. Great. I'm pretty happy with
how it looks right now. I think we can do a little bit more once we start to add in the inner components
here as the header. And we're also going to add in the input, the button
and the actual to do. So let's jump on and do that. Hopping back over to or actually saying
in our Do container, let's go ahead and
add the header. So we're going to
create an H one. And actually because
we're using material I, which is a particular styling and components library
that is available to us. Because we're using react, we can actually use
some of their built in components that allow us to
style things a bit quicker. It'll allow us to get sort of up and running with our Apple
a little bit quicker. And also teach us a new library and give us a new tool
to be familiar with. So I'm going to use a
component they have called typography and import. Now from previous
experience I know that the topography component has a element or a property
called variant. So I'm going to use
the variant property and I'm going to want to
access the variant of H one, because this is going to
be our title on our page. And then within
these two brackets, I'm going to type in todos. That's going to be
our title for now. And there we go,
we have it there. It's a little bit different
from the one we had before. I might want to go ahead
and style it a little bit differently just for the
purpose of this tutorial. But if you did want to sort of use materially y to
style a bigger project, you can actually hop into
the styles folder that comes with next JS and then modify the theme and work a
little bit more in detail with the typography
and what size or H, one is, what the thickness is, the font weight, and
things like that. You can really get down and style the components even though it is a
component library. But for now, I'm
just going to access the actual styles of the element itself to modify it to the
way I want it to look. So to do with material I, every material Y component has a special property called X. And X is basically
just like style, like inline styling, but it's just specific
to material Y. So we're going to
use the SX Prop, and I'm going to actually
set the font size to be, let's say three Ram, maybe four. Then we'll set the font weight. I think about 500. All right, cool. It looks pretty good
to me. Let's move on. So the next thing
we want to do now, right, we, looking
back at our To Do app, we want to consider this input, the Submit button, and the
actual to do themselves. So I'm going to start by creating the Todos and
then work our way back, hopping back over to our app and actually going to set
this to three Rams so it matches the design the example
a little bit more closely. We're going to create
another component, call to do item. We're going to use the
same thing, R AFC, and it's going to export
our component there. And then we are, instead of just importing
it immediately, I'm going to actually
create some mock data. So I'm going to go
constant mock to do then I'm just going to
create an array of strings, that
will be our mock. To do so to do one, do two, and to do three. And
we're going to save that. And what I'm going to do
below the typography now I'm going to mock data and
import our to do item. So I'm going to, using
these pearly brackets, I'm going to take our mock to do and I'm going
to map over them. So if you remember correctly, that map is a function that we can use on
arrays to allow us to iterate over the
objects or the items in an array and then
spread them out and do sort of our repeatable
action on each of them. So we're going to
map over each of the tos and what we want to do, because maps have
to have a return, we're going to return to do item, we're going to say that. Now it's giving me an air here. It says I'm missing the key Prop because with maps
you do need to have a key so that each item is
independently identifiable. So what we're going to
do is we're going to set the key to be the To do, because we know our
to Dos are unique. This will work. But you'd want
to set it to a unique ID, which we'll do down the line. The next thing we're going
to want to do here, so we, even as you see on
the right here, the to do items have populated
for the number of times. So the Mac to Dos are present.
So there are three to do. There are three to two
items. However, they haven't actually
populated with the data. And that's because we failed
to pass the data into the actual to Do it component. So let's go ahead and do that. Heading back to the do item, what we're going to
do here and this is where Javascript
and types scripts start to differ a little bit. If you're familiar with
the reacting Javascript, you'll know that
you can just create a prop to do and then pass it into your
actual component. But what you wouldn't see in job script is this
error I'm getting. So it says binding element to
do implicitly has any type. And that's because
we haven't specified the type of to do so. Just like in Javascript, everything has a type, right? Everything in type
script has a type. But in type script, they want
you to explicitly define or declare that type
so that there is no confusion about
what is being passed, where it's being
passed, et cetera. So one way that you can
do this in type script is creating something called
an interface interface. And you can call it
whatever you want, but we're going
to call it props. And within this interface we're now going to define our types. We only have one right now, but we can add more
to it as we need. So we're going to
create, we're going to define to do to be a string. We're going to say
that. And then outside of this
curly bracket here, we're going to put a colon. And we're going to type the
word props to indicate that these props should be
applied to these parameters. To do is the type string. If we add anything else here, we won't have to go
and add more and more props on line seven. We could just add them on
lines 56.7, et cetera. So heading back to do item, we now want to pass
the actual to do. Right? Because you know
it's now expecting it. Basically, it knows that
to do item takes a to do. So it needs us to actually
use that particular property, which is one of the great
things about typescript. You're not going to make
these kind of mistakes. Like if this was Javascript
and we never passed to do, we might be wondering why our
to do is never populated, but because it's type script, it's going to give us this error as we're writing our code. And so we won't have these like silent errors failing
as our app is running. So all we need to
do here is write the property to do and then pass in the to do and save that. And there you go. We
have our to do one, to do two, and to do three, and just how we've written it in our mock to do so we know that we're passing the correct data. Awesome. The next thing that
we're going to want to do is we are going to want to actually start to
style this, right. Because we have a few things that we want to get done here. We want to have a
little checkbox, we want to have a
little delete button. We want to have this
gray background. You know, a couple of things
we want to accomplish. So if we head over to do item, we can start to scope that out. So within this to do, the first thing I want to do I guess is set that background. So let me grab a color here. So let's do an RG, a color, let's go to the color
picture here and let's pick sort of a light
gray for our background. I'll do this and then we'll just set it as the
background of our dive using that style
background color. We're going to set it
to that. We're going to save that help over here. Great, we have our
background color. The next thing that
we're going to want to do is we are going
to want to probably add some spacing below them and then add that
border radius in again. So I'll add this by doing a margin bottom of
let's say one Ram. That way every new to do that gets added, we'll
have that spacing. And then we're going
to also add, um, the border radius of, let's do 0.25 Ram. And say that the final thing we're going to want
to do here now is add some padding just so that there's a little bit
more room around us to do. So add the padding and we'll do maybe one Ram as
well, just all around. All right, cool. So that
looks pretty decent for now. The next thing that I think
we're going to want to tackle is the actual
elements inside, right? We want to have that checkbox and we want to have
that garbage can. I think the easiest way
to grab the check box, we'll probably be using
material check box. Yeah, we just want something
really basic like this. We want it unchecked
at first and then checked as we use it. We can actually just
copy this line of text right here
and include this. Before we can pre bend it, we'll take out this
piece that's label here for how they
want to label it. If we want to include a
label with the checkbox, we can, but we're going
to style it separately. Then we're going
to add that import from maturely by checkbox. Then ifa over here we
have to do awesome. Another thing we can do is wrap art to do in a
typography element as it is a element typography. And save that, cool. Then we want to
add a garbage can. I'm not sure if they
have a garbage can icon, but if they do, that would
be great. Let's try trash. Awesome, they do
have a delete icon, we can actually access this. We can copy that. Use that in our components, I wonder if. Yeah, and we can change
the color, which is great. Let's go ahead and we'll
just drop this on, sorry. We'll drop the icon
into our project here. And then we'll just
call delete icon here. That the great, we have
our delete icon here. And then we should be able
to set the color on it. So if we type in
color and we put in, I think it's probably going
to be danger or error. Probably error should
be the red color. If we save that, great. We have a red trash can. Awesome. You'll notice
though that these are all coming down directly
in a straight line, which is not ideal. What we want to
do to fix that is actually we're
going to basically set it to be in a flex box across and then we'll
separate them from there. So we're going to create a dive that wraps around
the checkbox in topography. Because if you recall
from our example, we want them to stay
on the left side and the delete to
be on the right. Then we're going to
make this larger of a flex box type in display. Set it to flex that. The same thing here, we're going to add that prop, say we're also align items in the center because they're a bit wonky there And we'll
do the same thing here. Cool, everything's
looking pretty good. The final thing we're
going to want to do is set this upper dive to the
content to be spaced between. We want them to basically this div and this delete icon to
be as far apart as possible. And one thing that's
going to assist us in this is actually
setting a minimum with this outer container because
right now there's not a lot of space
between them. Right? So to do that we're
going to go to our To do container and we are going
to set a minimum width, say 40 view width, one, if that,
that's pretty good. So we have our To do, we have them populating
line by line. We have our header, which I'm actually going to
add some margin to the bottom of just one Ram. And we have our to do, and our checkbox is checking
and unchecking, but right now none
of our buttons or icons are doing anything. So let's go ahead and
make them do things. So what we will also need
to do here in order to allow that functionality is wrap our delete
icon in a button. So I've just imported the
button from material. I, I have not. I've now imported the
button from material UI, and now it is actually a button. So when you mouse over it, you see it actually
turns into a button. There's a little
hover state there, so we're sure that it's
a button essentially. All right, so the other thing we're going to need
to do now, right, like rather than
using this mock data, we're actually going to want to use real data at some point. So in order to actually
enter the real data, we're going to need
an input, right? So let's go ahead and
create our input. We're going to create it right here in this
new container. I create, I believe material. I has a text input. Text input option. May text field. Yeah, it's a text field
and I think we want just like the really basic
outlined text field. So again, I'm just going to copy the first line of
the options here, the documentation, and
paste it in our project. And I'm just going to
do a quick fix so I can import the text field. And if we go back crew,
cool, it's there. But then we also need a button. So let's go ahead and create a separate button just using
that same button component, and it's going to
be a Submit button. Great. So we have the button and the
Submit next to each other. I'm going to actually go
ahead and wrap these in a dive just so that they're contained, just like
everything else. And then I can add
styling to them to make things sort of appear the way
we wanted to with the div. I'm going to do the
same thing. I'm going to set and make it a flex box. So we're going to
do Display Flex. And do you find you're
doing the same sort of pattern time and time again? One thing you could do is create something like a style
component that just is a container
that automatically creates a flex box every time. And then use that instead
of using basic divs. That's something you might
want to do if you're making a bigger project or you're just thinking about optimizations. Display Flex, we'll add a
margin bottom of one M. Yeah, it's looking pretty good. I want to do with this. Well, let's also, sorry, let's add some margin to the
side of our input there. Margin, right? We'll do one M again. And I want to do something
with this button here to make it stand
a little bit more. So if I go to the
button LI of contained, we have outlined, we have text. I think what we want to do
is have a contained button. So I'm going to actually
add this bit here that says variant equals contained
to our button. Let's save that. And now you see we have a bit more
of a contained button. But you'll also notice that
it's really, really tall. I don't know if we want
it to be that tall. I think that might be
because of our flex box. So I think what I can do
here is actually just align items to the
center and that should fix the extra tallness
of our button there. Let's try that. Say
that and great. Yeah, it's back to
this normal size. But yeah, I like the button, but I think I do want to keep a similar theme of similar
style across the whole thing. So what I'm going to do with the button
here is actually change the background to
match our linear grade in hot back over to
our index TSX file. I literally just going to grab this background color here, copy it, head back to
our button element. And within the X prop
that I'll add here, I'm just going to drop that
in and save it. There we go. Our button has automatically, so let's just comment
this out for a second so we can really
take a look at this. It was white and blue. And then when, let
me add it back in. It's still white,
but it does have this linear gradient now
working pretty well. The next thing we want to want
to tackle is actual input. Right now, the label
says outlined. Let's change that. So it's a
little bit more of a prompt. Let's maybe say, add
new dot and save that.
10. Adding Global State: The next thing we're going to
want to do here is actually basically make sure that our To Dos are living in
some state management tool. We're going to want to consider something like Redox or Z. Stand personally, I
think Redux might have a little bit too
much boilerplate for this project at this point. Because it's really just
a very simple to do app. We don't have a lot of
complex UI actions. I think just a simple using an instead might
be the way to go. If we look up the
documentation for stand, we can figure out how to
install it and get it working. It's like a simpler state
management system really. So we're going to go ahead
and install stand in our project that now
that it's installed, we are going to go ahead and I'm going to create a new folder here and I'm going
to call it store. So if you've never worked
with the store before, basically it's just
a place where you, your state essentially
lives in it. To put it simply, this store I'm going
to create called index and this is where our store is. This is going to
be our store file. Looking at their
documentation here. Basically use this to actually
create our component. So I'm going to put that
there and then we can go ahead and modify it to
suit what we're doing. So what this does here, so it imports this function
create from z stand. And we create a variable here called store, which
calls create. And then basically
this is actually our store here. It
creates our store. Bears in this case are actually going to
change to be todos. It's going to be an empty
array to start with. When we go to access our todos, this is where they're
going to be living. We'll just, we'll go ahead and add this to our
work space setting. So go to get that.
Are. All right. So then instead of
increased population, we're actually going to want to create something called add to. This is just going to
be what happens when we hit Submit and it adds our
To do to the list of things. We're going to set the state
instead of bears is going to be to whatever the
current state of to do is instead of plus
one we're going do, we might have to put in, wrap it in a array, sorry. We're going to do
whatever the state of to whatever the previous
array was and then plus the new to do so instead
of state plus the new oh, sorry, that was the wrong
place we're going to actually pass to do and plus
the new to do. I'm going to say that I'm getting some errors
here because again, the types we need to put the correct types
in this project in order for it to
work correctly. So in fact, I'm going
to create one more type and I'm going to create one
more folder for the type. So I'm going to create
a folder called types. I'm going to create a new file, index S, and that's going to be where all
our types are created. That way if I create
a type, for instance, I don't need to recreate
it in every file, create an interface
in every file. I can just export it and access it in every file so
we can keep our code dry. So this is another
way to create a type. I'm going to create
the type to do. And just like interface, it'll allow us to type
whatever we're working with. So I, let's really think about this for a second
here because this is going to be something
that we can either modify a few times or we can create once and then build
the code around. So when we're looking at our
example to do app, right, we want to be able to
add the To do, right? So it has to have some sort of description or whatever that
signifies What the to do is, as you mentioned before, we
want to have a unique ID. So that is also another property that our to do should have. So we want like a description
and we want an ID. We probably want to track whether or not it's
checked or unchecked. Because if we want it to
persist when the page reloads. We can't just have it live
on the client side, right? It needs to live in
the store somewhere. That's not going to change
from reload to reload. And then finally we want
to be able to delete them. So again, delete kind of
lives with that ID ability. In order to delete
the specific to do, it's good for it to have an ID. So I think we've established sort of three things that to do. Should have or three properties. We're going to give
it an ID property, which will probably be a string. We're probably going
to make it, sorry, we're probab going
to make it a UUID. We're probably going to
give it a description. It's also going to be a string. Finally, we're going to
give it a checked property. So whether or not it's checked, and that's going
to be a bolling. So a true or a false. Let me go ahead and export this type so that we can
access it in other places. And then I'm going to
import it here. Let's see. I think we can actually,
oh, you know what it is. I need to create another, I do need to create
one more interface, but this is just for the store, so I need to create
a type to do store. Basically that's going to
give us all of these options. And we're going to change this, but remove to Do, we basically need to define
what types these are. Is going to be an array to do. Array're going to import
the to do from types. An array of Todd to do is going to be a function
that takes into do, which is of the type string. Actually you know
what, this is not, this is probably going
to be description. So we're going to change that. We'll change it here. And
we'll change it there. We'll save that, then return, and then the final one here. Or maybe we're probably
going to have two more. So we're going to do remove to do so that's going
to be our delete. We're going to take in an
ID which is of type string and try to function. And then, yeah, so let's
just change this to remove. To do so we know that that's what that's meant to be accommodated up for
the time being. All right, so we're
getting an error here. Oh, because we have not
applied our store to act like our state to our
store with type script. It kind of depends
where things are going. But usually you
can put it sort of like right by the function here. Like when you're
creating a use effect, you put it sort of right
after the words use effect, but right before
the open bracket. So I think I can put it
right here after create. So I'm going to, because
it's basically a hook. So I'm going to
write into Do store, I'm going to close
the bracket and I'm going to save
it and then great. All right, the is have changed. It says I'm missing the
following properties. Add to do. Oh, you know what? That's just 'cause I've
typed it differently. Let me make it to
do all lower case. I was just saying I'm missing removed to do so.
Let's create that. So we're going to do taken an ID and it's going to
return nothing for now. Oh, no, it doesn't like that. No. Actually, let me fix, okay, let me fix two problems. I'm going to fix
up this ad to do. What we're going to
do here is I believe, oh, you know what, Well, it's
a couple different things. A couple differ errors
we're getting here. So the spread operator
actually needs to happen in state to do so, maybe we don't put it back in
an array. Will that fix it? Now, do state. Let's go ahead and
finish out creating our removed to do and then we
can address this other er, I'm just going to copy
this over and paste it. The way we're going to
figure out which to do, we're removing to basically access all of our to
do and we want to filter them for the to do
that we're not using anymore. All right. To do we
no longer want to do will instead become
whatever the to do. A state to filter for whichever to do
filter for the ID state. Dom Dodd filter. Ford is give mainer I'm missing another bracket
here stated filter Ford. We want to, let's
look up filter. Okay. We're going to
a right filter to do do not equal the DID. That should work. Let's figure out why these errors
are occurring now. All right, so looking at this, removed to do is
missing in type to do. Never add to do, but required
in type to do store thing. Oh, is that the only
error getting here? Sure. All my commas are
in the right place. Clear out, removed to do,
out of both of these. Let's take a look at just
the ad to Do errors. Let's see what's going on here. It's to clear but never set. So just a little
error here is that we actually just need to
probably remove these brackets. And then instead of just
passing the description, what we actually
want to do is be creating a new to do, right? So we actually want
to create an ID, unique ID, which
will be a string. And then we're going to
create the description, which will just be
the description. And then we're also going
to add a check state. So it's going to be checked and it's going to start
off as false. So the check state, now we can't just pass an
empty string for every ID. We're going to actually
want a unique identifier. And for that we're
probably going to use like a UUID library, which NPM has at least one of. We're going to use
this one UID and it's basically going to allow us to create unique IDs
for our project. So I'm just going
to install it here. And then I'm going to import it in our storm and save that. Oh, and you know
what, I think I do need to install and save Deb. I think I get this error
sometimes. Okay, cool. And then if all else fails, just close it and
open it back up. And sometimes it does
just clear the air. Oh, let's give me a suggestion
here, let me try that. Quit, come back in more time. All right. Perfect
error is fixed. All right, so we want
to, that should work. And then instead of
passing an empty string, I believe what they
suggest here is we just, yeah, we just call UID
whenever we need it. So ID before and
then we'll just call it and that should create a
unique ID for our new to do. Awesome. So I think we're pretty much set up
on the ID front. I don't think we're any to
install any more packages. We work with the Z stand now to actually access
ours and add them to our list and use those
to do instead of also. I think we can comment
roof to do now. I think we've sorted
out the error that we were having
which is really with the upper level we're going
to, we're based on to does. All right, so cool. Both of
these should be working now. Opt back over to to do item. We're going to sort of hook into everything now and make everything work the
way we wanted to. So I guess we need to
be into do container, so we want to the to do. So let's start with
that. So we're going to grab the to do. So constant to do equals this hook here
store from z stand. And then we want
to grab the state. And on the state the to do that are present
on that state, right? So that little array that we
created at the beginning, that's what we want to
grab for our to do are here D is not bowl, it's why is giving us that error actually
eight correctly. All right. It's just
a type error we're getting because
State has any type. I believe there's some
type script guides that we can follow here
accessing our store. What did I not export the store? Export the store. Yeah, I got to export the store. Otherwise, we can't use it. That was the issue. I was
like, Why is this not working? All right, let's close this some more time. Open it back up. Oh, we're still
getting the error. That's so interesting.
What did it say? Type, but it is importing
the wrong store. The store. Actually rename this a
little bit less confusing. So we're going to call
this To Do Store. And I'm going to
call Store Store. I imported the wrong store, so I need to import
store from store. Then I can do what
I was trying to do. I was wondering why
it wasn't working. All right, so State will
be then State to do. And you see how type script a ready creates like this sort
of built in documentation. It's really great in that
sense that you can just figure out what you're
missing essentially. All right, so this
will be our to do. So we should have a
list of our to do. We don't have any to do yet, but this will be
where our to do live. If I go ahead and I change
to do to two to do, we should have no data because we don't have
a need to do yet. So that's actually working. So we know either we've
completely broken our, our app or, you know, we've
changed it correctly. So I'm going to close this out. I'm getting a little
error here that the type of to do is
not assignable to do. And that's correct
because actually To Do, we had originally
defined it as a string. So what we need to really
pass is to do description. Same thing with the key here. We need instead of passing
the object of to do, we need to pass to Dod and
save that, have those errors. The next thing we're
going to want to do now is we are going to want to hook up our ad to do
so we can actually add the tod that we're
going to hop back out. We're going to be in our to do container and then
we're going to grab our function
which is ad to do. So we're going to
do the same thing. You store, store,
bracket, state. And then we're going to grab state ad to do. We're
going to save that. And then what we're going
to do is we are going to call that when the Submit
button is clicked, right? So we could do this, we could actually
do this on Submit. We can create, we
can turn this into a form component component and we can actually create a
handler function for this. We're going to create a
handler called Hand Submit. We want to do two
things. We want to pass in an event because
basically what we're going to end up having
to do is to target this input and like the
value of that input, so we want to pass in
the event of the click, any type it for now, which
is not best practice, but that's just going to get rid of the error
we're about to hit. So call event, prevent page from reloading
every time we add it to do. What we're going to do
now is call our ad to do. So then we're going
to add To Do. And the to do that we're adding is going to
be on that event, so it's going to be
the event finish. We're going to have
to target it, right? So this handler is going
to be called on submit. On our form, we have a
special property called on submit that basically
when you submit the form, it actually calls whatever
function you want to call. So our onsubmit is going
to be this handle to do. So as a result of that, an event is going to be passed
into that handle to do. And so we want to add
our to do target. That event, it's going to be event target because the form wraps around multiple elements. It's going to be the first
element that we're targeting. And then it's going to
be the value of that. The value of the element is going to be what we are
passing to our ad to do, which is the description. I know that was probably
a lot to take in. Let's just run back
one more time. We've created a form component, we've used the form element. The form element has a
built in property called on submit whenever your form is
submit, that's what happens. We created this function
called handled to do, which prevents default
which stops the page from reloading when we hit the Submit button or
submit the form. And then it also adds are to do. The ad to do is going to
take that description, that value of the input, and then it's going
to send it to our store and give us to do. It's going to create a
to do with a new ID and the check state of faults
that should pretty much work. The last thing we're
going to want to do before we go ahead and add need to do is adding
the type to our button. So you want the button
to be of type submit. There are two ways to
submit this right now. You can hit Enter when you add in your value, or
you can hit Submit. We want to make sure that
both are working correctly. So now the button
is to type Submit. The form knows that hey,
when they hit this button, they mean to submit and it
should work accordingly. What we're going to
just do is test it out. So let's go ahead
and add in what to do and see if it shows up. It showed up. We
have our first to do and our ad is working correctly. What we're going to
want to do now is have our remove working correctly.
So that's very similar. We're just going to have
to do it within our to do item component. So hopping over to to do
item going to actually go ahead and we are going to
add it to our button here. We're going to add it to the delete button that
we've created. So first things
first we need to do. So this is going to
be removed to do. Removed to do store our store. We're going to grab
the State and then we're going to do
State. Remove to do. Awesome. Correctly removed
to do takes an ID, so we're going to want to
grab whatever the Dos ID is so that we can delete the correct to do
with the button. Now we're going to say
on click to remove. We want to call remove to Do. Then we want to pass it
to Do and save that. Actually, it's going to give me a little error because I made a little mistake in
the to do container. I actually made the mistake
of passing to do description. We don't want to do that. We
want to pass the hole to do. I'm going to give
this to do the type of to do from our types folder. That was another good reason why we should have
passed our to dues. Then it's going to give
you another error here because it's like all of these
things are now breaking. We're, we're just
going to access the description and all of
our errors should be done. Now again, this is another good reason
type script exists. Like although it might
seem a little bit annoying to have to resolve
these errors all the time, if we didn't resolve the error, we would now spend a
few minutes trying to debug why the error is even
occurring with Java script. Because there's no
way to know that our project is silently failing. If we've done
everything correct, we've hooked up our move to do, we've passed to do to ID. Let's add a second to do, just to be sure if we do delete it, that it's the right
one we're deleting. And let's go ahead and
try to delete to do. No one worked perfectly. So we're now able to add to do, we're able to remove does. The last thing that
we want to do is probably just, I think, sorry. The last two things
we want to do are be able to track
the check state. And then if you notice when I
refresh this page, persist. So we want to make
sure that our T is persisting, are using it. Tackle that first. Let's
tackle persisting first. To tackle persisting,
we're going to use the middleware that is
included with Z stand. So what we'll do here is
we're going to import, we're going to
import depth tools and we're going to
import persist. And as you can see
here, all they've done is really just
wrap their app in, wrap their store in
depth tools and persist. And that will just
allow to persist. This does this by I believe, saving it in local storage. It will save to your browsers local storage and then every
time you spin it back up, you should be able to
access the same values. If you were to set it
in session storage, then whenever your
session expired, then you would be able to
access those values again. Go ahead and just
wrap our app in this. Put it here, Oops, grab these two there. And then we want to call
set power function. I'm also making a mistake here. I need to remove
this bracket here. And then all of this
should move up into the save that I think
I have a couple more. A couple too many, a couple
too few brackets, two more. Save that. We are still
getting an error. I need to pass the options. That's my bat. As you see here, persist the actual state that you're working
with and then it creates something to name it. That's because when you
look in your application, on your de tools,
when you inspect, you'll actually see a name
present for your store. So we're going to go ahead
and give it a name as the second argument
to do. And save that. Put it within the right bracket. Have I added one? No, no, no. I've put it
within the wrong brackets. That's what it is here. Persist is not assignable
to a type to do store. Why is that set a pass set here? That's the problem. So I just need to take this out, that out and then that will
actually get rid of our, the extra bracket
problem we're having. So it was just an
extra arrow that did not need to be there
in an extra parameter. So yeah, now we've
set up persist. So if we've done this correctly, we hop back over to our app. Give it a little refresh there. Adding to do refresh the page ration to
fix that hydration. What that hydration is basically saying is like
whatever it builds is not necessarily what we're
getting that we're persisting. It's like different every
time. Which is fair enough. So what we can do to fix that hydration is
actually just run a simple use effect on sure
that what we're seeing, it's sort of like a loading
page just to ensure that the correct
thing is loaded. So what we're going
to do, we're going to run here in our index page and we're just going
to create loaded. Set is loaded. A really simple from react. And we're going to just
call use effect here. But run once and then once it runs we're just going to
set is loaded to true. So it's basically
going to see that, you know, the page is loaded. It's going to see
what data we're working with and then
it's going to be true. What we want to do now is just show this to do container only when is loaded is
true correctly. We should not get any errors. No, we're sleeping in her. Why is that did before? That's my bet. I just said it to the wrong thing more time. No use effect errors,
no hydration errors. So let's move on
to the next piece. All right, so the
final piece that we want to do is deal with
our check state, right? We want to make sure that when it's checked and we refresh, it actually stays checked. Right now, it's just always
defaulting defaults. So what we need to do
for that is actually set the check state
within the state. When it's checked,
it passes it to the state and that persists
as part of the state. So what we're going to do now
is head over back to index. And we're going to add
a final action here. The action of toggle checked, take in the ID of whatever
to do we're working with. And then it's going to follow the same structure
where it sets, it does some more stuff. Then we're going to add it
up here so we don't get the error toggle checked which is basically
the same as removed. To do as far as text script
is concerned string equals. So what we want to do
here now, let's see. We want to figure out which one of the dos is
checked or unchecked. That okay, let's, let's
go ahead and take our state dot to dot
to do over each to do. All right? And if that to do, DID we want to do
one of two things. If it does equal
ID, want to return, want to return
whatever the to do is. So we want to return
the ID and we want to return the description. But we want to set the to do
whatever it was not to do. It just needs to be the
opposite of what it was. So it was checked, it
should be unchecked. If it was unchecked,
it should be checked. If that's not the case, we just want to return to do. I made one mistake. We just want to set checked
because we already know it's to do to be to do
checked two arguments. We've got one to put
this in the wrong area, that's probably why
I'm getting an error. Oh, no. Yeah, and work if I
say yeah, that's should work. All right, cool. So
we have taken our, we've gone through and
we've mapped through our Do to grab the
individual to do. And we're checking
each of those to do, so we want to see if
the ID of that To do. Id ID property of the To do. Matches the ID that
we're passing in. When we checked that doubling the check, if it does match. So yes we want to pass the
rest of the parameter to do, but then for the
check parameter we want to pass the
opposite of what it was. So whatever the
check parameter was, we want to pass, you
know, if it was true we want to pass
falls, et cetera. If it doesn't match for
all the other two Dos, we just want to pass back
that to do and move on. And so the way so then we're going to actually just
go ahead and try this out. So I'm going to head
over back to to do item and then I'm going to pass in Target, the
toggle checked. I'm going to use the
store one more time date. Do toggle checked, save
that on the checkbox. On click I just want to pass
in in line going to toggle, checked, checked, and
then I'm going to pass in the Todd and save that. That should work. So if I check this page and I refresh the page, one
more thing I have to do. I actually have to access the checked property
on the checkbox because right now the checkbox doesn't know whether or not
it's supposed to be checked. Right? We're just like kind of assuming it would know.
It has no way of knowing. So what we're going
to do here is access the checked property. The checked property
is actually going to be whatever to do, checked is, so that's whether or not it
should be checked. So if I refresh, if I
check it and then I refresh it's check state. Awesome. I'm going to do one more little tweak with the stylings just now that we have access to this
prop in the typography. If it's checked, I want to do a couple of
different styles. So I want to change the color to be a little bit
more graded out. So it's kind of like,
oh, we've done this, it's like doesn't need to
be as prominent anymore. So I want to change the
color of the To do. If to do checked
change the color. Maybe something a
little bit darker than this, maybe that. And then we'll pass that. We want the color to be
whatever it was meant to be, so we'll just pass an auto. Yeah, You mean
checked unchecked? Cool. The next thing I want to do is add a strike through. Literally striking it
through on our list, ready for that is text
decoration line through. I'm going to do the same check. I'm going to say in is the
property that I'm targeting, if to do is checked. Sorry question, I want to
make it a line through. If I just want to have no
text decoration check, it strikes a line through. Awesome. So yeah, we pretty much have our
entire to do app working. As I mentioned before,
you can actually see where the store
for this is living. If you check out the application
need local storage here, you can see that we actually
have or to do store here. So we have our state. Let me bring this
up a little bit. So we have our state
we have to do. They have their unique IDs, well, just the 12,
but it has unique ID. It has the checked property of true and it has the
description of to do. If we uncheck it,
you see that it changes and that the to do no longer has
that true property. It has a false property now, has the description to do
and it has the same ID. So yeah, our to do app
is fully functioning. The only thing left to
do is maybe host it. But we can cover that
in a different lesson about how to host
it using Verselle. Next S and Verselle
actually are connected. I think Versell created next S, so hosted using sell. But we'll cover that
in a different lesson. So yeah, hopefully this
will helpful for you. If you have any
questions, please do leave a comment in the
comment section below. If you enjoy this lesson, please do leave a
review as well. It really helps out, sort of surfacing this to other people who want to take the course.
11. Conclusion: Conclusion, we talked about
a lot in this video from the origins of react
to building out your own fully functioning to
do app using next JS. Going forward, you
should be able to tackle any react project
that comes your way. Even stuff with type script
to look up something when you're unsure and go to
stack overflow as necessary. I'd love to see how you decided
to implement your Do app. So please put link to your
code or the hosted site in the Projects and
Resources tab so that I can see all the hard
work that you've done. I do read every comment, every review, and look at
every project submission. So if you do have any questions, please feel free to
leave a comment in the review section below or
to reach out to me directly. I love to see what
you guys have to say. Check page for more
information about that, Learn more about coding. Check out the other videos
I have on my profile page. I also have videos on HTML and CSS available on my Youtube
channel and website. I'll link those below and on my profile if you're interested in learning those as well, and I'll see in the next one.
 Zoë Davidson, Software Engineer & Cinematographer