Transcripts
1. Introduction: Hi, are you someone
that's wanting to learn how to use
Microsoft PowerPoint? You have little to no
experience with this program. Perhaps you want to learn how
to use Microsoft PowerPoint for work or personal reasons. Not to worry with my
Learn PowerPoint now, Microsoft PowerPoint
for Beginners course. I will show you the foundations
of the program and how to use it through interactive
video lessons, exercises, and
exclusive resources are only available to students enrolled in this course of mine. On top of this, whether you have an older version of the program or in your version
of the program, it doesn't matter
because throughout, across the board, a function and the layout of the
program is about the same. Now on top of this, even
though I will be showing you how to use the program
on a Mac computer. I do include shortcuts
for PC users as well. So definitely enroll
in this course today if you're looking
to learn about the basics of Microsoft PowerPoint
in order to create beautiful presentations and so much more. I hope
to see you there.
2. Launching Microsoft PowerPoint: Hi and welcome to the first
section of the course, introducing you to
Microsoft PowerPoint. In this section in the course, we will cover a
variety of things, from launching PowerPoint to learning about the
elements of the program, and so much more. But before we get
to any of that, let's go ahead and
launch the program. So at the bottom of my
screen here you can see I have my Microsoft
PowerPoint program icon. You want to make sure
that this program icon is available and easy to find on your computer when
you start it up. Because that way anytime
that you may need to access or open the program, it'll be right there
for you to do so. Let's go ahead and open Microsoft PowerPoint
by left clicking once. Alright, so as we can see
here straight off the bat, we're taken to the home screen. We can see that here at the home button and select it on the left
side of the home tab. Every time you open the Microsoft PowerPoint
program directly, you will see this screen. This screen lets us access a variety of things that we
will talk about right now. So as we can see here later, cross at the top
horizontally are themes. And in case you're
wondering what a theme is. The theme is basically a pre-designed and
preformatted skin for your presentation. By default, we will always have blank presentation
selected first. But if you want to use
a fancier theme that Microsoft has already made
for you to use for free. You can definitely
go ahead and do so. We will talk about
this a little bit. Next, a blank presentation. We can also see that we
have the ticket tour. Welcome to PowerPoint
presentation. This is a small PowerPoint presentation
that Microsoft has made with some tips and guidelines to help you get started with using the program. You can check it
out if you'd like. But since we're already
going to be covering the ins and outs of the
program in this course. We're not going to go
over this mini-tour, but just know that
it's there for you in case you want
to take a look at it. Then after that, we have the recent button here
below the themes. And we can see here that it says recent presentations
will appear here. So since we're just starting with PowerPoint for
the first time, we didn't have any
presentations laid out yet. But note that here, the recently worked on presentations that
you worked on will appear from most recent to least recent as you scroll down. This is a very useful function because that way it'll retrieve all the things that you've
worked on in the past day, our week or whatever have you. And therefore, you don't have to go searching your computer for whatever presentation was
that you were looking for, because it will likely
be here already. Then next to the recent button, we have the pin button. In case you don't
know what this is. A pen is basically painting
something that you find important and
keeping it at the top. So any presentations that
you may want to work on later or are urgent
for you to work on, you wouldn't make sure
that you pin them. So that way they appear here, and as you can see here it says pinned presentations
will appear here. Then next append, we can see
the share with me button. This shared with me button
is all of the presentations that other people
have shared with you and they will
appear so here. In case you didn't notice yet, Microsoft PowerPoint
allows you to work with others and collaborate
on presentations. So if someone else
invited you to edit a presentation or
work with them on one, you would have access here and you wouldn't be
able to see them here. This is what recent
pinned and shared with me are below the themes view. So now that we've
talked about that, Let's move on to the New
button here on the side. So we can see here that this
plus button with the word new Android takes us to the variety of themes that
we just talked about. These are again preformatted and pre-designed skins that you can use an import into your PowerPoint
presentation from scratch. All you have to do is
change the text and the design will already
be important for you. This saves you the
time of having to customize and make your
presentation fancy, especially if you're
either out of time or don't know
how to do so yet. But this is something
that we will cover in this course as
well, of course. But just know that we have a
slew of different skins or themes rather that Microsoft has made for us to use
with PowerPoint already. But again, by default, blank presentation will always
be the selected option. Again, underneath
we have recent, which we just covered
is another view to get our most recently worked on
PowerPoint presentations. Then after that we have shared again what we talked
about as well. Powerpoint presentations that other people have allowed us to see or work on with
them and collaborate. Then lastly, we have
the Open button here. The Open button in case you
don't know what this is. It's basically for opening
any PowerPoint presentation, whether it's a recent
one or one that you have worked on
before and so forth. This requires you to dig into your computer
files should you choose to do so or retrieve
them from your OneDrive? Your OneDrive is basically where your work is stored on
Microsoft's digital servers. It's kind of like iCloud if
you're familiar with that. But the Microsoft version of this one drive is very
useful for you to backup all your presentations
and files onto because should something
happen to your computer, your data and files will be
stored on your OneDrive. And of course, in order for
you to have a OneDrive, you need to have a
Microsoft e-mail, which of course is free
to have and create. But nonetheless,
your OneDrive and your actual computer
hard drive are the two different
places in which you can retrieve PowerPoint
presentation and files from. So just know that this is
what the Open button is for. So again, we have a recent folders that
we've opened or retrieved PowerPoint presentations files
from or from our OneDrive, the digital Microsoft
Online Server, or our actual hard drive, which in this case is on my Mac because I'm
on a Mac computer. Alright? And of course if I
want to add another location, I can do so by
clicking Add place. So I can add a specific
folder or whatever have you. Then the last thing to
talk about when launching PowerPoint is the
little search bar here at the upper right. If you're looking for
a specific function, specific presentation file,
you can search for it by the title or by the name of
the function and the button. But again, this is just
another great way to access something quickly
in case you need to do so. Nonetheless, these buttons
here already should do the work for you and should have everything
you need covered. So now that we've
talked about that, it's time to
actually get started into launching the program itself and creating our first Microsoft
PowerPoint presentation. So we would do that, of course by clicking
Create here. And we will continue to do
this in the next video.
3. Introducing the PowerPoint Ribbon: Welcome back. So in this video we will be introducing the
PowerPoint ribbon. And in case you don't
know what it is, we will talk about why the
ribbon is so important to the PowerPoint program and why
it is very useful as well. But before we can
introduce the ribbon, we must first actually get into working on a presentation. And we will do that by working on our first plank presentation. So in order to do that,
we must make sure that the blank presentation
theme is selected. And then click the Create button here at the bottom, right. Alright, so now you can see I've done that and there we go. We can officially see the
PowerPoint program in action. Now, this is what you will see anytime you work on a
presentation new or old, right? And this is very important because this is the window that actually is the program itself
in terms of working mode, editing mode, and so forth. So let me just
close this here to the side and talk about
the PowerPoint ribbon. The ribbon is these nine buttons here that you see at the
upper left on the screen. These nine buttons are essential and crucial
and we will be talking about each
one of these buttons in this course later on. Now these buttons, of course, are called and makeup what
is known as the ribbon. The ribbon, of course, are these nine buttons. And each of these
buttons contains specific functions that allow you to do different
things or tabs. Each of these tabs allow you to do a variety of
different things based on the title of each
of these tabs in the ribbon. By default, every time you open the program and work
on a presentation, you will be taken
to the Home tab or button in the ribbon. And this is the button
that of course is kind of like the main tab
within the ribbon. And it's also the first one. But we have other ones as well, such as insert, draw, design, transitions, animations,
slideshow, review, and view. And if you saw as I
was clicking those, each one of these tabs and
the ribbon had a variety of different buttons
in each of them. And in cases seems overwhelming. Don't worry, because
like I mentioned before, we will be breaking
down and talking about every one of these buttons
within each tab in the ribbon. But the point of this
video is just to introduce you to the ribbon
and to know what it is. It is these nine main tabs
are buttons that allow you to execute a variety of different functions
towards your presentation, such as adding or editing text, changing the color of the text. Adding, we're inserting
shapes, drawing shapes, inserting new
designs and themes, inserting transitions, which we will talk about
later on in this course. Inserting animations, 3D
animations or 2D animations, again, something that we
will talk about later on. Or adding a different
view to the program, such as slide-show view, which allows you to view
your presentation as if you were presenting it
to the public eye. And also review in which
lets you add comments or other things in case you're working on a collaborative
presentation. And of course, view, again, which allows you to view this presentation in
a variety of ways, such as a presentation
mode in case you're presenting
it to other people. But of course, this is what
the Microsoft ribbon is. So anytime you are
asked about the ribbon, know that it is these
nine buttons within Microsoft PowerPoint
that allow you to do a variety of
different things. And of course, each of these tabs is named
differently to let you know what type of
buttons each tab contains. So if I'm interested
in inserting an image or a shape to my presentation, I would likely go to
the Insert tab, right? So therefore, this is why these tabs in the ribbon
are named as such. Within the ribbon, you
also have the share and comments button in
the upper right side. The share button just
allows you to share this presentation
to other people. You can upload it again
to your OneDrive, which is the online
Microsoft server that other people can
access if you choose. Or you can send a copy
by e-mail and so forth. And comments of
course just lets you add comments here to the side, like if I click new for example. And then I can type
a comment telling the person or myself
whatever I need in case. Let's say I want to work on something in this
presentation later on. And I want to make a little
comment to remind me, I would go ahead and do that, type in the comment
and then click this little button here, this little arrow button, and it'll post the comment. As you can see here. We have
a little comment button or notification rather
under this slide here, this first slide. But again, this is
getting a little ahead of ourselves here. We'll talk about all of
this terminology later on. Just know that this is what they share in the comments button or four in the Microsoft ribbon. And anytime you want to
get rid of that view, you just click the
comments button again. Alright, so this is the
Microsoft PowerPoint ribbon, and I hope that this helps.
4. The Slides Side Tab: In this video lecture, we will talk about another essential and
important component and part of the Microsoft
PowerPoint program. The slide's tab panel, which is here on the left side. On the left side is where all of your slides can be viewed. And this is important. But before we get to
talking about that, you might be wondering
what is a slide? A slide is basically a
page, a presentation page. The more slides you have, the longer your presentation is. Your slides are
numerically in order. So your first slide, also known as the
cover, will be here. And then the rest of your
slides will fall under that. In this video, we will
cover things such as how to create a new
slide and so forth. But first, let's just talk about this slide tab, panel here. Every time you want to
access a certain slide. For example, let's say you have a long presentation
and you want to jump to a certain slide, all you have to do is left-click
one of the slides once. It's as simple as that, and we'll learn how
to do this as well by creating another
slide right now. If you right-click
under a slide, you will have a variety of
options such as cutting, which is removing
the slide, copying, which is copying the
slide, pasting a slide. This is if you have
a copied slide already in your clipboard, you can paste the
slide to duplicate it. You can also click select all, if you want to select all
of your slides at once, then an addition, we can do the important new
slide function here. So if I want to
create a new slide, all I have to do is right-click
under my first slide. Or I can also add a section. This is something that we will
be talking about later on. But sections are
basically points within your PowerPoint presentation
that introduces a new section just
to keep things more organized and an order. Additionally, we have
the zoom function. If we want to make
something bigger. If I want to zoom in, I will increase the quantity and then everything will become bigger within these slides
side panel, as you can see, it increased a
little bit and push the presentation
here a little bit to the right because I made the
left slide tab panel bigger. In addition to this, we also have the
slideshow function, which then lets us see our presentation in
presentation mode. And if we want to
get out of here, we can just hit the escape
button on our keyboard. But nonetheless, these
are some great functions that these slides tab
panel lets us do. And if I decide to hover
over a tab and right-click, it lets us do similar things, except with some added buttons, such as formatting
the background, which allows us to
change the background, color, the design and so forth. Also hide slide. Let's say I don't want the
slide to appear anymore, or I just want to temporarily
hide it. I can do that. And as you can see here, a little band type sign appeared on the upper left-hand
corner of this slide. Then in addition,
if I right-click again to see the
rest of the buttons, you can see that the
height slide is checked. So that means that
this is in effect. If I want to remove that, I will just click again, left-click hide slide,
and it removes that. Then I right-click again and
the little check has gone. Some other buttons that we have introduced when I right-click
on top of a slide, or again, zoom slideshow mode. And then a new button, new comment, which we talked about in the
previous video lecture. If I want to add a
specific comment, I will do so here by right-clicking
and clicking Comment. Then what happens is that the comments panel appears
here on the far right side. Then I can either see
my previous comments or add a brand new comment
should I choose to do so? Let's go ahead and
create a new slide so you can see how this
looks like in action. So I will right-click under the first slide or
above the slide. It doesn't matter. And then
click the new slide button. And if you noticed, next to each of these buttons are some keyboard shortcuts. So that means that you
can access or do these and execute these functions
using your keyboard as well. So you didn't have to click. But I'm just gonna go
ahead and click new slide. And as you can see here, a brand new slide was created under my first
presentation slide. So as you can see here now my presentation
has two slides. And when I click
each one of these, the presentation
view here changes. This is something
that we'll talk about in the next video lecture. But nonetheless, as
you can see here, I left-click in each
of these slides once I can go to each one
of them directly, instead of having to scroll endlessly or figure
out how to do that, I can just left-click
each one of these slides on
these slides panel. But again, this is why
this slide's tab panels so important in PowerPoint. Because it is where all
your presentation pages are stacked up nicely for you to access and preview without having to look at
them one by one. They are all here
for you to look at. And you can obviously left-click hold and
drag them up or down, above or below each
other to reorder them. So let's say I prefer the
second slide to be my cover. Then I would left-click hold and drag it above the first slide. So then my second slide
becomes my first slide, and then my first slide
becomes my second slide. So as you can see
here now the cover first slide is now the
second thing that's showing, instead of the first edition, if I want to undo that, I can just left-click hold
again and drag it below. As you can see, there's like little orange lines appearing. Those are just showing you
where the slide we'll move to. Above or below, right? So this is how the slide tab panel
works. I hope this helps.
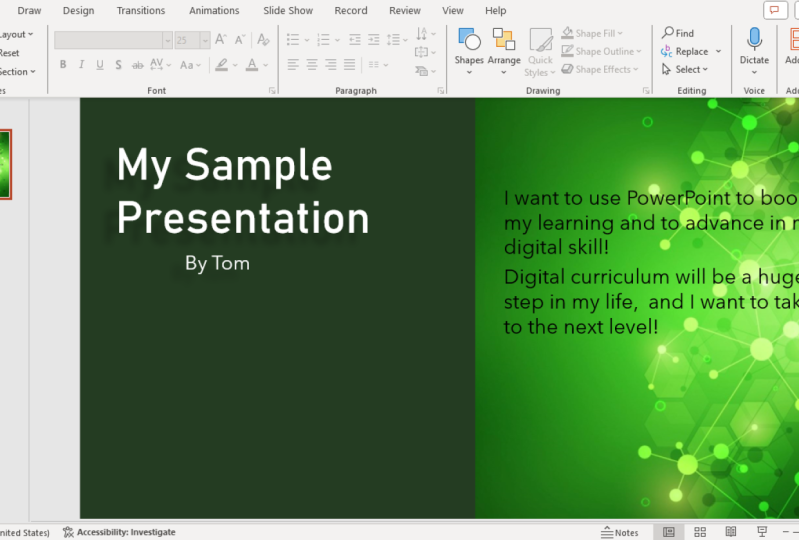
5. The Presentation Window: In this video, we
will talk about the presentation pane window
within Microsoft PowerPoint. Much like the ribbon and
the slide's tab panel, the presentation window pane is very important and essential to the PowerPoint program
because it lets you not only see your slide
for your presentation, but also lets you edit it. In addition, right, so in contrast to the slides panel
here on the left side, which only let us see our
different presentation slides. The presentation window here on the right side center right, lets us actually edit as well. And this is important because this is where you'll be spending the most time when working on your
PowerPoint presentations, the presentation
view or pain rather. Now as we can see here, the center of our first slide, it says click to add title and then click that
subtitle under it. This is where you will
always see every time you create a brand new
blank presentation, because this is how
presentations and presentations overall in
PowerPoint are formatted. You typically have a cover page and then the rest of
your presentation. So much like you would have an introduction
paragraph to an essay. You would have your cover page to your PowerPoint presentation. So notice how when I move
outside of these lines, my cursor turns into
a regular cursor. But then when I go within
the borders of these lines, my cursor changes
to a text line, which allows me
to then click and start typing in
whatever it is I want. So I will typically name
this my sample presentation. And then under it,
clicked Add subtitle. I'll add my name by John. And then solidify those changes. I don't hit the Enter
or Return button on my keyboard because that
instead creates a new line. What I do is I just
click outside of this, left-click once and
the border will be gone. Just like that. So as you can see, I
typed in my name of my presentation and then
the author who created me. This is typically
how your cover page should look like and signifies to whoever is viewing your presentation that
this is the first slide. You want your slides
to be, of course, an order, much like an essay, introduction,
body, conclusion. Same thing with your
PowerPoint presentations. But let's talk about
the presentation paying a little bit more. So we now know that this
is the presentation pain. If I wanted to edit
how this text appears, I can play around
with these borders. I can drag it. When my cursor turns
into a little compass, I can move the text
around however I want. And as you can see, little lines are appearing that kind of set the text into a preset area, whether it's the
center or the left, or the right or up or down. This is to keep
your presentation looking neat and professional. And you also see some
measurements along there. But if I decide to click on
one of these little squares, instead of moving it around, you see that there is an
arrow pointing up and down, which lets me move
this around as well, but in a different way, right? So as you can see here, I can drag it up or down and it moves it left and
right and so forth. This is another way
to modify your text. An addition to this, I can also tilt it by clicking over here and
left-click holding. And I can tilt my text to a certain angle should
I choose to do so, the default will always be
0% or rather 0 degrees. And that is another way to
modify straight off the bat, your text within the
presentation view. Everything that
you change here is what your viewers will see. So the way you're seeing it now is how the
viewer will see it. But when you see the
lines around a textbox, for instance, an element in your PowerPoint
presentation know that you are in edit mode. But if you don't see
any lines around any images or text
boxes or anything. No, that you're not so
much in edit mode but in presenter or view mode. But anyway, the point
is if you want to get to actually edit whatever
elements, text images, or whatever are on your
PowerPoint presentation, you just go right
ahead and click above the text or
whatever have you. Now, in case you're wondering what happens when
I right-click on a slide in the presenter or Presentation View
Pane in PowerPoint. Well, we can see that a variety
of options pop up, right? Some of these buttons,
if they're grayed out, means that you are
not able to use them, they're not available to use. But if they are white and
not faded out or gray, it means that they are clickable and that you can use them. So by right-clicking on a presentation slide in the
presentation window pane, I can create a new slide, duplicate this current slide, or delete the slide. I can also hide it, which
we've talked about before. And then there are
some other things. Such as the ruler. What is the ruler? The ruler is basically
a ruler that appears above and to the side of your presentation
slide and lets you change or view an
eyeball on the margins, for example, of your
textbox, right? So as you can see here, this
is very helpful because whether I expand or reduce this, as you can see here,
the little line above and the ruler
of follows along. So that way I know how
many inches my textbox is. For example, if
you're into really eyeballing things and are into keeping things
centered and so forth. You can use the ruler. But of course you don't have to, because like we saw
earlier in this video, PowerPoint already has these
things centered to the left, to the right and so forth. For you to not have to
work with the ruler. But should you choose to. This ruler is very helpful
to help you eyeball the different sizes of the elements on your
PowerPoint presentation. Let's go back and
right-click on our slide. We can hide the ruler
again by clicking it. But let's click guides. Now, I hover above guides, and as you can see, I have add vertical guide at horizontal guide and so forth. What is this? Well, again, this just
has to deal again with the different layouts in terms
of formatting your text, margins and so forth, right? So as you can see here, this
created a vertical guide right down the center of my
PowerPoint presentation. Let's say I wanted to make sure that my text
is very centered. I can use this visual guide
to make sure that it is. This visual guide makes
it very clear that my text is not centered from
my sample presentation. So thanks to this
middle visual guide, vertical visual
guide, I can then center it correctly
right down the middle. So that's how it can
be very helpful. And of course, if it's
annoying you that it's there, you can just go back to
guides, right-click guides, hover over the word guides and then remove the
vertical guide. By hiding the guides by
clicking here guides. That's how you remove it. But then let's talk
about the other things that were available
when we right-click, which were below guides. We also have Zoom, which again we talked about
earlier in this course, which lets you zoom in to things higher number means
the more zoomed in it'll be. So right now it is at a 103. Typically the default
will always be fit to your computer
screen size or 100%. But let's say this is not big
enough for me and I want to make it more zoomed in says
clearly see the details. And I will just click the 200% as an example and click Okay. And as you can see, it made the presentation a lot
bigger. It zoomed in. It didn't change the actual size of the presentation slide. If I let say send
this to someone, it just changed the view. Because again, we need
to remember we are in presentation window pane view. We're not actually changing the size of the PowerPoint
presentation itself, just the view in case that, say some text is too
small for us to read. We would use this view function
here to let us zoom in. And as you can see here
at the bottom right, we also have another way to zoom in or zoom out so you
don't have to right-click. It says 200 per cent here. I can click here and
change it to a 100. Or another fun way
to do this is to click the toggle circle here and then drag it back to 100 or whatever percent I
want it to be at. So just know that at the bottom right is another way to change the zoom function and feature. Again, if we right-click
on the slide itself, not within the borders
of a certain element. We then also have
Format Background, something we talked about but didn't really get to explore. So let's go ahead and
click Format Background. Format Background
is where you can change the color of
the background, right? Right now we can
see that we have a solid fill in our background, which means that it is
just a solid color. But I can also add a gradient
if I want to be fancier. And then it adds this gradient, which is basically
a color fade out. Or I can add a
picture or a texture. I can also add a pattern
should I choose two? And then there's a variety that Microsoft PowerPoint
already has included. For the picture texture
filter or fill rather, I can insert something
from my computer. Let's say I have a
nice background on my computer that I want to
use a nice little image. I would click here
and click Insert, and then choose something from my computer that's an
image file obviously to use as the background
for my presentation, background for this slide. Specifically, I can also
use something that I copied and paste it here
using the clipboard button. Or I can again use a
texture that PowerPoint has included in the
program for free. Then I can change the
transparency mode, how opaque it is, aka how light or dark it is. I can also tell it, meaning that the picture
will appear throughout the entire presentation as opposed to just a
certain part of it. That does not look good. And on top of this, we can also change how
it appears in terms of left to right and so forth by changing
the numbers here. And so much more. But this is of course really
in detail and depends on you and how you want your
backgrounds to peer. It is typically recommended that you have your background across your entire slide covering every single inch and centimeter because it
looks unprofessional. If your image
background is only for a certain portion of the
background of your presentation. So just be aware of that. But again, this is what the Format Background
button is within the right-click panel of the presentation pain in
PowerPoint format background, we have slideshow, which
we're not going to talk about again because we know it
takes us to the view mode. If we wanted to view
the presentation as if we were presenting
it to someone, then new common again, we're also not
going to talk about because we know by now what comments are and how to
create them in PowerPoint. But this is what is available
when you right-click on a slide in the presentation
pain in PowerPoint. Well, let's talk about
some other things that this presentation pain offers. If I decide to right-click on an element
such as this texts element, I have a variety of other
different things that I can do, such as exiting the
edit mode, right? So I'm no longer editing it. Or I can go back and
right-click again. Make sure you don't have
anything highlighted. And then I can change the font, paragraph style, and so forth. Or I can also look up certain
words if I want to use certain words from my slide
or whatever have you. There's also at the store
is a translation function if you're wanting to create your presentation in
a different language, and so much more effects, etc. We're not going to
talk about all of these things yet because again, all of these functions will
be covered when we get to the Microsoft ribbon buttons
later on in this course. But just know that
you can also access some of the functions
and features by right-clicking on
an element within the presentation pain in
Microsoft PowerPoint. Now another thing that
you may have noticed is that when I added the
Format Background, it only added it to this slide. If I click the second slide, it's a white blank background. So just be aware that when
you add Format Background, It's not going to do it to the entire PowerPoint
presentation. But it is recommended
that you keep a consistent
background throughout all of your slides in PowerPoint to keep things professional. So if you are wondering, well then how do
I make sure that everything has the
same background? So I don't have to
do this one by one. We can do is again, right-click here, and then
click duplicate slide. Then it creates
another slide with the background that you
had in the first one. So again, that was just by going to right-click duplicate slide. Now we have two slides
with the same background. Make sure that you
typically do this to the first slide and then the rest when you begin working on your
presentation that we didn't have to go back and
change them one by one. But again, a neat feature that the slide's tab panel
houses that you can select them all by right-clicking the slide itself and then clicking Select All. Then of course you can duplicate the slides from there
as well by clicking duplicate slide or format
background to give all of these selected slides the
same background we just gave. First to write. Again by going to
picture a texture fill. And as you can see,
all of them changed to the same background. But nonetheless, this
is how the slide's tab, the pain and the
presentation pain work hand in hand in Microsoft PowerPoint. And these are some
of the features that the presentation window pane and Microsoft feature offers. So I hope that this helps.
6. The Quick Access Toolbar: Welcome. In this video lecture, we will talk about the Microsoft PowerPoint Quick Access Toolbar. Much like its name suggests, this toolbar lets
us do things and execute functions
without much clicking. The Quick Access Toolbar
can be accessed here and seen in the upper
left-hand corner of the Microsoft PowerPoint, next to the close, minimize and expand buttons
here at the upper left. We first start off with
the auto save button. The auto save button is a
really cool feature that PowerPoint and all
Microsoft programs include, is that if you're someone that's worried
about losing data, or let's say your computer
accidentally shuts off and you were working
on a presentation, you're worried that you
might lose something. It's recommended that you have the autosave feature
on because what this will do is it will save everything
automatically for you. So anytime you make a small
change or a big change, it doesn't matter
because PowerPoint, we'll save it and
create an auto save. For that presentation
you're working on. A change as little as a
period being added will trigger PowerPoint to save the new version of your
PowerPoint presentation. So that way, the most
recent PowerPoint version of the presentation is saved in case you lose Internet access or your computer shuts down
randomly, technology can fail. So this auto save
feature is very useful. And of course turn it on, you just toggle off to on. And then you must make sure that the presentation
has a name and you specify where you want your auto save files
to be stored in. And typically this will
be under the OneDrive, which we talked about is linked to your Microsoft
e-mail account. So make sure that you have
a Microsoft e-mail account if you want to have this on. Of course, you can store
this in other places as well should you choose. But the OneDrive is the
most recommended place. Alright, so let's
get out of this. So after the autosave, we have the home button. The home button will
just take us to this window which we are
familiar with by now, which is before the
actual presentation editing mode in PowerPoint. This screen here is
the screen that we saw in the first video lecture in
this section of the course. This is the home screen
which lets us either open another PowerPoint
presentation to work on or create a brand new
one from scratch. Again, this is the Home windows. So to access that easily, you just click that home icon or button in the Quick
Access Toolbar. Then after that, we
have the save button. This save button here has
a little floppy disk icon. And we click this
button anytime we manually want to save
the presentation. So instead of autosave, you can have just this button
clicked every time you want to save a new version of the PowerPoint presentation
you're working on. And of course,
this lets you save not only to your OneDrive, but also to your hard
drive if you choose. And what I mean by
that is OneDrive is of course, online saving. Your hard drive is saved to your actual computer,
your computer files. So that's the Save button. And then next to the Save button we have to really
useful buttons. We have the undo button
and then the Redo button. So let's say, let's start
off with the undo button. Let's say you made
a change that you regret or want to undo. How would you go about that? In PowerPoint, you just click this back arrow or undo button as many times
as you need to. Or you click the little triangle pointing down next to it. And it'll show you
the variety of things that you did in the past. And if you want to undo
multiple things at once, you just select all of the things that you
want to undo and then click and you see how
all do this right now, you'll see how it works. So I'm going to undo the
four typings that I did. And as you can see,
not much changed because of course we
didn't do very much. But if I wanted to
undo some more, I would just keep on clicking the Undo button and so forth until everything is back to
how it was originally, right. Just keep on doing. That's how this works. But if I want to redo
and let's say I changed my mind and I actually want
that change that I had back. Then I just click the
forward pointing arrow or the arrow pointing
to the right, which is the Redo button. And it'll just redo
everything that I undid. So again, the new
slide came back, the old background turn
into new background, and we are back
to where we were. So that's how the
undo and redo buttons work in the Quick
Access Toolbar. And lastly, in the
Quick Access Toolbar we have these three dots, which lets us customize our toolbar here if we want
to add more buttons to it. So as you can see you
here, we have five checks, which means that there
were five buttons here in our little toolbar. If I wanted to add more functions or commands
to this little toolbar, I just click one
of the ones that aren't checked and
it will add it. So for example, let's say I
want to add a print button. I would just click Print. And as you can see here,
a little printer icon just appeared in my
quick access toolbar. But let's say I wanted to
remove that print button again. I just clicked my
three dots here, the customized toolbar button. And then click Print again, which is checked, and then
click it to uncheck it. And then the print
button goes away. It's as simple as that. So this is the quick
access toolbar within Microsoft PowerPoint. I hope this helped.
7. The Title and Search Bar: In this video lecture, we will talk about the
Microsoft PowerPoint title bar and the search bar near
the Quick Access Toolbar, which we just talked about, is the title bar
here at the center. The title bar will always show the name of your
PowerPoint presentation. This presentation is
called Presentation one. So this is the name of our
PowerPoint presentation file. In case you're wondering
why it's presentation one. This is just a default
name that PowerPoint gives two brand new blank PowerPoint
presentation files. So just be aware that if you
see this is just because PowerPoint generated it itself. Now if you're wondering
how to customize it to an actual title
that you want. Don't worry, we
will get to that in the next video lecture. But for now, just
know that this is the title bar up here and the light gray above the Ribbon. And it contains the title of your PowerPoint presentation
and the file name. In older versions of
Microsoft PowerPoint, you will see a dot pptx or
just dot ppt at the end of the file name or presentation
name rather because that is the file format of
PowerPoint presentations. That is the suffix
or the acronym that they have created for
PowerPoint file presentations. So anytime you see
dot ppt or pptx, just know that it is a Microsoft PowerPoint
presentation file. So again, that's all there is that needs to be said
for the title bar. Then for the little search bar, we can see it up here in the upper right-hand corner of the program with this
magnifying glass icon. If I click it, I will
be able to search and presentation anything
that I look for. For example, a word, let's say I want
to find the name John in this presentation, I just typed in the name and then hit Enter
on my keyboard. And then it highlights
the results. One of two in John
here is selected. Highlighted. If I wanted to find
the other John, I just click this little triangle pointing to the
right and it takes me to the other place in my PowerPoint presentation
where the word John exists. So as you can see, this is very useful if you're working on a long PowerPoint presentation
are trying to find a certain sentence or
word to edit or remove. And of course, if I click
next to the magnifying glass, there's a little triangle
button pointing down. If I click that, I can
then do Advanced Find, which lets me find
special things, such as not only words, but if words are capitalized or certain words
that are lowercase, right? Or words that have a certain
grammar associated to them. And on top of this, I can make it match
the whole word instead of just a few letters
within the word, right? So for example, if
I search for John, I'm only looking for
results that include all four letters in
the word John, right? If I have this whole
word only checked, and on top of this, I can also do replace with, which is a great feature that we will talk
about a second. But again, going back to
the magnifying glass, Let's remove here what it
says, and click it again. Next to the magnifying glasses, this little triangle
pointing down, we can click Replace. It'll take us to the same
place, Find and Replace. Just showing you that again
as to how to get there. If I want to replace a
certain word that is found throughout this entire presentation with another word. I can do that with
just a few clicks. So let's say I want
to replace the word by with something else, right? So then I would click where it says fine what,
and type in the word. By. Then I would replace it with, let's say from right. Then I would click, Replace All or replace. If I click Replace, it will do it for justice slide. But if I click Replace all, it'll do it for all slides. So let's click Replace All. And there we go. It replaced a word by two from an all slides of this
PowerPoint presentation. So as you can see, this is how the Find and Replace
feature works under the search bar and search icon in the search bar
in Microsoft PowerPoint. We can also replace
fonts as well. Let's say my presentation is in a certain font, and
I don't like it. I can do that as well. But this is obviously something that we'll
talk about later on in this course to not
get ahead of ourselves. But just like you
can replace words, you can replace fonts as well to change the style of the font. And then just next
to the search bar is this share to Microsoft if you want to help them
improve the program. But nonetheless, this is the Microsoft PowerPoint
title bar and the search bar. I hope that this helped.
8. The Status Bar: In this video lecture, we will talk about the Microsoft
PowerPoint status bar. The status bar can be found at the very bottom of this program. This light bar, this
light gray bar that you see here at the very
bottom is the status bar. And the status bar is more
useful than one might think because it tells us a lot about our PowerPoint
presentation. For example, to start off this status bar at
the bottom left, you can see here it says
slide one of three. Slide one of three is also, of course, counting
the slide number that we are presently on. And how many slides are in
our PowerPoint presentation. Whether I'm on
slide 12 or three, the status bar here at
the bottom left updates the number to tell me what
slide I am currently on. So it can be very useful to look there if you
don't want to look at the slide tab panel
here at the left side. The status bar also tells
you what slide you are on, your PowerPoint
presentation and how many slides over all your
PowerPoint presentation has. Then next to slide number
is of course, the language. You want to make sure that
this is always accurate to the PowerPoint presentation
language you're using on. Because of course, if
it's not accurate, then it'll be harder
for PowerPoint to pick up incorrect words, grammar mistakes, and so forth. You want to make sure that
this is always accurate to the language that
you are working with. And here it says
English, United States. So of course this is accurate. Then after that,
the status bar has this really cool
accessibility feature. Accessibility is basically a button that contains
recommendations to help make your
PowerPoint presentation more understandable to viewers. So here it says
accessibility investigate. This means that I
have some errors and tips that
Microsoft PowerPoint wants to give me to help
make my presentation better. After I clicked the
Accessibility button. We can see that here
on the right side and your pain appeared, the
accessibility pain. And we can see that
PowerPoint found some errors such as a missing
slide title in slide three, which makes sense because
there's nothing there. So something has to go there. And some tips which include a duplicate slide
and saying that I have two slides that
are exactly the same. And this can potentially
interfere with making my slide clear
and easy to understand. The PowerPoint program
even has this. It has not only errors, it can not only detect errors within your PowerPoint
presentation, but also even give you
tips and recommendations. So that is a great feature
that is in the status bar. Then after the Accessibility
button we have here, the Notes button, Notes button. If I click it in the status bar, a little tray will appear here where it says
click to add notes. And these notes won't be
seen in your presentation. These are just for you, the creator to have
as whether a reminder in case you need to work
on something or just other little tidbits
of information. Again, I clicked the
Notes button and this little tray here where it says click to add
notes appeared. I can just click left-click
ones and start typing in whatever little note I want to make to myself
about a certain slide. Let's say this slide I want to work on a little bit later, but I don't want to forget this. Or let's say you're working
on a long presentation and you might forget what number the slide that
you need to work on is. That's fine here you can
create a little note which is kinda like a ribbon on your
finger to help remind you. So then I can add a little note here that
says something like work on this later. And then I just click out of there and it
just adds it there. So that is the Notes button
here in the status bar, that is the function and what it does separate from comments, which of course we
talked about earlier. So we won't again, which have their own little pane on the right side and
work differently. Then after notes and
comments in the status bar, we have the normal view, which is the default
view that PowerPoint will always be and
will be selected. If you de-select this, it'll show the
slides side tab bar as just a different view. And I don't recommend this view because you won't
be able to preview what your slides actually look like without having
to go to them. It'll just show them
as many squares with the name of the PowerPoint
presentation file. So you typically want to make sure that normally selected, it's the recommended
view for PowerPoint. Then after that we have
the slide sorter button, which lets us see our
slides exclusively. So it removes the
presentation window pane and only lets us see our slides. So let's say if you're working
with a variety of slides, 30 or more, and
you don't want to keep scrolling up and
down, up and down. You can click slide
sorter to have them laid out in
a more clear way. So that way you don't
have to scroll as much. And of course to
get out of this, you just click
slide sorter again. So that's a cool
little view there. If you need to use it. Then after that we
have Reading View. Reading View just removes
all of the buttons and the slide side panel and just lets us see our
presentation proper. To exit out of this, we would just hit the escape
button on our keyboard. So that is the Reading View. And then after that we
have the Zoom Toggle, which we talked about
earlier in this course, which lets us either
zoom in or out of a presentation slide to make the view either larger or
bigger for us to view. And of course, we
can also change the numerical value instead
of toggling that button, should we choose to do so, and instead choose a number. But again, this is
the zoom out and zoom in feature toggle
within the status bar, and then of course the
numerical Zoom button as well. Then the last button in the status bar in
PowerPoint is here, bottom right hand corner, which is fit slide
to current window. This is basically
just a fit button which will make
the slide fit into the presentation pain of your Microsoft
PowerPoint program depending on how big
your computer screen is. So that's just an easy
way to get out of. Like let's say, I zoomed in a lot and
then I don't want to manually type in a number again or drag it back to the center. I can just click this button and it'll drag
it back to what it was. But again, this
is the status bar within the PowerPoint program. And I hope that this helped.
9. The "PowerPoint" and "File" Buttons: Welcome. In this section of the course, we will talk about the
Microsoft PowerPoint menu bar, which is the menu bar that appears when you
open the program. And we will talk about
certain features of these buttons and only
a select few of them, because a lot of
these menu buttons can be found in the ribbon, which we will get to in the
next section of the course. So let's go ahead and
start off by talking about the first button in the
PowerPoint menu bar. The menu bar, by the way, is this bar here
that appears above the Microsoft PowerPoint
Quick Access Toolbar, title bar, and search bar. So basically it is
above the program. It is where your
battery information, the date, and the time is found. And so much more. Basically, it's kind of like your computers uppermost bar. Now if you're on Windows, you typically have
this somewhere else. So this is more so if
you're a Mac user, but nonetheless, the
buttons are pretty similar. And in this video, we will also talk
about how to save a PowerPoint presentation with a title of our own selection. So let's go ahead and
start off by talking about the first button found in
the PowerPoint menu bar, which is the one that
says PowerPoint. Here, it's not much to it. The first button is
about PowerPoint, which tells us the version
of PowerPoint that we have, the PowerPoint on our Mac. And so much more, it's not much to it. That's just what it is. That's why it says about
PowerPoint. Let's go back to it. And then under that
we have preferences. So this is an important
button if you want to modify some preferences or settings in your PowerPoint
program, Let's click it. We can change some
settings such as the General settings or
more specific settings, such as the view, the ribbon, how we want the
ribbon to appear, and how we want edit mode
to appear in so much more. But we won't talk about every single one of these
buttons because of course, these buttons more so
deal with changing the interface of the program and how we want the
program to appear. And of course, this is
not so much the focus of this course because this course is PowerPoint for Beginners. So we are working with what is by default selected
by PowerPoint. So we don't want to
work on too much of these custom settings though
if you are interested, I do recommend that you check
these settings out if you do want to change some
very specific things. But nonetheless, this is the Preferences tab under the PowerPoint button
in the menu bar. Alright, so let's exit
out of here by clicking the red circle and going back
to the PowerPoint button. Okay, and so then after
that we have sign out. So again, as we talked about often earlier in
the video lectures, is that we must be connected to a Microsoft Outlook
e-mail to get the most out of our Microsoft
programs such as PowerPoint. And so therefore,
if we want to have things like our one
drive connected, or we want to have our autosave
turned on and so forth. We make sure that we have a PowerPoint connected account and Microsoft e-mail as well. And so that's why this
says sign out here, because it lets you sign out
of your Microsoft e-mail in case you want to sign into another Microsoft
e-mail account, or you're working on a shared computer and someone
else wants to sign in instead and have
their files appear instead. But nonetheless, this is
just why it says sign out. Then underneath that
we see services. Services. This just
deals again with specific preferences related
to the Microsoft program. If we want to modify this, we go to our computers
service preferences. This is a more advanced and in detailed thing that
you don't have to worry about if you're just working with default PowerPoint itself. So we're not gonna
get into that. Hi, PowerPoint is if we want to hide the PowerPoint program. So let's say if I
click it, it hides it. And if I want to retrieve it, I just click the icon
from the very bottom. Then let's go back to
the PowerPoint button. And then underneath that
we have hide others. So this will be hiding other programs and other
things in terms of PowerPoint. If we want to not have a PowerPoint program that is blocked or other things that are in the way
we would do that. We would click Hide others. So that is what that is for. Show all, of course, shows them all again. And since PowerPoint
is the only program we have open Pretty much, That's why nothing
changed there. Then after that we
have quit PowerPoint, which obviously will quit
the PowerPoint program. That is everything in the PowerPoint button
itself within the menu bar. But now let's get into the very important
button in our menu bar, which is the file. But the file button is very important because
in this tab or button, we have a variety of different
things that we can do. We can create a brand
new presentation, a brand new PowerPoint
presentation. We can create a new
presentation from a template or theme that again, you can have downloaded
from the internet or one that Microsoft PowerPoint has already provided for you. Then we also have
the Open button, which lets us open a
PowerPoint presentation that we already have in our
documents are in our OneDrive. Then underneath that, we
have opened recent and here you're recently worked on PowerPoint presentation
files will appear. So that's a great
little function there in a shortcut to save you some time so you don't have to go digging in your hard drive, your documents folder,
or your OneDrive looking for a file or
PowerPoint presentation. Then we have clothes, which obviously will close
this drop-down menu. And then we have the
very important buttons, Save and Save. As we already know that we can save either through
autosave or through the little floppy disk
icon here found in the quick toolbar that we've covered earlier on
in this course. But another way to
save as by clicking Save As and save as
is important because width save as we can then
save this presentation with a name that we choose instead of a default name that
PowerPoint selects for us. So instead of presentation one, I can name this whatever I want. So let me remove presentation
one and instead name this my first presentation. Then I can choose where
I want to save it. Do I want to save it on my
OneDrive or on my hard drive. As you can see here on my Mac, this would save it to my actual hard drive
on my computer as opposed to Microsoft's digital online servers through OneDrive. And then the file format, which is always recommended
for you to keep as pptx PowerPoint
presentation because it is compatible with the
newer versions of PowerPoint. However, you can save
it as older formats, such as PowerPoint in 1997
to 2003 and so forth. You can also export
this as a PDF file. If the person you're sharing this presentation
with doesn't have Microsoft PowerPoint or
other formats as well. But it's typically
recommended that you keep this as what it is. The default settings, microsoft PowerPoint
presentation, dot pptx. Then by clicking Save, I will actually save it to wherever it is that I selected, which was here on my OneDrive
in the documents folder. I can also add a
place or a new folder to save this in, right? And then I can set that as
my default saved location. So that way I don't
have to go through this process every single time. And PowerPoint will know
what folder to store my presentations on or
n by checking this. Nonetheless, this is how
it works when it comes to saving as know that Save and Save As are
two different things. Save just automatically
saves it has whatever named PowerPoint has
chosen for the file, which is typically
presentation 123 and so forth. Whereas save as triggers
this little pop-up to appear where then
you can type in a specific name for your
PowerPoint presentation file. I recommend always giving your presentations
specific names, because if you don't,
it'll be confusing to know which presentation
is what, right? And it'll be confusing
for other people as well. So now that I've given
this a default name to a custom name From presentation one to my
first presentation. Let me click Save and notice what will happen
in the title bar. Let's click Save. And look what happened
in the title bar. It changed from presentation
one to my presentation. And the status is saved. And it tells you when
it was last saved. Just now. And if we click
this little triangle, we can see where it
was saved as well. So again, we did all of
this just by going to the File button or tab in the menu bar and then
clicking Save As, then save as a copy. Again, if we want to make
a duplicate of this file, we would click Save as a
copy, Save as Template. Let's say we want to
keep this formatting in background for future
PowerPoint presentations. We would click Save as Template. Then we have the Export
button, which again, if we want to export this as a PDF file to other
people, we definitely can. And the cool thing is that
with PowerPoint presentations, we can also export
them as videos, as you can see
here, video files, mp4, MOV, or we can also export
them as plain old images, JPEG, tiff, PNG, GIF, BNP. These are all image files
and video file formats. So that's a cool thing if you want to share this
PowerPoint presentation with others that may not have PowerPoint on
their computers, right? You can save them
as PDFs or videos, or even image files. Then we will do that by
clicking Export here. And of course, the same thing. You make sure that
you select where you want that presentation to be stored and whether your OneDrive or on your
actual computer. Alright, so let's click
Cancel and go back to File. Then under Export is move. So if we click Move, it'll just let us move our presentation from one
folder or place to another. So let's say I don't like that. I saved this presentation to the Documents folder
in my OneDrive. I can select it and move
it to another place. By clicking where it says new folder and
creating a new folder. And let's do this
for the sake of demonstration. Create. And then I want to move it. Then I'm moving it from
this to my untitled folder. So I selected my untitled
folder and then I click Move. That means it changed from
my Documents folder in my OneDrive to my untitled
folder in my OneDrive. So that is what the
Move button is for under the File tab in the
menu bar in PowerPoint. Very useful if you want to
move your files around without having to drag and drop or
dig for files manually. Rename is not available.
It's grayed out. Anytime you see grayed
out button in PowerPoint, it means that it's not
available for you to click to use or rename obviously just lets us rename the name of our presentation. Sometimes this is not available for you to
do because again, you are either working on it or because it is
currently saving the file or because you manually have
to do it yourself by going to the folder in which
this file is located. Then under rename we have
brows version history. This shows us the
previous versions of the PowerPoint that
we are working with. And then this will load your OneDrive if you saved
it on your OneDrive and show you the different versions of this PowerPoint presentation in the past and the most recent one as well in
the current version. So this is a cool feature
that PowerPoint offers. If you have a
Microsoft e-mail and a OneDrive connected to
your Microsoft program. Alright, so let's exit out of this and go back to PowerPoint. Alright, and then in the
File tab under the menu bar, we see the drop-down again, and then afterwards we
have the share button. The share button is very
useful if we of course want to share this
presentation to other people. We can invite people to
view this presentation, edit it by typing in names
or e-mail addresses up here. Names is if you have contacts enabled on your computer,
email addresses, obviously you just type
in the email address and then type in the
message if you'd like. If you have the can
edit button selected, that means that
you're also giving these people edit access. So be aware of that. If you uncheck it,
then they can only view this and not
edit it as well. But again, that is just the
difference between having the candidate checked
or unchecked. So you can share through this way, through
e-mail addresses. But there are other
ways to share as well. If I click File and
I go to share again, I can also copy the link
to this presentation, which is cool because Microsoft PowerPoint
has this enabled. Now you can use PowerPoint links to share this with other people. All I do is click Copy link. And then this sharing
link is copied to my clipboard that
I can then paste for other people to click on and see this presentation through
the window that we saw earlier in which my
internet browser appeared. Then another way to
share is of course, if I copy the view
and edit link. So instead of only
allowing other people to view my PowerPoint presentation
through the internet, they can also edit it as well. And then some other options that we talked
about is of course, sending the presentation to
them through whether it is Outlook or your mail app on your computer or mail program or whatever you have installed. You can do that
through that as well. Or you can also
share, of course, by sending it as a
PDF file instead of a PowerPoint file
in case the person you're sharing this width
doesn't have our point. So those are some great
ways to be able to share your PowerPoint
presentation. A lot of variety there. Then we have always
open read only. This of course just opens a
different type of view which only lets us see this PowerPoint presentation
in read-only view. And then after that, we
have restrict permissions. So again, if you are working with something that
is quite protected and you don't want other
people to mess with this and you're having a
lot of people use your computer or
there are a variety of people logging
onto your computer. You can restrict this PowerPoint presentation
to of course, be password protected, which is the next button down
here, passwords. And then you can encrypt this
PowerPoint presentation to only be accessible if you know the secret
password by checking, encrypt this presentation and
require a password to open. And then you type in your
secret password here. Though of course, make sure
that you make this password easy to remember for yourself
because if you lose it, you won't be able to
access this presentation. Alright? So that is a cool feature
to be able to lock your presentations
in order to avoid other people from messing
with them and so forth. Then compress pictures. This is if you have
a lot of pictures on your PowerPoint presentation. And let's say they're huge
and take some time to load or making your file
really big and slow to load. Compressed pictures is a
great feature because it reduces the size of the pictures without
losing the quality. And you can choose here the
type of quality that you want and how much you want your pictures
to be compressed, the more you can press lower quality of the
pictures will be. But the easier they will be
in faster will be the load. And of course it will make
your PowerPoint presentation file a lot smaller. So that way when you're
sharing it with other people, it takes them less
time to load and open. Then underneath that, in the
File tab we have Page Setup. Page Setup obviously is how the setup for each
slide is shown. You obviously want
to make sure that your PowerPoint slides are
always in landscape mode, also known as a rectangle, not portrait, because we are
working with slides here. So slide is sized
for widescreen, which is the default. We want to keep it as that. And it tells us the width and inches and the height
in inches as well. And of course, the orientation
that it appears in, you don't want to mess
with these settings, leave them as is again, we want to work with
what PowerPoint gave us for the sake
of this course. Then after that we have print. So of course, if you want to print this PowerPoint
presentation, you can do so by going to
File Print as we just did. And then you want
to make sure that your printer is selected. And you can even
see how this would look like if it were printed. You can select to
be printed in black and white or in color. And you can even show details
such as the paper size. And if you want to print
certain slides are just one or two of
them, and so forth. And the layout, of course, if you want again, color
or just black and white. So there's a lot of
variety here with printing options,
with PowerPoint, this is something you can explore if you are interested in printing out your own
PowerPoint presentations. Then lastly, after print, we just have properties under the File tab button in the
menu bar in PowerPoint. And properties just tell you statistics and information
about your PowerPoint file, such as of course,
the size of it, when it was created, when it was modified, what type of file? It is, very in-depth
things that you really won't have to work
on that much or view. Rather, if you're starting
off with PowerPoint, but it goes very detailed. It can tell you how many
times you've worked on this. How long you've worked on this, how many slides there are,
how many words there are? A lot. Powerpoint is a great
program because of this, because it contains
so much information and so much capabilities. So just be aware
that this is what the properties button is under the File button in the
Microsoft PowerPoint menu bar. And with this, we have covered
all of the buttons within the File button in the
Microsoft PowerPoint menu bar. So I hope that this helped.
10. The "Edit" Button: Welcome back. So now that we've talked
about the File button within the menu bar in PowerPoint and the PowerPoint
button itself. Let's talk about
the next button. In this video lecture, we will talk about the
edit button within the menu bar in
Microsoft PowerPoint. So the Edit button is also very important because
it contains a lot of things that we can
do through shortcuts in this drop-down menu
under the Edit button. As you can see here, we have
undo and repeat properties. You can undo and redo
things in the Edit button, in the menu bar in PowerPoint. Below that we also
have cut and copy, so we're able to delete things and also copied
things as well, specifically text or images, or even entire slides using the Edit button from the
menu bar in PowerPoint. And then underneath that we have three different paste options. We have regular
paste which pastes regularly as in nothing to it. It just pastes everything
you copied as is. Or paste special. Let's click Paste Special. Paste Special. Great. Because let's say
you copied a lot of information from somewhere else. And it has its own formatting
and font style and color. And you want to paste that
into your presentation, but you don't want to transfer that color and font style onto your presentation because
that's sometimes happens. So what do you do? Well, you go to Edit and Paste
Special like we just did. And we paste this as
unformatted text. And what it will
do is that it will paste the text that you copied, but strip away any
of the formatting, the color and so forth, and just paste it as
blank normal text that falls in line with
your text font, style and family that you're using in your PowerPoint
presentation. In case you're wondering
if there's a way to paste things from other sources and make them fall in line with your font style and size that relates to your
PowerPoint presentation. Without having to
do that yourself. You can definitely do
that by going to Edit, Paste Special and making
sure that you paste this as unformatted text and
then you would click okay. And of course, it will
paste that wherever it is that you desire. But under Paste Special, we also have paste
and match formatting. This is different from
what we just talked about. This would actually
make sure that the text that you pasted, which I just did right
now as an example, fits with the formatting and the style of your current
PowerPoint presentation. So this is just
another way to do it. If you don't want it to
be just super plane, but also want it to be related to the texts that you're using on
your presentation. So just so you know.
Alright, let's go back to edit and let's undo that
paste and click Edit again. And under paste and match
formatting is clear. So clear is if I had some texts that I
wanted to get rid of, I just go to Edit Clear
and it removes the letter. I meant to do that again, and it removes the next letter. So again, this is not the
best way to delete things. I would probably rather just select everything and then
hit Delete on my keyboard. It's a really clear everything. But in case you want to do that, you have the edit clear option. I'm going to undo that lead and undo the clear of
those two letters. Alright? And then under clear
we have select all, which lets us select
the entire text or element in the borders
of the selected element, which is this one. Or if I wanted to instead select from John instead of my
sample presentation, that wouldn't make sure I
first select from John, then go to edit, select all, and then it selects that text. Notice that when I'm not in a specific element and then
I go to edit, select all. Instead it selects all of
the elements as opposed to the text, a certain element. So that's just a difference. And you will know that these are selected because the borders of the elements will have
appeared in popped up. So that's the difference
between selecting all within an element and then
selecting all. With out being an element. It selects the whole,
entire slide instead, the elements on that
slide, I should say. So that's the difference. Alright, and then after that
we have Edit, Duplicate. This is not able to be used right now because
it's faded out. But how this works is you first have to select everything on the slide in your presentation
and then click Duplicate. And what it'll do
is just make a copy or a duplicate of the elements
that you had selected. So there is a shortcut to
do that, if you please. And then after that we
have delete slides. If you want to delete the slide, we would just click Delete slide and then it removes the slide. Alright, so then let's
go ahead and undo that. Then underneath the
lead slide we have removed section or
renamed section. This is something we
haven't gotten to yet. But again, much like we
have slides in PowerPoint, we can also break
these slides down into certain sections are
kind of like chapters. I can say the first three slides are my introduction section, then the next three
are my body section, and then the last three are my conclusion section for
a total of nine slides. If I wanted to remove a section, I can do that by clicking
here or rename a section. I can do that by clicking here. Then after that we
have defined feature, which lets, lets us
find certain words. And we talked about this
feature before when we were working with the search bar
earlier on in this course. This has the Find and Replace feature in the search bar here in the upper
right-hand corner. That's just another
way to access it. The Find and Replace features, of course, that are found
within the search bar. Then we have toggled
drawing under the Edit button within the
Microsoft PowerPoint menu bar. Toggle drawing is great. If you want to draw on your PowerPoint
presentation slide. You can see here my
cursor turned into a dot and I can draw on
it if I please. This is probably something
you won't be working with, but know that it is there under the Edit button in the menu bar. So no need to worry about that. Then after that we
have start dictation. This is a really cool
feature that PowerPoint has. So if you're not a fast typer or you just
don't like typing that much. You can actually
dictate what you want to be written on your
PowerPoint presentation slide. So all you do is you
would have to connect your microphone and you can use your computer
microphone for this. Give PowerPoint access to your microphone and then
just start speaking away. And then powerpoint will
pick up the words as best as possible and write them
onto the presentation. This is a really nifty feature
that PowerPoint actually. If I click Start dictation, my computer asks me, Do you want to enable
dictation to start dictating, press the Control key twice, or to start dictation
from the Edit menu. Then of course, all I would
have to do is then speak. And then powerpoint
will write out the words that I'm
speaking onto the slide. You'd have to make
sure of course, that you have an
element selected first. And that of course, you see the borders of an element to know whether you
are in an element are not. Only then can you
actually start dictation. Because if you're not, then it won't have
anywhere to write it in. This is a cool feature if
you have a microphone, but you don't have to have a
fancy microphone for this, you can just use
a headphone set. And PowerPoint actually picks
up the words pretty well. And of course, if there's a word that PowerPoint
that and pick up, you can manually go back and type it and
change it yourself. Then lastly, we have
emojis and symbols. The images and symbols
is just a way to access the emojis tray. If we want to insert emojis and symbols onto our
PowerPoint presentation, we can definitely do so by going to Edit
emojis and symbols. So that's a cool little
feature there as well. But all in all, this is the edit tab in the Microsoft
PowerPoint menu bar. So I hope that this helped.
11. Other Things to Know About the Menu Bar: Welcome. In this video we will talk about some other
things that are important and good to know about the menu bar within
Microsoft PowerPoint. So by now we have talked
about the File button and the edit button within
the PowerPoint menu bar. But what about these
other buttons? View, insert, format,
Arrange tool, slideshow, window, and help. Well, as you might
have already noticed, a lot of these buttons
here in the menu bar, or identical to the
names of some of these tabs within the
Microsoft PowerPoint ribbon. And that is because the menu bar is just
another way to access these same areas
in which you can execute certain functions
related to inserting images, for example, or formatting
text and so forth. So therefore, we're not
going to cover the rest of these buttons in the
menu bar in this course. Because again, a
lot of these will be redundant if we
do so because again, these are ribbon
buttons and a lot of these buttons are
exactly the same on a Mac, you will see these buttons above the Microsoft PowerPoint
program on the menu bar. Whereas on a Windows computer you will see them and
below the ribbon. So just know that a lot
of these buttons in the menu bar can be found
in the ribbon as well. They're just another way
to access the things that you can do in the
ribbon, in the menu bar. As you can see, we can create a new
slide, duplicate slide, things and functions is that
we've already covered and learn how to do earlier on in
this section of the course. So again, it would be
redundant to cover these buttons repetitive
because again, they do the same, identical functions
and features. However, I will say though that the file and edit
buttons are unique. And so those are the
two main buttons in the menu bar that you'll
be working with any way. Because again, a lot
of their features aren't found in the
ribbon or outside of it, such as the Save As feature. So you want to make sure
that you pay attention to the file and
the edit buttons, at least which of course we've covered earlier on
in this course. However, should
you ever need help outside of what this
course provides? For example, if you have a question or
something like that, PowerPoint and
Microsoft have included a great help guide to the PowerPoint
program that you can do by just searching
for a question here, typing in a question and a bunch of articles
and they're helpful, useful user guides
will appear here. You can also click
PowerPoint help as well to get more tips and guides, so forth within PowerPoint. So you don't even have to
go to an Internet browser. Everything is in here for you if you need more
help, of course. But again, these are just some other important things
to know regarding the menu bar within the
Microsoft PowerPoint program. And know that of course, it depends whether you
have a Mac computer or a Windows PC and where
this menu bar will appear. But nonetheless, that a
lot of these buttons in the menu bar are shared with the Microsoft ribbon buttons. So I hope this helps.
12. The "Home" Tab: Alright, so welcome to the
next section of the course. In this section, we'll
finally be able to explore the Microsoft
PowerPoint ribbon, also known as the
nine buttons in the upper left hand side which compile and compose the ribbon. We will talk about each
one of these tabs and the ribbon and the buttons
under each of these tabs. So we can then be
able to fully use PowerPoint to its
maximum potential. And on top of this, if you
feel like I'm going too fast, no worries, you can always
rewind the video lectures. And on top of this, I've
also included a resource for each one of these ribbon
buttons and tabs. And on top of this quizzes at the end of this
section of the course. So that way, if in case
you forgot anything, that will help you reinforce
what you've learned. But nonetheless, let's get
to it without further ado. The first button within the Microsoft PowerPoint ribbon is of course, the home button. This Home button here that we see in the
upper left-hand side, takes us to the first
button in the ribbon, and it will be the button
that by default you're taking two every time you open
Microsoft PowerPoint. Why is this button the default button and the first
button in the ribbon? While, because it
contains some of the most essential buttons
within the PowerPoint program. So what we're gonna
do in this course, for every one of
these ribbon tabs, we're going to start with the
buttons from left to right. And we're gonna be
talking about each one of these buttons and what each button can do along with some
examples along the way. Now if you see some
buttons that are grayed out and faded out
and are not clickable. This means that these
buttons are only exclusive to be able to use when you are working with an element in your
presentation slide, such as a text element or
an image and so forth. Alright, so let's get started. In order to activate
these buttons entirely, I'm just going to select
my text element here in my PowerPoint covers slide. As you can see, some
of these buttons turned white instead
of faded out gray. But let's start off
with the very far left. So we start off with
the Paste button. We know now that the Paste button will paste anything that you have
copied in your clipboard. Let's say I want to copy this
word presentation, right? I can click the Copy button, or I can click the
little triangle next to it and just copy
or duplicate this, but we just want to copy this. So I'll click Copy. Notice how after I did that, the Paste button
is now clickable. This is because I now have
something in my clipboard. And we've talked about
this already that in PowerPoint and in Microsoft
programs in general, there's a variety of ways
that we can paste things. We can paste things
using the theme as into it falls in line with what the theme of
our presentation is. We can keep the
source formatting. For example, if this
were a bulleted list, if I paste it using this option, it will keep in the
bullet-pointed list, so that's text formatting. Or I can paste
this as a picture, not just as text,
but as a picture. Or I can just keep the text as is plainly and
paste it as that. If I click Paste Special, I have some more ways
in which I can paste this word that I copied onto my clipboard that we've
talked about before, right? We can keep it as how it's formatted on the website that we copied it from or
the other place where source that we
copied this text from. We can keep the formatting
which we also talked about. Or we can keep it as
unformatted text, meaning that there's
no formatting. So if this were a
bulleted list are included any fancy
fonts or any colors, this option would strip
all of that away. We can also paste this
as a PDF or a picture, which we talked about just now. So there's a variety of
ways in which we can paste things in PowerPoint. But to keep things simple, you want to make sure
that you just paste regularly by clicking paste, or that you paste using
the unformatted text. So I'm gonna go ahead
and click, paste. And boom, there you go. It just pasted the
word that I copied, which was the same
word presentation. And as you can see here, a
little button appeared because it's giving me paste options if I want to keep it how it is, or I want to change it to
another format or look. But for the sake of
just demonstrating how the Paste button works within
the Home tab in the ribbon. That's how it is. And with that, we've also
covered the Copy button. Now if I highlight
this word again, the cut button is now clickable. If you're wondering
what that is, a cut just means to delete. So if I click the cut button, it will just remove the word. So that is just
what Cutting Does. It deletes things. So let's go ahead and undo that. And then underneath
that we have format. What is format will
like it says here, we can copy formatting from one location and
apply it to another. So we just talked
about this, right? Let's say I copied the
word presentation and it has certain style
associated to it, a certain color
associated to it. And I want all my text and my PowerPoint presentation to actually look like that as well. Well, if I click Format. My cursor will turn
into this line with like little paintbrush
icon next to it. And then everything I click
or select will be formatted. Just like that as well. Just like the word
that I pasted, or just like the text that I intended to
replicate and formatting. So that is what
these buttons do. Paste, Cut, Copy and format. And again, cut, removes
or deletes things. Copy self-explanatory, paste is self-explanatory
and formatting, of course, copies formatting
into a variety of places and more so deals
with formatting text, not so much images or videos. Then we have the
new slide button. Within the Home tab in the
Microsoft PowerPoint ribbon. We can also access the ability to create
a brand new slide. Next to this, you'll
see a little triangle. And I want to mention this now, anytime you see like a little
triangle next to a button in a Microsoft program
like PowerPoint. That just means that there are additional options
for you to check out. And it will bring up a drop-down menu once you
click it, such as this. So as you can see here, we can create a new slide as is if I go ahead
and click this, it will just create a blank default slide that
looks like this. Any slide that is in
your cover slide, such as your first slide, We'll have your title
and your body like this. It will always look like this. And then of course,
the buttons here to give you the options
in case you want to shortcut out a video or a table or an image
or whatever have you. But back to the
new slide button, we have a little
triangle next to it. And if I click the drop-down, shows you that
there's a variety of different slide types which you can add to your
PowerPoint presentation. We have the title slide, which is similar to
our cover slide. The first slide which has of course the title and
then the subtitle. Then we have the
title and content, which is this slide
we're on right now, which has the title of the top and then the content here below. Then we have Section hetero. This is typically
used when you create sections within your
PowerPoint presentation. Something we'll talk
about in a little bit. But again, as we know,
we can divide up our PowerPoint presentation by sections to keep it more
clean and organized. Then we have two content. So as you can see in
the preview here, this slide has a title and then two columns
next to each other. Same way with comparison. Then we have a title only slide, which only has a title text box. Then we have a completely
blank slide which has nothing at all
no text elements. And because it has
no texts elements, That's why it is blank because
it has nothing at all. The rest of these slides have borders and boxes
because they are taxed elements that will appear automatically once you
left-click these ones each, and they come with the
slides preformatted. Blank is the only one that
doesn't have any of that. So that's kind of like
a free roam slide in which you can do
whatever you want, paste anything you don't have
to follow any formatting. If you choose. Then we have a
content with caption and picture with caption,
slide formatting. So again, as you can see here, we have more than
just one slide type. We have a variety
here to choose from to make our slides
more customized. And then below that again, we have the duplicate
slide feature or button which we
used before already. And then outline in case you're wondering
what outline is. It takes an outline for your PowerPoint presentation
that you already have on your computer. And it can replicate that onto this PowerPoint
presentation. So that way you don't have to build it from scratch again. And reuse slides is
a similar concept. We can reuse slides that
we already have worked on in previous
presentations in the past, we're working with PowerPoint. But again, this is, of course if you've worked
with PowerPoint before, okay, so that is the new slide button here along with little triangle drop-down to give
you a variety of other slides to work
with, should you choose. These are preformatted with texts element boxes for
all except the blank one. Alright. Then after that we have
the layout button, which again has a little
triangle next to it. So these are some
additional ways to get to creating slides with preformatted boxes
and text elements. All of these we
just talked about. So this is just another
way to get to what we were just on in the new slide button. Then we have reset. So this resets everything
back to how it was. Normally. If you added a bunch
of new slides, reset will just
bring the slide back to how it was when you added
it for the first time. So let's say you
added a slide from new slide or layout and
you customize a lot, but you regret that and you don't want to
keep clicking undo, you can just click Reset. Then we can talk about
the suction button, which we have been mentioning
earlier in this course, but haven't really gotten to. So sections. Clicking this, we can add a section to our
PowerPoint presentation. So again, what is a section? A section is
basically a group of slides within your
PowerPoint presentation. You can have more
than one to make your slides and PowerPoint
presentation organized. So let's go ahead and
click Add Section to take a look at
how this looks. So let's go ahead and click it. And as you can see here, it added a section
after my first slide, my title slide, and it
says untitled section. I can title this section
however I please, and then add whatever
information I choose to do so typically those sections
are only one or two words. You don't really want to add
too much here because again, this is just to help you break down your PowerPoint
presentation into sections so it's easier to navigate for your viewers. So perhaps I would
name this section, my introduction section, and then I hit the enter button
to solidify that change. And therefore, these
three slides below 234 slides 234 are now part
of my introduction section. And as you can see next to
the title of the section, there's a little
triangle pointing down. This just allows you to
either show the suction, not sure this section at all. So this is useful if you're
working with a lot of slides and you want to hide them from view temporarily to
get to other ones. And PowerPoint is
really useful because it even tells you how many
slides each section has. So it says here
parentheses three. And that is true. There are
three slides in this section. That is how the sections button
within PowerPoint works. So now you know how to create sections within your
PowerPoint presentations. So now we get to
the middle or left middle side of the home tab
within the Microsoft ribbon. Here is where we work on all of our text editing options
when it comes to size, color, and so much more. So in order for me to
activate these buttons, I must first select
on a text element. And then these buttons come
alive and I can click them. Let's start off
with where it says here Calibri light headings. So this is your font style
or your font family. If you don't know what that is, it is just the type
of font that is being used in your text element, in whichever texts element
you are currently clicked on, not for the entire slide. Hovered is recommended
that you use the same font family across your entire PowerPoint
presentation to make it easier to follow and
more professional. As you can see here,
you have a variety of different fonts that you can use should you choose to do so. But again, this can be changed just by clicking
any one of these. Though, if you already
have texts written, you must first select the
text by double-clicking it. And then changing the
font family by clicking the little triangle
and then choosing a different font,
for example, Ariel. And as you can see, it changed the font style from
Calibri, arial, just like that in one-click, that deals with changing
the font family. Then next to that, we see the number 60. So as you probably assume this
deals with the font size. The bigger the number, the
bigger the font will be. So right now, this is 60 for this selected font or text
in this text element. If I make the number bigger, the text will be bigger. If I make the number smaller, the text will be smaller. So this is just how it works. So this number here, you can also type in
numbers if you want. And I type in the number
60 and then hit Enter, and then it changes back to 60. Now remember you have to
have your texts selected, because if I do these changes
without selecting the text, it won't apply as you see here, it will only apply for the
texts that comes afterwards. And so therefore, it's
very important that you select the text that you
are going to modify. If it's already written. If I hadn't nothing here, I would make sure to
first play around with these settings and then start typing and to avoid having
to select anything. Okay, So then after that we
have these two letter a's. We have a big a and small a. This is just another
way to increase the font size or
decrease the font size. The big a increases
the font size. The small decreases
the font size is just another way to
change the font size. Then after that we
have a with an eraser. This just clears all formatting. So if this text was modified
or made fancy and whatever, this neat little button removes all of that fanciness and
brings it back to how it was. Alright, then underneath
the font family name we have this be, this is just to make text bold and in case you
don't know what that is, that just kinda makes the texts thicker so
it's easier to read. So that is just a bold button. The next that we have a
slanted eye that is to italicize texts and that
just makes texts slanted, as you can see
here, live changes. And then after that we have a U with an underline.
This just makes Text underlined. So again, notice how after I
click these buttons they become light gray. That means that they are
currently in use by this text. If I click them again, it'll remove the effect and it will no longer
be light gray. So if I remove also the
italic and the bold, as you can see,
there are no longer in a light gray square. And of course the text
changed back to how it was. Then after that
we have the a and B with a cross line across it. This is just to cross or strike through text
as you can see here. When I do this, it creates
a line across the text. This is just in case you want to use this for any reason you may. You definitely have this option here called strikethrough. This is the
strikethrough button. Then after that we have
two buttons here that deal with equation
and also code. So superscript and subscript superscript and makes the
text float at the top. Subscript mix texts
float to the bottom. As you can see here
it's happening. This is more so if you
work with exponents and mathematical equations
and whatever have you in science formulas, you have those two 0 as well. Then after that we have
this AV with arrows, two arrows pointing
opposite each other. This is character spacing. So you can also change the
spacing between each letter. Very tight, makes
the texts really close to each other or the letters really
close to each other. Whereas very loose makes the text very apart
from each other, the letters very apart
from each other. So this is just what
this button is for. The character Spacing button, normal will always
be the default. And then after that we
have these two A's here. This just changes
the lowercase or uppercase of your text, right? So maybe you want to make
your text in a sentence case. So only the first letter
would be capitalized. Or maybe you want to make
everything uppercase, you select uppercase and then your texts all
becomes uppercase. This is if you
don't want to take the time to manually
do that by yourself. You have this nifty
little button here that can do
this work for you, The Change Case button. Okay. Then afterwards we have
this Highlight button here, which lets us highlight text, kind of like a highlighter
that you would use in real life in
a book or magazine. If we just click this button, this text here will have a
yellow highlight behind it. You can also change the
color of the highlights by selecting the text and then clicking this little
drop-down menu. And then you have a variety of different colors to choose
from to change the highlight. Then next to that
Highlight button, we have a, uh, with a red bar underneath it. This is the text color button. So I would highlight the text. And if I want to change
the color to red, I just click it once and
then my text becomes red. If I want to change the
color from red, again, I just click this little
triangle next to it, and I have a variety
of colors to choose. So let's say instead of what
I want to make this text LU, or go ahead and do
that by clicking blue. There we go. My text is now. So that is how you can
change the text color within PowerPoint
in your slides. Alright, so then we move
to the next section of the Home tab in the
Microsoft PowerPoint ribbon. The center section. This more so deals with the
formatting of your texts. So like creating bullet points, numerical lists, indenting
things, and so forth. So in order for me to accurately demonstrate the
capabilities of this, I'm going to move on to
another slide to show you. Let's work on this
slide and click here in the content where
it says click to add text. And I'm just going
to type some things. This is sample text. Hello. As you can see, this
is a bulleted list. And this is why, as
you can see up here, the bulleted button
is in light gray. Anytime an element is
using a certain button, it will appear with a
light gray background. So if I want to change these bulleted circles
to something else, I can do that as well by
using that bulleted button. So let me select
my bulleted list. And you'll know everything
is selected because it will have a orange tint
background to it. And then click this little
triangle next to the bullets. And as you can see here,
I have a variety of different bullet point
shapes to choose from. I can do circles, squares, checkmarks, whatever have
your diamonds and so forth. So you don't only have
to stick with circles, you can definitely
choose whatever you'd like from that as well. And you do so by clicking the little arrow pointing
down next two bullets. Whereas this button right here, it just removes
the bulleted list. And that is why
it's no longer in a lighter gray background. But if I click it again, it'll re-add the bulleted list. And now the bulleted list
button is in light gray. This is how the
bulleted list feature works in PowerPoint. And then next to that, I
have the numerical list. Feature, so instead
of bullet dots, I could use numbers, right? So a numerical list, one dot, two dots, right? And again, next is the
numerical numbering button. I have a parentheses option, Roman numerals, letters,
whatever have you write. If I don't want to stick to this layout and it'll change it for you like
that with one-click. And again, if I
want to remove it, I just click the button
and then it removes it. If I want to add it
back and just click the numbering button again
and it adds it back. So it's as simple as that. Now after that, we have the
indentation buttons here. So we have to indent
less or indent more. If I click indent more, you will see what will happen. It indented the text and pushed it a little
bit to the right. But if I want to indent it back, I just click the plus button and it'll undo that basically. So this is very useful
if you're working with paragraphs
and essays, right? You want to indent your first line of
your first paragraph, and you can use these
indentation buttons. Though of course, you
won't be working on with paragraphs as much in PowerPoint because PowerPoint isn't really a program intended
to write essays on, That's Marsal from
Microsoft Word. But just know that you
have that capability here as well in PowerPoint. And then after that we have
the Line Spacing button. So much like we can change the spacing between each letter. We can also change the
spacing between lines. So I can change it to be double-spaced, as
you can see here. And then it made this bulleted
list lot more expanded. If I wanted to undo that, I can just go back and click 1, which will be always
default selection. So that is just what the Line Spacing button
does in PowerPoint. Then after that I have the
Add or Remove Columns button. So this is a useful feature and button in PowerPoint
if you want to, of course, create multiple
columns within a slide. So I can not just
have one column, I can have two columns, three columns,
whatever have you. But again, instead of
doing it like this, you want to make
sure you'd rather create a new slide that already comes with more
than one column, right? Like the two content
or comparison slide. But just know that
you can also do that through here in PowerPoint. And it'll create multiple
columns like that. Nonetheless, one column
will always be the default. Okay, So before we talk
about Convert to Smart Art, Let's talk about
the things under the bulleted list and
numbering buttons in the Home tab within
the PowerPoint ribbon. So as you can see here, we have four buttons
that are full of lines. These are the alignment buttons. With these buttons you can align text to be aligned to the left, to the center, to the right. Or justified. And justified means
that it'll align to the left and the
right margins equally. So that way both margins
on both sides of the slide will be equal
in terms of texts. You may have seen this when you're writing essays
and your margins must be the same on each side to make the
paper more readable. That is what justified is. So again, if you ever want
to align text to the left, to the center or to the right? These buttons are very useful here within the Home
tab in the ribbon. Then after that, we have this a with two
arrows pointing down, which is a text direction. This is if you want
to rotate your text. So rotate 90 degrees, rotate tucks 270 degrees
or whatever have you. This is the Rotate Text button and changes the text direction. Horizontal will always be
the default. By the way. Then after that we have
this rectangular icon, which is the aligned
text button. Instead of aligning things
left, right, and center, this aligns them to the top, the middle, or the bottom. And we have more options here. If we click Align Text Options, which go more into detail, should you choose to do so. And of course, this deals with more-so shapes and so forth
when it comes to text, which is a little bit more advanced and we will
get to this later. But just know that
you're not just limited to aligning text left, right, and center, but also
top, middle and bottom. And top will always be
the default selection. Then lastly, within this
portion of the home tab, we have Convert to Smart Art. And Convert to Smart Art.
What does that mean? Well, smart RR graphics, which are a part of PowerPoint. And as you can see here, they include charts and nice little columns
and so forth to make your PowerPoint
presentations look a bit more professional
and customized. If I select any of these, it'll import the
look into the text. So of course, the more
things you have selected, the more complicated it'll be. We're not going to
get into this too much because this
still is more so with another tab within the ribbon that we will talk
about later on, which when it comes
to, of course, adding designs and so forth. So let's just undo that. But that is what the
Convert to Smart Art button does in case you don't
want blend text, you can definitely
choose from one of these designs to
change your text into. Alright, and near the right
side of the home tab, then we get into picture
shapes and text box. So of course this
is if I want to add a picture to my slide here, I can click the picture
button and then I have the option to choose
from my photo browser, which of course is
within PowerPoint, and also takes from my photos
app if you're using a Mac. And also I can take a
picture from my hard drive, any computer image that I have, all my hard drive, any image file I can
take from there as well by going to
picture from file. I can also use stock images
that are available to use. You know what stock images
are in case you don't. These are just default
images that are made already taken already and
available for you to use. And they don't require any
payments that are free to use. And they come in PowerPoint here already
for you here on the left, I'm sorry, on the right panel. So therefore, you don't even have to go on your
Internet browser. Powerpoint has this
included for you when you go to the picture, stock images. So that's really great
if you're someone that doesn't have a lot of
images on your computer. And then lastly, within picture, you can always use pictures
from the Internet. So if you have a URL
link or a website link, you can definitely
use that as well. Or you can also use
a search engine like Bing to search for
categories and images that are
available for you to use within PowerPoint. And you don't even need to
leave your Internet browser. All you have to do
is click the image and then click Insert, and then it will insert
that image into PowerPoint. Again. This is just something that's a little
bit more advanced when we get to
adding pictures and so forth and
formatting pictures. That is for another
tab within the ribbon. But nonetheless, this is
how you add images and pictures into your PowerPoint
slide using the Home tab. Alright, so let's
get out of here. Alright, and then afterwards
we have these shapes button. So this Shapes button
here lets us insert a variety of different shapes
into our PowerPoint slide. So we can add
squares, triangles, arrows, or whatever have
you, and we can draw them. As you can see, my cursor
turned into a little plus sign. So then I would left-click
hold and drag this out. And then I create a
little arrow here. Again, this more so
deals into shapes which we'll talk about in a
later tab within the ribbon. Know that you can do that and access that through
the Home tab as well by going two shapes here. And of course you have a variety of different
shapes to choose from. If you like. Then we have the textbox button. So in case we want to
include a new text box, we can draw a text-box on top of the text box or just draw
a textbox in general. And you can see the size
dimensions of my box. And then when I left-click hold, it creates the box. And as long as I keep holding, it'll keep expanding
the textbox, the one I let go, it'll
create the textbox and then I can start typing
in here as well. So that is if you're
interested in creating brand new textbox within
your PowerPoint slide, know that you're not
limited to just two, as you've probably seen
so far in this course. And every time you
select the text in it, powerpoint will move to
that element in the slide. Then near the end of this Home tab in the
Microsoft driven, we have the Arrange button. You arrange button allows
you to reorder objects. Sometimes you can
probably have like for example, two images. One is on top of each other. Let's say you want a certain image to be
in front of another, then you would
reorder the object by clicking one of these
different capabilities. We can bring a
picture to the front. We can send a
picture to the back. We can bring a
picture forward or we can bring a
picture of backward. So if you're working
with two images, think of it as two images
overlapping with each other. And these allow you
to either bring one above the other or
beneath the other. We can do this with
objects as well. We can align objects
to be to the left, to the center, to the right. And we can also rotate
objects as well. This button arrange is all
about just reordering things, how we want them to be. Obviously, since we are not
working with much right now, there isn't much to rearrange. But know that you
can always also rearrange the order of
your slides here as well. Should you choose to, by going to this
Arrange button in the Home tab of the
Microsoft ribbon. So for example, I can make slide to slide three or back to two, should I choose to do so? And to solidify these changes, I would click OK, Right? But again, that is what
the Arrange button here in the Home tab in Microsoft
PowerPoint is four. Then after that we
have quick styles. Quick styles is basically
to create a custom look, a preformatted look
with a color and so forth that PowerPoint
has already made. So if I don't want to
keep this basic text and I want to create
something that's fancier. I can click a quick
style and then it will insert that into the textbox. So as you can see
here, it change the text color and added
a nice orange background. Or I can do a different color
should I choose to do so? So this is if you
want to live in up your slides so that way they don't look that dull and boring, or we use the same colors. So just know that quick styles allows you
to do this as well. And this one even has a
nice little gradient. So there's a lot to
choose from here from the presets in quick styles. And of course, if you want
to go back to the regular, you just click the
simple white default. Then after that we have Shape
Fill and shape outline. Of course we can't say
much of these right now because we're not
working with shapes. But if you want to fill a certain shape with
a certain color, whether it is a shape or a
textbox like we have here. We can do that by
clicking Shape Fill, and this will only create a color for the
element we're in. Notice how it didn't make the orange background
for the title. But if I move to the
title like adjusted from content to title and
then click Shape Fill. I can then choose a
color to then fill this text element as well. Let's say I want to
make this one red. And there you go. So
that's how this works. Okay, so that's Shape Fill. Next is shape outline. Shape outline creates
a little outline. So a border around
your elements, whether it's a
shape or a textbox like we're working
with right now. So let's say I want to
create a little outline that it has a black border. I can change that as well. And I can change the
weight to make it really thick or really thin. And as you can see
here, if I move away, it created a black outline
or a black border around my text box because I use the Shape Outline button
and I change the weight. I can also change if the line is a straight line,
squiggly line, jagged line, I can also make it dashed or whatever have you. So there's a lot to choose
from, as you can see here, a lot to customize,
width as well. So that is the shape, outline, and shape fill buttons
within the home tab. Then the last button
within the Home tab in the Microsoft ribbon is design ideas which
popped up earlier. Powerpoint is so
advanced now that it even gives you recommendations
for your slides. In case you are
not someone that's very creative with
these type of things. They even give you here
on the right side, design ideas that you can
just one-click import onto your slide in case you like
how they recommended you. Some of these. So if you're someone
that really doesn't know how to format
your slides or has no idea how to make them pop and make them
look customize. All you have to do is
click design ideas. And then the PowerPoint
algorithm comes up with some great designs
that they think will fit depending on
what you already have in your PowerPoint slide. So this has been the home tab within
the PowerPoint ribbon. The first and default tab and button within the
Microsoft ribbon, and one of the most important
buttons in the ribbon. So I hope that this helped.
13. The "Insert" Tab: Alright, so welcome back. So now that we've talked about the Home tab within the
Microsoft PowerPoint ribbon. We're now going to move on
to the second tab or button within the Microsoft
PowerPoint ribbon, the Insert button. So as you can probably assume from the title
of this button, this all deals with
inserting things onto your PowerPoint
presentation slides, such as shapes, images, and so much more as we'll
take a look in a second. So like in the
previous video, again, we'll start from left to
right within the buttons. And we'll begin with
the new slide button. So yet again, the new
slide button appears here within the Insert tab in the
Microsoft PowerPoint ribbon. So we're not going to go
explain this button again, because by now we
know what it does. It of course, inserts a brand new slide into our
PowerPoint presentation. But then after that we
get a new button that we haven't seen before,
this table button. So this table button
allows you to insert tables into
your PowerPoint slide. The cool way about
adding a table is that we can use
these little cubes. And then PowerPoint
tells us what the size of our table will be when we hover over these cubes. So as you can see, the
more I hover over, the more cubes turned white, and then the bigger
the number gets. So this would be, for example, an eight by seven table, right? Whereas if I bring it back, it makes the table
a little smaller. So take a look at what
this would look like. Let me create a
three-by-three table and then left-click ones to show you how PowerPoint will add this table onto my slide. There we go. This is our three-by-three
table, right? So we have a total of nine columns in this
three-by-three table. And then I can go right
ahead and start typing in whatever the names of these
columns would be, right? And so forth. So this is how you add a
table with in PowerPoint. Another way to add
a table within PowerPoint is if we go
back to the insert tab, we can see that if we look
next to the table button, there's again a little arrow
triangle pointing down. So the one that we just clicked, Let's click it again. And instead of using
these cubes are squares. Again, let's go down to
where it says insert table. If I click Insert table, this will let me add a
table by manually inserting a numerical value of how many columns I want
and how many rows. And just so you know, columns go horizontally
and rows go vertically. So if a table has the same number of columns
and the same number of rows, they will be like our table
here, three-by-three. So this is just
another way to insert a table if you want to
use a numerical value. So this is how we
insert tables within the PowerPoint program
using the Insert tab. Then we have the
pictures button here, as you can see, this is
to insert a picture, and we've talked about
this earlier on, that we can insert a
picture in PowerPoint using a variety of
different methods. We can use the PowerPoint
built-in photo browser, or we can take a picture from our hard drive or
our computer rather. Or we can take a stock
image from the Internet or take an image from a
search engine like Ben. So again, we have variety
of ways to be able to insert an image onto
our PowerPoint slide. This is something that
we covered earlier, so we're not going to
go in depth again. And two, how to do this? But now you know
that you can also do this through the Insert tab. Alright, and moving on, after the pictures button, we have the Insert Picture
screenshot button. So this is a little different. So this is inserting a screenshot picture into
your PowerPoint slide. And a screenshot is of course a screenshot of your
computer screen. So if we click this, what PowerPoint will
do is take a photo of our computer screen
and then insert that into the PowerPoint
slide that we're on. So if I click this little
arrow pointing down, you can see that this is what the screenshot would look like. And then if I click it, it will insert it into
the PowerPoint slide. It's a really cool feature
and you don't have to waste time editing pictures
doing this yourself. Powerpoint has this built-in
with just one click. So let's go back
to the insert tab. And again, that was
the screenshot button. You can also click
Screen Clipping. And what this will
do is that this will actually record the
computer screen. Should you opt for a video
instead of just an image? So then afterwards, we have
these two buttons here, Get Add-ins and my add-ins. And this is something that's really cool about PowerPoint, that you can install
add-ons to the program. And in case you don't know
what atoms are there, basically just apps that you can use to enhance and boost
PowerPoints capabilities. Let's go ahead and take
a look at the PowerPoint add-ins store by
clicking Get Add-ins. So again, as we can see here, there's a variety of different
add-ins that we can add to our PowerPoint program
that allow us to do unique capabilities that
PowerPoint alone can't do. But through the power
of these atoms, we can do these things
such as, for example, viewing the web or
adding forms, quizzes, and surveys to our PowerPoint
slides and so much more. And again, this is not just
strict it to PowerPoint, but all of the Microsoft
Office programs have this capability. So if you've ever used your
smartphone and downloaded an app on the App Store
or the Google App Store. Know that these atoms are
similar to those types of apps. Powerpoint would be your phone, and then these atoms would be the apps that you
add to your phone to enhance your phone's
capabilities and what it can do. Okay, and as you can see
here on the left side, there's a variety of different
categories to choose from. Education, productivity,
visualization, the best apps. You can also sort the apps by popularity, the
rating, the name, and when they were released, you can also search
for an app or a capability here
in the search bar. So that's a great thing
to know about this. And then underneath the
Get Add-ins button, we have the My Add-ins. This shows you the add-ins
that you already have installed into your
PowerPoint program. By clicking the little
arrow next to it. It will show you a list of your recently used add-ins
and all of your atoms, if you have any I don't have
currently any installed. But if I wanted to take a look, I could just click My Add-ins and then they would appear here. Alright, let's move on. So that was the Get Add-ins and my add-ins buttons
within the Insert tab. So then we can go on
to the shapes Button. Shapes button is
obviously to insert a shape into our
PowerPoint slide. So we can definitely
insert shapes and you have a huge number of
shapes to choose from here, you just one-click
and done, right? So let's say I wanted
to insert this star. I just left-click once
and it inserts that star. Actually let me get rid of this screenshot
here so that way we can have a better view
of our little star. There we go here in the
upper right-hand side. And again, I can go back to the insert tab and
add another shape. Let's say this time I
want to add a rectangle. And I also have the
capability of drawing a rectangle instead of
just one-click adding. So that's the cool
thing. I can also draw shapes and not just, you know, basically insert
them with one click. I can also draw them to the
dimensions that I prefer, like we just drew
this rectangle here. Alright, so let's go
back to the insert tab. So those are the
two different ways you can insert shapes. You can either one-click them and it'll add them to the slide. Or you can draw out your shapes by clicking one and
then left-click, holding and dragging like so. Then we have a little line here. So again, that was the shapes button
within the Insert tab. And you have a huge variety
of shapes to choose from. And of course, you can
also click the shape. And then you can
modify the color, the size if you choose by dragging the boarder's
out and so forth. Afterwards we have the icons
button next to shapes. So instead of adding shapes, we can add icons. And icons are really
small little images. Typically if you've
ever been inside of an Internet browser and
you've looked at your tabs, you can see that next each tab there's a small,
tiny little icon. That is what an icon is. And they're very small typically and already come with their preformatted shapes. As you can see here,
we're taking a bunch of icons that are stock images. And we don't even have to
leave the PowerPoint program. So let's say I want
this icon that is these nice 3D glasses, right? I would just click it once
and then click, Insert. And as you can see, PowerPoint added that to my
slide and then I can drag it around and drop it
wherever I please. This is different from images. Images are different from icons, so that's just something
to keep in mind. And of course, you have a
variety of categories in icons. Look at this one is
security and justice. But again, there's an endless
variety to choose from. Okay? So that is the icons button within the Insert
tab in PowerPoint. Then after that we have
the 3D models button. So we can insert even 3D models into
our PowerPoint slide. As you can see here when
I click this button, a little tray appears
here on the right side. And we have a variety of 3D
models that we can take, again from the Internet. I click View all
animated models. We can see here that there
are a variety of great 3D. I pop in models that you can insert into your
PowerPoint slide. Let's say I want to add
this model of the Earth. Click Insert and watch
how it will insert this 3D model into
my PowerPoint slide. Alright, and as
you can see here, there is a variety of controls. I can shift it, move it around, move it up and down. It's really, really cool how
PowerPoint has this, right? So you're not
limited to just one. You can do a variety. And you can also pause the
animation or let it play. You can also resize it again
by moving the borders and the different dimensions
of the model. So again, this can be
done just by going to insert 3D models and
clicking 3D models. And then it opens this
tray here on the right. But if we take a look at the little arrow pointing
down next to 3D models, we can also insert 3D
models that we have on our computer or stock 3D
models from the Internet, which is where we were just at. So again, you can
insert these 3D models, whether it's on your computer
or from the Internet. And you don't even have to
leave the PowerPoint program. So that's really cool. So then let's go ahead and
get rid of this model. Actually. Take a look at the next
button, Smart Art. So the Smart Art
is a fun and also eye-catching graphic
that you can add to your PowerPoint slides. We've talked about this actually
earlier in this course, that you can have a variety of different charts and pre
formatted tables and pie charts and so much more
that you can just one-click and add into your
PowerPoint slide. And then all you have to do is add the information yourself. For example, if,
let's say I want to add these four squares, I can then add the
images that I want here and where it says text, just type in whatever
it is I want, right? So I didn't even have
to work on designing anything or formatting
anything or coloring anything. These SmartArt graphics already came in the PowerPoint
program made by Microsoft. When I go to the Smart Art
button within the Insert tab. And as you can see here, there's a variety by category
to choose from. So definitely take
a look at these if you're interested when
you're in PowerPoint. Alright, let's move on
to the next button. Let's get rid of this
SmartArt graphic. So then we have chart. So we can insert charts into our PowerPoint
slides if you're making a presentation
that deals with a lot of data or research studies. This will be very useful to you. And we have a variety
of different charts. We have column charts, line charts, pie
charts, et cetera. Again, much like the
SmartArt graphics, you can just one-click, add them into your
PowerPoint presentation. But do be aware that if
you're gonna do this, you will need to work
with Microsoft Excel. So that way you can add
your data for your chart there and then be able to
bring it to PowerPoint. So just be aware of that. And we're not going to
open excel right now. But just know that that is
how it works with charts. And you have variety
of different templates to choose from. So no need to worry that there might not be
one that relates to the type of research
or chart that you're trying to present
and create, right? And again, you have a
variety of templates here. And you can also create your own templates
to get from later, as you can see here, where your chart
templates that you've created and saved in
the past will appear. Alright, so let's
get out of here and then take a look at
the zoom button. So the zoom button is
a button that lets you create summary slides for
your PowerPoint presentation. So let's say that you're nearing the end of your PowerPoint
presentation and you're gonna create a summary of every slide are just
a few select slides, for example, the sections of your PowerPoint presentation. You can definitely
do so by going to this Zoom button here and
then clicking Summary Zoom. And then what will happen
is that you can select one or multiple different slides to create a whole summary slide. To select more than one slide, you have to hold the shift
button on your keyboard as you're doing this and then left-click the slides
that you want to add. So I am holding the
Shift button on my keyboard and then I selected
all four of these slides. And then I'm going to
hit the insert button next and take a look
at what happens. It created a brand new slide
with these four slides in the slide to create a summary slide to
wrap things up nicely. For example. So that was done by going to the zoom button here
in the Insert tab. Then we also have section zoom. So we can also do
this for sections. As I mentioned earlier, you don't have to do
it for every slide. You can do it for only the
sections in your presentation, the section slides in
your presentation. And we also have the
last option, Slide, Zoom to create a summary slide, but for every slide
in the presentation. So again, this will
either insert things into the slide or create
a brand new slide, like in the summary
zoom feature or Option. So that is the zoom button
within the Insert tab. And then after that we
have the link button. If we want to add a hyperlink, which is a website, we can do so here by clicking
the Hyperlink button. And then here it says link to an existing file or web page. So I can add a website address, or I can do this
document so I can self-reference my own
presentation slides as a link. So that way when
the viewer opens this file and then
clicks the link, it can take them to another
slide in my presentation, or it can take
them to a website. Or it could take them to a file, or it can take them to
their e-mail provider. And this can happen if I decide to insert an
email address, right? So there's a variety
of things to do here. So for the sake
of demonstration, I'm going to create a
hyperlink within a text word. So let's go to this slide and highlight the
word presentation. Let's say I only want to
make this word a leg. So I go back to
Insert and then hit the link button and then type in the
website I want to add. So let's say I want to add Google.com as my
link for this URL, for this hyperlink, I type in the website and then I
hit the Okay button. Notice how this word
presentation now turns into a blue underlined
word because that signifies or implies that this is a link, a
clickable link. So then that way when my
presenter clicks this word, it will take them to
the external link, the external
website, google.com. Then now let's move on to this action button
here with the star. So this action button
basically is similar to the link button except that there's more
capabilities here. So when they are taken
to the hyperlink, I can take them
to another slide, a previous slide, a URL, which is a website like
we just talked about. Or it can even open another PowerPoint
presentation or even another document
and so forth, right? I can do all of this. I can also run a program. This is more for
advanced things. So don't worry about this. But let's say if I'm running a script with code or a program, I can definitely even
add that as a link. I can even attach a sound for every time the
person clicks the link. So that way, let's say
once they click a link, I want to add a little
bit of a click sound. That way every time they
click the word presentation, a click sound happens, right? So that is even something
that you can add as well. Additionally, that was all
the mouse click Settings. Then when we click the
mouse over settings, when the person
hovers over the link, such as going above
it with their cursor. What can happen is that they
don't even need to click it. They can already be
taken to the next slide, or the URL or another
presentation or file just by hovering over the
link, not even clicking it. And again, you can do
this with scripts, code. And also again,
attach a sound when they hover over the
word that has a link. What this would mean
is that every time the viewer either hovered
or click to this link, I can attach a sound to it. And so much more on by going to this action button here
within the Insert. So know that you're not just
limited to adding a website. You can also reference your own slides for the person to be
taken there on click. And you can also even
attach sounds and so forth. Alright. Then afterwards we have
the Comment button, which we've talked about a
lot in this course already. So we're not going
to get into it. But yet again, this is another
place where you can access the comment and comments
pain within PowerPoint. We've already talked
about how comments work. So we're not going
to do So again, but just know that
you can also access comments through the
Insert tab in PowerPoint. And then after that we
have the textbox button. We can insert a text box. This is also something that
we've talked about earlier. If we left-click hold and drag, we can create a textbox
to then be able to type in new text, right? So that is again by going
to the textbox button here. Then after that we have the
header and the footer button. The header and the
footer button. If you don't know what those
two things are, the headers, the very top of
your slide or page, and the footers the very
bottom of your slide or page. So again here we can see the preview of how the header
and the footer would work. These three little columns
that you see here at the bottom would represent
the footer on this slide. And I can add a variety
of things down there. I can add the date. In various formats the
time and so much more. I can also say on what slides the footer shows
this information. And of course, if it's
going to be there at all. And I can also say
that I want to exclude the footer from
appearing on the title slide, which is the first slide. So you have all of these
unique capabilities. And so then you can either
apply to just this slide alone or applied to all
which will then have the footer apply to
all of the slides. And in this case,
all of the slides except the title slide because I have the don't show on title
slide option selected. But that's the
difference between apply and apply
to all apply just applies it to the
slide you're on and apply to all applies
it to all of them. Then after that we have the
notes and handouts options. So again, here it'll show you
where this will be located. So this would be on
the bottom right, whereas the slide was
all the way in the left, center, and right of the
bottom part of the slide. But in notes and handouts for this specific
highlighted area. And again, I can also add the
time they're header there, a footer there and so much more. And so therefore,
as you can see when I chuck header and footer, it highlights those
two parts as well. So again, if you want to
add things to the very top or the very bottom
of your slides, aka a header and a footer. You can do so by doing so here, you have a variety of
things to add down there. Whether it's the
time or the date or a fixed look for the time, the date, 12-hour clock
or 24-hour clock. You can exclude certain slides from showing this
footer or header. And you can exclude
the title slide from showing this
footer or header. And of course, you
can also choose when you want this change
to start appearing. And then if you
click apply to all, as you can see here, it applied it very
faintly here we can see now the date and the slide number in the bottom left and bottom right-hand
corners of these slides. Okay? So that is the header and the footer button
in the Insert tab. And then after that
we have the word art. What? The word our button is basically
fancy 3D type of text. So let's say I'm not
satisfied with this. Look, I want my text to pop out and be more 3D and so forth. I can click Word Art and then select from one of these
different looks that are 3D. And then just one click, insert them by doing this, left clicking and take a
look at how it created an inserted a word art
textbox with this text that's more 3D and has a background and shadow to it to
make it look more lively as opposed
to the other 2D that I had before or
behind it, right? So again, this is
what word art is. Anytime you want to
create fancier 3D letters and texts that pops
out of the page. You can create these
word art type of fonts. As you can see, I just
did here by going to Insert WordArt and then selecting from any of these
that are available that Microsoft PowerPoint has
built in into the program. Okay. So then after that we have
the date and the time button. So this just deals with
what we just talked about, right when we were in the
header and the footer button, we can select the header
and the footer to show the time and date in our slides in our
PowerPoint presentation. Should we choose to do so by clicking the date
and time button. And it just takes us back to the same window that the
header and footer button did. And we can choose
how the time looks, how to date looks,
and so much more. So again, this is
just another way to access what we
were talking about in Header and Footer
by going to date and time in the Insert tab. And then after that we have
the slide number button. The slide number of button
again takes us to where we were in the header
and footer button. Because again, this deals with what will appear on
the header and footer, not only the date and time, but also the slide
number as well. And we can see that we
do have a slide number here at the bottom right. Of course the number two because we are on
the second slide. And yes, we also
have the date and the time at the
bottom left here. So just know that the
date and the time and the slide number buttons, along with the object button, are all relevant to
the header and footer. So let's just go
ahead and lastly click the object button. And so the object button
is basically Will, we can add is a variety
of objects that relate to the older versions of Microsoft Excel or Microsoft
Word or whatever have you. And so if you have objects from those programs that
you've worked on before, Let's say you've worked
on Microsoft Word or Microsoft Excel. There's an object there
that you want to implement into this PowerPoint
slide and presentation. You can definitely do so by
going here to insert object. And it will insert
whatever it is, either a worksheet or
a chart or a document. And you can even display it
as a little icon instead. And it will show
you the icon page for that respective
Microsoft program. So this is typically what
a Word file looks like. And this is typically what
an Excel file looks like. And you can have these inserted in your
PowerPoint slides. And when you do so, what will happen is
that it'll try to open the program that
you selected to retrieve the file and then insert that into your Microsoft
PowerPoint slide. Okay, so we're not going to open Word either because again, we're focused here
on PowerPoint. But just know that
this is how you can do so you can
cross-reference your files and insert objects between Microsoft
Office programs. Okay, and then afterwards we have the equation button here. So what is the equation button? Well, if you work with mathematical formulas or scientific formulas
or whatever have you, we can definitely insert these
type of special symbols, such as the greater than, less than signs, special arrows, cosine and Pi sine
and so much more. If you're definitely
someone that works with these things, you can add them here by
going to Insert equation. And then next the
equation button, which is a Pi icon. There's a little arrow pointing
down when you click it. Powerpoint is even pre
formatted some formulas for you that you can just add with one-click and
it's pretty amazing. So for example, this
quadratic formula, I would just want to
click it and then it inserts it into my
PowerPoint slide. And then of course
I will just change the values by typing them out myself depending on
what they are, right? So this is really cool and saves you the
time from having to actually manually create this formula
yourself from scratch. Again, that's by going to Insert equation and not
clicking the pie chart, but the little icon next to it. And you have a variety
of mathematical formulas here to choose from. You can also of course, insert a brand new equation
that you create. But to make your own equation, you click the little
pie chart icon, and then you have variety
of icons and so forth, choose from here,
and also fractions, scripts and so much more. So if you're definitely mathematical and
scientific person, you'll know what
to do with this. You'll know that again,
you'll be working with these and you
don't have to even format these equations
from scratch because they already pre-made
for you in PowerPoint. So again, that's the
Insert equation button. Really cool. Then after that we have
the symbol button. So this is to insert
a unique symbol. We talked about
this before when we were looking at emojis. So if I want to insert
an emoji as a symbol, I can definitely do so. You just click the
Symbols button and then this little
tray pops up. And whatever emoji I click
or whatever symbol I click will be added to
my PowerPoint slide. And of course, you can choose emoji variations
and so much more. But again, as you can see, it created that little emoji that I selected right there and inserted into my
PowerPoint slide. Then the last two buttons in the upper far
right-hand corner of the Insert tab within the Microsoft
PowerPoint ribbon or the video and the audio button. This is obviously to insert
video or to insert audio. Let's first talk about
inserting video. So when we mean inserting video, we can choose from a variety
of sources to choose from. We can choose from our
movie browser, which again, will take from any previous
things that you've worked on in PowerPoint or if you have a Mac from
your photos app. And additionally, we can take a movie from our hard
drive for our computer, which is what movie
from file is for them. We can also take stock videos
from the internet as well. And it'll load up that little tray that we're familiar with in
which we can even insert stock videos
from the internet onto our PowerPoint slide without even leaving PowerPoint. And the last option is to take videos from the
internet as well. So this is of course,
by pasting the URL. So maybe you have a
video from YouTube or any other online
video hosting platform. You can paste the URL here
and it will insert and embed the video player
onto this slide. So that's a really cool
feature right there. If you're someone that
is interested in adding videos into your
PowerPoint presentations. Then lastly, the audio button. This is to insert audio. We can insert audio
from our audio browser, aka our audio library. So if you have a
variety of MP3 files or any other type of audio
files on your computer. What PowerPoint we'll do is
look for them and so forth. If you have them
on your computer. And then if you go after that, you'll see audio from file. This will take, or rather input audio files
from your computer, so from your hard drive. So that is of course
another option. And lastly, you can even record
audio within PowerPoint. Now, PowerPoint
wouldn't be needing my microphone and then I would
give it the access to it. And then when I click
Start Recording, PowerPoint will actually
record my voice. And then when I'm
done, it'll add the audio to this
PowerPoint slide. So that's a really cool feature. Okay, So this has been
the Insert tab within Microsoft PowerPoint
and the second button within the Microsoft
PowerPoint ribbon. So I hope that this helped.
14. The "Draw" Tab: Alright, welcome back. So in this video we
will be talking about the Draw Tab button within the Microsoft
PowerPoint ribbon, also known as the third button in the Microsoft
PowerPoint ribbon. So as the name of
this button implies, the Draw tab contains
buttons that are all about drawing things into
our PowerPoint slides. Let's start off first
here in the far left with this draw button here. Let's click this button here, which takes us into Draw mode. When we're on Draw mode, we can then see that our
cursor turns into this dot. And we can draw and doodle on our slide in our
PowerPoint presentation. This is something that we've
talked about earlier, right? So you have to do is left-click
hold and drag however you want to create lines or
drawings or whatever have you. But then if we want
to erase what we did, we just click this eraser
button up here and then just click the lines
that we want to erase. And as you notice next
to the Eraser button, there's a little
arrow pointing down. We can change even the size of the eraser stroke eraser is specifically
for erasing lines, but we can also have
a small eraser to erase certain parts
of that line. Or we can create a
medium eraser to create a larger eraser
that erases more. And then lastly,
the segment eraser, which just is kind of
like the stroke eraser, which deletes the whole line and of course, delete segments. So even with an eraser, There's a variety of
erasers to choose from to erase your doodles
when you draw. We also of course have a
lasso eraser which selects certain parts of the slide to erase from if it had
a drawing on it. So let me go ahead and drag
and to show you what I mean. So let's say I draw this squiggly line
and I want to select. So I can use the
Lasso Select tool by clicking it like I just did. And then as you can see
here, there's a little lasso being created as I'm
left-click holding. Know that this is useful if
you definitely want to select certain portions or the whole, entire drawing or doodle. And of course, as you
can see here it says you can turn ink into
shapes and text. So we'll talk about this
a little bit later when we get to the buttons that
are coming on later on. So let's click, Got it. And notice how after I selected
it with loss of select, I can even also increase the size of my
doodle if I want to. Then afterwards we have
the Add pen button. So the Add pen button is basically the place where
we can select what type of, basically instruments to
draw with that we want. We can use a basic pen, which of course has
these varieties, right? We can have a basic black pen, a red pen, or a
highlighter, right? And as you can see here
is I'm using them. They all have their
respective colors. We can also of course use
different highlighters as well and change the colors of these highlighters
to whatever we want. Let's say I want a
red highlighter. I just went ahead and click
this little arrow pointing down and change the color
by clicking it right. On top of that, we
also have pencils, which are of course, signaled by a pencil symbol. And again, I can also change
the color of a pencil. If I want to know that pens are very differentiated depending on what
symbol they are. If they look like
a pencil there, a pencil, they look like a pen. Pen. And if they look like a highlighter and then
there are highlighter. So just be aware of that. In addition to the
symbols here of a pen, pencil, and highlighter,
you can also see that they have their
colors associated. So when you click on them, you're not only taken
to that type of pen, but also the color associated with it as well as
you can see here, I went from a red highlighter
to a yellow highlighter to now a blue pencil and
then a black pen. Okay? So you do this by going to add pen and selecting which
one of these you want, pen, highlighter or pencil. Now some cool features
that PowerPoint has within the Draw tab in the
ribbon is ink to text, ink to shape and Ink to Math. Let's talk about these. So these buttons basically
relate to that little pop-up that appeared
earlier when I drew this squiggly line here. So ink to texts
allows you to change lasso and other little doodles and drawings into actual text. So let's go ahead and do that. Let's go ahead and select this squiggly line
with the Lasso, and then click Ink the text. As you can see here, it changed it to a dark because the PowerPoint program
thinks that that lasso is equivalent to a period. But let's say I try to write
out a word in pen, right? So let's say I tried to
write out the word hello. And then I highlight it with
the Lasso Select button. Then I click Ink to text. And it'll turn this
inked Hello into a text. Hello, As you can see right now. There we go. Just like
magic, isn't that cool? It can even turn doodles
and drawings and recognize them and turn them into
actual texts letters. So from drawn letters to
actual texts letters in font. Additionally, we can do
this with ink to shape. So let's say that I
draw out a shape. I'm going to draw
a square that's probably not that
straight or even, but again, I'm using
my trackpad here, so bear with me. This is my squares.
You can see it's not the most squared square. But let's say I want to turn
it into an actual shape. Then I again go to lasso select, highlight this
square that I drew, and then click ink to shape. This will turn my
squiggly square into an actual square-shaped with all four sides
being straight. So again, it's really cool
how PowerPoint can do this. And lastly, you can also
do this with Ink to Math. You can actually draw out math formulas and equation
formulas and so forth, like I'm doing with
this pi symbol. And then turn this
pi symbol into an actual math symbol by using again Lasso Select and
then clicking Ink to Math. There we go. There we have pi 3.14. So this is the ink to text, to shape and Ink to Math buttons within the
Draw tab in PowerPoint, really cool features
of PowerPoint. Then lastly, we have the
draw with trackpad button. This is if you're
on a laptop like me and you're not using a mouse, you use your trackpad. I drew with my trackpad. So if I have this on, I can definitely draw using this PowerPoint
built-in trackpad. And all I have to do
is just move around on my trackpad and write whatever I want or
draw whatever I want, like this with just one finger. Again, as it says here,
draw with one finger, move with two fingers, and then press any key to exit. So this is a really
cool trackpad feature that PowerPoint offers as well. So let's exit out of this. So that's just what the draw
with trackpad button is for. But again, I'm already
using a trackpad, so that would be redundant. But nonetheless, this is a cool feature to have
within PowerPoint. So this has been
the Draw tab within Microsoft PowerPoint in the
Microsoft PowerPoint ribbon. I hope that this helped.
15. The "Design" Tab: Alright, welcome back. In this video lecture, we will be talking
about the Design tab within the Microsoft
PowerPoint ribbon, the fourth button in the ribbon. So now let's talk about the
design tab and its purpose, along with the
associated buttons and features and so forth. So as we can see here
in the upper left, we can see a variety
of rectangles here. And these should look
familiar to you because we did cover this a bit in
the beginning of this course. These are themes with different templates skins
that you can one-click, insert into your
PowerPoint presentation. And the best part of
these themes is that they already come designed as
you see them up here. And you don't have to work
with code, with editing, with none of that stuff because Microsoft has already
done the work for you. All you have to do is type in your material and your
texts and your images. You add them as well, and that's all you have to do. And so if I click one of these, Let's take a look
at what happens. So let me click this
green one right here. And look how my title
cover slide changed. Just one click, a color changed. And also the positioning
of the text, along with a nice little
design here that's tricolor. And anytime you do this, the design ideas panel on
the right side will pop up to give you some
additional ideas that are associated with this theme. And so if we scroll down, we can see that PowerPoint not
only has designed a theme, prosper even gives us additional
different additions to this theme that can look good
and work with the steam. It's really cool. And as you can see, the first
one or two have animations. It has fade in texts, so you can even have that in your PowerPoint presentation. And that's also something
we'll talk about later on when we get to
the Animations tab. But nonetheless, this is what the buttons here are
in the upper left. They are just themes. And we're going to take a
look at some more of them. When we hover over here, you'll see a little
arrowhead pointing down. We click that, and then we have the full view of the themes
that come with PowerPoint. Now, are you limited
to these themes alone? No, you can get some more and we'll talk
about that in a second. But as you can see here, we have these teams under
the office category, meaning that these themes came when you installed PowerPoint. Now, if we want to
install some more themes, we can definitely do that
by clicking over here where it says browse for themes. So when we click here, we will be taken
to our documents folder or wherever it is on your computer to take
PowerPoint theme files from. If you didn't know this. The PowerPoint themes skins are downloadable and you
can get some from the Internet through a
variety of websites that sell PowerPoint themes
that are customized and pre-designed for you. And there are also some
free ones as well. And you can download those PowerPoint templates skins
from those websites, download them onto
your computer, then upload them here and import them into your
PowerPoint program. This is really cool because
this then means that the options for themes and templates on
PowerPoint are limitless. So you're not only stuck
with the ones that come with the PowerPoint
program up here, but you can always of course, import some from your computer and the ones that you
download from the internet. And also, let's say you did do some work and you did
modify a theme yourself. For example, let's say
I played around with this theme and
modified it myself. But I don't want to lose this
team and I want to use it perhaps for future
PowerPoint presentations. Well, how would I do that? Well, to do that, you
again hover over here, click the arrow head,
and then click where it says save current theme. And what this will
do is it will save this modified or customized
theme that you edited. And you can even
give it a name here to export it as along with tags that you can
add here to help you categorize this team
and find it easily. And you can also of
course, select where you want to save this theme, which is typically in the
themes folder in PowerPoint. So again, you can
even do that as well if you customize one of the themes that came with PowerPoint or one of the
themes that you downloaded, then you can attribute this theme that you
customize and modified onto your future PowerPoint
presentations and slides. Alright, so let's just click
cancel to get out of here. So that was of course, the upper left-hand
side of the Design tab. Then we get here near
the right side and we see some more
template theme skins. So we see that we have this time more so
a color variation to the one that we already imported into our
PowerPoint presentation. So we have the green version, the blue version of
the yellow version, and the red version. And all it does is
change the color. Again, you get some
design ideas here on the right side into
design ideas, pain. But again, this is just color variations of the
theme here that you select. The color variations
are over here. And again, when you
hover over here, there's an arrowhead
pointing down. You are not only limited to these four colors and you can
of course, select your own. And PowerPoint even
offers a variety of color palettes that
you can choose from with colors
that work together. So let's say you're
not someone that knows what colors
go with each other. Not to worry because
PowerPoint even has created color
palettes that would go along with each
other to create a balanced look on your
PowerPoint presentation. You can always, of
course, click customize colors if you want to
add your very own. And on top of that
we have fonts here, so we can even change the
font that is being used in this PowerPoint
presentation and the slides. For example, I click Calibri, it changes to calibrate. This goes for all of the slides, and especially for your
PowerPoint presentation. This is useful because you
want to make sure that again, your PowerPoint presentation has a similar font or uses
the same font throughout all of it to keep
it professional organized, of course, cohesive. So again, let's go back here, the arrowhead, and
that was fonts. So we know now we
can also change the color palette
and also the fonts. And then lastly,
background styles. We can also change the different backgrounds
that appears. We can do this by
selecting a color. So let's say I want to change
it to this peachy color. And you see how it
added this type of greater than, less than sign. So it's really cool that you
can do this in PowerPoint because you're not only
limited to just color or font, but even also the
background itself, the design that
appears in the styles, of course that show up. And if you click Format
background here, you get some additional
options that you can play around with that we've
talked about before, right? We've seen this before. We can play around
with the transparency. The higher the number, the more transparent, the lower the number, the
less transparent. We can change the type of fill, whether we want it
to be a picture, or a color, or a
gradient or a pattern. There's so much to
choose from, right? So this is something that
you'll play around with when you're working with
PowerPoint presentations. So then let's go ahead
and get out of here. And so then that was of course, this arrowhead here within the secondary themes and templates trait in
the Design tab, in the PowerPoint ribbon. So that was colors, fonts, and background styles. And of course, if you
don't like that change, we can always just reset
the slide background. Then after that we
have slide size. So this is to change the
size of your slides. We typically want to
keep our slides as rectangles because that way
it is easier to present. Therefore landscape mode,
or as you can see here, widescreen 169, right? This will always be
the default setup, but you can change it
to standard for three. This will make it
a smaller size. This is not recommended. You really want
to keep it as is. But if you're someone
that wants to work with smaller presentations
and smaller slides, then you can change this
instead of 69 widescreen, two standard for three. And of course, that would
require you to scale the slides and
presentation down. But we're not gonna do
that, so I'll click Cancel. But again, this is
useful if you want to change the size of the
slides themselves. If you go to page setup, we have more options
when it comes to that. We have not only widescreen, but also a variety
of other sizes. We can even change this
to an 8.5 by 11 paper, which is your typical
paper that you would like print vertically
from top to bottom. But again, this is unusual
for PowerPoint presentations. Nearly all PowerPoint
presentations will be rectangular sized, 169 ratio. So just leave it as widescreen. But again, you can change the dimensions yourself
and also of course, the orientation and the
scale of everything. We can also even edit the
header and the footer, which we've seen before
and talked about. So we're not going to
talk about that again. Alright, so let's click Okay, so that was the slide
size button here. Then after that we have the
Format Background button, which is another button that
we've just talked about, which allows you to edit the background image and
color for your slides. So again, you can
choose a color to fill, a gradient, or a picture, or a pattern, whatever have you. This is completely up to you
and requires you to just play around some
more with this to see what you like or
what you don't like. But again, this is something that you can
access by going to the Format Background button
within the Design tab. And of course, if we don't
like any of our changes, we can reset the background. Or if we like our changes, we can apply them to all of the slides in our
PowerPoint presentation. Alright, and then
the last button in the upper far-right in the Design tab within the Microsoft PowerPoint ribbon is the design ideas button, which we've just talked about and has appeared earlier
on in this course. This just opens a pane on the
right side that gives you some more ideas that PowerPoint recommends that would work well with your current
setup of your slide. So again, some of these
even have animations, transitions and also fonts and texts that fade
in and fade out. If you want to make
it really fancy, you can do that just
by one clicking. You can choose any
of these that you want just by clicking
them once like this. Alright, so this has been the Design tab within the
Microsoft PowerPoint ribbon. I hope that this helped.
16. The "Transitions" Tab: Alright, welcome. In this video lecture, we will talk about
the Transitions tab within the Microsoft
PowerPoint ribbon. This is the fifth button in the Microsoft
PowerPoint ribbon. And so let's talk about
the Transitions tab and its features and what it can do for your PowerPoint
presentation. So the Transitions
tab is really cool because these can create nice visual effects between slides for your
PowerPoint presentation. So that way when you're
presenting it to other people, when they move from
slide to slide, they will get nice transitions, such as effects like
fading in and fading out, zooming out and zooming in, cross fades and so forth. So it's kind of like
it adds more of a movie effect to
it and also a nice touch to it along with some professional type quality
because it shows that you actually added everything that PowerPoint can offer into
your PowerPoint presentation. So let's start off by talking
about the Preview button. So as we can see, this
button isn't clickable right now because of course we haven't added any
transitions yet to our slides to preview
what it would look like. But once we do this
preview transitions button will become active to click. So we can then take a look
at how our transition looks. So then let's talk
about over here all of these different
transitions that appear. Now I'm not going to talk
about each one of these, because as you can see
when I hover over them, PowerPoint tells you what
this transition does. So that's really cool as well. When you're working
in PowerPoint, you can take the time to look at how each transition
moves and so forth. None is the default if
you have no transitions. But some of the more known
transitions are wipe and fade. Fade obviously is
self-explanatory. Even these icons here
are serving to help you visualize the
transition phase, transition phase
between two slides. So let's go ahead and add it by clicking it to see how it looks. So as you saw there, that was a little preview. Let
me do that again. If you didn't see you saw
how the fade just worked. It faded between my two slides, my third and my fourth slide. Notice how I was on my
fourth slide when I clicked the fade transition, and it added a little star icon here under the number four. That means that this slide has a transition
associated to it. So now you know, if you
ever see a little star in your slide side panel under
a number of your slides. That means that that
particular slide or slides have transitions
associated to them. Again, this little star represents that the
slide has a transition. So that was the fade transition. There are other ones like
push, wipe, split, reveal. As you can see, a lot
of these are really cool and add more to
your presentation. So it's not just boring
going between 123 slides. It actually creates a
nice visual effect. And of course, if you
click this arrow head pointing to the right
are some more options. And if you click this arrow
head pointing to the bottom, you can see in one view all of the transitions that
PowerPoint comes with. And it's a lot, right? So you'll definitely
play around with these to see which
ones you like most. But again, to keep
things professional, I recommend sticking with either the fade or
the wipe transitions. But again, your presentation, your rules so you choose
whatever you like. But again, these are what
transitions are in PowerPoint. And we see that we even have
little categories here that split up transitions based on what kind of style they are, the exciting or
the subtle, right? So are they in your face or
are they low key, right? So that's a cool thing to know about transitions
in PowerPoint. Then we can also see that the preview button
and became clickable. So let's go ahead and click
it to see what this does. Again, this just shows
us our transition and how it would look
like when presenting. Then after that we have
the Effect Options button. Let's go ahead and
click this button. This allows you to
customize the transition. So you're not only limited to the transition animation
that PowerPoint comes with, but you can also
change things like the direction it
transitions from. For example, from
right or from left, or through black from right or through black
from left, right. So there's so much
here that you can modify alone with
justice one transition. If I decide to change my
transition to, let's say, a wipe transition, I can again go to effect options and change where the
wiping comes from. Does it come from
the right direction, from the top direction, from the left direction, from the bottom,
diagonally, etc. So there's a lot here to
definitely play around with. For each of these
transition effects, you can change the direction and the color even of
each transition. You're not limited to just the default animation
presented here, but by going to affect options, you can even customize the effects animation
for the transition. Alright, so then after that, we have the duration. So this, like it says here, specifies the duration in
seconds of the transition. So depending on how
big this number is, is how long the
transition is going to take to finish an effect. So right now it is at 1 second. So that means that
my transition when presenting will take 1 second. So between, let's say slides 34, it'll take 1 second
for the transition to animate and get there. If I want to make
Transition shorter, I obviously would
make this number smaller by clicking the
arrow head pointing down. And now I made it half of
what it was 50, right? If I want to make the
transition longer, I of course click the
arrowhead pointing up. Now I doubled it to
two seconds instead. So this is how this
duration works. And if I click preview, I can see how this change versus before when
it was 1 second. As you can see, this is a lot faster to fade in and
fade out because again, this is only 1 second
compared to two seconds. So you can even play
around with how long your transitions take
to complete their effect. And then after that
we have sound. We can even add sounds
between transitions. So when the presenter, like yourself, moves
between slides, a sound can play. You can have many sounds here. An arrow sound, a breeze sound, camera sound, cash
register sound. And that means that
every time you transition between the slides,
if I choose, for example, the cash register sound, that means that that
sound will play every time I go between slides. I can even also choose
other sounds as well that come from my own
library on my computer. And on top of this, I
can even loop sounds. And if you don't know what
loop means, it's just there, the sound, but the default
will always be no sound. And then after that we
have on mouse click. So if you are presenting
and you're using a mouse or a clicker
as some presenters do, you can make these transitions
happen when you click. This means that when you
move on to the next slide, it will only happen when you click on your mouse
or your clicker. So this will always be
checked by default. Anytime you click,
you will move on to the next slide in your
PowerPoint presentation. And this is a very
useful feature because that means that
you are in command. So the slides move when you instruct them or command
them to by clicking. And of course this will
always be checked by default. And then after that, we have the after here with the time as well
like we saw in duration. If you instead want to make your slides appear for
only a set amount of time, you can definitely do so
by clicking here where it says after in this little
box and checking it. And then after means that after this certain
time PowerPoint, we'll move on to the next slide. So let's say that after
five-minutes, right? I want PowerPoint to move
on to the next slide. So this is how this works. And of course this
is completely up to you whether you want
to make your slides move on command when you click or after a certain set
period amount of time. So let's say maybe you're on a time limit and you
want to make sure that you stay within the
limits of the time period. You can definitely have this
option selected so that each slide moves by itself, say after every
five-minutes, right? So again, this is
up to you if you want this feature in your
PowerPoint presentation. Okay, And then
after that we have the applied to all button. The supply to all
button will apply the transitions between
all of your slides. So this is really cool because that means that you're
not just limited to having a transition
between two specific slides. You can if you choose to. But also this means that you don't have to manually go one by one through each of your
slides and manually do this transition,
adding and clicking. You can just do apply to all. And as you can see now, there's star transition shapes underneath every single one of my slides here in the left
side slide tab panel. So that's what's really
cool about this apply to all button is that
it just applies it to all in just one click. So now between every
slide in my presentation, there's this nice wipe
transition that we see here. This has been the
Transitions tab within the Microsoft
PowerPoint ribbon. I hope this helped.
17. The "Animations" Tab: In this video lecture, we will talk about
the Animations tab within Microsoft PowerPoint. The Animations tab is the sixth Ribbon button
within PowerPoint. And so now we'll talk about
the associated buttons and features and functions that
we can do under this tab. So in the previous
video lecture, we talked about the Transitions
tab and how transitions, our animation effects
between slides. Well, the difference
between transitions and animations is that
unlike transitions, animations aren't
between slides. They are actually
animation effects that are on your slides. So we will talk about
how we can animate objects on our PowerPoint
slides in this video lecture. As you can see here, most of the buttons are not clickable. They're faded out, such as the Preview button up here in
the upper left-hand corner, which will start with the preview button is also known as the preview
animations button. And this button
will let us see and preview our animations that are present on our
PowerPoint slide. The reason why
this button is not clickable is because
of course we haven't added any animations onto our objects in our
PowerPoint slide yet. So let's go ahead and get
started by doing that. Let's click this, my
sample presentation here. This is our textbox element. And notice how when I did this, a lot of the buttons up here on the Animations tab
became clickable, right? This is because now we have selected an element
or an object on our PowerPoint slide
that we can then apply animation effects onto. So up here in the
upper left side, we can see that there
are some green stars here with some names
underneath the star. But this is the different
animations to select from that we can apply to this
element in our slide. And every time you
hover over them, PowerPoint gives you a
brief description of what each animation entails
and looks like. If we click this little arrow head pointing to the right here, we can go and see more animations that come
with the PowerPoint program. So these animations are
pretty self-explanatory. But again, if you want to
know more about each one, you just hover over them and then powerpoint
will tell you. Additionally, if you click this little arrow head
pointing downwards, you can see the full
drop-down menu of all of the animations that come with
PowerPoint in this section. And there even
categorized by basic, subtle, moderate
and then exciting. So the basic ones are the
ones that don't move as much. Subtler are the ones that
are still kind of low key. And then the moderate and exciting ones are
ones that are a bit more in your face when
it comes to animations. Let's go ahead and apply
one of these animations onto our text here in our slide. Let's go ahead and add
in the fly in animation. So as you can see,
when I added it, it played, it gave
us a little preview. And this little box here with
a number of one appeared. What is this little box? Well, anytime you
add an animation onto your elements in
your PowerPoint slides, you will have these
little boxes here. They'll pop up and we'll talk about these more in a second. But right now let's continue
talking about the buttons. So now that we've added the flying animation to our
my sample presentation texts, we can see that that
animation is selected, so there's a gray
border around it and that the preview button
is now also clickable. So when I click Preview, take a look at my slide. It plays the animation, the flying animation that
I added to the text. And if we click this
little arrow head next to the button
pointing down, we can see that we have
preview and Auto preview. What is the difference between
both of these buttons? Well, Auto preview as
a default selection, so I'll talk about that first. Auto preview means that
every time you add the animation to your
element for the first time, it'll auto play it for
you to see it on click. So this means that anytime
you add an animation onto objects and elements on your
slides for the first time, they will play immediately once. So you can take a look
at how they move. Whereas preview is
on your command. So they don't move until you click the Preview
button up here. So that is just the difference
between both of these. But just know that auto previews always going to be the
default selection. And anytime you click
Preview here, up here, you can always take a look at what the animation
looks like. Alright, so with
that, we've covered the preview button and these animations appear
in the green stars. But then if we take a look
to the right of that, we have some more animations
here and golden stars, which again have
titles under them. These are some more
additional animations that you can apply to your PowerPoint elements
in your slides, right? So again, if you click this little arrow head
pointing to the right, you can take a look at some
more that are offered. And again, if you click this little arrow head here
pointing to the bottom, you can see the full drop-down of the additional animations, again categorized by basic,
subtle, and moderate. And lastly, exciting.
So these are again, some additional
animations that you can apply to your elements. And on top of this,
these animations deal more so with color, as you can see here,
fill color or font color and so forth,
transparency. So you can even change the color of when your text animates. And in addition to this, you can add some
transparency to it. You can also make
your text spin. So if I click this
little spin effect, take a look at my text and my sample presentation
on my slide. As you can see, it spun around. So these are some additional animations that you can add here that PowerPoint offers for
your elements on your slide. Then after that, we have the
exit effects button here, this red star, this button is different from
the other ones. The star rather is different
from the other two colors, the green and the golden ones. Because this deals
with effects for when you want to make your
elements leave the slide. If you haven't noticed by now, all of the animations that we talked about and have seen so far introduce the text or the element rather
onto the slide. Onto our slide on
her presentation. Exit effects to use
with effects that remove the texts from our slide. So if we want to remove this, my sample presentation text, we can go to exit effects and select the texts
that takes it out. For example, such as the
Flyout button or effect. So let me click
this fly-out button and take a look at my text. When I do that. As you can see, it flew out, right, just as the animation
says, self-explanatory. So it takes the
text away from view in our PowerPoint
presentation in slide here. So this is what
exit effects are. They differ from the other
two because these effects deal with removing the
objects from the slides. And you have again, a
variety here to choose from that are
categorized from basic, subtle, moderate,
and again, exciting. Then after that we
have path animation. This is a cool feature
that PowerPoint has because this lets you modify and change the direction of the animation that
your object contains. So you don't have to stick with the basic directions
that PowerPoint offers. You can choose your
own here, for example, let's say I wanted to make this my sample presentation move in a star path. I can go ahead and click
the start button and take a look at my
text on my slide. As you can see, it moved
in a star direction. Then I have this
little star line here behind the text to let
me know that this currently has the star path
animation associated to it along with the path
animation button now changed to a star. You can also change it to
any other one that you want. And these are again
categorized by custom, basic, and complex. So depending on
whichever one you want, you just one click and add them. In case you're wondering what this green and red button
or circles rather are. In these. It's just means where
the effect starts and ends or where the
animation starts and ends. Again, if you hover over these PowerPoint tells you a little brief description
about each one. Okay, So that is the
path animation button in PowerPoint under the
Animations tab in the ribbon. Then after this we have
the Effect Options button. So this is a really
cool button because it lets you customize
the effect, the animation effect much more. You can change the
animation effects color also change how much
points the star has. Do you want a simple 4 star or a regular standard five-star, six-star or an 8 star. So let's say I want
to change from 4 star to a six-point star. My animation becomes
more complex and it now has a six-point star. I can also of course change
if sequence as one object. So this means that do I want this entire element to
move as one object? This will always be
the default selection. And then afterwards
I have the origin locked and unlocked as you can see here on lock this checked. This origin deals with making your animation editable
or not editable. Locked, solidifies
the changes and then locks the animation
to stay as-is. Whereas unlocked lets you change the animation effect
along with of course, the color or the shape of
the star and so forth. So typically unlocked
will be the default, but if you want to
make your changes as is no longer editable, you would just go
ahead and click Effect Options and check locked. Well, let's leave
this as unlocked for now and then go back
to Effect Options. Then after that we
have edit points. So this is really
cool as well because this lets us edit the
points in our animation. If we go to Effect
Options, Edit Points, we can change the points in our animation and
how they appear. So if I wanted to,
of course change, like let's say I'm not satisfied with the star looking like this. I can click Edit Points and drag around each little square, which represents a point
to make my star a unique star that I can then apply if I like it by
clicking Edit Points. And then when I click
the preview button, it changes to that animation that I just edited
with the points. So now my star looks more
like an explosion sign or a sign that you would see on sales and
so forth, right? So again, you can even change the points in your shape
for your animation. So this is really cool
because you can get really, really detailed in terms of your customization options here. As you can see, I'm doing, I'm playing around
with the points. And each point represents an animation spot to where
the text will move to. So just be aware
that you even have this option here
under Effect Options. And then lastly, we have
Reverse Path Direction. Earlier when we were talking
about the red circle and the green circle
under path animation, as you can see here,
this just reverses that. So then for example, let's say if it starts from the left and
moves to the right, the Reverse Path
Direction would then start from the right and move to the left, if that makes sense. So it just reverses
where the text moves to. The tech started moving
from left to right under the Effect Options Reverse
Path Direction button, it would then start moving
from right to left. So it just reverses it. Okay, and then
after that we have the animation pane button. What this will do is
it'll just pop up this animation pane
here on the right side. This is what happens also
when you double-click the little number here that
we talked about earlier, this little square
with the number. This little square with
the number will appear for every element anytime you
add an animation to it. And let me show you, Let's
say I also want to add an animation to this
from John text element. Well, I clicked it and
then I wanted to add, let's say an appear
animation to it. It just appears, right? Notice how when I added that little number appeared as well. Instead of having just
one box with one number, now have two boxes, 12. So then when I click Preview, I can view both of the animation's
happening on my slide. Now, anytime I
double-click this number, any of them, the animation pane will appear here
on the right side. The same one that we accessed by clicking the Animation
Pane button up here. It's the same thing. Whether you click
this button up here, Animation Pane, or double-click
these two little squares. The animation pane will
appear on the right side. And so this animation
pane is really great because you can change
a lot of things. You can move around the
order of the animations. So the one that was
the second is now the first and vice versa, by left-click, dragging
and moving it, or by using these
little arrows here. You can also click Play from. This decides where you want to start playing
your animations from. Do you want to start from
your first animation or from your second animation? And when you hover over
each of these animations, you also get more
information such as what type of animation you're
using and who added it. And then you can even delete these animations by
clicking this red X. Like for example, if
I do so right now, I just removed one
of the animations, the one that was from John. And notice how
there's little number went away here with the square. On top of this, I
have variety of other effect options
for each animation. I can change. For
example, the timing. Don't want to make the
animation long or short. For example, the duration here, I can change it to
be five seconds or very fast, 0.5 seconds. I can even play around
with how long it'll take for this
animation to happen, the duration, but we'll talk a little bit more
about that later on. We could also of
course, add a trigger. So for example, if someone does something on your slide that
can trigger the animation, whether it's on a click or on clicking a certain element on your slide,
such as a picture. If the person does this, then the animation will happen. So that's known as a trigger. So you can add that as well to your animation should
you choose to do so. And lastly, down here we
have text animations. We can animate the
text all at once, or even by word or
even by letter. So you animate letter by letter. So this is up to you, right? And then we can also group
the text as one object, so that way it moves as
just one object entirely. So this is all depending on you. How you choose to do
this is your choice. And you can play around
with these settings when you're working in
PowerPoint yourself. Alright, so let's get out of the animation pane by
clicking this X up here. Moving on to the next button, the trigger button, which
we just talked about. You can also access that by
going to Animation Pane. We can create a trigger to
launch or start the animation whenever a person clicks a certain element in your
PowerPoint presentation. So let's say if someone
clicked this image here, that would be the
triggers that would make this text down here, again to animate or move. That makes sense. So this is how you can add
triggers to your PowerPoint slides when people are opening
it and going through it, if they click a certain thing, you can make certain
things move as well. So this is useful if
you're trying to make a very interactive and animated PowerPoint
slide presentation. So just know that that is what the trigger button does up here. Then we have the
animation painter button. What is this button for? What is it used for? Well, this button is
really cool if you want to paste the
animations that you have on this object
in your slide to another object and
your slide with just a few clicks or
one-click rather, let's go ahead and
take a look at that. So let's click
animation painter. And let's say I want to add this animation that
I have this star here to this other texts object on my slide
that says from John. So I clicked animation
painter and then I click the text
element from John. Now look, now my from John also has that star
animation as well. And again, the little number two square popped up yet again, telling me that I now
have two animations in my slide here in
my presentation. So that is the animation
painter button. Then lastly, what we have
here is the duration, which we said we were
talking about earlier on, and now we'll talk
about it again. Now. This is to
modify how long you want your duration of
your animation to be. Typically the default will be two seconds, as
you can see here. By clicking the arrow
head that's pointing up, you can make it longer. And by clicking the
arrowhead is pointing down, you can make the
animation shorter. So this is just how long the animation will take to
complete its animation. So if I make this really long, like let's say five seconds, this animation will take
that long to complete. Whereas if I make
it really short, like let's say two seconds, the default than
this animation will only take two
seconds to complete. I can also of course, go
in and type in a number of myself instead of using
those arrowheads. Right above that is, of course, the start onclick button. This is just a timing
of your animation. Again, another thing related to the timing of your animation. You can choose when
your animation begins. So does it begin
when people click? Or do you want it to begin with the previous animation starting first or after the
previous animation. Typically you want to
leave this as onclick, meaning that this animation
won't happen until you get to this slide and
then they all happen at once. But you can also change
which animations happen when the order
of them as such, which is why these little
squares here have numbers. Because you can also
change if you want all of the animations to
animate and happen at once or one after the other. So this is what this deals with. We can change the order
by again clicking twice here and popping up the animations pane and then reordering which
animation is what. But again, this is what the start onclick animation timing has to do and deal
with in PowerPoint. And again, the
duration to change how long the animation
will last for. This has been the Animations tab within the Microsoft
PowerPoint ribbon. I hope that you
found this helpful.
18. The "Slide Show" Tab: Welcome. In this video lecture, we will be talking
about the slideshow tab within the Microsoft
PowerPoint ribbon. As you can see up here, the slideshow tab is the seventh tab within the
Microsoft PowerPoint ribbon. And we'll be talking
about what this tab is used for along with the
associated buttons under it. So let's start off
with the upper far left or with the play
from the start button, as you can probably assume
by the name of this button. And play from start
button lets us play our PowerPoint presentation in presentation mode from
the very first slide. So as you can see
here right now, we're in the fourth slide here. But if I want to change
to presentation mode, it will take us to
the first slide by clicking play from start. So let's take a look at
what that looks like. So as you can see here,
we've been taken to the very first slide in our
PowerPoint presentation. And this is presentation mode, what we're in right now
because we can see the program turned into a full
screen slideshow mode. And so therefore,
this is optimal for when you're presenting
this to other people, your presentation in public or in a classroom setting
or whatever have you. You want to make
sure that you are in this full screen mode
because that way the buttons and the
PowerPoint program aren't appearing and other distractions aren't visible on the screen. But as you can see here
on the bottom left, I have five buttons
here on this tray. So let's go ahead and talk
about them because they can actually do a lot and
are pretty useful. So let me first start by
talking about these two arrows. One pointing to the left and the other pointing to the right, the arrow pointing
to the left and then circle is the previous
slide button. This button lets us go back
to the previous slide. So let's say we're on
slide two instead of one. If I then click the
left arrow button, it would then take me to slide
one, the previous slide. Whereas conversely,
the arrow pointing to the right is the
next slide button. So by clicking this, it will take us to
the next slide. So we're on slide one, and then I clicked
this button once, and now we are on slide two. Okay, So that is
what the function of these two buttons are. But I just wanted to say that a good shortcut
to avoid having to use these buttons is
hitting or pressing rather, the left and right
arrows on your keyboard. Because these are easier to use to get through slides
instead of having to manually go ahead and use those buttons there in the
bottom left-hand tray. Then after that we
have a pen tip icon. As you can see here. This pen tip icon lets
us change our cursor from the typical cursor to a variety of
different options. We can hide the cursor
so that way it's not floating around
as we're presenting. We can then make it
visible again if we have the hidden
option selected. And we can also change
our cursor into a pen if we want to
write annotations and other scribbles and notes on our slides as we are
presenting them. So if you want to do this and know that you can do
that through here. And this pen tip icon
also lets us change the pen color of the pen tip to any other color that we want. And we can even change it to be a laser pointer
instead of a pen. So as you can see here, my cursor turned into
a laser pointer. So I can point
people into what I want them to focus
on in the slide. And additionally,
I can also change the laser color of the pointer to another
color, for example, green. Notice how when we are
in laser pointer mode, the icon changes from
pen tip to a laser. Then I have other options
here, like a highlighter. I can have a highlighter on
my slide show if I want to. So I can highlight
certain things that I want people
to take note of. So that's really cool. And of course I can
also change the color of that as well
through pen color, but I can also erase
things I don't want anymore through the eraser
as we just saw was there. So I will just click things
and erase whatever things I want to be gone from
my presentation. But another way that you can do this so that we don't
have to keep clicking and clicking is to
instead go here to the eraser pen and click once and everything will
be gone, right? Notice that in every
one of these there's keyboard shortcuts to let you do that with your keyboard instead of having
to click around. So that is what this
pen tip button is for. But the automatic selection will always be the
default selection. Because again, that
will take you back to the cursor that we
all know by now. Then after that we have
the two Cs button here, which is the closed
captions button. And this button is really
cool because it lets us add captions below our PowerPoint
slides as we're speaking. Powerplant can
pick up voices and then add the words
onto the screen. So in case you're presenting
to people that are hearing impaired or whatever, have you had any
other disability. This would be very useful for them as well as
you're presenting. So that is what that closed
caption button there does here in the bottom left. Then after that we have this
circle with three dots. This just gives us more
options to be able to visit or view the next slide, or go back to the
previous slide, or view the last viewed slide, which is just another way to go back to the previous slide. We can also change the size
that we want to go to. So I can manually jump to certain slides
here so that way I don't have to go in
chronological order. For example, let's
say I want to jump to the side my sample presentation, which is my fourth slide. I did that. And then it took me here
back to my fourth slide. But again, clicking
this button with the three dots and then going to buy title and selecting the slide that
I want to jump too. Okay, then after that
we have custom show, which we'll talk about later. So no need to worry
about that right now. And then after that
we have screen, so I can change my
presentation screen to be a blank black screen
or a blank white screen. So instead of slides, I can show just a blank
screen and these two colors. And this is useful if
before you're presenting, you don't want any distractions, or you just want to talk a little bit before
you start showing off your PowerPoint
presentation. Then after that we have
used Presenter View, something we'll talk
about in a little bit. This is a useful button if
you're going to be pacing yourself or timing yourself as you're going through your
PowerPoint presentation. But we'll talk about this later. So let's go ahead and go
back to this button here and exit the presentation mode, and then go back to the
US slide-show mode. Then afterwards we have
keep slides I updated. This will always be
by default selected. So in case you want
to keep any of your slide changes shown in your presentations
as they are made. Then you make sure that
you have this selected. So that way none of that
changes are left out. So keep slides updated. We'll basically just
update and include all of these updates in your PowerPoint presentations
when you present them. But then underneath that we have update slides and as you can
see, it's not clickable. That is because of course we do have slides updated
already enabled. But if you don't want that, you can just select
that and then it'll have that
they're de-selected. Okay, so then next
we have pause here. So pause is useful
if you want to pause your presentation
because you have the ability to loop your
presentation on its own. So that way it
presents each side for a certain amount of time if
you want that to be enabled, we'll talk about that in a
little bit and how to loop your presentation or your PowerPoint presentation
as you're presenting it. But if you did have that
loop option selected, you can click pause here. And what it'll do is it'll pause wherever it's at in
the presentation. And so therefore, you have
that manual control here. And resume will then just
allow you to continue. Then n show, of course, we'll just end the
presentation mode or sideshow viewer that
we're on right now and take us back to the program with all the buttons and the tray and the ribbon showing again. So that is what
those five buttons are in the bottom left-hand side under the Slide Show or presentation
mode in PowerPoint. Then after that we have the play from current slide button, which you might already
assumed by its name. It allows us to begin
playing or PowerPoint presentation from the slide
that we're currently on. So right now I'm on slide four. If I click this button, it will start the
presentation from slide four instead of slide one. So that is all that
button can do. By the way, a good shortcut on your keyboard to get out of slide-show or
presentation mode is the escape button
on your keyboard. So just press Escape
to go back to this viewer with the PowerPoint
program buttons included. Okay, so that's the escape
button on your keyboard. Then after that we
have Presenter View. So this we've seen a
little bit before, right? This is useful, this
Presenter View mode. If you are someone that
wants to paste yourself as you are presenting your
PowerPoint presentation. So as you can see here, I have five slides and my
PowerPoint presentation. Let's say I want
it to be speaking for a minute per slide, right? Then I would go ahead and click Presenter View as I just
did and then start talking. And as you can see here
in the upper left, I have a little timer here that tells me how long I've
been in presenter view. So that way I know that I'm
either pacing myself well or I need to work on speaking
either slower or faster. So again, I can click
these arrows here to manually go to each side, or just go ahead and directly
click each one of these. And then each one
will be bordered by a blue border to let you
know which one you're on. But this is what this
presenter mode or view is for. If you're someone that
definitely wants to work on timing
yourself and pacing yourself as you are
presenting in PowerPoint. And you even have
tips here to give you some keyboard shortcuts
like I've been giving you, to give you an idea of what you can do with your keyboard alone. So that way you don't have
to keep clicking all over the screen presenting because
that can get distracting. So definitely check out these keyboard and mouse shortcuts under the tips button in
the Presenter View button. And then afterwards, we can add even notes to ourselves in these slides and presenter
view by going to each one and clicking here where it says
click to add notes. So maybe in this
one I wanted to say speak less next time. So that way I know that myself, that I perhaps too much in
this particular slide and I want to shorten the
amount of time that I speak here because it's
taking too much time, then I can change even. The size of the notes text by clicking these
two letter A's here. Alright, so then let's
go ahead and click and show to get us back to where we were outside of Presenter View. So that was the Presenter
View button in PowerPoint. Then after that we
have custom show. So this is a really cool
feature that PowerPoint has. Customer show lets us create
custom slideshows that only show certain slides within your PowerPoint
presentation. Let's go ahead and
take a look at this by clicking custom slideshow. So as you can see here, I
don't have any customer shows, but to start creating the show, I click this little plus here, and then I can even give
this slideshow name. So let's say I want to
name this slides 24. I only want slides
24 to appear in this custom show when I'm presenting this to other people. Then after I've given my
title to this slideshow, I want to then click
the particular slide I want to add here
on the left side. And then click this Add
button in the middle. And then it'll add that slide to the custom
show on the right side. Then I go ahead and make sure
I click the second slide, slide for that I want to add to this particular slideshow show, and then click the
Add button again. And now as you can see here, I have two slides
here, sides 24. And by clicking the
sides on the right, I can change the order by
clicking these arrows here. So let's say side
four appears first instead of sidewalks
and vice versa. I can do that by clicking
these arrows up and down. And I can also delete
a slide from this show by clicking this minus sign. We're not going to
do that because we want to slides in this show. Again, I have slides to insides for in this particular show. Then to create this custom
show, I would then just click. Okay. As you can see here, it appears now under my
list of customer shows, you can have many and just dropped down here lets
you edit them if you made a mistake or
copy them if you want to duplicate
this particular show. But nonetheless, let's go
ahead and click Start show. So then we can see our
PowerPoint presentation for this particular
custom shelf. You can see it started
off with slide two. And then the next slide
will be slide four. Right there, side form. So this is how custom
shows work in PowerPoint. If you only want to show particular slides within your
PowerPoint presentation. Alright, so this is
a very useful button for this purpose. Then afterwards we have the
rehearsed with Coach button. This is another button that lets us speak into PowerPoint. And the PowerPoint will
pick up one hour words. So as you can see from
the bottom right, we see that it says Welcome to PowerPoint Presenter Coach. As we rehearse, as
you rehearse rather will give you feedback on
how you're presenting. And then at the end
they'll give you a summary of what they think. So if I click start rehearsing, PowerPoint will do
is that it will begin listening to
every word I'm saying. So as I start talking, you can see the
little timer here at the bottom right telling me how long I've spent
talking in seconds. And then as I just keep going, tips will appear here
in the bottom right, telling me if I'm
doing good or I need to work on and
improve on certain things. This is useful if
you want to improve your diction and also your
public presentation skills. See, you just gave
me a tip here. It says pitch, try varying
your pitch and so forth. Then let's say I'm done. And I really want to take a look at the summary of
what they think so far. I can click this pause button here to pause everything
that I'm saying. And then maybe I want to take a deep breath and then continue. And then it'll go
ahead and listen again and exclude the
part where I paused. But let's say I'm done
with this and I want to go ahead and
receive feedback. Then I just hit or press the Escape button
on my keyboard. And then a rehearsal report will appear here of
what they thought about my speaking and presenting that we just
did and you just saw. So this is really cool because
it goes really in-depth. It tells you the summary
of how long spent talking and how many slides
you spent talking on, along with their recommendations such as avoiding filler words and repetitive language
or even tells you that things that you need to work on and the things that
you've done great. So it says here, nice work. Your variety of word choice will keep your audience engaged. And then it says here,
inclusiveness, great job. Your use of inclusive
language was excellent. Then if I scroll up, it even tells me the pace
that I spoke at, the number of words per minute, and my average pace over time during the
minute that I spoke. It'll even tell me and my
pitch. How was my pitch? Was I monotone or was I
varying and pitch, right? And then lastly, originality. You avoided reading
slide texts aloud, and that's good for
keeping the audience engaged with your message. And this is actually one of
the most important tips you can ever get when
presenting in PowerPoint. You don't want to
read off the slide. Because again,
your audience will see that and read that anyway, when you're presenting a slide, you should be introducing new and original
information that only comes from you when
you're speaking. So definitely keep that in mind. Do not read your slides out
loud off as is verbatim, you have to add some additional in original
information yourself. But anyway, this is all under
the rehearsed with coach, but let's go ahead
and exit out of here. Then after this, we have
the setup slideshow button. This gives us more
opportunities to customize how we want our
slideshow to be presented. We want it to be in full screen, or do we want it to be browse by an individual such
as a small window? Or do you want it again
to be fullscreen here, the first and the third
options don't differ much because the parentheses really tells you how
it will be presented. Full-screen will
always be the default because it'll cover
your entire screen. That's where it's full screen. But if you do want to show your presentation
in only a window, meaning a portion of the screen. You have this second
option here, alright, but presented by a speaker, full screen will
always be the default. Then after the words
we have Show Options. So again, here's
where we can loop our presentation as
much as we want it to. And in case you
don't know what loop means is just basically playing our
presentation over and over and over repeating
itself, right? So if I have this selected loop continuously until escape, this means that when I'm
presenting in slide-show mode, the slides will continue to play over and over by themselves from the beginning to end until I press the Escape
button on my keyboard. But definitely don't have this selected if you want to take control of when the slides
change using the arrows. So just know though
that you have this option here with
loop continuously. Then afterwards
we have Show with narration and show
without animation. Show without narration. In case you've added
narration to your slides. You can definitely avoided
the captions from being seen or shown on the
screen by checking this box here and then
show without animation, if you have any animations
on your PowerPoint, presentation slides and you
don't want them to be shown. You can check here so that way the animations aren't included. Then afterwards we
can even select what slides we want to
appear in our presentation. Do we want all of
them to be shown? This is the default, or do we want only a certain
range to appear, right? I can choose from one to three, or from two to three, or from two to five or
whatever have you write. You can even play around
the range of the signs that you want appear
in your presentation. Or we could even grab
from a customer, show like the one that
we've just made earlier. We can use these
slides to and for custom show to only show slides to enforce when
we're presenting. But all will always be
the default selection. And then advanced slides. So again, we can choose to
advance the slides manually, which means that
the slides won't move on to the next
slide until you press the arrow or button that signals to go
to the next slide. Or you can use the timings from Presenter View that you've included to only cap each slide to show for only
a certain amount of time. But again, this is up to you. Manually will always
be the default mode. Then lastly here
we have monitors, slideshow monitor, automatic
or primary monitor. This just is if you're going to be presenting this presentation on multiple screens and you are connected to multiple computers. But automatic will always be the same thing pretty much as your primary monitor or rather
the computer that you're using in working with right now and seeing this on right now. But just know you
don't have to worry about this too much unless
you're someone that works with a variety of
computers and want to present in a variety of
different computers. But automatic will always
be the default selection. Alright, let's go
ahead and click. Okay. Then after this we have
the hide slide button. The hide slide button is
really useful if we want to hide a particular
slide from view. So for example, if I click
it and then click it again, you'll notice how
this slag slide to, to kind of faded
to white and has this icon appearing in
the upper left-hand side. And you'll also notice that
the slide is being hidden because the height slide button is activated on this
particular slide. If I've moved to another slide, you'll notice that
this button won't be backed by a light
gray color anymore. For example, if I
click slide three, the hard slide button is now no longer backed with a light gray. If I move back to slide two, then we see that
light gray again. But again, the
more useful way to find out if a site is
hidden or not is if it has this faded white over it and this little icon on
the upper left-hand side. And what this will do is
that when you're presenting, it'll skip over this slide. So in this particular instance, it'll go from side one to slide three in the presentation
and skip slide too. So if you ever want to hide particular slides when
you're presenting, you can do so by clicking here
where it says Hide slide. Then afterwards we have the
rehearse timings button. So this is if you want to again, rehearse for how long
you want to spend. On each slide in
your presentation, just sum up how long
you spent presenting overall using this
presenter view that we are now familiar with. We have this little
timer here at the upper left-hand
side that tells us how long we've spent on this slide and
presentation in general. We can also pause it by
clicking the pause button here, or reset it by
clicking this arrow that points clockwise, right? So that is just what the
rehearsed Timing button is for. You can practice and rehearse your pace and your time
in your presentation. So you can then know how long
these slides take you to present and how long
this presentation takes you overall to
present in general. This is what The rehearse
timings button is four. And notice how when I tried
to escape it, it says, total time for your
slideshow was 50 seconds. Do you want to save
the new slide timings? If I click Yes, then I will be able to
use these 50 seconds as a way to cap my presentation when I present
it to be only 50 seconds. Meaning that these slides
will go through all five of these sides will be
shown for ten seconds each, if that makes sense, right? Because I kept it at 50 seconds and it took me 50 seconds to get through
this presentation. And since there are five slides, there's ten seconds per
slide to make up 50 seconds. Okay? So if I click Yes, I can then use this under
the custom show option or the other button that allowed us to add
custom Show Options, which was the setup
slideshow button. And then go here where it
says use timings if present. And then I can use that
50 seconds here to only show and kept my
presentation for 50 seconds. But that is what the
rehearse timings button is for and it's very useful. Then after that we
have record slideshow. So this is really cool
because it lets us record our PowerPoint slideshow in the mode that we're in, right? So if I click Record Slideshow, what this will do
is that PowerPoint will ask for my camera access. And it will record the presentation after I click
this red circle up here. So as I'm going through
this presentation, it will record everything and then exported as a video file. So just know that you have this capability as
well in PowerPoint. And you can do this by
clicking the red circle here after you've clicked
Record Slideshow. And it'll tell you
up here for how long you've been recording. And let's say you
don't like this. You can click this trash
icon here to throw it out. Or you can click
this pause button here to pause the recording so that way you can take a
break or whatever have you. You can also include your
microphone to be included as you're presenting so
that we have picks up your voice as well as you're
going through the slides. But again, this all
depends on you. And you also have the ability to play around with color here. If you're using a pen that we've talked
about before, right? As you are recording your
PowerPoint presentation size, you can even draw
on this as well. And the recorder will pick up the drawings and
scribbling is as well. So it's really cool. It'll pick up everything
that you do on the slides. But again, you'll need to
give PowerPoint access to your camera and your microphone for these particular settings. Okay. So let's go ahead and
exit out of here. So then that was a
Record Slideshow button. If you ever want
to record any of your slideshows and
presentations in PowerPoint. And then we have clear here. So again, we have
more options here. We can clear timings
on all slides. So this just ties in again to the 50 seconds that we
were just talking about. If you want to have your sites to be shown for
an unlimited amount of time, instead of 50 seconds, you would click Clear
timings on all slides. And we can also clear
narration as well. Then afterwards we
have play narrations. This will be
selected by default. But again, if you don't
want the narrations to show and appear as you are
presenting this presentation. For your particular
PowerPoint presentation, you can de-select this and then the narrations
won't be included, so people won't
see or hear them. But again, by default
this will be selected. Then after that we have to
use timings chat box again, this ties into the 50 seconds
that we were talking about. If we want our PowerPoint
presentation to be using the timing that we talked about in setup and rehearse timings. We can check, use timings. And so then when I
click play from start, it'll start this at 0 seconds
and then end at 50 seconds. All five slides,
ten seconds each. But again, this
will be your choice if you want that to be a thing. If you have, let's say time constraints when you're
presenting a presentation, this might come in handy. Then we have the
show media controls. This just deals with, of course, the little buttons here that
we are shown and talked about in the bottom
left-hand side. So when we have these selected, they will show here at the
bottom left-hand side, which are of course
these buttons here, these five buttons in this tray, that is the media
controls button. So by default, media
will be selected. Media controls rather
it will be selected. But if you don't want
them to show, you, just de-select this checkbox
and then they won't appear when you begin presenting in
the bottom left-hand side. Alright, so that's
just what this is for. The default will
always be checked. So that way when you
start presenting, they appear here at the
bottom, left, right. Then after that, we have
always used subtitles. So again, if you are presenting
this presentation and you want to include subtitles
in your presentation, you must make sure
that you click this. Always use subtitles
selection because this will apply for your
presentations in general. So that way, if you know, you're gonna be
presenting to people that are hearing impaired
and so forth. They can read the subtitles. And so therefore, there'll
be presented under your slideshow and science as we saw earlier in
this video lecture. And then lastly, we
have Subtitle Settings. So we can even change the
language of the subtitles. Again, you want to make
sure obviously that the subtitles are within the language that
you're presenting in, but you have a variety of
languages to choose from. So this is really cool, and we can choose the language
for the spoken subtitles and also for the subtitles
that appear on the screen. So you have a variety of
options to choose from. And then afterwards
we have microphone. So this is useful. You want to make
sure that you are correctly set up
with the microphone. That is going to be picking
up your voice the best. Typically though, you can use your built-in microphone
on your computer, which in this case my
MacBook Pro microphone. But the danger of
sometimes doing this is that some of these microphones
are not the best quality. So that way when
you're speaking, the subtitles might
be incorrect, the words might be incorrect. So make sure that you try to
use a external microphone, or at least try
to be as close as possible to your computer so that way when
you're speaking and projecting the subtitles
will be accurate. Words that appear under your presentation
and your slides. You can even change
the position of where your subtitles
appear, right? Typically the default will
always be below the slide, but you can even change
them to be above the slide or over the bottom of the slide, or over the top of the slide. So overlaid just means
over instead of creating a black bar under or
above the slide itself. Lastly, we have system
caption preferences. This will take me
outside of PowerPoint to my computer system
preferences for my captions. This is outside of PowerPoint, so we won't talk about that, but just know that it is there in case you want
to check it out. Okay, so this has been
the Slide Show tab within the Microsoft
PowerPoint ribbon. And I hope that you found
this useful and helpful.
19. The "Review" Tab: In this video lecture, we will be talking
about the Review tab within the Microsoft
PowerPoint ribbon. The Review tab is
the eighth button within the Microsoft
PowerPoint ribbon. And we'll be talking about
what this tab is used for along with the
associated buttons under it. So we can see here starting in the upper
far left-hand corner, there's a spelling button. And as you may already assumed by the name
of this button. This button lets us do a spell check for all of
our PowerPoint slides. So if I click it PowerPoint, we'll do a quick run
through my presentation to see if there are any
spelling errors. And since there aren't, this says spell check complete. If this shows up, this
means that you're in good standing and that you don't have any spelling errors. However, what would
this look like if I did have a spelling error that
PowerPoint picked up? Well, let's take a look at this. Let's go ahead and modify this word and make it incorrect. And then click spelling again. This time you see it doesn't
say spellcheck complete. Instead it added
a jagged red line underneath the word that
is marked as incorrect. And opened a panel here
and the right side. Anytime you see a red jagged
line underneath a Word. And Microsoft programs
such as PowerPoint, means that the word is marked as incorrect as it's
spelled incorrectly. And you need to address it, which is why there is
a line underneath it. Now, in this spelling mistake, we see that first there are three buttons here
we have ignore, ignore all, and add. What are these buttons mean? What are they used for? Well, ignore would let
you tell PowerPoint to ignore this particular
spelling mistake and move on to the next one. So let's say this isn't
actually a spelling mistake, but PowerPoint thinks it is. You can just click
Ignore to let PowerPoint ignore that particular
word or spelling error. Ignore all however, would let you tell
PowerPoint to ignore all of the spelling mistakes it thinks it has found
within your presentation. So all of these red lines would disappear because you
would tell PowerPoint to ignore them all because they are not actually
spelling errors. Whereas ad would let you add this particular spelling error to your PowerPoint and
Microsoft dictionary. What this means is that in the future if you
type this word, it won't be marked as wrong by PowerPoint because it's
added to dictionary. Now this is useful if
you're working with typing people's last names or company names or whatever
other specific nouns, right? That aren't general. And so therefore can be picked
up as wrong by PowerPoint. This happens if
that happens where you can do is you can
double-click the word, select it and then click Add. So then therefore it's to your dictionary and
they're in the future. It's not marked
as wrong anymore. But let's just fix
this spelling error. So right now what I can do
is click the first word or any other word
from the list here to change it to the
correct version. So since sample is the
actual correct word, then I will double-click
sample to change it and we'll take a look at what that looks
like in a second. But I just wanted to
mention that after you add words to your dictionary, you can also go
down here where it says here add words to. And then it says here
custom dictionary. The dictionary is the
dictionary that you compile and add words to by
clicking Add up here, okay? So just know that you have that feature in
PowerPoint as well. If you work with
nouns that aren't found in a dictionary
but are still correct, such as lastName and so forth. You can click Add here. Now let's go ahead
and actually fix the spelling mistake using the spelling panel here
on the right side. So I double-clicked and
the spelling error. Now I'll double-click
the word sample and let's take a look
at what happens. There we go. It fixed our error for us. We didn't have to type
anything or we didn't have to type the word all over again,
we just double-clicked. And then it added
the letter M again. And now it says spellcheck
complete again. Because now we are back in good standing and
everything is correctly spelled with an our PowerPoint
program and presentation. Okay, so then when we click this X here to get out
of that spilling tray, and then the button afterwards
is the source button. So let's go ahead and click
our tucks element here again, so that the source
button can be clickable. And that the source
button is really useful if you are looking for adjectives or other words similar to yours,
such as synonyms. And you can take a look at any words here from
the list that appears. So right now I'm
highlighting sample. And here's a list of words
related to sample or list of synonyms rather
related to sample, right? Model, trial, mockup
and so forth, right? So if you're ever in a situation where you find yourself repeating
a word too much, you can use this thesaurus built-in within
PowerPoint so you don't even have to leave the program and go in and Internet browser, you just click this
to Source button. And this little panel
here on the far right appears with synonyms. And then if you click
this little icon here, that's a magnifying glass
with the arrowhead. It even tells you
your history of words that you've searched
for with a thesaurus. So it's very useful. You can use any of
these words then within your PowerPoint
presentation. So this is a really
great feature with the source in parallel. Alright, so let's go
ahead now and close this, the source here, and then
go to the next button. Then we have here Check
Accessibility, right? So check accessibility
allows us to make sure that our PowerPoint presentation
is actually clear, to understand and cohesive
and concise and so much more right here when I click the accessibility
within the Review tab, and I click that, it gave us this little tray here
on the far right. And what PowerPoint just
did is that it inspected our entire presentation for
any accessibility errors. And as you can see
here, I have some right here on my list of errors. And it says that I'm missing
text. Very detailed. It tells me where
I'm missing text. It says where I'm missing the slide titles and where
I'm missing section names. So you obviously don't want to have this in your
actual presentations. You don't want to miss
any slide titles. Every slide within
your presentation should and must have a title. And of course, you
also want to keep your sections clearly defined. And also you can include alternative text
so that way people can see taxed when
they hover over an image or an element
on your presentation. But nonetheless, since we're working with just sample
presentation here, this is not so important, but just know that for your
presentations you must always have a slide
title for each slide. Of course content. Then after errors, it tells
us also the warnings. So things that are
kind of just alerts, not an actual error, but kind of alerts
for you to check out. It says Warning, hard to
read, texts contrast. And notice how when I close the little arrowhead just closes the drop-down and then when I click the
little arrow head, it gives me the
drop-down of errors. But when I close the
little arrow head, there's a number in parentheses. This is the amount of errors or warnings in this
case that you have. So then I click the
little arrow head pointing to the right
and you can see that, yes, I have three warnings here. So it says that in these slides, slide to slide two, slide two. So in this slide side too, I have three warnings that
deal with texts contrast, meaning that the
text is hard to read because the colors
are very similar, or just don't go and contrast
with each other very well. Again, of course,
this is something that you should keep in
mind in your presentations. You always want to make
sure that your text contrasts with each
other very well. If you have a white background, have darker colored texts
such as black and so forth. Or if you have a
dark background, make sure that your
text is very light, such as white, yellow, and so forth, right? So this is what this is for. Then we have other
warnings here as well. And we even have
some tips, right? So after warnings, we also have tips that PowerPoint
gives us the checkout. And it says here that I have a duplicate slide
title with slide for. So again, this is just something else that
you want to keep in mind. You don't want to duplicate
your slide titles. Every slide should have
a unique title and unique content with few
exceptions of course. But nonetheless, this is what this accessibility check
Accessibility button does. In PowerPoint. It checks your presentation for any errors when it comes to clarity or cohesion
and so forth. And this is really
important for you to check out because it will help make your presentation better and easier to understand. And then down here we
have this checkbox that says keep accessibility
checker running. Well, I work. You want to make sure
you keep this truck to this will always be
checked by default, because this means
that PowerPoint will continue checking your work as you add more things to
your PowerPoint presentation. So that is the Check
Accessibility button. But next to it we have a little
arrowhead pointing down, which gives us more options. We can again check
accessibility, or we can check accessibility when it comes to
alternative text. So for example, if I have an element that I want
to add alternative text, this is text for people
that may be disabled and so therefore they
need additional texts to help them and so forth. You can add alt text. So therefore, you can
even describe each one of your elements in your PowerPoint presentation
for people who, for example, are blind or
have low vision, right? So this is really useful if
you'll be working with that. Then underneath alt texts, we have selection pane. So we can select a
variety of our elements here through this drop-down in the selection pane
here on the far right. So that way we can break
down our slide and each, and every slide in our
PowerPoint presentation by every single element. And notice how there's
an eye next each one. If I want to hide a
certain element from view, I will just click
this little eye here and then it removes it. So if you want to remove elements from your
PowerPoint slides, the Check Accessibility
selection pane button is a
great way to do that. You just de-select or select
the eye on every element. I can also show all
of the elements on the slide or hide
all of them as well. For example, show all, just keeps them as is, whereas hide all hides
everything except of course, my template or my theme. Whereas show all, shows
all of the elements. Again. This is a useful little feature here under Check Accessibility. And then lastly we have
accessibility help. So powerpoint has its own little Accessibility help
manual here for you. So if you have any questions, you can type something
here or so forth. We've seen this
before when we talked about PowerPoint having its
own little Health Manual. If you need additional
help with anything, you can just type the
question here where it says Search help in the
search help search bar. Okay, So let's exit out of this. So that was all under
check accessibility. Then afterwards we have
the translate button. Translate button is really nifty because when we click it, a little panel here appears a little pain here
on the far right. And it lets us translate
text into another language. So for example, it
says here select text from the document or
slide in this case, and enter it here to translate. So let's say I want to
select where it says here my sample presentation. I double-click that
and then I hold left-click and drag to
the right to select it. And then let's say, I want to translate this from English to another language. Let's say Spanish. I would go ahead
and click Spanish. And then PowerPoint
translated that text, my sample presentation
into Spanish. Well, let's say I want
to do this in reverse. I would click this
little button here. And it goes from
Spanish to English. And every time I hover
over a certain word, it even tells me what word is in the translation
when I hover over it. So this is really cool. You don't even have to leave the program or find
an online translator. Powerpoint has its own
built-in translator as well. If I just click the Insert
button, for example, if I wanted to click
the Spanish version of my sample presentation, I will just click the
Insert button and then powerpoint would
add it to my slide just like that in one click. This is really cool. But let's go ahead
and undo that. So that is the translate button within the review
tab in PowerPoint. It will also detect the
language that the texts you already have on your
presentation is written in. This is useful if, let's
say you're working with presentations written
foreign languages, and you don't understand, you can definitely use
this Translate button to translate the text yourself. Alright, let's go ahead
and click out of this. And then after the
translate button, we have features that we talked about before
earlier in this course. We have the new
comment button here, which we can add new comments to elements in our PowerPoint
presentation slides. So we're not gonna get into
detail with this again, but just know that you can
access the new comments and comments pain by going to the Review tab in
PowerPoint as well. And of course, writing
your little comment here. And then clicking this icon
here to add the comment. That is the comments pain
here on the far right. After clicking New Comment. Then we can also have
delete comments. And we can delete this
particular comment, or we can delete all the
comments on this slide. So if I had multiple comments, I can delete them all
with this selection here. Or let's say I have
multiple comments throughout my entire
PowerPoint presentation. I can delete them all
using this button here, delete all comments
and presentation. So just knowing
that you can delete multiple comments in one-click with these two buttons here, as opposed to just using delete, which deletes
comments one-by-one. Then we have the Previous
and Next buttons. These just let us sift between comments in our
PowerPoint presentation. And as you can see
here, because we've done this earlier
on in this course, I do have other
comments as well. So if I click this
previous button, it takes me to the
previous comment. And then if I click the Next
button and it'll take me to the next comment in our
PowerPoint presentation. So that's what these
two buttons are for. The comments will always appear here on this right side pain. Then after this we have
the Show Comments button. What this will do is
it'll just show us the comments pain here
on the right side. Then there's a little
arrowhead pointing down here. So we have two
additional buttons. We have Show Markup and
then show advanced markup. Usually the first two
will be what is selected. But just so you
know that markup is the comments and
other things that you add onto your PowerPoint. Slides in your presentation. Show advanced markup, shows more advanced things such
as advanced comments. But just know that basically show markup and
show advanced markup. Show you basically
the comments and other little tidbits
that you add on two elements in your PowerPoint presentation to remind you of things that
you have to work on. Or just general comments
that you've made to yourself or other
people in the past. Markup is just another word
for basically comments and other little tidbits here that will appear
on the right side, such as, for example, the responses to the comments
or for example, threads. So in case you don't
know what a thread is, is let's say I wrote this comment and
someone else replied. Like for example, Thanks. I click this little icon
here to add that comment. This would be in reply actually, so this would be a
reply to my comment. So I have now created
a comment thread. So this would be an
advanced type of markup as opposed to
just regular markup. So as you can see here,
when I de-selected it, a little text bubble here
went from purple to white. And then when I re-select,
show advanced markup, take a look at that little
bubble again, it turns purple. This is because again, advanced markup shows us
advance things related to our comments such as common
replies, comment, threads. And of course, you
can always edit your comments by
clicking Edit here, and then deleting them
by clicking Delete here as well, and so forth. So let's go ahead
and close this. So that was the arrowhead next to the comments button,
Show Comments button. Then we have the always
open Read Only button. What this button does is
that it will let us open this PowerPoint
presentation in read only mode, not edit mode. So we won't be able to edit the PowerPoint
presentation any longer. We will only be able to
view it in read mode. This is useful if,
let's say for example, you're sending this
PowerPoint presentation to a colleague or a friend. You don't want them
to have edit access. You can click this read-only
button to let them know, hey, only open this
in read only mode. So that way you don't
accidentally move an element around or add any
additional texts by accident or
whatever have you. You can do always open read
only so that way all of the things related to your PowerPoint slides
such as elements, aren't modified and the
changes are solidified. That way, none of these types of borders and each
element will appear. It will only be in read mode, only like this, as
you see right now, without any of the
elements having borders and editing
borders and so forth. So for example, like this, this would be edit
mode right now, because you can see the borders
of the selected element. Read only mode would be the
slide without these type of elements and additional
textboxes like so, like this. Then restrict permission. So this is if you want to
restrict the permission for who can of course, change. Again, your PowerPoint
presentation, for example, the elements
on the slides and so forth. So let's say that you
don't want the person that you're sending this to
be able to edit it. You can restrict the permissions
to not let them do that. In addition to this, you can
also restrict permissions to only certain people have certain abilities within your
PowerPoint presentation. For example, you can only let certain people be able to read it and then let
other people edit it. Or you can give the
permissions for both of these things to
certain people as well. So this is really
useful if again, you're sending this PowerPoint
presentation to someone else and you want them to have
only certain permissions. And you wanted to
restrict them from being able to do certain things, such as editing the
slides and so forth. So that way the PowerPoint
presentation only arrives to them in read only mode as
they can only view it. But they can't modify
or edit anything on the PowerPoint presentation
and the slides. So that is what restrict
permissions is four. And lastly we have the
height Inc button. The hide ink button lets us hide any ink or scribbles
that we've made with the pen feature that
we've seen earlier on in this course on our
PowerPoint slides. So for example here in
slide to have a variety of scribbles and so forth that
I've drawn on the slide. If I click Hide ink, take a look at what will happen. As you can see, it hit all of those scribbles that I had here. And you can tell that this
is enabled because again, the button has a gray
background associated to it. Let me de-select it. And the scribbles return. And then after that I just have a little arrowhead
pointing down. Again. I can hide ink on this
particular slide, or I can delete the
ink on this slide. So it'll delete the ink
on this particular slide. Or if I undo that, I can also delete the
ink found throughout my entire presentation
with just one click. So here you go. If you ever want to delete any scribbles or so
forth that you've made on a particular slide or throughout your
entire presentation, or you can do so in one-click with these two buttons here. Alright, but this has been the review tab within the
Microsoft PowerPoint ribbon. And I hope that you
found this helpful.
20. The "View" Tab: Welcome. In this video lecture, we will talk about the View tab within the Microsoft
PowerPoint ribbon. As we can see up
here, the View tab is the last and final button or tab within the Microsoft
PowerPoint ribbon. And as such is the ninth button
in the PowerPoint ribbon. So let's go ahead and talk
about the buttons that appear underneath this
tab when it is selected. Let's start off with the far left for upper
left-hand corner again. So as we can see here, we
have five different buttons. We have normal Outline View, Slide, Sorter, notes,
page and reading view. So all of these five
buttons have to deal with a different view
layouts that we can change PowerPoint to show us. So normal by default will
always be the Selected View. And the normal view is the view that we see right
now on our screen, right, we have this slide's
tab on the left side. And then the slides
pane here on the right. This will always be the
normal default selected view, but let's say you
want to switch it up and mix things up for a bit. And you want to view PowerPoint
using a different layout, you most certainly can do so by clicking the outline
view button here. And after we've done so, you can take a look at how our slides side bar has changed. We don't see our slides
as thumbnails anymore. Instead we see them
as tiny little boxes. And instead of being able to
see what's on the slides, such as the side content
through the thumbnails. We instead get to
see the slide title along with the text
content in each slide. So if you want to change
how your slides tab looks, you can definitely do so with
the outline view button. After that we have the
slide sorter view. The slide sorter view removes these slides pane on the
right side and just leaves us with an extended or expanded
rather slide side tab bar. So it takes up over the entire PowerPoint
screen from left to right. And instead, let's us just
see our slides as thumbnails. Here on the left side. This is useful if
you want to take a break from being able to see your slide here
on the right side and a big editable view. And you just want to
take a look at them as thumbnails for a second to
make sure that let's say, for example, they're
in the right order. Or you want to take a look
at more specific details in terms of the animations
associated with each one, or maybe the comments, right? So again, this is all up to you. This is just the
slide sorter view, a different view within
PowerPoint that removes the slides pane here on the right side that we've
all come to know by now. Then after that we have
the notes page view. This lets us change the view of PowerPoint to
what it would look like. Should we decide to print
any of our slides, right? And underneath we
have the notes. Pain that we know by now is always here at the
very bottom right, a little vertical line and put instead in the notes page view. It prioritizes the
notes so I can start typing in my notes
underneath each slide. So that way if I
print out my slides, for example, on an
8.5 by 11 size paper. It would look exactly like this. When I printed out the
slide would be at the top. And all the notes regarding
the side would appear here in this white space. And then where it says Header, there'll be the
number of the slide. So that would be the number one. And then underneath
where it says Footer, that would be obviously things that are
appearing in our footer. Such can be the number
of the slide or the date that the data's already appearing here in the
upper right-hand side. So anyway, just
be aware of that, that you can use the
notes page view. Should you decide to view
your sides this way? Then after that we
have a Reading View, the Reading View button. The Reading View just changes our entire PowerPoint
program to basically almost like a
presentation mode view in which we will see our slides, take over our entire
PowerPoint program. Remove the tabs, remove
the ribbon and so forth, and just be able
to scroll through our PowerPoint
presentation like this. This is just what
this view is for. Of course, the
Reading View button. And if we wanted to
get out of this, we just hit the Escape button, press the Escape button
on our keyboard. So that is the Reading
View button right there. So let me just go back
to the normal view. So again, now we've covered what these PowerPoint buttons
here under the View tab, or for normal, of course, will always be the default. But you have four other options. Should you want to change how your PowerPoint program is laid out in terms of view mode. Then after that we have
the Slide Master button. So the Slide Master button is an interesting button
because it lets us change and format our entire PowerPoint
presentation slides. So in case you're
someone that doesn't want to take the time to format your PowerPoint slides
and structure it nicely. I bulleted lists and so forth. You can just use this button
here under the View tab, the Slide Master button. In PowerPoint, we'll
even do this for you. It will create a
layout and generate a layout for all of your
slides and your presentation. So that way everything
is organized and all you have to do
is go ahead and start clicking and typing
in the text that you want to basically write. This is really cool
that PowerPoint has this because it saves
you the time from having to manually decorate and format your PowerPoint
presentation. And so as we can see here, we have variety of different
views for each side. And they are in order in terms
of how they are organized. And PowerPoint even gives you the textboxes with the
recommended things that you can add there, such as the images and also
the text belongs there. So this is really
useful if you don't want to spend time doing this yourself and
formatting basically a slide or an entire
presentation. Powerpoint can do this
for you again by using the Slide Master button within the View tab in the
PowerPoint ribbon. Then after that we have
the Handout Master view. So what this does is
that it lets us a view, our PowerPoint
presentation slides, and again, a printed type
of Page Layout view. So let's say I want to print out my entire PowerPoint
presentation handout mode. And these little squares
here or rather rectangles, the PowerPoint slides will
appear within my presentation. I can format how
many sides appear in each page that I print out or in each view here rather below by clicking up here where
it says two sides, six sides, nine slides or whatever have you right
now as you can see here, because it has the
light gray background. This means this button is
selected six slides and yes, of course we can see
here that there are six rectangles for
six slides here, but I can obviously
change this to another button should
I choose to do so. And so therefore, my
sides will be printed within these rectangles below. Okay, so this is just what the handout masters for if
you're thinking about printing out your
PowerPoint presentation and giving it out as a handout. Alright, so this is
just another view. This is what this is for. You can always play around with the outline and how many
sides appear on each page. You have up to nine slides
to appear on one page. So obviously, the more slides, the less detailed
each side will be. So if you really want to
let people be able to see the detail in content
within each side of yours. Try to stick two or maximum
four slides per page. And you can even change
out the orientation, whether it is going
to be printed out in portrait or landscape mode. Landscape mode is typically what is used for presentations. But when you print out things, typically portrait is used. And we can even
change the slide size to a smaller standard for three, or the typical widescreen 169. I don't recommend you
play around with this, keep this as 16.9. Unless of course, you don't have that many content and images and elements on your PowerPoint
slides and your presentation. Let's go ahead and
click Close Master and go back to the view tab. So that was of course the
Handout Master button. Then after that we have the
view notes master button. The notes master
button is similar to the handouts Master View button, except this one prioritizes
again our notes. So it will also be
able to show us the content on our slides. Text-only mode below. So again, this
prioritize this more so the text view as opposed to the fancy design and
theme and template view. If you definitely want to
print this out and prioritize the text on each side as
opposed to the fancy design. Then perhaps this Notes Master
view is the view for you. And you can go ahead here under the View tab by
clicking Notes Master. And then it'll be right here. And again, header will typically show the number of the
slide that this page is. And the footer will typically show whatever you
had on your foot. Or in our case, we had the number of the
slide and also the date. Data is up here in the
upper right-hand side, and much like in the
handouts Master view, you can also again change
the orientation of the page, whether it's going to be printed in portrait or landscape mode. Or again, you can
change the size of the entire thing by scaling
it down or keeping it as is. And you can even
reduce the amount of things that are
appearing here, such as, let's say you're
going to remove the date. We want to remove
the page number. If we don't want that to appear
on our printed out pages, we can just uncheck
each of these boxes. Alright. That is of course, under the View tab, the notes master button. And then after this we have
the ruler and the guides, buttons or check boxes rather. So as you can see
throughout this course, I've had the ruler enabled here. But you don't have to. If you uncheck this box here,
you can see this ruler. It goes away from
our slides pain. But if I check this box again, the ruler is added again. We're not going to talk
about what the ruler is four because we already did
earlier on in this course. But again, if you want to
eyeball the size of elements, you can definitely
use this handy ruler that your cursor follows, as you can see
here with the line above, horizontally
and vertically. Also then we have
the guides checkbox. We've also seen the guides
earlier on this course. If you want to keep
everything symmetrical, all of the elements
on your page. You can use these guides checkbox to help you
eyeball that as well. But the default is that
both of these will be de-selected or
rather unchecked. And then after that we have
the notes pain button here. As you can see, this is
selected because again it has a light gray background
associated to it. But the notes pain
as we know by now, is right under our
slide view here. It's right here where it
says the word hello, right? So we can add notes underneath
each one of our slides. For ourselves. Our viewers won't see
this pain down here. Only we will end. This is useful if you
want to create notes here to basically kind of remind yourself of things or things you have to work
on or whatever have you. You can use this notes
pane here to select it and have it show underneath the slide
and the slide pain. You just click here, the Notes button here, and then the little
nodes paint appears underneath the slides on the
right side in PowerPoint, you can just go ahead
and type in whatever you want down here per slide, each side can have its own
little note paint below it. Alright, so that is
the Notes button. Then after that we
have the zoom button, which we know by now. We can change the zoom of the slide in our
PowerPoint presentation. So if we want to make
things closer or rather more doable than we make the number or the
percent bigger. If you want to Zoom things out, then we make the number smaller. So let's say I want to
zoom in on my slide. I would click here where it says 400% and then click Okay, and you can see how zoomed in. Now I am in this one
particular slide, but then there's
a useful button. If you want to go back to the
default that it was before, you can obviously of course, click Zoom again and then click Fit or type in a
number, typically 100%. But instead of doing
this the long way, you can just go ahead and click
this button next to zoom, called fit to window. When we click it, we
can see it zooms back out the slide to fit our screen. So this is a very
useful little button here, fit to window. It will always make and
show your slides in PowerPoint to fit your screen
on your PowerPoint program. Alright, so that is the fit to window button next to Zoom, and that is also the zoom button as well. If you want to zoom in. Then the last button within
the view tab here in the PowerPoint ribbon
is this Macros button. And this is something
that I really won't talk about a lot because this more so deals with advanced
Microsoft Office users. And if you're just starting with the program and you
just want to use it for the sake of completing
presentation, so forth. You really won't be
needing this button here. But macros is more so if you
want to basically create a function that is repeated
often and so forth. So in case this is a
little confusing to you, let me talk about this
a little bit more. So in PowerPoint and in
Microsoft programs in general, you can create a
command that instructs PowerPoint to execute
over and over again. So let's say for example, I use a certain formatting
for all of my presentations. I can create a macro. So that applies that
in one-click to, let's say this presentation. I would go ahead here
and give this macro the name of formatted
presentation. Then I click this
little plus button. I can also add a description, but right now we're
just going to click this little plus button. And when I do that,
a window here that lets me type in
basically sort of code, as you can see here,
the module code. Let me type out a little
command, encode that format, my presentation,
how I want it to, but I can then apply as a macro in any blank presentations. If this all sounds
confusing to you, no need to worry because again, if you are starting off with PowerPoint and Microsoft
programs in general, you don't have to
worry about this. But macros are basically for creating functions through code that allow you to execute different things rapidly
and automatically. So you don't have to do
them manually one-by-one, such a specific formatting when it comes to slides and so forth. But you really don't need this anyway because the
PowerPoint program has so many other buttons that allow you to do
things like that, such as, for example,
the Slide Master or the handout and notes
master buttons anyway. But just know that that
is what macros is for. It is again, a series of commands that you can
create through code and you can group together as a single command to
accomplish a task. Alright, so this has
been the View tab within the Microsoft PowerPoint program and the Microsoft
PowerPoint ribbon. I hope that this helped.
21. The "Tell Me" Button: Hi, this is just a
little bonus lesson, but in case you were wondering what the Tell Me button next to the View tab and the
Microsoft PowerPoint ribbon is. This is just a great
little shortcut to tell the PowerPoint program
what you want to do, what function or
action you want to do. All you have to do is click
where it says tell me and then type in what it
is that you want to do. And PowerPoint will give
you a list of the actions are buttons that are relevant
to that search function. As we can see here, we have
already some suggested actions that we can
tell PowerPoint to do, such as start the presentation, changed the layout of the slide. Insert picture or insert shape. Whatever it is that you type
in this little text box. Powerpoint will then
list out a variety of different buttons that contain the keyword that you typed in. So this saves you
time from having to look for the button yourself. And on top of this, Let's
PowerPoint do this for you. So this is just what this
little Tell Me button here is for. It's a useful little shortcuts with that way you don't have to go ahead and search
for the button. If you don't know where it is, you can just type
in the keywords related to what you
want PowerPoint to do, such as insert a shape or start your presentation or
whatever have you. And as soon as you do this, PowerPoint will either
do the action if you've supplied enough keywords for PowerPoint to know exactly
what it is you want it to do. Or lists relevant buttons
related to your input. Alright, so this is just what the Tell Me button is for up here next to the View tab in the Microsoft
PowerPoint ribbon. Hope this helps.
22. Conclusion Video: Hi and welcome to the thank you and congratulations video. First of all, I
would like to again, thank you so much for enrolling
in my PowerPoint course. I'm very thankful that you
selected in my course, out of all of those courses
that are out there. And on top of this,
I would like to then congratulate you for completing my course and getting this far. I hope that you now
find PowerPoint, a very useful program and
know how to use it to create great presentations both personally and professionally. And I hope that you
found this course very useful as well to get
you there because you are now equipped
with the basics and foundations of the
PowerPoint program. And you now know the skills
and buttons and knowledge in order to be able
to use PowerPoint to its maximum potential. I would like to also
ask you if you could please leave a review
for this course, if you enjoyed it
or if you didn't, because this will
help me and also future students know if this is the correct
course for them. And then it'll help
me in anything that I can potentially improve
regarding this course. But again, thank you
so much for enrolling. And on top of this,
I have attached a resource that gives you some additional tips and
recommendations to help you create better and
more professional presentations and PowerPoint. So again, thank you so much. Congratulations. And I hope you take care. Bye.
 John Cordova, More than 10 years of teaching experience