Transcripts
1. Introduction: Hi, are you an artist and you're searching for your
own voice and style. And maybe you love to
experiment new arts techniques. If yes, then I invite you
to my new Skillshare class, where I will teach you
how to use watercolor and masking fluid and
fun and modern way. Hi, my name is Anna. I work as an
illustrator recently, I also studied the book illustration Academy
of Fine Arts here in Italy. In this class, you
will learn two things. The first is that you will use watercolor in a
fun and modern way. You will find plants or
trees in modern technique. And also you will learn
how to use masking fluid in order to
create lovely textures. I think it's fundamental
to do exercises, to paint every day, and to try new techniques, new styles in order to
create your own voice. So I think that by the
end of this class, you will be one step
ahead in this process. I'm very excited
about this class because it's the first
class that I do, that it's not complex. It's made of some
simple exercises. I think it's a lot of
fun and that they will help you in your creativity. This class is for everybody, no prior knowledge is needed. If you are new to watercolors
and two masking fluid, the exercises are really simple. And also the masking fluid, the topic that I will explain really in a
detailed way here. So here are the
major steps that we will take in this class. First, I will show you
art supplies and we will dive deeply into
the masking fluids. So I will explain
you this medium. I will show you how to apply it. Then we will paint trees. And also I have a
bonus lesson where I will show you how I paint the
final trait illustration. So I'm very happy
to welcome you. If you're curious, then let's
jump into the next lesson where I will explain the
details this class's project.
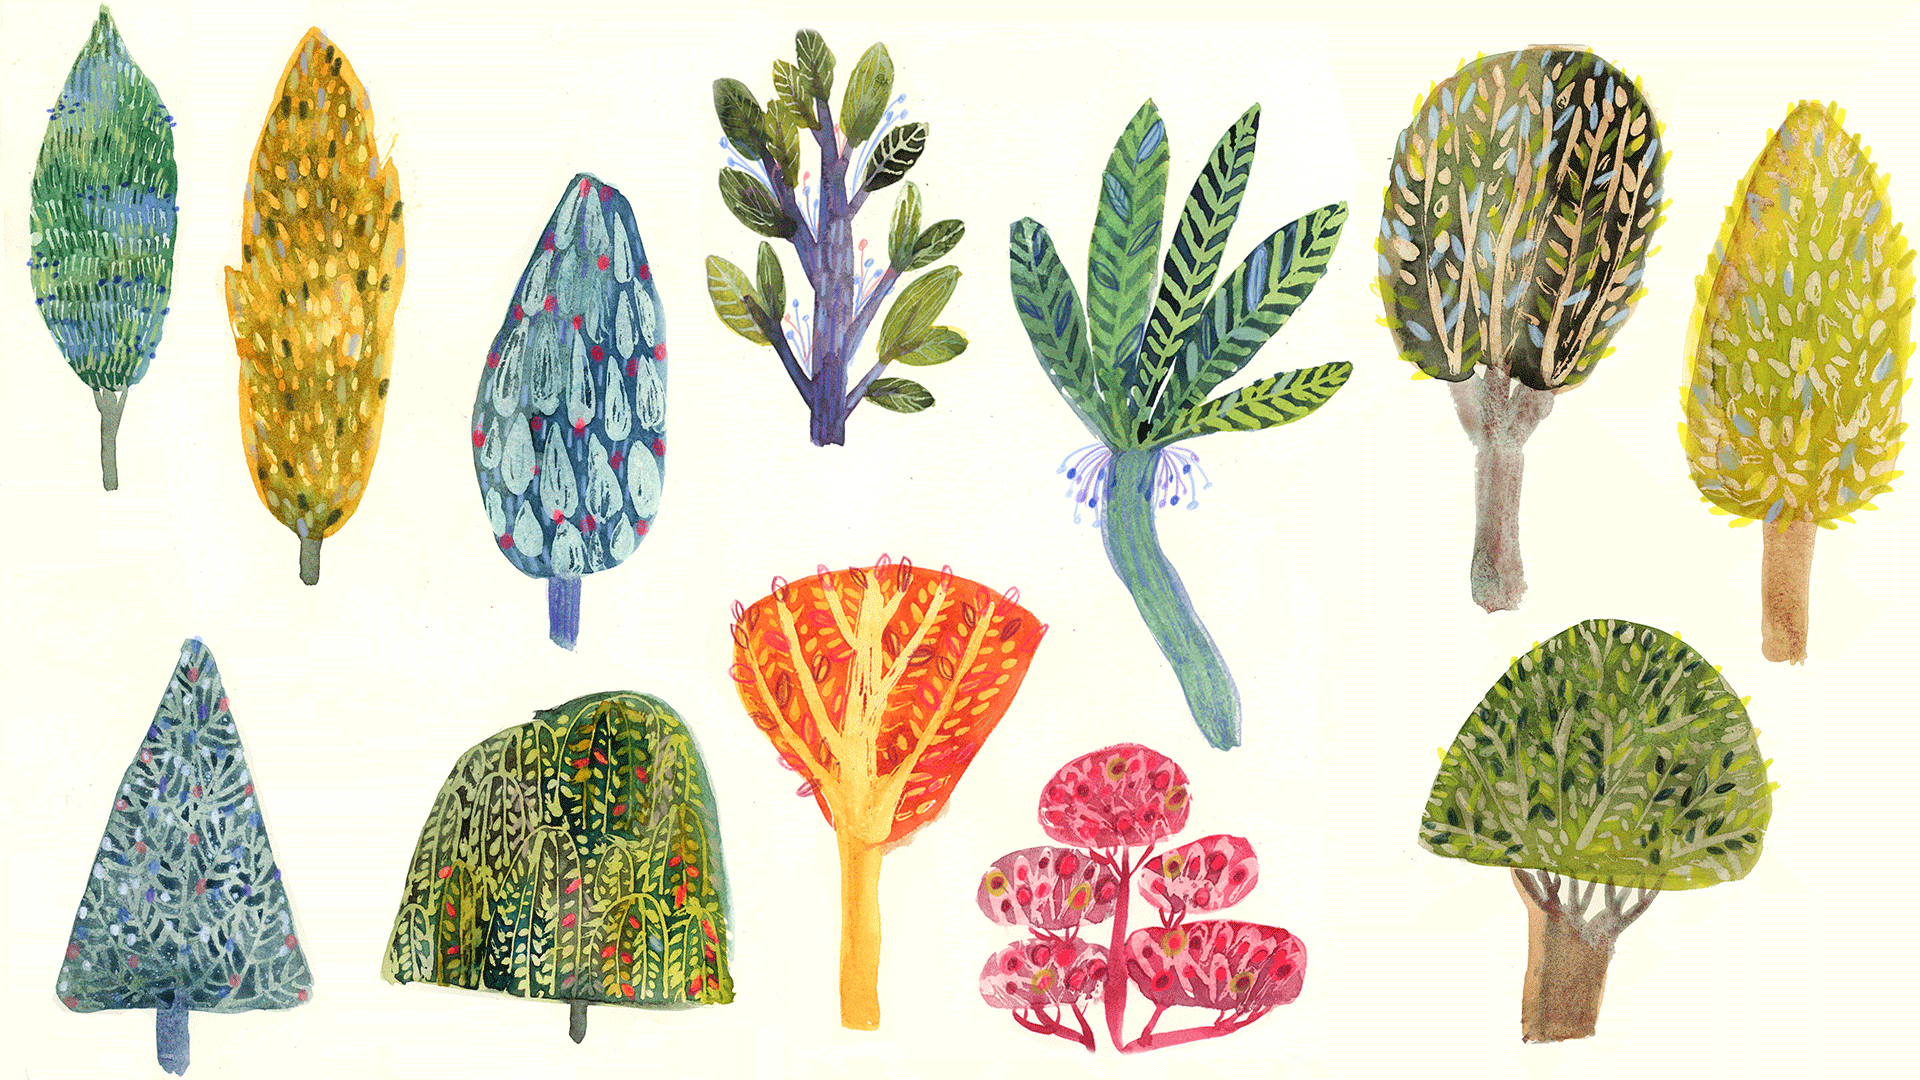
2. Class Project: This class is project. I want you to prepare three
different kinds of trees that you can paint in your sketch
book or wherever you want. They don't have to be. The final and complex
illustration. I would like you to play
with shapes, with colors. Change a little bit here, or creativity or imagination. And also I would like you to try different ways of application
of the masking fluid. I personally love
experimenting and I, I'm still searching for my style and experimenting
new arts techniques, different styles is fundamental
for me in my art journey. I also love in Australia style. So I often do exercises, drafts in order to
create new styles, new ways of drawing. Your surely aware
of how important the sketchbook is in your artistic journey
for a long time, I didn't use it, but I think
it's fundamental, e.g. here in this sketch book, I exercise my style with the
different arts techniques. I'm, I'm searching for
different techniques, e.g. some more realistic style, let's say I will use also this one for this
class's project. I will show you art
supplies that we will need for this class. And in particular way, I will be looking
at masking fluid. I will dedicate three lessons
to the masking fluid. So you will know really
well this Miriam, I'll show you different kinds, different ways how to replicate it in a fun and creative way. And also because I
know this medium causes different
issues, It's not easy. Especially if you're a beginner
and you didn't use it, or maybe you use it and you saw that it causes
different problems. Then I will share
all my knowledge and steps that I have
regarding this medium. Then finally, we will
paint our trees. I will show you the
process of my research. There will be two steps. First, I will show you
how to paint the basics, how to apply masking fluid. And then we will paint the second layer and peel
off the masking fluids. And finally, we will
paint the details. I chose strings as a topic. But you can use other plants or maybe other subjects.
It's up to you. I just thought that plants
are particularly trees, in my case, are a great
object to experiment, to search for
different creatives, shapes that are not
necessarily realistic, but are a good point to start to search for more
illustrative style. And I also prepared a
bonus lesson for you where I will show you how I paint from the beginning
until the end. Illustration or
watercolor paper. It will be the final
complex illustration that later on I can frame
and hang on my wall. I invite you to post your
project in project gallery. As a final project, I would ask you to post at least three different
trees where you will apply all the things that
you learned in this class. What you have to do
is click here on the projects gallery and then
here to upload your work. If you want, you can write few words about your process,
about your inspirations. I think it will be
great for all of us to share our process. I always three projects. And I really love to
see what you create it. I always say the same
thing that I think that it's really useful
and good for all of us. I think also other students watch other students projects. So it's great to
share our knowledge, our inspirations, and
learn from each other. So if you feel inspired, then grab your sketchbook, crap, your watercolors, maybe if you have the
awesome masking fluid. And in the next lesson, I'll show you the art supplies that we will need
for this class. See you there.
3. Art Supplies: Let's have a quick look at the art supplies that we
will use in this lesson. I will use sketchbook
to make drafts. And this one is
talent art creation. And I think it's good. It's okay. Also for the wet mediums,
for watercolors. But you can use the one
that you have at home. I recommend the ones that have a thicker paper
that are good. Also for mixed media, not only for dry pens, pencils, or dry media,
watercolor paper. I will use this one. Molar hot pressed. I recommended for the quality
and it's not too expensive. Watercolor brushes. I use synthetic brushes
from various sizes, from small to big 01, and also a flat pick, one of them comes handy. Then I will use also silicon brushes to
apply masking fluid. This one is from our from
talents, talents art creation. This one is Brown's number two. Number two. And the bigger one is called angular number six. If you have silicon crashes at home and grab the
one that you have. Also ink pen will use this one, but basically the one
that you have a tone. I will use colored pencils for the details and
our protagonists, which are masking fluid. In the next lesson, I
will show you better the types of masking
fluids I have. So jump there to see
to see the details. And also we will use, I will use the toilet paper role and also a plastic wrap. This one is from the tissues, but usually I use also the
one that you haven't kitchen. So find the masking
plastic wrap. Now that you know which art
supplies you will need, jump into the next
three lessons, where I will walk you through the specifics of
the masking fluid.
4. Masking Fluid Part 1: Let's learn something about
masking fluid because that's the major medium
that I will use in order to create fun
and modern textures. So I will show you
different kinds that I use, but basically that you
can find out there. If you're a beginner and you
didn't use masking fluid and then you will find
some useful tips. And if you already use that, maybe you already know that
it can cause some issues. Hopefully, I will
give you the tapes to in order to solve all the
problems that you will have. Also, I will share different
ways of how to apply masking fluid in a fun
and creative modern way. And who knows, maybe
you don't know them and you will learn
something new about it. There will be three
lessons long. But I invite you to
watch all of it because you will find some useful stuff and skills that you can learn. So you're probably already
familiar with this medium. But maybe not. So I will be happy to explain
you some of the basics. Masking fluid is kind of a
rubber dam that it's liquid. But when you apply
it, it will be dry. And you can then pull it off and use it to mask
some areas of paper. E.g. if you'd like some
area not to be colored, then you can use masking fluid. Here's one example. Then we will do exercises boats. Just to explain
you briefly, e.g. those white branches were
masked by masking fluids. So first before applying
the watercolor, I drew with masking fluids. The white where you
see the white areas, they were covered
with masking fluid. Then I painted over it
with watercolor and I created this
stain, this color. And then I pulled off the masking fluid and
the white area remains. So there are many types of
masking fluid and brands. I will show you which one do I use and the basic three
types that I have at home. The first one, the
most common one, is in the bottle. Cover, is gone, but it's the
royal talents masking fluid. I really recommend it. It is really great. And it's a gray color, but they're also white
color is blue colors. It depends. It created this
air bubble and insight. It has kind of a
yogurt consistency. Then you can find
as well masking fluid in this marker applicator. Usually use it for details
because you can apply it with this thing to shrink. One. I also recommend it, It's good. Or I recently found that there are masking
fluids for really tiny, tiny details with this
very thin applicator. This one is met
metal applicator. It's not plastic and
it says it's create 0.5 mm thin lines, so it's really, really thin. I'm waiting for other brands, which I heard is it's
better from this one. But I will show you, I will
test also this one with you. So you will see how it behaves. Right? So now I would like to
talk with you about a few of the characteristics
of masking fluid. What you should have in
mind when you use it. From my experience, if you
haven't used it yet or not, you have some problems, then I will share with you
my experience and tips. The first one would be the
consistency of masking fluid. It can be tricky. Some of them are too diluted, some of them could be to dance. Too diluted. I found this one. It's really liquid. Maybe because it has this
really thin applicator. And maybe to avoid. It to become dry
and it's liquid. But I saw that also. Another masking for
that I had after one year or more than one
year became more diluted. So maybe with time, when time passed, it
changes its consistency. So it's not maybe big problem
if not for the application. Let me zoom it for you. E.g. of another problem of this specific brand that
it creates those bubbles. I think that's also
because it's too diluted. So I really didn't figure
out yet how to apply a thin, really thin lines with this. Because what it does, It's two liquids to dilute it. So it's impossible to create a thin line with the
blobs that's coming out. But I will have
soon another brand. So I will show you it's maybe
at the end of this lesson. When it arrives at then
I will see if it's better because I heard it's
more dense and it's better. So the first problematic
is when it's two liquids, It's hard. It's not easy to
apply because if, especially if you want
to create some details, another problem can be
when it becomes too dry. So this one is, it has already two years, I think, and it's still okay. But after time, it
creates this kind of a film can be created
on the surface. So it created this
kind of call it. As you can see. Why disgusting. Now you can just remove it. And when it creates
also above the surface, you can just take some tool, maybe a brush and take it out. Also, it happens to
me that I had this shrink masking fluids and the marker and I didn't use
it for about a year, I think. And it all became dry inside. Didn't go out because the fluid's dried and become rubber. This one is new, so it's okay, but my tip for you is to use it because when you will wait than with time, it will dry it. So that's my experience. Okay, So another problem is that your masking fluid
can move in your paper. You can tear off a
piece of paper, e.g. here it third of Peter of this piece of
this paper or e.g. here. So there is one reason I
know when it can happen. It's when your color
underneath is still wet. You have to apply your masking
fluid on the dry surface. This watercolor was dry before
I applied masking fluid. It's really important. Otherwise, you will
tell off for the paper, this kind of mistake happened
were when I prepare it to the other class about
the negative painting. And I didn't wait enough
to layers to dry. And this is what happened
when I pulled off the masking fluid to turn it off
a little piece of paper. So my recommendation
is really to weight your painting
to be dry and to be 100% sure that your
color underneath or your paper is dry before you
apply masking fluid on it. But my experience
is also that it depends also on
the kind of paper. So I have this problem
with this type of paper. This one is my sketch book. It's a sketchbook. So theoretically it's really
very good quality paper. But I, so it has this
problem with masking fluid. So probably it's also
depends also on the paper. Usually, if you have
a good quality paper, then it shouldn't happen. So this theory is
not always, right. So probably you should always test beforehand
the masking fluid, that's my tip for you. Before painting, do
always a test both on the white paper and then try
to apply it also on color. And then see how your paper, how does, how does it work
with your paper? Because e.g. this sketch book, which
has a lower quality, theoretically, this one is Royal talents,
artistic sketch book. And the paper is thinner. It's not so thick, but it's good for
the masking fluid. I did several trees here
and it's never ruined. The papers are another
problem that you can have is that the masking
fluids can live color. So it happened to me
with my masking fluid. Width was very old. It was this kind of masking fluids are already throw it away so I
cannot show it to you. It was the Molotov
masking fluids, so it was very good
masking fluid. I really liked it with time. When I use it. It was a few days ago. It also has blue color
as this shrinkage one. When I took off
the masking fluid. As you can see, the
blue color remained. So probably that's
because it was old. This problem didn't happen with the shrinkage masking
fluid, in my case, is so you shouldn't be
worried about this. But if you prefer, you can always choose the
white masking fluids. Sri Lanka has also white
version of this one or this one didn't leave
stains never, ever talents. But also it could be issued for you when you
apply masking fluid. It will leave the blue mark. Obviously when you deleted, when you take it off, it will disappear
because you peel it off. But while you're painting, it can can be disturbing for me. It's okay, but if
you feel that you like to have neutral color, then you can choose
the white one. Let's walk through the steps
that we took in this lesson. First, we saw the different
types of masking fluid. Then I show two different issues that it could cause, e.g. it's consistency
issues with paper, and that it could stain
your paper as well. So now we can jump into the
next lesson where I will show you different ways of how
to apply the masking fluid. See you there.
5. Masking Fluid Part 2: I'm really happy
to welcome you in this lesson because
here I will share with you many different ways of
how to apply masking fluid. There are really many fun
ways that you can do it. You don't have to
use only a brush also because usually
you will ruin it. But there are many different
tools with you, you, with which you can
do it in order to achieve really
lovely textures. So let's jump in. This one. You already saw. It should create thin
lines, but this one, particularly to liquid
creates blocks. In this case, we
will try this one, which is also good, which is good to
create thinner lines and it also have
thin applicator. Let's see together. Remember your
watercolor must be dry, so my watercolor paper is dry. And as you can see, it's more dense. Doesn't hello away. When I push really, really, really carefully, it
creates really thin line. When I push harder, the line is thicker. So this one is great
to create details. And here you can create
releasing lines. After all. Also with this one, you could use a brush to apply
masking fluid from bottle. But the problem is that
the brush will be ruined. So you can use old brush, cheap brush that you don't use. But after all, I never
use brush also because it creates a afterall
thick, too thick lines. And I don't really find it too comfortable to apply
masking fluid. But if you'd like to try brush, I heard that if you
have a soap before, you will dip your brush
into masking fluid, you should first
wash it a little bit and then with the
soap on your brush, dip on masking fluid. And it should
protect your brush, then you should
be able to remove it without problems because otherwise it will stick to your brush and it won't go away. As I said, I don't use brush. What I actually do that, I use the silicon
brush to apply it. So royal talents, art creation, this is number two. Okay? There are different types. This one is bigger and
has also different shape. This one is royal challenge
as well, and it's angular. Number six. I like it because it creates
really lovely textures. As you can see, you can
cover all the surface. And you will have a willing, homogeneous, nice
area, masked, covered. Or with this specific brush, I can create textures
when some of the areas left uncovered. So if you, if you don't
have this thin applicator, you could try using
the ink pen, dip pen. Hopefully it will work because
this one is really old. It has some issues, but usually it works. So let's try. You want just to
dip it like it was Inc. and when you have
rubber masking fluid on it, you just paint with it? Yes. So my case, because this
one is a little bit old, it has some issues, so it doesn't work good. Neither with ink. But you have to trust me. This, that it creates
a really thin lines. Maybe I'll be able to buy
a new one and show you, oh, here it is. Once and that's it. Here it is again. All right. And to clean your dip pen, you can easily do
it when it's crash, when it's still wet. But if it's if it
will dry on ER, then it's okay because
it will peel off easily. It's one stay attached. Last tip for you of how
to apply masking fluids is to use that. Sorry, Let's paper roll. E.g. with toilet paper
and masking fluid, I created those and
many other patterns. We'll use it for my trees
to create lovely textures. I'll show you how to do it. So first you have to
prepare your masking fluid. I will leave it here. This is metallic
cover for my crayons, but it won't ruin it
because once it's dry, you can easily peel it off. So you can do different
things with this. Just be created. You can apply it as you wish. E.g. I. Will deep older surface from it. You can see here to create circles, shapes, e.g. what I often do is that
I cut it some pieces. I will, I will come to peace. And e.g. I. Will make it a
little bit smaller. So I will have this shape. This, once again. I dip it in the masking fluid. And I will create
this kind of shapes. E.g. you could create
a lovely flower. It's great to create
leaves, textures. Leaves shapes. Or I could e.g. just use one side
of it like this. And again, dependent example, if you'd like to
create grass texture, you want it smaller. No problem. This smaller. And I can create different
kinds of textures. Sample some pattern. We can play around. Really very, very
creative with this. And you can find your
own ways to advocate watercolor masking
fluid. It could be e.g. a. Plastic patrol to
create tiny circles. It's could be, I don't know, whatever, just be, be creative. If you find new ways, then share it with us. Share, Let's share
our knowledge, our tips with one another. I'm really curious and
I will wait until it will dry and then I will paint
over it and I'll see you. I will show you how
it will peel off. For this and for other tips, let's jump into the second part of how to apply
the masking fluid.
6. Masking Fluid Part 3: Masking fluid is already dry. You can see it because it becomes darker and
more translucent. Obi-wan that was
white is translucent. This blue, like this. The gray darker now
and also translucent. And when you touch it, it has this rubber texture. Quite sticky. So once it's dry, I will paint over a large
brush and the same color, this dark green color. So the watercolor
is already dry. To peel off the masking fluid, you can use your finger. But if you want to make it easier and faster way than I suggest you to
use plastic wrap up. This one is the classic rub
that I took from the tissues, but usually I use the one
that you use in the kitchen, but I don't have
it in this moment. So let's try this one. So basically, it's
better when it's faster. So this is the blue one, is, as you can see, it didn't leave any
color, any stain. So that's not an issue. I finished it. It's
a little bit messy. So it will create all
the all the mess around. When I work with
masking fluids and I find it everywhere
on the floor, on my table, on my working desk. I'm really happy
with this result. So this one was the
shrink and marker. This one, look how lovely
texture with silicon brush. So you should be aware that at the end
with silicon brush, it can create this texture even if you cover all the area, probably I wouldn't
recommend the silicon brush if you want to have for
the homogeneous color. But if you want to
create these textures, It's a great tool. This one is created with
toilet paper roll here. And this one is the tip pen. As you can see, it creates
really thin lines. It's cool. And again, toilet paper. So as you can see, this paper didn't
create any issues, but didn't the masking
fluid didn't ruin it. So it's great. My new masking fluid
arrived today. So I wanted to add little
feedback about this one. I will try it out with you. So it's the same as this one, but this one is half
milliliter, millimeters, sorry. And this one is 0.8 mm. It has a nylon nip, while the other
one had metal nib. But it's still a thing. Let's see how thin
lines can get can get and is it more dense because the other one was too diluted. So yeah, I think it's okay. The air bubbles. I think it's a normal thing. It happens. And he would go allow,
It's fantastic. Look at this. It's, the
consistency is perfect. It's not, it's not too dense. And see how Tim yeah,
there are bubbles. I kind of I think you cannot avoid it. But once your have
your liquid out, then it's really,
really nice and thin. Especially if you're able to control movement
and the pressure. I think you can achieve
really thin lines. So let me, the bubbles
are so annoying. I wanted to try
make some zigzag. It's not so easy to control. But what I wanted to try is a tool kit because I heard
that someone did it. And I'm really curious
to try it on my own. To skip the nibs. They should work
with each other. So I will take the other
NAEP which is center, will then a metal nib. Let's try if it goes
on top of this one. And what works
also for this one, it has the same top. So let's try if I
can use this one. Doesn't make difference. Shoot vertically. It's thinner. So I see it's easier to control. Looked at this, this
one is fabulous. This one is really thin. If you're into
searching really thin, thin, thin masking fluids lines. So this is the perfect solution. Probably. Well, the first thing is that
you can take both of them, take both of these bottles. And skip switched,
sorry, switch. I think I said skip
before I meant switch. You can switch to
nips or I will, I would also like to try, but not in this class. I will have to try it
maybe in the discussion, or I will do it. To put here. I mean, if you have this bottle already without having
to buy other liquids, masking fluids with the name. Put here another masking fluids, like like this one. Why not? I would have to
give it a try or maybe I could mix them together because maybe this
one is too dense. So I will make this test also
for the discussion panel. But for now, let's tried to, let's wait until this one. Tries and see how it works. But until now, I'm
super happy about it. So here it is. Perfect. Look how thin the lines are. They also a pillow really
pretty nicely without further effort because there's tiny city of masking fluids. Sorry, this was the
air bubble also here. But look at the lines. It's really, really nice. So I think I found a
solution to have thin lines. Okay? So that would be it
for this lesson. Okay, so this is the final
result of my testing. So let's recap as always, the major steps that we took
in the last two lessons, I showed two
different ways of how to apply the masking fluid, e.g. how to create a thin
lines with applicators, with nibs or with an ink pen. I saw, I show to how to
use silicon brush and toilet paper in order to create different and
interesting textures. And of course, maybe
you will come up with some new ideas of how to
apply the masking fluid. Okay, So that's it. That's more that's more or less what I wanted
to share with you. I'm also planning to do another class about
masking fluid itself and experiment more and dive more deeply
into this medium. I also invite you to ask me some questions if you have
them in the discussion panel. So then we can
talk a little bit. If you have some
issues and questions, then come back to me
in discussion panel. Okay, so let's jump into the next lesson where we will
start to paint our trees. See you there.
7. Painting Trees Part 1: Now we can start
painting our trace. I will divide it
into two lessons. First lesson we will paint the first layer
that it's dry and then we will apply in different ways that I showed
you in the previous lessons. We will apply masking fluid, then we will wait
until it's dry. And then the second lesson, we will paint over it, kill off masking fluid. And within some trees, I will do more layers and I will apply masking
fluid more times, but I will explain it. During the process. Finally, we can start playing around and
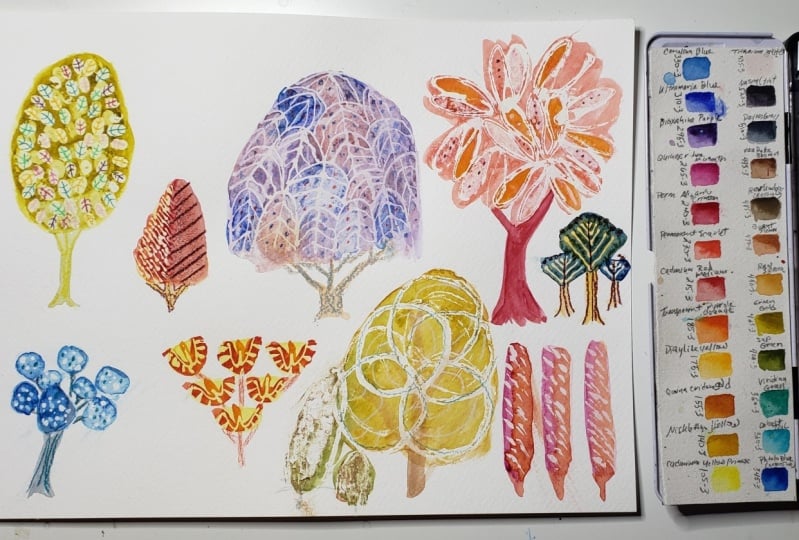
painting our trees. So my process will
be that first, I will paint all the shapes. I will think of all
kinds of shapes. I watched my mood board, I watched my books, and I thought that I
would like to search graphic and modern
shapes. Colors. I want give you a color palette. It's up to you. I will also play with colors. Also. In this lesson. In this class, you won't
have to do a final tree. You can do it in bonus lesson, but in this phase, you work in your sketchbook, so you can also make mistakes. The purpose of this exercise
is to exactly exercise and I'm not trying to
find final solutions. So play with shapes,
play with colors. See what will come up. Once. I will paint all the trees, then I will let them dry and
I will apply masking fluid. I will play with the different
types of masking fluids with different ways
of application. And when the masking
fluid will dry, I will paint the second layer
of colors over my trees, and then I will peel off the masking fluid to
see the final result. Afterwards, I will apply some details with
colored pencils. So that's more or less
my way of painting. You can obviously do one tree, finish it, and then
start another one. Totally up to you. I did it mostly also
because in the meantime, while I'm painting
the second tree, the new trees that old ones with the
previous ones will dry. So that's also the practical
side of this method. Yeah, it's totally up to you. So I will speed up a little bit. I forgot to tell
about the I wanted to clarify that I will
use only watercolors. With wet on dry technique, I will alternate colors, play with different gradients. It means that sometimes I
will use more than color, than one color and let
them blend together. I will play with
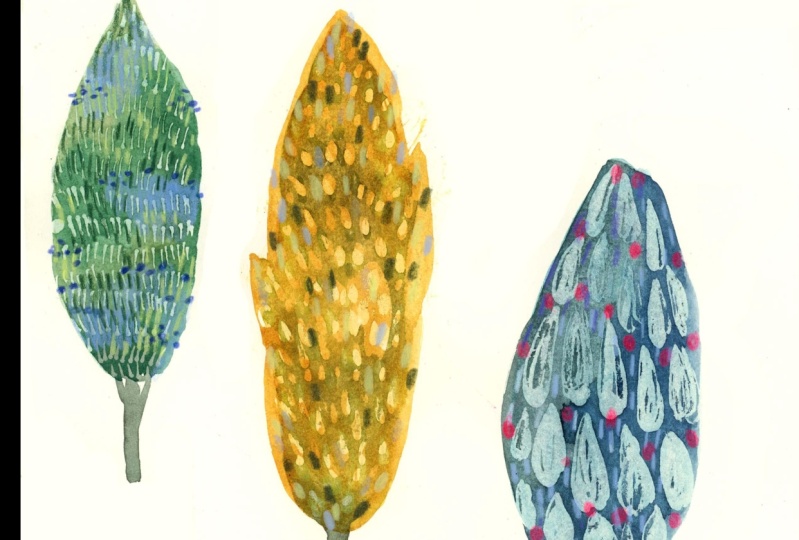
different shapes, e.g. here I want to draw a poem. I drew a willow tree and poplar tree and other that
are not quite defined. It really is about playing. Also, if you want to
paint something more realistic, you can do it. If you want to play with shapes. As I do. Whatever you feel works best
for you, just go for it. My playing with forums is
basically searching to simplify the shapes of trees. I play with geometrical
shapes, circles, ovals. I'm just trying to simplify
as much as possible. The trees, shapes of crowns. The first tree, the Cyprus, I will, I want to do needles. So I will use this very
thin masking fluid. I already changed the nibs. I explained to you that
in the previous lesson. So I will use the metal thin
nib and see if it will work. So far so good. Yeah, In this case, I want to just make
tiny, tiny lines in the yellow tree. This one is poplar. I wanted to try to make
the dots of light. So first I will try
with this marker, and then I will alternate
also with the silicon brush. I will use the
small silicon brush because I want to have the tiny, tiny textures,
tiny leaves, dots. Sometimes they will
be regular and sometimes they will
be not regular. And it will create this lovely texture that
I really, really like. That seems to be
like Linnaeus cut. I will continue with
silicon brush this time. I want to make bigger marks to achieve
this knock-out effect. And I think the effect will be similar to a
cone, a cone shape. Those seems to be
seats from a cone. I really, really like
this kind of design. Now I'm switching
to shrink a pen. And I want to create
a pattern which will be similar to
winter pine branches. A son Qi, and more salary style. It's time for the willow tree. And I will do the branches with the shrink happen
and the leaves. I will finish with
the silicon brush. This tree I want to try again the thin nib because I
wanted to create leaves, lines very, very thin. This particular tree I
want to make in two steps, the branches, I want
them to be yellow. So I will paint branches
with silicone brush. Then I will paint over
creating the orange layer, and then I will paint leaves. So I wanted to do this
experiment with two layers, two colors you will see later. So right now I'm covering
the yellow layer. For the last three. I will use this time a role
from the toilet paper. I caught a tiny
pieces as I prefer, masking fluids in the
top of the bottle. And then I will dip
into masking fluid. This cardboard. And I want to play a little bit with shapes and creating
these semi-circles. Okay, now, I will wait until
the masking fluid is dry. And in the second lesson, I will paint the second layer
may be third in some cases, and I will peel off the masking
fluids. So see you there.
8. Painting Trees Part 2: The first three are dry, so I will proceed with painting the second layer on top of
the dry masking fluids. Now, I will jump
into the tree when I wanted to create three layers. Now I'm painting the second
layer, orange color. And above that layer I want to paint leaps with
the masking fluid. Now it's time for
the poplar tree and I think I will
do the same here. I mean, I will paint the second layer and
when it will be dry, I will peel off the
masking fluid and I will do another layer
of masking fluid leaves. You will see later on right? Now, I'm painting the
second watercolor layer over the pine tree. I wanted to add
also snowy texture. So first, I will paint watercolor and while
it's still wet, I will splash a little
bit of white ink. I didn't mention it
in the art supplies, but that's because it's
something additional. If you have white ink, you can try it as well. Or maybe you can play with
other inks in order to create textures.
Let's play around. Sometimes I will
play with colors. I will add different
kinds of colors on the second layer just to
see the different effects. Now I'm turning
to my orange tree and when the orange
layer is dry, I apply leaves with
silicone brush. For the third layer
for the orange tree, I will use red color, while in the meantime
the leaves are dry so I can paint the final layer. Finally, it's time to peel
off the masking fluid. You can do with our hands. But I will use this plastic crap because I find, find it easier. It payoffs faster
with less effort. You can do it with your hands or sometimes also the
eraser can be helpful. I also heard there is a
special rubbing off gum. I think you can find
an art supply stores, but I don't have it. I think plastic crap. Do does its job. Prepare yourself? Because this process
is really messy. So also, a broom can be handful when you use
a masking fluid. This process is really fun, especially in the
moment when you discover the layer beneath, I'm really happy all the effect. And I will proceed with
the remaining trees. As I told you for
the poplar tree, I want to make another
layer of masking fluid. Then I will paint over it
because I wanted to see if I can achieve another
dimension of light. Stains, of light, dots
that I have in mind. Let's see how it will work. Here. I thought to give a little bit of light and a little bit
of color in my willow tree. And I want to make really diluted light layer
of this warm yellow color. I also thought to add
wooden texture on the pole. And later on, I will also paint light layer of turquoise
over the leaves. So here's the final
result of the trees. I will leave it also in
the cluster's resources. Let's see the process of the previous two lessons where
we painted the trees and I tried to simplify the
forms of the trees. Then, uh, you have to paint the first layer of watercolor, then let it dry, then apply, apply
the masking fluid, let it dry and paint over
it the second layer, you can repeat this steps as long as you want to in order to create more
overlapped layers. Okay, so now that
our trees are ready, we can add some sparkle and pain details.
So see you there.
9. Details: You can skip this lesson if
you feel that your trees are ready and you like
it the way they are. But I also like to add details, so I will use colored pencils and I will
show you how I do it, but you can use your
favorite art supplies. You can continue with
watercolors and adding details, or maybe acrylic or inks or other markers there many ways and you will know what
will work best for you. I will use different
brands of colored pencils. The only thing in common and
that I usually search in colored pencils is
that they should be really high
pigment it and soft. Because I worked
with mixed media. I often cover, must
cover or watercolors, gouache or acrylic with pencils. So they should be really soft. They often they have oil inside. It doesn't mean that they
are oil like oil pastels. But having a little bit
of oil makes them more soft and it's easier
to cover the color. So if you're working with
mixed media and you would like to cover in the media
that you worked with, that you are working with. Search for good-quality
pencils. So e.g. here I use the whole binds
artists colored pencil I ordered on the white color. I think it's really very good, but it's also very
oily and walks waxy. So it's almost like oil. Pastel. Right now. I'm using fabric Estelle, pull the chromosomes are
really good quality. Now I switched to
Hubbard pastel, Albrecht Durer, it's
watercolor pencils. They can be diluted with water and then create
watercolor textures. Usually watercolor pencils are also good quality or
high pigments it, and they are always softer
than the normal pencils. The other brand of watercolor pencils is
Darwin's that I use. Also Darwin's ink tents, which are really great. They are really high
pigments it and when you use water with Darwin's intense pigment is
really, really very colorful. Other brands that I use is Darwin's light fast
and Karen dash, luminance, more or less. I have also other
brands, watercolor, It's Qur'an dash
and like Museum, a quarrel or soft supra color. And try them. Probably you have
already at home. So try them over watercolors. See what works best. If you have some art
supplies shop nearby, go and you can test, see specifically which
one of them are harder, which one of them are softer, and so on, etc. Well, what I'm doing
actually here is that I'm playing around
with I don't know, I never plan what I will do. So here, e.g. I'm adding colored strokes
in between the gaps in between the lines that are created already
with watercolor. I just wanted to add more color. Light, gradient effect. Maybe I will play it
with some greens. In this case. I also use blue with a
little bit of violet. I think it's called blueberry. It's harder. I think it's our
teaser pencil brush. I love their tea that colors, but they are harder, so a little bit
more difficult to apply on the watercolor. I decided to add some
dots on my winter tree. Here. I'm, I'm testing also. I'm trying. So here I'm testing how
this blueberry lilac color. We'll work on this violet, purple tree and I
think it's okay. You can also use your
sketch book as kind of place where you will explore colors, combinations of colors. If you're not sure, then you can use just monochromatic combinations that are manias combinations. It means that you can use
blues with blues violets, with violet screens, with greens that more or less
what I do here. For darker greens, you can
use the lighter one and, and vice versa, etc. So, explore your colors, explore the types of pencils. And I will also proceed
with my exploration. E.g. I decided to
add leaves patterns. So basically, I'm playing also with shapes, with patterns. I'm testing colors, textures, and see what works best for me. So because sometimes I decide to add other layers of
textured masking fluids, sorry, and other layers
of watercolor from, I decided later on, also in this case, while I'm painting with pencils, I will also finish
another trees, e.g. the bark of this poem is ready. I mean, the masking fluid
is dry and I paint over it with really light
lavender color. It's watercolor. It seems like almost like a
gouache because I think it has white pigment in it. And basically watercolors
never have white in it. That's why there
are translucent. This one is Aquarius, a brand it acquires brand
has some colors that are really more washed and watercolors because
they are more opaque. So I use this lavender
color from aquatic. Now, I will proceed
with pencils. I will also finish
poplar tree later on, as soon as the masking
fluid will dry. For some plants,
I will also paint external elements, e.g. here. Kind of various.
Maybe in this case, I was inspired by the plants
in the real life that I saw. I really like those berries. The end, I decided to add a contrast color
to my pine tree. In this case, It's really
bright and vivid. Each color. I would like you to very
much so I will add it to more of my trees. Now it's also time to peel
off the masking fluid from the third layer. I mean, it's the second
layer of masking fluid. If you remember, I made two
layers of masking fluid. The first one day I paint
over it with watercolor, and again, I repeat
it to first steps. I apply the masking fluid and painted with
watercolor over it. And I'm really happy
of the effect of the textures were some
of the dots are lighter, some of them are darker, and they are overlapping. So they create really
nice flights effect. And I will add also
colored pencils anyways, because I want to add a little
extra color to my popular. I will paint with
different shades of green. Here. I am pulling off the
bark masking fluid. And also, I think the
result is quite nice. The green with this lilac
lavender color above. I think Silicon brush is
perfect for the wood textures. And I decided that I will draw some pound fruits also
with polymers, pencils. So here's the final
result of the trees. I will leave it also in
the class resources. And I will leave you
all saw the list of the colored pencils
that are used. Okay, So we're finished. I invite to applaud also what kind of art
supplies that you use. If you like to write
a little bit about the process of painting trees and upload it to the
projects gallery. And now I invite you to the bonus lesson where
I will show you from the beginning till the end
how I painted this tree. See you there.
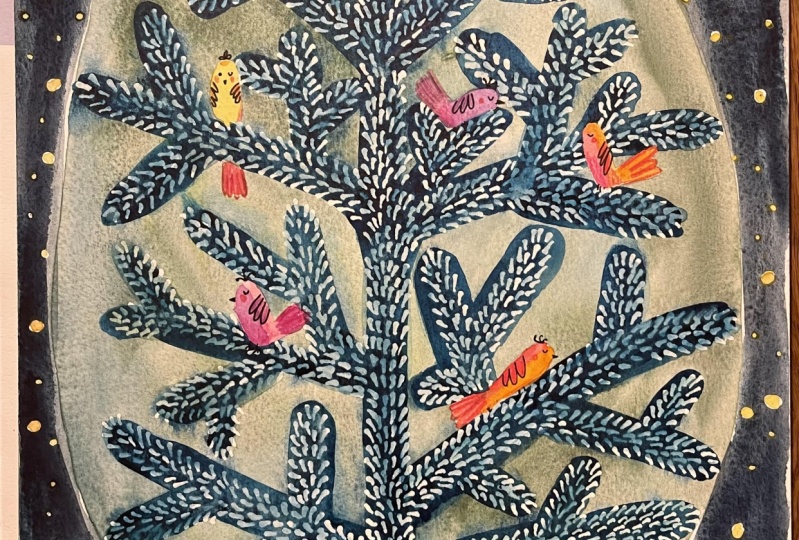
10. Bonus Lesson: Welcome to the
last bonus lesson, where I will show you how
I paint this winter tree. Because it's winter here
when I'm doing this class, soon it will be Christmas. So I decided to paint a pine tree without
any declarations, but I was inspired by the
Christmas tree itself. Feel free to paint
your own tree. But if it's enough for you, then you can just stop by
painting only the draft trees. And if you feel
inspired and you can paint your own
final illustration, you can then frame
it and hang it on your wall or maybe
give it somebody, especially if it's
Christmas like here. Right now, relax and
watch my process. So first of all, I've
already prepared my sketch. I sketched the pine tree with n, So maybe I could do the
lines a little bit bolder, a little bit darker
because later on they will disappear when the two
layers of watercolor. It's fine anyway. And I will use masking fluid. I'm the one with thin nib. In order to create needles, I will apply it directs me
on the white paper because I want the needles to be white. Then I will peel off
the masking fluid. Now, I will paint
the first layer. I will prefer a very
light wash of color. I don't want it to be too dark because this is the first layer and I will
create a shape of the tree, the oval-shaped also
outside the branches. And to do that, I will use a very light color. I'm mixing my favorite
granulation watercolors, and makes all blues
and blueish greens. In this case, I think it's Glazier green functioning care, and Florence Lu from
Sri Lanka as well. And I let them blend
together to create, because they will create a really crispy,
wintery green textures. While the paint is still
wet, I will sparkle. Make some splash with
wearing the white pink that I used also for my draft
paying a fine tree. I prefer drops of white ink
and then I will dilute it and splash with a brush
in order to create snowy texture the same as
I did for drafts treat. In this case, I will
use a toothbrush. Um, you can use also
normal paintbrush. And as long as it's not, as it's not too soft. Toothbrush is a good
solution because the bristles are not, they are not too soft and they
splash little bit better. So have a look how lovely
texture it creates it. And I will also
add darker slash. So the process is the same. But in this case, I will
use just watercolor. Decided to add another texture. The paint is still wet. The paint is still wet. So it's the wet
on wet technique. And just tap rush
with my green color. I think it's it's creates
pine tree effect. I don't know how to call it, but I think it works quite well. And when the layer is dry, I will paint with a
darker green color. I will also mix greens and
let them blend together. Some, some, some
branches will be green somewhere be blueish. I really like to combine
different Radians, different gradients of color. As you can see, the masking fluid
is showing through. I still haven't peel
it off because I want to take it off as the last step where when the tree
will be painted. That's because I want the
needles to remain white. So right now, it's a
little bit difficult for me to find the branches because my pencil has
disappeared and I see only the traces
of masking fluid. But yeah, I managed any way to find more or less
the original shape. In this step, I forgot
to tell you that the color is more than I said, darker, but it means that
it's not only a darker tone. Yeah. I mixed darker greens, but also there's more
color, more pigment. It's not so diluted as high as it was for the
background colors. So if you want to
do a similar tree or similar process with
the background that it's lighter than
for the branches. Use more dense watercolor. Wash. If you're not sure how
to use watercolors, I also have a class
that where I show the basics of
watercolor and whereas also the exercise with
the transparencies. And when you use a different
density of watercolor. And again, I'm using different colors and let them blend why they
are still wet. So that's more or less the
process I use to paint all the branches of this tree. I decided to call it finished. For now, maybe I will add
to break ground later on, I was thinking to add some indigo dark blue
background outside the tree. But right now, I will
leave it like this. For now. I will peel
off the masking fluids. So I must tell you that I was tempted to
leave it as it was, because it created a
really lovely texture. The masking fluid that was
underneath was kind of 3D. And it created really, it seemed to be a
needle texture. And I thought it would be
cool to mask the background, not the white paper. So the needles could be a little bit lighter
books not white. So that's why I decided to peel off just some
of masking fluids. Not all of it because I
thought that although swipe strokes would
be too heavy, maybe I really liked the original covered masking fluid and the effect that it's made. So yeah, I didn't
feel it off entirely. So here it is. Here is my
final result of the tree. So if you decide to paint
your bonus extra tree, then upload it to
your project as well. But remember, it's not
the part of the project, It's only if you like to
paint, define illustration. So I invite you also to
see the last lesson where I will share some final
information with you.
11. Final Thoughts: Thank you so much for
joining me in this class. I hope you had fun. I hope that was
useful fun for you. And I hope that you'll
learn a lot of new skills. Let's recap all the steps
that we took until now. So first, I showed
it all art supplies. And specifically, I explained you different
kinds of masking fluid and different creative
ways of applying it. Then we tried to use all the previous
steps in order to create the trees with our
inspirations and with different kinds of applying
the masking fluid. Also, I showed you how I paint details of colored pencils. And as a bonus lesson, I painted a whole tree
and not as a draft, but as a final illustration. I really hope this class
was helpful for you. Not only in the way that
you will use masking fluid, but I think first of all, in the process of
your creative journey that it was helpful for you.
 Ania Kropla Malinowska, Award-winning illustrator