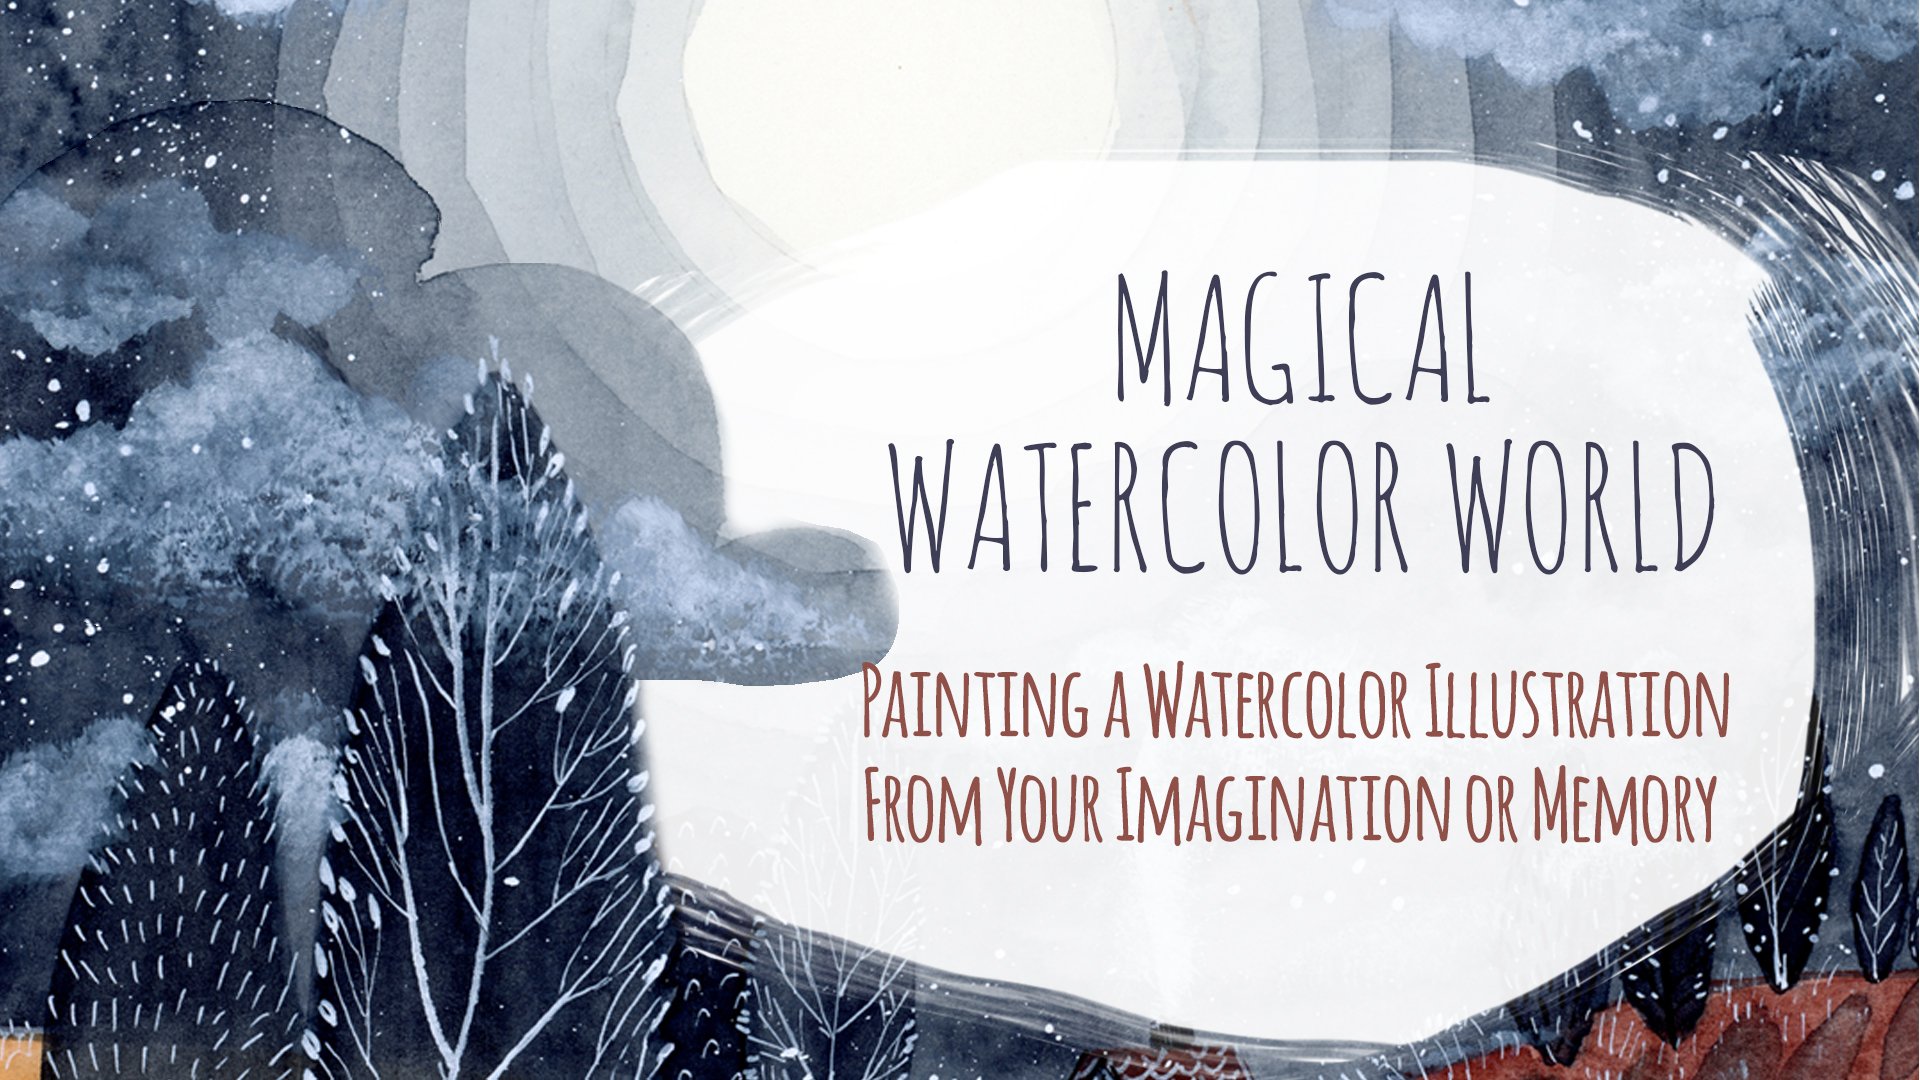
Transcripts
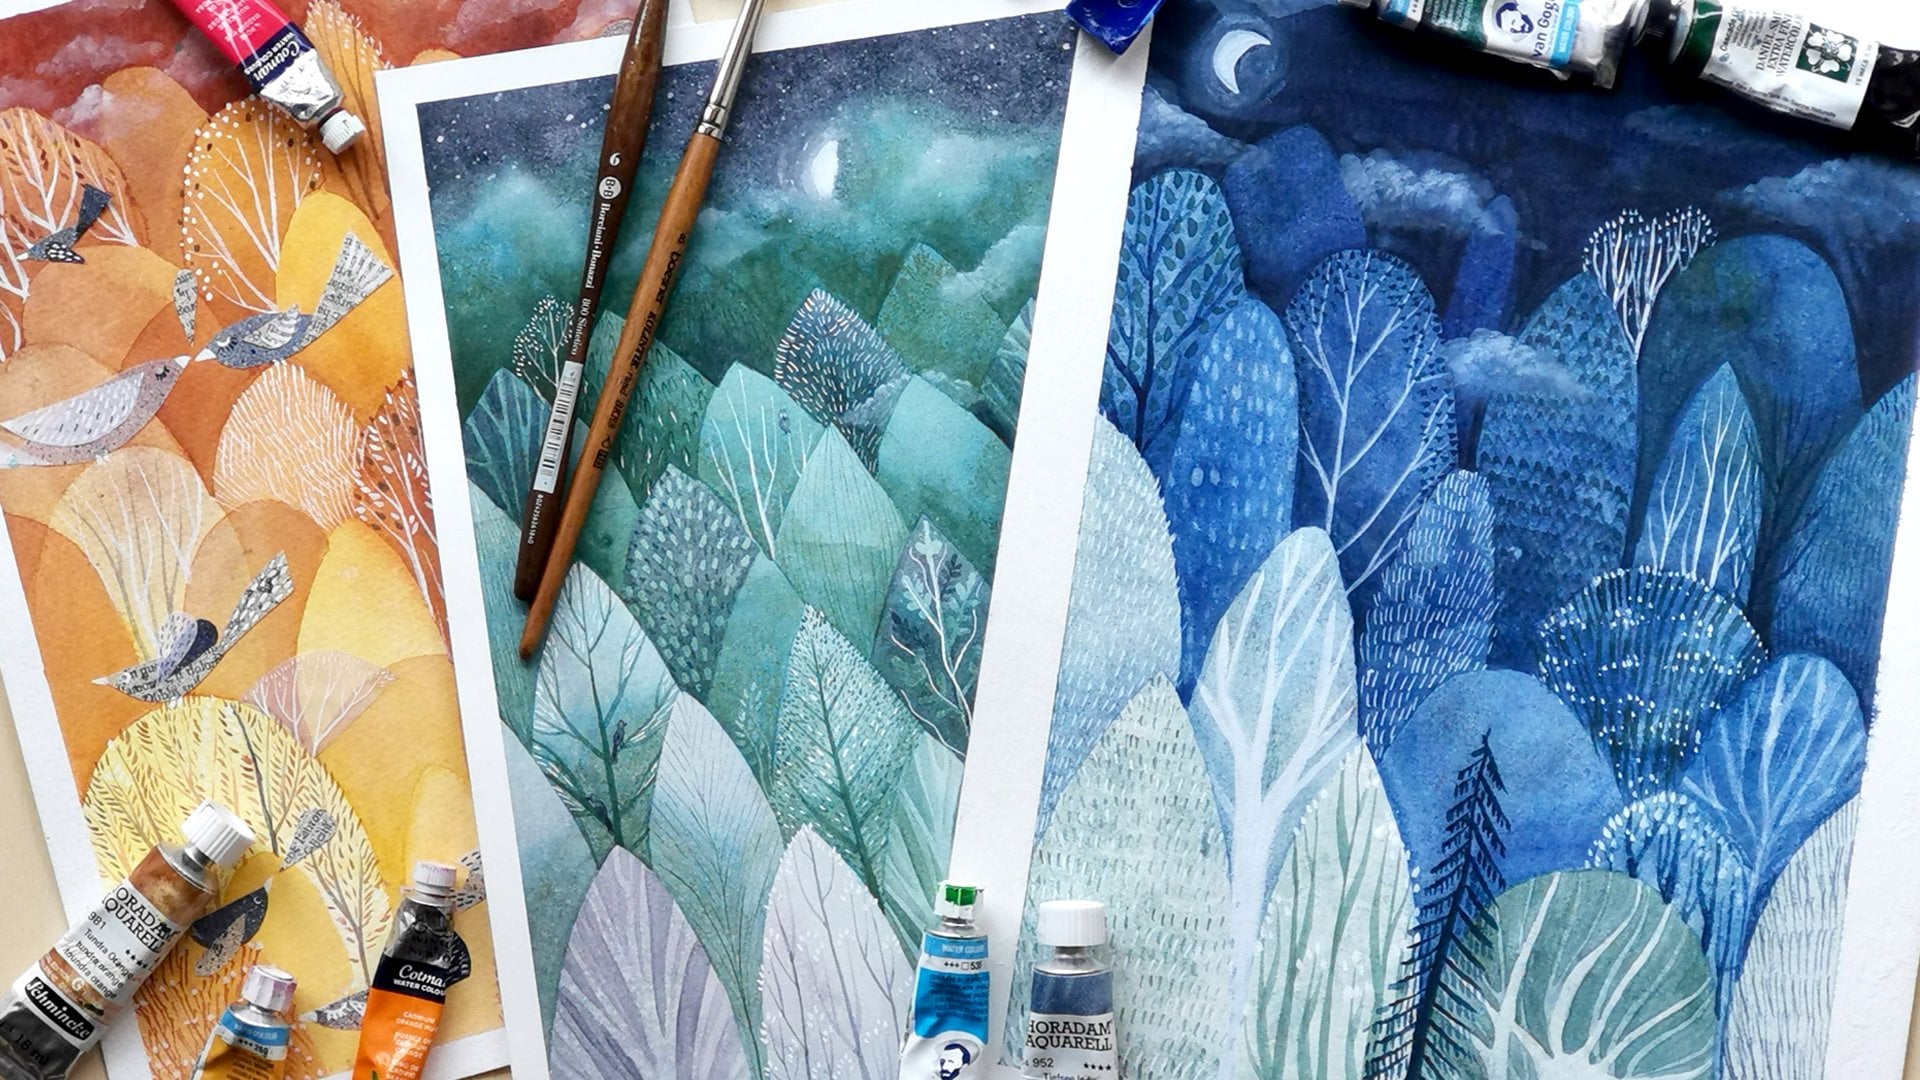
1. Introduction: Let's learn new art
medium and explore colourful world of
liquid watercolors. Hi, my name is Anya. I'm Polish illustrator
based in Italy. Lately I graduated from children's books
illustration and the Academy of Fine
Arts in Italy. I work with mixed
media and in my art, I use really different art
supplies and techniques. I invite you to take
this class if you want to learn new arts medium
and new art techniques. But also if you are wondering, well, it's liquid
watercolors are, maybe you don't know
if to buy them, if they are good for you, or maybe you already
have them at home, but she didn't know
how to use them. Maybe you're intimidated by them or not sure how they work. In this class, I will show you what our liquid watercolors, some fun exercises to know
the basic techniques. And later we will apply
those techniques to paint fun illustrations,
pebbles and cactus. You can choose to paint one
of them as the class project. You can paint all
pebbles or cactus, or if you want, you can
try to paint both of them. I decided to do this
class because I really love colors and vibrancy
of a liquid watercolors. Liquid watercolors can provide you not only vibrant colors, but also a kind of transparency that the traditional watercolors
not always can give. So I think it is really, that is fun to know. By the end of this class, I'm sure that you
will know better this medium and that you can apply the knowledge and
other contexts in your art. This class is for all the illustrators,
professionals, amateurs. Also, if you're a beginner, I will explain all the basic
knowledge and techniques. So if you feel inspired, then jump into the next lesson
where I will explain more precisely the steps and the project that we
will do in this class. See you there.
2. Class Project: For the class project, I would like you to apply one or more of all of the techniques that we will learn here and
paint one illustration, I will show you how to
paint pebbles and cactus. And you can choose to
paint one of them, or pebbles or cactus. Or if you wish, you can
paint both of them. Here are the steps that we
will take in this class. First, I will show you what are the art supplies
that we will use. And especially, I will give a deeper look into
the liquid watercolors. I'll show you
different kinds that I have, their main
characteristics. And then we will
test them on paper. I will show you the
characteristics. You can join me and explore, try to know them better. And also, I will show
you the difference between liquid watercolors and the traditional watercolors. Then we will dive into the sun, basic and also modern liquid
watercolor techniques. Even if you already are familiar with this
kind of exercise, I find it every time. Very good exercise
to warm up yourself, to know your medium better. So we will try different
techniques and different fun ways of how you can apply liquid watercolors. And finally, we will
apply all the techniques and paying the final
illustrations, levels and cactus. And you can choose which one you would like to paint for
your final project. I would like you to post all the projects in
the project gallery. I will show you here. Just click over here and
upload your project. Also leave comments,
doubts, questions. If you have any, maybe write a little bit about your experience with
liquid watercolors, the July kit, the
struggles you have, or maybe you had, or maybe the nice surprise
us what you liked. And I'm very curious to
hear your experience. So grab your colors,
your paper sketchbook. And if you're not sure what supplies we will use them
jump into the next lesson.
3. Art Supplies: Let me show you
what you will need for this class project. For this class, our
main protagonists are the liquid watercolors. So I will use
basically this one. It's a clients. You can find different
brands out there, e.g. those are little bit
different because those are concentrated
watercolor. So there are liquid
watercolors, more concentrated. They are different
from the other, Dr. Ph. Martin's liquid watercolor. But still there. They are. The same, the same
thing at the end. Another brand that I
have is PBO upper Bell. I'm not sure how
to pronounce it, and it's still
liquid watercolor. You can find those in art supply store and you
can buy them separately. So maybe it's more convenient
to have just a few bottles. The colors that you prefer. If not, you can also find
them online and then maybe it's more convenient
to take whole set. I think there are six
colors set and maybe more. Yeah, so those are the liquid
watercolors that I have. Then obviously water, I suggest
to have to borrow else. So you can wash your brush in the first
and then in the second. I will use paper towel
to clean brushes. It's really very handy and
you will use a lot of it. Can be tissue or maybe a cloth if you don't
want to use paper towel. And also brushes
for this project, I will mainly use
one size brushes. One size brush, the medium
one and the small one. But you can also take
the big one, e.g. square one, where we will make the background for our
exercise for our project. Also, probably I will use also this ten for details,
for extra textures. I will use salt. This one is the kitchen salt and also water in this spray tube. I will do all the exercises
and this in the sketchbook. This one is the regular,
normal sketchbook. So you can use your
sketch book as well, or you can use a regular
watercolor paper. Here is the list of
all the art supplies. And then the next
lesson we will see more closely water
liquid watercolors.
4. What Are Liquid Watercolors: In this lesson, I will show you what our liquid watercolors. I will walk you through all the characteristics
and also show you some differences between traditional watercolors
and liquid watercolors. So hopefully after this lesson, you will have answers to your questions
about this medium. So what are liquid watercolors? Liquid watercolors are a
type of watercolor paint where the pigments or
dies or in a liquid form. They are different from traditional watercolors
because they are consistency is thin and watery and it's here
basically it's liquid. Also in signed they have
die and not pigments. E.g. here for sure. And this for sure. In this one, I'm not
sure if there is any pigment because in
the bottom of the bottle, I'm not sure if you can see it. The powder remains, so every
time before I will use it, I have to shake it. So maybe in this one
there is a pigment, I'm not sure, but generally, other liquid watercolors have
die inside and not pigment. Basically, the colors are
really vibrant and electric. You want achieve some of the colors with
traditional watercolors. Sometimes it's good to add a
drop of liquid watercolor to your basic watercolor
if you want to add vibrancy and saturation
to your color. Also, the transparency is
different between those two. As you know, watercolors
are translucent. But when you will paint
with very saturated color, not diluted color, and you
can achieve bake color. Also, there are
different kinds of transparency for
each watercolor. So there are some watercolors that are really more
opaque than others. And with this watercolor, liquid watercolor, you can
never achieve opaque color. It will always be
translucent swatch. Also with liquid watercolors, you can get very
homogeneous swatches. That's because they don't have pigment and so they
don't do granulating. So if you're
searching in your art and your illustration style, plain swatches of a vibrant, plain color than I would
recommend you to try those. I heard that the main problem with them is that they
are not light fast. It means that the color
will fade away with time because the light
will make it fade away. My experience with is that the illustrations
that I did until now are still very vibrant. And I don't have this problem, but maybe it depends on brand. Maybe because the
illustrations that I did are not hanging on the wall. So basically they they don't
have contact with light. I have three kinds at home. E.g. alkaline from a talents. Right now you can find them in this round bottle
with a pipette. You can apply color. It's very handy
because you don't have to dip the brush into your color so you
want to contaminate it. Once they were like
this and this, We're bottle without the pets. Then I have a bell or PBO. I'm not sure how
to pronounce it. They also are
provided with a pet. I like them very much. And also the third type
that I have is Dr. Ph. Martin's. Those are concentrated
watercolor. So it means the color is more vibrant and
more concentrated, but it's still
liquid watercolor. So here's the summary of the liquid watercolor
features and brands. So now that we know a little bit more about liquid water colors, then let's test them and see
what we can do with them.
5. Painting Techniques Part 1: In this lesson, we will paint, we will try different
techniques. Also. Play a little bit,
e.g. with salt. For me, it's always fun to try techniques if you already
know this kind of exercises. I invite you to do them also
with liquid watercolors that the clips that I
will show will be similar to the traditional
watercolor techniques. I also explained in a deeper
way the basic watercolor techniques in my class about
traditional watercolors. Later on we will apply all those techniques and
our final illustrations. I will start with
some swatching. I want swatch every
color that I have. I wanted just to try them out. If you don't know
liquid watercolors yet, you didn't try them yet. Then you can warm
up in just like this by creating some simple
swatches and circles. Right now, I'm showing the
different brands that I have. The pads always
prepared or without. So let's get started. There are many ways that you can apply liquid watercolors. I will try to apply
directly with the perfect. I think it's very handy. You can put your drop directly on the paper or
on your color palette. Right now, I want
diluted by want to see their consistency there, transparency, just like
that without looting. So I will swap out
different brands. This one is a bell. So as you can see, the color is really vibrant and saturated. This is the thing
that I really like. The watercolor,
liquid watercolors, they behave like ink. Swatches, are
really homogeneous. And now I will paint a client because I
wanted to show you that among different colors you can find the ones that
are more saturated. And the one that I'm
more translucent. E.g. as you can see, this one is already translucent. I think it's already diluted. Maybe it gives this kind
of diluted effect, e.g. also, this one,
this one is blue, Celeste blue, very, very light. I didn't dilute it. It's applied directly
from the bottle. So you can see when you will buy your liquid
watercolors that some of them are more delicate
and some of them are more condensed as colors. And try it now I
will try Dr. Ph. Martin's. Those are concentrated
liquid watercolors. They should be more saturated and more
intense as the color. I usually shake them before
I will use them because they will usually have color
residue on the button. The difference is not
so big between Dr. Ph. Martin's and e.g. higher swatch. I would say also that the bell is more
saturated and vibrant. But I can assure
you that Dr. Ph. Martin's hence really vibrant
and intense colors as well. Now, I just wanted to show you quickly a difference between a liquid and traditional
watercolors rights now I'm applying normal, traditional, regular
watercolor in pen. And you can already see there is some pigment moving
and it's very dense. I applied color. And I hope that you can
see the difference. So this is liquid watercolor
and it's quite the same. I wanted to choose
the same tone. And you can already see
it's much more light. It's not diluted, and it
behaves more like ink. It has the dye and it
doesn't have pigment. And it's now I want it to mix both traditional watercolor
with liquid watercolor. To add a little bit of saturation and vibrancy
to your color. I already used quite
vibrant color, which is this bluish turquoise
shrinkage watercolor. And I added a drop of Dr. Ph. Martin's chalk wise. Maybe it's a little
bit too much. But I wanted to show you this technique that you
can use if you want to increase the saturation and vibrancy of your
traditional watercolor, then you can mix them together. Obviously, you can also
dilute liquid watercolors the same as you would do with
the traditional ones. So I will show you a quick
exercise for transparency. So you have to start by painting a swatch of the most
saturated color, most dense color, in this case
directly from the bottle. And I will just pick a
little bit of water. I want wash my brush, but each time I will dip
it and clean it more. And while the swatch
is still wet, I will paint with a brush which is cleaner every
time that I will dip it. So you can see that
you can achieve different tonalities
of the same color. We can also apply your color on the color palette
and try to dilute it directly from
the color palette. So she diluted a little
bit my first swatch, and then I added more water. So it's quite simple. I just would like you to
try it if you, if you like, because I think it can be
helpful to know this medium. So try to swatch it, play with different
transparencies. Try to dilute your color and see what colors
you can achieve. Now, let's try
layering technique. It means that we will
paint over the color. We will do overlapping. I already painted my
swatches of color. So the first thing
that you should consider is that your
basic, the first layer, the basic layer of
color should be dry before you will
paint over it, over it. Sorry, if you want to avoid
the blending of colors, then you will have to be quick. You don't want to move to match the color
that it's underneath. So here e.g. the two squares
overlap just in one angle. But later on I will try
to do more overlapping. I wanted to show you this
exercise also to show you the excellent transparency
that liquid watercolors half. And that is different than traditional
watercolor transparency. I didn't want to repeat
it too often here, but as I already told, the swatches are more
homogeneous and flat. And also for this reason, layering and overlapping
is different. So I think it is a really good technique to exercise with
liquid watercolors. As you can see, the
color underneath doesn't activate match. That's because the color
underneath is dry. And I already and
I also tried to paint quickly without insisting. I don't want to color, to blend, and to reactivate. So try this. At the beginning. We want to be able to achieve two separate colors that are overlapping.
Then don't worry. Probably. You will have to
do more exercises. Probably are color was wet, e.g. later on you will see that
I also wasn't patient and I layered new color and the color underneath
and blended. It's also about the patients
and doing exercise. So I will leave you with this. So in this precise moment, I wanted to show you
that my layering didn't succeed because I wasn't patient nav and the color
underneath was still wet. And as you can see, it's activating and it will, it will simply blend
with my new layer. And also, it's more difficult if you're
painting more layers. E.g. I'm painting right
now over to colors. It's more difficult to not
activate those colors. But as you can see
this time, I succeed. The color was dry. So I invite you to try this
technique, to do exercises. And if you wish,
you can upload them also with other basic
techniques in your classes, project, and share
your experience. In the other lesson, we will continue to play with other fun
painting techniques.
6. Painting Techniques Part 2: Welcome to the second part
of painting techniques. So now that you're more familiar
with liquid watercolors, Let's jump into playing
with other techniques. I really like this part, especially if you're
new to some medium, you want to know it. It's really great way to warm up yourself, to unblock yourself. If you feel blocked, if you don't know how
to start this way, you really now to get
better medium and to play. So no pressure, no expectations. And play around. I think liquid watercolors with those kind of
exercises are really great and you will see how really beautiful
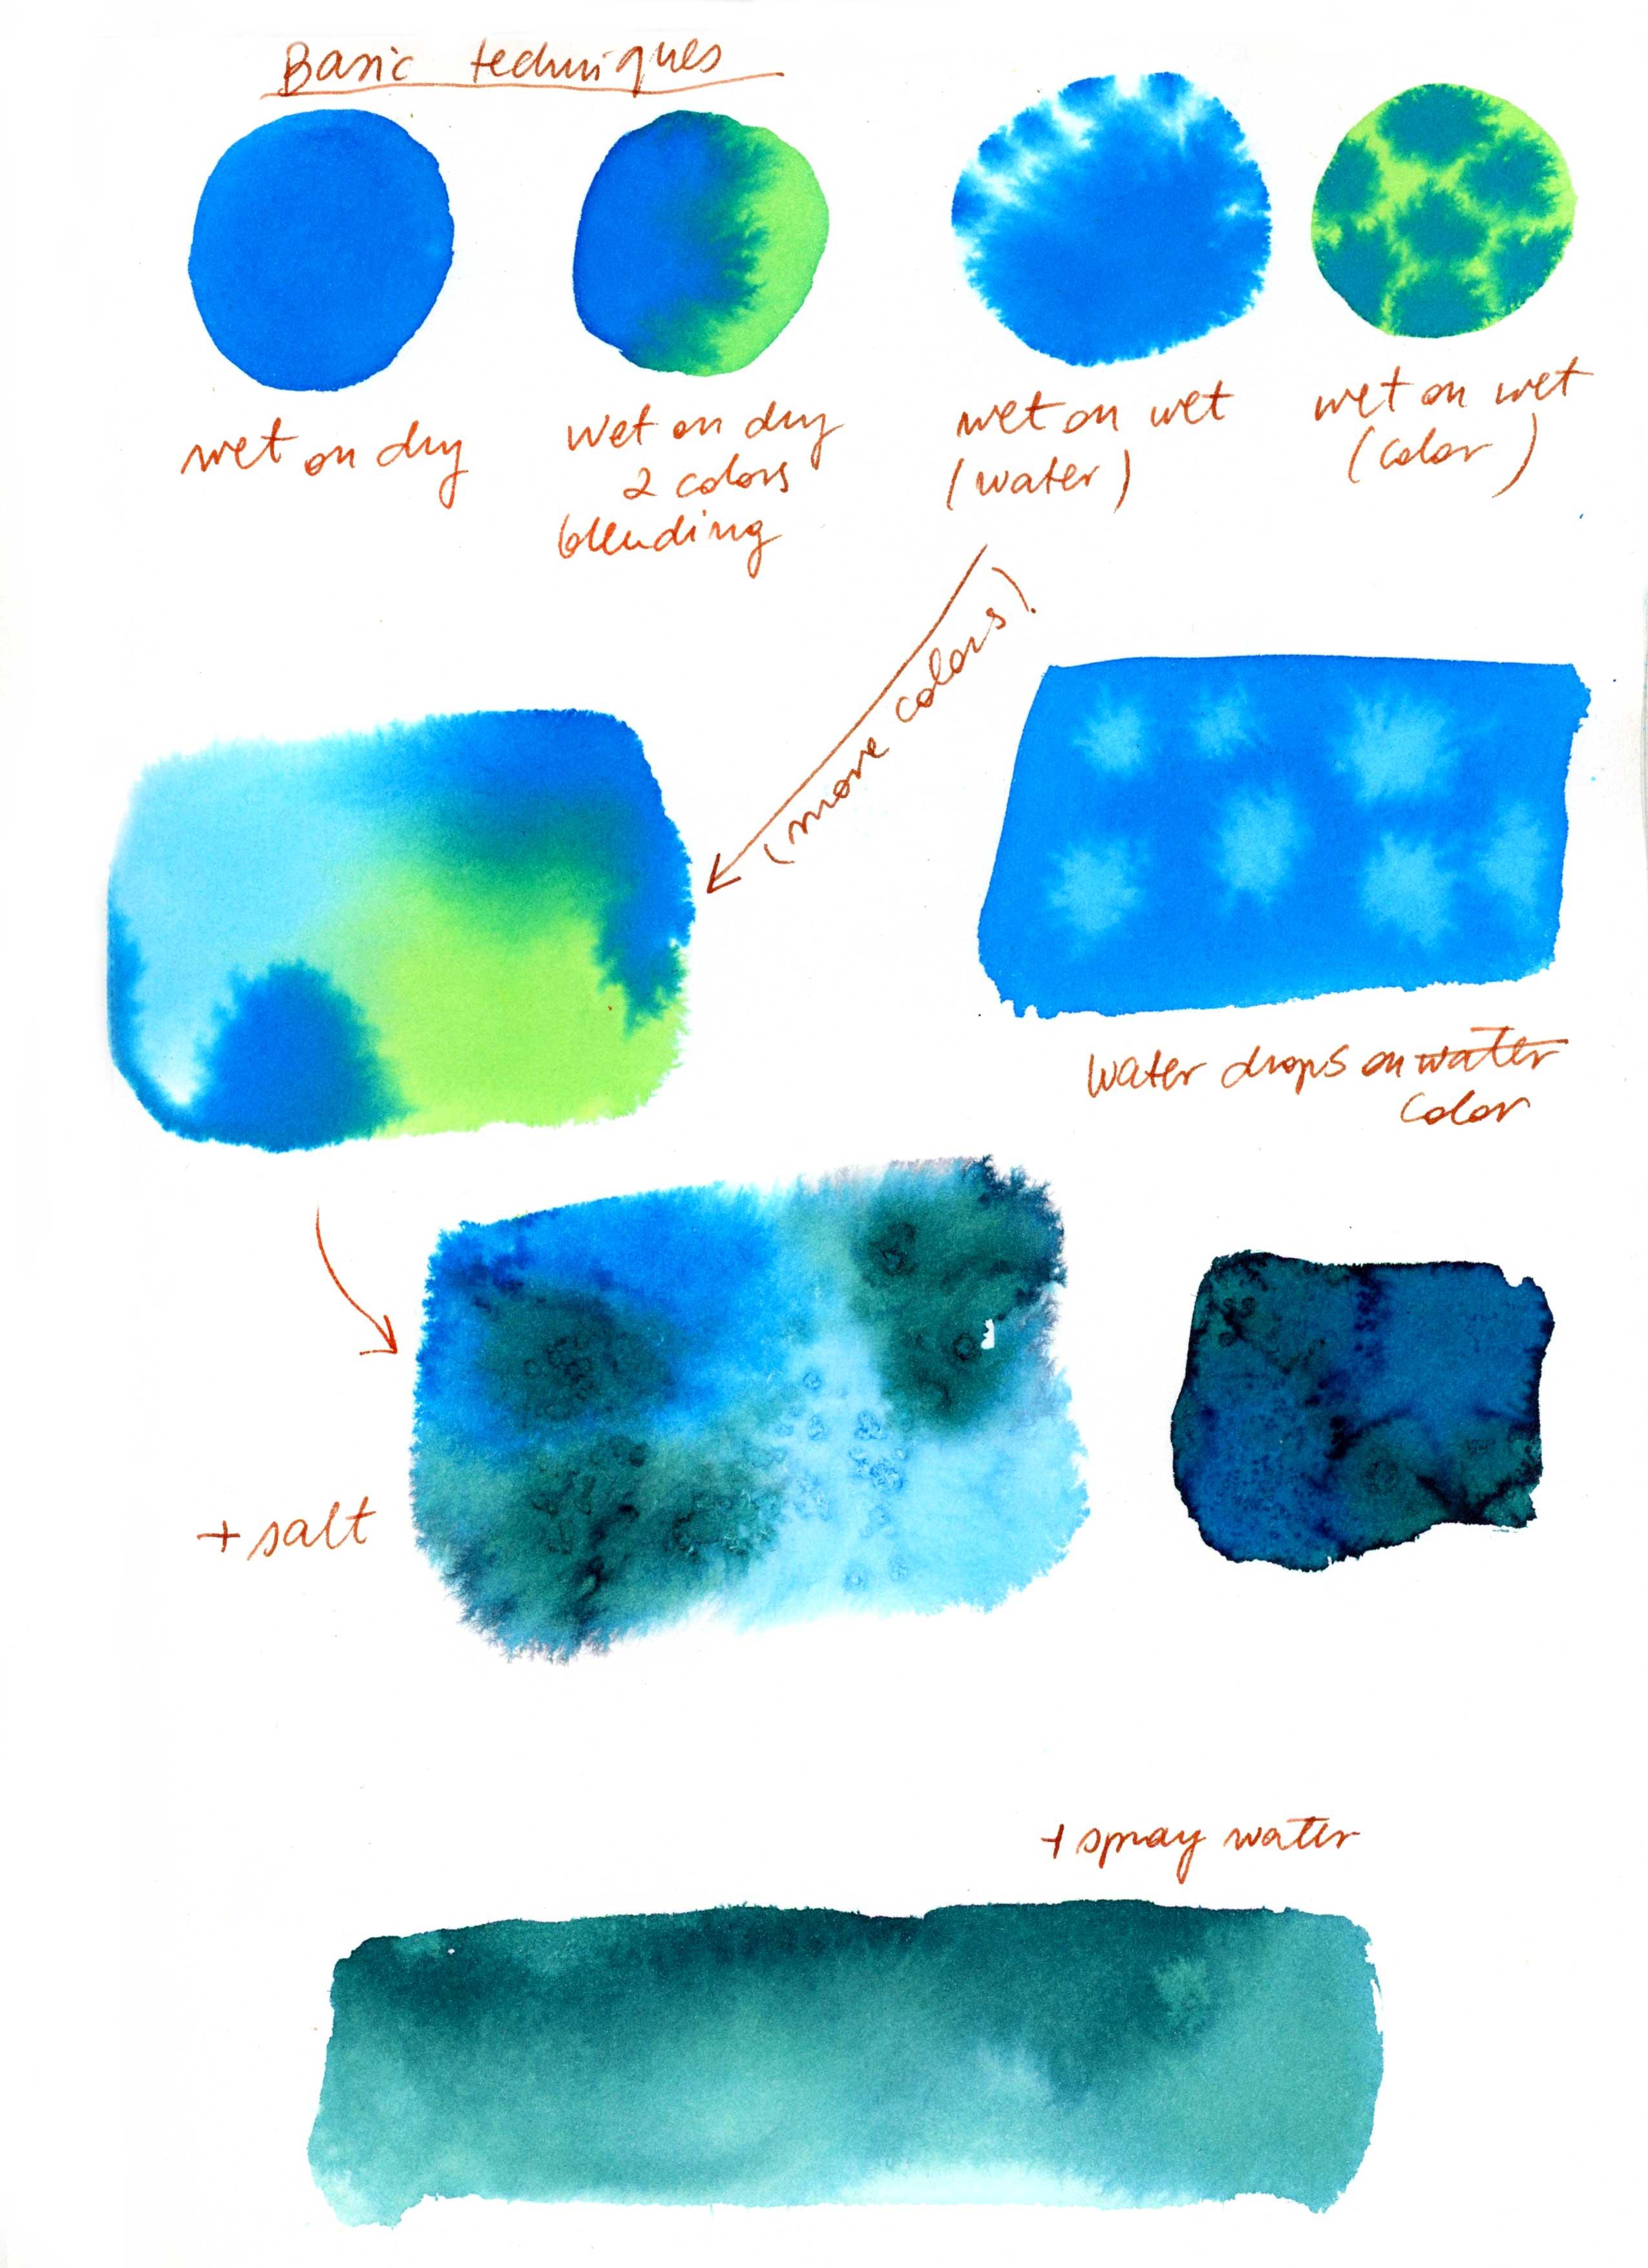
effects they can create. So I already written down the techniques
that I want to try. The first one was wet
on dry technique. And though most of
them are the same that you can Use also
traditional watercolors. But the difference is
that you will see, you'll see by experimenting
by using liquid water colors, sorry, by your own e.g. this wet on dry technique with two colors that will blend. I find it really fantastic
because they blend in a different way than traditional colors, than
traditional watercolors. To. The first technique was
simple wet on dry when you paint color on dry paper. And now is blending part, which is really exciting. Here you can also see
the difference that the colors that are blending
are more homogeneous. They don't create
the granulation, granulation effect that
you would probably would have with
traditional watercolors, you will see some
cauliflower effects. Color blooms if you
know what I mean. Here. It's the color is more homogeneous and now I will try wet
on wet technique. So first you paint
with clean water. You can also paint the
color if you like. I use the clean water and then
you apply drops of color. You can do it with a
pipette or with your brush. It's up to you. I think it's also a great way to experiment
with different tools. And that provides you
different effects. E.g. was Prussia
have more control. You can apply less color. And if you drop a
color with a pipette, you can create an
explosion of color, which is obviously also great. Now, I will try the
same technique, but with painting the color, I will paint the
green color and then apply glue as I did in
the previous circle. Now wet on wet technique, but I will blend more
colors together. So first quarter and then I will paint with more colors
that will blend together. So how the technique
that I really enjoy. So it's like wet
on wet technique, but another way around. So first you paint color
and then you drop water, clean water on it. So it's the same technique
that you create with traditional watercolors and to create so-called color blooms. And also here you can see
the difference because in liquid watercolors
the color blooms will be more homogeneous. And I didn't know the word. But you can see that
it's different. So I'm trying it
and play with it. I think it's really,
really cool. Now let's try the salt exercise. I will do it with wet on
wet technique right now. So I paint with water
than paint with color. And while the color
is still wet, I will sprinkle a little
bit of kitchen salt. You have to use. A huge amount, just a
tiny bit here and there, a few grains of salt, and then wait until it will
try to remove the salt. I will try different colors. I will use dark tones this time, just to see the difference. You can do it as well. You can try it with my blending. 12 or more colors. Light with darks are just darks. You can create a
different effect. So I just wanted to
see the difference. One of the techniques
that I use for the often is using the spray, the water spray in the bottle. So I will try it on
one color swatch. I would suggest to use darker
colors to see the effect. You have to spray your water while the
color is still wet. Right now, I'm praying. I hope you can see the tiny
little dots that are lighter. And the effect will be visible. Also, why when the
color will dry. Once again, I want to
show you the difference between the traditional
and trick with watercolor. But this time with color
blending technique. On the left side, there is a traditional
watercolor, and I'm blending
ultramarine with indigo. And you can already see
there's some granulation. There is some more dense color. Basically. You have less control and
you can predict less. Because traditional watercolors, because it's pigment based, can create really
different effects. And you can really, you can't really predict
what will happen. I mean, also here, when you blend colors, on the right side, there is the liquid watercolor. Obviously, you cannot predict
how the color will blend. But the thing that
you can be sure that the color will be
more flat and homogeneous. So it will be more soft. There won't be pigment that
will be spreading around. The color will be
because it has dye, pigment will be more
homogeneous and flat. Here already you can see that some granulation and pigments. So I hope it is clear for you. I invite you to test it on your own and see
the difference. E.g. here I painted
the background with the traditional watercolor,
traditional ultramarine. And you can see there
is a lot going on. There are some color blowing,
water blowing, pigments. Also here. You can
see where the color, the water spread it
and create a really interesting, interesting
cauliflower effect. And yeah, so once again, try to play around and try different techniques,
different colors. You can mix traditional
and liquid watercolors and C on your own, how it, I hope you've got
more familiar with liquid watercolors
and that you are no longer intimidated and that you had fun with
those techniques. Share in the project gallery the outcome of your exercises. And if you have any
questions or doubts, also, you can write down in your project or in the
discussion of this class. In the next lesson, we will apply all the techniques and we will paint pebbles.
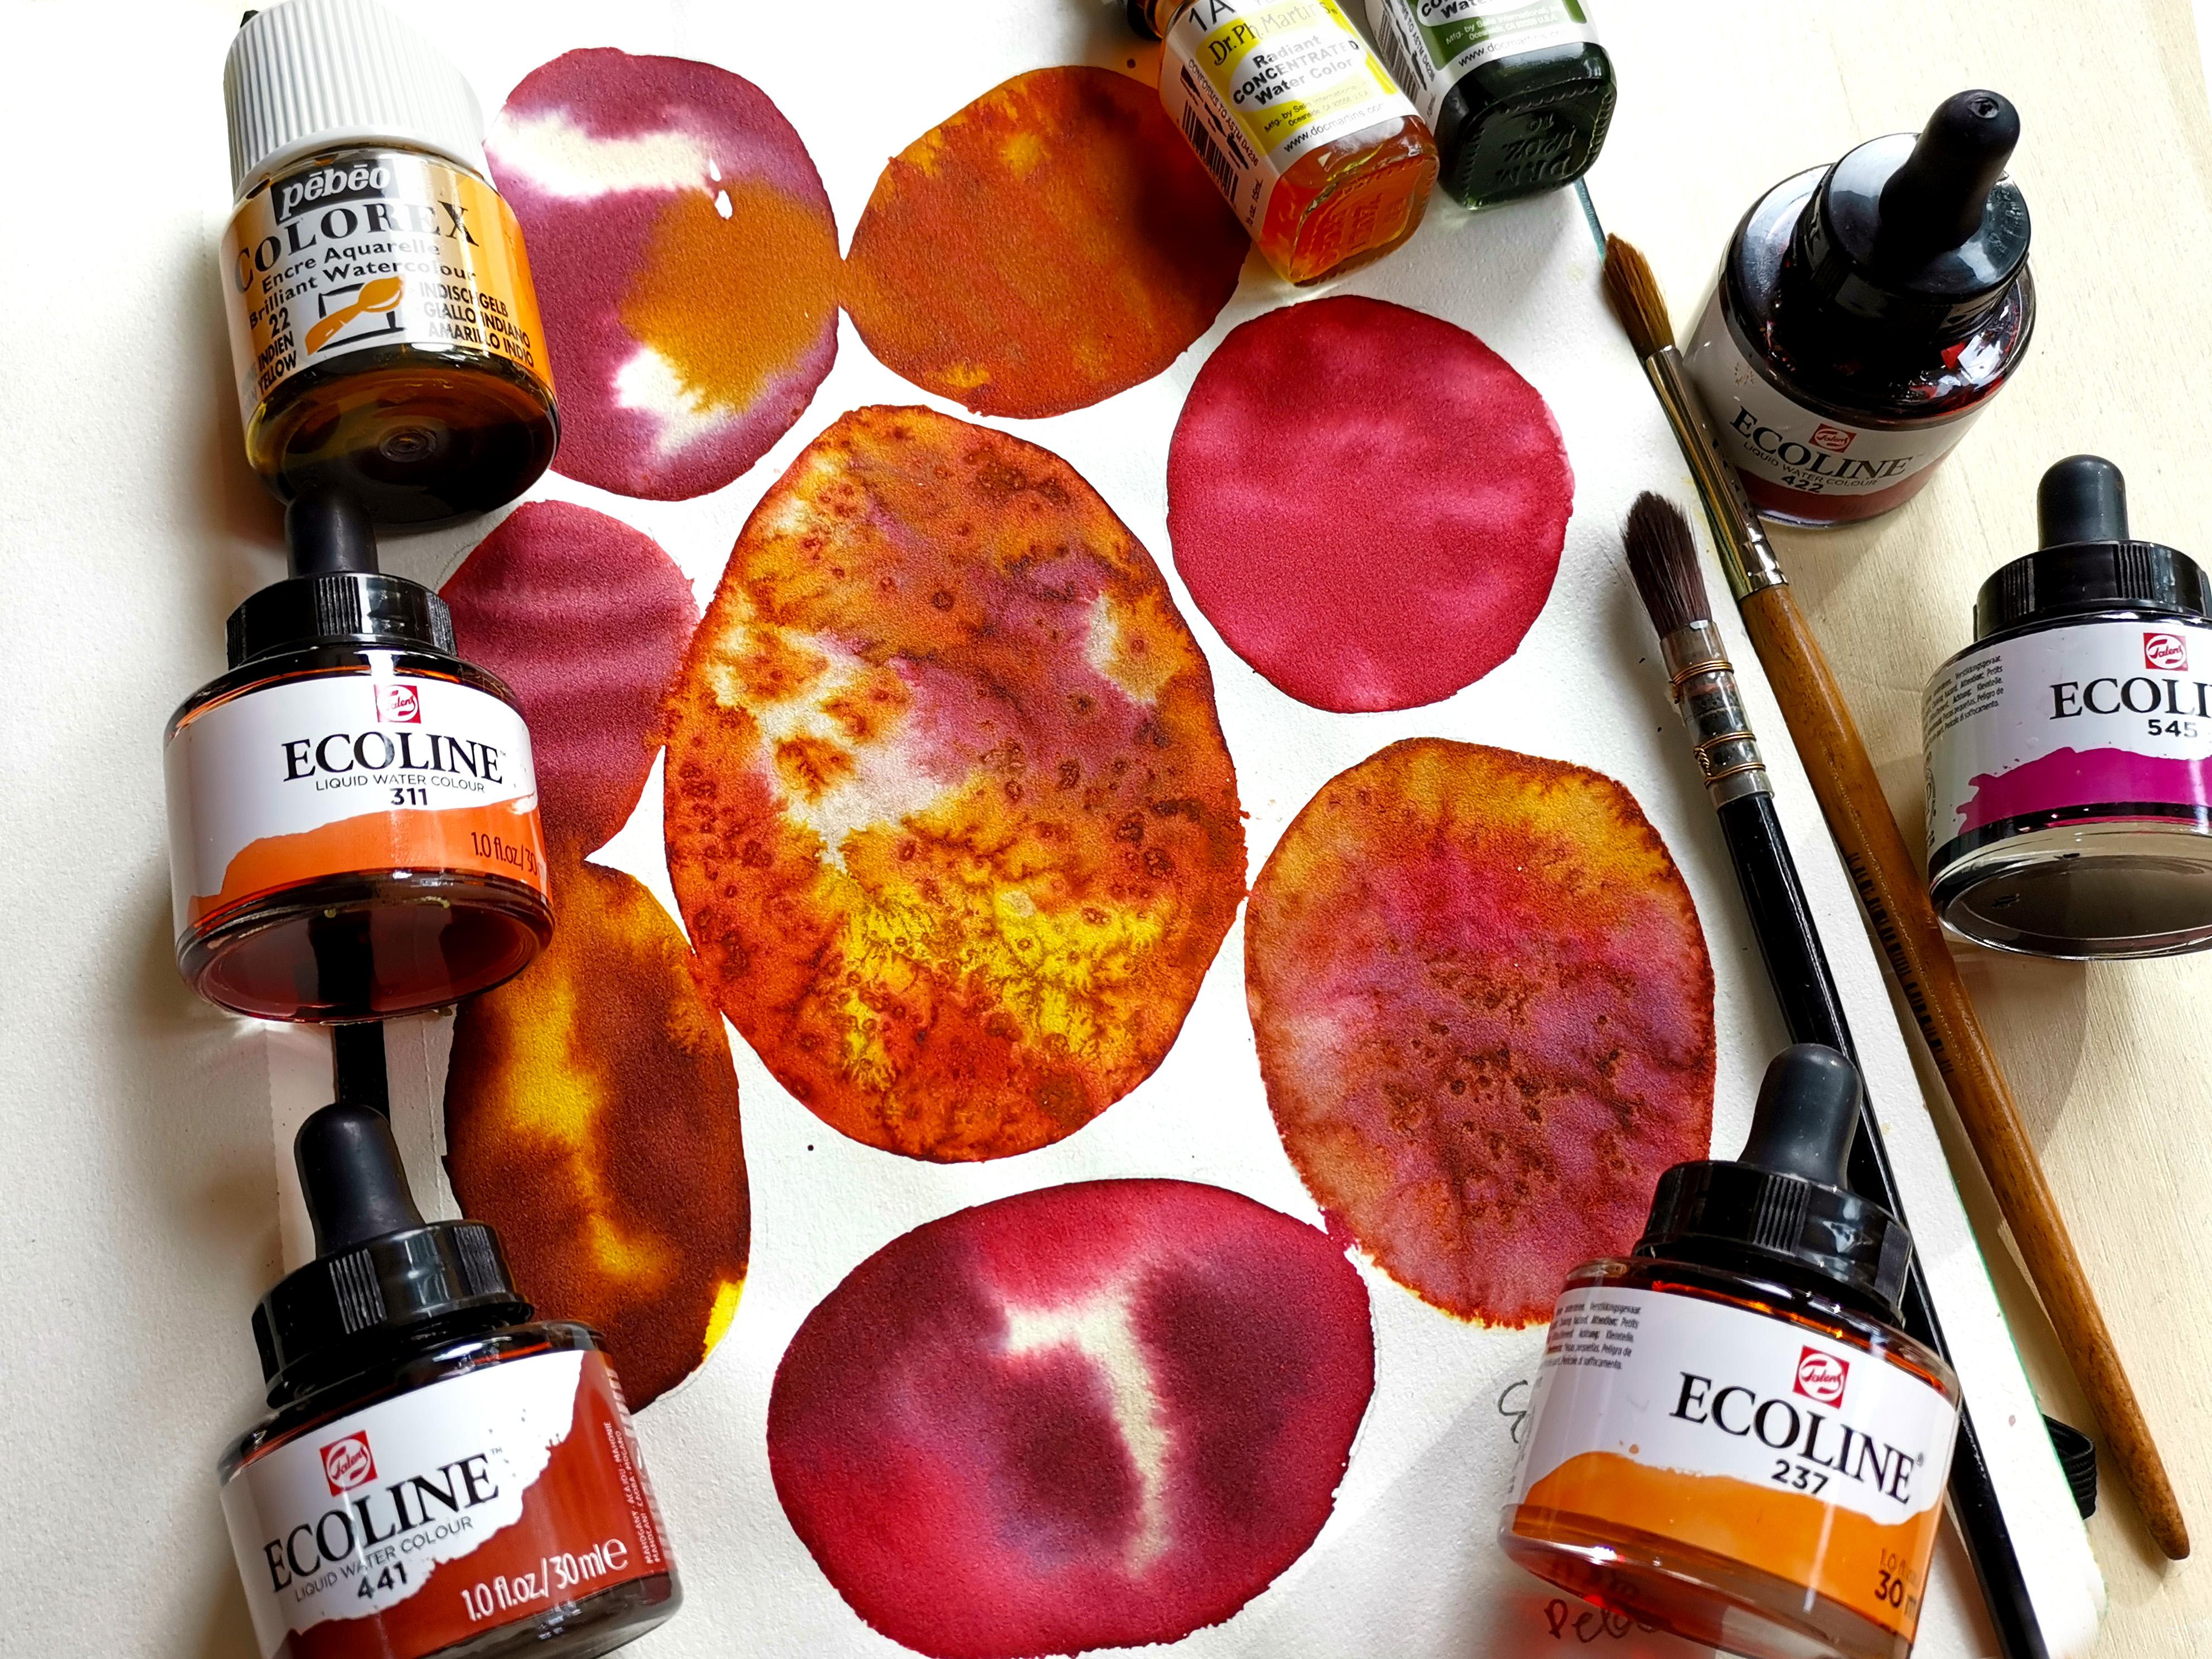
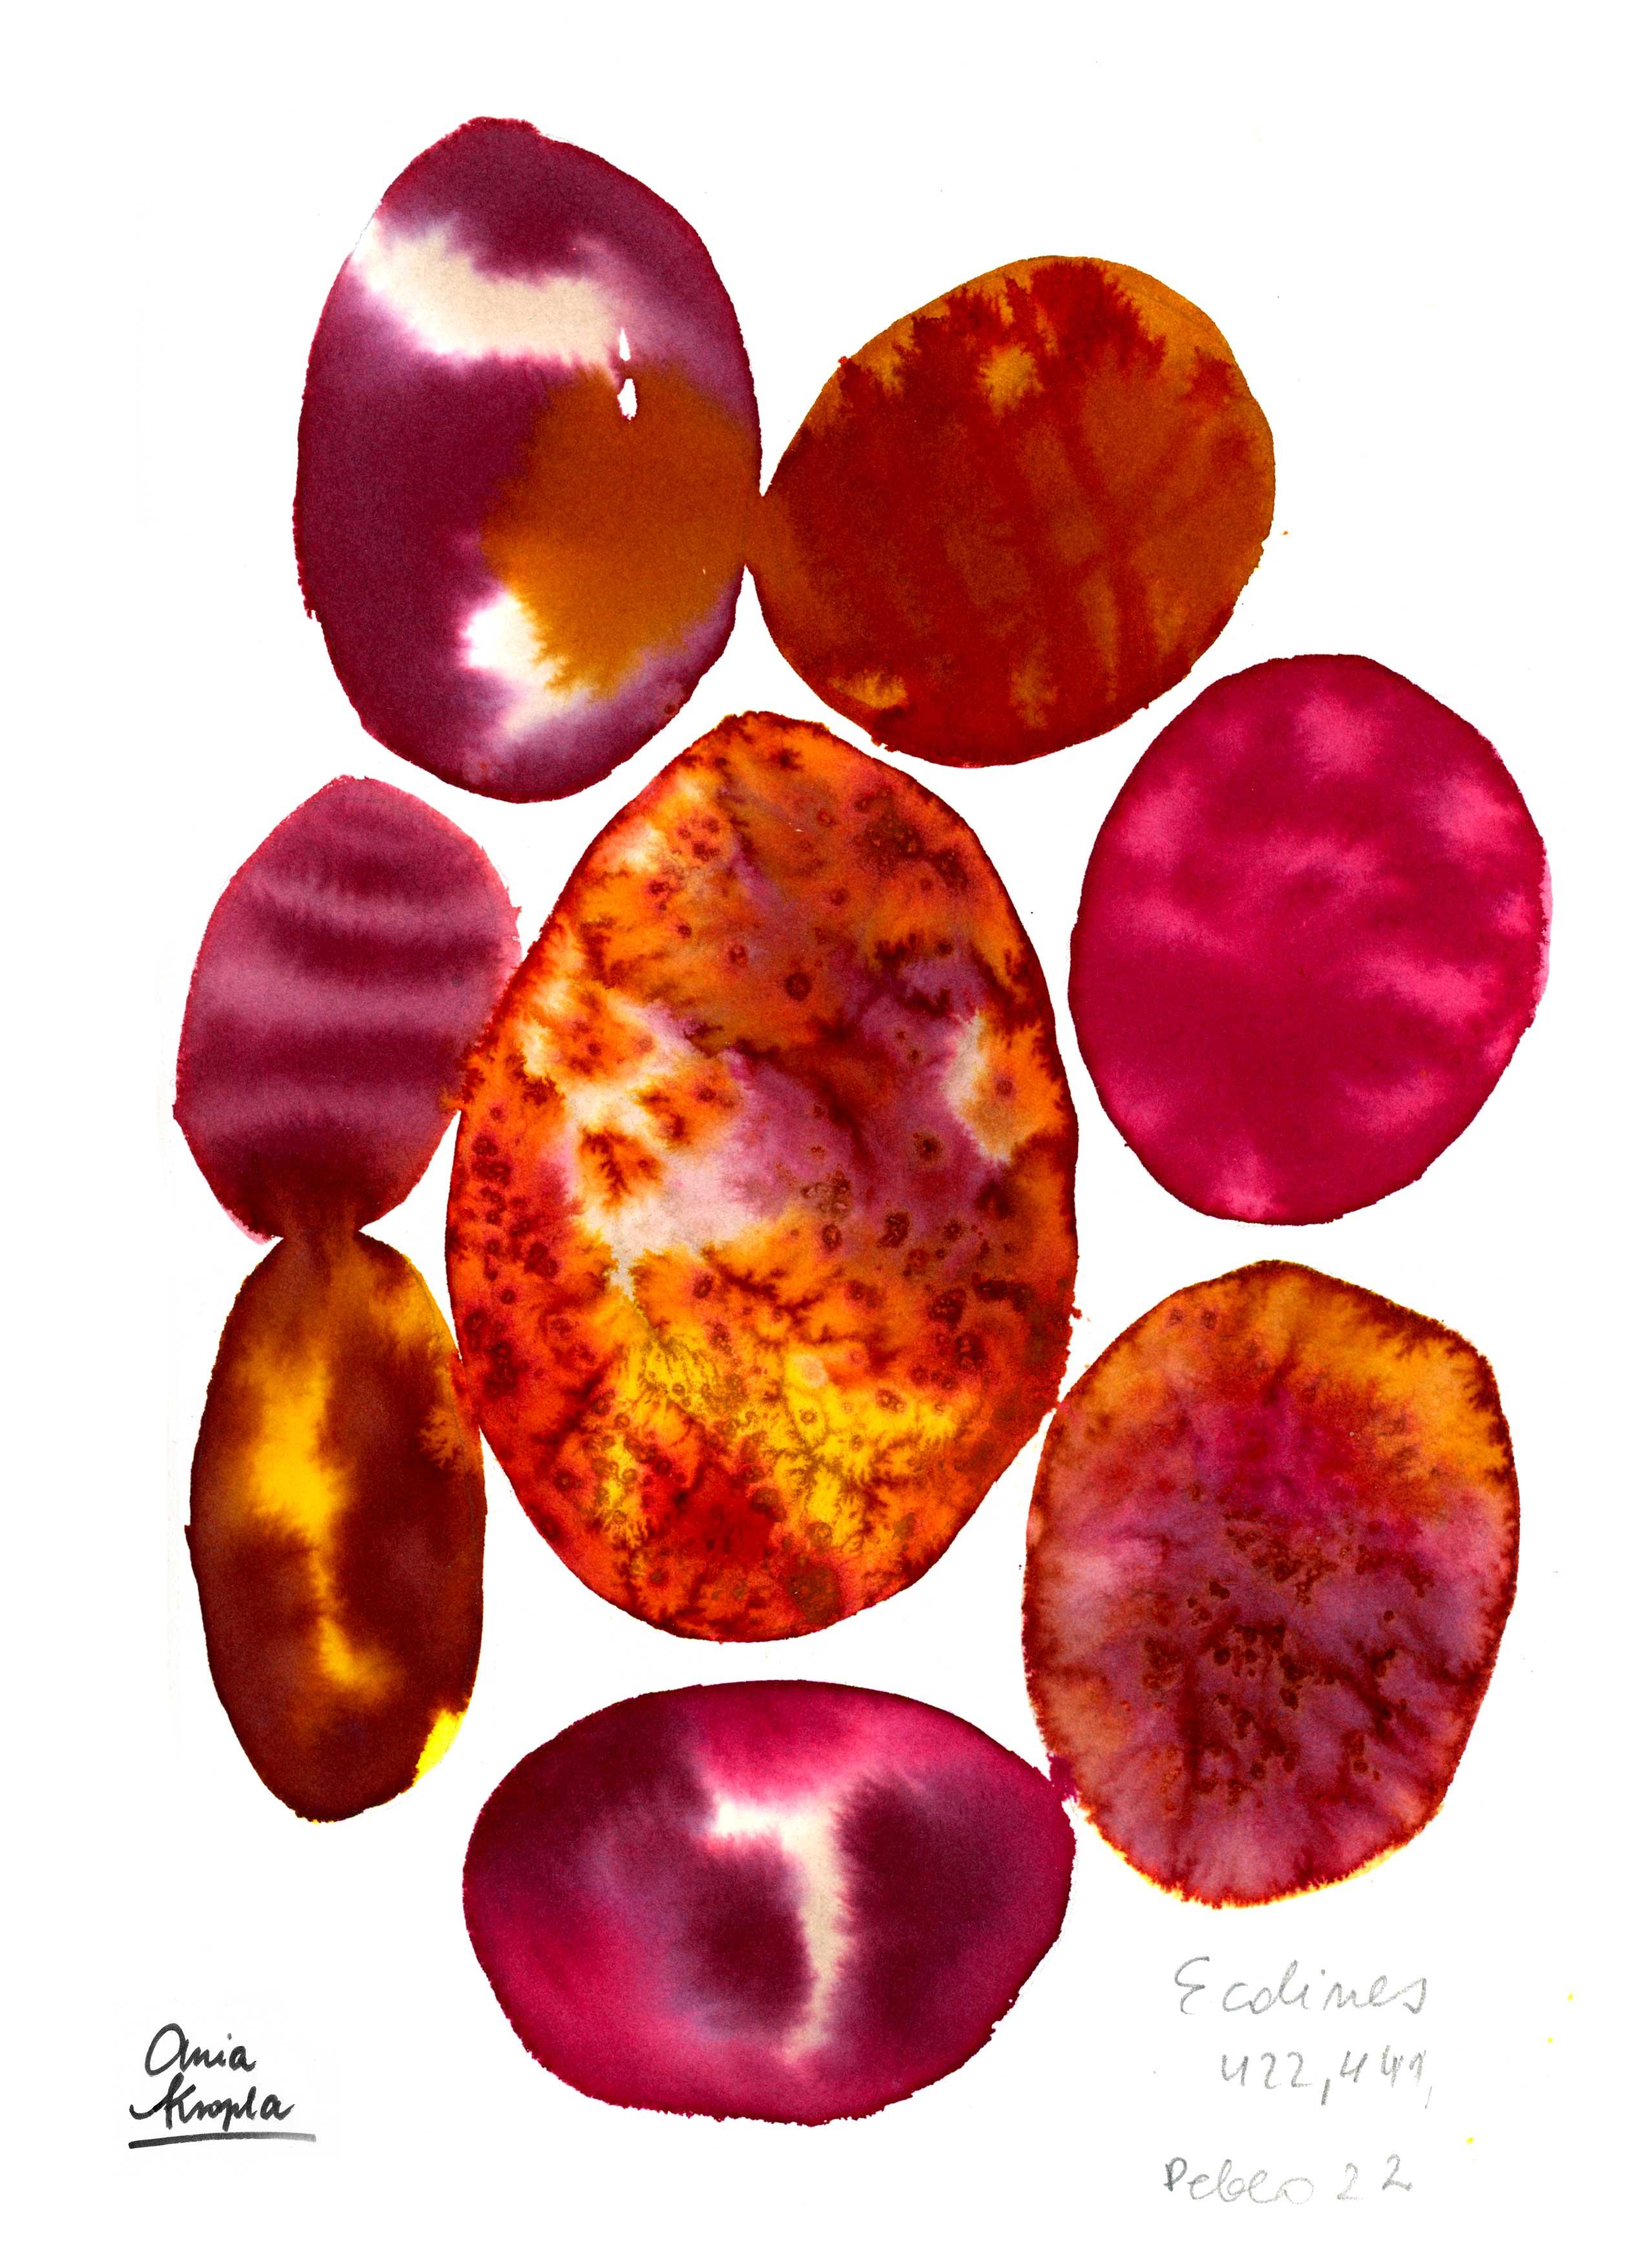
7. Painting Pebbles: Welcome. In this lesson where
we will paint pebbles, we will apply all the techniques from the previous lesson. So we will play basically
with wet on wet techniques. We will apply salt, we will apply water on color, color on color, we
will blend that. Yeah, basically all
about being expressive, letting flow your creativity. My advice would be to
not plan too much. Obviously, you can plan What's the snakes
he wants to use. But after all, let yourself go dance plan and just
play with this exercise. It's about exploring,
not being stressed, not painting details, not
doing something really final. You can do more pebbles,
more illustrations. If you're not happy
with one outcome, you can try another. Thought also, try
not to be perfect. Embrace mistakes and
embrace the process because I think this
exercise is excellent, excellent to relax and play. So I invite you to do this. Also in this exercise, I will use limited
color palette. Don't stress out about colors. Use the colors that
you feel like. You can also use
this exercise to explore which colors work
best and which don't. Just play around. So
what you will need for this exercise Is your sketchbook or your watercolor paper. It's up to you. I will
use a sketchbook. It will be handy to have
also clean water, e.g. if you will use color on
water technique, also, brush or paper towel and
assault and your liquid colors. I will use a selection
of warm colors. So there will be browns, e.g. reddish brown, mahogany. This is the PLO and Saffron. And I will also use a gray, light gray because they think it will create lovely contrast. You can use your selection
of colors, you can use. My advice is to use a
limited color palette. It could be 34 or even two. If you have just two of them. Two is the minimum
and it's enough to play and see the interactions. Wet on wet technique. If you are not sure
what colors use than mucus limits yourself. And e.g. you only warm colors as I
do or on the cool colors. So let's get started. I already draw sketch
with a pencil. Usually, I probably
wouldn't do that. I would play around with shapes. But for the purpose
of this class, I just drew the outline. So feel free to
do as you prefer. So I will start with wet on wet technique
with painting, with water. So I will paint with a clean
watcher the first shape. So you can put more water. Maybe I will show you now. Yeah, Exactly The more walter. So the colors will blend really. It will be difficult
to control them because it will be very rare. Lot of water and a lot
of movements here. So you can do also this
kind of exercise to see what happens if you will use more water for this technique. And what will happen if you
were to use less water, e.g. here? If you put too much water, then you can lift
it with dry brush. And dry your brush
and your paper towel. You can control it in this way. I will try to make it a
little bit less watery. Let's see what happens. It's still spreads
really quickly. Also maybe because
I use the pipette. So try to use as
well your brush. And you can control
it a little better. You can make smaller marks. So you can see here, there's still people of color. That's because I
used a lot of water, not of watercolor ink. Here, I will see
yellow color as well. I will do wet on wet
technique for color on color. More or less as I did here. I could add to walk
through a sample of water. Could also do it here. No planning here. It's about seeing what
will what will happen. If you're not happy with a
color results? It can happen. E.g. I'm not so convinced
that the yellow, bright yellow, It's so
good in this combination. You can, while it's still wet, try to move farther solutions
or you can just let it go. I mean, It's exercise on also
for me to let myself go. Notes being perfectionist. Just to play, play
with your art. Now we could try e.g. blend two colors with
wet and dry technique. Dark brown. I will add salt to
this bit is enough. And it will have
to dry them too. Scrub it off, and we'll go. So here. As I said, there was no right and wrong. My water is already colored. I could to try to play
a little bit with gray and add a little bit of yellow. Now, this is happening. Again. A little bit of salt over
here, like this stuff. So I will have water also here. Now I wanted to show you what's, what's happen if two pebbles to touch and to create blending between two pebbles in purpose. Again, this lovely
mahogany color. Two of them should be who we really wedge. Split. The colors, blend together. So I think pebbles are really perfect for this
kind of exercise. Because the colors are good. You can play with colors,
with shapes, textures. It's very expressive
technique, but also relaxing. You don't have to worry
about final results. I will let blend
those two together. Let's say that this one, I will make all gray. I'm deciding when I'm painting. Feel like I'm really getting
relaxed with this exercise. I'm letting myself go to Europe. You can try to lift your
color also with brush. So e.g. for this, I cleaned my brush. I will try to live well
to have to be aware that with liquid watercolors
won't be able to. Reach the white paper
because they're very strong dice and they
already colored to your paper. So maybe you will be able to get a little bit lighter
tone by lifting it. It's one to be white as it
would be with watercolors. Because what it follows,
pigments are easier. They don't penetrate
so much your paper as the dice, dice do. So look here, there's
really a lot of water. This one. I can split it like
this or I can help myself by tapping and
lifting little bit. But I'm really curious what will happen if I let
it dry like this. So I will just lift
a little bit. Here. Maybe. You can also leave it like this. Alright. So here look the water
flow this direction. That's what I mean when I say that you don't have
control when you use really watery
swatches to treble cleft. Maybe I could play with water on color will leave drops of water. Here in there. Again, it's really very liquid. So probably it
will spread a lot. We tried to do it here as well. Here it's little bit
better when you have less water, less color. My kids, e.g. take all the red. Do some more that
not all disaster. What I loved this
disaster. That's okay. I will add soap here and there. This one is quite dry, but I want to see if it's
going to make any reaction. That's it. I think
those colors are cool. Maybe some of the browns, e.g. this one is not so nice, but it's also for you to
play with your colors, e.g. we can write down the
colors that you use. In the future. You will know what
color combination use if you like them or to avoid. So I will write
them down and wait until my pebbles are dry. So the illustration is dry. I helped myself with dryer. You can wait until it's
dry naturally on you can, you can use a hairdryer as well. The soul will survive. It's one Sloan fly away if if, because it will
stick to the water. It was almost a try, but as you can see, it did leave a really
lovely texture. Let's see here. Oh, look how lovely. It left the dark outside. The inside. Color remained light. Also, this one is
really beautiful. So here I really love
this leveling effect. And also here I really
like this effect, which reminds me of
the purples that I collect on the beach or e.g. shells, sometimes
this kind of texture. Okay, So this is it. I will throw away the salt. So I'm happy with the result. Not of the colors are
so interesting, e.g. as I already said, this one, maybe it's not so interesting. Also these crayfish be a little bit vibrant,
but it's okay. That's like I said, experiments. I wrote my colors
so I will know if I will repeat this color
combination and future are not. So. Create your own
hovels, play around. You can make them
really a lot of color combinations.
At least one of them. I will be happy to see them
in the projects gallery. Okay, so I hope you had fun with this exercise. Let me know. And in the next lesson, we will see how to add layering and we will paint
the cactus. See you there.
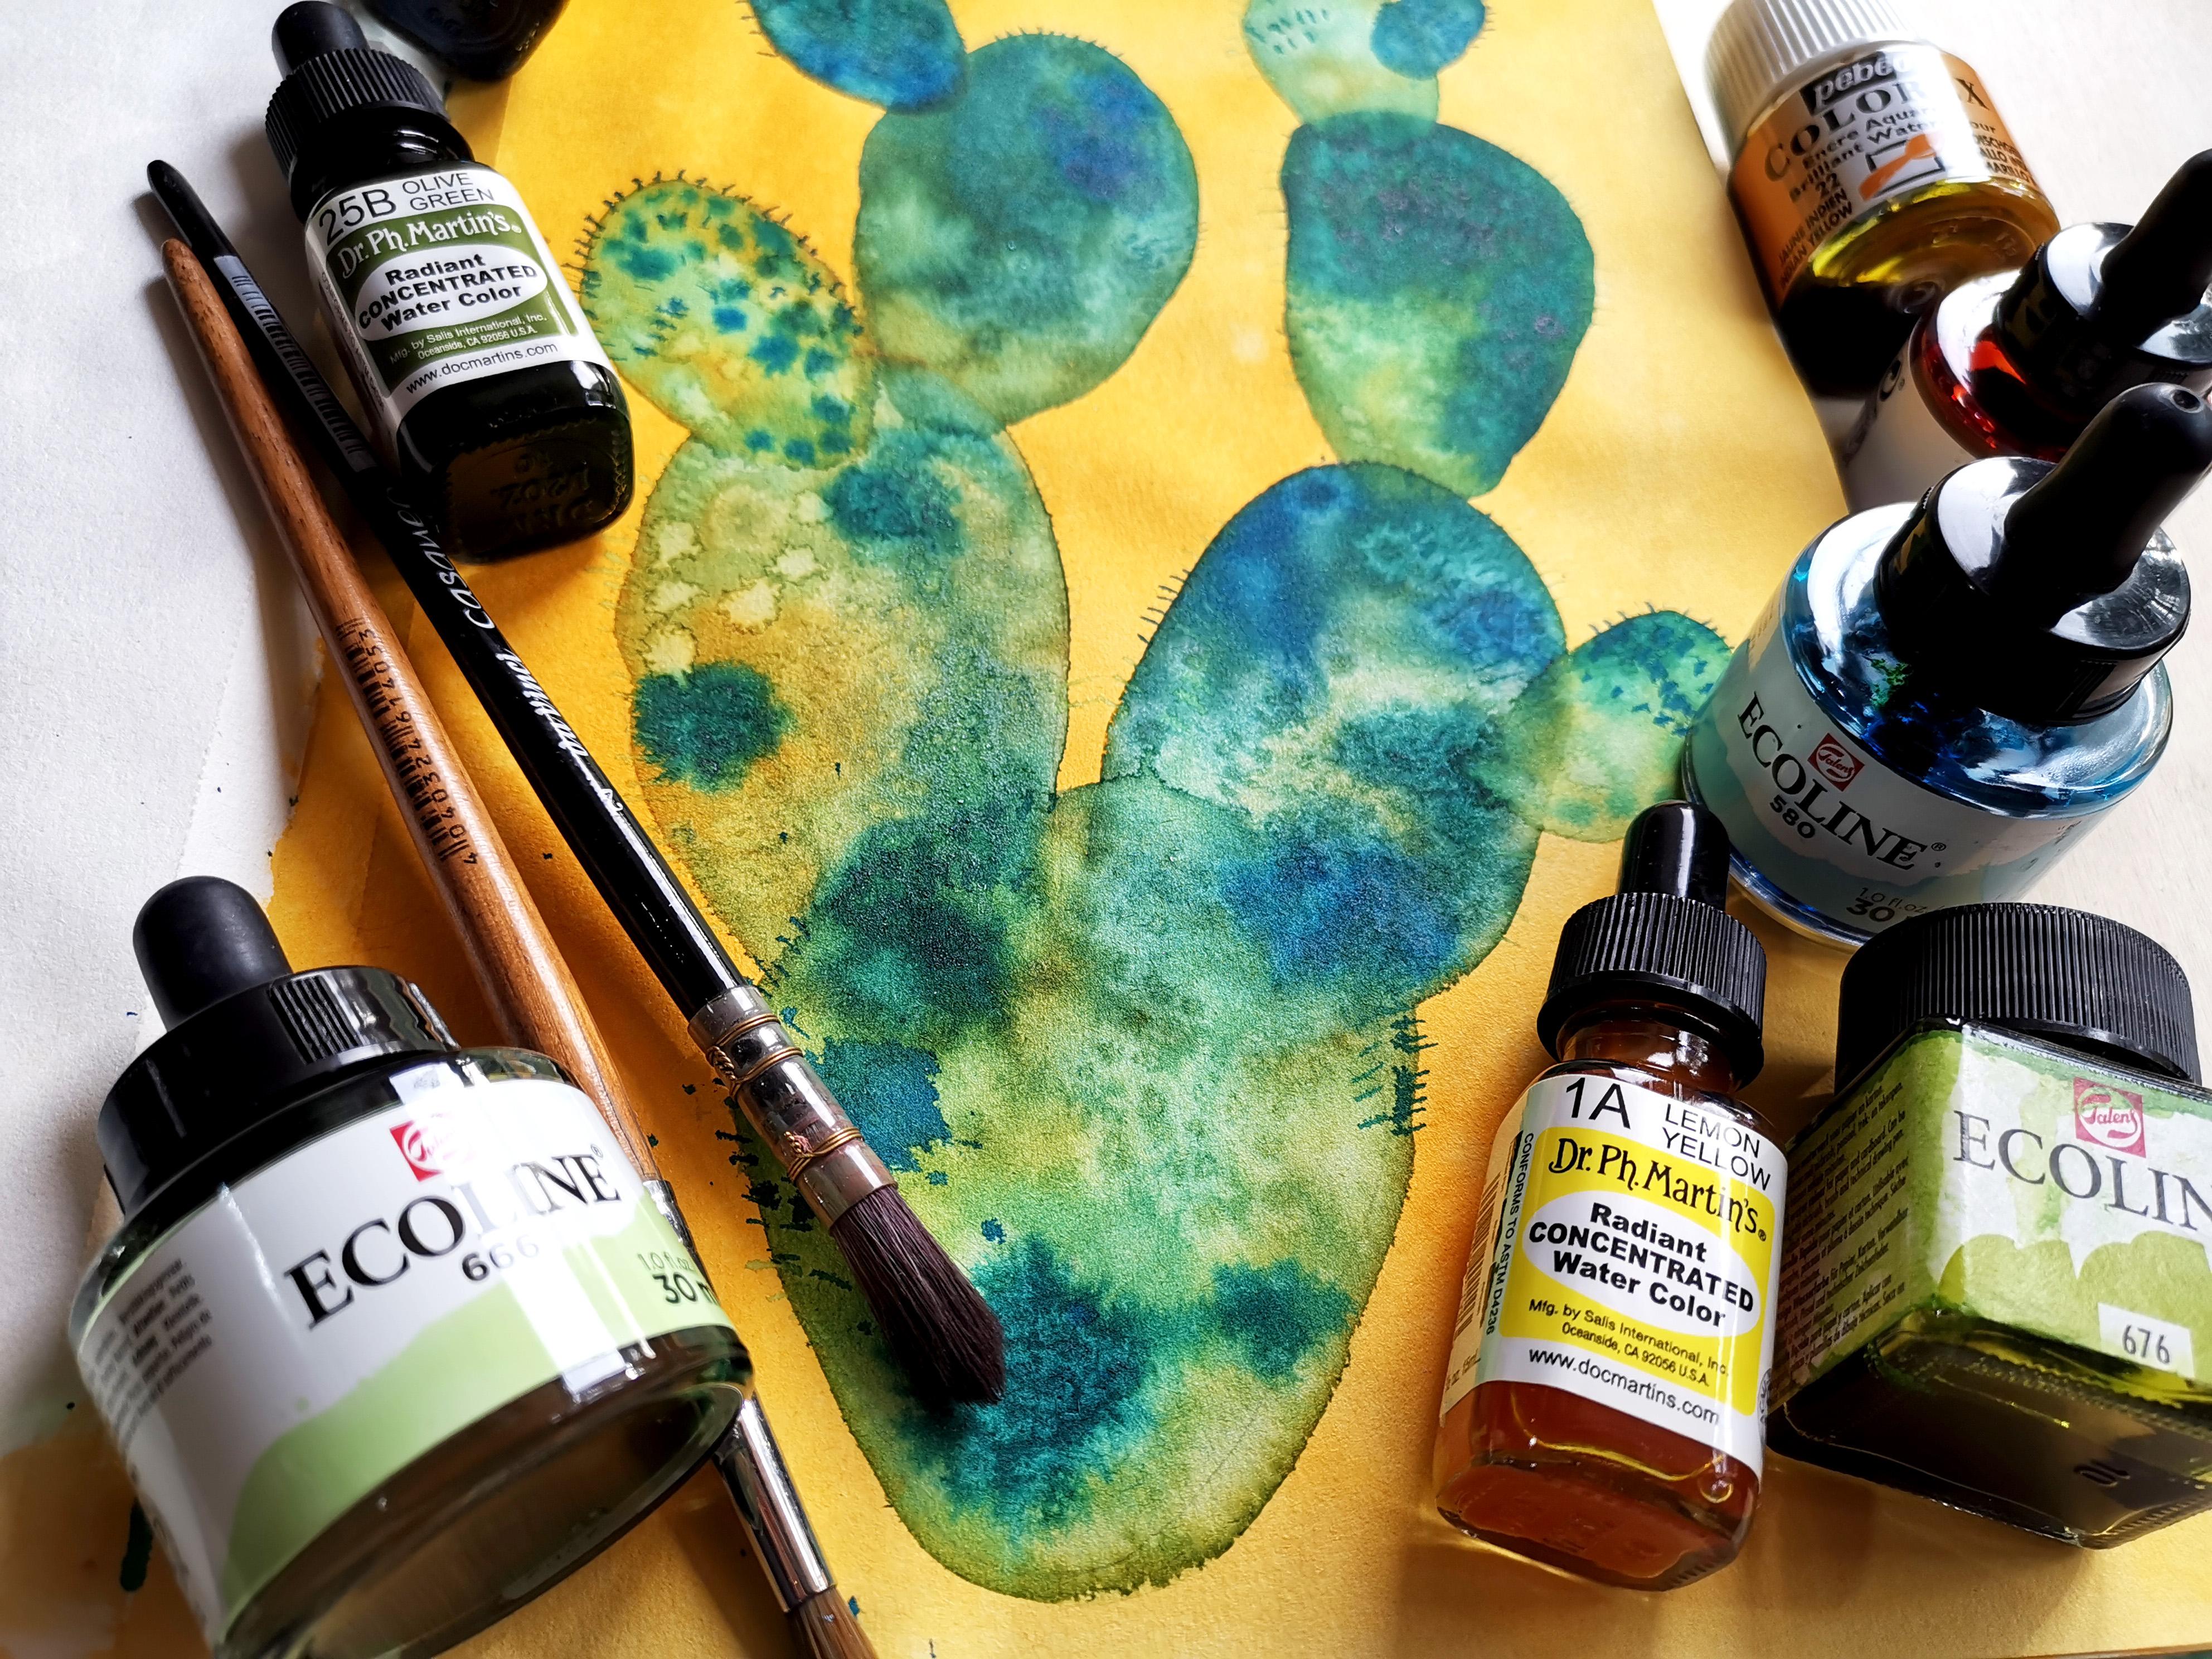
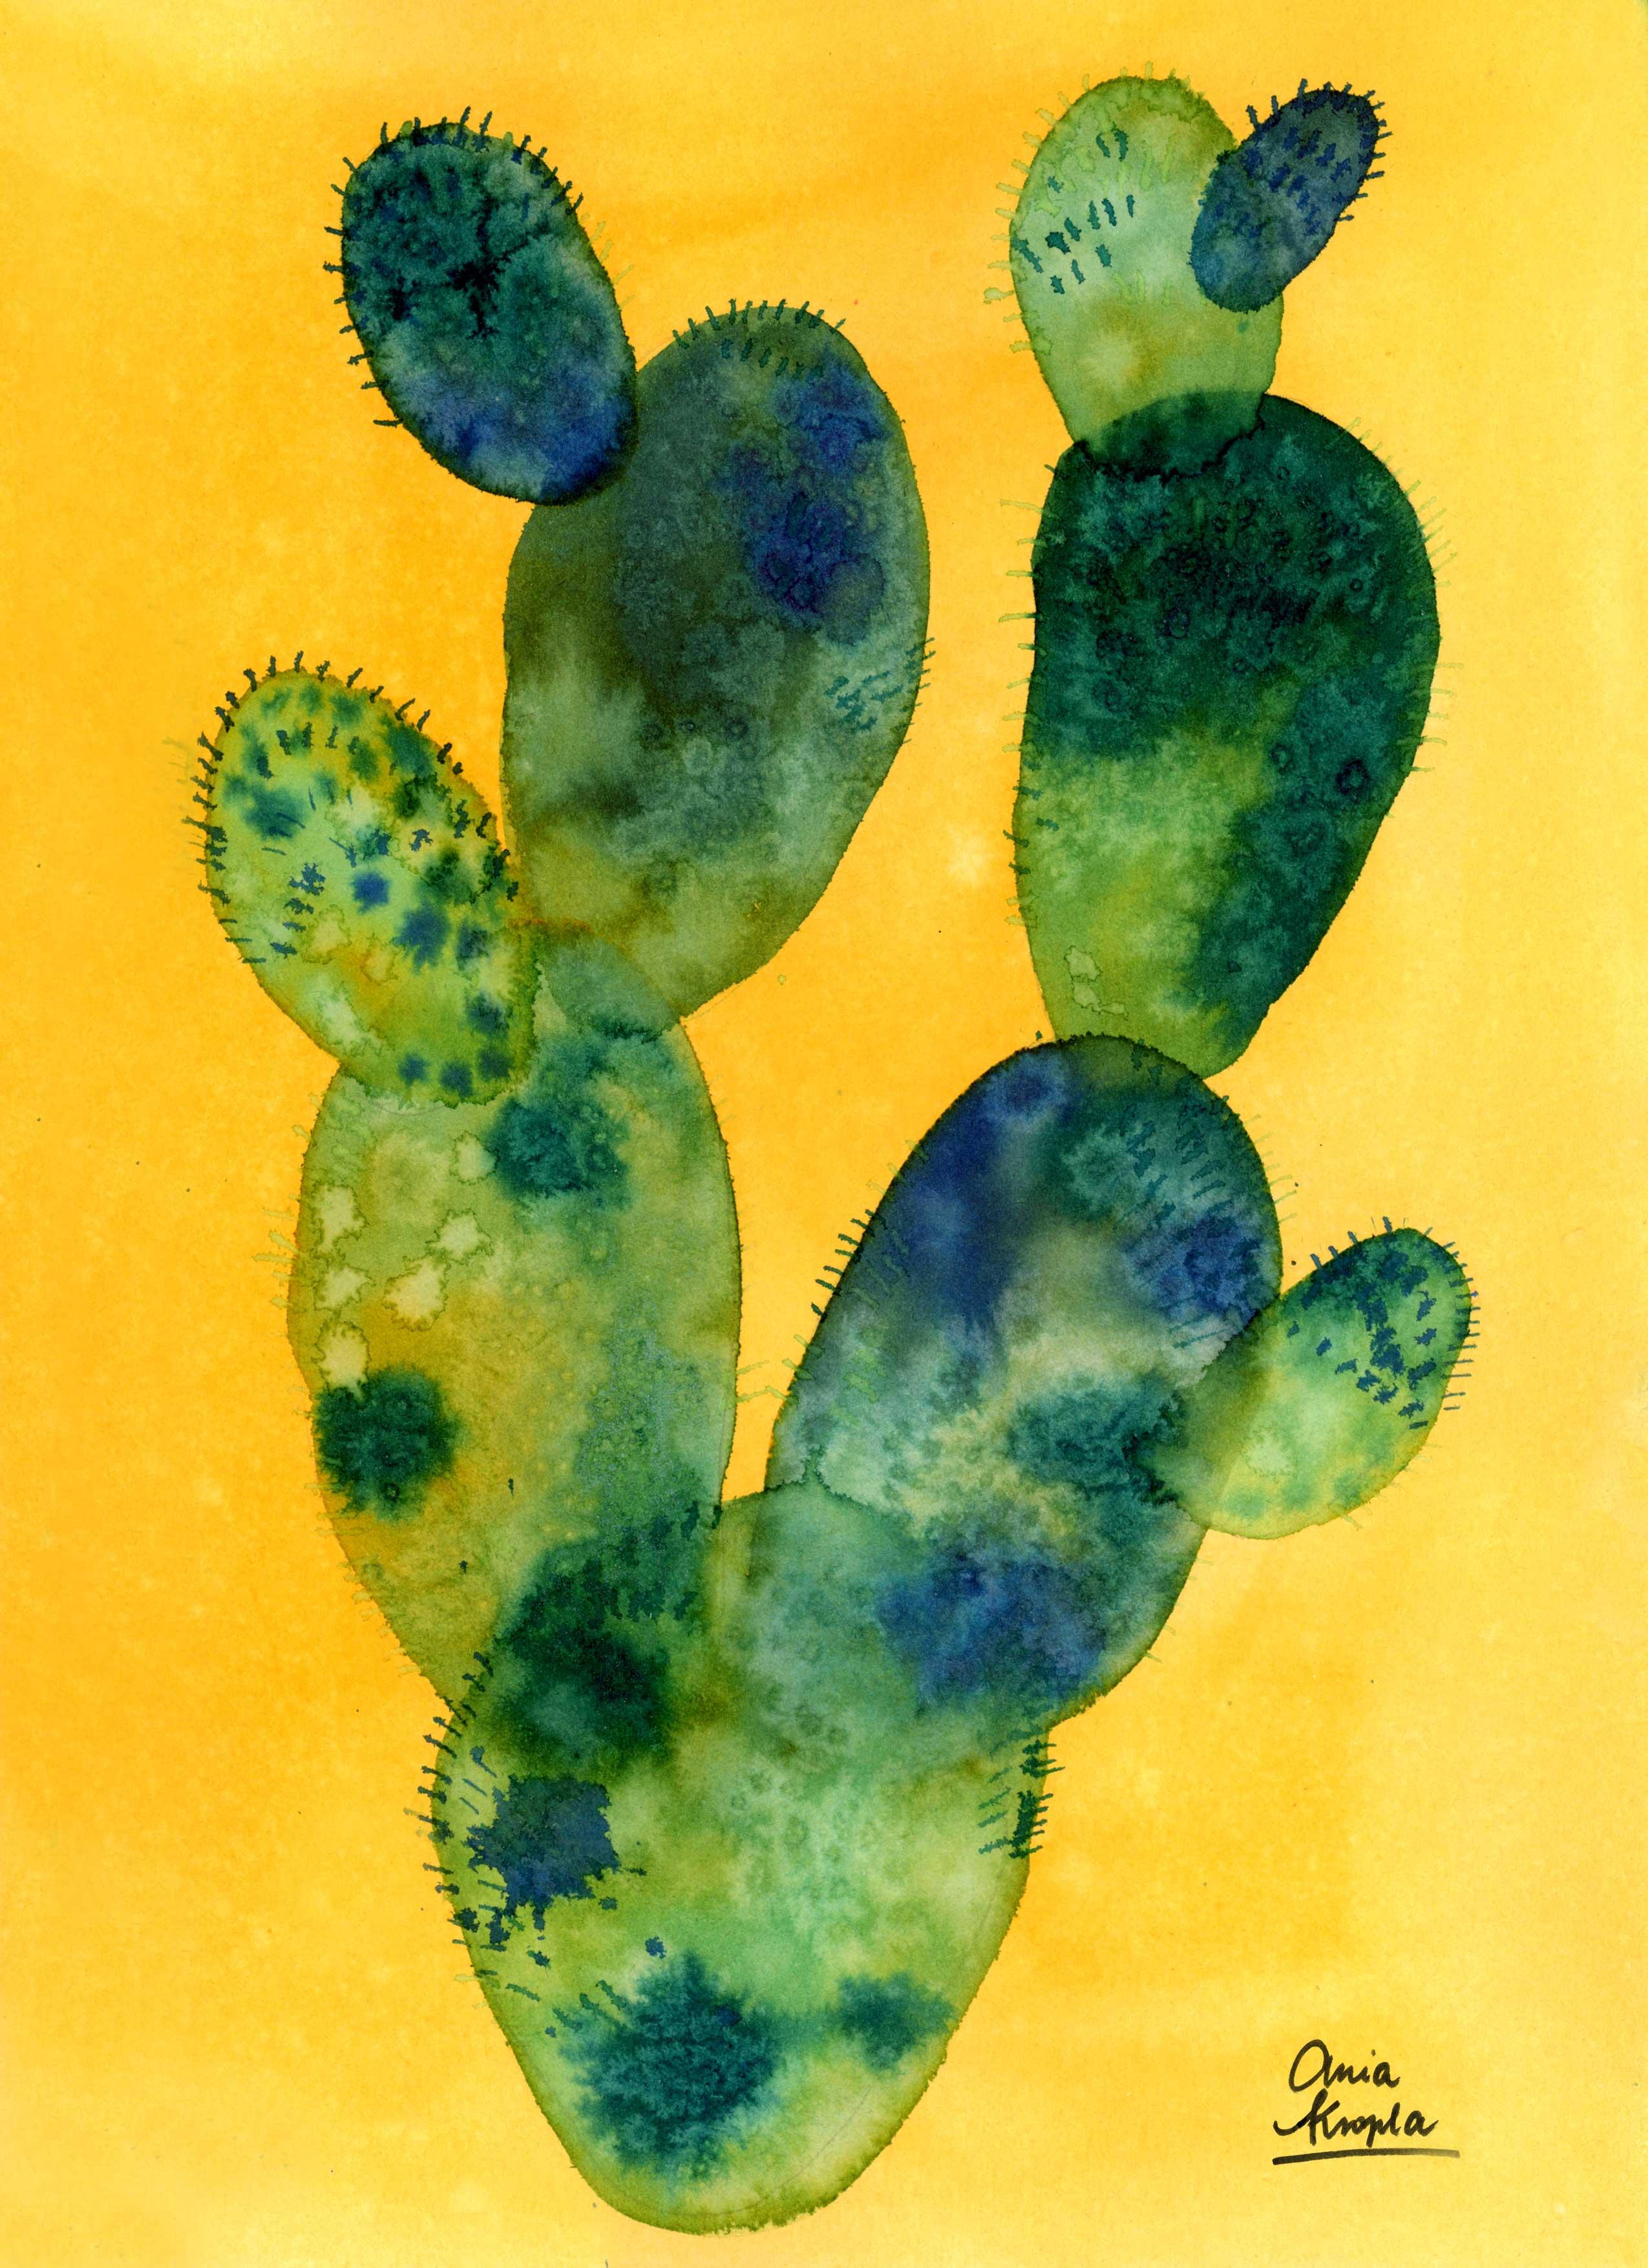
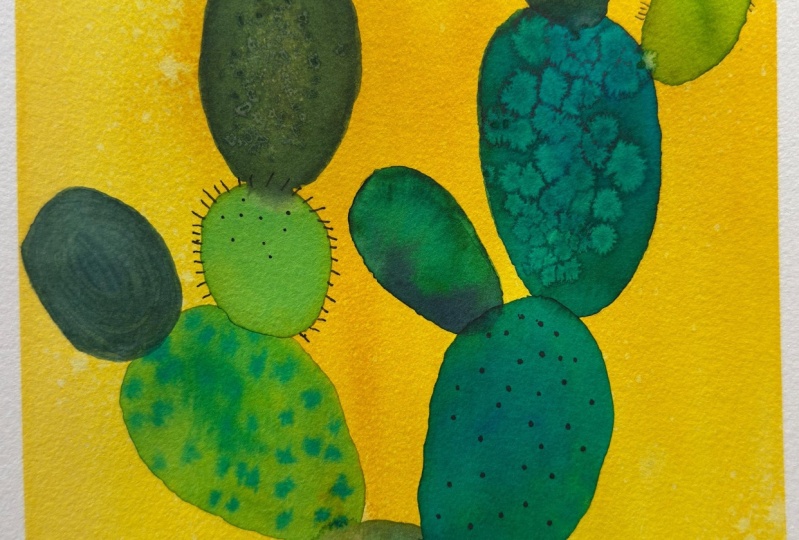
8. Painting Cactus: Welcome to the lesson where
we will paint characters. So we will use again all the watercolor techniques that we used for the pebbles, but we will also use layering. So for that, I will paint
background and the cactus. I will paint later on, later on, the background. A word that this exercise
can deal with difficult. Feel free to paint the Texas without,
without a background. I will use limited
color palette, but feel free to use
your own colors. Mine will be yellow for background and greens and
blues for the cactus. If you want to use other
color combinations, then go for it. If you want to use more
colors, also, feel free. Do it. I limit myself to make
the process easier, but it's up to you. Again, don't be afraid
of meeting ever. We are here to explore. So I hope you will have fun. I thought of painting
also cactus, Because when I
painted the pebbles, I saw that it creates, it's really lovely
textures that reminds me of the cactus I see here
in Italy where I live. So here we will try also
layering technique. So first I will draw background and then
I will let it dry. And I will paint over. The dry layer. Can be a little bit tricky. So if you feel like
you want to try to do the cactus without
a background, go for it. I will use a yellow color
for the background. Then I will use blues and
greens for the cactus. I already drew the
shape of factors. I left randomly the color drops and then I will
diluted with water. It's really vibrant. Yellow, but it's okay. So I was thinking I could try to add water spray on texture. We'll see if it will be visible. I have this spray bottle and while it's still wet, Let's see. Yeah, some texture
is created to you. I will use a little
bit of hairdryer to dry it and then
try with spray again. Alright, I dry it a little bit. It's still wet. Not totally dry. So let's see if now the waters water texture
will be more visible. In some points it is. There is a little
bit of texture. Let me show you example here. Here. So I will finish to dry
it with a hairdryer. Alright, so my
background is ready. I prefer as my colors. I will use green, blue greens, and blues. For maybe five. And tried to limit myself. I left the red color from the other from
the previous exercise, but it shouldn't influence so much your color if you want, you can change your water and we will basically try
the same techniques. I will try to play with colors. But the difference here is that you have the color
in the background. So let me show you what
happens where I will, when I will apply water on it. Okay, So what happens
is that your color reactivates when you
put water on it. And so it's a little more
difficult to control. But let's start and
see what happens. I put quiet screen. I will also put blue to
see what will happen. Little bit bluish. So it's okay. I thought that it
will be more grainy. But as you can see the
yellow in the game. I will also use salt. Because I am searching for the textures that we created
with the pebbles exercise. I will jump into another part of characters
because this one is wet. I will wait until it's dry and I don't want the
colors to blend. I want them to overlap. So I will jump from the wet parts to the dry
part and vice versa. Right now, I will apply color
directly on the dry color. And we'll see if it
will activate less. As you can see, yeah. The grain is more
greenish because yellow activates more slowly. You have to be quick in order
to not to move your color, your background color to match, because the more you
will paint with a brush, the more you will
move your color, the more you will also
move the background color. And I will play with my
wet-on-wet techniques. So again, I leave
it so I leave it to dry and I will jump
to the other parts. Let's not forget the cell. Doesn't have to be everywhere. Sorry, my battery went off. So I finished this part. In the meantime, at the end, I covered it all with water and then I add a
few drops of light blue and this dark to acquire. And then I added salt. Now I dried also the wet part. I will try to do overlapping. So here I will overlap two layers because I
will overlap the layer, the yellow background
and the part of cactus, I will reactivate more colors. So let's try again, do the same thing
that I did here. So as you can see, the color starts to smile. That's because it's reactivates. Maybe if it will, let it dry a little bit more, maybe overnight, it would
****** less but still smudge. So now I will try to make
some wet-on-wet technique. Again. You can see I'm not too precise. I'm trying to be quick. And the precision is
not my best quality. They have to admit. I wanted to see if I
will add drop of water. It still works. I'm creating
water blobs too much. Okay. And again, it's nine, little bit of salt. Lands. Jump to another part. Here. I will paint
directly with blues. I will try this light. I wanted to create overlapping transparent
layer of color. I will say if 0 make it. It's tricky. And the color underneath,
they activate it. Here, as you can see, some of the green,
it will happen. It's nothing that
you can control, but what you can do
is you can paint quickly and turn
back on this color. You want activated too
much and you can create, you can create this
overlapping effect that I wanted to show you. So I will try also to this the same shear with a smaller part of
the capitalist. I will use this time, greeny yellow, sorry,
light green this one. Morning, a few drops and again, I will have to be quick. Also to jobs. All. Try to do it with a brush. Darker green as well. This one, e.g. it also creates this texture that you
can find them cactus. I think we kept this was
a good idea. After all. I will continue with
this technique. I will play with
the techniques that we saw is that you already
know and are familiar with. Maybe the last thing that
I will show you here, it's tried to put the water on over the dry color and
see what will happen. I will leave few drops and
let them dry without lifting. Here you can see they
reactivated the color. Okay, so here is a tricky
because there's still salt. I could take it off, but I forgot, so I
will just leave it. Remember to wash your
brush really well. You want, you don't want
the cell to enter through your bottle with color. And again, I will use lighter
color for the smaller part. Oh my gosh. Watch. My brush fell and
it's thrashed everywhere. Those are accidents that happen. One drop felt here. I will try to remove it, although I think will be quite
impossible to remove, it. Only gets worse. But hey, this is sketchbook. I can edit it in
Photoshop later on. I want to print it. Right? So the cactus is dry. I will take off the salt. So here it is. I'm really happy
with the results. Look how long did it
texture is created? It's created at the
end of the blue. Turn. Green as I, as I thought, it will look at the different
kinds of effects, e.g. this was water on wet color and this one was
water on the dry color. And I love both of them. The salt is really perfect
for the capitalist texture. So I think it's a
really good idea. I never thought I
will paint cactus. I will do it more often
because I really enjoyed it. And as you can see,
another disaster happens. So this is my fault because
I didn't close the bottle. Well, and the splash and
the color and the splash. Look at my hand, also unhappy. So be careful, be
really careful. I will embrace my mistakes and to try to be more
careful in the future. So what I will do is
that I will dip pen, normal pen that you will
use for calligraphy. And they are alkaline, so you can use it as my ink. And TRO middle here and
they're not everywhere. I was wondering what will
happen is I will use green because probably
it won't cover. Maybe on the brighter parts. I will see what will happen
if I will add light, color. Maybe I will proceed
with creating needles. Right now. I will leave
you here and I will show you my final result. I'm really curious
about your process. What colors did you use? They just travel with
some things if yes, then write about it.
In the next lesson. I will summarize all
the steps that we took and give you the last
thoughts. See you there.
9. Final Thoughts: Congratulations, you made it. I hope you've had fun. Thank you for taking my class. I invite you to post
your project in the projects gallery to
share your thoughts. And also, I invite you to
comment on other projects. It's really great when we
support, support each other. So leaf likes and comments
also on the others projects. Let's recap the steps that
we took in this class. First, we saw all the features
of liquid watercolors. Then we try it fun and
easy painting techniques. And then we tried to apply them on two different
illustrations. One of them was pebbles and
the second one was cactus. If you enjoyed this class, I asked you to
leave the overview. It will be really helpful
for me, for my visibility, but also, if you think that
I could improve something, then also let me know. I'm really here for you
and I'm really curious about your feedback in your
impressions On my classes. Also follow me on my
Instagram and on my YouTube. I hope you had fun
and I hope to see you soon in the next classes. See you bye.
 Ania Kropla Malinowska, Award-winning illustrator