Transcripts
1. How to Draw Cats intro: Hi, I'm Amy, and this is cocoa and we are here to
teach you how to draw cats. In this class, we will
go over the basics, starting with drawing
from reference photos. Beginning with simple poses, we will analyze some of the
basic shapes you can find whenever you're
trying to break down the form of a cat
to draw it easier. I will also include notes
during the analysis phase, and eventually we will move
on to drawing our subject. We will then continue
small lessons increasing in difficulty
as we go along. Then after our sketch session
using various cat poses, we will focus on the cat's
face specifically so we can go into greater detail on probably what is the most
important part of the cat. By the end of this class, you will have enough knowledge
to go out there and find your own references and make your own projects using
the lovely form of cats. You know we all love them. Hope to see you in class.
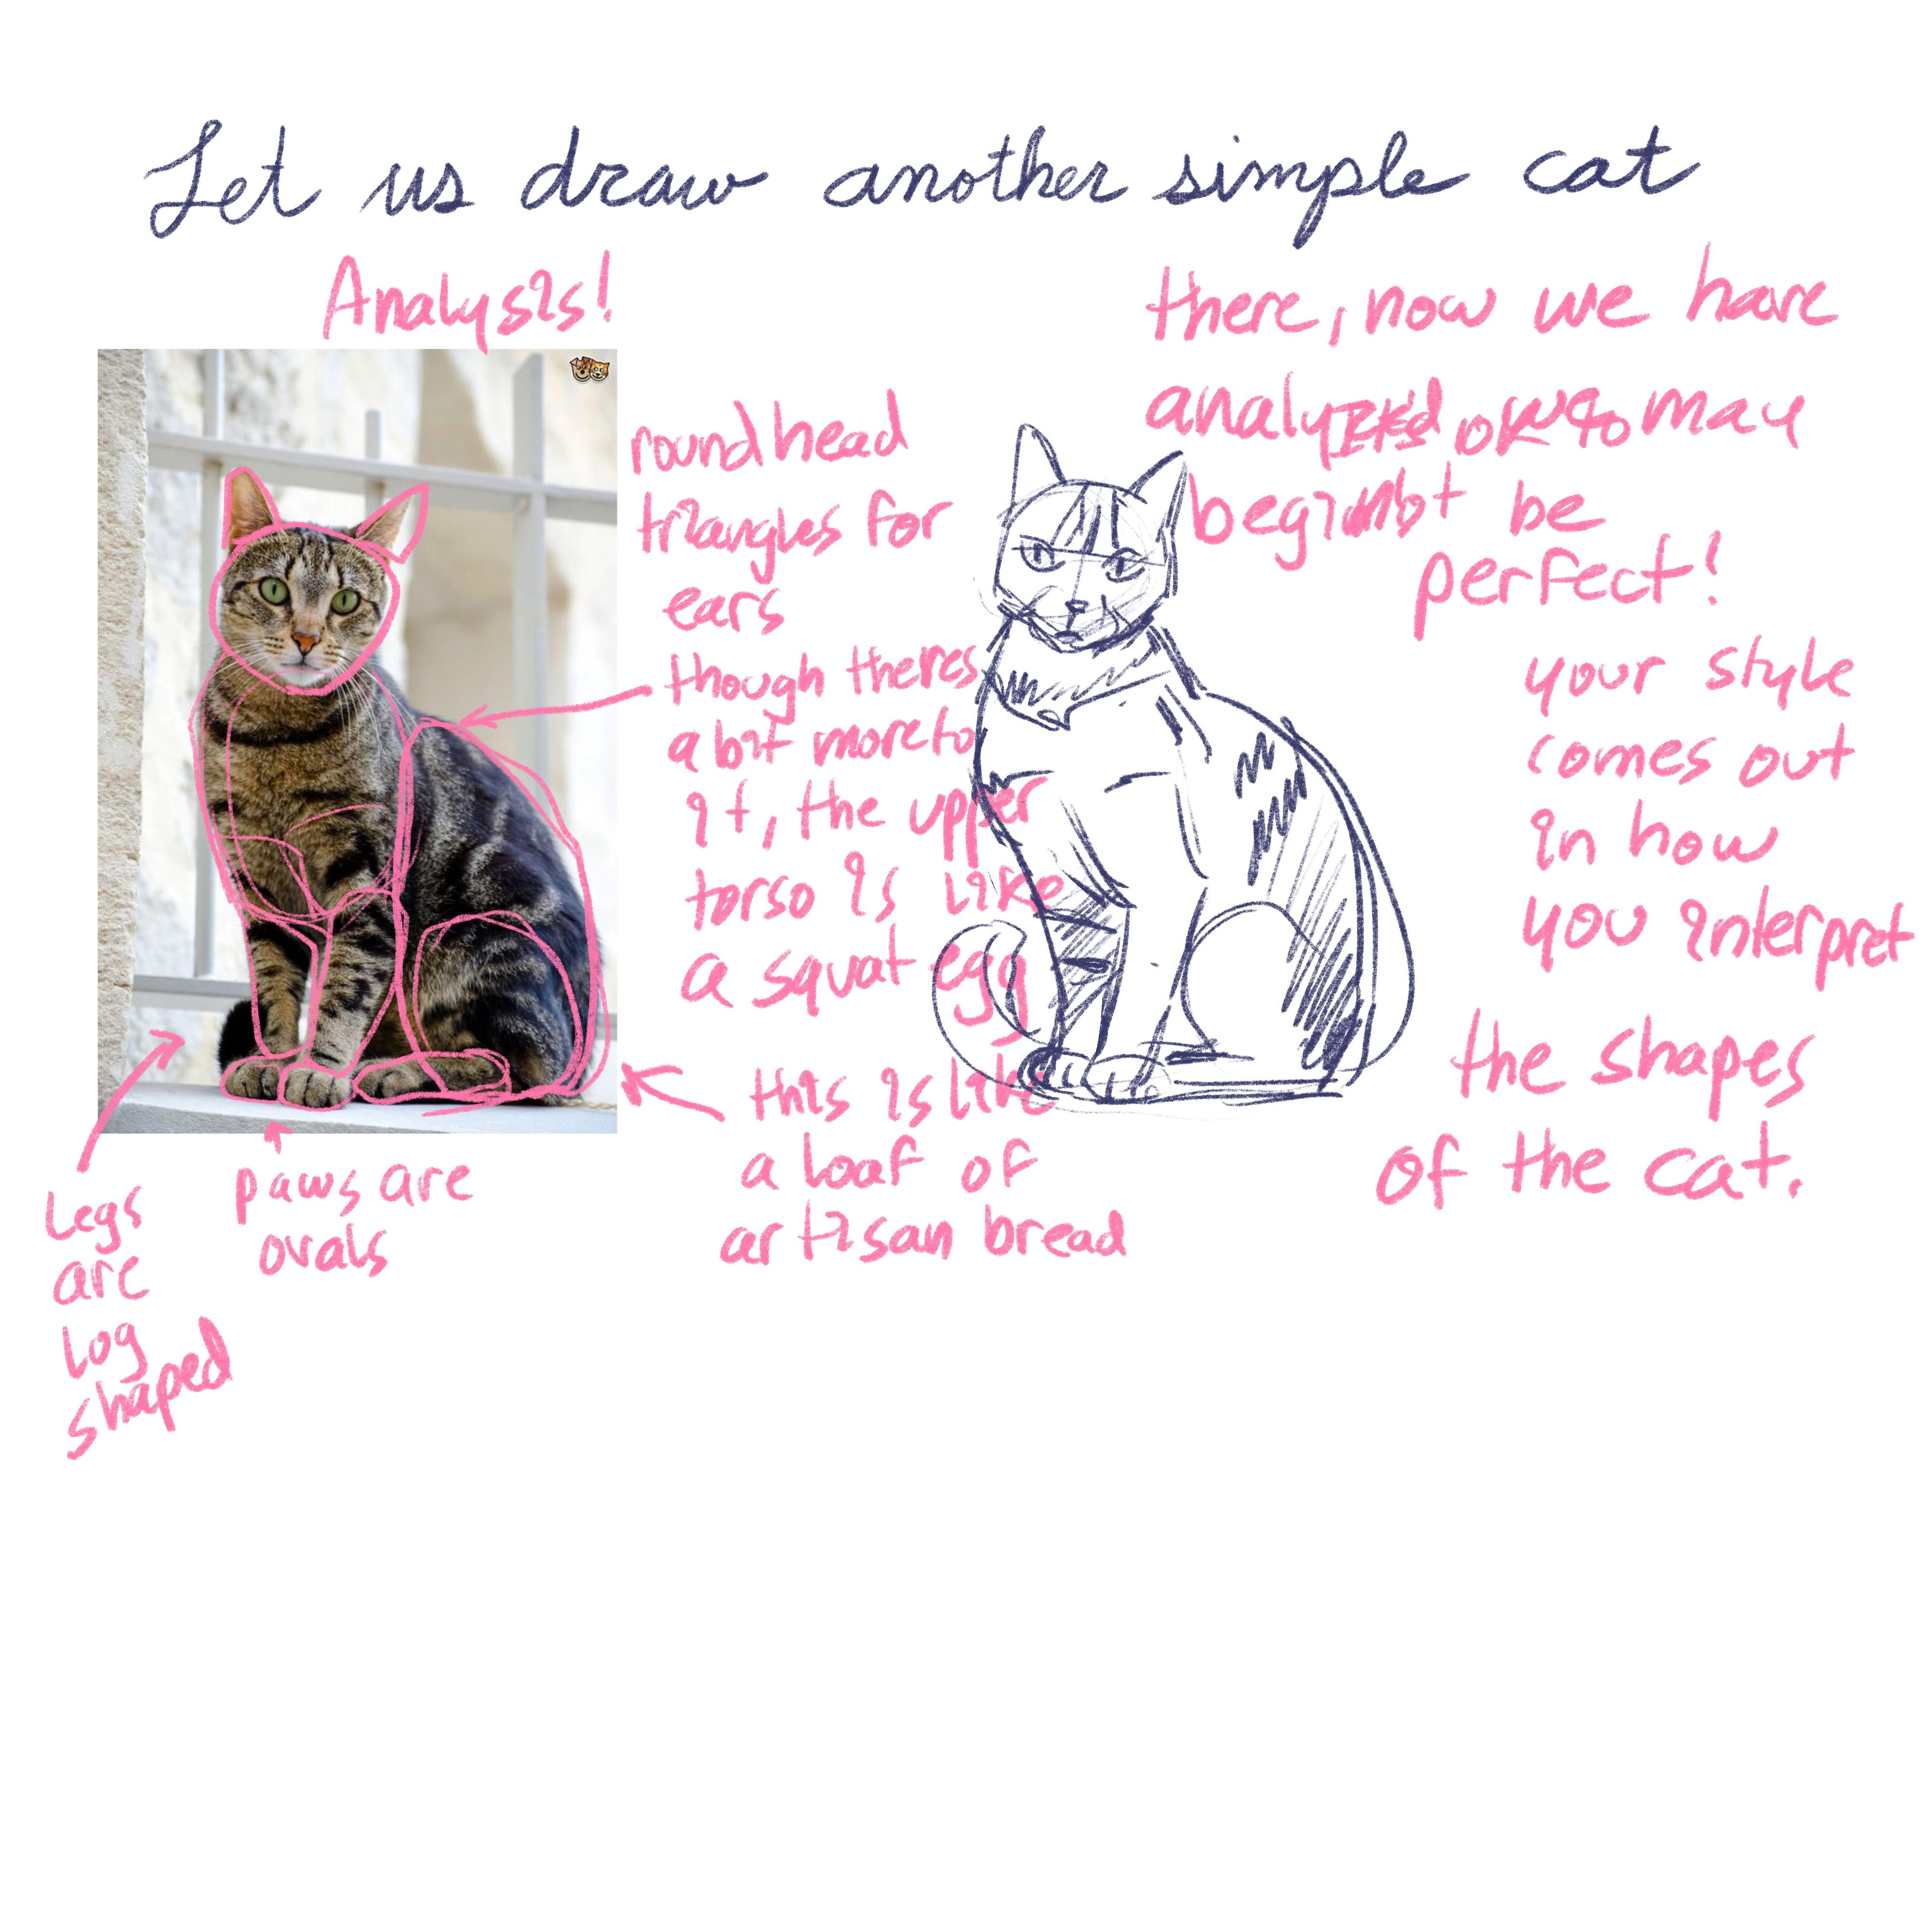
2. Lesson 01 - Starting with a simple seated pose: For our first lesson, we are going to pull out a
very simple reference photo of a sitting cat and we're going to analyze it first
before we begin drawing. You will also be
able to find all of these reference photos down below in the
classroom documents. Let us begin the analysis. The goal of the
analysis is to break down the shapes of the cat into smaller little bite
size pieces so it's easier for a new
layman to understand. And here I already have a start. The cat's head is very round. Is ears are triangular, and the bulk of its body here looks kind of like an
egg with a flat bottom. And then there's a
little trapezoid between the head and the body here. And then the tail is kind
of like a big old sausage, and you don't want to eat that sausage because
we don't eat cats. We can go ahead and
take things even a step further here and say that this cat's head is more like a rounded
diamond shape. Cats can often have slightly
different face shapes, but one thing that
remains constant is their ears are always
little triangles. Now that we have
our analysis done, it's time to start drawing. You can start drawing by
just plotting out all of the basic shapes that we found on the photograph
on the left. Following the
shapes will get you a good starting base that
you can then refine. For those of you who are
a little more advanced, you may just want
to draw the cat, how you normally naturally
draw. This is fine. You do not have
to start out with the actual shapes to
use as your base. If you are more comfortable
drawing in another way, then go ahead and do that. I will now leave you with
a slightly sped up version of my own sketching process
for you to see how I do it. You may also choose to sketch
your own cat at this time, or you can pause the video and do some
sketching on your own. When this little clip is done, we will come back and
discuss a few more details. I also want to mention
that during this lesson that you can feel free to use the Lasso tool and the
Transform tool to adjust any of your drawings that you feel are not aligning with the
vision of the photograph. Don't feel as if you
cannot use all of the tools at your disposal because you think it
might be cheating. These tools are there
for a reason and nothing is cheating when you're
doing everything by hand. Once you have a good base down, you can begin adding
details like I have. These details will bring
your creation to life. Also, don't be afraid
to not be perfect. This is all for practice and just for sketching
and having fun. This is how you learn,
don't worry about being perfect every time because not every sketch
will be perfect, but you will gain
the knowledge to eventually one day be as perfect
as you would like to be. So I'm going to go ahead and stop the lesson here
with only one sketch. If you feel ready to
move on to Lesson two, go ahead and you can
continue that now. If you feel you need a break, go ahead and take a break, and then you can move
on to Lesson two, where we will do a
slightly more advanced, not too much pose of the cat. See you in the next
lesson. Bye bye.
3. Lesson 02 - Sketching a slightly more complex seated pose: So here for Lesson two, we're going to amp up the
difficulty just to touch, and we are going to do
another sitting pose that is slightly more complex. In this pose, you
also get to see the cat's forelegs and
one of their back legs. So this introduces a
little more complexity. So let's begin again by
doing another analysis. Again, we will start with the
head and notice that it is a very nice round shape with a slightly little diamond
point on the bottom. Next, we can see again that the cats ears
are little triangles. Now, as we can see the
cat's forelegs here, our upper torso shape becomes
a little more complex, and the legs come off of the front torso kind of
like two little logs, and the little front paws are just some nice
tidy little ovals. And here, the back torso looks about like a
quarter of a circle, or it can also translate into another squat little flat
bottomed egg, as well. Now, let's go ahead and analyze this torso a little
bit further because we can see the rounded
portion of the bottom leg, and it kind of looks like a
little artisan loaf of bread, one of those little
bolls around one. Now the foot on the back
leg just looks like a little sausage link and you can go ahead and
in the upper torso, you can put a couple trapezoids in for the upper leg
portion since there is a joint between those little trapezoids and
the little logs of the leg. So by fleshing that out, you can get more detail into your drawing whenever it
finally comes time to draw. So let's go ahead and
start drawing now. As with doing normal
human figure drawing, it is often easiest to
start with the head, as the head can be a basis for the proportion of the
rest of the body. For me, I also like to flesh out the head a little bit
before I continue. As you can see here, I've used a little crossbar to
indicate exactly where the eyes are going to hit and to find the center of
the face vertically. Doing this helps keep the proportion of
the face together, and we will discuss this
more in a later episode. Now I will go ahead and speed up my drawing process
slightly just so you can actually see my
whole drawing process and have it not take too long. Just a friendly reminder, making changes while you're
sketching is perfectly okay. That is, after all, the
whole point of sketching. And here I have the cat mostly finished,
sketched out, anyway. And I want to remind you that your sketching does
not need to be perfect. And however you
interpret the cat, that is you developing
your own style of drawing. You're still referencing and you're still learning things, but you're also developing
your own style along the way. So I'm going to end this lesson here, and in the next lesson, we're going to do a
much advanced pose for the next sketching session. If you feel that you're ready to move on to the next lesson, go ahead and do that now. If you feel like
you need a break, go ahead and take a break. Either way, I will see you
in the next lesson. Bye bye.
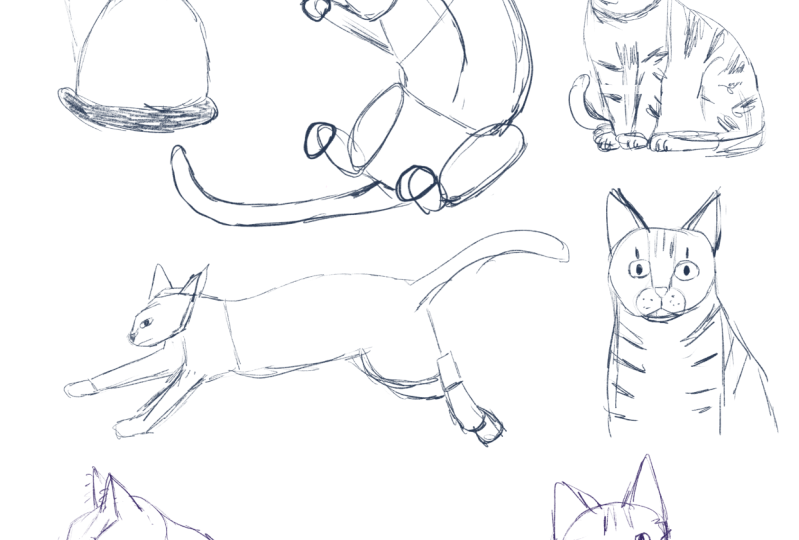
4. Lesson 03 - Sketching a cat in motion, a running pose: Alright, so for our
first advanced lessons, we're going to tackle
this portrait of a cat running from the side. All right, so let's just go ahead and jump
into the analysis. So from the side and running, the cat looks quite
a bit different. The head shape has changed
from a perfect oval to a circle with a little trapezoid on
front for its muzzle. Its ears are still triangles, and there is a trapezoid
there for the neck. Then you'll want to
break down the legs. Again, you'll have a
little triangle area where the muscles
for the leg is, and then a trapezoid
for the base leg. The body is kind of like a tube, and we'll cut it off there at the back leg so we can
check that out later. The bottom legs up
front are, again, two more rectangles, some
little ovals for the feet, and then the back leg area, you're going to have a
real rounded kind of like a loaf of bread shape there for the whole
hunch of the back leg. And then you're going
to have a little square coming out the back and then a kind of a rectangular
shape for the back feet. That was a lot of
information all at once. So let's just pause here
for a minute and look at the cat and analyze how all
these shapes come together. When you are ready, let's go
ahead and get to sketching. As this is a more complex pose, I'm going to slow down a
little bit and plot out this cat using some of the shapes that we
analyzed in the image. I will go ahead and
leave you now with a slightly sped up version of my sketching so you can
watch it in a timely manner. And if you feel like sketching
along at this moment, you can or you can
wait until the end. Once you feel satisfied
with your basic form, you can go ahead and
zoom in and start adding some little details that will bring this
little cat to life. Also, in the process of
adding these little details, you may like to go
ahead and erase those inner forms like the triangle there
for the leg muscle, just to keep things neat and clean because real cats don't walk around with triangles
on their upper torso. However, if you don't feel
comfortable erasing them, you can leave them
in there for now. It's all part of the
learning process. Also, at this point, if you are dissatisfied with
your sketch of the cat, you can go ahead and erase
it and start a new one, or you don't even
have to erase it. You could keep your progress, and you could just select this cat and move it off
to the side, try it again. And as you do this, you will see a steady
progress in how you're improving each time you
reattempt the drawing. Believe me, the more you
draw, the better you get. So that is pretty much
it for this lesson. You can go ahead and continue
sketching the CAT and add more details as you see
fit in the next lesson, we will be moving on to a slightly even more
difficult pose, and I will get into slightly more advanced
construction ideas for the form. Thank you for joining me, and I will see you in the
next lesson. Bye bye.
5. Lesson 04 - Sketching a playful cat with foreshortening: In this lesson, we have a
much more difficult pose. This time we have a cat
lying down and bending its body and it has its
paws in front of it. We're going to start off this analysis a
little bit different because we are going to
start drawing the hip line, the shoulder line, and we're going to incorporate
a spine line, which will help us better
gauge how the body is flowing. This structure is pretty common
in human figure drawing, and we can use it
here again for cats. Basically, these marks
are going to show you the direction that the body is moving in in its
different points. This will help you keep the
flow of the body better. Now, along with these
new structural helpers, you can still find the
shapes here in the body. For example, here
around our bar marks, we can go ahead and form the
torso as two trapezoids. Now let's focus on
the lower body. Here, the thighs of the cat are essentially
almost perfect ovals. If you plot out the thighs, you can then start going in and filling out the rumpatumps and the little side of the
body here on the other side. Then we'll eventually
move on to the feet. The feet have some
foreshortening, but don't be alarmed
because it's very easy. We just draw two
ovals on the top, and then two little sausages
underneath the ovals. But remember, they're not really sausages and we don't eat cats. And similarly, the fore legs will be treated in
somewhat the same way, except one is outstretched and the other one has a little
bit of foreshortening. Now, lastly here,
I'm going to go ahead and draw in
the spine line, which is basically going to run down the center of the animal. Normally, you would do this
in the beginning, right, whenever you're doing
your little marks to show the direction of the
upper and lower torsos, it's usually a little more
helpful at that point, but at any time, you can add it in and
it'll be helpful. Basically, putting in
the spine line adds a very simple visual
representation of exactly the flow of the body. So at this point, we've
analyzed everything, so let's go ahead and give
it a try and get drawing. I'm setting up this time on
a completely new document because I used too much of the other space in
the document to draw. I also still have the
reference image up, but it's off to the side
and you can't see it. But we will still circle
back to our shapes and re analyze the finished
drawing at the end. At this point, as in
previous lessons, I'm going to go
ahead and speed up my drawing process just a
little bit so you can watch the whole process tolrably and then we will circle back
and rediscuss everything. So here my sketch of the cat
is pretty much complete, and I'm going to actually
move it off to the side here. And what I'd like
to do is I thought the cat also might look
cute with its eyes closed. So what I plan to do is I'm just going to
copy and paste it, and then I can make
detailed changes without changing the
original sketch. And here you can see
that it does look pretty darn cute with its
little eyes shut as well. So because this was a considerably
more difficult lesson, let's go ahead and review
the shapes in the drawing. For this, I've just copy and pasted the same figure
for a third time, and now I can write over it with all of our shape analysis. So let's go ahead and begin. Again, we have a
circle for the head, and this cat's head is
really very circular, compared to some of the other
cats we've been drawing that had a slightly more
diamond shaped head. Again, we have
triangles for ears. And the belly of our
kitty is kind of a little more rounded than we actually had in our
original analysis. You can still draw
the bars to find out the directions
of the torsos, but torso, rather. There's
not more than one. They aren't caterpillars. Oh, but that would be
a really good joke. Anyway, getting back on track, we have a trapezoid connecting the head
to the round belly. Again, the legs are
like little sausages and here is our lower
trapezoid that is the lower portion of the cat with a couple
little sausage legs and a couple little oval feet. Again, remember that the thighs are actually two ovals
within that trapezoid, and that's what helps you
get that nice smooth shape. So how do you feel you did? If you're not happy with
your first drawing, just try and try again. But don't be too
hard on yourself, especially if this is
completely new to you. So I'm going to go ahead
and end this lesson here. And in Lesson five, we're actually going to, um, take a little detour,
I guess you could say, and we're going to focus specifically on drawing
the cat's face. We're going to get in there into the nitty gritty and draw some nice little details of the cat's face because
as we all know, that's kind of the most
important thing of the cat. I mean, we like all of the cat, for sure, but we always like to see their
cute little faces. Anyway, I hope you
enjoyed this lesson, and I will see you in
the next one. Bye bye.
6. Lesson 05 - Sketching a front facing cat portrait: So for this lesson, we're
changing gears a little bit, and we're going to be focusing specifically on the
proportions of a cat's face. So let's start off by doing the same
thing that we did with all of the cat figure drawings
and do a little analysis. To begin with, we do have a
circular head here and you can use the cross hair technique to figure out where the
centerline of the cat's face is and where the center line is across the width of the face, which is usually where
the eyes will line up. This is very similar to setting up a portrait
drawing for humans. You can use the same
technique here. So I'm going to begin this
sketch by plotting out the roundish oval shape and putting the crossbars
across the face. So I know where the nose
line is and the eyeline is. Now, I personally like to start with drawing
the eyes first and then using those eyes for the proportion to go
bloom out from there. I will show you what I
mean here in a minute. So here is one rule of proportion
when it comes to cats. There is almost
exactly one eye width of space between their two eyes. The second point is the cats tear ducts at the inner corners of their eyes will align down with the outer
edges of their nose, and it'll kind of go in a little bit kind of like a
little inverted trapezoid. Now using these
proportional guidelines, we can start filling out
the face a little bit more. Another proportional
guide you can count on is that the inner corners
of the ears will match up with the inner corners of the eyes or the cat's
tear ducts, like so. I will now leave you with a slightly sped up version
of my sketching process so that you can see how I pulled everything together
without it taking too long. But I would also like to remind
you that it's okay to use all of the tools
at your disposal and to make adjustments
as you go along. And again, if your drawing
isn't coming out perfect, like mine wasn't on this day because my sketching
game was not on point, it doesn't really matter because you're learning something. And so as long as you're learning, you're
going to get better. So just keep at it. Mm Okay, I have a couple more proportional notes
to share with you. The first being that the
cat's muzzle is very round, like an oval here. And inside that oval, the upper part of the
muzzle on either side of the nose is kind
of like a small ball. Next important thing of note is that when the
cat is facing you, the edges of the
muzzle will line up with the center
of the cat's pupils. With this knowledge,
you should be able to faithfully recreate
a cute little kitty. And remember, perfection
is not required. Go ahead and enjoy the process and let your
own style come out. With all of this said, I am going to end this lesson here, and in the next lesson, we are going to tackle drawing
the cat's portrait from the side and also dig into the three quarter
view just a little bit. Well, I hope you
enjoyed this lesson and I will see you in
the next one. Bye bye.
7. Lesson 06 - Sketching a cat portrait in profile and 3/4 view: So here we are for the
sixth and final lesson of how to draw cats. The first cat we're
gonna be focusing on is this lovely little
profile of a cat. Again, we're going to do
a little bit of analysis, and we can see that the cat's
head is, again, very round. It kind of looks like an extra chubby sunflower seed
that's upside down. And then the muzzle is another little trapezoid that just boops right
out of the face. The next important feature
is that in profile, the ears become more
three dimensional. So you're essentially drawing a couple little slanty pyramids
to get the ears correct. All right, so I'm
going to go ahead and get straight
on into drawing. Here I'm just trying to
get the basic shape of the cat's head down and adding that little
muzzle out the front. And similarly, as I did with the cat's full face portrait, I'm going to start
with the eyes next. Now, remember that when
the eyes are in profile, they're not going to
be completely round. They're going to be kind
of like a flattened oval. I happen to notice that my sketch is looking a
little too downward, so I just make a little adjustment and
get it back on track. After I've got the
eye fleshed out, it's time to figure
out where the ear is. Now, what I like
to do is just draw a little guideline out from what I consider
the inner corner of the eye and the outer
corner of the eye to help me find the inner corner and the
outer corner of the ears. Then, of course, we're doing a pyramidal shape so we can get that nice three D
effect of the ear. Now I'm going to
just groove into my drawing mode and
I'm going to share a little sped up version so you don't have to watch
for 1 million years. All right. See you in a moment. All right, so I want to explain the ear thing just a
little bit better. One of the proportional
cues that I follow, it's not like a
tried and true rule is following from
the outer corners of the eye to the outer
corners of the ears, and it will kind of make
this trapezoid shape, as you can see, with the pink lines on
the reference photo. And I just find them helpful for me to figure out where
the ears should fall. If it works for you, great. If it doesn't, you can
throw it to the wind. A couple more shapes
you can look for in the cat's profile is
the nose as a triangle, of course, but it's
kind of flattened. And you can look for the
upper lip of the muzzle, and then another thing
you can look for is the cheekbone
area of the cat. This is more for
getting into shading, but it can also help you put together your cat's proportions. Now, here is a
more advanced pose for drawing the cat's face. This is about three
quarters view, so you can't see all
of the cat's face on the right hand side when
you're looking at the cat. So let's go ahead and do some analysis before
we begin drawing. It's going to be really
important to get our analysis nailed down since this is one of the more
difficult poses. Here, the cat's eyes
are very round, and the one on the right
is squished a little bit. Then we want to find the
muzzle, which, again, is well, in this instance, it's kind of a bean shape. And then the little
lower jaw mouth just sort of juts out from
the middle of that space. Another thing you can do is
you can do the middle line, again, just like we did the cross hairs on
the front facing cat. You can do the same
thing here to find the center line of
the cat's face. Again, the ears are triangles, and the ear to the
right hand side of this portrait is a little
bit three D. So again, you're going to have a
little funky pyramid. Another helpful
feature to make note of is drawing a little ey eline in so you can find the center
of the face horizontally. Alright, with these basic
starting points in mind, I'm going to go ahead and start doing a little
bit of a sketching. I'm going to start with an oval for the
head of naturally, and I am going to put in the cross hairs for
the middle of the face, both vertically
and horizontally. Again, as with my
other cat portraits, I'm going to start
with the eyes as their great basis to get the rest of the proportions
to fall into line. So as I noted during
the analysis phase, the eye on the right is
squished just a little bit and is not as wide
as the eye on the left. This is kind of important for getting that three D feeling. If the eye is too large and equal in width to
the one on the left, it will look a little
less three D. All right. I'm going to go ahead and
hit the zoomies again, while I do my little
sketching and then we'll come back and we'll talk a little further
about proportions. All right, so we're ready to talk a little more
about proportions. I wanted to really
drive the point home that when you're in
a three quarter view, the left hand side of the
face, well, in this instance, because the way the
cat is facing is going to be about almost twice as wide as the space on the
other side of that noseline. It's not quite a
precise measurement, but a close enough
kind of measurement. Next, I wanted to point out that you could do my
little ear trick, which is to connect the outer corners of each ear with the outer
corners of each eye. Again, it becomes a
trapezoidal shape, and it can help you
find the angle of the ears a little bit and just basically keep your
proportions tighter. I also happen to notice that my cat's face is a little
too wide in the drawing, so I'm just going to use the transform tool to make
a few quick adjustments. Again, this is not cheating. You're allowed to use all of the tools that are
at your disposal. Feel free to make all
the little tweaks and adjustments you want. Finally, one last
thing of note here. Whenever you're filling
out the cat's whiskers, be sure that you always make one go in the
opposite direction. It'll feel more natural, as you can see from the photo, that whiskers are not perfect. So let's zoom out a moment and have a little look
at our handiwork. We've done a lot of
work in this course. We started out
with simple poses, moved on to more advanced poses, did even a little bit
of foreshortening, and then we started focusing on how to draw the
portraits of the cats. If you made it through all
these lessons and have a digital or physical sketchbook filled with little cat drawings, give yourself a big
old pat on the back. You did it. But before
we end this class, I want to go out on a
little cartoony note. Now that you have
the basics down, you can go ahead and explore
a few illustrative styles. You can give it a go at trying some more cartoony
and cute cats. You can do things like
exaggerate the face shape. For example, this cat here has a very exaggerated
diamond shaped face that looks a bit like
a piece of Oigeri. You can get out there and start experimenting with cats of all different shapes and sizes. You can also begin playing with proportions a little
bit within reason. There are a few
guidelines, again, you are going to want
a total eye width between the two eyes and so on. But yeah, you can get out
there and start experimenting. And if you want to make
really cute cartoony cats, be sure that you draw the nose really close to the eyes because that
just makes it cuter. And of course, very large
eyes add a cuteness factor. I hope you enjoyed this class and I hope
you will get out there and populate the world with a ton of really
cute cat drawings. I thank you for joining
me on this journey, and please feel
free to check out my other classes if you
like my teaching style. I'll see you in the
next one. Bye bye.
 Amy Stoddard, Amy Illustrates