Transcripts
1. Welcome To The Class: Hi and welcome to the
node DJ equipment needed DJ course brought
to you by to be a DJ. In this course, you
will learn how to mix four tracks
together in a short DJ routine by using
just the keyboard on your laptop and using
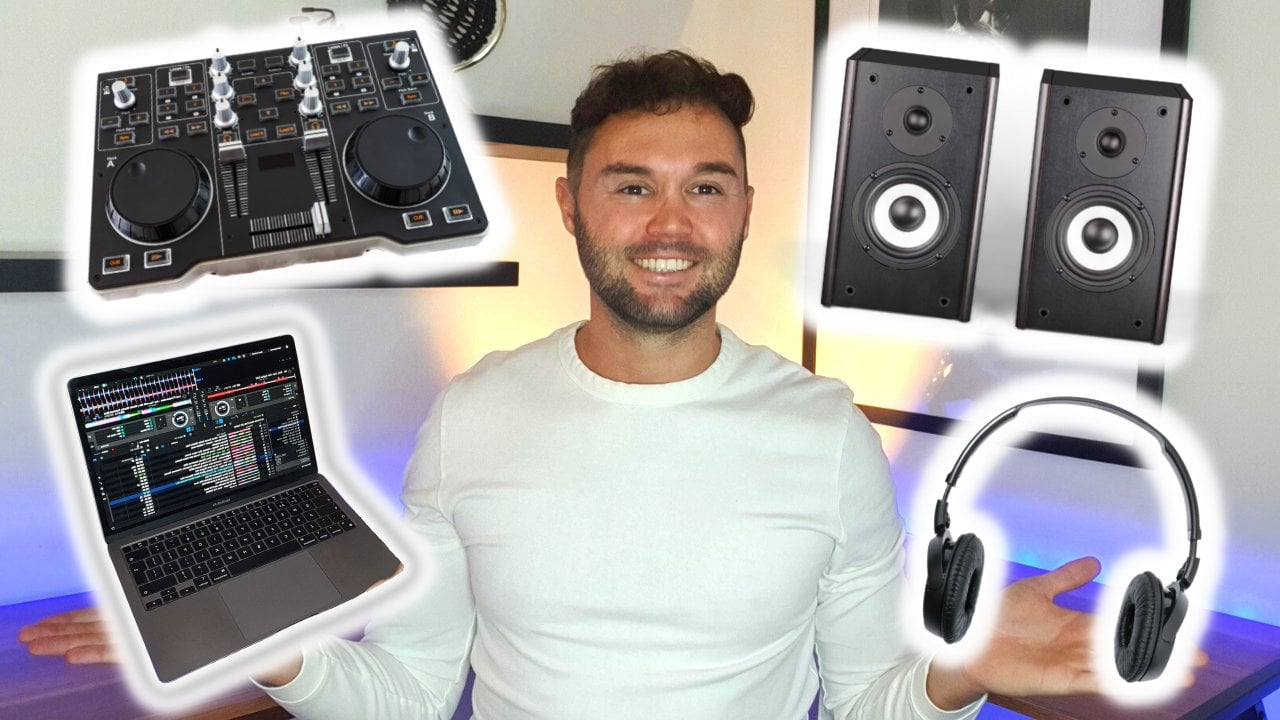
some free DJ software. You don't need any
prior DJ knowledge or any DJ equipment at
all to do this course, all you need is just a laptop and a keen interest
in deejaying. This is possible because
you only need to do three things to be able
to do a basic DJ mix, you need to be able
to start the truck, stop the track, and move the volume fader from
one side to the other. That's it. The key to doing your
first deejay mix is all about timing, knowing when to press play, knowing when to move the
volume fader across, and knowing when
to stop the track. And in this course, that is exactly what you're
going to learn. How to time the perfect mix. By the end of this
course, you will be able to mix four
different tracks together in a short DJ routine or with perfectly timed mixes. All the tracks that are used
in this course are also included for you to download for free in the
course resources. This means that you
can follow along with the course step-by-step in real time and do the exact same DJ mixes as I do in the course. And you get some free tracks
to DJ with the DJ routine that you'll be learning will be demonstrated to you
in the next video. Feel free to watch that
video next and see the exact DJ routine
that you will be learning in this course. You're not just going to learn how to mix these
tracks together. And then that's it. This course is much
more than that. You will also learn
the key fundamentals and principles of deejaying. You will be able to
fully understand at a basic level how DJ and works. And you'll be able to
understand how to mix two tracks together and make it sound good
to the audience. This is so that if
you did want to continue to practice DJ
and after this course, you'll have all the tools
and knowledge to do so. You will learn all
about how tracks are structured and
you will learn at what point you should mix in and mix out of your tracks
when deejaying, you'd get the perfectly
timed mix every time. So if you are interested
in learning how to DJ, but you're not yet
sure if you want to buy some DJ equipment. This is the perfect class
for you for this course. All the tracks are
included for free. The DJ software we
use is also a free. All you need is your laptop and an interest in wanting
to learn how to DJ. That's all there is to it. All you need to do is follow the detailed instructions
in this course. And by the end of it, you'll
be putting together your very own professional
sounding DJ routine. Either watching the next video and I'll demonstrate to you the exact DJ routine
that you'll be learning with the
exact same tracks. I hope you enjoy it and
I'll see you on the course. Bye for now.
2. DJ Routine Demonstration: Hi there, welcome to the course. In this first video, I'm
going to demonstrate to you the exact DJ mixers and DJ routine that you will be
learning in this course. So by the end of this course, you will also be able to do the exact same DJ routine
with the exact same tracks. By the end of the
course, you will also understand why we are mixing
these tracks in this way. And you will understand
what makes them mixes sound good and also how to avoid
them mixes sounding bad. We will break down the
timing of each track, when to press Play,
and how to make smoothly from one
track to another. You can also watch how
I use the keyboard and most on my laptop
to do the mixes with. You can see how easy
it can actually be to learn some basic deejaying
with just your laptop. So let's dive straight into it. I hope you enjoyed the mix and I hope it gets you
excited to learn. And let's do it. Hi. Yeah. Hi. Hello.
3. Download Rekordbox DJ Software: In this video, we're
going to download the free DJ software
called recall box DJ and get it setup ready for the costs for
those that don't know. Reco box is the DJ software that all clubs standard
DJ equipment uses. So when you see DJs in
clubs are at festivals, most likely going to be using record box DJ
software to DJ with. It is the software
that I've used for most of my professional
DJ career. I still believe it is the
best DJ software to DJ with, and also the best DJ software
to learn how to DJ with. So if after this course,
you ever continued to pursue deejaying and make
it to playing at events, you will most likely be using the record books DJ
software to DJ with. So I believe that you
are practicing and learning to DJ with
the best software. I am no way affiliated with
recall box in any way. This is just my honest opinion over my years of
experience of deejaying. So that being said, firstly, we need to go to the link in the description and go
to recall boxes website, which should be
recalled box.com. The reason why I haven't given
you the link directly for the download is because when you go to the
record Box website, the language changes to whatever country and
region that you are in. The download page is also different if you are
a Windows or Mac. So as you can see here, it
has changed for me to recall box.com forward slash e n because I'm currently
in England. Then all you need to do is go to the tab at the top
where it says plugins. And just click this tab. We can go to the
download tab as well. Download the
software from there. But I just wanted
to show you first what we're going
to be downloading. So I'm just going to click plans from here in the
Plans and Pricing. It will offer you four
different plants. But the one we want
is the free option. If we scroll down here,
pass these plans. In the bottom right hand corner, we can see the free plan. And as you can see
here, it will give you access to the performance mode. And within that
performance mode, the second one down is DJ
control via PC slash mark. And this is exactly
what we want. This free version of reco
box allows you to use the DJ controls by using
just your PC or Mac. So what we need to
do now is just click the Download button
just below this. As you can see, it
automatically comes up for me as download for Mac,
because I'm on a Mac, if you want to read any of
the licensing agreements or system requirements, feel free to pause this video at anytime and give them a read. There's no rush. I may recommend you get the
System Requirements. A quick read to see
if the device you are using is compatible
with reco box software. Generally, most modern PCs
or Macs should be fine. But if you are unsure, you can give that section
and read first. What we need to do
from here is just go to agree and then
click Download. And as you can see now that in the bottom left-hand
side of my screen, the software to install record box D J is now downloading. Once that has downloaded, we
can go ahead and open it up. If you don't have a tab at
the bottom of the screen, you can just go to your
Downloads section. And you should have a
zip file like this. If you just open the zip file, you'll get the box
for reco box here. What we're going to do is
just double-click this box. Now you'll have the
installation process. Oh, we've got to do is
follow this step-by-step. So I'm going to click continue and then click Continue again. Now, if you do want
to have a read of the licensing agreement,
that's completely fine. That's up to you.
But I've downloaded record box enough now to know this software
is fine for me, so I'm going to click Agree. Then I want it to install
onto my hard-drive, click Continue,
and then install. So from here you may
be prompted with your password for your
computer or laptop. So if you just type that in
and click Install software, and it should start installing
to your PC or laptop. There you have it.
It should now be installed to your PC or laptop. So I'm just going
to click Close. And then from here
move to trash. So I'm going to move
the installer to the trash now it is
already installed. So now it is installed.
We need to find where it is on our laptop or PC. I'm a Mac, I'm just going
to go to Applications. Scroll down and I
should find one, say record box six. It's going to open up this. And then this icon here is
the record box DJ software. So I'm just going to
double-click this to open it up. Again. You might
be prompted with your password, you just
have to fill that in. Now from here you'll be prompted with filling your email
address and password. If you already have a
record Box account. If you don't, we're
just going to go here and click create account. This will now take us to
the record Box website. So from here you just need
to fill in these details. And then click giant pioneer DJ. Dj is the company that
make recall box D J. So to access record box, we just need to create an
account with pioneer DJ. So I'm just going to fill
these details in now and then click Join
pioneer DJ myself. Once you've done that,
it'll just ask you to validate your e-mail address. So I need to do is go
into your email account and confirm the email
from Pioneer DJ. And then from here
we're just going to click back to cite. Not know. It should then take you back
to the homepage of reco box. But what we're going to do is go back to our recall Box login. From here, we should
be able to login with them details that
we've just filled in. So I'm just going to
fill them in now. Once we fill them details and we're just going to click Login. And it should say account
setup has been completed. Click okay. So here's a
pop-up from reco box. And it's just asking
you to answer five quick questions
about your DJ lifestyle. All we need to do here is click Skip in the bottom
right-hand corner. Are you sure you want to skip? Yes. Next, it would have loaded the software up and we have another
pop-up here from recall box saying
to use reco box, you'll need to do the following. So it's either convert
recall box library, which we don't have
our choose one of the record box
subscription plans, which is what we're going to do. So we'll click Next. Now it will ask us about
converting our library. Now because we don't
already have a library, what we need to do is go on the right-hand
side here where it says Start Record box
with an empty library. Just click this.
Now the next part we'll ask us about new
subscription plans. It's just letting us know
that subscription plans has no change for
reco box version six. So what we need to do
is just click Next. And now it's just telling
us about the free plan, which is what we want and
hardware unlock device. So that just means
that if we plug in a device like a DJ controller, it will unlock the device, but we're going to go
with the free plan. So again, all we need
to do is click next. And these are the plans
that we spoke about before. We have three core,
creative and professional. And we just want the free plan. So what we need to do
is go to the bottom and click Choose your plan. Now I'll open up a website
for us, a webpage. Then what I'll do is open
up the page that I showed you earlier with the
different plans up. Now we want the free plan, so we don't need to
click anything here. All we need to do
is go back again to record box where
we've just been. And it should say the library
conversion has finished. So on the webpage we don't
have to click anything. Just go back to
recall box and click. Okay. Now it's asking us to
get started with Cloud Sync, which is a free trial,
which we don't want. We're just going to
click the arrow. Click the arrow again. Click the arrow again. Now
he'll ask us to start, but we don't want
this cloud feature. What we want to do just click the Close button on
the right-hand side. I know the installation
process should be complete. So it takes you to
the library thing here, but there's nothing too. But we don't need to
worry about this. If you go to information, this will give you the
information of your recall box. And then if you click plan, should say here that
you're on the free plan and that's perfect. So what we need to do
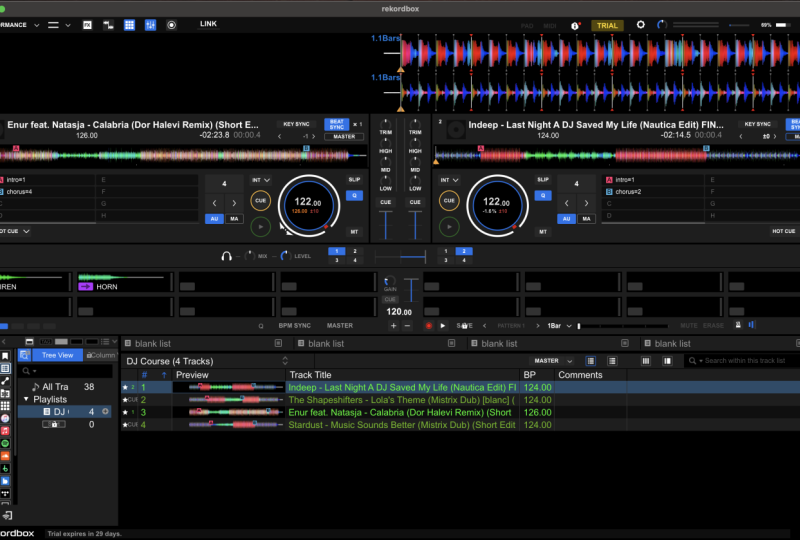
now is click close. And we're in record box. So this is the screen you
should be seeing now, once you've installed
recall box successfully, what we need to do
from here is going to the top left hand corner
where it says Export. Now we don't want Export mode. What we want to do is click this arrow button and then
change it to performance mode, because this is where
we are going to be doing our DJ techniques from now once it's changed to performance mode,
you should see the screen. And then just to be clear, we want to deck horizontal. So if it's not already
on to that horizontal, we just need to click
the arrow tab here and change it to two
deck horizontal. And they have it. Now we've
downloaded record box successfully and we're ready to do our deejaying in
performance mode. Now I can appreciate
that this may look very intimidating at first. Sometimes DJ equipment can look like a control panel
of a spaceship. But don't worry, I'll
explain everything you need to know about the software
throughout this course. I'm not going to
explain everything at once because it can
be too much to take in and also won't hold as much meaning until we
start using these features. I'll only explain the
things we need to know as we go along
and as we need them. To be honest, we
don't need to use about 8% of the things
on this DJ software. For this course,
we'll only be using around 20% of the
basic features we need to learn the key principles of deejaying and to give you an introduction to what
deejaying is like. But I'll just give
you a quick overview of what we're looking
at right now. When you're deejaying, you
generally have two decks. And what you can see
here, the top half of the DJ software is
representing two decks. This deck, one on the
left-hand side here, and then deck to on
the right-hand side. They don't have any
information displayed just yet because we don't have any tracks loaded up into the decks. But when we do, these
decks will display all the tracks information
on wave forms, which we'll go through
in a later video. Both decks are exactly the
same and mirror each other. What you see on
the left-hand side will be exactly the same, unmarried on the
right-hand side. So that already has the information that you need
to know about the decks. Once you learn it on one side, it applies to the
other side too. Now, all the bottom half of the screen is your
music library. This is where you will store all your tracks and put
them into playlist, ready to DJ with. All your folders and platelets will be here on the
left-hand side. And then this big space
on the right-hand side is where all your tracks will
be displayed individually. Which takes us to the
next part of the course, which is downloading
your music and putting them into playlist,
ready for the course. Thank you for being patient
and following along with the instructions and
the step-by-step of installing, recall box DJ. We're now ready to move on
and download the tracks. I'll see you in the next video.
4. Download Music Tracks: In this video, we're going
to download the music for the course and put
it into a playlist, ready to practice our mixing. First thing you need to do if you haven't done so already, it's downloading music files
attached to this course. There'll be a tab called resources located somewhere
around this video. It will either be
below this video or to the side of this video, depending on which platform and device you are
watching them. So if you haven't
downloaded music files yet, make sure you just
take a moment to pause the video and download
them to your PC or laptop. One subtracts have downloaded, we need somewhere to put
them on the DJ software. So we're going to create
a playlist for them. Playlists are the best
place to work from in your DJ software when
deejaying with your tracks. So if we go over to
the left-hand side here on the library, there's a tab here
called playlist. And if we go to the right-hand
side and click here, there should be a plus icon and this says create new playlist. So we're just going to
click the plus icon. What I'll do is
give us a drop-down here with a new playlist. So you can name this
playlist whatever you like. But for me, I'm just
going to name it the new equipment
needed DJ costs. So now we have here a playlist called no equipment DJ cars. Now what we need to
do is find where our music files have
been downloaded two, and this would generally be
in your downloads folder. So I'm going to do is go
to my Downloads folder. And here are the
tracks that we're going to need for the course. If you've downloaded
the zip file, you just need to go ahead
and unzip the file and open the folder so you can see
all the individual tracks. And what we're simply
going to do is highlight all the tracks
and select them all, and then drag and drop
the tracks over to the new equipment needed
DJ costs playlist. So it's going to click
these tracks and drag them across until it highlights
the new equipment DJ cos, I'm just going to put
them into that folder. When you load new tracks into
a playlist on record box, the software analyzes
the tracks for you. This is where the DJ
software analyzes the music files to make
them ready to DJ with it. We'll get things such as
the speed of the track, the waveform of the track, and find where all the
beats in the track and put what's called
a beat grid on them. We will go over all
these things and how to use them
later in the course. But for now when it comes
up with this prompt here, for anomalous settings, we don't need the key
or the phrase for this course and the
BPM range is fine. All we need to do
is click, okay. What it'll do is
it'll start analyzing our tracks just here
on the left-hand side. As you can see now
it's populating the library with the tracks, wave forms and
other information. Now while the tracks
have been analyzed, we should have all
the information about the tracks ready to DJ with. Before we move on,
we're just going to tidy our library
up a little bit. There can often be
too many columns in the library
than is necessary. So if I just scroll across
to the right-hand side here. Now under library, there's quite a few columns
that we don't actually need for this course. So what we can do is secondary click one of the
titles of the columns. So that's just like a
right-click on your mouse. And what this will
do is it will give you a list of
options that you can choose from for what information you want to see
about the tracks. And for this course we only
need four columns selected. That is preview, track
title, BPM, and comments. All the lists can be deselected. So I'm just going to
quickly do that now. So as you can see
now, we've got rid of quite a lot of the
columns on our library. We only have preview,
comments, track, title, and BPM, but we're just going to
tidy up a little more. So what I want is the comments to be at the far
right-hand side. So I'm just gonna drag and
drop this column here. We can stretch out the
track title a little bit more so we can see all
the title of the tracks. Now this is looking more
similar to what we want. We want the preview first, the track titles second, the BPM, and then the comments and everything
else de-selected. Now reco box font can be quite small when you first
install it as standard. So what we can do is you can make this font a
little bit bigger. So we're going to go
to the settings in the top right-hand corner of
this settings cog just here. We went to click this.
Then the first option we have is view. Then as you can see here, it says font size. So I can do is you can
make this larger or smaller to suit your preference. So I'm just going to put it
about a quarter of the way up just to make the text a little
bit bigger in my library. Then we can exit settings.
There we have it. The text is a little bit
bigger in my library. Now that we have our music
downloaded and in a playlist, we can move on to the next
video and change the rest of the settings ready
for the DJ course. We're going to set
up the visuals on the DJ software to
make what we're looking at easier to understand. And we're going to set up
the keyboard shortcuts so we can use the keys on our laptop to control
the decks and the music. See you
in the next video.
5. DJ Software Settings: In this video, we're going
to set up the visuals on the DJ software to make what we're looking at
easier to understand. And we're going to
set up the keyboard shortcuts so that we can use the keys on our laptop to
control the text and music. Just a quick point
that the DJ software might look slightly different
than the last video. You may notice there
are more playlist on the left-hand side. And the hock queue
bank these squares here a slightly
differently than yours. The only difference
is my hot cues now go across from
left to right, where yours will go down
from top to bottom. This is just because to film
this section of the course, I've had to jump into my
teaching account on record box. Whereas in the previous videos, I created a brand new account to be able to walk you through step-by-step exactly how to set up a new account
from scratch. Everything will still be
the same going forward. None of this will affect
the course any differently. But I just wanted to explain
in case you may know, is the two differences
on the screen, but there will be the
only two differences. I've reset all the settings in this account back to default. So it'll be doing exactly
the same thing as each other and the cost
won't be affected. Now that's cleared
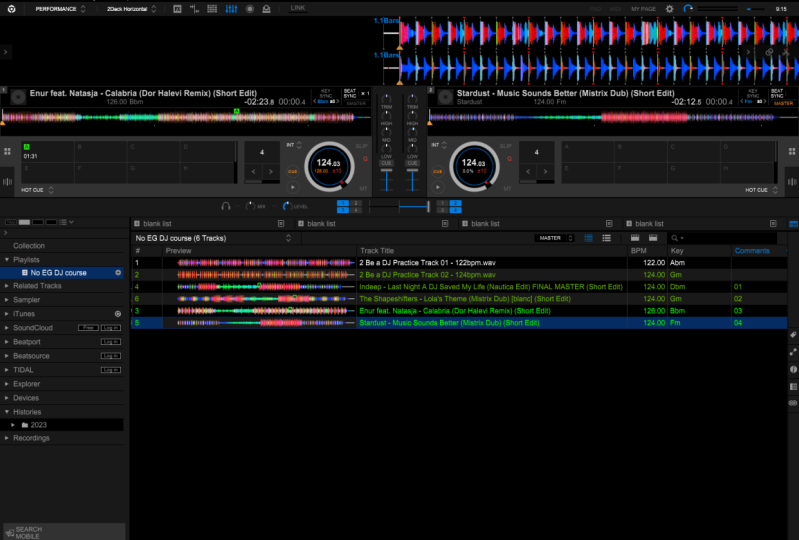
up. Let's move on. Firstly, there should
be two tracks in your playlist called
practice tracks. If you can drag practice
track one over to the left-hand side on deck one. And drag practice track two on the right-hand side
on deck to so you just got to click the
track and drag and drop it onto the right-hand
side or left hand side. You should now see that
the information of each track is
populating each deck. The main thing we are
going to be looking at is the tracks, wave forms. The waveform is a
visual representation of the track using
lines and waves. And as you can see, there are three different
wave forms on your screen. The extended wave
form at the top. This is so you can see
the wave form close up in better detail when you
are playing the track. And this waveform moves across
the screen when you play the track so you can see what is being played at that time. The full waveform
is on each deck. So this is the full
wave form on deck one, and this is the fault
way of farm on deck to this is where you can see the full tracks
waveform and what will be coming up next
in a track on a whole. And then we have the
preview waveform at each track in the library. So just here in the library, you can see a preview of
each tracks waveform. This is so you can
preview each tracks way of farm before you
select them to play. Now the default setting for reco box is to have the
waveforms colored blue. But what we're going to do now, it changed the color of the way bonds to three
different colors, red, green, and blue. This way, it will be easier to see the different sounds and sections of the
tracks when they are represented by different colors. So what we need to do is go to the Settings cog on the
top right-hand side. And then go over to view
on the left-hand side. And then scroll down
until we see wave form. Then from here, from waveform, we just need to change
the color to RGB, which stands for red,
green, and blue. And then just below that,
we also need to change it from half-wave form
to full waveform. That box needs to be
selected for full waveform, The box needs to be
selected for RGB. So now we can exit settings. As you can see now,
the tracks are looking a little more colorful, rather than just having
the tracks waveforms set as one color of blue. This will make it a lot
easier for us to identify the different sounds
and sections of the tracks as we go
through the course. And I just find it's nicer to look at then a sea
of endless blue. Just on the left of the
extended wave form, there is a little arrow here. If you click this, it opens up a magnifying glass with
a plus and minus in it. This is zoom in and zoom out. Now, if I click the
Zoom Out button, it's going to zoom out of
the extended wave form. And then if I click
the plus button, it's going to zoom
all the way in. On the extended waveform. It's time to each DJs preference how zoomed in you
want your web form. But for this course, I would recommend zooming
all the way out. This is because the
extended waveform will them move slower across the screen and you can see more of what's coming
up next in the track, making it easier to watch and get your timings
right when D Jane, especially when first learning. So now we've discussed
the waveforms. We're now going to move on and take a look at the two buttons we are going to be using the
most throughout this course. These are the play and pause
button and the q bottom, which is just here on deck one, and just here on deck to the play and pause button
does exactly that. When you press play, it plays. So I'm going to do
it here on deck one. And then when you
press it again, it pauses and stops the track. At that point, when
you press Play, you will see the
waveform starts moving across the screen
from right to left. When the waveform passes over the white line in the middle, that is the stone that you will hear from the track
in real time. The white line in the middle of the extended waveform is
called the play head. When you press Play,
you can also see a marker move across
the full wave form on deck one to let you
know what part of the track is playing in
relation to the fault track? So I'm just going to
press play again. From here you can see the track moving from right to left. And when it passes over the
playhead in the middle, that's the sound you
hear in real time. Then over on the full waveform, you can see a white marker
moving across the tracks. So you can see where you are in relation to the full track. The Q button just above it
has a few more functions. If you press the Q button
whilst the track is playing, it acts like a reset
button and stops the track and takes it
back to the Q point. So e.g. if I press Play now, then when I press the
Q button is going to stop the track and take
you back to the Q point. The Q point is
represented on record box here with a small triangle
underneath the wave form. The Q point is generally set on the start of the very
first beats of the track, which is called the downbeat. And as you can see
here, is not set to the very first bit of the
track is slightly before. So what we can do is move the coupon and set it to
a different position. We're going to move
it to the various started the very first beat, which as we have said,
is called the downbeat. We can use the
cursor in the mouse to click and drag the
extended waveform. So the very start of
the first beat is right on the playhead and
then press the Q button. I'm just going to
click the first track and then drag it across. Then from here, when the
playhead is near the first beat, I'm just going to
press the Q button. And as you can see here, the Q point is no move
to this position. There is no need to try and be too accurate with this because the Q point will always snap to the start of the class is beat. So just for this example, I'm going to zoom in a bit
more on the waveform to show you if I was to move the extended waveform and
the trucks slightly off from the first beat and then still press the Q button whilst
the track is paused, it still snaps to
that first beat. So e.g. I'll show you again. So I'm just going
to move it and set the Q point before
the first beat, and then move the playhead before the first
beat of the track. So that's nowhere near the
first beat of the track, but because it's closer to this beat than it is
to the one before it. When I press the Q button, it's going to set the Q point on this first beat and
snap it to that one. So now we can zoom all
the way back out again. Neighborhoods press
play on deck one, and now press the coupon
as the track is playing, the track will stop and go back to the first
beat of the track. So I'm going to press
play on deck one, and then press the Q button
as the track is playing. And it takes us straight back to that first beat of the track. So there are two ways that
you can use the Q button. When the track is playing. And you press the Q button, it stops the track and
takes it back to the start. If the track is paused and
you press the Q button, it will reset the Q point. Now because we're
going to be using these two buttons the most, there is an easier
way to use them, then just clicking them
with the mouse cursor. We're going to assign
these buttons to keys on your keypad and use
the keypad instead. To do this, we need to go to Settings up in the top
right-hand corner. And then go to the
keyboard tab at the top. And then from here we're
going to go to deck one first and click the plus
icon next to deck one. And this will open up all
our keyboard shortcuts. So at the minute on deck one, the play and pause button
is set to the keys. But what we're going
to do is change this. I'm just going to
secondary click or right-click and
then click Change. Now I'll ask you to press a key combination to
set to this function. So what I'm going to do
now is press the letter a. And as you can see
in the middle now it says key combination a, and that's what I want
you guys to do as well. It does say that
this is currently assigned to cube,
but that's fine. All we're going to do
now is click, okay. It will say change key mapping. And what we want to
click here is reassign. It overwrites the previous key. And what you can see now,
it's changed to the letter a. And we're going to
do the same with the Q button just below. This time we're going
to press the plus icon that's in line
with the Q button. And from here we're going
to press the letter Q. So again, it will say
key combination cube, currently assigned to beat sync. And that's fine. We're going to click, Okay. Change key mapping. Yes, we want to re-assign
that letter to this function. Now what you should
see on deck one is the play and pause
button is assigned to the letter a and the Q button is assigned
to the letter Q. So I'm just going to click
the Minus on deck OneNote, and then click the
Plus on deck to, to open up deck
two shortcut keys. I'm going to do something
similar here now. So for playing,
pause on deck to, we're going to
right-click the letter n. Click Change. And this time we're going
to set it to the letter L. So as you can see now,
key combination is L currently assigned to
loop out, which is fine. Click Okay, then re-assign.
Same with the function q. We're going to right-click
the key that it's set to hate. Click Change. Press a key combination now and we're going to
press the letter 0. So key combination 0, currently assigned to
call previous memory cue. That's fine. Click Okay, reassign. Now what we have for deck
two is play and pause is assigned to letter L and
Q is signed to letter 0. And that's brilliant. So now what we need to
do is exit the settings. From here. What I'm going to do is
just drag up the cam over my keyboard so you can see what I'm doing
here now on the camera, you can see what I'm doing
with my keypad as well. Now when I press the
letter a on my keypad, deck one will start playing. Then when I press Q deck one will stop and go
back to the Q point. Just like you access the Q
button, I'm going to press Q. It takes deck one back to
the start of the track. Same on deck to, if I
press the letter L, D2 will start playing. Then when I press the letter 0, d2 will stop playing and
go back to the Q point. But as you can see on
deck to the Q point isn't right at the start of
the first beat of the track. So let's move that by moving the extended waveform
with the Mohsen cursor. So the first beat
is on the playhead. Whilst the track is paused, we're going to
press the letter 0, and that represents
the Q button, and that's reset
the Q point here on deck two. So let's
try that again. On deck to, I'm going to
press play it with the letter L. And then press the letter 0 to take it back
to the start to the coupon. There we go. If there's any track
where the Q point is not at the start of
that first beat. When you load it up on the deck, you're going to have to reset the Q point of that track,
just like we did them. So that the Q point
is set to that started the very first beat. With these shortcut keys, you can assign any function on the decks to any keys you
want to on your keyboard. So play pause and q doesn't have to be on these exact keys. But there are a
couple of reasons why we are assigning
play and pause and Q to these specific
keys are for this course. One reason is because Q and a, at the two letters
furthest to the left of the keyboard that are above
and below each other. And 0 and l are the two letters furthest to
the right on the keyboard. They're above and
below each other. Now we're not using
P because it has a colon and semicolon
underneath it, and it's probably easier to keep them as all letters for now. Another reason why
we are putting the Q button above the
Play Pause button, because that is how
the buttons lead ion most DJ controllers index. So as you can see on
the software here, the Q button is above
the play button. And this is what
it's like on Mars. Dj controllers and DJ
equipment and CD jazz. The Q button is always above
the play and pause button. The shortcut keys that
we'll be using in this course are also the
shortcut keys that I use when I'm preparing
my tracks and practicing mixes on my laptop
and record bucks. I know that they're in
good positions to have shortcut keys for practicing mixing with when you've
got your laptop. So just a quick point
before we move on, you may also notice
that when you hold the mouse cursor over certain
features in record box, it explains in detail
what that feature does. So e.g. if I hold the mouse
cursor over Q button, is going to explain to me all the different features
that the Q button does. This is a great tool for
beginners called tooltips, where if you hold your mouse
cursor over a feature, explains what it does need. To be honest, we
don't really need this feature in this course. This is because we're
only going to be using very basic features
at the moment. And I will be explaining how
to use them as we go along. If you have Tooltips
on and start putting your mouse cursor over all different types of
features on the decks. It may get confusing
and give you too much information at once
Before you actually need it. So e.g. if I hold the mouse
cursor over this queue, it'll explain what quantizes, but we don't need to know
what quantize is just yet. Same with the slip function and same with the empty here
for mass, the tempo. It can be a good tool
for you to turn on in the future if you do want to be reminded of what features do. But for now, it's probably
best if we turn it off. So what we're going
to do is go up into the top
right-hand corner on Settings again, then go to view. Then scroll down until
we find tooltips. Then from here we can just
take it off and exit settings. Now if I hold the most
cursor over a feature, it doesn't come up with the
distracting explanation. So that being said,
let's get back to the play and pause
button and Q button. The main ways in which
we are going to be using the Play and
Pause button and the Q button is to
basically start the track and then stop the track and go
back to the star. But the Q button does have some other uses which we
are going to quickly cover. Note just so you
know what they are. If you press and
hold the Q button whilst the track is paused, at the Q point, the track
will play for as long as you hold down the Q button
until you let it go. So e.g. if I hold down
the letter Q, now, it's going to play the tract
and sample the tract for as long as I have the
key press downfall. And as soon as I let
go or the letter Q, the track will stop and
go back to the Q point. And if you press and
hold down the Q button, but want the track to keep playing and not go
back to the start. When you let go, you can press the play button at
the same time and then let go of the Q
button and the track will continue playing. So e.g. if I hold down the Q button, it will sample the track
and keep playing for as long as I hold
onto the Cube button. Then if I press Play
and press the letter a and then let go of the Q button. The track will continue playing. So now to get it
back to the staff, I'm just going to
press the Q button and the track is
back at the start. We're not really
going to be using the Q button for them
last two reasons. They are more for
when you're a DJ and live on actual DJ equipment. But I just thought I'd
let you know what else to Cuba and does in case you start playing around
with it and he wasn't sure why it was doing
certain things. So now you know how
to fully use it. So there we have it. Our settings in the DJ software should now be set up correctly. And we have our first couple of shortcut keys setup ready for the next lesson
in the course, which we'll be learning
how to be matched the tracks together
and to get them sewn in good and in time with
each other will also be keeping the camera
here on the keyboard going forward whenever we can. So you can see what I'm doing on my keyboard in real time so
you can copy along with me. I'll see you in the next video.
6. Beat Matching: In this video, we're
going to cover water betas and how we can
beat much two tracks together, so they are in time with each other and sound good together. The word beat gets thrown
around a lot in DJ. And when people are talking
about music in general, a common mistake is people
think that a beat is a sound. Light when people say, listen to when the
beat comes in, which is understandable
because it sounds right. And it will be easy to assume
that a beat is a sound, but a beat is not a sound. A beat is actually a
measurement of time. So if you have a look at
the extended waveform here at the top of the screen. You can see that each beat is represented by a white line. And the space between the
white lines are the beats. The zone people can
often mistake as a beat, is actually the sound
of the kick drum. The reason why people can
often assume a beat is the sound of the kick drum
is because in dance music, there is often a kick drum
or the start of every beat. Just like in these
practice tracks. At the start of every white
line, there is a kick drum. So I'm just going to press
play on track one here. And as you can see,
every time there's a white line, there's
also a kick drum. So as you can see that it's
quite understandable why people can think that a beat is the sound of the kick drum. Another way that I
can show you that a beat is not the sound of the kick drum is if I drag an actual track up for a second. So I'm just going
to drag the track Calibri or up on deck one. And I'm going to
put this track to a part where it
has no kick drums. And you can see that the track
continues with the beats, even with no kick drum. So I have a listen to this
section of the track. So as you can hear that
there are no kick drums in that part of the track. The white lines still continue and the beat still carries on. Another example is if I just drag a hip pop and R&B track up. Here on this track, on
the left-hand side, rockstar, you can just
ignore the coupons for now. This is attract from
another course. But you can still
see the white lines and the beats that
are in the track. But on this track, the kick
drum is not every beat, it's at random times. So I have a listen
to this track here. So this track, rockstar
still has a beat, but it just shows that
there's not a kick drum. At the start of every beat. A beat is a measurement of time. So now that we have established that a beat as a measurement of time and not the sound of the
kick drum. We can move on. The beat is how you can
measure the speed of a track. You measure the speed
of the track by how many beats
there are in 1 min. And this is called beats
per minute or BPM far shot. The slower the track,
the lower the BPM value, the faster they attract,
the higher the BPM value. As we can see here
on practice track one is 122 beats per minute. So the BPM of the
tracks are shown in these circles here on
deck one, on deck tomb. And also you can see
that practice track two is at 124 beats per minute, which means that practice
track one will be slower than practice track two. If we were to press play on both these tracks
at the same time, they're eventually
going to go at different speeds and they're not going to sound
very good together. So let's have a listen to this. I'm going to press
play on deck e1 and e2 at the same time and listen to what happens to the tracks. So as you can hear
that the beats and the tracks
slowly start to get further and further apart and they start sending
worse and worse. When this happens,
when the beats are not in time with each other, it is called double beating. Apart from the music
going completely off, which has happened
to me many times. But that's a different story. Double beating is a
DJ's worst nightmare. Years ago when DJ's used
to DJ, we've just finals. They had to do this
beat matching manually, completely by ear with no
technology to help them out. And this skill took
years to perfect. But no thanks to technology, you can shortcut all them
years of learning to beat match by pressing
one little button, button called the Sync button. The Sync button
will automatically snap the beats in time with each other and also keep
them perfectly in time with each other
whilst you are mixing. Now, there are still a lot of old-school DJs who
still liked to beat match by ear and frown upon
the Sync button being used. But in my opinion,
those people are dinosaurs and need to
move with the times. I can say this because I'm
one of them dinosaurs. I went to DJ the hardware
on vinyl decks and it took me years to perfect the
beat matching skill by ear. And I believe that
the Sync button is a great tool to use
and it's one of the main reasons
why learning to DJ today is much more
fun and easier to do. The end result for the
audience is still the same. If not better with
the Sync button. So if you ever come
across a DJ saying that using the Sync button
is not real deejay, which will probably get at some point when learning to DJ. Don't listen to them,
leave them stuck in their old ways and carry
on using the Sync button. There is a lot more today Jane, than trying to
beat much by year. Trust Mac, using the Sync
button is still real deejaying. So anyway, that being said, let's move on and give it a go. Record books should be set to the correct setting for
beat sync by default. But we're just going to
check before we move on that we're both
on the same setting. So we're going to go to settings in the top right-hand corner. Then we're going to
go to controller. And then Deck. I'm from here, we're going
to scroll down until we find beat sync slash BPM sink,
which is just here. What we want is
beat sync selected. Beat sync means that
the beats will snap in time with each other
when you press Play, which is what we want. But with BPM sink, the beats won't snap in time with each other
when you press Play. So to be more effective, we want beat sync selected. Let's exit settings. Now, all we need to do
is activate bulk beat sinks on each deck just by clicking it
with the mouse cursor. So as you can see now, deck
one is 122 beats per minute, and deck two is 124
beats per minute. So I'm going to press beat
sync just here on deck one, and then beat sync
just here on deck to. You can see now
that they are both activated by being lit up white. Now you can see that both
tracks are at the same BPM. So deck one is at 122 beats per minute and deck two is
at 122 beats per minute. Also. You may also notice now
that the beat grid and the white lines on the tracks are now in line with each other. Now if we were to press play on both tracks at the same time, they should stay in
time with each other. There should be no but double
beating and this shows sound good together.
Let's have a listen. Another quick point
that you may have noticed is that
both decks are at 122 beats per minute and
not 124 beats per minute. Why did they go to 120, 224? And this is because deck one at the moment is
the master deck. So as you can see here
in orange on deck one, it is lit up as the master. The master deck determines
the BPM of both tracks, which means that the
other track always follows the BPM of
the master deck. So if deck two was the
master deck, both tracks, we've got 224 beats per minute. So I'm just going to take
beat sync off again. Reset the BPM of this track. Now that both at the
original speeds, if I was to change that
to to the master deck. So now it's lit up on
the right-hand side. And I know Press beat
sync on both tracks. You can see now that
they both have gone to 124 beats per minute. So whichever track is the
master deck determines the BPM and the other deck will follow the
master decks BPM. Now whichever track
is, the master deck isn't too important right now. But I just wanted to explain why this happened and how it works. Just in case you were wondering and in case during the call. So we have different
BPMs as each other when we beat
sent the tracks up. It doesn't really matter
throughout the course if we have different BPMs
as each other, as long as the two tracks
you I'm mixing are the same BPM beats inked up. Now before we move on, just to have a bit
of a practice, what I would like you to do
is set one of the tracks off playing and get used to pressing Play and Q
on the other deck. To get used to pressing
play on stop on the track by using the
keys on the keyboard. So e.g. I'm going to set deck one off and press
play on track one. What I'm going to do is press play on deck
to using that key. Then I'm going to reset the
truck on the right-hand side. And then press play again. You get the idea. Sometimes it can be weird for people to have a pause button under Q button
that both stop the track. What we need to do
is just get into the habit of pressing
the Q button to reset the track back to the star and to not
pause the track. This is because if you took press the pause button to stop the track and then press the Q button to take
it back to the start. It won't go back to the star. It will reset the Q point
in that position. So e.g. if I press play on deck to
then press pause and then go, Oh, I need to go
back to the start of the track and press
the Q button. It actually resets the coupon. Then we have to drag the
trek through the playhead, press the Q button
again, and reset. So I just want you to
get into the habit of pressing Play to
start the track, and then Q to restart the track. What you would have
noticed as well is the beat snap in time with
each other when I press play. And that is the effect
of the beat sync. You didn't notice that
not one point I was double beating when I had both tracks playing
at the same time. This again is why
beat sync is so good. So have a go at both
sides on deck one, a deck to pressing
play and the Q button. And then we can move
on to the next video. We'll be learning about
the all-important phrase and phrase matching. See you there.
7. Phrase Matching: In this video, I'm
going to explain to you what phrases and show you
how to do phrase managing. A phrase is 32 beats. Sometimes there can
be exceptions where there may be phrases
of 16 beats. But to keep this simple for now, a phrase is 32 beats. This is something you
need to remember. I'm probably one of the
most important things you need to remember when
it comes to learning to DJ. That's a phrase is 32 beats. These 32 phrases are the building blocks that make up modern-day electronic music. The reason why these 32 phrases are so important when
deejaying is because significant changes in attract happen at the start of
these 32 beat phrases. Now there may not be
a significant change every 30 to beat phrase. But when the tracks do change, it will happen at the
start of a 32-bit phrase. This is important in DJ because if this is where the
changes happen in a track, this is also where
we want to be doing our changes when
we're mixing as DJs, the audience expects
the tracks to change in these 32 blocks. And if we as DJ's, don't do our mixes in time with these 32 beat blocks is going to sound off and out of
time to the audience. So let me give you an example to make this a little clearer. I'm going to drag the track
Calibri or up on deck one. Then I'm just going
to reset the Q point. So I'm going to
drag the play head to the first beat, press Q. And the Q point is set
to the first beat. When I press play on
the track Calabria, I want you to watch and
listen out for the changes in the track at the start
of these 32 phrases. I am also going to be pressing the hot cues as the track plays. And this is just a highlight
the phrases in the track. So we can have a visual aid
of where the phrases are. You don't need to
do this yourself, and you don't need to know what the hot cues are just yet, as there'll be explained
later in the course. For now, I just need you
to watch and follow along with the 32 beats as
I play the track. You can also count along
in your head if you like. Okay. So you're ready for it. 3212, 3456, 7811, 1213, 1415, 1625, 2062, 7208. Perfect. So there you have it. You
can see in that track the building blocks of the 32-bit phrases that make
up the whole of the track. And as you may have
noticed whilst listening and
watching the truck, the truck doesn't always have a significant change
every 32 beats. But the significant changes in the track do happen
at the start of a new 32-bit phrase.
It doesn't change. You can still generally
hear a cymbal sound to represent the start
of a 32-bit phrase, or a slight buildup
and some extra noise at the start of a
new 32 beat phrase. And as you can see
in this track, Calabria is made up of nine different blocks
of 32-bit phrases. And knowing this
role of 32 beats and how phrases work and
how to identify them in a track is going to be the key to our
deejaying until when it comes to timing our mixes
perfectly later in the course. So for now I'm just
going to delete these hot cues and drag
practice track one, backup onto deck one. Reset the Q point. So now looking at these
two practice tracks, I've made it easy to see where the phrases are
in the wave form. You should be able to visually
see a 32-bit blocks on the tracks when looking at this full waveform
here on deck one, on here on deck to
sometimes on a track, they can remove the kick
drum sound just before the next phrase to add
a bit of anticipation, just before the start
of the next phrase. And that is exactly
what I've done here on these tracks and
why it is so easy to see the phrases you should be able to hear just before
the next phrase starts, the kick drum being removed. And you should also be able to hear when the new phrase starts the sound of a symbol to let you know that the start
of a new phrase. So e.g. if I press
play on track one, just before the start
of the next phrase, should be able to
see and hear that the kick drums go out
and then as a symbol on the first beat just there. So what I want you to do now is a similar exercise
to the last video, but this time I'm going
to try and time pressing play at the start of
a new 32 beat phrase. So instead of me pressing play randomly on the other track, I went to press play
at the start of a new phrase so that the
phrases match up together. And then you should be
able to see the changes of the track happen
at the same time. So answer press play
on track 14321. Now I press play at the
start of a 32-bit phrase. You can see the tracks will
change at the same time. I'm just going to do that
again one more time. 321. Good to try it the other way around 4321. So when you have both tracks, phrase is lined up
and time together. This is called phrase matching. Beat matching is when you're
timing the beats together. And phrase matching
is when you're timing the phrases together. So as you can see now,
this is also the reason why I like to have my
wave forms zoom right the way out so I can see the phrase is
coming up and I can tie in pressing play easier to get the phrases in
time with each other. So before we move on
to the next video, I just want you to have a few practices are
pressing play at the right time and phrase match in these two
tracks together. Have a go at trying
it both ways. Tried timing track
one, track two, and also tried trimming
track to track one. I know this may seem
very basic and not to entertaining at the
moment. But bear with me. It is important that
we do get used to pressing play at the
start of a new phrase and get used to the
Q button to reset the track back to the
start and not using pause. If there is anything you
take away from this course, one thing that you
have to remember, please let it be this lesson. You always want to press
play at the start of a 32 beat phrase and phrase match the tracks
together when mixing. This is so that when
the tracks change, they change at the same time. This is one of the
biggest mistakes that I see all the time
from beginning DJs. There by a DJ controller, find the Sync button that snaps of beats in time
with each other. And then think that's all
there is to deejaying. As we will find out
throughout this course, that is not the case. There is more to DJ than
just using beat sync, including the timing of 32-bit phrases and
phrase matching as we have now just touched on. And that is what we're
going to do from now on moving forward is work more on this foundation of our new knowledge
of phrase matching. Start to understand when to time tracks together to do
some actual mixing. So well done for getting
this far in the course. You are creating a great
foundation for DJing. And I hope that you
are learning a lot and enjoying the course so far. We are now ready to ditch the practice tracks or move on to the next video and look
at the structure of an actual damped
struck. See you there.
8. Sections Of A Dance Track: In this video, we're
going to cover the main sections
of a dance track. There are five main sections
that we're going to be looking at today that
make up a dance track. These are the intro, the intro plus the
break or break down, the chorus and the outro,
as you may have guessed, the intro and outro makeup, the very start and the
very end of the track. The breakdown and chorus make up the main middle
section of the track. Depending on the track, there can be different amounts
of breaks and choruses. The tracks that we will
be using in this course, I have specifically made shorter for the purpose
of this course. So they will only consist
of one brick section in each track and one chorus
section in each track. This is so that we
can still learn the principles of
basic deejaying. And we don't have to wait
and sit around listening to 6 min of each track just
to do the next mix, it will make learning the
fundamentals of mixing the end of one track into
the start of another track. A lot easier for us by
cutting out some of the middle parts that are not
necessary to learn to DJ. But it's worth knowing that
generally, in dance tracks, there will consist of
two breakdowns and two choruses in the
middle of each track. Each of these sections
have its own purpose within the track and we'll
go over what these are now. We will also have a listen to what these sections generally sound like and also what they
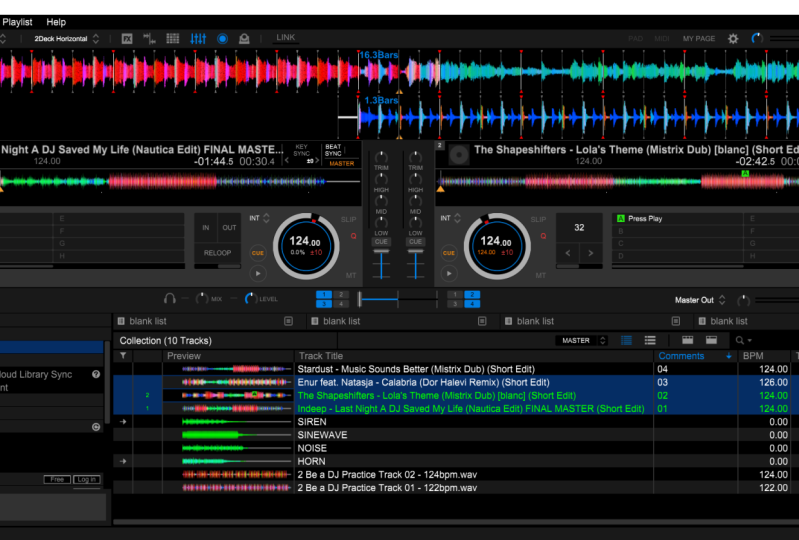
look like on the waveform. Where to load two tracks up now from the download in
tracks for the course. On deck one, we need to track last night at DJs saved my life. And on deck to,
we're going to load the track called lawless theme. And what we're going
to do first is get that Q point at the very start of the
first beat of each track. The intro of a track
generally starts off with simple
percussion sounds. Percussion sounds are sounds that could be found
on a drum kit. E.g. the sounds of a kick
drum, hi-hat collapse. All snares are all signs
of a drum kit. So e.g. if I just zoom in on the
extended waveform here, where the Q point is now is
the sound of the kick drum. So let's have a listen to that. Then. In the middle of the
B is generally a high hat. So I'm just going to set the
Q point here for a second. That higher sound is a high hat. And on the second beat, There's generally a kick drum and a clap at the same time. Every second beat
sounds different. So I have listened
to the beats here. So you can kind of hear it go. So that is generally what
this percussion sounds. So unlike the kick
drum, the high hats, and the clubs, they are short hits of sound that
come from a drum kit. You don't need to
be able to isolate these different separate
sounds at the moment. All you need to really remember is that percussion sounds are sounds that you can
hear off a drum kit that a generally one hit sounds. At this point in the
track, in the intro, where there are just
percussion sounds, you generally cannot
tell which track it is. There is nothing significant about the track at this point where you would be able to
identify which track it is. So we have a listen to
the start of track one. Then have a listen to
the start of track two. Now, even though this
sounds slightly different, you still cannot tell
which track it is. The intro section with percussion sounds is
very basic because it is used for mixing in the new track into the track
that is already playing, because this part of
the track is not very significant and he's
just percussion sounds. You cannot tell when it's
playing over the other track. And this is why it's
used for mixing. So e.g. if I was to put the
track one in the middle and then play the start of the track lowest
theme over the top. You won't be able to
tell much difference. So as you can see here that
there we're out of time. But the point was
that you cannot tell that the percussion
sounds of lawless theme. We're over the top of
the track last night, a DJ, I save my life. The intro starts off very simple with basic percussion sounds. And then after a phrase or to the track introduces
more sense to it. And on this track, on
the left-hand side, last night a DJ saved my life. You should then be able to hear a baseline come in
under slight melody. So let's have a listen to
this start at this track. I'm just going to
pause it there. So the baseline is the law of frequency sounds
that you can hear. The sound and the melody is the main kind
of catchy part of the tune that stands
out the most. So it's like it
didn't, it didn't. Then it didn't. And I hope you liked
my impressions there, but I hope it makes it a
little more clearer for you. Let's have a listen.
There you go. You can't even tell
the difference. So now, even though
you can identify what the track is and these
sounds are more significant, it is still part of the
intro of the track. This is because it's still
building up and introducing the track and it has not yet got to the main
parts of the track. So because it is no longer just basic percussion sounds anymore, and it now has a baseline. I'm melody added into it. But it's still
part of the intro. I like to call this
section in drop plus. I call it the intro plus, because it is still the intro, but it has some added
significant sounds. Now, when I use the term
significant sounds, generally referring to
sounds that would stand out to an audience and
keep their attention. The dictionary definition of significant is
worthy of attention. So if I refer to
significant sounds, what I mean is sounds that would keep the attention
of the audience. I will be using this
term quite a bit throughout the course
because I believe is an important point when
learning to DJ when discussing intros and
outros of tracks, which are what we'll be using
for most of our mixing. So in my opinion, the
percussion sounds of the intro and
not significant. They're quite flat and boring. But soon as the baseline
and melody command, I will class these are
significant sounds because they would
get my attention. And you can also identify
what tracker is. So let's have a quick listen to that little transition again. So it goes from
percussion sounds to significant science.
Let's have a listen. So as you can hear the
percussion sounds that are not significant wouldn't really
grab your attention, can get a bit boring
after awhile. Then insignificant
sounds that would grab your attention and
that you could dance to. So what I'm going
to do is highlight these sections of the track
with hot cue markers. Again, just like I did when
we were counting phrases. You don't need to
do this yourself. Again, they are
just a visual aid so we can see the
different sections easier. We will cover hot cues in more detail later in the course. So just as insignificant
science come in, I'm going to set a hot
Q market just here. Okay, so moving on. After the intro and intro plus, there were generally become a break or break
down in the track. Some people call it a break, and some people call it break
down. It's the same thing. A break is when the track breaks down and has less energy, and then starts to build back-up the energy again
towards the chorus. The break generally doesn't have any kick drums in it or beats, as some people like to call it, a break generally
only consists of just the main melody of
the track or any vocals. Again with no kick drums. So let's have a
listen to this tracks break and you should be
able to hear what I mean. So I'm just going
to put it towards the end of the intro plus, and listened to the
transition from the intro to the breakdown. As you can hear that there's no kick drums And it's just some slight
melody and vocals. And this is the
breakdown of the track. After the track is broken
down the energy during the break and then starts to build back up the energy again, you'd think get the chorus. The chorus is the most
energetic part of the track, where all the sounds
come together and the kick drum comes back in. This is where
everyone will dance and jump around to the track. Now it is worth noting that the first beat of the
chorus is called the drop. You may hear people say, listen to the drop
of this track. And that basically
means listened to in the chorus comes
in on this track. So let's have a
listen to the break of this track and the breakdown, and then it will build
back up to the chorus. So as you can here now
we're into the chorus. So I'm quickly going to do
is just set hockey marker at the start of the chorus
and on the first beat, which is known as the drop. Now, as we have mentioned, in a normal dance track, there will generally
be another break and another chorus in the track. But because I've
made these tracks shorter for the purposes
of this course, after this chorus, it goes
straight into the outro. The outro of the track is
very similar to the intro in the way that it
will generally just consist of percussion sounds. And the main significant
signs of the track will end. So I'm just going to move this track a bit
closer to the end of the chorus and listened to the transition between the
chorus into the outro. Now you can hear
where in the outro, which is just percussion sounds. As you may know, start to notice the sections of a dance
track are usually determined by the
different sounds that are included in that
part of the track. And because of this, you can often see the
different sections of the track just by looking
at the waveform. So e.g. let's have a look at the full
waveform here on the track, just going to reset the
track back to the Q point. So the intro of the track, you can see here with the blue waveform and
it's a bit smaller. And then the intro
plus adds more sounds, a more significant sounds, including the kick
drum and the waveform goes slightly bigger
under red color, and then it started to break. The tracks waveform changes
color again and goes green and it goes smaller
until it builds up. It starts going
into a blue color. And then just at the start
of the chorus, again, the waveform goes bigger
and into a red color. And then for the
whole of the chorus, it's red and the wave form is larger until it transitions
into the outro. And the outro, the
waveform is little shorter and of a blue color. So from here now, you
can start to pick up on the different sections of the track just by
looking at its waveform. This is one reason
why I like to change the waveform color to
red, green, and blue. And the waveform to a full
waveform or not half. Because the sections
of the track are a lot easier to see all the time. And with experience,
you'll get used to seeing the waveform
unknowing word. The sections of a dance track are just by looking at
the full wave forms. You can even look down
at the library at the different preview waveforms and pick out the
different sections of the tracks and get
a simple overview of the full structure of the
track just by looking at it. So just here on
track number two, you can see the intro, the intro plus break and break down the chorus and
then the outro Again. It is important to note
that not all tracks amid the same way and
have the same structure. But most of them do follow a similar structure to this one. They'll have the
intro, the star, followed by a breakdown,
and then a chorus, and then maybe
another breakdown, and then another chorus followed
by the outro at the end. The key thing is to
be able to identify these different sections
and know where they are in your tracks and
what they sound like. In the next few videos, we're going to start mixing
these tracks together. And I'm going to show you how to time the different tracks together to get perfect
mixes every time. I see you in the next video.
9. Basic Mix 1: In this video, we're going
to do our first basic mix. We're going to learn how to mix the first two tracks
together of our DJ routine. This is where everything we have learned up until
this point comes together and becomes
clear to why we have covered it
earlier in the course. So we now know that each
track has different sections. Intro, intro plus break, chorus and an outro. We also know that the intro
and outro mainly consist of percussion sounds. Percussion sounds are sounds that are found on a drum kit. They're not really significant. The intros and outros are
used for mixing because they can be played of other tracks
or not be that noticeable. We also know that
the intro plus break and chorus consists of
significant sounds. Significant sounds are sounds that will hold the
audience's attention, such as baselines,
melodies, and vocals. When these significant
sounds come in, you should be able to
identify what track is. This may seem like a lot to
take in, but don't worry, we will keep reinforcing these points as we continue
throughout the course. As we start applying
this knowledge and start mixing the
tracks together, it will become a lot clearer
and easier to understand. Now, the key to doing basic
mixing is that when one track significant sounds and the next track
significant sounds begin. And that is the key
to basic mixing. You have to time the points in the track where you would lose
the audience's attention. With the points in the
next track where you gain the audience's attention and time these two points together. That way, when you are mixing
and playing your tracks, you always keep the audience's
attention and therefore, hopefully always keeping
them entertained. We want to avoid any flat
parts in our mixing. We're just percussion
sounds will be playing by themselves. And we also want to avoid any
clashes and our mixes were both tracks significant
sounds will be playing at the same time
over the top of each other. If we just have percussion sounds playing to the audience, there will not be enough going on to keep their attention. And if both truck
significant signs were playing over the
top of each other, they would clash and it wouldn't sound good to the audience. So the key to a perfect
sounding mix is to find out where the significant sounds end on the track that
you are playing. And then find it where
there's significant sounds. Begin on the next trial
you want to play next, and then time them in
a way that the tracks switch a mix well together
at them two points. And that is exactly
what we're going to do now together with
these two tracks here, with this mix, we are going to start with the
truck last night. A DJ saved my life
already playing and then mix out of it and into
the track lawless theme. So the first thing we need
to do is find out where the significant sounds
end on the track. Last night, a DJ saved my life. And as we have already
listened to it, we should note that
it's at the end of the chorus when the
outro beat star. So let's have a listen to
that section of the track. So just here, as you can see, the red waveform ends and
the blue waveform begins. That is when the
significant sounds and on the track last night
at DJ saved my life. It is at the end of the chorus and it starts at the outro. So it is just that this
point here that we want the next track
significant sounds to begin. So what we need to do
now is find out where the significant sounds begin on the next track,
lawless theme. We're going to have a
listen to the start of the track Lola steam and listened to and insignificant
sounds come in. So as we can here though is just percussion
sounds at the start. And we can see the
tracks waveform change color around here. So I can assume that the percussion sounds will
last up until this point. And then insignificant
sounds and the intro plus we'll start here. Let's
have a listen to that. So as you can hear
that at that point, the baseline and melody comes in on the
track lawless theme. And this is the point where
the significant sounds begin. Just here. So it's at these two points here
that we want the tracks to switch over and mixed correctly for perfect
sounding mix. Now you might be
thinking that's great, but how do we time these
tracks together so they switch over at this point,
I'm mixed correctly. That's a great question. We now know that 32 beat
phrases are the building blocks of tracks and whether significant changes
happen in attract. So what we need to
do now is work out how many phrases that are in the track before the
significant sounds begin on the track
lawless theme. We need to work out if
there is one phrase, two phrases are three phrases, and so on, before the
significant sounds begin. Now we don't really
want to be pressing play at the start
of the track and counting 32 beats in our heads every time we
want to work this out. So what I'm going to do
is I'm going to show you a good little shortcut
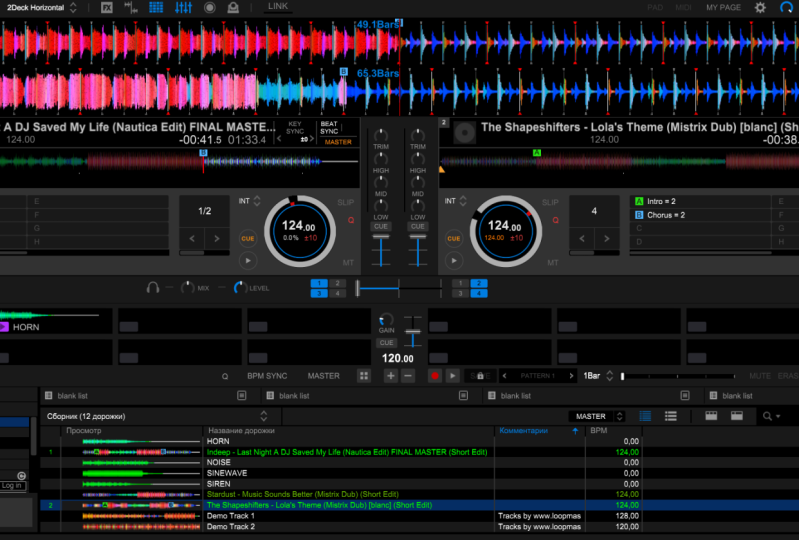
on how you can quickly count phrases of a track on deck to here
on the right-hand side, there's a couple of
arrows and taxane hot. Q. What we're going to
do is click this and you'll have a
drop-down and we're going to select beat jump. What beat jumped does is allows
you to jump forwards and backwards in the track by the amount of beats
that you select. And the main one we're
going to be using is the 32 beat beat jump, because that is the
number of beats normally in a phrase. So e.g. these two arrows here on
either side of the number 32. If I was to press
the right arrow, it will jump forward
in the track 32 beats. Then if I was to press
the Arrow backwards, it would jump back in the truck, 32 bits back to the same point. So now we can use this to quickly count how many
phrases there are before the significant sounds begin in this track
lowest theme. So what I'm going to
do is press backwards 32 beats until I get back
to the start of the track. So I'm going to press it
once and then again twice. There we have it. That
is two phrases before the significant stones come in on the track lawless theme. And what we need to
do now is work out when to press play on
the track lawless theme. Whilst the track last
night, a DJ say, my life is playing to
time their mics, right? We can do this by working
backwards from the start of the outro on the track last
night a DJ saved my life. We can use the beat jump
again to jump backwards two phrases from the point where the significant sounds end
on the track on the left. So again, I'm going to go over to the arrows that say hot cue, get the drop-down,
and go to beat jump. So I'm going to now jump
backwards two phrases. One, to using the
32 beat, beat jump. I went to move
backwards two phrases. So we are now at the
point of the start of the chorus of last night
at TJ saved my life. As we know, this is
called the drop. So this tells us that to
time this mix perfectly. So when the
significant sound and on the track last night
a DJ saved my life, the significant sounds begin
on the track, lawless theme. We have to press play on the track lawless theme on
the drop of last night, DJ saved my life. So let's give this a go
and see how it sounds. We're going to start
the truck on the left, in the middle of the break. We're going to make sure beat
sync is on for both tracks. And we need to make
sure the Q point is set on the very first
beat on the track. We're going to mix in next. And let's do the mix. So what I'm going to do when the course of last night
a DJ saved my life, starts on the drop. I'm going to press play on the track lawless theme on the right. Let's have a listen. There you have it.
That's how you do the first deejay mix
of this DJ routine. And as you can hear
that both tracks with timed perfectly. When one track
significant sounds ended, the next track,
significant science began. Keeping the audience's
attention and keeping them entertained
with no flat parts of just percussion
sounds and also no clashes of significant sounds playing over the
top of each other. It is a perfectly timed mix. Have a go at time in
that mix yourself on your own DJ
software and haven't listened to how it sounds and how the significant sounds
switchover at the right time. Then once you've
had a go at that, Let's move on to the
next video where we're going to be looking
at how we can mix these two tracks a little
bit better by using the cross fader to blend the tracks a little
more smoothly. I see you in the next video.
10. Using The Crossfader: In the last video, we
learned how to turn these two tracks
together perfectly by finding out where
the significant zone started and ended on each track. And then by counting the
phrase is leading up to them points and timing
when to press Play. So they mixed together
at the right time. In this video, we're going to look at how to use
the cross fader effectively to blend the tracks together a little more smoothly. Instead of just pressing
play out load and hearing the other track command straightaway at full volume. So firstly, if you
don't already have the mix of you on
your DJ software, we want to go to the top bar
at record box, just up here. And click the mixer
button that looks like a picture of
some volume Vedas. This will open up
the mix of you. In the middle of the two decks. There are quite a few
buttons and dials here, but the only one we
need to focus on at the minute is the cross
fader here at the bottom. What the cross fader does is it helps us mixed from one track to the other smoothly by
using only one fader. When the cross fader is in
the center, like it is now, you should be able to
hear both tracks at full volume at the same time. When the cross fader is all the way over to the left-hand side. You should only be
able to hear deck one by itself at full volume. And when the cross
fader is all the way over to the right-hand side. You should only be
able to hear deck two by itself at full volume. And when it is
moving in-between, it blends the tracks volumes
in and out gradually. So let me give you
a quick example. Good to put the cross
fader in the center. Press play on both decks. When the cross fader is all the way over to the
left-hand side. You can only hear deck one. Then when the cross
Veda is all the way over to the right-hand side. You can only hear deck
to anywhere in between. It blends the two
tracks gradually. So what we're going to do
now is the same mix again, but start the mixed
with the cross fader all the way over to
the left-hand side. So you can only hear deck one. And what we're going
to do is slowly and steadily move the cross
fader to the center, slowly fading in deck to just as insignificant sounds
are due to switch over. We want the cross
fader in the center so that both tracks are at
full volume for the switch. Then after the significant
science have switched, we want to slowly start
moving the cross fader to the right-hand
side towards deck to and start painting out the track that is
just played on deck one. Let's have a go at that
and give it a listen. We're going to start
the track last night. A DJ has saved my life in the
middle of the break again. Beat sync is on for both tracks. The Q point is set on the first beat of the
track lawless theme. The cross fader will be all the way over to the left-hand side. And for this mix,
we're just going to use the mouse cursor to move the cross fader across
from one side to the other. Now a good tip for this
particular mix is that because the mixed takes
four phrases in total, you can divide the
cross fader up into four sections to represent
the four different phrases. Over each phrase, you can move the cross fader one-quarter
distance across. So during the first phrase, you can move it one quarter
across the cross fader. And gerund phrase two
will move it towards the center phrase free,
three qualities across. Then of a phrase for it, we're going to move
it all the way across to the right-hand side, splitting the movement up into four quarters across
the four phrases. So let's do the
mixed one more time, but this time using
the cross fader. Hopefully as you can here, then that is a lot smoother mix and the tracks blend
together really well, rather than just pressing play
on the track lowest theme, and both volumes being
constantly throughout the mix. Now I'm quickly going to show
you another way in which can use this by
assigning the crossfade. It's a shortcut keys
on your keyboard. So now we're going to
go to Settings cog in the top right-hand corner, and then go to keyboard. And then we're going
to go to the mixer tab and click the plus here. And what we need to do
is scroll down and find slide cross fader to the
left and to the right. So let's scroll down. Just here we have slide crossfade it to the left and slide cross
fader to the right. What we're going to do is
change the small setting. So not the medium and large, but the small settings. While the small setting does, is it moves the cross fader
across in smaller increments. So you can be more
precise with your mixing. And the medium and
large options, move the cross fader across
in bigger increments. When you press the buttons, It's up to you which
one you choose. You can have a play
around with all three. But for this course,
I'm just going to use the small increments. So on this one here where
it says slide cross Veda to the left,
small in brackets. I'm going to click
the plus icon. And let me just move this
out of the way a slightly. Then it says, press a
key combination now. And the key we're going to
use is the comma just here. The reason why we're
going to use the comma is because it has the
arrow on the key. Once I press that key, I'm going to press okay. And then reassign. Now I'm going to
do the same with slight crossfade
it to the right, small again, click
the plus icon, and from here press
the full stop key. Again, I'm using
this one because it has a right arrow on it. Then I'm going to click
Okay, and then reassign. Now you can assign these to the arrow keys on your keypad. But the reason why we don't, through my own experience, is that these arrow
keys also move over parts of the software
that cannot be changed. So for me personally, I like to say it to
these arrow keys here. And then these arrow keys will
only move the cross fader. So now they're setup. We can exit the settings. As you can see, when I
press the arrow keys, the comma and the full stop, it moves the cross
fader across in the center in small increments. Another quick tip is
if you double-click the cross fader at any point
with your mouse cursor, it will take the cross
fader to the exact center. So if I double-click here, it takes the cross fader
to the exact center. I wouldn't recommend doing
this when actually mixing, but just a quick tip
if you did want to get it back to the true center. So there you have it. Have a go at doing
that mix once again, but this time using
the cross fader to mix the tracks more
gradually and smooth way. Have a go both ways of
mixing and see which one you prefer to try using the most cursor to adjust
the cross fader across. And also try and use the keys on the keyboard to move the
cross fader across as well. But remember to do it nice and smooth and make sure the
cross fader is in a sense of for the switch and then
completely over to the other side before the
start of the next break. Now we know how to time our tracks and use
the cross fader. And the next video, we're
going to learn how to do the second mix
of our DJ routine. See you there.
11. Basic Mix 2: In this video, I'm going
to show you how to do the second mix of
the DJ routine. Now on deck one, we need to track Calabria. We just need to set that Q-point right on that first
beat of the track. Now we know the
theory and basics. We're going to jump
straight into it and work out how to do the mix. First, we need to have
a listen to the starts of Calabria and work out how many phrases it takes to get to a significant
moment in the track, and then how many phrases it
takes to get to the break. So let's have a listen to
this dots of Calabria. So as you can hear there, it's just simple
percussion at the start. It's a heavy kick drum, followed by some
hi-hats and claps. So as you can hear that
the baseline comes in, followed by some melody. Again, the low frequency of the baseline and the catchy
tune from the melody. So I'm just going to
continue listening. Though. You can hear
the track go from intro to intro plus and then
into the breakdown. So what we're going to
do is just work out how many phrases that
is for each section. So I went to wind the
track back to the start of the break, which is just here. Then I'm going to use the
beat jump function again. I'm going to jump
backwards 32 beats wants. This is the point here where
the significant sounds start with a baseline
of melody comes in. I'm going to jump back
again another 32 beats. And this takes us
back to the downbeat, the very first bit of the track. So we can say here
that the intro right at the very
start of the track, which just has percussion, consists of one phrase, which takes us up to this point. This is when the significant
signs first come in on the track, the
baseline melodies. And that also last for one phrase until it gets
to the break of the track. The key thing to remember
here that it takes one phrase to get to the significant
sounds of the track Calabria. Now what we need to
do is work out where the significant sounds end
on the track lawless theme, and work backwards from that
0.1 phrase to see where we need to press
play on the track Calibri or for the
mix to time, right? So I haven't looked
at the waveform here on the track lawless theme, we can generally see the intro, intro plus the break, the chorus, and then the outro. So what I'm going
to do is have a listen to the transition between the chorus and the outro
just to double-check. Okay, so we can see that
this point here is where the significant sounds
end on this track. It goes from the
high-energy chorus to the low-energy of
just percussion sounds. So what we're going
to do from here is used beat Trump again, jumped backwards 32 bits. That is, this point here is one phrase before the
significant sounds end. This is the point here
where we need to press play on the track Calibri to
time them mixed correctly. So to time is mixed, right? We need to wait one phrase from the drop of the chorus
on lawless theme. So one way in which we
can turn this mixed right and wait 32 beats
after the start of the course to press play
is to basically just count 32 bits in our heads from when the chorus starts on the
track lawless theme, and then press play
on the Calabria. But instead of counting, what we can do instead is set a hot Q Marker at this point. So that when this point
comes up on the track, we know we have to press
play on the track Calabria, and there's not counted needed. So what we're going to
do here on deck two is change it back from
beat jump, too hot cue. Then at this point, which if we look at
the extended waveform, we can see that it is 57.1 bar. Now, we don't really
need to worry about what bars are at this
point in this course. But just so you have
a reference point of where you want to
set this hot Q is at 57.1 bar on the
track, lowest theme. And at this point here,
we're just going to press the letter a in
the bank of hot cues. As I click that,
it's going to sell hot Q Marker at this point. And as you can see now, it has a green marker on the waveform. I'll just move that
across slightly. Has a green market here on
the extended wave form and on the full waveform down on deck to and also in the
hot queue bank, it has the timestamp of
where the hot cue is saved. Now what hot cues are
actually designed to do is to recall that position in
the track when you press that hot cue. So e.g. if I press play on the truck loads theme
and then press hot QA, it will recall that position in the track and play the
track from that point. Press play on low esteem. Then click, hey, it's gonna take me back to that
point every time. Using hot cues in this way, where we recall the position of a tract is a more
advanced technique. And the technique I do
not actually teach until the advanced section
of my main DJ costs. But as well as being able to jump to certain
points in a track, hot cues are also double
up as visual markers. When I DJ professionally, I actually use the
hotkeys more as a visual markers than I do to recall the
positions of a track. And that is how we're
going to use them today. When lawless theme
is playing and gets to this point where
we have set hot QA. We know it's at this point
we need to press play on the track Calibri to time
them mixed correctly. And a nice added such that
we can do is write and make notes on the hot cues
as well to give us prompts, and to let us know what
to do at this hot Q. So what I'm going
to do is secondary click this hot Q here, and it'll give me some options. So if I click add comments, I can just type in
here, press play. So now we know when it gets to this hot cue in the future, this is where we
need to press play. Another thing we're
going to cover just before we do
the mix is that the last mix we did lasted
over four phrases in total. This is because at the
start of lawless theme, it had two phrases of intro to the significant
sounds and then to phrases of intro to the
break, totaling four phrases. But this time at the start
of the track Calabria, it has one phrase or ventral
to the significant sounds, and then one phrase
of intro plus two, the break, which this
time totals to phrases. So what we need to do with
the crossfade at this time is to divide the cross
beta into two parts. Fault the mix. We should
use the first phrase of the mix to start all the way
over on the right-hand side. And then slowly move the
cross fader to the center, ready for the significant
sites to switch. And then use the second
phrase of the mix to move the cross fader all the way
over to the left-hand side, ready for the break
of the track. This way the mixed with
a cross beta will be smooth and also time
right, with the whole mix. So let's give it a go and
have a listen to that mix. Now, we're going to start the track on
the right-hand side, in the middle of the break. We need beat sync on both tracks and both
tracks at the same BPM. The coupon on the track Calibri
or is on the first beat. We need the crossfade it all the way over to the right-hand side. We're going to press play
on the track Calabria, when we get to the hot cue
marker that says press Play. And for this mix, we're going to use the arrow keys to move the cross fader across over the two phrases instead of
the mouse and the cursor. Let's do the mix and
see how that sounds. There you have it.
That is how you do the second mix of
the DJ routine. Have a go at that
mixture ourself. And then we can move on to
the next and final mix of the DJ routine in the next
video. See you there.
12. Basic Mix 3: In this video, we're going to do the third and final mix
of this DJ routine. Now on deck to we want
to load the tracker. Music sounds better. And again, we want to set that Q-point right on the
first beat of the track. We should now be getting
more familiar with what we need to do to time
these tracks together. So first we need to find where the significant sounds star on the track music
sounds better. And then work out how
many phrases it takes to get to that point from
the start of the track. So let's have a quick listen to the very start of this truck. I'm just going to put the
cross fader in the center. So as we can just hear there, It's simple percussion sounds. And having a look at
the full waveform here, I'm quite confident
that these precautions signs last until this blue point here on the waveform. So
let's have a listen. Okay, so we can
see at this point here is when the percussion sounds and the intro stops and the break
of the truck starts. Let's wind this back slightly. So as you can here
with this track is different to the others. This track doesn't
have an intro plus. It just goes from the beats with the basic percussion straight into the break of
the track where the melody slowly
starts to build up. It is quite common for
tracks nowadays to do this. There are quite a
lot of tracks that just go from an intro of just basic percussion straight
to the back of the truck. That is one reason
why I wanted to include a track like
this in this course. Now we would still time
the track and the mix with the same principles of when one track significant
sounds end, the next track
significant sounds begin. But what we have to
do is just mixed attracts in a slightly different way with
the cross fader. So firstly, we need to count how many phrases
there are before the significant sums come in at the start of the
break of this track. So we're going to
beat, jump back on, on deck to then jump back
32 beats, once and twice. So that tells me
that this track is two phrases until the break. And then what we need
to do is work out where the significant sounds
end on the track Calibri. And then we need to work back to phrases from that point and set a hot Q Marker at
that point to tell us when to press play on the
track music sounds better. So having a look at the
waveform here on Calibri, or if this is the breakdown and then the chorus
starts just here. We're going to look
at any differences in the wave form when
the track changes. So all the way up
until this point, the waveform looks quite
similar for the chorus. And then it goes a
little darker red here. So I'm just going to listen
to the transition of this part and see
if it goes from the chorus to the outro. So we can hear a distinct
change that going from the chorus to the outro
beats of just percussion. So I'm just going to wind this extended wave form
back to that point. Then from here, we
need to jump backwards two phrases using the
beat jump function 12. So we know at this point here is when we need to press
play on the track, music sounds better for this significant sounds to
switch at the right time. So I'm going to
change this setting from beat jump
back to hot queue. Click the button a in the hot queue bank to set
our hock here at this point, if you are looking at
the bars, this is 49.1. So at the point in this track, we want to set a hot
Q Marker at 49.1. Then also we can secondary
click this hot queue bank. Click, add comments,
and type in press play. So similar to the last mix. When the track Calibri,
it gets to this point. We know we need to press play on the track music sounds better to time the mixed correctly. Now what we need to do
with the cross fader whilst we are mixing is we still need to get the cross fader all the way over to the
right-hand side. Before the break starts on the
track music sounds better. But instead of doing an equally and even throughout the mix, what we're going to do this time bring the tracking
music sounds better, a lot more slowly and steadily over a longer
period of time. Then mix out of the track
Calabria a little bit faster. This time because the mics
will be all the two phrases. Instead of taking
one phrase to get to the center and
then one phrase to get over to the
right-hand side and doing an even mix
across the cross fader. We're going to take
one-and-a-half phrase this time to get to the center
of the cross fader. And then only half a phrase
to move the cross rate from the center all the way
over to the right-hand side. We're going to move
the cross fader a lot slower for the first
one-and-a-half phrases, then a little bit faster
for the last half a phrase. The two phrase mix. This doesn't have to be done perfectly and it's
not a strict rule. These are just guidelines for this mix to sound a
little bit better. The reason why we want to do
this is because Calibri is chorus will be
playing throughout the mix and attract
music sounds better. We'll only have percussion
sounds to mix with. So we want the chorus of Calabria to play
louder for longer. So it will be the more
dominant sound throat the mix. If we mix it equally, the percussion sounds
of music sounds better, will be the dominant sound for the second half of the mix. And it won't sound
very good to just have percussion sounds as
the dominant sounds. For the second half. It will start to
sound a little flat. I'm going to give you an
example now of it done wrong with an equal half and half
split on the cross fader. And then after it, I'll
do the same mix again, but bring the cross
fader in slower at the start and then mix it
out faster at the end. Just so you can compare the two mixes and hear the
difference for yourself. So it's a little
clearer what I mean. So for this example, I'm going to stop the track Calabria already in the chorus. But before the point where
we have to press Play, I'm going to put the cross
fader all the way over to the left-hand side and then move the cross fader to the
center after one phrase, and then all the way
over to the right for the second phrase and
give it a 5050 split. And notice how it
sounds flat towards the end of the mix. Let's
have a listen to that. So as you can hear
that it loses a lot of energy towards
the end of the mix. Now going to do the mix again, but this time I'm going to bring the crossfade
it to the center. All but one-and-a-half phrases. So the track music
sounds better, is introduced into
the mix a lot slower. And then I'm going to move the
cross beta from the center to the right hand side over
the last half a phrase. So it will mix out
the track Calibri at later in the mix and faster. Let's have a listen to
the mixed on that way. Crossfade is going to start all the way over to the
left-hand side. Both tracks of beats inked up. I don't want it to
start the track. Calibri are already
in the chorus, but before that, we have to
press play on the track. So let's have a listen to
it done that way and watch our manipulate the cross
fader in this mix? None. Hopefully you will
agree that that makes any better than the first. It didn't lose as much energy
towards the end of the mix. And it would still hopefully
sound better to the audience and keep their attention
better throughout that mix. So a key thing to note here is that if you have
a track that it just has precaution intro beats and then go straight to a break. You want to keep the
other tracks chorus in the mix loader bit
longer and just move the cross fader fully across in the last few moments to keep the energy higher
throat, the mix. But you still want the
significant sounds to switch at the same time. So keep that makes
a go yourself, a play around with how the
mix sounds when you move the crossfire to fully
across later in the mix, use your ears and
trust your ears to see what the mix sounds like as
you move in the cross fader. And this is now when you have to start thinking more like a DJ. And things are not so black and white as
they were before. And you have to start using your ears and adjust to what you think will sound good and
best to the audience. This obviously gets easier
and better over time. But I have a practice
now and have a play with the cross fader and try and get the optimal sound
during your mix. Now before we move on and do the whole DJ routine together, I'm going to show
you how we can add some extra sound effects to our mixes to add
some extra energy to our tracks. See you
in the next video.
13. Sampler: In this video,
we're going to set some sound effects on
our sample at bank so we can trigger them
during our mix and add some extra energy to our tracks. When you download reco box, you get some sound effects
free with the DJ software. If you go to the library on the left-hand side and
click the collection tap. This shows you all
the tracks you have ever uploaded into record box. And in here you will find
the free sound effects. You might see on mine
here that I have a few extra sound
effects that I've added. These are for the other
courses that I do. But you should have
for free sound effects in your collection already. Have a listen to
them. You can just simply drag and drop them onto one of the decks and press Play and see what
they sound like. So from here I'm just
going to drag and drop the siren sound
effects on deck one. And then you can press Play
and having listened to it. But to use these sound effects, we don't want to be
loading them onto a deck every time we
want to use them. What we can do is
we can load them into what's called
a sample bank. If you go to the
top of the screen, just like we did when we
opened up the mix of tab, you'll see an icon
that looks like a grid full of small boxes. If we click that, that will
open up the sample bank. What you can do here
is drag and drop the sounds that you
want into these boxes. And we can assign these boxes to shortcut keys
on our keyboard. So when we press the key
that it is assigned to it, we'll play that sound effects. So what we're going to
do for this course, if you want to follow along, is we're going to put the siren sound effects in
sample bank one, and then put the horn sound
effects in sample bank two. Then what we need to do
to be able to trigger these sound effects is go to Settings in the top right-hand
corner, then to keyboard. And then two sampler. In here we have the
different playback slots and the keys that trigger them. So for playback slot one, this is this one
here for the siren. What we're going to
do, it's already assigned to the letter x, but just for this, we're
going to change it around. So secondary click,
right-click it. Go and change. This time we're going
to put the letter S. Now it says it's currently assigned to
slip reverse, which is fine. We're just going to click Okay. And then reassign,
then play it back slot for the horn sound
effect currently set to see. But we're going to
change this to hate. Click. Okay, then we're going
to exit settings. Now some of you may
have noticed that we have set it to S and H, just to remember that means
S for Simon and H for Han. So now if I was to press the
Esc key on the keyboard, it will trigger the
siren some whole bank. And if we were to
press letter H, it will trigger the
whole ensemble bank. Now, as you may
have heard though, it can be quite loud. So to change the
volume of these two, what we can do is
change the gain. We can move that up and down or use this fader on
the right-hand side. Generally, the
gain seems to be a little bit better when I use it. I'm just going to turn that
down slightly and press the H. And you can adjust it accordingly to
however large you want it. So I'm going to turn
it down a little bit more on that one should be okay. You want your
samples to be heard, but you don't want them to
overpower the track itself. So we're going to have a
listen to this with a track. So I'm going to go into
my no DJ equipment needed DJ calls folder. And I'm also going to exit
the siren sound on deck one. I'm going to drag up the
track music sounds better. Now I personally like to
press my sound effects either eight beats before the drop of four beats before the drop, or just as the drop happens. So this is just before the chorus or as
the core of stars. The reason why I press it
sometimes eight beats or four beats before the
drop is because it gives the sample a chance
to fully sound out just before the drop and add
some extra anticipation. So let's have a listen to that. So around eight to four beats, I'm just going to
press the S for the siren just before it drops. So as you can hear
that the siren sound effect was the
one I triggered, but it's a bit quieter. So this is where you
may have to adjust your GAN levels or this
volume fader on the right. So what we could do is
turn the gain up slightly. And then when we trigger
that Simon sample, keep it as it is. But then when we
trigger the Han, we can turn this fader
down to about halfway. Let's try that again. So that sounds a little bit better and a better
level of volume. Then we're going to try
the home side effects again just before it drops. But this time
because I think the Hornstein effects a bit louder. We wanted to turn the fader down to halfway. Let's try that. So that sounded pretty good. I'm going to try it
again just on the drops. So see what it sounds like
when the track does drop. We'll try the siren again. So volume fader on
the right-hand side for the sample bank all
the way to the top. So that was pressing the siren sound effects right on the drop. Let's have a listen
to it to a couple of beats after the drop. So let the drop take its
effect in the Simon, just box it up slightly afterwards. Let's have
a listen to that. I quite liked to the four
beats after the drop. As you can here that you
can have a play around with your sound effects
and see what they sound like. Ovo tracks. And when you want
to trigger them, you can go online and
search in YouTube or any other DJ record pool for DJ sound effects or DJ samples. And you should be able
to find some that. But I generally find the
siren and in the home is plenty for whenever
you're doing your sets. I wouldn't recommend overusing the samples and
the sound effects. I wouldn't do as sound
effects on every drop or every key point in the
track or Joan, your set. Because that can
get quite annoying for some people listening. I'll try and use
them on the known again to avoid overdoing it. But also only use these
samples when m d gen life, if I'm doing pre-recorded
sets for online purposes, are generally try and avoid the horns or the sirens
as much as possible. But during a live set, they
can add a bit more energy to your tracks until you're
set. So they have it. You can add some
extra sound effects to your mix when we do
it in the next video. In the next video,
we're going to put it all together and mix all four tracks one after another. See you
in the next video.
14. Final DJ Routine: In this video, what
we're going to do is put all the mixes that we have learned
together in one DJ routine. We should already
have our tracks setup and ready to do the mixes. We should know when to press
play on each track and how to move the cross fader
across in each mix. What we're going to do first
is put the tracks in order. So it'll help us
when doing the mix. The start of the course,
we arrange the columns in our library and we included the comments column as
part of the library. I'm just going to
move this across. Here we have it, the comments
column in our library. The comments column helps
me a lot when I DJ, as well as saying hot cues and putting comments on
them to help me. You can also leave notes in the comments on the library
to help you as well. We're going to use
the comments today to our tracks in
order that we're going to play them
to make it easier for us when selecting
our tracks. So the first track that
we're going to play is last night a
DJ saved my life. So in the comments here, I'm just going to
double-click and then put 01. Then the second track
we're going to play in the DJ routine is
low this theme. So in-law lose theme comments. I'm just going to double-click
and press zero or two. Then the third track, Calabria, is going to be 03. And then the fourth track,
music sounds better, is going to be zero for. Now, if we click the comments title box just here at the top, it will arrange the comments in alphabetical or numerical order, in either ascending
or descending order, we want the tracks to start
at 01 or go down to 04. So if I click the
comments title box, it's going to rearrange them. So now we can see the tracks
are in order 010,203.0. For now, the practice tracks don't have anything
in the comments, but they do go at the top. But that doesn't matter as
long as these are in order for us to DJ through
in a routine. So now we have our
tracks in order. We're going to load the
first track up on deck one and the second
track up on deck to. So for the purpose
of this DJ routine, instead of starting
to track last night, DJ save my life at
the very start and listening to the
percussion science and the intro of the track, we're going to set a key
0.2 beats before the break. This way we don't
have to listen to that full intro and it goes straight into the main
part of the track. But you're going
to do it two beats before the break so that we fit the full vocal of
the track in the mix. So I'm going to let you
have a listen to that part. If I was to put it right
at the start frame, set the Q point here, miss out parts of the vocal. So what we're going to do is put the Q-point two beats earlier. So it should be at 16.3 bar. Now it should fit the full vocal in and still sound good to
start the mix from here. So we should now be ready
to do our full DJ routine. We know what order we are
going to play our tracks. We know when to press play
to time the mixes correctly, and we know how to
move the cross fader across in each mix. Don't forget to set the
coupon at the start of each track when
you first load it up for the first time. So e.g. here, low this theme,
I just need to get the Q-point right
on that first beat. We also need to check
that beat sync is activated on both decks before
we start the whole mix. So from here, I need to
activate beats in conduct one, beats and conduct too. And when we started out with
debt one playing first, we want the cross
fader all the way over to the left-hand side, starting to mix from there. Now we're going to do the
full DJ routine via neck. So you can watch and see if you can pick up on what I'm doing. And then you can get the DJ
routine a go yourself after. I hope you enjoyed
the DJ routine and hope you enjoyed doing
it yourself after two, good luck, and let's do it. Good morning.
15. Bonus: Track Preparation For Any Occasion: Hi there again. I hope you
enjoyed doing the DJ routine. Now you might be thinking,
Yeah, that was fun, but I only know how
to DJ these tracks in this particular order.
And that is very true. So what I'm going
to do in this video is give you a few tips on how you can prepare
your tracks so you can mix them in any order. So firstly, what we need to
do is reset all the tracks. We need to delete
all of the hot cues and also delete all the
numbers in the comments. So there we have it. We've
deleted all the hot cue sound. The tracks are deleted. The comments also
attached to the tracks. What we're going to do now
is prepared each track, so we should be able to mix
them with any other track. So first we're just going
to load up the track. Last night a DJ saved my
life on the left-hand side. And the first thing
we're going to do, just like we have
done with previously, is find out what the
significant sounds start in the track and work out how many phrases it takes to get there
from the start. So with this track, we
can already guess that the blue part of the wave form is the precaution, an intro. And then the red part is where the baseline of melody condemn. This is where the
significant sounds come in. So let's have a quick
listen and check. Okay, so just here where the red waveform stats is where the significant
sounds start. We're going to use beat jump. Quickly, find out
how many phrases this is two, this point. I've just jumped
back one phrase. So this tells me it's
one phrase until the significant sounds
come in on this track. So what we're going to
do now is set a hot cue at the point where the
significant sounds star. And then put in the comments of the hot cue intro equals one. I'm going to go
back to the start of the significant sounds. And this is at bar number 9.1. And then I'm going to go
from beat jump back to hot cue. Set hoc. You'd just at this point here. And then secondary click it, add comments and put
intro equals one. Now when we look at this track, we can see where the
significant sounds start by seeing
where the hot Q is. And we know how
many phrase is to, is to get to that point
from the start of the track by looking at the comment attached
to the hot cue. We're now going to do
something similar with the end of the track where we are
going to be mixing out of it. We need to find out where
the significant sounds end in the track. So as we know, the
red part should be the chorus and where it
goes blue on the waveform, that should be the outro. So at the point where the red
transitions into the blue should be where the
significant sounds end. Let's have a quick check. Okay, so it's at this
point here at 49.1 bar where the significant
sounds end on this track. Now because we don't know what we're going to be playing next. We don't know how many phrases
we need to jump backwards. So instead, we need a
reference point to work with. What we're going
to do is work out how many phrases it
is from the start, the chorus to this point. So we're going to go
back to beat jump. Then we're going
to work backwards and see how many phrases it is until the drop
of the track 12. So now we know it's two
phrases from the drop of the chorus until the
significant sounds end and the outro begins. So now what we need to do is
go back to the point where the significant sounds and
go back to hot cue setting. Set a hot cue it just here. And then put in the
comments, course equals two. Now when we look at this track, we can see where the significant
sounds end And how many phrases it takes to get to that point from the
start of the chorus. And what we can
also do is we can change the color of
the second heart Q, just to make it stand out a little more from the
first heart care. So again, I went to
secondary, click it. I'm going to change this
one to a light blue. So now we can associate the green color
with the intro and the blue color with the
outro. So that's great. Night last night DJ say
my life is all set up. What we're going to do now
is look at the next track, low this theme and do exactly
the same with this track. We're going to find it where
the significant zone Stop, which should be here where
the waveform goes dark red. I'm going to go through
this a little quicker, but feel free to check
this at home if you like. This should be at 0.17, 0.1. I'm going to go to beat jump
on the right-hand side. And find out how many phrases is from the start of the
track to this 0.12. So it's two phrases going to go back to the significant
sounds. Stop. Change it back to hot
cue mode and set hoc. You'd just here. I'm going
to right-click add comments. Intro equals to. So now when I look
at this track, I know where the
significant sounds start by seeing where the
hot Q market is. And then by looking
in the comments, I know it's two phrases
to get to this point. Now we need to do the same
at the end of the track. So I need to find out where
the significant zones. And so I'm assuming this is the chorus and
this is the outro. Again, you can check this
at home if you like. Sometimes is worth listening to because here it does go blue. But this is the end
of the core is still, and the next phrase starts here. At this point, if you
just have a quick listen, sometimes it is
worth checking with the ears as well as your eyes. So at this point here, 65.1 is where the
significant sounds and we're going to
go back to beat, jump, jump back 32
beats, once, twice. So we know from the
drop of the chorus to the significant sounds
ending is two phrases. So we're going to go
back to this point, change it to hot Q,
hot, cute just here. And as you can see that
the playhead is not directly on the beat, but the hot Q will set
onto the beat line. So you've not to worry about
getting it exactly on. It just has to be the
closest beat to it. So I'm going to zoom back out. Right-click this hot cue, add comments. Chorus equals two. Now I know at this point
the significant sounds end by looking at the hot Q. And I know it's two phrases
from the start of the chorus. I'm also going to right-click and change that color
to a light blue. Now we have done this.
What we can do is work out when to press play from
the notes we have made. We can take the number
of cores phrases a minus the number
of intro phrases, and that will give us
the number of phrases. We have to wait from
our reference point, which is the start
of the chorus. So if we were to play
it lawless theme first, so start it here in the
middle of the track. I want to mix in last night, a DJ saved my life. I would take the
number of phrases in the chorus, which is two, minus the number of phrases in the intro to the
significant sounds, which is one, which two minus one would leave us with
one another is simple. I'm not trying to insult
your intelligence of maths. I'm just going over it for
the purpose of the course. This means we'll
have to wait for one phrase before we press Play. And that makes your
time perfectly. So let's have a
quick go of that. So I'm going to press play
on the track lawless theme. Wait, 32 beats, and then press play on
the track last night, DJ, say My life, Let's see if it mixes well, no, because this time we do not have a hot Q Marker
telling us when to press play it in the chorus. Have to work out
ourselves when we're DJ. The way to do this is
generally we would just have to count 32 bits of a phrase in our heads as many times as we need to
until we can press Play. So in this instance we would
have to wait one phrase. We would need to count
to 32 beats wants, and then press play on the track and it should time right? There are ways of getting
around this counting, but they are more advanced
techniques using loops that I do not teach until the advanced
section of my main cause. Just for now, we're
just going to have to count in our head with these simple
mixes to 32 bits. And the more you get used to it and the more experience you get, you don't actually have
to count the 32-bits. You just get used to the
rhythms of the tracks. And you'll just know
when to press Play by listening to the track e.g. now when I'm DJ and
I don't need to actually count 32
beats in my head. I just know when the
tracks are going to change just through
to experience. So let's get that Mexico and see if it times
right when the truck loaders theme drops and let's
go 32 beats in my head. And then press play on
the track last night to DJ saved my life. Let's
give it a listen. There you have it. That
makes time perfectly. We could do that
from working out how many phrases are in the
course of the trackway, mixing it up and using
the number of phrases. It takes to get to
the significant signs of the track that
we're mixing in. Now what we can do is
we can quickly set the other tracks up
in the same way so that all the tracks are prepared and ready to mix
into any track we want. I'm going to do this
a little quicker, but you should be able
to pause the video and follow along with the
track preparations. If you do need to.
The next track I'm going to load up is
Calibri or on deck one. I'm going to find out
where the significant sounds star in this track. Now it's not as easy to see on the wave form because it
does look very consistent. But just in the middle
here you can see that the left side
is a bit darker, on the right side
is a bit lighter. I'm just going to
have a listen to this transition here to see if the significant sounds
coming in at this point. So at this point here the
significant sounds come in. I went to set hoc Q Marker. I'm going to set the
hot Q market first, so I remember where
it is because it's not as easy to see. And then I'm going
to go to beat, jump, jump back 32 beats once. So I know it's one
phrase to this point. So now I need to go back to hot cue and make a note
of intro equals one. Brilliant. Now I
need to find out where the significant
sounds end. So it looks like this whole
chorus is consistent. And then it goes
darker red here. So I'm going to have
listened to this transition. It's just that this point here
where the track goes from the chorus into the outro with
insignificant sounds end. And that is at bar number 65.1. So I'm going to
set a hot Q here, change the color to light blue. And then use the beat
jump function to jump backwards 32 beats and see how many phrases it
is to this point from the start of the
chorus. So 123.4. So this course is
for phrases long. So what I'm going
to do is change it back to the hot cue setting. Secondary click this
hot queue bank, add comments and put
chorus equals four. So that's the track
Calibri assaulted, intro equals one and
chorus equals four. Now for the last track,
music sounds better. The start of the track
looks quite consistent on the waveform until this
point here at the blue part. So I'm going to have a
listen to this track here and listened to the transition between this bit going into the blue waveform. So as you can hear, it
goes from percussion sounds that are not significant
into the breakdown. And it slowly starts introducing the significant
signs of the melody. So we say this point here where the significant zone stop. So I'm going to set the hot cue. Then I'm going to go to
beat jump and work out how many phrases is
until this 0.12. So it's two phrases. Go back to hot cue,
secondary click, add comments. Intro equals two. And then we're going to do
the same for the outro. It looks like the
chorus is here, the thick red waveform, and then goes into
a lighter blue and another multicolored
waveform here, I'm going to have a listen
to this transition where the big waveform goes
into a smaller wave form. Okay, so is that this
point here where the significant
sounds end at 49.1. I'm going to set a
hot Q Marker here, change it to light blue, and then use the beat jump
function to jump backwards and see how many
phrases it is until this point from the
start of the chorus. 12. So back to the
hot cue setting. And then in here
on the comments, I'm going to put chorus
equals two. We have it. We should have all our tracks
setup in the same way, giving us the option to mix any track into any other track. We can now use the same
formula that we talked about before to mix any
of their tracks together. We can take the
number of phrases of the chorus minus the number
of phrases in the intro. And that will give you how
many phrases you have to wait from the start of the chorus
before pressing play. This is a very
similar way in which I prefer all my tracks in my library when I'm deejaying so that when I go to
my life sets or no, I can mix any track into any
other track at any point. And I am confident it's
going to time right? And same goods to the audience. So what I'm going to do
now is I'm going to do for random mixes to show
you how this works. And then you can give
it a go yourself after. Want to try with starting with one random track and then picking any of the
track to mix into it. And then I'm going to
try and go through all four tracks to
see if I'm able to mix these altogether in any order. So let's
give this a go. I'm going to exit these tracks. And on the first day, congruent to load
this one up Calibri. And on the second deck,
I'm going to load. This one, which
is lawless theme. Then after these two tracks, I'm just going to pick the
one of the other two that are random and work out how to mix the phrases to
time perfect way to start this first track
on the left-hand side at the start of the brake. Set the Q point just here. Set the Q point and the
start of the next track. Now we're going to
mix all four tracks. Have a watch of this
and then do it yourself after and see how it sounds. Let's do it next. No. Hi.
16. Class Project: Hi there again. As part of the
Skillshare community, you may already know
that class projects are a big part of the platform
and what makes Scotia unique. So in this video,
I'm going to quickly outline this class
project for you. For the class project
on Skillshare gives you an option to add a cover
image, a project title, a project description,
and any extra images, videos, or files that you
may have and want to share. All you need to do is go to
the Projects and Resources tab under this video and
click Create Project. For the cover photo,
you can either take a screenshot of your DJ software as you were
doing the course, or you can just take a
picture of your laptop and DJ software with your
phone and upload that. For the class project. You can title it
whatever you like, e.g. you could title it my first DJ project on my first deejay mix, or even I am now wicked sick DJ. In the project description, you can feel free to
put whatever you like, emulation to the course. You can share your
experience with the course in any way you want. There is no right or
wrong answer here. Any information on how
your experience was with the course and you're deejaying in general will be perfect. But if you are
struggling for things to write and you want to
keep things simple, as I know, it can
be hard to think of things on the spot sometimes. And also because I want
as many as you guys as possible to participate
in the class project. I'm going to give you an
optional structure to follow, which is you can finish
these three sentences. I started this DJ cost
because three things I have learned from this DJ costs
are after this DJ course. I'm going to, so for your
project description, feel free to finish
them three sentences. The more that you guys share, the more we can all interact
with each other and connect and discuss the
topic of deejaying. It's always great to hear how people have got on
with the course and the positive impacts it has had on the deejaying journey. Record box does not allow
you to record your mics when only using your laptop
in performance mode. So for this reason,
I'm not expecting anyone to recall there
are mics and applauded, just sharing an image and your experience with
the course would be great if you
have any questions about the class project, feel free to create
discussion in the class, and I'll get back
to you from that. I hope you enjoy the course. I look forward to hearing how
it goes in your projects. See you in the next video.
17. Congratulations!: Congratulations for
completing the node. Dj equipment needed DJ cars. I hope you've really
enjoyed this course and that you have learned
a lot about deejaying. I have tried to
include as much value as I possibly could for you in this course with only the use of a laptop and we have no actual
DJ equipment to work with. You should now have
the knowledge and tools to be able to go and get your own tracks and
have a play around with them and have a go at
some basic deejaying. Even if you're just
using your laptop, you should be able to prepare
a mixed a plan DJ routine, and also prepare a mix your
tracks in any order you like. When preparing for
my own DJ sets, I'll always prepare my
tracks using my laptop. And just the way as we've
done in this course, it is a great way to plan
and practice your mixes beforehand without having
to use actual DJ equipment. If you've done this
course, because you are interested in
starting deejaying, but didn't yet want to commit to buying some DJ equipment. I hope this course has
helped you decide. And baby no, because you've
done this amazing course, you are now thinking about
buying some DJ equipment. Make sure you check out my
other videos where I discuss my recommendations for
beginner DJ setup. I will put the details
of where you can find this information in the
description below for you, so you know where to find it. And if you do decide to take the plunge and buy
some DJ equipment, don't forget that I also have another amazing cause called
the complete DJ calls for beginners that will teach
you everything you need to know about deejaying
on a DJ controller. So make sure you check that out. Once again, I hope
you've really enjoyed this course and I hope you've
learned a lot from it. I hope to see you
again in the future. Bye for now. See you again soon.
 Jak Bradley, Professional International DJ