Transcripts
1. Class Intro: Hello everyone. My name is Ramsay.
We'll hash and our director game and
from production designer, graphic artists,
product designer, concept artist, VFX artist, and a lot of other things. I made this course for
anyone wants to become a great concept artist for
film and gaming industry, is also creating amazing
robot character. I share with you in this class on my experience about design and rewards with the 3D and
photo bashing technique. This is the fastest
technique and most effective we use in fulfilled
in gaming industry. I will talk to you about how to become a great concept artists. As I will teach you or tips and tricks from
inside the field. This is a high-quality
training course. I tried to cover all the
topics in text, our content. In this class we will learn
storm brain in ideas, how to prepare your ideas
about your character. Learn the way of choosing the perfect image and
building a great image liver. Analyze the light. We will learn how to analyse
the light for our artwork. 3d sculpting. We will learn how to scarred hard surface for concept
art using ZBrush. Keep applying. We will learn about
how to use Git Bash to speed up our workflow
using Alpha. How to tell our models
in the fastest way, we will learn how to export
our design and decrease our geometry to work so fast when you're
working in rendering, rendering layers,
we'll learn how to render materials
layers in key shot, photo bashing our models. We will learn how to
add more details and finishing design with
photo bashing techniques. Adding details to our
model will learn how to add details to make our
design loop manufactured. Whether in our model, we will learn to add texture
to our model to make it look realistic and give
it a background story. At Effects, will learn
to add effects like smoked our model to make
our shot look cinematic. We learned also
working with ZBrush, T-Shirt Photoshop and
a lot of other things. This class requires
basic knowledge about ZBrush, key
shot Photoshop. Although we'll see
about all the tools, we're going to use, it easy
to follow even for beginners. As a bonus, you will get six Photoshop square
shapes for hard surface, a tie kit-based pieces as the IMM brush ready to use
in ZBrush for your project, then alpha to use in any hard surface project
along this class. I hope you like the
class and teach you how to become great
concept artists. I wait for you to join me in this journey and I
hope you like it. Thank you.
2. Understand Concept Art: Concept art can be
done with many ways. Example, illustration,
sketching for the version, 3D design, and a
lot of other ways. Your key here is to
find the fastest and the most workflow that
gives you the best results. Many concept artists they like to work with for
the brushing technique because it's the most
fastest one in give you the best results always
when you are working with. That's what we're going
to see in our class. Design a robot. Also one of the hardest because you are working
with a hard surface. Yes, you need to practice
what you learn here. And when you design
a robot to try to give it a personality
and background story. Either a dangerous and Kayla, either cool or funny or
any other personality. Like are designing a human
character or a creature. Whether in your design, will always help you
sell your story. We're going to see all
these techniques here. And I go, and I'm going
to show you how so more about how to design
a great concept art.
3. Concept Art Topics: Hello guys. I want to talk to you about our main topics
for concept arts. And they are six topics. The first one is working fast. It's important as
concept artists to be passed as a sketching, some rough sketches and make
final concept of bees ready. You need always to work with the fastest workflow that gives you the best
results to aim and port. Studios don't wait you
to take your time work in any piece because
time cost money. You will need to
communicate with them from the first you start working on their project and update them with all
the faces you reach. So if you start
working on a project, you make a rough sketches
you send to the studio in any weight for their critics to continue working
on the project. Practice a lot. Practice on your
own projects will help you always make mistakes
and learn from them. And find where you are. Strong tools doesn't make you great concept artists
need to work with what you are comfortable
with and give you the best results
you are aiming for. Make some studies. The main keys of becoming a great artists is to make
studies in real life. Watch and observe. Ccds have been
constructed during about human and animal anatomy if you want to do character
design or creature design. Also the same for robot design, which also about mechanical that help you know how
hard surface work. If you want to work in sci-fi. Although I like to work
on all kind of a concept, art, sci-fi, fantasy or
action, or wherever. Watching movies, comics, games, or whatever can feed your brain and make your imagination flow. Think out of the box
when you work on a project pricing different
from what other artistic. See what has been done already and try to
come with a new IDs. Stood, you will
get boring senior doing things similar
to other artists. Did they want to check for a
new talent in any new ideas? So try to be always authentic and put your
own style on your art. The story that stand. When you design some sketches
or character or wherever. Try always to link
them to a story. You are not just designing. You are making a stories. You the one who created
the script of the movie visually before it
goes for production. So always try to design a story, not adjusted design. Build portfolio. Building portfolio
in any platform will help your
marketing yourself and engage in the community to exchange ideas with
other artists. But also it helps to
use your walk and decide if you are suitable
for any of their projects.
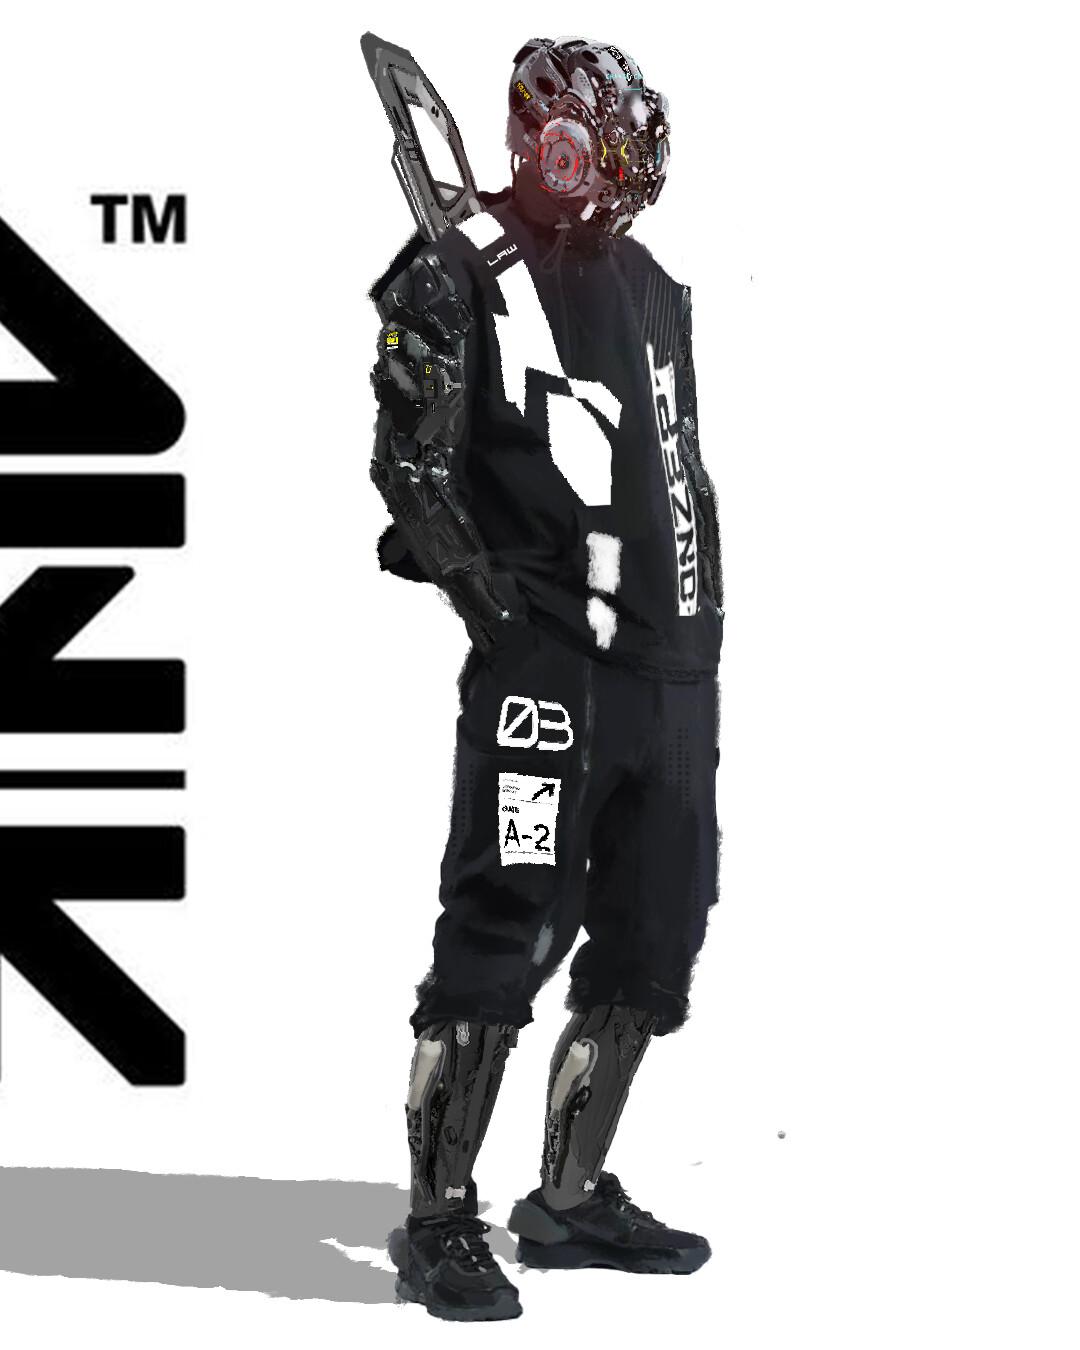
4. Class Project : Guys, for our class project, I want you to create
a robot concept art with a story background, same we learned in this class, using the same
techniques and tricks. As you see here with my design, different concepts and ideas. I want you to do the
same, create your own, not necessarily same we did, can be a soldier,
can be a cyber pop, can be animal robot,
whatever you like. I want to see how much you
learned from this class. I'm so excited and
waiting for you to upload your
design to our class. Try to do your own project and go with your ideas. Thank you.
5. BrainStorming Your Ideas: Hello, guys, we
are here in mind. This is a software for putting all your idea about what you're going to
do with your work, like character, like the story or whatever you
want to put here. This is very simple.
I so easy to use. Here you have this net and
it is also main topic, one, two, three, four, and the central topic like what you're going
to be building here. Here as you see, there are
many ways to make your net. As you see many forms. You just click
create a new start. Let's see here how we're
going to create our project. We're going to storm some ideas. I enjoy doing this
kind of work guys at the beginning because
this is going to put all the idea I
have in my mind, what I'm going to do
exactly and all that. We start here at
the center here, we're going to put our product, which is going to be a soldier. We're going to build
a soldier robot. So we're going to
call it by now. The first main topic
is going to be time. Here we go to think from
which time it came robot, maybe from the future, maybe from another planet. Also the place, as
we talked here, maybe it came from Lost City, maybe it came from some district on Earth or maybe on March
or any other planet. The other topic is
going to be weapons, what kind of weapon
he's going to use. That is very important. You can design the
weapon or photo bashing. We're going to see
all that guys. No problem. The other main topic is going to be environment. We got to think from which
environment came our soldier, maybe came from a war zone, where there is already
being wars there. Maybe he came from place where
there is a lot of water, maybe place like a desert. We got to think
about all that guys. These are our main topics. But each one of them is going
to explain it even more. We're going to put
their subtopic. This is what we call subtopic, which came from the main topic. Here we're going to add
subtopic to our time, and we're going to talk
about something specific maybe which time it came our soldier form like
example, the air. Maybe example we put 2060. He came from distant
time in the future. Now we got to put also the
subtopic of the place. Let's see, maybe we call it some kind of a
district or something. I want to put it not
from another planet. I want to put it from Earth. For the place, we're
going to say it came from going to think
it came from Earth. Maybe we add another subtopic. Because as you think this is a robot so it must be
came from the future. You've got to think very well about your character the time, the environment, the
place, the weapon. The idea you have not only
make you build the character, but also could make
you build a whole. It's like a war for a game or a movie or
something like that. I like to do this is very
nice and awesome to do. Now we're going to add also to the whipping subtopic category, maybe we're going to say
machine or something, let's say machine gun. I think this is necessary. I prefer you do this all the time you are working
on a project because this is make you think well about your character
while you are working on it. Environment here we add war because sure he came
from a war zone. Maybe we add another main
topic to our project. We're going to talk
about the clothes. I think the cloth is here
sure is going to be military, we're going to add subtopic. We're going to say military
military and form. So here we have some ideas
how we're going to make our soldier Maybe for the war, I'm going to add
another subtopic. This look kind of similar to sky or terminate or whatever, but no, no, human VS machine
because you know, guys, not so much movie that they
are talking about robots and the human friend and they
fight together something else, liens, maybe or
something like that. But could be a good idea to
make something like that. We have to try always think
of something not so cliche. Here we add to the war. Sure going to have smoke,
maybe destroy buildings. Here we put our idea, but then later we decide
what we're going to do exactly for real understand. When we are working, maybe
we change our visions, maybe we have new ideas, maybe we change the old ideas, we delete some, we put new ones. It's all about your imagination
while you are working. What you want to add, what you want to erase and all that. Here, for the weapon. Maybe I say it's a plasma,
but I don't know. Maybe I let it just a traditional heavy machine
because sometimes when you mix traditional with turistic it gives
something more believable. I don't know. For me, it looks like more realistic, more nice, let's say. Try always guys to
avoid working without having some idea on
draft or something, what you're going to
do because this will be a map for you to know what you're going
to do with your work. Now we're going to
save our work and just end the brainstorm. We can go even more and add more things like to our story
to our soldier character, maybe we add what kind
exactly of military uniform, what kind of a gun, is
going to be all that. We can talk about all that here. We can even say which
character he goes against, but this is not
necessarily anyway because it's going to be only
one picture of a soldier. So I hope was so clear
with these guys. Now we're going
to talk about how to build a photo
delivery for your work, for photo bashing because this is what you're
going to need to add for your character after you do the three D because
this is some kind of a technique we use a lot for sketching so fast concept art. We're going to see
you all about that.
6. Chose The Project Image: Here, guys, we are
in splash.com. Here is a website very nice. You can choose a lot of nice pictures here with
a very good quality. You can even choose
the quality you want and everything
it's free here. You can find all
the category here. We're going to start and buy
searching for a si images. As you see here, guys, there
are a lot of the pictures of soldiers with weapons and you've got to see very
well about the light. Example of pictures
like the ones in the total dark we
can't use because it's very dark and we can't
show anything of our design. So here we need to
search for an image clear and also a nice pos. Example, here many pictures, but none of them, I can see This picture could be nice for our project because it's clear and
the posing is nice. But something more interesting like you see here there are many ones in the dark.
This one can be used. Also, I don't like it's
so small in the dark and this one so I don't like
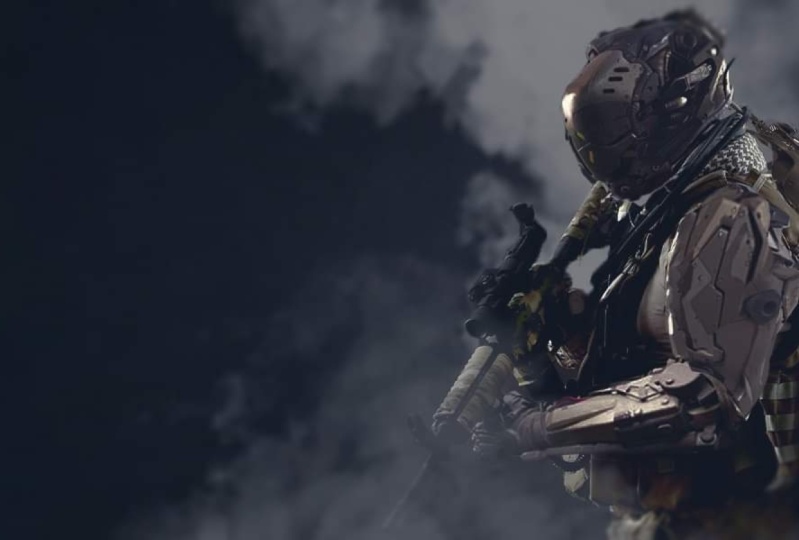
the lightning so much. I'm feeling very
grateful this one, guys. I think this is a
very good picture of what I have in mind. I want to show a soldier
in the battlefield with a gun down and he's
looking to the camera. I'm going to
download this image. Always be careful
when you choose when you choose an image because the lightning is very fort level up to your story and all that. You can search also for
a whipping to use for photo bastion or maybe
use for your character. This is a simple approach, guys. You can search for an image and then you block
on that image. You can make your
three D character, and then you choose some
stuff and photobon over it. There are two kind way
of working here, guys. In our work, we're
going to choose the simplest way of
blocking one or two images. We need to sketch so fast to deliver very nice concept art. You can have some ideas
about where it could go. We keep on and mix glass. I.
7. Build Image Library: As you see guys here, we are on pinarrest because we need to
search for image to build our library for photo
bashing, our concept art. As you see here, we
have engine pictures. Because as we are working, but we need to see
mechanical stuff, we can search for the engine
of the cars of the bikes. There is a lot of things
here you can find and save and start building
your library image. As you see here, also, we have the Ben we
just save the picture. Then we put all in the folder
and we make it example. This is for the
robot photo basin. We make things for
creature photobi. It's all the same
techniques, guys. Well, some kind of a different in organic and hard surface. Today, we're going to
learn about hard surface. We've got to search for
the mechanical stuff, like we see here
a lot of things. We can search in the rockets, we can search in the
category of cars, bikes, search
industrial mechanical, a lot of things you can You can search also about
specific things like apart. Like you see here, we have many form and many image
and you can use this, for example, the neck area. You can use this
in the hand area. This is for me look like the
van in human anatomy like the big vans of the
neck where we'll be able to turn
and move smoothly. Also, we can search for
the military clothes. Search for a jacket
example, for bullet proof. Many, many other things. You can use them
as in your work, like the fabrics, and
many other things. Well, here, guys, we are
talking about the military, but when you are building
your image library, you've got also to collect
all the images you found on your way because you may use them in your artwork. If not, military, it's
going to be another thing could be much all the images you have already
in your library. Search also for
military uniform, where you can find the jackets, you can find trousers, you can find the pants, you can find bulletproof, fabrics, pockets, everything you can use
in your work, guys. As I told you before you
can search on Pinterest, but also you can
search in Google, you can search for
other websites for free pictures like Nsplsh. I'm going to show you here. I put military pants
to show you search. You can search for general
things or specific things. Guys, if you know some
names in the mechanical also stuff you can search
by the name, guys, like you search for cables, like you search for crews, everything you can use
in our bodic character or anything in the
hard surface category. Okay. Image is not a problem. You can search it
everywhere you want and just go to know what you're going to search for
use in your artwork. Try always guys to build
your image libery according to your style and not to
any other artists style. That's make you more
authentic with your photobi. I hope this was clear. Now we're going to search for the image. We're
going to work on.
8. Analyse The Image Lights: Before I start
working in my design, I want to take a look on my image and try
to break it down the light and also I
have some ideas where I'm going to go with my work with my blocking
and rendering guys. As you see here we
are in photoshop. We're just going to put the
layer of the photo here. Then we're going to break
down the light of the image. First of all, I want
to add empty layer. Then I will choose a brush Here my favorite one
is the square bruh. Choose a small size. First, before we start, guys, I need to know a lot about my picture, study
it a little bit. I know even where I'm going
to go with my design example. Maybe the colors,
maybe the posing. I'm going to see the
direction of the lights. I'm going to try to break
it down here as you see, the direction of the light, where I'm putting
these white arrows. As you see there are
different shape of lights. Here, we have some
areas has light, some are soft light, some area has a darkness. We got to know all about
that before we start. I mean, you got
to know very well about the light to
do good quality art. This part of his half head, it's a soft light. Here, there is a soft light. I can tell from this that
the environment either in the blue time in the blue light time or the
sky is covered by the cloud. But from where I can see here there is kind blue
color in the image, so I can tell this is in
the blue time of the day. Here I see on the gun, there is a bluish color also
on the clothes. You've got to always
analyze the colors and the light very well
in your images, guys. Try always to analyze it
very well before you start. That's going to help
you to make it more realistic when you're
working on the render. See all this area I'm putting
in the yellow dark area. This is so logic
because these things blocking the light where his
hand here, where is the gun. The light in this
area can access. We're going to have some
dark areas in the image. It's important to have three different kind of
light in the image, guys. You've got to have the gray, the black and the white because that's make the
picture more three D, not only flat pictures. Always try to make your work. Three color got to
have your design, always that give more
realism to your artwork. Avoid doing flat things. You can study more
about the light, you can search on the Internet. You can do a lot of research. You can see some
examples how light cast on object in the real life or even on character in a different light environment or a different time of the day. Try to practice that
and see well about the lightning because lightning is the health of the art for me. Now we're going to start our
blocking procedure guide.
9. Learn About Zbrush Tools: Hello, guys. We are in the brush. We're going to take a look
about some of the tools we're going to need to use
during our work. I'm going to be working also
in a little bit of speed because it's going
to take a lot of time to make it in
the same time frame. Here as you see, I hope
you know about the brush. But anyway, even
if you don't know, I'm going to show
you the tools we're going to need to
use in our work. As you see here, I
have these brushes. You're going to know
each brush we're going to use when we
are working anyway, but here, I'm going to show
you what you're going to do. One of the important tools I use while I'm working is the mask. There is the mask lasso
and there is the mask pen. When you click on the lasso, you click command
and then you draw. The resolution here is very low, so I need to hire a little bit. I'm going to go to dynamic
geometry dynamic here. I'm just going to hire the
resolution little bit. As you see here,
the resolution 872. Now the resolution
make my draw clear. I'm going to draw
just two lines. No, I'm going to use something I used a lot in my work,
which called extract. This is you find it in the
sub Tool at the bottom. I'm going to choose
some thickness. Example, 0.006, and
then I click Extract. Then I click Accept. You click accept only guys when you see you get the
result you want. Not you click in higher
or lower the thickness. I'm going to higher
the resolution here, the dynamis before I do that, I'm going to show
you something I use a lot also which
called panel loop. I'm going to make it zero zero
the pervle and the polish, the loops one, and
I'm going to put also the thickness for something
very low like 0.0 0/4. Okay. So as you see here, I think I like the
stickness is not so much. Now I can go and put some
resolution numbers and dynamic. Okay. Okay. As we are working with symmetry, I'm going to click on x
to close the symmetry, and then with command and art, I'm going to choose only one
and the other is going to be dens then I go to modify
topology and I click Delete. This is the way I can
work only on one piece. I don't want to
work on two pieces together because sometimes
make some artifact. As you see here, I'm using click curve to make
some cut shapes. This is very nice brush guys. We use it a lot to cut some
shapes, very straight. So I'm going to show
the result here. Now, we go to click on command on the space
to make the mask disappear. Now I'm going to go
to modified topology, go to mirror and then and
then I mirror my object. Now, I'm going to use
another technique. So I'm going to get the half
of the seper here with mask. Then I'm going to go to split. And he click split
and Musket Point. Don't worry, guys, even
if you don't understand very well about it right
now during our work, you're going to understand more. You're going to talk a lot more about the technique we're
using and the tools. Here, I'm just going to
give you some idea to know what tools we're
going to use exactly. As you see here, I have
now separated pieces. When you click on the eye, you can hide and hide. This is the two pieces. Now we're going to
use something called EMM brush with
something I use also, I use the geometry here. This is the one that
has primitive geometry like cube or cylinder or Spa. I use also lot in my
work example here. When I click on the
right and drag, I'm going to have a cube there. I'm going to click
on the air with the command two times
make union operation. As you see here, make the cylinder and
the cube one piece. This is in three D, you
call it union operation. Now I'm going to hold out and do the same drag and make square. As you see here, the
square is not so clear, so I need to go to display properties and I'm going
to make it double. Let click double here, all the square is
going to appear. Now, I do the same two times. At this time, I made a
substract operation guys. This is a technique, I use it a lot to substract
some shapes in my object. This is also you can use it
in the Bollin operation, which called substract If you work with three D software before you know what
I'm talking about. We have boluin here
also in Zbrush. I don't use it a lot
because I like to use these two methods
more fast for me. Now, I'm going to show
you something else we're going to use called Alpha. We're going to choose
a brush called layer. Then we should change
the alpha of the brush. If you have some alpha, you can use them or you can use the ones you have
here in Zbrush already. When you work on with Z brush, we're going to start collecting your own alpha or you do
them alone because there is a course how you make
your own alpha also to use them in hard surface or organic or whatever you like. I'm going to click Import and I'll bring some
of my alpha here. Search for the folder
is the folder. Here I have many
alpha I work with. I'm going to put the Alpha
we're going to use in this project for you in the class material
source material, so you can use them and you can follow well along this class. Let's example choose
one of these. I'm going to choose
this one accent. Okay. As you see here,
I have the shape. It's all the alpha are
in black and white guy. White means one and
black means zero. When you drag the alpha
over your object, the black area is going
to be substracted and the white area is
going to be added. As you see here exactly. Now when I click Alt, the shape is going to be more
substrated in my object. You can mix a lot between D
and substract, you hold out. It's up to your imagination
and your ideas. Brush, you can
create them by your own or you can purchase them. You have some pieces of hard surface objects
or even organic also. Also, you can have
pieces like screw, some engine pieces, whatever use in the
hard surface work. With the practice guys, I advise you always to
build your own EMM brushes. Make hard surface pieces
in any three D software. Then you create it as EMM brush and you use it in
your project in the brush. That's cut you more time and make your
workflow more fast. Example, if we need to add
some screws to our project, we're going to use brush here just a drug and you
place them wherever you want. Sure. Everything you add, it should be explainable, guys. You don't put it in the air. If you have a panel,
show the panel, you got to have some
screws in the corners. Okay. Okay, there it is, guys. Most of the tool we're going
to use in our project. Now we're going to start
working on our robots. Okay.
10. Avoid Hard Surface Mistakes: Hello guys. So before we start
to blacken it on, you form something
so you need to avoid why is cotton or
other enhancers? Although it's not a
program while working in concept art for the
washing technique, because you can fix
all in Photoshop, but it's a good habit to do
two things very correctly. First, the edges. Be always careful from the Blumberg edges
in hard surface. Always the edges should
be sharp and straight. We are working with
mechanical things. Always remember that. Also be careful of the defects in the
corner of your model. In modeling for
production example, you got to do the topology
from the beginning in any 3D software Blender,
Maya, or wherever. But in concept art
technique we will do, we can pass with them. Surface different. When
you Scott or a model, you should be careful
about your surface. Straight and no bumpiness because the eye can
see are released. But in rendering window light
scattered on the surface, it will show all the
defects very clean and your surface over should
be smooth and straight. I will show you how to do that.
11. Prepare Robot Head And Arms: Hello, guys. Now we're going to start
working on our project. We open Z brush and we open the light box here
and search for the two. Here we have this guy. This is a mesh for my work. If you have your own base mesh, you can also use them. You can purchase these ones to use them for any project
you're working on. Here we're going to use
the one of Z brush. First thing I'm
going to do is go to layers because this base
mesh here has many layers. I'm going to change the
opening of of the arms. Now, with the mask tool, I'm going to start
cutting some shapes. I'm going to cut the
head. Before you do this, you're going to click
back all the layers. Now you can click and
split mask point. Now you have only
the head alone. Now we're going to go to resolution and going
to dynam head. I'm going to give it more
resolution to work with. I'm going to click
active point here and we have add more resolution. Always keep an eye on the active point on
and the total point. We want to see how
much polygon and more can eat because I
don't want to reach millions of polygon
that's going to be so heavy for the
program to work. Now I'm going to cut hand in the chest split
and musket point. You find it in the S two. Dy mesh again. You go to the geometry. You click here it dynam find dynamic guys ways
you'll find it there. I'm using a pop up menu. That's why I mean I don't go to the sub Tool or the
geometry there, but you know exactly
where you find them. Here with a mask pen, I'm going to try
to mask the hands. I want to see very
well here. Okay. After you mask the hand. You're going to click again,
split and Musket point. Remember, split
and Musket point, you find it in sub
Tool under split. Then you dine mesh. You mesh so the chest. Anyway, I'm not going
to use the chest, so it's not necessary. I'm going to cut and
then I see maybe I use, but let's see the thing
I need here in my work is the hand going to need the hand and I'm
going to need the head. That's the only thing I'm
going to show my image. Now with the clip curve,
I'm trying to cut some pieces of the head there. We are sculpting actor guys. This is what we are doing,
but just a digital, not like the traditional ones. If we're working with tradition, we're doing some
knifes and stuff, but this is more fast and
easy because this is digital. Now with the clap build, I'm trying to add some shapes. I'm going to add some
shapes here and there. The I'm just trying to give it another shape, understand instead
of a human head. I'm going to try to
make it different form. That's why I and
then I smooth when you hold shift guys
and d over you smooth, as you see here, is
smooth in my object, and then I add smooth d Now I'm going to use this brush which
is called H polish. This bruh, we use it a
lot in surface work. I'm going to make it more flat, but also it look more hard
surface look as you see here. I'm trying to make the
head more robotic. I put that in the
face from the front, I shapes, then I
subtract some shapes. Here I'm using the
clay build up again. I'm trying to change
some stuff as you see. Now, I smooth smooth smooth. We're going to use now the
clip curve to cut some pieces. First, I want to use the move to change the form of the head, S with the move you
drag No problem, guys, if you do
mistakes or whatever. I mean, come back again
and change what you did. Instead of, as you see there, we have the small lines.
That's the history. We back one step or two
or whatever you want. We can even start from the
beginning. No problem. If you see yourself, you are
going, very wrong direction. Here, I cut pieces front of
the face to make kind of a geometric I see
some smooth thing. This is just the rough blocking as the beginning
blocking the head. That's it, we prepared our head, and we are ready to keep on.
12. Sculpting The Robot Head: She goes, we're going to
start to block in our head. Now, as you see, there are some different
things. A little bit here. Just use the clip curve
to cut little bit from the chain and a card
also from the neck. Just make it I'm gonna show
you exactly what I did. I made like this here and then also iconic here to make it
look more geometrical. Don't worry about my zipper. Note look differently. We are wondering why my
ZBrush look different, but it's just I like to
change the interface and the style to be more
comfortable for me to work. Now as you see,
this is how a cat, but we just got a little bit like I did at
the beginning here, guys. Okay, I just saw
now we're going to start baking panels and cut up to you and
your imagination. I'm just showing you the tools and I will show
you the workflow, but you can do the same
project and doing, or even you start work
on your own project. I advice you to work
on your own project because that's teach you more
how do the same work flow? So here I go to the
stroke and I change the lazy mouse 95 and
the steps also to seven. That way I can draw a straight line without
any problem if you hold Shift in photoshop when you are drawing
a straight line. Okay, here, I'm trying to
make a panel on the head. This is the idea of
getting my mind well, I'm just working guys, I'm just Colton and working in I see
where he is gonna go. Now. I'm going to use the mask tool to cut
this panel. Okay? I want to have weak
panel on the head here. So I'm going to move the mask, ban, draw the mask here. And draw with holding command
and altogether, okay. With command you draw without
anchorman, do Andhra. Okay, So I make some mistake while it's
good to have the history. So you can back, I click now split a musket point and I
have two different pieces. They see the head now a clue
because I cut the shape. No, the clip curve, I'm going to cut this part. C. Now. We're going to need to
DynaMesh these, say, I give it some lotion, like maybe 1200, and
then I'll DynaMesh here. Now. When you DynaMesh it close all the holes
you have, right? Okay. So here I'm going to try
to clean it with a curve. I'm going to follow
the, the edges here to make them look more straight. Made a mistake. When
it doesn't work, they could curve for you guys. You just changed the direction and stayed from the bottom. You go from the start, from the app. Now, it worked. Now as you see here,
now it's clean. I'm going to choose
the H polish. Want to try to clean it a
little bit, make it flat. Okay. So that's it. We flatten the surface. Autosave is always well, it's annoying little
bit autosave guys, but sometimes help you on
that because if it crashed, we're going to start
from the beginning. But as you have the autosave, you're gonna access to a project where you start to
run the auto, say. So I don't prefer to close it. Okay guys, because
saved me many times. Now I want to try
to clean the panel. So I'm going to go to geometry
and to the panel loop. While loop. The Polish and the bevel put
them always in 0, and then I choose some
thickness number 0.40. I think I'm going
to let this okay. The parents should not be
more thicker than this. Now, I want to clean it. So I'm going to use our
usual the curve click. I want to reshape or
the clip curve guys, two times on our n
is going to make you follow the
shape of the panel. Okay, now I want to DynaMesh this little bit. Now I'm going to need
some rose lotion. Okay, great. What I need to clean it
from the front to play. So first, before I
start to clean it, I'm going to shut the
symmetry by clicking on x and then Command and Shift. I'm going to choose these. Indiana, the hearing. I have only the half of the pen. Now I can walk without problem. Because if I let the symmetry
or let all the panel is gonna make me so much defect
is going to mirror the same, undo it on the other side. Effect guy as well. This is the way to solve
that problem. Like this. I cut only the half and
then mirror it late. I hope everything
is clear by now guys anymore understanding
this workflow, It's not complicated,
it's very easy. I'm not using so much the sophisticated
things here are tools to fix the verge, remove brush. I'm going to put it in small
numbers and try to reshape. See, now look better. I go to the sub tool
and I show the head. Now I'm going to try
to mirror the panel. Go to mirror world. Well, we'll have
some problem here. We have this opening
in the head. I'm going to DynaMesh
see how much is going to close with
11 at the animation, then I can show you
how to fix that. Okay, I think I'll close it, steal a little bit, open up the bone and we're going to fix it
later. No problem. Hey, now with a smooth I'm
trying to smooth the surface. Now with the Damian standard. Put it on a lazy mouse. I'm going to draw some panel. Okay, let's see here. Each artist has his
own technique, guys, this is the technical use most of the time when I'm trying to try to work on 3D photo
question technique. And I use this technique when I tried to blow
up only one picture, two different style you can, you can do and not
working in ZBrush, this is one of the easiest
workflow you can use. There are different
ways of approaching your project when you
are working in gaming. In this tree, you can
make sketching by just walk in this workflow for use for the
washing technique, dry painting, a bit
of a 3D in ZBrush. But if you want to work in ready production design got our different
workflow doing that. But to extract piece-by-piece, you walk and then you
go to merge them. Then you need to take to another 3D software to
work on the topology. And you got to read
the pathology, all the product
from the beginning. Then also you need to work on the uv maps because you're going to read it and
you're going to animate it. So you need to have
clean topology guys. This is for concept. We can go along with
this. No problem. I mean, you can bark,
doesn't decimate. I'm going to show you
how to disseminate object and all that. I'm going to explain you
everything very well, guys. Okay. So here as you see,
we are still cut and some panels would have
Damien standard brush on. Most fast and easy
way of working guy. There are other way of
working on your visit. Each each piece alone, even the schools and all that. You're going to have many, many, many, many sub tools. Then each store you're
gonna give it a material. But what we do on here is the easiest workflow
to make a concept art. You guys. So bear with me, I'm follow
the workflow very well. So as you see here, I'm
going to mask the neck because I wanted to put it
on a different sub two. In this field guides,
you got to be always fast or
working okay guys, because there's a lot of pressure and there is
time and time cost money. And you've got always to
find the easiest workflow for you to do the job
asking you to do. Okay? So here I'm showing you the fastest way of
making a concept art. This is we call 3D photo
bashing technique. See here with the mask path
and I'm going to mask, this time, I'm going to mask the jaw here because I
wanted them separate. And C, Thus the opening and the head, we're
going to fix it later. No problem. Go to the sub two and
split unmask. Dynamesh. Okay? You see here now we
have it separated. Now. I won't also DynaMesh this
part because we split part. You let it open. Okay? So you need to
DynaMesh to close. Now with a curve. I'm trying to fix the shape. As I told you guys
to follow the edges, you need to click
double times on the Alt to make you a corner and then you
follow the edges. I'm going to use the
move tool to pull the shape here, close the gap. I'm going to go to the
move tool as you see, when you are doing
this workflow guys is not a problem that
there are some things not perfect because later you're going to paint on
Photoshop guys, okay, so you fix everything. You need the try to avoid, make much mistakes when
you are working here because now we are supposedly
working fast workflow. The client asked us
supposedly to make one image concept
art and we need to deliver it in few hours. Here is the easiest way and the fastest and give you
very good results. You're going to see
what I'm talking about. Okay? So here I'm shaking the head. Now I need to fix these. Maybe I Paul little
bit with the brush. As you see when you
click on X guys, you make symmetry open. When you click X
again, it close. See, now I'm working
with the same. Now with Command and click in
the space to make DynaMesh. You should put it on Word
DynaMesh, first guys, then you're going to
click every time you want in the space and
it's going to DynaMesh. I'm going to use MM
brush to close the gap. I'm going to add object
right here to close this. Autosave again. When I click on Command
and drag the arrow, I'm just making a duplicate. Okay. That's how you
duplicate the DynaMesh. And then with the clip curve, I cut the shape. They use the smooth brush. Here. I'm going to cut this out. So when you click on
Alt one time guys, it makes you rounded edge. When you click double times, it makes you a sharp corner. Okay? Remember that always, and this is how you use
the clip curve. Okay? So now I'm trying to clean this roommate at
closing the gap. So the Move tool. Now with the H Polish, I'm trying to flatten
the head flattened also, these parts here need to make it look more
of a hard surface. So that's why we use the
clip curve a lot to cut some sharp edges. You see? I'm trying to flatten
the H polish. I think he, this workflow
is not complicated guys and you can follow and
understand it very well. If you don't understand, always stop the video and see it again and
work in the same time. Use the tools in the same times. So that way a new practice, more of the tools and you understand how to
work with them. I prefer your work on your own design guys
combine video by video, you'll follow all I do and you apply it on your own project. Okay? This way you're
going to learn more faster. See, I'm
going to cut it. Got here some panels. This is the primary
shaped Wordsworth later maybe even I can
change everything. I can go another direction. I don't know, I'm just
seeing what this is going to give me and I'm looking
also for the happy accidents. Happy accident always happen. Maybe you are cut in
some shape and it gives you another shape
more interesting, okay, just be open for everything, but try to not see it. We're going to keep
on in the next one. And the next one, we're going to try to add some kickback pieces
for our head. Okay, I will show you
all in the next one.
13. Work With Kitbash: Hello again, guys. Now we're going to add some
kit bash pieces to our head. As you see here, I
have some pieces. I already cloaded. This is my own liy. As I told you you can
build your own livery, or you can purchase the brush. I have a big livery
as you see here. I'm going to put you the
pieces we're going to use for our head so you can
follow the course, y? So as you see here, I'm searching for a piece. I want to put it in this side, this gap here to
look like engine. So I'm going to
put this one here. As you see, I'm adding this piece as an
engine for the head, and I'm going to put it
inside the gap right here. I'm using the move
tool to place it. You know already
how to add pieces. You just click on the piece
you want to add and you just a drug where you're going to place it
in your object. Now as you see, I'm
trying to place it. Well, I'm just trying to
place it, rotate, and move. This is what came
to my mind to do, guys, but you can
go different ways. You can do other things. But this is what I'm thinking to do to the
head I'm working on. Now, I will try to
add more pieces. The best thing when you work in robotic design guys is
always to have keep bash. You go do first bash pieces, you make them in any
other three D software, you prepare them,
and then you work with them in your brush project. Because if you're going to
do these pieces right now, it's going to take
a lot of time guys, you've got to make delivery use it most of the
time in your work, like example, screws, Sure. You can make many
screws and then you can use them in each project. First of all, I need to
split and Musket point to make this piece I head
in a different sub. I don't want them to
be merged already. I want it to be each one of
them in a different sbt. Each time you drag a piece, you can click on split and
MasketPoint and that way, you have each piece alone. If not, it's going to be
already merged with the head. As you see, I'm going to
place these two pistols. I want to put them on the sides inside sure I'm trying
to zoom in here. Okay. So example here I'm putting
the piston always make the head function the work like article for any robotic
design guys, Okay? Always prepare your livery or your purchases,
it's up to you guys. There are many artists they
sell their own livery, you can purchase from them, or you build your own. It's up to you. It's your design,
guys, do as you want. I mean, add any pieces you won't see what goes well with your
design and then add it. But I prefer everything you
add more justified, guys. It doesn't look
just put it there, should look more justified
it belonged to the design, not just add it wherever. It's more better if
it has something with a functional in the design. Okay. The piston you find
them everywhere in any robotic design or
hard surfed design, they are so important for the
functional of the design. Now I'm going to add these
two cylinder right here. I want to add the
bottom of the head. I thought this is will
add more to the design. That's why I put them on the bottom because
I wanted to look more like kind of animal and at the same time, also humanoid. So these pieces give
it like ears for me, animal ears or
something like that, but it's nice for
design, I think. The design is up to
you, it's your own, as you want, guys, you can add whatever you like
for your design. You can add any pieces you want. Okay. Each artist do on the robots, always has his own ideas about how the
robots should look. I don't want to give the robot defined eyes because they
don't look so much robotic. For me, they look like
a cartoon when you add to them some
yes or something. If you're normally
in the real life, robots work with the sensors. They don't work with yes. Most of them, they work
with the sensors or small lenses or pieces before you find them
maybe in the head, you find them in the
front face, wherever. Now, here, I'm adding more
pistons for the neck. I want to add two in the
front and two in the back. This is for the functionality
of the head where you help the head to
turn and to move, okay? So I'm trying to
place them very well. Now, I want to add
also some cables. So I want to add some
lables right here. First of all, I
always told you guys, you need to separate keep bash pieces each one,
you put them alone. I'm going to add these
two cables in front. Sure. Is robotic
design should have cable small cables
and be cables. Either they're going
to be obvious to the one who see or they're
going to be from inside. It's up to you how you want
to show in your design. But this is make
it more robotic. When you add the pistons, the cables, each pieces
they add to the design. They don't mess
the design, guys. I don't want to add more
bash pieces to my design. I'm trying to add the
less I can, guys. Now here in the
front of the jaw, I want to add this piece. Well, this is look nice
to put it this way, but anyway, I think I'm
going to place it other way. I like how I add it. I'm going to split and
then I'm going to try to see what I'm going
to do, I think. I'm going to cut a
little bit of it. This time with the
command and shift, I cut some piece and the piece didn't cut
because it's hidden guy. I need to delete if I see, this is what I want, I can go and delete iden. If not, I let it and then I can bring it
back whenever I want. When I click in the space, command and shift again and
appear that green square. Right now, I'm going
to delete the hidden. Delete hidden, you find it in geometry, modified
topology, guys. Still not so clear, but later we do advance
of the design guys, you're going to see where
we are going exactly. Okay? This is enough bon, I think for the design. I
don't want to add more. I don't want to add
more complicated things to my design because
already we're going to do photo in
photoshop. So we keep on.
14. Extract The Robot Head Pieces: Welcome again, guys. Now we're going to keep
on working after we put some bash
pieces to our head. Now we're going to keep
on blocking the shape. I'm going to use the
demon standard here. I'm going to choose the
lazy mouse radius to 59 and the lazy
steps here to seven. I use the lazy mouse or
loud guys because it makes you straight shapes as
you see right here. You can make the
cuts of the panel big or small up to you guys. When you're working on
your design, you decide. The symmetry was off right here, but I just click
mirror and wheel is going to mirror what you did in the side to the other side. Now, I'm going to
use the mask tool. Try to extract
some pieces, okay? I'm going to draw the
shape of the mask I want. Now, I got to undo some
also stuff right here. I see this is this
part right here. This piece, I want to extract
it to be a different piece. So I'm going to draw very
well, see the shape. I think I'm going
to use split and Musket point instead
of extract that. Then I'm going to dye. This piece I extracted
to be a different piece. Now this part also need to dye to make it because
it has a gap open, so Okay right here, I'm going to ext this piece. You know, I'm going to
kick and split must part. I don't like to split this. I'm going to extract
this piece, guys, okay? So I'm going to back
in the history, and then I'm going
to go to extract. Extract. As I told you, you find it in the
sub in the bar. You choose the thickness you want and then
you click Accept. Now I have this piece
on a different sub To. Okay, so I'm going to clean
it now with the clip curve. Make the edges very
clean and straight. Okay. Clean right here. Okay. Okay. Going to clean this part. I keep working with the symmetry guys if you want you can also work on only one side and
then you mirror. So we're going to keep on
cleaning the piece right here, guys, with the clip curve. Then you can add also some resolution with
dynam if you want. You can add some resolution with dynam straighten the jaw, I'm going to see how it looks. Yes, it's more cleaner. For me, guys, when
you do a robots, it should always
have some kind of a little gaps between the
design because it's a robot, it's not organic, it's not
human, it's not a creature. I mean, it always
it's made of panels, it's made of pieces, so it should be a little bit
of gaps in the design, okay? Okay. So right here, I'm going to clean
with the H polish. I'm going to flatten it. Okay. Flatten this part right here. Guys, when you click out and
you draw with the H polis. You make shapes. It makes
you add flatten shapes. I don't know, maybe circles, maybe squares.
It's how you draw. Right here, example, I made these two circles in
the end of the jaw. You see later, what we're
going to add there, maybe. So I keep adding some panels. Now, the move tool, I want to
put it in the exact shape. This is to fix. Guys right here. Polish. With the alta as I told you, you can make shapes there. H pulse is a great brush guys
to work in hard surface. I think is the most
important brush. With the clip curve and
some other demi standard, you can make nice
design surface designs. Here is little part, and then with a move tool
to pull some shape there. Okay. See the design, I
keep rotate around the design to see how it looks and then see if I can change if I'm going to
change or let it the same. Now here's going to draw the
mask to some other shape, and then I'm going to
try to extract it. Okay. Okay. Maybe it's going to be a
piece of a metal right here because when you
are working guys, you should always think
about the materials, about the functionality, maybe about where it's going to be where you're going
to have some scratches, where you're going
to have some dirt maybe where the plastic
is going to be, where the metal, you may think also about
the colors you're going to use for your pieces. Now here, I draw a little
bit of mask and I'm going to pull some shapes. I'm
going to do this. We move to I'm going to pull some shapes. I keep clicking
on the lock guys. I do when you click
on it to open, you can fix the move
tool direction. Then when you click again
again, you close it. Lock and unlock when you want to fix the move to direction. Now I'm going to use a
clip to to fix shape. Okay. I'm going to take now this piece solo because I can't
fix it very well alone. I'm going to add some dynamic
resolution to the piece. Then going to try to use the clip curve to fix
it right here. Okay. Be careful when you use the clip curve guys
because you don't want to cut more than you
should cut from your piece. A try to use it
very carefully now. You just cut, use the smooth to dynamis and smooth dynamis and smooth
to fix the shape. As you see here, I'm
trying to cut more. I think I cut more
than I should cut, but let's see when I
see it on the design. I'm going to make mistakes. With the move tool now, I'm going to try to fix
the shape more. Okay. I use the move tool to some shapes and see how
is going to give me. This is also some of
the technique I use. Then with the clip curve, I make it look more
straight and sharp. Because this is very important. When you work in work guys, you need to work with the
tools you are comfortable with because that doesn't
make you problems, focus on how to use the tools. You need to focus on
how to make the design. Matter what tools you are using. Because the important for us is the design, not the tools. You don't need to search for some sophisticated
tools to use and not necessary if it's going to give you the
same results, guys. You just use the thing you are comfortable
of working with.
15. Design The Screw Holes: Guys, we keep on
with our design. Here we'll reach up to
now, some panels cut, we extracted some pieces, we add some keep bash, we make the head panel up. Now, maybe we're going to add some I'm thinking now of
adding a little bit of more pieces to my head because I can't example
cylindrical shapes. I should put some
circular shapes right here to see like there is a
hole where they are inserted. To make it look like
I have a hole there, I'm going to add some
cylindrical shape. Then I'm going to
cylindrical circle here. Maybe I'm going to choose
this one more nice. I'm going to add it here. Yes, I think this
is much better. I let the symmetrical
here work in and then try to pieces. Try to add them very correctly. So As you see guys
in a few times, we already blocked some head. Even with this, I
can stop right here and I render and then
I start photobon but I prefer I add
details as much as I can also I think of the
photobon I'm going to add more of the photobon
it's up to you. You can stay adding details
and work and on your design. We can even work all
the day on the design, guys and we add more details
and more layers of details. But I prefer to do the half
work here and the half in the photobon So I add how detail here is
and how in the photoga. I don't want to go further. If not, we're going to take
a lot of time doing this. Now I'm going to go
and split a mask point to add these pieces
on different sub too. Now I want to work
on the neck also because I know it has
different colors. I want to make only one color. With Command W, I make
it only one color. Because it was different groups. The neck was in a
different groups, and it means you can cut
it in a different pieces. But I want it only
in one group guys. That's why I click Command
W and put it on one color, which is one group. Colors in brush define the groups you have
in your object, guys. I hope you are
familiar with this. Now I cut the neck in
the sides and I made it more hard surface look because before it would
look more like organic. As you see, I'm going to cut even this because
I don't need it. As you remember, our picture
guys, we just need the head. We don't need shoulders and more than that because the head, we're going to add
it to our image. You're going to
see later when we are working already, guys? Try working on. You don't concept art guys always try to adapt your workflow
to the time you have. If I have more time, maybe I approach the design other ways. Maybe I started from the scratch instead of using the
photo barge technique. But it's up to you guys, how are comfortable
approaching your project guys? How much time you have
to work on that project? Because in the
industry in general, they always rush
you to do the work. They always want you to block some things and then
you see with them. Then you keep on
if they give you the ok to keep on the same way, you keep on if not, you
change even the design. You don't finish the design all and then you talk
with the client. You just make some
rough sketches, example, and then
you show for them. Then maybe you
block something so fast and then you show and
then you discuss with them. Now, as you see here,
I'm going trying to add some more bash
pieces. A few things. I'm not trying to
go so much here. But this is cut me a
lot of time, guys. I make me win time and
blow some designs so fast. As you see, I add a little
bit tunnel on the neck here. Maybe because these panels maybe have some
little cables under some kind of motor or something there
for the neck to work. So I'm going to draw the lazy mouse the
same we did before with Damian stander and trying to add some panel cuts here. I'm going to do straight
line here. Draw here also. Then I'm going to use add
cuts on the neck right here. As you see here, we are
working on the neck guys and at the same time we
are working on the neck. We're trying to add some cuts, and then maybe we change. We try to add some details to our neck to
look more robotic. I'm going to draw the
lines more deeper. Shape here. Sometimes I draw things
here and some details, and maybe when I work in photo bashing I'm going to
change those details. Maybe I led those detail
and do another thing, guys. Guys, as I told you, I
had some details here, but when I work on design and using the photo
bash technique, for me, it's like you work
on a movie and then the director shoot many
things and maybe then in the montage is going to cut
lot of scenes in the movies and try to go another direction because as they say in
the film and history, The editing is the
second script. As we do with the design here, maybe I do some details
here in the Zbrush, but then when I go to the photobhon technique
and photoshop, maybe I change some details, I edit in ZBrush and spent
many time working on that. When I work with photoahion
maybe I change it to something else
come to my mind when I'm working in photoshop. What we're going to do here
is not necessarily what is going to be the last
thing we are doing. Well, not necessarily. I work so much on the
back and the side of the neck and the back
of the neck guys because as you saw in our image, the face is going to be a
little bit of the profile, but the front is the most important is going to look
in the picture, guys? Because we're not going to
block many images here, we're going to do one image. So I'm going to draw
some panels here. Then I clean them. No problem. I just a draw and then I clean while I'm working or
even on photoshop. Try to be more cleaner when you are working
in the brush because photoshop is going
to make you win more time working on photo bushing then
working on refining. I already have
some ideas come to my mind details to add to
my design right now, guys, but I'm not going to add a lot of details in Zbrush
because this is just a sketching and I'm
going to take more time to go to work on the small
details in Zbrush. Here I'm going to do the
most important details, and then in so I add the rest. Necessary because I'm not
going to show the back anyway, but I just add some details
on the back anyway. So as you see here. Keep turn it and see
what we got up to now. Sure still some works here. I want to add also
details to the panel. So I'm going to see how to do that later, what
I'm going to add. I'm going to go to the layer. And then I'm going to put
some screw alpha and then I want to add some screws
to the panel, Okay? I Here, I need to add more resolution to my design to add
the schools guys. I'm going to see what
I'm going to do. First, I'm going
to use this maybe. The intensity. I add more. Yes, this is better. I'm going to add holes
for scores there. I uploaded the scalp and decided to go
other direction, guys. You always think what goes
better with your design. Here I added some hole
for the screw Okay. I'm going to keep
adding some holes for right there right here. If you want to add some
screws alpha guys, you can just divide or
higher the resolution, and then you can add that. No problem. I don't want to
add so much here because I don't think it should make a so many screws in the design. I add there. You can use alpha to
add screws, but for me, I'm going to add the
holes and then add the screws as the M broach guy. I'm going to add out
on the jaw right here. Okay. I think I should add in at the top also of the panel. Add there. I should
on there also. That's it. Now, we're going to keep on in the
next class glass, y?
16. Design The Head Panels: So here, guys, after we add
some holes for the screws. Now we're going
to keep on adding more details to our head, okay? I want to add more details to
the big panel of the head. I'm going to search what
I'm going to do there. As you see here, the design, it's already started
looking a little bit. Now I'm going to
use the alpha to add some details to the
big panel of the head. In this alpha shape, I have it in my library, and I'm going to try
to use but before. I want to change
it a little bit. I'm going to draw the
mask to some shape. I make straight line. When you use the mask guys
and then you add the Alpha, it can give you a
different shape. That's what I'm trying to do. Also, I want to mask the back because I don't
want to surpass that area. Now I'm going to try to
add the alpha shape, before I want also to
some of the mask here. The mask is not straight, so I need to fix that. I'm going to fix that. Now it's better. I want to add another shape square like this example guard. Okay. Now, I had the shape. As you see guys, the shape. I think it's nice. It gives
it more personality for me, I had the shape also over the
first shape, but this time, I hold up to make some
obstruction inside of the shape. Now I will dine in mesh. Now I'm going to try to clean shape of the
head a little bit. So you see the shape we
add it right now look a little bit messy and the edges, and I need to clean it with
maybe the smooth brush. Pull shift and then you draw. W shift We're going to use V H polish
to fix the shape. There was a mistake
from the masking guys, you always be careful
when you drop the mask. Do not let unmasked. Example, guys, I can add some mechanical piece in the head over. It's
up to you guys. Just think well of
what you are design, if you want to add
more details there. I think for me, it's not
necessary because I'm making one image and I'm showing
only one part of the head. It's not going to show what
is inside the head from up. I'm going to try to flatten
also the shape right here. To fix. Be careful, even when
you're using also the H polish guys because it could
make a mess like this. Then you need to fix the shape. I'm trying to keep on shape
and fix on the shape. Okay. He made so I got to fix it again
because I'm not seeing well. I got to fix it from the up also. Okay. It's not necessary
to keep on because, as I told you, we're not
going to show that guys way, but if you're going
to show that part, you got to be careful
and clean it very, very well before you keep on. Okay. This is a sculpting guy, so I remember to use
the brush low to fix to make the shape
look more sharp. Now, I want to cut
the panels I cut some shape demion
tender and then I that. Okay. As you see here, we cut
the panels and then we try to clean it and
make it look more flat. So use the H polish again. Every time you find time to
work on your own project, guys do that and make your portfolio because
that's very important. I keep each class I teach, I always keep
telling the artists to do this because
that's very important to build your own
portfolio and you put all your work there because then the client gets
your work you do, and then he knows if you are adaptable for the things
he's looking for or not. All of them, they
ask you even to send your link for your portfolio
to what you work before. This very important for you
guys to make some portfolio. Keep on cleaning the panels up So you want to clean
more this part also. Okay. Trying to give it a hard edged. Don't scare at all guys
to pull new shapes in your design even
after you refine it very well because maybe
you discover something better than you did and
give you more nice look. Always be open to try new things in your design and
make it look more sophisticated and always
try to think out of the box when you are
doing some things, try to approach other way. Try to think of the detail so more guys because that's
what makes the design better. So we keep on. Now
we're going to block more shapes right here. Okay. So now we're going to
refine more the panels. I made the cut between
the panels big and deep. That's the style I work
with most of the time, but I'd like to have some
gaps between my panels. Now, I will fine so
the back of the head. Use the H polish to clean. I had cyc shape here with the H polish
clicking on the out. And now, I'm going to add maybe another one another
shape right here. You just click on the Alt and then with the strokes you make, I'll give you the
shape you may like. Now, here after
adding the shapes, I'm going to use
the demon stander to make look like a panel. So I'm going to draw them with a demon stander using
a smaller size brush, the autosave here we need to fix this because
it doesn't look. I'm going to change here. Okay. Well, never mind because later I mirror it and it's going to
appear on the other side of. If there is something
I need to fix, I can use the mirror to make both sides look so identical
without any mistake. You don't scare one side doesn't look so much
like the other one. You just mirror to
the other side, and going to fix your design. Always use the
mirror and we tool. It's very important and can
help you fix many problems, and also can help you win time when you are
working on a project. You work on one side and then you mirror to the
other side and just that. We keep on in the
next plus guys.
17. Learn Working With Alpha: We keep on our work guys. Now we're going to start
working on the details. We're going to add some
screws with the EMM brush. As you see we made
holes for the screws and then we're going to add them in all the holes we made. You just drag and put
the screws in the holes, and then you go to
the sub Tool under split option and you put
split and Musket point. As you see here, we keep
on adding everywhere. If you don't want to add all the screws in
the brush guys, you can add them also in photoshop with the photo
brushing technique, we're going to see
how we do that. As you see here,
we have many parts where we led for
there on the neck and the jaw on the back
head, right here. As you see, we have many choices of the screws guys
you can choose from so you can put the same one I'm putting here or
put another one, y A lways you will have a sco because that explains how it's being
hold there, okay? Yes as well. Remember, we are working on a mechanical things, should always explain
what we are doing. We the head good searching here in the bash. So I decided to add
some shapes here with using the primitive shapes
that come with brush. I just wanted to
add some details for the neck because I see the neck little bit empty and I need to add a little
bit of details there. Even though I'm not going to show guys in the
picture is not going to be shown because I need to show only the front part, okay. Here, I'm going to add
also two more boxes. I thought it's going to be a nice detail to add
there kind of I know boxes where there is some of wires or something
inside, little wires. Okay? Now I'm going to use the alpha to start adding some shapes. I'm going to use
this alpha here. It's like a porque where
you can add some gaps inside the design and the
panels or whatever you like. I'm going to dy mesh
more because I need more resolution for my
CT to appear better. Maybe here I'm going to rotate
it and I put it vertical. You see here, think it's nice. You try your alpha shapes on your design and then see if
it goes well with the design. If not, just get back
with the history and change the shape
or even smooth it. That's how you erase,
I add cut right here. A think I'm going to add
something here, maybe. I'm still thinking. I don't have any idea what I'm
going to do, guys. I just try and things then
I see if it look nice, if not, I'm going to
change the other thing. Now, with the mask pen, I'm going to add some lines
on the sides of the panel. But before that, I want to draw some straight lines while holding the command
for the mask. I go to the stroke and then I'm going to activate
the lazy mouse. Now as you see, we draw
the lines on the sides. Then I click with the command on the space to invert the skin. Now with the move
tool, I'm going to try to extrude some shapes. There you go. I think it's nice. I totally have no idea,
guys what I'm doing here. I mean, I don't have sketches
before I start my design. Usually, maybe I draw some rough sketches and
then I start from there, but with this project,
we didn't do anything. We just go with the flow. We just trying things and then see if they goes well
or not like you see here, I made some shapes and
then I can do that. Try to do the same guys. Don't be scared at all. Blocking the design
is an experiment. You can find some
nice shapes you can lead for your design
or maybe you do them, do other things, go
other direction, pull another shapes, or you change even completely
all the shapes, okay? It's all about experiment
and trying things and see what results
you get from that. Use Alpha k bash. You can use the masking tool
like I'm doing right here. I'm trying to mask some part in the neck and make some shape. Maybe here instead of extrude, I'm going to push
inside to make a gap in the neck with the alpha tool, maybe some shapes here. I want some bigger shapes. As much as you keep drag guys, you get bigger shape. Okay. Right now, it happened happy accident
because I forgot to mask the shape from behind normally do
not pass to the back. But I let it and I see I have some interesting
shape at the back. So I'm going to
let it like that. No, I'm going to mask
again some shapes here, maybe I try with the alpha
or I go another direction. As you see When you work
on the project, guys, try to do some rough
sketches before you start like drafts, guys, maybe different shapes or some ideas you
get in your mind. You put them on a
notes or something and then you can start
working on your project. We don't do the same
as we did right now. We just started from the scratch without even
making some sketches. This is my way of
working sometimes, but I advise you, you better
do your first sketches. Now, as you see, I just must
get some part right here, and I add this
accent Alpha and try to add some different shape
on the sides of the panel. Okay. As you see here, I
like the shape we just did. Now, it's the same alpha to
add some shapes right here. Maybe here. As I told you guys, I'm trying to experiment
with the design. I drag it as it is, or I hold I'll to make as a gap. I enjoy light working on robotic design because
there is a lot of area where I can experiment where I
can try new shapes, where I can go wide
with my ideas. Unusually, my work all about science fiction guys because that's my passion
since I was kid. I like the movie talking
about science fiction like Carminator Chapin many, many movies I watched
during childhood guys. I watched almost all the
movies that have been released in the genre
of science fiction. I think this was
kind of a background that helped me to go wide
with my imagination, working in some designs or work on some environment or whatever. I don't know if you
watched Space guys, but that was one of
my favorite movie I ever watched
since I was a kid. Also, a blade runner
was very awesome movie. I mean, that when I start admiring more much, the
science fiction work. And I decide to become a concept artist and designer in the field
of film and gaming. Here we keep on it in some
details with the alpha. Nothing sophisticated
right here. As you see. As I told you guys,
whatever you watch, it's always helpful for you if you want to become a creature
designer or something, you can guys try watch movies, play some games, include
creature designs. Your mind is going
to pick up alone all the stuff you are watching
and all the stuff you are playing with Always going up your imagination
to do some designs. We are using another
alpha right here. All the alpha I'm using in
design gas I'm going to let them for you to download for the source
material of the class. Okay. I'm not trying to add so much details
because I know I'm going to add some more details when
I'm work on photoshop. That's why I may see
things and change my mind. May I add a little bit here, but I don't go so much on the detail because
later on the photoshop, we're going to add
everything we want. I have this pattern. I
like to use it a lot, so I'm going to use on the
panel and also on the job. A you see. I don't think I'm going to add more and more details, guys. I think this is enough
for me to start. Take a look and see
whether I can add or not. Well, we keep on
next class, okay?
18. Export The Head Robot: Here we are again guys, want to see what
we can before we export the redesign is going
to be the glass, this face. Here as you see, I just made the shape from
the beginning, but this time I
use the mask tool. Now here also I may make some
shapes and then extract it. I'm going to use
the mask pattern. Draft some shape right here. So now I'm going to extract the shape and thickness right here and then
extract the shape. Maybe 006. Extract and except. Now we've got to refine
the shape we just made. I don't like it. I'm trying to cut
it in the middle, but I don't like it like
this because it looks like eyebrows and I don't want
that look in my designs. So I'm gonna try again a different clip curve to the symmetry in the Command and Shift. I got the half and
half, I delete hidden. Now we have only the South
we're going to work on. First of all, I need
to DynaMesh it. Now. I'm going to use the
clip curve. Clean it. Still. Use the smooth ER, the smooth brush, the H polish. I'm just refining the cleaner right numbers for the
patients I extracted. We are using the same tools in the same techniques
is not something new. So you're already going to practice all the tools
I'm using right now. Because you're going to
repeat them many times. You want to learn
them very well. As you see here, I'm
trying to clean. This is a concept art guys. I don't break my head a lot
on working on the topology. Make it clean to pause example
for the area that will not appear in my sketching
adult work on it. So much. I just left it as it is because it's not going to
appear in my sketching. Here we are not to make
any 3D design here, we're just working with the 3D and then sketch
it in Photoshop. So the main idea here is a
sketch in Photoshop and using the photo brush technique thing. I'm trying to clean it
with the move tool. Then certainly I mirror
pool with the move to now go mirroring. And that's it. Now we're going to use the demon standard to clean the carts little bit. Not a problem guys,
because this is a sketch and we're going to
make all three design. You got to make
everything clean. And if you're gonna
make it already designed for production, you're going to need to take
all the design you make in ZBrush to another
3D software anyway, to polish it from the beginning. Like the ZBrush
design is gonna be just a guidelines
for our design. I may use my Cinema 4D. You can use whatever you
like. It's not a permanent. Just adding some lines
with a demean standard. I may add some lines in
energy for later nutty. Experiment with my
design right now. Need to clean some stuff
with the smooth brush, the age polish brush again to
clean the panel right here. We are cleaning the surface, tried to be careful not to make some bumpiness because guys, when you are rendering and
the light scatter over, the design is going to appear on the defects you
have in your design. Almost dry. Be aware of that. Okay. Just clean there so we need to fix with fixed
mesh integrity or close Hall. I keep on refining the LAH polish and
brush. Keep refining. I think we're not going to
add more details, guys, because we're going to add more why we're working in Photoshop. So for me this is, let say this is
enough by now and I don't want to spend more
time working in ZBrush. It took a lot of time
because also we're going to need to block the arms. We do the same procedure
for that. Okay? So H polish, as I told you, try to work on your own design better than do the same design
I'm doing right here. You can do the same techniques
on your own project. I want to see in
the project student of this course
were all designed, you made using the
same techniques you learned from this course. I'm trying to do
the demonstration. There are some cards. This is called the pinch brush, can help you close gaps
or straight some edges. I don't use it much. Just to try and
ear if it can give me some great results
or something. Other than that, I don't
lose it night sky. I don't need any way
because when I'm painting the design
in the Photoshop, I'm going to also fix
on the bed edges. I'm going to use this pattern. Maybe in a place. I decided not to
search another Alpha. I'm going to use the square. But before I want to divide
it to get more resolution, I subdivided four times. Then I add my driver here, divide maybe the
head right here. See you when I divided, it gives me more resolution,
became more clean. But anyway, I want to go wide
with the geometry polygon. Always keep an eye on the reactive point
and the total point. Because you don't need
to get like millions of polygons for your design is going to become so heavy
for you to work with. So I'm trying to see if I can add more shapes or you may be with a mask tool. I add some shape and make
some gaps or something. You make it a little
bit smaller than ln. Inside. Nothing is going to appear
in the design anyway, because they told
us, they told you that only the front
of the design, as we saw in our image
of the soldier relook at the front ladies little bit of the profile appearing
in the picture. So we've got to copy the
same position for the head. As you see, we have 1,000,675
thousand polygon active. So we want to make that
down before exporting. And I'm going to show you
what tricks to do that. So first of all, I want to see all the
sides of the design. Are we decimate,
we need to merge. So I'm going to merge Visible. And then we have the head
merchant one sub two dice. We turn it all the pieces of
the head in one sub tool. You can decimate sure, each sub tool alone if you want to export it with a
different set of tools. But I prefer to do this
because as I told you, I'm just doing some
sketch and I'm going to show you how to render only one sub tool to get all the materials
inky shot. Okay. Now as you see, I clicked
pre-process servant. After the ZBrush
finish the process, we want to click this summit on. So first, need to merge visible
when it on once a tool, then you go to the plugin and
you go to decimate muster. You click on process. All after ZBrush,
finish the process. You just go again
and click decimate. Okay? And there you have
smaller number now, 260 thousand active point from 1,000,675 thousand active point. Okay. Now I need to go to Export
and exported as OBJ. Okay, So I'm gonna pull
the file on the desktop. That's it guys. Now we're going to start
working on our arms. We finished the process
of a block in the head. Now we're going to work on
blocking the arms, okay.
19. Sculpting The Robot Arms: So we are in ZBrush again and now we're going
to work the hands. I decided to use
the immune brush. And here it is, the brush come with ZBrush
called ANN, the parts. So we're going to choose
this male fore arm. I let the object
right here, the star, because you need to have
object to use VMM brush. So now I'm going to
read and musket point, and then I'm going
to delete the star. The star. Now we have arm. We're going to start
working on this. Now we're going to start
to blocking the robot are. So first thing, first thing I need to do is DynaMesh the hand and
get more resolution. So I DynaMesh it on 1696. Now I'm going to use the H polish brush
to sculpt the hand. First. I put it on a bigger size. So I'm going to use it
also holding the Alt to add some shapes when
flatten it in there. Because I wanted to have
robotic design is not organic, so each orange is
the best choice to add in, flatten the object. Okay? So as you see here, It's already given
me the shape I want. I do the same for all the sizes. Wanted to geometric we're
seeing or something. Nice. I prefer guys, you learn about
the human anatomy. It's important also to work. It's very helpful if
you are working for the robots also because that's helped you to know how human body function
or the articles and all. And then you imitate that
in your robotic design. So you will have idea how good your robot function or the Arctic we want to
add for the knee, for the feeds and all that. And rotate and see
what I'm going to add, what I'm going to flatten. As you see already have some
kind of a geometric hand. You see guys Molina me guys, I am just working
but I don't know what I'm doing exactly. And as I told you,
always undoes, experiment with the design. I use the brushes and see
what I am going to get. The only thing I'm
sure here is that I need to separate the pieces of the hand on a different sub to the elbow in the
shoulder and the arm. Here also going to
separate this part. Undo some of the masking. Use command and
out for that guys. You can use the
Lasso masking tool. You can use the
curve masking tool. You can use the mask pen
tool wherever you like. Nope, we just need to mask the part that we
want to separate it. So here I decided to
use the mask pen tool. So we're still going to separate each
part on the sub tool alone and work on each
one of them solo. This is the fastest way
of doing the things guys, because there are
other ways of work of designing in ZBrush and
could take much more time. So sometimes I need to
speed up a little bit to the video because
it's going to take like day is working
on one design. Okay guys, so here you see the mask to try
and to most companies. I already my skin. Some shapes come
to my mind and I think when I start
having idea how I'm going to lock my hand,
they are missing. The idea. Come along while you
are working on the design. Maybe already noted some ideas, but then when you are
working on the designs, you go different way because
that's how things goes. You need always to be opened up. As I always tell you this, you got to be always open up. You don't scare, you, don't desperate when you
go on the road, you are thinking of going right, annotating the role you
are thinking of, hidden. You just can go on
the road and it's gonna be much better than what you already
have in your mind. Just be always open for experiment in UID is
and what your design. Okay, here I'm going
to click Split, unmasking point
and musket point. And I'm going to separate the elbow parts on
different sub two. Now we have three different, now we have three different
sub tools for the arm. We're going to walk through
each one of them alone. Now I need to
DynaMesh each piece. We're going to DynaMesh it
to give it more resolution. Also close the gaps. You don't see the
gaps right now, guys, but wherever it makes a split, a musket point, you
always have some gaps. You only need to DynaMesh. Then image each subtour. You see here, this is the
first draft blocking in. Then we're going to keep
on in the next one.
20. Design The Arms Joins: Now I'm going to add
article to the hand. The first thing I
want to need to do is to upload my Bash. M Brush. I put my kit Bh
pieces on M brush in there. I use them wherever I need. I load the brush right here. Then when I click on, I can see the list of
all the pieces I have, and then I decide which one I'm going to use
for hand article. I may choose another one. So I keep searching for a piece. I made my designs
so searching here. I see all the kibsh I have and Then I see which one I'm going to
use for as an article. I think this one is interesting. I'm going to try use it and see if it's good for my design. First of all, I need to push
away pieces from each other, where we're going to
add the articles. Because as you know, the
robots always human, they have articles
between the pieces of the hand that make them move and function as a human body. When you work on Mica, that's also maybe other thing. I think with a mecA, I may
think of the animal anatomy. But with the humanoid robot, I always use the anatomy of the human to try
to make my design. Here, I'm going to
try to add the piece. So we're going to add
this article right here and we're going
to add this piece as an article for the hand in the middle between the
elbow and upper arm piece. Then we move to and try
to place it very well. So I think first of all, I need to split a Musket point to put it on a different sub T and then I'm going to
try to place it better. So as you see, rotate. We are just keep on
trying to place it here. I speed up right here, guys because I'm
just placing these. I'm not doing
something important. Here, I'm using the clip
curve to cut some pieces. I want the big piece
of the article to appear in my design.
It's up to you guys. If you want it to
appear a little bit in the design of the em, or you want it to appear
more, it's up to you. Now I want to cut right here. When you use the
clip curve and you see it make wrong cut, you just need to invert the
side you are cutting with. Example, if you cut
from the down to the top and it made a mistake, you need to go and drag
up to the bottom to cut. Now, I want to mask some part and I'm trying to
add some shape right here, I'm using the masks, and then I use the move to exert Now, I want to cut
shape right here. I drag the clip curve and then
I click Alt and click Alt. That the way I make a
round shape to cut. I want to put it on the solemn
mode to work on its alone, as you see, I'm making a round shape making a round
shape right here to cut. Click out in drug, click out in drug. I'm going to mow the shape. I move to to push it
direction. Rotate. I'm just experiment. I'm trying to find something
interesting in my design, but I see there's some kind of the circular shape if
I'm going to let it or not, I may cut another
shapes in the arms Okay, this is the shape of song because it's not straight. So rotate and move I'm not sure if I'm
going to design the hand because the hand, I don't think it shows
in the design, guys. So I'm still don't
have any idea about that if I'm going to
lock the hand or not. For now, we're going to keep on working on the other design. So I'm going to keep on working on the
article for the arms. So I'm searching for
another article design. I may design it from the boom. I think I'm going to use the cylindrpi here
as an article. The cylindri in the arms make
the arm rotate in twist. Okay? This is the idea about the cylindrical
article for the robot. Okay. I advise you
also guys to take a look on the robots on the
Internet or in the movies, and you see how
it's been designed, how they put the
articles for a body, where they put the wires, you got to watch always movies
in real world machinery, like the industrial designs. I always like to watch example Boston dynamic robots and see
how they've been designed. It's an idea also in real life, how robots may
function because for the concept art and real life
is not similar guys because something we do in the concept
art for movies or a games It's hard to make them as a functional product
in real life. It's better if you know
to do both of them. It's always better to think as an artist and the same time
as an engineer and think, well, the functional
of the design and also the beauty
of the design. When you master both things, you will be the most great
designers in the world, guys, believe me,
because it's very important when you design
robots or something, you know how it could
function and understand because maybe later when you
are working on a project, you're going to make
a production design ready for some film,
maybe or again, You need to work with the
rigger and the animator, and then you need to discuss
how the design function. Maybe you make some great
design and beautiful, but then when they
try to animate it, is going to be hard to make
animation from that design. You always got to think of all the while you are
designing your robots. That's it. We're going to
keep on in the next one.
21. Design Robot Arms Panels: So after we add the articles, now we're going to add some
big shapes for the hand. I'm going to use
another technique here I'm going to import
some alpha shapes and then I mask the back of
the hand and I try. This is what's wrong skin, rotate it to make it straight and then I'm going to mask it. With a mask pain, I
make square and musk. When I work in the design, guys, I always do the same. I work from the bigger thing
til the most smaller things. I work on the rough
design, the, the cutting, the splitting of the subtols example with the hand and
work on the articles. Then I'm going to add the
bigger shapes, make panels, and then I start working
on the smaller details, y? You got to be always
organized guys. You start from the
bigger till the small. I avoid adding small details from the beginning
because for sure, you're going to erase later and you need to do it again, okay? Start organized from
the bigger the small. Here, I'm emploding alphas and I'm trying to use
them to make some shapes, big shapes in the hand, like cuttings or whatever. Okay. So As you so the first alpha holding the. I made a big gap
inside the hands. Also, I'm trying to do this. Before I do that, I
need to mask as we did before because when
you drag so much, it's going to pass
to the other side. As you see here, I made this shape then I invert the dragon and I make
another small shape inside. Here so I think I'm going to let it this way because it's
like happy accident again. I'm always open up
guys. I do something. Maybe it's not what
I'm thinking to do, but then by mistakes
happen, something. I think it's interesting,
so I let it. I don't try to change it
already have in my mind. Okay? You should be always like that when you
are working on your design. No, I want to rotate and see what I can add
big shapes here. I'm going to use another alpha here and try to
add it somewhere. I mask before, and then I
want to ask more right here. Mask mask this part. Okay? No. I'm going to add
this first to check my making if it's correct
or not, and it was. So See when I add it go
to the other side, guys. As I told you, we
always need to mask. Let me see right here. It's much better. Now I'm going to add maybe
the same but small details. The part, I'm going to
add small details there. I know I'm not going to
add something bigger there or I'm not going to add
something there, right here, I'm going to use the See, guys, I'm just using the alpha
to scalting the hand now. This is another
technique you can use. The kit bash and the alpha are important to when you
work your design, guys. It's not necessary, but it's always helpful to make
your work flow so fast. But always you can do
everything from the scratch. But then it's going
to take a lot of time to finish work
on an arm like this, maybe maybe take two days, three days or something when you can finish
it in 2 hours. So try to search for
another offer I can. So I'm going to add more
details right here. I'm going to use the lazy mouse. Now I'm going to start dividing some panels right here in the R. Divide some panels. Make small panel right here. Sure here also, we
need to have some cut. Okay. The panel right here also. We keep on dividing
panels much as you guys. Even with the cutting
right here now, I'm trying to think
in real time, guys. I didn't prepare which cut I'm going to
do for the design. I'm just making
letting the design. Okay. As we see here, we are using the same techniques
we used for the head, but we experiment also
with the new technique of blocking with Alpha because I thought that is going
to be so nice to learn faster workflow and make you gain much more time
working on your designs. Anyone you from is going to tell you
about this, but guys, believe me, in any
workshop I make or class, I always talk to them so about the time because I
know what I'm talking about always you are under pressure
working on time because you're not going to
take all the time you want working on a design. They're always going
to rush you to finish the design so fast because they don't have time to wait more
for your design to finish. As you know in this field, time costs money and the
work needs to be so fast. If you are not fast enough, you're not going to
finish the work and deliver it in time
and that's going to become very bad for your
reputation as an artist guys. As you see here,
I'm trying to cut Anyway, when you are working
in your own project, you can take your time and work little by little every
day as I do the same. I work first on the things I
need to finish for a client, and then I try to take
a little bit time. I try to if I have because it's hard now to find time
to work on your own project. So sometimes I may
have my own project. Maybe it could
finish in one week, but it may take three
months to finish because every day I work a
little bit on that project. I told you the time is
very, very important. Even for you as an artist, you got to know how to
organize your time working on your project and on
client projects, okay? I'm just still
dividing some shapes. I'm working on hand here, guys, but I don't think I'm
going to show the hand because as I remember
in the image, we don't have hand shown only the ones from the
other side holding the gun, but even with that, I'm
thinking I'm going to do it photov I'm not going
to do it this way. So now, I'm just showing
you how to block the hand, give you some idea how to divide the hand and
make some shapes. But for the hand
holding the gun, I think I'm going to
photograph it, okay? So we keep on on the next one.
22. Extract The Robot Arms Pieces: So we keep on guys
are working on extracting some pieces
for arm and all that. So we're going to
have on hand here, I want to separate each piece of the finger in
the sub tool alone. We're going to
move mass cluster. And then I'm going
to mask each piece and then click Split
and musket point. That way I put them
in different subtour. Want to split these
three fingers and then I duplicate it. You see here each piece of wire. You see we separated the
pieces of the finger because we need to add our two
core between each piece, the hand of the robot should have article like
the human body, the fingers to
move and function. That's what we're
gonna do. We're gonna add article to the fingers. But first, I'm going to extract some pieces in the
hand of the reward. Here, I want to put some panel to have some
shape of a box right here. We have some details. Then I clean the edges where
the curve as we did before. The same tools and techniques we're repeating in this way, you're going to learn
them very well. You can, if you are not familiar
with working in ZBrush, think anyone guys can learn this workflow even if you don't know about ZBrush so much. Because we are using the same techniques and
the tools all the time. We got, just keep
repeating that. So here I'm going to
extract another piece also by another panel. When you look to robots
guarantee you see they have the engine under
the mechanical, but outside you see the panels, some wires or some other
details of the mechanical. And I want to have
combination of two when I walk on my design, but to show the mechanical from inside
and also the panelists. I want to add more. I'm just practicing
bit with you. The hand in my wall because
I'm not going to use it. I'm just going to photo bashing. I already have the idea
and what I'm going to do because I already
put the question. So now we're going
to add the articles. Do our fingers that we need to move the pieces
away from each other. And to make space
for the cylinder. There they will, like articles. Here I'm searching
for the ENM brush, the perimeter virion brush. I'm going to add this
empty cylinder shape of the articles. You can do wherever you like, Guys me, I'm just putting
some simple cylinder. You want to use
another way kind of article units according
to you guys, okay. So rotate and place, scale, Split, Mask, point. The pieces, the articles. I always had in my mind, some of their board I saw during a child who died
variables in the movies. We've got to always
keep observing the mechanical in
real life guys. So you have idea how
the pieces work. You can feed in your
imagination with all the things you
see in a real life. Or we can recall, or wherever those things will
help you know what you are doing when you are designing our votes or any other
hearts of a design. Z here, I'm going to try to
clean with a quick curve. Also a very important tool. Also just don't go
over with it, okay? Always to be careful
when you use it. We don't need to cut
all the piece and then change its former completely
only if you want to do that. Right now I'm trying
to cut some edges, make the articles appear more. And I check. All I need to do. Here. I'm going to extract some piece. This is look like
a panel for me. Let me to extract it. We can keep working on the
head or the arms all the day. And even more days to add more details and
see more things. Maybe we didn't see before
why we're working in, because we're tired already. Eyes don't see new things. Maybe could be interested
in the design. If you want to work that way, you can do that. But as I, as I told you when
you work in total version, you don't need to walk so much
on the details in ZBrush. The autosave. Now I extract
the piece and then I mask it. We're going to need to
DynaMesh it to give it more, give it more resolution
to work with. Especially if we're
going to use some alpha, we need always to have enough resolution for the
Alpha to appear clean. Now, let's drag this
little piece right here. Also. You see we worked on the beak shape, that medium, and the
small essential pieces are design habits. We can keep working
on the details right now and extract
maybe more pieces. Or we can even stop right here and we'll go to the
Render procedure. I want to extract more pieces, mask and then
extract the pieces. You want to extract, maybe extract some
boxes, panels. Cleaning the edges right now. Also this small piece. Okay, we'll keep
protected and search for interesting things to do
with the design right now. So we keep Maschine and
extracting more pieces, creating some new
shape layer here, like something holding
the article of the arm, the upper part of the elbow. The edges. You're going to also
make your own 3D design. And then you photo
******** in the Photoshop instead of searching for an image and then you
work on that image. There are two ways of
doing this. For us. We're doing the other
technique of finding an interesting image and then make a design
starting from death. So here I'm making a new shape also trying to see if I may, if I do this or not. Seem not sure. Make another shape over here. I'm going to let it this way or I'm going to change
it, not showing it. I think I'm gonna change it. Won't change the shape. I think this is this
way more interesting. The shape. As you see guys now, I will use it the clip curves to change completely the shape, not just clean the edges. Okay, so there are two ways of working with the clicked
card. As I told you. If you're gonna work
on cleaning the edges, you have to be always
careful when you use it to not cut so
much from the shape. And if you want to
change the shape, you can do whatever you like. So no problem, you got it
wherever the way you want. Here we finished our work
with extracting more pieces. I'm going to keep on
and an extra class and add in more details.
23. Design The Robot Fingers: We'll come again, guys. Now we keep on working on our arm. I want to put the layers of each finger
together under each other because I
want to merge down those layers to make
finger only one sub tool. That way I can duplicate
it to make more fingers. Here I merging down
Right now as you see, we have one fingers Now we can duplicate
it as I told you, always always hold the command
or the control in windows, and then that way we
duplicate each piece. So I'm trying to make the size different
because as you know, the fingers as in
the human body, they are not the same size. I'm going to duplicate
this one also make a charter Okay. Okay. When you duplicate each one
after you place it guys, you need to click on
a Speed MasketPint. Now we're going to
make the small finger. See, right here, I see the
other one is well placed. The other one is
not well placed so we need to fix it again. Set I must get point
first for the small one, and then I'm going to place
the other one very well. It could at the eye from
maybe it but it's not. Okay. Now I'm going to choose the layer of brush. I try to import some alphas to add some details to the fingers. I'm searching for interesting
alpha right here. I want simple shapes. I don't want something
complicated. I chose the shape. I'm going to try to
use it on the hand. Okay. First, I see that we need to unmask there, and then I add the shape. Maybe I use it another place. Also, I'm trying to see. Okay. You got to zoom out and see
it from far, how it looks, and then you zoom in and you keep try to
see the design from far and I see if I need to
add more details or not. Okay? So in here, I'm going to choose another alpha to
add some shapes. And I'm going to import
another alpha and try to add more details to
the hand or the fingers. We will see what
we're going to add. I didn't prepare sketches to do the design as
I told you guys. I'm trying to work
with experiment guys. I'm trying to add some shapes, and then I see what
I can get from that. This is another work
flow you can do. I also told you before you add some sketches and then
you work from there. I tried to experiment
with the details. I tried to add some details
and I see how they look on the design when I'm skting and then I see if I'm going
to change them or not. You got to know when
you should stop when you add in details to
your designs, guys, you can add a lot of details and make the design is
not good to look at and it's not very nice. You always need to know where you should
stop adding details. For you want to see
the design can't add more details will make the design much better
when usually I stop. Every time you're going
to add the details, you say, this detail is going
to add to the design or. If it's not going to add, then
you don't add more. Okay. So as you see right here. So we're going to
stop right here and we keep on in the
next one, okay?
24. Add Details To The Arms: Hello, guys. Now back again, and we're going to add
some details to our arm. A here, I'm going to try to use the mask to extract
some new shapes. I always try to use the lazy, especially in the
mask because it helps you draw very straight lines. So I'm going to draw square. I think I'm going to make
some gap right here. I have a place for
a box or something. Draw some shapes
a little detail. Draw little details over here. Okay, I need to
straighten the shape. Okay. Try to draw the
edges straight. Okay. I think guys, skin is one of
the first thing you need to learn to master Zbrush because it's a very
important tool. You need to practice a lot. Masking is very
important to extract to split pieces, and all that. Okay. So one of the first thing I learned when I was
working on Zbrush. I was learning the masking tool and I was practicing a lot like hours per day practicing
only the tool of masking. So I draw some shapes right here and trying to
make the edges. I'm trying to
straighten the edges always because I need them to
look in straight geometry, and then I clean also
with the clip curve. We're going to extract
shape right here. Maybe this one is going
to be a piece of metal, maybe chrome half metal. Later, I decide what this
piece is going to be. But it's better to
think of the detail of each piece you are
making the color, the material and as
I told you before. My work flow of three
D modeling guys, I always try to use Z brush as a guide for the
first blocking and then I go to
the software three D and then start designing
from the beginning, but using the scar
met in Z brush. I wish it was very nice tool we can use in Z brush to make the automatical topology because I think that will help
speed up the work. Much, we have zeros here, but it's not good enough to make a good topology for
animation example, guys. Ally guys in ZBrush can
make zero mess more powerful and make very clean topology
for production design. There is a workflow we can do
also in the brush to clean the topology and then project
the details and all that. But I think most of the people working in the industry
gaming in films, I always prefer to topology from the beginning pieces
because that's the best way to get a
very clean topology. Right here, you see,
I'm trying to see here, I extracted this piece. Well, then I order to
look like like a handle, so I'm going to move the shape up. A. We want to try to exclude the shape up, using
the move tool. First, I want to dy mesh it
to add more resolution to it, and then the move tool. Then mask it to
mask and extrude. I just want to mask this part here and then invert the mask. I'm going to use the move
brush to move the piece up because I wanted to look like I wanted to
look like a handle here. Then I'm going to use
the H polish brush to clean it and
make it geometric. Now, the clip curve
will clean the edges. Okay. I like how
it look from here, so I'm not going to change something to clean
the edges, so. Okay. So we keep cleaning the corner right
here, clean the edges. The circle edges always is a little bit
difficult to walk in, but anyway, it's
not complicated. You just be patient and keep repeating until you get
the shape that you want. So Now I'm going to use the move tool move this piece
and clean the way it looks. That's the move tool I
use it a lot guys to remove the pieces
and clean the edges. The move brush is always nice to deform some pieces to give
you some nice shapes. But here example, I got
to make the edges better. Okay. The mask and then I try to clean the edges. As I told you, you hold out and you move till you make
a circular shape. Click one time on out, and then drag one
on time on out, and then drug you make a
nice circular shape. Okay. There it is. I think we're not going to make so much details as we
did with the head. Because we're going
to work in photoshop, so we're going to paint over, going to photob nice way
of creating concept art, mixing the three D and the photoshop is going to be one of your favorite work flow to do when you are
making a concept art. Just follow me. Try to do as I told you work on your own project and I'd like to see what art you're going to create after you
take this class. I'm going to wait for
the art you're going to create and see what you
learned from this class. Here with the mask tool again, I'm trying to make a new
shape to extract a new piece. Striking the edges I
always want to have the clean edges. Clean edges. I'm going to choose
the thickness and then I'm going to strike Here, we have a first, we need to unmask
and then dynam and clean the edges with the
clip curve as we did before, the same work flow guys. Using the clip curve. Trying to make the
edges look better. I don't think this part
also of the hand is going to appear in the
design, but anyway, we're just going to
practice together the tools and the technique
we use to create the head. I hope the techniques are very clear and you are
getting them very well. You can do the same workflow
to create your own project. I would want to see the
robots you're going to create with this workflow. Let's see. We made some shapes here, small shapes, medium and big, and that's the essential of designing guys that
always in your design, you've got to have small big
pieces, and medium pieces. This is the fundamental of
designing and sketching guys. Layer three size
pieces like the, the small and the medium. Always remember this.
As you see here, rotate and see if I still
have some things to do. Let's keep on on the
next class. Okay.
25. Export The Robot Arms: Hello guys again. Now we're going
to keep on adding some details and extracting
some pieces in our alarm. As you see my ZBrush look
so different in black. All don't worry because I'm just changing the Enter fire
service like to do that. Now I'm going to hold all masked pen tool and I go to the lazy mouse and
I add some numbers. That way I can draw some straight lines
to extract pieces. Example, I'm making some handler here for the article
in the elbow. I'm thinking this piece could be a rubber example like
you see in the engine. Or maybe I let it as a metal get inside and
outside when the hand move. Okay. I'm gonna try to
make it up here. Who should have
put the move tool? As you see? The move tool to
move it and clean. Think I change it. Yes, I know I made a
mistake right here, so I need to straighten
it very well. Then with the crypt curves. Sure, I'm going to try
to clean the edges. I keep repeating these guys. Always be careful
when you are using the clip curve because
using it so much, you can destroy the shape
you already created. As I'm telling you here, guys, I'm trying to not do so
much details in the arm because I'm going to paint
and photo verse in Photoshop. So it's not necessary to do
a lot of details in there. Now I'm going to
bring some alpha. I want to add some
details to the hand. I'm trying this shape here, but maybe no, I don't like it. I think I'm going to
import another Alpha and then I try a different shape. I'm going to choose this alpha. Let's see what we
can do. This one. I don't think I'm going to add
this alpha in the fingers. Maybe another place
would be much better. I think I'm going to add
the Alpha right here. I need to DynaMesh more
to add more details. I already added
that alpha to add some details and bring
another alpha right now to add to the fingers little
bit gaps on the fingers. I'm just experiment. As you see, guys were trying things and then change our mind and
try different things. Can you see where the
design is going to take us? Okay, so I add more
details on the finger, more details on the
fingers, and also indies. Now when I use the mask to
add some shape right here. So as you see guys with
a mask tool only we can make so many shapes
and extract shapes in. We create many great things. So that's why I'm
telling you it's very important to practice very
well the masking tool. And if we think is going
to be so much easier. Anyway, this workflow I think is the most easiest workflow
incretin concept art because anyone even without
background in ZBrush can follow and learn
so much from this. Now I have this brush
which is called shovel. I'm going to try to use it to add some lines, maybe grave. Sometimes you're
going to see guys, How nice is this brush
to add lots of details. As you see here holding Alt, I can draw some, engrave it, a line
in the plastic. Normally these pieces
is going to be plastic. Well, I'm not sure if
I'm going to let this, but let me see first, when I add this line here, then I'm going to decide if
I'm going to keep it or not. Okay. See here, because
you've got to be careful when you use it because it
could make some defect. Maybe. Yes. And it has also want to let it I don't think
this is also straight. I don't know. I'm still thinking if I'm going to want to change it or not, also try some stuff
or even fingers. I think no, I'm not
going to do these neither in the finger or a hand. So guys, I try things and then I can back again
and change my mind. That's how design and you
got to try things and then see if they'll go well
or not on your design. And then you change.
Again, it's not a problem. It's not a mistake
when you do that. This is the way design work. I think there is no designer in the work and do
the things very perfect from the beginning they all do the same we
are doing right now. They experiment, they always try things and then
change their idea. They make mistakes and
they fix those mistakes. Working in 3D most
of the time is, I think you need to know how to solve some problems also guys, because
that's important. Not stuck while all these
you get by practicing. Here, I'm holding Alt and I'm
adding some gray with line. As I told you. See what we can do only with
one brush guys. Not necessarily, you know, a very complicated tools
and make you spend most of the time trying to see how
to work with these tools. That's not what designing is. You need to know the
simplest way of recruiting great designs in give
you the best results. I keep adding some lines
and some gaps here. I didn't even use
renewals for all that, a alpha even I'm just using a one brush to
add all these details. Trying to add some
line right here. Okay, That's why lazy
mouse is helpful. You make a draw very slowly, a very straight line, as we use in Photoshop
when we hold the shift key and then we
make stroke with a brush, it's going to be so straight. Sure this is work only way. You're going to draw a
horizontal or vertical line. We're going to make a
juggernaut that you need to flip the documents. You're going to draw that well, you can learn that very easy. It's not a big deal guys. Okay, so we're going
to keep on here, add in some details in vain. The last thing, we're going
to export our design, we're going to do
it the same way as we did with the head. The other way is to export. Your design is to export in
many subdued in one file. But this is the easiest
way of working is to merge all the sub tool on one sub tool and then you export one piece. This way work only when
you're going to paint gun. Because if you want to render all the image in one software like T-Shirt or
something the morning need to export your design
in a different subject. And then each shot or
any other software for rendering Arnold
or VRA or something, then you can add a material
to each piece alone. But example, if we want to paint on Photoshop or something, we can merge all the pieces in one sub tool and then we make different render with
different materials and we take to
paint in Photoshop. Or also you can even export it as one sub tool in texture it in 3D texture software like texture from tricky
code or substance, painter, Murray, or any of
these texturing software. But that way you need to have a UV maps for all
your pieces, guys. Okay. That's why I'm telling
you this way is the most easiest way of
acquitting the concept art. But this way it
doesn't work if you're going to make a
production ready design. Okay guys, this is only for
paint in a concept art. I go to Z plugin in the integral to decimate master, pre-process. All, wait until it
finishes processing and then we go to the plugin
again and click Submit. After we decimate all the MEC, the number we have is
487 thousand polygon. I want to decimate it more. So I'm gonna go again and
click the Submit or four. Then we go again, guys and click precursors or in this
summit on again. And we get a smaller number, I think 400,087 to
work on the show. It's not a big deal, so
I'm going to let it like this and export the file. When you work with the
summating tools, guys, be careful, be careful
always to keep decimating. Then you lose all the details and the shapes of your designs. So always when you decimate, few times, you need to decimate, see your design if it
lose some of the details, if it's still okay, You can just submit it
again and then look, if you didn't include
details again, then you can keep on. When you do another
decimate them and you see the details in the shape or you lose some of them already, you need to get to the
previous number, okay? So I hope it's clear. Now we're going to
export it and just that we're going to go to the
other phase of the design, which is the
rendering inky sharp.
26. Rendering The Robot Head In Keyshot: After all the pinky shot, I can just go to File and click import the OBJ file of
the head or adjust, drag and drop it
inside the t-shirt. There is also another
way from ZBrush. You can click on the bridge of the shot
and it's going to take your design from ZBrush directly took a shot
without exploiting it. And as you see here, T-Shirt we have on this
side the material, the lights and the texture
and all these waves. In this place we have the
environmental light and all. First thing can go
to environment and then I check back plate image, I want to import our image. We're going to work in
jobs who don't want to want to check the light
and also pose the head. Okay, so now we're going
to try to pose the head. I go to the Tools here
and click Move to. Try to place the head very well. May scale bigger. Rotate. We need it to loop right here. Allied soldier
look in the image. Scale. Rotate, rotate the head
and try to place it. You can also do it
other way guys. You just bring the
image of the soldier. You can bring the image of
the soldier to ZBrush and then you pose your
character the same way you, the soldier is
posing in the image, then you start working
on your design. It posing in the correct pose. I don't do that so much guys. I just work on the design
and then I post that later. Here. I'm trying to use
the camera focal setting to try to pose the head. So as you see here, we are getting the same pose. Think, I think this way is, this way is correct. So I'm going to click Okay. I thought you guys
were not going to see the back of the design. We're not going to see
so much from a profile because the pose is
pointing to the front. It's like the soldier is
look into the camera. Okay. Now we're going to add
material to our design. The first material I'm going to choose CTU think I'm going
to choose the paint, metal, choose the basic color, which is the paint,
middle green. So I'm going to search in the
paint little option here. Blue, have middle gray. The search more in another area. I keep searching for
something I may use, guys, I think I'm going
to use this green. This green is much better. Let's see which one of the green middle we're
going to use here. I see guys there is
biting her material you can choose from and colors. Anyway, any material you
can use here on marrow the color because
you can change it later in the setting
of the material, I choosing these
dark porous material from the paint metal. Now as you see, I'm changing the color of the
material to a darker gray. Okay. So that's this one here. We're going to change both
colors of green to dark. So I choose always the two colors lung
darker than the other, as you saw in the
setting of the module. So you've got to copy that
but darker way example. I'm changing more here, the post material, making them more darker and I
keep watching by design. As you see guys like
keep searching for the twisting color or dark gray interesting
chord the most, the most famous monetary
color is the green guy. So that's why I'm trying. You can use any other color, blue wherever you like. But just me, I want to use the green because it look for
uniform soldier. I know. How I had HDR map here, I have them in your environment
option in key shot. I just placed that and then I play with the
settings and see if it gives me more or less the same light and I
have in the image. That's why I use the
black plate image to check the light. Okay, I'm gonna try another one. Rotate the ADR map here. You see guys, I'm trying to
use different HDRI maps. And then I'm trying to
find which one is more closer to the light we
have in our design, I just drag and drop
each file and then I try playing with a certain rotation and see what I'm going
to get from that. So we keep on adding DRI file
guys, tweak the setting. I think this is the most
closer one to our image. As you see there are some
clouds hovering the sun. I can also make the
brightness and the contrast also tweak the setting and we see what
we're going to get. Trying to rotate it. As you saw guys before when
we were analyzing the light. You can take that. You can use the
guide of the light analyzing to work
on the key shots. You put it another panel
and you watch well, light direction in the
image and you copy the same in your design
as you saw before. There is light softer
than other light on the head parts and also there are the darker
parts in the image. I add something light here, and that's us, another light, that's our point lights. We can add them to the HDRI file to add
more light to our scene. We can use the pain
to add light to our scene to help us
enhance our HDRI map. Like we can add more
light to some area. And also I can change the radius size to smaller
or bigger as I want. As you see under the neck, normally it is darker
guys because there is block waiting for the
light to access these areas. Always got to think
about real life. So we're going to now go to the settings render and we're going to
change the setting there. First, I'm going
to choose a name. I'm going to just say
MIL for military. Okay, so now I'm going to
choose the preset resolution. So I need on bus with my render because only helped me in for the show to
select the pieces. You go to option here, you can change the same pulse, but I'm going to let them hear. You got to know guys, every time you add more samples to your render is going to
take so much more time. For this project purpose. I'm going to let it
only on the default. Now first before I do that, I got to close the image. Don't want to rent in
the back plate image. So I'm gonna go to
the environment and then I go to the
setting here and check the back plate
image and go to the color example and change the color maybe to gray
or something like that. So any color just don't make something make a
change the lightning or something where onchange just don't make a very
bright color better. Always try to use a
medium color or a darker. Now guys, I'm going to choose
the resolution of my image. We have here presets. I'm going to choose
maybe two thousand, five hundred sixty-three
thousand eight hundred Okay. Sure. 3,858. And then I'm going
to pick cranial. I wait till it's finished
render and then I'm going to do the same
within each material. So this is the method you do when you merge them
all in one sub tools. You got to make, make different vendors with
different materials. Then you're going to assemble
all that in Photoshop. I'm going to show
you how to do that. Okay, Just bear with me here this see the
render is clean. Anyway, we're going to clean so much also in the Photoshop. The most important
for me that I don't have so much ingrained
in the image. I wanted to be clear. If you have grain, you can add more samples
to your rendering. As you saw guys, we've finished
our first render and we save the file in some
folders we already made. Or if you didn't make specific
path for your render, you will find them always
under the shot render files.
27. Work With Materials Layers: Again guys, now we
are on key shot. I'm going to show you how
to apply the material. After we made the
environment light, after the band played image, we prepared everything already when we made our first render, not going to change anything. So the first thing
we're gonna do is we're going to
apply material. Okay? That's what we're
gonna do exactly Guys. We're not going to
change anything, just just the material and then render, change
the material. Renderer change the
material and render. Then we're going to gather
all our material layers we rendered already in
the shot and then we put them in Photoshop. In Photoshop, we're
going to apply the material to our design. Our first render
here we're gonna do is paint texture orange. You'll find it in the
paint metal. Okay guys. We just apply it to the head and then we'll change the
color. You can get to them. In the render settings. Guys, we're gonna say
we're gonna put the same. We're not going to change
the render settings at all. We just need change the name to another layer of material. Okay? Now I'm going to
apply another one which is bank middle yellow. And then I click two times. I try change the
color to a little bit darker as we did
with the orange. Okay guys. Now we're gonna go to
the plastic and we go to clear wrath plastic to
apply that to our head. Then also, we do the
same random, okay, Then after we finish render, we go again in search for another material we
use in our design. Maybe don't change
even the material and I change only the color to gray and I have a different
material. Okay guys. See sometimes if you want to do is the same material but
the different colors, you can do that by changing the color the same I
showed you right now. So now we're gonna go again
to the material after sure, we put the material gray
and then we render it. Now we're going to
apply another material. We're going to apply a middle. I think of a middle. Or maybe Chrome. I think I'm gonna go
with the Chrome graph. Okay guys. So apply to the
head and then we do the same seat if
you want to change the color or maybe if
you want to change the brightness or
anything of that. And then you go and hit render. That's how we apply the
material for your head design. We just apply
material and render. You don't need to
change anything in the lighting or the position
because we're going to apply the material in
Photoshop. See you in next one.
28. Rendering The Arms In Keyshot: So as we save our
project of the head with all the material
will render with the same camera position, with the same light, with
the same environment, do the same plate image as we saved our project
with the same light. We're going to need to just know to delete the head
and then we're going to drag and drop the arm and try to do the same as
we did with the head, you know, already
the procedure guys. So you see here, I have a bit of difficulty
in the arm inside, but always be careful. This is I think he's a
defect from decimated. So I'm going to go open again
the debate plate image. And then I tried to place
the Move Tool. Sure. Go here to the move tool, go to the scene, click on the tool again, delete it and try to
post those in the image. That's why guys, I didn't pose my character at the
beginning in ZBrush because I'm just making a different pieces for even though I'm going to
make all the character, I'm going to pause
it after I finish. There is a technique to you to pose your character in ZBrush, another workflow and
another technique, I'm gonna try to pause
the arm maximum. I can pose it as in the image. It doesn't matter if
there is little bit different because as I told you, photoshop is the magic there. We're going to clean all there. So here I'm trying to
make the most I can. I'm going to pose the arm. I think this is good enough. As you saw from the weight of the arm appear in the image. So I'm going to clean
that in Photoshop. So now problem, now, I want to add material
to our delight. I'm not going to change is
the same light we use for the head because that's
what supposed to be guys. We just change the material. Now after we pose it, we need to add a material
first one is gonna be the dark porous material and military material as we
did in the first one. See here is the dark
forest green material. I'm going to edit. Now we're going to change also the color as we did
in the first one, to the same color,
the darker colors? Darker color. I think. A little bit more. So as you saw guys, we change it the both corner of the darker green as
we did the head. So we have already
the first material. Now we'll just close
that plate image. I think this is the
reflection of the ground. I'm gonna go to the
ground right here and just uncheck
the ground shadow. Okay. Now guys, that's all we need to do. We have the same line, the same line, the same setting. We're gonna go to
Render Settings. I don't think I'm
going to need to change the setting
of the render. Now resolution the same, just change the name. The clown pass is checked. You can name it whatever
you like as it's not a problem in
any name you want, you can name it even 1231, hand to hand, whatever you like. Now click Render and we
wait to finish the Render. Then what we're
gonna do the same as we did with the head. We don't change anything, just the material we go to into material render as we
did in the first one. Okay. So again change the material
as we did in the first, the same materials
we used in the head. This is the paint metal yellow. I'm going to change
the color a little bit dark and then I just render the
same we did before. Just changed the material. Maybe change the colors, render, finish the render,
change the material till you get all the
material you need. As you see here,
we're going to make the yellow color more darker. Now we go to the Render. Render again the same
as we did before. That's all we need to do, guys. You change the material you render change
the material you render as you have
already before. The light and everything. Don't change anything, just
the material as I told you. After you get all the render
and the process you need, you're going to import
them to Photoshop.
29. Apply The Head Materials In Photoshop: Hello, guys. Now, after we have all the layer of the
material on our photoshop. We're going to start applying the material we
want for our head. Here I have the
layer of the metal, the chrome, I'm going
to add to my design. As you see here, I
select the piece I want to make it metal and
then with command NG, I cut it on another layer. So That way, anytime I want to put to
add some metal pieces, I back to my I back to my metal material and then
add to my design, okay? Now I'm going to try to cut some more pieces to be
metal in the design. Here with a magnetic tool, I select the pieces I
want to make them metal, and then the same way, common cut them in
a different layer. See how easy this way to apply material to
your design guys. It's more effective
because when you add material to your design and you want to change
your mind example, yes, you can do that, so
easy by the material, you add it and then replaced
by another material. Or maybe you have some
places you didn't think of adding material into
that specific part. Then when you are
working this way, like I'm doing right here, guys. I didn't design a little
piece right there, but I got a little bit of the middle material
and I added there. It's like creating a new piece. It was not there from the
beginning with my design. I'm going to select
the piston here with the plastic
plastic material layer, I'm going to cut
also these pieces. Command the G sure to do that. Do the same, do the same
for the other also. Okay. Even when I'm
adding material, I need to think, maybe I have Ds I want to do like I did
with the neck example. I didn't have piece there, but right away, I
thought maybe it's going to be nice if I add
some metal piece there. You see, where the
little part also on the side with the
black plastic material. Okay, this one again. Cut. Now, I have
all the pistons, the middle part, and
the plastic part. I want to add some
plastic material to this box on the head. Same with the magnetic tool, I'm going to select this part. Take your time and be careful when selecting the pieces
to select them correct. I'll select this part and
then I'm going to cut it. Sure, go back to the plastic
material render layer, and then with the ComanG I cut this new piece
on a new layer. As you see here the
layer is not so. I want to change the brightness. I'm going to use
adjustment layer to change the brightness
of the piece. You can do guys many
materials and then you try them and see what goes
with your design. Try always to have many
many materials renders. You have them there when you
need them at any time, guys, be authentic to yourself, never copy anyone, Mx many
material together, guys. Also, I advise you to observe the light reflection on
the material in real life. That is going to
help you understand more how the material
look in real life. So we're going to back again to our plastic material render, and I think I'm going to add a plastic material to
the box on the head. Okay. First, I want to
see more layers here. I like this orange paint layer. This is orange
paint metal layer. When I hide and hide, I'm thinking where
I'm going to add this material guys in my design. First of all, I'm going to
check more layers right here. See while I'm adding the
material, I'm just thinking guy. I don't have any idea what I'm going to do exactly Example. I was about to put
black material there, but now I'm going
to change it to use this yellow paint metal layer. I want to clean this
part right here, and maybe it's not the final reserve, I'm
going to leg here. Maybe I'm going to change
it later for another thing. Let's see why we are working on our design guys
because later come new ideas to my mind and I see much better my design
and then go for it. I'm going to add also a little
piece yellow right here. Command to cut it on
a different layer. Always balance your
material colors. Don't try to make
many colors together. Be always in balance with your design shapes and
your colors, guys. Material is the most
important in your design, and also the reflection of it, how it's going to look in real life if you put it in
a real environment guys. Also while you are
applying material, think well of the
weathering of your material means how it's going to
adapt to the environment. See if we added different yellow paint
metal in our design. Also, I'm going to use this
one for this little part. I make it orange
paint matter metal. Yes, I think I like it. Okay. Guys, I use this technique also even if
I have many sub tools and I and I apply all the materials
in shot example and then I bring it all the material already applied on my design. I make more bonus
layer when after I apply all the materials for
maybe later on photoshop, I change my idea about the
material I want to add. Maybe I'm going to want to add a different material
instead of the one, I already render it in shot. I already have the bonus
layer where I can use them to change the material
I didn't want. Okay. So always good to have many different renders
to do your images, okay? Sure, we can do that if
we want to make animation because animation
has another work and another procedures, guys. So I put it the original
render on a different color. I'm putting all the pieces there similar on the
same group, guys, okay? As you see here, I put all the yellow layers
in a group together. Then I'm going to use
adjustment layer to change maybe the brightness and make
them a little bit darker. The pistons metal pieces, you put them in a
group together, the plastic pieces
of the piston, you put them on a
group together. All same pieces, you
put them in a group. That way, it's going to
be more easier for you to apply to all of
them the same effects. Also you can change the color
or do whatever you want. As you see here, also here
for the metal trying to change its appearance from Crow maybe to rough metal or
something like that, and not a new this is a soldier, should not have a new
metal shining and all that because he supposedly he's a soldier already
in the battlefield, he already was in the war. All the material would not be new or would not
be perfect, okay. As I told you before you
always got to think about the story of your character why you are designing it, okay? Here, also, I'm going
to add a plastic piece. So I bag to the plastic render and I try to cut this
piece and put it in a different layer also and
I add it to plastic pieces. I'm going to make
also this part metal back again to the chrome render and then I'm going to
make these pieces. Cut this, got the other one. Both of them got to be in
a different group also. This piece, I want to make
it also paint a piece in the chain and the
orange material. Cut the piece in the chain. This part, I want to
make it also metal. See, guys, I don't
have a piece there, but now I'm thinking of adding a little piece
metal right there. I don't know how it's
going to look, but anyway, I'm going to go for it. Okay. I'm trying to see. I don't know if I'm going to it. I change my mind. I'm going to make this
little piece here metal in the chain Even with all the
stuff we are doing right now, I'm still not sure, guys, what I'm going to let,
what I'm going to add. Later, I'm going to
decide after applying all the material I want
to apply for my head. Back again to the
plastic material, then I make also the cylinder of the head that the
ones look like ears, want to make them also black. As you see with the
image right now, I'm still not satisfied
with the result, but we're going to keep on and see what we're
going to go from there.
30. Apply The Arms Materials In Photoshop: So now, guys, we're going to add the material to our hand as we did the same
with the head. We're going to see all
the rendered layer for our hand material, and then we're going
to add the different material to the parts we want. First of all, I think I'm going to change something
with the head, guys. I bet a black plastic
material of the head, and I decided to change
all the parts to material. I don't want the yellow pieces. I'm going to add black
instead all black. Again, with a magnetic tool, I'm going to select this part and I cut on a different layer with commG as we
did before. Okay? You saw guys how many
times I changed my mind. That's because I see some
things I like right now, but when I look at the
design again later, then I think this doesn't
look nice enough for me, so I'll try to change
it to other things. So now we have the
material of the arm guys. I'm going to select
this metal material and then I try to cut some
middle pieces from it. I'm going to cut the
cylinder right here. Co put it on the front layer
and it's not well placed. I try to move it and place
it with a move tool. I select also this part
and I try to make it. Okay. Select command G to cut it on the front layer. Okay? Not in the correct place, so I try to also do the same
and place it well. Okay. Here look nice. I'm going to make also the
small cylinders metal. I select them with the select tool to erase some part of the
selection you guys, cut it on a different layer, and then I place it correct. I also got this. As I see the layers of the arm in the same
correct position. That's why I need to push
them more right now. But when you are working in
your design guys, be careful, the position of the arm
doesn't change even a bit, like happened with us
right now and that's make using them correctly. So I keep adding
material to my design. Here, I'm going to add
also this part metal. I choose this part cut
it on a different layer, and then try to
place it corrects. As I told you guys, be careful when
you are rendering your layers for the object
doesn't change its place. We need the material
layers to be in the same correct position
light and all setting guys. So Okay. I put now all the pieces of the
metal in one group. Command G to make
a group so guys. Then the original render, I give it another column. This range here, also, we're going to cut some pieces. This piece here, I'm going
to cut it pan metal ornge. You can add a lot of materials
to your design guys, but I'm trying to add only a little bit different
materials for the R. I'm not going to go
so much with the head. Here I'm going to add
less materials to the R. With a magnetic tool, I select this piece is gap I'm going to make it
a different material. So I commend to cut
it in the fern layer. First, I need to clean the
selection with the art. Okay. Okay. I think it looked nice. We're trying to
place it correctly. Sure you move to or com. I'm taking a look at what other orange pieces I need to add. So I'm looking to the design. With a magnetic tool, I cut this little
piece right here and make it range color also. So com the same replace it. I don't know what happened
while rendering guys to make all the material of the arm
not in the same position. But I always advise you to be careful when you are doing
that before you render, try to see if
everything is correct. I'm going to cut this piece and make it a yellow
material, paint metal. So I cut this little piece. Okay. We need to cut it on a different material. As you see, I need to clean
the part in the middle. So I select that part
and you erase it. Okay? I think it's enough, not going to add more
material to the arm, but I'm going to add more
details with the photos, guys? We didn't finish. This is just the basic So let's say guys, we keep
on in the next class. We have already the material
for the arm and for the head bashed and now we're going to do
the same for the ar.
31. Organize Your Materials Layers: Before we keep on working
in our design, guys, need to take time to clean out, to clean our layers. Going to go and
check called loops. What I'm gonna do here guys, I'm going to select
all the layers of the head and I'm going to
place them in one group alone. And then select all the layers of the arms and put them
on a different group. Okay, so here I'm trying to find all the groups of the head and
all the groups of the arm. So I hide and unhide and z, which ones are for the head, which one for the iron
because they have a lot of small
pieces right here. I don't see very
well on the design. Shoot from the beginning. Try to put all the layers
of the head alone. The bottom example
in all the layers of the arm in the top
and put any groups, we'd become more
easier for you then do these and try to find
all the layers unit. Okay, I could skip these
guys and show you what I think is very important
to show you for your work, how to clean your work in, put everything can
a difference in. Anyway, we're going to put all the layers of the
head on one group. That's because also we're going
to need to move the head, replace it in the
correct position. And we're going to do also
the same for the art. It's necessary to put all the layers in one group
and then move that group. If not, it's going
to take a lot of time searching for all
the layers and move them. Then again, you search for the layer and then move them so you better place
everything in one group. Here I'm putting all the
layers of the R group. Here. I put it over there
or the arm in one group and call
it hand layer. Okay? And then, and hide the
layer and then try to find, and then I tried to do the
same for the other layers. It is very important. So your goal is to
do the same with each project you are
working in, are working on. If not, it's gonna be a mess for you and make
you lose more time. I'm selecting all the
layers of the head and then I'm gonna put
them on one group. Okay, so let's do that. Select all the
layers of the head. There are too many layers with the adjustment layer also guys, a lot search in place. So he, he, he, he also too many layers for the hat. Guess. I'm trying to search
all the layers. I keep a check in if
I forget something. Now, I put them all in one group and I call
the new head layers. Now, I select the other layers of the fingers and I put them also in a very different
group. Recall it. Fingers left. So as you saw guys, we have all the pieces in
different groups, so clear. And then we're going
to drag them to the bottom and we're going
to place them on the bottom. So I bring all the layers at the bottom so we can
hide and unhide them. Now, then I'm going to try to cut some pieces of the soldier. I don't want I'm going
to use the fingers should be under the
gloves, not over. Okay. So that's why
we cut it these part. Then we put the fingers
under the gloves. The finger under the gloves. Now I'm going to try to place
also the correct position, trying to make it a little
bit and place it better. Now unhide the head layer and try to place it correctly. Okay? So I'm going to move the layer. I put it, the head
layer is under the layer of the soldier because we want to
place it correctly. Okay, I think I'm
going to delete the part of the sweater. We're now everything's
looking good, so we're going to keep
on in the next class.
32. Photobashing The Robot Head: Hello again guys. Now after we apply in the
materials for the head, now we're going to try to add more details with photo
bashing techniques. As you see here on the layers
we have the head material. I want to give them
some color so I know all the random array. To see the layers,
keep checking. Two layers, I need to
put them on a callers. Want to change the payment of the head materials to choose
this plastic material. See how it's going to do. Let's see trying
to place it first and see maybe I
let it to or not. Still don't know. Just
want to see first. Okay. But do you see guys, it's
not a complicated technique. We just cut the material
we need for each pieces. It's more easy than having different sub tools in
material to each sub tool. Because this way I can change what I
don't like as I want. I can do whatever I like. Okay. See here is the rhabdo took the place
value of the piece. Now I want to try, maybe I add some of the
metal, trying to see more. If I need to add more details. I need also to refine it a bit. So I'm gonna, I'm gonna delete this part because
I don't like it. Slow climb bad cards. But think the light, green light or something. I'm going to clean
this part right here, guys, I don't know. I don't like how it looks. As you saw our picture example. We don't have rim light
in the original image of the soldier because there is no light casting from behind. He was standing in front of the wall or in front
of a military base? I don't know, but try to not use so much rim light because
I don t think there was something casting and we might find this bird magnetic tool or the Lasso tool. They are so helpful to refine. I like so much this technique because you become independent, the design as you want. You can even change in real-time the things
that come to your mind. Maybe in the moment 20
while you are working on applying the material
or the photo version, you try things, you see how
it looks with the design. If not, you can undo and
then do other things again. So it's very nice to
work this way, guys. As you see here, and I wanted
to cut the gray piece. I want to add it to the design. Yes, I think I like that. I'm going to also
add one right here. Then our like all the
different players in inside the groups. And I add some effect
on them together. I don t need to make effect
on each layer alone. Okay? So we want to cut this piece also. Then I'm going to
refine it later. Okay, so we'll look
at this piece. It doesn't matter if
the refining now guys, because now we just
add in the material, the refining we're
gonna do all late. So don't scare if
there is some defect in the pieces you are
codon or the design. Everything can be refined in
later with painting, okay. See there this part
and in the middle and I will need to
refine that part. Refine that later. Uk has gotten a little
bit defect right here. So I see what I can
add more material, but we're going to add more
detail by photo bashing. Okay, so I'm going to see
what I have this image. I'm going to cut this piece and see what I can do with this. I still have no idea about that. Thinking of adding some
details to the neck area. I tried in different areas here. Don't like it. Don't like it. See how put
aversion working guys, you got pieces and then
try and place them. Some were on the design and see if it's going
to look nice or not. If not sure who got
to change it to another place or even
try another thing? I'm trying to place it
in the neck area here. I think I'm going to
knit it here by now and then later I see
what I'm gonna do. Now we're going to use
the level tool and I try to blend it with the design. I'm going to use iteration. Change the color a
little bit or something, then the corner a little
bit to the green. I'm going to make the
mid tone more darker. Now I put all the layers
together in one group. Then duplicate the group, and I make another piece, flip horizontal and place
it on the other side. That's all you do. By now. I'm going to let this, but maybe I'll do
another thing later because the idea start
rushing in my head, guys. So I may use another, another pieces or
may change my idea. I see no, now we
see why it work. Now I have this image and I want to cut this little piece. I see the head area from
the top need more pieces. So I'm thinking of placing
nice piece on the top of the head with the command. I'm trying to twist
the aim is to place it correctly right here and
see we have some problems. Okay, now, when
you use the level again to darken the image, I think this is more easier
to blend then other pieces, I don't need to
change the color. I think just to play
with the mid tone in the high light and
the dark shadows. You see him trying to blend it. The head part of it. I'm going to use
the use iteration, maybe saturate the
piece little bit. Also change the color. I think that's good. Now I'm going to put the
layers in one group. I do the same,
duplicate the group, and I place on the other side C, It's so easy method guys, you just need to
observe very well, the color is observed
very well, the contrast. So the brightness. That's the only thing
you need to blend the pieces in your with your design to give it
more realistic loop. See, I'm trying to place it here with the
correct perspective. You've got to think always the perspective
than we are alive. When you look to some objects, how the things look
from different sites. These piecewise. It correctly. So example guys, when
you look to the head, you see the cylinder,
how it looked from this side and how it looks
from the other side. Because there is more size. The camera look into the head. It shows little bit of the left side, then
the right side. We've got always to
think about that when we are placing our pieces. This is a mirror of a
practice guides and they become so easy for you to use this technique with your work. And you're gonna be enjoying every day new and a new
project, a new design. And challenge yourself to make more great designs before you cut anything or
do anything, guys, you always try if
you're going to use something and you're going
to resize as always, you need to turn it
to smart object. That's very important. So the resolution stay
always in good-quality. Place it in the
history of the jaw. Now, moves on the
level again to blend. I put in one group and
then duplicate it, duplicate guys by holding Alt, drag, Alt and drag to categorize k. That's
the short key I'm using. Let's see, I'm trying to place a threat now the same
as the other one. Okay, I'm thinking about
the perspective also. Be correct. Let's
see the image again. Tried to find some
pieces, two cards. I'm going to cut this
piece in the middle. You see here grinds. We're
going to put this little piece on the chain and then we're going to try
to blend it very well. We're going to use a level to each very nice
tool in Photoshop. You can play with
the shadows and the mid tone in the highlights, and also help allowed to blend pieces together and make
them belong to the design. Also, I use a lot of the
brighten the contrast, the use iteration,
the same tools. I use them to blend
my photo bashing. I'm trying to add a little
bit of color, green. Now. Play with the highlights. I need to make it
look like designs. There is not added as
a photo, Okay, guys, always observe very well
your design and try to make it possible. It can belong to the design. Here I use this technique
a lot in my work, which making a new layer. And then I select the most
obvious color in my design. And then with the bucket tool, I add the color to the layer and then you
clip it to the piece. I want to blend it
with the object. I just see you and now also
dial down the opacity. I'm going to die and
more the opacity because we don't
have a solid color. We just have me to beat up that color to make it
blend with the object. Now, as always do, I put all of the layers in a group and then
a name the group. See those as the same technique we're going to use all the time, guys, just need some practice. We're going to keep on adding
more pieces to our design. So I'm going to select piece to add it on the
side of the head. Let me see. Really place it. Rotate. Holding command, I
can rub it over the head. We do these holding
Command guys, okay. To cut these little
pieces for you. Horizontal. In vain,
tried to place the piece. Neither. Always think of the respective wherever you're currently
looking into the camera, anything I think we're going
to appear when you place it. Here too. To take this little
piece from this helmet. Your own research in the
images guys and try to find some important shapes
you may use in your design. Could look very nice fit for
the design you are doing. Okay. So here I'm going to add this little piece,
flip horizontal. And then as we did before, as we did before, we try to place it
over the head using the command in the dragon. Okay? Mr. change the layers and
place them very well. Put any groups at both colors for the images I
cut pieces from. I put them on a color, so I always know which are the original
images in my layers. Sometimes when you are
working on photo bashing or design like this guy's going
to get many, many layers. Maybe you can reach
hundreds of layers. You're going to be
always organized and try to put the pieces together. You put them in groups. That's where you make it a
little bit cleaned for you. God, always to try zoom
out and zoom in to see how my design look from
far and from close. Now I'm going to
level two pieces. Should not forget to clip it. When you click on
that small square to affect only the pieces
don't affect all the image. Okay, here I'm trying to use the level to the color. They use iteration
to change the color, make it desaturated little
bit, maybe so much. Then I tried to change
the color to green. This way, it's good. So what I need to do, Convert to Smart Object, always the image you're
gonna cut pieces for. So don't destroy the
resolution guys. Okay, here I'm going to cut this piece in
the middle and maybe added in the middle of
the head of the robot. I enjoy allowed to
work in this way. And then there's gonna be
very nice technique to learn for you to also always work in this way because it wasn't easy and fast
to get great results. So I'm going to try to place it with a hole in
the command as usual. We're going to do again, the adjustment layer is the
level and the user duration. Blend it with a level tool here, as you see, it's
already blended. I think very well. I don't need to even use the use iteration
for this piece. Now I have the image also of these machine gun and want
to cut this piece where it, when it has gapes format. I think the neck is
the most Laplace need more work and more details. So I'm going to
try to put a toy. So as you see, we're holding the Command
and dragging here and here from the corners and try to place it the correct
perspective. See right now garden to worry about the pieces behind because they don't
need them anymore. I want to add this
piece instead. As I told you before, you may change your mind
later while you are working in your design and
you get more new ideas. We'll add them instead. Here we're going to
use the level two. Other ways to try blended. As you know they're
part there is darker. So you may think about the alto and make the
piece look darker, same as the part of the neck. This way is better. Okay, guys, researched already the first part of
what the version, we're going to keep on adding more details in the
next class, okay.
33. Detailing The Robot Head : Hello again, guys.
We're going to keep on photo bashing our head. Now to add some little details to the head to
enhance the design. So we observe the head very
well and see what we can add to the design to make
it look much better. I think I need
some small details could be helpful to enhance
to enhance the design. Let's do it. As you see, I have this image
I put it on a purple color. I'm going to cut this
small square right here and then and then try to
add it to the head design. Cut this with commanding
G on a different layer. So you can use the lasso
tool to select guys. You can use the magnetic tool, the quick select tool. Do any tool you are
comfortable of working with to select the
pieces you want to cut. This piece I'm
going to add it to this black. But I
don't think so. I think it's going
to be much if I add it to black material
of the head. I may put it on the
side of the head. I place it then
without and drug, I copy same layer and I try to place it
on the other side, horizontal, then place it
with command and drag. As you see this
little detail can enhance the design of the head. But when you are working, avoid to add things. I doesn't doesn't look nice
to add to your design. You always got to
be careful when you add some little details. Think well before you choose the pieces and the detail
you want me to put. Okay. You may observe image
of some mechanical stuff in the world and then
get some ideas and then you can add
to as I always tell you keep on the same things because there is no magic guys. It's all about
learning, observing, experiment, and try new things. I'm going to cut this
little piece example here and I'm going to try
to add it to the head. I want to add small
metal pieces. Holding the plastic
panel on the head. Okay. So first, I need to scale it, rotate, and then
I place it over. So I place it on the
top of the head, rotate, and then
I place it there. This is my world. Science
fiction is all my work. I like to design to science fiction world
Cperpankbo robotic stuff, some flying cars. The idea is always
work on a new project. That's practice
even more and make you grow as an artist.
This is very important. As an artist, you've got
always to manage your day, you can work on projects
some hours in the day. Then if you have some work, so you need to do for
some client or something. You make hours in
the day for that, but always try to keep some
hours for your own work because because that's important for you to grow as an artist, do the things that
you like to do, not the things that the
client want you to do, okay? Okay. Most of the time, you may be working
on some kind of a type of things you want
to work in as an artist, the style of things
you need to do, but also when you
need to work to listen to all your client and then try to do them what
they ask you to do. When a client approach you and ask you to do some concept art for him and he's
going to describe for you what you
need to do exactly. Always ask him about the
back round of the story, what story you want to do ask him about the
time, the place, the same what we did
when we were brainstorm and the ideas for
our concept arts. That way, you're going
to know very well what kind of a concept
you're going to need to do. If you want to need to do a damage character
or you want to do a character like a cool one or make a very devilish
character or whatever. It is whatever type of a character you need to do
all come from the background. Okay, guys, even the clothes, even the weapons, the
stuff he is having. It's also effect
by the background and the time and the
place of the story. So try always to discuss these with your client before you
start working on the design. It's better if you make some rough sketches and
send to your client and ask him if the sketches are near to the things he has in his
mind or something like that. Now you're going to trace
the road for your art. You're going to be doing
the correct thing for guys. So it's all about
communication with the client. Here we are trying to blend this little piece we added to the box of the
head on the top, as we did before the same
saturation and also the level. You can use the bright contract,
you can use the curves. You can use many
tools as you want. Just try to apply the
same technique by blending the pieces with
any kind of tool you want. So as you see here, we
added some little details, I may added more to our design. It didn't mess it up. I think I'm still thinking of the little pieces on the
top is in the color yellow. I don't like them that much, so I may change them or
let all that panel black. We're going to see while we are working on the design,
what we're going to do. Now, I did the same technique. I had an empty layer with a bucket tool, I
select the color. From the plastic material, and then I clip it to the piece, dial down the opacity. This is a technique
I made to blend the better the pieces
with the design. Okay. So I put it
the gap pieces on the sides of the head robots
on a different group. Then also, I'm going to put
the middle pieces also. We added in a different group
and all the similar pieces, you better always put them on a different group as I'm
doing right here guys. Also the images,
the original image, try to put them on
layers with the color. You give them a color
you know already, which are the original
images you cut pieces from. Here I have this image, but I don't know if I find
something interesting to cut, maybe I'm going to cut
this piece right here. I think I'm going to head
it also to the head And, I already thinking of some part. I may put it, but
I'm not sure yet. So I cut it on a
different layer, then I tried to place it. I think I'm going to
try to place it in this part of the job guy. It's kind of article
for the job. Place it there, then I'm going
to out and drag to copy. Place the other
piece right there. The one also to the other side. When you watch terminator
example, guys, you see that there
is a different way of showing the
robots in the movie because they made it look like a human under it
has the mechanic, but over they give it a show
on a look like a human. Anyway, that's kind
of other approach, but for me for robots, I like to show a robots. I don't think the
robot should have a human skin or whatever. I like the robot to
look mechanic or read that look more nice
and more beautiful, but robot look like a skin for his kind
look like a stupid. Well, it was so successful in terminator because in
some part of the movie, also, they made the
mechanical under that skin show off
in the screen. That's what makes
it better, but I don't think it is
going to go well if they that robot shown all
the movie as a human. I don't know, guys.
That's my idea. That's my opinion. I don't
know what your opinion sure. Every artist he has his
own things you admire. Some artists like other
kind of robots guys. This is my style in
design and robots, but some artists they
like another style. Each one has his own style, that's how make us different
as an artist guys. That's it. We're going to
keep on in the next class.
34. Photobashing The Robot Arms: Hello guys. We're going to keep on photo version our head. I have this image right
here and I'm going to cut this little piece, like this little
piece right here. I want to add them to
the head and maybe to the arms later or something. Let's try and see guys. Okay. When our photo bashing, you need to look at the
material to your design. You put it in front
of you and then you look on the image library you have and try to sink
and emergent things that could go well
in your design. Then you can maybe
experiment with them and try to
add the GeoDesign. Then if it doesn't work, Delete, do again,
really do again. And also a way to find the right pieces
for your design guys. Know on how to do that. Also by observing the rely of guys and also watching
real mechanic, real designs, whatever it is and not necessarily
watch a robot designs. You can watch example cars. You can watch the
medical things, you can chew, Watch and
destroy your thing. You can watch a lot of things. Can teach you how to do
hard surface designs glass. So you see here I added
these little pieces. They already blended
to the design. Now I'm going to put the layer on a
different color to know all the images are used
for my photo bashing guys. I know all their places. So because already right now
we have a lot of our layers. This little piece also
right here, gluco, interesting for me, so
I'm going to cut it and try to use it for my design. The Move tool, I
place it on the head. Now, duplicate the
piece by holding Alt and dragging the
layer to the top. I have a new layer,
duplicate it. Then I tried to place it
on the other side of that. Think of the perspective
as I always tell you guys how it could look
different from the side. I want to also cut
this piece and try to see where it
would be useful. I purchased it and then I'm going to try to
place it right here and C is useful
right there or not. Kay? That tried to place a device perspective
as I always tell you guys, and then also duplicate it and put it on the other
side, Flip Horizontal. So guys, even little
pieces can make the difference with the
designs are always got to think about the small details and the big details and
the medium details, because that's what makes a great design is having
three sizes of pieces. Small, medium. And as I keep always
tell you guys, okay, So this one, I need to blend it better
so I'm going to use the level as we did before,
the same technique. So for the bashing guys, you need always to make a
big library for yourself. Maybe you add all the liberal rebooted in breach and you can open a bridge with Photoshop and you work in harmony
together with that. Normally I use a bridge trying to drag and drop
the images from the files. But I prefer you use bridge
or some similar where to put all your images in and make it open another
window and you can solve, you can drag and drop
easy the images you need. Okay, so here I'm going
to use the same level. Make those pieces also with a
level to blend them better. Or maybe I desaturate. Also. Don't forget to
click this square to clip them to only affect the
pieces that all the image. I was telling you guys. Try to make it big liberal
and you are working. I all I spent some time, some hours during the day
trying to find many images. I may use it for my work. Try to find the images that
goes well with your style because we are working on a redesign guys who are
trying to put your own style, try to find your own style. I tried to find your own
self making a design. When anyone see your designs, want to say, I know
the artists, I mean, they know your name
directly because that's your way of
design and things. Each artist has his
own way of designing. So try to find your own self and your own style and an artist who are working with projects
in experiment and practice. All these will help you to grow and become a
mature as an artist. Don't be afraid of
trying new things, guys with the art. Try new tools, try
everything you think it may be helpful
in your workflow. Okay. As you see, same pieces, I placed them on the arms. Pay. The smart object. Here we have this hand guys
are going to cut pieces, are weird and use them for our you can design your
own hand and not necessarily use a picture
from the net guy. You can design your own hand and then try to place it
with your design. I'm trying to be more fast here, so I'm trying this image
and on the net and cut in some pieces and
try to place them there. They got these piece also. Be single or put it right here. You can even work more on
the fingers unchanged, even more the design. But for me I'm
going to let it go. This end is not going to appear so much in
InDesign as we're going to add the
smokes for our image, anything is going to be
hidden under this model. Duplicate the layer, edit
right here or this finger. Try to follow the position of the fingers in
image of a soldier. Copy this one also. I think I need to cut part of it because as you saw with
the image of the soldier, there is recent partner John. So I'm going to cut these Neptune's magnetic tool and then I cut it to hitting the
delete key in the keyboard. Place it. Well, that's it guys. I think this is more correct, but I want to put all the
fingers are grouped together. So I put all the
fingers in group two, Gregor, and then I'm going to try to blend them
with the image. So name the group two fingers. Select, use iteration. Sure. To plug in square
to clip it to the pieces. I try to change the color. I'm going to try to
change the color and the saturation, make the saturated. Then also I dial
down the brackets. So let's see it because we need to dial
down the brightness because in this part of our
image there is a shadow. So we need to make
the part there. Seat. We have all the
fingers place it blended. Now I may make it longer
because I think it should be. It's going to try
to make pieces, to make it longer
and place it better. I want to bring this
image right now and cut some details. So neither steel thinking, yes, I'm going to cut all
these parts from the image. I'm thinking directly to
place these on the arm that so I'm going to cut it and then see how
we're going to place it. Command G to group it. Now, holding the
command that I tried to deform it and place it
in the correct position. That's it, guys. We're going to keep
on in the next one.
35. Add Screws With Photobashing: So guys, we keep on
washing our hands. I'm going to place this piece using a command and
dragging the corner. That's the way you
before my piece, as we saw before, I'm going to use iteration. Click on the little
square to clip it. And then I'm going to try to
make the brightness darker because that part of
the design is dark. And I keep on trying to deform the piece to
the right perspective, bringing in the image. And then I'm going to
cut another piece from the image may be
this one right here. Look like a square box. Use a lot of boxes because I think anything hard
surface should add a lot of boxes because they can hide some mechanical pieces or
wires or stuff like that. I'm going to grab this piece and try to
place it on the hand. I bring this piece
rotate command, then Dr. corner to place
it also as we did before, same techniques and tools. I don t think this is how I hopefully these techniques very well in make a great art
to the same technique. Okay. I keep deform the
fees to place it correctly. The right perspective,
as I always say, be saturate the piece
would use a duration and just change the color also. I think this is correct. There is a lot of
refining guys we're going to need to do after applying all the material and put in all the bees with a foot
of washing technique. We want to clean very
well later redesign in. You're going to see how
we're going to do that. I'm going to keep on it
and pieces to the hand to bring again the same image. The same image guys, because
when I look to the image, I come directly to my mind
some ideas of some pieces. I may place it in
some area of the arm. So I don't hesitate and
go cut these pieces and try them on the arm and see if they match the
idea in my head. So I'm going to
go to these bees, command G to cut the curve
it on a different layer. I'll do wave guides. Now. I want to place this piece inside these girls on the shoulder
right here, exactly, guys. It look like we can
put part of the arm so the command G or
use the same technique as always try and
deform the piece and place it in the
correct perspective. You see a folded inside
the gap. Tweak the form. Then we want to
sell checking for something else in
the same image. Yes, I think I'm gonna get
this little piece right here. I think I like it. So I've got this small piece with
the magnetic tool and then I'm going to try
to find a place for it. I'm thinking more or less the middle part of the
head, which is middle. So I'm going to try to move it to the place
I want to edit. We can stay bashing the head
all the time. Also the hand. I'm trying to not go over with the design guy who want
to try to make a balance. But you are working in design. You can stay adding layers and layers of details all
the time to go design. Can you get the results
you are aiming for? Now we don't just want to, I'm going to try to blend this piece saturated little bit, and then change the color. I think it's blended already. Need to add anything more. Maybe a search if
there is something else interesting I can use. I don't think so. You guys, I beg to the
screw PNG file I have. And it got some screws. And then I'm going to try
to add them to the art. I like this one, so I'm going to try
to add it to the arm. The same technique
we did before. How the command, and
then drag the corner. Do you place it very correctly? I can add a lot of
pieces to the arm. I can stay working on it all day long against
their work and add in little pieces and details and make it maybe even
change the material. But I got to think always
what is over for my design, what is the right pieces
in the right places? When I add also effect to
the design like the smoke. So we're going to see
that later in some of the design is not
going to be even show on. So it's not necessary
to work a lot on the details because some of it is going to be
hidden under the smoke. So you got to think of
all these things guys, while you are working
on a new design. And you try to gain the time you need to finish your design. Working in this field is
working deadlines guy. So you got to always optimize your workflow to the time you have to work on your designs. Always keep thinking of that. When I start this field, The worst enemy was in my
work is the time guys. Before, as a beginner, I didn't know how
to manage my time, how to find the right workflow. The easiest way
that make me finish the thing so fast and get
the result. I'm hoping for. What I'm trying to do here is I'm going to try to
cut you all the time. I spend to try find the right workflow to
finish my designs. Do as I do girls and
you're going to be okay. Okay. I added screws for the arm.
I think that's enough. I don't want to add more. But if you want to add more
screws, you can do that. One needs to do the
same idea exactly. Another told you also
you try to work on your project instead of doing the same project
I did right here. Because I think that's
where you're going to see your first artwork with the same techniques and you're
going to be so great with what you did with yourself
taking this class.
36. Create The Robot Tools: Back again, the work,
now we're going to keep on photobon
and refining guy. So as you see here,
I have this image. I want to cut all the pieces
on a different layer. I'm going to select this piece. I select this piece and
then with command G, I got it on a different layer. Now I rotate it
flip zontal want to put it on the back
because you need to add some military
stuff on his back. I pull the layer behind
the layer of the robot and then I try to deform
it and place it the correct perspective, So I move to holding command, and then I try to place
it very well. Okay. I'm thinking that in military, they have radio on the back, they have backpack,
they have more tools, they have more
guns, more weapons. You need to think
about that while you are working on your design also because any little detail is important to make your
design look more realistic. Okay, guys. This is the best
way to place it on the back of the soldier and image of the radio I'm going to
put it on another layer, and then also try to place it on the back of the soldier. Okay. Do you see the design already start appearing more
clearer than before? Okay. I keep on adding on the back of the
soldier or these designs. I got to also select
all the wires because that's the most important
part in my image. Put it on a different
layer with command N G, and then you have it alone now. We're going to try to place it on the back flip horizontal. You can let the other image guys or you can take it no problem. For me, I'm going
to let them both. Now, I have also this image. I want to cut this piece
right here and then I'm going to try to place it in
another part of the design. I'm thinking of
making a piece that can charge also the machine gun. The idea there is that
this kind of a gun can be charged directly from the robot and also a laser gun. While you are working, you think of the details of your design. You think about some ideas try and see if they suit
your design or not. Keep your mind
always open guys in think out of the box and don't scare to try
new things at all. As you see, to make
it link to the gun, like kind of a charger. Okay. So I'm going to make an empty layer and try to pe blend it with the gun. Here, trying to draw wires. Okay. Now, I'm trying to refine also the gun, guys, so it's some to change
the design of the gun. So I'm going to put kind
of a battery right here. Mm. This guy right
here is his guy to look so dangerous
and so deadly in the design cell to
make I don't give it an ice doesn't look kind
of friendly or something, I know why, but I think when
you give eye for the robots, they could look like kind of
friendly and not dangerous. The idea I want
to put it here is that a soldier robot
from the future, he's dangerous and deadly and he's fighting against human. We can think like he's a
robot made by human to fight in the battlefield another
human because sure guys, I think this idea is more
reasonable because robots are made by human and who's going to control all this
robot is human well. In the case of our story here, I want this robot to look
like made by human, but here, the idea of our soldier
is a robot made by human, but he has his own character, drive himself, take his
decisions and fight. He choose to kill or not. He has all the decision. We aren't making
concept art guys, we aren't making a story. We got to think while designing, we've got to think
what we want to show with our concept art, what we want to make people
see in that image because this image is supposedly
to be any kind of a story like film
or game or anything. I want to give it a
background, okay? So I have this image here. I want to cut this little
antenna and I place it over the head of my soldier. This kind of a
connection antenna that makes the soldier connected
to the military base. Okay. I'm trying to make it a smaller and try to
place it on the head. Okay. Any details I, guys, I always think about I'm going to put the
detail in my design. I need to justify
what I'm doing. With some pieces I put that why they are what kind of
things are the sensors, lenses, what kind of things
I put for my design. Always guys try to avoid put some pieces without thinking of the reason of
putting them there. Does that make your design more realistic and more beautiful? We finish this part. Now we're going to keep
on in the next class. Okay.
37. Learn To Add Decales In Photoshop: In this section guys, we're going to add some
details to our design. As you know, each hard
surface object or robots or no car or wherever. Always there are some details in the designs and we need to
do the same for our design. As you see here, I
have some details PNG, I'm going to add them to
the source file material for this class. You can download them and
use them for your designs. So I have this
small plus symbol. I wanted to add it in
front of the head. So let's go ahead and do that. Replace it in the correct
place right there. Now I bring another decay
will also be sworn in. Here. I think I'm going to
try to place it on the head. You can even make your own
details and use them guys, because in some of
my artwork I use my own because I
already designed them. This is another beaker
I'm using for my design. As you see, I want to blend them so I don't want them
to look contrasty. And then they make the eyes of the observer go directly
there on the observer, see all the designs of the head and the body Nazi in
the contrasty parts. Always be careful when you
are working because we don t, The idea is we make them see
what we want them to see. So we got their eyes
the way we want. Here. When I add the details, I don't want to look so
obvious in the design, in the eyes of the one who's
looking go directly there. Also, we need to
blend them to look realistic part of the design. So are you the Soft Light blend right here as we did before, we can even brush them little b to make some part
of just erase it. You can try to think of the real life and
do the same guys. Here also, I have this yellow. See how contrasty it is. I don't want it to look
so clear in my design. I wanted to edit and
blended with the design. As we did before. Soft light. See that
way is more realistic. So avoid to make the details so obvious
and contrasty and you'll design with this danger because I'm thinking
where to apply it. I'm going to apply
it in the arm. Okay? So I'm going to put it
right here. Exactly. The place ID, same
technique we did before. This is our design.
This is art gets belong to us who
design as we want. We don't have rules.
Thus the most thing I like about are that
we don't have rules. We got to follow guys. We just learned techniques
and use them to create our own yard as we want. We don't need to
follow any rules. And I also hate when someone tell me these
things can be done. These things can
be added to this. You don't listen to
the pupil hotel. You know, this design
is not impossible. You can't do these things. You can do this thing. We don't listen to these
people understand. We just get free where our mind and do
wherever we want to do and try to
achieve the results we have already in
our imagination. The difference between a
great artist, normal artists, is that great artist
tried to do all he can to make the art look exactly the same
as he imagined it. Some artists can
imagine crazy things, but when they tried
to realize that they can't do anything
guys, in their stock. It's like you have
someone example, maybe learning theatre and maybe he has doctor and theatre and then you tell him to act, He's gonna stack is not
going to know what to do. So I'm trying to refine with the eraser
that are simple. I don't want to erase
these a lot of things. We need to find it. So as we were saying,
as a designer, the most thing you need to learn is to be a great observer. You got to observe real life. You observe how things are in real life and tried to adapt them to what you
have in your head. So I'm trying to cleaning little bit right here
and then I'm going to say, I'm going to create
it like this, okay, but right now I don't want to distract me with
this white paper. Here. I'm using the Chrome
to try and clone some part. There. I go and make
zoom out and see how I'm grateful about the
result up to now guys. But of course, we're
going to keep on adding more details and refine
the design better.
38. Learn Refining Arms And Head: Hello again. Now we're going to start
refining our design. So I'm going to find the layers that I want
to refine right now. I just see I'm going
to unhide the layer of the head and then I want
to clean this part. Don't want this watercolor
in my design here. So I'm going to cut
this out to delete it. So I'm going to put it
on a different layer, enterocyte if on it or I delete the copy
on another layer. That way guys, I see if I want to edit or I
want to delete it. That's how you guys to
work on different layers. You don't put all your
work on the same layer. You put always things on a different layer and then
you want to fix something, you can make a
visit, no problem. Okay, so always remember to put everything on
different layers. So I'm going to select
the head group. And then we're going
to add a empty layer. Then I'm going to
choose a brush. I have this square brush, I'm going to include it in
the material for this class. Okay guys, this is my favorite brush because when I work in the hard surface, I need the brush that
make nice straight lines. Okay? So I'm going
to use this brush. I select the color
from my design without example right
here as you see, I'm trying to select the
colors and then refine. I'm trying to refine
this part also. See refining we do with
painting guys, okay, we paint over our design
so then we will fix all the problem and the
straight lines and we blend even more pieces
we added to our design. The way of refining your
design guy when you guys, when you are working on as concept art sketches
in Photoshop. If you afford to have
a doublet webcam, it's gonna be more
easier to work with, but other than that, this is no problem to
work with the mouse. Just the word comb is more, a faster and easier for to
buy any kind of a tablet. You better try
something like that. I'm going to define all
the edges right here. Keep refining and fixed, fixing all dancing
multiple edges. Time to get the details here. But then I say yes or
no, I don't think so. You see guys, I try
things and then I delete. I try and lead and see
what good goes well, what else would fix the edges and blend of these is better. Now, we're going to also
pay into this part is missing from the
neck of the jacket. They see. You select the same course
from the design and then you try to paint, to paint. As you see here, we already
painted the missing part. Now I'm going to
paint this part. Shortest paths would be black because it's in
the shadow girls. So go ahead and do that. Why you are painting, you got the same
in the real world, how things are as always
tell you here this part, I want to make it shadowed, dark because I want it
to look like a gap. I want I want a jacket to be light jacket without the sleeves because he has the arms
out of the jacket. It's cover only the
part of the chest. So all these details are necessary to think about the
cell. Don't forget that. I'm trying to make the line of the stitches go even further. We try to find more. As you see concept art or
design or any of the art, it's always about the
little details that maybe enhance the design or
make it look better. As also when you go over you, you can make it look bad
when you go over it. Okay. Observe always the
designs and CD amount of details they had and
they put it in each design, you think how to place
it to look so balanced? We keep on refining my
here with the painting. I keep painting parts
from the design. Seen many things when you're going to need
to paint the eye. So this is just
the first part of the finding when I keep refining more in
the other classes. Okay, so now I'm
painting the hand, the elbow right here, trying to make it
loop geometric. So you see, you see here, instead of designing the piece, I decided to paint here. Okay. We're going to create these armed to look the same
as the other one. We keep painting. Now I'm going to be
the shoulder with the same color of the other arm. This part also I'm going to put like a cruder and then I keep on painting some, some cuts in the design. And then I paint
also the same color. But anyway, I don't know
if I'm going to let it painted or maybe I
keep on bashing. Okay guys, up to now, we just refine it this way
after we keep on bashing in working with going to
see how we're going to refine, refine even further. Okay? I always look to your design and see the parts you will
need to refine later. Observed very well the edges. Here I'm trying to refine the thesis and try to
blend the pieces I made. Please be seated me straight. This part also want to
make in class like this. I'm trying to walk
with the mouse now to the tablet because I want to show that it's easier
to work with a mouse. Not necessarily mean
you have a tablet. We always think art is about the artists, not
about the tools. And I can make art
with any tools I find or I afford to have. You can make great artwork later once you have enough food because it's all about the
artist Annette, about the two. Don't always think about that
in don't start if you don't find the necessary tools
to do your art Omega. I find this little
piece right here. I'm going to define this part. You should have the defect. You're trying to paint
over all the edges. C will give on fixing the edges. Okay, it looks so
much better now. So as you saw guys, we just
made the first refinement. It was very helpful
to clean your design. So always try to
clean your design by painting all the defects. Okay, Glass. We keep
on in the next class.
39. Learn Refining The Robot Gun: Hello guys. Now we're
going to keep on refining in photo
question our design in. I want to add some
details to the clothes and also I'm going to add
some details to the guns. Were going to
redesign little bit the gun and make
it look different. First of all, I have
these military bag I cut, I want to edit in
the place where we had before this liquid paper because it's way it should be more nice
than just painting. Okay guys. So the last minute I decided to add this
piece right here. Now, we're going to try to place it over the jacket, right? To place it correctly. Okay. As I always tell you, you
hold the Command T and try to move the corner from the
object to place it over, like it belonged to the design. The design. Now I'm going to use the rep to. This is more powerful because it's going
to use many dots. You can wrap the bees
over the design. Now, I want to change
the brightness and also be saturated and
it changes a bit the color. So that way we try to
blend it better guys. You see here try to
write it because sure, it'd be objectives all do because he's already
in the battlefield. He's not to just get
out from the factory. Here. I tried to scale it. I'm still trying to
place it very correctly with the correct perspective
I was telling you guys. I keep on in the piece. Now here I'm going to make a new empty layer it over and going to draw some
shadow with the paint. Now, I'm going to cut
this piece. This piece. Here, I got it, this
little piece and I will try to place it where
I've already painted. I lower the opacity because
I want to delete the parts I don t need which are over the gun and also see
the under shape, any shape it correctly do that. Now, I'm going to dry cleaning
the parts in the gun. See here, this part, I need to delete it. Now. Keep on. Drown this bird lady, nice and clean the
hand I already added. I'm refining the edges. As you saw guys is all
about the small detail. You got to clean very well. And if you don't
see more things, you need to fix you back
again in another day. Or you look again to
the image again and again and again till you see
what you need to refine. See here example
what I didn't hide the background galaxy
and have a lot of things I need to clean because I painted it
a background color. As you saw, I painted
with a background color, so it was not obvious for the eyes be incorrect
lines I made. So now I got to delete all
these neat because our soldier is going to be over
another background is not gonna be on the
gray background. We just say edit, temporary. Now to see how many ages I
need to refine the gun also. So let's try to delete some parts we don't need in the loop and then we'll
clean them with the paint. So I'm gonna make
an empty layer and then C again to draw
very straight line. So I'm going to use
some technique here. I'm going to make a
straight line with the magnetic tool and then
with a brush I paint inside. So guys, when you make a
shape with the magnetic tool, it's so easy for you to draw a very straight lines and
then you paint inside it. Okay. I have this image, so I'm going to try to cut some pieces and see how
they're gonna do in my design because I want to change the design of
the gun right now. So let's see some
interesting pieces. It may goes well with
the design of the gun. Now what I'm doing
even with these peas, but let's try and find a place
for them to try blending. So as we have this piece, we need to change the
brightness of it. So we're going to select adjustment layer,
hue saturation. And then I'm going to try to do the color and also
with the brightness. No, I choose the level also. And then I try to blend into
play with the mid tone, the shadows and the highlights. See he didn't blend very well. Change the type of a blended
from normal to maybe missed by maybe pin light. Yes. I think I like it ends and instead of adding details there, I added imperfection of like the gun already
been shooting in, burned in that area. Okay guys. So here also
I have this video image. So I'm going to
select the Display and I add it to my god, it's a futuristic glands. So we're going to try to add
a display screen for it to dry place it. So as you saw, we place the screen there and now we're going to try
to change the color. I want to change the
corner of the screen to arrange. What I need. I clip the user
duration to affect only the screen in vain or
change its color to orange. I just saw that with a
little bit of details. We already change it, redesign of the gun. And he made it look
more realistic. I don't want to cut
this piece right here. When I added inside the
design lie the batteries. I'm going to cut this part. Any added When a more rounded down right now, I'm thinking maybe
I can add wires, maybe I can add this isn't
your batteries or cylindrical, and they can even add lances. I can add many, many
ideas come to my mind, but I'm not going to try to go further with this
design expecting, I'm going to try to
make this smaller. That Megan who
because of realistic, because if we're going
to keep on adding more and more design
course is going to be like maybe 20
hours or even more. We added this piece
now we're going to try to blend it with the gun. The idea of this course guys
are going to show you how to make would be the smallest
way and the smallest things. Great concept art and also
show you the techniques that you can use them
for your own artwork. Okay. I'm going to put a two in this
part right here and try to blend it better. I don't want it to be completely
of these gabled to be kind of a little bit on
the edge of the gun. Because if I want to
pull it inside guys and we need to cut part of that gun and put it on
a different layer and then place this piece. Now I'm going to try to change the color to yellow down the brightness and
the use of duration. Add a new layer. Then I'm going to
add empty layer. Now I'm going to try to blend it with the paint a little bit. But as I told you, this is
going to take a lot over time. So here we tried
to add little bit of details that make
it look futuristic. Okay, I'm keep on
painting some part. Now I'm going to select
this piece right here. See if I can place it somewhere. I'm not sure yet. We're going to get it in Beirut. I place it over our values. I'm going to make it blue, kind of a pattern, not a piece. Okay? So first of all, I'm going to blend
it with the level. So this is what I'm looking for, so I'm going to change
its blend option. I like it this way. I'm not going to find
another piece by that. Then I'm going to
let it this way. It's going to do kind
of imperfection. Sometimes we may designs
or use some pieces to use them as an
imperfection or some pottery. My head. The design. Sometimes I add
them as a pieces. It's up to the ideate come my mind while working on
the design in that time. You saw here guys, now, we're going to
keep on working on the design in another video.
40. Add Effects To The Image: Hello, guys. I'm glad we're
reaching the final section, the final details to our design. We're going to put our
soldier in his environment. First of all, with a lasso tool, I'm going to erase character
from the background. You can use a different
background if you want. I want to use the we already matched the light of the
background to our design, but if you want to
do a new background, and you need to match
your design color and light to the new
background, okay? Here I go to contend
to where feel. Appear right here, Kickok wait and there it is.
The soldier gone. First of all, I need to make command to blend the new
layer and the original one. Command D, select the as two. Now I bring my character and
place it on the background. Here I have some PNG files
of scratching and dust. I drop in my photoshop
and I try to add them to my character because
as we were talking before, guys, he is a soldier, he's in the battlefield. Normally he's going
to have a lot of imperfection in his body. We're going to have
some scratches, we're going to have dust, maybe we're going
to have a blood. I don't know yet if I'm going
to add the blood or not. But right now I'm trying to add scratching and
dust to my design. As you see here, I'm adding it, and then I delete the
part I don't want. I need to see maybe if
I change the blender. To overlay maybe soft light. I think I'm going
to it soft light. I make a layer mask, then command I inverted, and then with a brush
on the white color, I try to reveal part
of the MPN G file. This is the best
technique I use guys. I put the layer and then
I make layer mask invert the layer mask and then instead of applying and then erase
the part I don't need. I just to reveal the
layer in part I want. You see here I
duplicate the layer and then I raise it from
the part I don't want. So I add on the gun also. I add everywhere everywhere I think I should add guys, okay? So the same? No, I'm going to
add this texture. Because as you think
guys in the battlefield, there is a lot of bombs. They've been thrown and a lot of dust is going to be
thrown on the soldiers. Normally in the real life, it should have
layer of dust also. I did the same layer mask and then invert the
mask with command, and then I try to reveal the
dust in the parts I want. Sure, when you want to reveal, you put on the white collar, when you want to erase, you
put on the black color. Don't forget that also, the brush should be always
on a lower opacity. Hey. Glad we reached
the glass part and the design looks so
awesome right now. I'm so happy with the results. I just need more details and
then it's going to be ready. I'm going to add
a little bit dust to the gun to the hand. Adds to the metal sticks. I'm going to add
also to the antenna This is antennas of the
military radio guys. The low the opacity. Convert to smart object to
another layer of scratching. Then I try to place
it over the head. Okay? Do I, guys. You see guys all the texture
we added to our design. It makes it look even more realistic and blended
with the environment. I have also this PNG file
of blood I'm going to add. But first, I want to change the blending
mode to multiply. Then as we did before layer
mask invert the layer mask. And then with the brush, I try to reveal some blood in. He's in the war in
the battlefield. Normally, you should
have some blood on his clothes or even his face. That's the reality
of the war, guys, no matter, it is very
ugly and all, but I mean, but when you think of a war, you know what thing is going
to appear on the soldiers, like blood, dust, scratching. Maybe even gun holes
as he is robot, is going to have some holes
from gun shooted on him. I don't think I'm going
to add bus to the design, but if you want to add
that to your design, you can search PNG
file of bullet holes, and then you blend
them to your design. Sign. Right now, I decided to change the color of my soldier. I tried to change the color
of my design completely. Let's go and do that. Would I select adjustment
layer use saturation, then I will find a color I like. The brightness
maybe a little bit. I let it on the
color I like, guys. Now I'm going to also
make a layer mask for my use seration color
and try to erase a little bit of the color
from another parts. I drop a smoke PNG file, and then I try to place
it with my design right here and duplicate the smoke
also and I place one behind. I think I like it how it looks there is burning
behind him where he is. There is things
burning behind him. Also, the smoke is
very contrasty, so I'm trying to lower the opacity and make
less contrasty. And then I keep on try to
place the smoke where I want. Lower the opacity. So as we zoom, it's very nice, guys,
I like the design. I like the result up to now. It looks so great the image. We made a great
concept art up to now, still a little bit of refining. I don't want to
convert the layer of the soldier to smart object, and I need to use
the go blurt bit. I'm going to add a
little bit blur. You make A bit amount of a blur
to the design 02.0 0.2. Would the last I select
some part I want to blur. Then I go to Booz blur. And then I try blur We are trying to
add the field of the camera lenses to our image. As you saw guys, we
make some part of blur. Now we're going to
use adjustment layer bright and contrast, try to make it dark and then I'm going to invert
the mask layer and try to dark
some places right here example under the arm. With the white color, I try to add some shadows
to this part. Dark part because I think
that's the correct thing to do, guys, dark in the
part I need. Yeah. Then also with a gradient
tool right here, choosing the black
color and I add some vignette to my design, and then Now, I go to the color and I choose
layer, then the opacity. I chose in this one. So we finish already, guys, we can merge all the image, and then I bring it back to the photoshop and then you see all the things maybe you
need to refine or anything, and then you can save the
image and you send it to your client or you post your portfolio or
wherever you want, guys. I'm going to show
you on the last video details we need to refine to make the
image even more perfect because with
all project guys, we need to refine
some things, okay? Okay. I may wait another day to bring it back to photoshop guys
and see it again because that time as my eyes get tired working on the design many
hours and many hours. My eyes already get
tired and I don't see the little details or the
defects in the image. I got to back another day
and see the image again, and then my eyes is going to see new things I
didn't see before, guys, always do that. You finish the design
today, tomorrow, bring it back to photoshop or wherever and look at it again to see if there are
some things you need to refine.
Always do these guys. This is very important, a because always the eye is
going to see things didn't see before from the other
time as you get tired working and seeing the same things hours
and hours and hours. Guys. Guys, we make a great concept art and think it look amazing and cinematic. We're going to keep
talking on the last one, and then we look to the design again and see what we're
going to refine more.
41. Final Refinement : Okay guys, I'm so
happy we're finished already the class and we
created good concept art. Now you can design robots
and go wild with your ideas. The last thing we need to
do is refining our texture. After applying our texture, we revealed it in places
without thinking. I wanted to show you how to fix this when it happened to you. But you should always be
careful when you invert mask layer and start
revealing texture. Take your time to
reveal any places to look realistic.
Here it's a mess. We have continuous lines and texture are floating in space. To fix all that, you
just make empty layer. Then with the brush, select
the same color from the place you need to fix and you
paint over it to erase it. Then we're going to have
a realistic result. Watch on your image
and try to fix that in the head and the arms, the glowed is
anywhere. Okay guys. The last things I want to advise you guys is to practice a lot, the techniques and tips and tricks and try to work
on another project. Then try to create your own portfolio because that would make you
a great artist. Thank you so much
for taking my class. I really appreciate it. I hope you learned a lot
from it and it was very, very clear for you. I will be waiting to see all the art you're
going to create, guys. Okay? So after you create
your project, I want you to upload
it to our class so I can see them and they
give you my opinion on them. Okay. Keep a nice guys on my profile. I will be uploading lot of high-quality courses
about many fields, design, graphic animation,
3D illustration, concept art, and a
lot of other things. Thank you again for
taking my class and I hope to see you
soon in the next classes.
 Belhadj Ramzi, concept artist, concept designer, vfx ar