Transcripts
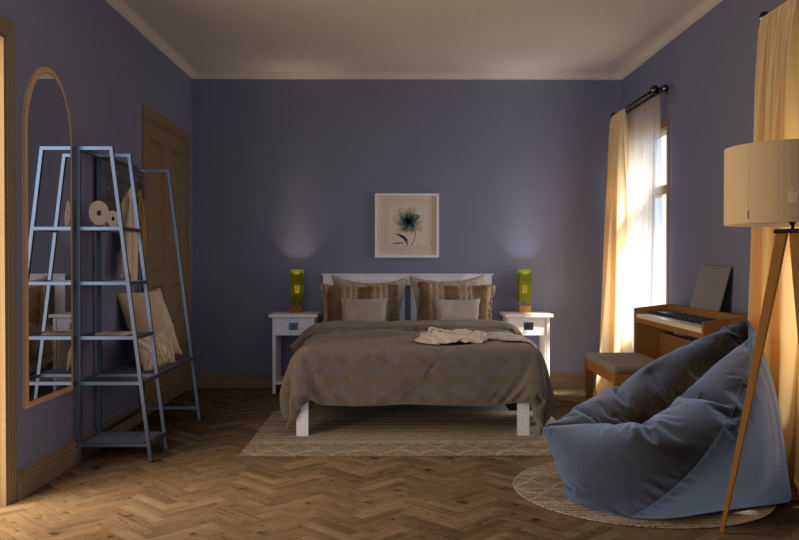
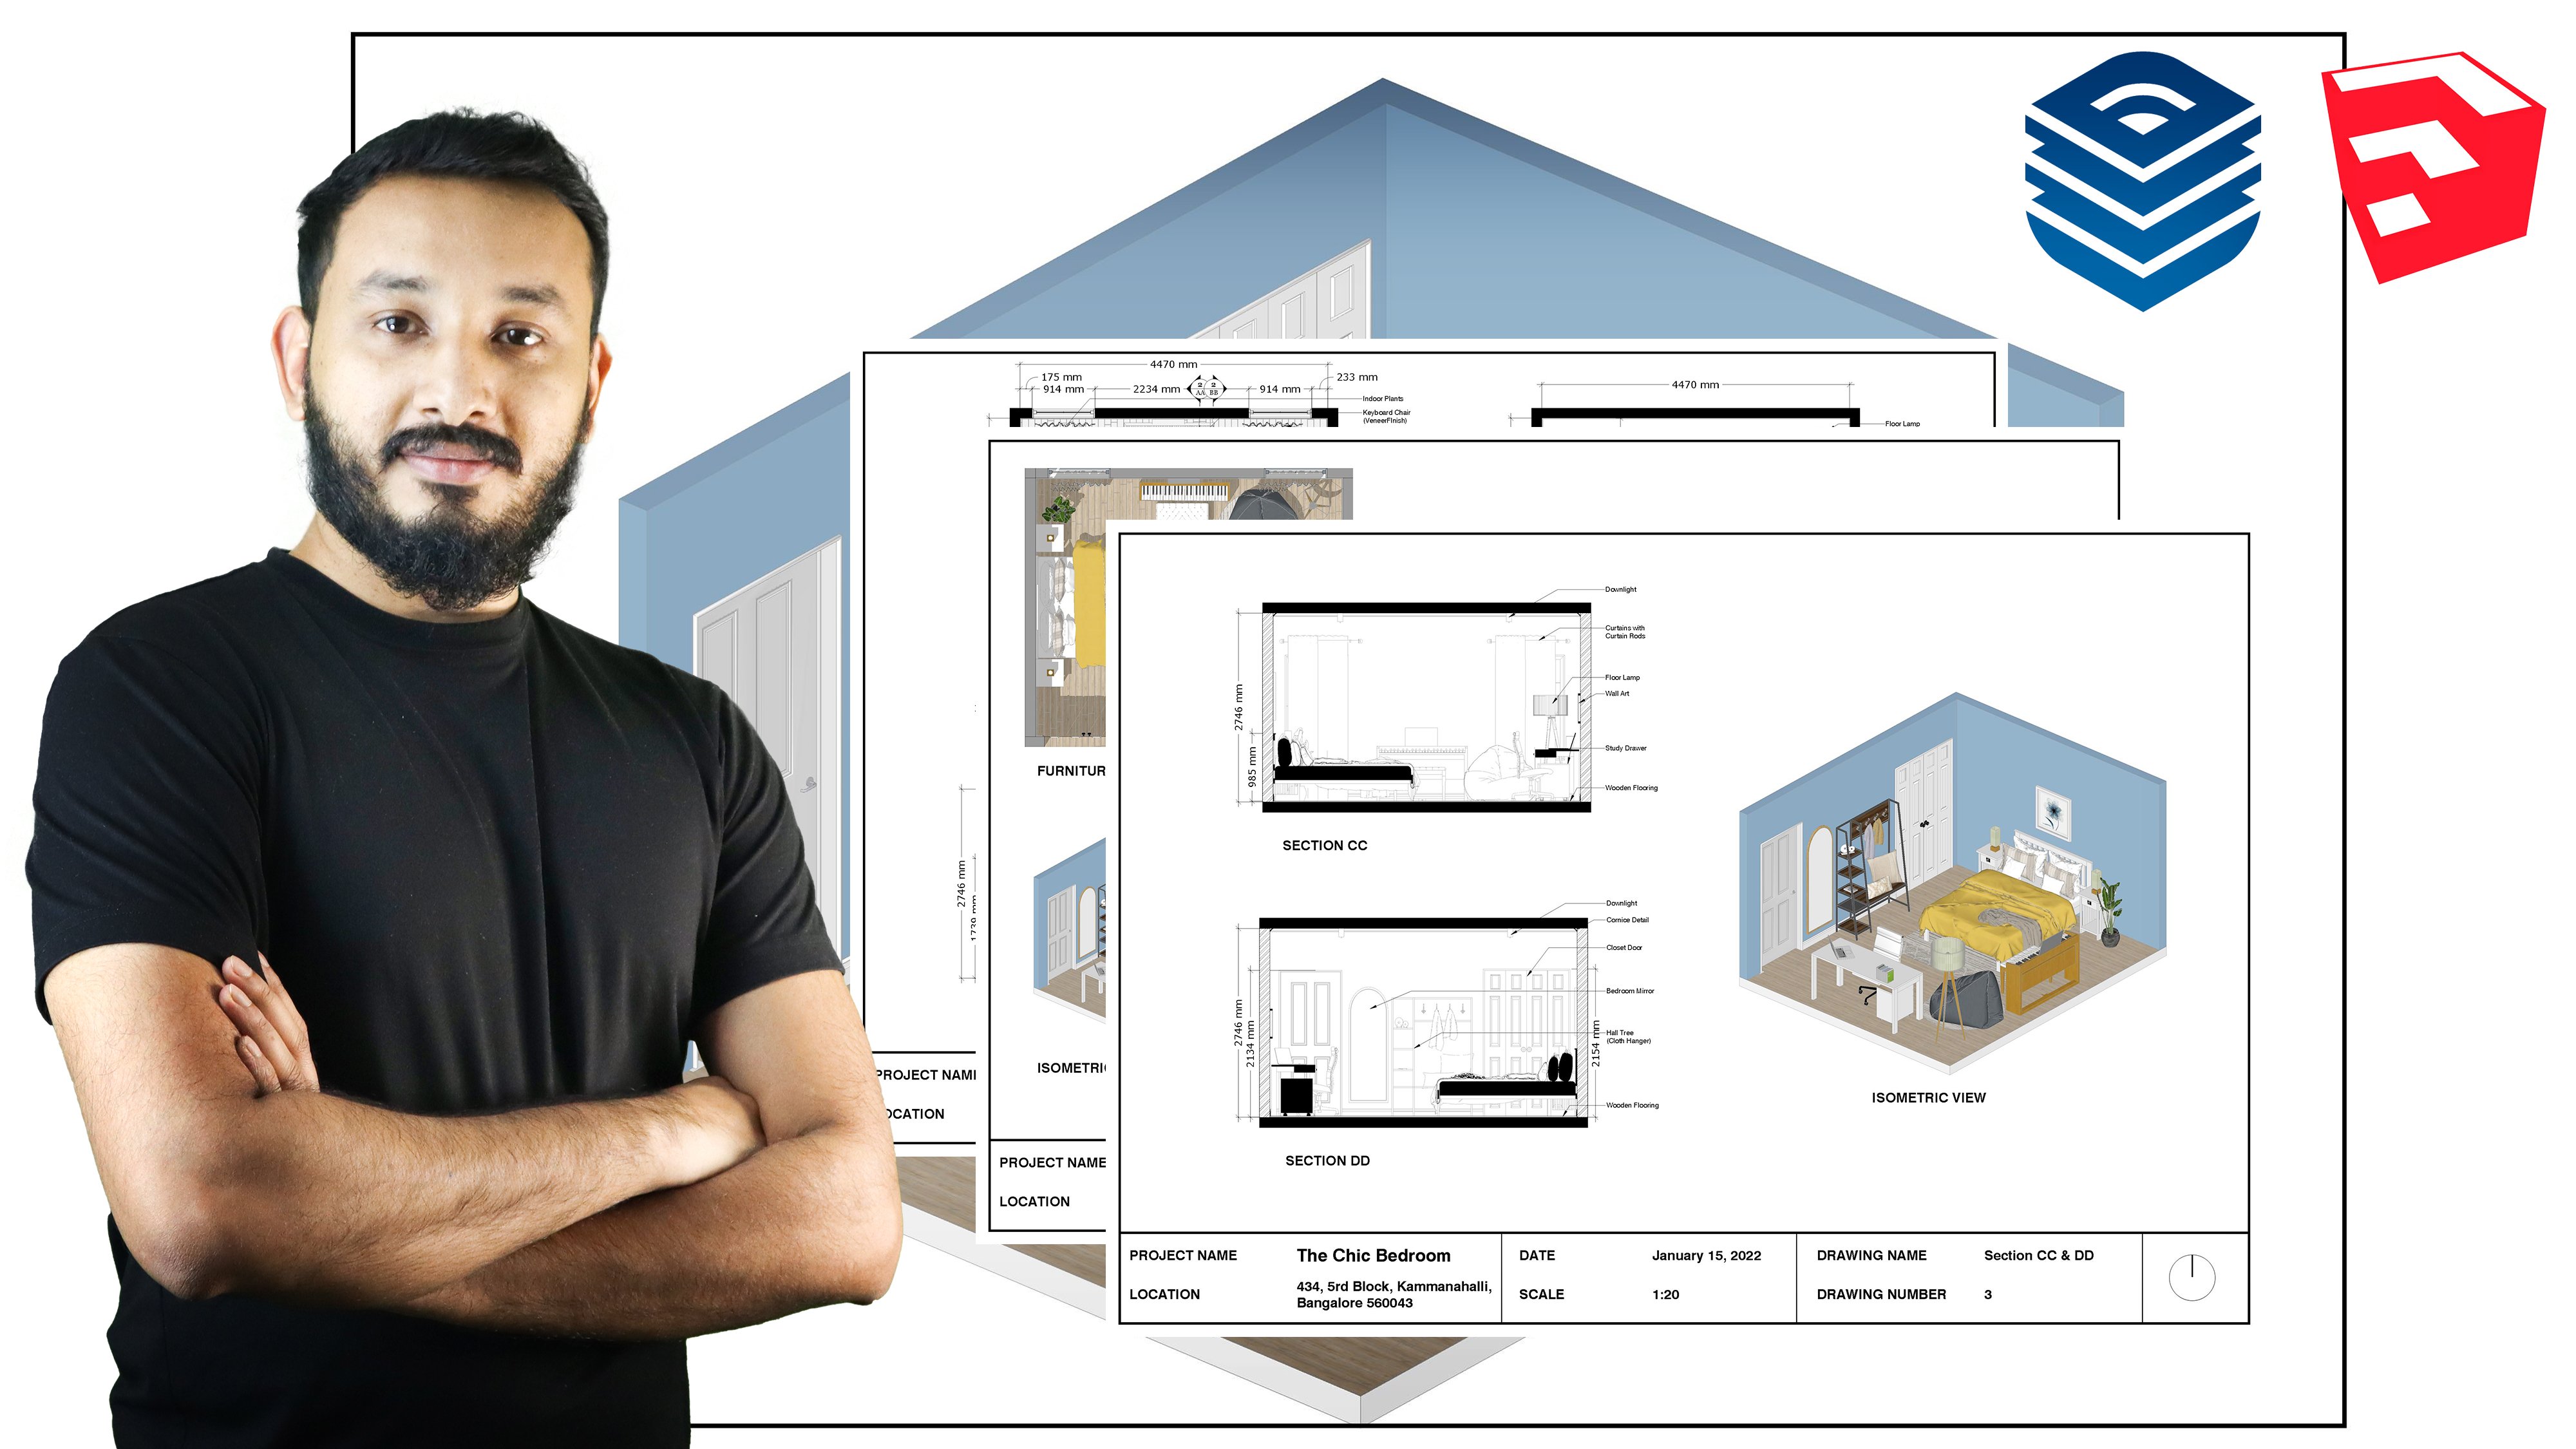
1. Class Preview: Hey guys, welcome to my Skillshare class, where I'm going to be teaching you how to model, render, and post-produce this awesome photorealistic bedroom. You'll also learn how to create this even more awesome 3D section and perspective. My name is Manish Paul Simon. I'm an architect with over five plus years of experience and I've worked on various types of projects from residential, commercial, office, interiors, and a whole lot more. I've been leveraging SketchUp and 3D to create compelling renders, which has amazed my clients and which has also helped me get even more clients. On this class, I'm going to be taking you step-by-step in modeling and rendering this room, where we'll start off by modeling our room in SketchUp. Then we use plug-ins like profile builder and Floor Generator to create our moldings and our floorings. Then we use the latest features in SketchUp 2021 to bring in live components and also add in our 3D models. Once we set up our room, we get into the rendering part, where we're going to set up the camera, aka scenes, and then we set up the lights, and then we set up our scene for render. Towards the end of the course, we'll also learn some post-production techniques and make our renders look even better. As a bonus, I've also showed you guys how to create this 3D sectional perspective render, which will definitely help you amaze your clients. By the end of the course, you'll be confident in creating awesome renders like this. It would be great to see your work in the student dashboard. Now without further ado, let's jump straight to the course. I'll see you guys in the course and say, cheers.
2. Installing Sketchup Plugins and Vray 5 for Sketchup: Hey guys, welcome back to yet another video. Now before we proceed with this section, there's download plug-ins that we require to go ahead with this section, which is Profile Builder and Flow Generator. You can open the Sketchup Guru Google Resource sheet. You'll find all the links and resources in the sheet. It's been sent to your mail and I'll add it to this video as well. We'll start off with Profile Builder. You can click on this link to open it up. This is a paid plug-in, but you have a 30 day trial lessons. You can click on "Get 30 Day Trial". Click on "Accept". If you have a group and you can apply a grouping. But since this is a 30-day trial lessons, we're going to simply click on "Checkout" for $0. I'm going to quickly put in my details. You can open to the newsletters if you want to, and stay updated on their new offerings. After filling in your details, you can click on "Next" again. We can finally click on "Submit Order". Now you'll receive a mail either in your spam or in your main folder. Let's check the mail. We received our mail from MindSight studios which is a company behind these plugins. They've also shared the trial license key. Click on "Go to My Purchase" to download the plug-in. If you scroll to the bottom, you'll find an access to download page. Now I can download Profile Builder 3 RBZ plug-in for a SketchUp 2021. I can now open SketchUp 2021. Go to Windows Extension Manager. Click on "Install Extension". I'm going to select Profile Builder, which is the plug-in which we just downloaded. Then click on "Open". You can now click on "Opendoor Profile Dialogue", or you can also go to Extensions Profile Builder three, and click on "License". Now you can add in your email, which you use to register in the Profile Builder website. You can copy-paste the license key from your mail. I'm going to copy the license key and paste it here, and click on "Activate License". Now we have a 30 day trial license of Profile Builder. I'm going to be showing multiple profiles below in this section, so do stay tuned. Similarly, I can also install a free plug-in called flow generator, which would be useful to generate flooring in SketchUp. Again, go back to your master link sheet and at the bottom you'll find flow generator here. Click on the link to open it up. Now we can click here to download the RBZ file. Go back to SketchUp, go to Windows Extension Manager. Click on "Install Extension", select Floor Generator, and click on "Open". This is our floor generator plug-in, which I'm going to be showing more off in this section. These are the two main plug-ins that we need. Of course we need Vray-5 as well. I'm going to quickly show you guys how to install really F5. Again, head back to your master link sheet. Click on "Vray" to open it up. Click on "Try Free", you'll get a 30 day trial for Vray as well. Login with your credentials. If you do not have an account, you can click on "Create Account". I'm going to login with my existing account. Once you've logged in, you'll be redirected to this page where you can select what you're going to use Vray for. Now if you're a student, you can select Student. If you're an individual, you can select individual as well. I'm going to click on "Individual" and click on "Start My Trial Now". Now click on "Download Trial". You'll be re-directed to the downloads link for Vray, simply click on the latest version, which is Vray-5 for SketchUp hotfix 2, click on "Download for Windows" and let it download to your computer. You will also receive a mail by Chaos Group dating the order number, order date, and your customer number. Once the file is downloaded, you can right-click on the file and click on "Run as Administrator". Click on, "Yes". Click on "I Agree". Install Vray for SketchUp 2021. If you have Sketchup 2020, you can install it for 2020 as well. Click on "Advanced". It's a good idea to install all of these as well so that your licensing doesn't have any issue. Make sure you install the License Server, Swarm, and Chaos Cloud. If you already installed Vray and it's not showing on SketchUp, I would suggest that you uninstall every version of Vray from your computer. Also make sure to uninstall Chaos Cloud server before re-installing Vray again. Now I'm going to click on "Continue". I'm going to click on "Install". Because mine is a local system. You will also need to close your SketchUp before proceeding with the installation. Click on "Continue" once you closed SketchUp. Now it would start installing Vray for SketchUp. As you can see, I've not uninstalled my previous version, so Vray is going to do the uninstallation for me and then install the newer version of Vray. But I would suggest that you uninstall Vray on your own first. Then try reinstalling Vray. Once you've installed, you will be redirected to Chaos Group server page where you can check the license. Make sure you install and use the same email ID to download and install Vray. If you're not using the same email ID or Vray is reading, your license from a different email ID, you will not be able to use Vray for SketchUp. In that case you need to click on, "Sign Out". Click on "Yes. Sign in again. Make sure you login with the right credentials. Now we'll start SketchUp and see if it opens in SketchUp to. If that is an option like this which shows up in your computer make sure you click on "Allow Access". Then you can drag in your plug-ins in place. With our plug-ins installed, we are ready to go and dive deep into creating this awesome new chick bedroom for space. I'll see you guys in the next video, we're going to jump into the modeling of this room, a very simple modeling technique. Then dive deep into donning our SketchUp view into those awesome window. Let's go.
3. Using Shortcuts in Sketchup: Hey guys, welcome back to yet another video. Now, in this video, we're going to be showing you the various shortcuts that I personally use in my daily SketchUp workflow. The number 1 shortcut that you need to learn is the "Hide Rest of the Model" shortcut. We're going to assign the shortcuts first, and then I'm going to show what each of these shortcuts do. Let's go to "Windows" and go to "Preferences". Click on "Shortcuts". The first one we're going to assign is called "Hide Rest of the Model." Type in "hide", and when you go to the bottom, you'll find this "View/Component Edit/Hide Rest of the Model". I've given a shortcut called "J". If you want to assign a shortcut, simply press "J" on your keyboard and click the plus button. I've already assigned so this is why this dialog box is showing up. I'm going to press "Yes". Now the next shortcut is "Edit/Hide", so I've assigned "F2" for "Edit/Hide". "Unhide/All", which is "F4" on your keyboard. "Unhide/Last" is "F3". Three shortcuts here and then "Hide Rest of the Model". Now, the other shortcut which I'm going to use is something called X-ray mode. I've assigned the shortcut "Y" for this. You can simply press "Y" on your keyboard and press the plus button. Apart from these, I also use the "Camera/Parallel Projection" shortcut, which is "Alt + W", and the front view, which is "Alt + F", and finally, the top view which is "Alt +T". You need to press "Alt + T" and then it'll show up here and make sure to click on plus. Once you've added all of your shortcuts, in case you want to use it in the future, you can export these shortcuts out. It's called SketchUp Data File, and then you can re-import it in other systems or in future versions. Once you're done with this, press "OK". Let's start with the first shortcut which is "Hide Rest of the Model". Now, for example, if I want to edit a group here, and I want to edit the edge, or this face, the face here, you need to press "J" on your keyboard. What that does is it hides the rest of the model and it only shows the group which is active, and we can see with this bounding box. Now if I make something here, maybe a rectangle or something like this, an abstract shape, and if I press "Escape", you can see that I've added it to this side face of this group. So it helps when you have a lot of groups inside your model and you need to edit a specific model or group. Now if I enter this group and press "J", I can't really edit that side face. So this helps in hiding the rest of the model. It simply toggles between the main model and the group which is active so you can start using the "J" tool as well, "Hide Rest of the Model" tool. Next, which I can use is something called the X-ray mode. Sometimes in SketchUp it's difficult to select certain faces and edges so we use the X-ray mode. If I press "Y" on my keyboard, you can see it's a wireframe mode, and now you can see the back part of the faces as well. Now you can enter the group and you can also select the back part faces and the below face or whatever it is. It helps when you're trying to move stuff, decorating a room. If there are too many things in your space, then it'll be difficult to move stuff, so you use the X-ray mode to see things which are inside your model. All these shortcuts will make more sense once we start modeling our room. The next shortcut is "Hide and Unhide". If I want to hide this and edit it later, I can press "F2" so it's hidden. If you want to see what is hidden in your model, you can go to "View" and click on "Hidden Objects", so you can see that. This mesh means that this model is hidden, it will not show the hidden objects. If I want to unhide using the keyboard shortcut, the last object which I hid was this box, so I can press "F3" to unhide the last object. If I hide a lot of stuff and I want to show all the objects which are hidden, you can press "F4", so that will unhide all of your items. These are the main shortcuts that I personally use. Apart from that, like I mentioned in the previous few videos, if you want to go to the plan view, the best way is by going to your parallel projection, which is "Alt + W", and top view which is "Alt + T". You can also switch between "Perspective" and "Parallel Projection" in the top view as well. There's also the front view. This helps in modeling faster. This workflow is generally used in 3ds Max. But in 3ds Max, we generally have four windows, but as is in SketchUp, you can only work with one viewport. I hope you found this video useful. In the next video, we're going to finally start creating our room. I'll see you guys next video, cheers.
4. Modeling a Room in Sketchup 2021 (New Workflow): [MUSIC] Hey guys, welcome
back to yet another video. Now, in this video
we're going to model a room and I'm going to be using a new workflow
to model this room. To kick things off,
we're going to start using inches for this
project because this project is based in the US and US citizens are only used to
inches, but do not worry. I have a good hold of
both inches and meters. When I get the chance,
I'm going to be stating both these directions
in this section. To kick things off I'm going to start with architectural inches, so open SketchUp
2021 and click on "Architectural inches" to select the units for your model. I'm going to clean
this model up a bit. I'm going to delete Sumele who was the new avatar
for SketchUp 2021. When you go to your Asset Editor once you've delete Sumele, you can notice
that her materials remains in the Asset Editor, so it's a good idea to delete these materials as well [NOISE]. Click on "Delete" on your
keyboard after you shift, select all of these materials. Now I'm going to
make the room size. Let me just check the size
once again just to be sure, as you can see it is 14'8" which is our length and
the width is 12'4". Here's a small tip for you guys. Whenever you see a flow plan
and that is a dimension, in most scenarios,
in most cases, if the architect has
designed the floor plan, most architects would
give the length first, which is this way,
and then the width, which is this way
so 14'8" this way, and 12'4" this way. I'm going to activate the
Rectangle tool by pressing "R" on my keyboard and
then I'm also going to snap it to the
blue axis so that I do not accidentally
create it on another plane. To snap it on the blue axis, you simply press the
top arrow key and you can see that it
snaps to the blue axis. Even if you click anywhere
here or on the axis, it doesn't go there, it's
always on the same plane. So make sure you press
"R" on your keyboard. Snap it on the top axis
before clicking anywhere, and then click on
your first point. Now we're going to put
in the dimensions, which is 14'8", 12'4" and then enter. Even in SketchUp, you can see that the length comes in first, which is 14'8", and then
the width which is 12'4". We made a rectangle, now, I'm going to
make it a group. You can select the
entire rectangle, right-click and click
on "Make group", or you can go to Windows, Preferences, go to Shortcuts, search for group and make sure
you assign Edit/Make Group the shortcut G. Now it's
very simple to make a group by just double-click on the face and press
G on my keyboard. That's how simple it
is to make a group. Then enter the group by
double-clicking on the group. Use a push-pull
tool by pressing P on your keyboard, click once, the height of room is nine feet, so type in nine and then
apostrophe "Enter". That is nine feet or 2.7 meters. We have our room now. Now I'm going to select each of these faces and make it a group. Double-click, press "G", double-click "G." Similarly, here as well and it will
add top and bottom faces. I'm going to give
some thickness to these faces to enter the group, press P on your keyboard
to activate the Push tool. Click once and now you can
type in your thickness, which is going to be
six inches or 150 mm. Similarly, here as well.
Here's a neat trick. Once you've applied a
dimension or you want to apply the same dimension
to all the other walls. What you can do is
enter the group, select the face, use
the Push/Pull tool, and then submit double-click, it's going to use the same width which you applied
for the previous groups. I can also get the
same thickness for the bottom and top slabs. We have our room. It's also a good idea to extend these walls so that that is no light leakage once we
do the rendering in 3D, select the face, use
a Push/Pull tool and simply double-click,
similarly here as well. The spacebar is something
which is quite often used in SketchUp in case you want
to shift through tools, so make sure you keep
pressing spacebar as well, to shift through the various
commands in SketchUp. Now I'm pushing,
I'm going to press "Spacebar" to
activate Select tool. I'm going to select
the face, go back to push tool and double-click. Right. Now we have a room, but it's entirely enclosed
and humans require openings. I'm going to create openings
for my door and window. Enter this. This is a longer side and as you
can see in the plan, the longer side has
a door here which would be approximately
around three feet. We also have a closet
here which will be again approximately
around four feet. Finally, we have our
windows, two Windows. I'm going to take one
foot or one and a 1/2 feet from here here and
one foot from here. I do not have the
exact measurements but if you do have the
exact measurements, I would suggest that you
import it into SketchUp as a JPEG or AutoCad file and
then draft on top of that. Now, I do not really need to
be accurate for the space just enough to show what's
happening inside the room. Now I need to make my openings. I'm going make a rectangle
on top of this face. I'm going to snap it
to the green axis. We're pressing the
left arrow key. I'm going to type
in my dimensions, which is going to be three feet in length and the height is going to be seven
feet. This is my room. I'm going to push this out. Similarly, I'm going
to give a closet here as well again, snap it to the
green axis and type in your value which
is going to be four feet, seven feet. Then use a push tool
and create an opening. Similarly for the
windows enter the group. Press "J", if you want
to toggle visibility, which I'm sure you know, about, if you've gone
through this course, I'm going to select
this bottom line and then move it on top by two feet and then again
move it on top by five feet. Our lintel is at seven feet and our sea level
is at two feet. Now we can draw a line and
move this up by three feet. I'm going make an opening. I'll select these
two lines would approximately here
and then push it out. We have our openings, we can delete all these lines, and we are done with
our room-modeling. Press "F3" to unhide
the slab as well. This is a room which we are
going to use for this space. Do not worry about
these enclosed walls. I'm going to show
you a new workflow where you can use
these existing walls, create a section plane, and then start your ending. This is a much better
workflow and it would definitely help you create
windows, even faster. I'll see you guys in
the next video. Cheers.
5. Using Sketchup Live Components in 3D Warehouse: [MUSIC] Hey guys, welcome
back to yet another video. Now, in this video, I'm
going to be showing you one of the new features in SketchUp 2021 called
SketchUp Live Components. We're going to be
adding doors and windows using these Live
Components and I'm going to be changing the sizes and see
how it works for this room. Go to windows, click
on 3D Warehouse. Now if you click here on Search, you scroll down to Advanced, you get an option
called Live Component, so you can switch this on. Let's search for doors. These are the various
doors that we have. I'm going to use the single
swing door for the bedroom. Now if you click on Configure, you can put in the
size of your door. Our door size is 900
mm or three feet. Three feet exactly
would be 914.4 mm and seven feet
would be 2133.6. Now you can click on Download and you can place
your door in place. A perfectly modeled door along with the door handle and
everything in place. Now if you want to adjust this here, you can right-click, go to Configure Live Component and you can change the
sizes here as well, as you can see it
updates in real time. Can change the frame color, the shadow color, and it's
got a lot more features. It comes in with
these materials. You don't have to worry too
much of the materials now. We're going to be adjusting
that later in 3D. It's also a good
idea to rotate this. I'm going to find the midpoint, snap it to the blue axis
and rotate it by 180. You can't really scale Live Component so the only way to adjust this is
by right-clicking, clicking on Configure Live
Connector or Component, and changing the option there. You can also make it
an openable door. As you can see the
door starts to open. Pretty good. You can also
change the style of your door. We have this door in our space. Similarly, I'm going to add also the windows here,
these two windows. Again, go to Windows
3D Warehouse, or you can also click here, which is part of our menu. I'm going to search for window. Make sure Live Component is on. Click on models, and
you can see these are the various windows
designed by SketchUp labs. I'm going to select this window, click on Download, and
place it in place. Now I'm going to adjust this. Give it at the bottom first, right-click, click on
Configure Live Component. Now the width is 914.4 and
the height is five feet, which is 1524 mm. You can also change
the frame depth and you can also
change the material. I'm going to place this in place and I'm going
to rotate it by 180 and copy it to
the other side. Finally, for our
closet door here, which is four feet
by seven feet, there are four shutters
collapsible doors, but we're going
to use simply two shutters and show
it in the model. Go to windows, 3D Warehouse, search for closet door. Make sure you search in models because these are
models designed by UNA. In products generally
you will find the modular design
by manufacturers. Go to models and search for
an appropriate closet door. This seems to be good. You guys can choose the
door which you like, I'm going to select this
door and click on Download, place it in place, scale it. Since this is not a Live Component and doesn't
have any parameters, you can scale it
directly in SketchUp. Press S on your
keyboard to activate the scale tool and then scale it to the edges and
to the top as well. Move it in and you are done. It's a good idea to
give a gap between these lines because generally
if there is no gap, then it wouldn't show
up in the window. What I'm going to do is
move this out by one mm and move this line out by one mm as well and delete the middle line. I'm going to do the
same for all of these. I'm going to select these
two lines and copy it to this middle point and now I can delete these middle lines. You're definitely going to see a line now because there is a two mm gap between the shutters and it would
show up in your window. Great. Now I'm going to
place some door knobs, so again go to windows, 3D Warehouse search for doorknob and place one
which suits the door. I'm going to check one of these. Click on Download
and click on Yes. It's going to load
it into your model. I'm going to select
one from these three, so probably one
without the keyhole. I'm going to delete these
two and retain this. Now if you want to
rotate this perfectly, press Q on your keyboard to activate the rotate
tool and then press the right arrow key so that it snaps
to the red plane. I'm going to rotate
this by 90 degrees. Again, rotate it, snap
it to the blue axis now, which is the top plane by
pressing the top arrow key and rotate it
by 180 degrees. It's also a good idea to use the axis while you are
moving stuff as well. I'm going to click
using the Move tool. I'm going to snap it
to the green axis, snap it to this door and now to the red axis
and move it in place. It's already accompanied
so I'm going to copy it to the other side. We've placed our
doors and windows. In the next video, I'm
going to show you how to create [inaudible], crowns, and more using this awesome
plugin called Profile below. I'll see you guys in
the next video. Cheers.
6. Using Profile Builder for Mouldings: Hey guys, welcome back to yet another video. In this video, we're going to learn how to create our skirting and also our crowns. Generally, the bottom here in India it's called skirting, but I guess overseas you call it molding as well. All right. So to start off, I'm going to click on Profile Builder here which is ''Open the Profile Dialog''. If you do not see this toolbar, you can go to View, Toolbars, scroll down and you'll find Profile Builder 3. Make sure to switch that on and then click on ''Close''. You can click here to open the profile dialogue. Now, this is the default profile which comes with Profile Builder. If you want to load your own, you can click on ''Search''. These are the example ones which will come. You can select any of these and start placing it in your scene. Before I load any of this, I'm just going to show you quickly how the Profile Builder works. As you can see the placement point here is the bottom middle. I'm going to change it to top left. You can also change the width and height here. So I'm going to change this to, say, 2 inches and press ''Tab''. Make sure this is 2 inches as well so that it's uniform. Now I can click here, which is ''Build'' to start creating my profile. So click on "Build" and now I can start drawing my profile. Click once and then start drawing your profile. You can also snap it to the green or red axis by using your arrow keys. So left is for the green, and then right is for your red, and then finally, to close it, you can right-click and click on "Close the Path". So we have our crown in place. Now again, select this, right click, go to Profile Builder and click on ''Reverse Selected'' if you want to reverse it. But in our case, we do not really need to reverse it. It's also important to know which direction you want to apply the profiling. If I click on ''Build'' again and drag it on the other side, you can see that it doesn't show up because it's on the other side. You can mirror it if you want. So click on "Mirror", which is here, and now it comes back. But I would suggest that you always draw it in the right direction. In this case, it's the clockwise direction because our placement pointer's on the top left. That's how simple it is to create your crowns, moldings, and more. There's a lot more features in Profile Builder but I'm going to show it to you guys later in advanced sections. I'm going to use some additional profile libraries from the Profile Builder website. So click on "Search" first, and now here you can click on, "Get More Online". You'll be redirected to the Profile Builder website, and now you can click on ''Get Profiles''. These are the various profiles they have created for us. I going to to on ''Previous'' because there is a set of profiles which we can use for interiors which has moldings. I'm going to click on each of these and download it into a particular folder. I guess I've downloaded all of these files. These are Zip files and you need to extract them to your library folder. Where is your library folder? I want to show that to you as well. Go to Extensions, go to Profile Builder, click on "Preferences". You can see this is the profile library. You can use the default library and create a folder there and place all your profiles in there or you can create it in another directory as well, which I would always recommend because always keep the C drive free because it helps in making your system faster to a certain extent. So click on "Select the Home Profile Directory". I've created a main library folder called Profile Builder Library and under that, I've created another folder called Profiles. So I'm going to use this folder to load all my WinZip files in and click on "Select Folder". Similarly, assembly folder, which is called 02_Assemblies, and then ''Select Folder'', and then click on "Okay". Now I'm going to extract all of my profiles to that folder. I guess I've extracted all of my folders. I'm going to delete these Zip files now and now go back to SketchUp, click on the ''Profile Browser". Now you can simply click on "Open Library Folder'' or you can click on "Open Home Folder'' and it would automatically redirect to your library folder which you selected. Now I'm going to select a skirting. Click on "Bases" and you can see the various profiles. I'm going select one of these. I'm going to change the placement point to bottom left because that's the general placement point. Make sure your height is around 4 inches or even 3 inches, whatever you prefer. Finally, click on ''Build'' and then start creating your profile. You can press "Escape" if you want to create a fresh profile, and then create, start from new again. Right-click and click on ''Finish''. I also have a door frame profile. I'm going to search for one which I could add. Click on "Open Home Folder''. If you don't like any of these profiles, you can create your own as well. For that, you can make a rectangle. I'm going to just push this in. I'm going to make a rectangle this way make it a group, scale it to this edge and this edge as well, and now we can make our shape. I'm going to use the Arc tool, and create the arc this way, and delete these edges. Now we can exclude this. Click on "New Profile", call this Door Frame Profile and now you can see that it has created the profile. I'm going to change the placement point to bottom-right as the default placement point. I can mirror it as well, if you like but I'm going to leave it as is. I'm going to leave the width and height as is as well and then click on "Save Profile". I'm going to save this to a new folder called Custom Profiles. I'm going to give a prefix as well so that I know the number of profiles I have personally created, so 01_Door Frame Profile. This is the first one, and then click on "Save". So profile is saved and now we can start building. If you want to change the rotation of your profile, you can click on "End" and that would change the rotation of your profile. I'm going to change the rotation and I'm also going to click on "Mirror" so that I get it in place properly. If you want to change the placement point on the frame while you are modeling, you can click on "Home". Home and End is the main new tools which you need. I'm happy with this. I'm going to click here, snap it to the red axis and move to the right, and then to the bottom and we are done. Make sure to press "Escape" to finish the model. Similarly, I'm going to make a tier as well. Maybe just push the skirting in a bit and then create the profile again. I'll adjust it later. So move it to the top, snap it to the red axis, and move to the right and then move to the bottom again. Right-click, click on "Finish". We need to adjust these. Enter the group, you can select only the right side by dragging from the top left to the bottom right. Then you can use this point, and then snap it to the red axis, and move it to the right. Similarly, here as well. Make sure you're selecting only the left side of the frame, and then move it in place. Then do the same for the top as well. Press "Escape" and you are done. You need to adjust these skirtings so that they touch these frames and we are done. That's how useful the Profile Builder plugin is. I will be making more tutorials for Profile Builder in this course in our advanced sections. I'll see you guys in the next video where we're going to use another cool plugin called Flow Generator, to create our flooring. I'll see you guys in the next video. Cheers.
7. Using the Floor Generator Plugin: [MUSIC] Hey guys, welcome
back to yet another video. Now in this video,
I'm going to create a wooden flooring using a
plugin called Floor Generator. What you need for this plugin is a simple phase without
making it a group. I'm going to simply make a
rectangle on top of this. I'm going to snap
it to the top axis by pressing the top arrow key. I made my rectangle and
when I hit the bottom slab, so enter the group hide this. Now, this is our face. What I'm also going
to do is extend this way and that
should be good enough. We have our floor. I'm going to make a copy of this in case I want to
show another option, and then multiply by four
by pressing x into full. Now what you need to do is click on the "Floor
Generator" icon. This is our plugin and it has various options for patterns from break all the
way to diamonds. We're going to use
wood for this class. Click on wood. Now the length I would suggest that you
give it in inches. We could give a length of
say two-and-half feet, which is 30 inches. You can give units as well, which is the double apostrophe. The width, I'm going to
give three-and-half inches. The gap width, and
the gap depth, I can leave it as is. This is good enough to
create a wooden flooring. There are few other
options as well. If you want to
start the grid from the corner or from the
center of the square, or if you want to rotate
it by 45 or 90 degrees, and you can also randomly
apply all material. We're going to play
the material later in the V-Ray part of this section. Finally, I would also
suggest that you click on ''Create Behind Face'' so that there's a face
below the flooring as well. All these settings in place, I'm going to create
my flooring by simply just clicking on the
face of this square. We generated our decent
wooden flooring for our room space which I'm pretty happy about and it's
also made it a group. As you can see, that is
of face below as well. I'm happy with this.
There are certain places where the wooden plank has not shown up. What
are you going to do? Just enter this group, maybe just select this part of the group and then copy
and paste it here. But for our case, this wood surface and
we are good to go. That is a quick introduction
to the Floor Generator tool. I will be using it in
future sections as well, and I will also be creating a separate tutorial in
the advanced section. The next video,
we're going to add the remaining 3D Warehouse
models into our room space and then we jump into
V-Ray rendering and transform the space
to something awesome. See you guys in the
next video, cheers.
8. Adding Chaos Cosmos Materials: Hey guys, welcome back.
Now in this video, I'll show you how to create
the floating material without having to use the
floor generator plugin. Now in case you couldn't make the floor from the
previous video, then you can continue this
course by using this model. Later I'll show
you how to create the floor material in SketchUp. I'm going to select this floor, which we generated, delete it. Then I'm going to make
another rectangle again, from this edge to this edge. Like I mentioned before,
always snap it to the blue axis because sometimes
if you do not snap it, then you can see that it doesn't draw the
rectangle properly. Always snap it to the blue axis and then create a rectangle. Then we can apply our material. It's also a good idea
to make this a group. I'm going to double-click, right-click, and click
on "Make Group". Now enter the group,
and then push it down by around four inches
and we have our floor. Now we need to apply the
material and we need to just apply it on the
front face of this floor. The first way is by using
the Chaos Cosmos materials, which is a new feature, in the latest update of V-Ray. If you're using V-Ray 5.2, then this feature would show up. If you're using
the older versions then this feature
wouldn't show up. But I will show you
another alternate way to add floating as well. Let's open Chaos Cosmos. Chaos Cosmos is a new feature
of V-Ray where they had a 3D models which come
preloaded with V-Ray materials. Also, we have a category
called materials. Let's open materials. Now, these aren't high-quality
materials made by V-Ray, and they come with various
settings and various maps. These are super
useful in case you want to make a render
more realistic. I would highly recommend
that you start using Chaos Cosmos materials. Now in the bottom
we have something called wood flooring,
select that. Then we can select
any of this material. To use this material, you
have to first click on "Download" and then it will start downloading the material. Then simply you can
import it into SketchUp. To import it, you can
click here at "Import". But let's see which
floor would work well. This seems to be nice. I'm going to download
wood tiles 02, 150 centimeters.
Then load it in. You can see that asset
import is in progress, then this material
would actually be saved in your materials
to this tier. If I go to the bottom,
you can see that we have wooden tile 02, 150 centimeter. Now we can select this
material into this group. Then use the bucket tool. Press "B" to activate the bucket tool and then
apply your material. That's how you apply
your material. You can see that it comes
in the right scale as well. If you want to check the scale, I'm going to use
the sample paint. Select this material
and let's go to "Edit". Here you can see that's
four feet, 11 inches, which is 150
centimeters, or 1,500mm. Now let's say you want
to rotate this material, then you can simply right-click, select this face, right-click, go to texture, and
click on position. Then you can rotate it this way. You can also change the size. But generally it snaps to that
150 centimeter proportion. Then once you're done,
right-click and click on "Done". We've created our
floor this way. The other alternate
way in case you do not have the latest V-Ray version, is by using the
default V-Ray library. I can click on this
left arrow here and then you can see that we
had these materials here. Now this is my custom library, which I'll show you
later in the course. I'm going to close that. Then you can select any
material from here as well. Let's go to wood laminate. Here we have some
nice materials. I'm going to drag in wooden
planks A01, 100 centimeters. Let's drag this in. Make sure this is the right
material to select it. Then select your face. Let's enter this group, makes
sure the face is selected. You can also press
"J" to [inaudible] the visibility. Our
face is selected. Then we can right-click here
and apply it to selection. That's another way you can
apply your material as well. Similarly, we have to rotate this right-click, go to texture. Just a quick tip,
this texture option doesn't show up if you
right-click on the groups. Always enter the group,
select the face first, then right-click, go to
texture and click on position. Now you can rotate
it by 90 degrees. If you want to change the
size, you can go to edit. You can change the
size here as well. Let's types in 100
centimeters because that's the true scale
of this material. You can see it comes
in at the right size. I hope you found
this video useful. Do go ahead and select any material of your
choice that you feel would fit your mood board and
your theme for this room, and go ahead with the
rest of the course. I'll see you guys in
the next video. Cheers.
9. Adding Models to our Scene in Sketchup: Hey guys, welcome back
to yet another video. Now, in this video, I'm
simply going to be copying my 3D warehouse models
into the scene. As you can see, this is
the various models that I've assorted after downloading
it from 3D Warehouse. To select the entire thing, it's also a good idea
to make this a group. Go to Edit, click on Copy. It's going to take awhile since these are slightly
heavier objects. Once it's copied,
all you need to do is go to your other
SketchUp window, which is a room. Go to Edit and click
on Paste in Place. I was going to start pasting your objects in
the same position. It's pasted the objects, but it's not exactly
in the right position. In fact, it is placed
in the opposite side. What we need to do is
simply rotate this from the center and then maybe
move it a bit to adjust it. Press Q on your keyboard to
activate the rotate tool, press the top arrow key to
snap it to the blue axis, and then rotate it
by 180 degrees. Finally, I'm going to center
this bed or this painting, whatever it is, and
we are good to go. Maybe just move it out a bit. Moving the curtain rod
to the edge of the wall. I think that seems
to have centered the objects as well in
the right position. That's how simple it
is to copy objects from one SketchUp
window to the next. On the VRay material
video of this section, I'm going to be showing
you how to create these fabric materials which
contain a fall of map. Let me select that again. All of these materials contains something called a fall of map. I will be showing this and
more in the VRay materials of this section so that
you guys learn how to create fabrics in the right way. It holds two uniform curtains and anything which is
a fabric material. I'm also going to be
showing you how to add images from websites
such as wayfair. All you need to do is save this image to your local
drive or to the maps folder, and then load it into SketchUp. I will be showing it to you in the VRay material
video of this section. That's about it. I hope
you guys liked this video. I'll see you guys
in the next video, where we're going to
jump into VRay and set up a scene for some
awesome rendering. See you guys in the
next video. Cheers.
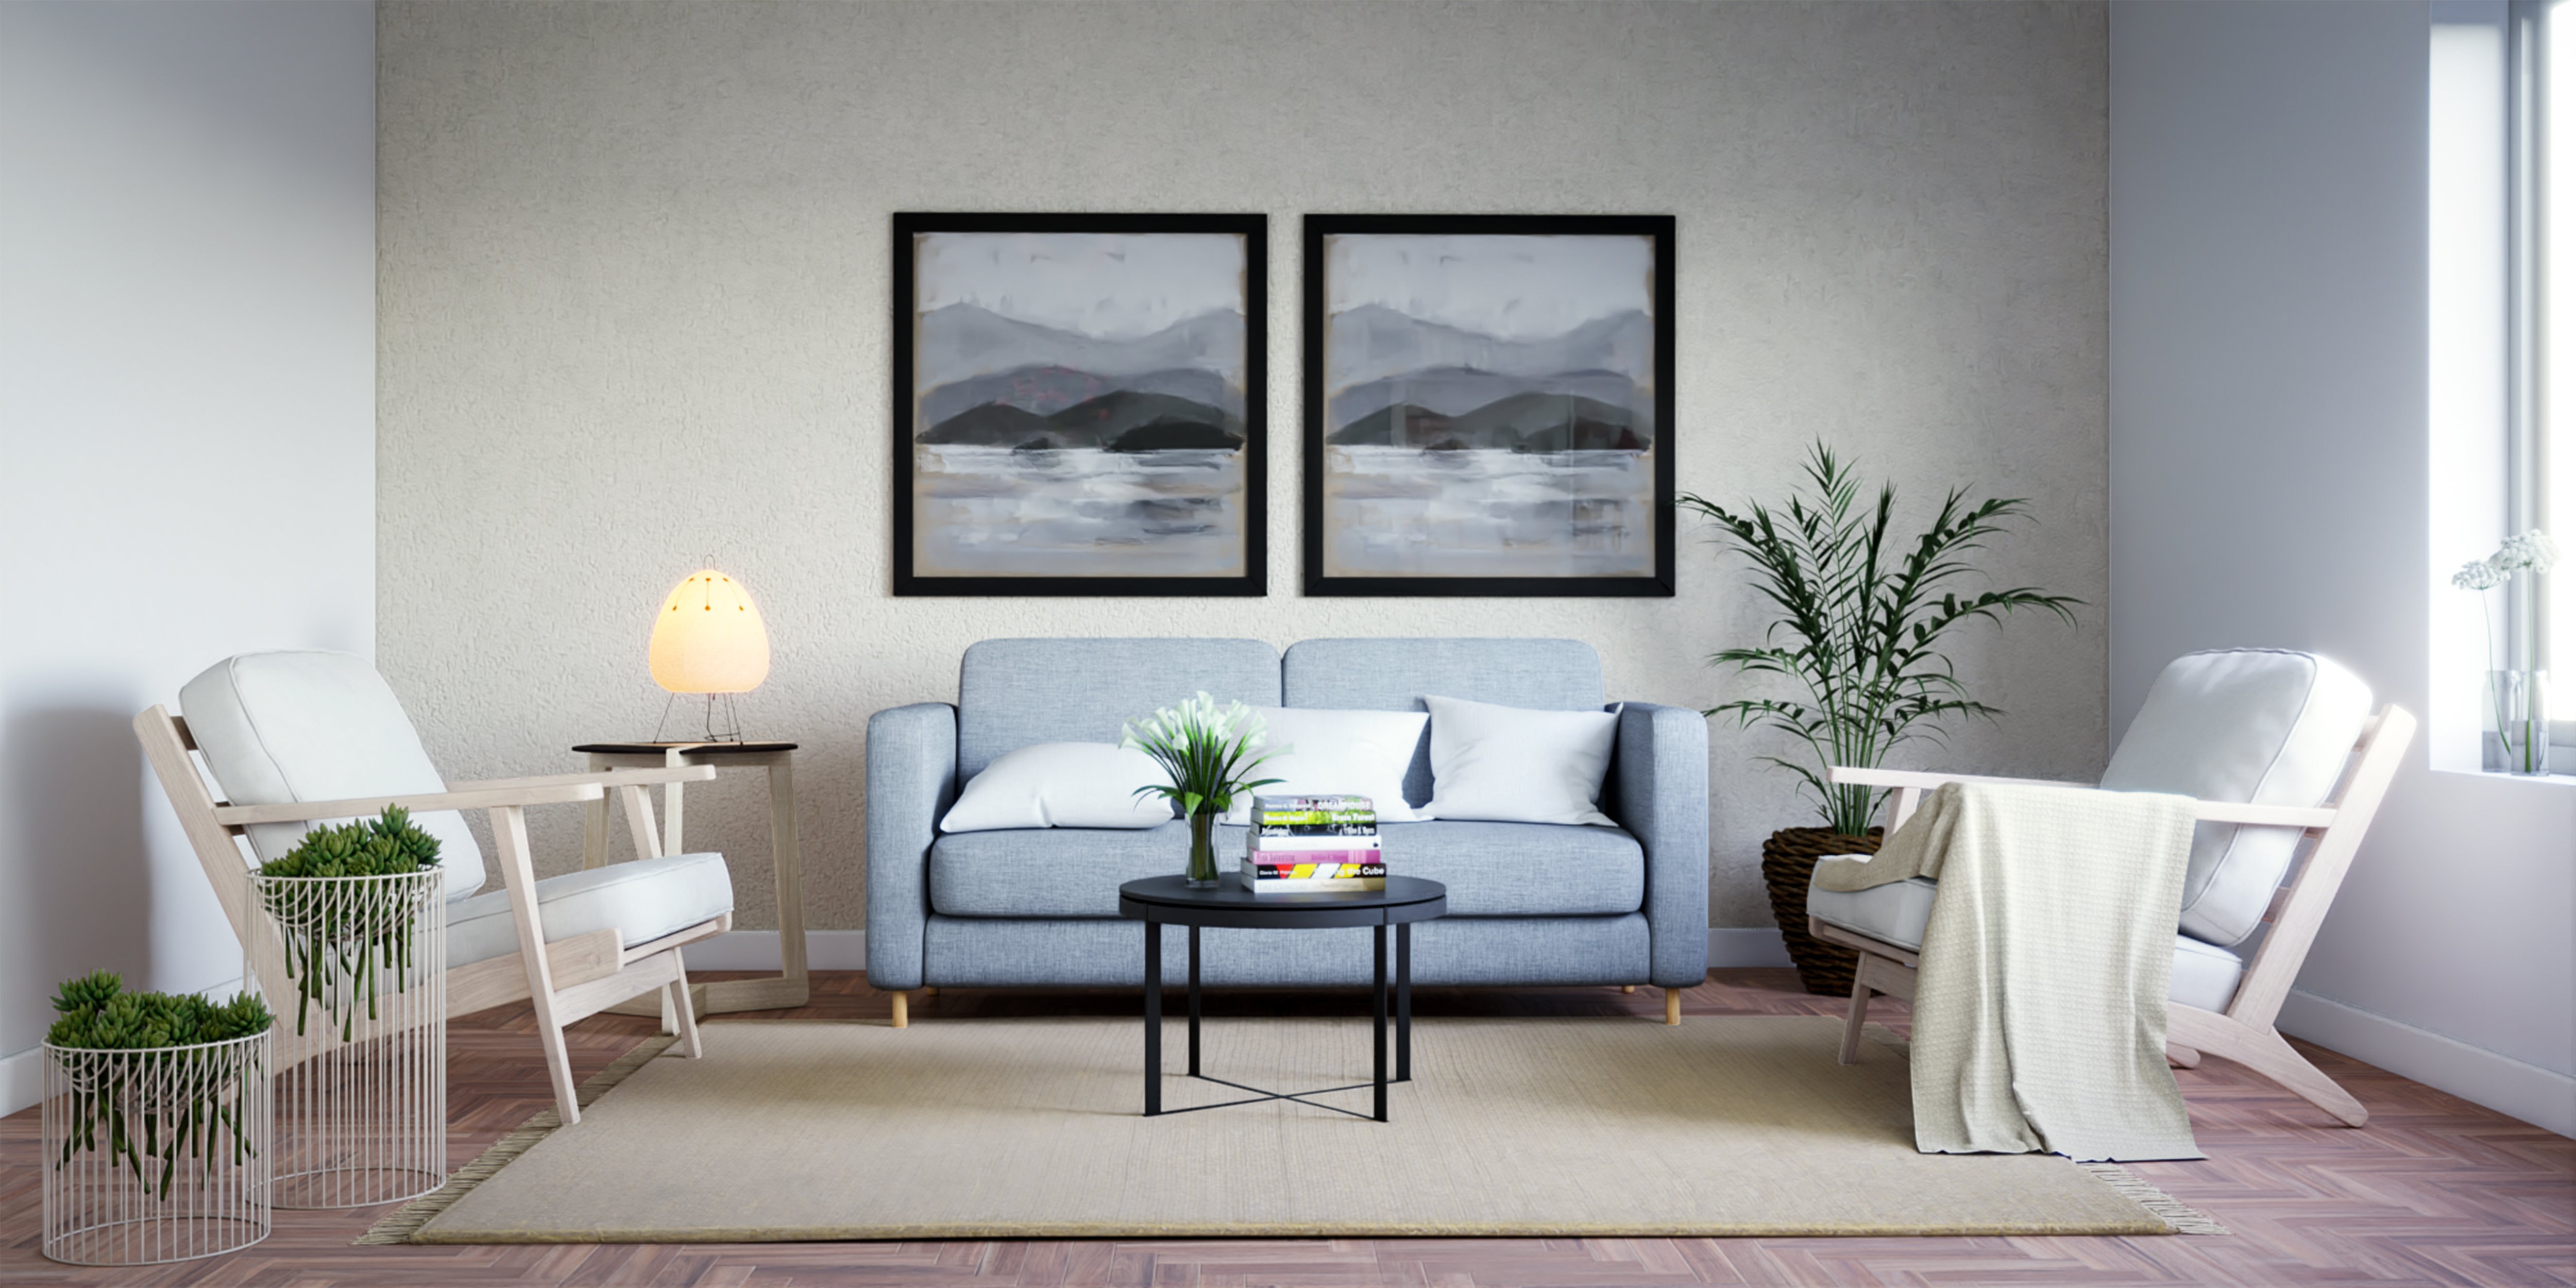
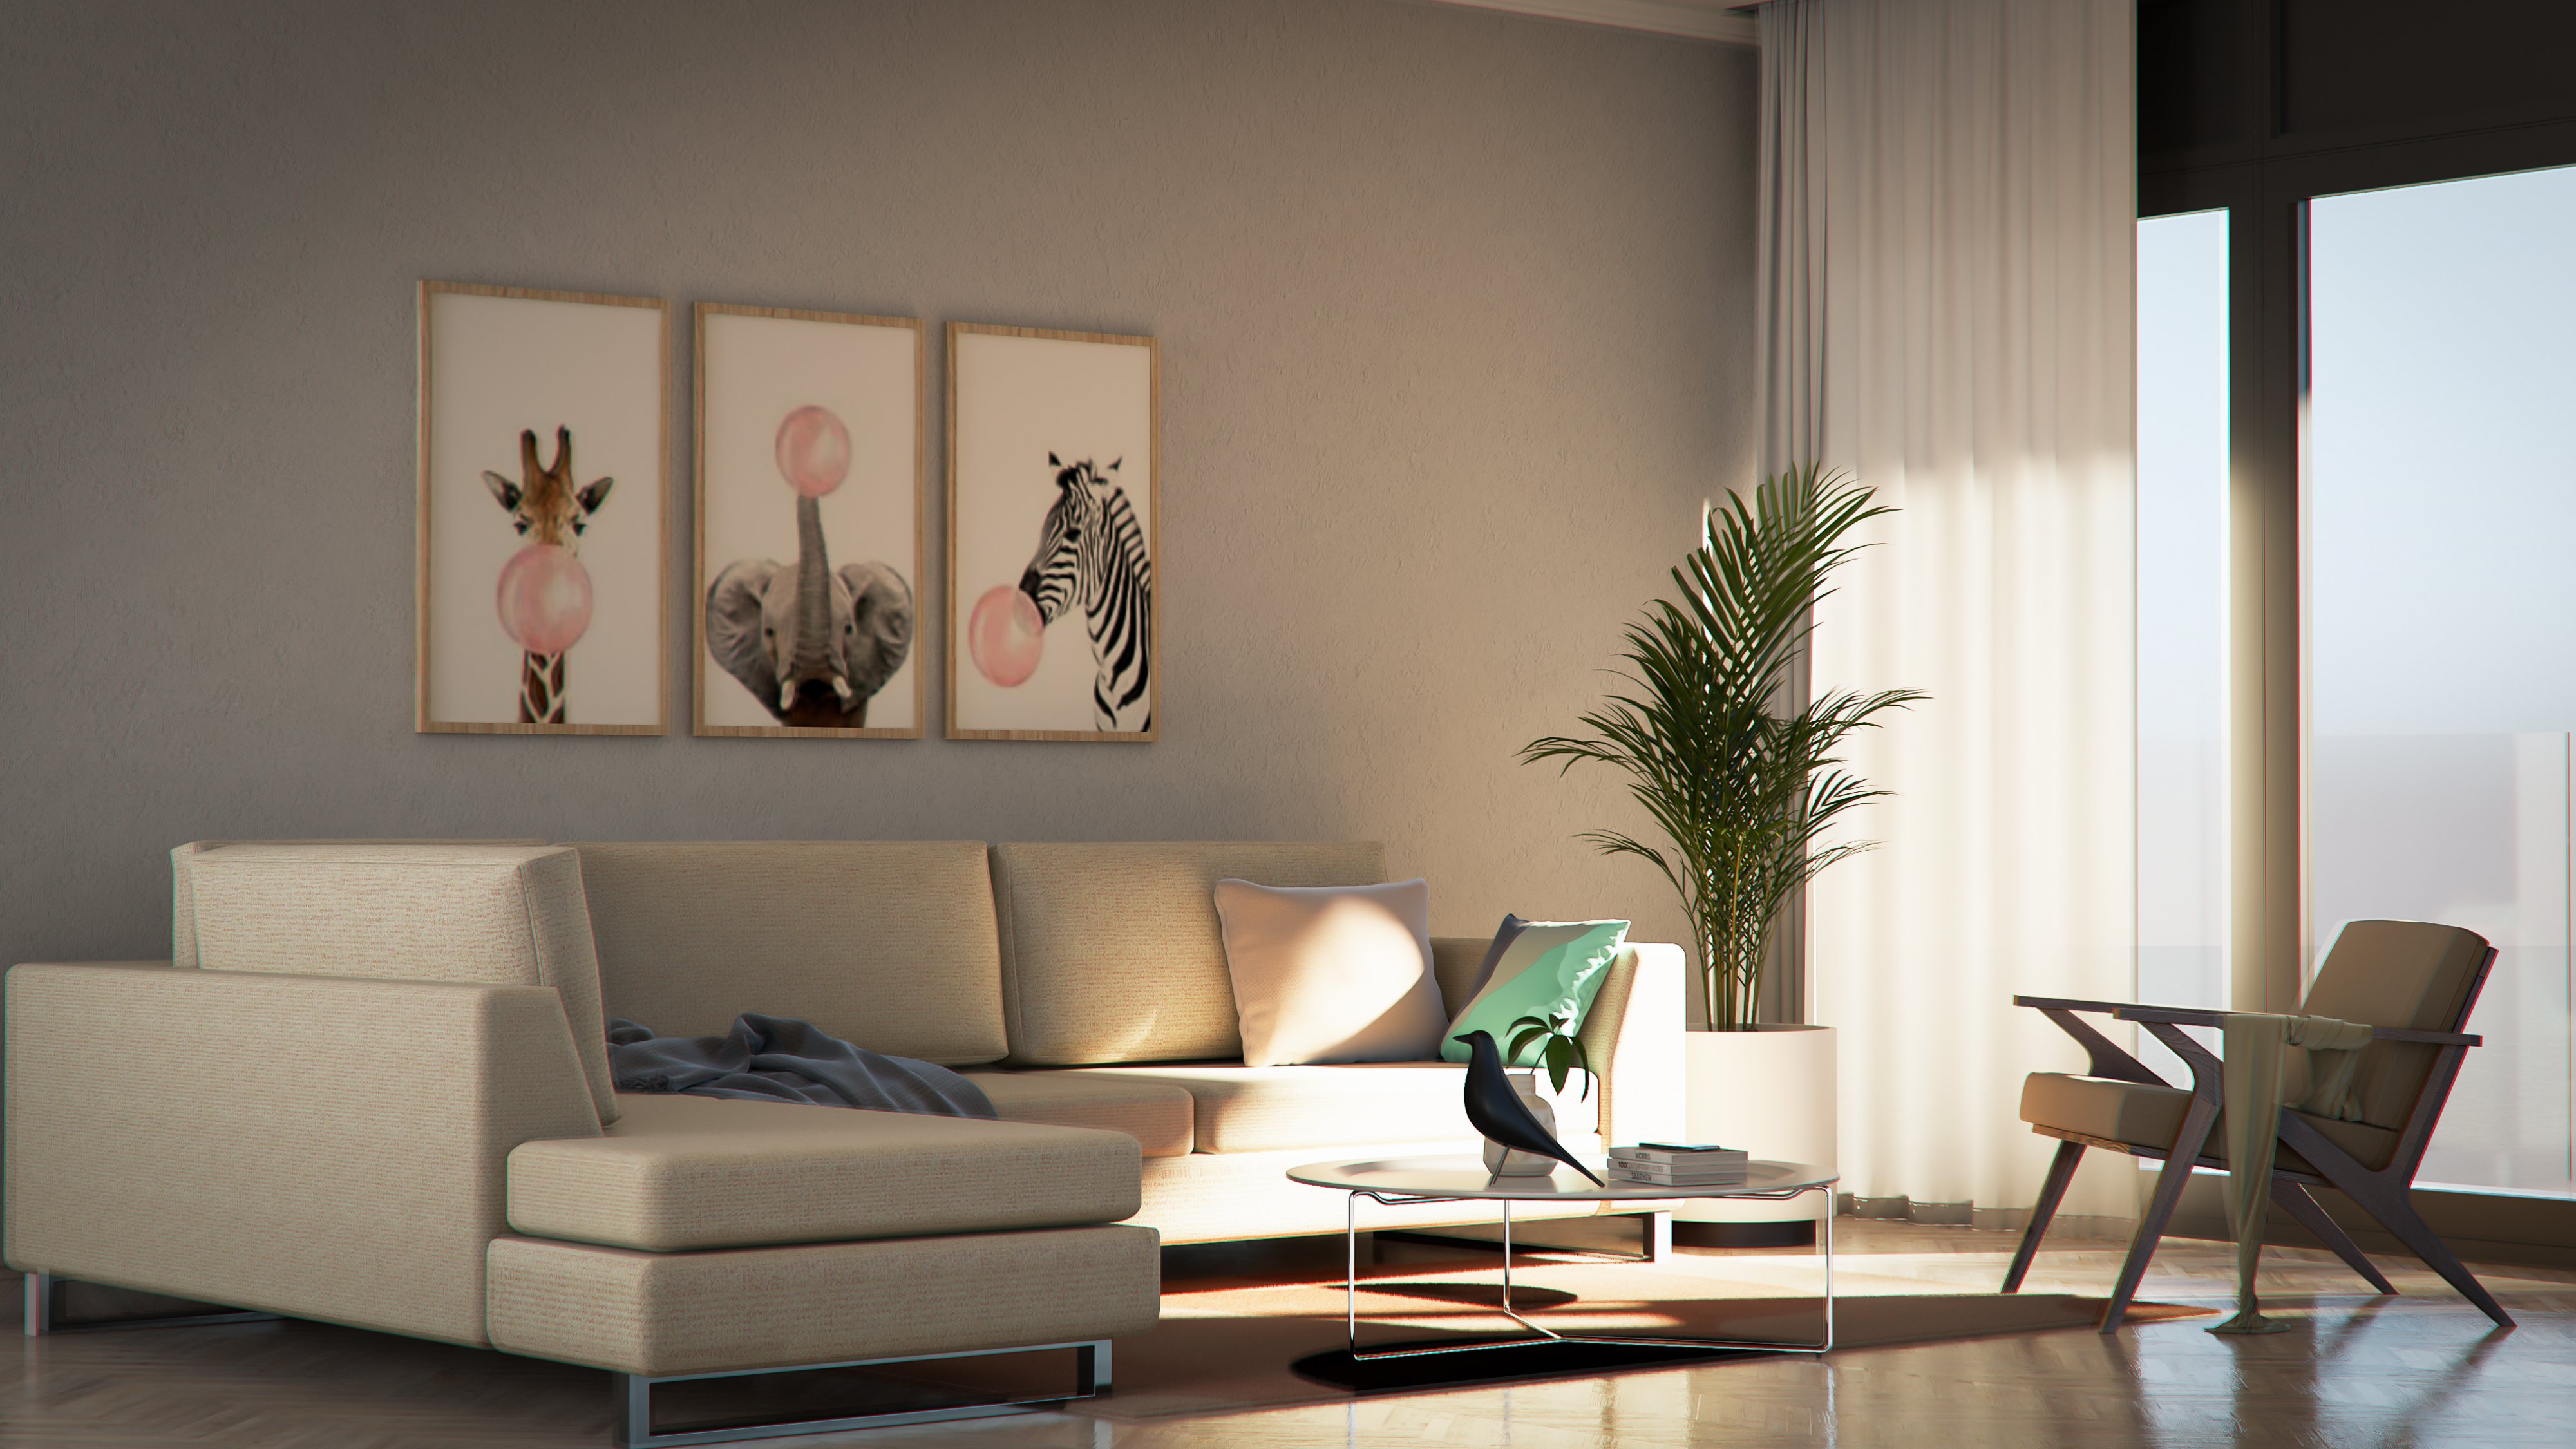
10. Create Camera in Sketchup: Hey guys, welcome back to yet another video. Now we're going to start the video part of this section. We're going to start off with the camera and setting up the camera. In the next video, we're going to set up the lighting and then the materials in the forthcoming video and eventually our rendering. All right. To start off, you can see that this scene is slightly different because it's covered by walls on all four sides. There was a student who asked if it is possible to set up a view when your walls are already in place? The answer is absolutely yes. I'm going to show you that technique in this section. What do you need to do is use something called Section planes in this SketchUp, which I am sure you must have gone through at the start of the course. If you go to Tools, click on Section Plane. You get this section kind of a box. Now you need to place your section planes. I'm going to place it here on this wall to create a cutout. I'm going to call this section one for now, and rename it later. Then I'm going to select this section plane by clicking it and moving it in so that I create a section of the space. There's more than a bit so that the room is seen. All right. I'm going to hide this furniture because I don't want it to be seen in the front view. This is a single group, right-click, click on explore, and now we can start to hide these. All right. Now I'm going to place my camera. To place my camera, I'm going to draw a line in the middle. Now I'm going to select the midpoint. I'm going to drag a line outside till here. You can't see this line because as you can see, we placed the section plane and you can only see stuff which is inside the section. If you want to see this line, you need to deactivate the section plane. There is two ways to deactivate it. One is by selecting the section plane and right-clicking and clicking on Active cut and then you can click on Active cut again to enable the section plane again. The second way is by going to your Asset editor. Go to your geometry settings and here we have Section one. Now if I switch this off, you can see that those section plane goes off and if I switch it on, it turns back on. So I'm going to switch it off for now. I'm going to place my camera first, go-to camera, position camera, and place it here at the center. I'm just going to eyeball to the middle and I want to change the eye height, which you can see in the bottom right right to around 3.5 feet, which is 3.5 feet or you can type in three feet, six inches. Now I'm going to switch on the Clipper again and now you can see our scene. Now I'm going to make a scene out of this. Go to your scenes on the default and click on the plus button here. I'm going to click on Create Scene. We created our first view. We going to try zoom-out go elsewhere and click on scene one, it's going to go to that scene. We can see that if I start an interactive render, the section boxes also could be seen. So I'm going to quickly start and try to render, switch on interactors, switch on RTX if you have a graphic card. Switch on Denoiser, and switch on NVIDIA AI. It's also a good idea to decrease our interactivity to medium or low if you have a slow system. I'm going to go to Render Output now and switch on, say frame. I'm going to leave these settings as is. You can click on Render with 3D interactive. Now you can see there's light coming in from the section plane plus you can see these section boxes as well. What I'm going to do is orbit in using my orbit tool. So I'm just going to orbit in like that. All right. I going to click on the zoom tool. Now you can see that the field of view is 59 degrees, which means that it makes the room elongated. To make it look more of an interior scene, you will change it to 35 and once you've changed to 35, it zooms in, but do not use the Zoom tool to zoom out. If you click here and zoom out again, you're going back to that field of view of 59. What do you need to do is, I'm going to click on scene one again. I'm going to change the field of view to 35 and then I'm simply going to use my scroll button to zoom out or scroll back. Now you can go to Camera, click on two-point perspective, and you'll be switched to the hand tool and now you can choose some of the ceiling as well. Go back to your select tool and zoom out slightly, and once you're happy with the scene, let me use the hand tool again and show some more of the ceiling. You can update the scene. So right-click, click on Update. I'm going to stop the interactive. I'm going to enter this group and press F4 to unhide the ceiling. I need to update the scene as well. Go back to Scene one, enter this group as F4, and right-click and click on update. There's two more settings which I need to sort out. One is my light settings. Now I'm going to start in interactive render. Now you can see that there's light entering from here, the environment light entering from here, and there is some light entering from here as well, our closet door. What we need to do is first is to block the light entering from the section plane. To do that, you can go to your Asset editor, go to your section one, click on Options, and you have this option called Affect Light. You need to turn this off. Now you can see that that instantly blocks the light entering from the section plane. That's number one but make sure you do it in scene one. Switch this off and then update this as well. Now to block this light, you simply need to draw a box on the outside. I'm going to stop the interactive render, draw a box to that, reverse the faces. Press Y on your keyboard to activate extreme mode, select this back face and delete. All right. So I think that should have blocked the light. Go back to Scene one and click on Render with V-Ray interactive. You can see that that blocks that light as well. There are some freckles, but we'll fix that in the next video. Similarly, I'm going to create another view but this view, I'm going to place it at the back, or the camera at the back so that I'm facing this wall. I'm going to create another section plane. Go to Tools, click on Section Plane again. Place it at the back, call it Section two and move this in. All right. I'm going to zoom in or scroll in using my scroll button, the middle mouse button, press F4. Go ahead and hide your table and the rest of it. You can change your field of view. Go to your Zoom. It's at 35, which is decent for an interior shot. I'm just going to pan a bit and adjust setting. If you want to use the rule of thirds or a guide for you to place your camera in the right position following all composition techniques, there's a technique in SketchUp, but we're going to use the V-Ray Frame Buffer. Click on the V-Ray Frame Buffer. Click here to add a layer which is a new feature in V-Ray file, and click on background. Now I'm going to select an EXR image. Click on Browse to open any EXR image. This is our grid, which is an EXR image which is perfect for photographic composition. Select this grid and click on Open. Then scroll down and click on as foreground. This shows up in your image and now you can compose your image better. We're going to do that for this scene. I want to start in interactive render. All right. That is light entering from the back scene. We'll leave it for now in the settings and adjust it later. I'm going to hide the bed for now. I'm going to restart and try to render because the pillows didn't get hidden. This is called the rule of thirds and in this photographic composition, It's a good idea to place your objects of interest. For example, this painting on these four points. It doesn't have to be exactly placed on these four points, it can be close to that point as well. As you can see, we have a painting here, a lamp here, a beanbag here close to this, and then laptop as well. So if you're happy with this view, you can create a new view by right-clicking on scene one and clicking on Add. This is our second view. Finally, I need to adjust the light setting for this as well by going to your Asset Editor, going to section plane, which is our new section, and going to options and switching off Affect Light. You can see that it instantly becomes dark because there is no light entering from the back scene. If I zoom out, you can see that there is no light entering into the scene from this section. That's very important to switch off your Affect Light. These are two camera views which we can work with. In the final few videos of the section, I'm going to show you an additional sectional perspective view, which is also pretty cool to show your clients. In the next video, we're going to set up the lighting because the space is a bit too dark and we're going to improve the lighting in our scene. So I'll see you guys in the next video. Cheers.
11. Set up lighting in Vray: Hey guys, welcome back to yet another video. Now, in this video, we're going to set up the lighting for our scene. As you can see in the previous video, we created two scenes, or two views in our SketchUp window, which is scene 1. What happens in scene 1 is this section gets turned off, and this section gets turned on automatically. That's how we set it up as well. If you go to scene 2, it's vice versa, this section gets turned off and this section gets turned on. I'm going to set up the lighting first for scene 1. Click on Scene 1. Now, we have two lights. If I go to my accelerator, we have the sunlight, which is on here, and we also have the environment light. These two lights would suffice for this section. I'm going to add some additional lights as well. The additional light which I'm going to add is just one light. These are going to fall from this side of the door. Select this door, right-click. Go to Configure Live Component, scroll to the bottom, you'll find an option called Open Angle. I'm going to increase this all the way to 90 or 95. You can see that the door opens. I'm going to close this. I'm going to hide this temporarily, and I'm going to place a rectangle light. Click on your Rectangle Light, click here and click here, and you are done placing your light. But the problem is it's facing the opposite direction, so you need to rotate it by 180. Now, I type in my value 180 in the center. We'll place this in place and we are done. That's one light and two more lights, which is the sunlight and the environmental light. Let me see if all of this is in order. There is no light leakage or anything of that sort. It's a good idea to maybe just give some thickness for this as well. You prevent any light leakage. Now go back to scene 1. We're going to start the interactive render. Go to Asset Editor, go to Settings. We're going to use the same settings as before and click on Render with V-Ray interactive. You can see that there's some light coming from here. I'm going to introduce you guys to something called the Light Mix, which is a new feature in V-Ray 5. I'm going to stop the interactive render. I'm going to go to my render elements and I want to select Light Mix. This is a very cool new feature in V-Ray, which allows you to adjust the lights in the V-Ray frame buffer. This was actually part of render engine called corona, but unfortunately, corona doesn't come with SketchUp. It only supports 3ds Max. But this year, V-Ray has introduced Light Mix and it is definitely going to improve your renders even more. I'm going to keep this option as is, which is Group By Individual Lights and I want to start an interactive render again. Now if I click on Source Light Mix, you have all the lights separated with these ticked boxes. If I switch off all, you can see that all the lights get turned off, and if I switch off one by one, so this was the rectangle Light, that was the environment Light. You also have some self illumination going on. I know know where this light is coming from, but we'll figure it out in the materials. We have environment, we have rectangular light and we have our sunlight. Now you can go ahead and for example, adjust one of these lights. Let's start with the rectangular light. You can reduce the amount here or increase the amount. You can also change the color by clicking here and reducing the temperature to make it more of a warm color, and then pressing Okay. We can also switch on their environment light and then increase the environment light this way to whatever you like, and similarly, you can do the same for sunlight as well. But the sunlight is not falling the right direction. So we need to fix that. To do that, go to your Asset Editor, go to Lights, click on Sunlight. Again, this is another brand new feature in V-Ray5 called customer orientation, where you do not need to adjust the shadows in the Sketch-Up window, you cannot adjust them directly in your V-Ray Asset Editor. Click on Customer Orientation, and now you can adjust the light settings here. I'm going to switch off these lights for now. You can see only the sunlight on, and I'm going to adjust the light setting accordingly. I'm also going to hide the collecting materials temporarily. We'll stop the interactive render. The reason why I'm hiding it does because maybe some of you do not have the right coating and the right coating materials applied. I will be showing you how to create coating materials in the next video. Let's hide this coating. Let's hide this coating, and then start the right render again. You can see there's more light entering the scene. Let me go back to my sunlight setting, and adjust this a little bit more. Customer orientation is in view of, I would say the light is falling, so the light is falling from this site and it reflects the same in your frame buffer as well. There's some light throwing on the bed, which I like, and I'm also going to adjust the light settings. Go to your sunlight, you can change this to overrate and not give that morning light. Or maybe just give a cool sunlight, and then change the sun or size multiplier to 10 so that we have softer shadows on the bed. You can see that the shadows become softer. I'm happy with this. I'm going to stop the interactive render. Let's update the scene. Now the reason why the light wasn't falling properly was because of these coatings. We'll adjust them in the next video. What you can also do to increase the overall brightness in your scene is, I'm going to start interactive render again. To increase the overall brightness in your scene, you need to go your accelerator, go to settings, and under Advanced Camera Parameters, make sure your shutter speed is 100 because that's what we generally use for interior renders. I'm going to switch on these other lights, so that brightens up the entire space. Now the second tip is, apart from increasing your advanced camera parameters, it's also a good idea to adjust your layers or VFB right off the bat. I'm going to add an exposure. So click on the Layer Button, left-click and click on Exposure. Now, I'm going to increase the exposure a bit. You can see that the overall scene brightens up pretty fast, and I'm also going to reduce highlight burns, and I'm also going to add a white balance to make it either warm or cool. I'm going to leave it slightly to the warm side, and I'm also going to add a curve. Then zoom out bit, click on the bottom left where the red and green lines intersect, and drag this to the left. You have a top red point as well. Click here, and drag this to the top so that you get an S-curve which increases the shadows and highlights. Now I can turn this on one by one. You can also reduce the opacity, which is similar to what it is in Photoshop. This is pretty cool. I would suggest that if you're setting up the lighting in your scene that you are adjust these along with your advanced camera parameters to get the best lighting in your scene. Don't give these settings towards the end after you're done with the rendering. Make sure you set up these layers laid off the bat so that you get the perfect lighting in your scene. Similarly, I'm going to set up the lighting for my view 2 or scene 2. Click on Stop. [inaudible] Make sure you update the scene. It's always good idea to update every now and then. Click on Scene 2. Click on Render Attractive again. We're going to hide these coatings temporarily. Restart then a render after you fill the coatings. Go back to your Light Mix. This is some illumination happening here, because the numbers of layers, so if we switch this on, you can see it turns back on. You can reduce the environment light if you want to. If it feels a little bright. The lighting set up pretty decently here. I'm going to leave it as is and come back in the next video, we're going to adjust the materials and then adjust the lights again. It's always important to adjust your lights as in when you adjust materials because some materials are of more profound impact on your lights. I'm happy with these two scenes. You can go ahead and save these renders so that you can see your before and after from your initial test render to your final render. Finally, before I let you guys go, if you want to save the settings and use them in the future, you can also save them by clicking on Save Layout Tree Preset. So click on Save. You can call this bedroom preset or a bedroom layer of preset. The next time you are rendering something new, you can simply click on the Load Layer of Preset, and you can load this preset, which would come with all these settings. Similarly, you can also save the Light Mix settings. Click on Save and click on this Light Mix settings. But generally, I do not save the Light Mix settings. I generally save the layers or the VFB files so that I can load it. Don't extend around as well. I hope you guys found this video useful. In the next video, we're going to jump into materials and set up the materials for our scene. See you guys in the next video. Cheers.
12. Cleaning up Materials in Sketchup: Hey guys, welcome back to yet another video. Now in this video, I'm gonna be showing you how to rename all your materials, only give them materials that you need. And also I'm going to show you how to use the 3D library and create your own awesome Mendeley library for really. Start off, I'm going to click on the Asset Editor to open it up. Now as you can see, there are some materials. So the only materials which I need to read in this glass material, similar selectors, glass material. And as you can see, the auto 15. So I'm going to right-click and click on Rename. I'm going to call this a underscore glass, underscore window. So it blesses itself alphabetically as soon as we rename it. I'm also going to adjust the settings. So click on this arrow to open the material pattern windows for this material. So you can see that there's a blue material, but what I would like as simple transparent window. So make this black click on reflection, increase the reflection color to full. Click on reflection, and increase the refraction to fool as well. So this would make it all completely transparent material. And we're gonna select the other parts of this window, this forams, I'm going to call this underscore frame. I'm going to make this metallic. So to make an metallic, you can go to the reflection. You can use use glossiness under sofas control, you can also use us roughness. And we'll use, use glossiness. And I'm going to simply increase the metals for this material. So that would make it modality. I do not want it to be so metallic. It's maybe just a bit to give it that reflective field. And you can also change the color. Make it slightly grayish. So we have Ephrem, a glass. Let me see if there's any other medieval that an eagle retained from this. Yes. So just those two materials for the rest of it can be deleted. Let me just check if there's any other material that I need to read in. I'm going to hide this by pressing F2. Let's check if these windows also have the same material. It is, since it's a component or light grip, I can go ahead and delete these auto other materials. So select all of these and holding Shift. So I'm clicking the first material, holding shift on my keyboard and celebrating the last material in this list. Then I can click on delete asset. We can also delete this material. So they click, click on Delete and click on Delete again. It's grander bottom and check if there's any other materials. We could potentially delete these materials as well. So select all these materials, click on Delete on your keyboard as well. We can delete Marcus materials, and we need to rename few more materials. So select this material. And we can also rename these materials in SketchUp default DRI, and know the material dialog box. So all you need to do is select this material and just given underscore, call this bending underscore frame. Similarly, the second material. Copy this if you want to be as the same prefix and select the last material and give it at the start. So now if I go to my acid editor, you can see that it renames in the acid editor as well. So you can either take an image or you can rename it as well. It would automatically reflect in your query Asset Editor. So let's check if there's any other materials that we need to clean. I don't need this medium. I can read these last materials as well. So select material on the wood floor bucket and click on Delete acid. Cleaned up our materials. And it looks neat. Know. Now you can see that we've deleted some materials, which has gone ahead and deleted the material from the object is when you do not have to worry about these because we will re-import them later. So for now we can delete this model. So select the model and click on Delete when the import them back again in a later video. So now what we need to do is seawall, the local bitmap fails to your local Dave. So that next time you shared this fail along with the maps, the file has the maps and backed. So to do that, go to Extensions, go to 3D, and click on failed by that a go. I can see that all these files are saved in another folder, but I need to read art gave and rebirth all these files to the folder which consists does fail, which is setting up material library. This is under 3D Warehouse, which is not what I want. So select the first medical hold Shift on a keyboard and select the second material, which is the last material. Right-click and click on our game and report. Now go to your folder which contains this scheduler file, which is heading up our material library. I'm going to create a folder in this folder called setting up a library called those maps and do the maps for low. And then select the folder. Know it's gonna go ahead and receive all these files to a brand new folder. So now you can see that we have our sketch up failing, which is this failure. And under maps, we have all the maps related to this scheduled fail. So the next time you are sharing a file with me, make sure it is this N2O4 law which contains water sketch, I'll fail. And they'll maps for logos contains all the map phase. And the best way to share this vein is by making it opens up auto Windows phone. So they click and click on Add, then setting up a material library in SketchUp. So what's going to go ahead and create a zip file? And you guys can share this fail, which contains both the maps and the scheduler file. This way, those SketchUp file doesn't lose access to the web map fails. And I can render the scene as is.
13. Create a Vray Library: I'm going to quickly show you how to set up the V-Ray Library for your workflow and future scenes. Click on the "Asset Editor". If I click here on the left arrow key, it opens up the dialogue box containing all the materials. I'm going to show you guys how to create your own library as well. I'm going to quickly close these libraries and then reopen them. Now if you click on this icon called "Add a new file system location", you can browse to the directory which contains all your library files. In my case, it's ID Materials. Then click on "Select Folder". What it does is it loads all the VR-made files and, in my case, I also have subfolders. Each of these are separated and I have different materials under each of these folders, which I can use in the long run and I can also drag these materials into my scene. For example, A_Porcelain_White all I have to do is drag it in. It gets loaded into the isolator for my scene with all the material parameters. All I have to do is simply select any group or any object and apply it into my scene. I can also drag some materials from my existing materials in the scene, and drag it to the Library. For example, this Mac_Screen I can drag it to my Emissive Materials. Simply click and drag it and it will be added to your library which you can use in the future. How do you create this library? It's very simple. Add a new file system location. I'm going to create a new folder now. Call this 00_Materials. I can click on "Select Folder". This Library folder. Now I can start dragging in materials. Now, what if you want to add sub materials or subfolders. You can again click on "Add a new file system location". Now under Materials, I'm going to create new folders, call this Curtains, Glass, Metal, and so on. Make sure you select only materials and not the subfolder and click on "Select Folder". Now if I right-click and click on refresh, you can see that it comes with a subfolders, and now you can start dragging into the subfolder category as well. That's how simple it is to create libraries. I will be sharing my set of library materials with you all in this section which you can use for your workflow. You can go ahead and create your own library as well. This is a good way to improve your workflow and get faster at rendering because you have materials ready to go loaded with good bitmaps and so on and it'll definitely save time in the long run. That is a quick intro to creating a V-Ray Library for your workflow and also cleaning up the materials in your scene. In the next video, I'm going to be showing you how to recreate this window frame, which I've taken from a website called wayfair.com, this is the exact same image. I'm going to be showing you how to use actual real-life products in your scene and create it using SketchUp and V-Ray. I'll see you guys in the next video, cheers.
14. Recreate Models from Wayfair in Vray 5 for Sketchup: Hey, guys. Welcome back to yet another video. Before we go ahead and create these photo frames or printing frames, some of you all have asked the reason why I put a prefix for all the materials. I'm going to show that right now. If you go to Windows and you go to 3D Warehouse, and let's say you download something random from 3D Warehouse. Let's say, for example, this hood. Click on download and click on yes, and you place this model in the scene. When you go to your asset editor, you can see that all these extra materials show up. I know that these three materials belong to this model since I've given a prefix for all my other materials. This is one benefit of renaming your materials, where you can simply recognize the materials of a new model when you import it into your scene. You can go ahead and rename these, adjust the materials, and so on. The second benefit is that if you delete this model, the material remains, but since you know which materials they are, you can simply select all these materials and click on the delete asset. That are some of the benefits, there are multiple benefits to being organized. I hope that you guys stay organized with your models as well. We're going to go to Scene 1, and we're going to recreate this model. Before I recreate this model, I'm going to delete these materials. Select this material, this is A-Frame window glass. Then we also have a wood white textured. I'm not going to delete this material because it's applied in other models as well. Let me just hide the window, undo the group, hide the window and select this material which is A-Frame 01 paint. I'm going to delete A-Frame 01 paint. You can see that it gets removed from your sketch-up view as well. I'm also going to delete this glass, which is A-Frame white glass. Right-click and click on delete. We can delete this frame as well or this box which I've created using groups. Select the box and click on delete. We're going to recreate this photo frame or painting frame, whatever you want to call it? Before we go ahead and create this, I'm going to show you guys the actual product from the Wayfair website. This is the actual product. Now there's two important things you have to keep in mind while you're recreating this in Sketch-up. One is, you need a clean image without any background. If you go to the next image, you can see that this has a background, so I can't really use this image unless you put it in Photoshop and save it again. But if you get an image which is clean, you can use the same. Click this image, I'll right-click and click on, save image as. I'm going to save this to my folder which contains the Sketch-up file. It's going to be called Indigo Bloom, I'm going to click on save. It's a JPEG file which you save. We should also keep in mind of the dimensions. What is the size which you want? We're going to keep a medium-size which is 26 inches high by 26 inches wide and also one and a half-inch in depth. Keep these dimensions in mind, it's best to read the actual dimensions of the product. Go to your sketch-up window press "R" on your keyboard to activate the rectangle tool, click on the wall, and now type in your value, which is going to be 26 inches. Comma 26 inches, and then press "Enter". This is how big our photo frame is. Now let's make this a group. Double-click and press "G" to make it a group. This is going to have some thickness, so you can enter the group and push this out by one and a half inches. That's how thick the frame is. We're also going to give one and a half inches offset to the inside. Now, I'm going to push this out. We have the frame, and we need to add the image to our background. Before that, I'm going to enter the group press "J" to toggle this a little bit. I'm going to make a rectangle at the back. Make this a group. I'm going to enter this group, and I'm going to apply the texture on this face. To apply the texture on this face all you have to do is go to file, click on import, click on the image one import into Sketch-up, and make sure that you are selecting texture and not the image. If you select texture, this image would tile as well, and that's what we need. Click on texture and click on import. I'm going to click once. I'm going to click the second time, so we placed our image in place. But the thing is we need to scale it correctly. There's two ways to scale. One way is by changing it in your material data box in this default here. Select the material and then go to edit. Then you change the size here. Let's try two and a half feet. That's one way. But the thing is, it doesn't change from the center point, rather it changes from the corner. To adjust it manually, you can enter the group, select the face, right-click, go to texture. Now some students have complained that the texture option doesn't show up. In that case, you can right-click, and you'll find an option called make unique texture. If you click on that and then again right-click, you'll find the texture option. Click on textual and click on position. Now we can position this like this. I'm going to decrease the size a bit and scale it to the edges and then right and click on done. Now this image is not scaled proportionally, so it's not exactly a square, it's a rectangle. If you want to adjust it, you need to adjust it in Photoshop. We're not going to be doing that now. In our case, we're simply going to extend the frames. Select the top part of the frame and move it up. Enter this group and select the top plane and move it up as well, till the bottom of the frame. Select the frame again and move it down to the bottom. That's how simple it is to create your photo frame. If you notice that it is overlapping with the wall, so all you need to do enter the group, select the texture group, and move it in. You can also add a glass if you want this image to be slightly reflective. For that make a rectangle and make this a group. We're going to create a new material, so go to asset editor. You can notice that we bought in this image, and it's coming with the name of the texture. I'm going to rename this and add a prefix, A_frame_indigo. We can create a generic material for our glass, right-click, rename, A_frame_glass. We're going to increase the reflection, and we're also going to increase the refraction. I'm going to decrease it slightly, so it has a little tint as well. The other way to add the tint is by changing the fog color. But we're going to leave it as is. Now with the frame glass selected, I'm going to apply it on my group. I'm also going to give some thickness. I'm going to type in 2 mm for the glass thickness. We created our framed print. Now the last step I would suggest is to make the whole thing a group, select the frame and the glass and the painting, and right-click and click on group. I'm also going to apply our material for this. Go to asset editor, Here for a wood white textured, which is essentially just a white texture with some reflection and a reflection glass in its map to give a smudge feel on your wood. I will show this later on in this section. Select the group and then right-click here, click on apply to selection. We have created our photo frame, which we use from Wayfair. Similarly, in Scene 2, you guys can go ahead and create these three printing frames. It doesn't have to be the same thing. You can take anything from Wayfair, adjust the images accordingly and bring it into Sketch-up. All I have done is given a box, given a thickness, and apply the texture on the front face. I've also rounded off the edges to make it more realistic in the render. That is a quick tutorial into creating photo frames and taking actual objects from websites such as Wayfair, Home Depot, and so on. I hope you found this video useful. In the next video, we're going to learn how to create fabric materials using something called a falloff map. I'll see you guys in the next video. Cheers.
15. Create a Fabric Material for Blankets: Hey guys. Welcome back to yet another video. On this video, I'm going to be creating the fabric materials for our scene and how you can also create a fabric material using something called a Falloff map. To start off, I'm going to delete this material. Go to your Asset Editor. Select the material again. Right-click on the material and click on Delete. Click on Delete again. Give it a bit for the material to delete. Generally fabric materials take some time because materials are applied on a high poly model. You've deleted the material. I'm also going to delete the pillow materials. Select this, which is a pillow fabric white. I'm going to right-click and click on Delete again. Click on Delete. I'm also going to delete this textured fabric materials, right-click, and click on Delete again. We're going to start creating a fabric material for our blanket. To do that, you can click on the Asset Editor. I'm going to create a new generic material, so right-click and click on generic. I'm going to rename this, call this a_Fabric_Blanket. Now I'm going to click on the right arrow key. Now, to add our Bitmap, you can click on the texture slot here and click on Bitmap. Now, these Bitmaps, I've downloaded from a website called poliigon.com. You'll find high resolution textures here, and these would definitely help bring more life into your scene and make your renders even more realistic. You'd get both paid textures, as well as free textures as well. All you have to do is go to textures. You can sort by category, and you can also sort by free, or the latest fabrics, or whatever material you'll require. I would definitely encourage you guys to test this out, and it would definitely take your renders to the next level. I'm going to use this fabric material which I've downloaded from poliigon.com. I want to select the first material, which is this fabric linen. I'm going to use this as my texture. Select the material and click on Open. I'm going to change it to rendering to make it slightly brighter, and then go back. We have our fabric material. I'm going to change the rendering mode to fabric, I don't want to see it this way, I want to see it as a fabric. For that, you can click on this three dots here and then change it to fabric. Generally in fabric use, the tangent side of the fabric is brighter than what you see directly. That's what we're going to do, and we're going to use Falloff map for the same. Right-click, go to Wrap in. Go down, scroll down on this list, and you'll find the option called Falloff. Click on Falloff. Now it would load the color A with our fabric. You can see that fabric has come in, and you can see that the sides is more brighter, which is the tangent views. That's how generally the fabric material is. In our case, you can see that we loaded this material in slot A, and now we need to load the same material in slot B as well. Right-click, click on Copy, and then again, right-click and click on paste as copy. Now as soon as you paste this, you can see that it loses its brightness at the tangents or the edges. We need to make those second slot texture slightly brighter, and how do you do that? That's right, we use color correction. Right-click, click on Wrap in, and click on Color Correction. Now, the best way to make this bright is by simply increasing the brightness control. Or you can also change the mode to gamma. Again, lift and increase the gamma, this way to make the texture brighter. You can see that this is a brighter version. Now if I go back, you can see that the edges are slightly brighter. I'm going to make the slot A texture slightly darker, so go to the first slot. So we need to add a color correction for this as well to make it darker. So right-click, go to Wrap in again, and click on Color correction. Change this to gamma again, and decrease the gamma now to make this texture slightly darker. Now if I go back, you can see that we have a darker texture here, and a brighter texture at the tangents. Now if I go back, you can see that it would automatically change to a proper fabric material. Now, if you want to change the color of your fabric material, which a lot of students have asked, using the same texture, you can right-click, click on Wrap in, and click on Color Correction. You can change the hue value. Now if I go back, you can see the color of the fabric changes. But I would recommend that you use texture map, which has the same color material, rather than changing it using your color correction. I'm going to change this back to zero, I'm going to go back. I'm also going to add some slots in the reflection, refraction and bump using the poliigon Bitmaps. I'm going to start off with the normal map to add some amount of 3D effect in the material. It's not going to be much, but just a tad bit to make it a little more realistic. Click on bump. Now change this to normal map, and click on the texture slot and click on Bitmap. Now we have this normal map here. Generally, normal maps look like this, so you need to select this normal map and click on Open. As soon as you open, it's a good idea to change this to rendering mode to make it slightly more brighter, and also affect the material a little better. Now click on Back. I'm going to reduce the normal amount a bit. You're not going to see much of an effect, but it does add that slight bit of 3D in your scene. You can go ahead and add some Bitmap slots from your poliigon website to these parameters as well. For reflection glossiness, generally you have a map called a gloss. This is the Fabric Linen gloss map. Select this map and click on Open. Now for this map, you definitely need to change it to rendering, so I'm going to change this to rendering. Now you can see that it's brighter. I don't know if you can see, but there are lines in the gloss map, although it seems to be completely black. Go back. I can also add Bitmap to my reflection color slot. Left-click on the texture slot and click on Bitmap. I'm going to select reflection Bitmap now. Click on Open. Make sure to change this to rendering space to increase saturation of the texture. This texture does have a bit of information in it to make the fabric material slightly reflective although fabric materials are not really reflective. This is our fabric material and this is actually our linen material so we can't really use it for a blanket, which is not really a blanket, but comforter. For comforter we use materials called polyesters. Now, I'm going to quickly rename this material. Right-click "Rename" and I'm going to call this linen. I'm going to apply it on this bed-sheet so enter the group, double-click to select all faces and edges, right-click on the "Material" and click on "Apply to Selection". It's also a good idea once you apply the material to click on "Tri-Planer Projection World". Give it some time to update, and we are good to go. I'm going to use this material in the future as well so I'm going to add it to my library. Go to "ID materials", open the dialogue and click on "Fabric", so these are my fabric materials and I'm going to simply drag to save. Also a good idea to name the color of the material. So I'm going to call this, light beige. Select the material and drag it into your library. It's going to be added to the bottom and it would show up in your libraries folder as well. As you can see here fabric linen, light beige, along with the maps loaded into your library folder. Now, for the comforter we need to create a polyester fabric so I have these polyester materials which I have downloaded from polygon. Click on "Acid editor", again, create a generic material. I'm going to rename this, call this A_Fabric_ Polyester_ Yellow. Again, add a bitmap. You can either add the first edition or the second edition. I like the less saturated version which doesn't burn the eyes with too much of color. I'm going to select this and click on "Open". You can leave it as green space, the diffuse slot doesn't have to be changed to rendering. You just need to change it for your other bitmaps. So go back and we're going to add a Falloff map to this and see that it's not really a fabric material. Before I add a Falloff map, I'm going to change this to a fabric rendering world and now right-click on the "Texture" slot, go to "Wrap in" and click on "Falloff". The bitmap is going to be loaded to your first color slot, right-click "Copy" and "Paste" it to your second color slot. one it's one single color. We need to make the sides brighter, which is our tangent view. So right-click, go to "Wrap in" and click on "Color Correction" again. This time I'm just going to use brightness and increase the brightness this way and then go back. I'll go back again. So we have our fabric material. I hope you saw the change. Now we're going to add another color correction and maybe reduce the saturation for this fabric material a bit. Essentially adding a color correction on top of the Falloff map which you added. This would make sense if we use a slate material editor, which is generally used in 3D as max. Right-click, go to "Wrap In" and click on "Color Correction". We have the saturation parameter which we can bring down to make it more of a beige material. Go back and this is what we want. Now we can add the other parameters, let's see what is there. We definitely need to add the bump so click on "Bump", click on the "Texture" slot and click on "Bitmap" again. I'm going to add a normal map so click on "Normal map" and click on "Open", make sure to change this to rendering for all your normal maps and click on "Back" again. It's not going to read the normal map because we are using the "Bump" map mode so change this to normal map mode. You can leave it as is, or we can reduce the amount of the bump on the material. You can also add a reflection and gloss again for this material as well so click on the "Material" slot again and click on "Bitmap" for your reflection color. I'm going to select this "Bitmap" as it's given reflection 6k, click on "Open" again. I'm going to change this to "Rendering Space Linear." Go back. So the reason why it doesn't affect the material too much is because it's sort grayish bitmap and as explained previously in the previous sections, the more brighter the bitmap is, the more it effects the material and the more darker it is, it has less of an impact on the material. This is slightly grayish, which would just give it that bit of reflection. Similarly for glossiness as well, click on "Bitmap" again and select "Gloss 6K", click on "Open", change this to "Rendering". Go back and you are done. So you're going to pay this material on our comforter or on our model. Enter the model, make sure to enter the group, double-click to select your faces and edges, right-click on the material and click on "Apply to selection". It's going to take some time because of the heavy model, and it's applied. Let's check this material in render. So I'm going to quickly intact [inaudible]. Go to see in one. Go to your asset, click on "Settings." Make sure RTX is on, interactivity is medium using the demoiser in media if you have an RTX graphic card, and then click on "Render" with reading interactive. If you want to adjust the color, if you're not happy with this color you can use a "Color correction" again, which I have applied. Enter the "Texture" slot to your color correction. Remember that it is applied on a Falloff map so if I enter this again, you can see that it's applied on this Falloff map. Now go back. This is our color correction. Now you can change the value of the hue, maybe I'll just keep it at zero for the hue and reduce the saturation a bit more as well. I like muted tones as it goes well with the space. You can see that this building is not showing up because of the glass so I'm going to adjust that material quickly. Select this material, which is our glass and go to your reflection value and reduce the glossiness here, so now you can see that the building starts to show up. We just just need a bit of glossiness for the glass.
16. Create Fabric Material for PIllows: Hey guys, welcome back to yet another video. Now, in this video, I'm going to create my pillow materials, and also apply a textured material on the pillows, and use a plugin called SketchUV to correct the UV of our material. I'm going to delete this lamp knob because I'll be showing the way. I don't need this and doesn't add value to the space so I can delete that. I'm going to create a simple fabric material now I'm not going to be using any sort of a bitmap. Go to your Asset Editor, right-click and click on ''Generic''. I'm going to rename this, call this A_Fabric_White_New. I'm going to use a slightly grayish-white material, not completely white, and I'm going to click on the ''Texture Slot'', scroll down and click on ''Falloff Map.'' Now, I'm going to make the slot A slightly brighter as well, and then go back. We have a fabric material, I'm going to change this to fabric. This is our fabric material. I'm going to right-click and copy and add this to the bump as well, and reduce the bump amount. This is our simple fabric material. If you're changing the color in your fabric material, I will suggest that you enter the texture slot and change it in the falloff map. Now for example, if I give this color which is maroon, I can right-click, ''Copy'', and right-click ''Paste'' here. So the same color now, but I'm going to make this brighter by entering this swatch and then simply reducing the value to make it slightly brighter. Now if I go back, we have a red velvet fabric. Now into the group again, I'm going to keep it white, so reset this, reset this and just simply increase this to the right. We have a fabric material and I'm going to apply this on my four pillows. Center this group, select both the faces and edges. Use the Bucket Tool, make sure that the fabric white texture is activated and apply it on your pillow. Once you apply it on your pillow, select both their faces and edges and click on ''Tri-Planar Projection World''. Now, some students will ask me if I can use the same reading material and show it in the sketch our view as well. Yes you can. Go back to Asset Editor. Under the material parameters for Fabric_White_New, we have something called binding. Click on ''Binding'' to open it up. I'm going to change the texture mode from Auto to Custom Mode and click on the ''Texture Slot'', click on ''Color'', and use a white color. Now it would reflect in the sketch up window what is shown in the binding for this material. So that's how you show your video materials in the SketchUp Window. I'm going to select this material and apply it for these pillows as well using the same steps. I'm going to apply our texture material now on this pillow, so back Asset Editor, create a new generic material, rename this, call this A_Fabric_Pillow Texture. I'm going to add a bitmap here so click on the ''Texture Slot'' here, and click on the "Bitmap" again. I'm going to select this material as my texture, you will find it in the exercise files and click on ''Open''. I'm going to go back. Now I need to make this a fabric material, which I'm sure you guys know by now how to create. So right-click, go to Wrap in, scroll down and click on ''Falloff Map.'' I'm going to right-click, "Copy" this and "Paste" in the second slot and I'm going to add a Color Correction to make it brighter. We have our texture slot, I'm also going to copy this to my bump, so right-click, ''Copy'', right-click, ''Paste.'' But make sure you paste it as a copy and not as a instance. If you paste it as an instance and if you change the material, it will change in the original material as well which is in the Texture Slot. If you paste it as a copy, this would be independent of this. I hope that made sense. Now I'm going to add a color correction and I'm going to reduce the saturation to make this a black and white map. I can increase the brightness a bit and finally reduce the bump amount. Now I'm going to apply this material on my pillows, so center the group, double-click on the pillow and apply the material. Apply the material, but the texture's gone haywire, so enter the group again and generally Tri Planar Projection World works if the UV is correct in your object. If it doesn't work, you can see. You can download a plugin called SketchUV. So go to Windows and click on ''Extension Warehouse." I'm going to select SketchUV, or you can search for SketchUV as well. I'm going to select this plugin and click on "Install." It's a free plugin and you can simply install it from your Extension Warehouse. We've installed SketchUV. Now what you need to do is, enter this group you select both the faces and edges or the face as well and now you can click on ''SketchUV Mapping Tools''. Once you click on this and you right-click on the surface, you'll get these various options. The best way to solve this problem is by using a planar map, so click on ''Planar Map'' and you can see that it is wrapped better than what it was before. Now you can use the arrow keys on your keyboard to nudge the texture, so I press ''Left'', you can see that texture moving to the left. Let me select "SketchUV" again. You can also decrease the scale of this texture by typing in multiply into 10. You can make it something along these lines as well. I'm going to undo and multiply it by three and then simply nudge it to the right a bit. You can also nudge top and down. Once you are happy with this, you can click on the ''Select Tool'' and click outside the group to finish. I'm going to quickly repeat that for this pillow as well and repeat those same steps. Now I'm going to start interactive render and see how this looks in the render, so click on render with video interactive and it looks pretty decent. That's how you create your fabric materials. In the next video, I'm going to show you how to create the fabric material for curtains and how to make it translucent or transparent to let in more light. I'll see you guys in the next video, cheers.
17. Create a Fabric Material for Curtains: Hey guys, welcome back to yet another video. Now in this video, we're going to create our curtains for this room. Press "F4" on your keyboard to unhide all objects. We're going to select the curtains, and then click on "Scene 1" again, and then right-click and click on "Unhide". I'm going to update the scene so that the scene contains the curtains. When I zoom into the curtains, you can see that these are not really fit for these kinds of curtain rods and simply feels like it's stuck to the curtain rods. This kind of curtains would generally be used for photo ceilings where you have a soffit or a core and you can hide the top of the curtains. I'm going to delete these curtains, I'm going to use another kind of curtain. Also, before I delete these curtains, I'm going to delete the curtain materials as well. Select the curtain, you can see that this is A_Curtain_White_Two Sided. Now if you want to delete it in the Materials dialog box rather than going to Asset Editor all the time, you can click on the "Home" button here. You can see that this is our material. All you need to do is, right-click and click on "Delete" and click "Yes". We can delete this curtain by entering the group, selecting the curtain, and then pressing "Delete". Similarly, I'm going to select this material, which is A_Floor Lamb_Two Sided, and it shows up here as well with the blue bounding box. Right click on, "Delete" and click on "Yes". I'm going to delete this model as well. I'm going to load our model or our curtain from 3D Warehouse. Go to Windows, click on "3D Warehouse". That's for our curtains. I'm going to use this podium browser which has been downloaded 23,000 times. Click on "Download" and click on "Yes", and place it in your scene. Now, this comes with a curtain rod, so I don't really require that curtain rod. Enter the group press "G" to toggle this [inaudible] I'm going to delete this curtain rod, and once we're going to delete this curtain and only keep one. I'm going to go position this to my double curtain rod here. I'm using the Shift and the right arrow keys to snap it to a axis. Now, if you can't move to a certain axis, the reason is because it is glued to that object, so right-click and click on "Unglue", and now you can move it to the more little inside. I'm also going to scale this down. Let me just hide the walls temporarily. Select the curtain, press "S" on your keyboard, and then scale it down. I'm going to scale it to the edge of this window and here as well. I might need to adjust the curtain rod. We can also scale it inside. There's the scale tool again. I can copy this curtain to the next curtain rod, and then simply scale it down, so we have two curtains. Now I'm going to copy this curtain along with the curtain rod on this side, and I'm going to delete this because we're not going to be using it again. Click on "Delete", select this curtain, select this curtain, and select the curtain rod, make it a group, and then copy to the other side. You can make it a component as well so that if you make any changes here, it affects another curtain rod as well. Right-click, click on main Component", call this Curtains, and press "Okay". Now I'm going to copy this to the other side, and we are done. Maybe just shift it to the left a bit. Now we're going to give two kinds of curtain materials. This is going to be our transparent material, and this is going to be slightly translucent. You can also notice that this is gray intersecting with the floor, so enter the group use the scale tool and then just scale it up a bit. Similarly, this is well. Choose the face. You can see that that affects with these components because they are similar. We need to renew and adjust this material. Select this material. It's called PDM_IKEA. I'm going to go to the Asset Editor. Now I do need these materials which can be loaded with the model. I'm going to delete these, select all of these, right-click and click on "Delete." Let us delete again. You can see now the curtain is without a material. We need to create a curtain material. Right-click, click on "Two-Sided" this time, to create a curtain material. Right-click, rename this, call this A_Fabric_Curtain_Two Sided. I'm also going to add to the end of this title as Transparent White so that I know which material this is. If I open the material parameters for this curtain, you can see that we need a front material and a back material. For that, I'm going to create another generic material. I'm going to rename this. Call this A_ Fabric_Curtain_White and I'm going to call this Base. We're going to add this to the Font. Select that material and add it to the Font. Similarly to the back as well. I'm going to increase the translucency. I need to make it more of a white material, it's slightly grayish. Go back to your curtain white base here, or you can also click here, which redirects to your curtain white base, and drag this to the right. To make it more open or transparent, you can reduce the opacity for this material. I'm going to reduce the opacity. Now if I go back, I can see that becomes a transplant material. You can also add a falloff map because these are fabric materials. Because I'll do that for this material. Click here, scroll down and click on "Falloff" map. I'm going to increase the colorful color here so that it starts to fade from the center towards the edges which is our tangent views. Change this to fabric, and viola. Go back to your two-sided material and this is our curtain material. You can go ahead and add this to your library in case you want to use it in the future. I have a sub-folder called curtains. Already do have the material in place, I'm not going to add it this time. Now, we're going to apply this two-sided material. Make sure to apply the two-sided material on your group and not the curtain white base, because the two-sided material is what gives it that curtain feel. Select the curtain two-sided material, enter this group. We need to make this a unique curtain. So right-click, that's made unique and to the group again and right-click and click on "Make Unique". Now if you select, it will not select this because it's a separate component. Now we can right-click here and click on "Apply to Selection". You can also apply it for these bands. I'm going to use the bucket tool. Select all these bands, and then play the material and select your curtain. We need to adapt the UVs properly. So select all of it and then click on a Tri Planar Projection World. Let's wrap the UVs as well perfectly. Now let's test this out in our V-Ray Interactive. I'm going to hide this curtain for now and just test the transparent white curtain. Click on "Render With V-Ray Interactive". You can see that we have a perfect white curtain material. Now I'm going to create a textured curtain material. So click on "Stop" to abort the render. Enter this group, press F4 to unhide your other curtain. Again, you need to create another two-sided material. So go to Asset Director, right-click, click on Two Sided, rename this, call this a underscore fabric underscore curtain underscore two sided, and call this textured, whatever color it is, in our case will be beach. We also need to create a base material, so again, right-click Generic, rename this again, a underscore curtain underscore fabric underscore two sided underscore textured beige base. Make sure you give the two-sided as well so that it sits right below this. Let me do that quickly. Make sure to change fabric to cotton so that it sits below this correctly. Also, our two-sided here. Now it sits in perfectly below this, which is our two-sided material. Now, we're going to add this beige base to our two-sided material. Go to our two-sided material, click on the Front Material and scroll down to Fabric Two Sided Texture Beige base. We need to adjust this material, so click on this Edit Selected material slot, you need to add a bitmap. Let's add a bitmap. You're going to use this light beige curtain material. Select this and click on "Open". Go back. Let's make this a fabric material. So change the rendering mode of fabric. Let's add our Falloff map, so right-click, Wrap In, Falloff map. Copy this, paste it to the H, and add a color correction. Increase the brightness and that should suffice. You can also go ahead and add those Spline Curve. Right-click, go to Wrap In, and click on this plane Curve". Now you can change this Spline, go to value and then simply drag this to the bottom to make it slightly darker. Now if I go back, we can see that we have those darker base material. Just give it a little bit of darkness and that should suffice. Now, we can also decrease the opacity a tad bit. Now let's go to our cotton two-sided beige material. Make sure to give this in the back as well, and we are done. Now going to apply this two-sided texture beige to our curtain. Enter the group, select your faces and edges, use the bucket tool and then apply the material. You can notice that it comes in with this relay texture helper. Once you apply the material, you can click on "Tri Planar Projection World". Now if you want to get those same V-Ray color to your SketchUp curtain material as well, which is this color, what you can do is add or color your, go back, and it gently a place on your material. Even if the color is different from what is shown in the V-Ray, you don't have to worry too much because in the end, the V-Ray render is only going to read from your asset editor and not from your sketch up material dialogue. Let's test out this material. I'm just going to scroll in a bit and then run a interactive render. All right, looks good. Let's go back to scene 1. I might want to change the color a bit, so let me just do that quickly. I'm just going to add a color correction and make it slightly more to the yellowish tint. Let's restart the interactive render. I'm happy with this material. Go back to scene 1, and we have our cotton materials. You can see that once we added our cotton materials, it's increased the darkness in the room. All you need to do is go back to your layer slot here and start to increase though overall brightness. You need to adjust the materials and the lighting at the same time. In the next video, we're going to do some final adjustments and add all our remaining materials and then jump towards the final rendering for our scene. I'll see you guys in the next video. Cheers.
18. Final Adjustments 1: Hi, guys, welcome back to another video. Now, in this video we're going to do our final adjustments for our scene and set it up for render. I'm going to go to Scene 1, which is our first scene, and I'm going to run and interact the render, so go to Asset Editor, go to Settings, make sure your interactive is on, your video is on, the safe frame for your render output is on as well and, then click on "Render with Vray Interactive". You can also use the CUDA render engine, which is a mix between the GPU and CPU engines, but if you have an RTX graphics card, it's best to use the RTX mode. Click on "Render with Vray interactive". This is our interactive render, know I'm going to do is I'm going to lock this view because if I move around or orbit in Sketchup, you can see that the view also starts to move in our frame buffer, so I'm going to lock this view. How do you do that? Let's go back to Scene 1, and once you go back to Scene 1, you can click on the "Lock Camera Orientation". So once you lock this and move in your Sketchup window, it's not going to move in your frame buffer, so this helps in editing our materials on the flight as well. I'm going to run the interactive render and leave it in the corner like this and then access my materials. I'm also going to hide certain objects like my beanbag, the standing chandelier here and also this haltry, this is called haltry and it's generally used in the living room and not much in the bedroom. I'm going to hide this as well, go back to Scene 1, we need to hide it and then update the scene. Hide the furnitures and make sure you are in Scene 1 which is in this view, and then update the scene. I'm now going to paint my walls, so make sure this is locked. We can obit around now. I'm going to go to my material editor, my Asset Editor, go to Materials. Let's see if we have a wall material. Now, if I go to my materials here, if I go to walls, I have something called a wall paint stucco material. I'm going to drag this in, click here to open the parameter settings. It's not much of a change. It's just the color which I've used here. Now, if you want to copy the same color, you can go to RGB, copy these values, and paste it into your model or material parameters and you would get the same color. I've also added a bit of reflection, not too much because every single material and surface has reflections and I've added a little bit of reflection and I've also added a bump, which is a stucco map. To add the stucco map, you just need to right click go to "Wrap in" and when you scroll down, you will find the stucco map. We're going to apply this material on my walls. Let's apply it on my ceiling as well. I'll do that, just need to select the walls. All right. If it doesn't show up in here intact or render, you can restart the render. Let me go back to Scene 1. Click on "Start interactive Rendering" again. Now, you can see that we have a bit white bedroom. Now, we're going to adjust these doors. I'm going to click here, which is a region render and just select this part of the render so that renders only these. As you can see, materials is not applied on the faces correctly. We need to adjust this. How we can apply a white wood texture for this face. I'm going to create that material woody oscillator. Right-click and click on "Generic". Rename this _white texture new. I'm going to make the color slightly white. Let's not drag it till the end. Let's keep it a bit away from the end so that it has some grayish undertones as well. Now, you can go to reflection and under reflection glossiness, I'm going to add a map. Click here, scroll down, and we can add a smoke map. What this map does is that it adds surface imperfections on your material because no material is perfect and most materials do have smudges, dot and so on. The best way to add dot, or smudges, and something along those lines is by adding a map to your reflection glossiness. I'm also going to add a bump. I can copy the same map and place it in the bump. You'll see that the smudges come and we'll reduce it, and that should be good. This seems to be a bit too bright for a reflecting glossiness map. I'm just going to make it slightly grayish so that is not too reflective. We need the reflection color at zero. This is a white wooden texture and I'm going to apply it on my materials. I'm also going to play it on my moldings with a nice coating and my crowns. Make sure to apply it for the door frame as well. You cannot apply it to a live component, so you need to adjust the material for the door separately but since we're now going to be showing the door in our render, it's fine. All right, now go back to Scene1. We're also going to add some wood material for our flooring. Again, go back to Asset Editor, right click, "Generic". Rename this to a wood floor. We want to add a bit bump this time. I'm going to use this wood acacia map for my floor. Siliceous material and click on "Open" and go back, and we can copy this and paste it to our bump. Let's make this material black and white in our bump. Right click, go Wrap in and click on "Color Correction". Let's reduce the saturation to zero. Can increase the brightness a bit and the contrast as well and reduce the bump amount. I'm going to add some amount of reflection as well. Not too much, just a tad bit, and you can, again, add a surface imperfection map. Now, if you want to use a surface imperfection map, it's best to download it from Poliigon. Can click on "Textures" and you can click on "Surface Imperfections". These are the various maps which you can use. You can also create this kind of an effect if you add it to your reflection glossiness map. I'm going to search for free and I'm going to use maybe this map so select this and click on "Free Download". I'm going to extract the map to my folder and I'm going to load it to my reflection glossiness. Let's use the darker texture so that the black part of the image remains perfect and a little grayish or the whiter tones in this map gives the surface imperfection in your material. We select this and click on "Open". Can also change it to rendering and make it slightly brighter. You can see the surface imperfection in your preview. Now, I'm going to play this material on my floor. Enter the group, you can see that I'm not really entering floor group, but I'm rather entering the slab here. I need to just push this down a bit. All right that should be fine. Now, we can enter the flooring group, use the bucket tool, make sure this material is selected, and then apply the material. You can also click on try pulling our projection wall rule to apply the material evenly on your surface. Now, let's go back to Scene 1 and then even try to render again. We can just click on the region render so that renders the entire scene and click on "Start" and try to render. It's starting to look good. You can also adjust this material because completely dark. I'm going to lock the viewport again and then scroll into that material. Let's see why it's showing us completely dark. Select this material. This is, again, a two-sided material. Let's check the parameters. Table lamp, two-sided, but as you can see, it is not reading the material properly. We need to redirect all the maps and link it to this map so that it reads from this material and then we can apply it on our module. To link it back to your material, all you need to do is go to "Extensions", "Vray", "File Path Editor". These are the various materials that we have. Select these materials, right click "Archive & Repath", go to your folder, which contains the Sketchup file and the maps and click on "Select Folder". Similar with these materials as well. Now, you can see the red icon you have for these materials, which means that it's lost a link with these materials. Now, if you do have these materials in your local drive, you can link them back by simply right clicking and clicking on "Set Path" and then selecting the folder which contains these maps. It would link back to these materials. Let's check if this material read the link. It has that, icon is gone. Now, we need to adjust this material a bit. Let's go to Opacity and reduce opacity a bit. That would make it more translucent. Can also increase this to the right a bit and that should help as well. Let's apply the material again. You can see that east side lamp bitmap is selected, we need to select two-sided. This is our material which we need and we're going to apply it on this surface. Once you've applied it, click on "Tri-Planar Projection World". This is a component so you do not have to where you would applying it on the other model. We can adjust bulb as well. You can see that it has some emissive materials. It's not going to be seen in the render so I'm going to delete this and press "F3" and I'm going to apply the bulb or the emissive layer on this bulb directly. Once you apply it let's check the parameters for this. You can see that the intensity is way too high, which is at 350. I'm going to reduce this to one or maybe let's create the emissive layer again. Let's delete this. Let's delete the reflection. Yeah, let's delete the diffuse as well. We don't need the displacement. So we need to add a relay material and on top of this we need to add a emissive layer and we can change the color of this emissive layer as well. Increase the intensity of it and we are done. Now, let's go back to Scene 1 and run and try to render. You can see the material, self illumination is off and that's why you couldn't see that. You can switch this on in the light mix and you can reduce the value as well if you don't want to see too much of light coming from the bulbs.
19. Final Adjustments 2: You can see that our material here is hazy, so I'm just going to delete that glass. I want to see the art board at the back. Let's select the glass group by entering the group, selecting the glass material, clicking on "Delete". Let's run an interactive render again. This looks much better. I'm going to adjust the light settings again slightly. Go to Exposure, increase the exposure here a bit more, you can increase the contrast as well. Let's go to Curves. Let's reduce this a bit to boost the shadows, and let's increase this slightly to make it more brighter. We can also add a lookup table which has an LUT file. To add an LUT file, which is a lookup table, which essentially boosts your image even more, you can add the Lookup Table layer, and then click on load or open folder. Now, I have this lookup table file called LD-Cashmere. I'm going to select this, "Open". You can see that that boosts the image a little too much, and it looks faded or washed out. I'm going to reduce the opacity. Then you can switch off and switch on, and see the effect it has. Let's run the interactive render again. Let's adjust the camera position a little more. I'm going to click on Camera here. I'm just going to zoom in a bit. This looks better. I'm going to change it to Two-Point Perspective to correct the vertical lines in the scene. This should be good enough, so stop the render. One final touch which I'm going to add to this space is by adding a ceiling can light. I'm going to update the scene first because I updated the camera position. Then you can create your ceiling light. Make a circle one inches, and radius of three inches in there. Make this a group, bring these down. I said three inches, but let's say four inches. This is four inches or 100 mm. I'm going to give a gap. The best part about SketchUp is that you can work with both mm and inches at the same time. I'm going to give inside offset. I'll say four mm and then push this in a bit. Now I'm going to apply a metallic material for this. Let's see if we have a metallic material that we can apply. We can use this matte black. I can apply this on the tone light. After you have applied it, you need to add a light here, but instead of adding a emissive layer, I'm going to add a rectangle light instead. Click on the "Rectangle Light" and place it here. You need to move that down a bit. Where did I place it? It's there on top. On the black it seems it's a little confusing and I can't really see what's happening inside. I'm going to change the color here. The colors I'm changing here is because of the parameter settings. Go to Binding, change this to custom texture. Now I'm going to change this to circular because I can't really place a rectangle light here. It has to be circular. For that just go to your light settings. This is a rectangle light. We're going to change this from rectangle here to disc. You can see that. We've changed this to a disc. I'm going to press the scale tool and scale it to the edges. Also a good idea to place it at the edge of the down light. Now this is a down light. I'm going to make this a group, make it a component, call this Downlight, and then place it in my scene. Back to Scene 1. I'm going to go to the top view, so press "ALT W" and "ALT T" to go to the top view. Press "Y" to activate x-ray mode. This is a down light. I'm going to place it closer to the bed and to the wall here. I'm going to make a copy here. Select these two, make it a group, enter the group, and copy it here as well, so four down lights in that space. Let me just go back to top here again. Let me just enter this. Then let's go back to Scene 1. You can see our down light here as well. Now let's run interactive render. This light is going to have a profound impact in the lighting in the scene, so we need to adjust that. Click on "Render Interactive" again. You can see the lighting. You can see the down light as well. Three inches also seems a little too big for a can light, so I would suggest that you keep the diameter at two inches. I'm going to change the color of this down light to more of a matte white color. Go to Asset Editor. I'm going to duplicate this material. Right-click "Duplicate", rename this to White. Change the color to more of a whitish reflector right here. It's also a good idea to reduce the metalness. In our case we're using the roughness. This should suffice, and we're going to apply this material instead. Let's bring this down a bit. Did I make it a component? I did, so it should affect all the down lights as well. I'll go back to Scene 1. Let's check our interactive render. You can see that we have our down lights in place as well. Now go back to source LightMix. You have different lights here. This is for each of the down lights. I'm going to group these lights. Go to your Light Mix and click on "Group Instances", and try to render again. We have just our down light here, which is grouped. This is our behind the door light. Looks good. I'm going to adjust the sunlight a bit more. I want more light entering the space, so let me go to my sunlight settings. This looks much better. There's light entering all the way to the edge of the room, which I like. I'm going to set it up for our final render. I'll set the scene for the final render on next video, and then we'll import it into Photoshop for our post production. See you guys in the next video. Cheers.
20. Final Render: Hey, guys, welcome to the final few videos of this section. Now, in this video, we're going to complete our final render and then do some post-production. I'm going to run an interactive render one last time to check my entire scene. Go to the "Asset Editor", go to "Settings", make sure you have the interactive settings on, and click on "Render with V-Ray Interactive". Looks good. I'm also going to give a material ID for this material so that I can change the material in Photoshop if I want to. For that, let me just show the default tray again. Select this material, go to "Asset Editor". You're going to add a material ID, so click on this plus button here and click on "Material ID". This would assign an ID for this. I'm going to change this to 1 or 2. Let's keep 1. Now what we need to do is add a material ID color render element. These are the only two render elements which we need, which is light mix and material ID color. Now let's go back to Scene 1. Let's set it up for our final render. Go to "Asset editor", go to "Settings", Switch off interactive, switch off progressive, make sure you use V-Ray denoiser and Nvidia, and you can increase your quality to high plus. Also, make sure to change your render output to 1920. Now, if you want a high-resolution 4K render, you can change the resolution to 3840 by 2160. But in our case, 1920 should suffice. Now, with these render settings in place, I would also suggest that you could save this render setting in case you want to load it in the future. Click on "Save". Call this Final Render Settings, and press "Okay". Next time, if you switch to your interactive render, and if you want to get back to your final render settings, all you need to do is click on "Load", select the "Final Render Settings", and click on "Open". This would load your final render settings. Once you're ready, you can click on the 'Render" button. Guys, this generally happens to a lot of us CG artists, where we're doing a render and then we realize we miss something. Here are some of the things which I missed. One is giving a metallic material for the door knob. Also, this room is looking empty without an indoor plant, so I'm going to add an indoor plant here on the corner as well. Is there anything else that I missed? Yes. I have to apply this same fabric material on top of my piano stool as well. I'm going to do that quickly and then restart the render. You can also notice that there's a gap here, so we need to fix this as well. I'm going to stop the render. I'm going to check this first. Let me just push this in one place. Maybe I just need to push this inside, or maybe the door is at an angle, which it is. Let's hide the walls temporarily. I'm going to rotate this using the rotate tool, snap it to the edge here and then [inaudible]. That should take care of that. Let's see what else is there. Go back to your frame buffer by clicking here. That's one. Next is the door knob. We need to add a metallic material for the door knob. Let's see if we have a metallic material. This should suffice. Enter the group, select all your faces and edges, and then apply the material. It's also a good idea to just move this out a bit and then place it on the door. We also need to apply this material on this couch. Select this material, or we can select the white fabric material. Right now it's reading the default material, but we need a fabric material for it. Select this fabric material, enter this group, select both the faces and edges by clicking, and then apply the texture. Give it some time to apply. Apply it on this edge as well and on this edge as well. Finally, we need to add our indoor plant, so I'm going to 3D Warehouse. Let me see if my materials are all proper so that when I bring in my 3d Warehouse all I have to do is just rename those indoor plant materials. Go to "Windows", click on "3D Warehouse", search for indoor plant. See if there's any cool plant. I'm going to just use this plant. Click on "Download" and click on "Yes". Place it in your scene. It's a little too big for the scene. Let me just place it on the ground first. We need to scale this plant. Use the scale tool by pressing the S on your keyboard and then scale this done. Move to the edge. That should be good to go. Let's run an interactive render and see if everything's in place again. Go back to Scene 1, run an interactive render. We are good to go. I'm going to load my final render settings again. Let's see if our chrome material has come as well. Let me just do a region around this. Yes, our chrome material has come as well. Everything seems to be looking good now, and we can render this again. Sometimes it may happen that when you're doing the final render you may miss something, so it's a good idea to stop the render before you do the final render and then adjust those materials. Come back, do a test render or an interactive render again, and then set it up for final render. Stop the rendering. Go to "Asset Editor", go to 'Settings". We're going to load our final settings. That's what we did before as well. Click on "Open". Save the sketcher file. It's a good idea to save as well before you run any render because sometimes in India we have a lot of power outages, and if my computer crashes I'm going to lose the changes I made to the file as well. It's a good idea to save the file and then run the render. Make sure to switch off region render before you run the render because it's only going to render this. Switch that off. Stop the render, switch that off, and then click on the "Render" button again. I'm going to come back once the render is done and do some post-production within the V-Ray frame buffer using the new features of V-Ray 5. The next video, we're going to do some additional post-production in Photoshop. Guys, our render is done. If I go to my render element material ID color, you can see that our floor has been given this color as well. We can change the floor color in Photoshop. Apparently, there was another material ID color applied for this material, which is our metal material. Now I'm going to do some post-production in the V-Ray frame buffer. Drag this to the left. I'm going to switch on lens effect to add a lens effect on this light. Select "Lens Effect" and click on "Enable Bloom/Glare Effect". Now I'm going to increase the bloom size and also the intensity. You can see that has an effect on the light. Let's not increase it too much, just to tad bit, and then maybe reduce the opacity. I'm also going to decrease the burn here, so click on "Exposure" and reduce the highlight burn. You can see that that completely gets rid of that burn there, and we just keep a bit of it. Let's go to our curves now and increase our shadows even more. Finally, we have a light mix. You can see that if I switch off one of these lights, it does an affect on the scene. You can save the image that you like. This is only with the sunlight, which also looks really good. I'm going to give the environment light on. Maybe I'm going to reduce the environment light. I can even reduce the self-illumination. You can see that I can turn that off if required or maybe just dial it down a bit. This our desk light, called Rectangular Light number 1. I should have renamed it but didn't. This is the behind the door light, which adds a significant amount of light into your scene. Maybe just reduce it a bit. I don't want so much of light entering the scene from that light. Maybe change the color of this as well. Once you're happy with the effects that you've added here, we can save this out. Click and hold on the "Save" button and click on "Save all image channel to separate files". Now I'm going to save this to my folder. I'm going to give a name. I'm going to call this View_01 and click on "Save". You can save it as a PNG or you can save in any other format. I generally save it in PNG format and then click on "Save". You also need to hide these lines before you save this out. I'm going to hide the background, and now I can save this file again. This time I'm just going to save current channel. I'm going to save it as effects results and call this UPDATED. This is our final render. In the next video, we're going to bring all these render elements into Photoshop and then improve it even more. I'll see you guys next video. Cheers.
21. Post Production: Hey guys, welcome to the final few videos of this section. Now we're going to do some post-production for the rendered images that we did for our previous video. Open Photoshop. In the latest version of Photoshop you have something called scripts, which helps you load the files into Photoshop layer by layer. I'm going to do just that. Go to File, click on "Scripts", and click on "Load Files into Stack". Click on "Browse", select your renders. I'm going to select Effects Results Updated. I'm going to select Material Color. I can also load in my Light Mix render elements. This show you guys the various render outputs with only certain lights. Once you've selected all your images, click on "Open". We're going to load this into a single file, so click on "Okay". It's going to load them one by one as layers. This is our final image. Now I'm going to select all of these. Maybe just drag this on top which is our Material ID Color, and I'm going to select all of these, the remaining ones. Group them, Control G to group, and I'm going to hide them for now. We can start off by making some changes to this image. Before I make any changes, I'm going to make this a smart object. Right-click on the layer, make sure to click on the text side and not on the image side. Right-click on the layer and click on "Convert to Smart Object". Once you convert this image to a smart object, if you apply any adjustment, you can see the before and after. I'm going to add an unsharp mask to this image to make it slightly more crisper and sharp. To do that, go to Filter, Sharpen, and click on "Unsharp mask". I'm going to keep a large radius. As you can see, it has an effect on the scene already. I'm going to keep a smaller amount. This way it would add a nice contrast and the image would pop up even more. Press "Okay" once you're done so you can see the before and after, adds that slight bit of contrast. I'm again going to add another unsharp mask. Go to Filter, go to Sharpen, and click on "Unsharp Mask" again. Now I'm going to do the opposite where I give a low radius and large amount, and this would add the sharpening effect in the smallest details in your scene. Press "Okay" again so you can see the before and after. I'm going to brighten the center and darken the edges. For that, what I need to is press "Control A" to select your entire image. Go to Select and click on "Transform Selection". Hold Alt and Shift on your keyboard and drag it in, and then click on the tick box here. Now go to Select, go to Modify, and click on "Feather" to feather the selection. I'm going to feather the radius by 100. Now click on the "Curve Adjustment Layer". Once you click on the curve adjustment layer, you can see that feathered out the center of this image and we can now make it brighter by dragging the center part of the curve on top. Now you can see the before and after. If you don't like too much of brightened effect, you can reduce the opacity as well. But I'm going to keep it around 90. I'm going to duplicate this, so press "Control J" on your keyboard. Select the layer and press "Control J". I'm going to reverse this mask. To reverse it or invert the mask, you need to press "Control I". Now you can see that the effect is at the edges. But what I need to do is, instead of making it brighter, I need to make the edges darker. So I'm just going to drag it down a bit. Now we can see the before and after for this as well. I'm going to duplicate this image. Delete the smart filter for this, so Delete Filter Mask, and click on "Clear Smart Filters". Now we have before and after. I'm going to make this a group. Select the first layer, hold Shift and select the third layer, so we select these three layers. Press "Control G" to group, and now we can see our before and after. We definitely have improved the image. Finally, you can add some additional adjustments. Some of you all have asked, how do you change the flooring. I'm going to press "Alt" on my keyboard and click on this eye tool so I'll see only the Material ID Color render element. I'm going to use the color range to select this material on this color. Go to Select, click on "Color Range", select that color, and then you can see that it selects all the flood and press "Okay". Now it selects all of this. Now what you need to do is go back to your group. I'm going to ungroup this again. Right-click "Ungroup", select this layer and I'm going to add it. Hue and saturation layer on top of this with the mask update only on this part of the image. For that, I'm going to click on the "Hue and Saturation" layer. Now you can see that the white part of this image is already selected. Now I can change the hue to change the color of the flooring. But I'm not going to change the color of the flooring, maybe just increase the saturation a bit, make it slightly brighter. Similarly, you can also add a curve layer only for the flooring. I'm going to select only the flooring again by holding Control on my keyboard and clicking on the layer mask to select these pixels, and then again add a curve layer on top of this. I'm going to add an S-curve. You can see that it makes the flooring darker, and then if I increase this, it boosts the highlights as well. This is an S-curve where the top part boosts the highlights and the down part boosts the shadows. I'm going to group these two together and I'm going to reduce the opacity for these just a slight bit. Similarly, you can change the color of the walls as well. All you need to do is add a material ID to this material in SketchUp and then render it out. I will show it to you guys in the next video. Finally, you need to save this image. Before I save, I see this white line here. You can either crop it out or you can also use a clone mask and apply a clone on top of this, so I'm going to do that. I'm going to use the Marquee tool now, so press "M" on your keyboard to activate the Marquee tool. Select only that part of the wall. I'm going to rasterize this layer first. Right-click on the text and click on "Rasterize Layer". Now, I'm going to use my Clone Stamp tool. So click on the "Clone Stamp" tool here. I'm going to increase the size by tapping the right bracket key on my keyboard. I'm going to select these pixels, and then simply drag them down. You can see that it samples even this, so I'm going to make the brush even more smaller, this sample of blue. You can undo in case, or you can also use the Brush tool if the paint sample is the same. I'm going to use the Brush tool instead, so press "B" to activate the Brush tool. Reduce the size, sample this color. Press Alt on your keyboard, and then click on the color to sample, and then click once. We can see it becomes dark. The Brush tool also doesn't work. I'm going to use the Healing Brush tool instead. Let's select the Healing Brush or the Spot Healing Brush. We'll reduce the size again by tapping the left bracket key. Click here to sample the paint, and then simply start dragging. I'm sampling and painting. You can see that it samples that wooden color, so I need to sample bit by bit and I'm going to do that slowly. There's a little bit more, so I'm just going to select this layer, let's paint that out. Use the Spot Healing Brush, sample this side of the pixels, and then paint that out. That should be good enough. Finally, let's save this out. Go to File, Save As, change the format to PNG, call this View 1_final. Click on "Save". Make sure to save it as the largest file and press "Okay". This is the final render that we were able to accomplish. In the next video, I'm going to render the second scene and also show you guys an additional sectional perspective scene, which looks just like this. I'll see you guys in the next video. Cheers.
22. Create a Sectional Perspective: Hey, guys. Welcome back to our final video. For this section, we're going to learn how to create this awesome 3D section and perspective, which will definitely wow your clients. I'm sure you're going to see a deal with whatever interior design project that you are doing. Let's go to our SketchUp file. I need to zoom out now. Now, the idea behind that sectional perspective is that I hide this wall and this wall as well, but we're not going to be using the side section planes, rather we are going to use the section plane from the top. What I'm going to do is deactivate the section plane. So right-click and click on "Active Cut". This is also deactivated and we're going to create a brand new section plane. Go to Tools and click on "Section Plane". Now click on the top of the room so it creates a section. I'm going to call this the top section. I'm going to select this section, and I'm going to drag it down a bit. Now what I need to do is hide this wall. Enter the group, press "F2" to hide this wall and select this wall as well. Press "F2" as well. So press "Escape" to exit the group. Now, before I hide the curtains and the windows, I'm going to unhide the rest of the models in the scene, so press "F4" to unhide your study table and this whole tray and mode, we're going to leave it for the scene, and now we can hide our windows and our curtains. Select the window, press "F2" to hide. Great. This is our scene. I'm going to create a scene out of this. Let me just find a good angle. You can also hide this back box and create a scenes. Right-click and click on "Add Scene". So this is add Scene 3. Now what I need to do is add an infinite plane at the bottom. I'm going to click this, which is the Infinite Plane button, and place it here, and press Spacebar to exit the Tool. Now select this Infinite Plane and make sure it is at the bottom of this slab. Now go back to Scene 3. Now what we need to do is switch off our main light, which is going to be sunlight and also our environment light. We're going to light the scene or leave it as ceiling light. Go to Asset Editor, go to Lights, Click on "Sunlight", and click the right dialogue box or the right button here and make sure to switch this off. Similarly, go to your Settings, go to Environment and switch those off as well by ticking off the box. We have our main two lights off. Now, I'm going to switch out this light as well, which is behind the door light. You can switch those off. Our only light is going to be our ceiling light or our door light. I'm going to just rename this quickly. Now, it's important that for this scene that your Affect Light is on for this top section plane. Go to your Geometry, that is, so this is our new section plane. I'm going to rename this, call this top section plane, and make sure our Affect Light is on. Now let's run our Interactive Render. Let's go to our Asset Editor, go to Settings, make sure the Interactive is on. Make sure you are using NVIDIA AI if you have a good graphic card. We can leave the rest of the settings as is. Now let's run an interactive render. Now, you can notice that our render is pretty dark. The reason why is because there is no light coming from that down light or that ceiling light. We need to check our ceiling light. I'm just going to move this. Let's check our ceiling light for this render. Go to your Asset Editor. This is a down light. As you can see, it's reading from the units which is scalar, but scalar is not as powerful as radiant power. We're going to change the mode do radiant power. So switch this on. You can see that brightens up the space immediately and it should brighten up the space here as well. Now we can set this up properly. Let's go to V-Ray Asset Buffer again, drag this out, click on" Exposure", we can increase exposure a bit, maybe the Highlight Burn as well to a certain extent. We can also check our curves. Maybe we don't need to boost the shadows so much. Let's also check basement of this model. As you can see, it's gone too much to the left, so we need to reorient this and place the model properly so that's composed better. I'm want to do that quickly in my sketch open door. Let's see how this looks. It needs to go some more to the left. We place interesting points next to the rule of thirds or these intersections, so maybe we can also zoom in a bit. I think that should suffice. I'm going to update the scene, so I click on "Update", and I can make some updates for the materials if required. For example, it's become completely dark. Let me just check the materials quickly and then set it up for render. It's also a good idea to show this edge properly. I'm just going to zoom out one tad bit so we can see that edge as well. I'll fix the materials quickly and then we'll set it up for our final render. So stop the Render. We're going to update the scene, and now we need to fix this material and this material as well, which is a two-sided material. So let me just show the Default Tray again, Windows, Default Tray, Show Tray. We need to check this material. As you can see, it's not reading correctly. So we need to simply save the map again to our local folder. Again, go to your Extensions, V-Ray, File Path Editor. So there's a lot of these files which have not being read properly and only being read from a temporary location. Select all these Materials, click "Archive & Repath". Go to your Sketchup folder, which contains the Sketchup file, make a folder called maps, and then simply see with until this folder by clicking on "Select folder". while all of this is green, we can also add colored part of this. These maps are not being read, but these are part of my local drive. If you know where the location of these files are, all you have to do is select all these files, ''Right-click'' and click on ''Set path.'' Then you need to go to the folder which contains these files and click on ''Select folder.'' As soon as you do that, it will turn to green, and then make sure you are currently [inaudible] into [inaudible] folder. That's all. Now lets me just check the material and see if it has the same problem. Let's go to our bitmap and you can see that problem is gone. Hopefully, it should work in our render as well. Let's restart the interactive render. You can see our lights come in perfectly. You can apply the same material for this floor lamp as well. Let me just select that material. To those group, double-click all your faces and edges to the public that is, and then apply the material. As soon as you apply the material, make sure to click on ''Planar projection word.'' I think that should be good enough. Now let's go back to Scene 3. Click on, ''Interactive render'' again, and we are done. Now we can set this up for our final render. You guys can go ahead and add some more certain options here. For example, I've added all lookup table, although I have not used it so much. Then you can also adjust the temperature, make it more warm or cool or whatever you like. Make sure that before you save the image, you switch off the background layer, which is the grid, that we used. I'm also going to show you guys in this video a bonus step where you can change the color of the walls. What we can do is select this wall color, go to your [inaudible] editor. You need to add material ID for this. Click on the plus button and click on material ID. We have material ID assigned to this, can give it any ID number, maybe three. Now go back to your render elements, make sure material ID column and light mixes on. Now we can set it up for our final render. Switch off and drag to make sure V-Ray on, to use for production renders. You can use the quality is very high, render output can be 1920 but 1080. We can leave the rest of the settings as is. Once you're ready, make sure you save this file. Then click on the ''Render button.'' That's all. We are going to come back once the render is done, take it into Photoshop and change the wall colors in Photoshop. You guys can go ahead and add material IDs to any of these materials, and it would generally save in the material ID, color, and element, which we can then use in Photoshop to change the color. You don't have to read with multiple colors. You can simply change the color in Photoshop and show the outlines. We're going to come back once that render is done, and then shift to Photoshop. Guys, our render is done, and now we can do some post-production within the video frame buffer. Let's go to our exposure and maybe increase the exposure a bit. Here's the highlights burn because it doesn't seem to be any places where it's burned out. It can also increase the contrast a bit. Then we can increase the curves as well to boost the highlights. Finally, we can go to a light mix and increase the light intensity a bit. It can also give it a color. Maybe a bit warm. We are good to go. We can also check our material ID color. You can see it's added a wall color as well as floor color. Now we can change the wall and floor colors in Photoshop. We're going to quickly save this out. Click on the ''Save'' button and click on ''Save all'' image channels, two separate files. We're going to go prefix called 001 and click on save. I'm now going to open Photoshop and load these images into Photoshop or I guess Photoshop is open, and we can now use the same post-production techniques start in the previous video. Go to ''File,'' click on ''Scripts,'' and click on ''Load files into stack,'' click on ''Browse.'' I'm going to select my affects results, and material ID color and open it up. Press ''Okay'' and press ''Okay'' again. We're going to load in as layers. Now I'm going to hide this layer by clicking on the hide tool and select this layer. I'm going to select this color. You can use the magic wand too, it selects the color or you can also go to ''Select'' and click on ''Color Range'' and select this color this way. You can notice that some of these parts are not selected. You can use our magic one too, make sure this is on, which is ''Add to Selection'' and not just select, ''Add to Selection.'' Then simply you can just click on these pixels to select them. I'm using a tolerance of 30. That's why I'm able to select this model pixels. I may select these as well. So I'm going to quickly select all of these. Then we made our selection. Now we can go back to our first layer here with the selection on, you can click on the ''UN saturation layer.'' Now we can go ahead and change the color of our walls. How cool is that? Now I can also add some additional post-production to make the image pop. I'm going to press Control A. Then I'm going to go to Select and click on ''Transform selection.'' Now I'm just going to hold ''Shift and Alt'' on my keyboard and simply drag the selection down. Now I need to click on the tick box to assign that selection. Now go to Select, click on. ''Modify,'' and click on ''Feather.'' I'm going to give a radius of around 50, and then press ''Okay.'' Now what I need to do is apply a curve on the selection. Click on the ''Curve Adjustment Layer,'' so you can see that the middle part of the layer gets highlighted. Now we can simply drag this on top to brighten up main main scene. I can press ''Control J'' for the adjustment layer here, and make a copy. We can reverse the selection, so click on the ''Layer Mask'' and press ''Control I.'' Now what we need to do is double-click on this adjustment layer and simply drag this down to darken the shadows. Similarly, you guys can go ahead and change the color of the flooring as well. But I'm happy with the scene and I'm going save this out. Go to ''File,'' save as, save it as a PNG. Call this updated, click on ''Enter'' or ''Save'' and then press on ''Okay.'' This is our final render output after the post-production, and this was our previous render. You can see the pop and a change in color of the walls as well. I hope you guys found this section super valuable. Please do leave a rating if you did like the course and the section so far. Do stay tuned for more such sections coming your way coming few months. I'll see you guys in the next section and the future videos. I hope you guys do really well in your field. Interior design, architecture, whatever it is. I give you the best wishes and I hope to meet you guys one day in person as well. Take care. Cheers.
23. Create a 360 Panoramic Render for VR: Hey, guys. Welcome back
to yet another video. In this video, we're going
to learn how to create a 360 panoramic render
using V-Ray 5 for SketchUp. You can open the previous file. What you need to do is unhide
the walls because you're going to place the camera right in the center
of the scene. I'm going to press F4 to unhide. Let's see where my other
walls are as well. Go to "View", "Hidden Objects", and "View", "Hidden Geometry". We can see you have walls here
so we need to unhide them. Select the walls. Right-click
and click on "Unhide". Similarly, this wall as
well. You're good to go. You also need to disable this top section
plane because we need the scene to be covered from all four sides and even on
top and bottom as well. Select the section plane, right-click, and switch
off "Active Cut". Now I need to place my camera
right in the center of the scene so that when I
create the 360 render, it renders from the center. I'm going to enter this group, select this top slab,
and unhide temporarily. Also, disable "Hidden Objects"
and "Hidden Geometry". You can either draw a line in the center and place it
right in the center of that line or you can arbitrarily place it in
the center of the room. I'm going to go to "Camera", click on "Position Camera", and place it at the center. Now, you can see that
when I left-click, I can see the entire room and
it's right at the center. This is good to go. We can create a scene now. Right-click on "Scene
3" and click on "Add". Also, make sure to
unhide the slab. If I go back to the Eye
tool and see on top, you can see that
there is no slab. I'm going to press "F4"
to unhide the slab. Now I am sitting perfectly
inside the scene. I can see all four sides
of my room as well. Now I can update Scene 4. It doesn't matter where
you see the camera. What matters the most is that you're placed right in
the center of the scene. Also, make sure
you're not inside any group when you are
placing the scene. Right now I'm
outside all groups. Then I'm going to
update the scene. Right-click on "Scene 4"
and click on "Update". Now it's a very simple process
to create your 360 render. Just go to your "Asset Editor". Go to "Settings". We can use the previous final
render settings. Now the only change
which you need to do is you need to go to "Camera" and change the camera
type from "Standard" to "VR Spherical Panorama". This would make a 360 render, which you can then place in any VR software or on
online platforms as well and see your scene
entirely in virtual reality. This is the only
setting that you need to do where you're
changing the type from standard to VR
spherical panorama. You can also switch on interactive and see
if the lighting is perfect in your scene. I want to do that quickly. Switch on "Interactive".
Go to "NVIDIA AI". Keep interactivity at high. Then click on "Render
with V-Ray Interactive". As you can see, our
scene is looking good. Since I've already placed the lights at optimal positions, the lighting also looks perfect. This is order for night render because it's lit by
artificial lights. I think this is good to
go for our 360 renders. I'm going to stop the
interactive render and then set it up
for our final render. Go to "Settings". Switch off "Interactive". Keep quality to high. You can also keep
it at high plus but it will take
longer to render. I'm going to keep it up high. I'm going to change
the denoiser to V-Ray. Once I'm done setting
the final settings, I'll also save this out. We'll just call this final. Then click on the "Render
with V-Ray" button. I'm going to come back
in a bit once the render is done and show you
guys how you can use this 360 render online
or on VR softwares to create your VR walk-through
or whatever it is you like to create
with a 360 Render. I'll see you guys in a bit. Cheers. Guys, the
render is done. What we can do now is simply
adjust this render a bit. You can see that we have this light coming up here and this is because
the lens effect. Just go to "Lens Effect"
and reduce the size a bit and the intensity as well
so it's not too much. [inaudible] a bit. Or maybe we can
reduce opacity this way just so that I can see
the light better as well. What I also want to
point out is that you need to check the render output before you do the final render. I did it at image width height
pixel of 2,160 by 1,080. If you want a 4K
360 render you can change this to 4,000
pixels as well. Now let's go back to
the video frame buffer. This looks pretty decent. I can save this out.
Click on "Save". We're going to call
this final 360 render. Save it out. Now all
you need to do is simply load this into
a online 360 viewer. You can go to
google.com and search for online 360 viewer. Or you can also download
the software as well. Generally, the starting
few 3-4 links work well. Let's start with
renderstuff.com. I'm going to open this. Then
I need to upload my image. I'm going to click on
"Upload Image from File". Then I'm going to
select my final 360 render and click on "Open". Now you can see that we have a nice 360 render of our scene. You can view it this way
as well. How cool is that? You can also click on
"Open New VR Tab". Now you can see your 360 render in full-screen. Pretty cool. You can also try out
the other links, but in most cases though, the first link works well
which is renderstuff.com. I will keep you guys posted on future tutorials on
certain platforms as well, which you can use for
your VR experiences. I'll also create
separate tutorials for walkthroughs in
SketchUp for V-Ray. I hope you found
this video useful. I'll see you guys in
the future scenes and the future sections
of this course. This is your host, Manish,
signing off. Cheers.
24. Your Assignment: All right, guys. We have come to the end of this course, and it's time for you to share your work in the Student Project section of Skillshare. I will be giving you feedback, which will definitely help you out. As a bonus, if you have time, it would be great to design your own room. I would encourage you all to make measurements of your room, draft it out in SketchUp, make the 3D model, add in the 3D models, and then set up your scene for indoor. Of course, you need to add the lighting, the materials, and the rest of it. If you have time, go for it. I will give you some awesome feedback for that as well. I hope you guys like this course, and it would be great if you could leave a rating and review. Also if you would like to reach out to me or if you want me to create something which would benefit you all, do hit me up on Instagram, I go by the handle of Manishpaulsimon. Or you could ask away on Skillshare as well. That's about it. I'll see you guys in the future videos. A lot more courses coming up. Stay tuned. This is your instructor Manish, signing off. Cheers.
25. How to add Decals in Vray for Sketchup: Hey guys, In this video
I'm gonna show you how to use the decals feature and create this cool
new wall pattern in VBA plus ketchup. Let's go. Alright, so to start off, I'm going to make
the walls white. I'm going to select
this wall material. Go to the asset at Udot. Let me select the
material again. Let's I'm gonna make this white, so I'm just going to open
this and make it wait. Not completely right,
sort of grayish in color. Now what I need to do is add
the decals into my scene. To find the decals and
the VD Objects Toolbar. You can click on DiCaprio. And then you can
simply click once. Kick the second time, and then you need to
click the third time, which is the projection. So I'm going to just drag out this way and click
the third time. Great. So now what I need to do is scale this to the edges so I can select the object and press
S on my keyboard to scale. And now I can select the edges and some be scaled to this edge, this edge to the ceiling. And let's see you as
though it's activate the X-ray mode to find the third and scale
this to the top. So we place a decal object. Let's go to Scene one. Now we need to add an
image to this DKL object. So I've downloaded two textures. One is this from
Shutterstock.com, and this is another image
from Shutterstock.com. And you're going to
use both of these together to create our effect. So to start off
just Lawdy acid at Udot and click on geometries. You'll find DiCaprio. Now click on the material and
we need to add a material. So if we've not
created our material, you can right-click on the materials tab and
click on generic. I'm going to call
this decal hills. And now I'm going
to add a bitmap. So let's click on
the bitmap here, and let's add our
rectangular image. Let's go back. We can leave the settings as us. So we've added our
image now we need to add this material
to a DKL object. So let's go back to geometries, select decal and added from your just crawl
down in the fine DK, DK hills with these settings, with the basic settings, Let's run interactive render. So I'm going to use
NVIDIA and rest of the settings as is and click on Render with 3D interactive. So now you can see that we've
added our digital object, but it's sort of
projecting itself on the other objects in the
scene like the pillows, the bed, and the
curtains and so on. So we need to fix this. So let's stop the render so
that it projects only on the back wall and not on the
entire models in the scene. So do that. All you need to do is to first enter this group. I'm going to press J
to toggle visibility. It's just a shortcut that I use or you can go
to View and then click on competent edit and click on hydrous
to the model. So that'll hide
rest of the model. And now I have this group here. What I'm gonna do
them, I'm going to select this group and then press Control X to
cut that group. Then we're going to press
Escape and I'm gonna paste it, I would say the main groups. So I'm just gonna go to Edit
and click on Paste in Place. Now this group is not
inside any other group. So now what you need to do
is select the DKL object, select the group, and then you can right-click and
click on Make groups. So now it's one group. Now this D only
project on the wall. So let's go to Scene one and click on Run with
very interactive. So now you can see it's
not being applied on the bed and it's only
applied on the wall. You can also mix and
match to decals together. So I'll show you that as well. So let's stop the render. Let's add another detail. So this time I'm going
to enter this group plus j to toggle
visibility or you can go to View competent at it and click on high-touch
to the model as well. So now I'm going to
place another decals. So let's click on this icon here and click once
in the corner, then this corner here, and then project it out. Now you can see that this
DKL is actually projecting, invented this First
Eagle that we added. So this would take
dominance over this. So let's see how that has
an effect on the scene. So let's go back to Scene one. There's good Asset Editor. So now we have decals one, so we need to add
another material, another material, selenium, this because the decals pattern. And let's add our image. So as I mentioned that
we're going to add. So now let's go back to
geometry is called a DKL one and add that image
and add that material. So go to Materials, scroll down and you'll
find decals pattern. Now let's click on scene one and click on Render with
3D interactive. So you can see that we've added our new pattern and that sort of overlapping over
the other pattern and the other pattern
has not seen. So now if you want to see the
previous pattern as well, which is those hills
along with this pattern. What you need to do is let's stop there
really interactive. Let's go to decals and
change the z order. To do so, the higher
the Z orders, the greater preference it takes over the
previous ones too. This is the other one,
which is the new one, and this is the order tooth, which is given for the old ones. So now let's run
interactive render. Now you will be able to
see the hills as well. So we fix this as
well where we have the hills scene and the
pattern on top as well. Now, I would not like to
see the color of the hills, which is sort of badge in color. So I would like it to
fade into the wall. So let me just stop this
interactive. Go back to D. Caillois. I'm going
to offer this, I'm going to fix
this, the fast decay. So let's run
interactive renders. I'm working only on
the first one now, which is the hills
I showed you again, I want the hills to sort
of fade into the wall, which is actually
white in color. So now you can see that
it's a different color. So if we run the denoise, Ohio, let it just
bento for a bit. If it's taking too
long to render, you can also click on region render and then place
or region box alone, just the wall so that
really the world gets rendered and it reduces
the render time. So you can see this page
which is coming from the wallpaper to make
this completely white. So how do you do
that, or how do you add a mask into this detail? So let's stop this
interactive render. Let's also add this
to the history VFB is to do a before and after. All you need to do is go
back to the Material Editor. This is our material. We need to copy this material, then go back to decals, and then we need to
paste it in mask. So right-click, click on, paste this copy,
paste it as a mask, but it's not black and white. We need to make it black
and white as well. So what you can do is you can
go to color my repletion, click on inward texture. So this would invert the Texas, only the white parts of
the image will be seen. Then what I would do is I would right-click
on the texture slot, go to rapid and click
on color correction. Now from your eye would reduce the saturation to minus one
to make it black and white. And I would increase
the contrast. Now the black part would not get rendered and you'll see
the white wall in the scene. So now it is merging
with the wall, which is perfect for
the scene as well. Now let me do the same
for the other decals. So I'm going to stop as an Endo, going to go to **** L1. So this is a baton. What I do is I will click on Moscow and click on
gradient to stay. And I will change the preset
from type you to circular. And I'll also change this to say smooth since I want the
center or lead to be seen, I would switch the scholar
swatch from right to left so that now you can see that the white parts would be seen in the blacks would get faded. And what I'll also do, this sort of drag the
right to the left, then keep it as exponential. This should work
fine. Yeah, this should work fine where
it's sort of fading out. So let's go back.
Let's agendas, decals. So we are both the decals. And now let's click
on scene one. I click on it and I would
really interactive. So now you can see
that a pattern is in the middle and sort
of fading out. We don't see any other
buttons on the wall and it sits well with
the trees as well. And on final render, this is how it looks. Nicer, dissolved looks.
How cool is that? So I went ahead and did a
final end of the scene, which looks like this. See you guys next video. Jugs.
26. How to create textured Wall in Vray for Sketchup : Hey guys, welcome back. In this video, I'm going
to show you how to create this textured wall
and Vd for SketchUp. Let's go. I like to start off, I'm going to create a material. So let's go to our asset detail. As I click on Materials
and click on Kendrick and rename this because
it's important to be organized and the name
of your materials is wet. So I'm going to call this a wall called the stock or brown. I'm going to give a brown color. So I'm going to click
on the swatch here. I'm gonna go here
and sort of try to pick brown or
beach earth color. I'm going to use this now if
you want to make it darker, you can move the slider to the left and make it
slightly darker as well. Let's, I'm gonna play this
material on the wall. So it's the active material
ear whilst darker brown. So let's enter the
group and then apply the material using
the bucket tool like simple plain model. Let's run interactive with Endo. So let's go to our asset
editorial. Let's go to Settings. And then with the settings, which is the RTX render mode
and Nvidia AAA, the nicer. I'm going to run an
interactive window. Please note if you're using
an older laptop or system and if you do not have
an RTX graphics card, stick to CPU, and stick
to the VTA, the noise. Okay? Alright, so render
with 3D interactive. Okay, so you can see from
this render that our wall doesn't have any sort of texture on it and
it's pretty plain, although it looks good as well. But generally in real life, most walls have textures. Although it is subtle
and it's a good idea to add those textures in
your renders as well. So I'm going to show you
step-by-step on how you can create a textured wall
in 3D for SketchUp. But so let's get started
and create a textured wall. So let's stop the render. Now for reference,
I'm going to add this to the history VFB. I'm going to switch on the
nicer and then had this year. So let's get started and
create a textured wall. So the first step
is to add a bump, seamless bump wall texture to
our bump texture slot here. And there's a great website
which I use to download. Bump seamless texture maps. So go to Chrome or
any browser using and go to SketchUp
texture club.com. You'll find a lot of
useful textures here. Now for your seamless
wall textures is go to architectural concrete, bed and clean models also, please note you may have
to sign up and join because you can't
really download if you're not registered
on the website. And if you are a premium member, you can download
the higher version, which I would highly recommend. But in this case, even this smaller versions
do work pretty well. So in this case I'm
going to go for clean walls and then the bottom, I would find a good
texture that I can use. So let's scroll down. You can use any of these
textures and experiment. I'm going to go with this
concrete bed clean texture. Click on Download. And then I'm going
to download and extract this file to a
folder on my computer. So once you've done that, just open SketchUp Vd
for SketchUp that is. And then open bump in
your material slot. You click on the texture slot, click on bitmap, and then
select the material. So click on Open and make sure the color space
is set as rendering space linear because
it would make the image a bit brighter and ready for the
render engine as well. If you use green space, can see that you don't really
get that pronounced effect. So let's click on to
entering space linear. Go back these settings, which is the bump
and the diffuse. I'm going to run an
effective random. Hello. Great, So we sort of added a bump and you can see that
the wall becomes darker, but you can't really see the
texture effect on the wall. Now let's quickly fix this. So I'm going to stop
the interactive. I'm going to add this to this, to VFB as well, just to
see your before and after. So let's do a before and after from our first time doing this. So you can see that
makes the world darker, but you don't really
see the texture. So to fix that,
what you need to do is you need to go to the materials and
go to binding here, and change the texture mode
from auto to texture helper. So what this will do is
that it would replace the color wall with
a texture helper. So that basically
indicates what are the size of our
texture on the wall. You can see that our
size is pretty small. So we'd need to scale
up this wall texture. So to do that, the
best way is to simply enter the wall,
select the face. And then from the villa
utilities we have something called try
planar projection fit. Click on that. You will notice that
Dirt Texture fits from one edge to the corner. If you want to bring back
the seamless tiling, then you can click on world. But in this case, which
should work well. So I've expanded the
texture to stretch from one end to the
corner of the wall. And I'm going to press Escape
and click on scene one. Now with these
settings, Let's run interactive render
and see what kind of an effect it
has on the scene. Great. So now you can see that
texture coming up on the wall. And it's made the wall
sort of darker as well. And now you can see that we have a textured wall in
Vireo for SketchUp. So that's how simple it is
to create a textured wall. So let's stop this render
and see how it looks. I'm going to stop the
render at the denial. Then add this to
the history VFB. And let's do a before and after. So this is set as B and Z. Now if you do a
before and after. You can see that we've
added our textured wall. Now if you want to
decrease the bump effect, what you can do is you can just go to the
acid at it though. And that is the
bump amount, 2.2.3. Well, let's leave
it at 0.24 and see how much of an effect
it has on the scene. Let's run it and check
the render again. And now you can see we have
a very subtle textured wall. So this looks much better than the more pronounced wall which we had in the
previous window. By the way, I've added
a region render. So if you want to add this, you can just click on
region render and then drag a box from this
corner to this corner. That would only render this part and leave the rest
of the render as is. Great. This looks good. Let's stop the render to John denies her and then add
this to the history VFB. It's also important to note that these textured walls would be more pronounced in
the light areas where, for example, the
sunlight area shows the textured walls better than the darker
areas of the wall. So if you have a more lit wall, then you would see the textures
more pronounced as well. So now let's do a
before and after, before our previous render this. So you can see that
the source with one, which was a little too much, but 0.25 works well. You can also reduce it a bit more and that would
work well as well. Now let's see, you'd
like to mix and match some bumpy textures
in 3D for SketchUp. So all you need to do is
right-click on the Texas law, click on wrapping and
click on Mix map. So now the first
material that we added is going to be automatically
added to color bottom. And we need to add
another color top. So let's download
another material from those SketchUp extra club. This time I'm gonna
go to damage walls. I'm going to select
the damaged one. So I'm gonna go with
this concrete damaged. Click on Download and then extract it to a local
folder on your computer. Once extracted, go
back to SketchUp, click on Color top and
click on bitmap and select the concrete barrel
damage texture will also make sure there's a setosa and
things space linear. Now let's go back to now
you can see that it's sort of merge these two
materials together. Now if you want to see more
of the bottom material, then you can drag
this to the left. And if you want to see
more of the rock material, then you can drag the
slider to the right. So this is the mixed map slider, which lets you see more of
one medial or the other. So I'm going to see more of the top material so you
can get the settings. Let's go back and let's see what kind of an effect
it has on the render. I'm going to click on
scene one and click on. We re interactive. I'd like to now you
can see these lines showing up your yard as well. Now what I'll do is
I'll try to make these lines more pronounced. So I'm going to stop the render. I'm just going to go back
to my mixed map here. And then what I'm gonna do is
I'm going to right-click on the first material coated rapid and click on
color correction. Now, I can make it
completely black and white, and then I can
increase the contrast, and I can also increase
the brightness. So now we can see that the
crack some more pronounced. So let's go back. So you can see the cracks
more pronounced. Let's show more of the
left material as well. Let's go back again and let's
run an interactive render. So now you can see these veins
running around the world, which gives a cooler
effect as well. You can mix and match
maps this way using the mixed map parameter
NVIDIA for SketchUp. Now if you want to actually see the damage will stop the render. Add this to our
history VFB quickly. What I'll do is I'll go
back to my bumps lot. I'll copy this. And then here what
I'll do is click on the texture slot and
click on mixed value. Then paste the bump
material here. So paste this copy. And then I've copied this
color and paste it here. So I click on the color
swatch and click on paste. So you can see that we have
this sort of orangey effect. So now let's go back and let's
run an interactive random. You would of course, change
the color of the wall because the diffuse texture
color changes as well. Now you can see that
pronounced crack on the wall. How cool is that? I hope you found
this video useful. Please do experiment
with these materials and please do share your
work in the assignments. I would love to check them out and see what kind of ineffective got experimenting with
materials on your walls. I'll see you guys next video.
 Manish Paul Simon, Architect | 3D Artist | BIM Expert