Transcripts
1. Class Preview: One, a quick guide on how to
create a realistic in DDO to Endo using the latest features
in 3D, a playful SketchUp. In this class, we
will go in-depth learning how to create this realistic living room
gender step-by-step, which includes both modelling in SketchUp and rendering
in 3D effect. We will start by
modelling are living room scene and then landed back with setting up the camera and lighting using the
DFA for SketchUp. After which we will learn to use the latest features such as
light makes two other slides. Use the VFB layers to
announce our Endo further, use high-quality materials from chaos cosmos that comes preloaded with displacement
and bump maps. Learn to use the real F0 and
its radius parameters to generate awesome
for drug materials. And finally, we
will learn how to pause produce our Endo within the frame buffer without
having to use Photoshop. But in you can change colors of your materials and
do a whole lot more. The end, I will share some additional post-production
techniques and Photoshop that
will teach you how to add a background
to your Windows. Choose a camera raw filter
and a whole lot more. This fully detailed
class will help upgrade your reading skills as I take you step by
step in creating this awesome living room vendor. So without further ado, I'll see you in the
class and say, Cheers.
2. Installing Plugins: Hi guys. In this video
I'm gonna show you how to install the plugins that
we need for this workshop. So open your Skillshare class and go to the About
section and the bottom, you will find the master
links, google Sheets. So click on that to open it up. Now you'll find the links to all the plugins that we
need for the course. So you can start
off with SketchUp, so you can open SketchUp. It's a fairly simple process to download and
install it scaled up. So all you need to do is select the category which
you fall under. So I'm gonna select for
personal projects and uses SketchUp Raul to
click on Start free trial, then you need to sign in. And it is a fairly simple
step-by-step process to download and
install it SketchUp. So once you download and open
SketchUp for the first day, you will be asked to sign in. So you would need an active
internet connection. Make sure to sign in with the
same email ID that you're going to be using to
register in this website. And you will get your
30-day three Sketch Up. Next is 3D, which is
similar to sketch up. So open though VD link. And then you can
click on tray free, which is really a
favorite SketchUp. Can click on Start your Drell
and then you would need to create an account or sign
into your existing account. If you're new to VRA, you will need to
create the Akan. So add in your credentials, click on Continue almost there, and then click on Create a con. So they will send a
link to your email, which you would then have to activate by opening your email. So open the e-mail and
click on Activate icon. And then you can sign in. And once you sign in, depending
on the country of thumb, you wouldn't need to
further verify argon. So just add in your phone
number and then click on get verification code and add in your verification Claude
and click on Continue. And now you can
select your category. If you're a student,
you can select student, make sure to send them a valid
student ID and you would get a discount for your
yearly subscription as well. So it might guess
I'm going to select individual and then click
on start measuring animal. So now you've got
it and they will send an e-mail with for
the information as well. So click on download URL. And then you will
be redirected to the download page
of girls group. And then you can select
media for SketchUp. Select the version that
you have for SketchUp. It comes from 2015
all the way to 2021 and want to select 2021. And then select the
latest version, which is really a fav update
to click on Download, and then it will
download to your system. So once the setup is
downloaded to your system, you can open it as
an administrator. You're going to open
it as general as well. And then follow the instructions to install it into your system. And wanted to
install your system. Towards the end it would be
read, adducted, do chaos. And so we'll just make sure that you've
been installed with the same email ID that you use to register for the
30 day trial license. And if it's not at
the CME malaria, you can click on
Online licensing, sign out and then sign
in with the CME melody. And then you would get
your 30 day trial license. So once we raise installed
and you open SketchUp, populate with the rule was no. If you don't see the
rewrite rule buds, you can go to View Toolbars. And when you scroll
to the bottom, you would find these
really toolbox. So make sure that
the switch them on. And then it would
show up your and then simply dock them in place. So we'll start off
with prevailed window. You can click on this
link to open it up. So this is a beard plugin, but you have a WNBA
player lessons. So you can click
on, Get WD a trail. Click on except if you have a group and you
can upload grouping. But since there's lessons, we're going to simply click
on Checkout, 400 dollar. I'm going to quickly
put in my details. You can append to the
newsletters if you want do and stay updated
on the new offerings. And after filling
in your details, you can click on Next again. We can finally click
on Submit Order. And now you'll receive
a mail either in your spam or in your folder. So let's check the mill. So we received our mail
from my insights reduce, which is a company
behind these plugins. And they've also
Chateau de license key. And I can click on go to my purchase to
download the plugin. And if you scroll to the bottom, you'll find an axis 2 axis
though download page. And now I can download
profile willow tree are busy plug-in for
us catch up 2021. I can now open SketchUp 2021. Goodwin, those
Extension Manager. Click on Install Extension. I'm going to select
profile below, which is the plug-in
which we just downloaded. And then click on Open. You can now click on
Opendoor profile dialogue, or you can also go to
Extensions profile, willow tree, and
click on license. Now you can add in
your email that you use to register in the
profile below website. And you can copy-paste the
license key from your middle. So I'm going to copy the
license key and paste it here, and click on Activate license. So now you have a Latins
off prevailed window. I'm gonna be showing
more double profile below and this section. So do stadium. Similarly, you can
install plug-ins as well. So Gaudium main Google sheet,
click on wrong corner. This is also a very
useful plugin, furan ring off corners. Click on Download, would
do your main follow, which contains all the plugins. And again, go back to SketchUp, click on Install Extension, click on long corner,
click on Open. So now you can see that for long gone all we
need to install, look through it OSX, which is like a platform
for loop plugins. So I'm gonna click on Yes, I'm going to download
lib thread 06 as well. This is a slightly bigger foul. Mood, your main folder. And then click on
Install and glucagon, Look Frodo and open. And now you can install
that on gunners. So go to the Extension Manager, click on Install, click on loan corner,
and click on open. If it doesn't show
up in your schedule, you can restart sketch
up and it would show up, restart SketchUp. And now you can see I'll
round corner in place. And you can snap it
to wherever you like. If you want to keep
it below this, you can just hover over the bottom and then it
will place it in place. So without plugins installed,
we are ready to go.
3. Before We Start: Hi guys. In this, we don't
want to show you how to use SketchUp or rather how I use get up when I
work on projects. And this will also
help you follow the course better
because I followed the same workflow in most projects and also most
of my courses as well. So the first thing, what
I'm gonna do is switch on this large tools
at bond the left. So go to View Toolbars. Scroll down a bit
and you will find something called the large
toolset. So switch that on. And you will find
the common tools that we use in scatter up on the left side of your window. And then of course we
have the VTA dude was which I showed you in
the previous video. And the other plugins which
we will use in this course. Next is how I use SketchUp saw. First thing is how
I make groups. So the traditional assembly
do enter the group, select or faces or edges that
you want to make a group. Right-click and
click on Make group. Now there's a
shortcut which I use, which is actually for competence
but MG Institute group. So what I do is
make a rectangle. And if I wanted to
make this a group as simply double-click and
press G on my keyboard. So that would make
groups Foster, I'm cutting down two steps
and in the long-term, I would save a lot
of time as well. Next is switching to valid projection or
perspective mode. So use the shortcut Alt W. So this would switch to
valid projection mode. And if I switch back, Febreze all w Again, it would switch back
to perspective. So what it does is if I want to quickly go to my top view, it would help me go to
my top view as well. So for the top view is Alt
D and front view is our F. So you can see that we are
in elevation, moderate know. So we'll press Alt W
goes to perspective. Alt W again goes to
value protection. So if you're wondering how
to assign the shortcuts, you can go to Windows, go to preferences,
go-to shortcuts. The first shot GOT, which I'm going to
assign a scaling group. So search for group. Now in the bottom of the list you will find Edit may group. So you can see that there
are saying, Gee, Gaussain, you're going to just
simply press Tokyo, press G and click
on the plus button, and then assign the shotgun. And so once you are saying
bazooka and you're done. So we also need a US
entity, more shortcuts. So go to Windows,
references, shortcuts. And I'm going to
search for camera. So under camera via
valid projection. So you can see that
as an old plus w. So simply click and press Alt W and then
assign the shortcut. Similarly, I also have a
shortcut for the top view, which is Alt D, and the
front view, which is odd. Now blood from these shortcuts, the other shotguns,
whichever sign is hide. So if I search for Haidt, you can see that era st, F2 for height and night all F4 and handmade
last is f three. There's another shortcut which is height desk to the model. So you see view
slash company and edit sludge high does
the model which is j. Now I will show you hold
these shortcuts work as well. So let's press Okay, to save our shortcuts. And the palate projection, I used to switch between
these two modes. We are going to camera and then clicking on perspective
or bad reprojection. But since he had the shortcut, it's made life easy for us. Now coming to the
height bools know, for example, if I want
to hide this group, I can simply select this and
press F2 to hide the group. Whereas F3 tornado. And if I select hide
this, hide this. And best effort. It doesn't unhide all the
objects in your scene. Now another cool feature
which I use a lot is the hide just to the model
or toggle visibility tool, which is assigned as
G. So for example, if I enter this group and I don't want to
see the objects at ONE this group and I'm editing those group members
GAP toggle visibility. Now the problem
with this model is that it is not being
modeled as groups. So each of these
elements are not groups. And it would be a big
problem while editing the mode Alito in gives
you want to make changes. But since you are doing
only the exterior window for the scene, it
should be fine. So that those toggle visibility. Let me just enter
this group so you can see that the rest
of the model heads, but if I press J again, it would toggle visibility. Now some additional stuff
which I want to show you in SketchUp is making a copy. So I use the move tool, so press M to activate the Move tool. And to make a copy, you
can press the Control key. So now you can see that dog goes through changes
to a plus button. To null, I just need to
click and then release, click and release, and
then move your object. And then click again. So let me show
that to you again. So with the move tool activated, press Control to switch
on the copy mode. Click ones, release
the key mode outside, and then click again to
copy. As simple as that. Now if you want to make an
RNA copy, so for example, if you want to copy
this 10 times, select this object, press M plus control again,
to make a copy. I'm going to reference
this distance. So I'm going to click
from this point, release and click on this edge. And now without touching any keys on the keyboard or
clicking your mouse again, simply type in x then, and then press Enter
on your keyboard. So that would add a copy
way then times yours. Another cool feature in case you change your mind and is not dead names without clicking anywhere or pressing any
keys on your keyboard, simply type in the value
again, which is x, five or six, presenter
X, X2 and X3. And so that would
update in real time. And once you're done, then
press the spacebar dual, other escape key and
new arrayed copy stuff. Now another important
workflow that I use a lot is locking stuff in
SketchUp, moving it around, lock it to these axis, which is the green
axis, the red axis, and the blue axis not to lock, we can either use the arrow keys or we can also press the
Shift key on your keyboard. So for example, if I want to move this along the red axis, I'm going to select this
object for us or this group, press M, and then press Control on my keyboard to
activate the copy dude, I'm going to click once at
the corner of this group. And now you can see
that when I drag it, it's not locking
to the red axis. So if I want to lock it and want to press the
right arrow key, so now it is locked. So even if I move my
cursor to the bottom, adoptive screening
will always move along the red axis. Similarly. So let me just place this year. Similarly, if you want to
lock into the green axis, click once and press
the left arrow key and the statement would
move along the green axis. Same goes for Google Doc axis as well by pressing
the up arrow key. And if you do not want
to use your arrow keys, you can also use the Shift key. So press M, click ones. Now once you move and you're aligned along the red axis or changes to a dark lane
on Febreze shift, it would lock the dotted
line and make it darker, which means that it's
locked along the red axis. So just get into the
habit of locking stuff and using
the arrow keys on your keyboard to align it and move it along a certain
axis in SketchUp. Finally, we do
reference materials and to use the same media and in your DAW objects you can
use the paint bucket tool. So Presby to activate
the paint bucket tool, click yo to sample the beam, which is this button. And then select the material
and apply it on your groups. That's the basic
stuff in SketchUp, which I'm sure you already know. And another cool workflow that
I use is the rotate tool. So if you want to rotate those
objects here, for example, in the x-y plane or
YZ plane or whatever, rescue to activate
the rotate tool. And now before
clicking anywhere or purchasing any keys
on your keyboard, press the right arrow key so that would lock to the red axis. Does the left arrow
key that will lock to the green axis and
press the up arrow key, and that would lock
to go top axis. I'm going to press the left arrow key block or
to the green axis. And then I'm going
to click once, release, click again,
release again. And then you can either
type in your value. You can see in the bottom
left we have an angle. So let's type in 30
and then press Enter. So that would oriented along the green axis
at an angle of 30. So one last step, which I will show you guys is, for example, if you want to edit some lanes and move some lines around, you would need to
enter the group. Now let's say I want
to move this line, so I'm going to select
this line and just like how I lock stuff along an axis, you can also select the
lane, press the Move tool, and then lock it
along an axis by holding the Shift key or by
pressing the right arrow key. So this way, your lane wouldn't go here and go on other bins. And if you make a copy, then they do not extend. Our groups would be careful when you are selecting
lanes and moving it. Not the best way to select this lane is either by selecting this lane or by making your direct selection from the top left to the bottom late. So that would select the line. If you drag select from the
bottom rate to the top-left, I could select the faces well, and that would move
the entire group. So make sure you're
always dragging from top left to the bottom rate so that it selects water was within that box and then you
can move it around. So that was a quick video
into how I use SketchUp. And it goes most of how
I would be working. Let's sketch up into courses. Well, in case you get stuck, you can replay the
videos and you can also reach out to me in the
discussions or in the notes. So I'll see you guys
in the next video.
4. Exercise Files : Hello. In this video, I'll
show you how to use the Exercise Files on Skillshare. So just go to a boat and at the bottom you'll
find the Exercise Files. Click on this link. So you can either
download the zip file. So we have this
afraid which contains all the exercise files together back in one single folder. It's an odd fail, so you need when you open it up
or even winds up. Or you can also go
to each folder and download the specific
file for each video. So every lesson
comes with DO files, the start file and finish. The finished file
is essentially what happens after you're done
going through the lesson. So you can start at the start frame and
then follow along. Or you can also open the finished violet
and check how it looks once the lesson has done. Some lessons also come with additional files which you can use for that particular lesson. So that is a quick video
into exercise files. If you have any doubts, please reach out to me in the class discussions and I'd be happy to
answer any of them. See you guys in the next video.
5. Import CAD into Sketchup: Hi, In this video I want
to show you how to import a CAD file we're going to use for the scores into SketchUp. So open SketchUp. Now in this workshop
and wouldn't be using the architectural
millimeters units. Because a CAD file is
also mean in millimeters. I'll add so click
on architecture and really windows
to open it up. Before I import the Gadfly and Lambda's going to
double check the units. So go to Windows,
click on modelling for and select on it. And now you can see that the
length is in millimeters. And now we can import
our CAD phone. So go to File, click on Import genes or fail
day from SketchUp. Do order to get
this autocad option will only open in the
SketchUp broad version. So make sure using
SketchUp Pro for this course, select
border guard. And you can see that we have the bland millimeter drawing. If you're using an inches
and already is you can open the same drawing and
I'm sure you hold a skill in SketchUp as well. So Inaki is we're
going to use bland really we do so select
bland million Windows, click on Import, click
on Close, and Load. So this is a simple
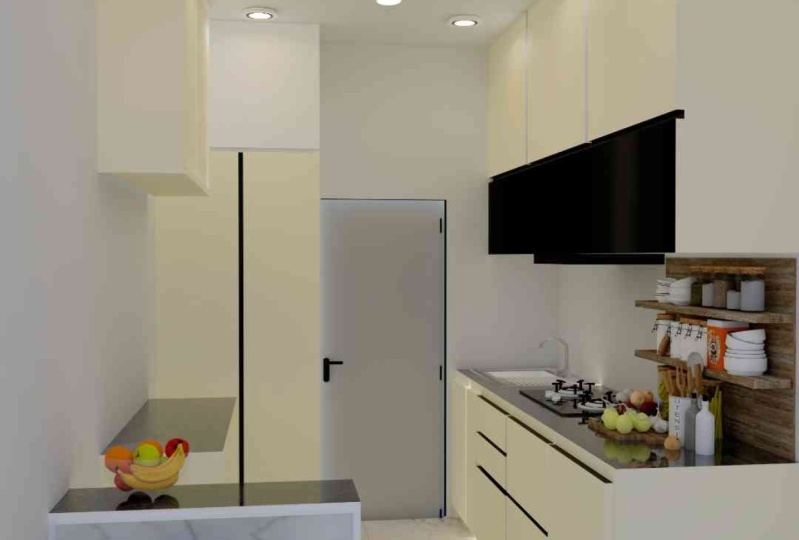
living room with a small kitchen,
you open kitchen. This is part of a bigger plan. But in this workshop, just going to show you a
simple living room window which you can create quickly, sketch up, and really don't want to import into
your sketch up. Make sure to save
your file as well. So go to File. Save As you appropriate name
for your fail and click on save. To dissolve. You're bringing your auto
CAD drawing into SketchUp. It's also important
that the drawing is made on the sampling. So sometimes I'm
autocad drawings are made on different levels. So it would import the drawing at those levels in
SketchUp as well. So make sure you clean up autocad drawings before
you import it into sketch up our video
on YouTube that shows you how to import
an AutoCad fame, which is not in that I blend how to fix the AutoCad file and then bring it into SketchUp, which egg followed by heading to YouTube and searching
for SketchUp Google. And one last thing to do after you've imported
your sketch, our failures to check
the measurement. So select the measure tool by pressing V on your keyboard. Click once. And when you hover
on the other side, you can see that for
phase one and phase, which is 4.5 meters. So this is a delayed skin. Now it gives the CAD file
is in the wrong scale, then you would need to scale it. So in that case, for example, this is a 175. Now if you want to
make this 300 MB and equally scalar
and diet group, you just need to
enter those group, select all the lines and
make it a group again. Now this is a group
within the main group. So if I showed you in
the outline or window, you can see that this group is nested within the main group. So now we can scale this nested group and
say the main group. All you need to do is press D on your
keyboard, drag do it. Now you can see the plus
button in the DIP dual icon. So if you press control, can see the door plus
bi been changes. Now you can scale this model. For example, if I want to
scale it but 311 or 250, Emma, click on an edge and then reference the second
which is at 175 men. Now you can dopant early as you can see in the bottom left. It mentions that you need to enter distance to
the SASE model. So I'm gonna type in say 250 MM. Press Enter, and
then click on yes. So now you feel, check
the scale again. You can see that it's 250 MM. And the room says
there's also increase. So we don't really
need to do that because you bought it
in. That aids good. So we can use the existing plan. So I always found
this video useful. In the next video,
we're going to start creating our room and then create an awesome Brando for this simple living room scene. I'll see you guys
next video shows.
6. Create the Room in Sketchup: Hey guys, welcome
back. In this video we're going to start
creating the room. So to start off, I'm going
to assign this bland and do a separate bag or LEO to go to your default
rate on the radio. Good at dogs. And click on the Plus
button to create a new DAG and wouldn't
call this plan. And then press enter an order to assign
this to the plant DAG, all you need to do is
select this group, got entity in full and
change the dark blue plan. So now if you want to hide
this plan when we are working in SketchUp, you
can simply click on that. I do. And it goes away. So it comes in super handy. Later when New York
scene gets more complex. So to start creating a room, you can simply graphed on top of this plan to make your faces. And groups in SketchUp
always restart off. You can go to your top view. So you can press Alt W and D, which is simply switching to
the valid prediction mode. So you've got a
camera projection and then standard views dot. I received a shortcut as I've shown in the
start of the course. Now, I can start
creating my walls. So to clear the walls in
need of fear. So the bottom. So in that case I'm going to use the ln bool to press L
bracket with the line tool. And I'm going to simply the
African dockworkers bland. So started the endpoint of the group click and then start clicking
all over the planet. So we'll click all
over the plan. And once you come back and
bind to the start end point, you can see that it creates this fierce to know for
hate the plan. We have one part of
the plan which is made login create the
rest of it as well. So this partition molecule. So again, when I do it, the main tool, and then
simply click away. So you could use
the line tool to create the rest of the walls. Now we can use the
Rectangle tool, press R on your keyboard, click ones at the edge, and then click on the
side of the water. So now we have our
fears and save her face outside and we have
a fierce for our window. Now this is a seaside
facing apartment. So it has a balcony as well. So I'm going to create a
rectangle for the balcony. So plus flip once the top-left and click once on the bottom plate to
make your balcony. Now I can start
getting the walls. So before I cleared the world, I'm going to make
these faces as groups. So all you need to do is
double-click on the fears. Can see that it selects
the office faces as well as the edges which is indicated
by these blue lanes. And then I'm going to press
G to make it a group. Similarly, this partition
Volume selected, and now I can select the floor, so I can double-click
on the floor, which you would select
the fluid and then you can make that
a group as well. And then our balcony and
under Window face here. So double-click do
to make it a group. Now we can give a height. So the height for this, but renders said that ten feet are three
meters from the ground. So you can then build this group Presby to activate
the Push Tool. Click once, and then push it out by three meters or 3000 MM. Similarly and dildo warrior
group, nor the water group. Dylan, Dylan said that 70 feet, which is the baud rate. So you can use the
push pull dude again to activate tool click once. And I'm going to push
it up by seven feet. And then I'm going
to press on Bolden, make a copy, and then
push it the edge. So when I push it again, you can see that
it creates a line and actually creates a
lane at own the box. So I am blessing J two dogs
reusability and no assembly. Push this in and we
have door openings. Finally, I'm going to make this partition wall as
well to enter the group, use the push pull
and push it out. So that is a Goddard or the state which leads
to other rooms. I'm not doing it
in this workshop as we are simply focusing
only on the living area. Well, it's an object
created the room and or we can go ahead and
via the door for this room as well before
you don't need to give some thickness
form a floor slab. So I'm going to enter this group because J two dogs
polarizability. And then we're gonna give a
thickness of around 150 MM, which is agenda slab thickness. And then I'm just going
to push this out. I can delete this
group known since I've pushed the slant
board to that edge, created the room in this video, and in the next video,
we create door, door for the room as well. So I'll see you guys
in the next video.
7. Create the Balcony Door in Sketchup: Hey guys, welcome
back. In this video we're going to create
or balcony door. So in this room,
the door actually spans from the floor
to the ceiling. So we can delete
this lintel Vimeo, and we can clear the board for the entire
height of the room. So I'm gonna make a rectangle. So press Alt, drag
the rectangle tool, and then snap it to the red axis by pressing the right arrow key. Now it'll always
draw and discipline. So click once and then click on the second to
make your rectangle. So now we can make
this face OR group. So double-click plus
G to make it a group. Alright, so I've
drawn the rectangle. Know we need to draw
the frame of course, which is going to support
so endogamous group. And then use the offset tool so plus F directory above the dual. And then you can
click on the face, and it would select the
boundary edges of the face. And now you can drag a
selection either inside or OT. So naturally we need to
drag the selection and say, and give an offset
of around 50 MM, which is two inches. Now we have a frame outside, so you need to give it a
thickness for the frame. So always make it a point to make it a group first and
then give it a thickness. So I'm going to double-click
on the face but as G to make it a rule
under this group. And then give a thickness
of around a 150 MM. Now we have a nice
thick 3M as well. And then we can
enter this group and then start creating
the door on this face. So the first thing
what you need to do is make this fiercer group double-click the inside
face and make it a group and build a
new nested group. If you want to see the various groups
that you're creating, you can go to the
Outline window. So you can see that we
have an ester group here to enter the
industry group. And then we can divide this
length so we can select the, the top, bottom lane
or the top line. So let's select the top plane. Right-click and
click on the way. So now you can divide this
line into equal segments. In our case, we need to divide
it into three segments. Simply hold to the
left or right. You increase the
number of divisions. So now we're going to
divide it into three. So simply hold to
the left and then click to make that division. Again, go back to the line tool. And then click once, and click at the bottom
to divide that face. Similarly owed as well. Although it looks good. Now we need to give her door
height of around eight feet. So I'm going to make a
reference line from the bottom. So use the measure tool, flip on the bottom and give
a height of eight feet. You can deepen in feet
and inches as well. They've been eight and then type an apostrophe and
then press Enter. So now we've given a
reference lane at eight feet. Simply create a line on top, on top of the reference
line using the line tool. And then we can start creating
the door for the space. So as you can see
from the photo, this balcony daughters
at the height of around nine feet or feet. And the width of these doors
are pretty wide as well. So we can retain the width which would be around
four to five feet. So you can either use the photo which I just showed you or you can also use any photo
that you find on Google, which is balcony door and
D delayed and sketch up. Alright, so from the photo, we can start creating the
shadows that glasses and mode. So as per my
architectural experience, the chateaux thickness of the shadow flame
thickness is around a 100 MM afford inches and want to deepen a 100
MMO, whereas Endo. And then I'm going to give it thickness for the shadow frames. So I'm going to double-click on the shutter frame plus z
to make it a group and the other group and
give it a thickness of two inches or 50 MM. Similarly, the glass, I'm
just going to make it a group mode and non bit and then give a
thickness of our own phi m. So glass thickness is
around five to ten MB. Framed thickness is around 50 to 75 or two
inches, three inches. And I'm gonna do the same
for the top as well. So double-click on the
face, make it a group. And this group of 3M
thickness of 50 Amman. And then make the frame
or group as well. And do the thin loop and then give a thickness of
around 50 MM again. Now, this is another
face which is insane, which is simply to block
the late and it will be metallic material,
so make it a group. And then more than and also give it a thickness
of around ten m. So dynamin as is, or mild steel sheet. Well, it's created
the first groups. Now we can create the
handle and then make this Endo part of the door system or component and
copy it do though. So so the door
handle is generally kept at a height
of around 1200 MM, 2 thousand, 350 MM. So I'm going to keep
it at around 1000, 350 so you can draw
a reference lambda, or maybe even 1200
also works well. So I'm going to give it at a
height of around 1000, 207. And then I'm going to draw a simple rectangle
which is a decent size. Make this a group
moved to the center. You will find the midpoint
so more to the center. And then you can enter
this group and push it out by say, dynamin,
one centimeter. So play it off. One centimeter and then you can start drawing your handles. So I'm just going to make
a rectangular square. Again, make this a group and that group and
then push it out. Where C for the MM. I'll select this edge and then
copy it and saved by say, 15 m or 1.5 centimeters, and then push this handle out. So that's how simple it
is to create a handle, you just need to know
the measurements of the handle and you'll be able
to create it and sketch up. These are all separate groups, so I need to group
them together. But as theater
Calgary is a pretty, I'm also going to
select this and i o component and then
make it a group. So now you can see that
this is our main group, which is nested under
another amine group. And we have all these nested groups within that main group. You can also go ahead and rename these groups
if you liked. It gives you want to use
it and Unreal Engine. But in our case, we don't really need to rename them
since it's so small z, alright, so we made
it a group and all we can make this
a competent as well. So if you make any changes
your head would affect the other similar competence or instances of this component. So select this group like and then click
on May competent, call this door component. And now we can make
a copy of this. So plus m pest control
Domenico copy, click once. Hold Shift to snap it
to the green axis. And then click to place your door and or you can
Monday Blackberry do. And you made a copy
of those competence. You can see that if I click, it's actually
selecting the fears. So we need to delete that fears. So I'm gonna select these
two competence, hide them, and then use the eraser tool to delete these faces and edges. You can also make a selection
and delete them as well. Of her press F4,
you can unhide all. Now I need to mirror this so that the door
handlers on this side. So press S to activate the scale tool and then
click the midpoint. Can also blessed x-ray mode, which is Y on your
keyboard or we do Wishart got Usain snow, you can see we can, we can
select that midpoint there. Ragged other side and then
David minus1 to make a mirror. Now we can simply move
this back and you're done. Finally, we don't
have a lawyer's. Let's go back to the normal
mode by pressing Y again, should disable the X-ray mode. So now we don't need handler, but the thing is if
I enter this group, I'll just competent
and then select those who do select instances
of their competence. So they believed those as well. So as you can see, it
deletes those instances. So we need to make
this competent Unix and select this competent
right-click and click on make unique and handle those competent
and select the group. Good unselected instance because this is a unique company. Allegretto, you're done
creating our door. One last thing, what I would
highly recommend is give a gap between these edges here. Because of that is no gap
between these shadows, then it would show up as a
single frame in the render. So always enter the group. Prayers data-toggle is a 3D. Select this and
bail left side of this frame and then move
it in by say, do MM. Similarly decide as well. Snapper to the green axis and
then mood and where do MM. So now you can see there's
a gap and that would allow for the edges to be
seen in that endosome. So let me do that
for the RPO as well. So select that
edge of the group, would invite do MM,
similarly year as well. Make sure you're
giving a gap like this so that it shows
up in the render. Also, the thing about these gaps is that there will
be lightly gauge, so you will need to simply draw our face or the back of
this door competent. So you need to make a
rectangle from this edge. Snapper do the red axis, we're pressing the right
arrow key to this edge. It's a dual Mm-hm. Gap edge. So this way it will block the
latest and make it a group, and then copy to the other side. And you're done. So that would block
the light leakage. And it would also
show the edges. Now, there is no gap
between these two shadows. So we need to adjust
that as well. So what you can do
is enter this group, select the top frame and
then make a drag selection. And then moved up,
snapping to the blue axis and type into m. So now there
was a gap of two women. Since this is an instance
that would be applied Eurozone makes you
apply it to the unique, competent to enter
the group mode up by I'm like grid and then finally other bags simply to avoid any late
leakage in your scene. When we start the video part of the course as a group.
And you are done. Hollow tube done our road. We can also create
the balcony railing, which is a simple law stealing. So make a rectangle, double-click on the
fears, make it a group. So we meet that
rectangular group or another group and
then push it out. Whereas a 1200 MM, which is the standard hate for balcony railings in apartments, and then get an offset of around 15 of them are driven
dynamics should be fine. And then push down and then
push those out as well. So once you pushed it out
to be a single phase, make it a group, and
then delete that group. We made our balcony railing. And what additionally
do is divide equally. So select that layer, click on the weight and then divide it. Do equal segments of
four feet in RET. Then make Lindberg
select that line and then copy it to the edge of that other line,
multiply into two. And now we can give a
gap through this glass. So I'm going to
push this out by do amine and then select this line, push it out to your brain
to remember as well. Select these two lines plus m plus controlled
to make a copy, select the midpoint, and then place it here. And when to play. Great to know what
we need to do, simply delete that middle line, then push it out,
make that last fear. So group and then delete lutea desert
delete assembly line. We should make that
last fiercer group and then delete it. So we made our glass
bug me as well. And it'll look cool
in the render. So in the next
video, we'll start applying the glass
materials and Greek, the Medellin VD, and proceed with the workshop and see
you guys in the next video.
8. Place Furniture with 3D Warehouse Models: Hey guys, welcome
back. In this video, I'm going to show you how
to add the new ADOS models. Before I did the
review arrows model, I'm just going to
collect some images on Pinterest just for reference. And also walk around
the theme for this living room space. This is how most interior designers approach
their project. They either come
up with this team, RBS and the client brief and
what the client requests, and also the client space. The interior designer
comes up with a mood board or Pinterest
board and so on. So what you can do
is you can open Pinterest and you can create
your profile as well. And then simply create
a board called the living. To create a board. For example, if I
open this image, all you needed to do is
click on the dialog box. We'll click on Create
board and then p8 a board. So I'll call this
board as living room. And I have different images that I've saved for
this living room space. Sam training goal for a
modern borehole check field. With also some that
just Scandinavian, you can mix and match styles as well, which is a good idea. I'd probably go
for an LLC dot so far with an Accenture to
renewed reference images. And when you see these images, it'll help you design
better as well. You're not really
copying the design, but rather using the selections. And then from this reference
you're coming up with your own design and
ideas for the space. Peri de la holders looks
the war-like your suit. I would suggest that you
make your Pinterest board first and then start
collecting images. And once you're done with that, and then you can
create a team as well. For example, a combination
of three or four colors. So in my scene I
might go for green. And green in this case
would be the indoor plants. Green, brown use, and
a very modern looking. To some interior
designers also approach their project by placing
the route first, which is sort of the
highlight in the room, and walk around
the rocks colors. So let's try to approach this, uploads this project the similar way we'll start by
placing the rock first. And based on the
colors on the rock, we will place the remaining
objects in our scene. So to start off, go to Windows, three red balls,
and search for dog. There are different kinds of rugs that you can choose from. What I'm gonna do is try
to work with this drug. So it's got these nice pastel colors that
we can work with. For example, this brown here. And we can work with
similar shades for the, so far the warlord and so on. So I'm gonna say like this, Fernando Perez CID 840 route can click on Download corneas. So now we're going to
place it in the scene. And I'm going to
rotate it by 90. Use the Rotate tool and
type in 90 to rotate 180. After you place that, we can then place the
software as well. That's also a good
idea to look at these models from the plan you, so that you can see how much
space they are occupying. So I'm gonna go to the parallel projection mode by pressing Alt W. Or you can go to camera
bile production as well, and then go to Camera
Standard use DOP. So this is our Gulp you and knowing when to create
a scene out of this. So let's go to our default here. Let's go to scenes and
then click on DOT, had seen button to add a route. Now we can place so far as well. So this space is
around 4.5 meters in width and 7.2
meters in depth. So we can place an LLC to this room and we can
place a console dW, along with some decor. And maybe a coffee table. And Accenture had some, a little bland and L1
up art in those speeds. So let's go to Windows, 3D shadows, and
search for so far. So now you can go ahead
and select any so far that you feel would
fit this BS best. Now the difference between
products and models is that products as a design then modelled by the
companies themselves. So these are actual
real-life models which you can place
in your scene. And if you're claimed
lakes these model to get more details of
what these models by simply clicking
on the company. And you will see the various models this company
makes for their clients. So me just scroll down and find a model that works
well for their space. You can also check
the list from models. Let's open models. You can also check collections
and catalogs as well. All right, so I'm gonna
go with this so far, which has our deal color.
Looks nice as well. You may have to tweak the fabric material later and really, but let's use this sofa for now. Click on Download
and click on Yes. And then you can place
it in your plan. Once you place
there, you can see that there's group
is slightly bigger. So let's enter this group and maybe delete
anything extra year. Let's press F4. You can see that there's a
hidden group here. So we can delete this. And now the group
bounding box or smaller. Now let me go back
to the plan view. I'm going to rotate this by 180. And I'm also going to scale it and meditate on
the other side. So let's go back to Scene
1 and then place it here. And then finally, there's
this mode back to go on. Now, so far looked good, but routes seems a little
too small for the sofa, so we can increase the
size of the cloud. So select the Route, use the scale tool and click
on the edge of the drug. So did the rock by 180. So you're going to
have to see the logo and mode outdo bit. Yeah, something like that. Also when you're placing models, it's a good idea to use
the perspective mode. Because when you
are in perspective, we can scroll and redder
and check the model. You can see that the
model is floating. So make sure your models
always touching the ground. So selective model use the Move tool and then
place it on the floor. It's also a good area to select that route and move
it down a bit. We will be changing
the material of the rod using the VDI firm. It's really pleased are so far and let's move to
the left a bit. So there's some space
for the gourd opening. It's probably opening outside, but still it's a good
idea to get some spheres. So there are some
circulation within that space of the leaving group. Now that isn't my children
so far was because these colors are complimentary
to the rocks colors. And I sort of the
same hue and don't. Now we can choose a
Walmart does well, similar to the
colors of the rock. So let's go to Window 3D models. So as for Walmart or
wall paintings as well. Let's go to models. So we have a different option 0. So I'm going to select one
with a lot of negative space. And ritual expelled
from the scene. A set of three also work well. You guys can go
ahead and select the one which you like the most. So finally, after some endless scrolling
and we're going to go with this theme because it's going to
match the colors of that, which is kind of pinkish
and brown hue ten decibel. It's got a lot of
negative space, which works well for Indians. And we'd sit perfectly
within the scene. So select this
model and click on, Download and click on Yes. Now we can place
this on the wall. If it hasn't been placed,
then you'll have to pay. I said manually, so
let's move it down. Here's the more snapper to the blue axis and
more dominant bit. Then you'll have to move it
along the green axis and finally rotate it using little blue axis
on little people. So I'm going to
rotate it by 180. I'm also going to scale
it up a bit slightly bigger and then place it in
the center of the scene. So I'm just going to move it and numbered. And that's good to go. Ideally, it's also a good
idea to sort of adjust the frame and depth so that it's not
intersecting with the wall. But for now this should work. Since you're going to
set the camera this way. Well, it's so we've
base three models. You guys can go ahead and add
additional models as well. In the next video, I'll show
you old had modeled from the gills cosmos
material library, which come with really
ready to random materials. So I'll see you guys in
the next video shows.
9. Place Chaos Cosmos Models: Hey guys, welcome
back. In this video, we're going to use the chaos
cosmos models in our scene. So there are few more
additional elements that make up and indeed cosine. So we did place the route so
far and the warlord which sort of match the diem end
state that we are going for. Then the scene which is sort of modern check borehole state. Now we need to place
an indoor plant and NLU glances
create for NGDOs. So this time we're going to
use the chaos cosmos library. So this is what a 3D
FA vein comes with. Really. All you need
to do is click on the class cosmos
window to open it up. You do need an actor Internet
connection, of course. Now we can go to 3D models. And here we have
different kinds of models that you can
place in your scene. We also have something
called materials, which is high-quality materials, which is just shipped with the
liters update Fourier DFA. And we have HDR days as well. These models and materials all come from these
creators here, which are DHAP websites. They create awesome
content for 3D artists. So let's go to 3D models, let's go to vegetation, and let's click
on indoor plants. So I want to play
some indoor plants. And then also believes the
bonds for these glands. So some glands look on with
bots and sometimes don't. Plants that don't actually fit
better in interior scenes. For example, the
Swiss cheese plant. So you can download the plant and then it
starts downloading. And once the download is done, you can then import
it into your scene. So you can see that
the icon changes. So I'm going to import
this Swiss cheese plant, which I've already downloaded and then displace it
in the scene for now. And now I'm also going to
play a part for this plant. So let's scroll down. There's Indian, let's go to Act the city's buses and plateaus. And let's select this plant part 000 10 and then place
it in your scene. After you play a studio scene, you can then move that. Then please always move along the axis lanes because it's easier to place objects
that we in SketchUp. Khaled, that looks good. Solo sitting on top of the part. And then I can also increase
the scale of this plant. Scale it this way. And then select these two
groups and make it a group. Chaos Cosmos also comes with other furniture which
you can add into your scene. For example, we can
add an AKS engine. And the one which I forgot to Charles has this simple,
traditional looking chair. So you can download the
model and then loaded a DOC. We're going to move with
the sphere. What's going to scale it? Happened minus1. And place it and please.
Alright, that looks good. And finally, I can also play so coffee table in our scene. So let's go to chaos cosmos,
let's call it enabled. And I can place this
wrong, the real coffee. So download the model and
then pass it in your scene. And let's go to the top view
and check the dimensions. All right, things
are looking good. There's enough ample spaces as well between
the coffee table, which is for around 24 MM, which is around one in our feet. It's always ideal to keep around one and our feet to do feat gap so that people can move around
the space easily as well. One enough to feed
means 450 MM do 611. Finally, I can also play some
coatings food our scene. So let's go to chaos cosmos. Let's go to access cities. Scroll down a bit. And you'll find these curtains from
the Celts cosmos library. I'm going to use this
curtain 000 three cases we have seen also rotated
by 90 or to the edge. This is going to be
a racist gotten. So we'd have to make a
recent scores on the slab. Will do that later. Let's copy it to the other side. And then of course
the large mirror it. So the seams are at the edges. And also move this a little bit more than safe and you are done. You can also go ahead and add some throw
pillows in your skin. So if I go to chaos,
cosmos could decode. We can add radius
decor elements onto the coffee table and some
throw pillows as well. So if I download, this can
be a cylinder. So far. After you've listed on the sofa, use the Q tool on
the Rotate tool. Go did it along that axis by
typing the right arrow key. And then some little
dated a bit hot. So after you rotate
it is more adult. And move up a bit. I'm going to play some
pillows this way. So these throw pillows also, can we accent in your scene, which are the two
main highlights in case the other colors in your individual room or more monochromatic and not to load. So maybe I can use this pillow just to add that additional
accent in my scene. You can also go
ahead and search for pillows in the 3D shadows. Bless it. Use the Rotate tool. Snap right along the green axis
and then rotate it. Then just simply move it
and can move the envelope, blend out a bit, and also move the pillow down. Finally, I need to add term
decode on my coffee table. So let's scroll down a bit more. I can place this
decorator board, which is seen in a
lot of 3D renders, and it's pretty famous as well. So let's use that. Let's place some books. Let's drop it the book a bit. That chaos cosmos models don't
come with the materials. And it's not possible
to add the materials as well even after you've
merged the modelling DOC. And so that's the small dog back with the chaos
cosmos modeled. And I'm going to place my
form on top of the book. Let's see if there's
anything else. Maybe this through
blanket as well. Then place it on the sofa, rotated a 180, then
move it down a bit. So that's laying on
the sofa and then just simply touching the floor. It is. That looks good. You know, there's a small gap. What you can do is maybe
just move this way. If you can sort of Fick how
it looks in the camera, then it should be fine. Make sure it's not entirely
overlapping to so far. So good. Okay, Let's move it up a bit. And we are done. And we
can also copy this load to the other side and
rotate it by 180. And also rotated
on the green axis. All right, This looks good. It's always a good
idea to give a set of three when you are adding,
decoding our space. So I'm just going to
add this was here to download and loaded and
then place it in our scene. So we have a set
of three elements. So that's a small little
closer together and natural. So phase, things
are looking good. So the next video, I'll
create the skirting and the gardeners detail
for this room. Because every room has
that coding of a 100 MM, which is simply a
profile that runs around the world and which is part of the Florida during
and post that we'll start creating the render
by positioning the camera, creating the lights, and then adding a lot
more good stuff. So I'll see you guys
in the next video.
10. Create Skirting with Profile Builder 3: Hey guys, welcome back. In this video we're going to use this awesome plugin
called profile below to add the score Dean
corners details and more. So what you can do is click on the Open profile dialogue to open her profile
builder plug-in. And then he had these
various profile and profile dialogue. So in this case, we need to first start
off with scouting. So you can click
on Search profile. We can see that we have two profiles that
we've used recently. If you click on Get More Online, you'll be redirected to the
profile builder library. And then if you go to
downloads profile library, you can then go ahead and
download any of these profiles. The ones I use mostly
is called moldings. So you can click on
moldings and then it would download though profile
library and do your computer. So you can click on More
links and then download any of these moldings, phone arguers, you can
download the basis. And once the basis
file is downloaded, download those as a thread. You can extract the
files into this folder. So simply click on
Open samples for low. So this is the link
for that folder. So copy this link via
Studio so you can see the different profiles or just go to libraries and
then clear the library. Or you can place it in any
other directory as well. And then simply open that folder in their profile
builder dialog box. So for example, I've created a folder called Profiles
and it's a custom for low, all I need to do is copy the
directory or this folder. Then click on Open BSD, a directory here, and then
click on Select Folder. So now what would come with
all the profiles loaded? And so we can select biases. And now you can see that
we have various bases that we can use as coding
in the scene. You guys can go ahead and
select any base that you like. I'm going to select
the splint Vizio. And the most important
tip after you've selected it is the placement. So always listed from
the bottom left. So the anchor point is
at the bottom left. And then simply
click on Build to. Once you click on Build,
then you can start building the skirting along the edge
of your living room scene. So you can keep clicking
all the way through. It will create the
corners, which is awesome. You can also do this
with the following UDL, but I found or profile builder pretty handy in creating
profiles in our scene. Similarly, you can also create the cornices and
ours in my scene. So let me go to profile
and closer again. And I can select
crown understand. Or you can open that library again and silicone treadmill. And you guys can go ahead
and select any ground that you label from the
drop-down list here. I'm going to select the assembly grown and make sure
the anchor point, in this case it's
top-left, so a nucleus, the crown, ankles scattered
Lee on the edge there. You can also change the
width and the height. For example, the
64 MM is too much, you can change it to 50 MM, and then it would change
the size accordingly. And then you can click on Build. So after you click on, well, you can start placing a
denouncing the sphere. And how cool is that? So it brings Endo grown as
a perfectly so similarly, you guys can go ahead and
create your own profile below. It's an awesome plugin
which you can use for the score Dane ground,
and a whole lot more. And it leaves a
separate workshop for profane below so
that you can learn. It's even more awesome
features that it possesses. The next video to find
the position the camera, because he have everything
that we need for our scene. And it sort of looking nice. So we'll position
the cameras set up late and then set
up for endosomal. See you guys in the
next video shows.
11. Position Camera in Scene: Hey guys, welcome back. In this video, we're going to position the camera
in the scene. So the first thing, what
I need to lose LR camera. So you can go to
camera and click on position camera or you can
also click on position camera. And I'm going to
click somewhere else. So now we can say the
scene and you can see the high hate to say
around five feet, know for India, it's
a good idea to place the camera at the same height. Has the object in your scene so that the object is the
main focus in the scene. So for example, in this scene, the main objects could potentially be the
software and the D chord, which is ADA height about
two feet, three feet. So let's take three feet first. So David 900 m and
then press Enter. So now you can see that
the cameras placed little better where you can see the scene goes so far
and a whole lot more. Let's zoom-out and bringing the scroll button to zoom out. And then I'm gonna hold shift and middle mouse button to ban. So this is how you can place
your camera in your scene. And this is simply by using your eye to place it this way. Just make sure the so
far and then DOC in a scene and then go to
camera 2 perspective. So now I can see more
of the scene also. Put these frames down a bit. So it's not all the way up. And then simply create a scene, pseudo, create a scene. Just go to scenes and
click on the Add button. Also good idea to
rename your scene. So this would be the top view. And then say like leucine and
rename this to perspective. All right, So you
created the scene. Now what we can do is also
check the field of view. So Febreze, field of view, which is good for indigenous and especially this living room
since it's allowed space. You can also test out some
other feudal fuels as well. Go back to perspective, mode and type in 2005. You can see that when a day 25 sort of overlaps
with the one. So those are problem when we had the wall and you will need to use that section
to sort that out. But I feel for this workshop or field of view of
35 should suffice. I would of course
show the radius are the options later on in the workshop is when
I'm happy with this, where I can see the entire sofa, the stabilise, the accenture, the gardens and the c naught. C naught is going to be a beach. You're gonna see
a horizon as well to adjust that later
on the scene, right? So once you're happy with this for the camera
two-point perspective, and then update the same. Right? So once you place your camera, you can now confidently
close the room as well. So you can make it a slab EEO. We're using the rectangle tool, so there's a rectangle
from one edge to the UDL. Make it a group.
Double-click, select my color group and the
low group and mood. Whereas a 150 MM. And push it to the
edge of the balcony. So this is our slab.
Now the problem is that we have an
opening for the garden, so I'm just going to
make an opening quickly. You can see that we
need a recess for the gardens so we can
give about 250 ML. And he says, and then
there's simply push this out this way and push it to
the edge of the wall lead. Similarly, this is alright. And then I need to cover
this group as well. So I'm going to make another OH, group on top, make this a
group and then push those out. So we covered it so that there's no late
leakage in the scene. Now if I go back to perspective, the scene is covered
by a roof as well. And also after that,
what do you need to do? Simply select these
gardens and move it up a bit so that it is
sitting inside the Reese's. And also that it is
touching the floor. Use the Scale tool
and scale it down. Now if I go to perspective, I can see though and diodes
in and is looking good. So in the next
video, I will show you how to light up
the scene and then we'll further adjust
the camera position using the rule of thirds. So I'll see you guys
in the next video.
12. Common Problems: Hey guys, welcome back. Now in this video, I'm
just going to show you the common problems
that students face while positioning cameras, especially if you're not using Section plans or groups as well. So the first problem
is when I zoom out and if I want to see
more than the scene, you can see that we have
this kind of a zoom effect. And the reason we end
up is that because we're still in
two-point perspective. So you need to go
back to perspective. And now if I zoom out, you can see that my camera sort of overlaps with the wall. And so this is pretty common. When you are working
with SketchUp. You're going to place
a camera and then it starts to overlap with the wall and you
don't really notice it. And when you run an
interactive render, you get a black screen in your read a frame
buffer as well. So to fix this, you can
use the section blends. So it's actually blends
common super handy, where you can orbit
and basic camera and doesn't really all output
a one replaces action plan, go to Tools and click
on Section Plane. And you can place
it on any side. But in our case we need
to place it on this side. So I'm going to call this
section one and press, Okay. Now I need to select
the section plane and more with them. All right. Now when I go back UDL
perspective scene, it will automatically switch off the section plane because we haven't updated
the scene yet. So we need to update the scene
with the section plane on. So let's go back to perspective so you can see the wall comes back to know I need to
go do my acid added o. Go to geometries,
select Section 1, and then switch on
the clipper pen. Once you start on, you can then right-click on the perspective scene
and then click on Add. And then rename this to perspective or
person with section. So now if I scroll out, you can see that we have
a section plane, a plane. So let's go back to
perspective with section. No perspective without section is one where the
wall will show up. So make sure you always
use perspective with detection for the
rest of the course. Embedded renaming scenes. So you guys can go ahead
and tendency in diaspora, what you think works best
with perspective section. Now, I'm going to run in
Tracker window just to see how the latest falling into our
scene from this window. Let's go to Arthurdale
Addo, go to settings. And you know, what I'll
do is I'll switch on RDX, know before age,
gender settings. A quick tip for those who are using or low CPUs and
older graphic gods, you can stick to
the CPU engine mode and also the denial video,
please, no, not genes, these two settings if you're using an
older system because that Endo will not show up in your refund and buffalo and
you'll get a black screen. So always use the CPU mode that we didn't either if you're
using an older system, but if you're using on
your system and you're using the RDA click
graphic God, CDs. You again switch to our dx. And I'm also going
to use and media AAA and the most
important setting and to switch on and Draco julia
enable us to visualize the render and also make
changes in real time. I'm also going to drag update effects to evaporate
so that I can see the related an ICER or played on the render as it progresses. So with these headings on, we want to click on Render
would really interactive. And you can see the
render in the scene. So you can see the
sunlight is falling from, that's a and R. You can see the shadow. And you can also see some later, which is actually the light
from the environment late. So if I go to my settings, go to enlightenment
and switch this off. Can see that this scene
becomes a darker. So the light is coming
from the environment late. And this is the sunlight for, so if I select the sunlight and sisters of the shadows, Gloria. Now the problem is I want
the Enlightenment late to fall from the window and
not from the section plane. So to do that, you can
go to your geometry. You can go to section one and good options and
then switch off effect. So now you can see that the environment is
not going to be falling from the
section plea and sale, but the latest coming
from the actual window. So that's an important setting that you need to keep in mind where after you've
placed the section, you need a switch
off effect length. So I'm gonna go back to my
perspective with section. So this is an NDA,
how it looks with the sunlight and
the enlightenment late, falling from the window. Now these bottles yours because
there's not enough later. So really is unable to sort of calculate the
late bonds in the 0. So once we add an
artificial later, that'll sort those out as well. So this is looking good. So this is the initial
lighting setup. And we'd like to also see
the progress that we made as we add more lanes and
make it more realistic. So I'm going to add it to the
history VFB on the right. So I'll be have a
folder loaded or no, if you unload your own folder, you can hold of options.
We have we settings. And then go to History and click on Enable to enable the history. And then Lord, in our
folder which works for you, I've created a folder
called VFB New, and then I'm going to
select that folder and then click on
Save and Close. Can leave that as to
the settings ises. And then I'm going to add
this to the history VFB. So to show up, you're although the next thing what
you need to do is add a background layer
and had the EXL image to it. So I'm gonna go to my layers
and click on Background. And then I'm going
to load in my file. So click on Open Folder and find this in the exercise
files rule of thirds, and then click on Open. So that's any excitement. It locked you up. You will need to add
it to the foreground. So click on as foreground. And now you can use this to
frame your scene better. General dip in using
rule of thirds is that you get points of interest closer the intersection
of these lines. And it also helps in
keeping your lines straight and clean and
composing and those better. Now before I run
an attractive and don't just call objective
under settings. So let's go to Azure, DO go to Settings. And I'm going to go
to the end output and search on CFR him. So as soon as I
switched on the cfm, you can see these
dark areas here, which indicates
that this board off those SketchUp you wouldn't
get rendered in the scene. So that way we have an
idea of how much in this ghetto abuse getting
rendered as well. So let's go back to acidotic go. We're going to use
emit height of 2000. Since it's LinkedIn, it's going
to change proportionally. And then I'm going to run an
interactive render. Right? There's looking
good. Maybe let me just switch to 2 perspective. You can see a bit of the
slab, your perceptions lab. So I'll have to zoom
into the scene a bit. So let me do adopt this
to the left for dark. Let me just move those bars to the left and right and then
unlock or to the left. And Dr. sketch of butyrate, an old fay scrolling, can see that there's
a little mode, doesn't have to be in the scene. So let's call in a bit more. As soon as the
albedo changes from 2 perspective back
to perspective, but you can always
change it later. I'm also going to use
a field of USA dot d, just to see how that
affects the scene. All right, This looks
good, where I have a point of interest
which is the plan TO, and I will point your
fingers the old Israel, which is our wallet. And then we have a lot
of negative space, which works well for cosine. So I'm going to update
this right-click, click on update or you
can click on add as well. In case you're not
happy with the scene, you can go back to
the original senior. But I'm going to
stick with C in food. And then delete the
perspective of section. You guys can word and also add additionally
multiple scenes. So this is another scene
which you can add. Go to camera 2, perspective, gender field of
view, so to say 25. That would make it
a little too flat, so I'll just stick to 30. Now review the previous year. You can click on previous year. Yeah, this looks better. And then click on. So we have two awesome
scenes that we can work with for learners
to the course, policy in fourth and Scene 5. So this is a benefit of using Section pins where you
don't have to overlap with. The next video, I
will be a distinct relating a bit more and improve the
lighting in our scene. And we also be using VFC Leo's
to improve the lighting. So I'll see you guys
next video shows.
13. Add VFB Layers: Hey guys, welcome back. In this video I'm
going to be adding the VFB Leo's to boost
their major bit more before we are
just delayed for them to open the scene
and click on scene 4. And then we can run
interactive render. So let's go to our
acid Erdogan settings. Let's check if all the
settings look good. And then run an interactive. And so this opens the reading frame
buffer with your Endo. And on the right you'll
find the Layers window. So if it's not seen, you can simply drag
it from the right. So you can notice
that we've already added a background layer. And our dog, you can see
these additional options called the Create Layer, delete selected Leo,
Leo p set and so on. So this works similar to
the layers in Photoshop, where you can add
multiple layers on top and boost the
image for them. So it's also important to know why you're selecting
before you add a layer. For example, I would
selected background and know if a Cu2 plus button
and click on exposure. The exposure layer is
going to be applied on the background and
not on the image. So it's always important to know where you click before
you add the new. So I'm gonna delete that. So let's click on
Display correction and then go to plus button. Yet then idol exposure layer. So now this is going to be
applied to the entire image. And if I increase the exposure, can see that it
brightens up the scene, but also make some areas
of the scene overexposed. So def, fix that. I can use the highlight
bonds and that will get rid of any over-exposed
parts of the render. Also, you can notice
these branches. And that's because really is unable to calculate
the late bonds than 0. But we'll fix that by adding
an artificial lake Lido. I can also boost the contrast just to boost the
sharpness in the skin. So now if I do a
before and after, you can see how much of an
effect that has on your scene, then I'm going to
add a ghost layer. So let's go to the plus button, click on cause, and then click on the bottom left and
drag this to the bottom. This will boost the shadows. If you click on the top rate, the red button there changes
through good handle. And if I drag this to the top, it'll boost the highlights. So now if I switch this
off and switch it on, you can see that it has
that depth in Yad Randall. Similarly, you guys can go ahead and add additional fields. And other personal favorite of mine as the White Balance Layer. So let's add the white
balancing and disallow Buto. Make your scene either cool or warm depending
on your desk. So we'll keep it slightly
towards the cool side. And finally, I can also
add a filmic don't map, which will make your
scene Paris cinematic. But if the effect is too much, you can always reduce the
amount to say 0.3 or 0.2. That works well. And you can also change
the blending mode. So for example, this
is all were eight. So I can change this to
say, for example, screen. I didn't make those in a bit, but I went to the
blending models, the ones similar in
Photoshop where we are multiplying screen Bin
Laden a whole lot more. I generally used screen. So these are the different
layers that we've added, which has definitely had
an impact on your scene. You can also add a lookup table, color balance, hue, saturation, constant, and so on. But the ones which I've added should suffice for our scene. Finally, the video phi are Baidu also has a new feature
called sharpen blow. So select sharpened blow and click on Calculate
sharp and low. So the SSL enabled or LEO. And then you can increase
the sharpness in daughter-in-law to if you
don't decrease it too much. So I don't make it
too unrealistic. So just keep it subtle values. And you'll only be able to see the sharpening effect once
you zoom in and switch it on. Finally, once you
are happy with this, but it's a good
idea at all to see these layers in case you lose them as you progress
through the render. So select Display correction
and then click on Save Preset and call this the
initial color correction. So it would be saved
as a VFB file, which you can then
later loading by simply clicking on the
lordly or triplets it. You can also have
a presets folder where you have
different effects. You can load in any
of those effects. So do enable this, you
need a good options. We have PHP settings
go to Layers. Then Lord, in our
presets folder. So I'm going to create a
folder called presets. And then select the folder
and then save and close. So now if I save this
to the presets folder called those initial color
correction underscore one. It will show up under
the presets here. And if I make any changes, say for example, I
had a lookup table, which is a lot file, and
then load in a flat file, which you can also add in
from the exercise files. I'm going to add this lab
fairly called Sunset Strip. Click on Open. So this
adds to this effect. If it's a little too much,
you can reduce the effect. You can also change
the blending mode. Let's see screen. And now you can see on whichever an
effect that has on the scene. And then we can
save this over to the presets folder
called this sunset by. And if I switch, you can see how it switches from the initial color correction
to the sunset way bilayer. So that's how cool it
is where you can add different presets and then play with those presets in as you progress
with your NGOs. And finally, you can add
this to the history VFB. So I'm going to load back the
initial color correction. So sometimes it shows black and your
thumbnails industry VFB. And this seems to
be a bug from VA which they will be fixing soon. And if you want to
see a before and after between these two renders, all you need to do is
click on the AB button. You're saying a to the
Fatah polio as assigned B0. And then you get this
long vertical line. And you can see the difference
between two random. So you can see that
this view looks much more composed
them, This one. Since we use the section plane, let's say you've
added the VFB layers and now in the next video, go not just delayed a bit more
and set it up for Randall. Since you guys in the
next video shows.
14. Adding Lights: Hey guys, welcome back in
this video and I'll just relate a bit mode in IRC. So before I run
introductory render, Let's check the light settings, which is 50 foreseen
at the moment. So let's go to isolated
or correlates. So you can see that we
have only one layer called the sunlight and it's on. And if I go to Settings,
forgotten vitamin late. We also have the
enviroment late, which is being read from this
environmental scale here. This is also linked to
the sunlight by the way. So you only have two main
daylight systems in our scene. And we're going to use this
to lighten up our scene. So before I change
any other settings, Let's check the shadow
settings as well. So let's zoom out. So you can see that the green
axis pointing this way. And in SketchUp, the green axis always pointed towards the NADH. Now if you want to
change the green axis, you will need to use a
plugin called solar not. So let's go to Extensions. Extension Mattos, and search for this
plugin called solar not. So you can install this
plugin and then open it. Circular view toolbars.
Search for solar. You have to do solar or not. And then Docker,
do your toolbar. So what this does is it
will display the knot in your Sketch View and you
can also change the NADH. So in case you want the
knot to face the side, you can change it by simply clicking here and then
changing the NADH this way. This way you don't have
to change the model. And the Nautilus change
automatically and SketchUp. So in our case, we
will have to change the knot to this direction
so that we can have some Evening Sun falling into the scene and
hitting those so far. So I'm gonna go
to my set naught, click here and set it to 0. Now if I go to View,
click on shadows. You can see that the Evening
Sun is facing this way. And you can see some shadows
falling on the sofa, which should work Bohr
effect for our scene. You will not see
this late TO because the section setting is
going to block that late. So make sure you are
acidotic or go do yours geometry called a section one and switch off effect late. So when this is off, the section will block any late coming from the section
side of the wheel. But what it was going to buzz through the glass material
will fall into the scene. So let's go back to Scene forward and then run an interactive Endo since
you've changed or not. So now you can see
the lighting in the scene, which looks awesome. Now, the lighting looks good, but they're scene looks
a little too dark even after adding
these VFB layers. So we can adjust
the exposure value. So let me just move
this and open the door, go to settings and torture
doctors to the right and left. And then let's go to
the Camera options. So the exposure value set at 14. So if I go to advanced camera, this is the current
exposure value. And as you drag it to the right, the exposure value reduces and
the biodata scene becomes. So if I drag this to the right, you can see that those scene
starts to get write-off. It also makes this part
of the scene overexposed. So we can go back to our exposure and reduce
dilate bronchi bit more. So afford in DDO seen. So a value of around
12 210 works well. So 11.96 or two works well with simply
increases Dinosauria. So I'm going to stop the render. Then add this to
the history VFB. Now you can see that
the shadows are a bit too sharp in the scene. If you want to make
the shadows softer, you can go to your
sunlight settings. And we have something
called the size multiplayer and increase this to say
about five or even 10. And this would make those
shadows softer in your scene. So no effect on
interactive render. You can see that the shadows
are much more software that's added to
the history VFB as well and do a before and after. So you can see holder shadows
change in your scene. So this lading looks really good and should work
well for the scene, but this area seems a
little too overexposed. So what you can do is
let me just scroll out. You can add some large groups with sort of block late and
also enhance the image. And I had a lot of character
in your image as well. So to demonstrate how you
can boost the shadows, I'm just going to
create two objects. So one is going to be a sphere. So I'm going to use the
so-called don't suppress see mucosa local library. And then before I click
again and want to snap it, right acts right axis. And then please also perpendicular
to the first circle. And then to make us feel. Or you can select the spheres. Photograph, follow me, do the intellect, the second phase. So that would make it a sphere. And silica spheres make
it a group and delete. So now we have a perfect
sphere or a ball. Make this a group. And then I'll make another
rectangle, the sphere. Push this out. We can use this to demonstrate how layering works in
3D and how you can use with groups and objects to boost the shadows and add
character in your scene. So the first thing
what you need to do is run in fact to render. And we maybe go to
the other side. Or maybe you just switch
off the sunlight for now, we can use the
environment late as well. All right, so now
you can see that the shadows are software. And if I make this sort
of black in color, Let's go to Materials
and then silicon. And use the black color that would boost the
shadows even more. So if I stopped at
Endo and run it again, you can see that the
shadows change quite a lot. So this way, you can
use these objects in our scene and boost
the shadows and add some depth and character
in our images. Also, if you do not want to see this material in the render, what you can do is we
select this material. Let me add the address property. Go to the previous property
and switch off visible to camera and visible
reflections and refractions. So this year, spread on
interactive render again. You can see that
it still shows up, but all you need to do is select the material and then
enter the group. And doing say the group, and then apply it to the inside as it says along as you apply the material to the backside
and the insight phase. And then if you run
interactive render, you can see the shadows remain
and the group goes away. So you're going to
use the same group in our Indio scene and then
boost the shadows a bit more. So let's stop the render. Let's go back to
our in DDO scene. And let's create our
large rectangles. So I'm going to create
one rectangle this way. And then I'm going to create
another rectangle this way. I'm also going to switch off the section plane for now
just to adjust these groups. And then I'm going
to rotate this such that I don't block any sunlight since the
latest hauling the Sioux. And we did this as well. An extended this way, using the section line
smoothly, this as well. All right, and then we need
our dust though materials. We can also delete this figure. And then we can also add
a plane at the bottom. Just so that the light
bounces off the spleen, select the spline, make it a group and move
it down a bit. And now we can apply that
material to these groups. So let's go to our acylated go. Let's create our
genetic material. And let's rename this
a underscore black. Let's add the
readdress property. So let's click on the Add attribute and click on
re-entry is property. And such are visible to camera
and also reflections and refractions so that the group doesn't reflect on
the glass median. So now we're going to apply this material on these groups. So until the group I'll
play the material, make sure it's a blade
inside and outside. Similarly, this group as well. We can leave the plane
medial as-is and change it later
because it is going to sort of bounce off
the late even if it's a default material
or late and no, let's go back to Scene forward. Let's open the PDF frame buffer. Let's Lord, in our
previous window. So there's our previous
Endo that's run in tractor lender that's added
to this reviewer three. And let's do a before and after. So you can see the depth that
it creates in the scene, sort of makes the scene a bit darker and it's not too great. What we can also do is let's deactivate the
section plane again. What we can also do is
sort of block delay TO. So I'm going to
make an additional rectangular because a group
and then push it out. Select this and then apply it to the inside and outside
and make it a group. And now let's go
back to perspective, scene for datas and an
interactive render. And I'm going to dock
this to the left. And dark mosquito pupae. Get rid of the VFB layers for
now and the default tree. And then I'm going to lock
the camera orientation. So you can click on Lock
camera orientation. This way fatal
date and sketch up ruling effect of
VD frame buffer. And then we can not just
these groups for those well, so for example, if I move this closer, see how much of an effect
it has on the scene. So it sort of makes it black. Don't know if I delete
this or sort of hate it. The scene becomes
brighter instantly. But this sort of
adds that character and depth in your
render because it makes the scene darker and also the shadows solid sharper. So you can see as I move this up and made to seem
completely dark, skin more down a bit. And this is looking
good for our scene. So let's stop the render and then add it to those two VFB. Finally, what I'll also
do is sort of added 30 so we can add some shadows
in say, the living. So let's go to chaos Cosmos. You do need to have an
active Internet connection to access gas cosmos, and then go to 3D models,
vegetation, groceries. And let's add any big
tree into the scene. You can auto update the gas Kosmo lay reader and it'll
update in the background. So I'm going to add those
American beech tree, download it and load it in. Now if this arrow shows up, you can simply close chaos
cosmos and then open it back up and then try again,
and then PepsiCo. So let's see how the Diaz
and effect in our scene. So let's run interactive
render again. That's locked the
camera orientation. And let's play with
the tree, the stamp. So I'm going to
put on top a bit. So this instantly makes
the scene darker. So let's move the three down. You can also clear the trees rather than groups if you like. All right, looking
good. Finally, I can adjust the
exposures are a bit, maybe increase the exposure
a little too dark. And then do Tyler points. All right, great. Now you don't have to worry
about these bottom 0. We're going to fix
that. Here, DO once we add artificial lights. And finally our
distributors to VFB. Now if you want your
history VFB dominated we seen you may have to switch
off the layer presets. It seems to be a bug with 3D, but hopefully in the future
updates they will fix that. In the next video, we'll add
some artificial lights in our scene and finish the lighting for us and
see you guys next video.
15. Add Artificial Lights: Hey guys, welcome back. In this video, we're going to add some artificial lights in our scene and then sort of make the lighting
nothing better. And also use this awesome
new feature called the Late mixture for that
just a late in 3D. Although to start off,
I'm going to place some filler lights in our scene. So generally you have
different kinds of lighting systems that
laid out your scene. And it varies from
scene to scene. But if it's an interior scene and if it's a delayed setup, we generally have the
delayed coming in and then we can add some
artificial late as well. So there are different kinds of artificial lights that
you're going to add. One is the filler layer, one is the ambient light, for example, the main
late in your scene. And other adults can
be smaller late, like say for example, your lamb plate and
a whole lot more. But in this scene
we just need to have filler lights coming
in from the CTO CIO, and that would suffice
for the scene. I had the rectangular
late for us. So click on rectangle
and then play a surgery. And then we can place
another late here as well. So once you've placed your late, you can go to your Asset
Editor, correlates. Let's rename the first layer called the squatter,
those filler layer. And the second late,
too convenient this to kitchen filament. So this is actually
a kitchen space and the latest gonna be falling from the kitchen
into the living. Now we can adjust
these late settings. So let's go to Azure
Datadog or relates to go to Colorado for late and
open. So late settings. So the main two options
is that you need to go to Options and switch off invisible so the source
doesn't show up. And then you can also change the direction idea
of the late so that the later not
being disposed up their swords but
Dido is falling. More doors, the grounded,
more data distance, some water for
spotlight, some loading. It's called a kitchen for late. Switch off invisible, and then change the
direction of the light. You can go ahead and
switch off collections. If you don't want
the affiliate to affect any glass
material in your scene. And I'm not going
to adjust these battery does the
job because we're going to use the late mix
to adjust these parameters. So go to render element and then add a late mix and element. And this will help you. I'd just delayed within
the 3D frame buffer. And it's super powerful to create different kinds of
lighting setups in your scene. So I wanted to
group by instances. So what this means is that
if you have a set of le'ts, say for example, a
set of Don late, and they are the same component. So instead of adjusting each of those layers
individually, you can group them
as an instance. And if you are just one, it
would affect others as well. All right, and let's
check the settings. Let's go to Scene forth. Or maybe even seen
fade the stain, and then run interactive render. What I'll also do is
these materials are sort of distracting at the moment since you are just in the late. So if you want to clear modeled endl can start the render, go to Settings, go to material
or aid and switch design. So it's going to update all the materials with this key color. And it's important that we exclude the glass from
this material over eight. So let's select the
glass material, use the bucket tool and
use the sample beam. And select the glass material. And then go to the bottom where you'd see can be ordered
to switch this off. And now it'll show up in
your clear and ozone. So let's go back to C15 and
then run interactive render. And that's an O. You can see
the lading Fredonia scene. So let's go to Source late mix. And let's switch
off all the lights. So this would of course
make your late dark. And let's start
switching on one-by-one. So let's switch on the
Colorado for late. So the latent coming
from the quadrotor, Let's change the color. Maybe let's make
it sort of warm. So we have a mix of
warm and cool colors which makes it
look nice as well. And then let's switch
on the kitchen, Philip. Now this is a little too bright, so we can reduce
the kitchen Philae late in density by
dragging the slider down and then changing the
color Eurozone, make it one. Then we can switch
on the sunlight, which is this nice
lighting your, and then we can switch
on the enlightenment. So this is how we've
eliminated our scene. I can also notice that sort of overlapping with
those lobules. So I need to start. So let me just use the
hand tool and just that. Now that should
work. So I click a bit and that's lab goes away.
So this is Bohr effect. The lighting looks good
and we are ready to go. So if I switch off
these two layouts, you can see that this area
is a little too dark. But with these ladies on, it adds that extra
ambiance in your Cenozoic. And this should work well for
us in, so let's stop there. Let's add this to this to VFB. I'm also going to movies
warlord to the right of it because it wasn't really sitting in the
center of the scene. And that should be fine. All right, and now I can
go to my acetonitrile, go to settings such
off material or aid, and then run interactive render. The lighting looks
perfect for our scene. Now if you want to see it
this late mix settings, all you need those, click on Save and
call this DLA setup. And click on Save. Now if you want to
make this render solid for nato window, we can do data key
within the radio, FM, but who without having to adjusting the weights
in the model. So I'm gonna switch
out the sunlight. And then I can turn them vitamin later to make it sort
of bluish and outside. And I can also reduce the
environment late effect. And then I can turn the kitchen Philip and reduce the values
of the origin little bit. Make this a bit darker. And now we have sorted
for neutrinos red. So you can see that there's ope. Call this name setup. So that's awesome glitters to sort of change the
lighting setup in your scene. And then load the DLA set up. All you need to do
is click on load. And then Lord, in
the daylight setup. Although it's an old too
late setup in our scene, we're going to further
adjust though materials, add some additional
models of regret, and then set it up
for our final end. We also want to remove
this blanket job because it's sort of
floating and spears. And we just don't know so far about a flooring
and all lot. See you guys next video shows.
16. Add Chaos Cosmos Materials: Hey guys, welcome
back. In this video, we're going to add some
details into our scene. Now, if you have a
really good system, you can run in Blackboard Endo and then add though materials, do the scene as that
in fact, Orlando's on. But if you ever slower system, I would recommend don't do
Bernard on interactive render. Now since my system
is a little decent, I will run interactive render. So let's go to oscillate ago. Auto settings. Let's check them
tracker settings. Then it looks good and
then run intact or Endo. All right, So this is DDO scene. So what I do is locked
door camera orientation. So let's go to the Settings and click on
Lock camera orientation. So this way, if a more what
I'm going to sketch up, it's not going to affect my render and then I can
add my materials as well. So I'm going to dock this to
the left-hand Dr. SketchUp. And the material that I want to add is of course, the flooring. So I'm going to add it from
the chaos Casals materials. So let's open cows cosmos. Let's go to Materials. And then we have wood floating. So you guys can go
ahead and select any floating material
that you like. I'm going to try going for the late Bucky and
Chevron materials. So download this and then import it and do
your Asset Editor. So once you import
it, you need to then open door Material Editor. Quarter materials. The name of that material
was called bargain. So if you scroll on
your phone, cop PACU, and then with this
medium centigrade, you can enter the group, use the bucket tool, then
I'll play the Medea. Know if it doesn't show
up in the interactive. All you need to do as
it under indigo again, sort of stopped it Endo,
go to Scene forward. And then unbind factor again. So now you can see
the bucket floating, which sits well in the scene. We can also add an accent
color for the wall. So let's go back to Cosmos. Let's go to Wall, the stem. So it has wall, stucco, plaster weight plus the regular Let's see if there's any other
material that we can use. We can also do this brickwall and what kind of an effect
it has on the scene. So I'm going to download this
and then added to acid and ago and stopped and window. Select brick wall
and then a blade. Do your scene. Also, please note that when
you assign this material, it comes in the correct scale. And that's the best part of all these chaos cosmos materials. So it's mentioned as
250 centimeters 0. If I go to Edit, you can see
that it's at 2500 element, which is the grade scale. All right, so let's run
interactive render again. And you can see this cool brick wall texture and
the Indian scene. I don't really like
this brick wall because it's a little
too much for the scene. So I'm going to change this and say Do this
brickwall stone. Select the ugliest on material. And that this group. And
I played on the group. So now let's see
how it looks with the ugliest on material a blade. So you can see
that it comes with those 3D geometry and
a whole lot more. You can also check
the settings of these materials and Leeuwenhoek medallions are made in 3D. It has in improving
your lenders as well. You can see that
it just comes with the bump and it looks pretty decent in the scene as
a bumper normal map. Well, let's I think I'm going
to just stick the weight because weight and Miocene and for large one is
going to disagree. Media would look a little too
or bubbling in the space. So I'm just going to go to my walls and the select
Wald's takeaway. And then I'm gonna play
one stock or wait and see. Yeah, like those walls
takeaway which sits well in the scene
and at great extra, has that nice texture filling in the scene as a late next, what I'll do is I can adjust
those so far texture. So let me just select
this material using the sample paint
for Asset Editor. And then I'm going
to copy this extra, which comes with this material. I'm going to add a
3D medial and be asked to do the diffuser. And then I want to go to court and then apply some Gore demoed. I'm also going to
change the preview two fabrics or less
chances to fabric. And then let me produce the glossiness a
bit more dire wife. So the court will help
you create sort of that sheen and cold effect
on your fabric material. And then I also need to
add or fall off map. So I'm going to click Hold it up and scroll down and you'll
find the fall off my bureau. So in fabric materials generally when you
notice you will find that the edges are sort of
blades go down the bad genes. So what we need to do is copy this and then be S22 Kenobi. And then endocardial B. And we can include that again, your decision maker Plato. What do we need to do is sort
of make this extra albedo, which will make that
just broke down. So if I go back, I can see
that the edges are Breda and I can also make this
main textual darker. So let's reduce it again. So now we have sort of a
fabric feel in the middle. So that's the fabric material. I can increase the size of
this a little bit more. Control arm. Who will scale it
uniformly from the center. And if you want to
change the kiosk osmoles model materials will have watch these medians
and you're acidotic. So if I go to gas cosmos,
go to geometries. You can see that we have
this decorator word. You need to click
on Merge and then you'll get an option to change
the materials if you like. But generally GasGas, most models come
with materials which are preloaded and proper
in for the scene as well. So let's turn to
interact with Endo. See how the fabric
material changes. Can reduce the exposure
a bit if it's a little too Great. All right,
that looks good. And then we can add this
to their studio FB. Now you're going nor does that
DO edges of these fabrics. I've Plato, immediate
relief fabric material. So fall off map heads and
creating that fabric metadata. You can also adjust
this material yet. So let's select this material. It doesn't have any deflection, so we can add video
material and then go to reflection and sort of
increase the metallic pattern. We don't release
the glossiness a bit and increase the
reflection color. And that should work with. So let's go back, proceed forward, run interactive render. And now you can see that
the metanephric shows up. What I'll also do is I just
don't know these edges. So that the highlights are seen on the edge of this median. And also I'll play the middle. So let's go to our
own corner, plugin. Select the rounding off, change the offset to I don't do MM. And then round it off. Once you round off you laughter, delete that didn't save face. So now if I go back to acidotic go maybe I can increase the
glossiness a bit more. Make it sort of dark zone. And then run n factor Endo. And this looks much better. Now I can use the same media for the door, but I duplicate it. So if I click duplicate and rename this called
this balcony door, and then reduce the
reflection a bit. Then lossiness Islam, and then apply it to
the door materials. So enter the group, select your door frame and apply them. It's always a good idea
to enter and select all the faces and
edges and not a blade directly on
the group so that your UVs are played
correctly as well. There's also select this door
group and is mod n Now bit. Nutshell, it's a face. So let's go back to Scene 4. Now, if you want to see
the black material, you're not their visit external
powders go to acylated, go scroll down and go to
binding to John binding. And change the texture
mode to custom mode. And you can add our color wheel. So this wouldn't make
it back to that color. You can also add a
material this year. Just clear this and
then add a bitmap. But scholarships or face late. Now let's go back
to Scene folder on interactive render and
see how that looks. Looking good. All the
materials look Well as well. Let's check the scene, faith. And this scene looks
good as well. Awesome. In the next video, I will
adjust the rug in our scene and add some 3d4 and generic
term for this median. So I'll see you guys next video.
17. Add Vray Fur to Rug: Hey guys, welcome back.
In this video we're going to add four drug. You're mostly going to delete this blank video because it's sort of
floating and spears. Or maybe it's just hide it for the scene five inches
shorter than scene 4. So annotate this year and I'm Peters and assured
foreseen for all right. So to start off, I'm just going to zoom into the rug a bit. So there we can see
what's happening. And then create a temporary
these interact click Add. And then what I'll do is I'll add the reader for
company to-dos route. So we're going to select
the rock and then click on Add to selection, but it's sort of grayed out. And one of the reasons
why it's grayed out, or sometimes if a
group is nested within another group,
it wouldn't work. So water lowers
until this group. Then you can see
that this group is actually nested
in another group. So if I go to Outline
window and see that this group is in another group. So I will need to right-click
and click on explored. And no facilities group. I can add 4 to selection. So I've added four to selection. We can not just the
properties of this. So let's go to Oscillator. Let's go to the geometries, and let's go to four. So these are the four settings which comes default with 3A4. Let's zoom in a bit and then run interactive render
and see how it looks. Right, That's
toggles to the left and sketch out butyrate
and zoom out a bit. All right, so now you can see that the fluid is being played, but we need to obviously
adjust the values of this 4 first Carlo. So you can see that the
length is about four inches. These values, you're actually correspond to the inch
unit in SketchUp. So forward means four inches. So I'm gonna change this
to say 0.6.6 looks good, but then you'll have to
obviously increase the density. And we also need to reduce
the thickness of this. So you can see that
the bases a little boutique and seems unrealistic. So I'm going to change the
thickness to say 0.01. All right, so those
are thin strands, which is what we need for four. And then we can
increase the cone. To say it, then 10 seems less as well as change
the distribution to both pairs so that it is calculating for band
diaphysis of the rock. Now you can hardly see
it because it's only 10. For xanthine dialogue. To change it to say
about ten hundred. Ten hundred also seems less. So let's stick to
poor area because it'll calculate boy area
which is 40 square feet. And let's change this to a 100, 100, 100 seems to have done the trick for us in
the scene and zoom in. So you can see the Fazio, let's say even do wonder. So it's a little more depth.
Alright, that looks good. And let's play with
other values as well. So what that does is that
as you increase the value, the strand gets denied the upper side and it
gets ticker the base. So we can maybe reduce the deeper a bit so that it remains uniform
from the base to the top. Gravity, of course gone
towards the force that pulls the four strands don't
along the z directions. So it's always a good idea
to keep it at a minus value. Because if you keep it at 0, then all the strands
would be pointing up. Ben controls that
elasticity of the firm. So it's always good idea
to increase the band. And this would reduce the number of split lanes in your forward. And then it would also
bend for the surroundings. And the greater the value
it causes the strands to bend under the influence
of the gravity parameter. So you can see that it
sort of bent or bit more. And the global scale
would increase the entire size of the photo, but we can keep it for now. I point since it's
starting to look good. And not of course, means that the force would
get knotted details. So you get a good idea to keep five to six or
seven for the seed, then we have variance. So brilliant helps in getting
randomness in the fall and also increasing the randomness
in the fourth geometry. So we can increase the direction
and increase the length. Thickness can be reduced with the gravity can
be reduced as well. So the value ranges
from 0.62.27. And it ranges between
these values on top to this value similar
to how scattered who works. We also have goals. Now if you enable this, it will add cause to the four. So the cold area specifies the radius of an
individual cold. So if you increase this, then each coil will start
changing based on the radius, which is about 0.2 inches. You can also increase the number of calls for each strand. So you can see that this is
the coil that's happening. So let's leave. It goes off because you don't
really need it for drug. It works better for grass
scenes and 3D Class. Level of detail when enabled
will help we regenerate less for geometry
depending on the distance. So up to a certain
distance of photo will be generated fade way the user. After that, the reader
will decrease the density. And this helps in that
Endo performance as well. Now if you want to
apply another material, you can switch on
material and then Lord in another material for
your, for geometry. All right, so this ODE
looks from a distance. Let's zoom out a bit more. We could maybe increased
the thickness a bit more. Let's say 300 or the
county area that is 300. And now we have a nice thick for rug in our scene. So
let's stop there. Really attractive. So
spectrum interactive. All right, It is growing and the thickness seem to
be a little too much. So let me just change
the thickness again. Let's say boo to 25. This looks much better and
much more realistic as well. I agree. So the VRef 0, which you up
once we do a forecast Endo, which we will be doing in their final end
of this workshop. In the next video, we will set up the scene for a final render, add some land elements, and then I'll show you how
to change the colors of the software and a whole lot more within the
video frame buffer. So I'll see you guys next video.
18. Add Render Elements in Scene: Hey guys, welcome back. In this video,
we're going to add somebody and elements
in our scene so that we can tune
to the gallows even after a bird and is done. So what it does
do a bucket tool. I agree the bucket tool
and then click on sand would have been and
then select this menu. So the first thing what I
needed was admittedly ladies, so let's go to acid Datadog
and do outer medulla. You can click your and at the bottom and find an option
called metta, you lady. So once you add them, I do lady. It's also good audio
to give an ID number. So I'm going to start with one year and then close
the default rate. Similarly, I can also
add material ID for the floating in case I want
to change the floating color, agenda floating material.
So if you like. So select the material
and then simply UDL related and make sure
to give on number of two. To go into material IDs. We can also assign
this floating material to skirting your
siliceous material. And I played Louis
coding as well. And then go do your Asiago
coded and elements. Right-click and click on
material ID column. No. You can also add an
additional render element called a crypto Matte mask, which Isla San Carlos, automatically to various
materials in our scene. Now if you want to select
the garden material in GIS, for example, in Scene forward, if you want to change
the background, you'll have to assign an object ID to the
Gordon material. So I'm gonna select
these two codons, right-click called a query object ID selection
and click on Set. So I'm gonna give an
object ID of one. And then go back to the acidotic go and add an object ID as well. Finally, we need a
materiality follow glass material as
well so that we can select the glass
material later. So let's add the medullary and give the material
number as three. And we can also assign a
material for the door frame. So I remedy that ID and give
them material ID as fourth. So now let's go back to Scene
4 and unattractive render. And now if I click here, you can see that we have
these videos and elements. And the jury can
lead to then use. In the post-production process. We can also add a vendor ID to the wall in case you wanted
to in the water column. Let's hold the render looks good and the only adjustment
which I'm gonna do is remote this fabric
because there's a gap here and it's going
to look unrealistic. Or we can also select
this and move it down. Rotate it more down. All
right, that looks fine. So please do it correctly. And now if I go back to see in forward and run
interactive render, the fabric sit on the sofa. And I don't really like
this in your plan too much, so I'm going to change that. So let's go to chaos Cosmos. Let's go to 3D models, vegetation and indoor plants. And, um, we'll
download and bring in this article palm model. And then we can also
scale this up a bit. I'm going to go back to Scene
for fun interactive render. And this looks much better
than the previous plan. Let's all, one last thing. What I do is I like to see
more than so far on the left. So sort of zoom, sort of orbital two bit. So I can split them,
DO living room. And then zoom in. And then use the Zoom Booleans
and zoom in a bit. And also use the band
bool can see rubric of the roof. And
then right-click. They always add a scene because I can always see the difference
between the two scenes. So this is the new
updated scene. It's also a good idea to
play object ID to the plant. So I'm going to
select both of them, make it a group like click, Go to read object ID, Select and click on Set and
select an object ID of two. So now let's go back
to see in seven to the financing and then render would really enjoy. All
right, there's looking good. Finally, what I'll
do as sort of check all the materials and the models and see if they're
sitting in perfectly. So select this model, select the BS, and make sure
there's touching the ground. Similarly, the studio as well. Sure that there isn't any gaps between the
fluid and the stool. And we can also don't
know these edges. And then set it up
for our final render. So let's go to settings. Let's switchover interactive
and switch to the 3D and an ISO for the final
production render and update effects at the end. And then go there and output and change this to 4 thousand, which will be off forget endo
with the settings in place. And we're going to click the Render button we
had for that end, auto-complete and come
back once Brenda was done. In the next video,
I'll show how to use the 3D layers and the composite Leodes to post an
image in media. Will see you guys next video.
19. Post Production in VFB: Hey guys, welcome back. As
you can see that those done. So I'm gonna switch
off the background because I don't need
those lines anymore. And then render looks
really need for good Endo. You can see that the dealers
were lower drug looks nice. Guard your looks nice. Everything looks to be decent. Now let's check how long
the standard group. So we can go to stamp
Julio and you can see there that Endo damp
make it was two hours, 41 minutes and eight seconds. That's quite a lot. And domes are rendered
name folder for QA window. So I guess I would
have to upgrade my system in case I need to create production
during those four clans. Certainly for glands you do
need to make for good Endo. And depends on the
client as well. If it's a real estate project, definitely your forget window. And you can charge about
250 dollars and above. Bees will not charge less than that because you're spending a lot of time in the software
and learning new skills. And it helps in charging
more for your clients, especially if you can get nice
render results like this. All right, so I'm going to
set this out before I start the post-production in
the video frame buffer. So i'm, I'm going to
click and hold and then click on Save Image
Analysis API files. And I'm going to call this final and give a number
and then click on Save. So now it's going to
take some time to save. Although it's saved, and it's also saved that
end elements as well. And we can go ahead and use
this later in Photoshop. But now we're going to do some post-production Within
the reading frame buffer. So I'm going to go
to my source light mix and I'm going to change
the late setup a bit. So you can see there's too
much later on the sofa. So I'm gonna use the
Goddard or filled late. And I'm also going to
reduce the kitchen late. Now that looks better
because you can see there was too much of
a focus on Disulfiram. And I'm also going to say, well, the image with the
environment laid off this way I can add a
background to the image. So I'm gonna see if this
out and I'm going to click and click on Save
Garden channel only. And I'm going to
call this without background and click on save. This way I can easily add up, back down to the random. So let's subtract our
environment late. We can reduce the
environment later bit. So this way you can see then vitamin DO and we can
see it this out as well. Although now comes the fun part. Where we can go ahead
and change the colors of our fabrics and a whole
lot more fasting. Or you can do is add this to the distributor FB,
so it shows up yo, and it shows up with the
diamonds. Next one I lose. I'll go to source light mix
and click onto competent. This will load, although late mix layers separately
on top of each other. Now we can go ahead and
change some of the Medusa. So to change materials, what you can do is first
you need to add a folder. So click on the plus button
and click on a folder, and then drag this fall on top. Now, you can only
apply layers and masks to a folder in this
VFB Leo window. So you can right-click on
the folder called a new layer and then click
on Crypto Map mask. So now I need to pick the
material that I need. So I'm going to click on here and I'm going to
select the material. So it's added that mask. Now if I click on Show Previous. So now you can see that we
selected this. Similarly. We can go ahead and select, although I DO so
far, models as well. So now if I click on Show
Preview and selected, you can see that you
selected most of it. We have this as well. And now we can change the color. So the agenda cholera, all you need to do is right-click go to New Layer and click
on Color Balance. So this will be added
into this folder. And over change
the Sian gallery. You can see that we can start with genes, the Carlota so far. How cool is that? You can also change
the blending mode. For example, multiply. You can also increase the
exposure of the software. So I click on the full logo, do new layer, and
click on exposure. And are you can
increase the exposure. This would make the OR
so far kind of darker. And it looks neat as well. So that's OUT and the color
of any material similarly, you can change the color
of the wall as well. So the first thing what you
need to do is add a folder. Drag the full on top. If I click on the full logo to New Layer and click
on crypto Matte mask. And then you need a big ball. Check if you selected
the wall, we have. And then simply rapidly
cooled a new layer. And you can use
the color balance. You can also use the
use saturation layer. So you can change the
color this way as well. And then once you're
happy with this, you can click on save
and see what option. Same goes for the
Florida as well. So I can add another full load. I click new layer, go to
folder, digress on top. I click on the foreleg
old and new layer, click on crypto Matte mask and
select the floor material. Now, let's see if we selected the floor material.
Yes, we have. And I click on the for loop
or a new layer and click on hue saturation and you can change the color
of the Florida zone. So generally, it's a good idea not to use use saturation for the floor so you can add
the color balance as well. And play with the shadows. Now we have a darker floor. You can right-click on the
diluted bringing back to 0. Or you can also right-click on the four logo, the new layer. Click on the Close layer. And then you can either booster flawed or you can make a darker for boosting the contrast. You can unhide these layers
just to see how it looks. And you can also
add this to the Leo please it so if I click on Save, we can call this option one. And then it shows up here
so I can switch between the radius options
are good with that. So I'm gonna switch off
these layers for now. You can also edit end element. So right-click, go to New Layer. Click on an element of
this is an RGB layer, which is simply an
layer added on top of the existing main layer. And you can also reduce the sort of intensity
it has on the scene. So you can see
that sort of makes the scene Baidu,
which looks names. And you can also change
the blending mode. So let's say you change
it to screen and that wouldn't make the
image a little black dot. Similarly, you can add goes. Let's say you want to boost
the window reflections. You can add goes. And you can also
drag this go on top. And then right-click on the go, go to New Layer, click
on crypto Matte mask. The mask which you want to play the chords to select
this glass here. That's short object. And select this class
here at as well. So we are, the
glass is selected. And then all you need to
do is go to Properties. Click on the bottom left,
and then you can boost the reflections in the Oregon
law. How cool is that? So you can do a lot
with COVID, Leodes, and it's above all dual and you can almost replace
Photoshop as well. Now in the next video, I'll show you how to add see
on the beach in our scene. And we're going to use
the masks which we sailed to add in our background. So this is our final
render in the GFP. So click on save and
call this final grades. I went ahead and render those thin as well. And
this looks nice. And L2 understood the later bit to reduce the
sunlight since it was a little too overexposed and also increase the
exposure a bit. So you can see that that has quite an effect
in the scene. And then finally, I
can see it dissolve. Now the best part
about these presets is that you can follow off
your Endo and any scene. That's when it helps to create. But he said CR and hadn't choose here a lot of
time in the future as well. But am I be with Xander
and I see it at all. And then finally
added to the history VFB and the David Duke for
this renders 38 minutes. There's a 1920 by 1080 Randall. So took half the
time compared to the foregut endoderm, right? So on the next video we'll do some final post-production in Photoshop and bring those
workshop group loss. So and so you've
got the next video.
20. Post Production in Photoshop: Hey guys, welcome
back. In this video, we're going to do some
additional post-production in Photoshop and total sure. Beach outside the living room. So let's Lord in R&D elements and finally, lender as well. So go to File scripts and click
on load files into stack. This will had been loading their majors as layers in
one fail in Photoshop. So let's click on browse. And let's select both
and in our scene. So the effects result
of the final render. And we can then go ahead
and add additional late. So we can add the kitchen
late daddy material ID. The quadrotor filler late. To be nicer if required
without background, of course. The final render, we can also add the crypto
Matt mosques. And then click on Okay. And then click on, Okay. Now it will start loading in
those images layer by layer. Lead to reload it in our layers. And we can just bring
the final image on top. And we can also bring in the
material ID layers on top. Diplomat layers, game
come in with mass so we can group these and
just hide it for now. And we can bring these
layers on top as well. So if you want to
add more later, so for example, this, this kitchen food-related
layer or you can do is change this dual screen and then added on top of the layer stack. And then you can
see that it runs upto end or similar for Yard caught it or
for later as well. If I move this on top and change this to a screen
that would Raven up door. So that's one way to
brighten up your render. And also, once you break open
these up, Let's group them. And then you can
reduce the opacity in case you're going to do
much later in your scene. Now let's add in the image that we're going to
add as the background. So we can drag this
into the scene. This video. We're going to
place it behind us. And I'm sort of include the sales and know what I
needed was I need to go to my Madrid idea where it
was all of them click on a doula to show
only this layer. And then I'm going
to select the green. Now if it doesn't select because you're not
in the active layer. So press Control D, then
select them active layer, and then select the green. And then press your
able to celebrate that. And then go back to
the sea sand layer and click on Layer Mask. So that would add a mask. No field things done orders that if I
drag this mask null, it will drag the Doppler
and not the actual mask. What we needed was
what it was that on top of this layer
we need a lock it. So I'm going to press Control Z. And then I'm going
to select this group and click on Lock. So now if I try to move,
it wouldn't really move, but it would move
the bottom layer. So in that case I'm going to lock the bottom layer as well. And now if I click on this link, it'll select this sea sand, Leo and in photo
it'll move it and see that door and
they unmask moles, that's not what they
want, they just want only the image and so to move. So all you need to do
is unlink the mask. And all of you more, you
can see that you can move an image to one
or more down a bit. I'm also going to
increase the scale. Then there's alert. So you have the holidays
and some it on. So good area to change
the orientation of the AutoZone so you
can change it this year. I'm just pressing Control
D and then holding Control on my keyboard and tending the autos and lameness. We're sort of
distorting the image. But it helped annoying
rather autos and lameness. Or you can just leave
it as is because generally or rather lame as sort of street and most images. So I want to keep below that. And I'm also going to add
this to the codons UAA. So let's go to the
coordinates layer. Select the quadrants. If there's any red
in your scene, what you can do is you
can go to channels, switch off the green, make
sure you read those on, and then Control click. And then you would
select the red channel and select everything
and sadism. So now let's go back to Leo's, then Alt and click on ODU again just to see
them and our WACC. And then go back to
the image or select the mask layer and do a blade
this mask on this image, all you need to do is
be ended with weight. So you can see that
the foreground is black and the
background is weight. So do I play the foreground? You can press Control Backspace, and then that would
upload your foreground. It's obviously you don't really need to apply for
the embryo Gordon. We don't have to update your. So what I'll do is I'll
use the brush tool and I'll switch to black. And then I will simply
be intos out also, you can see that it goes away. The more European. I can also switch back to the and I can use a soft brush just to be entered under weight. But at the end that shows the background
that way as well. Finally, what I'll do is I'll go to the background
layer and change this to multiply so you can see the
background and then you can reduce the opacity of the year. So now we can see
sort of a background which sits well in the scene. Don't give it too
much of an opacity because that would make
that Endo, unrealistic. So just to see that
horizon lender who works perfect or late. Finally, what I'll
do is I'll add some adjustments
to my main layer. So if you want to adjust this, you'll have to unlock the layer. Right-click and click on Convert to Smart Object
and then go to Filter, click on camera raw filter, and increase the exposure a bit. Contrast highlights a bit. Shadows as well, can reduce the blacks if you want
to see more shadows. And then if I scroll
down water affects, get an option called vignetting. So you can sort of
decrease this to give that vignette
effect, which looks cool. And there are some
additional options which you can play with. Maybe I can do the
sharpening a bit more, reduced the noise. You can see that, that reduces the noise but also
loses some details. But it looks fine. Turnover Bezos get applied to the scene and I
can see your before and after. Let perfect. So this is our final render. And one last thing what I do is also add a chromatic aberration. Just to see that
Chromatic Aberration, which you can see in most
photographs as well. So go to Fill, click
on Lens Correction, and go to Custom. And then yo you can
increase the fixed radius. So if there's a woman and
then reduce these values, you can see that chromatic
edge on the sulfur. That's pretty cool. And I can add this to
the effect as well. Let's do the final render. Let's say a result
would a File Save As, click on save as copy, and save it as a JPEG. If you're on a
loaded on a website or if you're on a
printed as well. And I'm going to call this the final boss, produce random. Now if you want to
play the same effects on the other end as well, Let's open the agenda, which is final do let's
move this to our scene. Now this is a 1920
by 1080 Dando. So this way, seeing it as a
smaller image, forget Endo. And then if you want to apply
this to this object here, all you need to right-click, click on Convert
to Smart Object, and then press Alt
on your keyboard, and then upload to
your mind object. Similarly, the camera
off it goes one. And now you can see that we've boosted this image as written. And then to see a result, only need to do is go to fail. Sierras, cmos copy. And then here there's a chip. So these are the
final two renders that we were able to
create in this workshop. How cool is that? So I hope you guys found his
workshop useful. I will be adding a
lot more content and courses if you like
the workshop so far, please do leave a review. If you found this course
useful and steady on the full, a lot more workshops and
tutorials coming away. See you guys on the flip side. Digger, just
 Manish Paul Simon, Architect | 3D Artist | BIM Expert