Transcripts
1. Course Introduction: Hi there. My name is Sean
Fowler and I've been a professional 3D artists and the freelance industry
for over ten years. And I'm thrilled to talk to
you about my newest course, learn 3D texturing and
Substance Painter, all levels. Comprehensive guide in
not only to learning but practicing in honing those developed skills
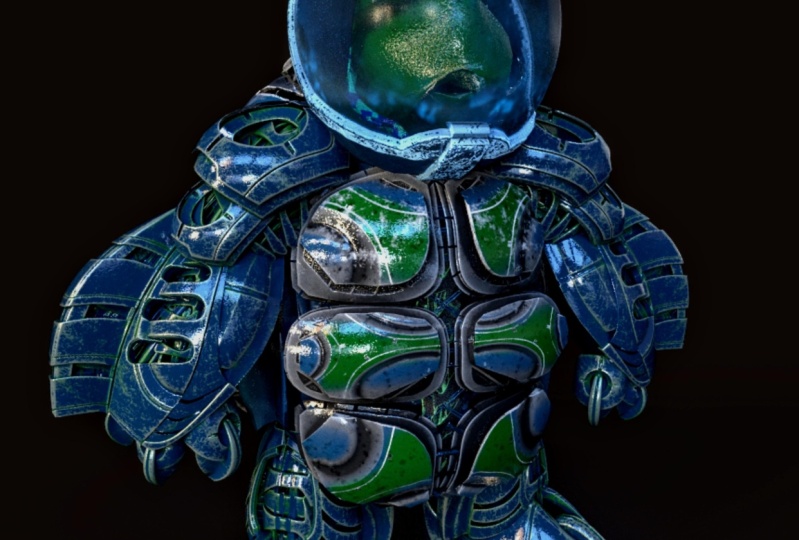
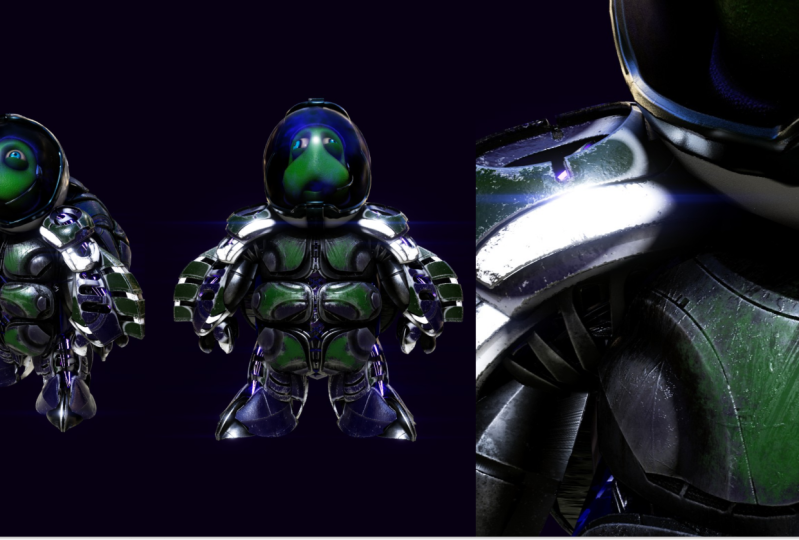
within Substance Painter, to that end, will be supplying a fun 3D model for you to learn and practice your
texturing techniques. And that's our brave,
courageous space turtle. Having said that,
we'll start off with the breakdown
of the viewport and how to import your provided practice model
into substance painter. And from there, we
go over the basics and walk you through
the process of baking out maps to set up your folder structure where
we officially start painting. Of course, it goes without saying that aside from
the fact we'll be learning 3D texturing in a fast and easy to
follow workflow. Some of the other things
will go over are as follows. A breakdown of the basics by first understanding
different workflows, such as fill layer texturing versus paint
layer texturing. You'll be creating some fun
opacity textures and how to experiment beyond
our own version with your own unique
texturing version. In addition to that,
we'll show you some interesting and unique
blending combinations of materials and smart
materials are provided demonstrations
for you to build off of. You will be establishing a
solid foundation in masking, as well as learning how
emissive effects work. And finally, we'll cover substance painters
built-in renderer irae to produce an industry
standard render shot for print or
portfolio purposes. Now, by the end of this course, you will have a
strong foundation in understanding 3D
texturing within Substance Painter
and understanding to establish your own
unique texturing style. And to that end, let's
start texturing.
2. What To Expect Here: Alright, let's get started. In this video, we're going to outline the course
curriculum here, as well as establish some
guidelines for you to help make your learning process just a little bit more smoother. And in fact, let's
start off with those learning guidelines so that we can get those
out of the way. One of the first guidelines, so I'm gonna go is
this please, please, please re-watch the content. In fact, go beyond that, I would say if you
ever feel loss, definitely stop
rewind, re-watch. Stop, rewind, rewatch. That's very important. You wouldn't believe
how much gets missed that you would pick up
on a second try around. So that's pretty important. Tip number one,
guideline number two is, please surpass the concept. Dare to deviate. You are more than
welcome to copy what I do and follow along
with the course, but I'm not going to lie to you. Learning Substance Painter also involves your own
personal exploration. I want you to feel free to go ahead and do your
own designs at once. You are at a comfortable point. We will hold your hand. We will go ahead and
tell you how to texture these models and how to
work in substance painter. But we would love to see that
final stage where you're breaking out of our
boundaries to your own texts, dreams, and your own
textured models. So definitely feel free to post them or send
an image to me. I'd love to critique it and
give you feedback on that. So with that said, we can kinda segue
into the third one, which is, please feel
free to ask questions. Message me, I am more
than happy to address any questions or
concerns you might have about the course or
something you don't understand, just send me a message. I'm I'm definitely
available all the time. I'm very good at
getting back to people. So with that said, the next thing up is, is we're going to go over the
curriculum of this course. Now. As we can tell you, this course is about
learning Substance Painter. And we do so with a 3D space turtle model
that we give you. It's yours to have as you see fit for your texturing
and practice. So definitely it's a lot of fun. We had so much fun trying to
make this turtle for you, and we're definitely excited
to show you what we have. So with that said, the first section is just
gonna be about getting set up. And we're gonna go over
navigation of the user interface. How to bring that model in, how to bake the high res onto the low-res so that you
have all those fun details. And we'll even end
with some basic things like talking to you about fill layers versus paint layers, et cetera. We'll go over that. It's like a beginner
setup section. Now, Section two,
that's sort of where we officially begin our texturing
in Substance Painter. And to that end,
we talked to you about starting off easy with teaching you how
to do masking and laying out the
folder structures. We do that just to
be sensitive to a beginner user and making it as easy and comprehensive
for them to understand. And from there we go into how we texture skin using generators, how we can contrast between materials and smart materials, particularly around hard
surface areas like the helmet. We then talk to you about
how we can edit some of those materials and
smart smart materials, as well as going over some fun stuff like
painting the eyes, which we again want you
to deviate and have fun and make your own
eyes if you want to, definitely choose your
own color if you want. Now, one of the last things
we'll do in the head is go over how transparency
works and Substance Painter. Now that's gonna
be a big one too, because We would love the
bulb and we just love having to have fun with making
our own textures on here. And we're going to show you
how good that comes out in a render for Ira later
on down this course. So the glass bulb is sort of our fun are fun lesson
that we kinda go over. Now, moving on, we go to
the texturing of the body. We start with the chest
pads and the gribble, and then we transition
into the texturing limbs. And that's where we show you
how we transfer details from the chest pads onto
another texture map. And then continuing
and expediting your process without
having to do much rework. So sort of a quick, fun little shortcuts that we kinda teach you how to do there. Furthermore, we go over
texturing the shell and then finally finish up by
exporting out those textures. We go over that as well. The last lesson is going to be the fun lesson and
that's rendering. Now this whole thing is about what you end up
with as a product. And hopefully you should have a good industry
standard level render image for you to
use and share with your friends or
portfolio if necessary, which we go over. Substance painters,
built in renderer, IRA. So don't feel like
you need to have an additional piece of
software not necessary at all. Ira is built-in to
Substance Painter. So with that said, those are the basics that
we're going to be going over. This kind of concludes the
what to expect section. And with that said,
let's get started.
3. Navigating User Interface: Okay, so let's begin In this
video here we're going to talk to you about opening up Substance Painter
for the first time, what Substance
Painter is and what the user interface is all
about here and give you a little bit of a crash
course before we get things started so that you're
not completely lost. Let's go ahead and start about
what is Substance Painter? Well, Substance Painter is
a 3D texturing software. You can basically import 3D models in and
texture them as you would if it were Photoshop
with a UV 2D platform, UV set for 2D preferences, or if you want to texture
it like it's Polly painting in ZBrush with a 3D preference. You can do that as well. It's layer based, so it's going to have layers
similar to how you would operate in
software programs like Photoshop and wear layers stack and overlap and cover up layers that
are underneath. That will make a little
bit more sense as we texture if that's still
feels a little confusing. And additionally to this, if you have a low-res and
decide to take it into a 3D sculpting program like ZBrush and sculpt
high-res details. You can additionally bake
those high res details onto the low-res and then make a continue on
with your texturing. So it's all very inclusive. Now, in the next
part of this lesson, we're going to talk to
you a little bit about the viewport and what
each section is, so no one gets lost. Now, when we bring
a 3D modeling, you, if you look at see
where my mouse is, right here, this is going
to be where we put a three. This is where you're
going to see the 3D model which you can view, rotate, scale, zoom in and such. Again, you'll, that will make more sense when we
see the next lesson. Now, with every 3D
model that comes in, you've got to have a UV set
or some set of UVs to texture upon so that you
can export them out as maps after you're
done texturing. Well, when you bring
the 3D modeling over here is where
you're going to view your UV map that comes with that three 3D model or that should have been laid out
before exporting out. Now, you didn't hear,
I remind everyone, as I said earlier, you can texture on either side. You can do 3D texturing, which most people
prefer, or UV texturing, which most people actually
use as an advantage to get some mask assigning done. And so this is basically
going to be where your UVs are going
to show up at. Now if we move over
to the right here, we're going to have three
panels and one tab here. We're gonna kinda break these
down pretty easy for you. Texture set list, which is
very much at the top here, is going to be where the 3D, when you bring it 3D modeling. Sometimes 3D model can have one set of UVs or maybe two
sets are three sets of UVs. Well, the number of UV sets shown here,
or in other words, the number of uv maps that get displayed in different areas
of which you can texture in, depending on how
it's organized on the 3D model get revealed here. Now when we go further
down where it says layers, we have a very important part. This is like a workshop
area for Substance Painter. It's where you drop all your
fill layers and layers, where you do all your
tweaking and texturing. If you do anything like that, it's going to be
shown right here. And it's going to
be sort of like your Canvas workspace
on how organize all the different
layers representing different colors and
textures onto this 3D model. It's going to be a very
important part right here, this layers, this Layers tab. And so as you'll see
throughout this course, you're going to understand
why that's so big. Texture set settings is going to be something we covered
down in the next lesson, where we talk to you a
little bit about the baking. And we talked to you a little
bit more about how we can assign additional channels if something's being excluded
out in a fill layer. And we dress fill
layers later as well. And then as we go further
down to the last tab, Properties is something that reveals the anatomy of
that which you click on. So if you click on a fill layer, you're going to see the
anatomy of a fill layer if you click on Smart materials
that you want to drag and that like smart materials that make
this piece look like rubber, make a 3D model
look like rubber. You can do
modifications to that. From here. Once you click
on it from your layers, you'll see all the details
that show up right here. The properties section. So it's a subsection of layers where you can do even more deeper
amount of workshops. So let's think of it like
your secondary workshop area. Now, we're going to cover it, close this out with
one final area. And that's gonna be
the assets library. Now for some people, the way that the user interface
is structured, it, some, if you're on an earlier
version of Substance Painter, you might be seeing
something where this assets library runs
horizontal and that's okay. It won't really
hinder you very much. Including it as vertical is an additional
prefixes, prefix. Adobe decided to go with. So let's talk about
the assets library. This is where we
have ingredients. Think of it like
your ingredients, like your spice rack when you're cooking or creating
that texture. It's all about how
you combine and create all sorts of
different textures, different smart materials,
different regular materials. You want to bring them over, drag them over to
your workshop area. This layers area, maybe want to tweak or work on
it from over here. And then you see
the differences, the changes that occur in
real time in the 3D model. That's what it is. And it's a very fun
thing to experiment with and it's a
must to experiment with when you're stacking layers on top of each
other and seeing all the different fun results of different flavors
that come out with textures when you
start combining. Now within here on the assets, you might notice some things. But breaking of
assets further down, it's almost like a
storage database of different utilities. So think of it like this. We have things that
are stored here for different materials
we can assign. We have advanced versions of those materials
called smart materials, which is in its own
unique category. And we'll talk about
the difference between materials and smart
materials further down. Then we have masks. When we want to add a fill layer over here
or a paint layer, we can add a mask like
we did in Photoshop, or we can do a customized
mask where we, that's what these are right here of which are smart masks. And they dictate a
procedural masking behavior based on how things are done
in a high-res, low-res bake. Like I said, you may think
when I'm talking like this, I might be talking a
little too quickly. I am again, just stop rewind. But I also say this as much. It makes sense a lot more when we start
texturing all this stuff. And what we do is going
to make a lot more sense. Now, if we keep on
going through here, I never really
touched the filters. It's never really had a big
impact on my texturing. So I'm going to
skip that for you because I don't want to
over-complicate things. But if we go to brushes here
you can see like Photoshop, all the different types of brushes that come
about that you can customize with a paint layer or a fill layer when
you're editing a mask. Then further on we have just some extra
library things like alphas that we can use to
occlude certain areas. Or we have certain sort of fractal patterns that can be used for wall
surfaces, et cetera. And now we have a lot
of different areas. So think of your assets
library as sort of that utility storage base that has a whole bunch of
ingredients that contributes to how we texture a 3D model. So that's now your
basic rundown. If any of it didn't
make any sense, I remind everyone right now, it's going to make sense. It's going to have a lot more sense when
you're going through an texturing the 3D
model because we do a lot of repetition
to ingrain this in. We don't go with just doing
it once and you never see it. We repeat a whole
bunch of things held, even including one thing we
repeat is the baking process. We structured a 3D
model with for, I believe it's 55 maps, I believe we'll have to check. I'm going to say five maps because the
bulb was Additional, where we just kind
of gets you through constantly repeating
the baking process so you know what to do. So let's just go ahead
and move on from there. In the next lesson,
we're going to talk about importing a 3D model and talk to you a little
bit about the process of baking a 3D model out. So with that said, stick around and stay tuned.
4. How to Import the Model: Okay, so let's get started. In this video, we're
going to pick up where we last left off and we were going to
import a 3D modeling. And we're going to talk
about how to rotate, zoom scale pan that's
modeling and go over some things like the
texture set list and end off with baking. So with that said,
let's get started. So to start off with, let's bring a 3D modeling. And so we can gain a little bit more
context of perspective and understanding
all the things in the last lesson to
make it easier. For that, when I
bring it 3D modeling, I go up to File. I hit New. Here, you'll get a pop-up
window of a new project. This is going to give you, it's wanting to ask the
parameters of what this model is and what kind of
maps you want and what kind of file
side and normal, normal map format, et cetera. They want you to do the
settings for all of this. So we're going to start off
with PBR, medical roughness. This is an easy one for
beginners to go with. It's a pretty good way to understand and learn substance painter
for the first time. So it's a one we
like to go with. Now below the template
we have filed now, this is where you're choosing your 3D model, your
low-res model. Now, we have a low-res model for you in the resources folder. So you're going to
have to open that up. Once you click on that and it's fine that resources folder open, you're going to want
turtle low-res FBX. Let's just go ahead and
click on it and hit Open. Now that the low-res
has been loaded in, Let's go into the document size and I'm going to set
that to 2048 for now. And for normal map format,
I'm choosing OpenGL, that's just pertaining
to the normal map on the green channel being
inverted or not has an effect on things like a
unity versus Unity on Mac vs, which is OpenGL to unreal on PC, which would be Direct X. It has a direct
relation to that. Now I left everything else off. Use UV tiled workflow
in poor cameras, auto unwrap, make sure that all of these are
off and just hit. Okay. Now, if we go ahead
and zoom out, which is wheeling down
on the mouse button, you're going to see your model. Now there's a couple
of things that you're going to see if we rotate it around with left Option,
left-click and drag. And if I hit the
FK to recenter it, you're going to see half
of this guy missing. And why did we do that? Well, because we're
going to also show you how to update files. We're going, this isn't
the only low res we have. We want to show you how to
update a fully complete file. Now, one reason, the
second reason we wanted it halfway is
the save on uv space. So what that means is we intend to bake out the
details of the arm, the details of the chest, and the details of the map, and then just mirror those details all the way
over to the other side, an updated low res. And that is very important. Why do we do that? Because if we UV this and this, this, and this, and
this and this, well, that would really make
the UV resolution smaller because you got to
make space for the other side. So we're trying to
just sort of give you as much time to not only understand why we are
trying to save on uv space, but also how to update
models as well. So let's go ahead and get, get on with how we
navigate this guy. Now, again, if you hold
left option and left-click, you can rotate this guy around. Of course, if you hold
wheel mouse or wheel down, we'll up, We'll down. You can also zoom in and based
off of where the mouse is, you can zoom into that
pivot point like so. Also, if you hit the F key, you can frame it
into view like so. If you hold left option
and middle mouse, you can pan this guy. Additionally, you can
also hold left option and right-click and drag
horizontally, presume. Now, depending on if you
have a command kidney or I have a Mac,
so it's Command. But it might be control for PC. We have a deal where if you hold left command and right-click, you can change the
radius of the brush. If you hold let command and left-click and go up and down, drag, you can change
the rotation. And if you try to
do left Command, left-click and
drag horizontally, you can change the flow. So those are all
things we're going to get more practice
on down the road. But let's now take a moment
now that we have that, let's go over to the
right side here. And as you can see, as we talked about, this is our UVU VY UI. This is where we
texture our UVs. Let's hit the F key, like we just learned a moment
ago and bring that in. And it's somewhat similar
if you look at the layers, a layer has been
automatically assigned, It's almost similar
to Adobe Photoshop. You can do the same
level of texturing, which we will go over. But additionally to that, just like over on
the other side, we can zoom in, zoom out. We can even rotate. If we look at our left option, we can rotate this way. I don't really recommend
changing rotation of uv maps, but you can not
only rotate it this way by holding left Option, left-click and
dragging up and down. But you can also hold Shift in addition to all
that to make a snap. And so that's a sort of an
interesting little play. Now, another very, very
intriguing thing about this is if we take a look up
at texture set list. Now this is the last thing
we're going to look out before we begin to
start to do a bake. Now you'll see five
texture set lists or as we would
say, five uv maps. In other words, when I
click on a different one, you're going to see
a different UV map, different UV map, a
different UV map, and a different uv maps. So the question is, why, why do we have five? This is a character,
doesn't a character only need one UV map? Yes, it does. But this is an
educational course and this is an
educational 3D model. We're trying to give as much
time as we can to breaking up lessons through each
map so we can improve on. So this is gonna be the
difficulty level one. And then we go and build
off of that into level two, level three and so on. So we're gonna go
through all of that. In addition to that, the nice thing about all
this is is you can turn on the visibility
of all of these. And we kinda like the
idea of just turning off the visibility of
all the maps because the head is going to be the
first thing we work on. So with that said, I'm going to go ahead and pan this guy in and zoom in like so. And this is where we are
going to do our baking now. To do baking, what we're gonna do is in case anyone is lost. We are going to
take a high res of this turtle and bake the
details of it onto a low-res. Additionally, we're going to be baking extra maps on there. And those extra maps
are going to serve as a way to map out procedural
generated processes. So in the next video lesson, we're going to actually, I know we said we're going
to do it at the end, but I feel like I
want to go through all of this first and then just sort of kinda go through and show one thing at a time. I want an entire lesson
pretty much based off of just focusing on the
anatomy of baking out maps. So get ready on the next lesson, we're going to talk to you
a little bit about baking. So stick around and stay tuned.
5. Baking Out Maps Breakdown: Okay, So let's
pick up from where we last left off in this video. Now we're going to bake
our first high res. And to do that, we're going to
actually make sure everyone has the right context. We're starting, we have more than one high reds because
we have five maps here. We have five high rises. Why do we have five
instead of just one? And we bake across all of them and just make
it simple like that. Well, the news is, is
that you can do it. You can combine all the
higher as is up and just bake them and
that's not a problem. The only reason we don't
do that is two reasons. One, this is an
educational model, so we're trying to establish
repetition by giving you many opportunities
to bake onto one thing. And then the other reason is file size constraint
limit of the high res. Sometimes it's hard to meet with the file size limits
of the learning platform. So we got to break
up the high roses. And so again, we create all these different
maps here to give you a lot of time to texture or something
and have fun with it. But in so you gotta have
more than one high res. So we're going to talk to
you about why we bake now. And the reason
that is is because we have a lot of materials and smart materials that uses data from texture
sets, settings. Do you see all these maps here? Well, when you do a bake, it creates maps like ambient
occlusion or curvature. And it goes through and plugs these maps
into their shader, which is gets seen in the
property channel automatically. And so as a result, you get a very cool
looking view based off of the parameters
of the particular map. For example, if you
have a curvature map and you have something
like steel paint, while you're going to
see all the edges of the model affected by a secondary paint layer
that is based off of a curvature map that
is being plugged into that steel paint
smart material, which you'll see in the
properties channel. So there's a little complicated, but once you see how easy it
is when we drag and drop, it's so automated that you don't have to really think
too much about it. So let's go ahead and
just get started with it. And for those that don't know, this is something we
should have said before. Hold Shift and
right-click and you can kind of adjust the light. So one of the first
things I'll do is I'll turn off the visibility of all the maps except the head map because that's the one we're going
to work with first. And I'm going to zoom in
and then pan that guy out a little bit so we
can see it nice and well, I'm going to hold Shift and
right-click to make sure the lighting is where I want it. Now to get started
with baking a mesh, Let's go to bake mesh maps
under texture set setting. Now, once you click on
that big mesh maps, you'll see a whole dialog box
with all sorts of settings about each map in the
parameters you want to adjust. And honestly you
don't have to get too deep if you're a
beginner right now, you can just leave it there. So decide on what you want the size of your file map to be. Some people can handle a 4096, but I'm going to tell you
right now for you beginners, you might want to
go with a 2048. If your computer is not fast, you might want to go with that. I'm gonna go with a 4096, but I might start off with a 2048 just to be
on the safe side. Now, we have high
poly parameters. This is where you can choose just because you
don't have a high res doesn't mean you
can't just still bake something on there and
create these maps. You can still use
your own low-res as a high poly mesh and
create maps out of that, which is just fine. But because we have
a high res with more details sculpted into it, we might as well take
advantage of that. So to access our high res map, our first high res, we're gonna bake onto this. We're going to first choose to access your resources folder. And you're going to look
for where it's making sure you have downloaded
the head map, FBX. It's right here where it
says high-definition meshes. Go to where that little
paper flip sign is. Click on that and look
for your head map FBX, and open it in there. Now that you see it loaded, you have some more things
you gotta still do. We gotta get through this. So one of the first
things we have to do is for the record, you see down here, this is very helpful. This gives us a description
of what everything is. So if you want to learn more, you just kinda put
your mouse over it, anything, and it gives you a little bit more
information on here. So very important learning
tool to go outside of. Now first thing we
have is anti-aliasing. Anti aliasing is pretty big one. It makes our render times
and our baking times. I should say, they go up
but they kind of dictate the smoothness of a line versus a jaggedy edge to a smooth line, you get a nice clean
bake with anti-aliasing. Unfortunately, though
with anti-aliasing, most people choose two-by-two. I'm going a little overboard
with four-by-four. This will drive up your
bake times quite a bit. It's one of the biggest ones. The other one I'll go
over in a second here. But you see where it says Match, change that by mesh name. That's because when we
look down here we have the low poly mesh
suffix underscore low and the low poly suffix
underscore height. What does that all mean? Well, when you choose
Select by name, then like if this head
is labeled in an FBX, the model is called
head underscore low as the suffix here is. And you have a high res
separate mesh that says ahead underscore high and it's a
low suffix or I'm sorry, it's an underscore high suffix. It's going to make
a cleaner bake when it intersects with other models. So that's just sort of
a food for thought. Make sure you understand that. Important to note though, caps sensitive on all of this, including how you even
spell the name because even the prefix
is cap sensitive. So we're not going to
do too much more past this except go over
to more things. And that is ambient occlusion. I've chosen to put my
secondary rays up to 150. That's going to make the
bake go slow for a while. That's gonna go pretty long. The higher your raise, the longer your
ambient occlusion. Go for a bake. So keep that in mind. The other thing here is the
max frontal distance and the max rear distance. This is always a little bit
of a tricky thing because you typically will start off
with 0.01 on both of them. But I had to do some finagle into catch a lot of artifacts. So I want you to change the frontal distance
to 0.0130.025. And then whatever we need to do, we'll just go ahead
and adjust further. If you did 0.01.01, it's still get a bank. But you'd have
like, for example, an artifact on the cheek that you'd have to
make some distance to. But this is all sort of just sort of adjustments
to how above or how far it can shoot rays between the low rose to catch everything in proximity distance since this is a proximity bake process. So when you're all set and done, let's go ahead and
hit Save Settings. Go back on here. Let's go ahead and
choose Bake head map. If you choose big
selected textures, you might go across everything. Let's just do just the head. We're baking just the head. Now this may take a bit
of time depending on what file size you
had and depending on if you're doing 4096 or 2048. But as you can see, mine's
going by pretty quickly. Except for the ambient
occlusion, which again, I told you ambient occlusion
maps, they take awhile. So this gives me
also an opportunity to talk to you a little bit about this back
face calling here. Now there's no real features
for back face calling on a 3D model to turn off. But one thing we can do is when we go over the lesson
that talks about upgrading a model with
project configuration, then we can add more geometry
to fill in the Backspace. Now as you can see, the ambient occlusion that's sort of addressing the shadows and the crevices of the maps
or giving you a nice sheen. The normal map is
sort of projecting the details of the
bumpiness onto a map. Curvature map has things
pertaining, most relevant, too hard surface curvatures, how it handles edges and how wear wear and
tear comes from. Things like thickness map. They're pretty much risk things like glass or
subsurface scattering. There's a whole bunch of
depth in all of this, but you can kinda see
all the results if you want through here. And kinda get a little bit of an idea of where everything is. So far the bake seems
relatively clean. So far. I always say so far. Once we got what we need, we can just sort of go back. And we can have our model. So as you can see, our model is kind
of going through this whole process and it's
going to complete itself. And we're going to
repeat this now. You see all the
different maps on here. We're going to repeat this now. We're gonna go through each map now and bake all
those details out. And then we're going to finally mirror them all
over once we're done. So let's just go ahead and
let this map take its place. I'm gonna do couple
more examples. And then it's gonna
be in your court where you have to take the helm and you have
to be the one to bake. Alright, so I'm walking
you through this one. But you got to at some
point bake and learn. Because this is learning
Substance Painter, you gotta kinda go
through and learn. I think we're almost
done with this. We're going to, once this
map also gets taken, one thing that we are going to do is I'm going to show you a little trick I like to do in baking or is do some
tests backings. So when we open
up our hierarchy, are other maps to be baked. I'm going to only do
like low-res back bakes of just a single map to see everything
going through, right. We'll just go ahead
and show you what that looks like coming up after this particular
bake finishes. It looks like we're
almost through. For the record, the
thickness map is the second longest
bake that takes. If you have GPU rendering
also on your PC, that's going to make
your bakes go a lot quicker on Substance Painter. But you got to make sure it does go through because if you if
you don't have GPU render, ray trace, I've seen
a lot of people have crashes on their computer. And if that happens, you might have to
disable GPU ray tracing under Substance
Painter preferences. If you get these
crashes, you shouldn't. And it looks like we're
almost done here. Bear with me. Just feel like we need
to have a countdown 109. All right, so now that
we have completed it, go ahead and hit Okay, and take a look at your map. And it should look
relatively clean up like so. So now that we do that, let's go ahead and go
to a different map. Now, let's turn
on your body map. That's at the top here. We turned off the head map. Now we're gonna do
that same bake. And this time we're going to go through and do
it slightly different. So now when we put
bring up baking, I want you to click
on this and take out that high res
because we're going to be baking with a different high
rates and that's the high res of just this model. So let's go ahead and click on that paper and click
on body map two. And again, you should go
through your everything should be saved because we save the settings mesh name high-res. Let's make sure ambient
occlusion is also, we see ambient occlusion is
now pumped back down to 64. Let's go ahead and
bring this back to 150 and hit Apply to all groups. And so we have everything here. So this is what we're gonna
do differently this time. So pay attention. I'm going to take off all these bakes
that you see here. We're doing something
different now. Why am I doing it this way? Because I want to just
bake out a normal map. This helps because if
there's any troubleshooting, you can just simply do a bake and then just
look at the normal map. You can see most problems and errors that come
from a normal map. And to be truthfully honest, this does a pretty good job
of catching most of them. The current settings
that we gave you. There's a little bit
of artifacts here, but that's probably
more related to deleted geometry of
the high res here, like take a look back here. This is deleted geometry. It's stuff that
will not be seen. So I'm not really going
to take this into account because moving around Settings here may affect
settings upfront here. So this is a clean Bake To me. I'm okay with that. So now that I have that, I'm just deleting that off. And this time I'm going to turn back everything we
just turned off, make sure that's on there. And then we're going to
do our high res bake. Now, let's go ahead
and make sure we're choosing bake body map, not bake select textures
because we're baking certain sections to
certain sections. And now let's just hit that. Now I'm going to go
ahead and screen saved or a quick, fast forward. So on. After this is done, we'll go ahead and skip ahead
to the completed projects. Okay, so now we're finished. Now that we have
completed our chests, that is that map. Now don't get too bogged down or overlooking to look for
the greatest impact. The imperfection. There's always gonna be
some small imperfection, but smart materials and materials tend to
always cover them up so don't get too crazy if it helps. A lot of the times, sometimes a model, you could just blame
it on me if you want, but don't try to rack
your brain and going to meticulous in the frontal
and rear distance settings. So now that we've given
you a couple of examples, we're gonna give you a
couple more examples of the same thing. This time I'm gonna go on to
the limbs model right here. And we're gonna do
basically the same thing. And I want you to think now
what the size of the map is. Making sure to remove the
high res and making sure to do just the test at
first with the normal map. That way because in
normal map takes pretty quick amount
of time on here. So put that in and go
ahead and go look for the, for the limbs map. You're going to look for
the high res limbs map FBX, limbs map to FBX. And then that's just going
all you need right there. We're just going to now bake out the limbs and look
at it just with the normal map to see if there's any red lights that fire off. Doesn't look like too many. Like I said, the settings
that I have are in fact pretty they're pretty decent. There's a little bit of
resolution problem here. And that has a lot to
do with this being a very dense map as well. And the, I'm sorry, not a dense map,
but the high res. Take a look at these
dark edges right here. This is a good learning
exercise for you. A lot of people will think that it's because of the edges. This is actually
from the normal map. And this is what it looks like when you decimate a high res, too many times you'll
get these hard edges. And again, we had to do that per file size constraints
because we have to be at a small file size
to upload on a platform. So we just had to make
a choice right there. We can offset it a little bit
with the higher resolution, but we're going to
still stick with 2048. So what I want you to do now is after you've
completed your test, do your bake, and then we're going to come
back after we're done. So now it's up to you. Don't forget, turn on
everything here, go through. Make sure it's by mesh name. Make sure it's by
underscore low. And make sure your
Ambient Occlusion has the right number
of rays on there. Those are the there's a lot
of other things you can do, but I don't want to
overload anyone with too much because it's
not that critical. So with that said, I'm just gonna go ahead and hit bake limbs on this and
make sure of course, everything is turned on like so common towards the
end here after this, it's just gonna be one more map and we'll see you at the end. Okay, welcome back. And here we have just
finished our bake. I times skipped a
little bit here, but as you can see, we have it updated. So now we have two more
maps we gotta go through. That's going to
be the shell map. And also the bulb map
will finish lastly, with the bulb map because we want to do a demonstration of a type of map bake that can be done without having to resort to a high
res texturing process. So let's go ahead and first finished with the shell
map before we get there, because we want to give you
all these different types of examples of how to bake. So let's just move
on from there. So if I go ahead and turn on the visibility of the map and left-click on that shell map
and turn off the limbs map. Let's look in the back here. And it's just like
we did before. And it's the same
process once more. It's just where you're kind of testing everything
out with normal maps. I already know
it's gonna be kind of this is a pretty clean, easy map to go through. So I'm just gonna go through and just do a full bake anyways, but you're welcome
to try and test. But I would caution you don't
let yourself get too crazy. Don't let yourself
get too nitpicky on the slightest miscalculation or the slightest dirty piece, it will drive you crazy. Again, trying to correct it. If it's like a major artifact, definitely do
something about it. But if it's the
smallest minor thing that a smart material
we'd go through. I'd let it go for now. So we checklist
again and what we're going to do output size first, we want that 2048. You can do 4096, but it's gonna be a long bake. We want to clear off
our high res here. So let's minus that off and
load in a new high res. This is the shell
and the shell map. So let's choose the
shell map to FBX. And let's keep going
all the way down. Make sure mesh by name is checked and it's
underscore, low underscore. Hi, check our ambient occlusion. We did hit apply to all so we didn't really make any changes. So everything seems
to be in order. I remind everyone. Again, we have anti-aliasing
turned on the end also, before we get to it. The three factors that drive up bakes on Substance
Painter, our output size, anti-aliasing, and ambient
occlusion secondary rays, those are the three
biggest factors that dictate the bake times. So let's go ahead
and just bake this out and then we'll
get back to you. Okay, so now we are
complete on this. We got this shell map, only one more lap to go, only one more map to go, and that's the bulb. The bulb is a unique one
that we wanted to include in its own little UV map
for its own purposes because this is gonna be a transparency object
and we wanted to have a separate area to
talk about transparency. Now, the other reason was is we found that the bulb didn't
really require a high res. And there are gonna be
some situations where you bring them modeling
and you don't necessarily have to have
a high-risk sculpting. May just want to
texture on the model itself or do some hand painting. That's fine. But nevertheless, it's still
recommended that you use a bake mesh maps even if
you don't have a high res. The only differences,
first of all, making sure there's
no high res that's located in the high
definition meshes. And also you just need to
simply clip right here. Low poly mesh as high poly mesh. Now you can go ahead and just go through everything else
like you normally do. Make sure all the
ambient occlusion rays are fairly good and high. And then you can go
back to once again, baking this out like
everything else, the high res is a
little bit quicker. It should go slightly
faster in certain areas, but this is the last area here. Before we move on, before the lesson ends, we're going to do a real
quick tutorial show on how to upgrade this Edit Mesh
project configurations. And so you don't get left out. So let's go ahead
and have this bake. Okay, now that we have
everything that we need, Let's just go ahead
and you should have a baked out bulb-like
everything else. And now that you have
everything there, in the next lesson, we're gonna go over
how to update the, the 3D model with a posed version of this so that you have
something to work with. So with that said, stick around and stay tuned.
6. Understanding Fill Layers: Okay, so let's get started. Now that we have done our bake, It's time to complete
this model and make it look like a full model. And show you the last piece before we start
getting started with texturing and that is
updating an existing model. Now, we update existing
models because sometimes we want to make changes or add extra
things to them. Now it's very important
if you do this, you should try to do this
as best you can before you texture anything that's
a lot to do with it can, often enough, since there's so many automated
procedures that can interfere with some procedurally generated proof
processes in Udemy. Let's just go ahead and update this now that we have our bake. So first thing I'm gonna
do is you're going to access your resources
folder and look for a project folder
that is the low-res. So if you go up to Substance Painter up here and go to project configuration, this is where you're
going to update or make any existing
changes to your model. It's right here where it
says file, you hit Select. And one of the first
things you'll do is go to your Udemy resources folder and select the turtle low pose. Hit Open and hit Okay. And it's going to rebate
and recollect and read data, collect
everything back. So now you can kinda
see an update to this. So with that said, let's go ahead and get started. Now, this beginner level section is going to actually
start with the head map, which is gonna be this map. So let's go ahead and just
turn everything else off. If you'll look also
in the background, I updated the model to have some extra
geometry in the back. That way we can
have a little bit of fixed to the
ambient occlusion. Just wanted to give
you a little bit of a reason why we can have the purpose of
updating a model. So let's continue to
turn everything off. And now let's just
go ahead and pan in. Like so. Now that we're ready, let's click on that head map. Right up at texture set, set, a texture set list, and click on Layers
tab so we can begin. Now, the first thing
we are going to do in this whole lesson is talk to you about fill
layers and paint layers. Fill layers and paint layers are the most basic four pieces
or construction blocks. And when it comes to
constructing a texturing, a 3D model, however, I am going to say a majority of the texturing
workflow is gonna be a fill layer based workflow because it's very editable, It's very customizable, it's non-destructive and we can make a lot more changes quickly, and it's a lot easier to grasp. Nevertheless, wanted to
talk to you a little bit about paint layers first
before we go into fill layers. Now, to create a paint layer, I'm going to go ahead and delete that first layer and
just start beginning. If we hold our mask
over and say Add Layer, we create a paint layer. Now if we put our mouse over it, you'll see a circle. You hold left command and then
just make the circle big. You can paint on it. And you can change the size
from over here because remember this is the parameters
or the Properties tab. It talks about the anatomy of whatever it is you click on. In this case, it's
a paint layer. So we're talking about things
like the size of the brush or the flow and how
often or the spacing. So you can do things like
customize your brush. You can also go through, I like to hold command and right-click and change the
hardness of the brush. And you can kinda see all
this different layers. We'll further, further down. We can see we can change
things like color as well. So now I can just
kind of color things. Now, if you ever want
to get to a point where you want to erase things, you can always hit the two key. And that will act as an eraser. You can kinda see it
change from there. So Q1 is changing to paint, which you can paint, and you can change
your color like so. P2 is erasing, like so. Again, like the
regular paintbrush on key one can change all the parameters of
your brush size like so. Now this is pretty easy. This is pretty simple
stuff to remember. But one thing I will
have you take look if I make a little streak here
of red and you'll look, it's recorded on this layer. We can change the
opacity of that up here by this right here. So we can change its blending opacity
mode right through here. In addition, we can have
certain blend modes. So if we want to blend it with layers that are
below or above us. We can do that as well. It's just like Photoshop. Another very, very
interesting thing about paint layers is we
have other channels. Height, roughness,
metal, normal. So if I change, for example, the height, you can kinda see that
now when we paint, we can paint height
on there, like so. And just like with
the base color, if we choose the
parameter of basis, we can control the opacity of that height on how high it goes. So it's pretty cool. Now with that said, a fill layer which can
do all the same things, is sort of a layer that
encompasses everything. Now, everything is a little bit trickier because
what if you have everything, how can you control
where everything goes? Well, that's what
we're gonna do next. We're going to first
of all talk to you now about a fill layer. So let's just go
backwards here and say, what is a fill layer? Well, we saw this brush here, that's a paint layer, this little bucket right here, that's an fill layer. We're gonna go ahead
and add a fill layer. We get a slightly different
set of parameters. Quite frankly, we get less
options than the paint layer. And that's a lot to do with
the fact because you're not really painting
anything in a Fill Layer. Now, let's go ahead and just sort of go
through this here. You can kinda see all the
different heights and channels, just like there
were in the paint. You can change the base color. So let's do that red again. And if you see it affects
the entire model. That's because that's
what a fill layer does. You can kinda see this
whole square right here. It fills in everything. As you can see, you can adjust. I would not really do that. It's probably going to be
for UV texture scaling. But I will say this. If we have it completely
engulf the entire area. How do we control where the color is and where
the color isn't? And that's why we use
something called masks to edit in control and manipulate where fill
layers are revealed. In addition to this, fill layers can constantly
be changed on the fly. Like so. Which is a pretty nice process if you think about it
because paint layers, you have to repaint
certain areas. So that's the
biggest difference. So I'll paint layer,
you have to actually manually painted a fill layer. You have to manually kind of
it engulfs the entire area. Basically, it's the same thing, but you don't really
control where it goes. In the next lesson, we're going to begin our
texturing process by getting through with
establishing how to manipulate, fill layers through masking. So that said, stick
around and stay tuned.
7. Laying Out Folder Structure: Okay, so now that we've talked about fill layers
and paint layers, we're going to talk
about masking. And we're going to
talk about masking because it's a very, very important component to get down and master if we're
working with fill layers, because Fill layer based
workflow is going to be what we're due for
texturing all of this. So what is masking? First of all, masking is
the occlusion of pieces or objects or elements of
textures in this 3D software, it covers things up for things below to be seen if they
are not covered up. Give me an example what
a mask looks like. You see this fill
layer right here. Well, let's add a mask to it. And I'm just going to hit Add black mask and suddenly
it disappears. That's because a black
mass is covering over it. Anything which is black brings it to darkness
and turns it off. Anything that is white. Let's it show again. And anything between it
shows the value of it. So for example, if
the mask is gray, you would see a gray
or half version of this color right here. So let me go ahead
and add a white mask. And you can see my
point that which is white shows that which
is black covers up. So that's the basics of it. A mask, we first click on that
thumbnail, we right-click, we choose the either
add a white mask or add a black mask depending on
covering up or showing it. Now, that's all well and good, but the whole entire
piece is covered. So how do we regulate certain sections to be seen and certain sections
to be covered up? That's the next part we're
going to go through. So first thing we do is we
click on the mask itself. And then when we click
on the mask itself, we have some choices. We can basically first of all, by default, paint the mask. That's right, we
can paint the mask. Or if we hit the X key, we invert the value. And if we painted by, first of all, covering the mask up like it's shown up here. The thumbnail is with a black
value under the Properties, hit the X key and it
goes to the white value, then we can start repainting
back the mask like so. Now, additionally to this, there are more
ways to select and even quicker ways to help
us get through all of this. One such way is going to
be over to the left here. It's this polygon fill tool. And we click on
this and you'll see the Properties tab
changes completely. We still have our color value, but we also have four tabs here. For example, mask by
selection of triangles, mask by the selection
of polygon faces, mask by the selection of a separate polygon face
mask by the UV chunk fills. So let's go over each of these. If I go ahead and go ahead
and cover up a piece here, Let's hit the X key
because we're on a white mask and we
need a black value. You can see there's always
two tries to every polygon, we cover up everything by a try. Additionally, you can see that the polygon Phil will cover
up pieces of polygons. You can also kind of
left-click and drag. So you can kind of
get a little bit of a quicker process through it. Let's go back in
here. There we go. So it's kind of a
process in which you can just select,
de-select as such. So you kinda have a whole process in which
you can control things. Now additionally to that, even is the the mesh Ville, which basically, if this
is a separate piece of polygon model than when we click on it only this
will be separated. If this is a separate piece
only this will be separated. If this is a separate piece
only this will be separated. That's basically what
Nashville is. Obviously. The helmet is a separate
piece and so forth. Now, the last one, the UV selection tool, this one is for this area. For example, we UVs a
shell for this area. And we can basically
manipulate selection like so. So now that we've done this, we're going to
instigate a sort of, I'd say a little bit of a
practice run for everybody. Taking what you've learned
and putting it into practice. What I'm going to do is this. Get ready for your
practice because this is you're manipulating
masks practice. We're going to
create some folders. I'm going to call this folder
just folder one for now. And I'm going to
create a fill layer. And this fill layer
is inside the folder. Let's change the color of this filler to be
something like red. Like so. Now that we have this, let's go ahead and duplicate this three more times
by hitting Command D, or just simply hitting
duplicate layers. Alright, so we are pretty
much four layers right here. I might do one more
just for kicks. And what I'm gonna do
is I'm going to turn the visibility on
each of them off. This is now the practice. I'm going to left-click
on that icon, add a black mask. And now we're going
to have sections of this area manipulated
and controlled. I want to mask for skin, I want to mask for, I want to mask for clothing in each folder is going
to be for each area. So let's start off with
the skin right here. So if I have a black mask and I want red
to show through forestall, go ahead and click on here. We're using UV selection, but I said I wanted
to mask for eyes. So let's go ahead and use a combination of several things
here to get what we want. Let's zoom in here. Like so. And I'll hit the X key and
we'll go ahead and on. Mask the, the pieces. Like so, just kinda get
through it real quick. Now. We'll probably still
trim some stuff up. That's okay. Because all I
want you to do is just get practicing on kinda covering
all of this up. Like so. Okay. So now that we have that we
still see it's a little bit, There's some areas
going on over here, so let's go ahead and
just kinda clean it up by paint instead. So to do that, I'm just gonna kinda go
in and think I'll just, if I hit x, I can just undo. And one thing I like
to do is I like to hold Shift and create
sort of like that line. You see that line right there. It's basically going to give
me like a straight line. And it's kinda nice
to kinda trim. And then you can just hold
or not hold butt, press X. And you can kinda just kinda
bring everything back again. And of course, you can
hit Command Z and undo. Just kinda through like so. Again, I'm pressing X to invert
the value of this brush. And this just takes a
little bit of practice. That's why we're
doing this practice. And all we're doing
is we're just kinda creating or creating sort of a the
opposite side here. Whoops, I keep forgetting. Kinda see how I'm just basically manipulating
the mask here. Because what I'm doing is
I'm setting things up so that I don't have to
constantly paint this line. I only need to paint
this line once. I only need to set
things up once. I could probably, if I
worked with paint layers, I'd have to repaint this
quite often without a mask and that's
why I'm against it. So we got the mask excluding
the eyes, which is good. And there were in a
name, this folder skin That's just by
double-clicking on it. Let's click on the next one
and open this folder up. Let's make this some
other color, maybe blue. Alright, now once more we're
going to add a black mask. And this time, I am thinking I'd like the
mask to be on here. So let's drag this
underneath the skin. And let's go ahead and choose which method of
selection should we choose? We choose and polygon fill. Maybe this area
might not get it. So let's go ahead and
choose this area. Uvs. There we go. All right. I'm thinking I like that. I may want to lead
this area out. So let's go from this to the
polygon selections and go black by hitting X and choosing
to occlude all of that. So this is all, this isn't
just max masking practice. This is also about trying
to establish a sort of of trying to establish a kind of a a pretext of work that we're going to
be doing within each folder. So think of it like that. Now that that's
been taken care of, Let's go ahead and make
one for the helmet. But first I'm just going to
call this let's see, hood. Then for this one
we're apparently does not have any sort
of fill layer in it. Oh, I know what I did. You know what I did. You
want to know what I did? I took the fill air
out but I didn't drag the folder and there so let's go ahead and
just bring that in. It's bring that into the folder. And let's do something
very interesting. This mask needs to
be on this folder. So let's left-click on the mask, right-click, copy the mask. And then let's just
go ahead and remove the mask at a black mask. Now, we're going to
copy and paste into that mask so it's back on
there again. All is good. Let's call the folder hood. Apparently I made
a mistake there. Apologies. Now the next one the next one's going
to be for the helmet. So let's double-click on
this, call it helmet. And now let's go ahead and
open the fill layer up. Let's change the
color once more to be o, something like that. And once more we're
adding a black mask. And then we're
gonna go on ahead. And we are going
to look like that. Now we have a area
for the helmet. We only got two
more places left. So let's go ahead and do this. Let's start with the eyes. Double-click on that
folder, call it eyes. And let's turn the
visibility of that all on. Let's change that color
to something else. Maybe something bright
and distinguished, and add a black mask on there. Now we have a scenario
where the eyes are showing. But should we go ahead and repaint an
entire mask for here, or can we just simply
drag underneath here and then simply go through and basically
drag it through. Like so. If you're wondering
why it's like that, it's pretty simple. Honestly. It's because of the mask above covering
up everything. See if we turned off this mask, then let me go ahead
and put it through. The eyes would just disappear. If I did an entire UV chunk, Phil brought it back in and then it would
fill the whole area. I turned the skin on. Remember that mask is
covering everything that is below here
except what we put. That's about it. Now, that's probably going
to be something right here. I feel little bit like we
could we could let that slide. Let me just make a
little itty bitty tweak. Then switch it a little bit because sometimes it's a
little bit of an ugly. One thing though, you'll get more precise results if you
had a higher resolution, but that's not gonna be
my issue. All right. So now that we have
everything taken care of, we just have one more area and we're going to just
call that Extras. And that's for all
this stuff up here. So let's go ahead and turn
that on at a black mask. And if you want, you can add a black color just to make
it all sleek and swag. And then let's just go ahead
and bring that in through. We did Nashville. So let's just bring it
back through meshes here. And like I said, all this is, is we're just laying
out our masks. That's it. We're just laying out our mass. So when we do all the work, It's pertaining
to these specific designated areas, like so. Alright. So now that we got
everything taken care of, The only thing left is to move on to our first
area, which is skin. Take note up here. There may be some extras
that we have to deal with, like for example,
the hood right here. Now, if you need to do some extra editing
with that, go on ahead. But I believe this is where we have to manipulate the skin a little bit more to show the red. So I'm kinda clicking on the red mask and I'm
choosing a white value. And I'm kinda going
through like so. Just kinda painting
back the skin here. It's a white value
of the mask and painting on skin with
this particular order. Now it's very important at
this moment that you don't rearrange the order of
the folders because that's going to have an
effect on the mask itself. You can do it here if
you want to paint. Or you can kinda go in
here and do it from here. I kinda like eyeballing
it and using the model because
that's just easier. And remember, this
whole dragging process right here that
you're looking at, that's done through
holding Shift. So this whole lesson
has been about working on establishing masks and learning how to manipulate masks and how to assign them
and control where they go. And it's going to be sort
of a very pillar foundation that we work on here. Because what's going
to happen after this is we're going
to build off of this very basic concept to more advanced concepts
like smart masks. And we're going to also
introduce you to automated, which are more automated
mask application skills. It's gonna be pretty fun. I think you'll like
it quite a bit. Smart masks are quite
fun too because they use procedural processes within the baked maps
that you've created. So with that said, you don't have to have
these exact same colors, but we have our
folders laid out. The first thing we're going
to start up with is the skin. So with that said, stick
around and stay tuned.
8. Texturing Base Skin: Okay, so let's continue. Now in this lesson
we're going to move on to work on our model. Finally, start getting into texturing now that
we have everything we're going to address
skin and you using skin. We're also going
to be looking into generators which
are basically like a procedural mask and automated mask under
certain parameters. It basically uses maps
that are baked out. It can use also
smart masks that are plot that can be plugged in
like these that you see here. So we're gonna go over how generators work and
how we can blend them to create an
interesting sort of stylized type of skin. Now, to get started, let's go ahead and take a
look at our skin folder. And let's just open that up
and you see that fill layer. So let's go ahead and
rename that fill layer. Let's call it skin or dark skin. And now let's just go ahead
and let's just change this. Let's give it a green now. It's your green. You can use whatever
green you want, but we can use this one. If you want. You can
also address things. You have several other
things in a fill layer, like normal map, metallic Channel
Roughness, channel height. And you can enable it as it's defaulted on or
disable it, like so. And then those channels won't
have any sort of effect. But in this case, I think roughness is
the most relevant one. If we scroll through, you can see the
difference between a chalky skin and
a complete class. I'd like to give
it a little bit of a specularity just so we can kinda see the
normal maps somewhat. And we'll just
leave it like that. Now, let's go ahead
and duplicate this by right-click and hit
Duplicate Layer. And I'm going to call
this light skin. Now that we have all that, let's go ahead and break into changing this light-skinned
to a basically lighter green. Now that we got that, let's go ahead and build
off of what we've learned, which is assigning masks. So we add a black mask first and that will cover up
that light green. And now again, only
the dark green comes through because black does
not show and white does show. And let's click on this mask and right-click
and add a generator. Now, once you add a generator,
nothing really changes. That's because you need to define where the parameters are. So let's first off, click on generator and you
can see all the ways to tell the mask to behave which
procedural process. And if you put your mouse
over it, you got it, you get a kind of a preview
of what everything is. So I would like to go with a generator based off
of ambient occlusion. And if we click on that, we can kind of see the process. I can go ahead and enable
the generator and we don't see too much going on
right now at this moment. So let's go ahead and
change that as we say, to the global balance. Because again, just like as you click on the Fill
Layer thumbnail, you'll see it's anatomy. Click on the mask. You'll see parameters
for its anatomy. And of course, like
everything else, you click on the
generator and you get a whole another section of
its anatomy to work with. And you can kinda see
all these things. So this is where you have to start now having a
little bit of fun. And just kind of, I would say, experiment
with everything. So we can invert
this generator or we can through global invert, or we can just kinda
keep it like that. That's always a possible thing. Don't be afraid,
I'd say to ever, ever, ever have fun. Just simply adjusting and seeing the different effects that you can have,
things like that. But I want you to
kind of look at this and just kind of make a sort of how it your own
little testing parameters. So yeah, I think
I got something I want now I'd like to
go ahead and go back through and start tweaking all the different colors and see if there's just a
simply to experiment. And remember, you
don't necessarily have to commit to anything. That's why we're
doing everything through fill layers
because we can just kinda click on everything and just experiment to see
where everything goes. Now, I'm gonna go ahead
and kinda zip back. Uh, kinda like how the
generator was giving me that subtle green. One thing I think I'm gonna
do is I'm going to add a, do something that's
very interesting. And that is, I'm going
to add a little bit of ambient occlusion all
around because I feel like it's there's not
enough ambient occlusion. So let me go ahead and show
you something real quick. I'm going to turn
off my fill layer. I'm going to bring
this fill layer all the way to the top. It doesn't have its own folder. I'm going to double-click
on it, call it A0. Just going to disable
all the channels, so it's just base color. And I'm going to find my Procreate map and we can see we have the ambient
occlusion now picked in. So we got a little
bit more shadow. Let's go ahead now and take this fill layer and
set it to Multiply. Now we've got something
that's a little bit more accustomed to it. So that's gonna be
one approach we have. We got a little bit
more of a start off. Let's go back into skin now. And so far I'm okay with
this as a start off point. But the one thing I do want
to give a little emphasis to is this is a generator. So that means that
when a generator gets assigned to a mask up here, you can't change
the mask anymore via selection or paint tools. Which you need to do
is click on the mask, right-click and
add a paint layer. And then you can mess around
with the maps. Once again. Now feel free to get a little crazy on this part
and just get how I, how I would say creative. Like for example, you see how I'm putting dots around here. If you wanna do
something like this, you can do that. For example, make a darker
green of all of this, and then put a mask on there. And then just have some fun doing some dots. Let me
show you what I mean. Let's just add one
more fill layer, double-click on
it, call it dots. And we're going to disable all the channels like so
and go through the color. And this one will have
its darkest dots, will add a black mask. We'll click on the black mask. And now we will go and
paint in all these dots. So let's first off go
to our library and choose our brushes because
we're doing paint. Now, we can't really go through and we can
find dots right there. And if we just kind
of just go through, we can have it a little
bit of fun with the dots. Now, you might
think to yourself, Let's do much this, it's a little crazy
there, right? Let's just have a
little fun first off, because I don't really know
how something's going to look until I mess around with the opacity, which is sort of the trick
to blending all this in. So let's just do
a little opacity. We can just, and it's
kinda like the subtlety. And all of this is where
it kinda comes in. So we have a little
bit of a start off. This is sort of like a
little bit of a base. It's still a very sheen
and very clear piece. And it's something,
and because of that, I kind of want to give
you a little bit of a preview taste to something
called smart materials. And smart materials
is going to be saved for you on
the next lesson, it's going to address
a couple of things. We're going to first of all, use smart materials as an
opener to explain the helmet. And then we're gonna
go back and turn, show you how to use smart
materials to give a little bit more of
a skin that's a little bit scale textured here in the green skin head here. So with that said, stick around and stay tuned.
9. Understanding Smart Materials: Okay, so let's continue in this video now we're
going to talk about materials and smart materials
and how we can use them for our helmet and finish off with
our skin that we see here. So let's begin. Materials in
substance painter or like preset textures
that you can plug into your
layers workshop area that can be used to modify, and they can be edited to fit a particular texture
that you desire. Smart materials are very
similar in this regard, except they incorporate more of the procedural
processes that are alongside with baked out
maps to help you go there. Smart materials
also have generally a culmination of
multiple layers. And so in other words, when you see a smart material, it's typically going to come
in the form of a folder. And when you open
that folder up, you're going to see a bunch
of layers as a result, all of which you can
edit and go through. So every smart material has a different number of
anatomy within it. It's folder and to which
you can edit each piece. It's therefore a little
bit more complicated, but you get a lot
more of a fun result. As a consequence,
generally speaking, smart materials do have a tendency to make things
look better because of its procedural
incorporated processes of multiple fill layers that have
generators, etc, upon it. So with that said, let's go ahead and
give some examples. The nice thing about materials, are there a lot simpler to
understand and control? You can cycle through
them also quite a bit. So let's just go
ahead and assign a material to this piece
to give you an idea. Now, we're going to close
the folder of the skin and look for the folder of the helmet and open
that folder up. And you can keep that fill
layer on if you want. It's not necessary,
but let's go ahead and go and find where
our materials are. If we go to the asset
section here on the left, you'll see up here
where my mouse is, that the first one to the
left highlights materials. The next one to the right. This is where smart
materials are. So you got a library of
materials and smart materials. Let's just choose one
and add one on there. So I'm going to choose
plastic PVC down here. And we're going to add
it and you can kinda see an already interesting
looking material. So we got something
already to start off with. But again, just like before, maybe you want to blend some of this with another materials. So let's, let's make it a
little bit more interesting. Let's have more than
one material on here. Let's choose copper pure. And again, they all function the same way in the sense
that they're fill layer. So what you're going
to need to do is how you've been doing it
with all the folders here, you're going to
have to add a mask. And yes, we can
add a mask within a folder that has
a mask already. So let's add a black mask that's going to cover
up our copper pure. Let's just go ahead and
delete the fill layer. We're not going to
need it anymore. And now there's no
generator that's attached. So I can just do
standard texturing. And if you can kinda see, you can kinda see the
differences here. See I added a black mask and I am now choosing
a white value. And this is showing up here because of the selection
of the folder. So what I'm going to
want to do is I'd like to have these
trims be copper pure. Just for now. We won't be done with them
now we can do this two ways. I'm looking at it and I'm
telling you right now, I think I can do it either
this way where I kinda go through and I'm just kinda holding or better yet, I can even go through and
do it this way as well. Now if you have a little
bit of a step in here, you can go through and adjust the spacing so it
doesn't skip a step. So things are a
little bit easier. Remember to hit X and
it's almost like the I C. And now you're just kind
of going through and you are just about fact. I'll tell you one thing
that might be easier. That is just simply going
through, whoops, sorry. Do it like this. And then keep going, keep going, keep
going, keep going. It gets dark. Just hold shift until we can see some light somewhere. Like that. That might make things
just a little bit easier that way we can
kinda culminate through, get everything
that's on the edge. And then like right
here, right here. Like so. Because this is
all like a normal map, I believe so we
can't really select a geometry of this because the geometry I
don't think aligns with it. So now I'll reverse and
hit X for subtractive. And it's just a lot easier
to do subtract gene. Why? This is kinda
what you wanna do. You just want to just
take your time and go through and have a
little bit of fun. And I remind everyone
if I haven't said it enough that we are using a we are using the
shift to create this line. We're holding down.
We're holding. We click, left-click,
then we hold shift, and it gives us
our little space. One thing I was a little
neglected to talk about to you, all of you is hitting
the L key is a way to, or I'm sorry, cemetery mode, we can probably do that. I want to just stay away
from it just for now though. Because I don't want to do any symmetry because the
truth of the matter is, is we've mirrored just
about everything over. So if we've mirrored
everything over, you're never really
going to need symmetry for this model. Now usually hit the L
key if you need it. There we go. And we just keep going through. We are kinda just
trucking along. And you're picking a little. It's kinda like
drawing on a drawing, a cartoon or staying
inside the edges. Just have a little fun with it. Hold, Shift and right-click
and rotate across to get the light readjusted. If you have too. I'm just kinda going back and
forth with the X key here. Between subtractive and adding,
subtracting and adding. So that you can kind of
take away or put back in. Kinda see at the bottom right, viewport how the shader changes. You can kinda tell when
I'm hitting the X key. So that's all pretty nifty. Almost there, almost there, almost there. And perfect. So now we got what we need, but maybe you want to make
some changes to this. Maybe you want to adjust
the color of this. Well, that's perfectly fine. Don't accept your
material at face value. That's not completely necessary. You can, if you understand
fill layers at this point, then you understand how
to apply it to materials. That's why we're going with a fill layer
texturing process, because we want that information of recognizing that to transfer over when you're using
materials and smart materials. So it makes it easier to see. Paint layers doesn't
really do a good job of that, since it doesn't. But you can just see
right off the bat, we can do just about
anything we want. I could actually
settle for this. We can kinda see an
interesting look. I think also one thing
I might do is to draw a little bit
just on the top. Let's make sure we have fairly we can. Then we're going to
do a lot of that. We're just kinda cleaning up the area of these fill layers. And you can kinda see this
is the beginning part of understanding. Fill layers. Now, if you want, if you're looking at this
and you're seeing, oh, the texture of this is the
same as the texture of that. Like it's bumpy
all around and you want this to be a
little bit more smooth. You can always do that. Copper doesn't have
a height value. At all. But if you wanted to
or a normal map of value. But if you wanted to have something that over
lines over this, you can always just simply
hit a fill layer and take this off and go
through and hit height. First of all, making sure that blend mode is set to normal and it accepts the same
map as the copper pure. So we would add, we would first copy this mask, call this bump, bump trim, and then add a black mask to it. And then paste into that
black mass the same thing. So now you have a smooth piece here and a little bit
of bumpiness here. And what I did was I changed
this to the height normal, and I change the
blending mode to normal. So it would go over this here. Now, we can kinda got a
little sidetracked here. So I apologize about that. We can do a couple of
more things on here. Because when we did this, we also accidentally made some things a little
bit wonky here. I only wanted to show this to kinda give you
an idea that you can kind of make a little bit. You can override the normal maps as well because the normal
and the height maps, you have a tendency to blend in. So we have to kinda do a little extra
work by creating a layer, switching the layer and
switching it to normal, and making sure that it's enabled as well in
the fill layer. Just wanted to kinda do
a demonstration to show that smoothness. Look at that. Let's just go ahead
and do it here. Sue though. Because I'm copying this
layer I'm going to have to go through like so. I'd have to do this
same process that you're seeing right here on to the normal map as well, which is the one we just
copied because it's operating off of the old map. Could just copy it
and go through, but I don't know. Sometimes it's relaxing
just to see this. But I just wanted to show you a little bit of
how that worked. Like so now that we
have a little bit of a demonstration of this
and how this works. We're going to
finish this lesson up as it's a little bit long. We want to finish this lesson
up with a smart material. And a smart material is going
to be used for the skin. Now again, if we
go ahead and close out the helmet and
we go ahead and open up the the face
again or the skin. Let's go ahead and add a smart material and have
this smart material. Choose creature tongue. Remember on up here. And I'm choosing
creature tongue. I'm going to drag that just
below my dots just for now. And you can kinda see, oh, it's this look creepy
looking slimy thing. Well, look at creature
tongue now it's, as we said, it's in a folder, and that folder is comprised
of multiple layers. So what we need to do is find the layer that
dictates color. And in that case, it can be several layers. So if it gets too close, if there are two intermingled, another thing that can
be done is you can go to the base color and just
switch the channel that base color and turn
off all opacity of that. And then you can get your
colors back like so. You do lose a little bit of
the turtle in all of this, but hey, that's okay. So now that we have
a little bit of this taken care of, if you want, since this is the top
layer of this dots, you can use this as a place to dictate a little bit more on. Like for example, maybe you want to the specs to be a little bit more
specular on the dots. You can use roughness
to kind of. Now, let's see if we can do something here on the roughness. Because I believe
the creature tongue is overriding the roughness. Use that to dictate
a little bit more. You can kinda see we have
a little bit more closer. Point to the dots. Now if you want to keep the
dots off, that's fine too. You can go to the base
and maybe lower it down once more like that. So that's sort of a difference we've seen now in this how we can apply materials on here several materials and
use masks for them. We've demonstrated how to use smart materials and what they
are and see their effects, as well as how to edit those smart materials through the opacity on the base color. Sometimes it's just
hard to find in a smart material base
color because we got this color regulating color and this layer regulating color. And sometimes it's just easier
to turn off the color by selecting Base and
lowering the opacity down. That's just a lot easier than trying to go through
the whole thing. So in the next lesson we're going to work on is
going to be sort of taken what we've
learned and applying it pretty much just to the
remaining two places here. We're going to do
this area right here, the extra accessories
and this little hood. So with that said, stick
around and stay tuned.
10. Material Assigning And Editing: Okay, welcome back. In this lesson now we're
going to build again, once again off of what we've learned in the last lesson
and start assigning some materials to start
expediting our process in these areas like this area here and the earpiece
here and the hood. Just to sort of give ourselves more chances and opportunities to familiarize and explore with different smart materials. So let's go ahead
and get started. Now when you start,
when you start picking out and coming up with a color theory
that you might be okay with on the helmet. Go ahead and think
about like for example, this piece right here. What's this piece? Like a full mesh looking piece. This could be a
metallic looking piece. This could be any kind of
thing for metallic to plastic. I'm almost okay with this, but you can make it
whatever you want. You can have different colors
on the top or the bottom. It's up to you. So I'm
probably going to say that the rule of thumb
you should have is try to do your best
not to make anything. It's a consistent color. Use color or
different changes of color to contrast
between two places. So in other words, this has to be a different
material from this And maybe a lighter
tint than this to help contrast and see
this a lot easier. Same thing with this. So let's start off
with this foam piece. Let's go ahead and open
up that extras here. And let's look into our smart materials because
I like smart materials. One thing I've always found is this fabric baseball hat goes well for any sort
of foam ish look, so I'm gonna go ahead
and choose that. And then I'm just
going to drop that in the extras folder at its
own little black mask. And as we've always done, let's just go ahead and collect
and hit a selection tool. And let's just go ahead
and add that back in. And you can kinda see we got a little bit more of a piece. Now, if you want, you can have
another piece right here. You can do anything you want. You can just the
sky's the limit. So it's not really a truth
or dare or I'm sorry, like any sort of right
or wrong scenario, you can put whatever
you would like. You can even experiment, which is something I
honestly would expect, expect people to do. So you can try, for example, plastic glossiness. And then maybe you feel
like how that goes and just explore that just with
this area right here. So we'll have it come out here. So then for here you
can do anything, maybe a lighter metallic look. For this little area right here. Might want to put something
here. How to black. And then do maybe you
might think this is too much of a, of a contrast. Now, don't, don't hesitate to go in and look for the
color in all of this. Wherever that may be. Looks like the color
might be here. And just kinda click
on the parameters are, I'm sorry, the base parameters. And look for a way to change out its color
a little bit more. If you want to add to
anything in a fill layer, you can always do that as well. One nice thing
about this is that it will blend if it's inside. So you can change
the colors around. If you want. You
can always go with something a little
bit easier like that. So once you, so this
is kind of, um, I'm just throwing things
randomly together to show you how fast I can
come up with something. And now I, it's not
necessarily a pre requirement. If you want to do something
like this or you can also kind of texture around
here and hit the X key. Maybe do something like this. We trace the ends of the
helmet is being applied. How we trace the eyes
is being applied. You can do something like that. It's not really a sort of
wrong answering any of this. This is just you exploring
your own colors. So that's why I say color
theory or exploring your own combinations of how colors look next to each
other is important. So something complimentary. And that takes a
lot of just time and giving yourself a
moment to experiment. So let's try this one more time, except this time we're going
to try it on the hood. So let's open up the hood
and let's look around. Look at some of
the fabrics here. We've got a stretchy fabric. See what that looks like. That's kinda cool and neat. I think the superheroes
similar to that. It's a little bit of
the similar thing. Kinda see a little
bit more like that. If you don't like that
little hexagon pattern, get in there, change it. If you'd like it looking
like that a lot more. That's kinda neat.
You can do that. But this is also
something that I say, go in there and experiment with. The, what I would say is the the the anatomy
of the fill layer. And a lot of that
comes with clicking on the masks and what's
underneath them. Because again, these
are all fill layers and they typically have
generators on them. So where you're
going to want to go is the masks themselves. And so you click on the masks and you click what's
underneath the masks. Not necessarily what's
on the Fill layer. There are things there,
but I never really have had to make much
adjustments there, but just work with that. So I got something like right
here that's kinda cool, but maybe I want it
to be a shinier and there's nothing here
for me on that. You can always just
as we did before, we added a fill layer on here and change
the color channel. We can do the same
with specularity. So I'll add a fill layer within this fabric, superhero
smart material. Turn off all the channels. Just work with roughness. We can give ourselves
a little bit more of a sheen look, a sparkly Look. That's kind of a
breakdown of that, that we kinda see a little
bit more on what we can do to hold that specular. And that's all you
need from that. I don't need that
hexagon pattern, which is to keep
that off for now. Let's look into the black. And let's see here. I can look into it. Let's see. We can just, I
want you to think, is there too much Blackwell, make it look less black and
see what that looks like. I want experimentations of, of what something
will look like. So I want you to
have fun really. So we are kind of, we showed you how
quickly we can get through all of the
texturing like we just did so quickly just by
adding such a small degree. And that all came from simply how we set everything up
towards the beginning here, creating our folders, creating all these assigned masks to certain sections
of the folder. So that we can just
simply drag and drop and start experimenting,
having fun. We are also trying to
encourage, once again, experiment with the anatomy of smart materials and
learn and learn, learn. I would say I would teach
you systemically on it. But the problem is, is every smart material
is so different, so you got a different
set of circumstances. So like with the hood. Now we have let me
delete that one. We have this fabric
superhero, multiple layers. And I checked in here and I said to myself what
I like about it, What I don't like about it. Well, I didn't like
this hexagon pattern, so I edited that out. I wanted to see a lot
more blue in there. So I then messed around
with the opacity on here. And we also know something about generators which co,
underneath the masks. So we messed around with what is constantly going to affect the degree of how far
something gets effect. This is usually in
the levels area, but it's a different set of parameters and levels to
work with in every generator. So every smart
material generator just has something different. You got to give yourself
some time to just simply just push buttons and turn knobs and
teach yourself how to do it and you're going to
get what you want out of it. So with that said, in the next lesson, we're going to work a
little bit more and with eyes and finish
this off with eyes. So with that said, stick
around and stay tuned.
11. Painting The Eyes: All right, work now coming
close to the end of this, we just got the eyes and the
glass bulb to take care of. So let's just work on
knocking out the eyes. First of all, the
eyes are pretty easy. It's just sort of utilizing
everything you know, so far. It should be a
cake walk for you. So let's go ahead and
collapse everything in. And let's go ahead
and open the eyes. And we have a fill layer here. So let's rename that fill
layer on that eyes folder, two eyes, the whites. Then we're just gonna go ahead and we're just
going to change that to something a little
bit more closer to white. Now that we have that, we don't really need
to make any changes. Let's just add
another fill layer or you can duplicate this one, but I'll just add another
one and call this black. And I'll just simply add a black parents
on here. Like so. Now that we have a black
appearance like so, let's just go ahead and disable all the
other channels here. So it's just color. And I'm going to add
a black mask over that, covering up everything. So now with this, let's just go ahead and
paint this back in. Like so. And again, I'm on the mask. When I'm doing this, I'm on the paint. And I'm just simply adding a little bit more
to it. Like so. Alright, so now
that we have that, we can go ahead and
let's just see here. I'm just gonna kinda take
my time on this one. I'm just going to kind
of add a little bit of just a little bit of fun. Now let's just go ahead and once more add
another fill layer. And this time I'm going
to add a different color, maybe something
like a light blue. So let's just go ahead and experiment with a fun
light blue color. Do the same thing. We're going to call this blue. And I'm going to add a mask. And you can kinda see
the pattern here. Maybe make some adjustments to the hardness which
you might have to do. I didn't simply held left
command and right-click and scrolled and dragged up to
make it a little bit harder. And don't forget to
adjust your spacing. If it hasn't been adjusted. Maybe something like that. I'm just very, very carefully
moving things around here. Like so. Okay, so now let's go ahead and turn the opacity of those blacks down
a little bit more. And let's add, we can
do a paint layer. Also. Don't forget if you
really want to, you can always do a good
old-fashioned paint layer. Just go down and make sure
you have the right color. Like black. And let's just go ahead and make sure we
have a hard surface. Remember you can hit
right-click also. Edit the hardness of
the brush as well. When I make my decision, I kinda always make it based off of how something looks
like right here. And then I'll just
call those dots. If you want, you can always add one more fill layer and just have that reflect sort of
like a glossiness about it. Like so. Now, just something to have a
little bit of fun with. If you want to make any
sort of adjustments, definitely, definitely
go for that. But this is a cartoonish look. So we're just kinda, kinda have a little bit
of fun with it. Like so. So now that we have this, the next one we're going to
do is the class texturing. We just wanted to have
something that's more fun, cartoonish this time we've
done real are looking, eyes and other substance
painter tutorials. We just wanted to do
something that was kind of a little bit more goofy, easier and simpler and fun day that people
could have fun with. That's the whole
purpose of this one. So with that said, in the next tutorial, we're going to talk to
you a little bit about concepts like transparency maps. So that's going to be the very
fun one that comes ahead. So with that said, stick
around and stay tuned.
12. Texturing the Glass Bulb: Okay, So let's finish
this whole head off. The last piece we're going to texture is going to be the bulb. And for that, we're gonna be
talking about transparency. So what's going to happen
is if you go up to texture set list and see
where it says bulb, let's go ahead and mark
the eye and turn that on. This is what we're going to
try and make transparent. This is also something
we wanted to have separate as
its own set of UVs. So we can have a
special section for this to deal with opacity. So let's go ahead and
now click on bolt. Now to enable opacity, Let's take a look here. I'm going to delete the layer
here and add a fill layer. If you look at the
channels here, you'll see color, height,
roughness, metal, normal. If we click on texture
set settings here, we could try to add
opacity in there. But as you see, opacity is under an
unsupported by shaders. So we gotta change the shader
in order for this to work. To do that, we need to go up
here just to the right of texture set list where it
says shaders settings. It's PBR metal roof. We need to change this to PBR metal roof with
alpha blending. Now, when we click on
that and click off, we have to hit the plus sign
under texture sets settings. And now you'll see
opacity is there. Now that we have that, let's go back to our layers. And if you look, you'll see, let's just go ahead
and double click this fill layer
and call it glass. You'll see that a OP stands out. But if you also notice
that it's turned off, let's make sure to
turn that back on. That way we see the channel
and we get a slider here. So now we have
ourselves some opacity. It's also very chalky, so we gotta go ahead and
deal with that first. Now, let's see if we can
make this into glass. Let's see what we can do. What are the
parameters we need to make this shyness glass? While we need color to be black. For starters. It's a little bit there,
but now it's like a frosting looking glass. So we need a little bit of
reflex e-tivity on here. We don't need any height because that's not
a factor in glass, but roughness, that can
be a factor like so. So now that we have a
little bit of glass, we have a little bit
of everything here. It's a little bit easier to see. So we demonstrated how to make a little bit
of glass on here. But also don't let
that constrain you because there's a lot of
ways we can create glass, including with smart materials. Now if we take a
look over here to our smart materials and bring in something called glass visor. You can kinda see it
gives us a similar look. And it's kinda neat. It's
kinda cool if you want. But just keep in mind that the glass visor is just something to think
of it like Oakley's. So I'm gonna go
ahead and turn that off because it has a preset for a very specific look and I'm not entirely sure I want
to be there just yet. So let's look into how we can maybe texture
this up a little bit. Have a little bit
of fun with it. Let's look at it. Maybe I want to do some
blue frosted stuff at the end here. Hello. And maybe have a little
bit of interesting looks. There's a whole bunch of
different ways we can do that. We can do that with fill layers, we can do that with
smart materials. Maybe there was some particular smart material we can go with. I could go with steel
painted stained. I know that's a pretty
good one to go with. And if we take a look at it, we have ourselves an
interesting look. But it's not very blue. And let's just go ahead and
just drag it above for now. Not too bad. Not too bad. It's a little thin, but it gives me a little
bit of what I want. I'll now looking
at the glass visor and I'm thinking to myself, maybe we can combine the glass visor with
the steel paint. Let's see what
happens when we drag a smart material inside
a smart material. Not really anything
special, right? Okay, so let's turn that
off and figure out why. Well, if we look at a smart material and
break down the anatomy, the glass visor has pretty
much only to fill layers. It's a glowing edges and a base. Only problem is glowing edges requires an emissive
channel to be present. We don't have any emissive
channel assigned. So let's go ahead and fix that. So add a channel. Let's choose emissive. And now we got
something that's a little bit more fun and cloudy. So let's go ahead and drag and try that one more
time this time, because now we got some sort of bright blue and it's very fun. Let's go ahead and bring
this into the bottom here. We can see a very
interesting look. That's very intriguing. I liked that look. I think that's about the color of frosted
blue that I want. I would like to see the
head a little bit more. So here's what I'm thinking. Let's go ahead and combine these two now that
we have them into a folder. And drag and drop these
two into a folder. And then we're going to talk and call this folder frosted. And now we're going to
add a black mask over it. So it's just this piece. Now let's add a generator. Now, let's experiment with
some generators here. Let's see, we got curvature, we got ambient occlusion. It can give us all sorts
of interesting things. So let's have some
fun now we know it kind of does a little
bit, something like that. And remember what we said, if we want to invert
the generator, would just go like that. So that's kind of interesting, That's definitely kinda fun. But maybe I find this to be
too clear on the center. Maybe I want to
make this a little bit more slightly frosted. Well, first thing I'm
gonna do before I do anything as is go ahead and add. Remember, this is a generator. So we need to click on the mask, right-click and add paint. Maybe I'd like to add
a little bit more. Just a little bit
more visualization of what I want to see and what I don't want
to see from this angle, maybe I want to still keep
the silhouette there. So now that that's
all taken care of, Let's go ahead and
duplicate this guy. Like so I just want
to see on a map this point where now
I'm at experimentation. Now I'm going to go with a white mask which automatically
deletes the generator. And now I think I want to go
ahead and add a black mask. And then we're just
going to go down here and just do a
little bit of painting. That way we can blend some of
this and a little bit more. Maybe I'd like to do a
little bit more over here. Just so it's not
like perfectly blue. So now we've got
something going on here. Now for anyone that's a little
confused about how we got this texture or how we got
the frosted looking texture. I'm happy to go over this again because I know that can
be a little confusing. But you have to
remember one thing. That first we start off, if I turn off the
visibility of everything, we start off with a glass mask. We then go to our
frosted texture, which is being occluded, show in the very center
here with a black mask. It's covering up the
frosted texture in the center so that the
glass below is being seen. Then we're going, we take
that duplicated piece here and just simply add a complete black mask
and cover it up. Then that is being given a low dark gray value to kinda cloud up the blending
a little bit more. Now, you can do other
things as well. For example, like mess with
the base color attributes to help with a little bit more
contrast to seeing things. But you're going to
have to go through multiple channels to sort of control where you
want to see that. Now with that said, the whole idea about
let me see if I can. The whole idea about
the frosted texture is this this this folder, frosted folder has
to smart materials. One is a steel paint
that we have on here, and then the other one
is a glass Pfizer. Now, the reason it's blue, wind from gray to blue is
because in the glass visor, there's this glowing
edges and emissive. This will always overpower any diffusion of
the steel because emissive effects always override any sort of color whatsoever. This is some very soft
emissive effects. And as for the transparency, transparency is being shown
at once again through here. As there's no transparency here. We're seeing it here instead. So that's kind of a
breakdown on the glass. It seems a little bit confusing if it's your
first time seeing it, but we wanted to have a little
bit of fun with you and trying to give you
a little bit of a, just imagine the
possibilities scenario. So now that we've kind
of figured that out, the next place we're going to
go is texturing the chest. And we're gonna, now that
you've gone through this, it's gonna be a lot, lot easier because
we're going to be doing much simpler concepts to kind of relax you
a little bit more. So with that said, let's
go on to the body.
13. Going Over Chest Pad Texturing: Okay, welcome back. Now that we have
the head completed, we're going to move on
to the next section, which is going to be the body. And this is gonna be
a fun section we're going to build again
off of our principles, but we're going to take
it up a notch with a little more speed so we can, so you're going to be
relying less and less on the video and more
and more on yourself. That because we kinda held your hand in that first section. But this time we're going
to do similar stuff we did, but at a quicker pace. So let's go ahead
and get started. So if you remember before what we're going to do the
body section first. So let's turn everything
else off for now. What did we do in the
beginning of the head, if we can remember. If you want to pause and take
a moment to thank, fine. But if not, I'll
just say right now, we start assigning pieces and our folders to
sections of the body. So like maybe I'll have a folder mask for everything
to be dropped in for the pads here or the greebles set of strip that comes in
the center here or the body. So I'll have, let's see, 123. We'll do three folders. So let's go ahead and
make three folders. Let's go ahead and double-click
and label these folders. So we'll call one chest. Pad, will call the other
one center gribble. Then we'll call the
final one body. And like before,
we're going to put a fill layer in all of them. So let's create
three fill layers. And let's just make it different color for
each one just so we can just make sure we're
doing everything proper here. You don't need to
necessarily label these or anything like that. We're just going through and putting these
in one at a time. And I'll just drag you can kinda see me dragging
through here. Alright. So the chest pad
is the first one. Let's go ahead and right-click
and add a black mask. And let's just go ahead
and just simply choose. Let's do mesh fill as
our choice because these are separate meshes except for these
areas right here. But you can kind of get a little mundane to double-click
and go through all these. If you can recognize
the UVs here, then yeah, that
would be great too. But if not, you can
just simply go through and actually almost makes more
sense to just drag across, but I'm already there. So let's undo that by hitting X to invert the value X again, to reapply the the
white value so we can occlude or control our occlusion
in certain areas. We go. I'll just use my spots like so. Alright, so we got our
first model taken care of. Now let's do that
center gribble, add a black mask, cover that up. And let's just go ahead and
bring all that fun stuff in. Here. I think one thing I
did do is There we go. For now, let's just
leave it like that. And finally, the body, I'll just go ahead
and leave like that since it's already pretty much
covered as the remainder. So now that we got our
folders designated, let's just dive right in. Now, we're moving a
little bit quicker. We're getting things
a little bit more compact into a video
lesson because we want to just
kind of up to paste and get you quicker
moving to it. So with that said, let's just go on ahead
here and try to look for a piece like the chest pad here. One of the first
things we're going to do is I'm going to kinda do some dragging and dropping with some smart materials in here. So let's go ahead and
designate this one. We can kind of experiment out. And I just kinda want you
to have fun experimenting. Just choose your own pieces. And if you feel like I'm
looking at this right now and I kinda want to die
down the height map. And that's a smart material, so I don't want to
have to go through all those fill layers. I'd rather just kinda. Gonna smooth it out like that and I'll leave the
roughness the same. What I'm choosing is plastic
glossy under smart material. And now I think what I'm gonna
do is I'm going to focus in these pads on just the
top pad that you see here. So right now, I'm
just going to add a, another mask on top
of the plot, glossy. And more. I'm sorry, I'm going to
add another folder and put the black glossy on
their name, that folder. Outer pad. Then in there I'm just going
to add black mask, like so. Then these areas here
are going to be sort of like the areas that we will choose to define the
whole thing by now, but I like that. Let's go ahead and kind
of okay with that. But we want to have like a texture that goes
underneath here. So I wanna go ahead and choose. One of my favorite go-to is always gonna be
steel Dark Age. It's my personal
preference style. We can see already what
that kinda gives us. It's a little bit dark. So I may find myself experimenting
with some other maths, but let's just go
ahead and go with steel Dark Age for now. And let's add a generator
now to my plastic glossy. We're moving a little
bit quicker now. Then this time we remember when we added
a generator before, we loved using that
ambient occlusion. Well, this is part of
that experimenting now, so we want to see other things. So how about this
metal edge tear? It looks like we need to
invert it to bring that blue back because it's only
addressing the corners here. So let's invert that. Okay, so we've got
something a little bit more interesting
on this top pad. Let's, let's go through and just press some buttons and see what we can get out of here. Grunge amount, where amount. I kinda like that. See here the occlusion scheme. A little bit like that. Curvature way. You can kinda just
see what I'm doing. I'm not like committing
to anything. I'm just kinda just
kinda looking through and seeing what I like here. If you find yourself
unpleasant or don't like anything
that is showing, you can always change
that generator and go back to ambient occlusion. And just to see how
that looks as well. For example, you can kinda get a cool looking piece like
you're seeing right here. That's kind of a
neat look as well. So I'm kind of drawn
to that amount, a little bit interested in that, but I also think to myself, This is plastic glossy. Let's change out the
color a little bit. Maybe something
green, something fun. Like that. We on the blue side and saturate that
down. Kinda like that. I'm okay with that. So we got ourselves a little
bit of a headstart on here. But if you feel like you want
to go further than that, you can just remember, you know, we can do things like modify this further by
some manual painting. That's just where you
click on that mask and add a paint layer and
then go through some of the choices up here. So if my thumbnails
a little bit slower, but you can go through and try hatches fills who I
liked the dirt brush. Maybe we can get something
out of the dirt brush. There were oops. We still first need
to select that. Here we go. You can kinda just
take your time. You can just sort
of go through here. Maybe you want to
see something here. And here you can kinda take a moment to just sort of
paint your story on here. So feel free to take that to
the next level if you want. And the same thing
goes for over here. Now, one thing I'm thinking
I might do is I might do a one fun little thing
and I might just add another smart material
on top of it. Just the kinda deal with
these guys on here. So I'm wondering what
I might do for that. Let's try to do something here. Let's do something interesting. Let's duplicate this
plastic Class C right here. Let's just duplicate
the layer, like so. Now let's change
the layer color. Which is you can do. And you know, you're
thinking, why am I duplicating the layer? Why don't I just make
another fill layer? There's no rule
that says I can't. There's plenty of
choices that you can do. There don't think that there's
a commitment of one thing. I don't like how that looks. I think I got that
on steel dark. Alright, so like I said, let's go through this time. Let's add a black mask
on the whole I'm sorry, a black mask on the
second. Steel dark. And then let's just
paint in a little bit more of our original
guy in here, like so. So once you establish this, think about how you want
to change out the colors. So they're a little bit more complimentary because right
now they seem awfully bright. Go ahead and trim it
out a little bit more. Just having a little
bit of fun with it and nothing really too insane. Maybe even change
my brush so I can actually get some little bit
more solid on this book. Like so. Okay, so now let's do some adjustments with that color a little bit. It's a little saturated. So let's see here,
plastic green. Let's desaturate that
a little bit more. Maybe make it a little bit. Right? I'm just kinda
tweaking right now. The colors between the two
plastic glossy plastic gloss these I could just rename those blue
and green. Like so. We can kinda go through
and choose firstly, I'll choose blue and kinda like a little bit of
turquoise in there. So we may just go with something
a little bit like that. Maybe. Then let's see if we can do something
with the green. And you can kinda see this
is why I like fill layers so much is because once you
have everything you want, know where everything is, you can kind of pick
your color palette. That's why I said kinda go with your own little
unique color formula. You might even like red
or something like that. I'm going with grain
because it's a turtle. Like, hey, that's the
flavor of this month. Okay. Maybe something like that. Okay, so now that we
have that taken care of, Let's go ahead and check out our heights and make sure
that's taken care of up there. So we kinda see a
little bit more on how we've established a
little bit of blue on there. If you want to bring
anything black, Let's say, for example, you want
to bring back some of the blue here you can. I click on the generator, which is kinda bring in the
blue manually if you want. So that's sort of our
little break down. You'll notice how quickly
we went through that. We didn't hold
your hand as much. Now again, this is sort of
an incremental difficulty. And part of that
difficulty is we're going little bit quicker
and a little bit quicker. And if it seems like
it's too quick, then I would say backup
a little bit and repeat lessons until
it's hard grained into your head until you can finally move on and
keep up like you can just like look at what I'm doing and have it committed
to memory because you don't want to just fall
on the line of getting tunnel vision and copy
exactly what I'm doing. It's very essential. You go outside of
the course material to explore all these
different things I already gave you, for example, like an example of two combinations of smart
materials, like plastic, glossy on top of steel dark age, being partially covered
with a generator to show that to like
ambient occlusion. So that's sort of that area. The next one we're gonna do, we're just gonna do a little
bit agreeable and body work for these bottom two. And then after that, we're going to show
you how we can transfer all of this
into other maps, which is a new feature and we'll take our time on that one. So with that said, stick
around and stay tuned.
14. Wire Texturing Techniques: Okay, so let's go ahead and
finish this body piece up. In this lesson, we're
going to finish some of the background table and
then go over a little bit more on maintaining or editing the roughness
of the chest pads. If you think think
it's overly shiny, for example, we can go ahead and make some
adjustments there. And then at again to remind
everyone in the next lesson, we're gonna go ahead and show you how to transfer
these details, two different maps,
particularly like the limb map. So let's go ahead
and get started. Now, let's start with
this gribble here. So let's go ahead First off and click on the folder for
our center Gribble. And I'm just basically going
to go ahead and just pick a smart material like copper wire and drop it in
and that's it, you're done. Now. Now there's more
to it than that. There's plenty,
plenty more to it. For example, as we have
talked about before. And as you should now know, up to this point, we are really encouraging
strongly about modifying, editing and combining
materials to teach yourself new methods of quick combinations
in certain areas. Then, once you establish that, to do your own personal
unique paintings or your unique texture things
outside of the presets. So let's give some
examples on that. So like for example, combining with the steel
paint and the clear coat. And then we went over
how we use things like generator by
adding a black mask, adding a generator and choosing like say the mask edge tear. And we'll try to invert that. Then we want you to once
again like do things like mess around
with the generator, experiment with the
generator and see all the different
things on here. We then encourage you to make editing with the smart
materials so you can learn and understand more deeper on fill layers
and how they work. So you feel the colors
a little too bright. Maybe something like this along with something and maybe
a little more blue, or maybe something a
little more green, go through the
spectrum and just have some fun looking for what
you want to see out of it. So feel free to have fun
going through that process. Now, the next thing
we're going to do is sort of a reminder to
people on roughness. If you feel that you want
to change the roughness, if you feel this
is overly shiny, we can start changing that, manipulating that in a variety of many different ways from both procedural two basic
Fill Layer two, basic painting, the roughness. And we can do three ways AND, or, OR in fact we
can do for ways. And that would be
smart masks as well. And we may go over
that a little bit. But let's give you some
ideas of things to explore As we want you to edit your
own unique pattern onto here. So like for the outer pad, Let's get into the outer pad. We structured ourselves by these folder for the chest pad, a folder into the outer pad. So now let's go
ahead and we have a green texture for here, blue texture for here. And we want to
manipulate and create a roughness manipulation for the overall arc of all of this. Well, that's fine. Let's just start with
something simple. We don't need a material
or smart material, we can just hit fill layer. And just like Photoshop,
this is layer base, so anything on top is going to cover anything that's
on the bottom layer. So let's go ahead and
say to ourselves, well, we only want roughness to
cover everything else. And we don't want things like color or metal or height or
anything else to affect it. So let's just disable
all the channels here on this fill layer
except roughness. We're left with a sort of already default sort of
steel paint looking metal that you can mess with or make chalky and
all sorts of ways. That's up to you. So go ahead and pick your play. And from this point on, you can do anything you want. We mentioned smart masks. And smart masks are
basically preset generators. Sometimes they can have extra
modifiers attached to them. Let me give you an example. If we take a fill
layer and we call that fill layer for roughness. Three S's. And all you would
have to do is basically just click and drag
that mask onto there. And you're not going to
really notice any change because you got to go
through the generator. We did start with a black mask, so let's go ahead
and invert that. And you can kinda see not
much of a change because we may need to do some
things like edit, for example, the levels, which is a fun way, and that's already given
us some interesting looks. And now you want to go
ahead and just kind of experiment and find what all
these different nods do, because there are so many. So it's very, very, very, very important when
going through all this that you are very
open to exploring. We're just setting
the path for it. So that's one way we can
establish some materials. Another way we can
do this is just, let's start from the
black mask again. We can just click on
that mask and say, let's add a fill
modifier onto that mask. Let's just put a
texture in there, like a procedural texture. So if I click on that
fill and then go down to see where the anatomy of that film modifier
is under properties. Let's click on that
gray scale and let's go for typing in dirt and just seeing what's going
to be pulled for us up here. And let's look for
some fun dirt. Any kind of dirt, you
can do dirt spots. And if you hover
your mouse over it, depending on what you want. Let's say I chose I chose
my own kind of dirt. I thinking I liked this one. Dirt cloudy. Now, you may
it may look like it's overly kind of
overly little shiny. So you can once again
sort of manipulate that by looking into the parameters
of this dirt cloudy. Like for example, you can change the parameters here or you can manipulate the hardness
first and see how that definitely changes the
parameters of cloudy. There is all sorts of
ways you can do this. In addition to dirt, you can just go ahead
and just experiment. Just try different
things on here. So I can, these things
give you what you want. And some of them are
standalone Alphas. So I want to look
for something that's kind of like dirt spots, that it looks like one that
can be interesting for me. But we need a little bit more, little bit more fun out of it. It's not really giving too much. What if we invert this though? Now let's see what this
looks like. There we go. There's our kinda see ourselves a little bit of an interesting texture
along with that as well. I guess that's one
thing we can also do is when I say this,
don't forget to. If there's an invert parameter, always make sure you're
hitting the invert parameter. Because we don't know what
something fully looks like unless we first
inverted like so. You can kinda see all the different types of
manipulations for Russ. Now you may want to
just stop all that. And if you want, you can just do an
add to paint layer. And then just simply go
through the brushes and simply choose something
like maybe artistic hair, soft sponges like here. And just sort of manipulate
the roughness like so. Or manipulate splotches
of the roughs. You can kinda go this route too. So there's all sorts of fun
looking ways that we can have width of messing around
with the parameters, both procedurally,
manually with a brush. You can right-click and change the brush presets there by hitting just
again right-click. It's just you. Having fun. And exploring is probably, like I said, the most
important part on this. So with that said, let's just go ahead and
just wrap it up there. And in the next lesson, we're now going to show you how we are going to
take everything we have here and just move it over to the arms with
minimal amount of work. So that said, sit
around and stay tuned.
15. Texturing the Limbs: All right, So let's continue on. In this video, we're
going to move on into the limbs area here. So we're going to show
you how we transfer some of our detail from our
body onto the limbs, which is going to be a pretty
easy and simple process if we think about it. So let's just go ahead and
dive into it and get started. So I want to take all the
information I did here, or at least aspects of them information and
put it onto here. So the first thing I
need to do is look at all the maps that I'm
gonna be transferring to. I'm going from my body
map to my limbs map. So I'm just going to turn
off everything like so. And then I'm just
going to first of all, select my outer pad. And I'm gonna look at all the
folders that I have here. And really what I need
is just two layers. I just need the blue layer, which can be done
here with the PVR, plastic and Steel Age. And from here, when you hold
Shift and left-click down, click the steel age,
and then right-click. From this point, simply
hit Copy layers. Now, take a look at everything here on that
thumbnail of that mask. If you notice right there, this mask matches this map. So if we go to our limbs map, Let's go ahead and delete that layer and hit paste layers. Now if we take a look at
that same thumbnail again, you'll notice the mask changed. That's because this
is a generator. So what procedurally
generated mask, therefore, it's going to
automatically rearrange itself to what is
being shown here. A normal mask if you transfer across maps isn't going
to do that thing. So we got to keep that in mind. Now, moving on, let's go ahead
and make some adjustments and then reapply our
greens like we did before. So this means of course you can go through your generator, your ambient
occlusion generator. And maybe you want to put
a little bit more blue. You want maybe a little
bit more contrast. Or maybe you would like to work with another
generator like Metal Edge. And that's, we're going
right back to it. You need to be in that open
mindset of experimentation. And I'll just move
some things around, have some fun with it. I kinda like kinda
like this one, but the ambient occlusion one. Still some areas that I also would like to
experiment with. I also will say, based on what you've learned
from the last lesson, we can also do the
smart masks approach. Like if you just
wanted to just drag and drop and see what something looks like through their go through the generator and inverted to see what
that looks like. You can do that too. Again, just like I did, except I believe I used the smart mask sand
as my generator. We then look at it. We just say to ourselves, Okay, This is pretty cool, but let's see if we can have some fun with
exploring the parameters. Let's see if we can
do the global mask. You see what I'm
doing right now. I'm just having fun
with all these areas, trying to just get a very fun
texture out of all of it. And I kinda like it like that. Now that you have it like
that, you have your blue. Let's just go ahead
and re-establish our grains and areas
we want to choose. So I'm just going
to right-click on that mask or I'm sorry, that smart material thumbnail. And I'm just going to duplicate that layer and I'm going
to call that green. And then I'm just
going to go ahead and change the anatomy inside that smart material to a similar tinge green
that we have over here. You can also use
the tear dropper and kinda go with something
like this if you want, and then try to match
it a little bit more. Now it's up to you. No wrong answer here. Then, like before, we
can either do a fill or just what I like to do is put it in a folder to
make things simpler. Grin. And that's just this green area going into a green folder. Because again, this is
a generator, like so. And we can't
manipulate generators. So I'll just add a
black mask on there. And choose the path in
which I want to take. Maybe I want these
areas to be green. Maybe I don't want
anything here to be green, or maybe I want this
area here to be green. Or it's completely up to you. Which path you want
to take with this. Or you can also just
do an inversion. Just to, again experiment to see what something
looks like. You can kinda do that. One thing I will say, I kind of like I think I like this
area being green here. Then this area being green, then this area being blue. Just kinda going back and forth. So we have something a
little bit like that. So let's go ahead and just add. Now, at this point, I'm going to do the
same thing here. I'm going to mask out
the blue paint here. So let's just steal
Dark Age showing. Make sure, oh, I forgot. This is a generator. So let's put that in there. Then call that folder blue. Add a white masks
so we don't change anything and just go ahead and make sure the
value set to black. That way we have
something right there. We can now maybe mess
around with putting a chalky color in
there just to get some contrast going on. Like so. So let's just go ahead and finish up
with one more thing here. I'm just going to add
a smart material, just to add some more things on there and get some
practice in here. It's going to be, let's see, a new folder called biceps. And I'm just going
to add that in there and add a black mask. Let's bring it in here. And maybe here. Then we're just going to add, go through the smart material. At a black mask. A generator could just add a white mask
and non-degenerate. Just want to have some fun. Then I'm inverting
the value so we can have something a little
bit more interesting. So now we got a little
bit more of a area. You can kinda see already how quickly I went through this, but we now still have some areas we can
still take care of. One thing I do want to do
is finish up the arms in the next lesson with a little
bit of of some Gribble. And so that's going
to be sort of like the next one that we work with. So like let's say
hold on a second. Make sure that that's
all been affected. Good. Just want to make sure
some things there. So from this point on, we can also do things. I may try to create a
little contrast here. You can do that through
the polygon or I'm looking at this bicep
and I kinda wanna cover up this area here. So I can do that through paint or through
polygon selection. Make sure we have a dark value. Go on to expect, don't hesitate. If you want to have a
little bit of fun on here, you can maybe want to generators taking away too much so we can't make any
of the green go through. So let's go ahead and say
if you want to go further, that is what we're
trying to say. Go further. We don't want to take anything too far
because we want you really, really, really to focus on grasping concept
before mimicry here. So you're understanding
the concept of masking and how we control
Fill Layer Smart materials, materials and manipulating
them how to blend on top of each other through
generators and smart masks. We want you to break that barrier and focus on
things like color theory, on how you can manipulate, mix and match everything too. So we want that interaction. So in the next lesson we're going to just
work on just filling in the insides which will
be somewhat similar to the outsides and do a little bit of work
with emissive effects. So with that said, stick
around and stay tuned.
16. How Emissive Effects Work: Okay, So let's finish this off. In this video, we're gonna
go ahead and finish that under wiring gravel underneath, and also give you a little
bit of a brief explanation on emissive effects and how we
can apply them to wires. We're also going to talk
to you a little bit about the pros and cons of that. So let's go ahead and get
started if you haven't already, Let's go ahead and
put some something in here for the walk. These little blades here underneath just
to have some fun. I don't care if it's just
something real super quick, like a smart material
with a black mask. We don't necessarily
need a folder here. You can just click on all these related areas
that we're seeing here. And it's just a quick
run here on this. I'm not necessarily married to It's sort of a
secondary effect. Or we're going to really be focusing on is a
couple of things, the wires here and how to
break them up a little bit. So one thing we can do is like we have small wires in here and we have a bigger wires. And for that, we're going to talk to you
about fill layer again and how they can be modified
with additional channels. Now we already went
over this with the opacity when we added
an extra channel in there. But we didn't. Opacity was the
only extra channel. We add it. We didn't add anything more. Let's go ahead and take out to miss it so I can
actually show you again. We're going to add a
fill layer in here. And it's gonna be at the top. We're going to call
that emissive. If you look at all
the channels here, you'll see everything
is its layer base, so it's covering up everything. Let's just turn off all
the channels just for now. And now it's almost
like an empty node, this fill layer, it's not
really affecting anything. So let's add an emissive channel into it, this fill layer. So every time a filler comes up, emissive comes up as well
with everything else here. So we'll add a channel. We'll choose emissive,
circled back to our layers and we'll see a
message show up right there. Let's turn that on. And you're not going
to see any difference because it's in black. So if we turn it to white and you're going to
see something happen, now, you see this
glow right here. You probably don't have that. So let's go ahead and
back up a little bit before we go over
glowing effects here. So let's see if we can find them trying to
trick myself here. Let's go ahead and
activate post effects. Let's make sure that it looks
the same as your screen. Now, as you can see, we have an emissive channel. It basically
overruns everything. It's like a super
blown out ambient, the way it just takes
out everything here. If it's a 101% color, it's going to be in white, It's just going to
take out everything. So let's choose a color like maybe something of a light tint blue or something like that. And go with that. It's
at a black mask to it. And select our Selection
Tool, polygon fill. And we'll do mesophiles since these are
separate model objects. And we can just kinda go
through and pick out. I'm going to go for like
just this super thin wires. I'm not really going to go
for anything other than that. Maybe just like one
wire over there. So I'm just kinda choosing
out really super thin wires. Then for the rest of what I
think I might do is just add a bright color to help contrasts out the other pieces
with a material. I'll just add
black, like copper. Now that's not, we're not going to go with
this as a choice. This copper, we're going
to go ahead and modify. It's still a little bit more to be desaturated because
this is an awfully, we want to desaturation
of a model, not necessarily one
thing or another. Let's go ahead and
modify that copper now and see if we
can manipulate it. Something like that. We can also do things like just won't think roughness is affected in this
area. Kinda is. We add three other layers where roughness is probably a factor, so it's up to you. You can just add an overarching
fill layer and just make that be the thing that
dictates roughness. But just go with that. Let's just have a little fun. Try to pick something that can
contrast out a little bit. From the top blades and
the the small wires. Like little bit, maybe
something there. So now that we have
our MIS of effects, Let's take a look at our emissive layer
and our copper wires. Let's take a look at some
emissive effects now. Now to enable a miss of effects, you've gotta do a
couple of things. First off, you gotta go up
to the shader settings, which are, I'm sorry. You have to go up to
the display settings. And then you have to go
down where it says activate post effects to turn that on. And then you see
where it says glare. You might have to mouse over to where this checkboxes
and turn that on. So now we have a
little bit of a glare. Now, it still doesn't
have a bloom. So one thing I want
you to take a note is when you open glare
and scroll down, it makes sure the shape
is set to bloom like so. And then finally to add
some glow intensity, you just click on is we have
display settings right here. Click just below that, and look for the
immensity channel. Now, this is where we
come to a good thing and a bad thing on Substance
Painter is that these settings, you can make this bloom, but you're going to make the
overall area bloom as well. This is a render setting
basically for effects. Now, one thing that can be done is that you can, for example, if you're trying
to do a rendering, you like the bright blue, but you don't want
this to be so bright. You can do a render with one where it's completely
bright like this. You can do a render
where it's just completely down like this. You can, or further
down like this, you can do two versions
and then composite the two on what you want
to see in Photoshop. You can do something like that. In other words. So
with that said, let's just go ahead
and move on from here. This was sort of a crash course, a little bit on
how to get you in this mindset of understanding
a little bit more, getting a little bit more
practice with things like the emissive effects and
doing some extra editing. Again, we're on fill layer,
so it's non-destructive. And I said this over
and over again, experiment to your
own color theory and go beyond what
you're seeing here. So if I'm, when I say go
beyond what I'm saying is like you saw
me do this color, do a different color, or you saw me do these
selected wires, do the inverse of these wires, and then see if you
want different areas. Or maybe you want to
use the mask and paint, sort of like a line right
here where this area is. And you probably have to go
a lot smaller than that. Paint a line along here. You'll have to take
your time to really trace it and hold
down that Shift key. But it's just the same concept. You can just kind of paint
a line all the way through. So I really do want
to focus on that. Go beyond my work is the goal
in order for you to learn. So with that said, we're just going to have one last section and it's
pretty easy section. It's the, it's the
shell section. And after that, we're gonna go ahead and finish up
with some rendering. So with that said, sit
around and say tin.
17. Texturing the Shell: Okay, so let's finish up
on the last section here. Now we've finished with the
wires and now we're kinda, I'm going to hold
Shift and right-click to rotate the light around. And we're going to talk
to you a little bit about this area right here. Now this is our fun
little shell area, and it's not gonna
be too complicated. So let's just go
ahead and upgrade and kind of go through and
click on our shell map. And I'm going to hit the F
key to center this around. So it's not really going
to be too difficult. We're gonna do is we've always done create a couple of folders. We see that there's an outer section here and
an under section here. And we can do one of two things. We can click on it, each one, or we can just use the
areas here as our clicks. Now I made the UVs a little
bit smaller underneath since you don't
really see too much of it and a lot of
it's dark and doubts, so bear in mind with that. So I'm going to first call
folder on the top outer shell. And we'll just go ahead
and call this inner shell. And so let's just go ahead and let's start off
with the outer shell. Let's first of all just
put something in there. We don't have to
put a fill layer. And because we're
getting now pass that whole area
of understanding, Let's start off with
something basic. And then we'll just go
ahead and add a black mask. And then we can select
everything to be for the outer shell that this
plastic PVC is going through. So we can do mesh by Phil and you can go ahead
and click everything here. Or if you recognize the UV shells in what are the outside and
what are the inside, you can just go ahead
and do it this way. It's the small grained
ones are the ones you got to watch out
for and not select. So now I'm gonna go ahead
and copy that mask. And I'm just going to add a, another mask and I'm going
to paste into that mask. So we'll have the same thing
and we'll invert the mask. Let's see what that does. If we drop something into there and we should
see two results. So that's sort of a quick way to deal with the masks without having to re-select
everything all over again. So with that said, let's just go ahead and
I'll work around with, I'm not going to use
plastic glossy pure. I'll maybe just
go with something like oh, maybe just still. Or maybe something
a little lighter. Still. Probably. So many things. I like clear coat. I've always liked clear code. So we can just go ahead and
stop there so we can then do things like steel dark
in the I'm sorry, still dark in here. You can kinda just just drop
some stuff and see what it looks like and then
make a decision. You don't get tunnel vision
with what I'm doing, just start experimenting. But I'm still going to walk
through what I'm gonna do. We're gonna do, let's
say smart materials. I'm sorry, smart materials, regular materials, plastic, PVC, and underneath, I think we'll go with let's try steel
paint underneath. Okay, so now we've
got something that's a little bit more
cast iron metal. Let's add a generator to that. And let's go ahead and choose our metal
edge tear for that. Oops. I'm sorry, I did
something wrong here. Let's go ahead and undo that. Add first the mask. I must not have clicked it. Then let's do our
metal edge tear. Let's invert the value of that. It's bumpy. So let's
modify and edit that. There's a whole
bunch of things and smart materials we don't need. So let's just underscore
all of it in the folder. Like so. And I'm also going to do a little bit of time
just taking a moment to see what sort of Everything is. What I wanna do is, is there's the, there's
two sort of textures. There's this cast
iron texture and there's this little
grain texture. And I got to now figure out and problem-solve how to get
rid of one over the other. So I'm not going to try. It seems like I can destroy
one without the other. So I'm going to have to
go into steel painted and do some manual
editing. There. Sometimes just going
through and turning on or off to see where it's at helps. And I would say probably right here. Right there. It was wrong. I forgot that. If I'm inverting the mask, it's gotta be up here
on the plastic edge. So now we have that
taken care of. It's pretty decent. Now let's mess around with the generator and see if
we can have some fun. Some of the warp. Like so. We're going to have a little bit of fun
where contrast, like it, a little bit
more messy, like that. You can just enjoy what
we're getting here. I like the idea of the white edges a little
bit, but I'm thinking, yeah, kinda like that. It kinda accentuates the edges and the tears a little bit. You can bring them out
a little bit further or a little bit like that
with the curvature way. Curvature weight is affected by a curvature map and it looks
like that's been turned up. So that's already a little bit of what I want to go for
now, if you want to, this is a lot to do
with color theory to, so that's kind of where we
experiment to have some fun. You want, you can, if you want to create a
little bit more contrast, you can kinda do that as well. But don't forget that when we're looking
at our steel paint, It's right now
being procedurally manipulated by the
mask generator above. So that means that we can do additional things
like clicking on the mask, adding either a paint layer, like so, like a modifier. And we can just go through, select our brush and start painting things or
right-click and do a modified brush by scrolling
down and clicking on choosing all the
different Alphas with DEC textures and oranges. And then afterwards scrolling down to define your
value parameter. Those are also processes
that can be done as well. So that's sort of the
whole gist of that. I'm okay with everything here. I would like to say that if we can do maybe more
things underneath, if you want, we can. This is I'm trying to do less
and less so that you can be more open to filling
in the gaps in there. Like for example,
you might wanna do steel armor and then
do the same concept at a generator into
that steel armor and go with the same whole idea. Invert. Just sort of manipulate the
generator that way. I think I did that
to the mask and not the steel plant.
To the wrong one. I dropped it right on
top and it didn't go in. There you go. Now we can kind of see it a
little bit better. Now we can see all the fun
things that go into it. Bring that in and try once more. I'm adding a white
mask this time with a generator and clear coat. Now let's manipulate
the wear and tear. You can do that as well, just to have some fun. But don't do too much
or get overly hung up on the the underlying detail. It's not seen as much
as the top detail. That's kind of where I'm hoping that you will put
most of your time at. So this is a conclusion. Now we can bring back
all our materials. We can kinda see now everything's been
kinda completed out. So now what we're going to do is we're going
to talk to you a little bit about the
rendering process in irae. And we're going to go over think fun concepts like
activating the bloom, the missives, putting
them together, going over render times and the pros and cons of IRA and where to
take it from here. So with that said, sick
around and stay tuned.
18. How we Export Textures: Okay, welcome back. Now in this video, we have all that's left is
to worry about is rendering. And we wanted to give
you a sneak preview of some settings that we set them with to give
you some render results. Because as you can see, this
looks probably different from what you saw
in the last video. But we also thought it's a
pretty important thing to be talking about exporting
textures once you're done. So we decided that
in this video, we're going to show you how
we export out textures. And then in the next video, we're going to backup this
and show you how we got this little setting
here and how to render out a piece in irae, like you see right here. So for now, this video is gonna be
about exporting textures. The next video after that, we're going to talk
to you about irae and rendering and producing your own little baked out
beauty, pass an image. So let's go ahead
and get started. Once you're done
with everything, you're going to go up
here to where it says File and Export textures. You're going to have
a pop-up window in three tabs come across. So we're just gonna
kinda go over this. Now, if you look first
at the global settings, you'll see here five maps. Like we said before at the
very beginning of this course, this is a practice
educational models. So we put in five
maps, five uv maps. Generally speaking, you're not really supposed
to have that many. We just wanted to
give you as much practicing time as
we could and how to give you opportunities to switch between
different textures, for example, we wanted to, and how to copy those
textures across maps. We just wanted to basically
make this educational. So in all fairness,
one, maybe two, uv maps is what's going
to be for a character. But still, if we click
on each of these, you can kinda see all the different
attributes like color here. And it sort of, It's a little confusing at
first what this is like, all these things that you
see here, these output maps. But if you want to know exactly what is getting exported out, just go over here to where
it says list of exports. Now again, this
looks like a long, long, long list of
textures, right? Well, don't worry
because in the end, if you look up and see, like in an untypical
PBR metal workflow, more metal, metallic
roughness workflow. This number is all you need
right here where my mouse is. This is the amount
you would need pretty much for a character. Again, we just added
a whole bunch of UV sets on here so you could
get a lot of practice. So you wouldn't normally expect or export
this many maps out, but it's good to actually
get everything through here. Another thing we'll take into
account is if you look at the name title here,
we have color. If we go through and
let me hit cancel so I can go to a fill layer and
give you some perspective. Get back into textures. If we take a look at
a fill layer here, and it's alright here. If we take a look
at, for example, a base color PNG coincides
with what the color is here, and emissive channel is coinciding with an
emissive channel here, the height is core siding with the height here,
metallic normal, roughness, metallic
normal and roughness. So the number of channels our corresponding with
the number of maps. Now from there,
depending on where you export it to and what preset
you would go through. You would take a shader that has all the different channels and plug all these maps into it. But that's breaching into rendering and
different softwares. And this is mainly about how to texture and Substance Painter. So we're kinda
holding out there. So let's go ahead and go back to settings and output directory. This is gonna be
like the location in which you export all
your textures too. So I have a little folder
setup there for you on that output matte template is reflective to what kind of
channels we're seeing here. It's sort of our beginner
level level template. This is a course instigating
to the file type PNGs. And then the size. Do you want all the list of textures see
they're all at 2048. That is a pretty big, or do you want the texture
size to be something smaller? Like 1024 or 512? You can control that size. I don't touch anything on
the dilation, infinite. As far as output maps go, output maps is a place. That's a little more
complicated because we have a whole bunch of areas in
which we can export to. For example, if I was
going into Arnold, I would probably click
here for Arnold in Maya. If I was going to do
something in Unity, I would probably choose the metallic standard
or probably, yeah, I probably just go with one of the
Italian pipelines. So that would be where
I take all of that. It's, you click on, basically, ask yourself the
question, where's this going? And what type of
Renderer or it is? And see if we can
match it to this. If it's Arnold in Maya, I like to always start off with Arnold ai, Standard or legacy. Now, the other thing is, is that a lot of
times you can just go with regular PBR
metal roughness. We have key shot which
comes from ZBrush. It's ZBrush, separate
software renderer. And we have an updated
version of that. So you got to ask yourself, where do you want
this to be rendered? Now we're doing our
own render in IRA, which is built into
Substance Painter. So you don't necessarily have to export any
kind of textures. You can just sort of texture
right in here and do your own little portfolio
picture piece if you wish. But like I said, some people want to go
in Arnold AI standard. I prefer Arnold ai
Standard from going into Maya because maybe they
want to do a video. You dims are referring to something that is
regarding the UV's. If you have UDM UVs. Like I said, this all comes
down to if you got Unreal, you want to render an unreal. You're choosing the preset for unreal before you texture out, you basically make
your call on it. I'm going to keep it on
PBR, metallic roughness. And then I'm just
gonna go ahead and do a quick little export so you can see what
it all looks like. And then once we kinda
going behind here, you see all these maps. And it can be a little
bit confusing actually. But if you just look at
the titles at the end, like if you look
proposed pose, pose, pose, all the way. That's pose. Okay. So I'm just gonna go
ahead and just keep an eye out on all of the the UVs that match with it. So Shell is their limbs are here and head goes here. And then bulb goes here, and body has an extra
channel goes here. So then I would
create folders for each of these UV set maps. For limbs is here, bulb is here, shells is here, body is here, and head is here. And we can kinda give ourselves an idea if we open
up one of these, like this map here, it represents the color channel. If we turned off everything, it's just about the color. This represents everything
that was color in what we did. Alright, this channel here is
the same thing except it's representing the normal
map on everything we did. So it just keeps on going on. We don't have any immersiveness, so it's gonna look
completely black. We didn't really do much with emissive on the head texture. We did a little
bit with the bulb. You're probably going to see
something with the bulb. But nothing else there. So there was not really anything else down here for a height map, we didn't play around with
the height channel at all. The metallic,
definitely there was some information
that we did with smart materials on
the edges there. So you can kind of
get an idea of what everything is through,
plugging it in. So that's just a
breakdown on this, on exporting out textures. We wanted to have something
just to show you in case you intend to take your textures
and go somewhere else. We wanted to give you a
little heads-up insight and let you know there's
definitely an option. Like I said, it's not
necessary to take your textures and go to a
different rendering software. We're going to just do a cool, fun little render here and do a nice little
picture for you. But with that said
on the next video, we're going to backup before all of this and show
you how we got all of this and talk to you
about irae and how to set up for a render image and how to export
that image out. So with that said, stick
around and stay tuned.
19. Learning how to Render in Iray: Okay, so let's finish up. In this lesson, we're going
to go over Iran getting a little crash course on that and do a quick little Render. We're going to do a little
quick run-through on some of the features and settings we go so we
can give you a good, decent quality render
that you can pump out. And again, like everything else, there is plenty of settings
here we go with one, but we also show you to
go with more than one. So that will make
more sense when we do the things like panoramic
global lighting. So that will come to make sense. So let's first of all decide which angle we want
to work off of. Now, one thing that you
can do is to enable irae. We first have to go
to the very topic here and where it
says rendering IRA. And if we turn that on, That's basically going
to give us irae, like you see here. And you'll have a little Render. And if you hold left all just like it is in
the other settings, you can rotate around and pan as well as much as you want. Now the frame rate of this
goes up higher and higher. If you render with lower
and lower textures. So keep that in mind. You also click out of there. The render will also click back to its substance
painter of viewport. I kinda moved everything
around here and kind of slided that so we can see
a little bit more of this. Now, the next thing we
want to do before making our full render is to start off by going up to
display settings. That's again that
little box screen just to the right settings
and texture set list. Want to click that on. Now if you remember,
this is where we also enabled things
like glare and emissive effects if we wanted to have anything like
that come through, this is pretty
important place to be. Now, from this point on, we can have to turn on
a couple of settings. First off, you can
enable shadows as well as the opacity
of the shadows. So this is all real-time effects that will affect the eye ray. If we go further down, one thing I'll have
you take a look at is the activate post effects. Now, this is where it starts
to get pretty important. It's kind of a big deal on this because this is where you
want to do all your fixed, fixing and texturing and
tweaking somewhere around here so that you can get
as much as you done, as much done as possible. So for example, let's say I would like to turn on
the color correction. And that's going to give us the ability to manipulate
the color in real time. I'm week have a Restore
Defaults down here. If you want to go back
to its default area. For the record, we have
saturation, contrast, brightness, all these things
where we encourage you just to sort of go through
and experiment with. Just kinda look through and
see what everything does, and then restore the defaults. And this is your
learning process. The one thing I will say on my personal workflow
is I don't touch color correction until I dress. Another area, which
will be C here, not the vignette, but let me
go further and further down. Let me see if I can find it. Because having fun, here we go. The color profile. The color profile is going
to be something that you're going to want to effect first before
anything else. If we go through these profiles, we see all these different choices that we can go through. And it gives us a different look as like a different
filter to work with. And what's nice is, is if
you go through all these, you can kinda see a
very different look. You can see how
everything kind of throws out and shows
something interesting. And now you get highly
contrast the bowl renders. For me. I'm going to
go with this one here, our EC seven O nine. Kinda like this one. Now that I have that, remember when I said
before touching color corrections,
choose your profile. Will we chose our profile? We're going to make a little bit more adjustments on the white points so we can
see it a little bit better. Now, we're going to go through the process of just
tweaking some small stuff. Here in Substance Painter. We can, we can tweet
contrast to work. We want you to just kind of
have a little bit of fun. I think contracts should
probably just stay slightly. It's just the small
changes that you make is the important part in. This is an interesting
one right here. So let's see if we can kinda see how we can give an interesting
look about that. That's kinda neat scenario. Here. Let's keep it there. I don't
want drowning out my colors. Right. Now if we keep going on, depth of field represents the
depth of the bore of this. So like, you know, we kind of go through and we can kinda see
the measure of blur. It's like basically going
to be blurry from here. If you hold left command
and middle mouse, you can set the
focal distance point to be different places. I'm sorry, I chose
the wrong one there. I'm just kinda want
to bring things in, maybe blur out the back there, but keep a sharp end right here. That might be interesting. Let's say vignette. Vignette is something that helps us kinda darken the edges. So I think like if we really turn that up
all the way the vignette, I would go back into color correction and
compensate in any areas. So like if it's the right or the white
balance temperature. A little bit of that, maybe
less compensating here. Let's go ahead and look at that temperature again
because we kinda lost it. You kinda see what
I'm doing right now? I'm just making these tweaks. I'm just sort of mapping in
my head what everything does. And then going back, every time I add something, I go back into my color
correction to compensate for it. So with that said, we can also add in anti-aliasing
so that that helps better subsurface
scattering is for more transparent things like skin or translucent materials. We don't have any sort
of scenario with that. For everything else,
we seem to be good. So we have our first default. Let's go ahead and look
into some extra things. Environment map
that's just affecting the lighting on the outside
giving us a different light. And you can see all these
different panoramic views. Again, just like with
the color profile. Like that's an interesting
one right there. How it kind of
gives us this look. That's pretty neat. We have all sorts of
interesting looking pieces. So we want you to be
very experimental. And don't forget
to rotate around. Hold by holding Shift and right-click to see
if you can have some fun with the
look of this model. That's sort of a sort of a fun thing to go
through and explore. Let's see here. Kind of like this
one a little bit. It brings out the
most color on here. But that other one that we did, which was this one that was kinda neat to gave
us a greenish more look. I'll go ahead and
go with eight year. But don't feel like just
because I'm doing this, that you have to do this, you go through all
the environment maps, make sure your
lighting is correct by holding Shift and right-click
and dragging across. And then have some fun there. There are a few more things
that we have to do still met. Want to make sure if
there's anything I missed here that's gonna be too terribly important
and not just yet, There's two more things
that we really have to do. And one is first, let's go ahead and
bring the rendering. We see a background here. I want to get rid
of that background. So let's go ahead and we have
the display settings here. If it doesn't show up, just simply click off it. If it comes in
looking like this. Just kinda go over here and hit Display settings and just
kind of docket in like so. So let's start looking
for our floor. We want to actually
look for some place. There she is. The ground floor. Notice we have that. Well, right now the ground
is kind of like that. That gives us sort of a shadow
that's going to be there. That's okay. But we want to
get rid of this background. So that's what clear color is. And with that, we can
kind of go through and just sort of, I would say, we can erase the background
and assign sort of like a, a, our own little unique
peace. As you can see. And if I hold left
Alt and middle mouse, I can recenter that guy a little bit more into
the center right there. I'm getting sort of like a
pretty cool-looking scenario, which is basically what I want, I want to go with that. So with that said, I think this is where we
want to kind of leave off. Now, the last thing
we're going to go over is the quality of I render. Now the quality of I render
is a interesting thing because what we're going to do is we have Min samples
and max samples. Let's not change anything
on here for now. We don't want to confuse anyone, but that's the number
of samples that we have on here that define what, how grainy this is
to how clear it is. And for some people, if we go back, if you want to make
any changes like make this less glossy and
more translucent, you already know
what to do there. You just have to go
through the bulb and just add a fill layer and
adjust the roughness. You know what to
do, how to create a glass so you can
do that. Max time. This is where it
all comes down to. I'm going to set
this to minutes. And what will happen is, is when you say max
time, ten minutes, that means it's going to keep on rendering for ten minutes based off of this number of minimum samples to this
number of maximum samples. I am okay with five samples to
ten because I can still get what I want out of it. But I want you to
be in the mindset of going through and thinking. This is how I want to, kind of, the longer this takes, the better the results are. So I'm going to go
higher if you want, goes out, stick sampler enabled. See these little white spots. It kinda helps with
that a little bit. It just kinda helps just to address certain
areas with that. So with that said, we have a couple more things
we just need to talk about. And one is override
viewport resolution. This is where we can
define the size of our our export to be image. And if you want to go with
something is exportable, and you can certainly do that by just simply changing
the document size here. You can go with a portrait piece or you can go through and just simply hit to a 1024
by 10242048 by 2048, resolution 4096 by 4096. And you take it
into Photoshop and you raise it down to 2048. It's all up to you, your choice, your
call in all of this. So there's definitely
not no such thing as a wrong call in any of this. So with that said, there's not too many other things that
we're going to say, except if you want, you can change the
Min samples to one. Always, never really do
that because it's not, the default really
is all I need. So with that said, that's pretty much how we do it. If you want to export
the image out, you just click on
Save render and you can label it
out as you want. So I'm going to
tell you right now, this is the concluding
part of the course. This will also be a, a sort of a prelude
where we wanted to remind everyone that please go outside of the concept of what
is taught to you. Here. It is a very, very, very, very important aspect to go beyond what is
being taught to you. So when you see me
doing things like this, and you see me doing Whole bunch of textures
like you see here. And I'm showing you how to do smart materials and smart masks. Again, I'm trying to also
get you to see how to do something and
explored the hundreds in different ways
it can be done. So that's, that's probably
what I am going to most four, you're going to drive
my Min samples down. Still see it a little
bit noisy here. So I'm going to go
ahead and work on that. My reset me, but care. The other nice thing about
this is that if you want, you can always make a
very much a bigger piece and really get a
super high resolution render that you can downplay. But I will go ahead and
also say that I really, really am interested in seeing the different renderers
that come out of this, the different lighting
schemes that come out, as well as Different,
how shall I say, different color choices, which are super important
in grasping texturing. I did a green, blue, I chose green because
it's a turtle. It's nothing like anything overly complicated beyond that, it's not really a whole
ordeal of a mess that is that much more deeper
or confusing than that. But I really want to see exploration and
growing and going beyond the concept
that says it's said at the beginning, keep
texturing, please. Keep growing beyond what
I teach you and keep surpassing what I have in front of you, get more creative. And that means to invent. You see like for example,
this bulb invented, use a user interface of
a fill layer and draw some designs with the emissive
channel on a black mask. And sort of break the boundaries that you're
seeing in front of me with an interesting and
unique user interface on this little bulb. I really hope that, that people will
consider doing that. Please. Definitely break and surpassed main because that is the whole purpose of
this entire video is to get you in a mindset of texturing better than
what the bar is here. So with that said, I hope you have enjoyed this
whole texturing process. And of course, you can
use this model of for your portfolio when it comes to demonstrating your
texturing or rendering skills. Or if you're a rigor,
you want to rig it. Or if you wanted an animator, you want to animate it. It's yours for portfolio
and you have my permission. I'll ask for credit on the model and the sculpt,
and that's about it. This is yours. And I really mean that I really hope and wish you the best of luck in your
journey in your, whether you are just a
casual 3D artists for a professional 3D artists or an aspiring to be
professional 3D artists. I wish you that lock in that just like I
said before, please. Just keep texturing. Thank you again.
 Sean Fowler, 3D Instructor