Transcripts
1. Before you begin: Thank you for signing
up for this course. All of my courses
include instructions at downloadable image
and the materials you will need for this class. These are all done and four
inch by four inch size. You can choose to draw
a smaller or larger, but I recommend staying with the original size to
stay with the pace. Please read the instructions
before beginning. Once you have completed
the portrait, I would love to
hear your feedback. You can not send me
a message through any social media or email
with any questions, comments for a photo
of your results. And I would absolutely love to see your results by the end. So if you do have
a picture of it, send it my way, any which way you can. So thank you again
and I hope you enjoy.
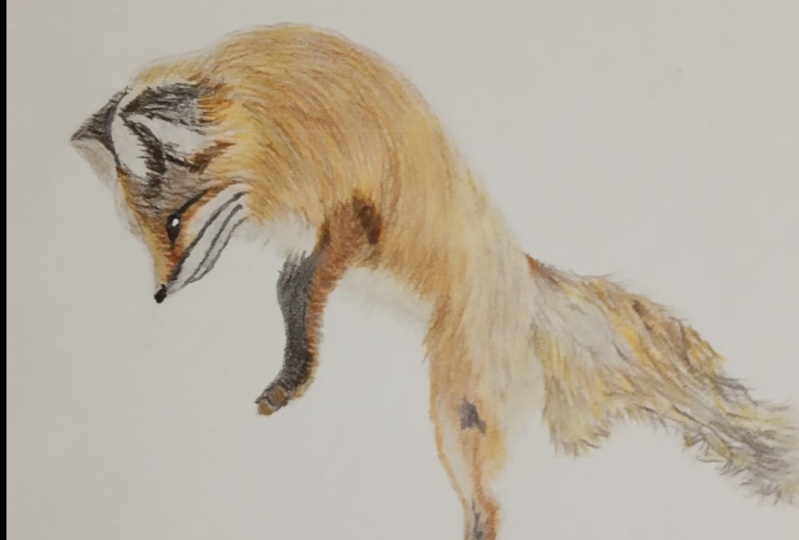
2. Part 1 Intro: Hello, hello. Let's get started on
this fox tutorial.
3. Beginning the head: And as you should know by now, this is done in a
four-by-four inch. And so we'll go ahead
and get started with a black colored
pencil here. Now, if you've done the outline, it'll be a lot easier if you did to be able to
drop proportionally. At least for the most
part, it really, I think I'm doing a lot of free hand with the
colored pencil, but the outline that does
help in terms of I, you know, where things are located, at least for the
eyes and the ears are in the limbs as well. So that's really why
I do an outline. And it does go by a lot faster. We'll use this black here
and we're just drawing the ears first,
the pointed ears. And you don't want to use too
much of a heavy pressure. Of course, you want to be
able to build up your layers. So even if it is just gonna be simple, black colored pencil, you still want to build
up your layers that we don't ruin the paper underneath. And as we finished that part, there is a little bit
of black and it goes underneath the right ear there. So we're going to kind of emphasize that
just a little bit. You have to be very
careful to not draw too heavy because
it is just barely there. And a little bit of
the fur as well. If you are a little bit, I'm afraid of using the black
for the for right there. You don't have to
draw that area. You can wait until you've filled it in a little bit better. So now we're using
a light warm gray. And you can use this in the
same colored pencil set. Or if you have Karen
dash luminance, that's what I'm
using for this one. And you're just filling in
the spaces around the ear. Most of the head, that's gonna be your
good bass player. As well as smoothing all of
the colored pencils on top. Which is called
burnishing or on, which basically blends those
colored pencils together. So that's what you will
use that in the future. But for now, we're just
doing that first layer. And of course you want
to make sure you're using a light pressure. Be careful where you're
drawing it that way. You are not drawing outside of the proportions for the
head of the fox there. And now using a brown
colored pencil. Great. Now you can't really see it, but you can see the little tufts of hair coming just
below the ear. And you just kinda wanna
draw that a little bit and kind of fill in some of the black part of the ears itself to that way it's not
just straight up black. And just basically
anywhere that you see, darker toughs of fur is where you're going to
use that code pencil. Now you do want to make sure
that your pencils are sharp. Sharp as possible. I know mine aren't
quite as sharp. But that's something that you want to be sure you're doing, especially for smaller sizes. Because the sharp pencil, the more detail you
will be able to get. The I is nothing special. It's just kind of a small almond-shaped and
you just want to be careful where that's located. It is a little bit closer
to the edge of the head, the top of the head
and they're not nostril area so it's
a little bit closer, you know, not to further back. And it does have this
little black Tulsa for kind of like a black
smudge it comes down to, but if you are a little afraid of doing
that with the black, you can just wait on
that until you've filled in more color and the head. So we're going to use
a pale skin tone. It's almost creamy ivory color. But just pick
something that's kind of like a very pale skin, almost yellowish tint to it. And you use this very lightly, just like your first
layer for everything. And I'm kinda start to fill
in the spaces there. Now you do want to
make sure that you're drawing in the same
direction as the firm. And the work can be a
little bit sporadic. Sorry for the shaky
camera there. But we do want to draw in
the same direction as the further that you see in
the reference image. And then you can use the brown
color pencil and start to bring in the fur
around the ear there. And of course, make sure it's
very light, not too heavy. And you can go back
and forth between the brown and the red brown there. Now this red brown is kind of, I'm like a good mid tone for a lot of the rest
of this fox here. So that's something that I
will keep coming back to, really ties in to
the orange tones, which we will be using a
orange colored pencil, as you'll see in
just a second year, it really ties in those
orange tones on top of that yellow base layer there when you use
that bread, brown. Now I know you can't
see it as part either, but you're basically
just filling in where you've already drawn that first layer with the
orange and not too heavy, of course, and you just kind of blending it in a little bit. Not, not too heavy
of a pressure. And really just making
that second layer and warming up that the first
layer with that yellow, turning it a little
bit more orange. And then now we get to use
the light warm gray to finish up the rest of the
face of the fox there, just before the
nose and the mouth. Because underneath the
math is mostly white. Leave that area a bit more blank than the rest
of the muscle there. And then we'll use the
black colored pencil and darken up some of the
features that look like it has a little
bit more black in it. I'm breaking on the
top of the head that some of that furnace be
darkened up a little bit. So we're doing that there. And you definitely want
to use short strokes, short and light for this area because it is a
smaller portrait. And going back to the
handy-dandy light warm, go re, colored pencil and we're just filling in a
little bit more here. The light warm gray is the base color that I'm gonna be using for this fox,
believe it or not. Oh, great base layer for
the fox because it's more neutral tone with
a hint of warmth to it. So it works really
well for being able to blend the colors together as
well as that first layer. So that's what we're doing here. And you'll start to learn these techniques
and stuff over time as you start to practice more and more
with the colored pencils. That's something that I have learned over a year's time span. I'd say, you know which color
pencils work best for you, and especially with the paper. Paper is a very important piece
of the portrait actually. And you want to find one
that suits you best. There really isn't one that is the vast kind of use
with colored pencils. Some people like more of
a tooth to their paper. The tooth basically
means a rougher surface. But I like to use more
of a smooth surface, but on a thicker
paper, I'm actually
4. Head and neck: Smooth surface but
on a thicker paper. So I'm actually using hot
pressed watercolor paper. And it works great for blending colors because it's
thicker so I can actually add more layers as I go without ruining the paper. Or I've noticed that
a thinner pieces of paper don't take
well two colors. So the thicker the paper, the better that it will take. Two of the colors, meaning
more vibrant colors, darker, black, stuff like that. So that's one thing
that you just had the try out for yourself. Of course, I have options
for colored pencils and paper in my materials list. And those are ones that
I've tried out myself. So, you know, of course that there's gonna be a lot more
options than just those. But it's always good to get a good foundation first
and try out one side. Other artists have
tried before making a big financial
mistake and purchasing ones that definitely don't
work with colored pencils. So I really like Prismacolor
colored pencils. Those are my favorite
for starters. I still even use it to this day, but when I make
commissioned portraits, I like to use Faber Castile, polychrome OS, and
Karen dash luminance. So those are my two favorite
and one is wax based on, one is oil-based, so they both provide their own benefits. So the face is looking
pretty good now I just wanted to do
some touch ups on. Later on. I'll also add more to it, but it's pretty good for now. So we're just going to continue on and darken underneath the
mouth a little bit more. Use the brown colored pencil and darken up some of the
features a little bit. That way it looks a
little bit more complete. So now we're going to use
the pale skin tone and finish up a little bit of the bottom area
of the head here. And use the black too
for the mouth there. And once we have
that part down will start to move on to
the rest of the body. You definitely want
to make sure that you have a sharp pencil for the mouth area because it's
a very thin line there. I even drew a little bit thicker than the reference image. Now back to the light warm gray. We're going to finish
it up a little bit here under the chin and just really start to blend
it in title and together there with
the light warm gray. And I know it's a
pretty small portrait, so it'll be a little
bit difficult to get those key
features in there. But I really love doing
these small portraits. And my favorite part about doing these small portraits is
that you can get them done within a reasonable time. A lot of these little
portraits you can get done in an hour to two hours. Well, probably more like
minimum of two-hour timespan. But you can also go
up to like four hours for some other ones that you really want
to add more detail. And the reason why I love
these little mini portraits for that is that anybody can do that within a
two-hour timespan. Anybody can complete a whole
portrait within two hours. And that's what I want. That's my goal is for
you guys to really enjoy the drawing part while also completing a whole portrait and feeling satisfied with that. So that's why my all my
monthly classes are done in a four-by-four size so that you can get that
whole portrait done. And B, feel like you have accomplished something to be
proud of yourself for it. And the more that you practice, the better you'll get. And that's something that I
did myself to was I just kept practicing and I did lots and lots of portraits
and a lot of them, I was frustrated
and for sure, but And over time, it got
better and better. And I loved the satisfaction
that I got in the end. And once I kept going with
that because I was satisfied, I even started to enjoy the
process a whole lot more. And because of that, I'm able to complete larger portraits even though
it takes a long time. So we're using the
pale skin tone here and continuing on
now you do want to leave room at the bottom of the of the fox there
because it is white. Toss a pair there. So
we don't want to use, but just use that pill skin tone and draw in the same direction
as the first course. And parts of it starts to kinda come down
and out a little bit. And then towards the
top because come up and curves a little bit rather than
sticking straight up. So you definitely want to pay attention to that to make sure that you're drawing
in that direction. And then we can
use a light worm, great to use as the shading of four though
white fur underneath. You just very carefully
with a sharp edge. Draw the little tufts of hair underneath
for that shading. I try not to leave any
whitespaces completely blank. So I'll use very
light pale colors to draw the shadows for white. For this one thing
that you really want to remember is that when you're drawing
white furs and things, gray fur or anything like that, you want to pay
attention to the shadows and tried to replicate the
shadows than anything else. And that'll really help you go along way with your portraits. So now I'm just blending the pale skin tone with
the light warm gray here. And we will build other
colors on top so you don't have to try to heavy. Let's use the red brown
here and start to add the depth of colors to differ. And the back of the
firm doesn't have too heavy of any one colors. So we're just going to lightly
with long nurse strokes, draw that furthest coming up and kind of curving
a little bit, moving down along the
side of that back there. I do want to make sure
that you are curbing your your strokes so that it does go along the same
same pattern as the firm.
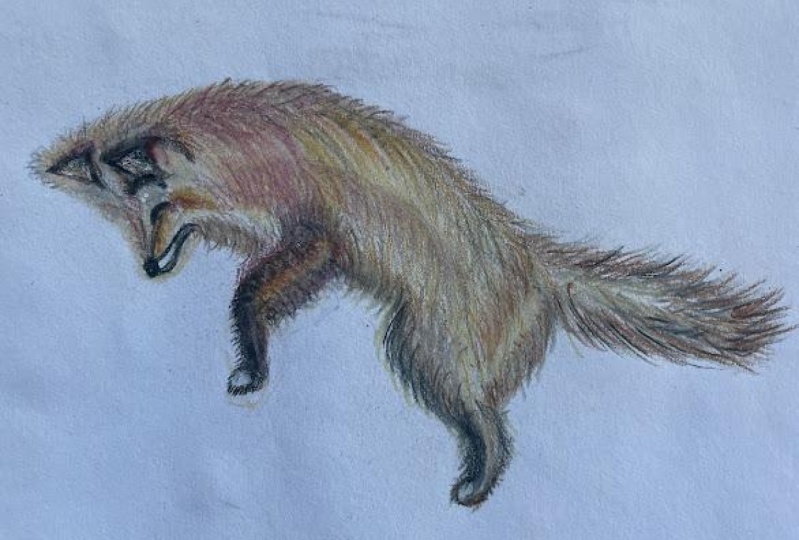
5. The back: I hope you all are
doing well so far. If you are struggling, of course, let me know. I am happy to help. You know, the one biggest thing that people
have an issue with is building up enough layers
so that when people have a hard time completing their
portrait with enough layers. And the biggest thing that I
can say that will help you with that is to be patient
and it stayed consistent. Keep building up those
layers when you think you're done and you still see
the tooth of the paper. That means that you're
not really done. Keep going, building
up those layers. You definitely want to use
light pressure and build your layers from light pressure
and light color to dark, heavier pressure
and darker colors. And the reason why you
want to start out that way is that that tooth, the paper underneath, there's not going to
show up nearly as much if you've already got
that first few layers down. And those first few layers are going to be lighter colors. So it's, it's helpful
in the end when you have the first few
layers that we'll be able to grab to
that tooth first. So let's use the brown here and draw in the same areas as
the red brown a little bit. You really, you're just
trying to add some depth, depth to the four here. So it doesn't have to be directly on top
of the red brown. Just anywhere that you see
that there is darker for I hope you're having fun so far. It is a long process, but it is definitely
rewarding in the end as I usually say. So, just keep going and
blending those colors, all the same colors that
we've used already and just keep blending
them together. Now, I'm using a
dark orange here to really warm up this area. Because in certain sections
of the fox it is a little bit warmer toned with that
orange than what the red. So that's how, but
I'm doing here is. Just doing it, you'll want to keep your
pencils sharp of course, and dry short strokes. And the more shaded
areas, I would say, the shaded areas tend to have more of an
orangey tone to it. Use the brown now to darken the back side of the fox as well as
down to the shoulders. Repeating that same
short and light strokes.
6. Front leg: Now that we've gotten a
good section down for the shoulder and the upper
half of the fox there. We're going to use the black
and start to draw the paw, as well as the rest of
the leg here for the fox. And as you are filling in the
blackened area for the leg, use a lighter pressure
and you don't have to. I would recommend
still drawing in the same direction as
the further to see. Because you'll start to see those the direction of the colored pencil
as you layer up. So you just want to
be careful about that and watch where you are drawing. And definitely keep
a sharp points so that when you're
drawing these minis, you can keep them as
detailed as possible. And now we get to use a brown
colored pencil and fill in the darker part of
the leg there as well. Since the black is
kind of a warmer tone, I'm using that brown, darker brown colored pencil. And I'm just drawing
the little bits of fur that comes out and
kinda occurs down. You can see that the
Fed does start to curve and it gives that realistic
effect of the leg. I'm rounding out essentially. So that's what you wanna do and you build up your
layers that way so you don't have to draw
two heavy there and use the dark orange and start to fill it
in a little bit more. You can do a little bit
heavier pressure since On this has all
that orangey tone. And you can still see
that the brown is showing through underneath
the dark orange. So that was the purpose of
that was to still show the dark the brown
underneath the orange. Now you can still
go back through, which is what I will do and draw in the hair's a
little bit better too. And this will help as
you're building up layers because as you've probably
heard it in the past, you always want to draw with
light colored pencils first with a lighter pressure
and built up over time. That way. You can still
see your highlights and your low lights as much as
possible with that method. And for the white fur here, I'm just using a little bit
of brown and pretending like I am drawing the shadow
part of the white fur. That's really important there, and I'll discuss that a
little bit more later on. But I'm coming back
down to the leg here are using a red
brown and warming it up even more and getting it
a little bit darker so that it does look a little
more realistic. 3d layer. I know you can't see
very well right here, but I am drawing the shadowed
area of where the wafer is. You really want to
pay attention to the the shading as much
as possible when it comes to light for so
look at the shading and just color in what
that shading looks. I cannot in the
white spots at all. So go ahead and do
that and then you'll see in a second here
what it will look like. Yeah, So you can still
see that there's white coming through and that the brown is acting like it's either a brown parts of
the fur closer to the head. And then it starts to blend into the white fur in the shading of the
white for a little bit. Now I'm sure you
want to be done with this leg hair does it's
taken a while to complete, but the more detail
that you can provide, the better outcome you'll get. So just remember that. And you want to slowly
build up your layers. Because if you have already drawn pretty heavy
and one section, without building up your layers, there's no going back. You can't go back and fix that mistake by
adding more layers. There's only so many layers
that your paper can handle, especially if it's a
thinner type of paper. So you just want to be aware of that and make
sure that you are drawing lightly and building up those layers and making sure that you are
getting that detail in. And don't forget
about the shading, as well as leaving room
for the highlights. And now we can continue
on from the leg there. And we're going to use
a red brown and just draw in the underbelly
here in the shaded area. And of course, leave room for the white fur that's underneath. You want to draw, starting, starting
down and drawing up. What happens is that when you are drawing one
direction or the other, with your short strokes, you'll start to notice
that the starting point is a little more blind
than the end point. The end point will be
a little bit sharper. So you really want
to pay attention to that as you are
drawing so that your finest points are going to be showing in the areas
that you want it to. For instance, here at the belly, you can see that it's
a little bit more blunt and flatter of the fur. And then it going towards the
middle of the body there. You can see that it looks
a little bit more finer. That's because your end point is a finer endpoint than
your starting point. So that's something
to remember as well. In case you needed to use your when you're
doing those strokes, doing it up and down
or side to side, making sure that your
starting point and end point are going to wreck
out in your favor. And of course we're
using the light warm gray as your first layer. Now this is the end of part one. So I hope that you have
had fun and not have gotten too impatient or
bored out of your mind. But I really love how
this one it turns out, and I hope that you
enjoy it as well. I will see you in part two.
7. Part 2 intro: Welcome back. So this is part two
of this box tutorial.
8. Begin the lower half: And we'll go ahead and
get right into it. We're going to start off with
drawing the leg part here and start with the
first couple layers using lighter colors with
lighter pressure, of course. And we'll do the brown
underneath the leg here. And really you just want to enjoy your time
and just draw it short strokes and
build up those layers and most of all the
patient but have fun. And it really doesn't
have to be super, super detailed
because this firm has lots of blended colors in it. And you really just
want to make sure that you're not drawing it too heavy of a pressure
at this point. I like to use this
light warm brown color to draw over the top
of some of this, some of the layers here. What that does is that blend
those colors together. Now it does lighten
it up a little bit. So if you are not looking to
lighten up certain areas, just make sure you're not using a lighter
colored pencil on top. Hello. Hello. And then in the bottom
part of the fox here, I'm going to use the Bronco
pencil and just draw in some loose detailed for here. Nothing too close together
really at this point, because we'll still
both of those layers. But for this part, we're really just trying to get a good idea as to where
the direction of the first going and also where the darker shadowed areas are for the bottom
part of the fox here. And we're going to go
down the leg here. And I start to add
in even more detail.
9. Back leg: In even more detail. Sometimes I like to work
in larger sections, especially if it is
a smaller portrait. So sometimes they'll
just kinda make very light first few
layers or a larger part of the body before I
get the details in. And it helps me kind of understand where everything
is located proportionally. When I do that, it
doesn't always work. When it comes to
larger portraits. I like to work one section at a time for larger portraits, but it's still something
that is an option for smaller portraits if you want to work in larger sections first, or finish your details and
the small sections at a time. Good. And one thing that
is really fun about this fox portrait
here is that there's not a lot of layers
that you have to build up an order for this one to look completed because
the fire is very fluffy, very light and airy. And the fluff here
it is easier it is to not have to build up
so many layers over time. But that's really
something that is up to personal
preference as well. If you want to build up
more layers or whatnot. But for this tutorial, it is all about getting a completed portrait within a reasonable amount
of time because my goal is to have you guys complete miniature portraits at a reasonable amount of time. And what that will
do is allow you to build up your experience
while not getting discouraged because you're
having a complete portrait made while you're learning these techniques at the same
time, if that makes sense. Because when I was
learning to draw, I was completing larger
portraits in the beginning. And I was rather discouraged most of the time because I didn't have a
complete portrait within, Let's say even just
a week's time. I didn't have much motivation to complete the portrait because I was getting
heavily discouraged. So what these
miniature portraits, it really allows me to have
some sort of satisfaction that I get to have a complete portrait while also learning all
these new skills. And it will suddenly
start to show up over time in
your portraits that you really are
learning these skills and you're improving it significantly without having all these
incomplete portraits. We're moving on to the tail. Now the tail has a
lot of white in it, so I'll show you
what to do for this. But for now we are using
the brown and we're just doing the
same light strokes to build up those shaded
areas as much as possible. And we're here, we
just want to make sure that you're not
drawing too heavy. And really you got to
just think about it as you're drawing the shadows and
not the actual for itself. So if we think about
it in terms of that, it'll be a lot to draw
this more white tail here. We're going to use a light
warm gray once again and start to build up over the top of
what you've already drawn. And you know, not, not filling
all the sections here, but just kinda
showing that there is toughs of white fur in there. And that the colors that
are in there or more of the shadows than the
actual for itself. So some of them, I have it sticking out a little bit in a
different direction. That's really important
when it comes to the, for the tail because the
tail comes in flux out, up and out and down and out. And to emphasize that you just use this
light warm gray and, and I, and draw
those a little bit. Now it doesn't show
up completely. But it still, when
you're looking at the original image and
you look at the details, it'll definitely show up. So I'm using a black
here and I am drawing those darker sections where
the shadowed areas are and where you can see that the like the black parts
of the tail are showing. And for this one, I definitely don't want to
draw too heavy either. And make sure that your
pencil is sharp still. That way you can get
in those details without so much of
the tooth showing.
10. The tail: The tooth showing
through from the paper. So this is a really fun part of the fox is drawing
the tail because it has so many different colors, so many different directions. And really trying
to make it look fluffy is a little
bit difficult, but it is a fun challenge still. So just have fun with it. Don't stress out
too much about it. And if it comes out looking a little bit off or different from the
rest of your flocks. That is completely okay. This is really just for fun and for your
own improvements. So don't worry
about that at all. And this pale skin
tone color pencil is really great for the white
parts of the firm as well. Because it's really
showing a warm tone to that white tuft of
fur and the fox. So even in the body to the pale skin tone color is great for those
warm highlights. And the light gray
colored pencil and others when we haven't used yet
and the rest of the body. But we're using it here
for the very end of his tail because the very
end of it is strictly white. So we're trying to
draw that somehow. And what I'm doing for this
is using the light gray. It's a cool gray
color and I'm just drawing the toughs of
firm that's coming out and emphasize not more because you don't
want it to be too dark and you just really want
to show that it is a white fur by drawing
the shaded areas. And now I am just going back over to finish off some details. This part, is it very
important going back over your portrait and
finishing off the details. Sometimes you can have
tunnel vision and not see. That you may take one or two
mistakes and other areas. And that is why you want to take a step back and look at your portrait first, once you've basically finished
it and see what areas look proportionally off or need more color,
anything like that? Definitely want to do
that and make sure that you are finishing your portrait that
way rather than just completing it and then
never looking at it again. And the light warm
gray is very important for after you've
completed the portrait. Because you can go back
over certain areas and blend those areas together using a light gray
or white colored pencil. Even a pale blue and
some instances is great for forgetting those details
all blended together. Or just areas look like it has a little bit too
much tooth coming through, anything like that. And for this, you do want to still
keep your pencils sharp. But if you're just blending or you really
don't have to keep it too sharp because you're
you're trying to use that dole side to
blend certain areas. So we are almost done here. And I hope you have
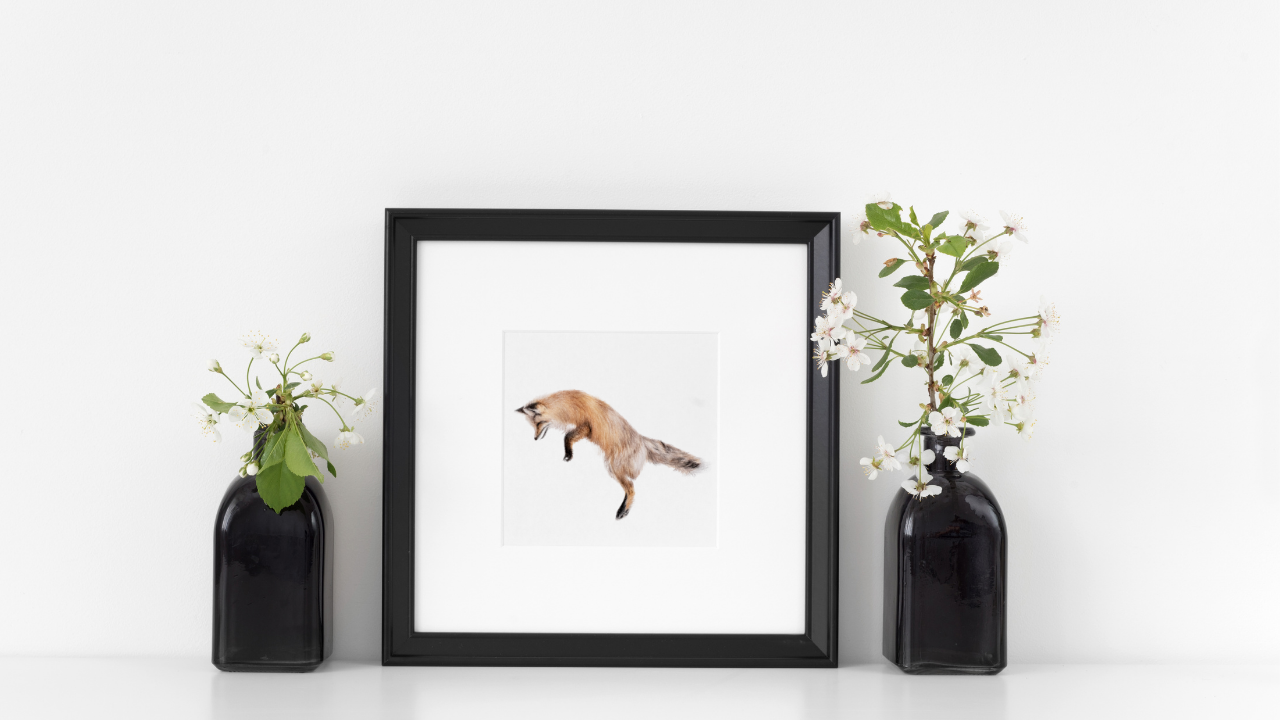
enjoyed this video. This sleeping fox is
absolutely adorable. I got this reference
image from one of my favorite Instagram
at photographers. She is a wildlife photographer
and she takes pictures of all sorts of animals in
her area where she lives. She has a lot of OWL pictures, as well as bears and bobcats and all the wildlife that
I I'm into all about. You should take a look at
her Instagram is at lid bug, it is LY D, E, BUT I believe and her work is just
absolutely fabulous. And couple of my
wildlife pictures or have come from
her photography. The big bobcat that
I've done is from her and the short erode owl
came from her as well. And if you're
enjoying this class, I do have previous classes that you can follow
along as well that will be in the colored pencil
crew member ship. And they are of all
sorts of critters. And one is a butterfly. Read Cardinal. And what was the other
at a hummingbird? Yes. So birds, drawing birds and a small portrait is
super easy and really fine. And there's all types
of birds out there, so they're really
easy to be able to draw and have a
variety to draw from. So I thought that doing
this sleeping for a frog, leaping fox would be a fun
one to do because it really helps you understand how to
draw firm and an easier way. And it's small and
it's in motion, the foxes in motion, rather than just doing the
head and neck portrait. So I thought that that
would be really fun to do this as a class
and draw a little mini, miniature portrait of them. So as you can see, I'm still doing a lot
of finishing touches. There's still areas that are not completely filled in and
need some more details. So I am blending lots
of different colors. So using the browns,
bread browns, even though pale
skin, tone, pencil. And this can take some time, but that's completely okay. When to take your one to set your pencils down
and call it done? I really don't know. I sometimes I just set it down and come back and look at it and if
I think it's finished, then I will be done. So it's hard to make a
decision right away. And you don't have to make
a decision right away, just let yourself kind of naturally flow into
it and out of it. Such occurrences down and come back and see
if there's anything else that needs to be done and if there's not
anything major, then call it a day
and that is it. So thank you. Thank you. Thank you so much for watching. I really hope you have
enjoyed this video. If you have a complete portrait, I would love to see it. Send me a picture. You can send it
to me via e-mail, Facebook, it basically
anywhere I'm available. So I would love to see it and I can't wait to see the results. And if you have any questions, feel free to ask me as well. I am always available to
answer and help you guys out.
 Lauren Kline, Drawing Classes for Aspire Artists