Transcripts
1. Intro: Have you learned that Nathan
prestigious and are ready to add more visual
interest to your projects. Maybe you want to create beautiful home decor
for your kitchen, or rather the next house warming party with handmade gifts. Hi, my name is Isabel
actual vec and I'm a maker. This where designer and teacher. I design knitting patterns
for mother makers, published a single
patterns in blog articles, in magazines, and as part of
kids with foreign companies. In this class, we
will take basic little prestigious
and combine them into visually appealing
products that look much more complex than
they actually are to make. I love texture coordinates
and I can't wait to share with you how I work
with textures in this class, our class project, we'll be leaving a piece of home Dekker, a small washcloth, or
a bigger tea towel. They are quick to make
and easy to design, making them an excellent Canvas for your creativity to shine. We will start with the tools and supplies needed to
create the project. We will cover a few
ways of combining textures to add
visual interests. Well design and
plan the project. How to make quick calculations. So we don't have to wonder
how many statistic cast on. After that prep. I will
show you how to need the square wash cloth
step-by-step in practice. I have also prepared a class
guide resource for you. Step-by-step recap of planning your dish cloth, FU
stitch instructions, links to tools and supplies, options and knitting
pattern. Let's get started.
2. Class Project and Resources: As a class project, knit a washcloth or a tea
towel using only knit and purl stitches and adding visual interests by combining Textures as discussed
in the class. You can either follow
the design that they share in the class or
in a knitting pattern, or design your own projects, which I totally encourage you to do because it's super fund. It's a great outlet
for creativity. Share a photo of your
finished product or an in-progress shut. If you have any question or any problems creating
your project, don't hesitate to
leave a question in our product description
or in the discussion. It will be super happy
to help you out. Don't forget to download
the Class Guide, which contains helpful
info how to follow the class as
Step-by-step reference for planning your project. Links to tools and Supplies, options, knitting
patterns, and more. This is a class for
beginner knitters. While I show step-by-step how to create the washcloth
usher in this class, it's best if you already know
the four basic techniques. So can let your creativity shine and have more freedom with
creating your project. Those four techniques
are Castilian, little purl stitches,
and bind enough. If you haven't knit
a single stitch yet, take one of the classes that I created for absolute
knitting beginners. Now, let's have a
look at the tools and supplies you'll need to create
the project in the class
3. Tools and Supplies: In this lesson, we
will look at tools and supplies that you need to follow the project
in this class. First, yarn for washcloth
and tea towels. Cotton will be a great
choice because it's absorbent and holds up
really well in the wash. I will be using
worsted weight yarn. So category four, medium. And my yarn chosen for
this project is 2047. Cotton by Lion Brand. When it comes to amount, you will need approximately
hundred grams. So this big scheme
for a tea towel size, the proximately
adds 35 by 40 cm. So that's around 14 by 16 " and around 20 g for
a smaller washcloth. Size that seven by 7 ", so eight and by
adding centimeters. You will also need
some knitting needles because the washcloth and
tea towels or knit flat, you can use both straight
or circular needles. Size that 5 mm. So us eight, I will be
using circular needles because this is what I
liked we using post. You can definitely use
straight knitting needles. If you have those. While my yarn recommends
size four millimeter Knidos, I will still be using the 5 mm just to have a bit more loose, more flowy fabric
for the tea towels. Other notions that
you will need, our tapestry needle, tape,
measure, and scissors. If you have only a
limited amount of yarn, then a kitchen scale
can be of use to. The next lesson, we will get to experiment with
Texture Calculations
4. Combining Textures: You already know knit
and purl stitches from the basic statistics
like stuck in it stitch and garter stitch. However, this is not all that
this stitches are good for. You can create lots
of variation and visual interests by Combining
knit and purl stitches. There are lots of different
easy stitch patterns that you can use as
a starting point. Use them directly in your project or modify
them so that you gave a little bit of differentiation and
your personal fill. Let's look at how
to mix textures to add interest to
or simple projects. The first way, using horizontal sections or stripes of different stitch patterns. That's an easy way to keep
the project simple to make and look more
complex at the same time. You can make it in
many different ratios. For example, half by half. So half of the project
in non-state and half in another 13 separate sections. Alternating stripes of
Texture in the same width or in altering with truly
the sky is the limit. An important point
to remember is that the more contrast
between the Stitches, the more visual impact this
combination will have. Very similar studies may give a nice result but more subtle. On the other hand, if few really bold stitch patterns may make the item
a bit too busy. As the first step, it's good to just two different
stitch patterns and combine them with the
principle of less is more. It's a more safe choice if
we want to dip your toes. In my recent projects, I decided to combine the following in this tea
towel stitch patterns. So the waffle stage
and the garter stitch in three sections. So I have a longer tea towel with Border of a waffle stitch, a big area of garter stitch, which is really simple and has a good contrast between the waffle seat and
the garter stitch. You can see here some specific
sections of the state. And this is just a sea of bumps. On the other end, again, a border of
the welfare state. In this tea towel, I combined three stitch
patterns in three sections. First Border of a seed stage, then a very thin
stripe of stuxnet stitch just for a
bit of separation. And then a big section
in hardest stitch. I also use this
principle in socks. So I combined lot strips
of stuckness stitch with very thin purl stripes and also added another color to
accentuate this difference. The next option is to combine
the Stitches vertically, either in wider
vertical sections are in stripes or columns. I use this in my socks. In this socks where
I combined a column, reverse stuxnet
stitch, a purl column. Then just one stitch
column of a stuck in it. Stitch to Stitches of garter
stitch in the middle, bordered with columns
of stuck in it. So it's all knit
and purl stitches. But you can see it creates
this Texture stripes pattern. I have used just knit
and purl stitches or so for this socks. So basically these are
stripes of stuxnet stitch and garter stitch
in the same width. It's basically a variation of a broken rib stitch which
I have in this socks, which is just one stitch
column of stuck in that state, and one set of garter
stitch just made wider. Here. Every stripe is just
one state to the width. And here for, as you can see, the look of the socks
is really different. So basically, all three of these sock pairs
have been created with just knit and purl
stitches for the Main pattern. But the way of a plank
with the width of the statistic and the order
in which they are knit gifts. Much different results. Use any stitch pattern
that you'll find as a starting point
thing if you could use just one repeat of a stitch as a column and add some knits are purls in-between to create
some texture stripes. For example, here we could take this one column of this knit statistics
interrupted by the programs. So this prestigious as a column. It would make a really
nice stripe pattern when divided with purl bumps. So the purls stitch column. Or maybe you can make this
teacher bit more narrow or wide and get the result
with a different field. So here you could try to add some more porosities in-between to make the columns wider. And it will give them more
bold and striking feel. I love experiment
equals stitches. And you can truly
create a lot of variation using just
knits and purls. If you have an idea and
you want to try it out before including it in
your final project. Cast-on a few stitches and work up your idea to
see how it looks. In the worst-case,
you will unravel your work and try
out another stitch. You can always unravel and use them again so there is
absolutely no risk. In the next video, we'll start planning
out our project
5. Project Planning: Now that you know a few simple ways of
combining Textures, let's go through planning
the concept of our project. The first step is to decide
on dimensions of the project. If you choose the
knit a washcloth, usually it's a square
with dimensions ranging from 12 by 12 centimetres
to 18 by 8 cm. So around five by
five or seven by 7 ". Tea towels are larger and
are shaped as rectangles. While there isn't
a set dimension in tea towel
knitting quarrelled. You can the base, the
dimensions of a tea towel you already own or go
with my go-to ratio, which is around 35 cm in
width and 42 cm in length. I have also seen a few other
ratios commonly in use. Basically, any ratio
that you chose that is, a rectangle is good. Keep in mind, the
bigger the tea towel, the more yarn you will need. So while I'm using around hundred grams for
my standard tea towels, anything bigger than that
will require more yarn. The next step is to choose Knitting Stitches that you
will using the project, you can find ideas
for statistics on the Internet or in
printed stitch books. You will also find references to a few options in
the class gets too, when choosing stitches for
washcloth and tea towels. So pieces that will have both right and drunk
sides visible in use. Just stitches that are
either reversible. So looking the same on both right and wrong
sites are statistics. We to like how they look on both the right
and the wrong side. Now it's time to plan the
visual aspect of your design. How many stitches will you use and how will you combine them? Do plan to create a washcloth with three horizontal sections. Textural stripes are
different concept. Think about distributing
the stitch patterns. You can also sketch it
out on a piece of paper. Use the examples
shared in the Texture combining lesson to start
your ideas running. When you have this statistic
tells him prepared the information about your
design and the Stitches. What are the proportions that you want to keep in your design? Do plan to have five stripes of equal width or too narrow
borders with a large mine area. Also know the info about
the stitch patterns. Over how many stitches and
drove does this teach repeat? It's gonna be important for
the decent calculation part. Next thing about edges and ice tea towel calls
for neat finish. Edges aren't a mask usually, but they can add to the
aesthetics of your projects. One option for a simple border on the site is slipped stitches. It creates a chain like edge. For this border, you will need to add one stitch per side. So two in total. It's a simple edge. And to work it, you
will always sleep the first stitch in a
row with yarn in front, and always knit the last stitch. Another option for side
edges is an I-cord edge, which I really like to
include in my projects. For this edge, you would
need to add to stitches per side because it's a
bit wider Border. The border is work
differently on the right and wrong
sides of the project, but it's still fairly simple. I will be showing how
to work this Border in our knitting, the
washcloth lesson. If you have only a
limited amount of yarn, you can use a kitchen scale to ensure you don't
run out of yarn. Just way your yarn before
starting the project. And after a section. This way you will know how
much yarn is used per section. So I use this idea when I was making this
particular tea towel because I really wanted the borders to be the
same length on each side. So what I did weight the
yarn before starting my project and then after
completing this border. So I knew exactly how
much yarn I need to complete one full Border
and then just work them in area until I had just enough yarn to finish off with the
same kind of Border. In the next lesson, we'll cover an essential
step in Project Planning, calculating the stitch
dimensions of your project
6. Design Calculations: The last step in the
Project Planning is to estimate the state
dimensions of the projects. So the number of
cast-on stitches and how many rows to work. So the best practice is to make a gauge swatch in
your mind stitch. So to knit around a
ten by 10 cm or four by 4 " square in the stitch
that you would be using. If you're using a
few statistics, you could choose to swatch just the Main stitch
that would be covering the most
Area in your project. Then to wash it and block it as you would be using
the finished item. And then to measure
how many stitches and throws you get
intensively meters 4 ". This way you can be sure
your project will turn out exactly in the dimensions
that you plant. This is the most critical
for items that you will work on your body
so that they fit well. For tea towels and
dishcloths in particular, the dimensions aren't
super crit, critical. Especially with washcloth that aren't much bigger
than actual swatch. You can get away with using the yarn label gauge spec to
make your calculation easy. If you're eager to
start right away. Alternatively, you can
knit a washcloth thirst, and then use it as
a gauge swatch for a tea towel to estimate
the stitch count, you will need to do
a really basic math. You can use the prompts in
the class guide to help you. First nodes the gate. So how many stitches and rows
you get per 10 cm or 4 "? Whichever measurement
system you use. Next, note that
desired dimensions of your kitchen towel in
centimeters or inches. Then to calculate the
cast-on statistic, the amount of cities you
have in your swatch. Per centimeter, 10 cm or 4 ", and then multiply it by your desired width in
centimeters or inches, and then divided
by 10 cm or 4 ". Then we need to take into
account the stitch repeats. Your stitch patterns may have
different stitch repeats. And actually it's quite
probable they will, while maybe a three
stitch repeat, the other two stitch
repeat, and so on. In case of rectangular
flat projects, it's best to keep the
same stitch count across the whole projects. So it looks even. So we need to keep the stitch count even
throughout the project. And we need to make sure that
the cast-on stitches we'll be fitting with every stitch pattern
that you choose to use. Personally, I don't always do full repeats in my tea towel here the stitch pattern is
starting to person while neat. You can see it's ending
here with just two Knits. Just to produce. There is no Knit Stitch. To finish the repeat. I'm doing that to
keep the design symmetrical so that it looks
the same on both edges. Therefore, my cast-on stitch
number is a multiplier of three because this stitch
pattern is a multiple of three, but I'm cutting the lasted. So it needs to be
plus two studies. So multiply a three
plus the Stitches. If you'd like to do the same, then you need to think about how you'd like every stitch to look like and what kind of stitch count restriction
that would have, then see if you can make it work anywhere around your initial
customers stitch number? Or would you have
to change it by quite match so that the project dimensions no longer would make sense for you. Sometimes it's just a
matter of compromise that definitely takes more
calculating and focus. So it's optional thing you can use for your next projects. If you chose to add
edges to your design, you can add the statistic
required for the edges on top of your stitch count to make the calculations
even easier. The edges aren't
whites so they want add much lengthier
project or with, I would say it's up
to maybe 1 cm for I-cord edge and just a few millimeters for
this slip stitch edge. You can also take the statistic out from your custom
Calculations. Then you need to make sure that the remaining stitches as stitch count number fits with your toes and
stitch repeats. Next, the row length
Calculations. So the length of our projects, the logic of calculation is basically the same as for width. You will just be using that
row gate as the reference. So multiply your
gauge in rows by desired length in inches
or centimeters and then divide by ten or four depending on which
measurement system you use. Then you can verify your row country
pure row repeats of the stitch pattern in the
same way as for the width. Take into account how long are high your
sections will be. When you plan your session state to take into account what is the row repeat for each
stitch that you want to use. And make sure that
your total rows are summing up to cover those in terms of how long
the sections you would like to have
and what is the row? Repeat. Maybe you need to add or remove a few rows to make it fit
right into your concept. Slight changes will not alter
the dimensions drastically. If you are a bit scared off at all the calculations,
no worries. Start small and easy and include one more complexity in your next projects
to keep learning. In the next lesson, I will share a quick
sample calculation for my project in this class
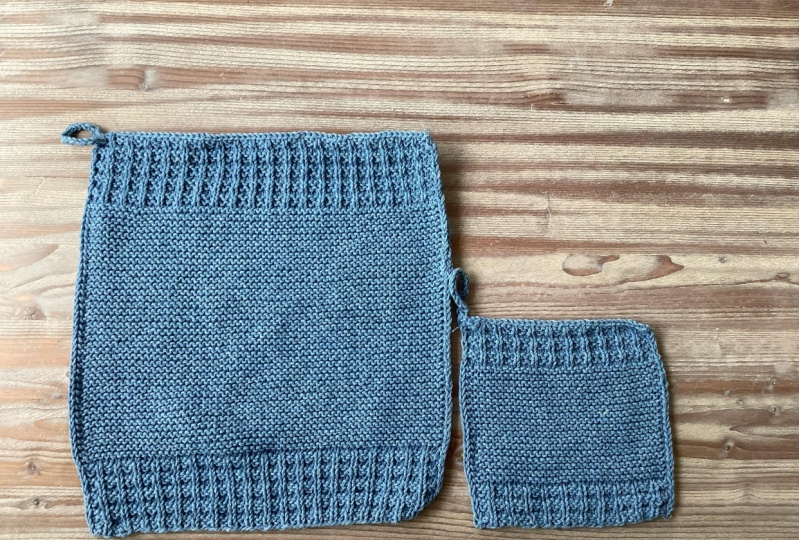
7. Washcloth Design: My project in this class
is knitting a washcloth. We have to Texture borders and a garter stitch in our area. This is the design that
I will be showing you an example math for and how
to knit it Step-by-step. If you would like to
need a bigger tea towel. And you don't want
to do the math, you can use the
little pattern in the class guide to follow along COO of
the cast-on stitches, worked out and
simple instructions. How many rows to work? Practically, both the washcloth and tea towel are
super similar to make. And they the main difference
is just the cast-on stitches number
and how many rows you work the particular stitch. Let's go quickly over calculate invested counts and planning
out the washcloth project. For my project, I want to knit a washcloth matching
my tea towel here. So to waffles stitch borders at the ends and filled with
garter stitch in the middle. So Mike ages 18 stitches by
28 rows and garter stitch. So I will use that gauge
for my calculations. I want my dishcloths
to be seven by 7 ", so 18 by 18 cm. And I also want to
have this I-cord edge on the washcloth so it matches the tea
towel at this gauge. And with this dimensions, that gives me 32.4
statistic cast on. So we will actually have
to round it. Of course. I know I will need
for stitches for my I-cord edges to each side. And the remaining stitches to be multiplied of three plus two. Why? Because the waffle stitch
is a multiplier of three, so it repeats in threes. There is. And let stitch then
to purl stitches, and that's one repeat. However, I do want my tea
towel to be symmetrical, so I don't want this border
to be fully repeated. I want to have the
edges exactly the same. I start with
two-person one knit. You can see that I'm
ending with just two purl, so there is no knit stitch. So I'm having this
multiplier of three, the two additional stitches
for this symmetric effect. In that case, I
will round it up to 33 statistic to fit
my requirements. Have 33 statistic minus
four for this I-cord edges. So that leaves us with
29 minus two is 27. 27 is a multiplier of three. Then the length of the project, which I also want to
plan out because I wanted to be as close to
a square as possible. So according to gauge, my length of my project in
rows would be 50.4 rows. So I will rounded up to
51 rows for the moment. For the border. The border that I made on
the tea towel is quite wide and I feel if I keep it the
same height in the washcloth, then the proportions of the washcloth versus the tea
towel will be much different because here the border
is just maybe one fourth, one fifth of the total length. So I will need to review that. My waffle state is
for row repeat. So to make a full repeat of
this Thetis of this stitch, I have to work for rows
and further tea towel, I might 12345 repeats, which is too much. I think if I make the border
one-fourth of the washcloth. So half of the
washcloth would be covered with the border and the inner area with
garter stitch. I think that would
work pretty much fine. One-fourth out of 51
would be 12.75 rows. I will round it up to
12th because I need to have a multiply of four and
this is the closest number. So we will have 12 rows, so three repeats of the waffle stitch on each
side and the rest, which would be 27 rows. I will be knitting in
the garter stitch. Now that I already know how
many stitches onto cast-on, how long I want to
work my Border, and how many rows
in total to knit? Let's get to knitting
the washcloth
8. Cast On: It's time to knit the
project in the class. I want to cast home for my washcloth with a
Long Tail cast-on, which is a two strand cast-on. And to relate to estimate the amount of yarn tail
before we start casting on. So to estimate the cast-on, I will take more my yarn end, wrap it around the
needle ten times. Then I will catch the yarn
tail at the end of the loops. And this is approximately
the amount of the length of yarn tail that I would
need to cast them ten stitches I will
make to cast on 33. So I will measure three
times this length and a bit more for the three
stitches and around 15 cm. So that would be 6 "
for the yarn tail. So we have this. Now,
I'll start the cast-on. So I will take the yarn end and spread it between my thumb
and my index finger. Take my needle and
twist the yarn. So this would be
my first stitch. Now I will cast on. So I will take my needle under the young
strand, next my thumb. Then above the yarn stone
next to the index finger, and put through the
loop and release. So the first, second
stitch is cast-on. Again. Under the yarn strength
next to my son, or the strength next
to my index finger, and pull through the
loop and tighten. This way, we'll cast-on together
therapy three statistics
9. Knitting the Bottom Border: So I have my stitches cast on. I have some yarn
tail to even later. And now I will start
working the dishcloths. So I was there in
my work so that my yarn tail leading yarn
and leading on to the Bot. So the working yarn
is on the right side. So we will start with working. The waffle stitch Border will be working the
I-cord edges. As we work. This is the wrong side, so I will sleep the first two stitches
with yarn in front. So I take my yarn to the front, insert the needle
from right-to-left, and slip the stitch. And the same of the second one. Slipping stitches. I turned my work so
that the working yarn, so the yarn that is a leading to the yarn ball
is on the right side. And I will be studying of
the wrong side row first. Okay, so our start with the
first row of my stitch. And I will be knitting the I-cord edges in the
same time simultaneously. So stitches at each site will be creating
this I-cord borders. So the query, the border. First, we'll bring the yarn to the front and then
slip two stitches. So inserting the needle from right-to-left and simply moving the stitch with yarn in
front to the right needle. And the same for
the second stitch. Inserting the needle and
slipping the stitch. Now I will be working
my my waffle stitch. I will lift the stitches and purl one stitch. And I will be repeating
that until there are four statistics
left on the little. Knit it to stitches. So to knit. As a reminder, we
insert the needle from left to right
in the front loop. Wrap the yarn around
and pull up loop. Make a purl stitch. We insert the needle if you are in front from right-to-left, wrap the yarn around. Okay? So knits one purl. Okay, we have first
stitches left. So our knit two stitches. So this is this partial
repeat of this waffle stitch. And purl the last two
stitches further the Border. Okay. During the work that they're
working on is again, on the right side of your work. And that will work the second
row of the waffle stitch. So first for the
border with yarn in the back, slip the status. So again, we will
insert the needle from right-left and slip
to the right thing though. And the same for
the second stitch. And then this row will be
working this waffle stitch in pattern purl to knit one until we have firstly
to slept on the needle. Will be working. Knits over knits and
purls over purls. We have first stitches left. So we were working out
for Bernie, just Stitches For the partial repeat and
for the border will be knitting the last two
stitches. So knit. Okay, so turn again the work. We are on the wrong side again. So for the border will be sleeping the first
stitches with yarn in front. And now working the first
row of the waffle stitch. So we will be per
link all stitches. So we'll be pulling
all statistics for in our area,
the pattern area, but we will also be partly
in the last two stitches because on the rug side of this I-cord
Border where hurly, burly all the way till the end. Finished my roles. So
I'm turning the work again in my yarn to the back. Whenever you are moving the
yarn from front-to-back, make sure that you
don't wrap it around the needle because that would create an additional stage
which we don't want. We want the whole washcloth
to be the same width. For the fourth row of
the waffles stitch will be slipping the first two
stitches with yarn in back. And I will be knitting all of those stitches until the end. So it can yarn back sleeping stitches and Knitting
until the end of the row. So we've finished the first
repeat of the waffle stitch. There are four rows
in this repeat. So starting on the wrong side, we slipped to stitches with
yarn in front for the edge. Then we followed Knit to purl one pattern until we had for
stitches left on the needle. And we worked knit and
purl to for the border. Then on the right side, slip, slip those stitches
with urine back. And then we follow the
same looking patterns. So we purl to knit one until four stitches are
left on the needle. And we purl to and Knits to. Then for the last two rows
of the waffle stitch. So on the wrong side with slip two stitches
with yarn in front. Then we purl stitches
until the end. For the last row. We slipped to cities
with yarn and back and Knit of the
status until the end. So this is one full
repeat of the waffle stitch and four rows. I want it in this design to have 12th row Border
of waffle stitch. So I need to work
two more repeats. And then switching to
the garter stitch. Let's work tomorrow for repeats. Okay. I have the first barter finished
10. Knitting the Main Area: Now it's time to switch
to this main pattern, this inner area, I will be
working that in garter state, which is super simple. Just basically knitting cities. But we'll be keeping
this pattern of the F statistic to continue
with those borders. So I'm working my first row of guards or sit
on the wrong side. If you have trouble recognizing the right and
the wrong side of your work, you can use a clipping stitch
marker and just clip it on, on the right side so
that you can reference. But for reference, this is how the wrong side of the stitch looks like.
That's the right side. On the right side, there are these thin
Knit Stitch columns. And on the wrong
side you can see much more bumps and there
are no thin columns. So let's work the wrong side. So firstly, continue sleeping. The first statistic if
you aren't in front, 1.2. And then we'll need the
stitches until we have only two left on the needle and we'll
be pulling those two cities. Berlin, last two. Okay? So the right side, we are slipping to first
statistics in back. All the citizens until
the end of the row. We have two rows of garter
stitch worked. In total. I wanted to 27, so there are 25 to go work, 25 more rows of
the Garter stitch. Keeping the edges as you
go on the wrong side. Slip the first test
statistic with yarn in front and pearly luster
stitches on the right side. Slip. The first stitch is
with yarn in back and knit. The last test statistic
11. Knitting the Top Border: Okay, I have finished my
garter stitch Main Area. So now I will be working the
other waffles stitch Border. And the last row I worked
was the wrong side row. So now I will be starting
on the right side. So this is different to the beginning of the project when we start on the wrong side. So we will need to flip stitch pattern a bit so
it's showing correctly. So ready, I like
this mural effects. So I will not be working again. Starting from the
pattern and then this stuxnet stitch thin
stripe in that order. Instead, I do want to have
this flipped exactly as mirror in the reverse order
as with the first Border. So the first row of
this new repeat to have this mirrored effect would
be on the right side. We will slip the first two
stitches with yarn in bag. And then we'll knit
the end of the row. So I turned my work
to the wrong side. That will be working
the purl row. So this is the wrong side. So we slip the first stitches
with yarn in prompt. And then we purl the row. So far, the third row, we are on the right side again. The first statistic, we will
sleep with the yarn in back. And then we will work the
pattern purl to knit one. The last first stitches. So we purl stitches.
Let's pick them up. We paired the two stitches, and then we need the last
test statistic for the add. For the fourth row of the repeat will be add on the wrong side. So we will sleep the first
stitches with yarn in front. And then we'll follow the
pattern of little purl, one until their first
statistic left. The last purl stitches. Well, knit and purl. Okay, So the first repeat of the waffle stitch for the
second Border is complete. And you can see already
that it's exactly mirrored. So first we have this thin stripe of stuck
in it here and here, and only then this
textured stripe. So it will be exactly
the reflection. So one repeat this work
we need to more repeats, so it's even working under
eight rows in this new setup. So starting on the
right side first, for the row one, you will slip two stitches
with yarn in back and knit all the
stitches until the end. Then for the second row, on the wrong side, you will slip two stitches
with yarn in front and purl stitches
until end of the row. Then for row three
on the right side, it will slip two
stitches with yarn in back and follow
the pattern of purl to knit one until their first stitches
left on the needle. And they will purl
to and Knit to. And for the fourth row of the
repeat on the wrong side, you will slip the
first two stitches with yarn in front
and then follow the pattern of leads to purl one until their first
stitches left on Benito, anyone knit and purl two. So let's work eight, we're rows. And then we'll get to Finishing
12. Washcloth Finishing: I will start binding of stitches and I will want to
create a hanging loop so it's more practical so we
can hanging in the kitchen. So I will bind off all of the stitches until I have only two stitches
left on my needles. And I will be using
a standard bind off first to keep this
pattern of the edge, I will slip first Stitches if yarn and back because I'm binding of on
the right side. So I will slip both statistics. And now I will insert
my needle from left to right into the
first stitch in the little and pass it
over the second one. So I'm binding of that stitch. Then I will leave
the next stitch. And again insert the needle and pass the first stitch
over the second bind off. And I will proceed binding of this way. Okay. So I have just stitches
left on Monday. There's one on the right and in the second one
on the left needle. So I will nevertheless stitch, but I will not be passing
over the stitches. Instead, our slip them both
back to the left needle. And now we will be creating
this hanging loop, basically will create a length of a corridor where technique
that is called an I-cord. Then we will together to the back of the washcloth
to create this loop. So after slipping the
statistic to the left needle, knit both statistics and slip them again to
the left needle. And again knit both of the status and slip them
again to the left window. So you can see that
knitting this way is making the statistics curl up a bit and create this kind of card. So keep working this way. So knit the stitches and
then slip them back to the left needle until you
have the length of the card. That creates a loop that you would like to have on the class. I have finished my border. So now it's time to
finish the word cost. I believe this is the length that I would like to have here. Now we'll bind up
the statistics. So slip them both
to the next little. Knit both of them. And pass the first stitch, our, the second one. And that's a big loop. I will cut the yarn leaving
some Tail to the cart and to even the end and or
pull on the yarn. So let's threat the yarn. So I will be selling the card to the back
of the washcloth. And two so it just pick
it can do it really. Anyway that fits you. I usually find some
strands and then underneath as the hanging loop do will be used often. So I will tie couple of nuts, just the security, so it doesn't unravel when using an hanging it that is left is to live in
the end from the custom edge. So I would riveted
really briefly, just following the away
the Stitches flow. The Textures sections,
washcloth is ready and I think it fits really
nice with my tea towel. So it has the same vibe. It's in the same color, which is even better. And in terms of proportions, I'm really happy with
how that played out.
13. Wrap Up: Thank you so much for
joining me in this class. You learned how to combine different textures to create visually appealing knit pieces. How to plan your project and
calculate the dimensions, take into account all use stitches and how to
create a simple, It's super practical
knitting projects. I hope you will
make your kitchen beautiful with your
new knitting projects. You can also take concepts in this class and apply them
to other knit pieces. Headbands, scarves, even
sweaters, you name it. I hope you enjoyed this class and I love to hear
your thoughts. Don't forget to leave a review. Also, if you're sharing
your new knit on Instagram, you can tag me at
Whileberry dot creative. And if you'd like to
keep in touch to hear about new classes,
patterns, and tutorials. Getting my newsletter at whileberry.com slash
newsletter, happy knitting
 Izabela Grzybek, Knit & Crochet Designer