Transcripts
1. Intro: Hello and welcome to Kino Saga, the stunning Japanese art
of stitch free patchwork. My name is Raya. I am a
quilter, a bag maker. And a fabric scrap enthusiast. My sewing journey began in 2008, and from day one,
I couldn't bear to toss even the tiniest
piece of fabric. To me, fabric has always
been too precious to waste. So I've made it my
creative mission to find bold beautiful ways to give
every last piece a new life. On my Skillshare page, you'll find classes all
about sustainable stitching. And today we're
diving into one of my favorite new scrap busting
techniques, Kenosaga. Kenosaga is part collage, part applique, and
part patchwork and requires no
needle or thread. It's an art form that turns
the tiniest fabric scraps into intricate textured pieces
without a single stitch. In this class, I'll talk about the origins of Kinsaiga
and how it evolved. I'll also talk about the tools and materials that are used in Kinsago and the simple
art of fabric tucking. So grab your scraps and let's turn leftovers
into art together.
2. History: Before we pick up our tools, let's take a quick
trip to Japan. Understanding the why behind this art makes the how
even more meaningful. The art of kenosaga was
developed in Japan in the 1980s as a way to
repurpose kimonos. Traditionally, silk
kimonos were too precious to throw away
even when worn or damaged. Resourceful artisans developed
a stitch free technique to repurpose silk scraps into
stunning layered artworks, pressing them into wooden
boards with delicate grooves. For this reason, Kinsaga is
also known as silk painting. Traditional Kinsaga
used silk fabrics and carved wooden
panels as the base. Today, modern crafters have embraced more
accessible materials. Today in Kinsaiga,
the wooden panel has been replaced with
high density foam boards. Foam boards are
lightweight inexpensive, portable and allow for
easier cutting and tucking. Modern Kusaga artists
use fabric glue, yarn, thread, beads, ribbons, and plastic bags to add
more details and texture, blending Kinsaiga with
mixed media arts. This was the brief history of
Kinsaga and its evolution. Now let's talk about the tools.
3. Tools: Now that you are inspired,
it's time to get ready. This lesson is all
about your toolkit. I'll show you the
essential items you need to start your journey. With the modern
version of Kinsaga. Because we're doing the
modern version of Kinsaga, I'll be using foam
board as the base. Foam boards can be easily found in craft and
stationery shops. You can also use insulation
boards, which are foam too. They come in
different thicknesses and are sold in larger sizes. This here is a pre
cut foam board that I got from a
stationary shop. It's about 1 " plus an eighth
of an inch in thickness. This is an installation board that I got from a
hardware store, and I had to cut up myself
using a foam cutter. It is very easy to use a foam cutter. There
are many kinds. The tricky part in using a foam cutter is to move
in a smooth straight line. This will need some
practice and a steady hand. Please use the foam cutter
with caution and use it in a well ventilated room because cutting the foam
will produce smoke. If you find cutting
straight line with a foam cutter
a bit challenging, you can always use pre cut foam. It's available in
all craft stores in different shapes and sizes. For an eco friendly option, you can use recycled foam
packaging for the base. Please keep in mind that some fam boards are easier
to work with than others. The type of board you
choose can affect the final look of the
project and how smooth and clean the finished look
will be and how easy it is to cut and press the
fabrics in the grooves. My advice is to experiment
with what's available in the market till you find the best foam for your
Kinsaga art piece. That's it for the base. Now
let's talk about the tools. I keep my Kinsaga tools
in this cookie ten. And here are most of the tools that we will need
for the project. First tools are cutting tools. So a sharp craft knife, also known as an exacto knife. You will see some crafters
using an office cutter. However, I find the craft knife easier to hold and
gives a cleaner, smoother cut, especially
when cutting curves. For cutting fabric,
the best option would be applique scissors. However, I've used
these craft scissors. Up until now, I've only used
them for cutting fabric. They are sharp and
they work well, so I'll be using
them in this class. We will also need
a ruler to draw the borders for the
kinosaga design. And to draw the design, I
usually use this kind of pen. That's what I mostly use to
draw the design on the base. If you're not good with drawing, you might like to
use carbon paper to transfer the design from
paper to the foam board. The final tool that we will
need is a tucking tool. So I have this nail file with a dull rounded tip,
and it's perfect. I've been using it for
a couple of years now. It's not very thick. It's thin. So yes, this is the
best tool for the job. If you don't have a nail file or you can't find a very thin, strong nail file, you can
use instead a seam ripper. The seam ripper is a bit sharp. It might drip the fabric
or it might pull it out of the groove after
you have pressed it in. So use it with care till you find the suitable nail
file for the job. Now, here's an optional
thing that you can use with your kenosiga to help the
fabric stay in place. You can use a glue
stick on the base under the fabric to help the fabric stay in place
while you're working. I personally prefer to work
without any adhesive at all. I've also seen some artists use adhesive sheets to place on the foam board before cutting
it and talking the fabric. You can definitely
do that. But for me, as I've said, I prefer to work without any
kind of adhesive. Okay, we finished talking
about the base and the tools. Let's put all of this
aside and talk fabric. Because I'm a quilter,
most of the fabric I use is mid weight and 100% cotton. This fabric works very
well with Kinsaga. But the great thing
about the art of Kinsaiga is that
it's very welcoming. You can almost use any kind of fabric that is lightweight
or medium weight. Linen and lace can add beautiful texture to
your Kinsaga design. Sadie's African prints and betiques will add bold,
beautiful colors. You don't have to only
stick with woven fabrics. Knits also can be used, and they will slide easily and smoothly into
curves and corners. The only fabric I would stay away from is heavyweight fabric, like this canvas fabric. It's very thick and
it will be very hard to tuck into the slits
that we make in the foam. It also may cause
damage to the foam, so I would stay away from it. I would also stay
away from denim, home deck, or upholstery fabric. Our tools and fabrics
are now ready. We can now move to transferring
the design to the vase. And the next lesson, we will prepare the base and
draw the design.
4. Tracing and design: Welcome back. In this lesson, I'll talk about
what makes a design suitable for Kinsaga and how to draw it on foam or
transfer it from paper to foam. So a beautiful eye catching Kinsaga piece starts
with a design. However, not any design is
suitable for fabric tucking, especially if you
are a beginner. I'll show you the design
I've picked for this class. After that, I will walk you
through the method I like to follow for transferring a
design from paper to foam. Now, for a modern Kinsaga
design, simple is key, especially since we are
working on a phone base, which is very lightweight
and can easily get damaged. Since you will be trying
Kinsaga for the first time, I recommend a pattern
that has large, clear, distinct sections, like,
let's say, a landscape. You have the sky, the
sun, and the land. Very clear, easy and simple. Or if you prefer something
other than landscape, then you can look up simple
basic line drawings, like the ones you find in
children coloring books. If you like something
more advanced where you can use more colors and
have additional details, then I would highly recommend
stained glass patterns. There are many free patterns online which you can download, and there are many books
that are dedicated to stained glass patterns. These patterns will
be very suitable for Kinsaga sometimes
but not always, you might need to do some
small adjustments on the pattern like adding lines to the design or
removing lines from the design to make it more
suitable for Kinsaga. Now, most of the time, if
the design I chose for Kinasaga is very
easy and simple, I would take my pen or pencil and draw it directly
on the foam board. However, the design I picked for this class is a
bit more complex, so I will use carbon paper to transfer the design
from paper to foam. The design we're going
to work on in this class today was designed
with the help of AI. So I asked Chachip to
make me an image of a fox that is a
basic line drawing and is a stained glass pattern. After several
attempts and a couple of edits and adjustments, this was the final result. Now let's transfer this
image from paper to foam. However, before I transfer
these lines to foam, I'll make a few adjustments. As you can see, there are some inner corners
here like this one, the fox ear or here,
the side of his head. I think these corners will be a bit tricky to work with
when tucking fabric. I will divide this section here. This corner here too will make tucking the fabric
a bit difficult. Draw another line here. I'll divide I'll draw
another line here. I want to make the
space here a bit wider. So I'll just so I'll draw a line here and I'll remove this
line. Okay, same thing here. I like this section
to be bigger. Remove this line. So this thing here is one space, and here is another space. I think this is good for now. Let's transfer these
lines to the phone base. The foam base I'm working
on is 11 by 14 ". The first step I like
to do is to draw borders on all four
sides of the base. 1.5 inch. 1.5 inch. And 1.5? I like having them. I feel like they frame the work nicely. You can do the corners
in different ways, as you've seen on the other Kinsaga pieces I've
shared with you. Again, I'll take the ruler and draw a line from this corner here to the corner
of the phone board. Now let's transfer the
fox to the foam board. I'll start with taking a
piece of carbon paper. And I'll place it
here in the center, and now I'll take the fox
place it in the center, and pin everything in place. Now, we'll take a pencil and
go over all of these lines, pressing firmly but not too hard because we do not want
to damage the phone base. So I'll press firmly, trace the lines, and the lines will
transfer to the phone. Okay, so the tracing
now is done. I'll remove the
pins and check to see if all lines have been
transferred properly. So here is the box image. I think it did a
good job. Let's see. Oh. Nice. I did a very good job. Again, I'll go over
these lines this time with the marker so
that they are more visible. Some of the lines stopped midsection and did
not reach the border. That's because the image is smaller than the
center of the piece, so I'll just extend these
lines to reach the border. And here is Mykonosaga design, Mr. Fox on the phone board, ready to be painted with fabric. And now let's go
to the next step.
5. Cutting and tucking: And Hello and welcome
to cutting and tucking. This lesson is the core
of the entire class, and it is the meditative
part that I absolutely love. In this lesson, we'll be
using two cutting tools, the craft knife to cut the foam and scissors
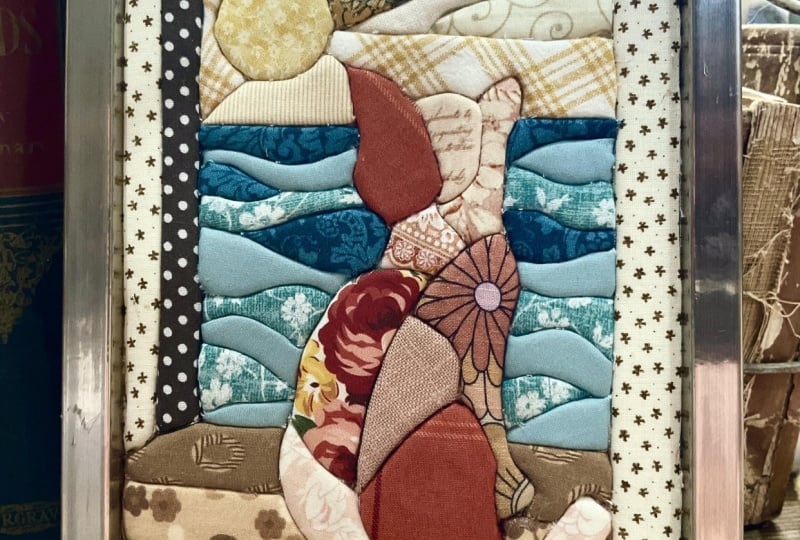
to cut the fabric. Now here's Mr. Fox and here are the fabrics that I picked
for this kinsaga piece. Dark gray, orange and white
will be used for the fox. These are midwight
quilting cotton fabrics. This blue here is lightweight cotton and I'll be using it for the borders and for the background area
surrounding the fox. We'll start by using
the craft knife to cut along all transferred
lines on the foam board. I'm going to cut to a depth of about a quarter inch or about
halfway through the foam. Let's start cutting grooves. Use a sharp blade for
cutting the grooves. A dull blade will tear and rip the foam's delicate structure rather than slicing
through it cleanly, resulting in a
ragged fluffy edge. A dull blade will also
require more force, and it will be challenging to
get straight precise lines. When cutting the corners, you will need to cut
through the top, the edge, and the bottom of the foam
board because fabric will be tucked into the corner and wrapped around to the
back of the board. Yeah. All done now. Now it's time to tuck, and
I'll start with the fox. So I have my scissors here, and I'm also gonna
need my tucking tool, which is the nail fire. To make it easier, I
will work in sections. Okay, so I'll start with
the tail of the fox. This part here is
supposed to be white. So I'll pick the
white fabric and cut a piece that is larger than that is larger
than this section. And I'll place it on
top of this section. Using the tucking tool, I
will gently press the fabric into the cuts or the grooves that I have
already cut into the foam. Now, I'll take my scissors
and cut the axis fabric. And as you see, there are some raw gas still sticking out, I will push these
into the grooves. And here is the first part of the fox done and
covered with fabric. Now I'll continue working on the body of the fox using white, orange, and gray fabric. I will move a little
faster through some of the repetitive steps
in this demonstration. But when you work
on your own piece, take it slowly and
enjoy the process. Working carefully
is the best way to get a clean,
beautiful result. So some of the grooves
are not deep enough, so I'll go over them once
more and make sure that they are deep enough
for chocking fabric. And So now I'm done with
the white fabric. I'll put it aside and move
to the dark gray fabric. Okay, so I'm done with
the dark gray fabric. I'll put it aside. Now I'm going to work with
the orange fabric. So, Mr. Fox is all done. Before moving to the background
and the blue fabric, I would like to talk about
some challenges that you might face while talking
fabric into grooves. These challenges
especially happen when there is a
curve in the design. When working with
curves and insaga, the technique changes
slightly depending on whether the curve is
convex or concave. So for a convex
curve, as you tug, start from the
center of the curve and work outward
toward the ends. Work in small sections. Don't try to tackle the
whole curve all at once. Talk a little bit, then smooth, then talk a little bit more. For concave curves, the
secret is to release tension. So before you talk the fabric, take your scissors and
cut little notches out of the fabric's edge right where
it needs to curve inwards. This will relax the fabric, and it will talk more easily. The center of the
KenosagaPiece is all done. Now I will move to the borders. As you remember in
the previous lesson, while cutting the
grooves in the border, a groove was cut into this corner because I will
be tucking the fabric into this groove so that the kinasagaPiece will
have a nice neat frame. The same way I tucked the fabric on the surface
of the foam board, I'm going to follow
the same steps and tuck the fabric
into the grooves of the border and into the diagonal lines and I will also tuck the
fabric into the corners. So from the blue fabric, I'll cut very white strips, about 5 " wide. These strips will cover the border and the side of the
foam board, plus the back. Start working on the
straight line first, and then the diagonal lines, and finally, tuck the corners. So this is the finished
back of the KinsagaPiece. All the raw edges of
the border fabrics are tucked into the grooves
I've cut into the bags, and the back is neat and clean. And here is the front
of our KinsagaPiece, finished, done, and
ready to be hanged. Our Kinsaga piece is complete.
6. Backing: Now we are done with the
creative part of the class. I want to share with you a
couple of different ways for finishing and covering the
edges of the saga piece. Now, with this piece, the border fabric was
wrapped around the edges. Grooves were cut into the
back of the foam board. The raw edges of
the border fabric were pressed into these grooves. Now with the dragonfly, I
followed a different technique. I used to pre cut foam. There is no border. Here's
the back of the piece. As you can see, no fabric
was tucked into the back. It's clean, there's no fabric. So what I did was, I cut the grooves into the
side of the foam board, tuck the raw edges of the
fabric into these grooves. Then I applied a double
sided sticky tape and used this strip of fabric, use it to cover the
side of the foam board, and pinned it in place. This is option number two, if you want to skip
adding a border to your piece or if you are working with pre
cut foam boards. Now with this piece
here, it reads red seed which is
hapyEd in Arabic. As you can see, I have
a white border here. All fabric edges are secured
and tucked on the top. On the back of the
piece, I was a bit lazy, so I just use glue and it's been two years and
everything is still in place. Now for this piece, borders are about an engine
and a quarter wide. The strips of fabric that are used for the waters
were not wide enough for the raw edges to be tucked in the back,
as you can see. So I used glue to stick
the strips in place and use thick tissue or flour wrapping paper
to cover the back. To cover the back of this piece, I used black, felt fabric
and a hot glue gun. Felt is soft, hides and
perfections and adds stability. So as you can tell,
I'm doing Kinsaga. I do it to recycle my fabric
scraps and as a hobby. I don't sell any of my works. If you are planning in the future to sell
any of your pieces, you will need to
make sure that they will last for a very long time. If you would like to frame
your Kinsaga pieces, I would recommend these
deep shadow box frames. They are about 1 " and
a quarter inch deep. So you should plan and
design to fit inside. They will last for a very long time and you can hang them on the wall or place them around
different spots at home. Simply place your finished
piece inside the frame. No glass needed because the texture of your
Kinsaga piece is the star.
7. Conclusion : We've reached the end of our
Kinsaga journey together. From a simple piece of foam
and some fabric scraps, we've managed to patch a beautiful image without
using needle or thread, creating a unique piece of art that carries a story
from a past life. I hope you not only discovered the joy of working with
fabric and patterns, but also felt the quiet beauty
of this Japanese art form. Kinasaga is a craft
that transforms simple everyday textiles into something
lasting and meaningful. Your mission now is to design your own kinasaga pattern and play with different fabrics. Try Chanel for texture, silk for shine, and lace
for layered effects. Each piece of art
you create with Kunsaga carries a story. The history of the fabric, the patience of your hand, and the creativity
of your imagination. Kinsaga reminds us that even the smallest scrap
can find a new life, becoming part of something
greater and beautiful. As you continue working
on your piece at home, I encourage you to take your
time and enjoy the process. When you are ready, I'd love for you to share your
finished artwork here on Skillshare so we can celebrate your
creativity together. Thank you once again
for being here, and I look forward to seeing your Kesaga creations
here on Skillshare. Take care and have fun.
 Rawyah Sami, Quilter