Transcripts
1. Intro: Kits are one of the most
adorable pets in the world. But what if we could make
them even more adorable? Hi, I'm a professional
artist and in this class, we'll be drawing adorable, she gets, the shoe
style is generally used when artists want to draw
something very cute and tiny. So this is what
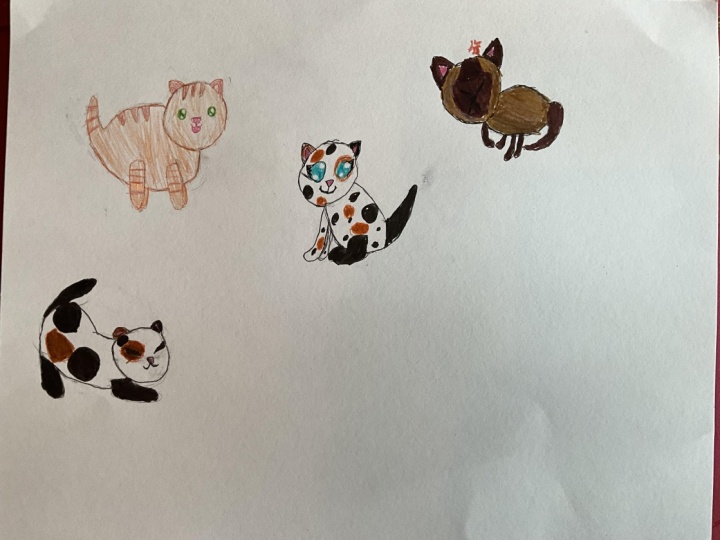
we're going to do to our cats in this class. Cute and tiny. We'll start by grabbing some
adorable references and inspiration from professional
artists and from real life. Look at all those cute cats. They're adorable. And then we're going to get
drawing right away. Not only are we going to see
me draw this to be cats, but you'll also
draw along with me. We'll start by
drawing the shapes, going through different
patterns and details, trying out different
she be expressions, and even posing your kitty
in different fun poses. More than this even includes templates
that you can use to draw your own Chevy gets
with a ready-to-use space. So what are you waiting for? Joy now, and I'll see
you in the next video.
2. The One Resource You Need: Hi and welcome. Let's start our class well, by focusing on something
fundamental, inspiration, the first thing every artist should get when trying
to draw something new is lots and lots of
inspiration and references. Creating a mood board filled
with images that inspire you is always a good idea
when drawing something new, Pinterest is a good place to keep those inspirations, e.g. but you can also keep photos and images you find on the
folder on your computer, or even take your own photos for places or subjects that
you find interesting. We need to see our
subject in real life, but also professional
work from other artists. This way, you can learn the many different ways and solutions to draw
the same subject. And that's why I've included
this lesson on inspiration. Before starting to draw, take some time to find some cute references
and inspiration. But where can you get inspiration for
drawing sheet we cats, as I said before, you
can find it by doing some research online
or even true books. I've also looked
around and found some great and cute
inspiration to share with you. I created a Pinterest
board filled with adorable shaving
kits that you can look through and hopefully give you a few ideas
and inspiration. Looking for photos of cats
can also be very helpful. Cats are already quite cute. So that can help you in
getting more inspired or maybe figure out their
ballot and how to draw them. Baby cats are especially
good to search for since the really small rounds and everything about
them is skewed. So they're a great reference
when it comes to drawing, shiva gets finally,
other ways to seek inspiration is by
finding games, books, or movies and TV shows that
have acute NCBI style, acute example of those
and that you can search for is the relaxing
game, Animal Crossing, where you can interact with several characters inspired
by different animals, including cats, be in public. Ed is an animated series
with a very cute style that features and adorable cats
that often appears grumpy. One other example is the
mobile game Nico atomic. Katie collected,
where the goal is to lower as many kids as you
can into your backyard. This game is filled with
2D drawings of cats. So it's definitely
worth taking a look at the games art
for inspiration. There are many artists that drawing them more cubist style, so it's worth finding
such artists that will inspire more
often than not, the archer find on
Pinterest comes with a link to the artists
social media page. That's a good way to
find new artists. Look for inspiration
wherever you can, because that's one of the
largest, most important tools. Take your time looking
at pictures of cats. Go through the Pinterest
boards I mentioned, and when you're ready, meet me in the next video.
3. Drawing The Basic Shapes: Hello and welcome. So before we draw
an actual cats and, or a finished drawing
of a Chevy gets first, I want to go through
the basic shapes. So basically, we're
going to build a blueprint of our
shear weekends. So we're going to start
with very simple shapes that you can use to build
your own Chevy cats. Let's start. I have here a blank documents and I'm going to start the shapes
of my Chevy gets, so we're going to draw
very small and round. She began, I have here
my pencil brush in red. And the first thing we're
going to do is drawing an oval shape,
something like this. Don't worry too much about
your lines, how they look. It's perfectly fine
for it to look messy. This is just a sketch, something for you to build
your kids as you go. So first thing we do is a
novel shape just like this. This is going to be our body. This one right here. Alright, now next, I'm
going to go ahead. I'm going to create
a new layer here, just so I have everything
in separate layers, so there's no confusion here, but you can draw it
in the same layer wherever is the most
comfortable for you. Now, here around this part, I'm going to draw a big
circle, something like this. This is going to be our head. Okay? I'm also going to take
this opportunity and draw some guidelines for the face. Something very simple like this. Alright, so we have most
of our cat right now. Now before doing anything else, I'm going to create
a few guidelines to help us know where everything goes and to draw everything in
its right place. So moving it a little
bit to touch this shape. Now I'm going to duplicate
this line and move it to touch the top
part of our oval shape. Now, another one for
t and of our head. So this is our
guidelines so far, we have our body or head. Now, let's continue
building our guts. So all we're missing right
now is the tail and our legs. For the tail, again, this is a very round cat, so we're going to be using very round shapes like
circles, ellipses or ovals. For the tail, we're going
to start from here, the end of our body shape. Go up and build this sausage shape that goes up to our head
guideline right here. You can make this shape
even ship here if you want, or somewhere like this. Now, all we're missing
is our legs. For that. I'm going to go right here, create another guideline
and move it down. Somewhere around here. I want the legs to be short. I really want a very round, round caps and very tiny. So somewhere around
here it's good enough. And now that we're done
with our guidelines, I'm going to join them altogether and give them a little bit of
transparency there. And now finally, we can
go in and draw our legs. Now for the legs, we're
going to have a very ranch. So you can start with a
circle like this and then go down until you reach
the last guideline. And we have one life is going to rotate it a little
bit like this. There we go. We have one lift. Now. For the front legs, we do exactly the same thing. One circle and the round shape. Until we touch or less
got it. There we go. We have here the very basic
shapes for our sheet. We get a novel
**** for the body. Then a circle for the head. This circle doesn't need
to be 100% perfect. Just close to it. Again, this is just a base, just something to guide us. So you don't need to be
perfect with this lines. They can be very messy. Don't be afraid of doing something that
doesn't look perfect. Okay, then we did our tile. This is going to be our
tail and finally, our legs. We're not adding years right now because that's going to
be part of the details. So for now, this is all I want you to do to spread shapes. These are the shapes
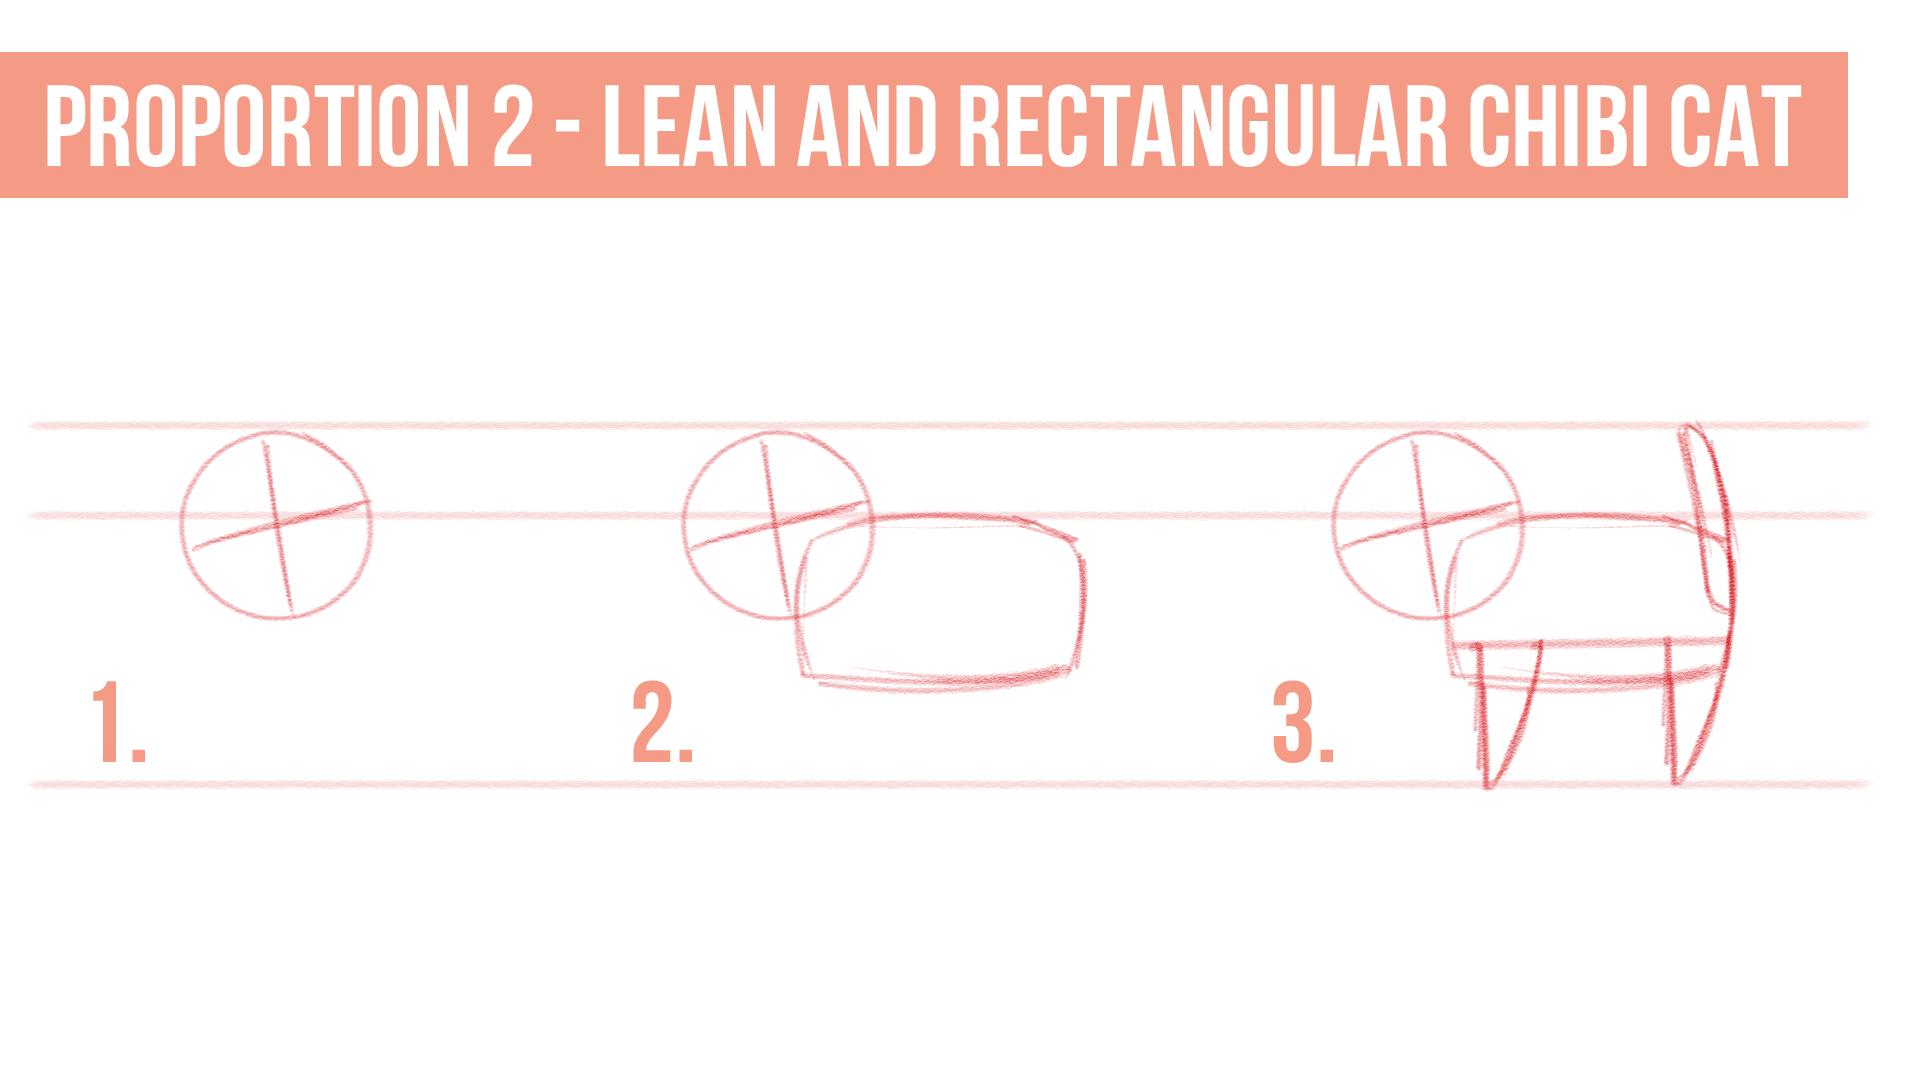
that we're going to be using throughout the class. However, when drawing issue we get there are many
ways you can do that, that are different proportions
or even shapes to do it. I'm going to give
you a template of this shapes along with
two other templates. One for Elinor and
rectangular cats. So the proportions and shapes are going to be
slightly different. And another template for a cat that is a bit more
anthropomorphic. So if that is something that interests you
and if you want to practice that you have
those three templates and you can practice three
different kinds of cats. Even though we're going to use a small round get for our class, I'm always going to give you templates with the
other proportions. So that's something you
can do if you want to have some more fun
with your CV cats, you can also try
your own shapes. Have some fun with this
phase, the shape phase. This is where you discover a
bit of your style as well. So have fun. Don't worry too much
about perfection. Be messy with your shapes. And when you're ready. Follow me to the next
video where we're going to start adding some
details to our sheet. We get.
4. Sketching Head Details: Alright, hello and welcome back. So here we are. We've figured
out the shapes for our cat, maybe practice
those a little bit, just over, are more
comfortable with them. And now it's time to start refining our sketch and
adding more details. So before adding the details, I'm going to go in, add some transparency
to my shapes. And I'm going to define
my cat a little bit more. I'm still going to
use a pencil brush, but with a darker color. And I'm going to go
through my shapes, but giving them a little
bit more definition. So it starts looking
more like a guess. Again, I'm going to still be
quite messy with my lines. We have our head here. Now for the body. We have here a very round body. And then we go up
and draw our tail. So as you can see, I'm going through my lines but giving them more definitions. So you see there's
a cat in here. Now, our legs, tiny legs. Then we have the belly. Again. Another. Then we close our
body right here, which just refining
more our cat. So it does look a bit
more like it gets. So you see there's a bit
of a difference now. Now, I think there's
a kitten here. Now, I'm going to go
here and add a tiny, or just a little bit of both. Because we don't see
a lot of it's right. It's the legs on the other side of our
cats. And this is it. Alright, so now
that this is done, it's time to add some
details such as the ears, eyes, and nose and
the maps, right? For that we're going to draw several different
types of each feature. Then you can choose your own. And so you know that
there are always a lot of options to use when
drawing shiva gets. So I'm going to go
over here where I already have a few basis, just the head ways, right? I don't need the body right now. Now we're going to go in and
draw different features. So e.g. let's start
with the eyes. When drawing a shabby character. In general, we tend to
simplify things a lot, especially the face features, usually the rounder or
the more simple and basic is most of the
time the cutest it look. So that's what we're
going to do right here. One thing you can do
is just go over to the ice area and
draw simple dots. Just like this. This is it, you
have some ice done. Another option, e.g. is instead of two dots, you can draw two ovals for the
eyes, something like this. There we go. And now for
something a bit more difference, even though usually
you would like to keep things small when going
for shabby character. Sometimes having that
exaggeration of proportion from different features
of the body to give your character a
little bit more kidneys. So one thing you can do is draw a very big and round
eyes on your kids. I can go right here. Draw a big circle. Alright, and now another
circle on the inside. But this one is called, this kinda reminds
me in when cats are in that playful states and
their eyes go really big. So that is what it reminds me. This kind of voice is very
round and very big guys. So these are three options of eyes you can use
on your CV cats. Of course, there are several
other ways you can do it. Again will come up
for other artists or other references might
give you a few more ideas. And you can experiment with
this as much as you want. These are the three types of
us we're going to draw here. Now, I'm going to
choose one of them. Go back to my cats
and draw them, going to draw my eyes. Now, I'm going to go with
the two dots. There we go. I like to keep things
very simple and I like the two dots
for eyes option. So you can go to your cats
and choose one type of ice. If you don't want to
choose anything right now, you can just go to
your sketch book and try out different
types of eyes. Practice them until
you like them, until you know what
you like to use, and then add them to your kids. Now that we have our Eisenstein, we're going to draw the nodes. I'm going to go right here. One of my favorite shapes of noses when drawing in animals, specifically cats,
is a tiny hearts. So cats have that
inverted triangle shape right in real life. And I like to transform
that into a small heart. So this is one of the nose is, you can draw against
the nose is going to be very simple,
very simple shapes. Another one you
can do is go right ahead and again, an oval-shaped. And finally, for the last one, I'm not going to draw a nose. That's another option as well. You don't need to draw the
nose when you're creating a new character or a character if you really want to go for us. Very simplistic style. You can omit certain features
if you think that fits. For the last one. I'm not
going to add any notes. It's a nozzle sketch right here. With that, then I'm going
to go over to my cats again and draw a little nodes. I think I'm going with
the ellipse here. The second nodes we drew. Alright, let's go
back to our details. And now we're going to draw three different
types of masks. More often than not, we use the laid down tree
shape for the mouth, right? So that's what we're
going to do here. I'm going to make
a line going down. Then the mouth. There you go, the cutest
small mouth you've ever seen. Another option,
while still keeping things simple is going down. And then just a notch
line like this. Now finally, we're going to draw another version of
our laid down three. But this time bigger, a longer mouth to
bigger mouth like this. And the great thing about
this one is that we can take the chance and adds a
small theatre right there. Or it may be even on both sides. I like to keep it in one side. So this is another
option for your mouth. Just like before. I'm
going to go back to my cat and draw the mouth. I like this very
small mouth styles. So that's what I'm
going to remember. Repeat as many
times as you need, even if they are
very simple lines until you feel you got
exactly the shape you want. Alright, so our cat
is almost finished. All we are missing now
is the ears, right? I said that we're not
going to draw the years yet because I'm going to
add those in this video. So usually cat ears,
our triangle, right? If you look at the cat, you see two triangles on
top of their head. So that's more or less the kind of shape we're going
to use right here. But again, you can have
several variations. So one option is going with
rounder ears like this, then another two on the inside. And we got to very small and
round ears for our good, almost like their ears. But for kids, then we can
go in a similar fashion. But drawing are a bit punchier. So again, two triangles, one on each side, and then two more
triangles on the inside. There we go. Going again with the different
proportions ideas. We can go in. And instead
of going with small, we can go with big. So this time we're going to draw very big and pointed triangles, one on each side. And you are done two more
triangles on the inside. And just like that, we drew three different
kinds of Chevy cat faces. So as you can see, even though they all have more
or less the same concept, you can have different
variations of a Chevy gets. It's mostly all up
to your own taste, your style, or even what do you think fits best
to your characters? So I'm going to go
back to my cats again. I had a new layer
and now I'm going to choose what kind of
use I want to go with. I think I'm going
with small triangles, small end pointy triangle. So with that, we have
our sheep cat finished. Or better yet? We have our sketch, our sheet, we get finished.
5. Adding Patterns To Our Cats!: So we have the sketch of
our sheet, we get finished. But if you want to
add something more, you can add a pattern to them. So e.g. cats can have
a solid color, right? They can be just
fully black or fully white or orange,
maybe even browns. But other times, cats have
different patterns, e.g. your cats can be a tabby cats more often
than not, they are listed, at least those are
usually black with brown or gray Orange sketch e.g. are usually listed like this, so they have the light
orange floor and then they have a darker orange lists or stripes throughout
their body. This is an option.
I'm going to go in, make a new layer. And I'm going to show
you how I would do that while keeping
things simple. So we can make those stripes
like this, small rectangles. And we have a few
stripes on their back. Then we can add some more
stripes to the tail. Can even darken this. So it's easier to
see more stripes. And another one. There we go. Then finally, let's
add a few more. The head. There we go. So we have here, Let's advocates a
very simple circuit. We can try other patterns, e.g. another option is going
with the calico cats. Calico cats, as you can see, usually have three colors, e.g. the white, orange, and black. How much of each color depends on the cats is pretty random, but usually they
are mostly white with a few spots of
orange and black. Again, we can portray
this on our cat. So I'm going to have height
here are tabby cats. Add another layer and
try it out. So e.g. we can color our ears and we can add a few circles to markets. Let's say this one is
going to be black. And the other ones, we're going to, we're going to have another
color, orange, e.g. for now, we'll leave
them like this. We can also take the chance, and again, the bits to the tail. So it's all about
blogs and stripes. When it comes to kids. We can even go in and color
something around there. I like this. This is an option. You can also go with two
blobs of colors right here. So it's all up to you. And really this, all these blobs are circles can be quite random
because usually they are. So when drawing a tabby cat, you want to draw some
stripes by using some triangles or rectangles depending on what
you're drawing rights. For a calico cat, it's all
about stripes and circles. That's the kind of shapes you want to draw for those patterns. You can even add
here a colored box. We're going to go
through another pattern, which is the seal point. More often than not, these are the
Siamese cats, right? So as you can see, they have a lighter color
throughout their body, but then they have, the points of them are darker. So e.g. the years are darker,
detail is darker. A lot of the times the faces well and the ends
of their posts. So this one is also fairly easy. So if you want to draw
a cat or a CME scat, you want to darker, dark and their ears, their tail. So this one is more all about adding darker shades through
all of their extremities. So pause, sale and years
and even the face. So as you can see, it's
very simple to add more personality to your cats by using very simple shapes. Going to use a heart for the
darker fur on their face. Because I think
that makes it look. And that's how you
would want to go for acyl point gets they
can have other colors, but usually this is what
you find most of the time, this brown scream and
almost black colors. But as you can see,
it's very simple. We have here again, our weekends, so it's
all about stripes. You can add even more
stripes if you want. This is the most basic way
of drawing this pattern, just a few stripes
on top of the body. Then we have our calico cat that is all about spots
of different colors, usually white,
black, and orange. And finally, we have our steel point cat
that is all about having darker fur on their
extremities such as the ears, tail, end, the center
of the face as well. So what we're going to do now is I'm going to clean
up this drawing with some new lines
with a clean line art. I'm going too fast for
this phase a little bit because all I'm doing
is going over my lines. So now all we have to
do is choose eyes, nose, mouth, and ears for your shoe begets and
add it to your sketch. And then a pattern. Again, I'm going to leave you
three different templates. One for this shape of
cat though the round, the small and round. Another furthermore
hit angular cats. And finally, another template for the anthropomorphic cats. You can see how these features behave in
different proportions. And if you want, you
can use those as practice once you're
all done with this details and the patterns and you have a cleaner drawing, just like I'm doing here. We're going to add some colors. So take your time. Have fun making as many
sketches as you need. And once you're ready, follow me to the next
video where we're going to add some
color to our ship. It gets, so it looks even cuter.
6. Choosing The Colors For Your Chibi Cat: Hello artist and welcome back. Now that are shaping
cat is ready. We can add some colors
to make it even Q-tip, if you have an idea of what
colors you want to use, you can just pick
any color you want. On the other hand,
you might want to follow the colors
from your reference, or the most common colors found in cats with a pattern you drew. Finally, if you're
unsure on what to use or just want to do
something different, you can find a random
palettes online and use it. Again, Pinterest can be
a good place for it. I often look up
color palettes on Pinterest and save
them for future use. I'll share with you my
color palette board, so you can find some neat
palettes to use drawings. You can also search for your
own colors if you want. Another great place to find a random color palettes
is coolers.co. I especially like going to
this website when I have no idea what colors to
use to make things fun, I'll generate a few palettes
and unload one that I like. You can generate as many
color palettes as you want and even customize
how many colors you want on your palettes. There's a lot you can do here, so it's a tool I
always find worth mentioning when it comes
to choosing color. Now whenever you have
your colors ready, it's time to color
our shear weekends.
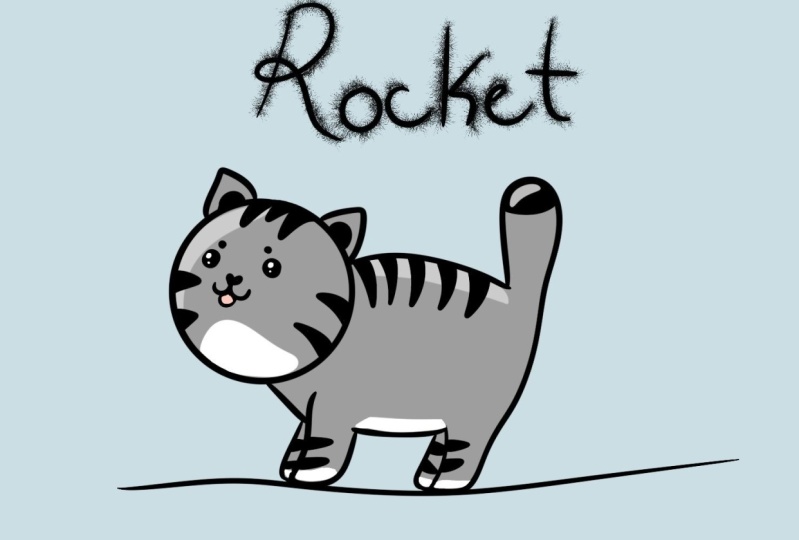
7. Adding Colors To Our Drawings: Okay, So I opened
here my tabby cats, and now I'm going to
add some color to it. I have here a very
simple palette, gray with almost black. I'm going to keep my colors very similar to what we see
in cats in real life. And this is going
to be very simple. We're going to add color to
our three different patterns. What I'm going to do is I
have here my line arts, my tabby cats, and
I'm going to let, to add a layer below it. So this is going to be
the layers for my colors. Now I'm going to go over
here to my paint buckets, pick the lighter gray. And now I'm going to start to add color to most of the body. Here. Here, here. The body, some of the
stripes and the other legs. So this is just I'm just
using a paint bucket. One thing to have into
account if you're using Clip Studio or
other drawing software. Be sure you have this
option when using the paint bucket that
says refer other layers. It might have a different
name in other software, but it's usually something
along these lines. This way, when you are creating a different layer
for your colors, it will always have into
account your lineups. As long as your lines are all
closed, there are no gaps. The paint bucket
will do its job. So continuing, I'm
going to grow to pick my darker gray color
and my stripes. So as you can see, very simple. Finally, you will just
missing here our ears. And for that, I'm going
to use a light pink. There we go. And we have our character colored in the very
simple manner. We have our Calico right here. And as you can see,
I have here a sketch of the patterns so it's
easier to add color. So again, keeping the
pallets very, very simple. And now I'm going to go
for my paint bucket. I added a new layer
below my lines. And now I'm going to
pick the white first. Just the light, the white. Of course we can't really see. We're doing this
right right now. I can go over here and use a darker gray for my background so I can check if I'm doing
everything right. Paint bucket again and quality in everything that we have this. Okay, So now going to
bring my pattern here. So I moved my patterns so it's on top of my
colors so I can see it. Now. It's time for some fun
and adding other colors. So I'm going to start
with the orange. As you can see, we have
here one big block. This block is going to be arch. There we go. This one here, orange again. I really like this
orange colors, so I tend to use orange
in most of my factor. Adds orange to one of
our ears right here. And now we're going to go
and add our darker color, which is this dots right here. Then our tail. And finally here
in one of our app. And I'm forgetting our year. And we go, we have
a cute calico cat. I'm going to hide
my sketch layer because we don't need it
anymore. And look at it. I loved think it's
really, really cute. I really like liquid gets. They always have fun patterns and they're very fun to draw. Alright, so we are
missing just one pattern. So let's go here
to our seal point. Cats. Move it a bit right around here. Again, as you can see, I have here a sketch. I'm going to create a
new layer for my colors. And first, the first
thing I'm going to do is add the main four colors. So this light brown or cream
color for most of the body. And now let's see
our patterns here and it's time to
go in and paint of the extremities
of our seal point Katz painting all the bus. As you can see, I'm being very
messy with this right now, but I'll fix it at all. So these patterns don't
need to be 100% perfect. These patterns, even
on real-life cats, if you notice there, they tend to be quite random and their shapes
are not perfect. So if you're not drawing
perfect shapes, That's fine. Well, adding the
pink to the years. And now I'm going to fix everything that
needs some fixing. E.g. here, the tail. Pause right here. We go. Erase everything
that goes outside. The ones we have here are three different
patterns of our cats. And you can leave your cat
just like this hesitant. Another thing you can do
if you want a bit more detail is to add some shadows. And that can be done
in a very simple way. What I'm going to do
is I'm going to go create a new layer
that is between my lines and my colors. There we go. Now, I'm going to go over
here and set it up as multiply and bring down
the opacity to about 50%. Now, all I have to do is pick up the gray color over here. Another thing I'm going
to clip to below layer. So this way, as you can see, I'm painting out of the line, but it's not painting
out of the one. Or you can see it. Since it's only having into account the color
that is right here. It's having into account
this layer right here. Okay? Now the next thing you need
to decide when painting, when adding some shadows is where is the light
coming from, e.g. if it's coming from this side, then your shadows are
going to be on this side. Right? If your light is
coming from this side, then our shadows are
going to be on this side. Alright? This is a very simple way
of adding some shadows. I'm going to say that my life
is coming from the left. That means I'm going
to add shadows to the right side of making
things very, very simple. Like this. Shadow here. And finally, right
here. A little bit. One of the years as well. And my shadows are mostly that. Let's go to the next cats and
do exactly the same thing. A layer between my line
art and my colors, set it to multiply with
around 50% opacity. And now we can start, I think, going with
a darker gray here. Now we can start
adding our chefs. You can see I am keeping
things very, very simple. There we go. Now. For less cats,
some more shadows, adding a new layer between
my colors and my line. Let's set it to multiply. 50% of opacity, pick
up one of the colors. It's whatever you prefer, e.g. if I pick up the lighter one, as you can see, it's
a bit too lights. I can of course, keep it and increase
my opacity of it. Another thing you can do is
pick the darker tone sample. If I go right here, you'll see that I have a
dark color right away. This is a very
simple way of adding shadows to any of your drawings. Any drawing you're doing via tertiary care or anything else. This is a technique you can use very simple way of adding shadows without
worrying too much. Just need to decide where
your light is coming from and then draw the
shallow on the opposite side. There we go. We have shadows on
all of our tree. We get we are done with
coloring our cats. Again, take your time, choose other colors, choose other patterns, find
different references. Just use the resources I gave you at the
beginning of this video. Just how fun it can be. Very weird colors that don't
appear in cats in real life. It can be anything you want. You are the one in charge here. Again, I'm going to leave you several templates for each of the cats proportions that we've talked about in the beginning. So have fun with your colors and your shoe. Be CAD drawings. Whenever you're ready. I will see you in
the next video.
8. Make Your Chibi Cat Come Alive With Expressions: Hello and welcome back. So we'll learn how
to draw a sheep. It gets, we added some patterns and details and
even some covers. So now it's time to try different things with
our shiva gets e.g. expressions. For that,
we're going to draw three different expressions
for your Chevy gets, we're going to draw
a happy expression and angry you want. And finally, something a
little bit more different. We're going to draw a
confused expression. So first I have here
these guidelines, these references
so I can draw on, this is the same guidelines are used for the facial
features, right? So we're going to start with
a happy expression for that. Instead of drawing two dots for the eyes or any other style
of either true going for, I'm going to draw two shapes
like this, like a mountain. Then I'm going to
draw, our heart knows. I'm going to draw to start trying to mouth in the same way we drew it before. This shape. Okay, I think our character already looks a bit
happier, right? It has a bit of emotion here. However, I want to
add something more. I want to, for them to
have their mouth open. And you can show that
then just like this, I'm going to move here, our nose a bit
upwards. There we go. And we have very easily with very simple lines and
shapes, a happy expression. But you can add
some more details, maybe even outside of the
face to emphasize the motion. E.g. sometimes I like
to add some lines outside like that show a bit
more emotion of Macedon. So this is something you can do. You can go especially with TB, which should be art
with a shipyard style. You can add these
little details around your character's face
or even on their face. So you can emphasize even more. You can saturate the
emotion even more. So this is it for a
happy expression. I'm going to create
another layer right here, just so we have
things separated. And I'm going to draw an
angry expression for that. Again, instead of drawing the dots of the eyes or
any other cell eyes, I'm going to go in and draw
some tilted lines like this. And I like to draw
it thick like this, like several lines altogether. But you can choose how thick
you want the eyes to look. I like to go this way. And then we can try this
time, or ellipse knows, Let's bring it closer
to the eyes to show how angry when
when we are angry, usually our faces
close a with or face features get
closer to each other. However, when you are
happy, it's the opposite. So when you're drawing
a happy expression, you can even move the
eyes a bit upwards. And how the facial
features away from each other with an
angry expression, tried to keep them close. And now I'm going to
draw the mouth here, the same shape we
did for our eyes, but this time for the
mouth, like this. So as you can see, everything
is close together. We can even make the nose go closer to the eyes like this. To exaggerate even more. N, I think it looks
even funnier This way. Finally, for our tiny detail, we can do something like this. If you've read some Mongo before or watched
animation shows, you know, this kind of symbol. And you know, it means the person or the
character is really angry. So this is something you can add to emphasize even more,
you're angry expression. Alright, let's go
to the next one. This one is really
fun and we're going to draw confused expression. So what I like to do here is instead of having
your usual eyes, I like to draw some spirals
for eyes like this. They don't even need
to look the same. Maybe if you have one
bigger than the other, it's even more fun. Let's try here. Let's make one of the eyes
bigger than the other. There we go. And even at different levels. So as you can see,
when I do this, it adds even more
to the expression. Exaggeration is always,
it always depends on the style you're going for or how you like to draw things. But usually exaggerating things even a little bit do
make a difference. And now, as for the mouth, so we draw our maps like this, right, some of our cat's mouth. So let's try to do that, but adds a pit of
undulation there. So we start this. There we go. And now the same thing
on the other side. There you go. Again,
as you can see, of course this was
kind of accidental, usually electrode things first
symmetrical to each other. But as you can see, one side of the mouth
is different than the other and it's
even a bit tilted. These things, even if
they are accidental, you can leave them, especially in this kind of
expression where confusion and assymetry emphasize
the expression even more, the motion the
character is feeling. So try to make real things. Don't be afraid to go out
of your way and exaggerate things a lot and make weird drawings with
your expressions. Because sometimes it
to work better than being very perfect with
whatever you're drawing. Now we can add, again, a bit of confusion
details, right? So we can continue
with the spiral idea. Something like this,
another one here. This is something that
you can do and these are our expressions that
we are learning here. As you can see, they
are all very simple. You can draw something
really cute and funny with very simple
lines or even shapes. So now what I'm going to do is I'm going to go
to our Chevy cats. We have those three
different proportions of Sheba cats, right? And I'm going to add these
expressions to them. I have them here. They look a little
bit scary without, without their faces right now, I have my guidelines. And now I'm going
to go in and follow exactly the same steps
that I did previously. So we're going to start with a happy face with our first
at something like this. Actually, let's move this
a little bit upwards. There we go. And now the nose, right? Heart nose, the mouth, and then very big open mouth. There we go. Don't forget the details,
the tiny details. There we go. Now for the next one, we have the angry
expression, right? So Hilton eyes, Let's
exaggerate those even more. Tilt them a lot. I like to have fun
with these expressions and really exaggerate things. Right now for this character, we have these nodes, right? The oval nose, and then we got an inverted V or a
mountain, mountain shape. There we go. He's really angry there. And now again, we can add
our angry symbol right here. We go. He looks so angry. I wonder what they did to him. Now finally, our
confused expression. So two spirals. I'm going to go with a one bigger
than the other. I'm going to be very messy
with this because I really don't want to have a lot of
control of what happens here. So it can be even
weirder and confusing. There we go. Now for the mouth. Same thing on the other side. Is so confused or thing. Some details around our
character here and there we go. See very easy, very simple. Now, all I have to do is go in and clean my lines
to some final lines. I always, even if it's simple, I like to go through a
sketch phase first and then redo my lines in
the cleaner with a cleaner look because this way, I'm sure I won't be
making any mistakes. So I created a new
vector layer on top. If you're working with
Clip Studio Paint or other similar
drawing software, a lot of softwares already
have Layer vector layers. I like to use a vector
layers for line-up. Because when I did this layer, if I need to scale it up, if I need to change
anything at all, I won't lose any quality to it. So it's very useful when drawing some lines to inverted fees. Hardness and a big smile. Now, let's go up. I forgot my details here. Don't forget about your details. Really fun expression
now for the angry one. Wow, he's so angry. Repeat the same on
the other side. Oval nose, and inverted
V for the mouth. This is such a fun
new expression. The small extra detail. Now for the last one, confused expression,
a big spiral. And the smaller spiral. Now on delighted mouth. And there we go, B, messy with it. Don't be afraid of being messy with your shapes and
your lines sometimes. That's what the drawing needs. And there we go. We have here all
our expressions. As you can see, you
can draw any kind of expression in a very simple
way. Have fun with it. Try different things.
Try different shapes, even lookup for
Mung expressions, indifference, she be art styles. See what you like, try them out, just try different
things and have fun. And when you're done, follow
me to the next video.
9. Posing Your Chibi Cats: Hello artists and welcome back. We went through the process on how to draw a shoe be kids, we learn which shapes to use
different emotions to draw, as well as different patterns
and details you can add. So now it's time to go to the next level which is
posing your shear we get you'll want to draw
your CV cats in more entertaining poses
than just standing still. And that's exactly what
we'll learn in this video. The first thing you
need is a reference. In the beginning of our class, I provided you with a
few Pinterest boards, including one filled with cats. You can go there now e.g. and find the posts
that you like. On the other hand,
you can search for something specific that
you might have in mind. The important thing
is that you choose a good and clear photo of
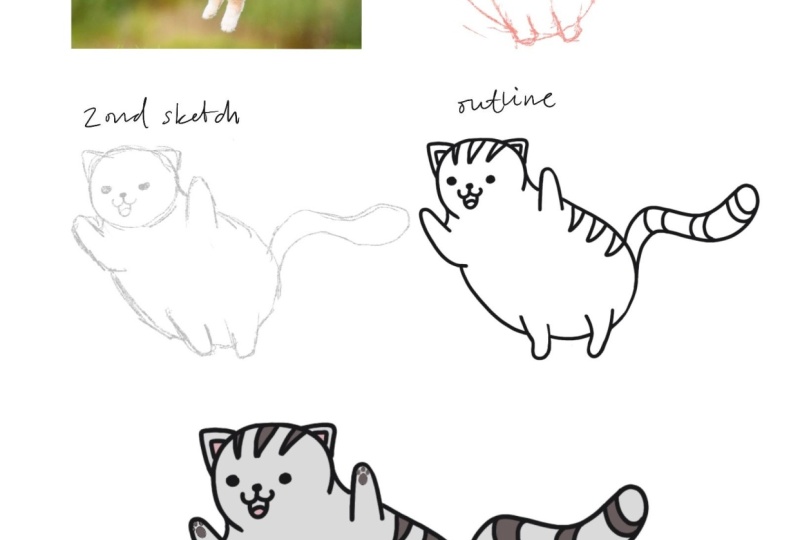
the poles you want to draw. For this exercise, I'll be
drawing a stretching cat. This is a reference I'll be
using throughout this video, and I'll leave this image
available for you to download if you want to
use the same reference. Now that we have a good
reference image to follow, it's time to start drawing. So I have here my
reference image, and I also added our base shapes for the sheep cat
we've been trying so forth. They'll forget, I
will leave you with templates with the
same exercise, but with the other
two proportions. So if you want to work on
those proportions as well, you can follow those. We're going to draw
a cat stretching. The first thing I want
to do is first go into our image and find
some shapes there. So we get more familiar
with the pose. I'm grabbing my pencil and I'm going to go in and start
drawing shapes. So e.g. we have a circle
here for our heads. Then. I think we have here
something like a bean shape of very long been for
the whole body right? Going in this direction. Then we have our
sausage for sale. So as you can see, the shapes I used for our ship, it gets kinda follow the
shapes of irregular cats. I just exaggerated the size
into very basic shapes. Not for the leg. We got one leg here. And we can also see
the one at the back. And then we have a very long legs coming out at the front
like a triangle shape. Alright, so with this, I can have a better idea of
the movement of the poles. So what I'm going to do
is I'm going to draw this pose with the knowledge gained here with our new pose, but using our Chevy cat shapes. So let's start.
First. We're going to draw a very big head, right? So round and be kept like this. And then we can go in
and draw our beam. Sometimes trying this shape can be a bit hard
at the beginning, especially getting
the proportions are the sizes you want, right? So what we can do is divide the bean shape into
smaller and easier shapes. So I'm going to go in
and I'm going to draw one circle here and
another circle Here we go. Now, I can connect them
and create the bean shape. As you can see, I'm drawing this shape even rounder
than in our heparins. And instead of going
for a long shape, I am going for something short. Just like here in our
shear we get, Alright. So now we can add our legs that we now follow
our bean shape. But I'm going to focus on
this shape right here. One part is done. Now, the other is quite long. But still, I'm going to
focus on this shape. But I'm going to lay down, since that's what we
see in our reference. We go, as you can see, I'm being very messy
with my shapes here, and that's totally fine. Okay. Don't be afraid to be
messy in your sketches. Now, all we are missing
is the tail, right? We have this sausage shape
in the tail goes up. And we're going to do
the same for our shiva gets a sausage shape. What? This? There we go. Now, all we're missing
is the head right? Now, if you notice
closely our cat here, the face isn't 100%. Turn to the side, right? We do see a little
bit of an angle here, but I want the angle to
be even more exaggerated. I want the cat to be
almost looking at us. So for debts. And
this is something very important when
drawing from reference. Sometimes you can draw
exactly what you see, but other times to make your
drawings more interesting, you can play a bit
with angles and adapt the reference
to different angles. So that's what we're
going to do here today. We're going to experiment
with that a little bit. Our cat's face will be beats in a three-quarter position,
something like this. There we go. Now, I'm going
to draw the eyes close. This are heart-shaped
nose, right? And there we go, All of
them missing is our ears. Let go. Around
here. There we go. So see, I play the
beat here with the angle of our reference and turn to face to
us a little bit more. Now, looking at this, I feel that compared to
our original shapes, the cats are cats is
a bit too emigrated. So while the sketch phase, this is a good opportunity
for you to change things, edits you're drawing until you are happy with the results. So I'm going to go in and
scale this up a little bit, make it wholesale, bring
it closer to the head. And there we go. This is a closer proportion
to what we have initially. So once this is done, all we have to do is repeat the same steps we did
when drawing our ship. It gets. So I'm going to
erase all these lines we don't need and move it to the center and maybe
even scale it up a bit just so it's easier
for you to see it. So as you can see, this is quite messy, right? So now let's go in. I'm going to add some
transparency here to my sketch, to my first sketch. A new layer on top. Still am going to use my pencil, but with a darker color. And I'm going to go
over all this lines. So it looks a little bit more organized and clear
for us to see. Of course, this doesn't
need to be 100% perfect. It's going to be clearer and it will look more like our care. Go. Now I'm going to
draw the small ears, one on each side. Again, this is the phase where you can move
things around, check and see if you're
happy with what we have. Feel free to edit stuff, scale it up and down. The sketching phase is
very important for this. So you can decide what you want your drawing to look like. Once that's done, all
you have to do is just like before go in and
draw the final lines. I'm going to fast forward
that because you don't need to be seeing me go over the same line over and
over and over again. But this is my usual process when drawing from a reference, I try to understand the pose. I draw on top of the pose, then go outside of it. Experiment with this shapes
adapted to my own style or any kind of other southern going for this case
should be art style. And sometimes I can
even go and adapt the angles of the post to
make it more interesting. After that, all you
have to do is make a more detailed sketch
or you can better understand where is everything. And so you can make your final
decisions on the drawing. Then go over all
your lines and you can even go in and add
some color to your cats. You can use the
same palette we use before you can use another one. The most important is that you have fun with the whole process. Don't forget, you can
download this and all the other proportions we
have been working on so far. So you can see all the examples and practice from
those. If you want. Have fun with your
drawings and meet me in the next video where
we're going to talk about your assignments. So I will see you right there.
10. Assignment: Your Turn!: Alright, We've been through
a lot in this class. And I hope you've
been following along and drawing your own Chevy
cats throughout the class. If you have, feel free
to share them with me. I'm always looking forward to seeing your art for my classes. If you haven't
drawn anything yet. The word, here's
what you can do. Grab the Chevy CAD
templates I'm giving you, draw your own version of a shiva gets and finally
shared it with me. That's it. Pretty is, right. You just need to download the template and use it
in a drawing software of your choice or printed out and use any
traditional media. Don't forget to
share it with me. I can't wait to see it. And before you go, I just
have a quick video left, so I hope to see you there.
11. Conclusion: Before You Go: Hi again, and thank
you for watching. I just want to say a few words. While you watch this quick speed painting in
the background, we've gone through a lot of
information on this class. So be sure to take
your time with it. Go back to the videos
and rewatch them. Practice drawing your
shipping kits and take it one step at a time. Experiment with
different shapes, proportions, patterns,
even different poses. Cats are a joy to
draw and drawing them in a Chevy style is so much fun. The possibilities are endless. And whenever you feel ready, share your drawings with me. I'm really looking
forward to seeing them. I hope you've enjoyed this class and then it was helpful to you to consider leaving a review so more
people can find it. Also, it really allows me to keep on creating new
classes in the future, as well as updating old ones. Thank you for your support and as always, keep on drawing.
 Patricia Caldeira, Illustrator | Digital Artist | Designer