Transcripts
1. Introduction: Hi, I'm Anne Butera. I'm the artist behind the website and blog, My Giant Strawberry. I believe that if you have a yearning to make art, you should make art. Whether you're new to art-making or your art practice needs to be shaken up a little bit. I'm hoping this class will help inspire and encourage you to go about your daily art-making in a different way. There are two things that often stop us when we want to create art. The first is that we don't have enough time but as you'll see throughout this week that we spent together, it doesn't take a lot of time to make art and all of the seven pieces that we'll create in this week take less than half an hour and some of them even five and six minutes. All of us have five or six minutes that we could devote to art-making. The other thing that sometimes stops us is not knowing what we want to create. You have a desire to make something but then we're faced with the blank page and we don't know what to fill it with so this class will help with that too. I will help you get started, overcome your fear and your hesitancy and help you form a structure for your daily art practice. Think about what works best for you and then create it your own way. If you think you need a little bit of inspiration and encouragement, click enroll and I'll see you in the first lesson.
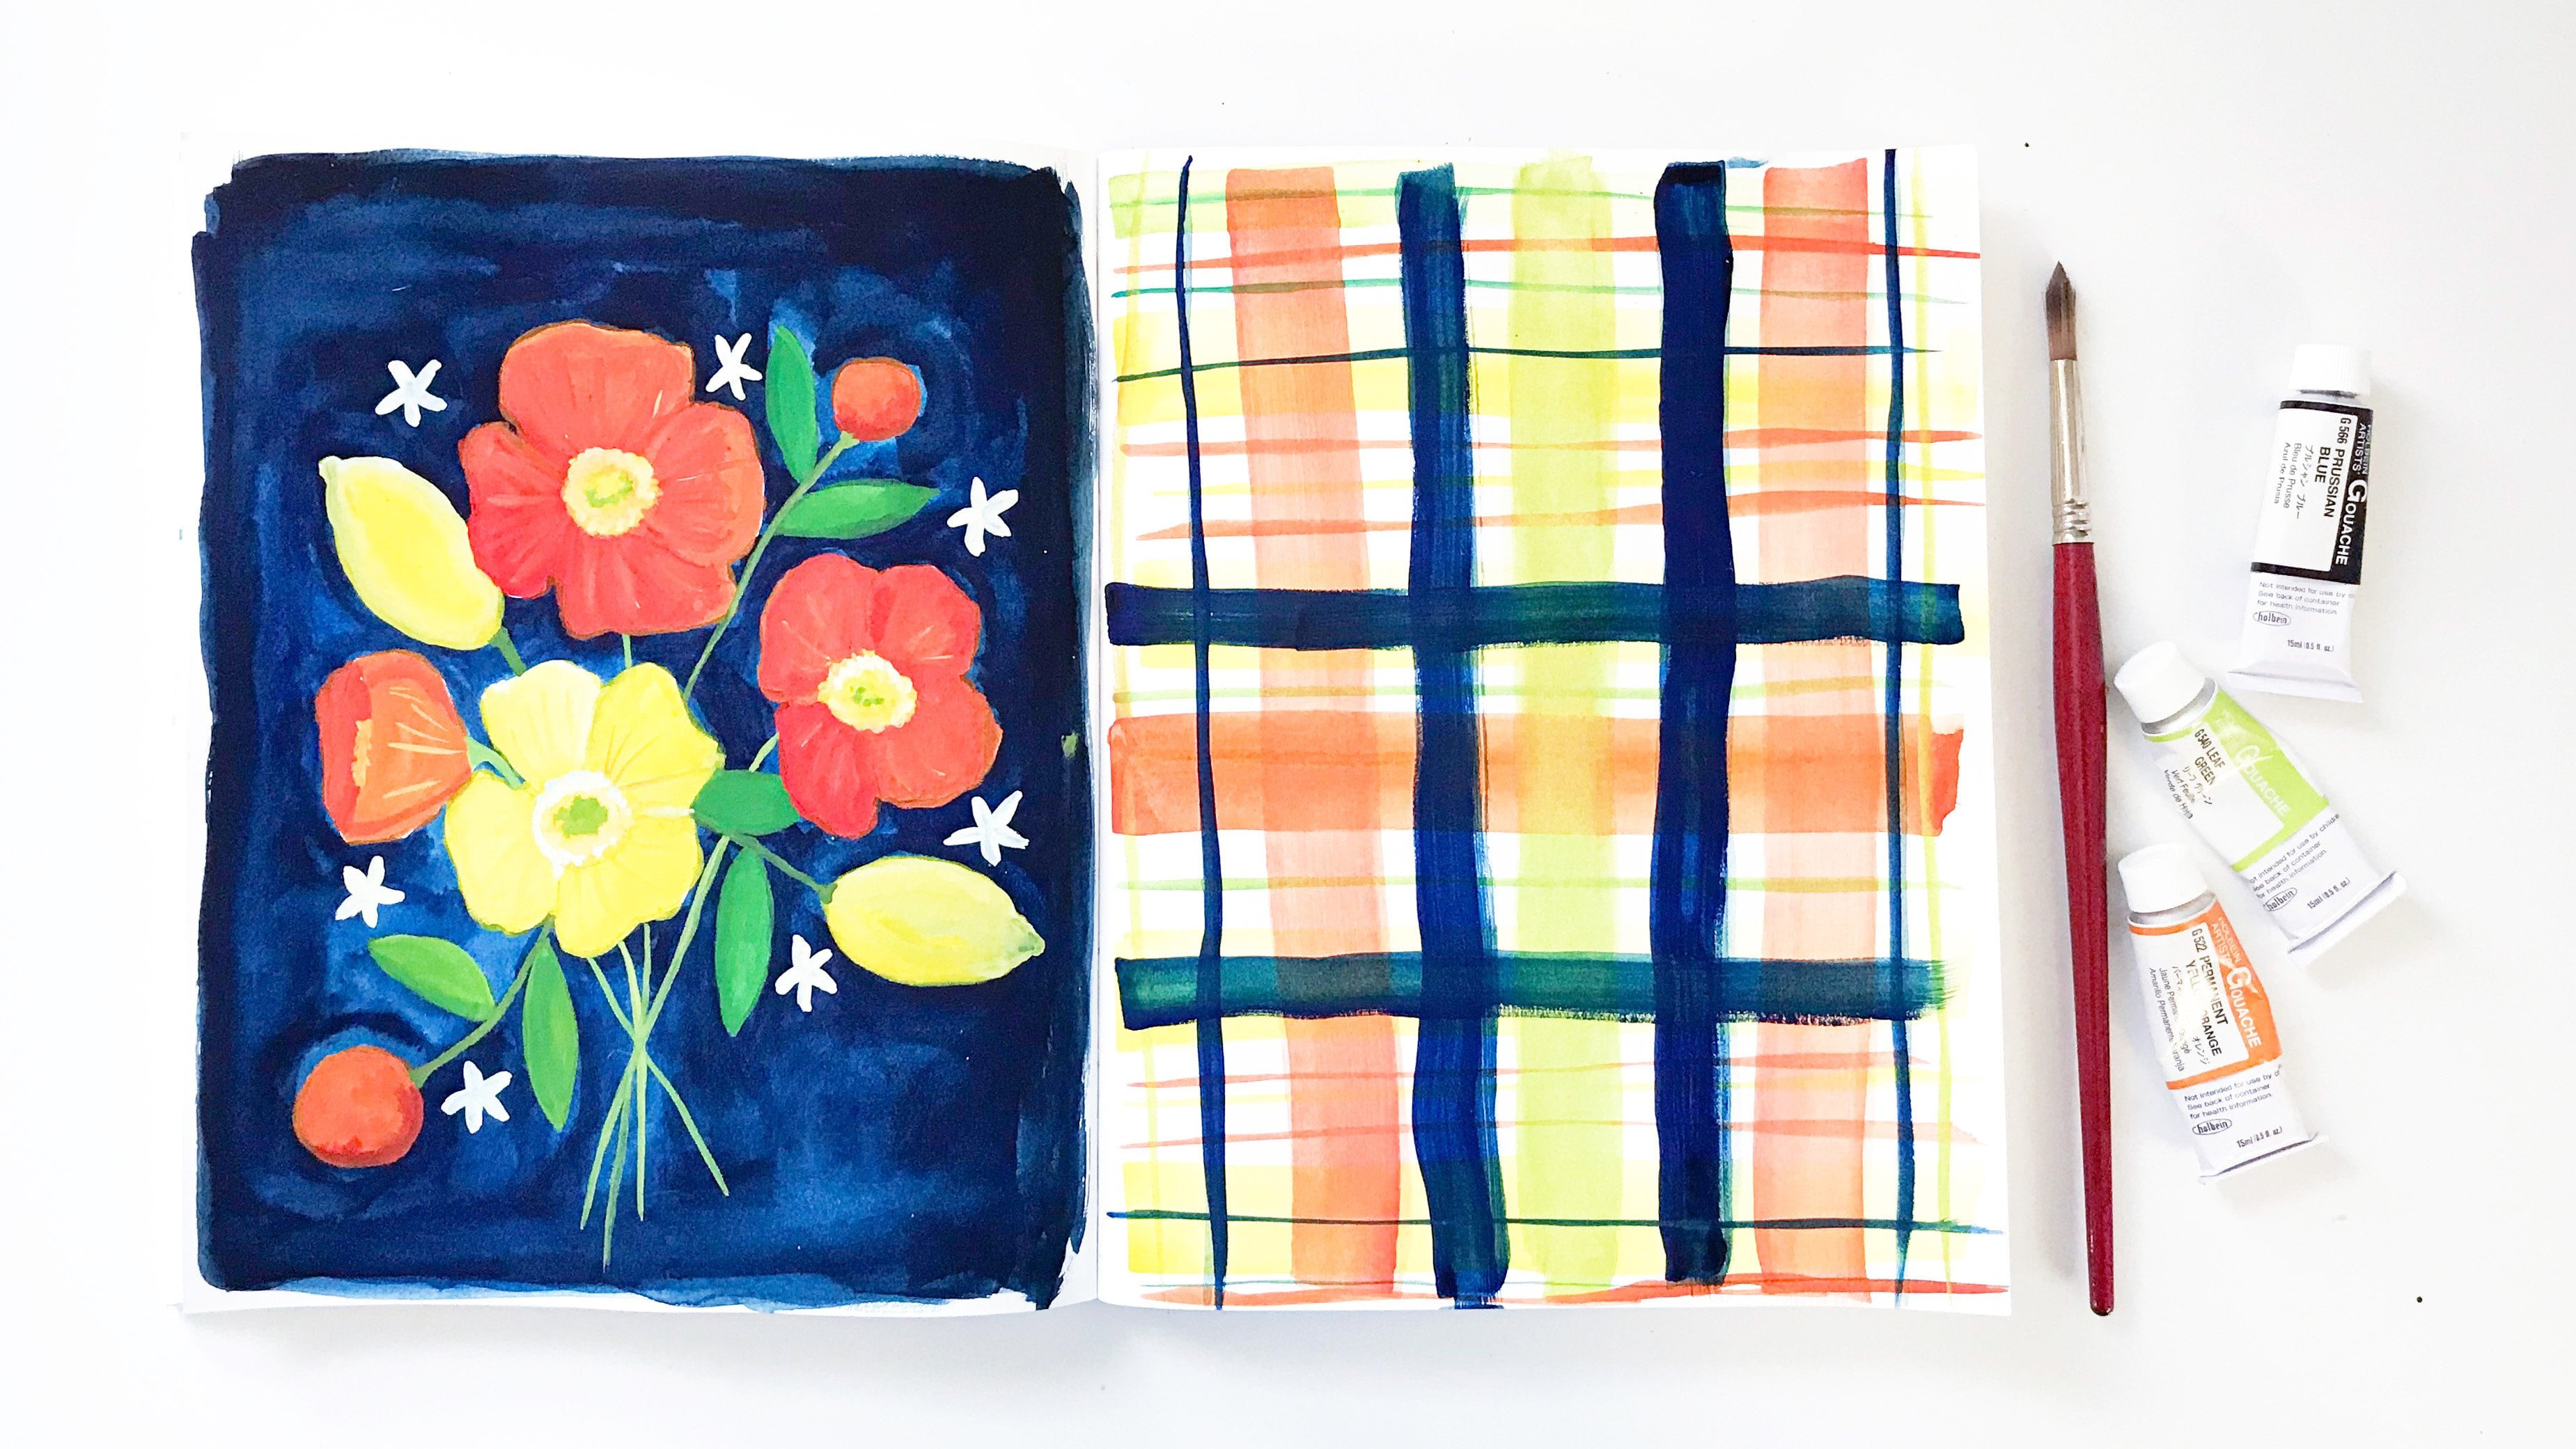
2. Structuring Your Daily Art Practice: We're going to start this class by creating a structure that will work best for you. I hope you've already printed out your list of prompts. Maybe you've started taking a look at it and maybe you have some ideas already and that's great. I'm going to show you a few things that will help with making the daily practice easier. The first thing I'm going to suggest is to choose a size to work on. I chose four by six. That's nice and small and that way you're not getting carried away trying to make a really big piece. Prepare that ahead of time. Spend some time cutting out a size that you're comfortable with. If you're happy working large, if you want to use large brushes or something like that, that is fine too. I'm not trying to tell you what's best for you, I'm just saying what worked well for me. Another option is to use a sketchbook. This sketchbook which I bound myself, the binding is a little wonky, but it works fine. This one I used in my first class, Getting Started with the Botanical Sketch book. You can see it's a nice size and just a little bit bigger than four by six. I may end up going back and attaching pages in here later and you can do that too. If you work outside of your sketchbook, you can always attach the pages later. It's nice to have a set up created to help give your practice structure. Another good thing to keep in mind is what time of day works best for you? Are you a morning person with a lot of energy in the mornings? If so, then set some time aside in the morning to work on your daily art, choose what time is best for you. Just playing around that, that just makes it a lot easier. It's also good to decide how long you want to challenge yourself to working every day. Do you want to just do the next seven days with me? Do you want to fill a whole month using every one of these prompts? Do you want to make yours 100 day project? Or are you going to be even more ambitious and go for 365 days? It's really up to you how you want to do that. I think it's good to strive to create some art every single day. But of course, I know it doesn't always happen that way and we need to be easy on ourselves too, don't let the excuses buildup, of course, but it's okay let yourself off the hook. After you've decided that and decided your structure in terms of what you're going to be working on, you can choose your media if you want, or leave that more open. It's entirely up to you. Sometimes it's nice to shake things up and change them around. In the next seven days, we'll be doing watercolor , gouache, pen, gel pen, and collage. That'll give you some ideas of different ways that you can create too. Then one other thing I want to touch on before we get started with the art is deciding how, when, if you want to share what you create. Sometimes it's nice to have a sharing section if you're on Instagram for example, to share every day a photo of what you created. That can also be a little stifling too if you get hung up on, how many likes do I have, how many comments? If that is happening, if you find yourself with those feelings, then I'd say step back and maybe not share so much because sharing should only really be to boost you up, not to make you stress out over it. You can share every single page that you've created in your class project if you want to, that is definitely not a requirement. I'm suggesting share one page in the class project just so I can see what you're doing and so that the other students in the class can be inspired and encouraged by what you're creating as well. Once you've figured out all of those things, I'll let you figure that out yourself, you can write up a little explanation, description, whatever you want to call it, and put that in your class project. In the next lesson, we'll start with the first prompt. So when you're ready, I'll see you there.
3. Day 1: Leaf: Today's prompt is leaf. Leaf is such a great prompt because there are millions and millions of leaves just outside your door. I'm choosing mine from my garden, I'm going to use a geranium leaf that's very colorful. I've painted geranium leaves in watercolor before, so today I'm going to experiment with goulash. I'm going to start by mixing my colors. The first color I'll mix will be the yellow and I'm mixing yellow with some white to make a nice creamy color like this leaf. When you're mixing goulash, you have to make sure to add just the right amount of water, it can be a little tricky to figure out the consistency. You want it to be creamy but not super wet. The next color I'll mix will be the red. I'm going to make a nice maroon red, so I'll mix a nice teal with some red to darken it. I'll give all the names of the colors I use in the handouts. Finally, I'll mix the green. I want it to be a nice, warm, medium green. So I'm going to combine some of that same teal with a limy green, and a little bit of red to deepen it and make it warmer. Sometimes you have to add a little bit more of one color if you don't quite liked how it's looking. Just play around and see what works best for you. Once you've mixed your colors, now it's time to start your painting. You could start by drawing the leaf outline first, but for today's painting I'm not going to. Do whatever you're most comfortable with. We'll start with the base yellow color of the leaf, and sketch out the shape with the paint. I'm just trying to get a basic outline of the leaf shape. Spreading the paint gently across the page and creating the lobes of the leaf around the shape of it. Because the middle of the leaf will be covered with the other colors, I'm not so worried about getting a really dark tone in the center and covering that completely, it's most important to get the edges. I'm using my watercolor brush here, it's a size 12. All the sizes of the different manufacturers are slightly different, so if you're using a different brand, then I'm using, your sizes might not match mine. Once you're happy with your leaf shape, let it dry a bit and then we'll start on the next color. I'm going to add the green to slightly wet yellow so that the green will move across the yellow paint. If you found that your paint is starting to thicken up and dry, go ahead and add more water with your brush. You can see that just dabbing the green on top of the yellow, it starts to spread, and I just add more green paint to darken it. Then start adding the other shapes and pattern of the leaf on the edges. Again, you don't really have to be exact with this, so just estimate it, eyeball it, and come up with a nice even pattern. I'm dotting the paint onto the page and also striking it across. I really love the patterning on these leaves. Once you're done with the green, you can go a couple of ways. You can let it dry totally or you can start working while the paint is still wet, or I guess a third option is when it's still damp, each will give you a slightly different look. My paint is slightly dried here. I'm going to dip in some of the red and see it's not spreading very much, so I think I'm going to change paint brushes here so that I can add more paint to the page with less strokes. It just dub and spread the paint in a basic shape that the red is on the leaf, just adding more as I need to, bit by bit. Then after I've finished adding the red, I'm going to take the smaller brush with a fine point and sketch in the veins. I'm going to use a brush with a tiny bit of paint and just draw in the veins. I use a tiny bit of green paint on this brush, or sometimes I'm even just going over with water and you can see that my brush will pull in the other colors and just keep working until you're happy with how it looks. Finally, I'm going to paint the stem. Since I didn't mix a lighter color green, I'm going to mix the yellow and green on the page itself to create a brighter green than the leaf green. Just keep adding and spreading the paint until you're happy with how it look. There you have a finished leaf. If I had added the red paint to the leaf when it was still wet, the red paint would've spread a lot more. I created another page using that technique so you can see the difference of the two. Of course, using the prompt leaf, there are so many different options; you can use different media, you can use different leaves, in the fall it might be nice to paint some colorful fall leaves, there's just so many different options and that's one of the reasons I like this one so much. In the next lesson, we're going to change gears and I will see you there.
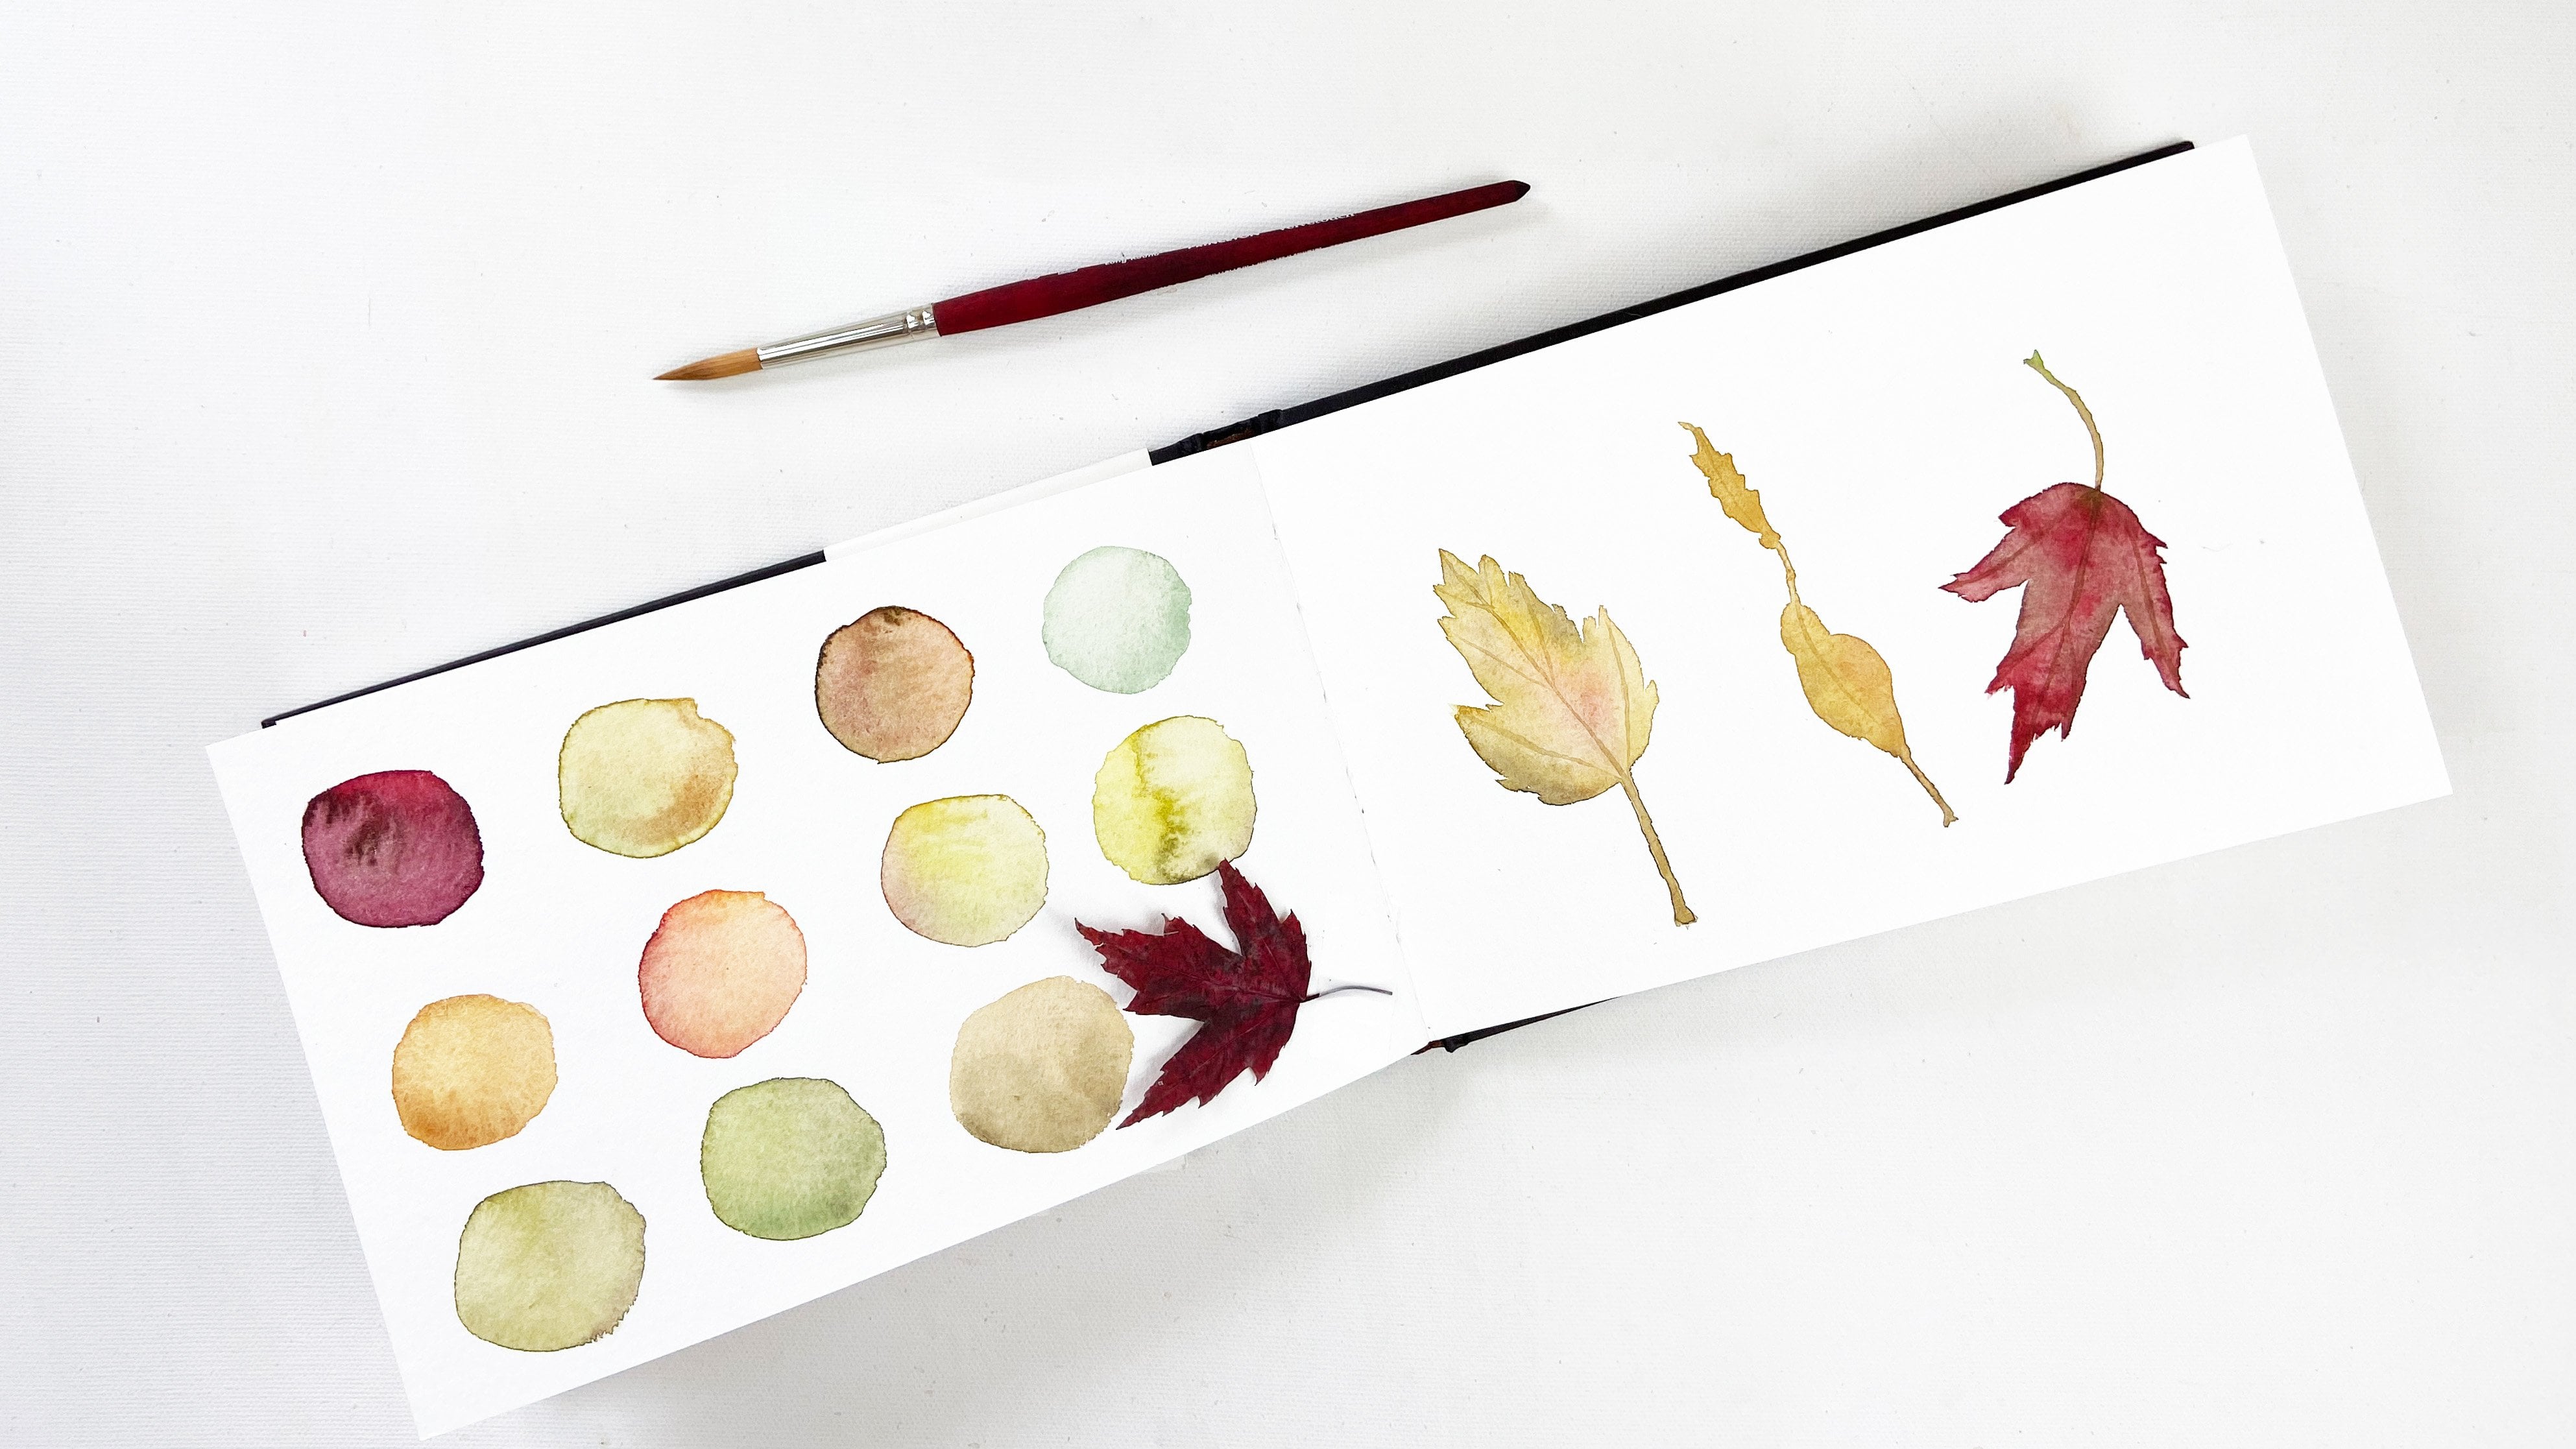
4. Day 2: Yellow: For today's prompt, yellow, I'm going to turn to my garden again for inspiration. How could I not be attracted to the sunflowers that are blooming in my garden right now? I'm going to bring one of these in. I think I'm going to do watercolor because watercolor really is my favorite. I'll start with mixing some yellow for this painting, and I like to work with the pan paints. I wet my brush and pull some of the paint onto my palate. Next I'm going to mix some of green. I want a nice limy green. Again, I'm going to share the names of the colors I use and the brand since I use a few different brands, in the handouts so you can refer to that. I just keep adding more colors. Just really by feel knowing I want to have a warm green. Then I'll mix another yellow this one a little cooler than the first one. I think we're ready to get started. Because the flower is so large, I'm going to keep it out of the sight of the camera because otherwise it would obscure everything. I'm going to start by painting the shape of the flower. I'm just loosely painting brush strokes towards the center of the flower and letting the brush create what looks like petals. I'm going to pull some of the color out with a wet brush. Just defining the shape a little bit more and giving some more tones. Next I'll drop in some green for that greeny center of the flower. With watercolor the dryness or wetness of the paper is so important. I'm going to let it dry a little bit before adding a bit more green. If it's too wet, the color will spread everywhere. If it's just starting to dry a bit more, the color will be more contained. To check to see how dry your painting is, feel it. If it's cool to the touch, then your paper is still damp. Mine is still damp and I don't want to ruin what's going on in the flower so I'm going to paint the stem, pulling color down and getting a nice shape for my stem. Then I'll work on a leaf because I'm going to give this flower 1 leaf on the side. Just painting a simple shape,letting the brush define the jagged edge that sunflower leaves have. I'm wetting my brush off camera, I have a jar full of water. I'm going to pull up some of the green along the edge and then add some yellow. Then drop in a little bit more green along the side of the leaf. Pulling up color along what will be the vein because this leaf folded in on itself. You're just seeing half of the leaf. I'm going to add a little bit darker green. I don't usually do this but, I didn't mix any dark. So I'm going to go directly to my paint pan and pick up some really dark green to add to my stem. Then dry off my brush and pull up some of that color, just so that there's a bit of shading. Now I think I need another color so I'm going to mix a little bit of orange. While I'm waiting for the flower to dry, I'm going to make some other colors because I am planning on doing some more watercolor during this week. I'm mixing some reds and a bit more orange, a reddish orange, more orangey orange, and some red, red because I'm going to be painting a tomato. That'll come later this week. But, mixing paint is a good thing to do when you're waiting for your painting to dry, and then I'll mix a little bit of green for the stem of that tomato. Using the same color mixing technique that I use. Greens are really hard to get natural looking colors, so I often add a lot of different shades to create just the color I want. I'm going to paint a few test colors for my sunflower here. For the paintings I will do the rest of the week just to see how they'll dry. I always like to take a scrap paper and paint some swatches, so I'll have an idea. Sometimes I have to remix things. If a color doesn't dry just how I want it to. But that's a fun quick project to do too. Now that my flower has dried I'm going to come back to it, and I'm going to be painting in a deeper color yellow here. Painting in the petals but being careful not to hit the center where I want to keep it green. I'll just go around the flower, painting more of the yellow petals using the warm yellow that we created. I'm painting my strokes inward and the brush is creating a sense of the petals. This sunflower is a messy, filled with petals form. If my strokes don't cover perfectly my earlier strokes that's okay. It's just creating the shape, and that sense that there are all these petals in this flower. Now I want to add a bit of some darker orange in here. Just to touch, not all over. Just here and there. Again, this shading will form the different petals. Hitting a bit of a darker color on the bottom and side for shading. Just going over until I'm happy with how it looks. While I wait for that to dry, I'm going to work on the leaf, adding a little bit of yellow to that vein coming in. I'm going to let it dry some more. Once it's dry I'm going to add some yellow to the center because I want to really get the deep color. With watercolor you're going to need to layer the paint when you're working with wet paint like this, you're going to need to layer the paint to get deeper tones. I'm adding a layer of yellow on top of that greenish center that we painted in the beginning. Then adding some more green, just dropping it in the center and letting it spread. Working in a circular manner, adding more. It's going to spread out. Going to add some concentrated dark green to the center. I'm going to work on the leaf a little more adding some green. Being careful not to go over that yellow vein that we painted. Just painting in another layer of green on this leaf. Adding some tones, adding some definition, and adding a hint of the shading and shape of the leaf. The three-dimensional shape, leaves have veins that help shape it in a not flat way. I'll add a little more. I'm using that darker green we mixed for the top of the tomato that we'll paint later. Adding a little bit of contrast and definition along the vein, and where the leaf overlaps beneath the flower. I'll drop in a little bit of yellow also. Again, giving a hint of the veining and shaping of the leaf. We're not trying to be super exact and realistic here. That's why we didn't paint or draw an outline and just want it to be loose and easy. I'll add a bit more color to the stem too, because as you could see it was still a bit pale. It's one of the reasons that watercolor takes a lot of time. You need to add layers and let it dry. Spread a bit more green and then some darker near the top for the shadow. Then we've got our finished painting. Of course this is just a start of a painting. It's perfectly fine as it is but, you could spend more time defining it more, giving more details. The point is to get working every day not to agonize over perfection. Of course for the prompt yellow, you don't have to paint a sunflower. There are plenty of other things that are yellow. There's so many different options with something as broad as a color for a prompt. I hope you have fun with this. I'm going to have a little change of pace for the next day's prompt. I'll see you in that lesson.
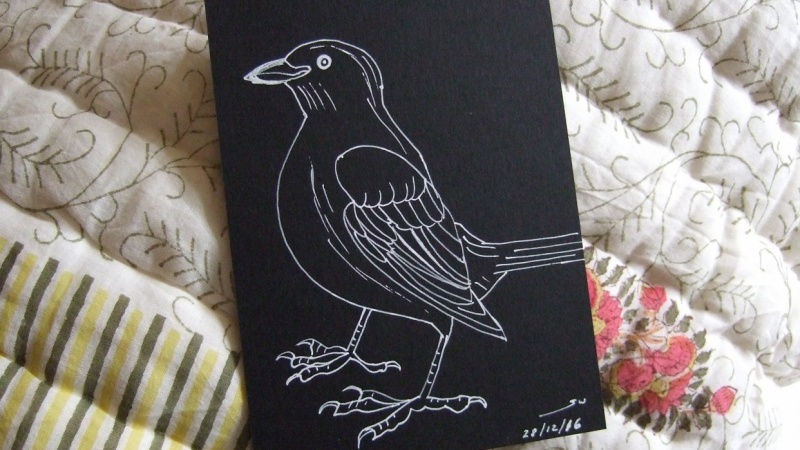
5. Day 3: White on Black: The prompt that I've chosen for today can go a bunch of different ways. It's white on black and what I'm going to do for today is draw with my gel pen on some black paper. I am going to go to my garden for inspiration again, and this time, the lavender has caught my eye. I want something that's very simple to draw because today is going to be a very quick exercise. I'm just going to use my gel pen and carefully sketch out the shapes of those lavender buds. They're elongated, I'm going to follow along with the shapes as they form the top of the bud. There are a bunch of these oblong buds that nestle themselves against the stem, we're just going to work them with my gel pen for a bit of stem because there's a bit of separation between the clusters of buds. Just going to work on defining it, draw a bit more of the stem, define that, sketch out some more of the buds, just want a nice basic shape. Lavender is pretty simple to sketch, it's a good subject to choose when you're starting out. I'm going to sketch the leaves here, and there's a little bit of a bud in the crack between the leaf and stem, so I'll add that too, and this lavender stem has a couple of sets of leaves, I'll sketch both of those sets of leaves. That's all it takes to have a quick, easy sketch. If you're going to use the white on black prompt, you can do just about anything for this, don't feel like you have to do a drawing or a painting. You could do collage, you can do just about anything, so don't feel like you have to do what I'm doing. I'm just giving you an example, and I especially like this because it's a quick one. I've sped up the video for this lesson, but the drawing itself took me only six minutes, so here's a great example of how your daily art doesn't have to take a long time. For the next prompt tomorrow, we'll do another quick one and the prompt tool use is fruit. I'll see you then.
6. Day 4: Fruit: For today's prompt fruit, I can't help but go to the garden for inspiration again. Possibly my favorite fruit is the tomato and today we'll paint a tomato in water color. It's one of my favorite things to paint too. There are so many colors and variations of tomatoes that you really have an almost endless supply of inspiration when it comes to tomatoes from the garden. I've already mixed the colors. We did that the other day, so I'm going to start by just setting out the shape of the tomato with some red paint, a nice wet mixture of the red and just pulling down the paint on the page with my brush to form the tomato shape. I'm going to add a little green, drop it in to show that green that's at the bottom of that tomato. Then I'll add some orange as well. Because this tomato has quite a few colors, had a little bit more yellow to that green, drop in a bit more red. As this dries, the colors will shift a bit. Now that this is a bit dry, I'm going to lift out some of the color using a damp brush and pushing fairly hard on the paper. Once I pull a little bit of the paint off, I'll rinse my brush and blow it on some paper towels. Keep pulling up on the paint, wiping that color off to depict the highlights may take a few tries as you can see here, depending on how much paint you have on your page and how staining the paint is. Different paint stains the paper more than others. We're going to test to see how dry this is. Remember that touching the paper if it's cool and it's still wet. Here, although it's a bit damp, I'm going to carefully paint the stem. Tomato stems, I really enjoy painting because you have a lot of freedom with how you depict it. I like to exaggerate mine a bit, make them bigger and more interesting. I'm using a very fine brush here and painting the green, trying to get the nice shape of this stem. Adding a bit more of these shapes and here's the stem itself has a blunt end. The other parts have pointy ends but this has a blunt end starting off by painting the bits that are on my side of the tomato. Here I'm just dabbing up the green that's overlapping onto the red. Painting in a bit more green, make that a bit darker, make the other bit of the stem darker as well. As I've said before, watercolor sometimes takes a number of layers to get a nice dark color. I'm going to paint after it's dried a bit, I'm going to paint the other sides. You can see there are five bits that point out and then the center blunt and to the stem where attaches to the plant. So these are on the opposite side, but you can see them. So they're going to be between and around the other parts of the stem I've already painted. You're going to overlap. Painting things that overlap when you're a beginner is difficult. So if you're painting something like this, just take your time. But this dry a little bit more. Now I'm just going to add some more details. Darken bits up, add some more layers. Give a bit of shading, so you have a sense of the three-dimensional shape. Turning your paper is important too. You've seen me do this already, but I think I'll touch on it. Turn your paper so you're most comfortable. It also helps when you have wet parts of the page so that you are not setting your hand or having to hold your hand over those wet parts. So using a lighter color green and a bit of yellow, I'm going to lighten up and warm up the parts that are on this side of the tomato. These parts of this stem, usually things that are closer to the viewer have a warmer tone and those that are farther away have a cooler tone. Make sure my points are nice and sharp for those tips of this stem. That's why having a very small brush helps. Now I'm done with this tomato. If you're going to choose fruit as a prompt to use for your own art, you can go just about any direction. Choose your favorite fruit or something that catches your eye at the farmers market or grocery store and use your favorite medium. Have fun with it. The next prompt for tomorrow is going to be a lot of fun, so I'll see you then.
7. Day 5: Butterfly: Today's prompt is butterfly, and it's a little different than some of the other prompts we've had because it's very specific. Today I'm not going to go out into my garden for inspiration although there are butterflies there, I'm going to turn to this beautiful book that I have and look in there. It's great for days that are rainy or for the winter time when I can't go outside for my inspiration. Today, I'm going to draw with pen, and I'm not going to replicate any specific butterfly, but I'm going to have this page open and get some ideas of what butterflies look like, how they're patterned. When you're drawing something like this, that often relies so much on color, it's important to choose a subject that is very graphic, because you're going to be depicting it whole with pen. I'm starting with my number 3 micron, and I'm working on printmaking paper which is smooth, you can use any drawing paper though. One of the things that's tricky about drawing butterflies is that they are more or less symmetrical. So just take your time and it helps to do one side and then the other, moving back and forth. You could also start by sketching out with pencil to try and get things as symmetrical as you can, but it's not necessary. I want this to be pretty quick. Sketch the wings and then I'll draw in the body of the butterfly. For the body I'm just doing light marks, and then the antenna. Now I'm going to switch to a number 5 micron and draw in some of the darker parts. The number 5 is wider than the number 3, so it can make a darker line. Work on the dark edges, then just do some definition to this drawing, and that micron wasn't getting a dark enough line for me. The tip of the pen was pressing into this printmaking paper, and just making it groove more than making it darker. I'm going to use this prisoner color brush pen, it has a wider tip and it'll let me make some really nice dark, wide marks. Just defining the dark edges of my butterfly. I'm doing one side first, and then I'll go back and mimic what I did on the other side. If you look very carefully at real butterflies, you'll see that they are not perfectly symmetrical. So that takes a little bit of the pressure off when you're doing your own depictions of them, as long as you're close. But it also gives you drawing a nice hand drawn look or of an organic shape. Darkening these edges, starting to make some pattern marks for the pattern of the butterfly, because again as I said, since I'm just using black on white paper, it's going to rely heavily on the patterning. Make some spots, one side and then the other, then I'm going to draw some of the veins, trying to stay more or less symmetrical. One side and then the other, always checking back and looking to see how it looks over and all. Seeing what it needs next, what I can add. I'm taking a look at my field guide for ideas of how the veins are arranged, how they split, at their patterning. Back to my brush pen, adding a little bit of the dark patterning, darkening it up, widening it up. Adding more dots, some dots on the top, wings as well. Splotches, marks, darkening up the body of the butterfly, and then we're done. Although I sped up the video for this lesson obviously, I don't draw this fast. This is still a quick drawing. It took maybe about 12 minutes for me to draw. So doing something similar for you shouldn't take very long as part of your daily art practice. If you want to do your own butterfly, it works really well with watercolor, wash, collage is a lot of fun too, cutting out the different shapes and layering them. So if you choose this prompt, I hope you really enjoy it, and it's one that you can do again and again and have your pages not look at all alike. Tomorrow's prompt I'll be going back to the garden, and I'll see you then.
8. Day 6: Seed: For today's prompt seed, I'm going to go out to the garden and look for inspiration. My scarlet runner beans caught my eye. I'm going to bring one of these beans inside to paint. Since I'm still experimenting with quash, I think I'll use that to create today's page with. This seed pod has an interesting shape. You can see the hint of the seeds, and if you look at it carefully, there are quite a few colors going on, it's not just green. The bits of leftover paint from my other painting are still on my palette, so I'm going to use that as my starting place, and here I'm going to add some yellow to that creamy yellow we started with. The maroon, I'm going to mix and create a brown. I'm adding some of the teal, some red. I'm going to mix in some yellow and just keep mixing until I'm happy with the brown. I'm mixing yellow and brown to use for this seed pod because I see some highlights and some shadows that I wanted to depict with these colors. I've got a warm medium green. I'll add some red for warmth and some lime to that teal color to brighten it up, make it lighter. Finally, I'm going to mix in blue. I'm just going to use this blue straight from the tube. Then start by painting the stem. I'm going to change the brush because that larger brush is a little too large. Start with some yellow, because the stem is lighter, add some green and some brown. Now changing brushes, I'm going to paint the scene. Just pulling the paint down to form the shape of the pod. Just adding more refining the shape, and I'm going to work over this quite a bit. This is just the base shape. Using the tip, I'll paint the very end of the pod. Just go over everything a little bit more. We're going to add some yellow for highlights, and then a bit of blue for some shadow. The yellow and the blue will also mix to form more green tones. Drop in some of the brown. Then using a smaller brush, I'm going to just mix everything around. Paint in some details. Create some shaping. Refine the edges. The tip of the brush is good for smoothing out the edges. Just keep dropping in more color until I'm happy with it. Using that small brush, I mix the colors on the page and drop in more. Refining the edge bit, creating the shape of the bulges of those seeds within the pod. Adding some more highlights, smoothing things out. Adding a bit more green. Just mixing on the page. Smoothing things out. Just seeing how things look. As I add more colors, as I move the paint around, it's really just an experiment to see what everything will look like. Writing some more dark tones for the shadows to help depict that shape. Adding some blue on top of that brown, and now we're done. This rendering for the prompt seed is very simple. As with all of the prompts, there are many options of different seeds that you could depict, different media that you could use. For another example, you could look to my first skills share class, Getting Started with a Botanical Sketchbook, where I show you how to create maple seeds with three different media types. The next prompt will be our last one, and I'll see you in that lesson.
9. Day 7: Kitchen: Kitchen is such a fun prompt and there's so many different ways you can go with this. I'm actually going to cheat and go to my dining room and not my kitchen for some inspiration, because these fiesta pitchers are really calling to me. Today is going to be the most involved week we've done so far, and we're going to do collage. We're going to make our own paper, colored paper to create our collage with. So let's get started. I'm going to start out by creating a page of blue because I'm going to do a small blue pitcher. I've covered my workspace with some freezer paper, and I'm using a marker to just cover this piece of regular printer paper with blue. I wanted to have a line equality, and I want it to transition from light to dark. What I like about this little picture is it's very geometric. What I'm going to do is cut out a series of circles and I've found a few different things I can use to trace, to make my circle's going to lay them on the paper and trace them and then cut them out. I'm going to try and make some lighter and some darker. I'll trace on the back side of the paper. I won't have to worry about Penn marks showing in my finished product, just tracing around these shapes. Then I'll cut them out afterwards. Make a variety of circles and different sizes, and some of them, I may have to change the shape of slightly or the size rather, if they don't have enough graduation between them, but we'll see after I've cut them out. Here are my circles. I'm lining them up an order by size and I try to alternate the lightness and darkness of them so that there's some more contrast and you can see the difference. I really like how the lines are showing, and they're my circles. Looks pretty good. Now I'm thinking about the handle. I'm going to use my largest circle and trace around it to create the handle and cut that out. I cut out the whole thing, not just to handle part. I'm going to glue together my circles. I'm just using regular children's glue stick. It's purple when it's wet, but it will dry, clear. Don't worry about any overlapping, if you're using this kind of glue stick, you can use any glue that you're comfortable with. I just had this on hand, so that's what I was using, and I'll just glue all the pieces together. Alternating the sizes and colors, layering them, making the lines not quite line up, so there's plenty of contrast. Just glue them all together. Now, looking at the picture, there's a flat bottom. I'm just going to cut off the bottom of these circles to be flat like the picture, and then the handle. The body of the pitcher needs to come in a bit. I'm going to trim off that edge, so we can see the handle lineup where I want the hand to go and just trim, trim, trim. I think that looks pretty good. Just take a look and see how the handle will line up. Figure out where I want the pattern of the paper to be. Just line that up. I think that looks pretty good. I will cut off the excess so it's not going to overlap or show. I wanted to have it there. I have plenty of paper for the handle, and I'll just glue that on the back, like I glued the pieces together for the front of my picture. Adding just a tad of glue on the edges that are going to overlap, and just pressing down the paper can move a little bit, move it into place where you need it, and there you have it. Now will need to work on our spout. I'm going to turn my pitcher over to look at it and draw my spout shape on the colored paper, from the back of the color paper, that's why I turned the pitcher over. Because it's going to be backwards, and we're going to try, we're going to use that circle just to see how it's going to overlap. Just make it slightly bigger, and I'll cut out the piece. Then we're going to take a look and see how that looks. Well, I think that spout needs another overlapping piece to be that lighter edge along the top. Just going to see how I liked the positioning of the spout, and then just going to draw a line down the paper and the spout on top of it, figure out where I want it, nice light part of the paper and draw that edge for the lighter edge of the spout. I've cut that out, I like how they look overlapping they're. Just figure out the placement on the pitcher. See how that looks. That looks pretty good. Just figure out the exact angle. Now I'm going to make some flowers. I've colored some more printer paper with a bunch of colors to create my flowers. I have lots to choose from. I'm going to cut out some flower shapes. I'm not trying to create a specific type of flowers, I just want some simple flower shapes. I have cut out some, have a lot of different colors of flowers, line them all up, cut out some circles to be centers for the flowers and made some brown and some green and some more paper, cut out a few more centers, and then I'm going to create my collage using some scrapbook paper. This piece going to be a tablecloth and line it up with the edge of my page, and then we'll layer everything on top of that. I'm going to put a doily, just a paper doily. You can buy almost anywhere. I've cut just an edge. So it'll be like my picture's going to sit on this doily on top of a table. It's okay that the glue is coming out of all those little holes. I'm just rubbing it in. I'm going to add my pitcher. Make sure I have enough glue. I can always add a little bit more glue to the edges later. Just make sure I have enough figure out where I want it. Just a little bit over. Get it nice and centered on my page. Glue that down, the toilet looks like it needs a little more glue here. Now, I've got to figure out the placement of all my flowers. That's a fun part, just laying down flowers, seeing what looks good. Seeing what colors look good next to one another. The different sizes of the flowers, arrange them and rearrange them, come up with a happy arrangement at some centers. See how those brown and green centers look on the flowers, and glue them all down. It's a little hard to glue those tiny little bits onto the page, and they like to stick to my fingers. There we go, we've got our pitcher. I hope you've seen how much fun collage can be. Well, watching this lesson, and maybe you'll make your own collage for kitchen or for another prompt. I was so inspired by the little piece that I made that I had to go out and fill my pitcher with some real flowers from my garden. Usually I work in the opposite direction, starting with a real arrangement and creating art from it. But sometimes life imitates art and not the other way around. In our next lesson, I'll be wrapping things up, and I'll see you then.
10. On Your Own: Thanks so much for taking this class. I've hope that it has encouraged and inspired you to begin your own daily art practice. Spend time creating as often as you can. As you've seen over the last seven days, you don't need long stretches of time in which to create. Even a few minutes each day will make a huge difference in your life. Share the plan for your own daily art practice in the project section of this class and share at least one page that you've created during that time. Remember to always be on the lookout for the magic that surrounds you each day. I hope to see you in the community section of this class. Until then, wishing you joy.
 Anne Butera, Artist. Instigating creativity and joy.