Transcripts
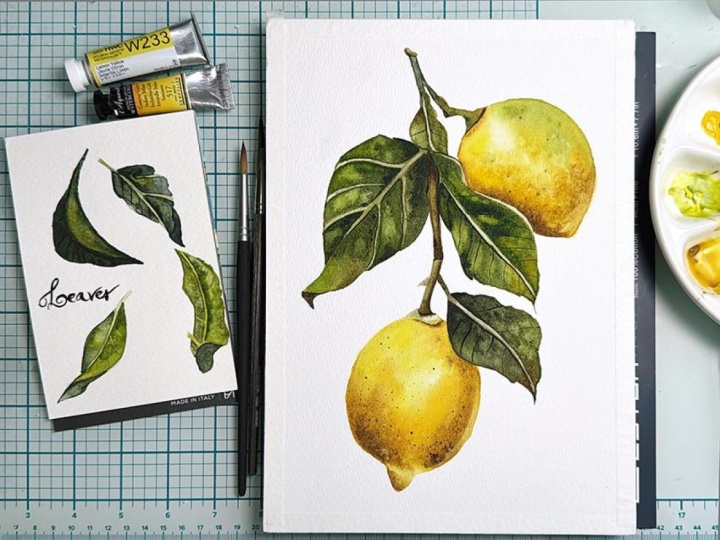
1. About The Class: Hello, and welcome to my new watercolor Botanical
Illustration class. In this class, we will paint these gorgeous juicy
yellow lemons and we'll learn about main techniques for painting botanical
illustration. My name is Alexandrina, and I'm a watercolor artist. I love to paint everything
from landscapes to animals and botanical
illustrations. In the beginning of the class, I will show you main
watercolor techniques for painting leaves because it's one of the most
important element in any botanical painting. I will share main
color mixes for natural green shade and will share art materials I
will use for this class. Then we will move to
drawing a sketch, and you can also find a copy of my sketches in the
attachments to this class. And finally, we will move to
paint lemons step by step. This class is designed both for beginners and for
intermediate artists. This class includes two class
projects for each level. You can paint a
single lemon with the leaves at the
beginner level or create a more complex
composition with two lemons at
intermediate level. Or, of course, you can paint both I hope to see
you in the class.
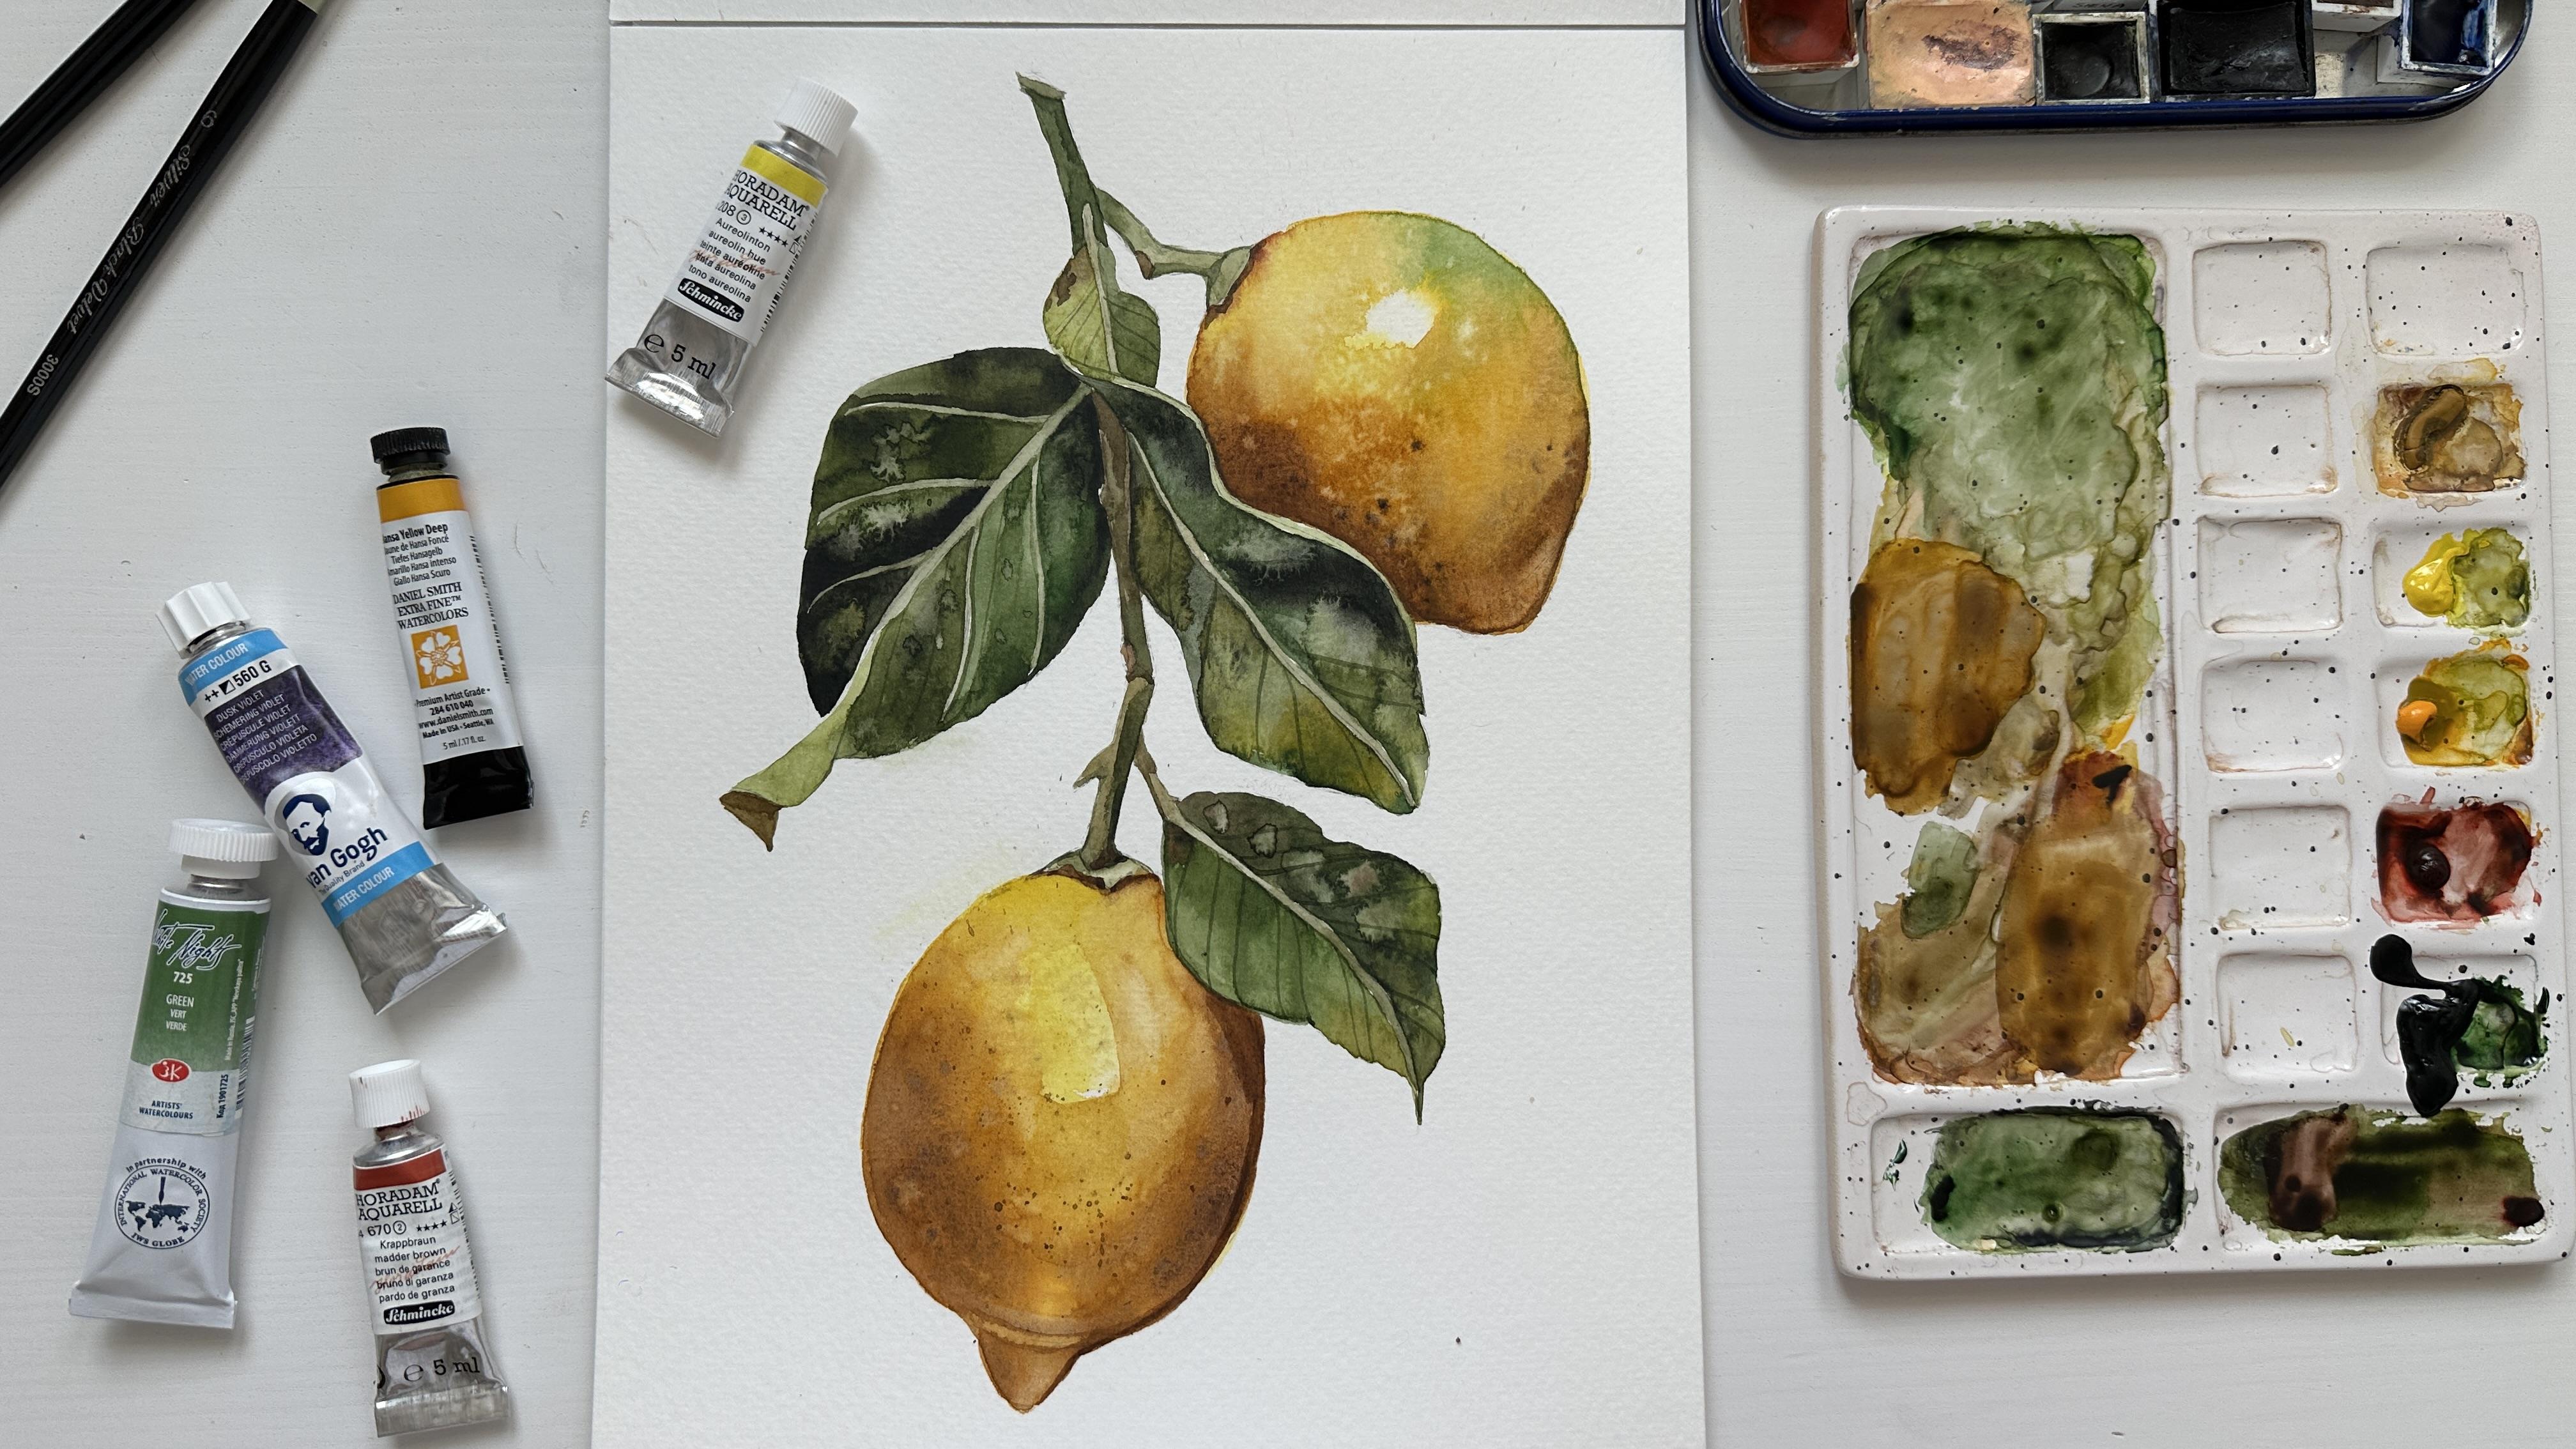
2. Art Materials: Before we start painting, let me show you
the art materials I will use for this class. The most important one
is watercolor paper. It always should be
not less than 300 SM. This time, I use
Kansan Montvale paper. It's cellulose paper with a grainthin texture
or cold pressed. I have ceramic palettes and I
love mixing colors on them, but if you have plastic ones or other type,
it's totally fine. I use mechanic pencil 0.3
millimeters by pentel. I love using green color by white knights for painting
botanicals and use it in different color mixes with Hansa Yellow
Deep, for example, by Daniel Smith, paints gray by van go and I will also
need some cold yellow, which is orlin by Schminke, mud brown by Schminke. And as an addition, you can find some
granulate in watercolor. I can use dusk violet. You can find links to the materials in the
description to this class. I will use main three brushes. I will need round brush number six by silver brush,
black velvet, brush number two by Davinci and brush number one by any
brand will just work fine. I always have paper towels next to me to remove the
excess of the water. And also, of course, a glass of water. You can have two if you don't
want to change them a lot. In my next lesson, I will show you the
green color mixes I mostly use for
painting botanicals, and I'll see you there.
3. Green Color Mixes : In this lesson, I will show you main color mixes I use
for painting leaves. First, I need green color. I will also use some yellow shades like
Olin and Hans yellow deep, which is cold and
warm yellow shades. Also some red shade
like Muda brown, and some dark shade
like Pains gray or some granulating watercolor
like dusk violet, Bvangl. You can check a lot of green swatches on
my YouTube channel, where I share different green
lighting watercolors by Daniel Smith and other
green shades, I love. But in this lesson, I will show you main color mixes we can create from these colors. I will start with a very
light green color mix. It's color mix of
green and orlein. I added yellow color
on the palette, and little by little, I add some green color
into this color mix. And let me show you the color I have when I add
just little green, and now I add even more, and the color becomes darken
but still quite warm. The next color mix even woma it's Hansi
yellow dip and green. You can replace
these yellow shades with the ones you
have, for example, allene can be replaced
with lemon yellow, and Hans yellow dip can be replaced with cadmium
yellow dip, for example. This color mix will be
much warmer and normally it's more suitable for painting
some autumn leaves or, like, leaves that are closer to aging becoming yellow and dry. Since I will use both of these yellow shades
for painting lemon, I will use both of
these color mixes for painting leaves as well just to give diversity
of the color on the leaves. Another nice way to
mute a simple green, it's mixing it with red shade. You can use any red shade and just check which
color mixes you get, but I like to use
this moda brown, very warm, interesting red shade for creating dark color
for painting shadows. Next color mix is
paints gray and green. It's pretty cold
dark green shade that I can always use for
darkening the shadows. And now let me show you
another dog green color mix. It's mix of dusk, violet, van go, and green. In this case, you
can use other dog renting watercolor for
mixing it with cream. Granulating watercolors create very nice
interesting textures, especially when
painting botanicals. But the main thing you
have to remember when using granulating
watercolors is to use enough water or even
add droplets of water into radiant wet
surface with color. I showed you many
color mixes I will use in this class
for painting lemons, and now let me show you how to mix green shades without green. I will use azimtin green yellow
by Vang, and paints gray. This color mix
creates very nice, interesting warm green shade. And in general, you can try mixing any yellow
with paints gray, you will get an
interesting green shade. Another color mix of green
its basics from coal theory, it's blue plus yellow. I'm using Prussian
blue and Allen. By just in the color ratio, you can get more warm green
shade if you add more yellow, or you can have more
intense green shade and cold one if
you add more blue. Now in the color mix, I have approximately 50, 50% of each. Another interesting
color mix is Ollen plus pins gray or basically any
yellow color plus pins gray. And that's basically
all the color mixes I wanted to show you. Of course, you can also add
three colors like you can mix red with yellow and green and to mute
down green shade, creating more interesting
green colors. Just try and experiment
with your color palette. You can also use color chart to explore more color mixes
that you can create. I will see you in the
next lesson where we will implement these green color
mixes into painted leaves.
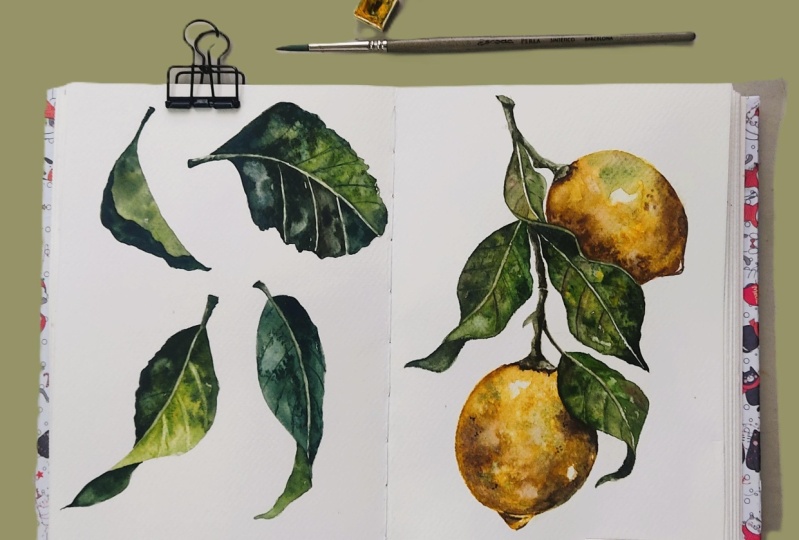
4. Drawing Leaves - Excercise For Beginners: Painting leaves is
an essential skill in botanical illustration. Leaves are not just
a background detail. They are a key element that defines the character
of a plant. Each species has its own
unique leaf shape, structure, and way of growing, which makes careful observation
especially important. In this lesson, we
will try to catch the shape of the leaves
trying to sketch them. Let's start by sketching
out the leaves that you can find in the
attachments to this class. As a photo reference, I collected from
some of the fruits I found on pinterest
or my own photos. Before you start painting take a moment to really
look at the leaf. Notice its outline is it round, elongated, jagged
or smooth edged. Look at how it's attached to
the stem and how it grows. Oh. Pay attention to the veins, too. They often give you a natural guide for
form and movement. Some veins branch
out like rivers, others run straight and parallel creating very
different visual rhythms. When I'm painting the leaps, I'm trying to analyze
the shape that I see on the reference and
just repeat this shape. Oh drawing the veins help you to show the
direction that leaf goes and to show the dimension of
the leaf that is not flat. If you choose a very
simple shape of the leaf, it will be a bit harder to show the dimension of the
leaf that is not flat, and we will use grenlation or just using different
shades of green because the shape is flat
and we need to add some more diversity in terms of color values and
different shades. When the leaf has twist, it's easier to show
the difference between light area and dark
area in the shadow. Normally, I start with
the central vein, and then I build up the
shape of the leaf around it. Now my sketches are done, and I want to invite
you to the next lesson where we practice in painting
leaves with watercolor.
5. Watercolor Techniques For Painting Leaves: In previous lessons,
I showed you the main color mixes I use
for painting green leaves, and now let's mix these
colors on the palette. First, I'm mixing
handsy yellow dip and green colour to get this very
warm and light green shade. Then I'm mixing green
with muddy brown. You can use any other red shade for muted down the green color. This color also
pretty warm but dark. I can use it for
painting shadows. The next one is green
and paints gray, which is also pretty dark, but more cold shade. And now these color
mixes are enough, I can later add some more
colors to the palette. First, I want to remove these strong pencil lines
with kneadable eras them. I start normally by covering the area I'm going to
paint with clean water. Now my brush has some green
pigment on the belly, and it's okay because I will
use green shade as well. I start by applying water, and then I introduce
some warm green shade, mix of yellow and green. To create a very sharp
and smooth edge, I'm pressing down the brush and making a one confident
brush stroke, it allows to create a very
nice line for the edges. And now I can add
some dark shade at the top of the leaf
because I see on the reference that
the top will be daka. We need this wet surface so the colors would nicely
blend with each other. Now I'm going to paint this
very simple flat leaf and I will show you two approaches in two different
halves of the leaf. First of all, normally, when we have this flat leaf, I separate the leaf in two parts in the middle will be the main
vein of the leaf. I also apply first the water, and then I start by
applying different shades. I see that I want to create
this diversity of the color. So I apply some warm color and closer to the vein to
the middle of the leaf, I will apply some dark a shade. Also, I see that I can apply dark shade at
the top of the leaf, closer to the stem. So I start using more
color and less water. For the very top of the leaf, I'm using the very dark shade
of green and paints gray. I'm moving brush carefully from the light area to
the darkest because the point where your
brush will end up on the painting and where you
will end the brush stroke, it will be the darkest
area of the color because you are lifting the
color towards this dark spot. I have to be very
careful if I'm moving from the dark spot to the
light one because I need to connect these two areas without any visible line visible edge. You can also add some drops of the clean water to create
this nice texture. Now I will show you another
approach in painting leaves. Here, basically we are painting every little part of this
leaf separated by the veins, and we are trying to achieve slightly different green shades. It's easier in
terms that we don't need to keep the whole area wet, and we can work slowly
on this little area, creating green
lighting textures, adding some interesting shades. The biggest challenge
here is to keep this very thin line
between these parts. Normally I'm moving color
towards the edge of the leaf and towards the
middle vein of the leaf. I'm using pretty similar
green color mixes, but you can use
different shades, adding some ultramarine or some yellow to create
different shades of green. This approach feels very therapeutic because
there is no rush. You are just working like
with the coloring book, coloring each part
one by one without any rush that normally comes with painting
with watercolor. While I have this dark
green shade on my brush, I can add also very little
dots on already dried areas. I can lift some color from the wet surface and
apply in that area some of the yellow color mix to create also interesting
texture and let it dry. Now I will come back to the
previous leaf and cover the dark area with a mix
of green and paints gray. I have to switch
between the leaves to let dry the first
area I've painted. If the area will be still wet, the colors will blend
and there will be no sharp edge between the
dark area and light area. This little even in this
little area of the darkness, I'm trying to move
color around creating some light and dark
areas in this part. The dark area will
be right below the light part of the left to highlight the
contrast between them. As the surface is getting dry, I'm trying to create
some brush strokes repeating the shape and
direction of the leaf. Now, our second leaf got dry, so I will move to
paint in the vein. I'm using a mix of yellow
and green and smaller brush. I'm using brush number two, and I'm careful in
moving from the stem towards the edge of the leaf. And now using slightly
dark color mix, I can paint the veins that are darker than the leaf on the
other part of the leaf. While the leaves
are getting dry, don't forget to
change your water or have a few glasses on the
table with clean water. For the third leaf, I will
use mix of reline and green. As you can see, this
color mix is more cold than the mix with
hansa yellow dip. And again, once I'm moving
closer to the stem, I leave this area
unpainted and apply some dark green
shade connecting it with already existing
light colour on the leaf. Now I can clean the brush and
tap it on the paper towel and lift some color from the
surface, creating veins. It's a third approach of creating veins and
texture on the leaf. While this leaf is getting dry, I will move to the last one. I applied slightly darker
color than before, and I can move to
another part right away, keeping this thin line
between these two parts. Now, I come back to the previous leaf and
cover the other half with a dark green shade and also keep a very thin line
between these two parts. So I think by now you
already understood the main technique behind
painting the leafs. I would recommend you to
practice steady brush strokes because they help you to create these sharp
edges of the leaves. Have to hold your brush almost horizontally and move slowly, pressing brush
closer to the paper. This angle gives you more
control over the edge, allowing the bristles to
glide along the shape of the leaf and form a
clean, crisp outline. It's a subtle movement, but it makes a big difference in achieving that
delicate, natural look. Knowing all the steps, you can finish painting
the leaf by yourself, creating a light vein in the middle and darker veins
on both parts of the leaf. I will see you in
the next lesson where we will start
painting the lemon.
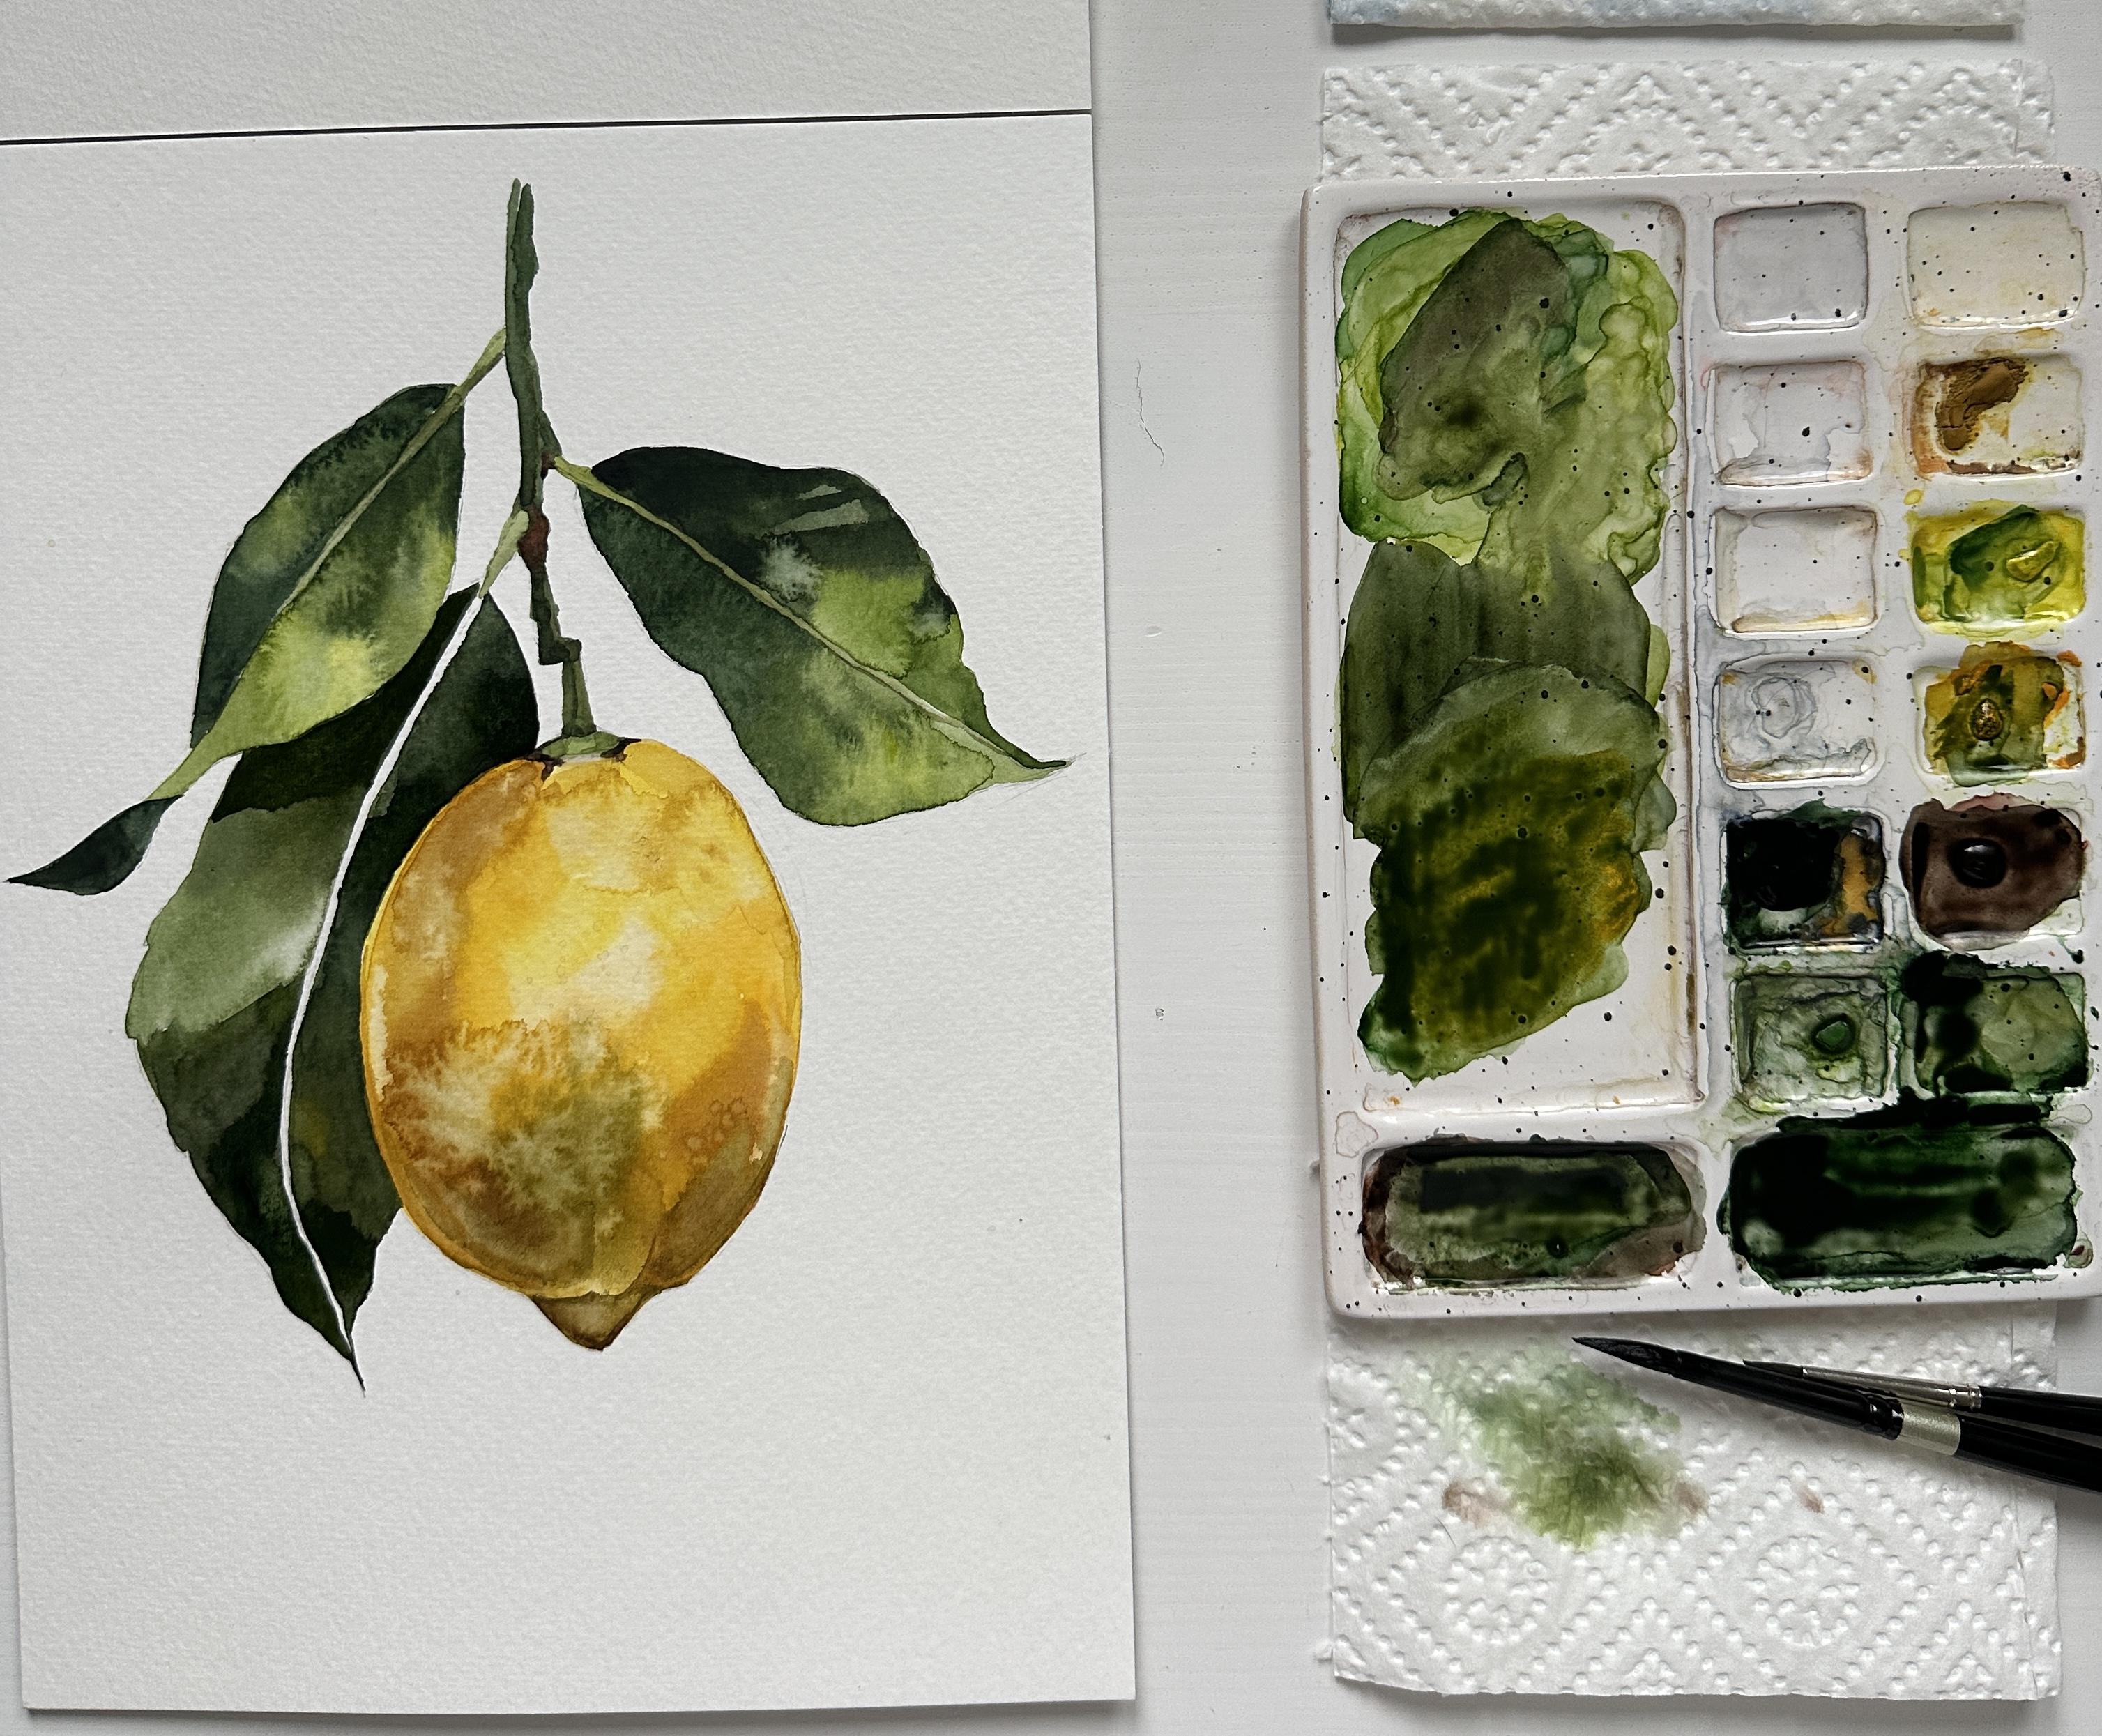
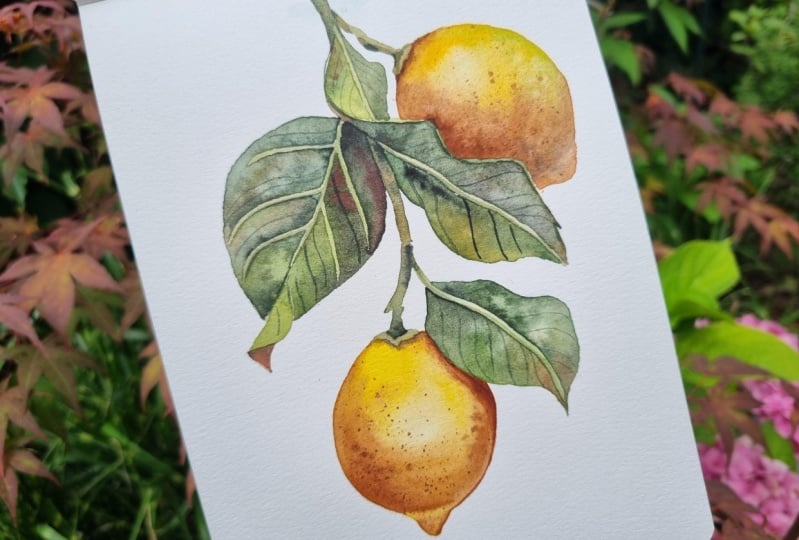
6. Main Steps Of Painting Lemon: Before we start painting, let me show you the
main steps we will follow to paint these
beautiful lemons. We will start by
painting the lemon. Then we will move to
painting the leaves. And then finally, we will
move to painting the stem. I analyze which
areas on the leaves are darker and which
areas are lighter. Also, I try to find
the highlight on the lemon and the darkest
area on the lemon. And the same steps I will follow when painting more
complex lemons, I will paint first two lemons, then I will move to
painting the leaves, and then I will move
to painting the stem. As a final details, I will add some
veins on the leaves. I hope that now all the steps
of the painting process are clear and we can start painting our lemons
without any rush.
7. Lemon Beginner Sketch: In this lesson, we will build
up a sketch of our lemon, and I start by drawing
a simple oval shape. Almost in the middle
of the paper, I'm analyzing where
the leaves will be, and I see that I need to leave a bit more space above
the lemon for the leaves. Lemon has its very
specific bottom, so I will draw it as well. It will be the darkest
area of the lemon. If you don't feel like
drawing a sketch on your own, you can just download a copy of my sketch and trace it to
your watercolor paper. I will also sketch
this little thing in the upper part of the lemon where the stem holds the fruit. And basically, when I'm
sketching botanicals, I'm just repeating all
even small elements that I can see on the reference. After we sketched the mainstem, we are drawing a little stems that are connecting the
leaves to the mainstem. It's very important
because if you just switch to the
leaf right away, it will look less natural
and we are trying to create more realistic
botanical illustration. Just like I showed you
in the previous lesson, I'm drawing the main vein of the leaf and
then I'm building up the shape of the leaf
around this vein into halves. And also, I will sketch some of the side veins to show the
direction of the leaf. Now I have already two leaves
and the only one left, which will have a twisted shape that we explored in
the previous lesson. So I hope you won't have
troubles in sketching it. And also this leaf will go above the first one
that we painted. So we'll have to keep in mind when we will analyze the
color values of the leaves. So basically, we need to
understand which leaf will be lighter and which
one will be darkem. But since the biggest leaf on the left from the lemon
will have the role of the background and will increase the contrast
between lemon and background, we will make it dakam I'm using mechanic
pencil, 0.3 millimeters, which allows me to create
a very thin lines, and I never press very roughly the pencil
against the paper. So you have to work on
the pencil lines so they would be very light and very easy to remove
from the paper. Now, my sketch is done, and I will see you in the next lesson where we will start painting
with watercolor.
8. Painting Lemon Beginner: In this lesson, we will
start by painting a lemon. And first, I will remove the strawn pencil
lines using db erasa. I placing main colors
on the palette, I will use cold yellow
shade or a lein, and I will use warm yellow
shade Hans a yellow dip. I'm also placing Muda brown by Smink on the palette because I will need some dark warm
mixes for the shadows. And I started making this dark color mix by placing hansa yellow
dip on the palette, mixing it with da brown. And I will add a little bit
of paints grape to make this dark almost
brown color mix. I clean my brush and I cover the area of the
lemon with a clean water. I have some leftovers of the
yellow color on the brush, but it's okay because I will anyway paint
with yellow shades. I'm using brush number six. By silver brush, it
allows me to paint little details and cover big areas with the
color of water. Once I applied water
all over the lemon, I will start by introducing this cold lemon shade or line, and placing it at the
very top of the lemon, moving slowly to the bottom. The color is traveling on the
surface but not too much. And now I will start placing more warm shade in the
middle of the lemon, moving again to the bottom. For now, I'm trying to avoid
painting in the middle and up a part of the lemon because there
will be a highlight, so I can lift the
color from this area, but not paint it
with dark colors. It's very important that your color mixes
have enough bottom. And now at the bottom, I will start introducing
this jacket color. I can add some green
shade as well. Now it's too dark, but when the watercolor
will get dry, the color will a bit
disappear into the paper. So I'm trying to apply quite
dark color at this stage. And I will continue building up the color using Hans yellow dip and will apply it at the top or on the
sides of the lemon, creating more intensity and dimension to the lemon to
show that it's not flat. It's very important to work on the whole object while
the surface is wet. And if you see that
some areas are dry, you can carefully apply some
water into the surface. I keep unpainted area
at the bottom of the lemon because there
will be a reflection, and I want to cover it
with light yellow shade, carefully lifting the color from the surface towards
the dark areas. A bit more dark color on
the left side of the lemon. When I apply this dark color, I'm trying to go
not very close to the edge because on the edge will be the
reflection on the lemon. I see rough edges on the
highlight in the middle, so I clean my brush
and I apply some water to just smudge this edge and
make more smooth transition. And I renew my color mix
of dark yellow shade, almost brown to continue
working on the shadows. Using limited palette for
the painting helps you to create harmonious
painting because all the colors are connected. It means that I pick
up to five colors, and I use them in
color mixes both for painting leaves and for
painting lemon, for example. Now I want to apply
some green color into the color mix to make
the color more diverse. It will create very
interesting colors on this object and feeling
that it's not flat again. And now I talked about reflections on the
sides of the lemon, so I have to clean my brush, and I lift the color from
the very edge of the side. Now, I want to apply a little bit darker
shade at the top. If I see that the
color is too dark, I can clean my brush and leave the color from the surface
screen in more light shade. And I also can lift
some color from the bottom part to
highlight the contrast between this bottom part of the lemon and this round
shape of the lemon. To make it less rough, I can just drag some colour from the upper pot and create more
light, smooth transition. I want to add a slightly
more intense yellow shade on the right side because
now it looks flat, but the area is already dry, so I use just very
transparent color mix, and I will use clean brush and water to just make these
edges less visible. While the areas are
still a bit wet, I can apply some little
dots using this dark shade, just to highlight this texture
of the pores on the lemon. And now I want to add even
more green and red shade into the dark color mix to darken this bottom part of the lemon, the blossom with this dark mix. Don't be afraid to use dark color because
now you see it looks very realistic and at the same time
artistic with these nice, interesting
watercolor textures. Now, I want to create
some splatters, so I clean my brush and
using just clean water, I pull back the bristles with my finger and let
go to flick paint.
9. Painting Leaves Beginner: In this lesson, we
will paint the leaves, and I start by mixing green
colors on the palette. Like the colors I described in the previous lesson
with color mixes, I start by mixing a
very light green shade. I'm placing aoline which is called yellow shade and
I'm mixing it with green. Another color mix will be also
light green but more warm, so I'm mixing green
with hansa yellow dip. I clean my brush between each of the color mix to keep
transparency of watercolor. Next mix is green
and paints gray. I will use this mix
for painting shadows. It's very important
that you have enough of the color mix on the palette
because when we will paint, we will have to
apply colors fast. I want to place Muda brown
on the palette so I could add this color in some places
and in some color mixes. I will figure out later, but now I just have
it on the palette. And I start by cleaning my brush and covering this half of
the leaf with clean water. Once I'm done with this part, I will apply the light
green color mixes I have on the palette into this
area of the leaf, and I carefully drag
the color around creating very smooth
transitions on the wet surface. Now I will apply some daca
shade and I will merge these color so the line between these two areas
would be invisible. The upper pot closer to
the stem should be dark, so I apply again mix of green and paints
gray in that area. While the surface is wet, I can apply colors building up the intensity of the
color on the leaf. I can also add some other
colors like I decided to add here or lein just to create more
interesting textures. I'm moving to another leaf, and I start also with the
lightest area of the leaf, covering this area
with a clean water. And then carefully applying
this mix of yellow and green. Normally when I work
with watercolors, I start with the
light areas and then I move to the dark areas. It helps you to see the overall image and
contrasts that you are creating and to understand
where you need to add more intensity, more colors. It's easier to make the color darker than the lighter
because with watercolor, it's very hard to create lighter color if you
already applied dark one. I started introducing
dark color mix of green and a little
bit of mud brown. And I highlight this
area closer to the stem. And now I want to
connect these two areas, the light color at the bottom and dark color at
the top of the leaf. While the area is still wet, I can mix green and paints gray and apply this
dark color carefully in the corner next to
the stem and let the color just blend with the existing color on the paper. I renew the light
green color mix on the palette using
aoline and green color. And using this
light green color, I move into the other
half of the first leaf. I keep a thin line between
these two halves unpainted. And once I applied
the light color, I introduce more dark color
into the wet surface. Make sure there is enough
water on the painted area, and now I apply some
udder brown and green shade moving towards
the top of the leaf. At the very top where the leaf
is connected to the stem, I apply mix of green
and paints gray. I can carefully apply some dark brush strokes representing the direction
of the veins on the leaf. I clean the brush and apply some droplets of water to
bring out the texture. Using color mix of
green and paints gray, I will move to painting this very little area on the
leaf with this dark color. Now, I add some of this mix of green and paints gray to the light green mix to make
it a little bit darker. And I'm using this mix to paint the other
half of the leaf. While the leaves
are getting dry, I will move to
painting the stem, and I will see you
in the next lesson.
10. Painting The Stem Beginner: Now I move to painting the stem. I switch to the brush
number two by Da vinci. You can find all links of the materials I use in the
description to this class. I use light mix of
yellow and green and paint this little thing
on the top of the lemon. I add a little bit of muddy brown to the color
mix to make it warmer, and I carefully move from
the bottom to the top of the stem using slightly
different shades of green. Yeah. Yeah. It's very important to make the stem not
a straight line, but a line with
different curves. It represents how it
looks in the reality. One Now, I'm mixing a little
bit of paint gray with muddy brown creating
this dark brown shade, maybe a little bit
of green as well, and I'm just outlining this little thing on
top of the lemon. If I see that it
looks too rough, I can just clean my brush and lift the color in some areas. Now, I load my brush with this light green color that
I have on the palette, and I move to paint in
the veins on the leaves. I remind you, it's a mix
of yellow and green. I'm trying to keep
diversity of the color even in this very
thin and small area, trying to switch between
different shades of green. And I'm doing the same
with another leaf. If you have troubles in color mixing or understanding
the color ratio, you should join my
color mixing class that I have also on Skillshare. And I will paint another stem as well while I have
this color on my brush. Normally, when you
have some color, you try to edit in different areas of the
painting to connect these areas by using same
color in different places. Our painting is almost done, and the only thing left is
to paint the last leaf. And I will see you in the
next lesson to do that.
11. Final Details Beginner: Welcome to our last
part of the painting, we are mixing again, green and paints gray
because this leaf will be the leaf and darkest
area in the whole painting. So I will use pretty
dark color mixes. Even when I'm mixing
green and yellow, I use more pigment than before to make the
color more dense. First, I apply some clean
water in the upper part of the leaf just to make the
painting process a bit easier. And then I introduce the dark
color of green and paints gray and green and
hunts yellow deep. And I'm just dragging
the color down carefully painting around
the edge of the lemon. This leaf will become a
backdrop for our light and yellow lemon and will help to make the lemon
pop up even more. I use silver brush black
velvet number six. It has a very pointy end, and it helps me to paint even this very thin line around the lemon and cover quite
big areas like the leaf. I rotate the brush to
get more comfortable in making very confident and
smooth brush strokes. Make sure that your hand is
pressed against the table, so it has a very steady position to make the brush stroke
very steady and smooth. This part can be very stressful, but to make more confident, you just have to do
it again and again. And you will be fine. And even if the
color goes wrong, you can always clean your brush, lift the color with
a clean brush, and use a paper towel to remove the color in unwanted places. While the leaves
are getting dry, I will make some more tea, and I will get back to
painting the other half. I'm placing the clean water in the middle of
the area I'm going to paint somewhere going
to the edges of the leaf, but I keep the areas close
to the other leaf in the upper pod painted with water because I want to
apply a very dark mix, very dark green color, closer to that leaf. And it will be easier
to have control if the area is not super wet, and I can just control the color that I'm moving
around on this area. You can also rotate
the paper itself to get more comfortable
angle for painting these very little areas where you need a precise
movement of the brush. I apply more dark
and dark color, creating a very dark area and keeping this white
line in the middle. I'm switching
between color mixes I have on the palette, green, mod brown and pains gray, and also green and hansa yellow. But I always use pretty dark color because
this leaf is quite dark. Now, I want to come back to
the upper part of the leaf and increase this
dark area even more, applying just more colmi
of green and pains gray. I want to keep this rough edge of this dark area because it just highlights the direction of the veins and
the leaf itself. And now we're almost done. I want to add some
final details. I'm using even smaller brush. Number one, you can use
just as small brush as you have and create these
little veins on the leaves. I'm using the colors already mixed on the palette
but just make sure that these
colors are not too dark because these veins
should be very subtle. Check the reference
to make sure that you are creating the veins
in the right direction. They shouldn't be
very straight lines. They should have some
curves just like the leaf is twisting around and
just having its own shape. Now, using the same color
mix I have on the palette, I want to fill the last vein
on the main bigger leaf, and I'm just carefully covering this white line in
the middle with this colour. If you don't already have
the colors on the palette, you can mix the ones we used
throughout the painting, Md a brown, yellow, green, a little bit of paints gray, and just create this light
and warm green shade. Don't forget to share your class project in the
class project section, and please add some words
about your painting process. What was the biggest
struggle in this painting? Or if you had just relaxed painting and you
enjoyed the whole process, please also share it because I really
appreciate your feedback. It helps me to improve my future classes and
get to know you better. And with these last veins
on this light area, I'm finishing the
painting of the lemon. Our lemon is done. I can't wait to see
your class projects, and if you want to practice
more in painting lemons, you can join my other
lessons in this class, the second class project, which is a bit more complex. Please don't forget
to leave a review, and I hope to see you
in my other classes.
12. Sketch Lemons Intermediate: Welcome to the second part of our class and second
class project, and we will paint lemons with
a more complex composition. And if you are
intermediate artist, it shouldn't be difficult, but if you are a beginner, you can start with a simpler project and
then move to this one. In this lesson, I will
build up a sketch. I won't comment a lot
on this because you can just follow my
steps or you can also download the copy of
my sketch and just trace it through the window or with the help of
lighting tablet. Before I draw in the sketch, I'm analyzing the reference
photo and analyze where is the lowest point of the objects and where
is the highest one. Also the right side
and left side and how they are positioned in
comparison to each other. Then I'm placing
the main objects. In this case, it's lemons, and then I'm just
adding some leaves with the shape and the direction
that I see on the reference. And now just like
an hour exercise where I showed you
how to paint leaves, I'm repeating the twisting
shape of the leaf, trying to catch the main
direction of each part. While I'm drawing, I'm analyzing also the color
values of the image, and I can see and think
which areas will be dark, which areas will be light, and what could be a problem when I'm
painting the same values, they will look the
same on the image. So I'm trying to make them
in rotation and in contrast, like the light area will be against the dark
background, et cetera. When I'm drawing
these little elements and details on the lemon, I'm trying to repeat the shape and the
structure that I see on the reference because if I will not draw it
during the sketch, I will not paint it and it
will look just strange if I don't understand how some
areas are connected to others. Now when I already sketched
lemons and the leaves, I'm trying to refine the lines and try to
make them more clear. Our main goal is to leave just one simple line and to follow it while
we will paint. And also, when I'm drawing this leaf that in the middle and have a
very twisted shape, I leave this very thin line
on the edge of the leaf. And I will not paint it just
like the veins on the leaf. I will just make it more
light than the leaf itself. Now, my sketch is done, and I will see you in the next lesson where
we will start painting.
13. Painting Lemon Intermediate: Before I start painting, I'm placing all the watercolors I need through the
painting on the palette, and I need to prepare enough color mixes on the
palette so I wouldn't be distracted while I will
paint because we will have to work fast since
it's wet on wet technique. First, I will do
my ordinary step. I will remove the
strong pencil lines with kneadable eraser. Ktable eraser helps to
not damage the paper and just gently remove the
strong pencil lines. Then I will move to place and
the colors on the palette. So basically, I already
have colors from my tubes, but I need to prepare a color
puddles on the palette so I would have more control over
the color to water ratio. Because I need to make
sure that I will not use too dense color because
watercolor loves water, so we need to add enough. So I have on the
palette pure Ollin pure handsy yellow dip. And now I'm mixing d
brown handsy yellow dip, and I will add a little
bit of paints gray. Or you can also use dusk violet or black oxide to make
it more granulating. We need this dark brown color. Then I clean my brush, and I start covering the
whole lemon with clean water. Well, I have some leftovers
of the color on the brush, but it's not a problem. I have 25% cotton paper
and 75% cell loss, so it will get dry pretty fast, so I need to add enough
water and work pretty fast. I keep this white unpainted, uncovered by water area in
the middle of the lemon, where I think will
be the highlight. So now I don't want
to think about it, I will just avoid
to paint this area. I start with aoline
and then I introduce the hands yellow dip close
to the bottom of the lemon. Now, I clean my brush, tape on the paper towel
to remove some water, and I just apply this clean water to this
area of the highlight, moving from the light areas
towards the colored area. And this is how I created the highlight
without keeping it white. And now I start applying
this dark shade. Don't be afraid
that it's too dark. Now I'm trying to find
the right proportion, maybe mixing it with
hansy yellow a bit. And for now, I'm just
applying this dark color. And apparently we will have shadow under the leaf on
the right from the lemon, so I have to place
it there as well. I will clean my brush, dap it on the paper towel
and lift some colour on the side of the lemon because on the very
edge of the lemon, we will have reflection, so we will have to keep this area light with
a very thin line. Now I'm renewing this brownish
color on the palette, and I want to apply
even more darker shade. It now I want to remove
some of the color lifted from the bottom
of the lemon to highlight the difference between the blossom end and
the lemon itself. I'm just lifting some color, and the lemon has already
three dimensional appearance. I want to add some
more dark shade on the right side
and under the leaf. And always when I see that
the area is still wet, I can apply more
and more colors and they will just blend
with the existing layer. But at the top of the lemon, I see that it's already dry, so I have to work carefully. And once I applied some color, if I want to smudge
this rough edge, I need to clean my
brush and carefully drag the color down or
apply very light shade. I'm trying to make
this rough edge a bit more smooth and natural, and I apply some
mid value color, and then I clean my
brush and I move from the light area
towards the dark one. If you will move otherwise, you will just bring this dark color to the light
areas and we don't need it. And now while the
area is still wet, I'm just making a
little droplets of dark brown colour to highlight this texture of the
pores on the lemon. I'm trying to make more
horizontal brush strokes to support the appearance of a round shape of the
lemon or oval shape, but to make sure that the light flows correctly according
to the reality. So I have to make these
horizontal brush strokes. And I don't like this rough
edge at the upper part, so I'm just dragging some color from the shadow
with a clean brush, and also I might add some of the aoline again with
a very light mix, and I keep this
highlight in the middle. And now let's repeat the same steps with
the second lemon. First, I cover it
with a clean water. And actually, you can just cover the whole area without
leaving unpainted area for the highlight
because anyway you can make the highlight by lifting the color
from the wet surface. And on this lemon, I will show you how to do that. I start with oline which
is bright yellow color, and I just use more color
around the highlight, and I can just leave this
area of the highlight, even though the area is wet. I started bringing up
some hansa yellow dip. And in this lemon, I want to try a bit
other color mixes, adding more green shade. But now I'm just using the same brownish shades for the dark parts as I did
with the previous lemon. It's mix of hansa
yellow dip, da brown, mainly, and maybe a little bit of darker shade if we need it. Like paints gray or any
black color that you have. And you see that
my brush strokes, they are moving in
the same direction that the lemon shape. So our brush strokes
help us to bring the color in the same
direction as the object is. And now I want to add
some green shade. I think it looks very nice on the lemons and I like when they have the green
interesting colors. So I'm just mixing
green with Ollin and I'm placing this color
carefully on the right side. And now I'm trying to blend this color mix with
the existing colors. While the area is still wet, I have to keep working on
building up the colors. So I'm mixing more dark brown using muddy brown and pins gray. And I apply this color
also closer to the leaf on the left from the lemon because
there will be a shadow, and it will help us to
differentiate the lemon from the leaf and to increase
the contrast between them. For now, I see that there are a lot of rough edges
on the lemon end. I will have to blend these edges carefully by
applying some more color. I'm just using yellow, and I'm connecting these areas trying to keep this highlight. And I again come back
with this brownish shade. I know that the lemon doesn't look yellow at all right now, but I think that it's the
point of artistic view, and you don't actually have to paint yellow
lemons, oranges, like you see on the image, you can bring in some
of your artistic view. And I like the granulation
on the lemons. I like how the colors are
interacting with each other. So I think it's a pretty nice
appearance of the lemons. And in my opinion, it looks very artistic. While I have this brownish
shade on my brush, I apply it under this
part of the stem, and I can remove some
of the color if I see that I don't like how it
travels on the wet surface. But in general, we need to keep in mind
that there will be a shadow under this light thin in the upper
part of the lemon. After the main work
with lemon is done, I want to add also some
dots of the dark color. Be careful and don't
make them a lot. They have to be pretty random, and I have to switch
between different shades, adding just diversity
of the color. After that, I can clean my brush and load it with clean water and just
make some splatters. I love how the water creates a very beautiful granulating
effect on the surface. So definitely try it out.
14. Painting The Leaves (Part 1) Intermediate: Before I move to
painting the leaves, I want to outline
this right side of the lemon with a dark
mix of muddy brown, a little bit of hansy yellow, and a little bit of pins cream and to add some shadow
under the leaf. I want to mew down a bit this highlight at the
bottom of the lemon, so I clean my brush and
with just leftovers, so the color, I just
carefully cover this line. And now let's move to painting the leaves and placing
green on the palette and mixing with aoline and also with some colours that
are left on the palette, creating more warm
light green shade. I'm carefully filling out with the color this half of the leaf, introducing the colors
from the palette, and moving from the
top to the bottom. Be very careful with
the edge of the leaf. To not drag the color
from the lemon, we have to paint very
carefully on this line. And we keep in mind
that the leaf should be light than the area
under it on the lemon. I can increase some intensity of the green color at the top where the leaf is
holding to the stem, and I'm dragging the color
towards the darkest spot. I can apply some of the udder
brown at the very top on the wet surface just to add some diversity and
also some pains gray, also to create a dark spot
at the very top of the leaf. I'm mixing pains gray with the green I have on the palette, and I'm creating
these dark veins to show the direction
of the leaf. It will blend with the
existing color, but it's okay. We will add it later
with wet on dry. Now, I'm mixing green
with paints gray, creating slightly darker color, and I move to painting the
other half of the leaf. I keep this white thin line in the middle between
these two parts. I'm moving from the top to
the bottom of the leaf, and little by little, I add some different
shades of green, and closer to the middle
will be the darker area to highlight this contrast between the light vein in the
middle and the leaf. And closer to the bottom, I can add some more
mix with yellow. Now I can clean my brush
and add some droplets of the pure water to create the granulating
texture on the leaf. I can also add some brownish
spots into the wet surface. It helps to unite all the elements that we've painted on the lemon
and on the leaves. Using the same color helps to create more
harmonious paintings. Now, I'm move into the upper leaf and I will
paint this dark area. First, I cover it
with clean water, and then I will apply
a dark green color. I have to keep in
mind that there is a very thin line between
the leaf and the lemon. It's a reflection on the leaf, and it will help us to show the dimension of the
leaf that's not flat. At the same time, this part should be pretty dark
at the very top. I also use mix of
green and yellow, but more green in
this color mix, and the color should be
a little bit more dense. The more water you use
in color to water ratio, the more transparent
color you will get. And if we use more intense
color with less water, you will get this dark color. I can also add a little
bit of paints gray to this mix and just switch
between these color mixes. The daka parts on this
leaf will be under this white line that I left on the right between
the lemon and the leaf. It will help me to increase this contrast between
the leaf and the lemon. I added some droplets of water, and now I can tap the brush
on the paper and just lift some color in the direction of the
veins of the leaf. I also decided to connect
a little bit more this area in the
top of the leaf, just to make sure that it looks very realistic and
natural the shape of it. Now I will move to
another half of the leaf and first cover it with clean water keep
in this white line between these two
parts unpainted. I will use mix of green and
a little bit of pink gray, but quite a lot of water. So the color would be more transparent than on
the previous leaf. This white line in
the middle helps us to prevent these two
parts from blending. Closer to the bottom, I will add a bit light
mix of green and yellow, using still quite
a lot of water. And at the very
bottom of the leaf, at the very little corner, I will drag the color and add more green to make
it a little bit darker. Now, I will load my brush
with hansa yellow dip, just pure color and will add this color at the
bottom of the leaf. I just want to see
how it will look like if I like it or not
and if I should change it. And now I see that I also
can add a little bit of this color mixed with
green at the top of the leaf. The main idea here is
that I want to make this leaf different by
color from the other half. So it would look diverse.
15. Painting Leaves(Part 2) Intermediate: Now, I renew the color mix of yellow and green
on the palette. I add some hansa yellow dip and also the color
mix with mud a brown. And green, which is quite muted and warm
but dark green shade. And I will move to paint
in the third leaf, and I start with an easy part, the left half of the leaf. I start with a mix of green and a little bit of muddy brown. At the very corner, I can add mix of green and paint gray
to darken this area. This leaf, I will paint
segment by segment, as I showed you in the exercise
with painting the leafs. So I will just carefully
move to second segment and will keep this
white line between these two parts that will
prevent it from blending. This technique helps
me to work slower. I don't have to keep track
of the how wet paper is, and if I should come
back to some area, I can just slowly work
on this little part, adding more interesting
shades and do not rush. Now I want to add some dark color mix of
green and paints gray, especially closer to
the middle of the leaf. These dark parts will
help us to highlight the contrast between light veins on the leaves and
the leaf itself. Oh while the surface is wet, I will apply some droplets
of clear water again. Now we will move to painting
the other half of the leaf, and you can just wait until
it will get fully dry. I'm just moving to
the other half. I'm mixing lein and green on the palette creating
this light color mix, and I start by applying it
at the bottom of the leaf, carefully moving
towards the top. And I start placing slightly dark color as I move towards the
top of the leaf. Then I move to the next segment, and here I already
keep the white line between these two segments
and the line in the middle. I keep it pretty simple
in terms of color mixes, but here you can
add in some places, especially on the
edges of the leaf, some more yellow color. Also you can add muddy
brown into the mix, and it will look very nice. Closer to the stem, I will need to create
more dark shade. And now I also can add some little dots with
the green colour on the brush on the wet
surface or already on the dry surface just to create also these interesting textures. Why add some more
line on the palette, creating slightly
light green shade. And I want to paint
this little part of the leaf that as I can see from the reference
photo is very light. And using this color, I continue working on this leaf and just dragging the
color on the whole, this white line that we kept between the
lemon and the leaf. Now, it looks quite flat, so I will load my brush with a brownish shade that
I have made a brown, a little bit of paints gray, and will carefully add this little corner
on this wet surface. I can lift some color from the surface if I see that
it travels too much, and I will move to paint in
the other half of this leaf. I keep it also light, but a little bit more green. As I'm moving closer
to the bottom, I create more dark green shade, but still trying to
keep it lighter than the main leaf under. But I have to make this part slightly darker than the line
16. Painting The Stem Intermediate: Yeah. In this lesson, we will paint the stem and
the veins on the leaves. I'm using brush number
two by Da vinci, and I'm mixing the colors
that are left on my palette, creating very light green shade, and I start applying this color on the stem of the upper lemon. I will add a little bit more
green color into the mix and will use this color at
the very top of the stem. I see that the color
already got dry, so I clean my brush dupe on the paper towel and just drag a little bit this color down to
make the edge more smooth. And I will add this
slightly darker color, creating the shadow on the stem. We have to remember that part, every single element of the painting has
its own dimension, so we have to create the shadow
part and the light part. I will mix a bit
of the green that I left on the palette
with the brown and paint this little spot
on the corner of the stem. And also, I will highlight this area below the
stem on the lemon. I will use this brown
color mix of mud a brown, a little bit of green, a little bit of paints gray, and will paint this little
part of the leaf on the left. Now I'm mixing this
brownish shade with the greens I
have on the palette, and I will move to
painting this stem. It should be lighter
than the leaf, so I might switch between different shades of green
cleaning my brush in between. And using this slightly
brownish shade, I will move to painting
the middle stem, the main stem that
connects to the branch. And I will just for now start by covering it
with just one color. Now I will darken
this color mix by mixing it with
green and pink gray that I have on my palette, and I will use this color
to paint some shadow on the right side of the
stem and at the very bottom. I will add a little bit of
muddy brown to this car mix, creating more
intense brown shade, and I will move to the
top part of the stem. This upper part of the
stem is quite dark, but I'm trying to use more brownish shade than
I used on the leaves to create diversity and to differentiate the stem
from the leaves around it. I will use same color for
the very top of the stem. Avoid painting this little stem which connects to the vein of the leaf because it
will be lighter. Now using light a mix of line and green and
quite a lot of water, the color mix should
be pretty transparent. I covered this stem on the leaf with this
almost watery color mix. And using the same color, I will paint this little
part at the top of the lemon with this light
green mix, but quite muted. It's mix of yellow green and a little bit of muddy brown
and quite a lot of water. This part should be lighter
than the stem itself. I will leave it dry and I will see you in the
next lesson where we will paint the veins on the lips and add
some final details.
17. Lemons Intermediate Final Details: Welcome to the last
part of our class where we will paint
some final details. Now I mixing Mada brown and paints grey create
in this dark color. I applied this colour carefully
to separate the lemon from the stem creating the
shadow under the stem. For painting the veins, I will use colors that
are left on my palette. If you don't have
any colors left, you can mix green and yellow and a little
bit of muddy brown, create in the same shades
we use in this painting. And quite a lot of water. The colors should be
pretty transparent and our veins should be lighter
than the leaves itself. Once I covered all the
veins on the leaves, I will add some dark veins with a smaller brush that will allow me to create
very thin lines. I'm using brush number one, and I load it with
a dark green shade. It shouldn't be too dark, but it should be
darker than the leaf. And I'm just creating these
very thin lines of the veins, keeping them in the
direction of the leaf. Using the same dark green color, I can also outline some of the edges of the leaves
to highlight the shape. Don't forget to share
your paintings in the class project section and write a few words about
your painting process. What was the difficult part? What did you like the most and did you like
the class overall? Now, our painting is
almost done and I just want to create some
more interesting textures, splatters, and so on. You can leave it like this if you already like the result, but also you can add some more interesting
details to the painting. First, I want to clean my final painting from
the pencil lines. I'm using just ordinary eraser, and I remove the lines
from the sketch. I want to add some splatters
on the central lemon, so I have to cover all the other areas around
with just scrap paper. I'm using main brush that
I used for the painting, and I'm mixing colors
on the palette, adding some handsy yellow dip, and creating this
brownish shade. Uh huh. Uh huh. Be careful with applying the
splatters because it can go a little bit in the
wrong direction like I did. I still haven't covered
it pretty good, but I always can use
a wet paper towel to remove some unwanted splatters
around on the background. Also, you can use
some paper towel and just make some
splatters less visible. Our painting is done. I can't wait to see your
paintings in the class projects. Please don't forget to leave
a review about the class. It will help me a lot
to get a feedback from my students and join
my other classes. I have also another class with botanical Illustrations
for beginners, and I hope to see you there.
18. Don't Leave Yet I Have Something For You: Thank you for being
part of this class. I'm super excited to
see your painting. Don't forget to share it as a class project
and drop a review. Your feedback is very
important for me, and it helps me to improve
my future classes. If you like this class, please join my other class
Easy botanical watercolor. In the class, we will
paint black olives, green olives, leek,
and green onion. This class is very easy and
a perfect fit for beginners. I hope to see you in
my other classes, too. Keep practicing,
keep experimenting, and most importantly, have fun.
 Aleksandryna Gromyko, Watercolor tutorials for everyone