Transcripts
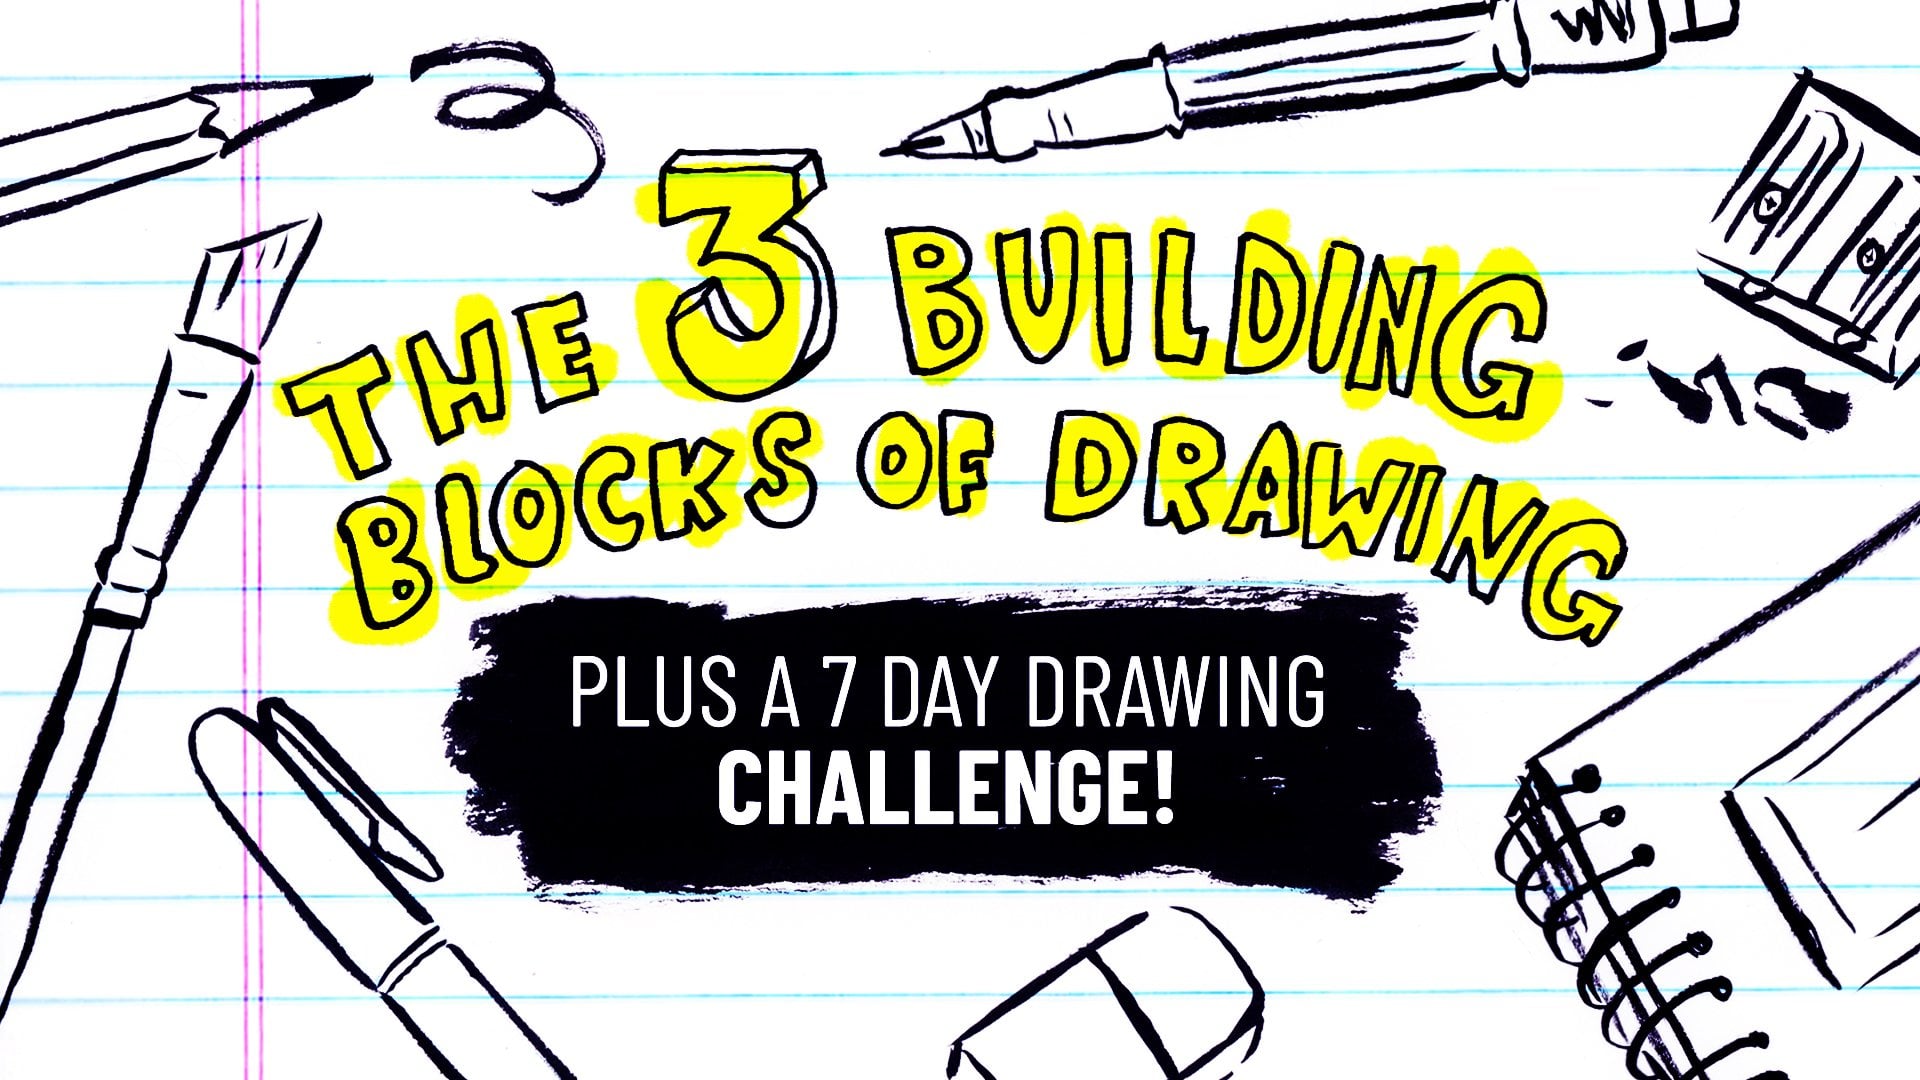
1. Introduction to Leonardo Journaling: Leonardo Da Vinci
is one of the most creative and inspired
people in all of history. I personally believe that it was his journaling practice
that made him who he was. In this seven day challenge, we will use some of
Leonardo's best ideas and apply them to our
own life and interests. This class is made for people
who might like drawing, journaling, being curious, and using way too many sticky notes. It is a seven day challenge for anyone who wants to
enhance their thinking, creativity, and level of inspiration using some of
Leonardo's own techniques. Whether you're a
journaling newbie or you have a stack of
filled journals at home, this class will provide
something for you. This class is designed to help you get over perfectionism, procrastination
and self judgment. Each lesson begins
with a warm up to get over the fear of
the blank journal page. The class is set up to help you build a
journaling habit over seven days that
will help you with your creativity,
inspiration, and discovery. This class leaves
you with more than just a pre art project
and one new skill. This class teaches
you the mindset of one of the greatest artists
and thinkers of all time. Hmm. Hm. And so why are you qualified
to teach this class? My name is Marley Peifer, and let me read you my list of qualifications for
teaching this class. I have been a fan of Leonardo Da Vinci since I was a child. I started journaling
in high school and have filled over
300 sketchbooks, diaries, and bullet journals. I have been teaching
sketching and journaling for over ten years. I have a YouTube channel with over 600 videos about sketching
and nature journaling.
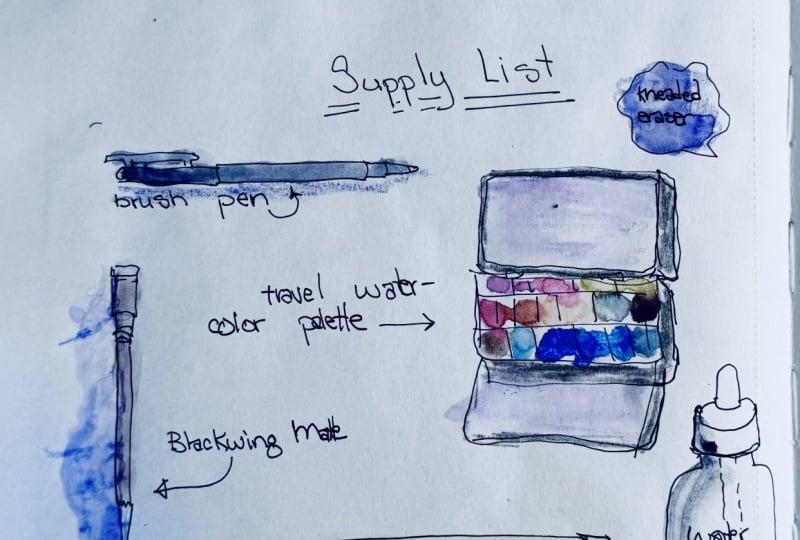
2. Orientation: Project, Process, Supplies: The project for this
class is to create seven multimedia journal pages emulating the style and
process of Leonardo Da Vinci. Interestingly, one of the
things we learn from Leonardo is his focus on
process over product. He was more interested in learning new things and pursuing his curiosity wherever it took him than producing
finished projects. In this class, we will also focus on process
over product. The paradox here that
many great artists and musicians have
learned is that focusing on the process is the surest way to get the best product
in the long run. We won't use the same supplies
as Leonardo Da Vinci. He used what he had
available during the late 1400s and early 1500s, and we will use what
we have available. The important thing is for it to all be in one
sketchbook or journal. At the very least, you're going to need a
journal or sketchbook. I recommend a larger
one like this, but you could use more of
a bullet journal size one. You also need a pen or a pencil. You will need some of compass. You will need a ruler or
straight edge of some sort, for more info, a lot of
specific info on the supplies, check out the PDF supplies list in the projects and
resources section. I have to admit I'm
feeling a little bit nervous about starting
a seven day challenge. Don't worry. I got some tips for you to help create a new habit. The number one tip
is create a trigger. A trigger is something that reminds you to
initiate the practice. You could leave out your journal or you could leave
your computer in a place with the tab open on this class,
this online class. Another really good habit
is same time, same place. Have a certain place in
your house where you always do your Leonardo journaling
practice every day. The other one that is
very useful for a lot of people is to create
a piggyback habit. You probably already
have something that you do every day, such as drink tea or coffee. If you put your
journaling stuff and the class information next to your coffee and drink
your morning coffee. As you do your journaling
practice, that will help. I just spilled tea
all over myself. Another one is to make
sure you start small. Don't get too ambitious with the different
prompts and lessons, and that way, you'll be
able to complete them. Another good one is to buddy up. Do you know someone else who
likes taking online classes, someone else who
likes journaling? Try doing the seven day
challenge with that person. They can be buddy,
your motivation buddy. Don't forget to reward yourself. Having some type of
reward when you complete the practice every day is a
great way to stay motivated. And last but not least, I just want to remind
you that focusing on the process of
filling lots of pages and doing something
on a daily basis is the surest way to get you to the best product
in the long run. A lot of classes are very focused on creating
a beautiful project. This class is training you
with the skills that are going to make you a
more creative and inspired person in general, and that is a process. Let's get started. I'm really
looking forward to doing these next seven days
with all of you. Bye.
3. Day One: Drawings, Words, Numbers: Written word is only one
language for your journal. Drawings and numbers
provide two more. Each of these languages has
strengths and weaknesses. If we only use one, we are missing out on
our true potential. One of the most beautiful
and intriguing things about Leonardo's journals is
his mixing of drawings, writing, numbers,
and calculations. Not only was this
an essential part of his learning process, but it defines the fascinating
aesthetic of his journals. Even if you feel more comfortable with just
drawing or just writing, we are going to try
to combine all three. But first the journaling
prompt and some warm ups. The prompt for this journaling is something that you want to pay more attention to and something that
you're curious about. Just start writing a list of those things for
the journaling prompt. Now that we did that, we can
do some warm ups to make sure we're ready to use
words, numbers, and drawings. The first warm up is going
to be really loose and fun, but it's also a way
that helps us plan our page layouts and how
we can combine words, numbers, and images
in different ways. I'm going to create a grid
with a bunch of smaller spaces inside of them where I
can practice page layouts in a format that's similar to the same layout that
I have on my page. All I'm going to do is I'm going to use basic shapes
like this rectangle. For drawing or images, and then I'm going to
use these squiggly lines for writing and numbers. You can see that in this way, I can plan out what a
page would look like. In this case, this right here
would be one page layout, a long drawing at the top, a smaller individual
drawing here, and then text that wraps around
that individual drawing. Another way would be to
have text at the top. Three smaller images in the middle and then all
text on the bottom. The warm up is to just
draw a bunch of these. You could do anything
5-10 practices of different ways of
creating a layout that combines images,
numbers, and words. You can see here that this
warm up is abstract and simple enough that if you're afraid of drawing, you
can still do this. You got that down on the
page and we're going to do one more warm up before we
get into the main lesson. The next warm up,
we're just going to play with some of the materials and supplies that
we're going to be using for the rest of the class. Get out all of those things. We're going to test
them out and make a fun page where we play
with the different supplies. It is time for the main lesson and we will be combining words
with images and numbers. Find something as a reference. It could be from
your refrigerator or from a potted plant
or from your garden. I'm just going to show
you a couple ways that I might in this example, combine all three
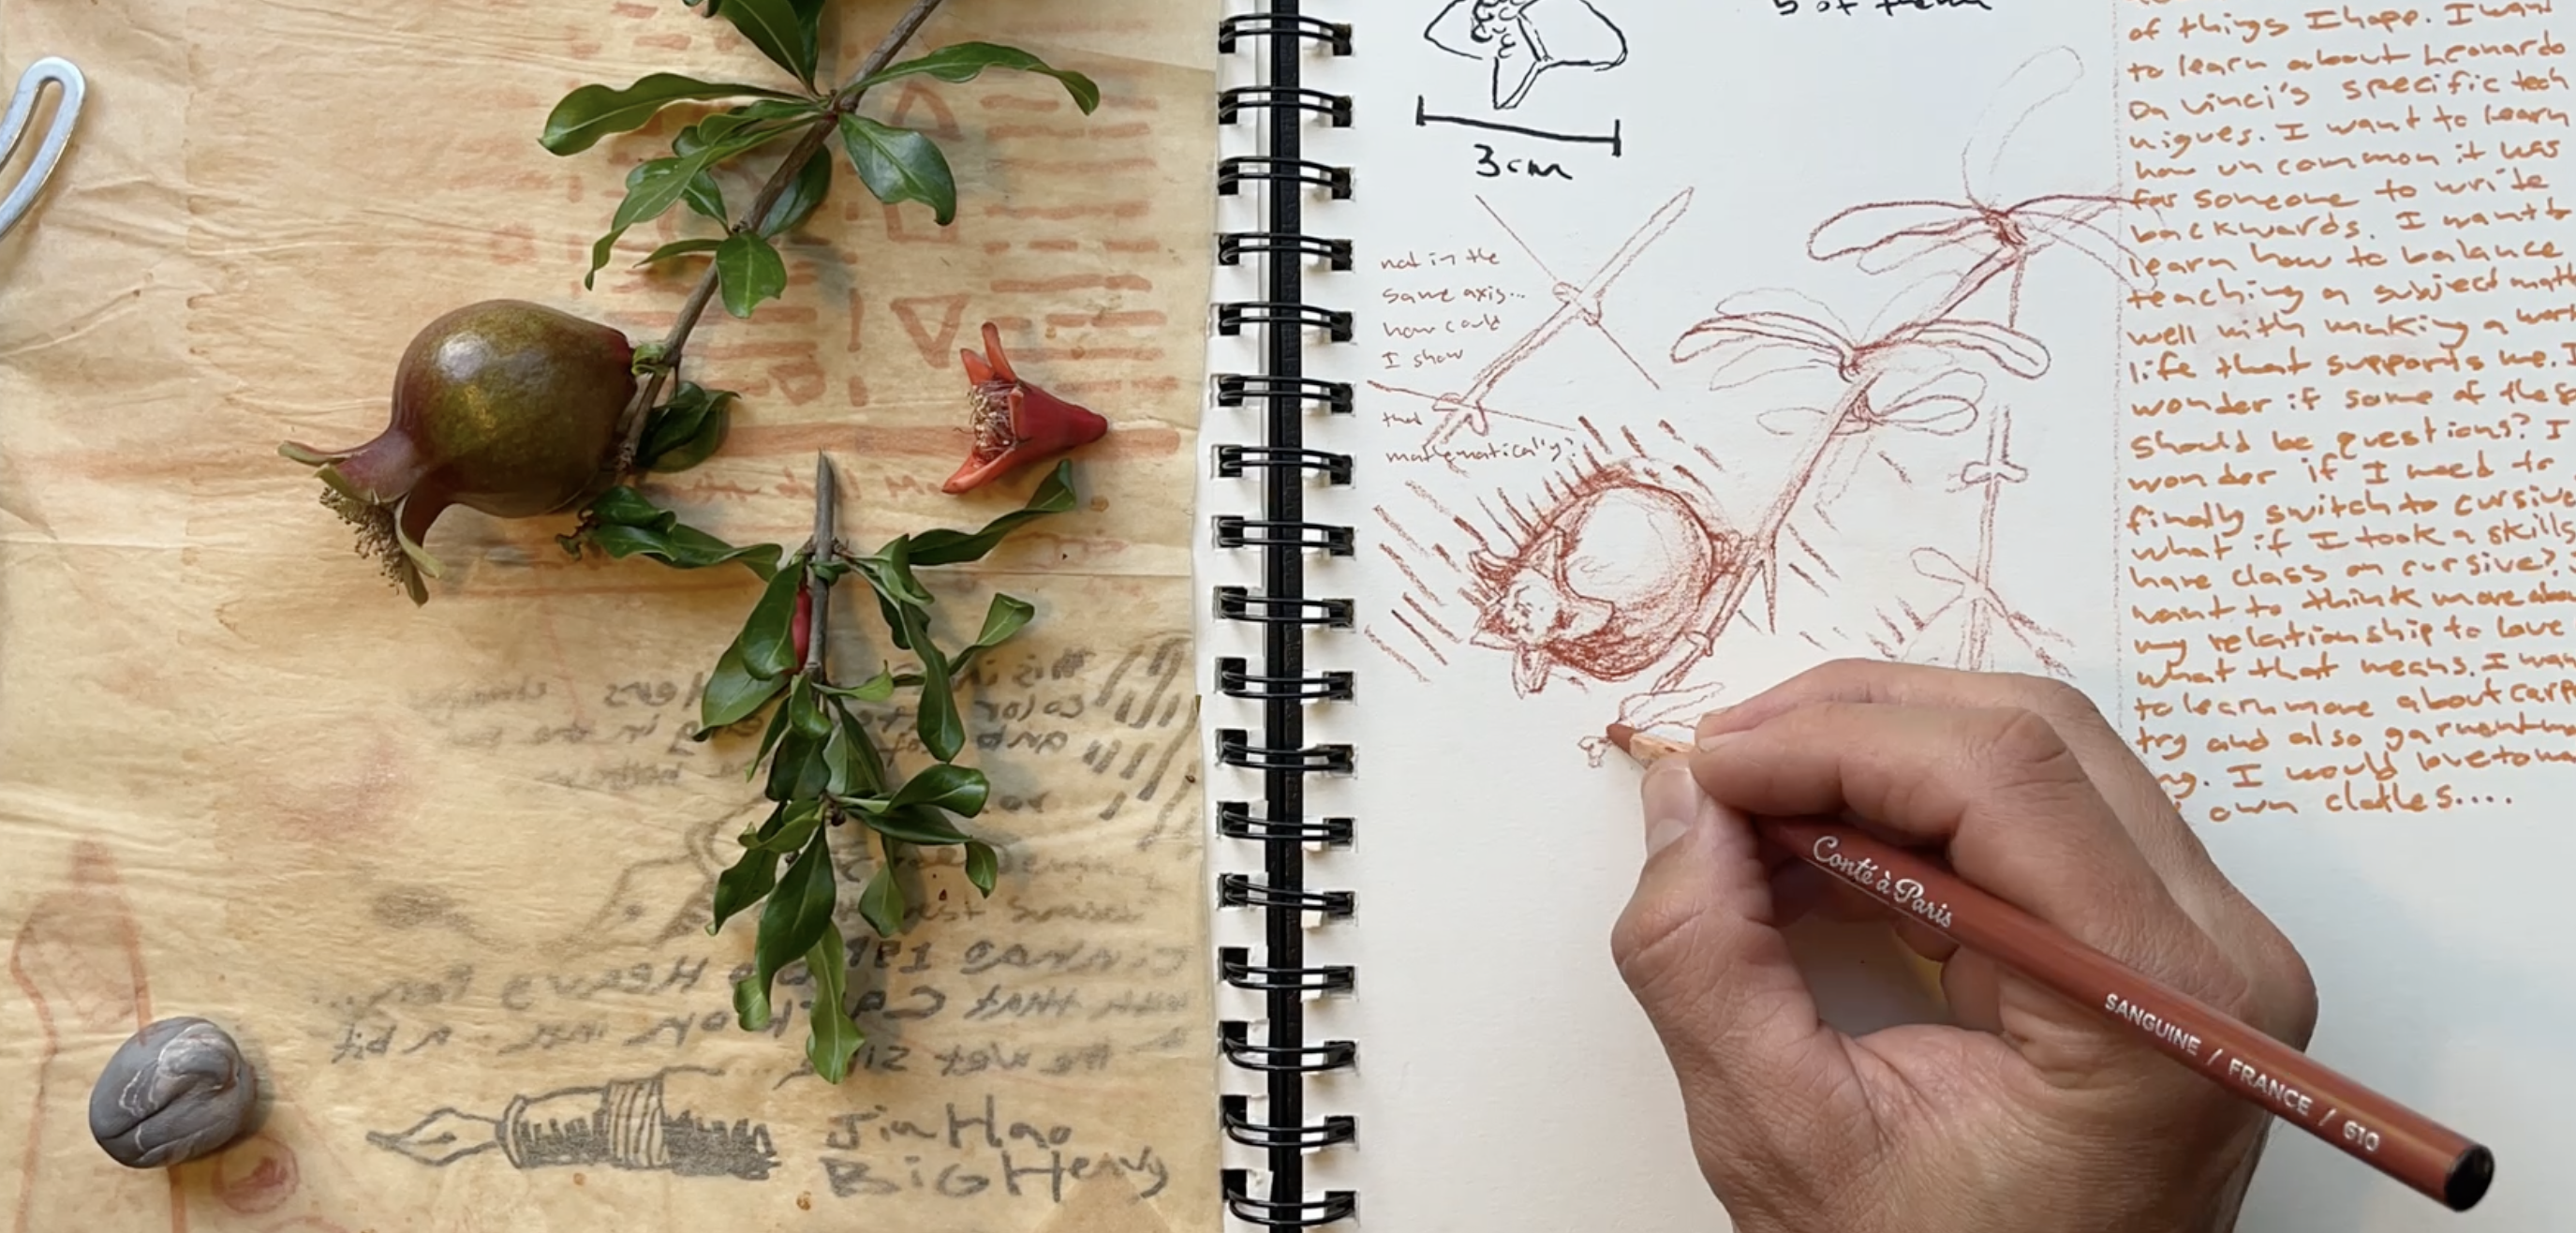
of those languages. Here is this incipient
pomegranate flower. I'm just going to start
with a light sketch here. Trying to get the
main feeling of it, which also will
include this geometry, which is a rather precise geometry Leonardo would
have been interested in. And get that little sketch. I wish I had done a smaller one. What I'm noticing is
I'm having trouble showing some of these
details in my drawing. I'm going to use some
words to describe them. Leonardo might make a letter next to the thing he wants to describe and then write it
right over on the side. Here I'm going to put the letter A. I'll put the letter
A there or make a line. And then describe it
a little bit there. The other thing I can do is
I can measure this or count. I can say five of them. That's the most basic way you can use numbers on your page. Then I can also measure if you have a math phobia like I am trying
to recover from, these are the easiest
ones for you to do. What do? It's basically 3 centimeters
from here to here. Measuring and counting is the easiest way to get
some numbers on the page. But if you look at Leonardo
Da Vinci's, of sketchbooks. He would often have different calculations, lots of geometry. This is just one example
and I'm going to spend some more time filling out
this page using words, numbers, and images to help me learn about this pomegranate. Go ahead and take at least
you probably need 15 minutes, ideally, maybe 30 minutes to do this exercise on your own.
4. Day Two: Draw From Observation: All right, it's day two of journaling like
Leonardo Da Vinci. Today we are drawing from observation just like
Leonardo Da Vinci did. One of the main
things that he did in his journals was draw
from direct observation. This not only trained
his ability to observe careful details and see things
that no one else could, but it also made his
drawings a lot better. Why does this
matter? Because when we practice drawing from life, we learn a lot faster, we improve our drawings, and we become better artists. There is no replacement
for drawing from life. We are starting each day with a list of the things we
want to learn more about, the things we want to
pay more attention to, and the things that
we are curious about. That is similar
to something that Leonardo often did
in his journals. We just did the written
journaling part of today's prompt for those of
you that find the writing, the easy part, and the drawing, the hard part, get ready because we're going
to do some drawing. But we are going to start with warm up so
that we'll really ease into it in a nice
and fun, relaxed way. You might find this
so fun that you return to this exercise a lot. If you've done some
drawing classes before, you might be familiar
with this exercise. It's called blind
contour drawing. The classic model is often
your hand that you draw. Idea with blind
contour drawing is basically that you're
drawing way over here, see where my right
hand is moving, and the thing you're
drawing is going to be way over here so that you can look at this object without being able
to see your drawing. That's right. In this exercise, you shouldn't be able
to see your drawing. Even if you can see it out
of the corner of your eye, you're going to lose the
effect of this exercise. For the sake of filming it, I actually can see my drawing a little bit out of
the corner of my eye. But in real life, you'd probably want to hold
these things even further away from your drawing so that you can't see it at all. Now, the next important
thing that you do is you try to draw what you actually
see to follow the outline. As your eyes go around
each part of it, you try to make your
line go in that shape. The hard part is you
don't know where you are, so you can lose the line or
mess up your proportions. But you don't worry
about that. You just keep moving and sometimes this exercise works better if you're drawing very fast and
not spending very much time. That's my first one there. That's a pretty
good representation of what a blind contra
drawing might look like. I'm going to do another
one taking the cap off. You'll also notice
that my pencil did not come up
off of the paper. I stayed on the paper
the whole time. I'm going to do a
little one of my hand. This exercise also
works better if I notice I'm cramping
myself a little bit here, I'm losing some of the
power of this exercise, the benefits of this
exercise because I'm worrying too much about
fitting in the space. You might want a bigger area. There you can see a couple more. I'm going to do the
lid now real quick. The good thing is if the
teacher's drawings look really bad that actually can empower
students to do better, there's some psychological
studies suggesting that showing students a
very good drawing at the beginning of the class ruins their motivation for trying hard and
for working hard. I'm going to go
back and actually do something that I
normally don't do, which is just add a
few details to these um a blind contra drawings
that I've already done. But this is the idea
with the practice. For today's warm up, either take one of your drawing tools. It could be the compass would be a really
fun one to draw. Sometimes long skinny
things are a little bit harder to do with blind
contra drawing or try drawing your hand in a
position like this and do a couple of those for the
first part of the warm up. Okay. Now for the
main part of day two, which is drawing
from observation, the first thing you need
to do is choose an object. I recommend something from
the non human built world, like a plant or an animal
or a piece of an animal, a skull, something like that. I need to get some
more skulls in here. Here is some plant
matter that I chose. This is what I'm
going to work from. The main thing that
we're doing is just practicing drawing
from observation. This is something that was at the foundation
of everything that Leonardo Da Vinci did and
it has a lot of benefits. It really improves
your learning, even if you want to draw stuff
ideally from imagination, for example, or do character
design or whatever. The main thing we're going
to remember too is that this is drawing as a
learning tool and we're not just trying to create some master botanical
illustration that's going to hang on the
wall in a museum somewhere. One of the things that
that means is iteration. Instead of just drawing one big, hopefully perfect
drawing here in the middle that puts a lot of pressure on that one drawing, I'm going to probably
make multiple drawings. I'm going to start up here with just some light sketching, trying to figure out
where these things are. I'm realizing maybe
I could start with a diagram of this leafing. This is something that
Leonardo studied. He was one of the
first people to really study philotaxs which is the organization and the
mathematical pattern behind where leaves come out
and how they're arranged. This plant surely has a very specific
mathematical formula behind how the leaves come out. So I've got this plan here showing more or less
where they're coming out. At the very least with plants, you need to show whether the leaves are
opposite or alternate. The exocredit for today's
journaling is to practice drawing from observation
with some of Leonardo's favorite
subject matters. Those include humans, spirals, flowing water, and
birds in flight. Go out there and for
your exacredit do some drawing from observation
of one of those things. Even water flowing from a sink or in a bathtub or
in a stream or a pond, that would be a perfect subject.
5. Day Three: Draw from Imagination: It is day three of journaling
like Leonardo Da Vinci. The first thing that
we're going to do is we're going to make a list of things we want to learn
and pay more attention to. I'm going to get my heading
going on the page, my title, and then I'm going to
write a list of things I want to learn
more about today. Apparently, Leonardo had
the tendency to draw these weird old men profiles as his recurring doodle when he got bored or in the margin of pages. This is an example drawing from imagination and what is
your recurring doodle? Is there some shape or it could even be a
combination of letters or something that you
recur to when you just want to move your pen or
pencil in a free way. It could be a bird, it could be a island, it could be a tool or
a vehicle or a car, it could be a cloud,
a lightning bolt, something that you
still draw or is the first thing automatically that comes out of your
hand when you draw? Right now for our warm up, we're going to experiment with
what your doodle is and do some doodles emulating
those old men that Leonardo love to draw. The first thing we're going to do is we're just going to do multiples emulating
that Leonardo style. You can look these up or look
in the PDF that I provided, but they're often called
nutcracker faces. Just do at least five of these right now pretty
quickly as a warm up. Go ahead and have fun with it, keep it loose and silly. For the next part
of the warm up, you are going to
do brainstorming to come up with your own doodle. What is going to be
your signature doodle? It could be a tree, a
leaf, an eyeball, a face, a hand, a skull, a snake, a crest a moon, a
wizard, a bird. Go ahead and pause the
video for 5 minutes and work on coming up with
your signature doodle. No looking at references
for this exercise. Do not look at references. Try to just come up with your signature doodle
from your imagination. The first prompt for the lesson for drawing
from imagination is go ahead and close your eyes and imagine something that you
look at every day. Go over that something
part by part. Pretend like it
is in your hands. Go over it detail by
detail in your mind. Even if all you see is black, try your best to
imagine the details. After focusing on this
for a solid minute, open your eyes and draw
one part at a time. Go ahead and pause
the video and take 5 minutes to do this
and I'll do my best. See you soon. That
felt like an effort, but I think that was
really good practice. Now we are going to let
loose our imagination with three different prompts for the main lesson, drawing
from imagination. The first one we're
going to do is we're going to close our
eyes for a minute and we're just going
to see what images pop up out of the
darkness of our mind. Is there a shape
or an image that starts to take hold
behind your eyelids? Open your eyes and
try drawing from this image or these
shapes for 5 minutes. Take 1 minute with
your eyes closed. Seeing what pops up out of the blackness
behind your eyelids and try to visualize
that for a minute with your eyes closed and then for 5 minutes, try to draw that. Go ahead and pause the video
and take 6 minutes to do this prompt. All right. The next prompt for unleashing your imagination is what
is a fantastical place, person, or animal that you
have imagined in the past? It could also be
from a vivid dream. Close your eyes for a minute, trying to imagine it, then open your eyes and try to draw out this figment
of your imagination. Use multiple sketches to
work it out on paper. Pause the video and take
6 minutes to do this. I so a tip for people who are struggling to visualize stuff
with their mind. One way you can go
about drawing from imagination is just start
with some light shapes, tracing out some light shapes
on your paper and thinking about the use of the space here and what shapes fit
nice into that space. You can just start with
some shapes like that, some squiggles, and
then little by little, turn that into something, let your subconscious start adding elements to that and
turning it into a drawing. I probably shouldn't give away
this trick in this video. But if you start like this and you make a
drawing like this, people are going to look at
it and be like, Oh my gosh, you have an amazing imagination. But the truth of
the story is that I didn't really
imagine any of this. I just started by making
those basic shapes on paper, just randomly making egg like shapes and
swirly curvy shapes. Then from there, I just start building it into
what it wants to be. That is the third warm up. Pause the video for 6
minutes and just start with some of these basic shapes and see where the
drawing takes itself. That is one bonus tip here for today's main lesson on
drawing from your imagination. In this lesson, we learned a couple of different
techniques that can help build your ability to
draw from imagination. This is a skill that
requires practice. The more you do it,
the better you'll get. For Era credit on this lesson, you can do all of the props from day three a second
time. Good luck.
6. Day Four: Go Down Rabbit Holes: Kids know how to go
down rabbit holes and so did Leonardo Da Vinci. For the rest of us,
it might be hard. Let's start with a list
of the things we want to learn or pay attention to the things we
are curious about. For today's warm up, look at your list of
things you're curious about and your
list of things you want to learn more about
from the last few days. Here's today, here's
the last few days. These things are going to
turn into your rabbit holes. As you reread them, what are the ones that spark your
excitement the most? Write them down on a new sheet of paper or on a sticky note. We're going to
brainstorm from these by asking more questions
around each one. For example, a couple of mine that I highlighted
when I was going through them was how can I teach journaling better? Those are three
potential rabbit holes. Now take 6 minutes and do
the review of your list and come up with at least three of the main recurring ones or the ones you're
most excited about. These are going to be
your rabbit holes. Now that you've got at least three potential rabbit holes, here are my
brainstorming prompts to use to think about each
one and develop them. First of all, what interests
me about this rabbit hole? Are some specific parts
especially exciting? Are some parts less exciting? What are some closely
related topics? Do any of these
adjacent rabbit holes spark my excitement as much? What steps can I take to
follow this rabbit hole? How deep is this rabbit hole? What part of this
rabbit hole do I most enjoy spending time in?
Now it's your turn. Pause the video and take
at least 5 minutes to brainstorm around your
top curiosity ideas. There are two main types of
rabbit holes in my opinion. There are research and imaginary and those rabbit holes can take place on the Internet and completely inside
of your own mind. Then there are real life
rabbit holes that are based on direct observation
of things around you and hopefully even
better technique to take notes and sketches
such as journaling. So for example, I'm
going to be doing corn because I want to go
down a rabbit hole related to corn over
the next month. And for our practice today
for the main lesson, we're going to focus on
real life rabbit holes, not research or imaginary. So it could be even something
that you find outside. I'm going to go through
the steps right now. To look at here, I have a couple corn plants that
were pulled straight out of the ground and you
can see this one came off without any roots. This one came off
with some root. I also have one here that's a partially germinated seed that hadn't come out
of the ground yet and look at how long the root is that came with
and then I have another one here also with some other plants germinating
in there next to it, which are little
amaranth plants. Between all of these, I have definitely
enough of a story, enough information
and complexity for a really interesting
rabbit hole where I can explore for a while,
just with this. I could probably
spend using some of Leonardo's techniques and
that level of curiosity, I could probably spend
a whole day just on what is right
here in this tray. Something like this, you don't need to go to a national park. Something like this would be
perfect for a rabbit hole. Part one, observe directly
and write your observations. All I did was observe part of my subject matter directly
and then write observations. I noticed it has no roots, about 6 " long and one eighth
inch wide at the base. Looks cleanly snapped or cut. I see some water
stains on the leaf. Those are examples of
how simple you can start exploring a rabbit hole. Part two, draw what you see. Here you can see
that all I did was try to draw what I could see. The little seedlings, the
growing corn, the roots, the little seed that's
trying to grow, and the one that's pulled
out with no roots. Part three, use drawings
to problem solve. Now I'm going to ask some
questions and write them down. This was a good warm
up and a lot of times while I'm doing these
observational parts, I start thinking of questions. I'm just going to brainstorm looking at these things and see where my curiosity takes me because that's part of what
makes it a rabbit hole. Part four, ask questions
and write them down. This part was really fun. The questions that
I came up with are comparing these
different corn plants, which has turned into the focus
here of this rabbit hole. So my questions are, what is the age difference? If I could dig up
the roots of the direct seeded one, that's
this one right here. How would the roots compare
to the one that was grown in the flat that
has a ton of roots? Does this tell me anything
about soil temperature? Does this tell me anything
about sun or nutrients? Does amaranth cause a difference
with the corn plants? This is the Amaranth, these really cool red
colored ones here. What is going on at the
soil food web level? That's the bacteria and microorganisms of all sorts
that live in the soil. What about the mycorrhizal? Those are just some of the
questions that I came up with. Now I'm going to go
on to the last one to show you what that's
like before it's your turn. Start getting ready. Part five, what do you want to learn next? Okay, for this part, I just made a list of
what I want to learn next and this is
something we've been practicing basically every day, you should be getting good
at this part and this is really important
for your process. What I want to learn next? I want to learn more,
what is going on at the microbiological level. How can I learn that?
Do I need a microscope? I want to also learn a practical lesson that allows
me to grow better plants. How can I grow better plants? This parts really important. That is Step five. Now it is your turn. These are just five
ways to explore a rabbit hole to help
you have some structure. You need at least 20 minutes to see the benefits
of this exercise, and if possible,
an hour is better, you should not feel rushed
when doing this exercise. Now it's your turn. Take
at least those 20 minutes and up to an hour if you can. All right. Now, a couple
tips for this lesson, if you're procrastinating,
starting it, you might have to go
outside for this one. Having something physical
is absolutely essential. You have to have
something physical. You might have to
hide your phone. Don't use the corn
from my video. This doesn't count. Even if you have
to use something like a vegetable from
the refrigerator, that will work perfectly fine. Sometimes you need a couple
days or even months to discover the best
rabbit holes for you and how to
best explore them. Some of Leonardo's rabbit holes include what mussels
control the human smile? How does water flow
through cylinders? How do birds fly? Some of these he explored
for his entire life. In this lesson, we
practiced and learned that curiosity is a muscle
that grows with practice. It's fun too. Don't be too hard on yourself if this
doesn't come easy at first. Just keep practicing and
trust in the process.
7. Day Five: Make Lists: It's day five of journaling
like Leonardo Da Vinci. Today's practice is making
lists. That reminds me. Now it's time to make our daily list of the things we want to pay attention to
and learn more about. Leonardo Da Vinci
made lots of lists. He even made Mundane
shopping lists on pages next to
perfect drawings. But instead of taking away from the value of these
master drawings, the scribbled lists
actually enhance them. They add the authentic aesthetic of an ADHD Renaissance genius. If only Leonardo Da Vinci had known about
bullet journaling, maybe he would have become
more organized and productive, but probably less original LOL. Some of the reasons
to make lists is to get stuff
out of your head, create an engaging
visual element, add a layer of layers
and story to your page, and if done right,
it can be part of a productivity or
research system. There are millions
of ways to make lists and people argue
about it online. But for today, we just want to get something
down on the paper. You're going to hate
this warm up exercise because basically all we're going to do is we're going to
set a timer for 3 minutes. If you want to
challenge yourself a little bit more, do 5 minutes, 3 minutes and during that time, just write non stop. You cannot stop writing. It doesn't matter
what you write. You could just say,
even if it's just starts off with blah,
blah, blah, blah, blah, as long as your pen or pencil is moving,
writing on the page. Go ahead and set a
timer for 3 minutes. I'm going to set my timer and I'm going to go for 3 minutes. Good job with the warm up. Now we're going to
do the main lesson. First, let's talk about
just some examples of list. You're probably doing
some of these already. There's lists such as
supplies, shopping, to do lists. Idea lists. Lots of people have a list somewhere where they write down their favorite ideas or
at least favorite ideas. A questions list, people
you need to talk to list. Things to learn list. That's what we've been doing
every day in our journal. Funny names for a band list. Weird list to perplex. This could be lists that
you make to confuse journal snoopers, potential
journal snoopers. Go ahead and choose two
lists from this list of lists and list your own
list for the next 6 minutes. You can also make and
categorize lists by function. For example, vinting
lists are lists where you're writing stuff out just to get it out of your
head in a list form, but you don't need it
for looking at later. A really common one
is a to do list. This is a whole category that the shopping list
also falls under. This is where you're
making a list of things that you need to do, things that are projects
or things that are tasks. That's a whole type of list. It's going to go right here. Venting could be weird
lists to perplex. Then there's reference
and inspiration lists. A list of things you
want to look back on later or a list of things
maybe achievements or a list of um of quotes or something like that that you
use as inspiration. That's an idea list.
I'll put that on here. Then there's also
just ornamental lists where the list is
just a space filler. These also can get close to
poetry lists where the list itself is actually fun or a beautiful thing
in and of itself, regardless of it being a useful
to do list, for example. Those were the main
types of lists Okay, a couple pro tips about placing lists and just
lists in general. Place them everywhere. You can put them in
as you think of them. If you're doing a page on one of our previous
pages and you have these random ideas
that are coming to you while you're drawing
a plant in my case, I could just have a list over here in the marginalia where I write down weird things that I think of that are distracting. You can put them in. You can put the lists in mix like that. You can also go back to old
pages and put them in gaps. For example, if I
go back um here and maybe even I'm not really
attached to this page. I could glue in a piece of paper here on top of it
with one of my lists. Or if you did one of your
lists on scrap paper, you could later come
it in and come in here and collage it
into other parts. You can also put them
on sticky notes. The list could go
on sticky notes and then one beneficial thing about that is you can move
them from page to page. If you're moving forward
in your journal, you could carry
this list with you. And then the other thing is just experiment with
collaging them. If you have lists
on scrap paper, even I know this is going
to sound sacrilegious, but for example, what if you have a bunch of old
bullet journals? I never look at these
old bullet journals, but maybe I could just
cut these pages up and use them as a collage
element in another journal. I know that sounds sacrilegious, but if you have
piles of journals, what are you going
to do with them? This is a cautionary tale. For some people, you might need to be careful creating
lots of to do lists, especially because to
do lists or lists of your goals can be a
problematic thing because you can use it as a
procrastination technique and also having a journal full of lists of things you have not completed can be stressful
or a mental drain. Just think if your journal is associated with a bunch of homework that you
haven't done yet, are you going to be
attracted to that journal? So I want you to pay
attention to that, practice self
awareness around that. If you notice these patterns happening to you where
you're using list making for procrastination
or for creating unrealistic goals and then being judgmental on yourself when you don't achieve those goals, if you notice any
of that happening, you're going to want to adapt your journaling
technique and try some of these other
more creative types of lists and try to limit
the use of to do lists. In this lesson, we practice
the fine art of making list. We learned some of the
benefits of list making and some different types of
lists by their function. We also practiced mixing lists into the rest of our journaling. The extra credit for this
lesson is to go back to some of the previous pages of Leonardo Da Vinci journaling that you've done and add lists. You could write them
by hand in the margin or you could glue them in on
separate sheets of paper.
8. Day Six: Build Things: It's Day six of journaling
like Leonardo Da Vinci. Today we're going
to build things. We're going to go from two
dimensions to three dimensions because Leonardo Da Vinci did not just draw pretty
things and journal. He also built things
with his hands, including theatrical props, practical inventions
and complex machines. Many artists and journals
in today's world are disconnected from the
benefits of building things. Before we start building things, we're going to start off with a little bit of writing prompts. To get us thinking about this. Start off with this prompt here. What is a tool that is
always annoying you? Is there a tool or object in your daily life that is
always annoying you? How would it look if you
designed that tool better? If you had the opportunity to redesign it? What
would it look like? Next prompt is what is a
tool you wish you had? Maybe it doesn't exist yet, maybe you've never
seen it, but what is a tool you wish you had? How would that tool look? Take about 6 minutes to do some writing off
of this prompt. The warm up for
today is to practice some basics with
ruler and compass. So the things that
you're going to need, you're going to need
a basic compass. You can see the supply list PDF for more information about that. I recommend a mechanical pencil, but you could also use other graphite pencils as
long as they're sharp. Then I have a ruler and
I also have a piece of paper for sharpening
my pencil to a point, especially on the compass. If you have a rough piece
of paper or some sandpaper, it helps you keep this sharp. The first thing we're
going to do is we're going to trace two circles. I start by tracing one and we have to make sure
that these will both fit fit overlapping on
the space that we have. So I made that
first circle there. Now what I'm going to
do is I'm going to put the point of my compass on
the edge of this circle, the furthest out edge. Now using that as the new
center for my compass, I'm going to trace
another circle and you end up with these two. Mine is not that clean because I have these under drawings, but you end up with these
two overlapping circles, and this is a very important
geometrical figure that everything
else is based on. Now I'm going to go down to this spot where the two lines
of each circle intersect. I'm going to make that the
new circle of my compass and always keeping that same
radius that I started with. All of these circles
have the same radius. Now I'm going to find the intersection here
again and do the same and you end up with this network of
overlapping circles, and that is the basis of the other constructions
we're going to do. This circle is not going to fit. Now we're going to draw
some straight lines between these between these
overlapping points. The overlapping
points give us all of our references and
the first shape that we're going to
make is a triangle. We're going to use this spot
right here where you can see that was the center for our first circle and this was the center
for our second circle. Then these are the points
where they overlap each other. Now we can draw a triangle
there by lining these up. I have to get straight above
it to make it accurate. This can feel stressful, but it can also feel
meditative at a certain point. If it feels
uncomfortable at first, I highly recommend you
try pushing through. Try focusing on your
curiosity and the feeling that you know you'll
have of mastery once you get a little bit of
familiarity with this. I know as an artist, I often avoided
anything that required any measuring or
any straight lines. But that was a huge
limitation for me. Later, when I started
messing around with some of this geometry
that you actually do for drawings and that Leonardo Da Vinci
other great artists used, it was actually Challenging
but very rewarding. So now you can see I'm making
these other intersections connect via straight
lines and that's creating a whole
grid of triangles. We had a network of circles and now we have a network
of triangles. This is the foundation
for a whole bunch of really cool stuff in
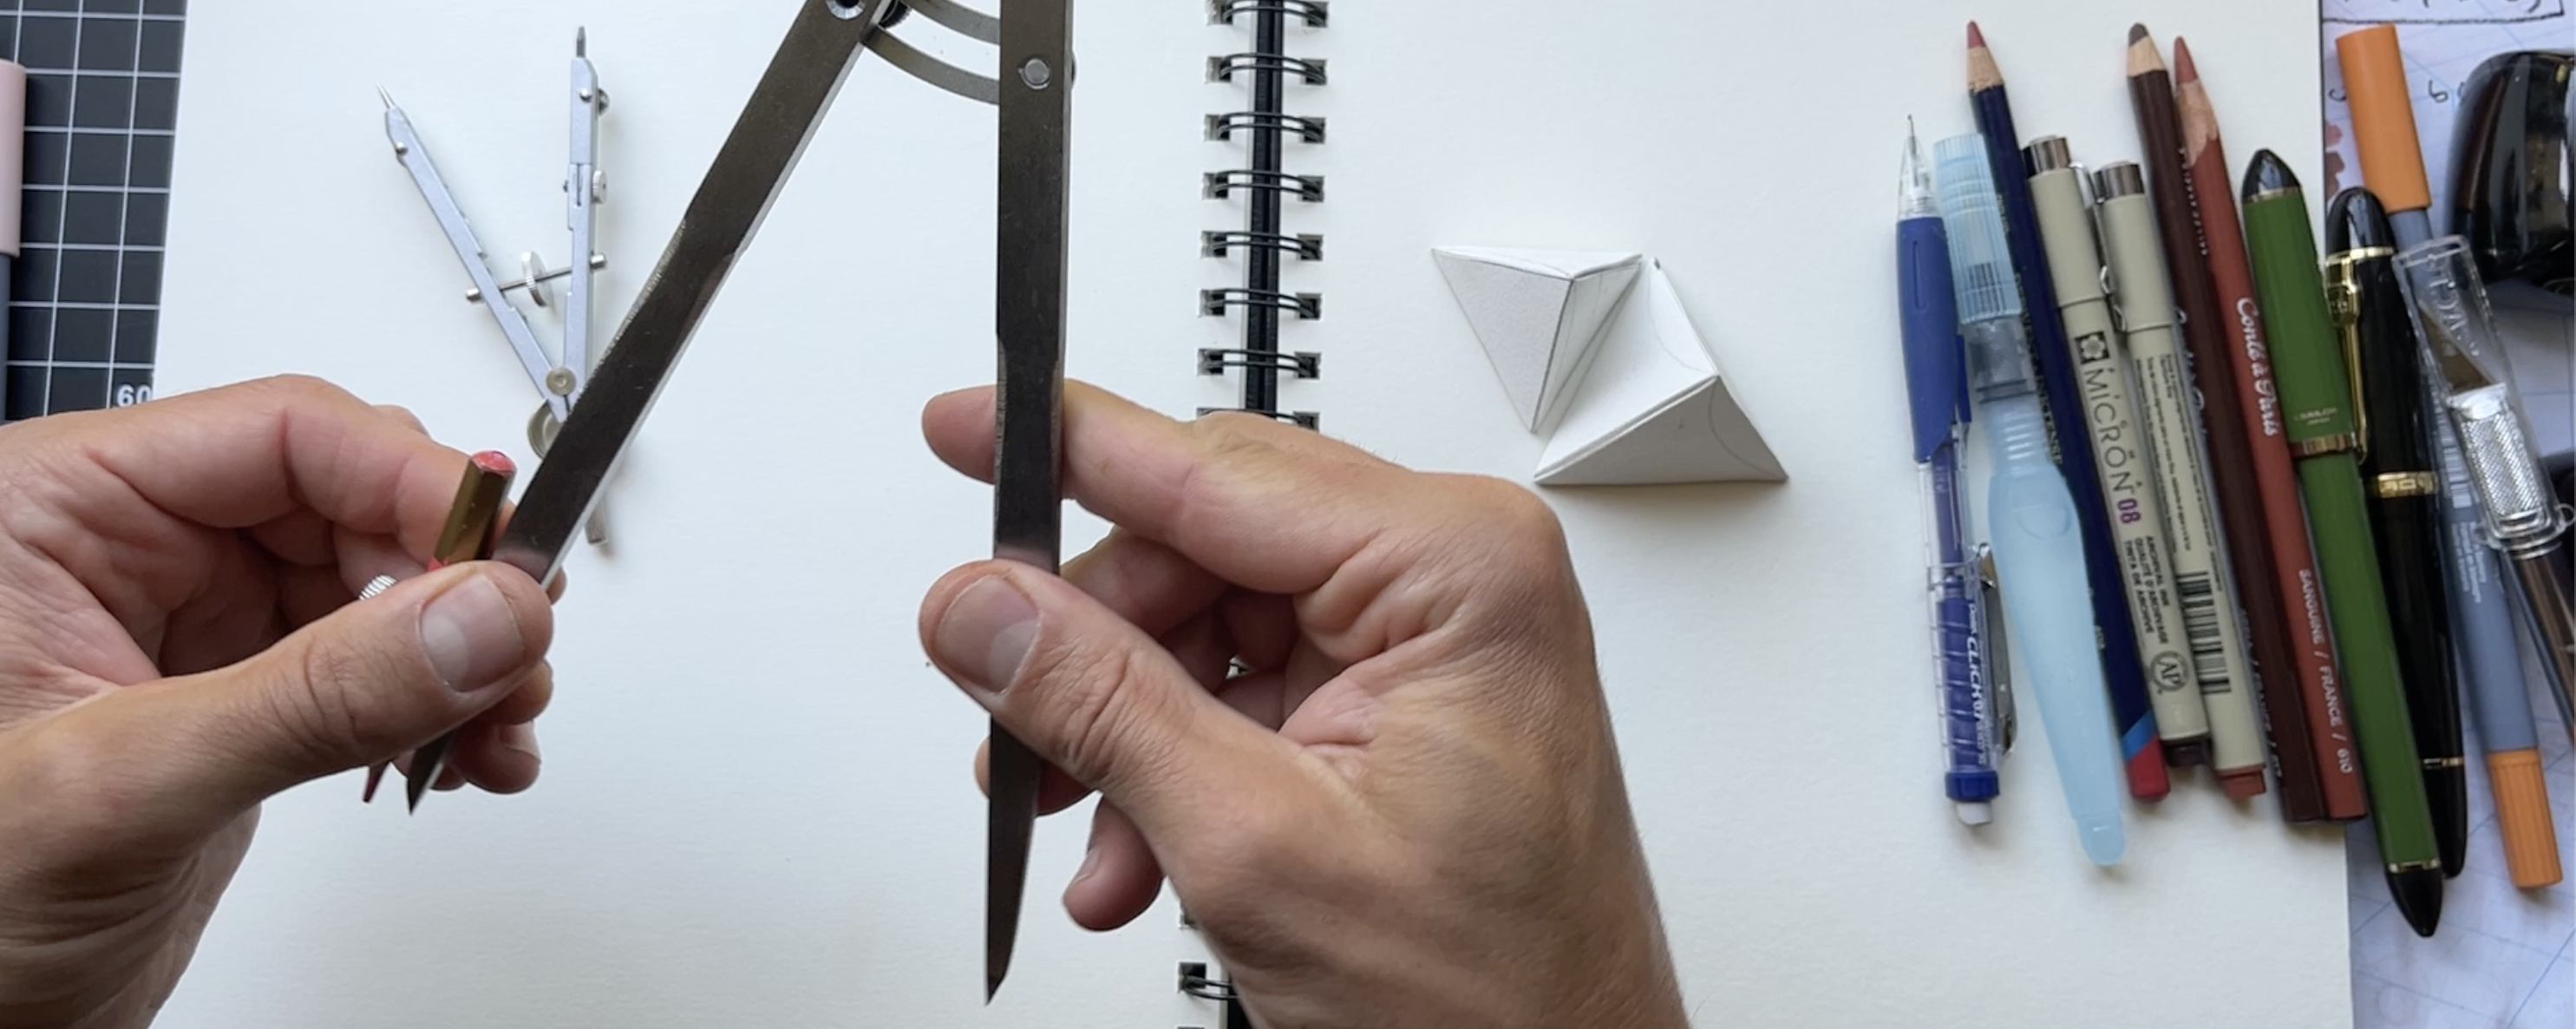
art and in nature. So the fun part is going to be, we're going to turn this into a three D model that
looks like this. I'm going to show you where
the cuts are going to go and where the
etching is going to go. All of these dotted lines that I do right now
are going to just be scored slightly with
the exacto knife. And then the whole area that's colored in is going to be the part that gets cut out. We actually use these
little slivers of the circles to make the tabs
for gluing this together. So it all works out perfectly. I'm going to do the
whole process start to finish on a separate
piece of paper now. Now I can fold this
whole thing up where I scored it with
the exacto knife, it will fold very easily in
a very clean line and then these little slivers will work as tabs for
gluing it together. Just going to use
some super glue. This parts always a
little bit hard actually. Super glue might not have
been the best idea, actually. Well, I already have one
crooked. That's good. Good start. Sometimes making it too small makes it harder. Now, I'm just going to
hold it for a second longer and then we'll
have a tetrahedron, one of the platonic volumes. We built something
three dimensional. A couple last things to wrap
up this page for day six. We put a lot of energy into
building these models. It does take a lot of time. If you're feeling frustrated, remember the compass
and ruler work, it takes practice and I have done it before
I've built these before. But a couple of things we
can add if you still have some energy left is we can
draw some of our tools. We could also draw the process and the different stages
of when things get cut. I'm also going to
use an extra one of these and I'm going
to glue it in in a way that it could
be folded up and I could look at the way
all of the folds work. Basically, using our drawing to document the process that
we just did of building. All right, tips and
tricks for day six. This was a challenging one for
a lot of people, I'm sure. A couple tips to deal with some of the common
mental obstacles that can come up for this one. It's really common to have mental obstacles that
are things such as, I don't have the right supplies. I'm not good at building.
I don't like building. I don't have a good
workspace for building. A lot of times these are
excuses we use to keep us from bridging the gap from two dimensional to
three dimensional. You might think that
your brain is not good at doing things that are more
measured or more precise. But I think if you
just try it and push through and remember, Leonardo did it because he
was a very curious person and he found that he
could learn a lot by building things in
addition to drawing them. The exacredit for this lesson is to build more of the
platonic solids. The next one up is this one, which is the octahedron. We just did the tetrahedron, and this is the octahedron. Go ahead and try
a couple more of the platonic solids if you want to do the
exacredit assignment.
9. Day Seven: Secret Language: Is day seven time for some mirror writing and
developing your secret alphabet. One aspect of Leonardo's
journals that always fascinates people is his
special backwards writing. Was it meant to befuddle journal snoopers or
was it just easier not to smear the ink for a
lefty? Why does this matter? Practicing writing
backwards or with your left hand is good
for your brain and adds a unique look to your page. But backwards writing is
actually easy to read. We will create a secret alphabet just for you that you can
use in your journals. It will be much harder to read than Leonardo's mirror writing. Okay. Today's warm up is going to get us ready
for mirror writing. Get a similar drawing tools so that you can have
one in each hand. What we're going to do
is we're just going to look at the physics of why depending on which hand you're using and which
language you're using, writing in one direction or
the other may be easier. For right handed people, writing English works well because
you're moving from left to right and look at
how easily I can just make these perfect squigglies going from left to right and
pulling my hand this way. I'm pulling and marking
as I go this way. So now if I were a left
handed person doing English, the first thing you'll notice is that my hand is going to be bumping into this
and it's going to be hard for me to
reach down here. Then as I go forward, I have to slide my hand either over the
ink that I just put down or I have to
somehow awkwardly hold it in a way that it doesn't get in the
way of the ink. But if I go from right to
left with my left hand, it is the same in terms of the biomechanics as
going from left to right for a right handed
person in English. So go ahead and just
practice doing this with both hands, even
at the same time, these loop de dos and
try to keep them even, even size and as
straight as possible. That's the warm up. I have done practice with writing backwards from right to left with my
left hand, let me show you. If you want to practice that, being able to write backwards is a random random
skill, but why not? It is hard to write backwards, but it's not that hard
to read backwards. It's not very secret. That's why for the
main lesson today, we're going to talk
about how you can create your entire own alphabet and how that is in a lot of ways easier than writing backwards and it's a
lot harder to read. The first thing I'm
going to do is I'm going to get a new page. And I'm just going to write
all of the letters of the Roman alphabet for English down on one big
huge column here. So go ahead and do
that on your page. This is the classic
example of why it's good to space things out and not just eyeball it because
I wasn't able to fit all of the
letters on one side. But now that I
have those set up, if you want, you could draw
little lines going here. That might be helpful and then just start creating a bunch of different possible letter
variations for each letter. The lesson for today is to
take all of these letters from the Roman alphabet
and come up with three to five variations
on each letter, in your secret language, what
will be the version of A? I decided I wanted to add some lines to keep
this more organized, so I'm using one of those pale color markers from
Favor Castel for the lines. Once you are done creating
variations for each letter, go back with a highlighter
or just underline the ones that you like best
and are planning on using. Da da da da, do, do, d d d do do do do do, do Now, practice writing a
sentence in your new alphabet. Now you've done that exercise, you understand why the
best time to start your own alphabet
was 15 years ago, but the next best
time is right now. Start practicing and that
was the main lesson. A couple of tips here is, don't make your letters
too complicated. For example, if the
letter in English E, which is also one of the most
used letters in English, if you make a symbol
that looks like this, for the letter E, I mean, that symbol looks really
cool and everything. But if every time you have
to write the letter E, you have to make that symbol, that's going to be
really annoying. Keep your letters as
simple as possible. That is one tip, and
then the other tip is, don't make them too different
from the original letter. It'll be easier for
you to remember that E looks like maybe
it's just a spiral, a complete spiral like that. See how similar that is, that'll be easier
for you to remember. It might also be easier for
an English speaker to decode, but that's another tip. The more weird and different
from the original letter, the harder it will be
for you to remember. The other thing is to create a habit where you
use your alphabet on a daily basis because that's the only way
that you'll be able to get fast with your alphabet. Try to create a habit
where you practice just a little bit of your
new alphabet every day. Otherwise, you will probably
never get used to it and you'll never be able to
use it in a practical way. The extra credit for
this lesson is to test out your new alphabet
making a list. See Day five if you need more
ideas about making a list, but test out your new
alphabet making a list.
10. Bonus Lesson: Supplies: Time for the bonus lesson. So far, we have been
focused on learning the most powerful parts of Leonardo Da
Vinci's techniques. In this way, we can
emulate his genius. However, if we also want to emulate the characteristic
look of his journals, we have to talk about supplies. First, I'm just going to
list all the supplies, starting with my sketchbook. I use the Delta series, Stillman and Burn nine by 12. It has ivory colored paper, which I think helps for the
Leonardo Da Vinci journaling. I'll go in order things I used the most probably Faber Castel gold fiber aqua dual marker. This comes in a
set for portrait, but I basically
just used one color of this and it is the
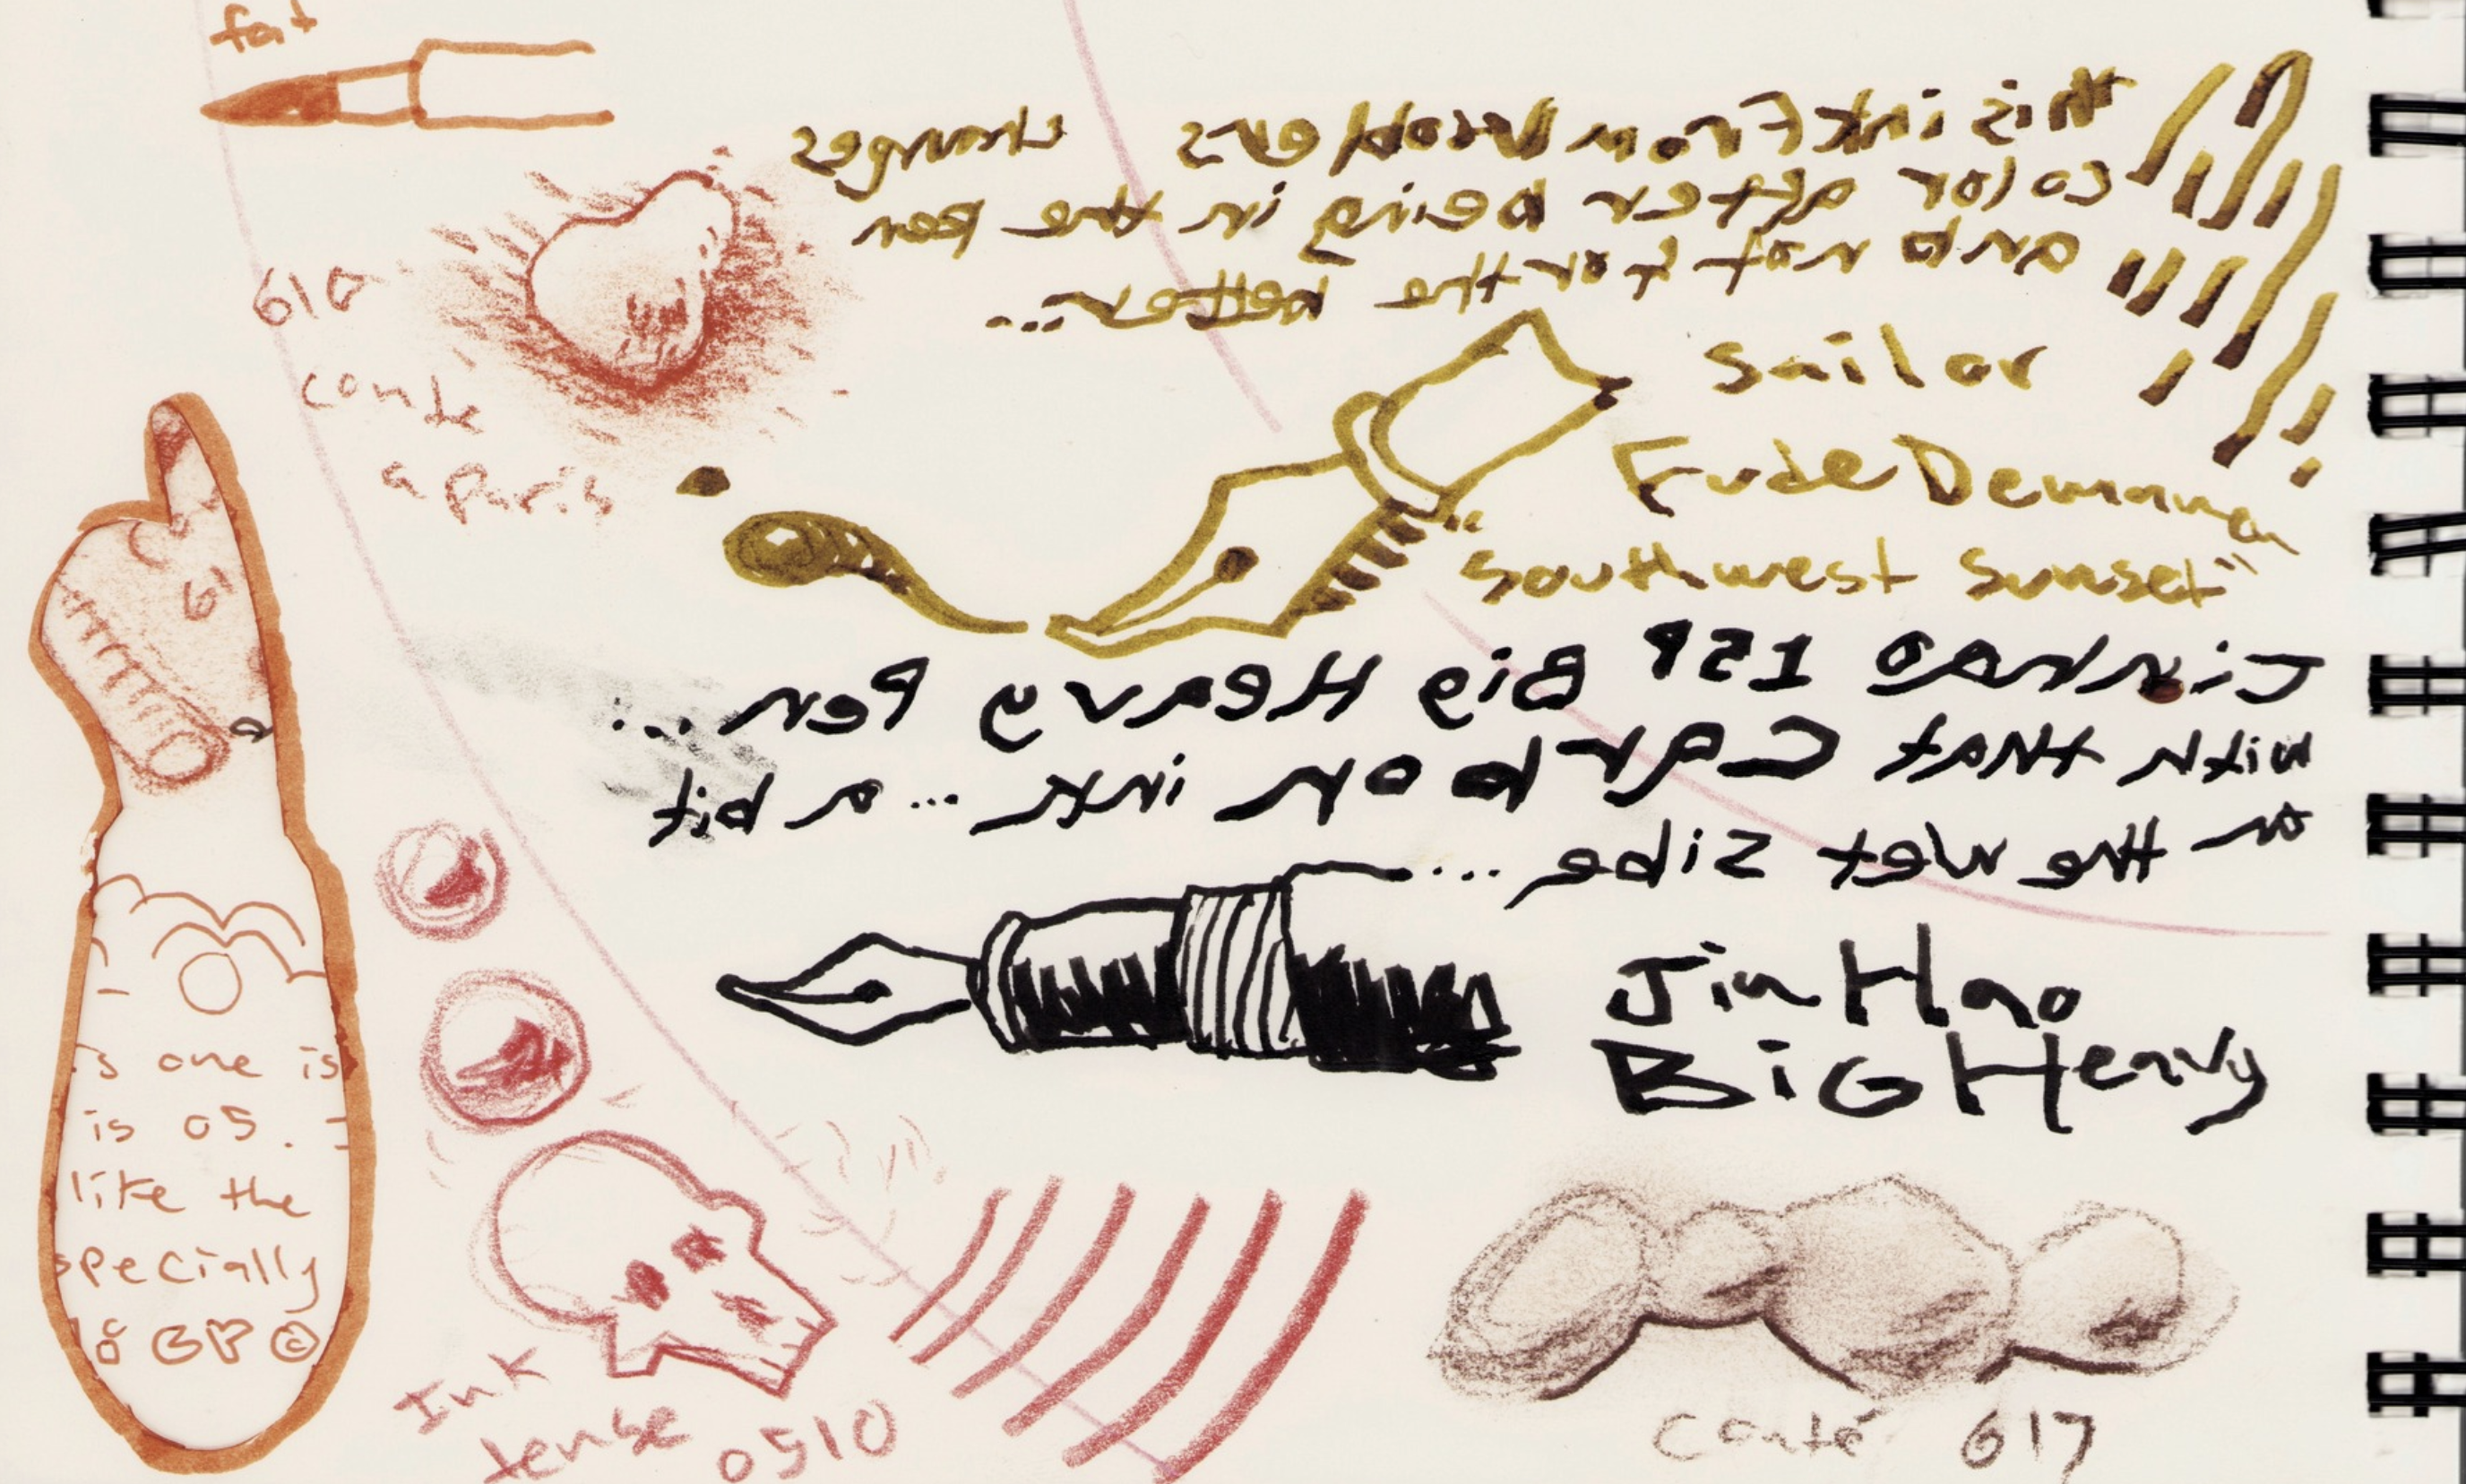
terracotta color 186. I use that quite a bit. I use this Jin hao 159
big heavy fountain pin. Yes, it's called Big
heavy pin and it is big, which is good for people like me that have some wrist
issues or maybe shakiness. I also used another
fountain pin, the sailor fude Dmanin. The inks that I use
with those two pins, I use the platinum carbon ink for the Jin hu for
most of the writing. I used a little bit
of this noodlers ink. This is the Southwest sunset formerly known as
Apache sunset color. I used that in the
Sailor fude Dmanin. After that, probably the
tools that I use the most, I used a lot of this
Conte pay colored pencil. It's basically like
Charcoal pencil and these come in sets as well, which I have in the
supplies list, PDF. But I just purchased
the 610 and the 617, Sanguine and sepia. The main one I used
was the sanguine one. These are a weird size, so they won't fit in your
normal pencil sharpener, which is a little bit annoying. Next, I did use this micron quite a bit and the main
one that I used was the 05. I wish it had been a 08, but in the brown color. The color is just
called brown and it looks like the back was
open there for some reason. The color is just called
brown and Micron. If you can get in 08, I
think that would be better. I do have a 08 in sepia
and sepia is cool, but I didn't use it as much. It's not as a light value. I like some light value stuff
for the Leonardo Da Vinci. Look, I also use some
Derwent ink tints. I have cherry, but I think
there's a better color. Maybe it's the haras or
something like that. It would be good to look for the colors that look
most renaissance. Because these are
water soluble as well. I only used one type of watercolor brush for all of this and it was the Pentel
aquaf size large. This works with any of
your water soluble tools. You could also dip it
straight into the ink. And I used it with watercolor. I only used one watercolor
in the whole thing and it was quinacridone
gold by Daniel Smith. I like this number two. I think this is the exact, the classic exacto knife. The number one has
a skinnier handle. This has a fatter handle and for people who have wrist
issues and stuff like that, I think this one is
just better in general. I use that for cutting
out the platonic volumes. This is a Pentel twist eras. Click 07. This twist erase is my favorite
type of mechanical pencil and eraser is way better than any other mechanical
pencil that I've tried. This is with 0.7 lead. You could use this for the
entire class, probably. If Leonardo Da Vinci had one
of these, he would use it. It doesn't really look like that style of things
from back then, but you can still do all of the technique and
learning tool aspects of the Leonardo journaling
with this tool. Then in terms of compasses, the one that I'm
recommending is actually this really big
one that you could stab through a
dragon's breastplate. It is very beefy. There's some downsides to it, but the cool thing
is you can put in different types of
pens or pencils. You might have to fix some rough spots on the inside of there to
fit your pencil in. But you can see I can put this pink colored pencil,
which is a lot more fun. This is the eight inch size. You can do massive circles
and curves with this thing. The cost of this is basically the same as
the cost of something small like this or
the plastic one that I put in the list. It's a little bit up to you. You might want to start
with a really cheap one and a lot of these sets
aren't actually that good. This set right here, it doesn't feel like it's going
to last for very long. It has this expanding one, but all of them you have to put in the little
pieces of lead, which aren't as good as being able to put in a whole
pencil or colored pencil. Now I'm going to go
through and just do an experimental page with all of the different
art supplies. If you haven't done this
yet, go ahead and do it. It's a very good practice helps you learn your
art supplies. It's fun. It breaks in the page. It's a good warm up, and it
helps you see which of these will work best with the
Leonardo Da Vinci aesthetic. Alright, good job.
That's the bonus lesson.
11. Conclusion: What You Learned and What's Next: Congratulations. You
made it to the end. You spent seven days journaling, like the genius
Leonardo Da Vinci. But there's still a
few things we need to do starting with
rewarding yourself. You made it to the
end of the class. Now it would be a
perfect time to give yourself a little bit of
chocolate or some other reward, a pat on the back, something special because you deserve it. Alright, while you are
enjoying your chocolate, let me go over some of
the main things that we learned in this
seven day challenge. First, we learned that process is more important than product. We learned that words, images, and numbers all have
a place on our page. They each have benefits, and they add to the Leonardo
Da Vinci aesthetic. We learned that drawing
from observation and from your imagination both have benefits and make you
a well rounded artist. We also learned that going down rabbit holes
is not a bad thing. It's actually a very good
thing that allows you to cultivate curiosity and
make your own discoveries, which is very important
in today's world. And last but not least, we learned that building
things is good for your creativity and trains you to bring your ideas
into reality. Now you finish the seven day journaling challenge,
what's next? Well, seven days is not enough. So if you can build this into a continuing practice
for at least a month, that would be a great
place to start. Also, see if you can
synthesize some of these ideas from Leonardo Da Vinci with
other journaling styles, things such as morning
pages, bullet journaling, other diary styles,
nature journaling, sketch noting, things like that. See the synthesis that
you can make of your own. Also, I want to suggest that
you don't avoid discomfort. Sometimes when you're
trying a new technique or a new tool or even journaling, it's harder than just scrolling on social media or
something like that, but it's so much more rewarding. So try to push through
that discomfort. Don't forget to share
your projects in the projects and resources
section down below. That way, I can see
the work that you did. I can't wait to see your ideas and we can learn
from the community. That being said, let me know in the comments as
well if there's other journaling classes you
would like to see me make. That's it for now.
Thanks for joining in and see you in
another class. Bye.
 Marley Peifer, Journal for Life