Transcripts
1. Intro: Hey, guys, my name
is Celeron Parson. I'm a graphic
designer illustrator and top teacher
here on Skillshare. And in this isometric
moves mini class, we will animate a cool
isometric dropdown effect in Adobe After Effects. You'll have access to a customizable Adobe
Illustrator file that has already broken
into layers so that you can start
animating right away. By the end of this
short 15 minute class, you'll be able to
animate with keyframes. You'll learn how to add realism with motion
blur and ease. You'll also learn to reverse animations and stager
animations for a cool effect. This class is perfect for those that have taken my
isometric moves. Anyone can animate in
Adobe After Effects class, or anyone who has some basic understanding
of Adobe After effects and wants to create
something today to add to their motion
graphics portfolio. This is a project based class and by the end of this class, you'll have your
very own animation so that you can share it on Skillshare and with the
world. I'll see you in class.
2. Illustration Set Up: So in this class,
we're just going to go through the
illustration file, how to set it up and get
it ready for animation. So as you can see here, I have my drop down animation illustration file open here, and I have three layers. I have an object layer, shadow
layer, background layer, and they're all separated
into three different layers, and this is what we need
to animate after effect. And now, if you open
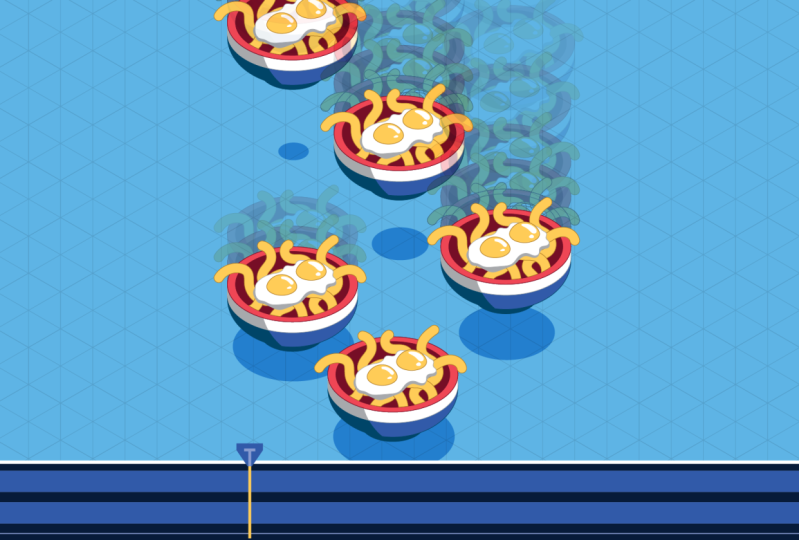
up the object layer, you can see that there are
different groups in there, and you can hide the group that you don't
want, so the noodles, and maybe you can
choose a different one, like the Cloud or you
can do a hot dog, or you can do, you know, Pizza, something like
that. You can go through them and see what you want to
choose for your animation. And then also you can click onto the shadow and you
can adjust it to fit the object you want
and how you want the shadow to sit
underneath your object. You can change the shape of
the shadow or you can keep it just as a circle and we'll scale that up
and down. All right. So after you decide what
you want to animate, you can hit Control or Command
S on a Mac and save it, and then we'll jump into After effects and start
animating. I'll see there.
3. Animating The Drop Down: Now that we opened
up after effects, we can right click into
the Project panel. We can import file. We can find our drop down
animation illustration. Create composition from this
illustration and import. We can keep the
composition settings and layer size as the footage
dimensions and hit okay. And now you can see
we have a composition and a composition with
our layers in it, and this is where we are
going to start animating. So the first thing that we're going to do is we're going to create our animation
for the object. So what I want to do with these two objects is I'm
going to lower them to the bottom so I can move them anywhere I want
around the scene, and you'll be able to view it. If it drops down from the top, you'll be able to view
it no matter what. So I'm going to just
drop it down to the bottom and start there. Now, if I hit P on my keyboard, I open up the position property. I'm going to hit
Shift page down, and that sends me
ten frames forward, and I'm going to hit
the position property. So this animation
will take ten frames. So if I do Shift page up, I'll go back ten frames right to the start and I will pull the object up past the edge
of the composition up there. Now, if I hit the space bar,
you can see what happens. Boom, the animation plays in. Boom. Now I'm going to
select both of them. I'm going to go F nine, and now you can see that
some Ese was applied to it. So if I were to open up
the speed graph over here, you can see, I'm just going
to fit it to the view. You can see that it
speeds up and slows down. Now, I want it to do more of a slow down and it can
start really fast. So I'm going to take this
handle on this side, and I'm going to
pull it up a lot. And I'm going to
pull this one back because don't see
the offscreen start, so I want it to start
off with a lot of speed, and then I'll exit out
of my speed graph, and I will look at that. Okay? Now you can
see that it gave it a nice smooth animation. Maybe if I wanted
to go page down, shift page down twice, maybe 20 frames, and I
will see how that looks. All right. Yeah, really fast and then smooth
down. I like that. The next thing that we're
going to do is we're going to animate the shadow
portion of this. So we're going to
click on the shadow. At the end point, this is where the shadow
should be the largest. So I'm going to hit
S on my keyboard. I'm going to hit the stopwatch to create a keyframe
right there, and I'm going to go back a
few frames. Let's go back. The shadow will start to
appear about this position here where the pizza is, and then it'll start to
come in at this point. So I'm going to change
the value to zero, and now you can
see what happens. Yeah. But again,
just like the pizza, it slowly goes in. I need to add some Es
to this last keyframe. So I'm going to hit F nine, and I'm going to go
into my panel here, and I will start it off
fast and it'll come in. There we go. Perfect. Let's
just see how this looks. Maybe I want to start
it a little earlier. Yeah, it looks pretty good. Okay, so that's how
we animate our pizza. So we set up our key
frames for one and two. The next thing that
I want to do is I want to add some more realism. So I added some Es
to both of these, and you can see it animating in. And now I'm going to add some
motion blur to the pizza. So you can see that it's really clear when it jumps
from one frame to the other, but we want it to blur so
it looks a little smoother. So how we do that
is we go over to our timeline here and we
just click this icon here. This is the motion blur, and you just click that on,
and as you can see, it changed it from uh a still
image to one with blur. So you can see the
movement in it. And if I wanted to turn off the motion blur throughout
my whole composition, you can enable motion blur here. Now it turns it off and on. So wherever that
property is used in your timeline or in your layers, it'll just turn it
off for the time. And then if you want to enable it, you can turn it back on. So I'll just hit Okay.
That looks great. So I'll just adjust my Playhead
here, and looks awesome. And you can add a motion blur to your shadow if you
wanted to as well, and it won't affect it as much, but it might give
it some character.
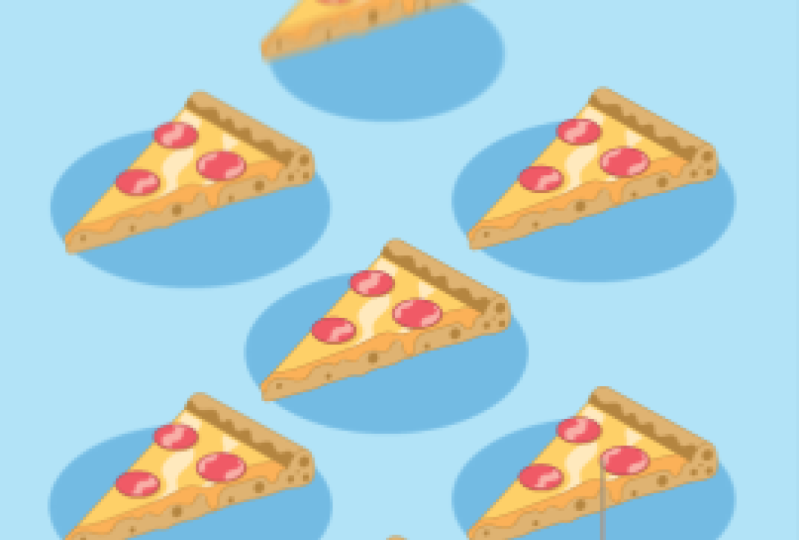
4. Duplicate and Offset: Now that we created
our first animation, what I'm going to
do is I'm going to select my object and
my shadow layer, and then I'm going to
precompose it into one layer. Select both right click, precompose, and I'm
going to name it. Now I have the animation, those two animations in one layer with the
background separated. So now what I can do is I can actually control D to
duplicate that layer, and now I can move it
somewhere on my screen, and I will be able to see
both animations happening. Now, I do want to be careful
about the layer order. So the animation
that I just created, I want it below because if the shadow the shadow will interact with the
one on top of it, so I want to make
sure it is below. So I'm going to duplicate this animation a bunch of times
so it fills up my screen, and I'm going to make sure
that the ones that are further back are lower
in my layers panel. Okay, so now you can see I
have animations throughout. Now what I want to do is I want to offset all my animations. So I'm going to
select all of them, and I'm going to
shift page down once. I'm going to control click
on my bottom most layer or maybe my topmost layer and I'm going to hit the
left square bracket. Okay? So what that did, it brought the endpoint of all other animations
to my playhead. So now if I play back, all animations start there. Now what I'm going
to do is I'm going to shift page down again, control or command,
click on my top one, left square bracket,
and it brings it again. Shift page down. The Now you can see that I've offset it so that each animation
comes in one after another. Like that. Looks pretty cool. You know, could come in quicker. So instead of doing
Shift Page Down, maybe I could just do page down five frames and
bring it to there. So now I can do Shift Page
or not Shift Page down, page down one, two, three, four, five, click on my layer.
Left square bracket. Page down, one,
two, three, four, five, click on my layer,
left square bracket. Click on my layer,
Lesco bracket. Now it'll go in
quicker. There we go. That looks pretty
cool. Awesome. So we have our animation
going in, offset it. Very cool. Now I want to
bring this animation back up. So what I'm going to
do is I'm going to double click into
my first animation. And now you can see that these are the animated properties. If I hit you on my keyboard, it'll open up all the keyframes. Now what I'm going
to do, I'm going to go to the two second mark. And I'm going to copy and paste these keyframes, copy and paste. Now, I don't want
it to start here. So I want it to
reverse the animation. I'm going to right
click on my keyframes. I'm going to go to keyframe assistant and time
reverse keyframes. So that basically
flips the keyframes around and it starts the
end one at the start. So now if I go back, you can see what happens
and it goes back up. Cool. So I'm going to
do the same thing with my shadow layer. I'm
going to hit Copy. I'm going to hit paste. I'm going to keyframe assistant, time reverse keyframes.
There. Perfect. Perfect. Now, what's cool about
this precomp is that I just made this animation
in this one composition. But if I go back to my
previous animation, all these compositions
are exactly the same. Since I changed the
animation in one of them, it created the animation
in all of them. Now we got a cool
looping in and out animation with all the pizzas.
5. Exporting: All right, now that we
have our animation, now we're going to export
it as a GIF or BfoeFle. So just go to Export
at Media Encoder. Now that it's added
to Media Encoder, you can double click into
this area here and you can decide which kind of format you are going to export it as. I'm going to export it
as an animated GIF. Okay. And as you
can see, it is set to the source range
of the work area, so it's only going to
export within this area, and that's perfect for
what I want to do. I'm going to just click on this. I'm going to change
the settings. I'm going to divide by two, just so it's half
the resolution, so it's a lower file
size and also change it 25-12 0.5 frame rate, so it's a little, you know, lower quality, so it's not
as high of a file size. Okay, now it's ready for export, so I'm just going to
click on it and go to hit Play and it'll
start to export it. Now I can find my
gift in my files. There you go. You got your animated gift
all set up for you. Now you can upload it into the project panel and
show it to the world. If you want to export
it as an M before, you can definitely
do that as well, and you can upload it on social media or
anything like that.
6. Customize: If you wanted to go back in
to your Illustrator file, you can change this object. You can go in. You
can change the object from that to a hot dog. Maybe change the
size of the hot dog so it matches a bit and hit Save and go back to
the After Effects file, and it updated automatically. And now you have a
hot dog coming in. Yep. Cool. Look at
that quick and easy. What if I didn't want a hot dog? I can go into my file
here and let's go back to the noodle bowl and I'll
go to the noodle bowl and I'll just change the size
of my shadow as well. I'll hit Save and go back to
after effects and hit Play. Now my file has updated as well.
7. Thank You! You Rock!: No sister, sister sister. Hey, guys, I want to thank you so much for taking the class. Now that you understand
this type of animation, maybe you can apply it
to other animations. Instead of just one item, try animating the
dropdown effect with multiple items in the scene and then stagger
those animations. If you have any questions, feel free to post in the
discussions panel, and I'll get back to
you as soon as I can. And if you enjoy the class,
please consider leaving a short review so that more
students can learn together. And if you want to
continue learning with me, consider following me
here on Skillshare so you can have access to my library of other classes and be notified when
new classes launch. I'm really excited to
continue with you on your creative journey until next time. I'll see you later. H.
 Kyle Aaron Parson, Graphic Designer and Illustrator