Transcripts
1. Intro: I taught this class for the very first time on
the Knit Happy Summit. I learned a great deal
regarding placement, accessorizing your photos ratio, how to use my phone camera, et cetera. Thank you, man. I loved Rn Odental's
presentation on how to take good photos. I never do the project justice. So I'm excited to put
it into practice. It was easy to follow and I appreciated that you didn't
need a ton of equipment. Just your phone was enough. I was truly impressed by the mode of photos
that popped on the grid on our Facebook
group on the very same day. In this class, we focused
on flat light photography. Be course, you can do it at
home in your sweat pants. And there's definitely
no need for you to show up in your own
photos and model your stuff. I will show you my
setup and then we have a live shooting together where you get to watch
over my shoulders. And you will learn my
best tips and tricks. So it's really easy to get started and it's a nice
way to show your makes. So are you out or are you in?
2. Class Project: For your class project, you need to take some photos. Big surprise, I know. So we have a project
gallery here. Please create a new project, upload your photos, and
write a bit about it. What went well, what didn't. And ask me anything you want to. I'm happy to give
you some feedback now to make this all
a bit easier for you. I created a workbook. It's 27 pages, nice PDF. I want you to download
it in the resource area. Please be aware it's only available on the browser version of Skilled Chair,
not in the app. This workbook will
help you to go through the lessons and do all the
things I ask you to do. It will also help you to remind whatever
you learned here. All right, let's get started.
3. Some Theory: So what? It's a flat lay photo, you probably already know this. But you know, just in case, let's have a quick
chat about it. For a flat lay, all your items have to lay
flat on your background, which is, by the
way, mostly a table. And the table is often
enough in your kitchen, so keep your sweat
pants on and relax. There's no need to go outside
for this tutorial flat. Lay is a styled and
composed photo and that gives you a lot of
freedom and get creative. We want to tell stories and we do not want to
document reality. That's a whole other thing. The one thing that is really important when you
shoot straight down, all lines have to be straight
to create a good look. I don't want to see
any weird angles. No, strange perspective. Okay, please keep that in mind.
4. Your Why: Y or y or should
I say Y or play? No. Okay. You don't have to answer this question
in a deep sense. Just a simple intention
will already give you pointers on how to
take your photos. To give you some examples. If you want to share
your work in progress on Instagram, keep
in mind that the, that's the kind of
new grid format is vertical and has a ratio of 425. If you enjoy being part of makers groups either on
revelry or Facebook, you can shoot in the
classic digital format that is four to three
and shoot horizontal. On another note, if you want to share your stories on a blog, you need to reach for a
higher level of styling.
5. What items: So grab whatever you
want to capture. Today we will talk about anything else like your
necessary equipment, backgrounds, and
props in a minute. However, let me tell
you right away, a Smartphone is absolutely
great to take flat lay photos.
6. Where...: I always recommend
starting with finding your magical place for flatly you won't need a
beautiful fancy set up, but you need the three things. First of all, good light. And with good light, I actually mean natural light, the one that's
coming from the sun. You know, natural light works best for us and it is three. Therefore, I recommend that
you shoot close to window second a table and that
one is mostly for comfort. I mean, if you want to crawl
on your knees on the floor, I won't hold you back. However, I can tell you from personal experience that it
can be quite uncomfortable. And if you don't have a
table next to window, move your furniture,
it's really worth it. Last but not least, it's good to have
neutral surroundings because a blue wall will reflect on your scene and so does a pink T shirt also. So be careful with noise.
7. When: If you want to know what is the number one thing you
need to get nailed for sure, Let me tell you, it's lighting. I would also say
that lighting is the one thing most
people get wrong because they think bright light in the middle of the day
creates the best photos. Or they have heard about the
golden hour and have to find out the hard way that it's not that great for
a knitting project. If you are up for a
little experiment, try this. Seek out your magical place in
front of a window, choose a light background, pick one small knitted item, and then take the same photo several times during the day. And in the end, compare
all your photos. Depending on the direction
your window is facing, you will get the best light, either in the mornings or afternoons, to shoot your makes. And I know that's
a bit of spoiler, I'm sorry, but just to
give you some points.
8. What else: What else do you
need? So we're going to keep it super simple
today with the equipment. I don't want to
overwhelm you at all. Your smartphone is fine, and the one thing I do
recommend additionally, is a white phone board
to use as a reflector. And we will see that in
the shooting in a minute. You can use a lot of
things for the background. A wooden table is great, like the one you might
have in your kitchen, or as a coffee table
in your living room. A linen cloth can be beautiful. Cardboards are
generally awesome. You can wire
background or you can also buy photo backgrounds
if you have money for it. Generally, I
recommend keeping in mind that a background should
stay in the background, so make sure that you don't
have a lot of texture there. It shouldn't be too colorful. Any kinds of crazy
are kind of no go. So you can use for props, a lot of things. I personally love a good bowl for a messy work in progress
just to hold it together. I do love dried flowers. The smaller the
petals, the better. And we will definitely
work with those today. Stitch markets are great, so are other notions. Books and magazines, of course. And generally, think about
what can help you tell your story and can enhance the atmosphere
you want to create. And try to keep it simple. No two to three extra items
are more than enough. Usually less is more.
9. Set Up: All right. And now that we
have everything together, we're going to start shooting. Okay. Let's do shooting. So, welcome to my studio, which is just a little
corner in our bedroom. I do get beautiful light
here in the morning. It's around 11:00 right now, and I want to use this
time to show you my set up and give you some tips how you can level up your
photos. Let's do it. I personally don't like
to shoot on white. I like to shoot on black. That's why I have
this black cardboard here. It's nothing fancy. You can get this in
any art supply store. The other thing I recommend you should get is a
white form board. You will put this
parallel to your window, it will even out
your background, and it will soften
up your lights. That's the way you create
a beautiful flat lay. But also any other photo, you can just put it next
to a box if you have one. Doesn't have to look
like this, of course.
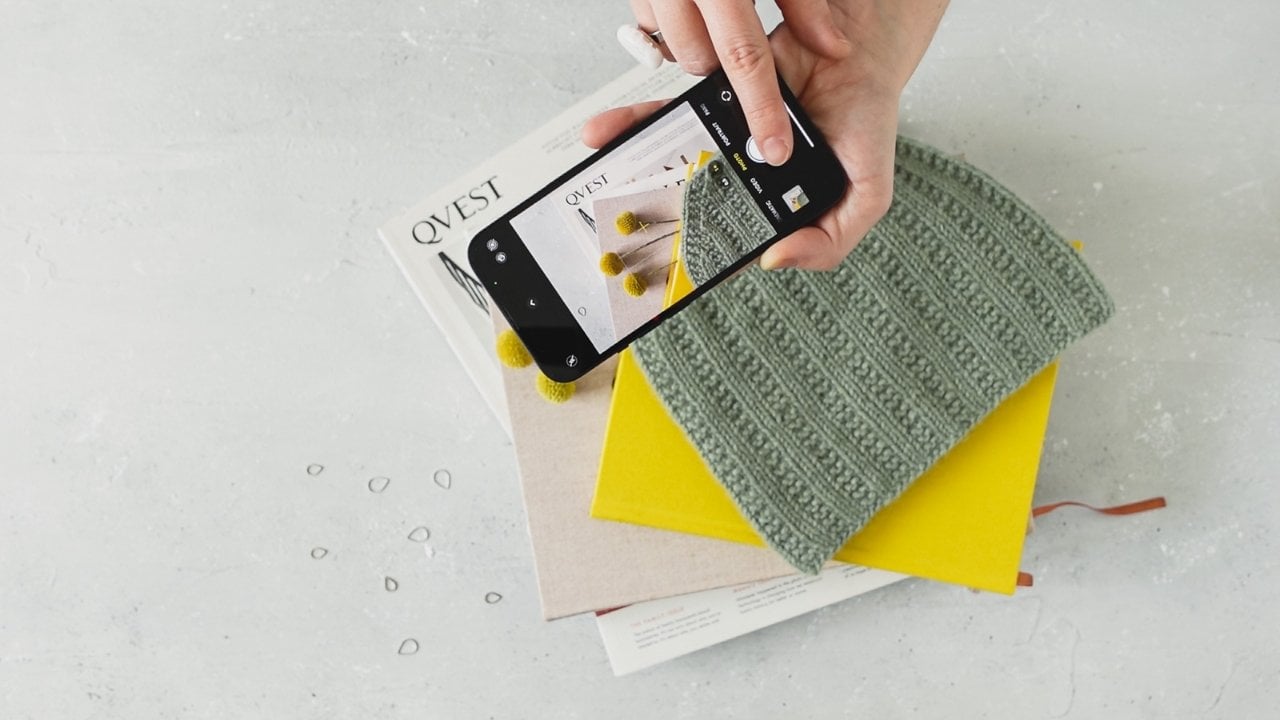
10. Ideas and Inspiration: So the items I want
to show today are my ahoy bandana cowl and
the matching head mo head. The mon head has been
in making stories, that's why I will add this
magazine to the whole scene. Additionally, I'm
thinking in two ways. For once, this magazine
is about sustainability. Those might be nice to add some elements that feel very
more like natural stuff. The other thing is that the fisherman's rib and the
whole collection is calf, had this nice sea
story behind it. I could also use some elements, maybe sea salt, maybe shells. We will see. Okay.
11. Shooting : One thing that's very important
that for this picture, I don't want to work
our whole scene you see in my regular camera. I want you to create
a vertical photo for Instagram or
other mobile apps. I put my smartphone here because that's what you
want to shoot with. Here you can see
what's happening on this little screen
is what I want to shoot and how I want
to compose my picture. When you shoot a flat lay, it's quite important
that you get your smartphone parallel
to your background and see that little x in
the middle that will help you to see if you are holding it really
parallel to the ground. If it's not parallel, you get to see that white
one and a yellow one. And you're going to
play with it as long as you need until you
get that yellow. Just one X and
everything is all right. I have my bandana
cow here in my head. I think that already looks nice. Now let's see how we can
implement this magazine. And I also have a cork notebook that
might be nice in the mix. Generally understand this
flat lay has no depths. It's actually really
helpful if you layer up, have some other things that
bring in different levels. You get additional
depths in your photo. So honestly, you can play for a long time here until you
feel like this looks good. I played a bit with
the arrangement, added this into the picture. Now let's see what
else we can do. All right, the next
thing I want to show you is to play with flowers. I dried this rose. Baby breath. I like to use the petals to add sprinkles for texture and I use the big ones
for Pka boy effect. Let's get started with
adding some sprinkles. This is really nice, especially if you have a minimal background
like we have here, the black, simple
black background. It helps to make everything a bit more
interesting and also looks, I think, a lot more creative. Of course, you will see it will light up and em up
your pictures quite a lot. This is a super simple trick. You can do this
with other things to markers are great for this. You have some nice ones confetti but also
salt and pepper. But flowers are kind of
my favorite to be honest. All right, so make sure
you don't have this. We overlaps slightly, everything is spread out nicely. The last thing I want to show you is how to create
pickable effect. And for this you're going to take just one of
these baby breaths. Things. You hold it very
close to your lens. I'm going to come
up here too because it could do the same
with the camera. See that what this does is it creates another
layer right at the front. Gives you the feeling as
if you peek through it. It also frames the
whole picture. If you play long enough, it will also focus again where you want to have
it, like in the middle. However, there's
a possibility to do this on your
smartphone very easily. All you got to do is
touch your screen, hold it right in the
middle, then it will lock. Now it locks the
focus in the middle. When you play with it
will always focus there. No matter what you do, see that? All right, And then
you take a picture. Not only one big rule. Always take someone. I'm now working with two
very small ones. Let's see if this is easier. Might be the tricky part is that you have
to hold them with one hand so you can shoot
with the other one. But there's also the
possibility to set a timer. You can either choose three
or 10 seconds on the phone. I'm going to go for ten now
it counts here in the corner. I have time to arrange
that with my hands free. Generally, for the
peekaboo effect. Let me say, the smaller
your petals are, the easier it is to
work this. All right? I think we've got it. This is our first picture.
I think it's beautiful.
12. Alternative Composition: Of course, there are other
ways to arrange a flat lay. In this case, I try to create
cover photo for this class. I arranged everything
linear to each other. It's a bit like playing
with Legos, to be honest. The rest is quite honestly the same
procedure than before. Lay it all out, take your
flat lay photo, be happy.
13. Alternative Styling: All right. So I already
set up my scene. As you can see, I just
wanted to show you that it's the same recipe
we used before. In this case, I chose a lighter background which
has a lot more texture on it. I added a book underneath my
knittings to layer it up. Then I added some things to
tell more of the story like the seashell and this thing, I'm not sure how it's called, you can see it a lot here
at the North and East. Sam for sprinkles. I went this time for sea salt
nautical theme around it. I think this already
looks pretty nice. I'm going to take
a picture of it. I'm not sure if I need
the baby breaths here, but we will try that too. Again, you just hold
it very close to your lens and then
you can frame it a bit and give this nice
little pickable effect. Another thing I want
to talk about is that you can put on
every camera a grid. Have a look at your settings. Those will help you to
align in flat all lines. Of course, you could also have this in a much more loose
arrangement if you want to. But what's really
not good is if you have something that is just
slightly, slightly off, always looks a bit weird, make sure if you have
it straight in here, that's cool, that it works
with the grid together. Something else you
can play with are actually this fluffy things. If you hold them quite
close to your lens, you get this mist effect. It's nice but it's
very hard to catch. To be honest, make sure
that you only have the Paabo stuff over
the things that are not important and
you keep your its clean. Maybe blur it out the
edges but don't hide them.
14. After the Shooting: As we are here at the
end of our lesson, let me tell you, this is only
the start of your journey. There is so much more to learn. One step is missing
here for sure. As every photo shoot
actually ends in, it's the last thing to do. Editing will transform your
photos from okay to wow. It starts with the simple things like cropping and ensuring your photo has a right ratio for the place where
you want to share it. It's also about making
basic corrections, but most of all it can help
you to enhance your style. What I did here with
our photos from the shootings are most of all
correcting the base color. It's winter here in Germany and the light today
was exceptional, cold, and made the photos
therefore too blue. I took it even one step further on the
right picture here, I worked with color grading
to make it look even more as if this scene got whitewashed on a
sunny day at the sea. Therefore, I changed
the highlights and tinted them with a
bit more yellow tone. On the left photo, I enhance the colors
to make them pop. I did also add
contrast and texture. That's just a quick
introduction for you. Generally, editing would
easily fill another. Maybe you will let me teach
you this art on another day.
15. Final Things: Congrats. You are at
the end of the class and you managed to watch the whole thing. I'm
very proud of you. How you enjoyed this
little journey with me immensely and learned a lot. Had fun shooting your own makes. If you like this class, please give me a rating. So there are several
things you can rat on. It's just to click some buttons. I will let you know if you think this is a
beginner class or maybe somebody with
intermediate knowledge would profit more from it. Thank you so much. Thank
you for taking this class.
 Maren Odenthal, Knitwear Designer & Photography Teacher